
CS 330 - Saw MCCULLOCH - Free user manual and instructions
Find the device manual for free CS 330 MCCULLOCH in PDF.
| Product Type | Brushcutter |
| Brand | McCulloch |
| Model | CS 330 (B40 B Elite / B40 BT Elite) |
| Displacement | 40.1 cm³ |
| Weight (without fuel, guard and cutting attachment) | 7.3 kg (B40 B Elite) / 7.4 kg (B40 BT Elite) |
| Idle speed | 3,000 rpm |
| Recommended maximum overspeed | 12,000 rpm |
| Max. engine power (according to ISO 8893) | 1.5 kW at 9,000 rpm |
| Fuel tank capacity | 1 L (1,000 cm³) |
| Spark plug | NGK CMR7H-10 (gap 0.9-1.0 mm) |
| Guaranteed sound power level (LWA) | 118 dB(A) |
| Sound pressure level (trimmer head) | 100 dB(A) |
| Vibration level (trimmer head, left/right) | 3.4 / 4.4 m/s² |
| Approved accessories | Grass blade 255-4 (∅255, 4 teeth), Clearing blade 200-22 (∅200, 22 teeth), Trimmer head P35 |
| Engine type | 2-stroke |
| Fuel/oil mixture ratio | 2% (50:1) |
| Recommended fuel | Unleaded gasoline (max 10% ethanol, octane rating ≥ 90 RON) |
| Recommended 2-stroke oil | McCulloch 2-stroke oil or equivalent high-quality |
| Air filter maintenance | Every 8 hours (clean with compressed air) |
| Angle gear oil change/lubrication | Factory greased, check level before use, replace only after repair |
Frequently Asked Questions - CS 330 MCCULLOCH
User questions about CS 330 MCCULLOCH
0 question about this device. Answer the ones you know or ask your own.
Ask a new question about this device
Download the instructions for your Saw in PDF format for free! Find your manual CS 330 - MCCULLOCH and take your electronic device back in hand. On this page are published all the documents necessary for the use of your device. CS 330 by MCCULLOCH.
USER MANUAL CS 330 MCCULLOCH
natural_image
Silhouette of a selfie stick with a hand and wrist, no text or symbols presentB40 B Elite, B40 BT Elite
EAC
EN Operator's manual 2-26
SV Bruksanvisning 27-51
DA Brugsanvisning 52-77
EC Declaration of Conformity.... 26
0
Introduction
Product description
This product is a brushcutter with a combustion engine.
Work is constantly in progress to increase your safety and efficiency during operation. Speak to your servicing dealer for more information.
Intended use
Use the product with a saw blade, a grass blade or a trimmer head to cut different types of vegetation. Do not use the product for other tasks than grass trimming,
grass clearing and forestry clearing. Use a saw blade to cut fibrous types of wood. Use a grass blade or trimmer head to cut grass.
Note: National or local regulations can regulate the use. Comply to given regulations.
Only use the product with accessories that are approved by the manufacturer. Refer to Technical data on page 24.

text_image
Exploded view diagram of a mechanical device with numbered parts for identification and assembly reference.- Blade (not for all markets)
- Grease filler cap, bevel gear
- Bevel gear
- Cutting attachment guard
- Shaft
- Stop switch
- Throttle trigger
- Throttle lockout
- Suspension ring
- Cylinder cover
- Starter handle
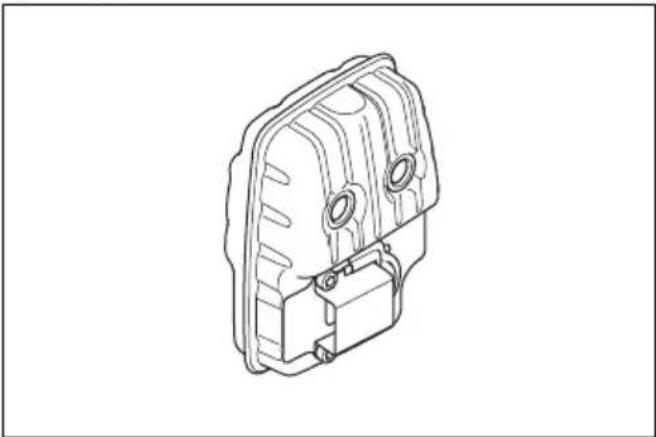
- Fuel tank
- Choke control
- Air filter cover
- Locknut
- Support flange
- Support cup
-
Drive disc
-
Handlebar clamp
- Operator's manual
- Transport guard (not for all markets)
- Socket wrench
- Locking pin (for products without hex key)
- Harness
- Trimmer head
- Air purge bulb
Symbols on the product

WARNING! This product is dangerous. Injury or death can occur to the operator or bystanders if the product is not used carefully and correctly. To prevent injury to the operator or bystanders, read and obey all safety instructions in the operator's manual.

Read the operator's manual carefully and make sure that you understand the instructions before use.

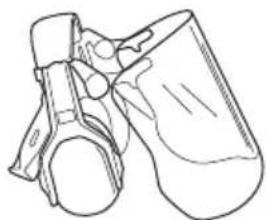
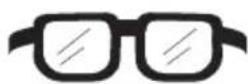
Use a protective helmet in locations where objects can fall on you. Use approved hearing protection. Use approved eye protection.

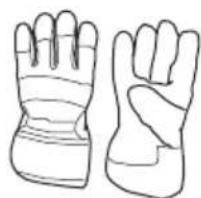
Use approved protective gloves.

Use heavy-duty slip-resistant boots.

The product can cause objects to eject, which can cause injury.

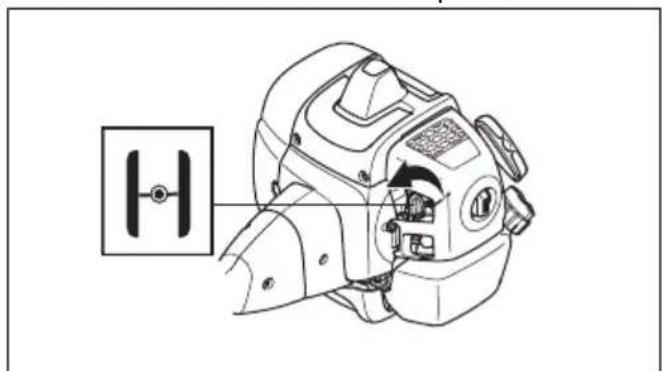
Maximum speed of the output shaft.
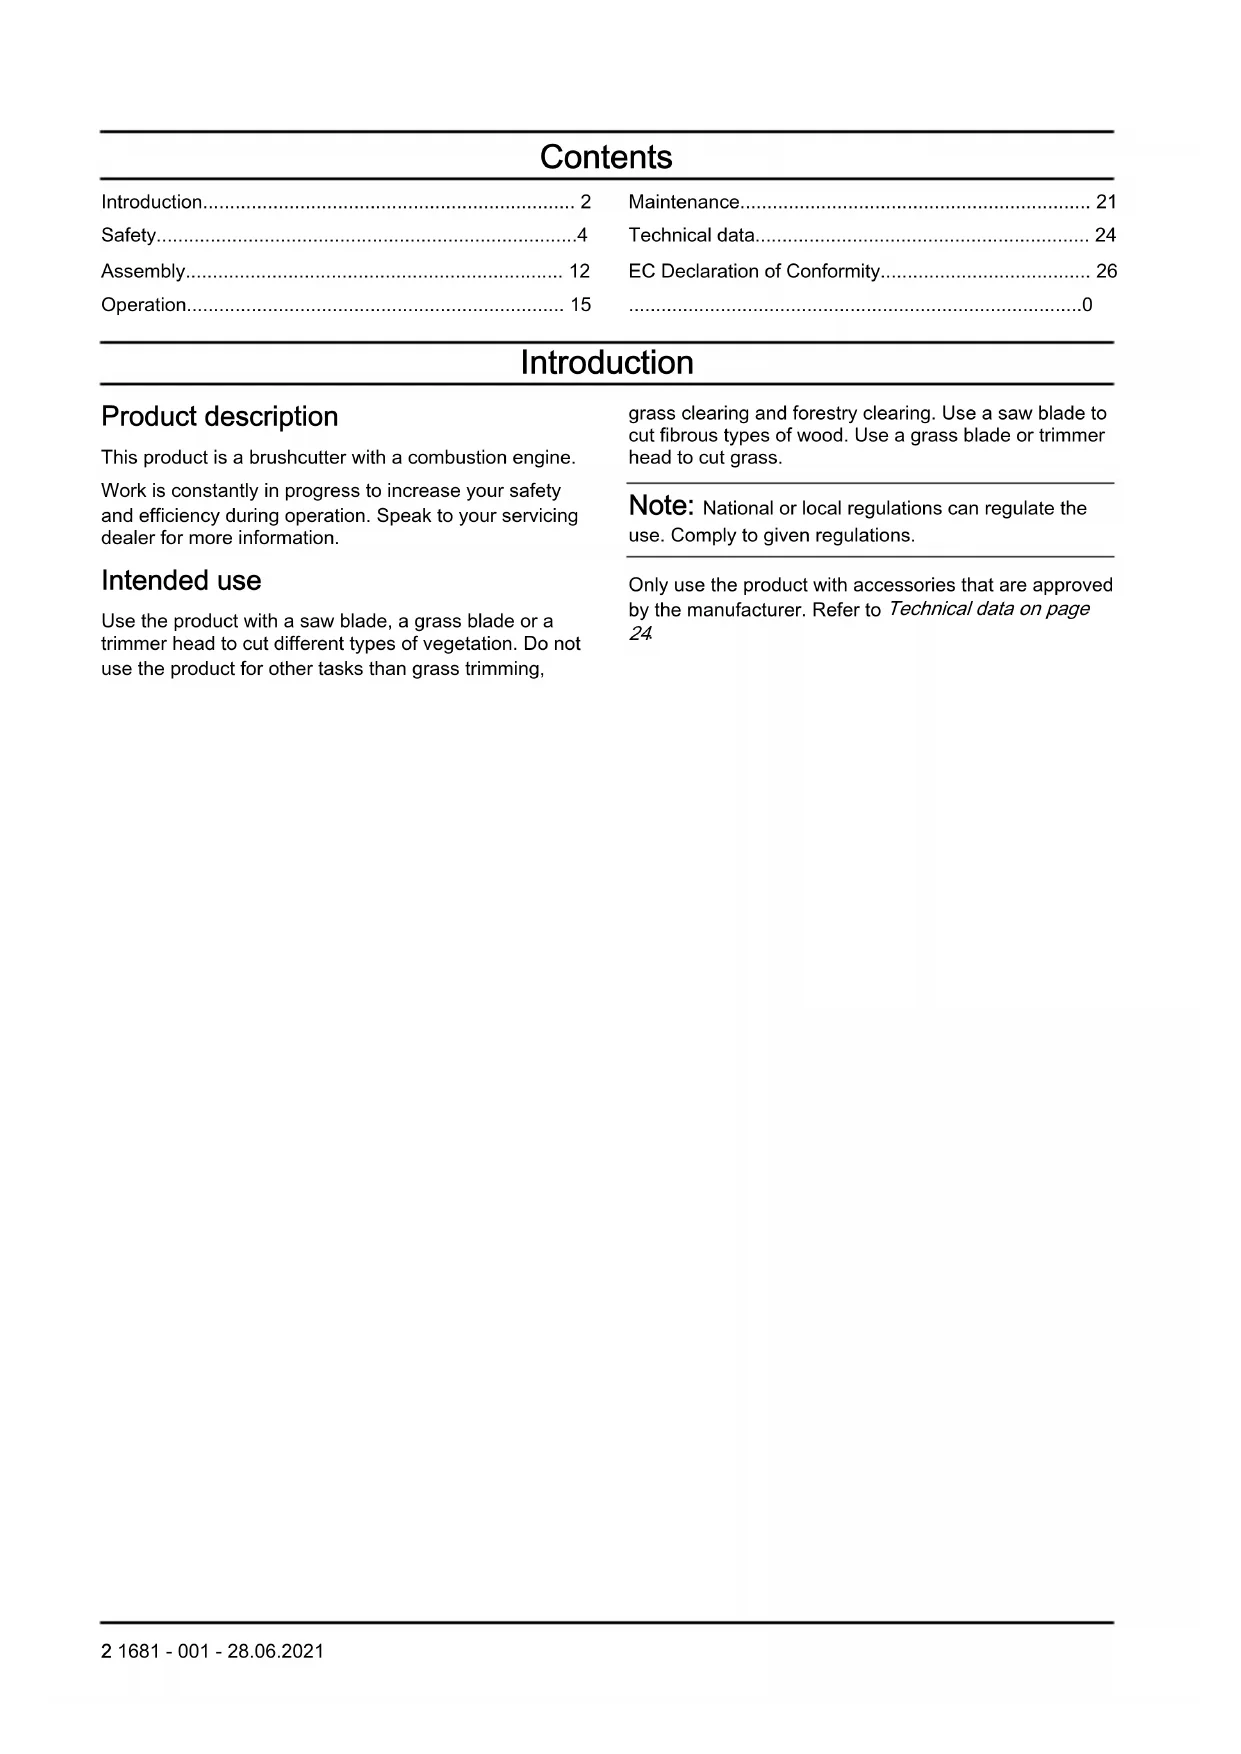
Keep a minimum distance of 15 m/50 ft to persons and animals during operation of the product.

Risk of blade thrust if the cutting equipment touches an object that it does not immediately cut. The product can cut off body parts. Keep a minimum of 15 m/50 ft distance to persons and animals during operation of the product.
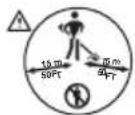
Only use a flexible cutting wire. Do not use metal cutting elements. Apply this for grass guard accessory.

The arrows show the limit for the handle position.
Air purge bulb.
Fill fuel.

Choke.
Noise emissions to the environment according to European Directive 2000/14/EC and New South Wales legislation "Protection of the Environment Operations (Noise Control) Regulation 2017". Noise emission data can be found on the machine label and in Technical data on page 24.

The product agrees with the applicable EC directives.
yyyywwxxxx The rating plate or the laser printing shows the serial number. yyyy is the production year, ww is the production week.
Note: Other symbols/decals on the product refer to certification requirements for other commercial areas.
Product liability
As referred to in the product liability laws, we are not liable for damages that our product causes if:
• the product is incorrectly repaired.
• the product is repaired with parts that are not from the manufacturer or not approved by the manufacturer.
• the product has an accessory that is not from the manufacturer or not approved by the manufacturer.
- the product is not repaired at an approved service center or by an approved authority.
Euro V Emissions

WARNING: Tampering with the engine voids the EU type-approval of this product.
Safety
Safety definitions
The definitions below give the level of severity for each signal word.
WARNING: Injury to persons.

CAUTION: Damage to the product.
Note: This information makes the product easier to use.
General safety instructions

WARNING: Read the warning instructions that follow before you use the product.
- This product produces an electromagnetic field during operation. This field may under some circumstances interfere with active or passive medical implants. To reduce the risk of serious or fatal injury we recommend persons with medical implants to consult their physician and the medical implant manufacturer before operating this product.
- Do not use the product if you are tired, ill, or under the influence of alcohol, drugs or medicine. This has a negative effect on your vision, alertness, coordination and judgment.
- Do not operate the product in bad weather, such as dense fog, heavy rain, strong wind and intense cold. To operate the product in bad weather can make you tired and add risks, such as icy ground and unpredictable felling direction.
• Always be careful and use your common sense. If you feel uncertain about a work situation or the operating procedures after you read the operator's manual, speak to a servicing dealer before you continue. - Remove the spark plug cap if you let the product out of view.
Safety instructions for assembly

WARNING: Read the warning instructions that follow before you use the product.
- Use approved protective gloves when you assemble the product and cutting attachment.
- Remove the spark plug cap from the spark plug before you assemble the product.
- Make sure that the correct handlebar and cutting attachment guard are assembled before you operate the product.
- A defective or incorrect cutting attachment guard can cause injury. Do not use a cutting attachment without an approved cutting attachment guard.
- Attach the clutch cover and shaft correctly before you start the product.
- The drive disc and support flange must engage correctly in the center hole of the cutting attachment.
A cutting attachment that is attached incorrectly can cause injury or death.
- Attach the harness to the product to prevent injury to the operator or others.
Safety instructions for operation

WARNING: Read the warning instructions that follow before you use the product.
- Learn and understand the difference between forestry clearing, grass clearing and grass trimming before you use the product.
- Use personal protective equipment, refer to Personal protective equipment on page 6.
- Long-term exposure to noise can result in permanent hearing loss. Always use approved hearing protection.
- Listen for warning signals and loud voices when you use hearing protection. Always remove your hearing protection when the engine stops.
- Never use the product if it is changed or defective.
- Make sure that the spark plug cap and ignition lead are not damaged to prevent the risk of electrical shock.
- Look around the work area to make sure that no persons, animals or objects have a negative effect on the safety of the operation of the product.
- Look around the work area to make sure that no persons or animals touch the cutting attachment or are hit by objects that are ejected from the cutting attachment.
- Do not use the product in a situation or location where you can not get aid if an accident occurs.
- Do not use the product without an approved cutting attachment guard.
- Make sure that persons or animals keep a distance of a minimum of 15 m/50 ft during work. Always look behind you before you turn around with the product. Stop the product immediately if a person or animal enters the 15 m/50 ft safety zone. If more than 1 operator does work in the same area, keep a safety distance of a minimum of 2 times the tree height and a minimum of 15 m/50 ft.
- Examine the work area. Avoid loose objects, such as stones, broken glass, nails, steel wire and string, that can eject or wind around the cutting attachment.
- Make sure that you can move safely and have a safe stance. Examine the area around you for obstacles
such as roots, rocks, branch and ditches. Be careful during work on slopes.
natural_image
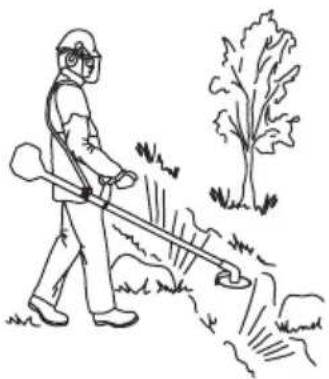
Line drawing of a person in protective gear using a long-handled tool to clean grass, with a tree nearby (no text or symbols)- Do not overreach. Keep a stable position of the feet and a good balance at all times.
- Before you start the product, put it on a flat surface, at a minimum of 3 m/10 ft from the fuel source and from where you fill fuel. Make sure that there are no objects near or touching the cutting attachment.
- If the cutting attachment rotates at idle speed, let a service agent adjust it. Do not use the product until it is adjusted or repaired.
- Look out for thrown objects. Always use approved eye protection and keep away from the cutting attachment guard. Stones and other small objects can eject into your eyes and cause blindness or other injuries.
- Do not put the product down with the engine on unless you have it in clear view.
- Do not remove the cut material, or let other persons remove cut material, while the engine is on or the cutting equipment rotates, as this can result in serious injury.
• Always stop the engine and make sure that the cutting equipment does not rotate before you remove material that is wound around the blade shaft or caught between the cutting attachment guard and the cutting attachment. - Be careful when you remove material from around the cutting equipment. The bevel gear gets hot during operation and can cause burn injuries.
- The exhaust fumes from the engine are hot and can contain sparks. Risk of fire. Be careful around dry and flammable material.
- Never use the product indoors or in spaces lacking proper ventilation. Exhaust fumes contain carbon monoxide, an odourless, poisonous and highly dangerous gas.
- Stop the engine before you move to a new work area. Always attach the transport guard before you move the equipment.
• Overexposure to vibration can lead to circulatory damage or nerve damage in persons who have poor circulation. Speak to your physician if you experience symptoms of overexposure to vibration. Such symptoms include numbness, loss of feeling, tingling, pricking, pain, loss of strength, changes in
skin colour or condition. These symptoms usually show in the fingers, hands or wrists. The risk increases at low temperatures.
Personal protective equipment

WARNING: Read the warning instructions that follow before you use the product.
• Always use approved personal protective equipment when you use the product. Personal protective equipment cannot fully prevent injury but it decreases the degree of injury if an accident does occur. Let your dealer help you select the correct equipment.
- Use a helmet if the trees in the work area have a height of more than 2 m/6.5 ft.

natural_image
Line drawing of a helmet with a pair of goggles, no text or symbols present- Use approved hearing protection.
natural_image
Line drawing of a mechanical component or bracket (no text or symbols)- Use approved eye protection. If you use a visor, you must also use approved protective goggles. Approved protective goggles must comply with the ANSI Z87.1 standard in the USA or EN 166 in EU countries.

natural_image
Line drawing of a mechanical component or device (no text or symbols)- Use gloves when it is necessary, for example when you attach, examine or clean the cutting equipment.
natural_image
Line drawing of two human gloves with bandages and shaded areas (no text or symbols)- Use protective boots with steel toe-cap and non-slip soles.

natural_image
Line drawing of a pair of boots with visible tread pattern and buckle (no text or symbols)- Use clothing made of a strong fabric. Always use heavy, long pants and long sleeves. Do not use loose clothing that can catch on twigs and branches. Do not use jewelry, short pants or sandals. Do not go with bare feet. Put your hair up safely above shoulder level.
- Keep first aid equipment near.

Safety devices on the product
For information about where to find the safety devices, see Cutting attachment guard on page 8.

WARNING: Read the warning instructions that follow before you use the product.
- Do not use a product with defective safety devices. Do a check of and do maintenance on the safety devices regularly. If the safety devices are defective, speak to your McCulloch service agent.
- Do not make changes to safety devices. Do not use the product if protective covers, safety switches or other protective devices are not attached or are defective.
- For all service and repair work on the product, especially for the safety devices, special training is necessary. If the safety devices fail the checks given in this operator's manual, you must let a service agent help you. We guarantee that professional repairs and service is available. If your dealer is not a service agent, speak to them for information about the nearest service agent.
- Do not use a cutting attachment without an approved and correctly attached cutting attachment guard. See Technical data on page 24.
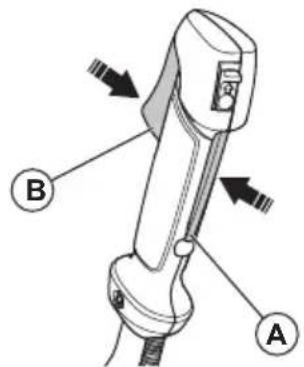
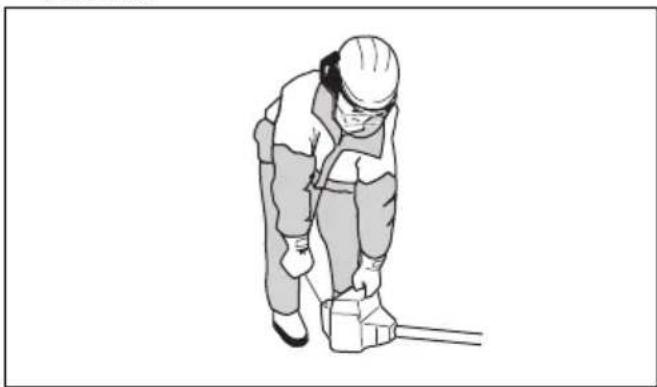
To do a check of the throttle trigger lockout
The throttle lockout is designed to prevent accidental operation of the throttle control.
- Press the throttle trigger lockout (A) and make sure that the throttle control is released (B). When you release the handle the throttle control and the throttle trigger lockout both move back to their initial positions. This movement is controlled by two return springs. This arrangement means that the throttle control is automatically locked at the idle setting.
text_image
Diagram of a medical or surgical device with labeled parts A and B, showing directional arrows indicating movement or force.- Make sure that the throttle control is locked at the idle setting when the throttle trigger lockout is released.

natural_image
Diagram of a handheld device with a scroll wheel and arrow indicator (no text or symbols)- Press the throttle trigger lockout and make sure that it return to its initial position when you release it.

natural_image
Diagram of a handheld device with two directional arrows indicating movement or force (no text or symbols present)-
Do a check of the throttle control and throttle trigger lockout move freely and that the return springs work properly.
-
Start the product (refer to instructions under To start and stop on page 16) and apply full throttle.
-
Release the throttle and make sure that the cutting attachment stops and remains at a standstill. Adjust the carburetor if the cutting attachment move with the throttle is in the idle position. Refer to the instructions in the chapter To adjust the idle speed on page 22.

natural_image
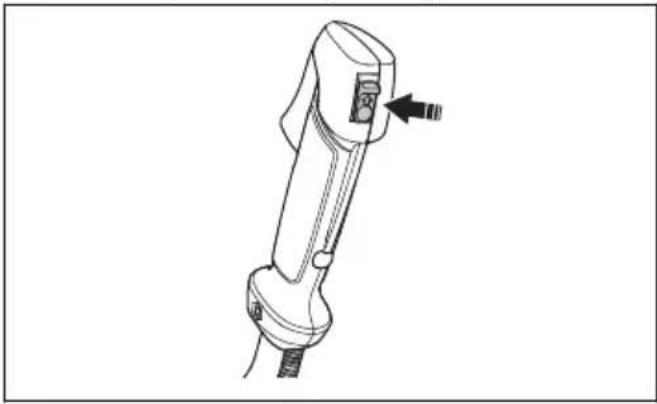
Illustration of a worker using a tool to adjust equipment, showing motion and rotation (no text or symbols)To do a check of the stop switch
-
Start the engine.
-
Move the stop switch to the stop position and make sure that the engine stops.

natural_image
Line drawing of a medical or surgical device with a black arrow pointing to a specific component (no text or symbols present)Cutting attachment guard
The cutting attachment guard prevents a loose object to eject in the direction of the operator. Examine the cutting attachment guard for damage and replace if it is damaged. Only use the approved guard for the cutting attachment.
natural_image
Technical line drawing of a mechanical tool or clamp assembly (no text or symbols)
natural_image
Technical line drawing of a mechanical assembly with gear and shaft components (no text or symbols)To do a check of the vibration damping system
The vibration damping system decreases vibration in the handles to a minimum which makes the operation easier.
natural_image
Technical line drawing of a mechanical device with no visible text or symbols-
Stop the engine.
-
Do a visual check for deformation and damage, for example cracks.
-
Make sure that the elements of the vibration damping system are attached correctly.
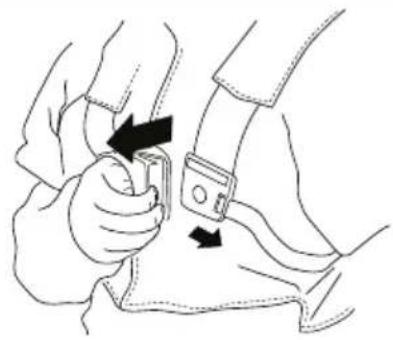
To do a check of the quick-release mechanism

WARNING: Do not use a harness with a defective quick-release mechanism.
The quick-release mechanism lets the operator remove the product quickly from the harness if there is an emergency.
-
Stop the engine.
-
Do a visual check for damage, for example cracks.
-
Release and attach the quick-release mechanism to make sure that it operates correctly.
natural_image
Illustration of a person adjusting a seatbelt with arrows indicating motion (no text or symbols)Muffler
natural_image
Technical line drawing of a mechanical housing or enclosure component (no text or symbols)- Do not use an engine with a damaged muffler. A damaged muffler increases the noise level and the risk of fire. Keep a fire extinguisher near.
- Examine regularly that the muffler is attached to the product.
- Do not touch the engine or the muffler when then engine is on. Do not touch the engine or the muffler for a while after the engine stops. Hot surfaces can cause injuries.
- A hot muffler can cause a fire. Be careful, if you use the product near flammable liquids or fumes.
- Do not touch the parts in the muffler, if the muffler is damaged. The parts can contain some carcinogenic chemicals.
- Clean the spark arrestor with regular intervals if the product have a spark arrestor.
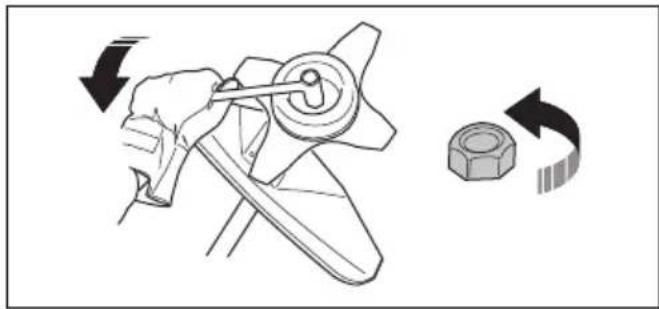
To attach and remove the locknut

WARNING: Stop the engine, use protective gloves and be careful around the sharp edges of the cutting attachment.
A locknut is used to attach some types of cutting attachments. The locknut has a left thread.
• To attach, tighten the locknut in the opposite direction to the direction of turning of the cutting attachment.
- To remove the locknut, loosen the locknut in the same direction as the cutting attachment rotates.
• To loosen and tighten the locknut, use a socket wrench with a long shaft. The arrow in the picture shows the area where you can operate the socket wrench.
natural_image
Diagram showing a mechanical assembly with a rotating nut and directional arrows indicating motion (no text or symbols)
WARNING: When you loosen and tighten the locknut, there is a risk of injury from the blade. You must always make sure that the blade guard prevents injury to your hand when you do this.
Note: Make sure that you can not turn the locknut by hand. Replace the nut if the nylon lining does not have a resistance of a minimum of 1.5 Nm. The locknut must be replaced after it has been put on approximately 10 times.
Cutting equipment
Choose and maintain the cutting equipment to:
- Obtain maximum cutting performance.
- Increase life span of the cutting equipment.
- Follow the checking, maintenance and service instructions for the muffler.
• Always use the recommended guard for the cutting equipment. See Technical data.

WARNING: Only use cutting attachments with the guards we recommend! See the chapter on Technical data. Refer to the instructions for the cutting attachment to check the correct way to load the trimmer line and the correct trimmer line diameter.

WARNING: A faulty cutting attachment may increase the risk of accidents.

WARNING: Always stop the engine before doing any work on the cutting attachment. This continues to rotate even after the throttle has been released. Ensure that the cutting attachment has stopped completely and disconnect the spark plug cap before you start to work on it.
Cutting equipment
- Use the saw blade to cut fibrous types of wood.
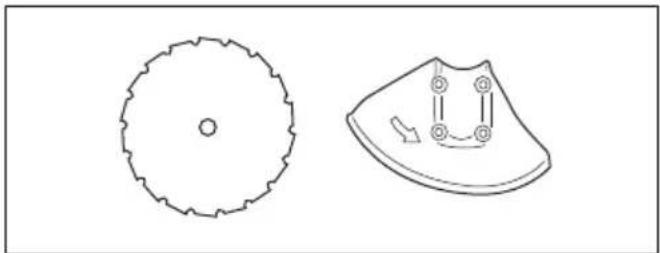
natural_image
Two technical line drawings of mechanical components: a circular gear-like part and a curved blade with mounting holes (no text or symbols)- Use the blades and grass knives to cut coarse grass.

natural_image
Four abstract geometric shapes with no text or symbols: a star-like polygon, a triangular prism, and a curved rectangular base (no text or symbols)- Use the trimmer head to cut grass.

natural_image
Technical line drawings of two mechanical components: a circular component with curved ends and a triangular plate with cutouts (no text or symbols)- An incorrectly sharpened or damaged blade increases the risk of accidents. Keep the teeth of the blade correctly sharpened. Obey the instructions in To sharpen grass cutters and grass blades on page 10 and use the recommended file gauge.

natural_image
Simple line drawing of a tool and a shield-like object with an arrow indicating direction (no text or symbols)- Examine the cutting attachment for damage and cracks. Replace the damaged cutting attachment.
- Only use cutting attachments with recommended guards. Refer to Technical data on page 24.
Blades
- Use the product with an approved blade. Do not use a blade without proper installation of all required parts. Make sure that the installation is done correctly and that the proper parts are used. Improper installation may cause the blade to fly off and seriously injure the operator or bystanders.
- Wear protective gloves when you handle the blade or do maintenance.
- Use head protection when you operate a product with a blade.
- A blade can cause injury when it spins after the engine is stopped or the throttle trigger is released. Make sure that the blade has completely stopped rotating before maintenance.
- Stop the engine before you do work on the cutting attachment. Make sure the cutting attachment fully stops. Disconnect the lead from the spark plug.
- Keep the teeth of the blade correctly sharpened.
natural_image
Diagram of a tool interacting with a mechanical part, showing a lever and blade (no text or symbols)- Do not use a damaged cutting attachment.
- Attach the transport guard to the blade when you transport or store the product.
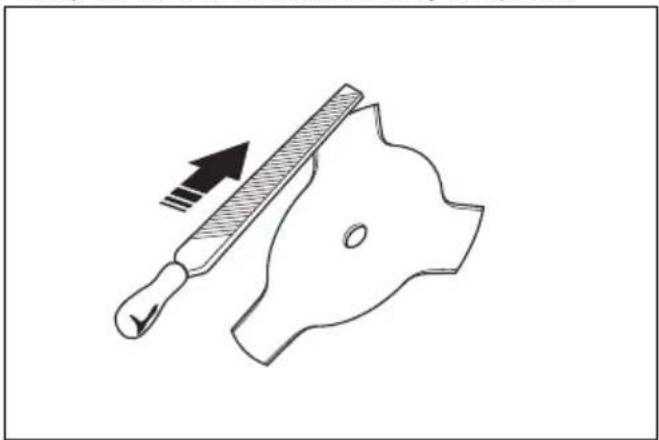
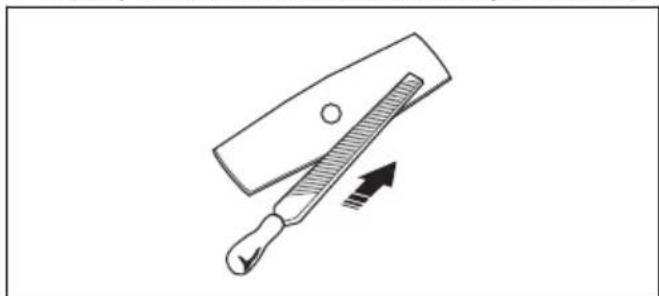
To sharpen grass cutters and grass blades
- Sharpen all edges of the grass cutters and blades equally to keep the balance. Use a single-cut flat file.
natural_image
Simple line drawing of a tool with a handle and arrow indicating direction (no text or symbols)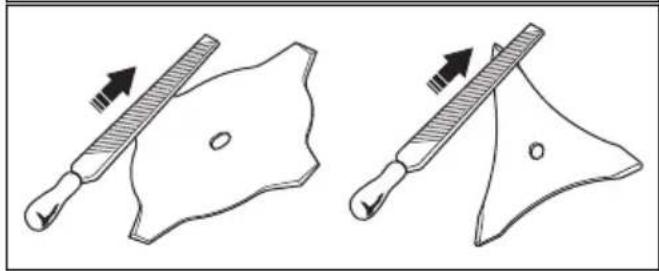
natural_image
Two diagrams showing a tool interacting with a shield-like shape, one with an arrow indicating direction (no text or symbols)To sharpen the saw blade
WARNING: Stop the engine. Use protective gloves.
• To sharpen the blade correctly, refer to the instructions that come with the blade.
• Make sure that the product and blade has sufficient support when you sharpen it.

natural_image
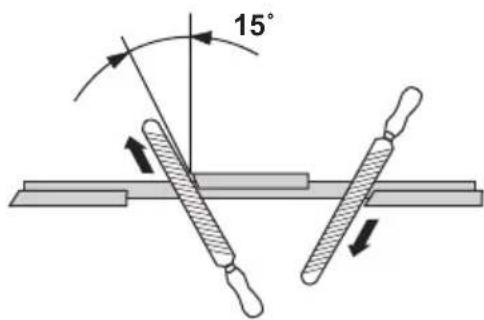
Illustration of a person in protective gear using a tool to measure teeth, with an inset showing a close-up of teeth (no text or symbols present)- Use a 5.5 mm (7/32 in) round file with a file holder.

natural_image
Pure mechanical component diagram without any text, numbers, or symbols- Hold the file at an angle of 15^ .
- Sharpen one tooth of the saw blade to the right and the next tooth to the left, see the illustration.
text_image
15°Note: Sharpen the edges of the teeth with a flat file if the blade is heavily worn. Continue to sharpen with a round file.
- Sharpen all edges equally to keep the blade balanced.
- Adjust the blade set to 1 mm (0.04 in) with the recommended setting tool. Refer to the instructions that come with the blade.

natural_image
Diagram showing two mechanical components with directional arrows indicating movement (no text or symbols)
WARNING: Always discard a blade that is damaged. Do not try to make a bent or twisted blade straight and use it again.
Trimmer head

WARNING: Always make sure the trimmer line is wound tightly and evenly around the drum to prevent harmful vibration.
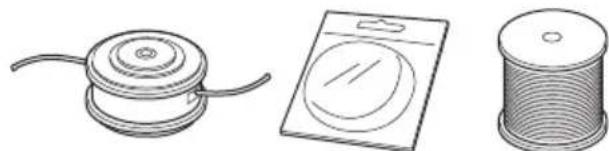
natural_image
Three technical illustrations: a cylindrical device with a loop, a circular component with a handle, and a spool of thread (no text or symbols)- Only use recommended trimmer heads and trimmer lines.
- Only use recommended cutting attachments.
- Smaller machines requires small trimmer heads and vice versa.
- The length of the trimmer line is important. A longer trimmer line requires greater engine power than a shorter trimmer line of the same diameter.
• Make sure that the cutter on the trimmer guard is intact. This cuts the trimmer line to the correct length. - Soak the trimmer line in water for a couple of days before use to increase the life length.
Fuel safety
- Do not start the product if there is fuel or engine oil on the product. Remove the unwanted fuel/oil and let the product dry. Remove unwanted fuel from the product.
- If you spill fuel on your clothing, change clothing immediately.
- Do not get fuel on your body, it can cause injury. If you get fuel on your body, use a soap and water to remove the fuel.
- Do not start the engine if you spill oil or fuel on the product or on your body.
- Do not start the product if the engine has a leak. Examine the engine for leaks regularly.
- Be careful with fuel. Fuel is flammable and the fumes are explosive and can cause injuries or death.
- Do not breathe in the fuel fumes, it can cause injury. Make sure that there is a sufficient airflow.
- Do not smoke near the fuel or the engine.
- Do not put warm objects near the fuel or the engine.
-
Do not add the fuel when the engine is on.
• Make sure that the engine is cool before you refuel. -
Before you refuel, open the fuel tank cap slowly and release the pressure carefully.
- Do not add fuel to the engine in an indoor area. Not sufficient airflow can cause injury or death because of asphyxiation or carbon monoxide.
- Tighten the fuel tank cap carefully or a fire can occur.
- Move the product at a minimum of 3 m (10 ft) from the position where you filled the tank before a start.
- Do not put too much fuel in the fuel tank.
• Make sure that a leak cannot occur when you move the product or fuel container. -
Do not put the product or a fuel container where there is an open flame, spark or pilot light. Make sure that the storage area does not contain an open flame.
-
Only use approved containers when you move the fuel or put the fuel into storage.
- Empty the fuel tank before long-term storage. Obey the local law on where to dispose fuel.
- Clean the product before long-term storage.
- Remove the spark plug cable before you put the product into storage to make sure that the engine does not start accidentally.
Safety instructions for maintenance
- If you cannot adjust the idle speed to make the cutting attachment stop, speak to your service center. Do not use the product until the product is correctly adjusted or repaired.
Assembly

WARNING: Read the safety chapter before you assemble the product.
Introduction
WARNING: Before you assemble the product, you must read and understand the safety chapter.

WARNING: Remove the spark plug cable from the spark plug before you assemble the product.
To install the handlebar
- Attach the handlebar onto the mounting bracket as shown.

natural_image
Technical line drawing of a mechanical device with connectors and wiring (no text or symbols)To install blades and trimmer heads

WARNING: Only use the approved guard for the blades. See Technical data on page 24. A defective guard can cause injury.

WARNING: If you operate the product with a grass blade, first install the correct handlebar, blade guard and harness.

WARNING: If you do not install the the blades correctly, it can cause injury.
- Make sure that the lifted section on the drive disc/support flange engages correctly in the center hole of the blades.
- Install the blades.

natural_image
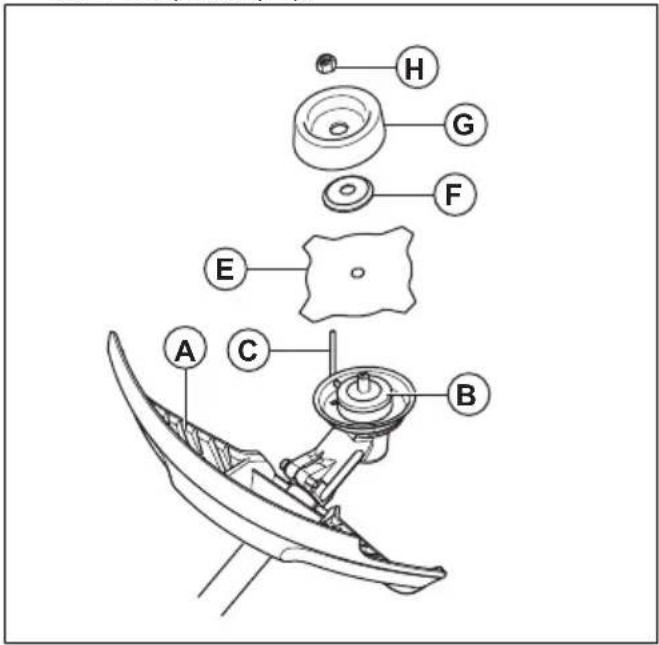
Two mechanical components with a no-smoking symbol, one plain and one with a crossbar (no text or labels)To install the blade guard, grass blade and grass cutter

CAUTION: Only use the approved guard for the blades. See the operator's manual.

CAUTION: Make sure that the guard extension is removed.
- Attach the blade guard/cutting attachment guard (A) onto the shaft and tighten with the bolt (L).
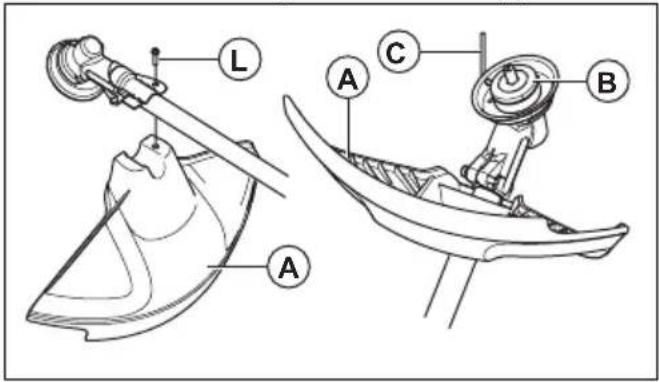
text_image
L A C A B- Install the drive disc (B) on the output shaft.
- Turn the output shaft until one of the holes in the drive disc aligns with the related hole in the gear housing.
- Put the locking pin (C) in the hole to lock the shaft.
- Put the blade (E), support flange (F) and the support cup (G) on the output shaft.
- Install the nut (H). Hold the shaft of the wrench near the blade guard as much as possible. To tighten the nut, you must turn the wrench in the opposite direction of rotation. Tighten the nut to a torque of 35-50 Nm (3.5-5 kpm).
text_image
A C B E F G HNote: Left hand thread.
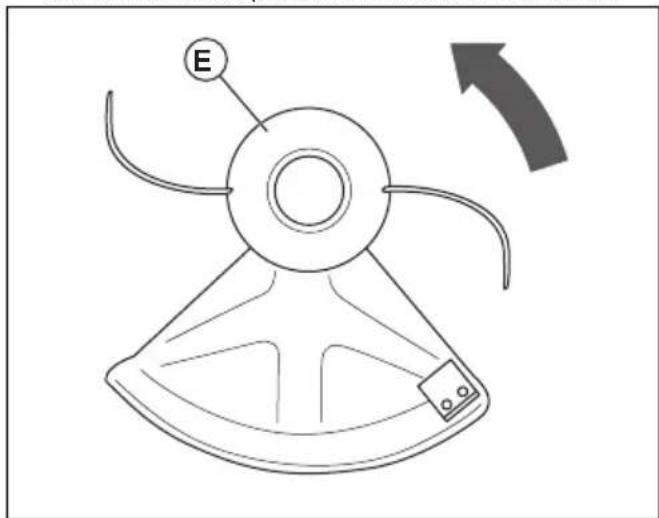
To attach the trimmer guard and the trimmer head
Note: Make sure to use the correct trimmer guard for the correct trimmer head.
- Attach the correct trimmer guard/combination guard (A) for the trimmer head.
- Install the trimmer guard/combination guard around the shaft and tighten it with the bolt (B). Use the locking pin or hex key (C).

text_image
Technical diagram illustrating mechanical assembly steps with labeled components A, B, C, and D- Put the locking pin or hex key (C) in the groove on the screw head and tighten.
- Attach the drive disc (D) on the output shaft.
- Turn the output shaft until one of the holes in the drive disc aligns with the hole in the gear housing.
- Install the locking pin or hex key (C) in the hole to lock the shaft.
- Assemble the trimmer head/plastic blades (E). Turn the trimmer head/plastic blades counterclockwise.
natural_image
Diagram of a mechanical device with labeled component E and directional arrow (no text or symbols beyond labels)- To disassemble, follow the instructions in the opposite sequence.
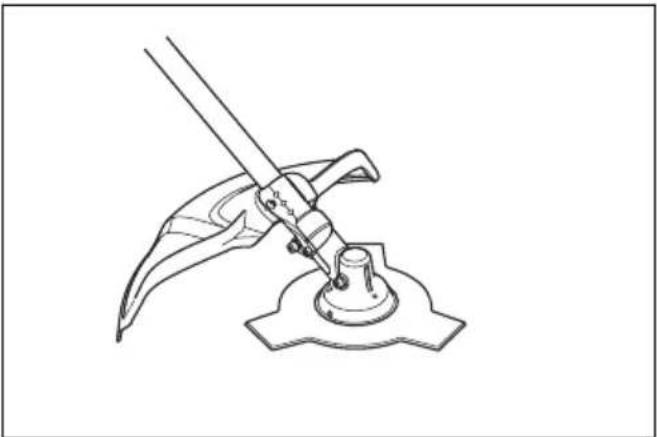
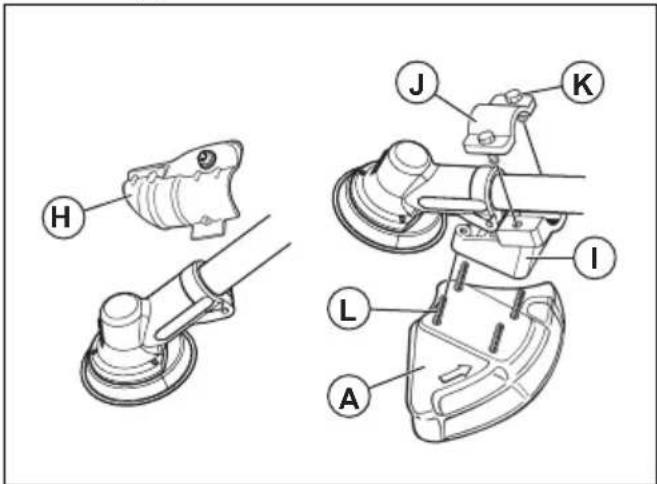
To install a blade guard and saw blade

CAUTION: Only use the approved guard for the blades. See Technical data on page 24.
- Remove the mounting plate (H).
- Install the adapter (I) and bracket (J) with the two screws (K).
- Install the blade guard (A) to the adapter using the 4 screws (L).
text_image
Technical diagram of a mechanical device with labeled parts including H, J, K, I, L, and A.-
Install the drive disc (B) on the output shaft.
-
Turn the blade shaft until one of the holes in the drive disc aligns with the corresponding hole in the gear housing.
-
Insert the locking pin (C) in the hole to lock the shaft.
-
Put the blade (D) and support flange (F) on the output shaft.
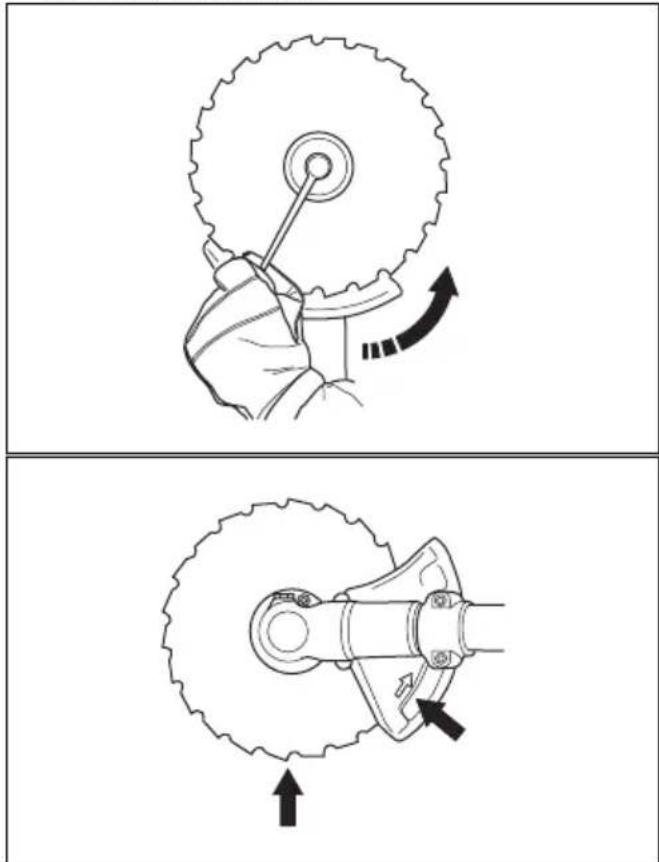
-
Install the nut (G). The nut must be tightened to a torque of 35-50 Nm (3.5-5kpm). Use the socket wrench in the tool kit. Hold the shaft of the wrench as close to the blade guard as possible. To tighten the nut, turn the wrench in opposite direction to the direction of rotation.

text_image
Technical diagram of a mechanical assembly with labeled parts including gears, shafts, and housing components.Note: Left hand thread.
- When loosening and tightening the saw blade nut, there is a risk of injury from the teeth of the saw blade. Therefore always ensure that your hand is shielded by the blade guard. Always use a socket wrench with a shaft that is long enough to allow this. The arrow in the diagram shows the area where you should operate the socket wrench when loosening or tightening.
text_image
Technical diagram showing gear meshing and tool path changes, with Chinese annotations indicating motion direction.To attach the transport guard
- Attach the transport guard on the blade as shown in the illustration.

natural_image
Diagram of a circular mechanical component with internal segments and an inset showing a cross-section view (no text or symbols)To adjust the harness

WARNING: The product must always be correctly attached to the harness. If not, you cannot control the product safely and this can result in injury to you or others. Do
not use a defective harness. Do not use a harness with a defective quick release.
- Put on the harness.
- Connect the product to the harness.
- Adjust the harness for the best work position.
- Adjust the side straps to make the product weigh equally on your shoulders.

natural_image
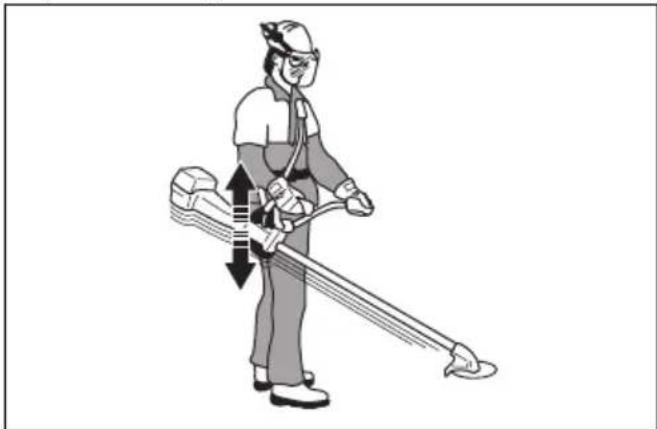
Line drawing of a person wearing a headlamp and holding an object, with a downward arrow indicating motion (no text or symbols)- Adjust the harness until the cutting attachment is parallel to the ground.
natural_image
Illustration of a worker using a long-handled tool to clean or walk (no text or symbols present)- Let the cutting attachment stay lightly on the ground. Adjust the harness clamp to balance the product correctly.
Note: If you use a grass blade, it must balance approximately 10 cm /4 in above the ground.
Operation

WARNING: Read and understand the safety chapter before you operate the product.
Introduction

WARNING: Before you operate the product, you must read and understand the safety chapter.
Fuel
This product has a two-stroke engine.

CAUTION: Incorrect type of fuel can result in engine damage. Use a mixture of gasoline and two-stroke oil.
Premixed fuel
- Use McCulloch premixed alkylate fuel for best performance and extension of the engine life. This fuel contains less harmful chemicals compared to regular fuel, which decreases harmful exhaust fumes. The quantity of remains after combustion is lower with this fuel, which keeps the components of the engine more clean.
To mix fuel
Gasoline
- Use good quality unleaded gasoline with a maximum of 10% ethanol contents.

CAUTION: Do not use gasoline with an octane grade less than 90 RON/87 AKI. Use of a lower octane grade can cause engine knocking, which causes engine damages.
Two-stroke oil
- For best results and performance use McCulloch two-stroke oil.
- If McCulloch two-stroke oil is not available, use a two-stroke oil of good quality for air-cooled engines. Speak to your servicing dealer to select the correct oil.

CAUTION: Do not use two-stroke oil for water-cooled outboard engines, also referred to as outboard oil. Do not use oil for four-stroke engines.
To mix gasoline and two-stroke oil
| Gasoline, liter Two-stroke oil, | liter |
| 2% (50:1) | |
| 5 0.10 | |
| 10 0.20 | |
| 15 0.30 | |
| 20 0.40 | |
| US gallon US fl. oz. | |
| 1 2 12 | |
| 2 1/2 6 12 | |
| 5 12 78 |

CAUTION: Small errors can influence the ratio of the mixture drastically when you mix small quantities of fuel. Measure the quantity of oil carefully and make sure that you get the correct mixture.
text_image
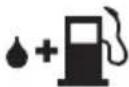
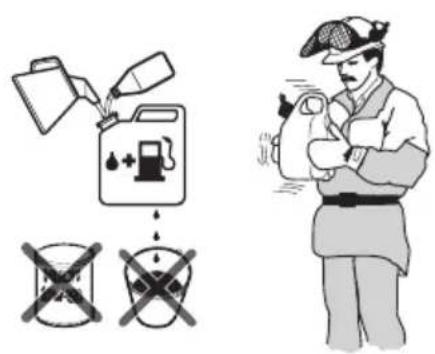
Safety warning illustration showing fuel injection and discharge symbols with a person holding a bag- Fill half the quantity of gasoline in a clean container for fuel.
- Add the full quantity of oil.
- Shake the fuel mixture.
- Add the remaining quantity of gasoline to the container.
- Carefully shake the fuel mixture.

CAUTION: Do not mix fuel for more than 1 month at a time.
To fill the fuel tank

WARNING: Obey the procedure that follows for your safety.
- Stop the engine and let the engine become cool.
- Clean the area around the fuel tank cap.

natural_image
Simple black-and-white icon of a fuel pump with a droplet and plus sign, no text or symbols present.-
Shake the container and make sure that the fuel is fully mixed.
-
Remove the fuel tank cap slowly to release the pressure.
- Fill the fuel tank.

CAUTION: Make sure that there is not too much fuel in the fuel tank. The fuel expands when it becomes hot.
- Tighten the fuel tank cap carefully.
- Clean fuel spillage on and around the product.
- Move the product 3 m/10 ft or more away from the refueling area and fuel source before you start the engine.
Note: To see where the fuel tank is on your product, refer to Product overview on page 3.
To start and stop
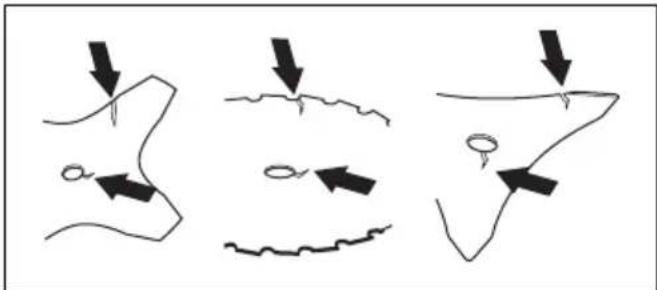
Before you operate the product
- Examine the work area to make sure that you know the type of terrain, the slope of the ground and if there are obstacles such as stones, branches and ditches.
- Do an overhaul inspection of the product.
- Do the safety inspections, maintenance and servicing that are given in this manual.
- Make sure that all covers, guards, handles and the cutting equipment are correctly attached and not damaged.
- Make sure that there are no cracks at the bottom of the saw blade or grass blade teeth or by the center hole of the blade. Replace the blade if it is damaged.
natural_image
Three abstract line drawings showing directional arrows and shapes, no text or symbols present- Examine the support flange for cracks. Replace the support flange if it is damaged.
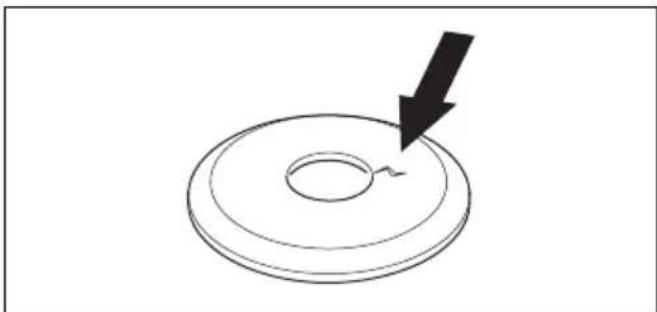
natural_image
Simple line drawing of a circular component with a downward arrow, no text or symbols present- Make sure that the locknut can not be removed by hand. If you can remove it by hand, it does not lock
the cutting attachment sufficiently and you must replace it.

natural_image
Simple line drawing of a hexagonal nut with a curved arrow indicating rotation or cycle (no text or symbols)- Examine the blade guard for damages or cracks. Replace the blade guard if it has been hit or if it has cracks.
- Examine the trimmer head and cutting attachment guard for damages or cracks. Replace the trimmer head and cutting attachment guard if they have been hit or if they have cracks.

natural_image
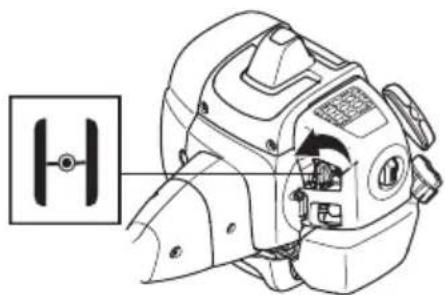
Technical line drawing of a mechanical device with no visible text or symbolsTo start the engine
- Put the product on a flat and stable surface. Keep the cutting attachment off the ground.
- Push the air purge bulb again and again until fuel starts to fill the bulb. It is not necessary to fill the air purge bulb fully.
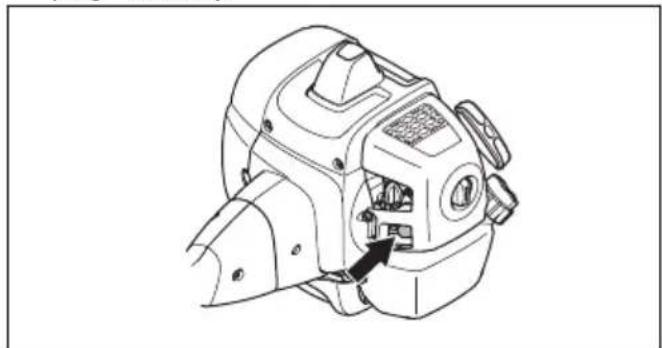
natural_image
Technical line drawing of a mechanical device with internal components and a black arrow indicating a specific part (no text or symbols present)- Move the choke lever to the choke position.
natural_image
Technical line drawing of a mechanical device with a close-up inset showing a component (no text or symbols)
WARNING: The cutting attachment starts to rotate immediately when you start the engine with the choke.
- Set the start/stop switch to the RUN position.

natural_image
Technical line drawing of a handheld device with a black arrow pointing to the handle (no text or symbols present)- Hold the body of the product on the ground with your left hand.
natural_image
Illustration of a worker in safety gear handling equipment (no text or symbols)- Hold the starter rope handle with your right hand.
- Slowly pull out the starter rope with your right hand until you feel some resistance.

WARNING: Do not twist the starter rope around your hand.
- Pull the cord quickly and with force. Pull the starter rope again and again until the engine starts.

CAUTION: Do not pull the starter rope to full extension and do not let go of the starter rope handle when the starter rope is fully extended. This can cause damage to the product.
- Reset the choke when the engine fires.
- Operate the throttle gradually when the engine starts.
- Make sure that the engine runs smoothly and let the engine become warm for 1-2 minutes before operation.
To stop the product
- Push the stop switch to stop the engine.
natural_image
Line drawing of a medical or laboratory device with a black arrow pointing to a component (no text or symbols present)Blade thrust
- A blade thrust is a sudden movement of the product to the side, forward or rearward. A blade thrust occurs when the grass blade hits an object that cannot be cut. In areas where it is not easy to see the material being cut the risk of blade thrust increases.
- When a blade thrust occurs, there is a risk that the product or the operator moves out of position. A blade that moves can hit bystanders and there is a risk of injuries.
- If a blade is bent, has cracks, is broken or damaged, discard the blade.
- Use a sharp blade. The risk of blade thrust increases when a blade is not sharp.
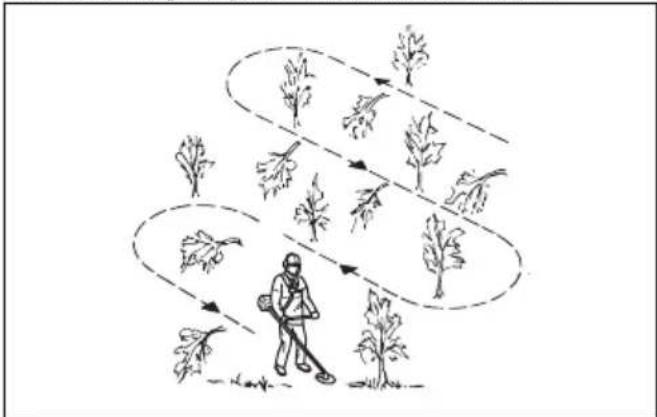
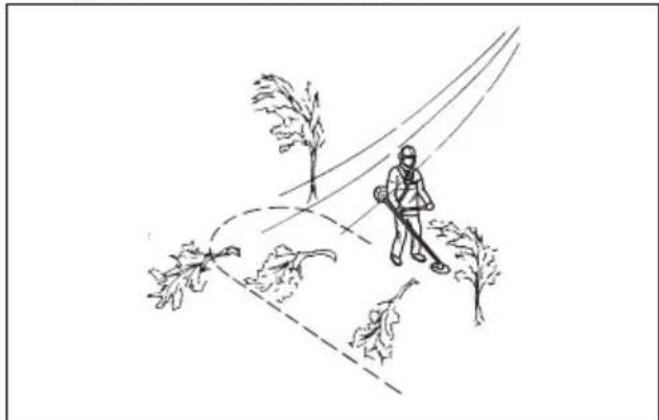
General work instructions

WARNING: Be careful when you cut a tree that is in tension. It can spring back to its normal position before or after the cut and hit you or the product, and cause injury.
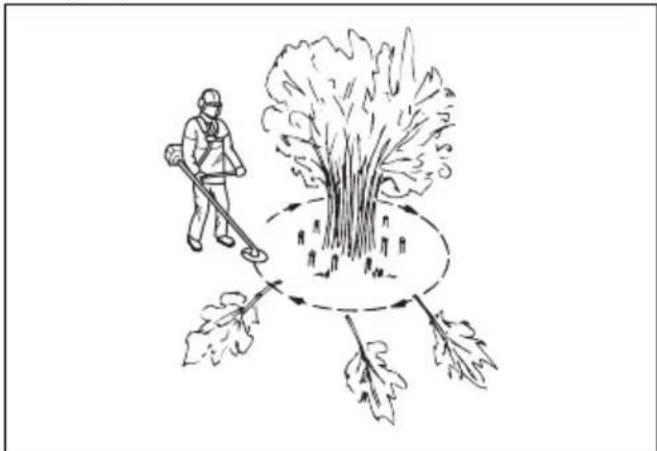
- Clear an open space at one end of the work area, and start the work from there.
- Move in a regular pattern across the work area.
flowchart
graph TD
    A["Start"] --> B["Path 1: Leafy Plant"]
    B --> C["Path 2: Tree Plant"]
    C --> D["Path 3: Leafy Plant"]
    D --> E["Path 4: Tree Plant"]
    E --> F["Path 5: Leafy Plant"]
    F --> G["End"]
- Move the product fully to the left and right, to clear a width of 4–5 m on each turn.
- Clear a length of 75 m before you turn and go back. Move the fuel can along with you as you continue.
- Move in a direction where you do not go across ditches and obstacles more than necessary. - Move in a direction where the wind makes the cut vegetation fall in the cleared area.
natural_image
Line drawing of a person walking on a path with trees and a dashed line indicating a path (no text or symbols)- Move along slopes, not up and down.
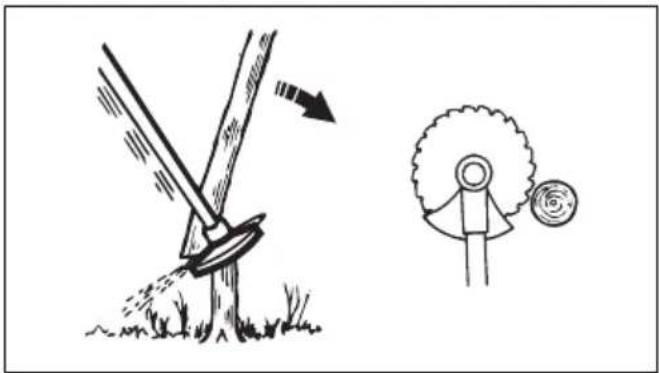
Forestry clearing with a saw blade
To fell a tree to the left
To fell to the left, push the bottom of the tree to the right.
- Apply full throttle.
- Put the saw blade against the tree as given in the picture.
- Tilt the saw blade and push it with force diagonally down to the right. At the same time, push the tree with the blade guard.

natural_image
Illustration showing a tree pruning with an arrow indicating direction, and a stick figure holding a ball (no text or symbols)To fell a tree to the right
To fell to the right, push the bottom of the tree to the left.
- Apply full throttle.
-
Put the saw blade against the tree as given in the picture.
-
Tilt the saw blade and push it with force diagonally up and to the right. At the same time, push the tree with the blade guard.
natural_image
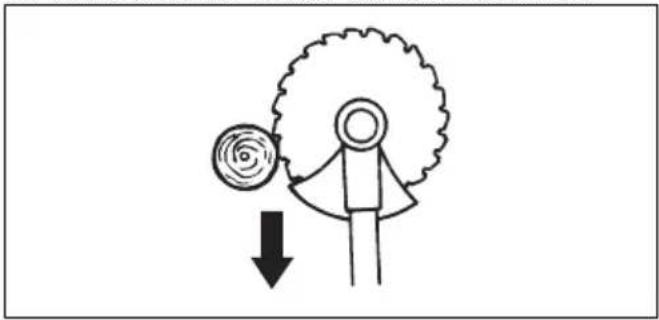
Illustration showing a tree planting a sapling with an arrow and a person holding a ball (no text or symbols)To fell a tree forward
To fell forward, push the bottom of the tree rearward.
- Apply full throttle.
- Put the saw blade against the tree as given in the picture.
- Pull the saw blade forward with a fast movement.
natural_image
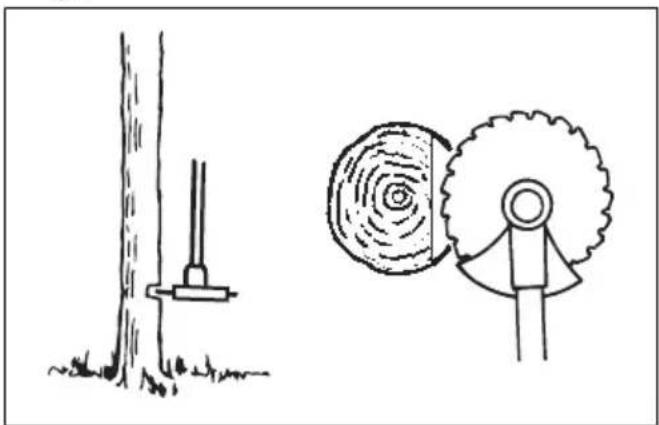
Simple line drawing of a person pushing a large circular object with a downward arrow, no text or symbols present.To fell large trees
Large trees must be cut from 2 sides.
- Examine in which direction the tree will fall.
- Apply full throttle.
- Do the first cut on the side of the tree to which it will fall.
natural_image
Simple line drawing showing a tree stump and a person holding a tree with a gear (no text or symbols)- Cut through the tree from the other side.

natural_image
Diagram showing a gear cutter cutting through a wooden mill with a moving tree, and a tool inserted into the tree with an arrow indicating rotation (no text or symbols)
CAUTION: If the saw blade becomes blocked, do not pull the product with a sudden movement. That can cause damage to the saw blade, bevel gear, shaft or handlebar. Release the handles, hold the shaft with 2 hands and carefully pull the product.
Note: Use more cutting pressure fo fell small trees. Use less cutting pressure to fell large trees.
Brush cutting with a saw blade
To fell to the left, push the bottom of the tree to the right.
- Cut down thin trees and brush.
- Move the product from side to side.
- Cut many trees in one movement.
- For groups of thin trees:
natural_image
Illustration of a person using a tool to spread over a tree with leaves, no text or symbols presenta) Cut the outer trees high up.
b) Cut the outer trees to the correct height.
c) Cut from the center. If you cannot get access to the center, cut the outer trees high up and let them fall. This decreases the risk that the saw blade becomes blocked.
Grass clearing with a grass blade

CAUTION: Do not use grass blades and grass knives on wood. Use grass blades and grass knives for long or heavy grass only.
- Move the product from side to side.
- Start the movement from right to left when you cut. Move the product to the right before you cut again.
- Cut with the left side of the grass blade.
natural_image
Illustration of a hand operating a mechanical device with a pointed tool extending outward (no text or symbols)- Angle the grass blade to the left to make the grass fall in a line. This makes it easy to collect the grass.
- Keep a stable position with your feet apart.
- Move forward after each right movement and make sure that you have a stable position again before you cut again.
- Keep the support cup with a light pressure against the ground to make sure that the grass blade does not hit the ground.
- Obey these instructions to decrease the risk that cut material winds around the grass blade:
a) Apply full throttle.
b) Do not move the grass blade through cut material when you move the product from left to right. - Before you collect the cut material, stop the engine and remove the product from the harness. Put the product down on the ground.
Grass trimming with a trimmer head
To trim the grass
- Hold the trimmer head immediately above the ground at an angle. Do not push the trimmer line into the grass.

natural_image
Simple line drawing of a grassy slope with a tool, no text or symbols present- Decrease the length of the trimmer line by 10-12 cm / 4-4.75 in.
- Decrease the engine speed to decrease the risk of damage to plants.
- Use 80 % throttle when you cut grass near objects.
natural_image
Simple line drawing of a grassy field with a shovel and stick, no text or symbols presentTo clear grass
- Keep the trimmer head above the ground.
- Tilt the trimmer head.
- Cut with the end of the trimmer line around objects in the work area.

CAUTION: Cut grass. Other objects that are hit by the trimmer line, increases the wear on the trimmer line.
- Use 80% speed when you cut and clear vegetation. This decreases the wear on the trimmer head and trimmer line.
To cut the grass
- Make sure that the trimmer line is parallel to the ground when you cut the grass.

natural_image
Simple line drawing of a grassy field with a small mechanical component at the top (no text or symbols)-
Do not push the trimmer head to the ground. This can cause damage to the product.
-
Move the product from side to side when you cut grass. Use full speed.
natural_image
Illustration of a person holding a mechanical device with a dashed arrow indicating motion (no text or symbols)To sweep the grass
The airflow from the rotating trimmer line can be used to remove cut grass from an area.
- Hold the trimmer head and the trimmer line parallel to the ground and above the ground.
- Apply full throttle.
- Move the trimmer head from side to side and sweep the grass.

WARNING: Clean the trimmer head cover each time you assemble new trimmer line to prevent unbalance and vibrations in the handles. Also do a check of the other parts of the trimmer head and clean it if necessary.
Maintenance
Introduction

WARNING: Read and understand the safety chapter before you do maintenance on the product.
Maintenance schedule
| Maintenance Daily Weekly Monthly | |||
| Clean the external surface. X | |||
| Examine the harness for damages. X | |||
| Do a check of the throttle trigger lockout and the throttle trigger. Refer to To do a check of the throttle trigger lockout on page 7. | X | ||
| Examine the handle and the handlebar for damages and make sure that they are attached correctly. | X | ||
| Do a check of the stop switch. Refer to To do a check of the stop switch on page 8. | X | ||
| Make sure that the cutting attachment does not rotate at idle speed. X | |||
| Clean the air filter. Replace it if it is damaged. X | |||
| Examine the cutting attachment guard for damages and cracks. X | |||
| Make sure that the saw blade or grass blade is attached correctly. Make sure that the saw blade or grass blade is sharp and not damaged. | X | ||
| Examine the trimmer head for damages and cracks. Replace it if it is damaged. X | |||
| Tighten the locknut fully for cutting attachments with a locknut. X | |||
| Examine the transport guard for damage and make sure that it can be attached correctly. | X | ||
| Tighten nuts and screws. X | |||
| Examine the engine, the fuel tank and the fuel lines for leaks. X | |||
| Examine the starter and the starter rope for damages. X | |||
| Examine the spark plug. Refer to To examine the spark plug on page 24. Replace the spark plug if it is necessary. Make sure that the spark plug is fitted with a suppressor. | X | ||
| Clean the external surface of the carburetor and the area around it. X | |||
| Make sure that the bevel gear is filled correctly with grease. Refer to Bevel gear on page 23. | X | ||
| Examine the fuel filter for contamination and the fuel hose for cracks and other defects. Replace if it is necessary. | X | ||
| Examine all cables and connections. X | |||
| Replace the spark plug. Make sure that the spark plug is fitted with a suppressor. | X |
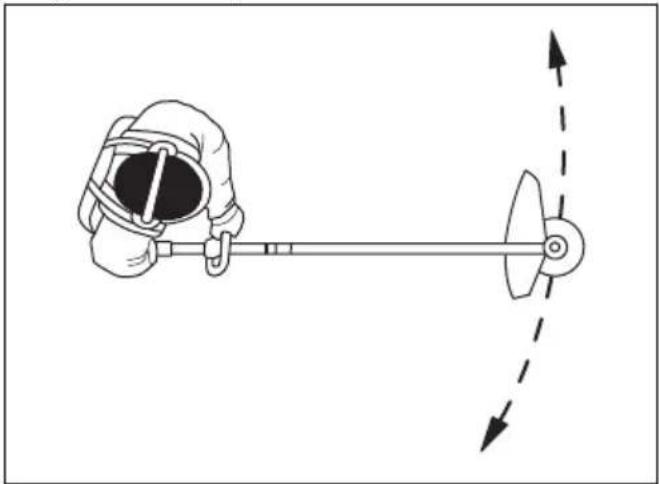
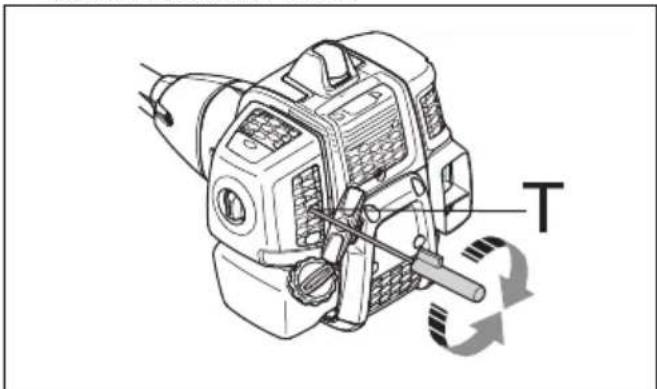
To adjust the idle speed
The high speed needle and the low speed needle are permanently set and cannot be adjusted. The idle speed is the only function that can be adjusted.
-
Start the engine and make sure that it is run warm before you start to adjust the idle speed.
-
Turn the idle speed screw clockwise until the cutting attachment starts to rotate.
text_image
T-
Turn the idle speed screw counterclockwise until the cutting attachment stops.
-
The idle speed must be below the speed when the cutting attachment starts to rotate. The idle speed is correct when the engine operates smoothly in all positions.
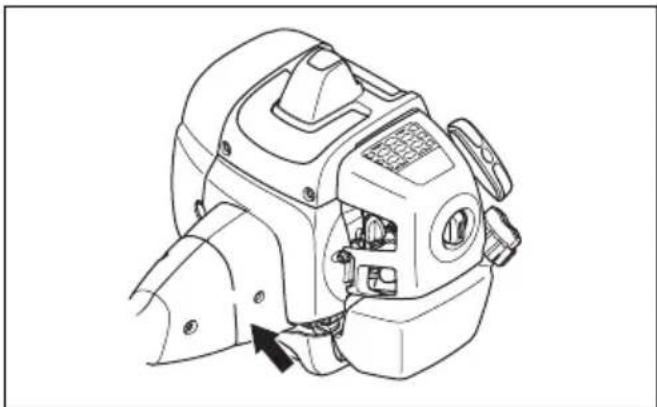
To do maintenance on the muffler
The muffler decreases the noise level and points the exhaust gases away from the operator.

WARNING: Mufflers that have catalytic converters get very hot during operation and will stay hot for some time after you stop the product. This also applies at idle speed. If you touch the product it can result in burns to the skin. Think about of the risk of fire.
- Stop the product and let it cool down.
- Remove the muffler.

natural_image
Technical line drawing of a mechanical component with mounting holes and internal channels (no text or symbols)- Remove the screws that holds the spark arrestor screen.

natural_image
Mechanical assembly diagram showing a motor housing with a clamping mechanism (no text or labels)- Clean the spark arrestor screen if it is blocked or replace it if it is damaged.

CAUTION: The spark arrestor screen must be replaced if it is damaged. Do not use a product if the spark arrestor screen on the muffler is missing or defective.

CAUTION: If the spark arrestor screen is frequently blocked it can be a sign that performance of the catalytic converter is decreased. Turn to your servicing dealer to examine the muffler. A blocked spark arrestor screen will cause overheating and result in damage to the cylinder and piston.
To clean/do maintenance on the cooling system
This product has a cooling system. A dirty or blocked cooling system can make the product too hot which can damage the piston and cylinder. Check and clean the cooling system with a brush one time each week or more frequently in demanding conditions. The cooling system have cooling fins on the cylinder (A) and air intake (B).

text_image
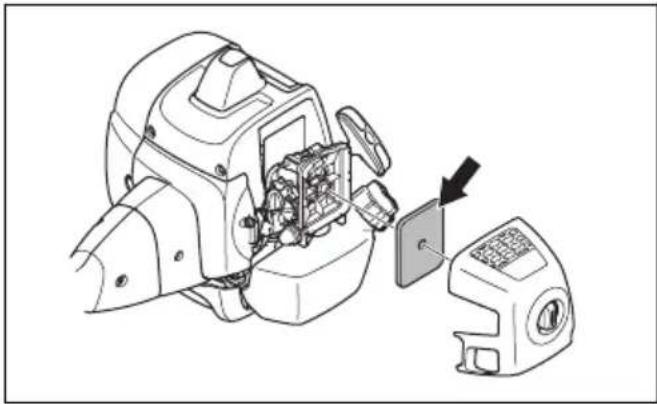
Technical diagram of a mechanical device with labeled parts A and BAir filter
A dirty air filter can cause carburetor malfunction, start problems, loss of engine power and wear to engine parts. It also makes the engine use more fuel than necessary. Clean the filter at an interval of 8 hours, or more frequently if the product is operated in a dusty environment.
Note: An engine adjustment can be necessary when the air filter has been cleaned or replaced. See To adjust the idle speed on page 22.
To clean and examine the air filter
- Remove the air filter.
natural_image
Technical line drawing of a mechanical device with internal components and a close-up view showing a component (no text or symbols)- Clean the felt air filter with compressed air.

CAUTION: Replace the felt air filter if it cannot be fully cleaned. Always replace a damaged felt air filter.
- Clean the inner surface of the air filter cover. Use compressed air or a brush.
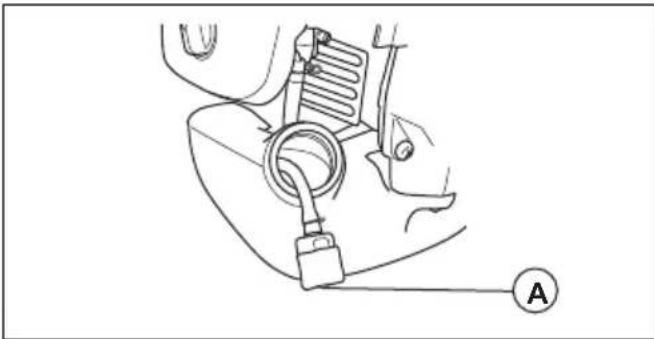
Fuel filter
When the engine runs short of fuel, make sure that the air hole in the fuel tank cap and the fuel filter (A) are clean.
natural_image
Mechanical component diagram showing a belt switch and valve assembly (no text or symbols)Bevel gear
The bevel gear is filled with the correct quantity of grease at the factory. But, before you use the product, make sure that the bevel gear is 3/4 full with grease. Use McCulloch special grease.

natural_image
Line drawing of a mechanical tool with a knob and lever mechanism (no text or symbols)It is not necessary to replace the grease in the bevel gear unless the bevel gear is repaired.
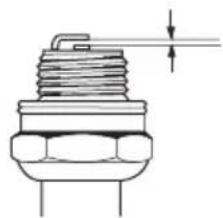
To examine the spark plug

CAUTION: Always use the recommended spark plug type. Incorrect spark plug type can cause damage to the product.
- Examine the spark plug if the engine is low on power, is not easy to start or does not operate correctly at idle speed.
• To decrease the risk of unwanted material on the spark plug electrodes, obey these instructions: a) Make sure that the idle speed is correctly adjusted.
b) Make sure that the fuel mixture is correct.
c) Make sure that the air filter is clean.
- If the spark plug is dirty, clean it and make sure that the electrode gap is correct, refer to Technical data on page 24.
natural_image
Technical line drawing of a mechanical component with threaded body and shaft (no text or symbols)- Replace the spark plug if it is necessary.
Technical data
| B40 B Elite B40 BT Elite | ||
| Engine | ||
| Cylinder displacement, cm3 | 40.1 40.1 | |
| Cylinder diameter, ∅ mm 40.5 40.5 | ||
| Cylinder stroke length, mm 31.1 31.1 | ||
| Idle speed, rpm 3000 3000 | ||
| Recommended max. speed, rpm 12000 12000 | ||
| Speed of output shaft, rpm 8220 8220 | ||
| Max. engine output, according to ISO 8893, kW @ rpm 1.5 @ 9000 1.5 @ 9000 | ||
| Ignition system | ||
| Spark plug NGK CMR7H-10 NGK CMR7H-10 | ||
| Electrode gap, mm | 0.9-1.0 | 0.9-1.0 |
| Fuel and lubrication system | ||
| Manufacturer/type of carburetor | Ruixing H225D- | Ruixing H225D- |
| Fuel tank capacity, l/cm3 | 1 / 1000 | 1 / 1000 |
| Weight | ||
| Without fuel, cutting attachment and guard, kg | 7.3 | 7.4 |
| Noise emissions1 | ||
| Sound power level, measured dB(A) | 112 | 112 |
| Sound power level, guaranteed LWA dB(A) | 118 | 118 |
| Noise levels ^2 Equivalent sound pressure level at the operator's ear, measured according to EN ISO 11806 and ISO 22868, dB(A), min./max. | ||
| Equipped with trimmer head (original) 100 100 | ||
| Equipped with grass blade (original) 99 99 | ||
| Equipped with saw blade (original) – 99 | ||
| Vibration levels ^3 Equivalent vibration levels ( a_hv,eq ) at handles, measured according to EN ISO 11806 and ISO 22867, m/s ^2 | ||
| Equipped with trimmer head (original), left / right 3.4 / 4.4 | 3.4 / 4.4 | |
| Equipped with grass blade (original), left / right 5.2 / 5.1 | 5.2 / 5.1 | |
| Equipped with saw blade (original), left / right – 4.5 / 4.2 | ||
| B40 B Elite, B40 BT Elite | ||
| Approved accessories Type Cutting attachment guard, Art. no. | ||
| Centre hole in blades/cutters, ∅ 25,4 mm | ||
| Output shaft thread M12 | ||
| Grass blade/grass cutter Grass blade | 255-4 1" (∅ 255 4-teeth) 580 30 50-01 | |
| Grass blade 255-3 (∅ 255 3 teeth) 580 | 30 50-01 | |
| Saw blade | Saw blade 200-22 (∅ 200-22 teeth) | 581 33 84-01 |
| Trimmer head | P35 | 580 30 50-01 |
| Support cup | Fixed | - |
EC Declaration of Conformity
Husqvarna AB, SE-561 82 Huskvarna, Sweden, tel: +46-36-146500, declares that the trimmer McCulloch B40 B Elite with serial numbers dating from 2021 onwards (the year is clearly stated on the rating plate, followed by the serial number), comply with the requirements of the COUNCIL'S DIRECTIVE:
• of May 17, 2006 "relating to machinery" 2006/42/EC
- of February 26, 2014 "relating to electromagnetic compatibility" 2014/30/EU
- of May 8, 2000 "relating to the noise emissions in the environment" 2000/14/EC. Conformity assessment according to Annex V. For information relating to noise emissions, see the Technical data chapter.
- of June 8, 2011 "on the restriction of the use of certain hazardous substances in electrical and electronic equipment" 2011/65/EU.
The following standards have been applied:
EN ISO 12100:2010, CISPR 12:2007+A1:2009, EN ISO 14982:2009, EN ISO 11806-1:2011, EN IEC 63000:2018
RISE SMP Svensk Maskinprovning AB, Box 7035, SE-750 07 Uppsala, Sweden has performed voluntary type examination on behalf of Husqvarna AB. The certificates are numbered: SEC/12/2339 - B40 B Elite, B40 BT Elite
RISE SMP Svensk Maskinprovning AB has also verified agreement with appendix V of the council's directive 2000/14/EG.
Huskvarna, 2020-08-25
text_image
P.M.d.u=Pär Martinsson, Development Manager (Authorized representative for Husqvarna AB and responsible for technical documentation)
Innehåll
Introduktion.... 27
Säkerhet.... 29
Montering....37
Drift.... 40
Underhåll.... 46
Tekniska data.... 49
text_image
Exploded view diagram of a mechanical device with numbered parts for identification and assembly reference.natural_image
Line drawing of a person in protective gear using a long-handled tool to clean vegetation, with a tree nearby (no text or symbols)natural_image
Line drawing of a helmet and safety goggles (no text or symbols)natural_image
Line drawing of a mechanical component or device with no visible text or symbolsnatural_image
Line drawing of a mechanical component or bracket (no text or symbols)natural_image
Line drawing of two types of gloves showing different grip positions (no text or symbols)natural_image
Line drawing of a pair of boots with visible tread pattern and buckles (no text or symbols)text_image
Diagram of a medical or laboratory device with labeled parts A and B, showing directional arrows indicating movement or force.natural_image
Line drawing of a handheld device with a scroll wheel and arrow indicator (no text or symbols)natural_image
Illustration of a handheld device with two directional arrows indicating movement or force (no text or symbols)natural_image
Illustration of a worker using a tool to install a mechanical component, with no visible text or symbols.Kontrollera stoppkontakten
natural_image
Line drawing of a medical or surgical device with a black arrow pointing to a component (no text or symbols present)natural_image
Technical line drawing of a mechanical tool or device with a curved blade and base mount (no text or symbols)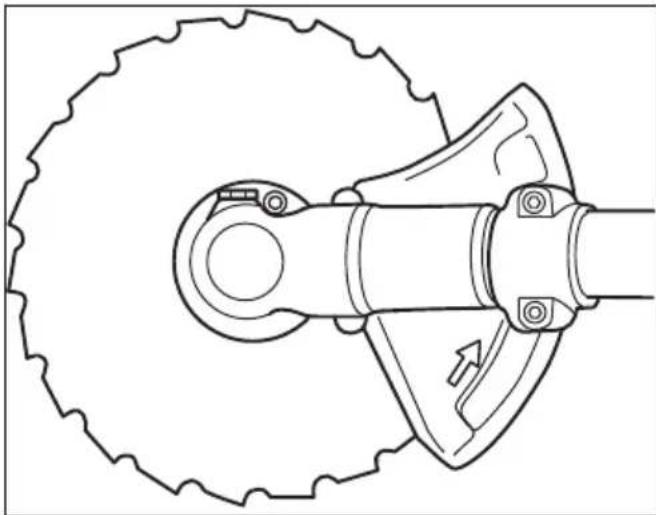
natural_image
Technical line drawing of a mechanical assembly with gear and shaft components (no text or symbols)Kontrollera avvibreringssystemet
natural_image
Technical line drawing of a mechanical device with no visible text or symbolsnatural_image
Line drawing of a person adjusting a belt buckle, showing two hands and a belt buckle (no text or symbols)Ljuddämpare

natural_image
Technical line drawing of a mechanical component with mounting holes and internal channels (no text or symbols)natural_image
Illustration of a hand operating a propeller with a nut, showing rotational motion (no text or symbols)
natural_image
Technical line drawing of two mechanical components: a gear-like circular component and a curved blade with mounting holes (no text or symbols)natural_image
Four abstract geometric shapes with no text or symbols, including triangular and rectangular forms (no text or symbols present)natural_image
Technical line drawings of two mechanical components: a circular component with internal rings and a triangular plate (no text or symbols)natural_image
Simple line drawing of a tool and a shield-like object with an arrow indicating direction (no text or symbols)natural_image
Diagram of a tool with a ruler and arrow indicating direction, no text or symbols presentnatural_image
Simple line drawing of a tool with a handle and arrow indicating direction (no text or symbols)
natural_image
Two diagrams showing a tool interacting with a shield-like shape, one with an arrow indicating direction (no text or symbols present)Fila sågklingan

natural_image
Illustration of a person in protective gear using a tool to measure bone structure, with an inset showing a close-up of the bone (no text or symbols present)natural_image
Pure mechanical component diagram without any text, numbers, or symbolsnatural_image
Diagram showing two mechanical components with directional arrows indicating movement or force (no text or symbols)
natural_image
Three technical illustrations of mechanical components: a circular component with cable, a rectangular plate with a circular cutout, and a coiled spring (no text or symbols)natural_image
Technical line drawing of a mechanical device with connectors and wiring (no text or symbols)natural_image
Two mechanical components with a no-smoking symbol, one plain and one with a circular cross (no text or labels)text_image
L A C A Btext_image
Technical diagram showing mechanical assembly steps with labeled components A, B, C, and Dnatural_image
Diagram of a mechanical device with labeled component E and directional arrow (no text or symbols beyond labels)text_image
Technical diagram showing mechanical assembly with labeled parts A through K, including a valve and adjustment mechanism.text_image
Technical diagram of a mechanical gear assembly with labeled components A through Gtext_image
Technical diagram showing gear meshing and wheel turning process with directional arrows indicating motionMontera transportskyddet
natural_image
Diagram of a circular mechanical component with internal segments and an inset showing a stepped mechanism (no text or symbols)Justera selen

natural_image
Illustration of a person wearing a headlamp and holding an object, with a downward arrow indicating motion (no text or symbols)natural_image
Illustration of a worker using a long-handled tool to clean or walk (no text or symbols present)text_image
Illustration showing fuel injection and discharge symbols with a uniformed officer holding a bag, accompanied by crossed-out containers.natural_image
Simple black-and-white icon showing a droplet and a fuel pump with a plus sign (no text or symbols)natural_image
Abstract diagram with curved lines and arrows, no readable text or symbols
natural_image
Simple line drawing of a boat with arrows indicating direction (no text or symbols)natural_image
Simple line drawing of a circular object with a downward arrow pointing to its center (no text or symbols)natural_image
Simple line drawing of a hexagonal nut with a curved arrow indicating rotation or cycle (no text or symbols)natural_image
Mechanical assembly diagram showing a motor and gear assembly with directional arrows (no text or labels)Starta motorn
natural_image
Technical line drawing of a mechanical device with a black arrow pointing to a component (no text or symbols present)natural_image
Technical line drawing of a mechanical device with a close-up inset showing a labeled component (no text or symbols present)
natural_image
Technical line drawing of a handheld device with a scroll wheel and handle (no text or symbols)natural_image
Illustration of a worker in safety gear handling a tool (no text or symbols visible)natural_image
Line drawing of a medical or laboratory device with a black arrow pointing to a component (no text or symbols present)Kast
flowchart
graph TD
    A["Root"] --> B["Leaf 1"]
    B --> C["Leaf 2"]
    C --> D["Leaf 3"]
    D --> E["Leaf 4"]
    E --> F["Leaf 5"]
    F --> G["Leaf 6"]
    G --> H["Leaf 7"]
    H --> I["Leaf 8"]
    I --> J["Leaf 9"]
    J --> K["Leaf 10"]
    K --> L["Leaf 11"]
    L --> M["Leaf 12"]
    M --> N["Leaf 13"]
    N --> O["Leaf 14"]
    O --> P["Leaf 15"]
    P --> Q["Leaf 16"]
    Q --> R["Leaf 17"]
    R --> S["Leaf 18"]
    S --> T["Leaf 19"]
    T --> U["Leaf 20"]
natural_image
Line drawing of a person walking on a path with trees and a dashed line indicating a path (no text or symbols)natural_image
Illustration showing a tree planting with a tool and a person observing (no text or symbols)natural_image
Illustration showing a tree planting a sapling with an arrow indicating direction, and a stick figure holding a ball (no text or symbols)natural_image
Simple line drawing of a person pulling a rope with a downward arrow, no text or symbols presentFälla stora träd
natural_image
Simple line drawing showing a tree stump and a person holding a tree with a circular pattern (no text or symbols)natural_image
Diagram showing a gear cutting through a wooden mill with a moving tool, and a tree trunk being pulled by a pulley (no text or symbols)
natural_image
Illustration of a person using a tool to spread soil or vegetation around a central plant with arrows indicating flow direction (no text or symbols)natural_image
Illustration of a hand using a pulley to measure a pine tree (no text or symbols)natural_image
Simple line drawing of a grassy field with a small tool or scraper (no text or symbols)natural_image
Simple line drawing of a grassy field with a tool and a small object, no text or symbols present.Rensa gräs
natural_image
Simple line drawing of a grassy field with a small circular object at the top (no text or symbols)natural_image
Illustration of a person using a mechanical device with motion arrows indicating direction (no text or symbols)Sopa gräset
natural_image
Technical diagram of a mechanical device with labeled component T and rotational arrows (no text or symbols beyond label)natural_image
Technical line drawing of a mechanical component with internal cavities and mounting holes (no text or symbols)natural_image
Technical line drawing of a mechanical assembly with a housing and clamping mechanism (no text or symbols)text_image
Technical diagram of a mechanical device with labeled parts A and BLuftfilter
natural_image
Technical line drawing of a mechanical assembly with a component and a separate motor (no text or symbols)natural_image
Mechanical assembly diagram showing a valve inserted into a car seat, with no visible text or symbolsVinkelväxel
natural_image
Technical line drawing of a mechanical tool or device with a knob and lever (no text or symbols)natural_image
Technical line drawing of a mechanical component with threaded body and bolted base (no text or symbols)Tekniska data
text_image
Exploded view diagram of a mechanical device with numbered parts for identification and assembly reference.natural_image
Line drawing of a person wearing protective gear using a long-handled tool to walk outdoors near a tree (no text or symbols)natural_image
Line drawing of a helmet and helmet with a flat blade (no text or symbols)natural_image
Line drawing of a human pelvic bone (no text or labels)natural_image
Line drawing of a mechanical component or device with no visible text or symbolsnatural_image
Line drawing of two human gloves with bandages and straps (no text or symbols)natural_image
Line drawing of a pair of boots with visible tread pattern and buckles (no text or symbols)text_image
Diagram of a handheld device with labeled parts A and B, showing directional arrows indicating movement or force.natural_image
Line drawing of a handheld device with a scroll wheel and arrow indicator (no text or symbols)natural_image
Diagram of a medical or surgical device with two directional arrows indicating movement or force (no text or symbols present)natural_image
Illustration of a worker using a tool to cut a block, with an arrow indicating the process (no text or symbols present)Sådan kontrolleres stopkontakten
natural_image
Line drawing of a medical or surgical device with a black arrow pointing to a component (no text or symbols present)natural_image
Technical line drawing of a mechanical tool or clamp assembly (no text or symbols)
natural_image
Technical line drawing of a mechanical assembly with gear and shaft components (no text or symbols)Sådan kontrolleres vibrationsdæmpningssystemet
natural_image
Technical line drawing of a mechanical device with no visible text or symbolsnatural_image
Line drawing of a person adjusting a belt buckle, showing two black arrows indicating clockwise motion (no text or symbols)Lyddæmper
natural_image
Technical line drawing of a mechanical component with mounting holes and internal cavities (no text or symbols)natural_image
Illustration of a hand turning a propeller with a nut, showing rotational motion (no text or symbols)
natural_image
Two technical line drawings of mechanical components: a circular gear-like part and a curved blade with internal circular features (no text or symbols)natural_image
Four abstract geometric shapes with circular centers, no text or symbols presentnatural_image
Technical line drawings of two mechanical components: a circular component with internal structure and a triangular plate with mounting holes (no text or symbols)natural_image
Simple line drawing of a tool interacting with a shield-like object (no text or symbols)natural_image
Simple line drawing of a tool and a mechanical part with an arrow indicating direction (no text or symbols)natural_image
Diagram showing two mechanical tool configurations with arrows indicating movement or force direction (no text or symbols)natural_image
Illustration of a person in protective gear using a tool to extend a tree trunk, with a close-up inset showing the same tree (no text or symbols present)natural_image
Simple line drawing of a mechanical clamp or bracket (no text or symbols)natural_image
Diagram showing two mechanical components with arrows indicating direction of movement (no text or symbols)
natural_image
Three technical illustrations of mechanical components: a cylindrical device, a circular component with a handle, and a spool (no text or symbols)natural_image
Technical line drawing of a mechanical device with wires and connectors (no text or symbols)Sådan monteres knive og trimmerhoveder

natural_image
Two technical diagrams showing a mechanical component with a no-smoking symbol above its side (no text or labels present)text_image
L A C A Btext_image
Technical diagram showing mechanical assembly with labeled parts A and B, including a magnified inset view of a tool interacting with a component.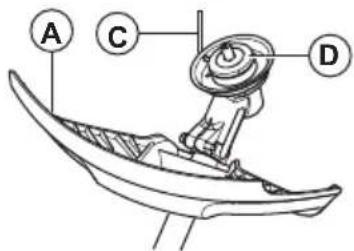
text_image
A C Dnatural_image
Diagram of a mechanical device with labeled component E and directional arrow (no text or symbols beyond labels)text_image
Technical diagram of mechanical components with labeled parts A through K, showing assembly or assembly sequence.text_image
Technical diagram of a mechanical gear assembly with labeled components A through Gnatural_image
Hand holding a gear with a rotating wheel and a tool, showing motion direction (no text or symbols)
natural_image
Mechanical gear assembly diagram showing a wheel and shaft with directional arrows (no text or labels)Sådan monteres transportbeskyttelsen
- Monter transportbeskyttelsen på klingen som vist på billedet.

natural_image
Diagram of a circular mechanical component with internal structure and magnified detail showing internal components (no text or symbols)Sådan justeres selen
natural_image
Illustration of a person wearing a headlamp and holding an object, with a black arrow indicating direction (no text or symbols)natural_image
Illustration of a person using a manual power shaver (no text or symbols present)text_image
Safety warning illustration showing a worker spraying water from a fuel can and another with no warning symbols.natural_image
Simple black icon of a fuel pump with a droplet and plus sign, no text or symbols present.natural_image
Three abstract line drawings showing directional arrows and shapes, no text or symbols presentnatural_image
Simple line drawing of a circular component with a downward arrow pointing to its center (no text or symbols)natural_image
Diagram of a hex nut with a curved arrow indicating rotational motion (no text or symbols)natural_image
Technical line drawing of a mechanical device with directional arrows indicating movement (no text or symbols)Sådan startes motoren
natural_image
Line drawing of a mechanical device with a black arrow pointing to a component (no text or symbols present)- Sæt chokerarmen i chokerstilling.
natural_image
Technical line drawing of a mechanical device with a labeled inset showing a cross-section (no text or symbols present)
natural_image
Line drawing of a handheld device with a scroll and handle, showing no text or symbolsnatural_image
Illustration of a worker in safety gear handling equipment (no text or symbols visible)natural_image
Technical line drawing of a handheld device with a scroll wheel and handle (no text or symbols)Kickback
natural_image
Line drawing of a person walking on a path with trees and a dashed line indicating a path (no text or symbols)• Gå langs skråninger, ikke op og ned.
natural_image
Illustration showing a tree planting with a shovel and a person holding a ball (no text or symbols)natural_image
Illustration showing a tree pruning method and a person using a net to reach (no text or symbols)natural_image
Simple line drawing of a person pulling a rope with a downward arrow, no text or symbols presentnatural_image
Simple line drawing showing a tree stump and a gear cutter cutting through a circular saw (no text or symbols)natural_image
Illustration showing a hand operating a wooden cutter through a gear slot and a tree with a tool, both without any text or symbols.
natural_image
Illustration of a person using a tool to spread soil or vegetation around a central plant with arrows indicating flow direction (no text or symbols)natural_image
Illustration of a hand operating a tool with a pointed tool, next to a pine tree (no text or symbols)natural_image
Simple line drawing of a grassy field with a small tool or scraper (no text or symbols)natural_image
Simple line drawing of a grassy field with a tool, no text or symbols presentSådan ryddes græs
natural_image
Simple line drawing of a grassy field with a small utility pole and a flatbed base (no text or symbols)natural_image
Illustration of a person wearing protective gear holding a long pole with a rotating wheel, connected by a dashed arrow indicating direction (no text or symbols)Sådan fejes græsset
natural_image
Technical line drawing of a mechanical device with labeled component 'T' and circular motion arrows (no text or symbols beyond label)natural_image
Technical line drawing of a mechanical housing component (no text or symbols)natural_image
Technical line drawing of a mechanical assembly with a housing and clamping mechanism (no text or symbols)text_image
Technical diagram of a mechanical device with labeled parts A and BLuftfilter
natural_image
Technical line drawing of a mechanical assembly with a component and a separate view (no text or symbols)natural_image
Technical line drawing of a mechanical component with a labeled connection point (A), no readable text or symbols present.Vinkelgear
natural_image
Technical line drawing of a mechanical tool or device with a black arrow pointing to a component (no text or symbols present)natural_image
Technical line drawing of a spark plug with threaded shaft and mounting base (no text or symbols)text_image
Exploded view diagram of a mechanical device with numbered parts for identification and assembly reference.natural_image
Line drawing of a person in protective gear using a long-handled tool to clean grass near a tree (no text or symbols)natural_image
Line drawing of a helmet and seat assembly (no text or symbols)natural_image
Line drawing of a pelvic bone structure (no text or labels)natural_image
Line drawing of a mechanical component or bracket (no text or symbols)natural_image
Line drawing of two types of gloves showing different grip positions (no text or symbols)natural_image
Line drawing of a pair of boots with visible tread pattern and buckle (no text or symbols)text_image
Diagram of a medical or laboratory device with labeled parts A and B, showing directional arrows indicating movement or force.natural_image
Line drawing of a handheld device with a black arrow pointing to a section (no text or symbols)natural_image
Technical line drawing of a handheld device with two directional arrows indicating movement or force (no text or symbols)natural_image
Illustration of a worker using a tool to install a mechanical component, with no visible text or symbols.natural_image
Line drawing of a handheld device with a black arrow pointing to the left side (no text or symbols)Terälaitteen suojus
natural_image
Line drawing of a mechanical tool or tool with a curved blade and base mount (no text or symbols)
natural_image
Technical line drawing of a mechanical assembly with gear and shaft components (no text or symbols)natural_image
Technical line drawing of a mechanical device with no visible text or symbolsnatural_image
Illustration of a person adjusting a seatbelt with arrows indicating motion (no text or symbols)Äänenvaimennin

natural_image
Technical line drawing of a mechanical housing or enclosure component (no text or symbols)natural_image
Illustration of a hand turning a propeller with a nut, showing rotational motion (no text or symbols)natural_image
Two technical line drawings of mechanical components: a circular gear-like part and a curved blade with mounting holes (no text or symbols)natural_image
Four abstract geometric shapes with varying line styles and dot patterns, no text or symbols present.natural_image
Technical line drawings of two mechanical components: a circular component with internal rings and a triangular housing (no text or symbols)natural_image
Simple line drawing of a gridded tool and a shield-like object with an arrow indicating direction (no text or symbols)natural_image
Diagram showing a tool interacting with a mechanical part, no text or symbols presentnatural_image
Simple line drawing of a tool with a handle and arrow indicating direction (no text or symbols)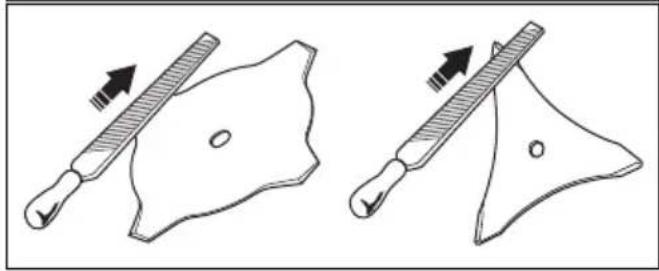
natural_image
Two diagrams showing a tool interacting with a shield-like object, one with an arrow indicating direction (no text or symbols)natural_image
Illustration of a person in protective gear using a tool to cut a tooth, with an inset showing the same tooth (no text or symbols present)natural_image
Pure mechanical component diagram without any text, numbers, or symbolsnatural_image
Diagram showing two mechanical components with arrows indicating direction of movement (no text or symbols)
natural_image
Three technical line drawings of mechanical components: a cylindrical device, a rectangular plate with a circular cutout, and a spool (no text or symbols)natural_image
Technical line drawing of a mechanical device with connectors and wiring (no text or symbols)natural_image
Two technical diagrams showing a mechanical component with a no-smoking symbol above it, no text or labels present.text_image
L A C A Btext_image
Technical diagram illustrating mechanical assembly steps with labeled components A, B, C, and Dnatural_image
Diagram of a mechanical device with labeled component E and directional arrow (no text or symbols beyond labels)text_image
Technical diagram of a mechanical assembly with labeled parts A through K, including a valve and adjustment mechanism.text_image
Technical diagram of a mechanical gear assembly with labeled components A through Gtext_image
Technical diagram showing gear meshing and mechanical assembly steps with directional arrows indicating motionnatural_image
Technical line drawing of a circular mechanical component with internal segments and an inset showing a detail (no text or symbols)natural_image
Line drawing of a person with a headband and arrow indicating direction (no text or symbols)natural_image
Illustration of a person using a long-handled tool, no text or symbols presenttext_image
Safety warning illustration showing fuel injection and hazard symbols for a person holding a bottlenatural_image
Simple black-and-white icon showing a droplet and a fuel pump with a plus sign (no text or symbols)natural_image
Three abstract line drawings showing directional arrows and curved shapes, no text or symbols presentnatural_image
Simple line drawing of a circular component with a downward arrow pointing to its center (no text or symbols)natural_image
Diagram of a hex nut with a curved arrow indicating rotational motion (no text or symbols)natural_image
Line drawing of a robotic arm with attached sensors and a belt, showing motion direction (no text or symbols)natural_image
Technical line drawing of a mechanical device with a highlighted component (no text or symbols)natural_image
Technical line drawing of a mechanical device with a close-up inset showing a component (no text or symbols)
natural_image
Line drawing of a medical or surgical device with a black arrow pointing to a specific component (no text or symbols present)natural_image
Illustration of a worker in safety gear using a tool on a block (no text or symbols)natural_image
Line drawing of a handheld device with a knob and arrow indicator (no text or symbols)Takapotku
natural_image
Line drawing of a person walking on a path with trees and a curved road (no text or symbols)natural_image
Illustration showing a hand operating a tree with an arrow indicating direction, and a stick figure holding a ball (no text or symbols)natural_image
Illustration showing a tree planting a sapling with an arrow indicating direction, and a person reaching for a ball (no text or symbols)natural_image
Simple line drawing of a person pushing a large gear with a downward arrow (no text or symbols)natural_image
Simple line drawings of a tree stump and a person with a circular saw (no text or symbols)natural_image
Diagram showing a gear cutter cutting through a wooden mill with a moving tool, and a tree trunk being pulled by a tool (no text or symbols present)
natural_image
Illustration of a person using a manual tool to spread soil or vegetation around a central plant (no text or symbols)natural_image
Illustration of a hand using a pulley to measure a pine cone (no text or symbols)natural_image
Simple line drawing of a grassy field with a small tool, no text or symbols presentnatural_image
Simple line drawing of a grassy field with a shovel and stick, no text or symbols presentRuohon raivaaminen
natural_image
Simple line drawing of a grassy field with a small mechanical component at the base (no text or symbols)natural_image
Illustration of a person using a mechanical device with motion arrows indicating direction (no text or symbols)Ruohon lakaisminen
natural_image
Technical line drawing of a mechanical device with labeled component 'T' and rotational arrows (no text or symbols beyond label)natural_image
Technical line drawing of a mechanical housing or enclosure component (no text or symbols)natural_image
Mechanical assembly diagram showing a component being inserted into a clamping device (no text or labels)text_image
Technical diagram of a mechanical device with labeled parts A and BIlmansuodatin
natural_image
Technical line drawing of a mechanical assembly with a component and a separate view (no text or symbols)natural_image
Mechanical assembly diagram showing a belt switch connected to a car wheel (no text or symbols)Kulmavaihde
natural_image
Technical line drawing of a mechanical tool or device with a knob and lever mechanism (no text or symbols)natural_image
Technical line drawing of a mechanical component with threaded body and central shaft (no text or symbols)text_image
Exploded view diagram of a mechanical device with numbered parts for identification and assembly reference.natural_image
Line drawing of a person in protective gear using a long tool to clean grass near a tree (no text or symbols)natural_image
Line drawing of a helmet with a pair of goggles (no text or symbols)natural_image
Line drawing of a mechanical component or bracket (no text or symbols)natural_image
Line drawing of a mechanical component or device with no visible text or symbolsnatural_image
Line drawing of two human gloves with bandages and shaded areas (no text or symbols)natural_image
Line drawing of a pair of boots with visible tread pattern and side clasp (no text or symbols)text_image
Diagram of a handheld device with labeled parts A and B, showing directional arrows indicating movement or force.- Kontroller at gassregulatoren er låst i tomgangsstilling när gassregulatorsperren slippes.
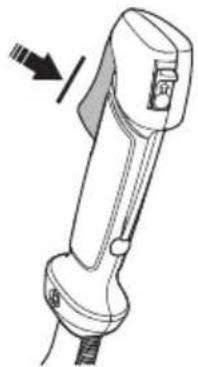
natural_image
Line drawing of a handheld device with a black arrow pointing to the left side (no text or symbols)natural_image
Diagram of a handheld device with directional arrows indicating movement or force (no text or symbols)natural_image
Illustration of a worker using a tool to adjust equipment, with no visible text or symbolsSlik kontrollerer du stoppbryteren
natural_image
Line drawing of a medical or surgical device with a black arrow pointing to a specific component (no text or symbols present)natural_image
Technical line drawing of a mechanical tool or clamp assembly (no text or symbols)
natural_image
Technical line drawing of a mechanical assembly with gear and shaft components (no text or symbols)Slik kontrollerer du avvibreringssystemet
natural_image
Technical line drawing of a mechanical device with no visible text or symbolsnatural_image
Illustration of a person adjusting a seatbelt with arrows indicating motion (no text or symbols)Lyddemper

natural_image
Technical line drawing of a mechanical housing or enclosure component (no text or symbols)- Ikke bruk en motor med defekt lyddemper. En defekt lyddemper øker lydnivået og brannfaren. Ha et brannslukningsapparat i nærheten.
- Kontroller regelmessig at lyddemperen er koblet til produktet.
- Ikke berør motoren eller lyddemperen når motoren er på. Ikke berør motoren eller lyddemperen på en stund etter at motoren har stoppet. Varme overflater kan forårsake personskade.
- En varm lyddemper kan forårsake brann. Vær forsiktig hvis du bruker produktet i nærheten av brennbare vesker eller damp.
- Ikke berør delene i lyddemperen hvis lyddemperen er skadet. Delene kan inneholde noen kreftframkallende kjemikalier.
- Rengjør gnistfangeren med jevne mellomrom hvis produktet har gnistfanger.
natural_image
Illustration of a hand turning a propeller with a nut, showing rotational shift (no text or symbols)
natural_image
Two technical line drawings of mechanical components: a circular gear-like part and a curved blade-like component with internal features (no text or symbols)natural_image
Four abstract geometric shapes with varying line styles and fill patterns, no text or symbols present.natural_image
Technical line drawings of two mechanical components: a circular component with a curved handle and a triangular plate with internal cutouts (no text or symbols)natural_image
Simple line drawing of a tool and a shield-like object with an arrow indicating direction (no text or symbols)natural_image
Diagram of a tool interacting with a mechanical part, showing a lever and blade (no text or symbols)- Ikke bruk skadet skjæreutstyr.
- Fest transportbeskyttelsen på klingen när du transporterer eller oppbevarer produktet.
natural_image
Line drawing of a tool with a handle and arrow indicating direction (no text or symbols)
natural_image
Two diagrams showing a tool interacting with a shield-like shape, one with an arrow indicating direction (no text or symbols)Slik sliper du sagklingen

ADVARSEL: Stopp motoren. Bruk vernehansker.
natural_image
Illustration of a person in protective gear holding a tool, with an inset showing a close-up of a tooth (no text or symbols present)- Bruk en 5,5 mm rundfil sammen med filholder.
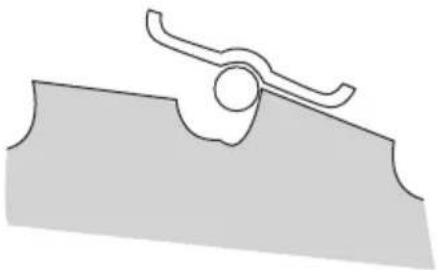
natural_image
Pure mechanical component diagram without any text, numbers, or symbols- Hold filen i en vinkel på 15 grader.
natural_image
Diagram showing two mechanical components with arrows indicating motion direction (no text or symbols)
natural_image
Three technical line drawings of mechanical components: a cylindrical device, a circular component with a handle, and a spool (no text or symbols)- Bruk bare anbefalte trimmerhoder og trimmerträder.
- Bruk bare anbefalt skjæreutstyr.
- En mindre maskin krever små trimmerhoder og omvendt.
- Trimmertrådens lengde er viktig. En lengre trimmertråd krever større motorstyrke enn en kort trimmertråd med samme diameter.
- Se etter at kniven som sitter på trimmerskjermen er intakt. Dette kutter trimmertråden til riktig lengde.
- Bløtlegg trimmertråden i vann i et par dager før bruk. Dette øker levetiden.
Brennstoffsikkerhet
- Ikke start produktet hvis det er drivstoff eller motorolje på produktet. Fjern uønsket drivstoff/olje, og la produktet tørke. Fjern uønsket drivstoff fra produktet.
- Skift klær umiddelbart hvis du söler drivstoff på klærne.
- Ikke få drivstoff på kroppen, det kan føre til personskade. Bruk säpe og vann for å fjerne drivstoff hvis du får drivstoff på kroppen.
- Ikke start motoren hvis du söler olje eller drivstoff på produktet eller på kroppen din.
- Ikke start produktet hvis motoren lekker. Kontroller motoren for lekkasjer med jevne mellomrom.
- Vær forsiktig med drivstoff. Drivstoff er brannfarlig, og avgassene er eksplosive og kan forårsake personskade eller død.
- Ikke pust inn bensindamp, det kan føre til personskade. Pass på at det er tilstrekkelig luftstrøm.
- Du må ikke røyke i nærheten av drivstoff eller motoren.
- Ikke sett varme gjenstander i nærheten av drivstoff eller motoren.
-
Ikke fyll på drivstoff när motoren er på.
-
Kontroller at motoren er avkjølt før du fyller på drivstoff.
- Åpne tanklokket sakte og slipp ut trykket forsiktig før du fyller.
- Ikke fyll drivstoff på motoren innendørs. Utilstrekkelig luftstrøm kan føre til personskade eller død på grunn av kveling eller karbonmonoksidforgiftning.
- Trekk til lokket på drivstofftanken forsiktig. Brann kan oppstå hvis du ikke gjør dette.
- Flytt produktet minst 3 m fra stedet du fylte tanken før du starter det.
- Ikke fyll for mye drivstoff på tanken.
- Kontroller at det ikke oppstår lekkasjer när du flytter produktet eller bensinkannen.
- Ikke plasser produktet eller en drivstoffbeholder i nærheten av åpen flamme, gnister eller pilotflamme.
natural_image
Technical line drawing of a mechanical device with connectors and wiring (no text or symbols)natural_image
Two technical diagrams showing a mechanical component with a no-smoking symbol, no text or labels present.Slik installerer du bladbeskyttelsen, gressklingen og gresskniven

text_image
L A C A Btext_image
Technical diagram of a mechanical component with labeled parts A through H, showing exploded view and assembly details.text_image
Technical diagram showing mechanical assembly steps with labeled components A, B, C, and Dnatural_image
Diagram of a mechanical device with labeled component E and directional arrow (no text or symbols beyond labels)text_image
H J K I L A-
Installer medbringerhjulet (B) på den utgående akselen.
-
Vri rundt klingeakselen til ett av hullene i medbringeren stemmer overens med tilsvarende hull i girhuset.
-
Før låsepinnen (C) inn i hullet slik at akselen låses.
-
Plasser klingen (D) og støtteflensen (F) på den utgående akselen.
-
Sett på mutteren (G). Mutteren trekkes til med et moment på 35–50 Nm (3,5–5 kpm). Bruk pipenøkkelen i verktøysettet. Hold i nøkkelens skaft så nær bladbeskyttelsen som mulig. Mutteren trekkes til när nøkkelen føres mot.
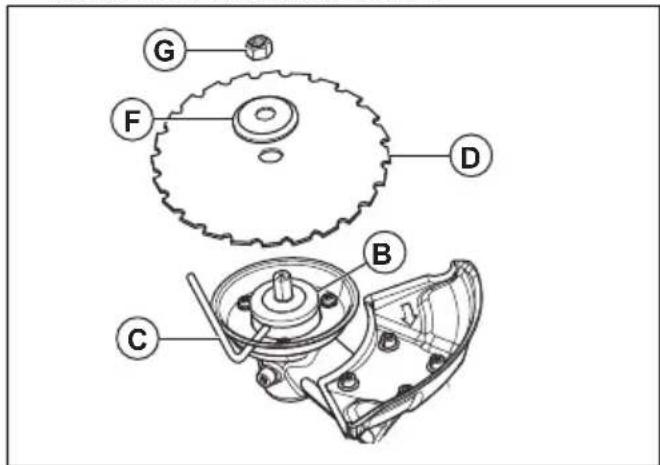
text_image
Technical diagram of a mechanical gear assembly with labeled components A through Gtext_image
Technical diagram showing gear meshing and tool path changes, with Chinese annotations indicating motion direction.Slik fester du transportbeskyttelsen
natural_image
Diagram of a circular mechanical component with internal segments and an inset showing a stepped mechanism (no text or symbols)Slik justerer du selen

natural_image
Line drawing of a person with a headband and facial expression, showing a downward arrow (no text or symbols)natural_image
Illustration of a person using a long-handled tool, no text or symbols presenttext_image
Safety warning illustration showing fuel injection and discharge with incorrect symbols for no errors- Fyll halve drivstoffmengden i en ren beholder for drivstoff.
- Tilsett all oljen.
- Rist drivstoffblandingen.
- Fyll resten av bensinen på beholderen.
- Rist drivstoffblandingen forsiktig.

OBS: Ikke bland drivstoff for mer enn én måned om gangen.
Slik fyller du drivstofftanken

natural_image
Simple black icon showing a fuel pump with a droplet and plus sign, symbolizing fuel efficiency or energy addition (no text or symbols)natural_image
Simple line drawing with arrows indicating direction of movement (no text or symbols)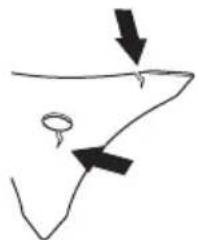
natural_image
Simple line drawing of a curved surface with two arrows pointing downward and one with a small circle (no text or symbols)natural_image
Simple line drawing of a circular component with a downward arrow pointing to its center (no text or symbols)natural_image
Simple line drawing of a hexagonal nut with a curved arrow indicating rotation or cycle (no text or symbols)natural_image
Technical line drawing of a mechanical device with no visible text or symbolsSlik starter du motoren
natural_image
Technical line drawing of a mechanical device with internal components and a black arrow indicating a specific part (no text or symbols present)- Flytt choke-hendelen til choke-stillingen.

natural_image
Technical line drawing of a mechanical device with a close-up inset showing a labeled component (no text or symbols present)
natural_image
Line drawing of a handheld device with a black arrow pointing to the left side (no text or symbols present)- Hold produktet på bakken med venstre hånd.
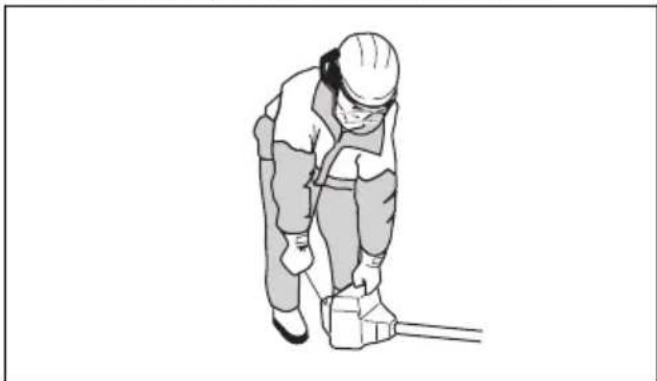
natural_image
Illustration of a worker in safety gear using a tool on a block (no text or symbols)natural_image
Illustration showing a tree planting a sapling with an arrow indicating direction, and a person holding a ball near a tree (no text or symbols)natural_image
Simple line drawing of a person pulling a rope with a downward arrow, no text or symbols presentnatural_image
Simple line drawings of a tree stump and a gear cutter (no text or symbols)natural_image
Illustration showing a person cutting wood with a magnified inset showing the blade and gear (no text or symbols)
natural_image
Illustration of a person using a tool to spread soil or vegetation around a central plant with arrows indicating flow (no text or symbols)natural_image
Illustration of a person using a pulley system to measure a tree trunk (no text or symbols present)natural_image
Simple line drawing of a grassy field with a small tool or scraper (no text or symbols)natural_image
Simple line drawing of a grassy field with a shovel and stick, no text or symbols presentSlik rydder du gress
natural_image
Simple line drawing of a grassy field with a small utility pole and a central support structure (no text or symbols)-
Ikke dytt trimmerhodet ned i bakken. Dette kan skade produktet.
-
Flytt produktet fra side til side när du klipper gresset. Bruk fullt turtall.

natural_image
Illustration of a person holding a mechanical device with a dashed arrow indicating motion (no text or symbols)Slik samler du opp gresset
natural_image
Technical line drawing of a mechanical component with mounting holes and internal cavities (no text or symbols)natural_image
Technical diagram of a mechanical assembly showing a housing and clamping mechanism (no text or labels)text_image
Technical diagram of a mechanical device with labeled parts A and BLuftfilter
natural_image
Technical line drawing of a mechanical assembly with no visible text or symbolsnatural_image
Technical line drawing of a mechanical component with a belt switch and labeled point A (no text or symbols beyond label)Vinkelgir
Vinkelgiret leveres fra fabrikken fylt med en passende mengde fett. Før du bruker produktet, må du sørge for at vinkelgiret er 3/4 fullt med fett. Bruk McCulloch spesialfett.

natural_image
Line drawing of a mechanical tool with a knob and lever mechanism (no text or symbols)Det er ikke nødvendig å skifte ut fettet i vinkelgiret med mindre vinkelgiret repareres.
Kontrollere tennpluggen

OBS: Bruk alltid anbefalt type tennplugg.
Feil tennpluggtype kan føre til skade på produktet.
natural_image
Technical line drawing of a spark plug with threaded shaft and mounting base (no text or symbols)text_image
Exploded view diagram of a mechanical device with numbered parts for identification and assembly reference.natural_image
Line drawing of a person in protective gear spraying water with a tree nearby (no text or symbols)natural_image
Line drawing of a helmet with visor and cap (no text or symbols)natural_image
Line drawing of a mechanical component or bracket (no text or symbols)natural_image
Line drawing of a mechanical component or device with no visible text or symbolsnatural_image
Line drawing of a boots with visible tread pattern and buckles (no text or symbols)text_image
Diagram of a medical or laboratory device with labeled parts A and B, showing directional arrows indicating movement or force.natural_image
Line drawing of a handheld device with a scroll wheel and arrow indicator (no text or symbols)natural_image
Diagram of a handheld device with two directional arrows indicating movement or force (no text or symbols present)natural_image
Illustration of a worker using a tool to adjust equipment, with no visible text or symbolsnatural_image
Line drawing of a handheld device with a black arrow pointing to the handle (no text or symbols)natural_image
Technical line drawings of mechanical components, including a saw blade and wheel assembly (no text or symbols)natural_image
Technical line drawing of a mechanical device with no visible text or symbolsnatural_image
Line drawing of a person adjusting a belt buckle, showing two hands and one belt buckle (no text or symbols)Silencieux

natural_image
Technical line drawing of a mechanical component with mounting holes and internal cavities (no text or symbols)natural_image
Illustration of a hand turning a propeller with a nut, showing rotational motion (no text or symbols)
natural_image
Two technical line drawings: a gear-like circular component and a curved mechanical part with internal features (no text or symbols)natural_image
Four abstract geometric shapes with no text or symbols: triangular, rectangular, and irregular (no text or symbols present)natural_image
Technical line drawings of two mechanical components: a circular component with curved ends and a triangular plate with cutouts (no text or symbols)natural_image
Diagram showing a grater blade and a shield with an arrow indicating direction (no text or symbols)natural_image
Diagram of a tool interacting with a mechanical part, showing a force arrow and circular hole (no text or symbols)natural_image
Simple line drawing of a cleaver with an arrow indicating compression or shift (no text or symbols)
natural_image
Simple line drawing of a tool interacting with a shield-like shape (no text or symbols)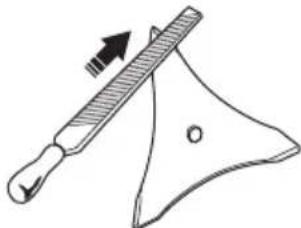
natural_image
Simple line drawing of a triangular tool with an arrow indicating direction (no text or symbols)natural_image
Illustration of a person in protective gear using a tool to measure bone structure, with an inset showing a close-up of the tooth (no text or symbols present)natural_image
Simple line drawing of a mechanical component or bracket (no text or symbols)natural_image
Diagram showing two mechanical components with arrows indicating motion direction (no text or symbols)
natural_image
Three technical illustrations of mechanical components: a circular brush, a rectangular plate with a circular cutout, and a spool (no text or symbols)natural_image
Technical line drawing of a mechanical device with connectors and wiring (no text or symbols)natural_image
Two technical diagrams showing a mechanical component with a prohibition symbol (no text or labels present)text_image
L A C A Btext_image
Technical diagram of a mechanical component with labeled parts A through H, showing exploded view and assembly details.text_image
Technical diagram showing mechanical assembly steps with labeled components A, B, C, and Dnatural_image
Technical line drawing of a mechanical component with labeled point E and directional arrow (no text or symbols beyond basic diagram)text_image
Technical diagram of a mechanical device with labeled parts including H, J, K, I, L, and A.text_image
Technical diagram of a mechanical assembly with labeled parts including gears, shafts, and housing componentsnatural_image
Technical illustration showing two mechanical assembly steps: top shows gear wheel turning with rotation arrow, bottom shows gear wheel with clockwise adjustment (no text or symbols)Pour fixer la protection de transport
natural_image
Diagram of a circular mechanical component with internal segments and an inset showing a fastening mechanism (no text or symbols)natural_image
Line drawing of a person in traditional attire with a headband and facial expression (no text or symbols)natural_image
Illustration of a person using a handheld power tool (no text or symbols present)natural_image
Simple black-and-white icon showing a droplet and a fuel pump with a plus sign (no text or symbols)natural_image
Three abstract line diagrams showing directional arrows and curved shapes, no text or symbols presentnatural_image
Simple line drawing of a circular object with a downward arrow pointing to its center (no text or symbols)natural_image
Simple line drawing of a hexagonal nut with a curved arrow indicating rotation or cycle (no text or symbols)natural_image
Line drawing of a medical or laboratory device with a black arrow pointing to a component (no text or symbols present)Rebond de la lame
flowchart
graph TD
    A["Root"] --> B["Leaf 1"]
    B --> C["Leaf 2"]
    C --> D["Leaf 3"]
    D --> E["Leaf 4"]
    E --> F["Leaf 5"]
    F --> G["Leaf 6"]
    G --> H["Leaf 7"]
    H --> I["Leaf 8"]
    I --> J["Leaf 9"]
    J --> K["Leaf 10"]
    K --> L["Leaf 11"]
    L --> M["Leaf 12"]
    M --> N["Leaf 13"]
    N --> O["Leaf 14"]
    O --> P["Leaf 15"]
    P --> Q["Leaf 16"]
    Q --> R["Leaf 17"]
    R --> S["Leaf 18"]
    S --> T["Leaf 19"]
    T --> U["Leaf 20"]
natural_image
Line drawing of a person walking on a path with trees and a dashed line indicating a path (no text or symbols)natural_image
Illustration showing a person digging with a shovel and a tree, next to a person holding a ball (no text or symbols)natural_image
Simple line drawing of a tree stump with a shovel and a person holding a circular object (no text or symbols)natural_image
Simple line drawing of a person pushing a large circular object with a downward arrow, no text or symbols present.natural_image
Simple line drawing showing a tree stump and a person with a circular saw (no text or symbols)natural_image
Illustration showing a person cutting wood with a magnified inset showing the blade and texture (no text or symbols)
REMARQUE: Si la lame
natural_image
Illustration of a person spraying plants with a tool, showing leaves and roots (no text or symbols)natural_image
Illustration of a person using a pulley system to measure a pine tree (no text or symbols present)natural_image
Simple line drawing of a grassy slope with a small plow and tool (no text or symbols)natural_image
Simple line drawing of a grassy field with a small plow and a tool, no text or symbols present.natural_image
Simple line drawing of a grassy field with a small mechanical component at the base (no text or symbols)natural_image
Illustration of a person in protective gear holding a long pole with a rotating wheel, connected by a dashed arrow indicating direction (no text or symbols)natural_image
Technical line drawing of a mechanical device with labeled component 'T' and rotational arrows (no text or symbols beyond label)natural_image
Technical line drawing of a mechanical housing or enclosure component (no text or symbols)natural_image
Technical line drawing of a mechanical assembly with a housing and clamping mechanism (no text or symbols)text_image
Technical diagram of a mechanical device with labeled parts A and BFiltre à air
natural_image
Technical line drawing of a mechanical assembly with a component being inserted (no text or symbols present)natural_image
Mechanical assembly diagram showing a belt switch inserted into a car's seat (no text or labels)Renvoi d'angle
natural_image
Technical line drawing of a mechanical tool or device with a knob and lever mechanism (no text or symbols)natural_image
Technical line drawing of a mechanical component with threaded end and shaft (no text or symbols)text_image
Exploded view diagram of a mechanical device with numbered parts for identification and assembly reference.natural_image
Line drawing of a person using a manual power tool to walk, with grass and trees in the background (no text or symbols)natural_image
Line drawing of a helmet and safety goggles (no text or symbols)natural_image
Line drawing of a mechanical component or device with no visible text or symbolsnatural_image
Line drawing of a mechanical component or device with no visible text or symbolsnatural_image
Line drawing of two human gloves with bandages and shaded areas (no text or symbols)natural_image
Line drawing of a pair of boots with visible tread pattern and buckles (no text or symbols)text_image
Diagram of a handheld device with labeled parts A and B, showing directional arrows indicating movement or force.- Controleer of de gashendel vergrendeld is in de stationaire stand wanneer de gashendelvergrendeling in de oorspronkelijke stand staat.
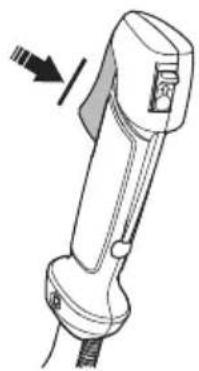
natural_image
Line drawing of a handheld device with a scroll wheel and handle, showing a directional arrow (no text or symbols)natural_image
Technical line drawing of a handheld device with two directional arrows indicating movement or force (no text or symbols)natural_image
Illustration of a worker using a tool to clean or adjust equipment, with no visible text or symbols.natural_image
Line drawing of a handheld device with a scroll wheel and handle, showing no text or symbols.natural_image
Technical line drawing of a mechanical tool or clamp device with a base mount (no text or symbols)
natural_image
Technical line drawing of a mechanical assembly with gear and shaft components (no text or symbols)Trillingsdempingssysteem controleren
natural_image
Technical line drawing of a mechanical device with no visible text or symbolsnatural_image
Line drawing of a person adjusting a seatbelt with arrows indicating clockwise motion (no text or symbols)Uitlaatdemper

natural_image
Technical line drawing of a mechanical component with mounting holes and internal cavities (no text or symbols)natural_image
Illustration of a hand operating a propeller with a nut, showing rotational shift (no text or symbols)
natural_image
Two technical line drawings: a gear-like circular component and a curved mechanical part with four circular features (no text or symbols)- Gebruik de messen en grasmessen om grof gras te maaien.
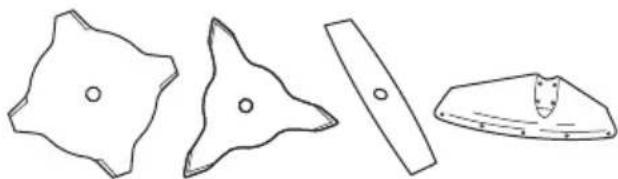
natural_image
Four abstract geometric shapes with varying line styles and fill patterns (no text or symbols)natural_image
Technical line drawing of a mechanical component with a circular top and curved side (no text or symbols)natural_image
Diagram showing a grater and a shield with an arrow indicating direction (no text or symbols)natural_image
Technical line drawing of a tool and blade assembly (no text or symbols)natural_image
Simple line drawing of a tool with a handle and arrow indicating direction (no text or symbols)
natural_image
Two diagrams showing a tool interacting with a shield-like shape, one with an arrow indicating direction (no text or symbols present)Zaagblad slijpen

WAARSCHUWING: Stop de motor. Draag beschermende handschoenen.
natural_image
Illustration of a person in protective gear using a tool to measure bone structure, with a magnified inset showing the same bone detail (no text or symbols present)natural_image
Simple line drawing of a mechanical component with a curved handle and circular end (no text or symbols)natural_image
Diagram showing two mechanical components with arrows indicating motion direction (no text or symbols)
natural_image
Three technical illustrations of household appliances: a cylindrical fan, a circular device with a lid, and a spool (no text or symbols present)natural_image
Technical line drawing of a mechanical device with wires and connectors (no text or symbols)natural_image
Technical line drawing of a mechanical component with a flanged base and cylindrical top (no text or symbols)
natural_image
Simple line drawing of a mechanical device with a prohibition symbol (no text or labels)Monteren van bladbeschermkap, grasmaaiblad en grasmes
text_image
L A C A Btext_image
Technical diagram illustrating mechanical assembly steps with labeled components A, B, C, and Dnatural_image
Technical line drawing of a mechanical component with labeled point E and directional arrow (no text or symbols beyond basic diagram)text_image
Technical diagram of a mechanical device with labeled parts including H, J, K, I, L, and A.text_image
Technical diagram of a mechanical assembly with labeled parts including gears, shafts, and housing components.text_image
Technical diagram showing gear meshing and tool path changes, with Chinese annotations indicating motion direction.De transportbescherming bevestigen
natural_image
Diagram of a circular mechanical component with internal segments and an inset showing a stepped mechanism (no text or symbols)Draagstel afstellen

natural_image
Illustration of a person wearing a headband with an arrow indicating downward motion (no text or symbols)natural_image
Illustration of a person using a manual power shaver (no text or symbols present)text_image
Safety warning illustration showing fuel injection and hazard symbols for a person holding a bottlenatural_image
Simple black-and-white icon showing a droplet and a fuel pump with a plus sign (no text or symbols)natural_image
Three abstract line drawings showing directional arrows and curved shapes, no text or symbols presentnatural_image
Simple line drawing of a circular ring with a downward arrow pointing to its center (no text or symbols)natural_image
Diagram of a hex nut with a curved arrow indicating rotational motion (no text or symbols)natural_image
Line drawing of a mechanical device with two arrows indicating motion direction (no text or symbols)De motor starten
natural_image
Technical line drawing of a mechanical device with a highlighted component (no text or symbols)- Zet de chokehendel in de chokestand.

natural_image
Technical line drawing of a mechanical device with a magnified inset showing a component detail (no text or symbols)
WAARSCHUWING: De
natural_image
Line drawing of a medical or surgical device with a black arrow pointing to a specific component (no text or symbols present)natural_image
Illustration of a worker in safety gear using a tool (no text or symbols)natural_image
Line drawing of a handheld device with a scroll wheel and control knob (no text or symbols)Terugslag
natural_image
Line drawing of a person walking on a path with trees and a dashed line indicating a path (no text or symbols)natural_image
Illustration showing a tree pruning method and a stick figure with a circular object (no text or symbols)natural_image
Illustration showing a tree planting a sapling with an arrow indicating direction, and a person pulling a rope (no text or symbols)natural_image
Simple line drawing of a person pulling a rope with a downward arrow (no text or symbols)Grote bomen vellen
natural_image
Simple line drawings of a tree stump and a person with a circular saw (no text or symbols)natural_image
Illustration showing a person using a gear to cut a tree trunk with a moving arrow indicating rotation (no text or symbols)
natural_image
Illustration of a person using a tool to spread leafy plants around a central plant (no text or symbols)natural_image
Illustration of a hand using a pulley to measure a pine tree (no text or symbols)natural_image
Simple line drawing of a grassy slope with a small utility pole (no text or symbols)natural_image
Simple line drawing of a plow and grass on grass, no text or symbols presentGras verwijderen
natural_image
Simple line drawing of a grassy field with a small mechanical component at the base (no text or symbols)natural_image
Illustration of a person using a mechanical device with a dashed arrow indicating motion (no text or symbols)Gras vegen
natural_image
Technical line drawing of a mechanical device with labeled component 'T' and rotational arrows (no text or symbols beyond label)natural_image
Technical line drawing of a mechanical housing or enclosure component (no text or symbols)natural_image
Technical line drawing of a mechanical assembly with a housing and clamping mechanism (no text or symbols)text_image
Technical diagram of a mechanical device with labeled parts A and BLuchtfilter
natural_image
Technical line drawing of a mechanical assembly with a component and a separate view (no text or symbols)natural_image
Mechanical diagram showing a car's seatbelt with a belt switch and labeled component A (no text or symbols beyond label)Haakse overbrenging
natural_image
Technical line drawing of a mechanical tool or device with no visible text or symbolsnatural_image
Technical line drawing of a mechanical component with threaded body and mounting holes (no text or symbols)• Vervang de bougie indien nodig.
Technische gegevens
text_image
Exploded view diagram of a mechanical device with numbered parts for identification and assembly reference.natural_image
Line drawing of a person in protective gear using a manual tool to clean vegetation, with a tree and grass nearby (no text or symbols)natural_image
Line drawing of a helmet and gear assembly (no text or symbols)natural_image
Line drawing of a vertebral implant (no text or labels)natural_image
Line drawing of glasses and binoculars (no text or symbols)natural_image
Line drawing of two gloves with bandages and shaded areas (no text or symbols)natural_image
Line drawing of a pair of boots with visible tread pattern and sole plate (no text or symbols)text_image
FIRST AID KITtext_image
Diagram of a handheld device with labeled parts A and B, showing directional arrows indicating movement or force.natural_image
Diagram of a handheld device with a scroll wheel and directional arrow indicating motion (no text or symbols)natural_image
Diagram of a handheld device with two directional arrows indicating movement or force (no text or symbols present)natural_image
Illustration of a worker using a tool to install a mechanical component, with no visible text or symbols.natural_image
Line drawing of a medical or surgical device with a black arrow pointing to a button (no text or symbols present)natural_image
Line drawing of a mechanical tool interacting with a base (no text or symbols)
natural_image
Technical line drawing of a mechanical assembly with gear and shaft components (no text or symbols)natural_image
Technical line drawing of a mechanical device with no visible text or symbolsnatural_image
Line drawing of a person adjusting a belt buckle, showing two hands and a belt buckle (no text or symbols)Marmitta

natural_image
Technical line drawing of a mechanical housing or enclosure component (no text or symbols)natural_image
Illustration of a hand turning a propeller with a nut, showing rotational motion (no text or symbols)
natural_image
Two technical line drawings of mechanical components: a circular gear-like part and a curved blade-like component with internal features (no text or symbols)natural_image
Four abstract geometric shapes with no text or symbols, including triangular and rectangular forms (no text or symbols present)natural_image
Technical line drawings of two mechanical components: a circular component with curved ends and a triangular plate with cutouts (no text or symbols)natural_image
Simple line drawing of a tool interacting with a shield-like object (no text or symbols)natural_image
Simple line drawing of a tool and blade assembly (no text or symbols)natural_image
Simple line drawing of a folding tool with a handle and arrow indicating direction (no text or symbols)
natural_image
Two diagrams showing a tool interacting with a shield-like shape, one with an arrow indicating direction (no text or symbols)natural_image
Illustration of a person in protective gear using a tool to extend a tree trunk, with an inset showing a close-up of the tree (no text or symbols present)natural_image
Simple line drawing of a mechanical clamp or bracket (no text or symbols)natural_image
Diagram showing two mechanical components with arrows indicating motion direction (no text or symbols)
natural_image
Line drawings of three household appliances: a cylindrical fan, a rectangular device with a circular button, and a spool (no text or symbols)natural_image
Technical line drawing of a mechanical device with wires and connectors (no text or symbols)Per installare le lame e le testine portafilo

natural_image
Two technical diagrams showing a mechanical component with a no-smoking symbol above it, no text or labels present.text_image
L A C A Btext_image
Technical diagram showing mechanical assembly steps with labeled components A, B, C, and Dnatural_image
Diagram of a mechanical device with labeled component E and directional arrow (no text or symbols beyond labels)text_image
Technical diagram showing mechanical assembly with labeled parts A through K, including a valve and adjustment mechanism.text_image
Technical diagram of a mechanical gear assembly with labeled components A through GNota: Filettature sinistrorse.
text_image
Technical diagram showing gear meshing and wheel turning process with directional arrows indicating motionnatural_image
Diagram of a mechanical component with circular cross-section and magnified detail showing internal structure (no text or symbols)natural_image
Illustration of a person wearing a headband with an arrow indicating direction (no text or symbols)natural_image
Illustration of a person using a handheld tool to clean or spray the machine (no text or symbols present)text_image
Safety warning illustration showing fuel injection and discharge symbols with crossed-out containersnatural_image
Simple black-and-white icon showing a droplet and a fuel pump with a plus sign (no text or symbols)natural_image
Simple line drawing of a curved surface with two arrows pointing downward (no text or symbols)
natural_image
Simple line drawing of a boat with two arrows pointing downward (no text or symbols)natural_image
Simple line drawing of a circular object with a downward arrow pointing to its center (no text or symbols)natural_image
Simple line drawing of a hexagonal nut with a curved arrow indicating rotation or cycle (no text or symbols)natural_image
Mechanical assembly diagram showing a motor and gear assembly with directional arrows (no text or labels)natural_image
Technical line drawing of a mechanical device with internal components and a black arrow pointing to a component (no text or symbols present)natural_image
Technical line drawing of a camera module with a magnified inset showing the H button (no text or symbols present)
natural_image
Line drawing of a handheld device with a black arrow pointing to the left side (no text or symbols)natural_image
Illustration of a person in safety gear handling a small object (no text or symbols visible)natural_image
Line drawing of a medical or laboratory device with a black arrow pointing to a button (no text or symbols present)Spinta della lama
natural_image
Line drawing of a person walking on a path with trees and a curved road (no text or symbols)natural_image
Illustration showing a tree planting with a tool and a person holding a ball (no text or symbols)natural_image
Illustration showing a tree planting a sapling with an arrow indicating direction, and a person holding a ball (no text or symbols)natural_image
Simple line drawing of a person pulling a rope with a downward arrow, no text or symbols presentnatural_image
Simple line drawing showing a tree stump and a person with a large saw (no text or symbols)natural_image
Illustration showing a person cutting wood with a magnified inset showing a tree trunk and a tool, next to a directional arrow indicating rotation (no text or symbols)
natural_image
Illustration of a person using a tool to spread over a tree with leaves, no text or symbols presentnatural_image
Illustration of a hand using a pulley to measure a pine tree (no text or symbols)natural_image
Simple line drawing of a grassy slope with a small plow and stick (no text or symbols)natural_image
Simple line drawing of a grassy field with a tool and a small object, no text or symbols present.Sfoltimento erba
natural_image
Simple line drawing of a grassy field with a small mechanical component at the top (no text or symbols)natural_image
Diagram of a person using a pulley device with directional arrows indicating motion (no text or symbols)Rimozione dell'erba
natural_image
Technical line drawing of a mechanical component with mounting holes and internal channels (no text or symbols)natural_image
Technical diagram of a mechanical assembly showing a housing component being inserted into a clamping bracket (no text or labels present)natural_image
Technical line drawing of a mechanical assembly with a component and directional arrow (no text or symbols)natural_image
Technical line drawing of a car seatbelt switch with labeled component A (no text or symbols beyond label)Riduttore angolare
natural_image
Technical line drawing of a mechanical tool or device with a knob and lever (no text or symbols)natural_image
Technical line drawing of a mechanical component with threaded end and shaft (no text or symbols)Dati tecnici
text_image
Exploded view diagram of a mechanical device with numbered parts for identification and assembly reference.natural_image
Line drawing of a person wearing a helmet and using a long-handled tool to clean or dig outdoors (no text or symbols)natural_image
Line drawing of a helmet with a visor and a triangular cap (no text or symbols)natural_image
Line drawing of a mechanical component or device with no visible text or symbolsnatural_image
Line drawing of a mechanical component or device with no visible text or symbolsnatural_image
Line drawing of a pair of boots with visible tread pattern and sole cover (no text or symbols)text_image
Diagram of a handheld device with labeled parts A and B, showing directional arrows indicating movement or force.natural_image
Line drawing of a handheld device with an arrow indicating direction (no text or symbols)natural_image
Diagram of a handheld device with two directional arrows indicating movement or force (no text or symbols present)natural_image
Illustration of a worker using a tool to lift a workpiece, with motion arrows indicating movement (no text or symbols)natural_image
Technical line drawing of a handheld device with a knob and arrow indicator (no text or symbols)natural_image
Technical line drawing of a mechanical tool or clamp assembly (no text or symbols)
natural_image
Technical line drawing of a mechanical assembly with gear and shaft components (no text or symbols)natural_image
Technical line drawing of a mechanical device with no visible text or symbolsnatural_image
Line drawing of a person adjusting a belt buckle, showing two hands and one belt buckle (no text or symbols)Silenciador

natural_image
Technical line drawing of a mechanical component with mounting holes and internal structure (no text or symbols)natural_image
Illustration of a hand operating a propeller with a nut, showing rotational shift (no text or symbols)
natural_image
Two technical line drawings: a gear-like circular component and a curved mechanical part with internal components (no text or symbols)natural_image
Four abstract geometric shapes with no text or symbols: a star-like polygon, a triangular prism, and a curved rectangular base (no text or symbols)natural_image
Technical line drawing of a mechanical component with a circular top and curved side (no text or symbols)natural_image
Diagram showing a grater blade and a shield with an arrow indicating direction (no text or symbols)natural_image
Diagram of a tool interacting with a mechanical part, showing a lever and gear mechanism (no text or symbols)natural_image
Simple line drawing of a tool with a handle and arrow indicating direction (no text or symbols)
natural_image
Two diagrams showing a tool interacting with a shield-like shape, one with an arrow indicating direction (no text or symbols present)Afilar la hoja de sierra

natural_image
Illustration of a person in protective gear holding a tool near a bone, with a magnified inset showing a tooth structure (no text or symbols)natural_image
Simple line drawing of a mechanical component or bracket with a circular hole and curved edge (no text or symbols)natural_image
Diagram showing two mechanical components with arrows indicating direction of movement (no text or symbols)
natural_image
Three technical line drawings of mechanical components: a cylindrical device with a loop, a flat plate with a side panel, and a spool (no text or symbols)natural_image
Technical line drawing of a mechanical device with connectors and wiring (no text or symbols)natural_image
Two technical diagrams showing a mechanical component with a circular no-smoking symbol above it, both without any text or labels.text_image
L A C A Btext_image
Technical diagram of a mechanical component with labeled parts A through H, showing exploded view and assembly details.text_image
Technical diagram showing mechanical assembly steps with labeled components A, B, C, and Dnatural_image
Line drawing of a mechanical component with labeled point E and directional arrow (no text or symbols)text_image
Technical diagram of a mechanical assembly with labeled parts A through K, showing exploded and assembled views.text_image
Technical diagram of a mechanical assembly with labeled parts including gears, shafts, and housing components.text_image
Technical diagram showing gear meshing and wheel turning process with directional arrows indicating motionnatural_image
Diagram of a circular mechanical component with internal segments and an inset showing a stepped mechanism (no text or symbols)natural_image
Illustration of a person wearing a headband with an arrow indicating direction (no text or symbols)natural_image
Illustration of a person using a manual power shaver (no text or symbols present)text_image
Illustration showing a fuel can being used to prevent chemical discharge, with no visible text or symbols.natural_image
Simple black-and-white icon showing a droplet and a fuel pump with a plus sign (no text or symbols)natural_image
Three abstract line drawings showing directional arrows and shapes, no text or symbols presentnatural_image
Simple line drawing of a circular component with a downward arrow pointing to its center (no text or symbols)natural_image
Diagram of a hex nut with a curved arrow indicating rotational motion (no text or symbols)natural_image
Line drawing of a robotic arm with two arrows indicating movement or force direction (no text or symbols)Arranque del motor
natural_image
Technical line drawing of a mechanical device with a black arrow pointing to a component (no text or symbols present)natural_image
Technical line drawing of a mechanical device with a close-up inset showing a component (no text or symbols)
natural_image
Line drawing of a handheld device with a scroll wheel and a button, showing no text or symbols.natural_image
Illustration of a worker in safety gear handling equipment (no text or symbols visible)natural_image
Line drawing of a handheld device with a scroll wheel and handle, showing no text or symbols.Lanzada de hoja
flowchart
graph TD
    A["Plant Growth"] --> B["Soil Stabilization"]
    B --> C["Plant Release"]
    C --> D["Soil Deposition"]
    D --> E["Soil Stabilization"]
    E --> F["Soil Deposition"]
    F --> G["Soil Stabilization"]
    G --> H["Soil Deposition"]
    H --> I["Soil Stabilization"]
    I --> J["Soil Deposition"]
    J --> K["Soil Stabilization"]
    K --> L["Soil Deposition"]
    L --> M["Soil Stabilization"]
    M --> N["Soil Deposition"]
    N --> O["Soil Stabilization"]
    O --> P["Soil Deposition"]
    P --> Q["Soil Stabilization"]
    Q --> R["Soil Deposition"]
    R --> S["Soil Stabilization"]
    S --> T["Soil Deposition"]
    T --> U["Soil Stabilization"]
    U --> V["Soil Deposition"]
    V --> W["Soil Stabilization"]
    W --> X["Soil Deposition"]
    X --> Y["Soil Stabilization"]
    Y --> Z["Soil Deposition"]
natural_image
Line drawing of a person spraying crops with a long tool, surrounded by trees and a dashed path (no text or symbols)natural_image
Illustration showing a tree pruning with an arrow and a person observing a circular object (no text or symbols)natural_image
Illustration showing a tree planting a sapling with an arrow indicating direction, and a stick figure pulling a rope (no text or symbols)natural_image
Simple line drawing of a person pushing a large gear with a downward arrow (no text or symbols)natural_image
Simple line drawing showing a tree stump and a gear cutter cutting through a circular saw (no text or symbols)natural_image
Illustration showing a person cutting wood with a gear and a tree trunk, accompanied by an arrow indicating rotation (no text or symbols)
natural_image
Illustration of a person using a tool to spread over a tree with leaves, no text or symbols presentnatural_image
Illustration of a hand operating a pulley system with pine needles (no text or symbols)natural_image
Simple line drawing of a grassy field with a small grasshopper (no text or symbols)natural_image
Simple line drawing of a grassy field with a small plow and a tool, no text or symbols present.Desbrozar hierba
natural_image
Simple line drawing of a grassy field with a small grass support structure (no text or symbols)natural_image
Illustration of a person using a mechanical device with a dashed arrow indicating motion (no text or symbols)Barrer la hierba
natural_image
Technical line drawing of a mechanical component with mounting holes and housing (no text or symbols)natural_image
Technical line drawing of a mechanical assembly with a housing and clamping mechanism (no text or symbols)natural_image
Technical line drawing of a mechanical assembly with a component and a separate device (no text or symbols)natural_image
Mechanical diagram showing a car's seatbelt and belt switch assembly (no text or labels)Engranaje angulado
natural_image
Technical line drawing of a mechanical tool or device with a knob and lever (no text or symbols)natural_image
Technical line drawing of a mechanical component with threaded body and shaft (no text or symbols)Datos técnicos
text_image
Exploded view diagram of a mechanical device with numbered parts for identification and assembly reference.natural_image
Line drawing of a person wearing protective gear and using a long-handled tool to walk outdoors near a tree (no text or symbols)natural_image
Line drawing of a helmet and safety goggles (no text or symbols)natural_image
Line drawing of a mechanical device with no visible text or symbolsnatural_image
Line drawing of a mechanical component or device with no visible text or symbolsnatural_image
Line drawing of two human gloves showing different grip positions (no text or symbols)natural_image
Line drawing of a boots with visible tread pattern and buckles (no text or symbols)text_image
Diagram of a handheld device with labeled parts A and B, showing directional arrows indicating movement or force.natural_image
Line drawing of a handheld device with a scroll wheel and handle, showing no text or symbolsnatural_image
Technical line drawing of a handheld device with two directional arrows indicating movement or force (no text or symbols)natural_image
Illustration of a worker using a tool to adjust the angle of change, with no text or symbols present.natural_image
Line drawing of a medical or laboratory device with a black arrow pointing to a component (no text or symbols present)natural_image
Line drawing of a mechanical tool interacting with a base component (no text or symbols)
natural_image
Technical line drawing of a mechanical assembly with gear and shaft components (no text or symbols)natural_image
Technical line drawing of a mechanical device with no visible text or symbolsnatural_image
Line drawing of a person adjusting a belt buckle, showing two hands and one belt buckle (no text or symbols)Schalldämpfer

natural_image
Technical line drawing of a mechanical component with mounting holes and housing (no text or symbols)natural_image
Illustration of a hand operating a propeller with a rotating nut, showing mechanical assembly (no text or symbols)
natural_image
Two technical line drawings: a circular gear-like component and a curved mechanical part with internal components (no text or symbols)natural_image
Four abstract geometric shapes with no text or symbols: a star-like polygon, a triangular prism, and a curved rectangular base (no text or symbols)natural_image
Technical line drawings of two mechanical components: a circular component with curved ends and a triangular plate with internal cutouts (no text or symbols)natural_image
Simple line drawing of a tool and a shield-like object with an arrow indicating direction (no text or symbols)natural_image
Technical line drawing of a tool and blade assembly (no text or symbols)natural_image
Illustration of a person in protective gear using a tool to measure bone structure, with an inset showing a close-up of a bone (no text or symbols present)natural_image
Simple line drawing of a mechanical component or bracket (no text or symbols)natural_image
Diagram showing two mechanical components with arrows indicating motion or force direction (no text or symbols)
natural_image
Three technical line drawings: a circular component with wires, a square plate with a central symbol, and a spool (no text or labels)natural_image
Technical line drawing of a mechanical device with connectors and wiring (no text or symbols)natural_image
Two identical mechanical components with a prohibition symbol (no text or labels present)text_image
L A C A Btext_image
Technical diagram of a mechanical component with labeled parts A through H, showing assembly or assembly details.text_image
Technical diagram showing mechanical assembly with labeled parts A and B, including a magnified inset view of a tool interacting with a component.
text_image
A C Dnatural_image
Diagram of a mechanical device with labeled component E and directional arrow (no text or symbols beyond labels)text_image
Technical diagram of a mechanical assembly with labeled parts A through K, showing components like a valve and adjustment knob.text_image
Technical diagram of a mechanical assembly with labeled parts including gears, shafts, and housing components.text_image
Technical diagram showing gear meshing and mechanical assembly steps with directional arrows indicating motionnatural_image
Diagram of a circular mechanical component with internal segments and an inset showing a stepped mechanism (no text or symbols)natural_image
Illustration of a person wearing a headband with an arrow indicating direction (no text or symbols)natural_image
Illustration of a person using a manual power shaver (no text or symbols present)text_image
Diagram illustrating fuel injection and rejection symbols, showing a container with fuel drop and fuel nozzle, and two crossed-out containers.
natural_image
Illustration of a person in uniform holding an object, no text or symbols presentnatural_image
Simple black-and-white icon showing a droplet and a fuel pump with a plus sign (no text or symbols)natural_image
Three abstract line drawings showing directional arrows and shapes, no text or symbols presentnatural_image
Simple line drawing of a circular ring with a downward arrow pointing to its center (no text or symbols)natural_image
Diagram of a hex nut with a curved arrow indicating rotational motion (no text or symbols)natural_image
Technical line drawing of a robotic arm with directional arrows indicating movement or force (no text or symbols)natural_image
Technical line drawing of a mechanical device with a black arrow pointing to a component (no text or symbols present)natural_image
Technical line drawing of a DSLR camera with a close-up inset showing the lens (no text or symbols present)
WARNUNG: Die
natural_image
Line drawing of a medical or surgical device with a black arrow pointing to a component (no text or symbols present)natural_image
Illustration of a worker in safety gear handling a tool (no text or symbols visible)natural_image
Line drawing of a handheld device with a black arrow pointing to the right side (no text or symbols)Klingenstoß
flowchart
graph TD
    A["Person in field"] --> B{Spray to crop}
    B -->|Yes| C["Tractor sprays"]
    B -->|No| D["Tractor leaves spread"]
    C --> E["Tractor leaves spread"]
    D --> F["Tractor leaves spread"]
    style A fill:#f9f,stroke:#333
    style E fill:#ccf,stroke:#333
    style F fill:#ccf,stroke:#333
natural_image
Line drawing of a person spraying water on a path with trees and a dashed line indicating a path (no text or symbols)natural_image
Illustration showing a person bending over a tree with an arrow indicating direction (no text or symbols)natural_image
Illustration showing a tree planting with a shovel and a person reaching toward a round object (no text or symbols)natural_image
Simple line drawing of a person pushing a large circular object with a downward arrow, no text or symbols present.natural_image
Simple line drawings of a tree stump and a gear cutter (no text or symbols)natural_image
Illustration showing a person using a saw blade to cut a tree trunk with a moving arrow indicating rotation (no text or symbols)
natural_image
Illustration of a person spraying plants with a tool, showing leaves and a central plant (no text or symbols)natural_image
Illustration of a person using a pulley system to lift a tree (no text or symbols)natural_image
Simple line drawing of a grassy field with a small plow and tool (no text or symbols)natural_image
Simple line drawing of a grassy field with a tool and a small object, no text or symbols present.natural_image
Simple line drawing of a grassy field with a small circular object at the top (no text or symbols)natural_image
Illustration of a person using a mechanical device with a dashed arrow indicating motion (no text or symbols)natural_image
Technical diagram of a mechanical device with labeled component T and rotational arrow (no text or symbols beyond label)natural_image
Technical line drawing of a mechanical component with mounting holes and internal cavities (no text or symbols)natural_image
Technical diagram of a mechanical assembly showing a housing component being inserted into a clamping bracket (no text or labels present)text_image
Technical diagram of a mechanical device with labeled parts A and BLuftfilter
natural_image
Technical line drawing of a mechanical assembly with no visible text or symbolsnatural_image
Mechanical diagram showing a valve inserted into a car seatbelt, with no visible text or symbolsWinkelgetriebe
natural_image
Technical line drawing of a mechanical tool or device with a knob and lever mechanism (no text or symbols)natural_image
Technical line drawing of a spark plug with threaded body and mounting base (no text or symbols)Technische Daten
text_image
Exploded view diagram of a mechanical device with numbered parts for identification and assembly reference.natural_image
Line drawing of a mechanical component or device with no visible text or symbolsnatural_image
Line drawing of a mechanical component or device with no visible text or symbolsnatural_image
Line drawing of two human gloves with bandages and fingers (no text or symbols)natural_image
Line drawing of a pair of boots with visible tread pattern and buckles (no text or symbols)text_image
Diagram of a medical or surgical device with labeled parts A and B, showing directional arrows indicating movement or force.natural_image
Diagram of a handheld device with a scroll and arrow indicator (no text or symbols)natural_image
Diagram of a handheld device with two directional arrows indicating movement or force (no text or symbols present)natural_image
Illustration of a worker using a tool to adjust equipment, showing mechanical components and motion arrows (no text or symbols)natural_image
Line drawing of a handheld device with a black arrow pointing to the right side (no text or symbols)natural_image
Technical line drawing of a mechanical tool or device with a curved blade and lever assembly (no text or symbols)natural_image
Diagram showing a hand operating a propeller with a nut, illustrating rotational motion (no text or symbols)
natural_image
Two technical line drawings: a circular gear-like component and a curved mechanical part with internal components (no text or symbols)natural_image
Four abstract geometric shapes with varying line styles and fill patterns (no text or symbols)natural_image
Technical line drawings of two mechanical components: a circular component with curved ends and a triangular plate with cutouts (no text or symbols)natural_image
Simple line drawing of a tool interacting with a shield-like object (no text or symbols)natural_image
Simple line drawing of a tool and a mechanical part with an arrow indicating direction (no text or symbols)Afiar as lâminas e as cortadoras de relva
natural_image
Simple line drawing of a cleaver with a handle and arrow indicating direction (no text or symbols)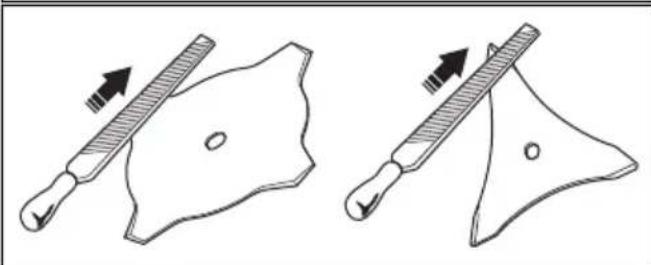
natural_image
Two diagrams showing a tool interacting with a shield-like object, one with an arrow indicating direction (no text or symbols)natural_image
Illustration of a person in protective gear using a tool to reach a tree, with an inset showing a close-up of the tree (no text or symbols present)natural_image
Simple line drawing of a mechanical component with a curved handle and circular end (no text or symbols)- Segure a lima num ângulo de 15°.
natural_image
Diagram showing two mechanical components with arrows indicating motion or force direction (no text or symbols)
natural_image
Line drawings of three different household appliances: a spool, a front panel with a circular button, and a coiled spool (no text or symbols)natural_image
Technical line drawing of a mechanical device with connectors and wiring (no text or symbols)natural_image
Two technical diagrams showing a mechanical component with a no-smoking symbol above it, no text or labels present.text_image
L A C A Btext_image
Technical diagram of a mechanical component with labeled parts A through H, showing exploded view and assembly details.text_image
Technical diagram showing mechanical assembly steps with labeled components A, B, C, and Dnatural_image
Technical line drawing of a mechanical component with labeled point E and directional arrow (no text or symbols beyond basic diagram)text_image
Technical diagram showing mechanical assembly with labeled parts A, L, H, I, J, Ktext_image
Technical diagram of a mechanical gear assembly with labeled components A through Gtext_image
Technical diagram showing gear meshing and wheel turning process with directional arrows indicating motionnatural_image
Diagram of a mechanical component with circular cross-section and magnified detail showing internal structure (no text or symbols)Ajustar a correia

natural_image
Illustration of a person wearing a headband with an arrow indicating downward motion (no text or symbols)natural_image
Illustration of a person using a long-handled tool to clean or walk (no text or symbols present)text_image
Safety warning illustration showing fuel injection and discharge symbols with crossed-out containersnatural_image
Symbolic illustration of a fuel pump with a droplet and plus sign (no text or numbers)natural_image
Three abstract line drawings showing directional arrows and shapes, no text or symbols presentnatural_image
Simple line drawing of a circular component with a black arrow pointing downward (no text or symbols)natural_image
Diagram of a hex nut with a curved arrow indicating rotational motion (no text or symbols)natural_image
Technical line drawing of a robotic arm with directional arrows indicating movement or force (no text or symbols)Arrancar o motor
natural_image
Technical line drawing of a mechanical device with a highlighted internal component (no text or symbols)natural_image
Technical line drawing of a mechanical device with a magnified inset showing internal components (no text or symbols)
natural_image
Line drawing of a handheld device with a black arrow pointing to the left side (no text or symbols)natural_image
Illustration of a person in safety gear handling a small object (no text or symbols visible)natural_image
Technical line drawing of a handheld device with a black arrow pointing to the handle (no text or symbols present)
natural_image
Line drawing of a medical or laboratory device with a black arrow pointing to a component (no text or symbols present)Arremesso da lâmina
natural_image
Simple line drawing of a person walking on a path with trees and a curved path (no text or symbols)natural_image
Illustration showing a tree pruning method and a person using a net (no text or symbols)natural_image
Simple line drawing showing a tree with a shovel and an arrow, next to a person holding a ball (no text or symbols)natural_image
Simple line drawing of a person pulling a rope with a downward arrow, no text or symbols presentnatural_image
Simple line drawing showing a tree stump and a person with a large tree cutout (no text or symbols)natural_image
Illustration showing a person cutting wood with a gear and a tree trunk, accompanied by an arrow indicating direction (no text or symbols)
natural_image
Illustration of a person using a tool to spread soil or vegetation around a central plant (no text or symbols)natural_image
Illustration of a hand using a pulley to measure a pine branch (no text or symbols)natural_image
Simple line drawing of a grassy slope with a small utility pole (no text or symbols)natural_image
Simple line drawing of a grassy field with a plow and a tool, no text or symbols presentLimpar relva
natural_image
Simple line drawing of a grassy field with a small mechanical component at the top (no text or symbols)natural_image
Illustration of a person using a mechanical device with directional arrows indicating motion (no text or symbols)Para aparar a relva
natural_image
Technical line drawing of a mechanical device with labeled component 'T' and circular motion arrows (no text or symbols beyond label)natural_image
Technical line drawing of a mechanical component with mounting holes and internal channels (no text or symbols)- Retire os parafusos que fixam a rede retentora de faíscas.

natural_image
Technical diagram of a mechanical assembly with exploded view and assembled parts (no text or labels)- Limpe a rede retentora de faíscas se estiver bloqueada, ou substitua-a caso esteja danificada.
text_image
Technical diagram of a mechanical device with labeled parts A and BFiltro de ar
natural_image
Technical line drawing of a mechanical assembly with a component inserted, showing internal components and a close-up view (no text or symbols)natural_image
Mechanical diagram showing a car's seatbelt and belt switch (no text or symbols)Engrenagem cónica
natural_image
Technical line drawing of a mechanical tool or device with a knob and lever mechanism (no text or symbols)natural_image
Technical line drawing of a mechanical component with threaded base and shaft (no text or symbols)text_image
Exploded view diagram of a mechanical device with numbered parts for identification and assembly reference.natural_image
Line drawing of a person spraying water with a tree in the background (no text or symbols)natural_image
Line drawing of a helmet with visor and cap (no text or symbols)natural_image
Line drawing of a pair of binoculars (no text or symbols)natural_image
Line drawing of glasses and footshoes (no text or symbols)natural_image
Line drawing of two gloves with bandages and shaded areas (no text or symbols)natural_image
Line drawing of a pair of boots with visible tread pattern and buckles (no text or symbols)text_image
FIRST AID KITtext_image
Diagram of a handheld device with labeled parts A and B, showing directional arrows indicating movement or force.natural_image
Line drawing of a handheld device with a scroll wheel and arrow indicator (no text or symbols)natural_image
Diagram of a handheld device with two directional arrows indicating movement or force (no text or symbols present)natural_image
Illustration of a worker using a tool to install a mechanical component, with no visible text or symbols.natural_image
Line drawing of a medical or laboratory device with a black arrow pointing to a component (no text or symbols present)natural_image
Line drawing of a mechanical tool interacting with a base (no text or symbols)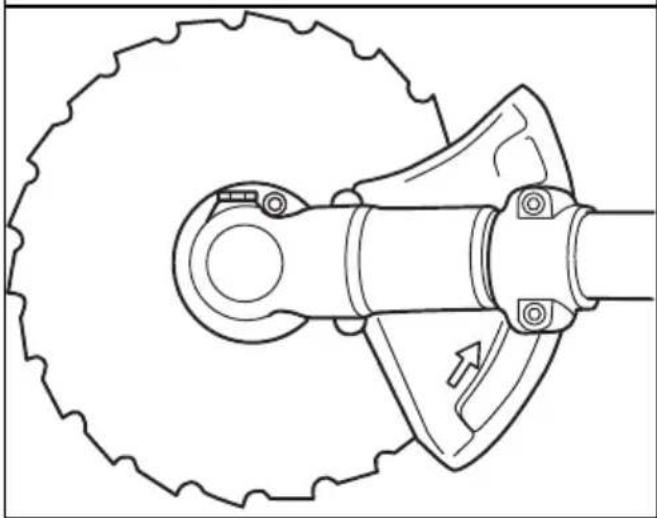
natural_image
Technical line drawing of a mechanical assembly with gear and shaft components (no text or symbols)natural_image
Technical line drawing of a mechanical device with no visible text or symbolsnatural_image
Line drawing of a person adjusting a belt buckle, showing two black arrows indicating clockwise motion (no text or symbols)Глушитель
natural_image
Technical line drawing of a mechanical component with mounting holes and housing (no text or symbols)natural_image
Illustration of a hand operating a propeller with a nut, showing rotational shift (no text or symbols)
ПРЕДУПРЕЖДЕНИЕ: При
natural_image
Two technical line drawings of mechanical components: a circular gear-like part and a curved blade-like structure with internal features (no text or symbols)natural_image
Four abstract geometric shapes with no text or symbols: star-like, triangular, rectangular, and irregular (no text or symbols)natural_image
Technical line drawings of two mechanical components: a circular component with curved leads and a triangular fan-like structure (no text or symbols)natural_image
Simple line drawing of a grater and shield with an arrow indicating direction (no text or symbols)natural_image
Diagram of a tool interacting with a mechanical part, showing a handle and blade (no text or symbols)natural_image
Simple line drawing of a cleaver with a handle and arrow indicating direction (no text or symbols)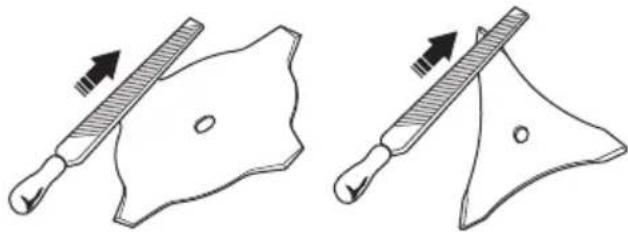
natural_image
Two diagrams showing a tool interacting with a triangular object, one with an arrow indicating direction (no text or symbols present)natural_image
Illustration of a person in protective gear using a tool to apply material, with an inset showing a close-up of a tooth (no text or symbols present)natural_image
Pure mechanical component diagram without any text, numbers, or symbolsnatural_image
Diagram showing two mechanical components with arrows indicating motion direction (no text or symbols)
natural_image
Three technical illustrations of mechanical components: a spool, a circular component, and a coiled wire (no text or symbols)natural_image
Technical line drawing of a mechanical device with connectors and wiring (no text or symbols)natural_image
Two mechanical components with a no-smoking symbol, one plain and one with a circular hole (no text or labels)text_image
Technical diagram of a mechanical device with labeled parts including H, J, K, I, L, and A.text_image
Technical diagram of a mechanical assembly with labeled parts including gears, shafts, and housing components.text_image
Technical diagram showing gear meshing and mechanical assembly steps with directional arrows indicating motionnatural_image
Technical line drawing of a circular mechanical component with internal segments and an inset showing a fastening mechanism (no text or symbols)natural_image
Illustration of a person wearing a headlamp and holding an object, with a downward arrow indicating motion (no text or symbols)natural_image
Illustration of a worker in protective gear using a long-handled tool (no text or symbols)text_image
Safety warning illustration showing fuel injection and discharge symbols with a worker in uniformnatural_image
Simple black-and-white icon showing a droplet and a fuel pump with a plus sign (no text or symbols)natural_image
Three abstract line drawings showing directional arrows and shapes, no text or symbols presentnatural_image
Simple line drawing of a circular component with a downward arrow pointing to its center (no text or symbols)natural_image
Simple line drawing of a hex nut with a curved arrow indicating rotation (no text or symbols)natural_image
Technical line drawing of a mechanical device with no visible text or symbolsЗапуск двигателя
natural_image
Technical line drawing of a mechanical device with a black arrow pointing to a component (no text or symbols present)natural_image
Technical line drawing of a mechanical device with a magnified inset showing internal components (no text or symbols)
natural_image
Line drawing of a handheld device with a black arrow pointing to the left side (no text or symbols)natural_image
Illustration of a worker in safety gear handling a block (no text or symbols)natural_image
Line drawing of a handheld device with a scroll wheel and control knob (no text or symbols)Отскакивание ножа
natural_image
Line drawing of a person walking on a path with trees and a curved path (no text or symbols)natural_image
Illustration showing a tree pruning with a tool and a person holding a ball (no text or symbols)natural_image
Simple line drawing showing a tree with a watering can and a person holding a ball (no text or symbols)Валка дерева вперед
natural_image
Simple line drawing of a person pulling a rope with a downward arrow, no text or symbols presentnatural_image
Simple line drawing showing a tree stump and a person holding a large tree with concentric patterns (no text or symbols)natural_image
Illustration showing a person using a wooden saw to cut a tree trunk with a gear mechanism, and a hand operating a tool on the ground (no text or symbols)
natural_image
Illustration of a person spraying water onto a tree with leaves, no text or symbols presentnatural_image
Illustration of a person using a pulley system to measure a tree trunk (no text or symbols present)natural_image
Simple line drawing of a grassy field with a small plow and tool (no text or symbols)natural_image
Simple line drawing of a grassy field with a tool, no text or symbols presentПодрезка травы
natural_image
Simple line drawing of a grassy field with a small circular object at the top (no text or symbols)natural_image
Illustration of a person wearing protective gear holding a long pole with a rotating wheel, connected by a dashed arrow indicating motion (no text or symbols)Уборка травы
natural_image
Technical line drawing of a mechanical device with labeled component 'T' and rotational arrow (no text or symbols beyond label)natural_image
Technical line drawing of a mechanical component with mounting holes and internal cavities (no text or symbols)natural_image
Technical diagram of a mechanical assembly with a housing and clamping mechanism (no text or labels)text_image
Technical diagram of a mechanical device with labeled parts A and BВоздушный фильтр
natural_image
Technical line drawing of a mechanical assembly with a component and a separate housing (no text or symbols)natural_image
Technical line drawing of a mechanical component with a labeled connection point (A), no readable text or symbols present.Зубчатая передача
natural_image
Technical line drawing of a mechanical tool or device with no visible text or symbolsnatural_image
Technical line drawing of a mechanical component with threaded body and shaft (no text or symbols)text_image
Exploded view diagram of a mechanical device with numbered parts for identification and assembly reference.natural_image
Line drawing of a person in protective gear using a long-handled tool to push grass near a tree (no text or symbols)natural_image
Line drawing of a helmet with visor and clasp (no text or symbols)natural_image
Line drawing of a pair of binoculars (no text or symbols)natural_image
Line drawing of a mechanical component or assembly (no text or symbols)natural_image
Line drawing of a boots with visible tread pattern and buckles (no text or symbols)text_image
Diagram of a medical or surgical device with labeled parts A and B, showing directional arrows indicating movement or force.natural_image
Diagram of a handheld device with a scroll and arrow indicator (no text or symbols)natural_image
Diagram of a handheld device with two directional arrows indicating movement or force (no text or symbols present)natural_image
Illustration of a worker using a tool to lift a block, with motion arrows indicating movement (no text or symbols)natural_image
Line drawing of a medical or laboratory device with a black arrow pointing to a component (no text or symbols)natural_image
Line drawing of a mechanical tool interacting with a base component (no text or symbols)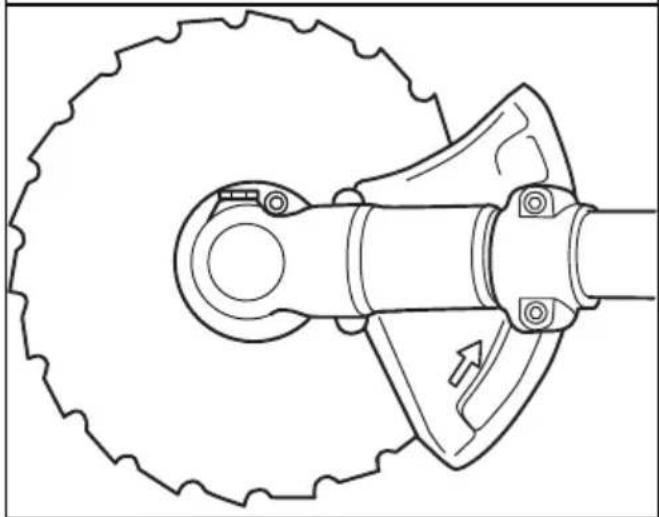
natural_image
Technical line drawing of a mechanical assembly with gear and shaft components (no text or symbols)За проверка на антивибрационната система
natural_image
Technical line drawing of a mechanical device with no visible text or symbolsnatural_image
Line drawing of a person adjusting a seatbelt with arrows indicating movement (no text or symbols)Ауспух

natural_image
Technical line drawing of a mechanical housing or enclosure component (no text or symbols)natural_image
Illustration of a hand operating a propeller with a nut, showing rotational shift (no text or symbols)
natural_image
Two technical line drawings: a circular gear-like component and a curved mechanical part with four circular features (no text or symbols)natural_image
Four abstract geometric shapes with varying line styles and dot patterns, no text or symbols present.natural_image
Technical line drawings of two mechanical components: a circular component with curved arms and a triangular base (no text or symbols)natural_image
Diagram showing a tool interacting with a shield-like object, no text or symbols presentnatural_image
Diagram showing a tool interacting with a mechanical part, no text or symbols presentnatural_image
Illustration of a person in protective gear using a tool to measure teeth, with an inset showing the same tooth (no text or symbols present)natural_image
Simple line drawing of a mechanical clamp or bracket (no text or symbols)natural_image
Diagram showing two mechanical components with arrows indicating motion direction (no text or symbols)
natural_image
Line drawings of three mechanical components: a spool, a plate with a circular symbol, and a coiled wire (no text or symbols present)natural_image
Technical line drawing of a mechanical device with connectors and wiring (no text or symbols)natural_image
Two technical diagrams showing a mechanical component with a prohibition symbol (no text or labels present)text_image
L A C A Btext_image
Technical diagram of a mechanical component with labeled parts A through H, showing assembly or assembly details.text_image
Medical diagram showing surgical procedure with labeled parts A and B, including a magnified view of mechanical assembly.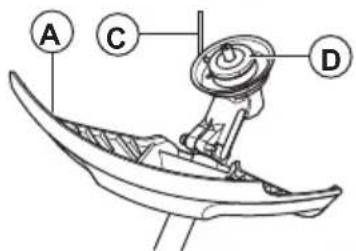
text_image
A C Dnatural_image
Technical line drawing of a mechanical component with labeled part E and directional arrow (no text or symbols beyond labels)text_image
Technical diagram showing mechanical assembly with labeled parts A, L, H, I, J, Ktext_image
Technical diagram of a mechanical gear assembly with labeled components A through Gtext_image
Technical diagram showing gear meshing and tool path changes, with Chinese annotations indicating motion direction.natural_image
Diagram of a circular mechanical component with internal segments and an inset showing a stepped mechanism (no text or symbols)natural_image
Illustration of a person wearing a headband with a downward arrow indicating motion (no text or symbols)natural_image
Illustration of a person using a manual power shaver (no text or symbols present)text_image
Safety warning illustration showing a fuel can being poured into a container with no visible text or symbols.natural_image
Simple black-and-white icon showing a droplet and a fuel pump with a plus sign (no text or symbols)natural_image
Three abstract line drawings showing directional arrows and curved shapes, no text or symbols present- Проверете опорния фланец за пукнатини. Сменете опорния фланец, ако е повреден.

natural_image
Simple line drawing of a circular component with a downward arrow pointing to its center (no text or symbols)natural_image
Diagram of a hex nut with a curved arrow indicating rotational motion (no text or symbols)natural_image
Line drawing of a robotic arm with attached sensors and a belt, showing motion direction (no text or symbols)natural_image
Technical line drawing of a mechanical device with a black arrow pointing to a component (no text or symbols present)natural_image
Technical line drawing of a mechanical device with a close-up inset showing a component (no text or symbols)
ПРЕДУПРЕЖДЕНИЕ:
natural_image
Line drawing of a handheld device with a scroll wheel and a button, showing no text or symbols.natural_image
Illustration of a worker in safety gear handling a tool (no text or symbols visible)natural_image
Line drawing of a handheld device with a scroll wheel and handle, showing no text or symbols.Откат на резеца
natural_image
Line drawing of a person walking on a path with trees and a curved road (no text or symbols)natural_image
Illustration showing a tree pruning technique and a stick figure holding a ball (no text or symbols)natural_image
Illustration showing a tree stump with an arrow and a person holding a tree with a spiral (no text or symbols)natural_image
Simple line drawing of a person with a spiral head and a downward arrow, no text or symbols presentnatural_image
Simple line drawing showing a tree stump and a person holding a tree with a circular pattern (no text or symbols)natural_image
Illustration showing a gear cutter cutting through a wooden mill with a moving tree, and a hand operating a tool on the ground (no text or symbols)
natural_image
Illustration of a person spraying plants with a lever, surrounded by leaves and a central plant (no text or symbols)natural_image
Illustration of a hand operating a tool to lift a tree branch with pine needles (no text or symbols)natural_image
Simple line drawing of a grassy slope with a small plow and stick (no text or symbols)natural_image
Simple line drawing of a grassy field with a small plow and a tool, no text or symbols present.natural_image
Simple line drawing of a grassy field with a small circular object at the base (no text or symbols)natural_image
Illustration of a person using a mechanical device with a dashed arrow indicating motion (no text or symbols)natural_image
Technical line drawing of a mechanical component with mounting holes and internal channels (no text or symbols)natural_image
Technical line drawing of a mechanical assembly with a housing and clamping mechanism (no text or symbols)text_image
Technical diagram of a mechanical device with labeled parts A and BВъздушен филтър
natural_image
Technical line drawing of a mechanical assembly with a component being inserted (no text or symbols present)natural_image
Technical line drawing of a car seatbelt with a belt switch and labeled component A (no text or symbols beyond label)natural_image
Technical line drawing of a mechanical tool or device with a black arrow indicating a specific component (no text or symbols present)natural_image
Technical line drawing of a mechanical component with threaded body and shaft (no text or symbols)text_image
Exploded view diagram of a mechanical device with numbered parts for identification and assembly reference.natural_image
Line drawing of a person using a manual power tool to clean vegetation, with a tree in the background (no text or symbols)natural_image
Line drawing of a helmet with a pair of goggles and a flat blade (no text or symbols)natural_image
Line drawing of a mechanical component or bracket (no text or symbols)natural_image
Line drawing of a mechanical component or device (no text or symbols)natural_image
Line drawing of two human gloves with bandages and shaded areas (no text or symbols)natural_image
Line drawing of a pair of boots with visible tread pattern and buckles (no text or symbols)text_image
Diagram of a mechanical device with labeled parts A and B, showing directional arrows indicating movement or force.natural_image
Line drawing of a handheld device with a scroll wheel and handle, showing a directional arrow (no text or symbols)natural_image
Diagram of a handheld device with two directional arrows indicating movement or force (no text or symbols present)natural_image
Illustration of a worker using a tool to adjust the base of a mechanical component (no text or symbols present)natural_image
Line drawing of a handheld device with a button and arrow indicator (no text or symbols)natural_image
Line drawing of a mechanical tool or tool with a curved blade and base mount (no text or symbols)
natural_image
Technical line drawing of a mechanical assembly with gear and shaft components (no text or symbols)natural_image
Technical line drawing of a mechanical device with no visible text or symbolsnatural_image
Line drawing of a person adjusting a seatbelt with arrows indicating clockwise motion (no text or symbols)Kipufogódob

natural_image
Technical line drawing of a mechanical component with mounting holes and internal cavities (no text or symbols)natural_image
Illustration of a hand operating a propeller with a rotating nut, showing mechanical assembly (no text or symbols)
FIGYELMEZTETÉS: A
natural_image
Two technical line drawings of mechanical components: a circular gear-like part and a curved blade with internal features (no text or symbols)natural_image
Four abstract geometric shapes with varying line styles and fill patterns (no text or symbols)natural_image
Technical line drawing of two mechanical components: a circular component with curved leads and a triangular plate with internal cutouts (no text or symbols)natural_image
Simple line drawing of a grater and shield with an arrow indicating direction (no text or symbols)natural_image
Simple line drawing of a tool and a blade-like object with an arrow indicating direction (no text or symbols)natural_image
Simple line drawing of a tool with a handle and arrow indicating direction (no text or symbols)
natural_image
Simple line drawing of a tool interacting with a shield-like shape (no text or symbols)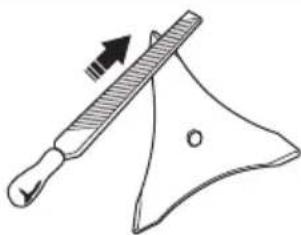
natural_image
Simple line drawing of a triangular tool with an arrow indicating direction (no text or symbols)natural_image
Illustration of a person in protective gear using a tool to measure teeth, with an inset showing a close-up of teeth (no text or symbols present)natural_image
Pure mechanical component diagram without any text, numbers, or symbolsnatural_image
Diagram showing two mechanical components with arrows indicating direction of movement (no text or symbols)
natural_image
Three technical line drawings of mechanical components: a cylindrical device with a loop, a flat plate with a circular cutout, and a spool (no text or symbols)natural_image
Technical line drawing of a mechanical device with connectors and wiring (no text or symbols)natural_image
Two technical diagrams showing a mechanical component with a prohibition symbol (no text or labels present)text_image
L A C A Btext_image
Technical diagram illustrating gear meshing and mounting process with labeled components A, B, C, Dnatural_image
Diagram of a mechanical device with labeled component E and directional arrow (no text or symbols beyond labels)text_image
Technical diagram of a mechanical device with labeled parts including H, J, K, I, L, and A.text_image
Technical diagram of a mechanical assembly with labeled parts including gears and a motor housingnatural_image
Technical illustration showing two mechanical components with gear and tool paths, no text or symbols presentnatural_image
Diagram showing a circular mechanical component with internal segments and an inset close-up of a stepped mechanism (no text or symbols)natural_image
Illustration of a person wearing a head covering and holding an object, with a downward arrow indicating motion (no text or symbols)natural_image
Illustration of a person using a manual power shaver (no text or symbols present)text_image
Diagram illustrating fuel injection and rejection symbols, showing a container with fuel drop and fuel nozzle, and two crossed-out containers.
natural_image
Illustration of a person in uniform holding an object, no text or symbols presentnatural_image
Simple black-and-white icon showing a fuel pump with a droplet and plus sign (no text or symbols)natural_image
Three abstract line drawings showing directional arrows and shapes, no text or symbols presentnatural_image
Simple line drawing of a circular component with a black arrow pointing downward (no text or symbols)natural_image
Diagram of a hex nut with a curved arrow indicating rotational motion (no text or symbols)natural_image
Technical line drawing of a mechanical device with no visible text or symbolsA motor beindítása
natural_image
Technical line drawing of a mechanical device with no visible text or symbolsnatural_image
Technical line drawing of a mechanical device with a close-up inset showing a labeled component (no text or symbols present)
natural_image
Technical line drawing of a handheld device with a black arrow pointing to the right side (no text or symbols present)natural_image
Illustration of a worker in safety gear handling equipment (no text or symbols)natural_image
Line drawing of a handheld device with a black arrow pointing to the right side (no text or symbols)Késlökés
natural_image
Illustration of a person spraying water with a long tool, surrounded by trees and pathways (no text or symbols)natural_image
Illustration showing a person bending over a tree with an arrow indicating direction, next to a cartoon figure with a ball (no text or symbols)natural_image
Illustration showing a tree pruning method and a person using a net to reach (no text or symbols)Fák kidöntése előre
natural_image
Simple line drawing of a person pulling a rope with a downward arrow, no text or symbols presentnatural_image
Simple line drawings of a tree stump, a gear cutter, and a person holding a large circular object (no text or symbols)natural_image
Illustration showing a gear cutter cutting through a saw and then moving a tree with a directional arrow (no text or symbols)
natural_image
Illustration of a person using a tool to spread soil or vegetation around a central plant (no text or symbols)natural_image
Illustration of a hand using a pulley to measure a pine cone (no text or symbols)natural_image
Simple line drawing of a grassy slope with a small plow and stick (no text or symbols)natural_image
Simple line drawing of a grassy field with a shovel and stick, no text or symbols presentFüritkítás
natural_image
Simple line drawing of a grassy field with a small circular object at the top (no text or symbols)natural_image
Illustration of a person using a mechanical device with motion arrows indicating direction (no text or symbols)A fü seprése
natural_image
Technical line drawing of a mechanical device with labeled component 'T' and circular motion arrows (no text or symbols beyond label)natural_image
Technical line drawing of a mechanical housing or enclosure component (no text or symbols)natural_image
Technical line drawing of a mechanical assembly with a housing and clamping mechanism (no text or symbols)text_image
Technical diagram of a mechanical device with labeled parts A and BLégszűrő
natural_image
Technical line drawing of a mechanical assembly with no visible text or symbolsnatural_image
Technical line drawing of a mechanical component with a belt and labeled point A (no text or symbols beyond label)Szöghajtás
natural_image
Technical line drawing of a mechanical tool or device with a knob and lever mechanism (no text or symbols)natural_image
Technical line drawing of a mechanical component with threaded end and shaft (no text or symbols)text_image
Exploded view diagram of a mechanical device with numbered parts for identification and assembly reference.natural_image
Line drawing of a person spraying water with a tool, next to a tree (no text or symbols)natural_image
Line drawing of a helmet and gear assembly (no text or symbols)natural_image
Line drawing of a mechanical component or device with no visible text or symbolsnatural_image
Line drawing of a mechanical component or device with no visible text or symbolsnatural_image
Line drawing of a boots with visible tread pattern and buckles (no text or symbols)text_image
Diagram of a medical or surgical device with labeled parts A and B, showing directional arrows indicating movement or force.natural_image
Diagram of a handheld device with a scroll and arrow indicator (no text or symbols)natural_image
Diagram of a medical or surgical device with two directional arrows indicating movement or force (no text or symbols present)natural_image
Illustration of a worker using a tool to adjust equipment, showing mechanical components and motion arrows (no text or symbols)natural_image
Line drawing of a medical or surgical device with an arrow pointing to a button (no text or symbols present)natural_image
Technical line drawing of a mechanical tool or device with a curved blade and base mount (no text or symbols)
natural_image
Technical line drawing of a mechanical assembly with gear and shaft components (no text or symbols)natural_image
Technical line drawing of a mechanical device with no visible text or symbolsnatural_image
Line drawing of a person adjusting a belt buckle, showing two hands and one belt buckle (no text or symbols)Tłumik

natural_image
Technical line drawing of a mechanical component with mounting holes and internal cavities (no text or symbols)natural_image
Diagram showing a hand operating a propeller with a nut, illustrating rotational motion (no text or symbols)
natural_image
Technical line drawing of a gear and blade assembly (no text or symbols)natural_image
Four abstract geometric shapes with varying line styles and centers, no text or symbols presentnatural_image
Technical line drawings of two mechanical components: a circular component with side handles and a triangular plate with cutouts (no text or symbols)natural_image
Simple line drawing of a tool interacting with a shield-like object, no text or symbols presentnatural_image
Technical line drawing of a tool and part with an arrow indicating direction (no text or symbols)natural_image
Simple line drawing of a tool with an arrow indicating direction (no text or symbols)
natural_image
Two diagrams showing a tool interacting with a blade-like object, one with an arrow indicating direction (no text or symbols)natural_image
Illustration of a person in protective gear using a tool to measure bone structure, with an inset showing a close-up of the bone (no text or symbols present)natural_image
Simple line drawing of a mechanical clamp or bracket (no text or symbols)natural_image
Diagram showing two mechanical components with arrows indicating motion or force direction (no text or symbols)
natural_image
Line drawings of three different household appliances: a spool, a front panel with a circular button, and a coiled spool (no text or symbols)natural_image
Technical line drawing of a mechanical device with wires and connectors (no text or symbols)natural_image
Two technical diagrams showing a mechanical component with a prohibition symbol (no text or labels present)text_image
L A C A Btext_image
Technical diagram of a mechanical component with labeled parts A through H, showing exploded view and assembly details.text_image
Technical diagram illustrating four labeled mechanical or structural components (A, B, C, D) with magnified views of a gear or tool assembly.natural_image
Technical line drawing of a mechanical component with labeled point E and directional arrow (no text or symbols beyond basic diagram)text_image
Technical diagram of a mechanical device with labeled parts including H, J, K, I, L, and A.text_image
Technical diagram of a mechanical gear assembly with labeled components A through Gtext_image
Technical diagram showing gear meshing and tool path changes, with Chinese annotations indicating motion direction.natural_image
Diagram of a circular mechanical component with internal segments and an inset showing a stepped assembly (no text or symbols)©
text_image
Safety warning illustration showing fuel injection and discharge symbols with a person holding a bagnatural_image
Simple black-and-white icon showing a droplet and a fuel pump with a plus sign (no text or symbols)natural_image
Three abstract line drawings showing directional arrows and curved shapes, no text or symbols presentnatural_image
Simple line drawing of a circular ring with a downward arrow pointing to its center (no text or symbols)natural_image
Diagram of a hex nut with a curved arrow indicating rotational motion (no text or symbols)natural_image
Diagram of a robotic arm with two directional arrows indicating movement or force (no text or symbols present)natural_image
Technical line drawing of a mechanical device with a black arrow pointing to a component (no text or symbols present)natural_image
Technical line drawing of a mechanical device with a labeled inset showing a component (no text or symbols present)
natural_image
Technical line drawing of a handheld device with a black arrow pointing to the handle (no text or symbols present)natural_image
Illustration of a worker in hard hat and safety gear handling a block (no text or symbols)natural_image
Technical line drawing of a handheld device with a black arrow pointing to the handle (no text or symbols present)Odbicie tarczy
flowchart
graph TD
    A["Plant"] --> B["Leafy Plant"]
    B --> C["Leafy Plant"]
    C --> D["Leafy Plant"]
    D --> E["Leafy Plant"]
    E --> F["Leafy Plant"]
    F --> G["Leafy Plant"]
    G --> H["Leafy Plant"]
    H --> I["Leafy Plant"]
    I --> J["Leafy Plant"]
    J --> K["Leafy Plant"]
    K --> L["Leafy Plant"]
    L --> M["Leafy Plant"]
    M --> N["Leafy Plant"]
    N --> O["Leafy Plant"]
    O --> P["Leafy Plant"]
    P --> Q["Leafy Plant"]
    Q --> R["Leafy Plant"]
    R --> S["Leafy Plant"]
    S --> T["Leafy Plant"]
    T --> U["Leafy Plant"]
    U --> V["Leafy Plant"]
    V --> W["Leafy Plant"]
    W --> X["Leafy Plant"]
    X --> Y["Leafy Plant"]
natural_image
Line drawing of a person spraying water over trees and a path (no text or symbols)natural_image
Illustration showing a tree planting with a shovel and a person holding a ball (no text or symbols)natural_image
Simple line drawing showing a tree with a stick and a person holding a ball, no text or symbols present.natural_image
Simple line drawing of a person pushing a large circular object with a downward arrow, no text or symbols present.natural_image
Simple line drawing showing a tree stump and a person with a large tree cutout (no text or symbols)natural_image
Illustration showing a person cutting wood with a magnified inset showing a tree trunk and a tool, next to a directional arrow indicating rotation (no text or symbols)
natural_image
Illustration of a person spraying plants with a tool, showing leaves and a central plant (no text or symbols)natural_image
Illustration of a person using a pulley system to measure tree branches (no text or symbols)natural_image
Simple line drawing of a grassy slope with a small utility pole (no text or symbols)natural_image
Simple line drawing of a grassy field with a plow and a stick, no text or symbols presentUsuwanie trawy
natural_image
Simple line drawing of a grassy field with a small mechanical component at the base (no text or symbols)natural_image
Illustration of a person holding a mechanical lever with a dashed arrow indicating motion (no text or symbols)Zamiatanie trawy
natural_image
Technical line drawing of a mechanical component with mounting holes and internal cavities (no text or symbols)natural_image
Technical diagram of a mechanical assembly showing a housing component being inserted into a clamping bracket (no text or labels present)text_image
Technical diagram of a mechanical device with labeled parts A and BFiltr powietrza
natural_image
Technical line drawing of a mechanical device with internal components and a separate view showing a component (no text or symbols present)natural_image
Mechanical assembly diagram showing a belt switch and gear mechanism (no text or labels)natural_image
Technical line drawing of a mechanical tool or device with no visible text or symbolsnatural_image
Technical line drawing of a mechanical component with threaded body and shaft (no text or symbols)Dane techniczne
text_image
Exploded view diagram of a mechanical device with numbered parts for identification and assembly reference.natural_image
Line drawing of a person in protective gear using a long-handled tool to clean grass near a tree (no text or symbols)natural_image
Line drawing of a helmet and hard hat device (no text or symbols)natural_image
Line drawing of a mechanical component or device (no text or symbols)natural_image
Line drawing of a mechanical component or bracket (no text or symbols)natural_image
Line drawing of a pair of boots with visible tread pattern and buckles (no text or symbols)text_image
Diagram of a handheld device with labeled parts A and B, showing directional arrows indicating movement or force.natural_image
Line drawing of a handheld device with a black arrow pointing to the left side (no text or symbols)natural_image
Diagram of a handheld device with two directional arrows indicating movement or force (no text or symbols present)natural_image
Illustration of a worker using a tool to lift a workpiece, with motion arrows indicating movement (no text or symbols)Seiskamislüliti kontrollimine
natural_image
Line drawing of a medical or surgical device with a black arrow pointing to a specific component (no text or symbols present)Lõikeosa kaitse
natural_image
Technical line drawing of a mechanical tool or clamp assembly (no text or symbols present)
natural_image
Technical line drawing of a mechanical assembly with gear and shaft components (no text or symbols)natural_image
Technical line drawing of a mechanical device with no visible text or symbolsnatural_image
Line drawing of a person adjusting a belt switch mechanism (no text or symbols)Summuti

natural_image
Technical line drawing of a mechanical component with mounting holes and internal cavities (no text or symbols)natural_image
Illustration of a hand turning a propeller with a nut, showing rotational motion (no text or symbols)natural_image
Two technical line drawings of mechanical components: a circular gear-like part and a curved blade with internal features (no text or symbols)natural_image
Four abstract geometric shapes with no text or symbols: triangular, rectangular, and irregular forms (no text or symbols present)natural_image
Technical line drawings of two mechanical components: a circular component with side handles and a triangular plate with cutouts (no text or symbols)natural_image
Simple line drawing of a grater and shield with an arrow indicating direction (no text or symbols)natural_image
Simple line drawing of a tool and a mechanical part with an arrow indicating direction (no text or symbols)natural_image
Simple line drawing of a tool with a handle and arrow indicating direction (no text or symbols)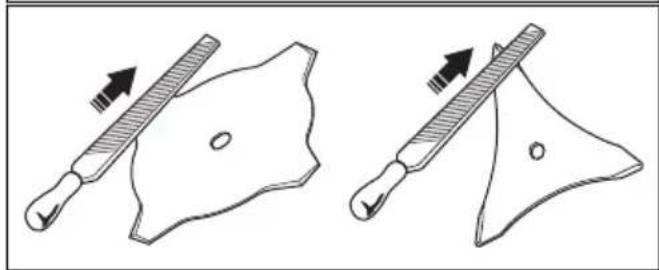
natural_image
Two diagrams showing a tool interacting with a shield-like object, one with an arrow indicating direction (no text or symbols present)Saetera teritamine

natural_image
Illustration of a person in protective gear using a tool to measure a tree trunk, with an inset showing the same tree structure (no text or symbols present)natural_image
Simple line drawing of a mechanical component or bracket with no text or symbols• Hoidke viili 15° nurga all.
natural_image
Diagram showing two mechanical components with arrows indicating motion or force direction (no text or symbols)
natural_image
Three technical line drawings of mechanical components: a circular component, a rectangular plate with a circular symbol, and a spool (no text or labels)natural_image
Technical line drawing of a mechanical device with connectors and wiring (no text or symbols)natural_image
Two technical diagrams showing a mechanical component with a prohibition symbol (no text or labels present)text_image
L A C A Btext_image
Technical diagram of a mechanical component with labeled parts A through H, showing exploded view and assembly details.Märkus: Vasakkeere.
text_image
Technical diagram showing mechanical assembly steps with labeled components A, B, C, and Dnatural_image
Diagram of a mechanical device with labeled component E and directional arrow (no text or symbols beyond labels)text_image
Technical diagram showing mechanical assembly with labeled parts A through K, including a valve and adjustment mechanism.text_image
Technical diagram of a mechanical assembly with labeled parts including gears, shafts, and housing componentsMärkus: Vasakkeere.
text_image
Technical diagram showing gear meshing and wheel turning process with directional arrows indicating motionTransportkaitsme kinnitamine
natural_image
Diagram of a circular mechanical component with internal segments and an inset showing a stepped mechanism (no text or symbols)Kanderihmade reguleerimine

natural_image
Illustration of a person wearing a helmet with a downward arrow indicating motion or pressure (no text or symbols)natural_image
Illustration of a worker using a long-handled tool to clean or walk (no text or symbols present)text_image
Safety warning illustration showing fuel injection and discharge symbols with a worker holding a devicenatural_image
Simple black-and-white icon showing a droplet and a fuel pump with a plus sign (no text or symbols)natural_image
Simple line drawing with arrows pointing to a curved surface and a small circle, no text or symbols present.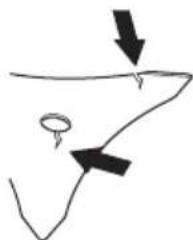
natural_image
Simple line drawing of a curved surface with two arrows pointing downward and a small circle inside, no text or symbols present.natural_image
Simple line drawing of a circular ring with a downward arrow pointing to its center (no text or symbols)natural_image
Simple line drawing of a hex nut with a curved arrow indicating rotation or cycle (no text or symbols)natural_image
Mechanical assembly diagram showing a robotic arm with directional arrows indicating motion (no text or labels)Mootori käivitamine
natural_image
Technical line drawing of a mechanical device with an arrow pointing to a component (no text or symbols present)- Seadke õhuklapi hoob drosseli sendisse.

natural_image
Technical line drawing of a mechanical device with a close-up inset showing a labeled component (no text or symbols present)
natural_image
Line drawing of a handheld device with a black arrow pointing to the handle (no text or symbols)natural_image
Illustration of a worker in safety gear handling equipment (no text or symbols visible)natural_image
Line drawing of a medical or surgical device with a black arrow pointing to a component (no text or symbols present)Tagasilöök
flowchart
graph TD
    A["Root Plant"] --> B["Plant Growth"]
    B --> C["Plant Infiltration"]
    C --> D["Plant Root Cultivation"]
    D --> E["Plant Growth to Root Plant"]
    E --> F["Plant Infiltration to Root Plant"]
    F --> G["Plant Growth to Root Plant"]
    G --> H["Plant Infiltration to Root Plant"]
    H --> I["Plant Growth to Root Plant"]
natural_image
Line drawing of a person walking on a path with trees and a dashed path (no text or symbols)natural_image
Illustration showing a tree planting with a tool and a person observing it (no text or symbols)Puu langetamine paremale
natural_image
Illustration showing a tree planting a sapling with an arrow indicating direction, and a person holding a ball (no text or symbols)Puu langetamine ettepoole
natural_image
Simple line drawing of a person pushing a large circular object with a downward arrow, no text or symbols present.natural_image
Simple line drawing showing a tree stump and a gear cutter cutting through a circular saw (no text or symbols)natural_image
Diagram showing a gear cutter cutting through a wooden mill with a moving tree, and a tool inserted into the tree with an arrow indicating rotation (no text or symbols)
natural_image
Illustration of a person using a tool to spread over a tree with leaves, no text or symbols presentnatural_image
Illustration of a hand using a pulley to measure a pine branch (no text or symbols)natural_image
Simple line drawing of a grassy field with a flatbed tool (no text or symbols)natural_image
Simple line drawing of a grassy field with a small plow and a tool, no text or symbols present.Rohu eemaldamine
natural_image
Simple line drawing of a grassy field with a small grass support structure at the base (no text or symbols)natural_image
Illustration of a person using a mechanical device with a dashed arrow indicating direction (no text or symbols)natural_image
Technical line drawing of a mechanical device with no visible text or symbolsnatural_image
Technical line drawing of a mechanical component with internal cavities and mounting holes (no text or symbols)natural_image
Technical line drawing of a mechanical assembly with a housing and clamping mechanism (no text or symbols)text_image
Technical diagram of a mechanical device with labeled parts A and BÖhufilter
natural_image
Technical line drawing of a mechanical assembly with a component and a separate housing (no text or symbols)natural_image
Technical line drawing of a mechanical component with a lock and labeled point A (no text or symbols beyond label)Reduktor
natural_image
Line drawing of a mechanical tool with a knob and lever mechanism (no text or symbols)natural_image
Technical line drawing of a spark plug with threaded end and shaft (no text or symbols)text_image
Exploded view diagram of a mechanical device with numbered parts for identification and assembly reference.natural_image
Line drawing of a person wearing protective gear using a long tool to clean vegetation, with a tree in the background (no text or symbols)natural_image
Line drawing of a helmet with a visor and a triangular cap (no text or symbols)natural_image
Line drawing of a mechanical component or device (no text or symbols)natural_image
Line drawing of a mechanical component or device with no visible text or symbolsnatural_image
Line drawing of two types of gloves with bandages and shaded areas (no text or symbols)natural_image
Line drawing of a pair of boots with visible tread pattern and buckles (no text or symbols)text_image
Diagram of a handheld device with labeled parts A and B, showing directional arrows indicating movement or force.natural_image
Line drawing of a handheld device with a black arrow pointing to the left side (no text or symbols)natural_image
Diagram of a medical or surgical device with two directional arrows indicating movement or force (no text or symbols present)natural_image
Illustration of a worker using a tool to adjust equipment, with no visible text or symbolsnatural_image
Line drawing of a medical or surgical device with a black arrow pointing to a specific component (no text or symbols present)natural_image
Technical line drawing of a mechanical tool or clamp assembly (no text or symbols)
natural_image
Technical line drawing of a mechanical assembly with gear and shaft components (no text or symbols)natural_image
Technical line drawing of a mechanical device with no visible text or symbolsnatural_image
Line drawing of a person adjusting a belt buckle, showing two hands and one belt buckle (no text or symbols)Trokšna slāpētājs

natural_image
Technical line drawing of a mechanical component with mounting holes and internal cavities (no text or symbols)natural_image
Illustration of a hand operating a propeller with a nut, showing rotational motion (no text or symbols)
natural_image
Two technical line drawings of mechanical components: a circular gear-like part and a curved blade with mounting holes (no text or symbols)- Izmantojiet asmenus un zāles nažus, lai plautu leknu zāli.
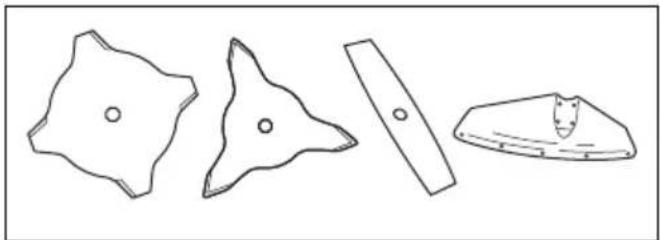
natural_image
Four abstract geometric shapes with no text or symbols: a star-like polygon, a triangular prism, and a curved rectangular base (no text or symbols)natural_image
Technical line drawings of two mechanical components: a circular component with curved ends and a triangular plate with cutouts (no text or symbols)natural_image
Simple line drawing of a tool interacting with a shield-like object (no text or symbols)natural_image
Diagram of a tool interacting with a mechanical part, showing a handle and blade (no text or symbols)natural_image
Simple line drawing of a folding tool with an arrow indicating direction (no text or symbols)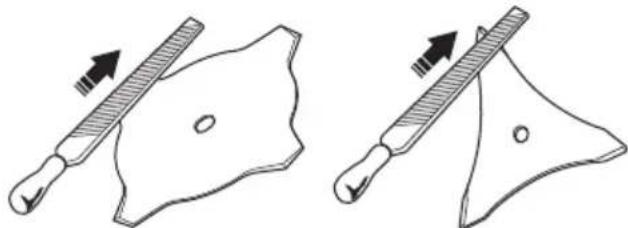
natural_image
Two diagrams showing a tool interacting with a shield-like object, one with an arrow indicating direction (no text or symbols present)natural_image
Illustration of a person in protective gear using a tool to measure bone structure, with an inset showing a close-up of the tooth (no text or symbols present)- Lietojiet 5,5 mm (7/32 collu) apalo vili ar viles rokturi.

natural_image
Simple line drawing of a mechanical component or bracket (no text or symbols)- Turiet vili 15° lenkī.
natural_image
Diagram showing two mechanical components with arrows indicating motion direction (no text or symbols)
natural_image
Three technical illustrations of mechanical components: a spool, a circular component with internal markings, and a coiled wire (no text or symbols present)natural_image
Technical line drawing of a mechanical device with wires and connectors (no text or symbols)natural_image
Two technical diagrams showing a mechanical component with a no-smoking symbol above it, no text or labels present.text_image
L A C A Btext_image
Technical diagram illustrating mechanical assembly steps with labeled components A, B, C, and Dnatural_image
Diagram of a mechanical device with labeled component E and directional arrow (no text or symbols beyond labels)text_image
Technical diagram showing mechanical assembly with labeled parts A, L, H, I, J, Ktext_image
Technical diagram of a mechanical gear assembly with labeled components (G, F, D, B, C)natural_image
Line drawing of a hand operating a gear with a rotating wheel and a tool, showing motion direction (no text or symbols)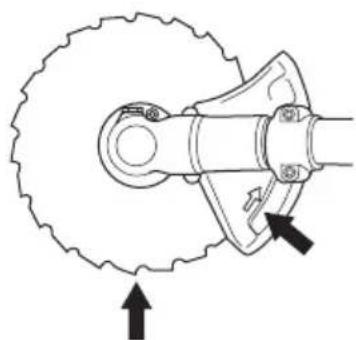
natural_image
Mechanical gear assembly diagram showing meshing gears and adjustment arrows (no text or labels)natural_image
Diagram of a circular mechanical component with internal segments and an inset showing a disassembled part (no text or symbols present)Uzkabes regulēšana

natural_image
Illustration of a person wearing a head covering and holding an object, with a downward arrow indicating motion (no text or symbols)natural_image
Illustration of a person using a long-handled tool to clean or disinfectant (no text or symbols present)text_image
Illustration showing a fuel can being used to prevent chemical discharge, with crossed-out containers and a person holding a bag.natural_image
Simple black-and-white icon showing a fuel pump with a droplet and plus sign, no text or symbols present.natural_image
Three abstract line drawings showing directional arrows and curved shapes, no text or symbols presentnatural_image
Simple line drawing of a circular ring with a downward arrow pointing to its center (no text or symbols)natural_image
Simple line drawing of a hex nut with a curved arrow indicating rotation or cycle (no text or symbols)natural_image
Line drawing of a robotic arm with attached sensors and directional arrows indicating motion (no text or symbols)natural_image
Technical line drawing of a mechanical device with a black arrow pointing to a component (no text or symbols present)natural_image
Technical line drawing of a mechanical device with a close-up inset showing a labeled component (no text or symbols present)
natural_image
Line drawing of a medical or surgical device with a black arrow pointing to a component (no text or symbols present)natural_image
Illustration of a worker in safety gear handling a box (no text or symbols)natural_image
Line drawing of a medical or surgical device with a black arrow pointing to a component (no text or symbols present)Asmens atsitiens
natural_image
Line drawing of a person walking on a path with trees and a dashed line indicating a path (no text or symbols)natural_image
Illustration showing a tree planting with a tool and a person observing (no text or symbols)Koka gāšana pa labi
Lai koks kristu pa labi, stumiet koka stumbra apakšējo dalu pa kreisi.
natural_image
Illustration showing a tree planting a sapling with an arrow indicating direction, and a stick figure holding a ball (no text or symbols)natural_image
Simple line drawing of a person pushing a large circular object with a downward arrow, no text or symbols present.Lielu koku gāšana
natural_image
Simple line drawing showing a tree stump and a gear cutter cutting through a circular saw (no text or symbols)- Zāgējiet cauri kokam no otras puses.

natural_image
Illustration showing a gear cutter cutting through a wooden mill with a moving tool, and a tree trunk being pulled by a tool (no text or symbols)
natural_image
Illustration of a person spraying plants with a tool, showing leaves and a central plant (no text or symbols)natural_image
Illustration of a hand using a pulley to measure a pine branch (no text or symbols)natural_image
Simple line drawing of a grassy field with a small plow and a tool (no text or symbols)natural_image
Simple line drawing of a grassy field with a tool and a small object nearby (no text or symbols)Zāles iztīrīšana
natural_image
Simple line drawing of a grassy field with a small grass support structure at the base (no text or symbols)natural_image
Illustration of a person holding a circular object with a dashed arrow indicating direction (no text or symbols)Zāles aizslaucīšana
natural_image
Technical line drawing of a mechanical component with mounting holes and internal cavities (no text or symbols)natural_image
Technical line drawing of a mechanical assembly with a housing and clamping mechanism (no text or symbols)natural_image
Technical line drawing of a mechanical assembly with a component and a separate housing (no text or symbols)- Tīriet filca gaisa ieplūdes filtru ar saspiestu gaisu.

natural_image
Mechanical component diagram showing a belt switch and gear assembly (no text or symbols)Koniskais zobrats
natural_image
Technical line drawing of a mechanical tool or device with no visible text or symbolsnatural_image
Technical line drawing of a spark plug with threaded end and shaft (no text or symbols)- Ja nepieciešams, nomainiet aizdedzes sveci.
Tehniskie dati
text_image
Exploded view diagram of a mechanical device with numbered parts for identification and assembly reference.natural_image
Line drawing of a person in protective gear using a long-handled tool to clean grass near a tree (no text or symbols)natural_image
Line drawing of a helmet with a visor and a triangular cap (no text or symbols)natural_image
Line drawing of a mechanical component or device (no text or symbols)natural_image
Line drawing of a mechanical component or device with no visible text or symbolsnatural_image
Line drawing of two gloves showing different grip designs (no text or symbols)natural_image
Line drawing of a pair of boots with visible tread pattern and buckles (no text or symbols)text_image
Diagram of a medical or laboratory device with labeled parts A and B, showing directional arrows indicating movement or force.natural_image
Line drawing of a handheld device with a black arrow pointing to the left side (no text or symbols)natural_image
Diagram of a handheld device with two directional arrows indicating movement or force (no text or symbols present)natural_image
Illustration of a worker using a tool to lift a workpiece, with motion arrows indicating movement (no text or symbols)Stabdymo jungiklio patikra
natural_image
Line drawing of a medical or laboratory device with a black arrow pointing to a component (no text or symbols present)Pjovimo jtaiso apsauga
natural_image
Technical line drawing of a mechanical tool or clamp assembly (no text or symbols)
natural_image
Technical line drawing of a mechanical assembly with gear and shaft components (no text or symbols)natural_image
Technical line drawing of a mechanical device with no visible text or symbolsnatural_image
Line drawing of a person adjusting a belt buckle, showing two hands and one belt buckle (no text or symbols)Duslintuvas

natural_image
Technical line drawing of a mechanical component with mounting holes and internal cavities (no text or symbols)natural_image
Illustration of a hand turning a propeller with a nut, showing rotational motion (no text or symbols)
natural_image
Technical line drawing of two mechanical components: a circular gear-like part and a curved blade with mounting holes (no text or symbols)natural_image
Four abstract geometric shapes with varying line styles and fill patterns (no text or symbols)natural_image
Technical line drawings of two mechanical components: a circular component with curved ends and a triangular plate with cutouts (no text or symbols)natural_image
Simple line drawing of a tool interacting with a shield-like object (no text or symbols)natural_image
Line drawing of a tool with a ruler and a mechanical part, no text or symbols presentnatural_image
Diagram showing two mechanical tool configurations with arrows indicating movement or force direction (no text or symbols present)natural_image
Illustration of a person in protective gear holding a tool near a tree, with an inset showing a close-up of a tooth (no text or symbols)natural_image
Simple line drawing of a mechanical component or bracket with no text or symbolsnatural_image
Diagram showing two mechanical components with arrows indicating direction of movement (no text or symbols)natural_image
Line drawings of three household appliances: a cylindrical fan, a circular button, and a spool (no text or symbols)natural_image
Technical line drawing of a mechanical device with wires and connectors (no text or symbols)natural_image
Two technical diagrams showing a mechanical component with a no-smoking symbol above its side (no text or labels present)text_image
L A C A Btext_image
Technical diagram of a mechanical component with labeled parts A through H, showing assembly or assembly details.text_image
Technical diagram illustrating mechanical assembly steps with labeled components A, B, C, and Dnatural_image
Diagram of a mechanical device with labeled component E and directional arrow (no text or symbols beyond labels)text_image
Technical diagram of a mechanical device with labeled parts including H, J, K, I, L, and A.text_image
Technical diagram of a mechanical assembly with labeled parts including gears, shafts, and housing componentsnatural_image
Illustration of a hand using a tool to drive a large gear (no text or symbols present)
natural_image
Mechanical gear assembly diagram showing a cam and wheel mechanism (no text or labels)natural_image
Diagram of a circular mechanical component with internal segments and an inset showing a sliding mechanism (no text or symbols)natural_image
Illustration of a person wearing a head covering and holding a scarf, with an arrow indicating direction (no text or symbols)natural_image
Illustration of a person using a long-handled tool to clean or spray (no text or symbols present)text_image
Safety warning illustration showing fuel injection and hazard symbols with a worker holding a devicenatural_image
Simple black-and-white icon showing a fuel pump with a droplet and plus sign (no text or symbols)natural_image
Three abstract line drawings showing directional arrows and curved shapes, no text or symbols presentnatural_image
Simple line drawing of a circular ring with a downward arrow pointing to its center (no text or symbols)natural_image
Simple line drawing of a hexagonal nut with a curved arrow indicating rotation or cycle (no text or symbols)natural_image
Diagram of a robotic arm with directional arrows indicating movement or force (no text or symbols present)Variklio užvedimas
natural_image
Technical line drawing of a mechanical device with a black arrow pointing to a component (no text or symbols present)natural_image
Technical line drawing of a mechanical device with a magnified inset showing a labeled component (no text or symbols present)
natural_image
Line drawing of a handheld device with a black arrow pointing to the right side (no text or symbols)natural_image
Illustration of a worker in safety gear handling equipment (no text or symbols visible)natural_image
Line drawing of a handheld device with a black arrow pointing to the handle (no text or symbols)Atatranka
natural_image
Line drawing of a person spraying water on a path with trees and a curved road (no text or symbols)natural_image
Illustration showing a tree planting with a shovel and a person holding a leaf, no text or symbols presentnatural_image
Illustration showing a tree pruning method and a stick figure with a ball (no text or symbols)natural_image
Simple line drawing of a person pushing a large circular object with a downward arrow, no text or symbols present.natural_image
Simple line drawing showing a tree with a stick and a person holding a large tree with spiral patterns (no text or symbols)natural_image
Illustration showing a person cutting wood with a gear cut and a tree being inserted, with an arrow indicating the direction of movement (no text or symbols present)
natural_image
Illustration of a person using a tool to spread over a tree with leaves, no text or symbols presentnatural_image
Illustration of a person using a manual tool to lift pine branches (no text or symbols)natural_image
Simple line drawing of a grassy field with a small shrub and a tool, no text or symbols present.natural_image
Simple line drawing of a grassy field with a small plow and a tool, no text or symbols present.natural_image
Simple line drawing of a grassy field with a small circular object at the top (no text or symbols)natural_image
Illustration of a person using a mechanical device with a dashed arrow indicating motion (no text or symbols)Žolès šlavimas
natural_image
Technical line drawing of a mechanical device with labeled component 'T' and rotational arrow (no text or symbols beyond label)natural_image
Technical line drawing of a mechanical component with mounting holes and internal structure (no text or symbols)natural_image
Technical line drawing of a mechanical assembly with a housing and clamping mechanism (no text or symbols)text_image
Technical diagram of a mechanical device with labeled parts A and BOro filtras
natural_image
Technical line drawing of a mechanical assembly with no visible text or symbolsnatural_image
Technical line drawing of a mechanical component with a labeled connection point (A), no readable text or symbols present.Kampinė pavara
natural_image
Technical line drawing of a mechanical tool or device with a black arrow indicating a specific component (no text or symbols present)natural_image
Technical line drawing of a spark plug with threaded shaft and mounting base (no text or symbols)text_image
Exploded view diagram of a mechanical device with numbered parts for identification and assembly reference.natural_image
Line drawing of a person using a manual shoveling soil next to a tree (no text or symbols)natural_image
Line drawing of a helmet with a visor and a flat blade (no text or symbols)natural_image
Line drawing of a mechanical device with no visible text or symbolsnatural_image
Line drawing of a mechanical component or device with no visible text or symbolsnatural_image
Line drawing of two human gloves showing different grip positions (no text or symbols)natural_image
Line drawing of a pair of boots with visible tread pattern and buckles (no text or symbols)text_image
Diagram of a medical or surgical device with labeled parts A and B, showing directional arrows indicating movement or force.natural_image
Diagram of a handheld device with a scroll and arrow indicator (no text or symbols)natural_image
Diagram of a handheld device with two directional arrows indicating movement or force (no text or symbols present)natural_image
Illustration of a worker using a tool to install a mechanical component, with no visible text or symbols.Kontrola vypínača
natural_image
Line drawing of a medical or laboratory device with a black arrow pointing to a component (no text or symbols)natural_image
Technical line drawing of a mechanical tool or device with a base mount (no text or symbols)
natural_image
Technical line drawing of a mechanical assembly with gear and shaft components (no text or symbols)natural_image
Technical line drawing of a mechanical device with no visible text or symbolsnatural_image
Line drawing of a person adjusting a seatbelt with arrows indicating motion (no text or symbols)Tlmič výfuku
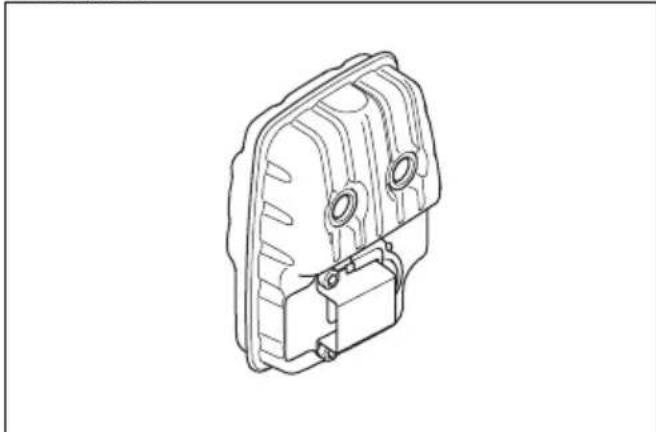
natural_image
Technical line drawing of a mechanical component with mounting holes and internal cavities (no text or symbols)natural_image
Illustration of a hand turning a propeller with a nut, showing rotational state (no text or symbols)
natural_image
Two technical line drawings of mechanical components: a circular gear-like part and a curved blade-like component with mounting holes (no text or symbols)natural_image
Four abstract geometric shapes with no text or symbols: triangular, rectangular, and irregular form (no text or symbols present)natural_image
Technical line drawings of two mechanical components: a circular component with side handles and a triangular plate with cutouts (no text or symbols)natural_image
Simple line drawing of a tool interacting with a shield-like shape, no text or symbols presentnatural_image
Diagram of a tool with a handle and arrow indicating direction (no text or symbols)natural_image
Simple line drawing of a tool with a handle and arrow indicating direction (no text or symbols)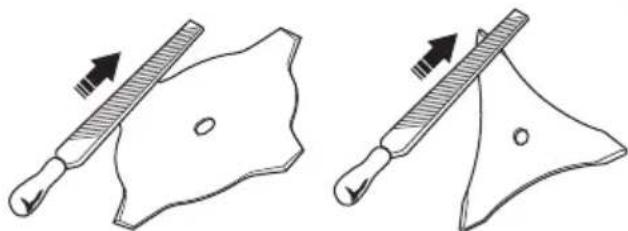
natural_image
Two diagrams showing a tool interacting with a shield-like object, one with an arrow indicating direction (no text or symbols present)natural_image
Illustration of a person in protective gear using a tool to extend a tree trunk, with an inset showing a close-up of the tree (no text or symbols present)- Používajte 5,5 mm (7/32 palca) okrúhly pilník s držiakom pilníka.
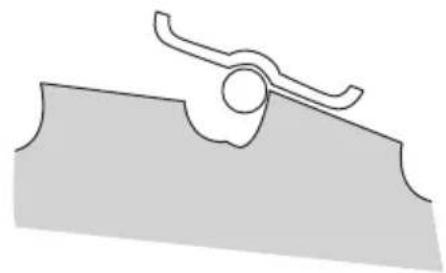
natural_image
Pure mechanical component diagram without any text, numbers, or symbolsnatural_image
Diagram showing two mechanical components with arrows indicating motion direction (no text or symbols)
natural_image
Line drawings of three household items: a cylindrical fan, a rectangular box with a circular element, and a spool (no text or symbols)natural_image
Technical line drawing of a mechanical device with connectors and wiring (no text or symbols)natural_image
Two technical diagrams showing a mechanical component with a prohibition symbol (no text or labels present)text_image
L A C A Btext_image
Technical diagram illustrating mechanical assembly steps with labeled components A, B, C, and Dnatural_image
Technical line drawing of a mechanical component with labeled point E and directional arrow (no text or symbols beyond basic diagram)text_image
Technical diagram of mechanical components with labeled parts A through K, showing assembly or assembly sequence.text_image
Technical diagram of a mechanical assembly with labeled parts including gears, shafts, and housing components.text_image
Technical diagram showing gear meshing and mechanical assembly steps with directional arrows indicating motionnatural_image
Diagram of a circular mechanical component with internal segments and an inset showing a stepped mechanism (no text or symbols)Nastavenie popruhu

natural_image
Illustration of a person wearing a headband with an arrow indicating direction (no text or symbols)natural_image
Illustration of a person using a long-handled tool to clean or walk (no text or symbols present)- Nechajte rezací nadstavec zlahka sa opierat' o zem. Nastavte svorku popruhu na správne vyváženie produktu.
text_image
Safety warning illustration showing fuel injection and hazard symbols for a person in uniform- Polovicu množstva benzínu nalejte do čistej nádoby na palivo.
- Pridajte celú dávku oleja.
- Zmes paliva premiešajte.
- Do nádoby pridajte zvyšné množstvo benzínu.
- Zmes paliva opatrne premiešajte.
natural_image
Simple black-and-white icon showing a droplet and a fuel pump with a plus sign (no text or symbols)natural_image
Simple line drawing of a curved surface with two arrows pointing downward (no text or symbols)
natural_image
Simple line drawing of a curved surface with two arrows pointing downward and one with a small oval shape inside (no text or symbols)natural_image
Simple line drawing of a circular object with a downward arrow pointing to its center (no text or symbols)natural_image
Simple line drawing of a hexagonal nut with a curved arrow indicating rotation or cycle (no text or symbols)natural_image
Technical line drawing of a mechanical device with two arrows indicating motion direction (no text or symbols)Štartovanie motora
-
Výrobok položte na rovný a stabilný povrch. Nedávajte rezací nadstavec na zem.
-
Opakovane stláčajte balónik pumpy, kým sa balónik nezačne plnit' palivom. Nie je potrebné úplne naplnit' balónik pumpy.
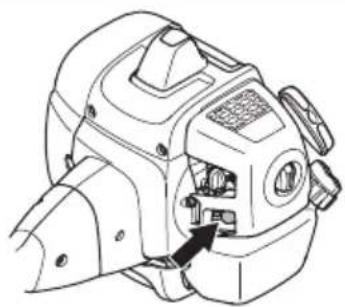
natural_image
Technical line drawing of a mechanical device with a black arrow pointing to a component (no text or symbols present)natural_image
Technical line drawing of a mechanical device with a labeled component (no text or symbols present)
natural_image
Technical line drawing of a handheld device with a black arrow pointing to the handle (no text or symbols present)natural_image
Illustration of a worker in safety gear handling a tool (no text or symbols visible)natural_image
Line drawing of a handheld device with a black arrow pointing to the left side (no text or symbols present)Odrazenie noža
natural_image
Line drawing of a person walking on a path with trees and utility poles (no text or symbols)natural_image
Illustration showing a tree pruning with an arrow and a person observing a circular object (no text or symbols)Spílenie stromu tak, aby padol vpravo
natural_image
Illustration showing a tree planting a sapling with an arrow indicating direction, and a person holding a leaf with a ball nearby (no text or symbols)Spílenie stromu smerom vpred
Ak chcete spílit' strom smerom dopredu, zatlačte jeho spodnú stranu dozadu.
natural_image
Simple line drawing of a person pushing a large circular object with a downward arrow, no text or symbols present.natural_image
Simple line drawing showing a tree stump and a person holding a large tree with a circular pattern (no text or symbols)text_image
Diagram illustrating a tree cutting process with labeled parts and directional arrow
natural_image
Illustration of a person using a tool to spread leafy plants around a central plant (no text or symbols)natural_image
Illustration of a hand operating a pulley system with a small inset showing a circular object (no text or symbols)natural_image
Simple line drawing of a grassy field with a small utility pole (no text or symbols)natural_image
Simple line drawing of a grassy field with a small plow and a tool, no text or symbols present.Odstránenie trávy
natural_image
Simple line drawing of a grassy field with a small mechanical component at the base (no text or symbols)natural_image
Illustration of a person in protective gear holding a long pole with a rotating wheel, connected by a dashed arrow indicating direction (no text or symbols)Odpratávanie trávy
natural_image
Technical line drawing of a mechanical device with labeled component 'T' and circular motion arrows (no text or symbols beyond label)natural_image
Technical line drawing of a mechanical component with internal cavities and mounting holes (no text or symbols)natural_image
Technical diagram of a mechanical assembly with a housing and clamping mechanism (no text or labels)- Ak je sitko zachytávača iskier zanesené, vyčistite ho. Ak je poškodené, vymeňte ho.

VAROVANIE: Ak je sitko zachytávača iskier poškodené, je potrebné vymenit' ho. Nepoužívajte výrobok, ak sitko zachytávača iskier na tlmiči výfuku chýba alebo je poškodené.

text_image
Technical diagram of a mechanical device with labeled parts A and BVzduchový filter
natural_image
Technical line drawing of a mechanical assembly with a component inserted into a housing (no text or symbols visible)natural_image
Technical line drawing of a mechanical component with a labeled connection point (A), no readable text or symbols present.natural_image
Line drawing of a mechanical tool or device with a knob and lever, no text or symbols presentnatural_image
Technical line drawing of a spark plug with threaded end and shaft (no text or symbols)text_image
Exploded view diagram of a mechanical device with numbered parts for identification and assembly reference.- Nož (nije dostupan za sva tržišta)
- Poklopac za sipanje maziva, menjač ugla
- Menjač ugla
- Štitnik nastavka za rezanje
- Osovina
- Prekidač za zaustavljanje
- Prekidač gasa
- Kočnica gasa
- Prsten vešanja
- Poklopac cilindra
- Ručica startera
- Rezervoar za gorivo
- Kontrola čoka
- Poklopac filtera za vazduh
- Stezna navrtka
- Oslona prirubnica
- Oslona šolja
-
Upravljački zahvatnik
-
Stezaljka upravljača
- Korisničko uputstvo
- Transportni štitnik (nije dostupan za sva tržišta)
- Ključ
- Blokirajuća osovinica (za proizvode bez imbus ključa)
- Uprtač
- Trimi glava
- Pumpa za vazduh
Simboli na proizvodu

natural_image
Line drawing of a person in protective gear using a long-handled tool to clean grass near a tree (no text or symbols)- Nemojte se preterano naginjati. Održavajte stabilan položaj stopala i dobru ravnotežu sve vreme.
- Pre nego što pokrenete proizvod, stavite ga na ravnu površinu, najmanje 3 m/10 stopa od izvora goriva i mesta na kojem ste punili gorivo. Uverite se da nema predmeta koji su u blizini ili dodiruju priključak za košenje.
- Ako se priključak za košenje okreće pri brzini praznog hoda, neka vam servisni agent to podesi. Nemojte koristiti proizvod pre nego što je podešen ili popravljen.
natural_image
Line drawing of a helmet and gear assembly (no text or symbols)- Koristite odobrenu zaštitu za uši.

natural_image
Line drawing of a mechanical component or device (no text or symbols)- Koristite odobrenu zaštitu za oči. Prilikom korišćenja vizira istovremeno se moraju koristiti odobrene zaštitne naočare. Odobrene zaštitne naočare jesu takve koje ispunjavaju standard ANSI Z87.1 u SAD ili EN 166 u zemljama Evropske unije.

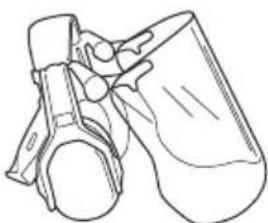
natural_image
Line drawing of a mechanical component or bracket (no text or symbols)natural_image
Line drawing of two human gloves with bandages and shaded areas (no text or symbols)- Nosite zaštitne čizme sa čeličnim delom na prstima i nekližućim donovima.
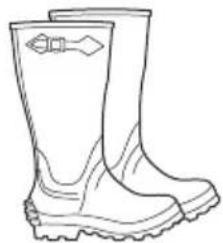
natural_image
Line drawing of a pair of boots with visible tread pattern and buckles (no text or symbols)text_image
Diagram of a handheld device with labeled parts A and B, showing directional arrows indicating movement or force.- Uverite se da je kontrola gasa blokirana u postavci praznog hoda kada je blokada prekidača gasa otpuštena.
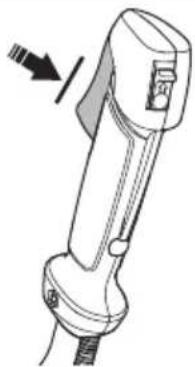
natural_image
Line drawing of a handheld device with a scroll wheel and arrow indicator (no text or symbols)natural_image
Diagram of a handheld device with two directional arrows indicating movement or force (no text or symbols present)-
Proverite da li se kontrola gasa i blokada prekidača gasa slobodno pomeraju i da li ispravno rade povratne opruge.
-
Pokrenite proizvod (pogledajte uputstva pod Pokretanje i zaustavljanje na stranici 524) i dajte pun gas.
-
Otpustite ručicu za gas i prekontrolišite da li se zaustavlja priključak za košenje i da li ostaje u zaustavljenom položaju. Podesite karburator ako se priključak za košenje pomera dok je gas u položaju praznog hoda. Pogledajte uputstva u poglavlju Podešavanje brzine praznog hoda na stranici 530.
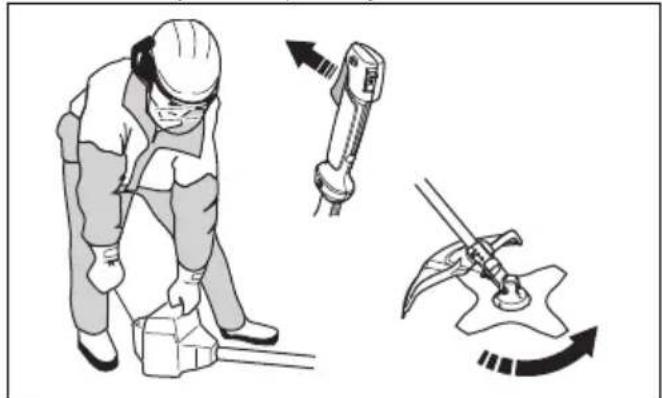
natural_image
Illustration of a worker using a tool to lift a workpiece, with motion arrows indicating movement (no text or symbols)Da biste proverili rad prekidača za zaustavljanje
-
Pokrenite motor.
-
Pomerite prekidač za zaustavljanje u položaj za zaustavljanje i proverite da li se motor zaustavio.

natural_image
Line drawing of a medical or surgical device with a pointed tip and arrow indicator (no text or symbols)natural_image
Technical line drawing of a mechanical tool or device with a curved blade and base mount (no text or symbols)
natural_image
Technical line drawing of a mechanical assembly with gear and shaft components (no text or symbols)Da biste proverili sistem prigušenja vibracija Sistem prigušenja vibracija smanjuje vibracije u ručicama na minimum što olakšava proces rada.

natural_image
Technical line drawing of a mechanical device with no visible text or symbols- Zaustavite motor.
- Izvršite vizuelni pregled deformacija i oštećenja, poput naprslina.
- Vodite računa o pravilnom postavljanju elemenata sistema za ublažavanje vibracija.
Da biste izvršili pregled mehanizma za brzo oslobađanje

natural_image
Line drawing of a person adjusting a seatbelt with arrows indicating motion (no text or symbols)Prigušivač

natural_image
Technical line drawing of a mechanical component with mounting holes and internal cavities (no text or symbols)- Nemojte koristiti motor sa oštećenim prigušivačem. Oštećeni prigušivač povećava nivo buke i rizik od požara. Neka vam pri ruci bude aparat za gašenje požara.
- Redovno proveravajte da je prigušivač pričvršćen na proizvod.
- Nemojte dodirivati motor ili prigušivač dok motor radi. Nemojte dodirivati motor ili prigušivač neko vreme nakon zaustavljanja motora. Vruće površine mogu da izazovu telesnu povredu.
- Vruć prigušivač može da izazove požar. Budite naročito pažljivi ako koristite proizvod blizu zapaljivih tečnosti ili isparenja.
natural_image
Illustration of a hand operating a propeller with a nut, showing rotational motion (no text or symbols)
natural_image
Line drawing of a cylindrical object with two curved arms, resembling a pot or lid (no text or symbols)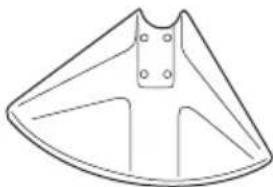
natural_image
Pure geometric diagram of a triangular fan or blade structure with internal cutouts and mounting holes (no text or symbols)- Pogrešno naoštren ili oštećen rezni list povećava opasnost od nesrećnih slučajeva. Održavajte zupce reznog lista u dobrom stanju i propisno naoštrene. Pridržavajte se uputstava koje navodi Oštrenje noževa za košenje trave i listova za košenje trave na
stranici 518 i koristite preporučenu turpiju za oštrenje.
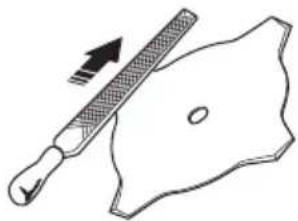
natural_image
Simple line drawing of a grater and shield with an arrow indicating direction (no text or symbols)natural_image
Diagram of a tool interacting with a mechanical part, showing motion direction (no text or symbols)- Nemojte da koristite oštećeni priključak za košenje.
- Pričvrstite zaštitu za transportovanje na list prilikom transporta ili skladištenja proizvoda.
Oštrenje noževa za košenje trave i listova za košenje trave
- Podjednako naoštrite sve ivice noževa za košenje trave i listova za košenje trave kako bi se održala ravnoteža. Koristite pljosnatu turpiju sa jednostrukim rezom.

natural_image
Simple line drawing of a tool with a handle and arrow indicating direction (no text or symbols)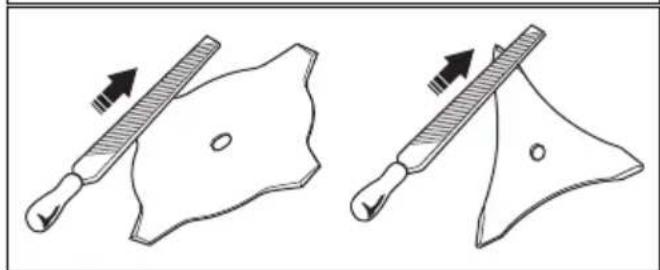
natural_image
Two diagrams showing a tool interacting with a shield-like shape, one with an arrow indicating direction (no text or symbols)natural_image
Illustration of a worker in protective gear using a tool to measure a tree trunk, with an inset showing a close-up of the tree (no text or symbols present)- Koristite okruglu turpiju prečnika 5,5 mm (7/32 in) zajedno sa držačem turpije.

natural_image
Pure mechanical component diagram without any text, numbers, or symbolsnatural_image
Diagram showing two mechanical components with arrows indicating motion or force direction (no text or symbols)
UPOZORENJE: Uvek odbacite sečivo koje je oštećeno. Nemojte pokušavati da ispravite savijeno ili uvijeno sečivo i da ga ponovo koristite.
Glava trimera

UPOZORENJE: Uvek vodite računa da je trimi nit čvrsto i ravnomerno omotana oko bubnja da bi se sprečile štetne vibracije.
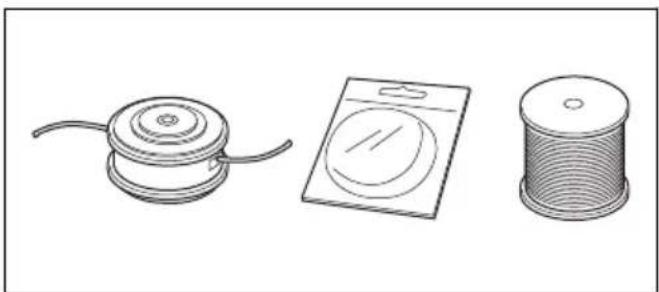
natural_image
Three technical illustrations of mechanical components: a cylindrical brush, a circular plate with a side panel, and a coiled spring (no text or symbols)- Koristite samo preporučene trimi glave i trimi niti.
- Koristite samo preporučene priključke za košenje.
-
Manje mašine zahtevaju manje trimi glave i obrnuto.
-
Dužina trimi niti je važna. Duži gajtan trimera zahteva veću jačinu motora nego što je to slučaj kod kratkog gajtana sa istim prečnikom gajtana.
- Proverite da li je nož koji se nalazi na zaštiti trimera neoštećen. Time se reže trimi nit na ispravnu dužinu.
- Potopite trimi nit u vodu tokom nekoliko dana pre korišćenja kako biste povećali dužinu radnog veka.
natural_image
Technical line drawing of a mechanical device with connectors and wiring (no text or symbols)Postavljanje listova i trimi glava

UPOZORENJE: Koristite samo odobreni štitnik za rezne listove. Pogledajte Tehnički podaci na stranici 533. Oštećeni štitnik može da izazove telesnu povredu.

natural_image
Two mechanical components with a no-smoking symbol, one plain and one with a circular cross (no text or labels)Postavljanje štitnika noža, lista za travu i noža za travu

OPREZ: Koristite samo odobreni štitnik za rezne listove. Pročitajte korisničko uputstvo.

text_image
L A C A B- Montirajte upravljački zahvatnik (B) na izlaznoj osovini.
- Okrećite izlaznu osovinu sve dok se jedan od otvora na pogonskom disku ne izravna sa odgovarajućim otvorom na kućištu menjača.
- Stavite trn za osiguranje (C) u otvor tako da se osovina osigura.
- Stavite nož (E), oslonu prirubnicu (F) i oslonu šolju (G) na izlaznu osovinu.
- Postavite navrtku (H). Držite osovinu ključa što je moguće bliže štitniku reznog lista. Da biste zategnuli navrtku, morate okrenuti ključ u smeru suprotnom od rotacije. Zategnite navrtku na obrtni momenat od 35–50 Nm (3,5–5 kpm).
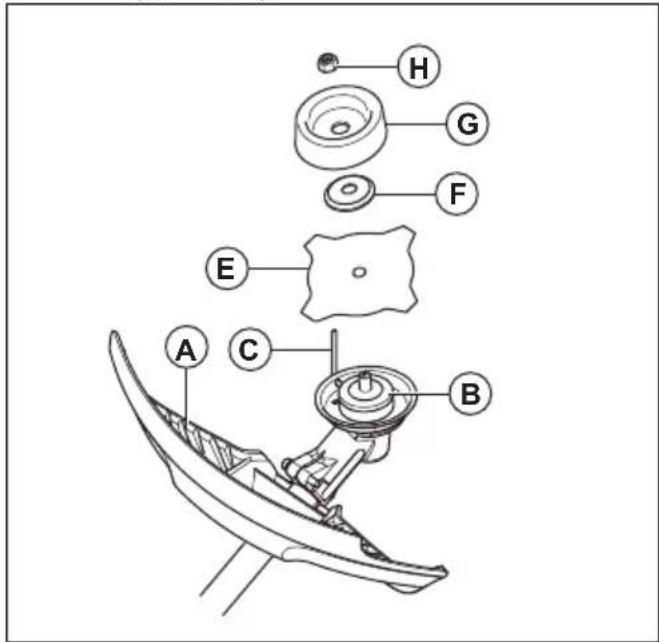
text_image
Technical diagram of a mechanical component with labeled parts A through H, showing exploded view and assembly details.text_image
Technical diagram showing mechanical assembly steps with labeled components A, B, C, and D- Postavite blokirajuću osovinicu ili imbus ključ (C) u žleb na glavi zavrtnja i pritegnite.
- Pričvrstite pogonski disk (D) na izlaznu osovinu.
- Okrećite izlaznu osovinu sve dok se jedan od otvora na pogonskom disku ne izravna sa odgovarajućim otvorom na kućištu menjača.
- Stavite trn za osiguranje ili imbus ključ (C) u otvor tako da se osovina blokira.
- Sastavite glavu trimera / plastične rezne listove (E). Okrećite glavu trimera / plastične rezne listove ulevo.

natural_image
Technical line drawing of a mechanical component with labeled point E and directional arrow (no text or symbols beyond basic diagram)- Demontaža se vrši obrnutim redosledom.
Postavljanje štitnika sečiva i sečiva testere

OPREZ: Koristite samo odobreni štitnik za rezne listove. Pogledajte Tehnički podaci na stranici 533.
- Uklonite montažnu ploču (H).
-
Postavite adapter (I) i držač (J) pomoću dva zavrtnja (K).
-
Postavite štitnik sečiva (A) na adapter pomoću 4 zavrtnja (L).

text_image
Technical diagram of a mechanical assembly with labeled parts A through K, showing exploded and assembled views.- Montirajte upravljački zahvatnik (B) na izlaznoj osovini.
- Okrenite osovinu lista sve dok se otvor zahvatnika ne poklopi sa odgovarajućim otvorom na kućištu menjača.
- Uložite trn za osiguranje (C) u otvor tako da se osovina osigura.
- Postavite nož (D) i oslonu prirubnicu (F) na izlaznu osovinu.
- Postavite navrtku (G). Navrtku treba zategnuti na obrtni momenat od 35-50 Nm (3,5-5kpm). Koristite ključ iz alatnog pribora. Držite dršku ključa što je moguće bliže zaštiti reznog lista. Navrtka se priteže kada se ključ okreće suprotno od smera rotacije.
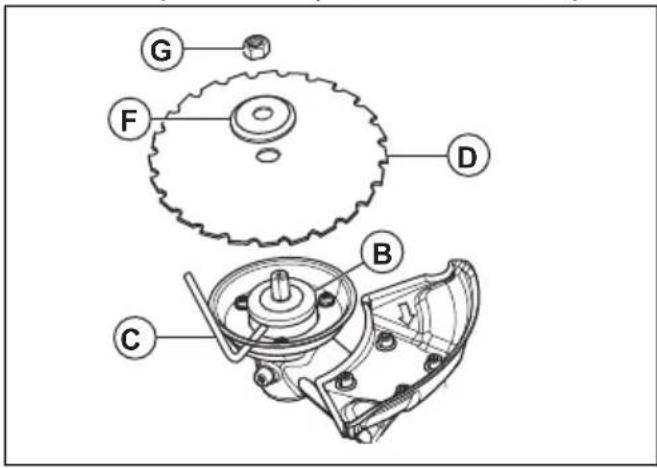
text_image
Technical diagram of a mechanical assembly with labeled parts including gears, shafts, and housing components.text_image
Technical diagram showing gear meshing and mechanical assembly steps with directional arrows indicating motionPostavljanje zaštite za transportovanje
natural_image
Diagram of a circular mechanical component with internal segments and an inset showing a fastening mechanism (no text or symbols)Podešavanje uprtača

natural_image
Line drawing of a person wearing a headlamp and holding an object, with a downward arrow indicating motion (no text or symbols)- Podesite uprtač tako da priključak za košenje bude paralelan sa tlom.

natural_image
Illustration of a worker using a long-handled tool to clean or walk (no text or symbols present)- Pustite da priključak za košenje lako leži na tlu. Podesite stezaljku uprtača da biste ispravno balansirali proizvod.
Napomena: Ako koristite list za travu, morate ga balansirati približno 10 cm / 4 inča iznad tla.
Rukovanje

text_image
Safety warning illustration showing fuel injection and hazard symbols for a worker holding a devicenatural_image
Simple black-and-white icon of a fuel pump with a droplet and plus sign (no text or symbols)natural_image
Three abstract line drawings showing directional arrows and shapes, no text or symbols present- Pregledajte oslonu prirubnicu u pogledu naprslina. Zamenite oslonu prirubnicu ako je oštećena.
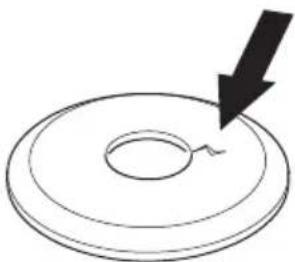
natural_image
Simple line drawing of a circular object with a downward arrow pointing to its center (no text or symbols)- Uverite se da se stezna navrtka ne može ukloniti ručno. Ako se može ukloniti ručno, onda ne blokira priključak za košenje u dovoljnoj meri i morate je zameniti.
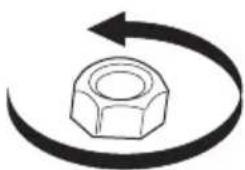
natural_image
Simple line drawing of a hexagonal nut with a curved arrow indicating rotation or cycle (no text or symbols)- Pregledajte štitnik lista u pogledu oštećenja ili naprslina. Zamenite štitnik lista ako je bio udaren ili ako ima naprsline.
- Pregledajte trimi glavu i štitnik priključka za košenje u pogledu oštećenja ili naprslina. Zamenite trimi glavu i štitnik priključka za košenje ako su bili udareni ili ako imaju naprsline.
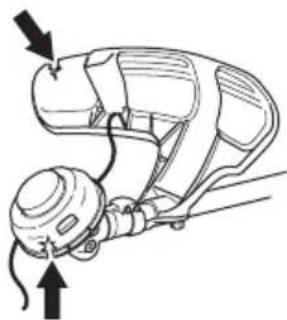
natural_image
Technical line drawing of a mechanical device with no visible text or symbolsPokretanje motora
-
Položite proizvod na ravnu i stabilnu površinu. Nastavak za rezanje ne naslanjajte na tlo.
-
Pritiskajte pumpu za vazduh dok gorivo ne počne da se puni u pumpi. Nije potrebno da se pumpa za vazduh potpuno napuni.
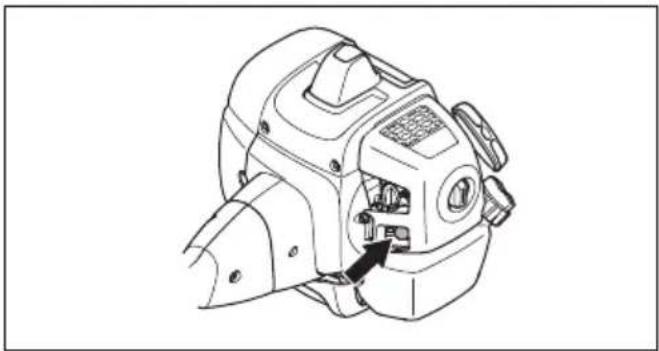
natural_image
Technical line drawing of a mechanical device with a black arrow pointing to a component (no text or symbols present)natural_image
Technical line drawing of a mechanical device with a close-up inset showing a labeled component (no text or symbols present)
UPOZORENJE: Priključak za košenje će početi da se okreće odmah kada pokrenete motor sa čokom.
- Postavite prekidač za pokretanje/zaustavljanje u položaj RUN.

natural_image
Line drawing of a medical or surgical device with a black arrow pointing to a specific component (no text or symbols present)- Držite proizvod na tlu levom rukom.
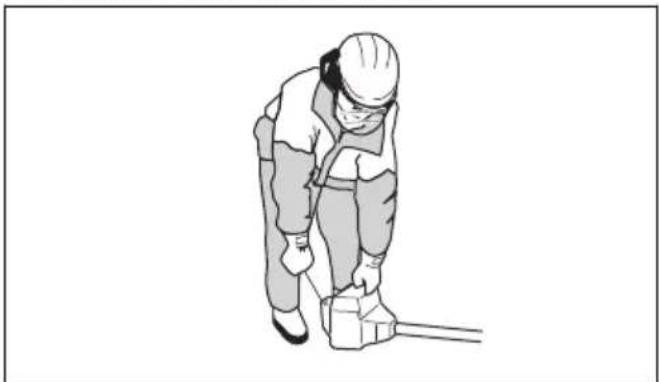
natural_image
Illustration of a worker in safety gear handling a tool, no text or symbols present-
Držite ručicu užeta startera desnom rukom.
-
Lagano izvlačite uže startera desnom rukom dok ne osetite određeni otpor.
UPOZORENJE: Nemojte namotavati uže startera oko ruke.
- Brzo i snažno povucite uže. Povlačite uže startera dok se motor ne pokrene.

natural_image
Line drawing of a medical or surgical device with a black arrow pointing to a specific component (no text or symbols present)Udar noža
- Udar noža je naglo pokretanje proizvoda ustranu, unapred ili unazad. Udar noža nastaje kada nož za košenje trave udari o predmet koji se ne može poseći. Rizik od udara noža se povećava u oblastima u kojima nije lako videti materijal koji se reže.
- Kada se udar noža dogodi, postoji rizik da se proizvod ili rukovalac pomere iz položaja. Nož koji se pokreće može udariti prisutne osobe i postoji rizik od telesnih povreda.
- Ako je nož savijen, ima pukotine, slomljen je ili oštećen, morate ga odbaciti.
- Koristite oštar nož. Rizik od udara noža se povećava kada nož nije oštar.
natural_image
Line drawing of a person walking on a path with trees and a dashed line, no text or symbols present- Krećite se duž nagiba, a ne gore i dole.
Čišćenje šume pomoću sečiva testere Obaranje stabla ulevo
Za obaranje u levu stranu, pritisnite dno stabla udesno.
- Primenite pun gas.
-
Postavite sečivo testere nasuprot stabla, kao što je prikazano na slici.
-
Nagnite sečivo testere i pritisnite ga snažno dijagonalno nadole udesno. U isto vreme, pritisnite stablo sa zaštitom lista.

natural_image
Illustration showing a tree pruning with a tool and a person holding a ball (no text or symbols)Obaranje stabla udesno
Za obaranje u desnu stranu, pritisnite dno stabla ulevo.
- Primenite pun gas.
- Postavite sečivo testere nasuprot stabla, kao što je prikazano na slici.
- Nagnite sečivo testere i pritisnite ga snažno dijagonalno nagore i udesno. U isto vreme, pritisnite stablo sa zaštitom lista.

natural_image
Simple line drawing showing a tree with a shovel and an arrow, next to a stick figure holding a ball (no text or symbols)Obaranje stabla unapred
Za obaranje unapred, pritisnite dno stabla unazad.
- Primenite pun gas.
- Postavite sečivo testere nasuprot stabla, kao što je prikazano na slici.
- Brzim pokretom povucite sečivo testere unapred.
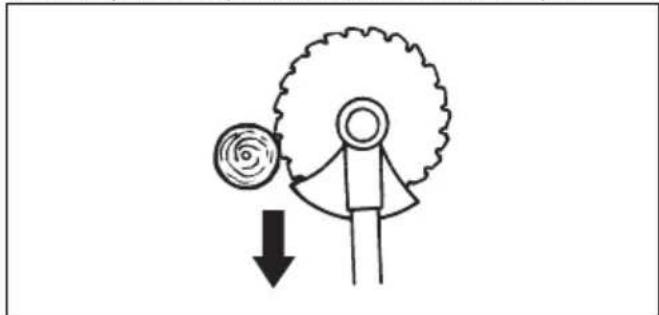
natural_image
Simple line drawing of a person pushing a large gear with a downward arrow (no text or symbols)Obaranje velikih stabala
Velika stabla moraju biti sečena sa 2 strane.
- Procenite u kom smeru će drvo pasti.
-
Primenite pun gas.
-
Načinite prvi rez na strani stabla na koju će pasti.

natural_image
Simple line drawings of a tree stump and a gear cutter (no text or symbols)- Presecite stablo sa druge strane.

natural_image
Illustration showing a wooden saw cutting through a gear with a moving tree and a tool, both without any text or symbols.
OPREZ: Ako se sečivo testere blokira, nemojte povlačiti proizvod naglim pokretom. To može dovesti do oštećenja sečiva testere, menjača ugla, osovine ili upravljača. Pustite ručice, držite osovinu sa 2 ruke i pažljivo povucite proizvod.
Napomena: Koristite više pritiska rezanja za obaranje malih stabala. Koristite manje pritiska rezanja za obaranje velikih stabala.
natural_image
Illustration of a person using a tool to spread soil or vegetation around a central plant (no text or symbols)a) Posecite visoko postavljena spoljna stabla.
b) Posecite spoljna stabla na odgovarajuću visinu.
c) Režite iz sredine. Ako ne možete pristupiti sredini, posecite visoko postavljena spoljna stabla i pustite ih da padnu. To smanjuje rizik da će se sečivo testere blokirati.
Raščišćavanje trave pomoću lista za travu

natural_image
Illustration of a person using a pulley system to measure a tree branch (no text or symbols present)- Namestite list za travu u levi ugao kako bi trava padala u liniji. Na taj način se olakšava sakupljanje trave.
- Održavajte stabilni položaj sa razmaknutim stopalima.
- Pomerite se unapred nakon svakog pokreta udesno i uverite se da ponovo imate stabilni položaj pre ponovnog košenja.
- Držite oslonu šolju sa blagim pritiskom o tlo kako biste bili sigurni da list za travu neće udariti o tlo.
- Pridržavajte se ovih uputstava da biste smanjili rizik da se isečeni materijal namota oko lista za travu.
a) Primenite pun gas.
b) Nemojte pomerati list za travu kroz isečeni materijal kada pomerate proizvod s leve na desnu stranu.
- Pre sakupljanja isečenog materijala potrebno je da zaustavite motor i skinete proizvod sa uprtača. Spustite proizvod na tlo.
natural_image
Simple line drawing of a grassy field with a small plow and tool (no text or symbols)-
Smanjite dužinu trimi niti za 10–12 cm / 4–4,75 inča.
-
Smanjite brzinu motora da biste smanjili rizik od oštećenja biljaka.
-
Koristite 80% gasa kada kosite travu blizu predmeta.

natural_image
Simple line drawing of a grassy field with a tool and a small object, no text or symbols present.Čišćenje trave
-
Držite glavu trimera iznad zemlje.
-
Nagnite glavu trimera.
-
Podrezujte krajevima strune trimera oko predmeta u radnoj oblasti.

natural_image
Simple line drawing of a grassy field with a small circular object at the top (no text or symbols)-
Nemojte pritiskati glavu trimera o tlo. To može prouzrokovati oštećenje proizvoda.
-
Pomerajte proizvod levo-desno prilikom košenja trave. Primenite punu brzinu.

natural_image
Illustration of a person wearing protective gear holding a long pole with a rotating wheel, connected by a dashed arrow indicating direction (no text or symbols)Pometanje trave
Protok vazduha iz rotirajuće trimi niti može se koristiti za uklanjanje isečene trave iz područja.
-
Držite trimi glavu i trimi nit paralelno sa tlom i iznad tla.
-
Primenite pun gas.
-
Pomerajte trimi glavu sa strane u stranu i raščišćavajte travu.

UPOZORENJE: Očistite poklopac trimi glave svaki put kada postavljate novu trimi nit kako biste sprečili neravnotežu i vibracije u ručicama. Takođe izvršite pregled drugih delova trimi glave i očistite ih po potrebi.
Održavanje
Uvod

UPOZORENJE: Pre održavanja
proizvoda je potrebno da pročitate i
natural_image
Technical line drawing of a mechanical device with labeled component 'T' and rotational arrow (no text or symbols beyond label)natural_image
Technical line drawing of a mechanical housing component (no text or symbols)natural_image
Technical line drawing of a mechanical assembly with a housing and clamping mechanism (no text or symbols)- Očistite mrežicu hvatača varnica ako je zapušena ili je zamenite ako je oštećena.
OPREZ: Hvatač varnica mora biti zamenjen ako je oštećen. Nemojte koristiti proizvod ako nedostaje hvatač varnica na prigušivaču ili ako je oštećen.

OPREZ: Ako je hvatač varnica često zapušen to može biti znak da je smanjen učinak katalizatora. Obratite se servisu radi pregleda prigušivača. Zapušeni hvatač varnica će prouzrokovati pregrevanje i rezultirati oštećenjem cilindra i klipa.
text_image
Technical diagram of a mechanical device with labeled parts A and BFilter za vazduh
Zaprljan filter za vazduh može da prouzrokuje neispravnost karburatora, probleme pri pokretanju, gubitak snage motora i habanje delova motora. Takođe čini da motor koristi više goriva nego što je potrebno. Očistite filter u intervalu od 8 časova, ili češće ako je proizvod radio u prašnjavim uslovima.
Napomena: Može biti potrebno podešavanje motora kada je filter za vazduh očišćen ili zamenjen. Pogledajte Podešavanje brzine praznog hoda na stranici 530
Čišćenje i pregled filtera za vazduh
- Uklonite filter za vazduh.
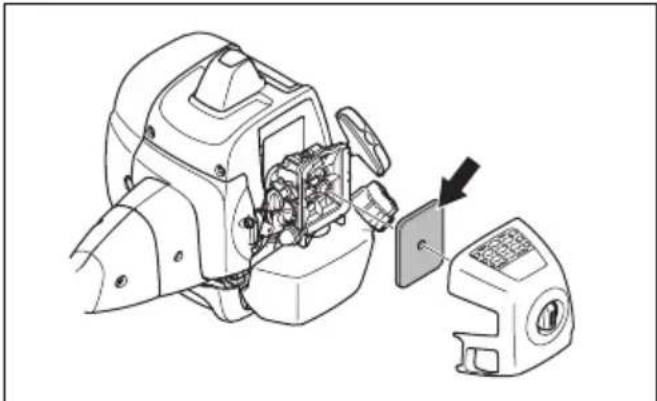
natural_image
Technical line drawing of a mechanical device with internal components and a separate component (no text or symbols)- Očistite filcani usisnik za vazduh komprimovanim vazduhom.

OPREZ: Zamenite filcani filter za vazduh ako ne može da se dobro očisti. Uvek zamenite oštećeni filcani filter za vazduh.
- Očistite unutrašnju površinu poklopca filtera. Koristite komprimovani vazduh ili četku.
Filter za gorivo
Ako oslabi dovod goriva u motor, uverite se da nije došlo do začepljenja na poklopcu rezervoara za gorivo i na filteru za gorivo (A).

natural_image
Line drawing of a car seatbelt mechanism with a labeled component (A), no text or symbols present.Menjač ugla
Menjač ugla je u fabrici napunjen odgovarajućom količinom maziva. Ali, pre korišćenja proizvoda, uverite se da je menjač ugla napunjen 3/4 mašću za podmazivanje. Koristite McCulloch specijalno mazivo.

natural_image
Technical line drawing of a mechanical tool or device with a black arrow pointing to a component (no text or symbols present)Ne morate da menjate mazivo u konusnom zupčaniku osim ako ga ne popravljate.
Pregled svećice
OPREZ: Uvek koristite preporučeni tip svećice. Neodgovarajući tip svećice može da oštei proizvod.
- Pregledajte svećicu ako je snaga motora mala, ako se teško pokreće ili nepravilno radi u praznom hodu.
- Da biste smanjili rizik od nakupljanja neželjenog materijala na elektrodama svećice, poštujte sledeća uputstva:
a) Uverite se da je broj obrtaja na praznom hodu pravilno podešen.
b) Uverite se da je mešavina dobro napravljena.
c) Uverite se da je filter za vazduh čist.
- Ako je svećica prljava, očistite je i ujedno proverite da li je razmak između elektroda tačan, pogledajte Tehnički podaci na stranici 533.

natural_image
Technical line drawing of a spark plug with threaded shaft and mounting base (no text or symbols)• Zamenite svećicu ako je potrebno.
Tehnički podaci
| B40 B Elite B40 BT Elite | ||
| Motor | ||
| Zapremina cilindra, cm3 | 40,1 40,1 | |
| Prečnik cilindra, ∅ mm 40,5 40,5 | ||
| Dužina hoda u cilindru, mm 31,1 31,1 | ||
| Brzina praznog hoda, o/min 3000 3000 | ||
| Preporučena maksimalna brzina, o/min 12000 12000 | ||
| Brzina izlazne osovine, o/min 8220 8220 | ||
| Maks. izlazna snaga motora, prema ISO 8893, kW na o/min | 1,5 na 9000 1,5 na 9000 | |
| Sistem paljenja | ||
| Svećica NGK CMR7H-10 NGK CMR7H-10 | ||
| Zazor elektroda, mm 0,9 – 1,0 0,9 – 1,0 | ||
| Sistem za gorivo i podmazivanje | ||
| Proizvođač/tip karburatora Ruixing H225D – Ruixing H225D – | ||
| Kapacitet rezervoara za gorivo, l/cm3 | 1 / 1000 | 1 / 1000 |
| Težina | ||
| Bez goriva, priključka za košenje i štitnika, kg | 7,3 | 7,4 |
| Emisija buke58 | ||
| Nivo buke, mereno dB(A) | 112 | 112 |
| Nivo zvučne snage, garantovano LWA dB(A) | 118 | 118 |
| Nivoi buke59Ekvivalentni nivo zvučnog pritiska kod uha rukovaoca, izmereno prema standardima EN ISO 11806 i ISO 22868, dB(A), min/maks. | ||
| Opremljeno trimi glavom (original) 100 | 100 | |
| Opremljeno listom za travu (original) | 99 | 99 |
| Opremljeno nožem testere (original) | – | 99 |
| Nivoi vibracije ^60 Ekvivalentni nivoi vibracije ( a_hv,eq ) na ručkama, mereni prema EN ISO 11806 i ISO 22867, m/s ^2 | ||
| Opremljeno glavom trimera (original), levo/desno 3,4 / 4,4 | 3,4 / 4,4 | |
| Opremljeno listom za travu (original), levo/desno 5,2 / 5,1 | 5,2 / 5,1 | |
| Opremljeno nožem testere (original), levo/desno – 4,5 / 4,2 | ||
| B40 B Elite, B40 BT Elite | ||
| Odobrena oprema Tip Štitnik priključka za rezanje, br. dela | ||
| Centralni otvor na noževima / listovi-ma, ∅ 25,4 mm | ||
| Navoj izlazne osovine M12 | ||
| List za travu/nož za travu List za travu | 255-4, 1" (∅ 255, 4 zu-ba) | 580 30 50-01 |
| List za travu 255-3 (∅ 255 3 zupca) 580 30 50-01 | ||
| Tarup Sečivo testere 200–22 (∅ 200–22 zu-ba) | 581 33 84-01 | |
| Trimi glava P35 580 30 50-01 | ||
| Oslona šolja Fiksirano – | ||
EZ deklaracija o usaglašenosti
Husqvarna AB, SE-561 82 Huskvarna, Švedska, tel: +46-36-146500, izjavljuje da su trimeri McCullochB40 B Elite serijskih brojeva od 2021 nadalje (serijski broj se nalazi posle godine, koja je jasno označena na pločici tipa) u skladu sa zahtevima DIREKTIVE VEĆA:
- od 17. maja 2006. „u vezi sa mašinerijom“ 2006/42/EZ
- od 26. februara 2014. „koja se odnosi na elektromagnetnu kompatibilnost“ 2014/30/EU
- od 8. maja 2000., „koja se odnosi na emisije buke u okruženju“ 2000/14/EZ. Ocenjivanje usaglašenosti u skladu sa Aneksom V. Za informacije koje se odnose na emisije buke, pogledajte poglavlje Tehnički podaci.
- od 8. juna 2011. „o ograničenju upotrebe određenih opasnih supstanci u električnoj i elektronskoj opremi“ 2011/65/EU.
text_image
Exploded view diagram of a mechanical device with numbered parts for identification and assembly reference.- Nož (nije dostupan za sva tržišta)
- Čep za punjenje maziva, pužni zglob
- Pužni zglob
- Štitnik reznog nastavka
- Vratilo
- Sklopka za zaustavljanje
- Regulator gasa
- Blokada gasa
- Ovjesni prsten
- Poklopac cilindra
- Ručica za uključivanje
- Spremnik za gorivo
- Regulator čoka
- Poklopac filtra zraka
- Sigurnosna matica
- Potporna prirubnica
- Potporni poklopac
-
Pogonski disk
-
Spojnica upravljača
- Korisnički priručnik
- Štitnik za transport (nije dostupan za sva tržišta)
- Nasadni ključ
- Zaporni klin (za proizvode bez šesterokutnog ključa)
- Naramenice
- Glava trimera
- Čašica pumpice za gorivo
Simboli na proizvodu

natural_image
Line drawing of a person in protective gear spraying water with a tree nearby (no text or symbols)- Ne posežite predaleko. Obavezno održavajte siguran položaj stopala i dobru ravnotežu.
- Proizvod prije pokretanja postavite na ravnu površinu, najmanje 3 m / 10 ft od izvora goriva ili mjesta ulijevanja goriva. Uvjerite se kako nema predmeta u blizini reznog nastavka ili u dodiru s njim.
- Ako se rezni nastavak okreće pri broju okretaja u praznom hodu, provedite podešavanje kod servisera. Proizvod nemojte upotrebljavati dok nije podešen i popravljen.
- Pazite na izbačene predmete. Uvijek upotrebljavajte odobrenu zaštitu za oči i držite se podalje od štitnika reznog nastavka. Kamenje i mali predmeti mogu biti izbačeni u oči i uzrokovati sljepilo ili druge ozljede.
- Proizvod s motorom u pogonu dopušteno je spuštati samo ako imate jasan pogled na njega.
- Nemojte uklanjati odrezani materijal ili dopustiti to drugima dok je motor u pogonu i rezna oprema se okreće, jer to može uzrokovati ozbiljne ozljede.
- Prije uklanjanja materijala zamotanog oko osovine pile ili zaglavljenog između štitnika reznog nastavka i reznog nastavka obvezno zaustavite motor i uvjerite se da je rezni nastavak nepomičan.
- Budite oprezni prilikom uklanjanja materijala u blizini rezne opreme. Pužni zglob jako se zagrije prilikom rada i može uzrokovati opekline.
- Ispušne pare motora vruće su i mogu sadržavati vruće iskre. Opasnost od požara. Budite pažljivi u blizini suhog i zapaljivog materijala.
-
Proizvod nemojte upotrebljavati u zatvorenim prostorima i u prostorima bez adekvatne ventilacije. Ispušne pare sadrže ugljikov monoksid, otrovan i vrlo opasan plin bez mirisa.
-
Prije prelaska u novo područje zaustavite motor. Prije prenošenja opreme obavezno postavite prijenosni štitnik.
- Preveliko izlaganje vibracijama može uzrokovati poremećaj cirkulacije ili oštećenje živčanog sustava kod ljudi koji sa slabom cirkulacijom. Ako imate simptome uzrokovane prevelikim izlaganjem vibracijama, obratite se liječniku. Primjeri takvih simptoma su umrtvljenost, nedostatak osjećaja, „škakljanje”, „trnci”, bol, manjak ili smanjena snaga, promjene u boji kože. Simptomi se uglavnom pojavljuju na prstima, rukama ili zglobovima. Opasnost se može povećati pri niskim temperaturama.
Oprema za osobnu zaštitu

UPOZORENJE: Prije upotrebe proizvoda pročitajte upozoravajuće upute u nastavku.
natural_image
Line drawing of a helmet and gear assembly (no text or symbols)- Upotrebljavajte odobrenu zaštitu sluha.

natural_image
Line drawing of a mechanical component or bracket (no text or symbols)- Koristite odobrenu zaštitu za oči. Ako nosite vizir, morate nositi i odobrene zaštitne naočale. Odobrene zaštitne naočale moraju ispunjavati normu ANSI Z87.1 za SAD ili EN 166 za države EU-a.
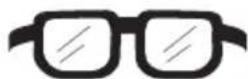
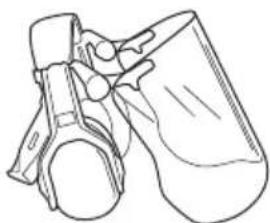
natural_image
Line drawing of a mechanical component or device (no text or symbols)natural_image
Line drawing of a pair of gloves with bandages and shaded areas (no text or symbols)natural_image
Line drawing of a pair of boots with visible tread pattern and buckles (no text or symbols)- Nosite odjeću napravljenu od čvrstog materijala. Uvijek nosite teške duge hlače i duge rukave. Nemojte nositi široku odjeću koja može zapinjati za grane i prutove. Ne nosite nakit, kratke hlače niti sandale. Ne budite bosonogi. Kosu podignite iznad ramena.
- Opremu za prvu pomoć držite u blizini.

text_image
Diagram of a handheld device with labeled parts A and B, showing directional arrows indicating movement or force.natural_image
Line drawing of a handheld device with a scroll wheel and handle, showing a directional arrow (no text or symbols)natural_image
Diagram of a handheld device with two directional arrows indicating movement or force (no text or symbols present)- Provjerite kreću li se slobodno regulator gasa i ograničenje okidača gasa i funkcioniraju li ispravno povratne opruge.
- Pokrenite proizvod (pogledajte upute u poglavlju pod Pokretanje i zaustavljanje na stranici 551) i primijenite puni gas.
- Otpustite gas i provjerite zaustavlja li se dodatak za rezanje i ostaje li nepomičan. Podesite rasplinjač ako se rezna oprema pomiče dok je gas u položaju praznog hoda. Pogledajte upute u poglavlju Podešavanje broja okretaja u praznom hodu na stranici 556.
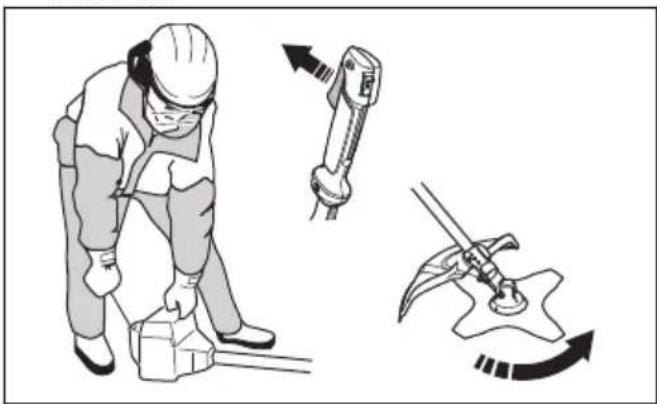
natural_image
Illustration of a worker using a tool to lift a gear, with motion arrows indicating movement (no text or symbols)natural_image
Line drawing of a medical or laboratory device with a black arrow pointing to a component (no text or symbols present)natural_image
Line drawing of a mechanical tool interacting with a base (no text or symbols)
natural_image
Technical line drawing of a mechanical assembly with gear and shaft components (no text or symbols)natural_image
Technical line drawing of a mechanical device with no visible text or symbolsnatural_image
Line drawing of a person adjusting a belt buckle, showing two hands and one belt buckle (no text or symbols)Prigušivač
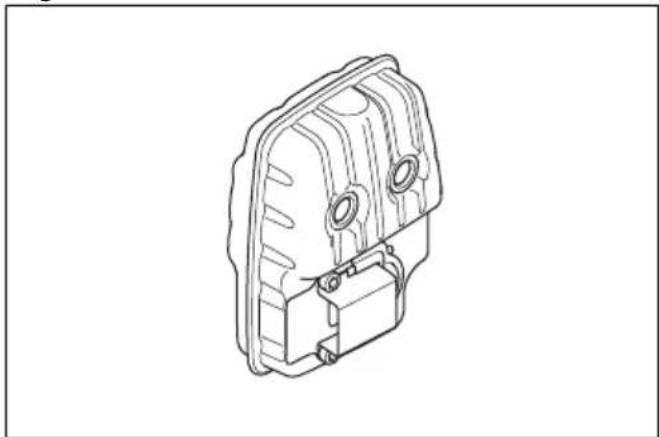
natural_image
Technical line drawing of a mechanical component with mounting holes and internal cavities (no text or symbols)natural_image
Illustration of a hand operating a propeller with a nut, showing rotational motion (no text or symbols)
natural_image
Two technical line drawings of mechanical components: a circular gear-like part and a curved blade with mounting holes (no text or symbols)• Gustu travu režite noževima i rezačima za travu.

natural_image
Four abstract geometric shapes with varying line styles and fill patterns, no text or symbols present.- Za rezanje trave upotrebljavajte glavu trimera.

natural_image
Technical line drawings of two mechanical components: a circular component with internal rings and a triangular plate with cutouts (no text or symbols)- Neispravno naoštren ili oštećen nož povećava opasnost od nesreće. Zupce noža održavajte pravilno naoštrenima. Pratite upute u odjeljku Naoštravanje rezača trave i noževa za travu na stranici 545 i upotrebljavajte preporučeni mjerač razmaka.

natural_image
Simple line drawing of a grater and shield with an arrow indicating direction (no text or symbols)- Pregledajte ima li na reznom nastavku oštećenja ili pukotina. Zamijenite oštećeni rezni nastavak.
- Rezne nastavke upotrebljavajte samo s preporučenim štitnicima. Pogledajte Tehnički podaci na stranici 558
Noževi
- Proizvod upotrebljavajte samo s odobrenim nožem. Nemojte upotrebljavati nož bez pravilne ugradnje svih potrebnih dijelova. Provjerite ispravnost ugradnje te jesu li upotrebljavani odgovarajući dijelovi. Nepravilna ugradnja može uzrokovati izbacivanje noža i ozbiljne ozljede rukovatelja i promatrača.
- Prilikom rada s nožem ili njegovog održavanja nosite zaštitne rukavice.
- Tijekom upotrebe proizvoda s nožem nosite zaštitu za glavu.
- Nakon zaustavljanja motora ili otpuštanja okidača gasa nož se nastavlja okretati te može uzrokovati ozljede. Prije održavanja provjerite je li nož potpuno zaustavljen.
- Prije rada na reznom nastavku zaustavite motor. Provjerite je li rezni nastavak potpuno zaustavljen. Odvojite visokonaponski kabel od svjećice.
- Zupce noža održavajte pravilno naoštrenima.

natural_image
Technical line drawing of a tool and blade assembly (no text or symbols)• Nemojte upotrebljavati oštećene rezne nastavke.
- Za transport ili skladištenje proizvoda na nož postavite prijenosni štitnik.
natural_image
Simple line drawing of a tool with a handle and arrow indicating direction (no text or symbols)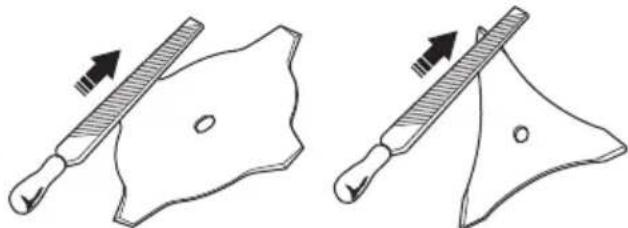
natural_image
Two diagrams showing a tool interacting with a shield-like object, one with an arrow indicating direction (no text or symbols present)Naoštravanje kružne pile

natural_image
Illustration of a person in protective gear using a tool to measure teeth, with an inset showing the same tooth (no text or symbols present)natural_image
Pure mechanical component diagram without any text, numbers, or symbolsnatural_image
Diagram showing two mechanical components with arrows indicating motion direction (no text or symbols)
natural_image
Three technical illustrations of mechanical components: a cylindrical device with a loop, a circular component with internal markings, and a spool (no text or symbols present)- Upotrebljavajte samo preporučene glave i flaks trimera. - Upotrebljavajte samo preporučene rezne nastavke. - Za manje strojeve u pravilu su potrebne manje glave trimera i obrnuto.
natural_image
Technical line drawing of a mechanical device with wires and connectors (no text or symbols)Ugradnja noževa i glava trimera

UPOZORENJE: Za noževe koristite isključivo odobreni štitnik. Pogledajte Tehnički podaci na stranici 558. Oštećeni štitnik može uzrokovati ozljedu.

UPOZORENJE: Ako proizvod upotrebljavate s nožem za travu, prvo ugradite odgovarajuću dršku, štitnik noža i naramenice.

UPOZORENJE: Ako noževe ugradite nepravilno, to može uzrokovati ozljede.
natural_image
Two technical diagrams showing a mechanical component with a no-smoking symbol above its side (no text or labels present)Ugradnja štitnika noža, noža za travu i rezača trave

OPREZ: Za noževe koristite isključivo odobreni štitnik. Pogledajte korisnički priručnik.

OPREZ: Provjerite je li uklonjen produžetak štitnika.
- Postavite štitnik noža/štitnik reznog nastavka (A) na osovinu i zategnite vijkom (L).

text_image
L A C A Btext_image
Technical diagram of a mechanical component with labeled parts A through H, showing exploded view and assembly details.Napomena: Lijevi navoj.
Postavljanje štitnik trimera i glave trimera
Napomena: Postavite ispravan štitnik trimera za odgovarajuću glavu trimera.
-
Pričvrstite ispravan štitnik trimera / kombinirani štitnik (A) za glavu trimera.
-
Postavite štitnik trimera / kombinirani štitnik na osovinu i pričvrstite ga vijkom (B). Upotrijebite zaporni klin ili šesterokutni ključ (C).

text_image
Technical diagram illustrating mechanical assembly steps with labeled components A, B, C, and Dnatural_image
Diagram of a mechanical device with labeled component E and directional arrow (no text or symbols beyond labels)text_image
Technical diagram of mechanical components with labeled parts A through K, showing exploded and assembled views.text_image
Technical diagram of a mechanical assembly with labeled parts including gears, shafts, and housing components.Napomena: Lijevi navoj.
text_image
Technical diagram showing gear meshing and mechanical assembly steps with directional arrows indicating motionPostavljanje prijenosnog štitnika
- Prijenosni štitnik pričvrstite na nož na način prikazan na slici.
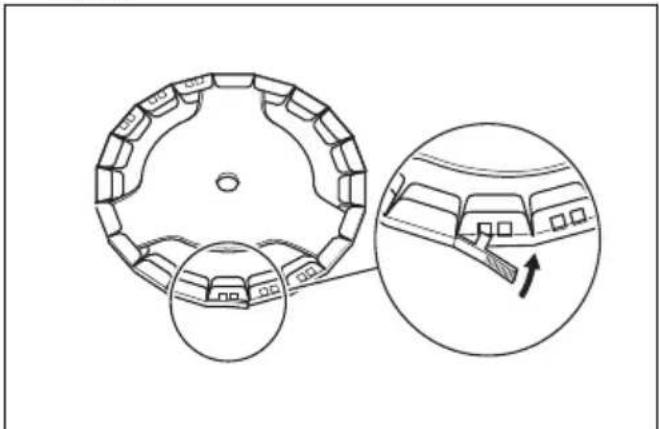
natural_image
Diagram of a circular mechanical component with internal structure and magnified detail showing internal components (no text or symbols)Prilagodba naramenice

natural_image
Line drawing of a person in traditional attire with a headband and facial expression (no text or symbols)- Naramenice prilagodite tako da je rezni pribor paralelan s tlom.
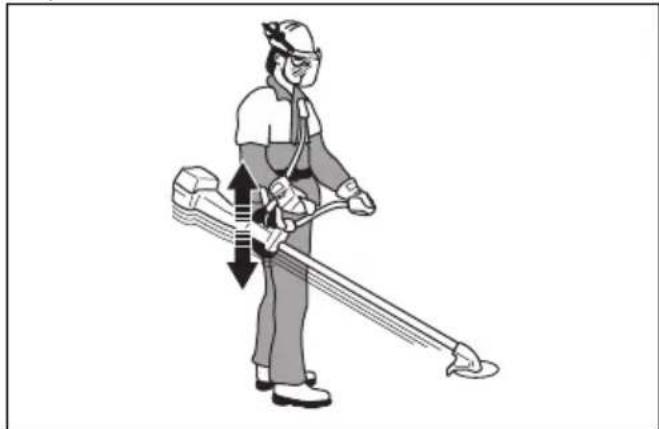
natural_image
Illustration of a person using a manual power tool (no text or symbols present)- Rezni pribor lagano prislonite na tlo. Prilagodite stezaljku naramenice kako biste pravilno uravnotežili proizvod.
Napomena: Ako upotrebljavate nož za travu, on mora lebdjeti približno 10 cm /4 in iznad tla.
Rad

UPOZORENJE: Prije korištenja proizvoda pročitajte i usvojite poglavlje o sigurnosti.
Uvod

UPOZORENJE: Prije rada s proizvodom morate pročitati i usvojiti poglavlje o sigurnosti.
Gorivo
Proizvod ima dvotaktni motor.

text_image
Diagram illustrating fuel injection and discharge process with labeled components and prohibition symbols
natural_image
Illustration of a person in uniform holding an object, no text or symbols presentnatural_image
Simple black-and-white icon showing a fuel pump with a droplet and plus sign (no text or symbols)- Protresite spremnik i provjerite je li gorivo u potpunosti izmiješano.
- Čep spremnika za gorivo uklonite polako kako biste otpustili tlak.
- Napunite spremnik za gorivo.

OPREZ: U spremniku za gorivo ne smije biti previše goriva. Gorivo se širi kada je vruće.
natural_image
Three abstract line drawings showing directional arrows and shapes, no text or symbols presentnatural_image
Simple line drawing of a circular component with a downward arrow pointing to its center (no text or symbols)natural_image
Diagram of a hex nut with a curved arrow indicating rotational motion (no text or symbols)- Pregledajte ima li na štitniku noža oštećenja ili pukotina. Zamijenite štitnik noža ako je udaren ili napukao.
- Pregledajte ima li na glavi trimera i štitniku za rezni nastavak oštećenja ili pukotina. Zamijenite glavu trimera i štitnik za rezni nastavak ako su udareni ili napukli.
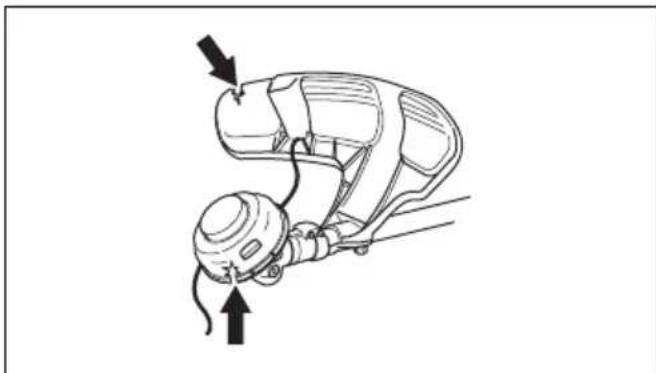
natural_image
Line drawing of a robotic arm with two arrows indicating movement or force direction (no text or symbols)Pokretanje motora
-
Proizvod postavite na ravnu i stabilnu površinu. Rezni pribor ne postavljajte na tlo.
-
Pritišćite čašicu pumpe za gorivo dok se čašica ne počne puniti gorivom. Nije neophodno do kraja napuniti čašicu pumpice za gorivo.

natural_image
Technical line drawing of a mechanical device with a black arrow pointing to a component (no text or symbols present)- Regulator čoka pomaknite u položaj za čok.

natural_image
Technical line drawing of a mechanical device with a magnified inset showing internal components (no text or symbols)
natural_image
Line drawing of a handheld device with a black arrow pointing to the right side (no text or symbols)- Kućište proizvoda lijevom rukom pritisnite uz tlo.

natural_image
Illustration of a worker in safety gear handling equipment (no text or symbols visible)
natural_image
Illustration of a worker in safety gear handling equipment (no text or symbols)natural_image
Line drawing of a handheld device with a scroll wheel and control knob (no text or symbols)Povratni udar
flowchart
graph TD
    A["Root"] --> B["Plant"]
    B --> C["Leafy Plant"]
    C --> D["Tree"]
    D --> E["Leafy Plant"]
    E --> F["Tree"]
    F --> G["Leafy Plant"]
    G --> H["Tree"]
    H --> I["Leafy Plant"]
    I --> J["Tree"]
    J --> K["Leafy Plant"]
    K --> L["Tree"]
    L --> M["Leafy Plant"]
    M --> N["Tree"]
    N --> O["Leafy Plant"]
    O --> P["Tree"]
    P --> Q["Leafy Plant"]
    Q --> R["Tree"]
    R --> S["Leafy Plant"]
    S --> T["Tree"]
    T --> U["Leafy Plant"]
    U --> V["Tree"]
    V --> W["Leafy Plant"]
    W --> X["Tree"]
    X --> Y["Leafy Plant"]
natural_image
Line drawing of a person walking on a path with trees and a dashed line indicating a path (no text or symbols)natural_image
Illustration showing a tree planting with a shovel and a person holding a circular object (no text or symbols)Rušenje stabla udesno
Za rušenje stabla udesno pritisnite dno stabla ulijevo.
- Dajte puni gas.
- Postavite kružnu pilu na stablo kako je prikazano na slici.
- Nagnite kružnu pilu i snažno ju pritisnite dijagonalno prema gore i udesno. Istovremeno pritisnite deblo štitnikom pile.
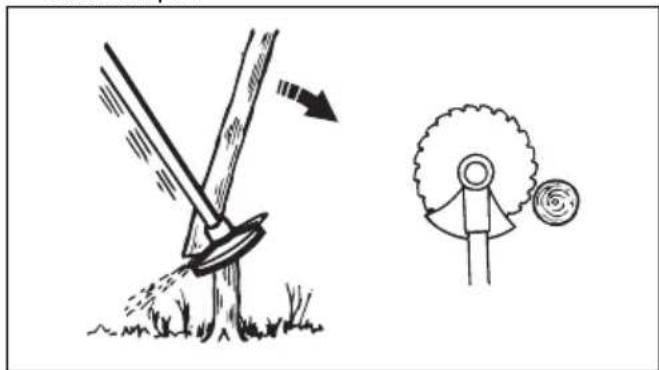
natural_image
Illustration showing a tree planting a sapling with an arrow indicating direction, and a person reaching toward a round object (no text or symbols)natural_image
Simple line drawing of a person pushing a large circular object with a downward arrow, no text or symbols present.Rušenje velikih stabala
Velika stabla morate rezati s 2 strane.
natural_image
Simple line drawing showing a tree stump and a gear cutter (no text or symbols)- Prorežite kroz stablo s druge strane.

natural_image
Illustration showing a person cutting wood with a gear and a tree trunk, accompanied by an arrow indicating rotation (no text or symbols)
OPREZ: Ako kružna pila zapne, proizvod nemojte izvlačiti trzajem. Tako možete oštetiti kružnu pilu, pužni zglob, osovinu ili upravljač. Pustite ručke, primite osovinu s 2 ruke i pažljivo izvucite proizvod.
Napomena: Manja stabla rušite s većim pritiskom rezanja. Veća stabla rušite s manjim pritiskom rezanja.
Čišćenje šikare s kružnom pilom
Za rušenje stabla ulijevo pritisnite dno stabla udesno.
- Porežite tanka stabla i grmlje.
- Pomičite proizvod s jedne strane na drugu.
- Režite više stabala u jednom pokretu.
natural_image
Illustration of a person using a tool to spread over a tree with leaves, no text or symbols presenta) Vanjska stabla režite visoko.
b) Vanjska stabla izrežite na ispravnu visinu.
c) Režite iz sredine. Ako ne možete pristupiti sredini, visoko izrežite vanjska stabla i pustite da se sruše. Tako smanjujete opasnost od zaglavljenja kružne pile.
natural_image
Illustration of a person using a manual lever to lift pine needles (no text or symbols)natural_image
Simple line drawing of a grassy field with a small tool or scraper (no text or symbols)- Smanjite duljinu flaksa trimera za 10 – 12 cm / 4 – 4,75 in.
- Smanjite broj okretaja kako biste smanjili rizik od oštećenja bilja.
- Ako kosite travu u blizini predmeta, koristite 80 % gasa.

natural_image
Simple line drawing of a grassy field with a tool and a small object, no text or symbols present.Čišćenje trave
- Glavu trimera držite iznad tla.
- Nagnite glavu trimera.
- Oko predmeta u radnom području režite s krajem flaksa trimera.
OPREZ: Režite travu. Ako flaksom trimera udarate u druge predmete, pojačavate trošenje flaksa trimera.
- Vegetaciju režite i čistite s 80 % brzine. Tako smanjujete trošenje glave trimera i flaksa trimera.
Košenje trave
natural_image
Simple line drawing of a grassy field with a small circular object at the base (no text or symbols)- Glavu trimera nemojte pritiskati na tlo. Tako možete oštetiti proizvod.
- Pri košnji trave pomičite proizvod s jedne na drugu stranu. Radite s punim gasom.
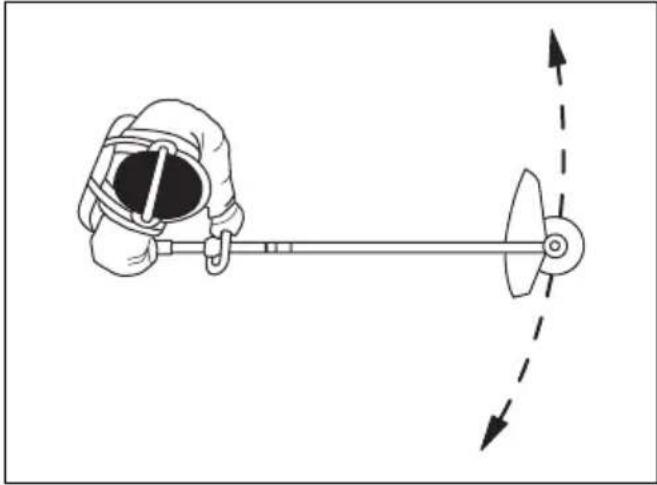
natural_image
Illustration of a person using a mechanical device with a dashed arrow indicating motion (no text or symbols)Čišćenje trave
natural_image
Technical line drawing of a mechanical device with labeled component 'T' and circular motion arrows (no text or symbols beyond label)- Vijak za prazni hod okrećite u smjeru suprotnom od kazaljke na satu dok se rezni nastavak ne zaustavi.
- Broj okretaja motora u praznom hodu mora biti manji od broja okretaja pri kojem se rezni pribor počinje okretati. Broj okretaja motora u praznom hodu pravilan je kada motor radi uglađeno u svim položajima.
natural_image
Technical line drawing of a mechanical housing component (no text or symbols)natural_image
Technical line drawing of a mechanical assembly with a housing and clamping mechanism (no text or symbols)- Očistite neprohodnu mrežicu za hvatanje iskri, a oštećenu zamijenite.
text_image
Technical diagram of a mechanical device with labeled parts A and BFiltar zraka
Prljav filtar zraka može uzrokovati kvar rasplinjača, probleme pri pokretanju, gubitak snage motora i trošenje dijelova motora. Također uzrokuje povećanu potrošnju goriva. Filtar čistite u intervalima od 8 sati, ili češće ako proizvod upotrebljavate u prašnjavom okruženju.
Napomena: Nakon čišćenja ili zamjene filtra zraka može biti potrebno podešavanje motora. Pogledajte Podešavanje broja okretaja u praznom hodu na stranici 556
Čišćenje i pregled filtra zraka
- Uklonite filtar zraka.
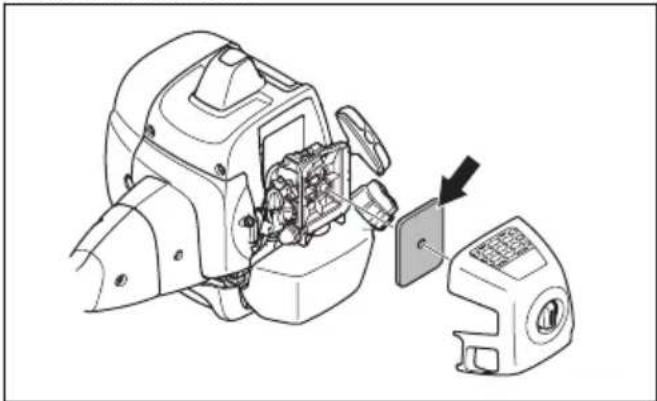
natural_image
Technical line drawing of a mechanical assembly with a component and a separate housing (no text or symbols)- Filcani filtar zraka očistite stlačenim zrakom.

natural_image
Technical line drawing of a mechanical assembly with a belt switch and labeled component A (no text or symbols beyond label)Pužni zglob
Pužni zglob tvornički je napunjen odgovarajućom količinom maziva. Ali, prije uporabe ovog proizvoda, provjerite je li pužni zglob napunjen mazivom do 3/4. Koristite posebno mazivo poduzeća McCulloch.
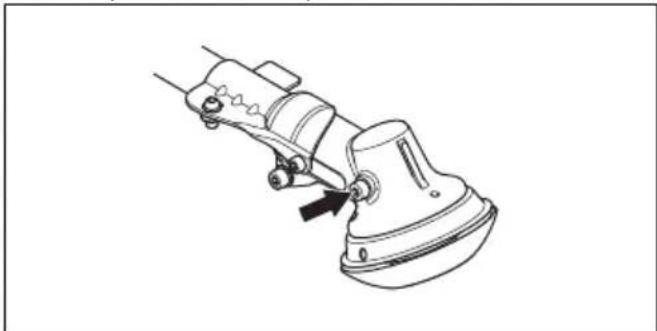
natural_image
Technical line drawing of a mechanical tool or device with a black arrow indicating a specific component (no text or symbols present)natural_image
Technical line drawing of a mechanical component with threaded end and shaft (no text or symbols)text_image
Exploded view diagram of a mechanical device with numbered parts for identification and assembly reference.natural_image
Line drawing of a person in protective gear using a long-handled tool to clean grass near a tree (no text or symbols)natural_image
Line drawing of a helmet with a visor and cap (no text or symbols)natural_image
Line drawing of a mechanical component or bracket (no text or symbols)natural_image
Line drawing of a vehicle's seat and wheel assembly (no text or symbols)natural_image
Line drawing of two gloves showing different grip designs (no text or symbols)natural_image
Line drawing of a pair of boots with visible tread pattern and buckles (no text or symbols)text_image
Diagram of a handheld device with labeled parts A and B, showing directional arrows indicating movement or force.natural_image
Line drawing of a handheld device with an arrow pointing to the left side (no text or symbols present)natural_image
Diagram of a handheld device with two directional arrows indicating movement or force (no text or symbols present)- Preverite, ali se ročica plina in zapora plina premikata neovirano in njuni povratni vzmeti delujeta pravilno.
- Zaženite izdelek (glejte navodila v poglavju Zagon in zaustavitev na strani 577) in pritisnite polni plin.
- Izpustite ročico plina in se prepričajte, da se rezalni priključek ustavi in obmiruje. Nastavite uplinjalnik, če se rezalni priključek premika s plinom v prostem teku. Glejte navodila v poglavju Prilagajanje hitrosti prostega teka na strani 582.

natural_image
Illustration of a worker using a tool to install a mechanical component, with no visible text or symbols.natural_image
Line drawing of a medical or surgical device with a black arrow pointing to a specific component (no text or symbols present)natural_image
Technical line drawing of a mechanical tool or clamp assembly (no text or symbols)
natural_image
Technical line drawing of a mechanical assembly with gear and shaft components (no text or symbols)Preverjanje sistema za dušenje tresljajev
natural_image
Technical line drawing of a mechanical device with no visible text or symbols- Zaustavite motor.
- Vizualno preverite, da ni prisotnih deformacij in poškodb, na primer razpok.
- Bodite pozorni, da elemente sistema za dušenje tresljajev pravilno namestite.

natural_image
Line drawing of a person adjusting a belt buckle, showing two hands and one belt buckle (no text or symbols)Dušilnik
natural_image
Technical line drawing of a mechanical component with mounting holes and internal cavities (no text or symbols)natural_image
Illustration of a hand operating a propeller with a nut, showing rotational motion (no text or symbols)
natural_image
Technical line drawing of two mechanical components: a gear-like circular component and a curved blade with mounting holes (no text or symbols)- Rezila in nože za travo uporabljajte za košenje goste trave.
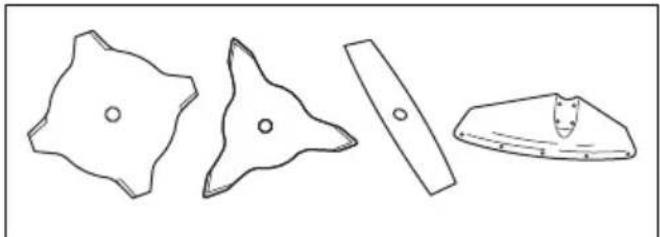
natural_image
Four abstract geometric shapes with no text or symbols: triangular, rectangular, and irregular form (no text or symbols present)natural_image
Technical line drawings of two mechanical components: a circular component with internal rings and a triangular plate with mounting holes (no text or symbols)natural_image
Simple line drawing of a tool and a shield-like shape with an arrow indicating direction (no text or symbols)natural_image
Technical line drawing of a tool and part, showing a tool with a handle and a blade-like object (no text or symbols)natural_image
Diagram showing two mechanical tool configurations with arrows indicating movement or force direction (no text or symbols present)natural_image
Illustration of a person in protective gear using a tool to protect teeth, with a close-up inset showing tooth structure (no text or symbols)- Uporabite 5,5 mm (7/32 palca) okroglo pilo z držalom.

natural_image
Simple line drawing of a mechanical component with a curved handle and circular hole (no text or symbols)- Pilo držite pod kotom 15°.
natural_image
Diagram showing two mechanical components with arrows indicating direction of movement (no text or symbols)
OPOZORILO: Rezilo, ki je poškodovano, vedno obvezno zavrzite. Ukrivljenega ali zvitega rezila ne poskušajte poravnati in ponovno uporabiti.
Kosilna glava

natural_image
Three technical line drawings of mechanical components: a cylindrical component with a loop, a circular device with a handle, and a spool (no text or symbols)natural_image
Technical line drawing of a mechanical device with wires and connectors (no text or symbols)natural_image
Two technical diagrams showing a mechanical component with a circular no-smoking symbol above it, and a flat base with a bolted joint below (no text or labels)text_image
L A C A Btext_image
Technical diagram showing mechanical assembly steps with labeled components A, B, C, and Dnatural_image
Diagram of a mechanical device with labeled component E and directional arrow (no text or symbols beyond labels)text_image
Technical diagram of a mechanical device with labeled parts including H, J, K, I, L, and A.text_image
Technical diagram of a mechanical assembly with labeled parts including gears, shafts, and housing components.Opomba: Levi navoj.
text_image
Technical diagram showing gear meshing and mechanical assembly steps with directional arrows indicating motionnatural_image
Diagram of a circular mechanical component with internal segments and an inset showing a fastening mechanism (no text or symbols)Nastavitev oprtnika

natural_image
Illustration of a person in traditional attire with a headband and facial expression (no text or symbols)natural_image
Illustration of a worker using a long-handled tool to clean or disinfect (no text or symbols present)- Rezalni priključek naj rahlo sloni na tleh. Sponko oprtnika nato prilagodite, da pravilno uravnotežite izdelek.
text_image
Safety warning illustration showing fuel injection and discharge symbols with crossed-out containers- Dolijte polovico bencina v čisto posodo za gorivo.
- Dodajte celotno količino olja.
- Pretresite mešanico goriva.
- V posodo dodajte še preostalo količino bencina.
- Temeljito pretresite mešanico goriva.

natural_image
Simple black-and-white icon showing a droplet and a fuel pump with a plus sign (no text or symbols)-
Pretresite posodo in tako poskrbite za ustrezno mešanje goriva.
-
Odstranite pokrovček posode za gorivo, da sprostite pritisk.
-
Napolnite posodo za gorivo.

natural_image
Three abstract line drawings showing directional arrows and shapes, no text or symbols presentnatural_image
Simple line drawing of a circular ring with a downward arrow pointing to its center (no text or symbols)natural_image
Simple line drawing of a hexagonal nut with a curved arrow indicating rotation or cycle (no text or symbols)natural_image
Technical line drawing of a mechanical device with no visible text or symbolsZagon motorja
natural_image
Technical line drawing of a mechanical device with a black arrow pointing to a component (no text or symbols present)- Ročico čoka premaknite v položaj brez čoka.
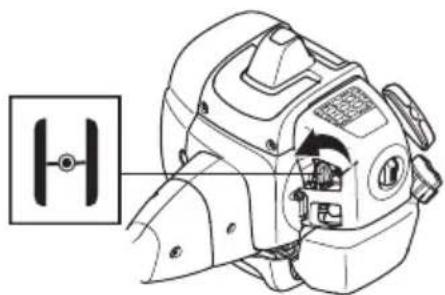
natural_image
Technical line drawing of a mechanical device with a close-up inset showing a labeled component (no text or symbols present)
natural_image
Line drawing of a handheld device with a black arrow pointing to the right side (no text or symbols)natural_image
Illustration of a worker in safety gear handling equipment (no text or symbols visible)-
Z desno roko držite ročico zaganjalne vrvice.
-
Počasi povlecite zaganjalno vrvico z desno roko, dokler ne začutite upora.

OPOZORILO: Zaganjalne vrvice ne navijajte okoli zapestja.
- Hitro in močno povlecite vrvico. Zaganjalno vrvico povlecite večkrat, dokler ne zaženete motorja.

natural_image
Line drawing of a handheld device with a black arrow pointing to the handle (no text or symbols)Nevaren izmet materiala
natural_image
Line drawing of a person spraying water on a path with trees and a dashed line indicating direction (no text or symbols)natural_image
Illustration showing a tree pruning method and a stick figure with a ball (no text or symbols)natural_image
Illustration showing a manual tree grafting a person with a circular object nearby (no text or symbols)Podiranje drevesa naprej
Za podiranje naprej dno drevesa potisnite nazaj.
natural_image
Simple line drawing of a person pushing a large gear with a downward arrow (no text or symbols)Podiranje velikih dreves
Velika drevesa je treba žagati z 2 strani.
- Preučite, v katero smer bo drevo padlo.
-
Dodajte polni plin.
-
Najprej zažagajte v drevo na strani drevesa, na katero bo padlo.

natural_image
Simple line drawing showing a tree stump and a gear cutter (no text or symbols)- Nato zažagajte skozi drevo z druge strani.
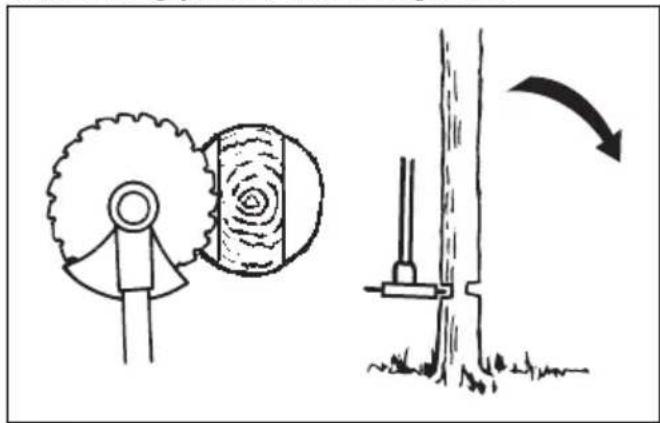
natural_image
Illustration showing a hand operating a wooden cutter through a gear, and a tree with a moving arrow indicating rotation (no text or symbols)
natural_image
Illustration of a person spraying plants with leaves, showing a circular arrangement around a leafy plant (no text or symbols)natural_image
Illustration of a person using a pulley system to measure a tree trunk (no text or symbols present)natural_image
Simple line drawing of a grassy field with a small plow and stick (no text or symbols)natural_image
Simple line drawing of a grassy field with a shovel and stick, no text or symbols presentOdstranjevanje trave
natural_image
Simple line drawing of a grassy field with a small utility pole and a flatbed base (no text or symbols)natural_image
Illustration of a person wearing protective gear holding a long pole with a rotating wheel, connected by a dashed arrow indicating direction (no text or symbols)Pometanje trave
natural_image
Technical line drawing of a mechanical device with labeled component 'T' and circular motion arrows (no text or symbols beyond label)natural_image
Technical line drawing of a mechanical component with mounting holes and housing (no text or symbols)- Odstranite vijak s katerim je pritrjena mrežica lovilnika isker.

natural_image
Technical line drawing of a mechanical assembly with a component and clamping mechanism (no text or symbols)text_image
Technical diagram of a mechanical device with labeled parts A and BZračni filter
natural_image
Technical line drawing of a mechanical assembly with internal components and a separate component (no text or symbols)natural_image
Technical line drawing of a mechanical component with a labeled connection point (A), no readable text or symbols present.Kotni prenos
natural_image
Technical line drawing of a mechanical tool or device with a black arrow indicating a specific component (no text or symbols present)natural_image
Technical line drawing of a spark plug with threaded shaft and mounting base (no text or symbols)text_image
Exploded view diagram of a mechanical device with numbered parts for identification and assembly reference.- Nož (ne odnosi se na sva tržišta)
- Zatvarač za doziranje maziva, konusni pogon
- Konusni pogon
- Štitnik dodatka za rezanje
- Vratilo
- Prekidač za zaustavljanje
- Poluga gasa
- Blokada gasa
- Prsten ovjesa
- Poklopac cilindra
- Ručka konopa za paljenje
- Rezervoar za gorivo
- Ručica za čok
- Poklopac filtera za zrak
- Matica
- Potporni obrub
- Prsten ležaja
-
Pogonska ploča
-
Spojnica upravljača
- Priručnik za rad
- Štitnik za transport (ne odnosi se na sva tržišta)
- Inbus ključ s umecima
- Igla za zabravljivanje (za proizvode bez zvjezdastog ključa)
- Pojas
- Trimi glava
- Pumpica za istiskivanje zraka
Simboli na proizvodu

UPOZORENJE! Ovaj proizvod je opasan. Ukoliko se proizvod ne koristi pažljivo i na pravilan način, može doći do povrede ili smrti rukovaoca ili osobe koja stoji u blizini. Da biste spriječili povrede rukovaoca ili osoba koje stoje u blizini, pročitajte i poštujte sva uputstva o sigurnosti koja su data u priručniku za rad.

Prije upotrebe pažljivo pročitajte priručnik za rad rukovaoca i vodite računa da vam upute budu jasne.

Koristite zaštitnu kacigu na mjestima na kojim predmeti mogu pasti na vas. Koristite odobrenu zaštitu sluha. Koristite odobrenu zaštitu za oči.

Koristite odobrene zaštitne rukavice.

Koristite robusne protuklizne čizme.
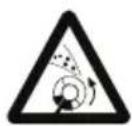
Proizvod može uzrokovati izbacivanje predmeta, što može izazvati povrede.

Maksimalna brzina izlaznog vratila.
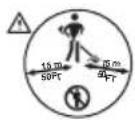
Za vrijeme rukovanja proizvodom održavajte udaljenost od najmanje 15 m / 50 stopa od osoba i životinja.

natural_image
Line drawing of a person spraying water with a hose, next to a tree (no text or symbols)- Ne posežite predaleko. Stalno održavajte stabilan položaj stopala i dobru ravnotežu.
- Prije pokretanja proizvoda, položite ga na ravnu površinu na udaljenost od najmanje 3 m / 10 stopa od izvora goriva i od mjesta na kojem sipate gorivo. Vodite računa da nikakvi predmeti ne dodiruju rezni dodatak niti da se nalaze u blizini.
- Ukoliko se rezni dodatak okreće brzinom praznog hoda motora, ostavite predstavniku servisa da ga podesi. Nemojte koristiti proizvod dok ne bude podešen ili popravljen.
- Čuvajte se odbačenih predmeta. Uvijek koristite odobrenu zaštitu za oči i ne prilazite štitniku reznog dodatka. Kamenje i mali predmeti vam mogu biti izbačeni u oči i uzrokovati sljepilo ili druge povrede.
- Nemojte spuštati proizvod na tlo dok motor radi, osim ako vam je u vidnom polju.
- Nemojte uklanjati rezani materijal, niti davati drugim osobama da ga uklanjaju, dok motor radi ili dok se oprema za rezanje okreće, jer to može uzrokovati teške povrede.
- Prije nego što uklonite materijal koji se omotao oko vratila oštrice ili koji je zaglavljen između štitnika reznog dodatka i reznog dodatka, uvijek zaustavite motor i provjerite da se oprema za rezanje ne okreće.
- Budite pažljivi prilikom uklanjanja materijala nakupljenog oko opreme za rezanje. Konusni pogon se zagrijava tokom rada i može izazvati opekotine.
- Izduvni gasovi motora su vreli i mogu emitirati iskre. Opasnost od požara. Budite pažljivi u blizini suhih i zapaljivih materijala.
- Nemojte koristiti proizvod u zatvorenim prostorima ili u prostorima bez adekvatne ventilacije. Ispušni dimovi sadrže ugljen monoksid, otrovan gas bez mirisa koji je veoma opasan.
- Zaustavite motor prije nego što pređete na drugo područje. Uvijek spojite štitnik za transport prije nego što premjestite opremu.
- Preveliko izlaganje vibracijama može dovesti do poremećaja cirkulacije krvi ili oštećenja živaca kod osoba s slabom cirkulacijom krvi. Ako primijetite simptome prevelikog izlaganja vibracijama, obratite se ljekaru. Ti simptomi uključuju trnjenje udova, gubitak osjećaja, trnce, bockanje, bol, gubitak snage, promjene u boji kože ili stanju. Ti simptomi se obično manifestuju u prstima, rukama ili zglobovima. Rizik se povećava pri niskim temperaturama.
Lična zaštitna oprema

UPOZORENJE: Prije upotrebe proizvoda pročitajte upozorenja u nastavku.
- Uvijek koristite odobrenu opremu za ličnu zaštitu kada rukujete proizvodom. Lična zaštitna oprema ne može u potpunosti spriječiti povrede, ali smanjuje stepen povreda u slučaju nesreće. Neka vam zastupnik pomogne pri izboru odgovarajuće opreme.
- Koristite šljem ukoliko je drveće u području rada više od 2 m / 6,5 stopa.
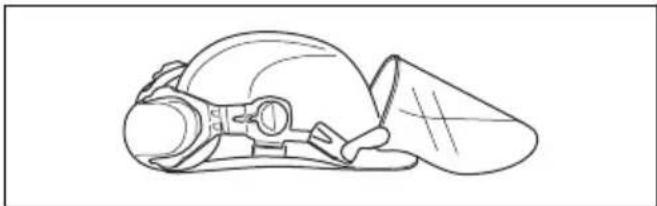
natural_image
Line drawing of a helmet with visor and cap (no text or symbols)- Koristite odobrenu zaštitu za uši.
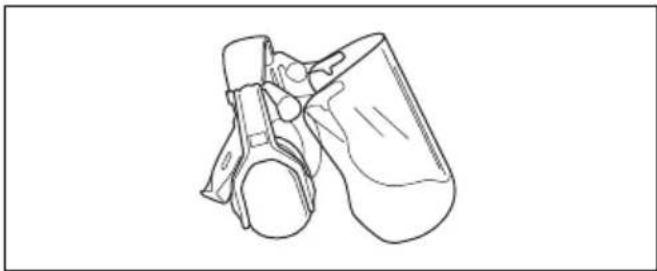
natural_image
Line drawing of a pair of athletic shoes (no text or symbols)- Koristite odobrenu zaštitu za oči. Ako koristite vizir, morate koristiti i odobrene zaštitne naočale. Odabrane zaštitne naočale moraju ispunjavati
standard ANSI Z87.1 u SAD-u ili EN 166 u zemljama EU.


natural_image
Line drawing of a mechanical component or device with no visible text or symbolsnatural_image
Line drawing of a pair of gloves with bandages and shaded areas (no text or symbols)natural_image
Line drawing of a pair of boots with visible tread pattern and buckles (no text or symbols)text_image
Diagram of a handheld device with labeled parts A and B, showing directional arrows indicating movement or force.- Vodite računa da ručica gasa bude blokirana u praznom hodu i kada je otpuštena blokada ručice za gas.

natural_image
Line drawing of a handheld device with a scroll wheel and handle, showing a directional arrow (no text or symbols)natural_image
Diagram of a medical or surgical device with two directional arrows indicating movement or force (no text or symbols present)-
Provjerite kreću li se ručica gasa i njena blokada slobodno i radi li povratna opruga ispravno.
-
Pokrenite proizvod (pogledajte uputstva ispod Pokretanje i zaustavljanje na strani 603) i dodajte gas maksimalno.
-
Otpustite ručicu za gas i provjerite zaustavlja li se pribor za rezanje i miruje li. Podesite karburator ako se rezni dodatak pomjera kada je gas u praznom hodu. Pogledajte uputstva u poglavlju Podešavanje brzine u praznom hodu na strani 609.
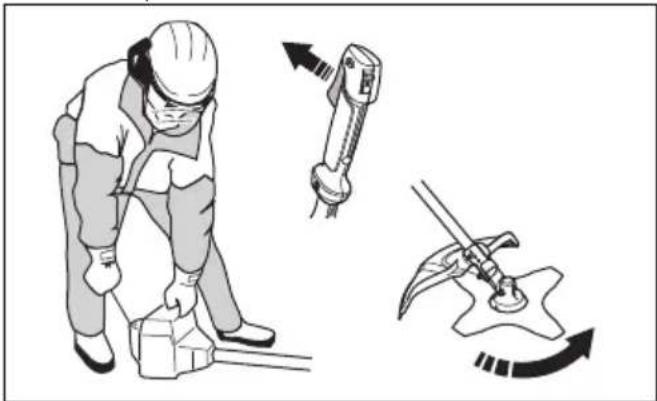
natural_image
Illustration of a worker using a tool to adjust equipment, showing motion and rotation (no text or symbols)Provjera prekidača za zaustavljanje
-
Pokrenite motor.
-
Pomjerite prekidač za zaustavljanje u položaj za zaustavljanje i provjerite da li se motor zaustavi.

natural_image
Line drawing of a medical or surgical device with a black arrow pointing to a specific component (no text or symbols present)Zaštitnik reznog dodatka
natural_image
Line drawing of a mechanical tool interacting with a curved blade and base (no text or symbols)
natural_image
Technical line drawing of a mechanical assembly with gear and shaft components (no text or symbols)Provjera sistema ublažavanja vibracija
Sistem za ublažavanje vibracija smanjuje vibracije na ručkama na najmanju moguću mjeru, što olakšava rad.

natural_image
Technical line drawing of a mechanical device with no visible text or symbols-
Zaustavite motor.
-
Izvršite vizuelni pregled deformacija i oštećenja, npr. pukotina.
-
Provjerite jesu li elementi na sistemu za ublažavanje vibracija pravilno povezani.

natural_image
Line drawing of a person adjusting a belt buckle, showing two hands and one belt buckle (no text or symbols)Prigušivač

natural_image
Technical line drawing of a mechanical component with mounting holes and internal cavities (no text or symbols)- Nemojte koristiti motor s oštećenim auspuhom. Oštećeni auspuh povećava nivo buke i opasnost od požara. Držite aparat za gašenje požara u blizini.
- Redovno provjeravajte da je auspuh pričvršćen za proizvod.
- Nemojte dodirivati motor ili auspuh kada je motor uključen. Nemojte dodirivati motor ili auspuh tokom nekog vremena nakon što se motor zaustavi. Vruće površine mogu izazvati povredu.
- Vrući auspuh može izazvati požar. Budite oprezni, ako koristite proizvod u blizini zapaljivih tečnosti ili para.
- Nemojte dodirivati dijelove na auspuhu, ako je auspuh oštećen. Dijelovi mogu sadržavati neke kancerogene hemikalije.
- Redovno čistite svjećicu ako proizvod ima svjećicu.

UPOZORENJE: Zaustavite motor, koristite zaštitne rukavice i čuvajte se oštrih ivica reznog dodatka.
Matica se koristi za pričvršćivanje nekih vrsta reznih dodataka. Matica ima lijevi navoj.
natural_image
Illustration of a hand operating a propeller with a nut, showing a rotation arrow (no text or symbols)
UPOZORENJE: Kada
natural_image
Two technical line drawings of mechanical components: a circular gear-like part and a curved blade with internal features (no text or symbols)- Koristite sječiva i noževe za travu za rezanje divlje trave.

natural_image
Four abstract geometric shapes with no text or symbols: triangular, rectangular, and irregular forms (no text or symbols present)- Koristite glavu trimera za rezanje trave.
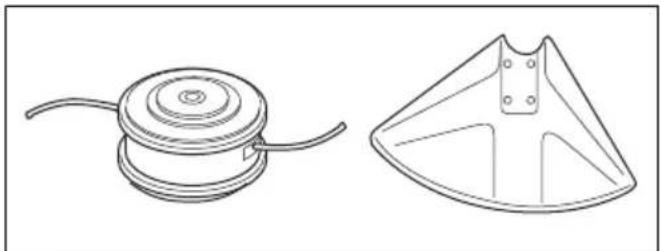
natural_image
Technical line drawings of two mechanical components: a circular component with internal rings and a triangular plate with cutouts (no text or symbols)- Neispravno naoštren ili oštećen nož povećava rizik od nesreća. Zupce noža održavajte ispravno naoštrenim. Pratite upute u Oštrenje sječiva i noževa za travu na strani 597i koristite preporučenu turpiju.

natural_image
Simple line drawing of a tool interacting with a shield-like object (no text or symbols)- Pregledajte ima li na reznom dodatku oštećenja ili pukotina. Zamijenite oštećeni rezni dodatak. - Koristite rezne dodatke samo s preporučenim zaštitnicima. Pogledajte odjeljak Tehnički podaci na strani 611.
Sječiva
- Koristite proizvod s odobrenim nožem za travu. Nemojte koristiti nož za travu prije nego što na odgovarajući način postavite sve obavezne dijelove. Provjerite je li instalacija izvršena pravilno te jesu li korišteni odgovarajući dijelovi. Nepravilnom instalacijom može se prouzrokovati otpadanje noža, kao i teške povrede rukovaoca ili osoba u blizini.
- Kada radite sa sječivom ili vršite održavanje, nosite zaštitne rukavice.
- Koristite opremu za zaštitu glave prilikom rukovanja s proizvodom koji ima nož.
- Nož može izazvati povrede dok se nastavlja vrtiti nakon što se motor zaustavi ili nakon puštanja regulatora gasa. Prije održavanja provjerite je li se nož potpuno zaustavio.
- Zaustavite motor prije obavljanja bilo kakvih radova na reznom dodatku. Pazite da se rezni dodatak potpuno zaustavi. Isključite kabl iz svjećice.
- Zupce noža održavajte ispravno naoštrenim.

natural_image
Technical line drawing of a tool and part, showing a handle and blade assembly (no text or symbols)• Nemojte koristiti oštećen rezni dodatak.
- Postavite štitnik za transport na nož prilikom transporta ili skladištenja proizvoda.
natural_image
Illustration of a person in protective gear using a tool to protect teeth, with a close-up inset showing tooth structure (no text or symbols)- Koristite okruglu turpiju od 5,5 mm (7/32 in) s nosačem turpije.
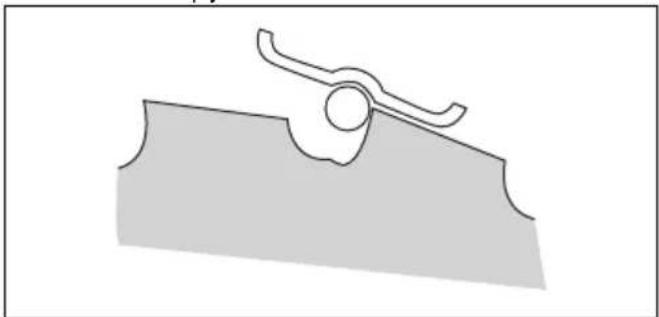
natural_image
Simple line drawing of a mechanical component with a curved handle and circular hole (no text or symbols)natural_image
Diagram showing two mechanical components with arrows indicating direction of movement (no text or symbols)
natural_image
Three technical line drawings of mechanical components: a cylindrical component with a loop, a circular device with a handle, and a spool (no text or symbols)- Koristite samo preporučene glave trimera i konopac za podrezivanje.
- Koristite samo preporučene rezne dodatke.
-
Manjim mašinama su potrebne manje glave za podrezivanje i obratno.
-
Važna je dužina konopca za podrezivanje. Duži konopac za podrezivanje zahtjeva veću snagu mašine od kraćeg konopca istog presjeka.
- Uvjerite se da je sječivo na štitniku glave za podrezivanje ispravno. Time se konopac za podrezivanje postavlja na ispravnu dužinu.
- Prije upotrebe, konac za podrezivanje uronite u vodu i ostavite nekoliko dana kako biste mu produžili vijek trajanja.
natural_image
Technical line drawing of a mechanical device with connectors and wiring (no text or symbols)Postavljanje noževa i glava trimera

UPOZORENJE: Za noževe koristite samo odobrene štitnike. Pogledajte Tehnički podaci na strani 611. Oštećeni štitnik može izazvati povrede.

UPOZORENJE: Ako koristite proizvod na koji je postavljen nož za travu, prvo instalirajte odgovarajuću dršku, štitnik noža i remen.

UPOZORENJE: Ako noževe ne postavite pravilno, može doći do povreda.
- Pazite da uzdignuti dio pogonske ploče/prirubnice nosača bude ispravno postavljen u središnji otvor noža.
- Postavite noževe.
natural_image
Two technical diagrams showing a mechanical component with a no-smoking symbol above it, both without any text or labels.Postavljanje štitnika noža, nož za travu i rezača trave
OPREZ: Za noževe koristite samo odobrene štitnike. Pogledajte korisnički priručnik.

text_image
L A C A Btext_image
Technical diagram of a mechanical component with labeled parts A through H, showing exploded view and assembly details.Napomena: Lijevi navoj.
Pričvršćavanje štitnika trimera i glave trimera
Napomena: Vodite računa da koristite odgovarajući štitnik za trimer za odgovarajuću glavu trimera.
-
Postavite ispravan štitnik trimera/kombinacijski štitnik (A) za glavu trimera.
-
Postavite štitnik trimera/kombinacijski štitnik oko osovine i pritegnite je vijkom (B). Koristite iglu za zabravljivanje ili zvjezdasti ključ (C).
text_image
Technical diagram illustrating mechanical assembly steps with labeled components A, B, C, and Dnatural_image
Diagram of a mechanical device with labeled component E and directional arrow (no text or symbols beyond labels)- Za rasklapanje pratite upute obrnutim redoslijedom.
text_image
Technical diagram of a mechanical device with labeled parts including H, J, K, I, L, and A.text_image
Technical diagram of a mechanical assembly with labeled parts including gears, shafts, and housing components.Napomena: Lijevi navoj.
text_image
Technical diagram showing gear meshing and mechanical assembly steps with directional arrows indicating motionPostavljanje štitnika za transport
natural_image
Diagram of a circular mechanical component with internal segments and an inset showing a fastening mechanism (no text or symbols)Podešavanje pojasa

UPOZORENJE: Proizvod uvijek mora biti ispravno pričvršćen za remen. Ako nije, ne možete sigurno raditi s proizvodom i to može dovesti do povrede vas ili drugih. Nemojte koristiti neispravan remen. Nemojte koristiti pojas s neispravnim mehanizmom za sigurnosno otvaranje.
natural_image
Line drawing of a person with exaggerated facial features and a downward arrow indicating motion (no text or symbols)- Podesite pojas tako da rezni dodatak bude paralelan s tlom.

natural_image
Illustration of a worker using a long-handled tool to clean or disinfect (no text or symbols present)- Pustite da se pribor za rezanje lagano oslanja na tlo. Podesite kopču pojasa tako da proizvod bude pravilno balansiran.
Napomena: Ako koristite sječivo za travu ono mora balansirati oko 10 cm / 4 inča iznad tla.
Rukovanje

text_image
Safety warning illustration showing fuel injection and discharge symbols with cross symbols, alongside a medical worker holding a bottle.natural_image
Simple black-and-white icon showing a droplet and a fuel pump with a plus sign (no text or symbols)text_image
Diagram illustrating three stages of a process with arrows indicating direction and annotations, likely illustrating a procedure or workflow.natural_image
Simple line drawing of a circular ring with a downward arrow pointing to its center (no text or symbols)- Vodite računa da se sigurnosna matica može ručno ukloniti. Ako je ne možete ukloniti rukom, onda ne zaključava dovoljno rezni dodatak i morate je zamijeniti.

natural_image
Simple line drawing of a hexagonal nut with a curved arrow indicating rotation or cycle (no text or symbols)- Pregledajte ima li na štitniku sječiva oštećenja ili pukotina. Ukoliko je nož udaran ili na njemu ima pukotina, zamijenite ga.
- Pregledajte ima li na glavi trimera i štitnika reznog dodatka oštećenja ili pukotina. Ako su glava trimera i rezni dodatak udareni ili na njima ima pukotina, zamijenite ih.
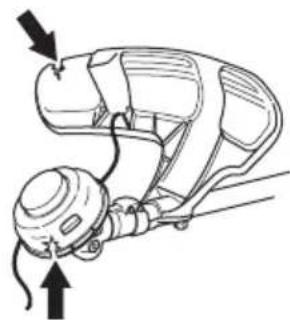
natural_image
Technical line drawing of a mechanical device with directional arrows indicating movement (no text or symbols)Zaustavljanje motora
-
Postavite proizvod na ravnu i stabilnu površinu. Rezni dodatak držite dalje od tla.
-
Pritišćite kuglicu pumpice za istiskivanje zraka dok se kuglica ne počne puniti gorivom. Nije neophodno da se pumpica za istiskivanje zraka napuni u potpunosti.
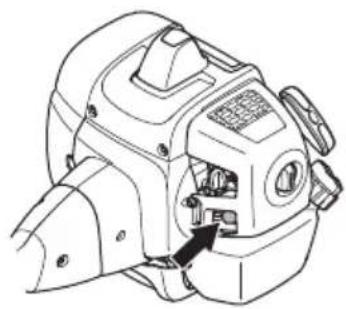
natural_image
Technical line drawing of a mechanical device with a black arrow pointing to a component (no text or symbols present)natural_image
Technical line drawing of a mechanical device with a magnified inset showing a labeled component (no text or symbols present)
natural_image
Line drawing of a handheld device with a scroll wheel and control knob (no text or symbols)natural_image
Illustration of a worker in safety gear handling equipment (no text or symbols visible)natural_image
Line drawing of a handheld device with a scroll wheel and handle (no text or symbols)Povratni udar noža
- Povratni udar noža je iznenadno kretanje proizvoda ustranu, naprijed ili nazad. Do povratnog udara noža dolazi kada nož za travu udari u predmet koji se ne može rezati. U situacijama u kojima nije lako vidjeti materijal koji se reže rizik od povratnog udara noža se povećava.
- Kada dođe do povratnog udara noža, postoji rizik da se proizvod ili operater pomjere iz položaja. Nož za travu u pokretu može pogoditi prolaznike i postoji rizik od povreda.
- Ako je nož iskrivljen, napuknut, slomljen ili oštećen, bacite ga.
- Koristite oštar noža. Rizik od povratnog udara noža se povećava kada nož nije naoštren.
natural_image
Line drawing of a person spraying water on a path with trees and a dashed line indicating a path (no text or symbols)natural_image
Illustration showing a tree planting with a shovel and a person holding a ball (no text or symbols)Obaranje drveta na desnu stranu
Da biste oborili drvo na desnu stranu, gurnite donji kraj drveta ulijevo.
natural_image
Illustration showing a tree planting a sapling with an arrow indicating direction, and a person reaching out a round object (no text or symbols)natural_image
Simple line drawing of a person pulling a rope with a downward arrow, no text or symbols presentnatural_image
Simple line drawing showing a tree stump and a person holding a tree with a circular pattern (no text or symbols)- Režite kroz drvo s druge strane.

natural_image
Illustration showing a wooden saw cutting through a gear and a tree trunk with a tool, both without any text or symbols.
natural_image
Illustration of a person spraying water onto a leafy plant with arrows indicating flow direction (no text or symbols)a) Režite drveće s vanjske strane prema gore.
b) Režite drveće s vanjske strane do određene visine.
c) Režite iz sredine. Ako ne možete prići sredini, režite drveće s vanjske strane prema gore i pustite da padnu. Ovim se smanjuje opasnost od zaglavljivanja sječiva noža.
natural_image
Illustration of a person using a pulley system to lift a pine tree (no text or symbols)natural_image
Simple line drawing of a grassy field with a small plow and tool (no text or symbols)- Smanjite dužinu flaksa trimera za 10–12 cm / 4–4,75 inča.
- Smanjite brzinu motora kako biste smanjili rizik od oštećenja biljaka.
- Koristite 80% gasa kada režete travu u blizini predmeta.
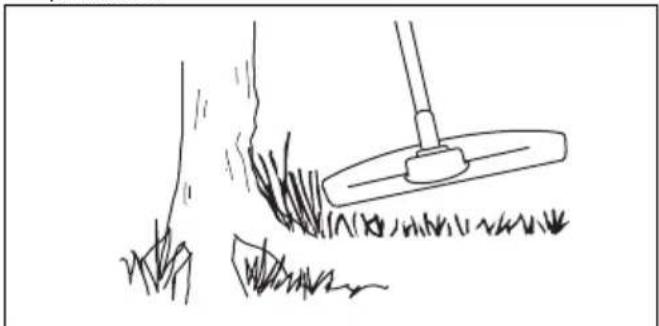
natural_image
Simple line drawing of a grassy field with a small plow and a tool, no text or symbols present.Uklanjanje trave
- Držite glavu trimera iznad tla.
- Nagnite glavu trimera.
- Režite krajem linije trimera oko predmeta u radnom području.

natural_image
Simple line drawing of a grassy field with a small circular object at the top (no text or symbols)- Nemojte pritiskati glavu trimera u tlo. To može izazvati oštećenje na proizvodu.
- Pomjerajte proizvod s jedne na drugu stranu dok kosite travu. Koristite punu brzinu.

natural_image
Illustration of a person using a mechanical device with a dashed arrow indicating motion (no text or symbols)Sakupljanje trave
Zračna struja iz rotirajućeg silka trimera može se koristiti za uklanjanje trave iz područja.
- Držite glavu trimera i flaks trimera paralelno sa tlom i iznad tla.
- Dajte puni gas.
- Pomjerajte glavu trimera s jedne strane na drugu i čistite travu.

natural_image
Technical line drawing of a mechanical device with labeled component 'T' and rotational arrows (no text or symbols beyond label)natural_image
Technical line drawing of a mechanical component with mounting holes and housing (no text or symbols)natural_image
Technical line drawing of a mechanical assembly with a housing and clamping mechanism (no text or symbols)natural_image
Technical line drawing of a mechanical assembly with no visible text or symbols- Očistite filter za zrak od filca komprimiranim zrakom.

natural_image
Technical line drawing of a mechanical component with a labeled connection point A (no text or symbols beyond label)Konusni pogon
Konusni pogon je napunjen ispravnom količinom maziva u fabrici. Ali, prije upotrebe proizvoda, vodite računa da su 3/4 konusnog pogona namazane mazivom. Koristite McCulloch specijalnu mast.

natural_image
Technical line drawing of a mechanical tool or device with a knob and lever mechanism (no text or symbols)natural_image
Technical line drawing of a mechanical component with threaded end and shaft (no text or symbols)text_image
Exploded view diagram of a mechanical device with numbered parts for identification and assembly reference.natural_image
Line drawing of a person wearing protective gear and using a long-handled tool to clean grass near a tree (no text or symbols)natural_image
Line drawing of a helmet and seat assembly (no text or symbols)natural_image
Line drawing of a pair of binoculars (no text or symbols)natural_image
Line drawing of a mechanical component or device (no text or symbols)natural_image
Line drawing of two human gloves with bandages and straps (no text or symbols)natural_image
Line drawing of a pair of boots with textured soles (no text or symbols)text_image
Diagram of a handheld device with labeled parts A and B, showing directional arrows indicating movement or force.natural_image
Line drawing of a handheld device with a scroll wheel and arrow indicator (no text or symbols)natural_image
Diagram of a handheld device with two directional arrows indicating movement or force (no text or symbols present)natural_image
Illustration of a worker using a tool to install a mechanical component, with no visible text or symbols.Kontrola vypínače
natural_image
Line drawing of a medical or surgical device with a directional arrow indicating movement (no text or symbols present)natural_image
Line drawing of a mechanical tool interacting with a base (no text or symbols)
natural_image
Technical line drawing of a mechanical assembly with gear and shaft components (no text or symbols)natural_image
Technical line drawing of a mechanical device with no visible text or symbolsnatural_image
Line drawing of a person adjusting a belt buckle, showing two hands and one belt buckle (no text or symbols)Tlumič výfuku

natural_image
Technical line drawing of a mechanical component with mounting holes and internal cavities (no text or symbols)natural_image
Illustration of a hand operating a propeller with a nut, showing rotational motion (no text or symbols)
natural_image
Two technical line drawings: a gear-like circular component and a curved mechanical part with internal components (no text or symbols)natural_image
Four abstract geometric shapes with varying line styles and dot patterns, no text or symbols present.natural_image
Technical line drawing of a mechanical component with two views: top shows a circular component with curved lines, bottom shows a triangular frame with internal cutouts and mounting holes (no text or symbols)natural_image
Diagram showing a grater blade and a shield with an arrow indicating direction (no text or symbols)natural_image
Diagram of a tool interacting with a mechanical part, showing a handle and blade (no text or symbols)natural_image
Diagram showing two mechanical tool configurations with arrows indicating movement or force direction (no text or symbols)natural_image
Illustration of a person in protective gear using a tool to measure bone structure, with an inset showing a close-up of the bone (no text or symbols present)natural_image
Simple line drawing of a mechanical component or bracket with a circular hole and curved edge (no text or symbols)natural_image
Diagram showing two mechanical components with arrows indicating motion or force direction (no text or symbols)
natural_image
Three technical illustrations of mechanical components: a spool, a plate with a circular symbol, and a coiled spring (no text or symbols present)natural_image
Technical line drawing of a mechanical device with wires and connectors (no text or symbols)natural_image
Two technical diagrams showing a mechanical component with a no-smoking symbol above it, no text or labels present.text_image
L A C A Btext_image
Technical diagram showing mechanical assembly with labeled parts A and B, including a magnified inset view of a component.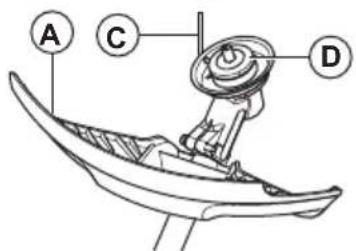
text_image
A C Dnatural_image
Technical line drawing of a mechanical component with labeled part E and directional arrow (no text or symbols beyond labels)text_image
Technical diagram showing mechanical assembly with labeled component H and a circular symbol
text_image
J K I L Atext_image
Technical diagram of a mechanical gear assembly with labeled components A through Gtext_image
Technical diagram showing gear meshing and mechanical assembly steps with directional arrows indicating motionnatural_image
Diagram of a circular mechanical component with internal segments and an inset showing a stepped mechanism (no text or symbols)Seřízení popruhu

natural_image
Line drawing of a person wearing a headlamp and holding an object, with an arrow indicating direction (no text or symbols)natural_image
Illustration of a person using a long-handled tool to clean or spray the machine (no text or symbols present)text_image
Safety warning illustration showing fuel injection and hazard symbols with a person holding a devicenatural_image
Simple black-and-white icon showing a droplet and a fuel pump with a plus sign (no text or symbols)natural_image
Three abstract line drawings showing directional arrows and shapes, no text or symbols presentnatural_image
Simple line drawing of a circular object with a downward arrow pointing to its center (no text or symbols)natural_image
Simple line drawing of a hex nut with a curved arrow indicating rotation (no text or symbols)natural_image
Diagram of a mechanical device with an upward arrow indicating motion or force (no text or symbols present)Nastartování motoru
natural_image
Technical line drawing of a mechanical device with internal components and a black arrow pointing to a component (no text or symbols present)natural_image
Technical line drawing of a camera module with a magnified inset showing the H button (no text or symbols present)
natural_image
Technical line drawing of a handheld device with a black arrow pointing to the handle (no text or symbols present)natural_image
Illustration of a worker in safety gear handling a tool (no text or symbols visible)natural_image
Line drawing of a handheld device with a scroll wheel and control knob (no text or symbols)Zpětný vrh kotouče
natural_image
Line drawing of a person walking on a path with trees and a dashed line indicating a path (no text or symbols)natural_image
Illustration showing a tree pruning with a tool and a person holding a ball (no text or symbols)natural_image
Illustration showing a tree pruning method and a person using a ball (no text or symbols)natural_image
Simple line drawing of a person pulling a rope with a downward arrow, no text or symbols presentnatural_image
Simple line drawing showing a tree stump and a person holding a large tree with a circular pattern (no text or symbols)natural_image
Diagram showing a wooden saw cutting through a gear with a moving tree, and a tool interacting with the tree trunk (no text or symbols present)
natural_image
Illustration of a person using a tool to spread soil or vegetation around a central plant with arrows indicating flow (no text or symbols)natural_image
Illustration of a person using a tool to lift a tree, no text or symbols presentnatural_image
Simple line drawing of a grassy slope with a small utility pole (no text or symbols)natural_image
Simple line drawing of a grassy field with a plow and a stick, no text or symbols presentnatural_image
Simple line drawing of a grassy field with a small mechanical component at the top (no text or symbols)natural_image
Illustration of a person wearing protective gear holding a long pole with a rotating wheel, connected by a dashed arrow indicating motion (no text or symbols)Odstranění trávy
natural_image
Technical line drawing of a mechanical device with labeled component 'T' and rotational arrow (no text or symbols beyond label)natural_image
Technical line drawing of a mechanical component with mounting holes and internal cavities (no text or symbols)natural_image
Technical diagram of a mechanical assembly with a housing and clamping mechanism (no text or labels)text_image
Technical diagram of an automotive air intake manifold with labeled parts A and BVzduchový filtr
natural_image
Technical line drawing of a mechanical assembly with no visible text or symbolsnatural_image
Technical line drawing of a mechanical assembly with a labeled component (A), no readable text or symbols present.Úhlová převodovka
natural_image
Technical line drawing of a mechanical tool or device with a knob and lever mechanism (no text or symbols)natural_image
Technical line drawing of a mechanical component with threaded shaft and mounting holes (no text or symbols)Technické údaje
text_image
Exploded view diagram of a mechanical device with numbered parts for identification and assembly reference.natural_image
Line drawing of a person spraying water with a tree in the background (no text or symbols)natural_image
Line drawing of a helmet and gear assembly (no text or symbols)natural_image
Line drawing of a mechanical component or device (no text or symbols)natural_image
Line drawing of a mechanical component or bracket (no text or symbols)natural_image
Line drawing of a pair of boots with visible tread and buckles (no text or symbols)text_image
Diagram of a handheld device with labeled parts A and B, showing directional arrows indicating movement or force.natural_image
Diagram of a handheld device with a scroll wheel and directional arrow (no text or symbols)natural_image
Diagram of a handheld device with two directional arrows indicating movement or force (no text or symbols present)natural_image
Illustration of a worker using a tool to install a mechanical component, with no visible text or symbols.Перевірка вимикача
natural_image
Line drawing of a medical or surgical device with a black arrow pointing to a component (no text or symbols present)natural_image
Technical line drawing of a mechanical tool or device with a base mount and handle (no text or symbols)
natural_image
Technical line drawing of a mechanical assembly with gear and shaft components (no text or symbols)natural_image
Technical line drawing of a mechanical device with no visible text or symbolsnatural_image
Line drawing of a person adjusting a belt buckle, showing two hands and one belt buckle (no text or symbols)Глушник

natural_image
Technical line drawing of a mechanical housing or enclosure component (no text or symbols)natural_image
Illustration of a hand turning a propeller with a nut, showing rotational motion (no text or symbols)