
BPA 1123 BT - Car stereo BLAUPUNKT - Free user manual and instructions
Find the device manual for free BPA 1123 BT BLAUPUNKT in PDF.
| Product type | Car radio |
| Brand | Blaupunkt |
| Model | BPA 1123 BT |
| Power supply | 10.5 - 14.4 V DC |
| Power consumption | <10 A (operating), <5 mA (standby) |
| Speaker impedance | ≥ 4 Ω per channel |
| USB connectivity | 2 ports: MUSIC (playback, 5V/0.7A) and CHARGE (DC 5V, 5V/2A) |
| AUX input | 3.5 mm stereo jack socket |
| Bluetooth | Hands-free and audio streaming (A2DP, AVRCP) |
| Analog radio | FM (87.5-108 MHz), MW (medium wave) |
| Station memory | 30 presets (6 per band: FM1, FM2, FM3, MW1, MW2) |
| USB playback functions | MP3, WMA; pause, scan, repeat, shuffle, folder navigation |
| Display | Backlit LC display (adjustable color) |
| Sound settings | Bass, treble, balance, fader, preset equalizer, loudness |
| Hands-free kit | Built-in microphone + external microphone input |
| Safety | Mute function, automatic shutdown with ignition |
| Maintenance | Clean with a dry or slightly damp cloth |
| Repairability | RST button for reset; disassembly with special tool; have repairs carried out by a specialist |
Frequently Asked Questions - BPA 1123 BT BLAUPUNKT
User questions about BPA 1123 BT BLAUPUNKT
0 question about this device. Answer the ones you know or ask your own.
Ask a new question about this device
Download the instructions for your Car stereo in PDF format for free! Find your manual BPA 1123 BT - BLAUPUNKT and take your electronic device back in hand. On this page are published all the documents necessary for the use of your device. BPA 1123 BT by BLAUPUNKT.
USER MANUAL BPA 1123 BT BLAUPUNKT
EN Operating and Installation instructions
1. Car radio controls
text_image
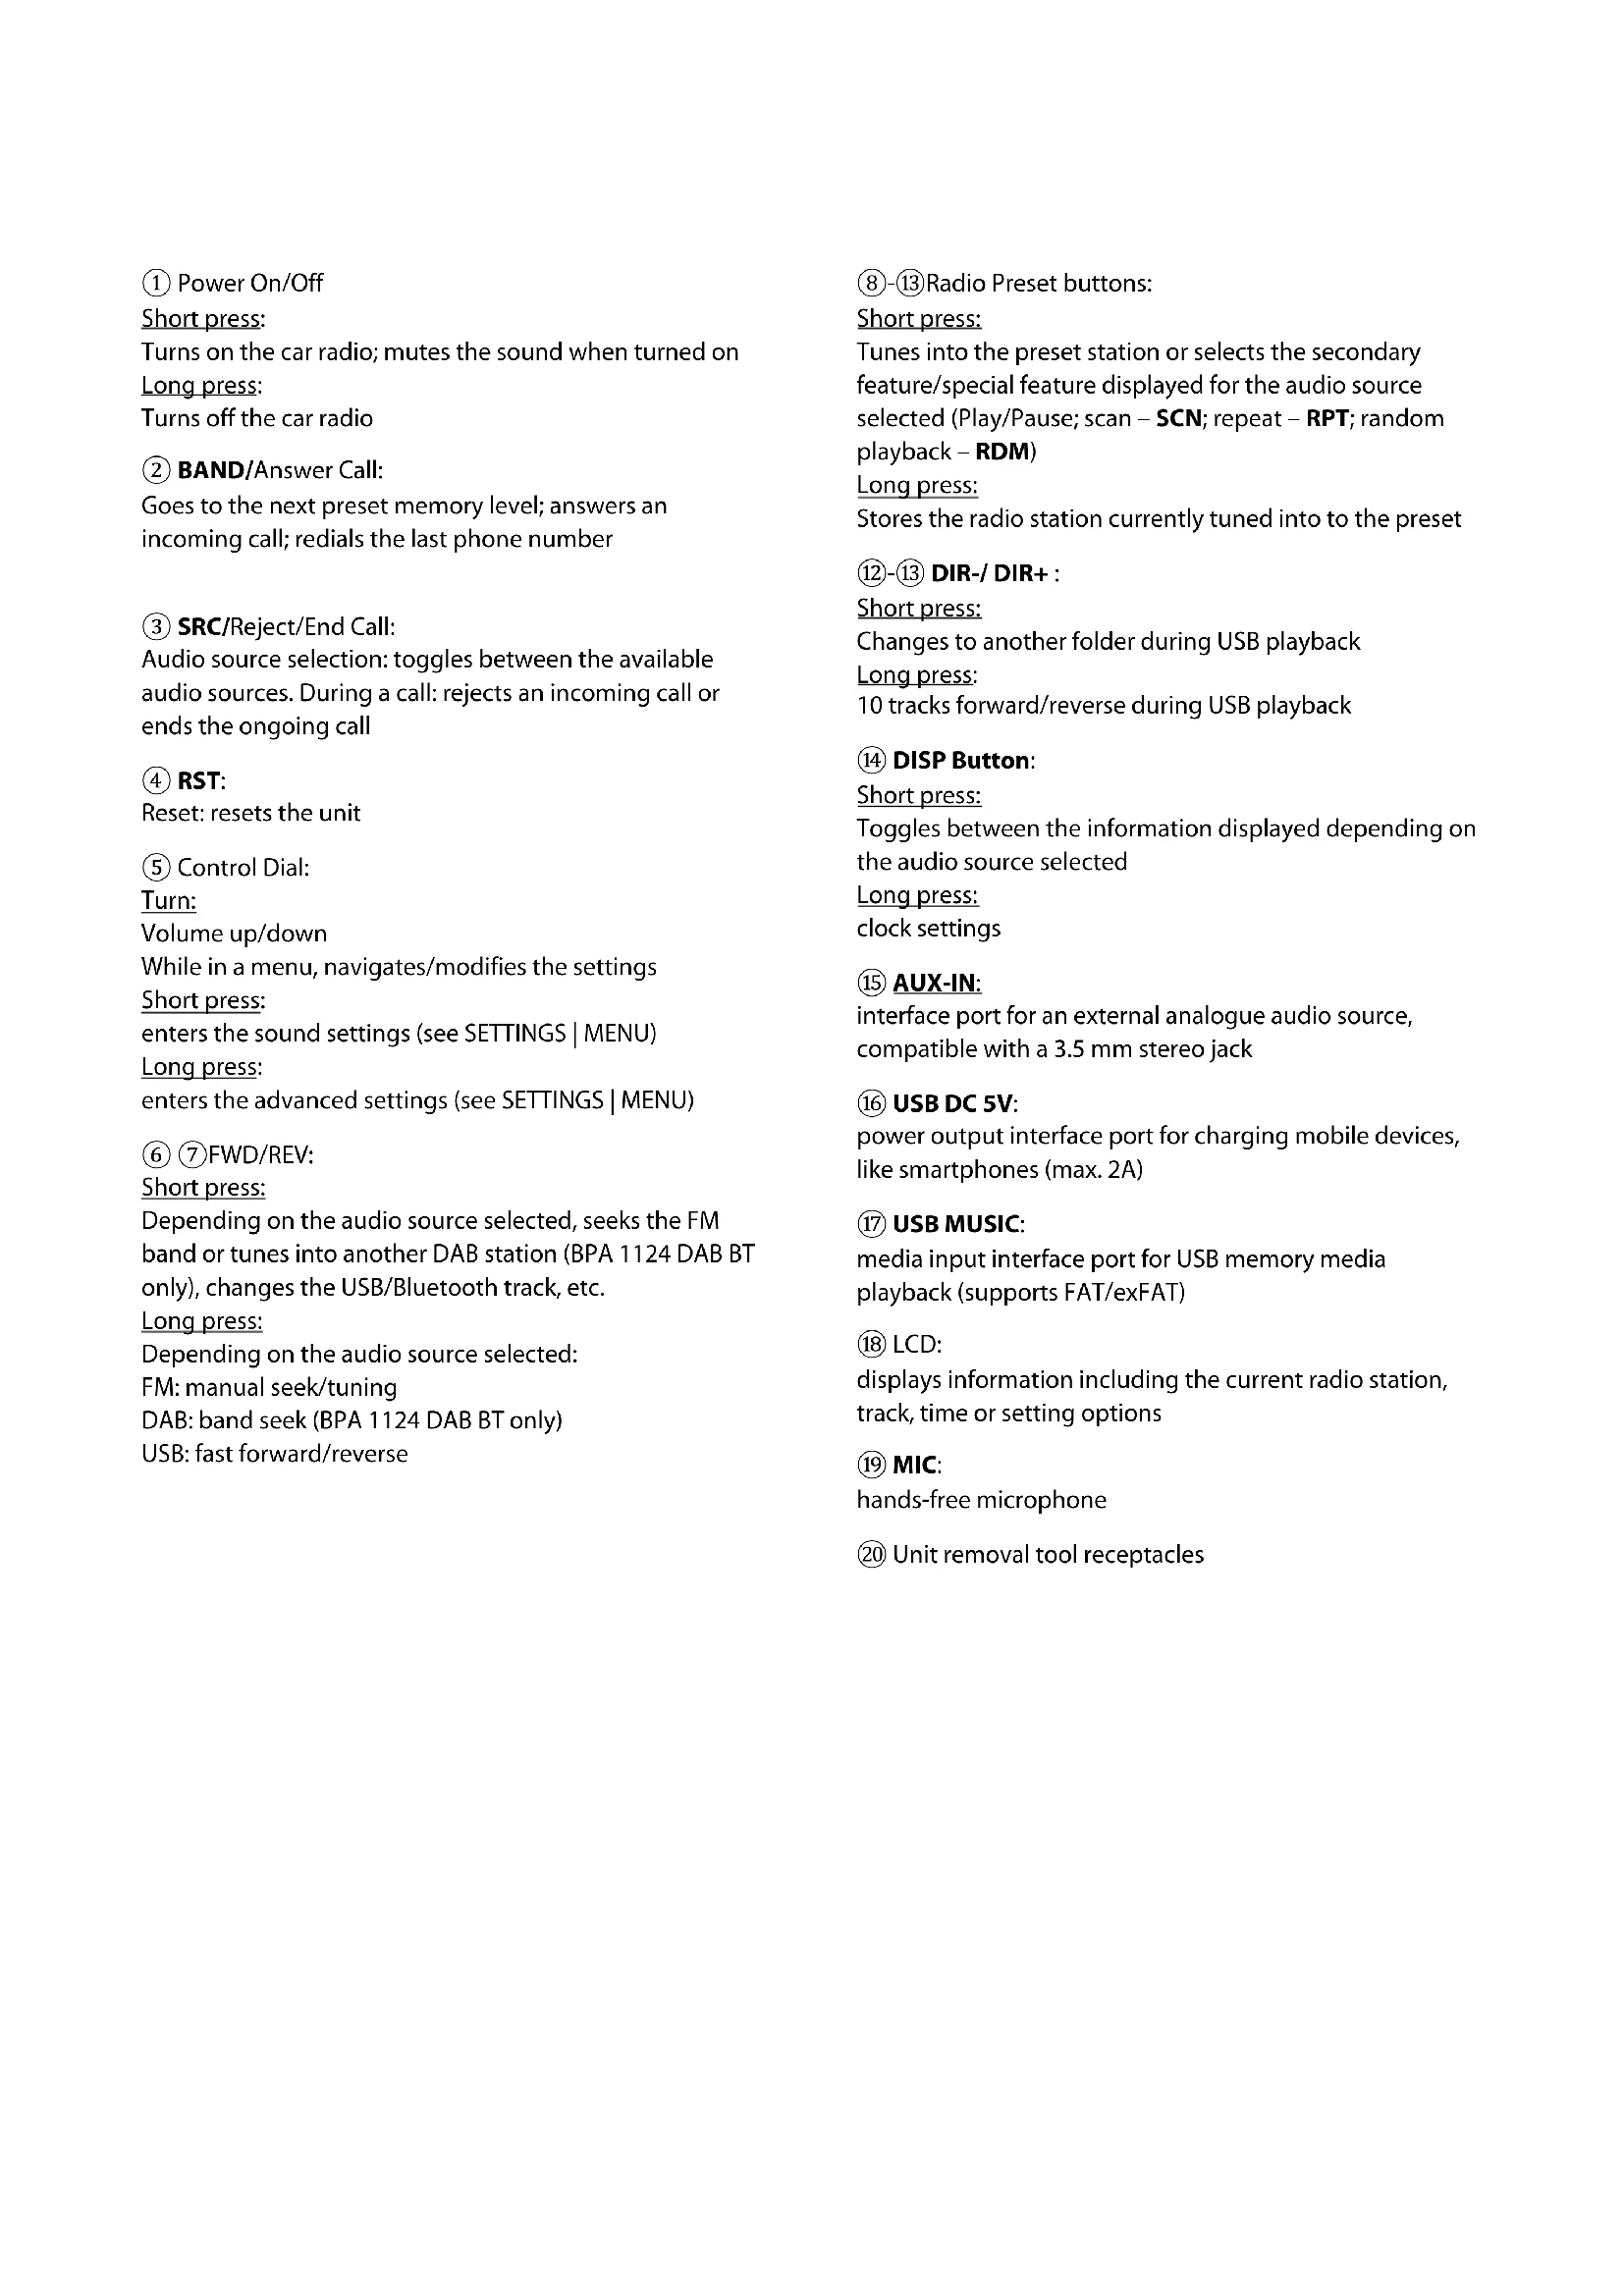
19 MIC BAND SRC RST 18 17 16 MUSIC DC 5V BLAUPUNKT 4 5 6 7 8 9 10 11 12 13 14 15 AUX IN① Power On/Off
Short press:
Turns on the car radio; mutes the sound when turned on Long press:
Turns off the car radio
② BAND/Answer Call:
Goes to the next preset memory level; answers an incoming call; redials the last phone number
③ SRC/Reject/End Call:
Audio source selection: toggles between the available audio sources. During a call: rejects an incoming call or ends the ongoing call
④ RST:
Reset: resets the unit
⑤ Control Dial:
Turn:
Volume up/down
While in a menu, navigates/modifies the settings
Short press:
enters the sound settings (see SETTINGS | MENU)
Long press:
enters the advanced settings (see SETTINGS | MENU)
⑥ ⑦ FWD/REV:
Short press:
Depending on the audio source selected, seeks the FM band or tunes into another DAB station (BPA 1124 DAB BT only), changes the USB/Bluetooth track, etc.
Long press:
Depending on the audio source selected:
FM: manual seek/tuning
DAB: band seek (BPA 1124 DAB BT only)
USB: fast forward/reverse
⑧-⑬Radio Preset buttons:
Short press:
Tunes into the preset station or selects the secondary feature/special feature displayed for the audio source selected (Play/Pause; scan – SCN; repeat – RPT; random playback – RDM)
Long press:
Stores the radio station currently tuned into to the preset
⑫-⑬ DIR-/DIR+ :
Short press:
Changes to another folder during USB playback
Long press:
10 tracks forward/reverse during USB playback
⑭ DISP Button:
Short press:
Toggles between the information displayed depending on the audio source selected
Long press:
clock settings
⑮ AUX-IN:
interface port for an external analogue audio source, compatible with a 3.5 mm stereo jack
⑯ USB DC 5V:
power output interface port for charging mobile devices, like smartphones (max. 2A)
⑰ USB MUSIC:
media input interface port for USB memory media playback (supports FAT/exFAT)
⑱ LCD:
displays information including the current radio station, track, time or setting options
⑲ MIC:
hands-free microphone
⑳ Unit removal tool receptacles
2. Congratulations on your purchase
Congratulations on the purchase of your new Blaupunkt product.
Please read this User Manual carefully to enjoy it for a long time.
However, if you are experiencing unexpected problems, consult this User Manual to see if you can solve them. Please also read the TROUBLESHOOTING section at the end of this User Manual.
Your Blaupunkt dealer and Blaupunkt Service will be happy to help you if you cannot solve a problem yourself. Our contact details can be found at www.blaupunkt.com.
This User Manual may apply to different models which vary in features. Some features and options may not be available in your unit or may vary between specific models.
We reserve the right to make technical changes to improve the product, as a result of which deviations from the features specified in this User Manual are possible.
Contents
Section
Car Radio Controls 1
Congratulations on your purchase | Contents 2
Safety 3
General | Package contents 4
Turning the unit on/off | Adjusting volume 5
Analogue radio: VHF band (FM/AM) 6
Digital radio: DAB/ DAB+ (BPA 1124 DAB BT only) 7
Playback from external devices and media: USB 8
Playback from external devices and media: Bluetooth® 9
Playback from external devices and media: AUX 10
Bluetooth® hands-free set 11
Clock 12
Settings | Menu 13
Installation | Removal | Connections 14
Useful information | Technical data 15
Troubleshooting 16
3. Safety
Safety
The car radio has been manufactured according to the current state of the art and specified safety guidelines.
However, hazards may occur if the safety instructions in this User Manual are not followed.
Read this User Manual to learn the major features and operation of the unit.
- Read this User Manual carefully before using your car radio.
- Keep the User Manual in a place that is accessible to all users.
- When passing the car radio on to someone else, include this User Manual.
- Follow the manuals of the devices (if any) used together with the car radio.
- If a problem occurs, stop using the unit.
Symbols
The following symbols are used throughout this User

Manual:
DANGER! Warning of injuries

CAUTION! Warns of the risk of damage to the DVD/CD drive or media in use

WARNING! High volume warning

The CE marking certifies conformity with EU directives
Hint
- List item
Road traffic safety
Follow the road traffic safety guidelines provided below

Use the car radio in a way which never prevents you from operating your motor safely.
Using the car radio features while driving can distract you from the situation on the road and lead to a serious accident!
Avoid all activities that distract you from the situation on the road or operating your vehicle.
Use these features having parked your vehicle in a permitted location.

Always listen to the unit at a moderate volume to protect your hearing and be able to hear sound warning signals (like police horns). When Mute is
enabled (e.g. when toggling through the sound sources), no change in volume adjustment can be heard. Do not increase the volume with Mute enabled.
General safety precautions
Do not attempt to modify or open the car radio. There are no user-serviceable parts inside.
Devices with a CD drive use a Class 1 laser that can damage your sight.
Intended use:
this car radio is intended for installation and operation in a motor vehicle with 12 V supply voltage and must be installed in a DIN slot.
Follow the operating limits of your car radio.
Have repairs and, if necessary, installation done by a professional.
4. General | Package contents
Declaration of Conformity
Blaupunkt Competence Center Car Multimedia Evo Sales GmbH hereby declares that the car radio complies with the essential requirements and other relevant provisions of Directive 2014/53/EU.
The full Declaration of Conformity can be found online at www.blaupunkt.com. If it not available from this website, please contact us.
Trademark notice
All other trademarks and their logos, brand names or company names referred to in this User Manual are used for identification only and are the property of their respective owners.
Cleaning
Solvents, cleaning and abrasive products, as well as car cockpit sprays, air fresheners and plastic care products can contain substances that will damage the surface of your car radio. Use only a cloth which is dry or slightly damp with water to clean the car radio.
Disposal

Once it reaches its end of life, do not dispose of the unit with the household waste! Use the available return and collection systems to dispose
of your waste unit and its accessories.
Package contents
The package includes the following items:
- Car radio (this unit)
- User Manual
- External microphone
• Supply voltage/speaker connection adapter - Installation frame and removal tool
5. Turning the unit on/off | Adjusting volume
Switching on/off
A short press on the Power On/Off button turns on the car radio. To turn it off, press and hold the Power On/Off button for more than 2 seconds.
The car radio cannot be turned on with the vehicle's ignition turned off.
Turning on/off with the vehicle ignition
If the ignition is turned off while the unit is turned on, it will automatically turn off and turn on again the next time the ignition is turned on.
If the unit has been turned off using the Power On/Off button on the unit, it will stay off after cycling the ignition switch and can only be turned off by operating the Power On/Off button manually.
If this feature does not work as described, the car radio has not been properly wired.
Adjusting the volume
The sound volume can be adjusted using the control dial from 0 (no sound) to 40 (maximum sound volume).
The unit displays the volume level set for a few seconds afterwards.
Setting the playback volume:
During music playback, turn the control dial to set the volume.
Setting the Bluetooth ^® (telephone) volume:
During a phone call, turn the control dial to set the volume.
Muting your car radio
Briefly press the Power On/Off button to mute the unit or unmute with the volume setting last used.

Always listen to the unit at a moderate volume to protect your hearing and be able to hear sound
warning signals (like police horns). When Mute is enabled (e.g. when toggling through the sound sources), no change in volume adjustment can be heard. Do not increase the volume with Mute enabled.
6. Analogue radio: VHF band (FM/MW)
Analogue radio signal transmission channels, such as FM radio from 87.5-108 MHz, are the 'classic' broadcast frequencies, widely used throughout the world.
The broadcast transmitters are analogue (FM = frequency modulation, MW/AM = amplitude modulation).
With weak or fluctuating signals, the stereo sound fades on FM radio, stations are played in mono and the reception has a hiss (is noisy).
Depending on the service region, FM stations can often be received on different frequencies, which the car radio can automatically tune into, depending on the quality of reception if the FM station transmits the necessary RDS data and the broadcast is of sufficient strength.
Playing FM/MW radio
Use the SRC button to select the last used analogue source (RADIO display or FM1, FM2, FM3, MW1, MW2), then use the BAND button to change the preset memory level or frequency range (FM1, FM2, FM3, MW1, MW2).
There are 6 presets on each preset memory level.
Tuning into radio stations
By briefly pressing the >>/<< buttons, you can start seeking for radio channels (forwards and backwards). The seek stops automatically at the first (or the next) received station with sufficient broadcast signal strength.
You can also tune into a radio frequency manually if the broadcast signal from the desired radio station is very weak and the seek fails to stop at the expected frequency. To do this, press and hold one of the >> and << buttons until MANUAL appears in the display.
The frequency will now change as long as the button is pressed and will only stop when the button is released. The frequency can be changed station by station by briefly pressing the >> or << button.
If no button is pressed for approx. 5 seconds, the unit reverts to automatic tuning automatic search and the display briefly reads AUTO.
Storing and selecting radio station presets
You can store your favourite radio stations with the preset buttons labelled from 1 to 6.
Each preset memory level (FM1, FM2, FM3, MW1, MW2) can store 6 radio stations:
Follow the procedure in "TUNING INTO RADIO STATIONS" to tune into the desired station.
Press and hold the selected preset memory button for approximately one second and release it.
You can tune into your station saved as a preset by briefly pressing the respective preset button.
■ The right part of the display will read the preset number.
Automatic storing of presets (Travelstore)
The available radio station can be preset using the automatic preset storing feature (travelstore):
Press and hold the BAND button until the unit starts the travelstore process. The display will show the frequency and the number of the free preset mapped to the radio station found; once the process ends, all radio stations stored in the presets will be briefly played back.
Display readout selection
Use the DIS button to toggle between different display information:
- Radio station name (or frequency if the name is missing)
• Time
The availability of display readout features will vary with the radio station and broadcast reception quality.
If the reception is poor, the radio-broadcast information might not be displayed properly or at all, or displayed for the last radio station tuned into.
More features or options:
See "SETTINGS".
7. Digital radio: DAB/ DAB+ (BPA 1124 DAB BT only)
Digital Audio Broadcasting (DAB or DAB+) is the digital successor to analogue FM broadcasting. Digital broadcasting has some differences from the well-known analogue FM radio:
One than more radio stations broadcast on a single channel – this is called ‘multiplexing’ (MUX) (or program packages).
The radio stations on a specific MUX are called 'services' (this means radio stations and/or data services).
In Germany, for example, MUX are available regionally from public broadcasters; moreover, there are currently two MUX that can be received throughout Germany: DR DEUTSCHLAND and ANTENNE DE.
A MUX can often be received on the same channel throughout the broadcasting area through transmitters in different locations (which is a common RF network) and you do not need to change a channel to enjoy continued service. This gives more room for additional program providers.
DAB stations do not output a noise known from FM radio; a DAB station audio broadcast is either received with a consistent quality – or not received at all when error correction is no longer able to reconstruct the broadcast signal, accompanied by a short "garble".
Playing DAB/DAB+ radio
Use the SRC button to select the DAB source, then use the BAND button to change the preset memory level (DAB1, DAB2, DAB3).
There are 6 presets on each preset memory level.
Browsing DAB services / seeking MUX
Use the >>/ << buttons to scroll up or down through the DAB services on the MUX.
When the first or last DAB service of the current MUX is reached, the unit automatically starts seeking the previous or next MUX that can be received, playing back the last or first DAB service listed in that previous or next MUX, respectively.
Seeking MUX
By pressing and holding the >>/<< buttons, you can, at any time, start seeking for the next or previous MUX that can be received.
Storing and selecting radio station presets
You can store your favourite radio stations with the preset buttons labelled from 1 to 6. Each preset memory level can store up to 6 radio stations.
Follow the procedure in "BROWSING DAB SERVICES / SEEKING MUX" to tune into the desired station.
Press and hold the selected preset memory button for approximately one second and release it.
You can tune into your station saved as a preset by briefly pressing the respective preset button.
■ The right part of the display will read the preset number.
Display readout selection
Use the DIS button to toggle between different display information:
• DAB service name
• Time
The availability of display readout features will vary with the radio station and broadcast reception quality.
If the reception is poor, the radio-broadcast information might not be displayed properly or at all, or displayed for the last radio station tuned into.
8. Playback from external devices and media: USB
The USB interface of the car radio can be connected to storage media (USB thumbdrives/dongles/memory sticks) and play back the media stored on them, provided that the files and the file format of the storage is compatible with this unit.
Compatible storage media types:
- USB storage media with FAT16, FAT32, exFAT file system
• Data formats: MP3; WMA
■ Given the variety of software products with which media files can be created, the performance of every media file cannot be reasonably guaranteed. - Direct connectivity with MP3 players or smartphones to play music is not supported.
The unit's USB port can also be used for charging external devices, like smartphones. Manufacturer-specific fast charging features are not supported. Charging of every mobile device cannot be reasonably guaranteed and it may depend on the actual USB cable used.
This car radio features a USB port for multimedia playback:
- Find the USB MUSIC interface behind the flip cover on the front of the unit (see "CAR RADIO CONTROLS").
Connecting USB storage media/media playback from USB
Open the MUSIC flip cover (tilt it upward).
Carefully plug the USB storage into the USB interface without forcing or bending the USB storage.
The unit will automatically switch to the USB playback mode. The data on the USB storage will be loaded and the playback will begin with the first media file recognised by the unit.
If the USB storage has been connected to this unit, switch to USB by pressing the SRC button; the data on the USB storage will be loaded and the playback will begin from the last file played back.
USB playback
By briefly pressing the >>/<< buttons, you can scroll through the tracks/files.
By pressing and holding the >>/<< buttons you can scroll fast through the contents of the current track/file.
Special features
The following special features can be used with the buttons 1-6, according to the legend on each button:
• PAUSE: pause or resume playback
- SCN: plays back the first 10 seconds of each track/file in succession until the feature is turned off by the user
- RPT: repeats the current track/file (ONE), the entire folder from its first track/file (DIR) or all tracks/file on the USB storage (ALL); pressing the button again disables the repeat mode
- RDM: enables/disables random repeat of the tracks/titles on the USB storage
- DIR-/DIR+:
Short press: navigates to the previous/next folder on the USB storage
Long press: jumps 10 tracks/files back/forward.
Display readout selection
Use the DIS button to toggle between different display information:
• Media file details (consecutive file number, file folder name, ID3 data, and track number)
• Time
The availability of display readout features will vary with the media files.
Removing the USB storage
Never attempt to remove the storage without first turning off the car radio, otherwise the data on the storage medium can be corrupted.

Higher risk of injury from connected USB storage!
In the event of a road accident, any part protruding from the car radio may cause injury.
It is recommended to use the physically smallest USB storage media available.
9. Playback from external devices and media: Bluetooth®
The Bluetooth ^® feature allows you to pair smartphone and media players with your car radio.
If the connected Bluetooth ^® device supports A2DP and AVRCP, you can play back music on the car radio and control the playback.
- At the time of marketing of this unit, extensive testing of Bluetooth® features was conducted with various smartphones and media players to ensure the highest possible compatibility. However, some features may be limited or not work at all, depending on the actual external device in use. In case of such problems, please check if an update is available for your device or car radio.
The last connected device will be reconnected automatically when this car radio is restarted. Depending on the smartphone or media player with Bluetooth® connectivity, Bluetooth® must be re-enabled for previously connected external devices or the connection must be re-initiated using the Bluetooth® device list.
■ Before connecting another Bluetooth® device, disconnect the already connected device.
It is not possible to stream media from this car radio via Bluetooth® to another device (like Bluetooth® speakers), as this car radio only supports Bluetooth® audio signal reception.
Bluetooth® connection
Turn on the radio, open the Bluetooth® settings on your Bluetooth® device, search for available devices, and follow the Bluetooth® device's instructions to pair the device and the car radio.
After a successful pairing, the car radio displays
CONNECTED with a small Bluetooth ^® icon.
- Confirm any messages prompted on your smartphone immediately, otherwise some features may be limited, unavailable, or the pairing process may fail.
The pairing process is required only once for each external device, after which the device will reconnect automatically.
If the device has already been connected previously (the Bluetooth ^® symbol on the display of the car radio must come on and the Bluetooth ^® device must also display the 'Connected' status), switch to the BT AUDIO source using the SRC button.
Bluetooth® playback
By briefly pressing the >>/<< buttons, you can scroll through the tracks/files.
Adjust the volume on the connected Bluetooth® device if the sound output is too quiet or loud. If playback does not start or the wrong application is started on the Bluetooth® device, start/select the correct audio player/app on the connected Bluetooth® device to be used for streaming.
Special features
The following special functions can be used with the preset button 1 according to the legend on the button:
- PAUSE: pause or resume playback.
Display readout selection
Use the DIS button to toggle between different display information:
- Current track/file details (BPA 1124 DAB BT)
• Time
The availability of display readout features will vary with the media files or the connected external device/app.
10. Playback from external devices and media: AUX
The AUX interface allows a compatible cable to be used and input analogue audio from an external device, like portable CD players, cassette players, or MP3 players. The AUX interface requires a 3.5 mm jack cable for connection. For the most common applications, you will need a cable with a 3.5 mm to 3.5 mm stereo jack plug, which can be purchased from well-stocked audio or electronic stores.
The car radio is provided with the AUX port:
- The AUX-IN interface on the unit's front (see "CAR RADIO CONTROLS").
Connect an external device using a suitable adaptor/cable and select the AUX IN audio source using the SRC button. If necessary or feasible to do so, adjust the volume on the external device to a volume similar level to other audio sources of the car radio.
The volume can then be controlled using the car radio controls.
To prevent damage to the unit, use undamaged plugs and cables only.
If you use 3.5 mm (mono) 2-pin jacks, you will not enjoy a stereo audio output and one audio channel may be missing during playback.

Higher risk of injury from connected audio jacks!
In the event of a road accident, any part protruding from the car radio may cause injury.
For this reason, angular (90°) jacks are recommended.
11. Bluetooth® hands-free system
The Bluetooth ^® feature allows you to pair smartphone and media players with your car radio. When you pair your mobile phone with the car radio, you can make phone calls using the built-in hands-free function.
- At the time of marketing of this unit, extensive testing of Bluetooth® features was conducted with various smartphones and media players to ensure the highest possible compatibility. However, some features may be limited or not work at all, depending on the actual external device in use. In case of such problems, please check if an update is available for your device or car radio.
The last connected device will be reconnected automatically when this car radio is restarted. Depending on the smartphone or media player with Bluetooth® connectivity, Bluetooth® must be re-enabled for previously connected external devices or the connection must be re-initiated using the Bluetooth® device list.
Before connecting another Bluetooth® device, disconnect the already connected device.
12. Clock
The unit features an internal real time clock so you can read the time on the display by pressing the DIS button repeatedly.
Bluetooth® connection
Turn on the radio, open the Bluetooth® settings on your Bluetooth® device, search for available devices, and follow the Bluetooth® device's instructions to pair the device and the car radio. After a successful pairing, the car radio displays CONNECTED with a small Bluetooth® icon.
- Confirm any messages prompted on your smartphone immediately, otherwise some features may be limited, unavailable, or the pairing process may fail.
The pairing process is required only once for each external device, after which the device will reconnect automatically.
Incoming calls
Incoming calls are indicated by a ringtone and a message on the car radio display.
You can accept or reject the call using the phone buttons.
Outgoing calls
Once the BT AUDIO source has been selected using the SRC button, the last phone number can be redialed using the Answer Call button.
An active call can be transferred from the car radio audio output to the phone or vice versa by briefly pressing the Answer Call button.
Setting the clock manually
Press and hold the DIS button until the clock hour start flashing. Use the control dial to set the hour. Press the control dial to switch to the clock minutes and set the minutes.
Confirm the setting by pressing the DIS button.
Setting the clock automatically
See "SETTINGS".
13. Settings | Menu
Select the sound settings by briefly pressing the control dial.
Pressing and holding the control dial longer displays the advanced settings.
Rotate the control dial to navigate the settings and modify the setting options.
To select an option or change a setting, go to it and select it by briefly pressing the control dial.
The ON option activates the setting. The OFF option deactivates the setting.
The following settings can be defined and modified according to your preferences:
Sound settings
BAS
Amplifies or reduces low frequency sounds (the bass).
Not available when the EQ option is active.
TRE
Amplifies or reduces high frequency sounds (the treble).
Not available when the EQ option is active.
BAL
Sets the balance of the audio output across the vehicle speakers.
FAD
Adjusts the audio output of the front/rear speakers.
EQ
Enables sound equalizer presets.
If EQ is active, BAS and TRE are disabled from use.
LOUD
Enables/disables bass boost.
Advanced settings of the unit
COLOR AUTO/ RED/ GREEN/ BLUE/ YELLOW/ CYAN/PURPLE/ WHITE
Sets the unit's button backlight colour or enables automatic cycling through the backlight colour options.
AF OFF/ AF ON
Alternative frequency (AF) selection: if enabled (On), the unit will always attempt to tune into the best-quality broadcast frequency.
This feature must be supported by the radio station tuned into to work.
TA OFF/ TA ON
Enables/disables traffic announcement (TA) priority over the FM radio broadcast.
If enabled (On), the car radio automatically tunes from the current radio station to the traffic announcement issued, after which it tunes back to the last radio station tuned into. The TA icon comes on the display when the feature is active; during a traffic announcement broadcast, TA flashes and the legend TRAFFIC appears on the display.
This feature enables seeking radio stations by specific programming type or music genre.
This feature only works when the FM source is selected.
REG OFF/ REG ON When this feature is enabled (On), the unit will only tune into the radio stations with the same regional (Reg) programming if, due to poor broadcast reception, another radio station needs to be tuned into.
RDS AFThe RDS AF featured needs to be ON and supported by the desired radio station.
CT SYNC/ CT INDEP
Used to enable automatic clock setting with the analogue or DAB broadcast data received.
If the clock time set so is incorrect, it is usually because of a data error in the broadcast; you can remedy this by manually setting the clock, see "CLOCK".
CLOCK 12/ CLOCK 24
Toggles between the 12/24-hour time display format.
AREA
Sets the broadcast reception region in which the car radio is operated.
DX/LOCAL
Sets the seek sensitivity for analogue FM broadcasting: DX seeks radio stations with a strong or weak signal reception; LOCAL seeks only the local radio stations with a strong reception.
STEREO/ MONO
Toggles between the mono and stereo reception of analogue radio broadcasting.
BEEP OFF/ BEEP ON
Enables/disables the sound response cues of the car radio controls.
14. Installation | Removal | Connections
Installation guide
Install the unit only if you have experience installing car radios and are familiar with the vehicle's electrical system. Follow the information and legends specified for the car radio connections. Connect the car radio using appropriate wiring harness adapters; ensure that all wires carry signals or voltages with the correct levels. Do not connect the vehicle-side harness plugs directly to the car radio.
The installation of the car radio must not interfere with or prevent deployment of airbags and other safety restraint systems, road safety features or vehicle controls.
Before installing the car radio, disconnect the vehicle battery (its negative terminal / ground); otherwise malfunctions or damage to the car radio or onboard electronic systems may occur.
Follow the vehicle manufacturer's safety instructions (for the airbags, alarm system, body computer, immobiliser unit, etc.).
Optional and dedicated connection adapters and/or installation accessories, such as mounting frames, fascias, etc. may be required, depending on the vehicle in which the car radio is to be installed.
Installation errors may result in damage to the car radio or onboard electronic systems.
The car radio housing gets hot during operation; make sure that no wiring touches the housing.
Installation in an environment with high humidity and/or airborne pollutant levels may result in malfunctions or failure of this unit.
If you need help installing the car radio, consult a car audio specialist.
Blaupunkt assumes no liability or grants no warranty for damage caused by incorrect and/or unprofessional installation, operation or servicing by the user and any consequences thereof.
The car radio is removed by inserting the removal tools into the holes on the side (see "CAR RADIO CONTROLS") unit they click into place. Now, carefully pull out the car radio from the installation opening.
Make sure no wiring is damaged.
text_image
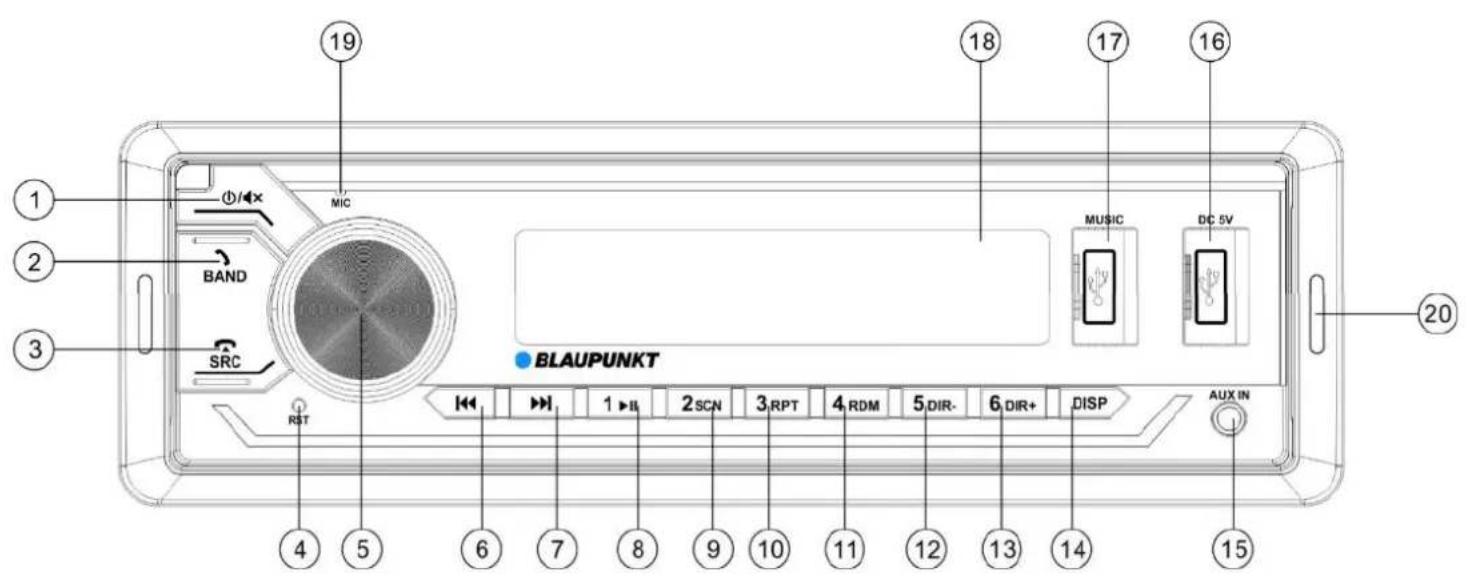
1 3 5 7 2 4 6 8 1 3 5 7 2 4 6 8 B A| A B | |||
| 1 | NC/free | 1 | RR+ speaker |
| 2. | NC/free 2. | RR- speaker | |
| 3. | NC/free 3. | RF+ speaker | |
| 4. | BATT/battery (Cl. 30) 4 | RF- speaker | |
| 5. | Antenna power/trigger output (remote) 5. | LF+ speaker | |
| 6. | NC/free 6. | LF- speaker | |
| 7. | ACC/ignition + (Cl. 15) | 7 | LR+ speaker |
| 8. | GND/ground (Cl. 31) 8 | LR- speaker | |
text_image
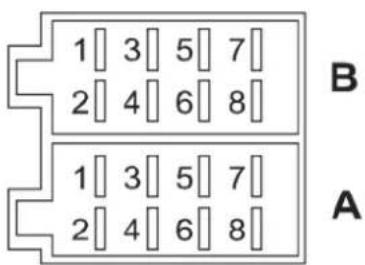
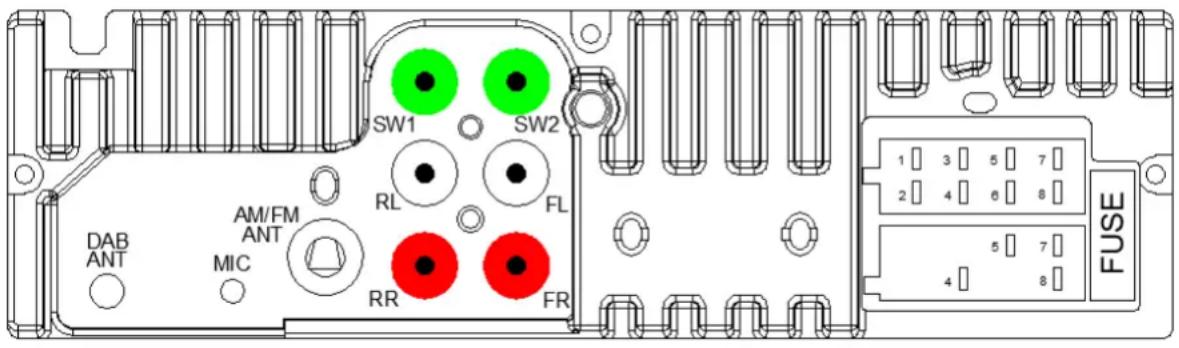
SW1 SW2 RL FL AM/FM ANT MIC RR FR DAB ANT FUSE 1 3 5 7 2 4 6 8 5 7 4 8Identification and explanation of connections
DAB-ANT: SMB connector with 12 V phantom power supply for active antennas (max. 150 mA)
MIC: External hands-free microphone connector
FM/AM ANT: DIN connector for analogue radio reception antenna
RL, FL, RR, FR: Pre-amp outputs for connection to an external sound amplifier unit
SW1, SW2: Pre-amp outputs for a subwoofer
Terminal block with section A (power supply), section B (speakers) and a fuse (10 A red, flat blade car fuse)
BATT/ BATTERIE (CI.30): Battery power input (hot all times)
ACC/ ZÜNDPLUS (CI.15): Ignition positive
GND/ MASSE (CI.31): Ground (negative)
ANTENNA POWER/TRIGGER OUTPUT: Switched power supply for active (powered) antennas or a source of trigger voltage for external amplifiers/subwoofers (12 V, max. 150 mA)
This car radio does not support CD changers, interfaces or other components compatible with older Blaupunkt car radios.
■ Make sure that the ignition (switched) positive and hot-all-times battery power are wired to the corresponding connections of this unit; otherwise, the car radio may increase the battery drain and/or fail to power off completely with the ignition turned off. This may result in battery drain and/or failure, failure of onboard electronic systems or vehicle exterior equipment!
15. Useful information | Technical data
Warranty
For current Warranty Terms & Conditions, please visit www.blaupunkt.com. Local regulations apply unless specified otherwise.
Servicing
Contact the Blaupunkt dealer from whom you have purchased this product if you need a repair service. For more information about service partners in your country, visit www.blaupunkt.com Service partners in your country.
Technical data
Speaker impedance ≥ 4 ohms/channel
Power supply
Operating voltage: 10.5 - 14.4 V
Power input
Operation < 10 A
Off (Cl.15/ ACC off): < 5 mA
Inputs/outputs
Antenna/amp trigger 12V, max. 150mA
DAB antenna 12V, max. 150mA
USB MUSIC port 5V, max. 0.7A
USB DC 5V port 5V, max. 2A
AUX port 3.5 mm jack
16. Troubleshooting
Malfunctions of the unit and possible remedies are listed below.
If you continue to experience problems with this car radio, contact your dealer or Blaupunkt Service.
If you experience a problem, have the unit checked or installed by a professional.
Most problems occur due to incorrect connection and operation. Read the User Manual carefully.
- Some specifications and data may not apply to your model because the relevant feature or option is not available.
- After installing the unit, the airbag lights comes on the instrument cluster / the speedometer does not work, etc.:
The car radio connections most likely have been wired incorrectly. Immediately disconnect the vehicle battery and remove the car radio. Have the installation performed/checked by a professional.
- The car radio does not turn on / the car radio displays 1 HOUR after turning on and turns off 1 hour afterwards:
The ignition positive is not wired or not hot. Check the connections.
- The display flickers at high sound volume / the car radio turns off altogether:
Check the wire cross section of the power supply cable. Have the installation performed/checked by a professional.
• The remote control does not work:
Check if the battery is properly installed in the remote; remove the small plastic wrap from the battery; point the remote control at the car radio for a direct line of data transmission.
This feature is not available on all models.
- The car radio does not turn on / does not respond to ignition / always turns off automatically after a certain period of time / cannot be turned on without ignition: Is the ignition positive / hot-all-times power properly wired? The ignition positive must switch properly between 0 V/12 V, there must be no residual voltage on the ignition positive with the ignition off.
Check the car radio for correct connections; never attempt to connect the vehicle-side harness connectors directly to the car radio without first checking the connection pinouts.
Have the installation performed/checked by a professional.
- Settings and/or preset stations are lost; the clock time is not displayed properly:
As a rule, the car radio stores the settings in a keep-alive memory which persists even when the power supply is off. However, some settings are not permanently stored until the car radio is turned off properly, so make sure you properly turn off your car radio.
The features such as the clock time, last source selected, or last USB/CD file/track played back require a power supply which is hot all times. For proper operation, the car radio must be properly connected to a power source which is hot all times and never interrupted.
- The car radio does not receive radio broadcast or the reception is poor:
Check the antenna for your reception area.
Check if a phantom power supply adapter may be needed. Is the antenna installed correctly? Many antennas require connection to the ground (the car chassis).
LED lights or other electrical components may interfere with radio reception, so look for these and remedy them.
When using the car radio for the first time, make sure the radio is set to the correct radio region (see "SETTINGS").
- NO SIGNAL or NO SERVICE is suddenly displayed in the DAB source mode:
The current MUX (program package) reception is too weak and audio signal decoding is not possible. Select another MUX or check the DAB antenna.
- The car radio suddenly displays SEEK PI/SEEK TA or tunes into different stations in the FM mode: Check your antenna and car radio settings. If necessary, deactivate the alternative frequency (AF) feature (see "SETTINGS"). Poor reception can cause the unit to change stations if the traffic announcement (TA) feature is enabled.
- The car radio does not properly display the radio station name in the FM mode:
Navigate to the display readout as required by using the DIS button. Check the reception (check the antenna). Note: Some radio stations broadcast additional data instead of the RDS station name; this is beyond the control of this unit.
- USB, CD, SD or other storage media do not work:
Test if other storage media work properly, format your storage medium, or try playing different files.
- Mobile phone does not charge or charges slowly from the USB DC port:
This may vary with the actual mobile phone and USB cable used; some manufacturer-specific fast charging features might not support.
- Bluetooth® issues (the phonebook is not displayed, the phone cannot be connected, or the caller cannot be heard):
Check for software updates for your mobile phone and/or car radio.
Reset the car radio using the NORMSET feature (see "SETTINGS | MENU") or press the RESET button (depending on the model). Remove the car radio from the Bluetooth device list on your phone and pair again. Confirm all access right prompts on the mobile phone by selecting "Yes".
Try using a different phone.
• The caller does not hear me:
Check the external microphone for correct connection. Check the microphone setting in the Bluetooth® settings (if available).
Try using a different phone.
- SUB-OUT or its setting options in the car radio do not work (model-specific):
Make sure the subwoofer is properly connected to the SUB-Out connector of the car radio; otherwise the options in the relevant sound settings do not have any effect.
- The fault/malfunction I am experiencing is not specified here. A car radio feature does not work as expected / the car radio does not respond as expected
Reset the car radio using the NORMSET feature (see "SETTINGS | MENU") or press the RESET button (depending on the model).
Verify that the software of this unit is up to date. The latest software updates are available on the Blaupunkt website or can be ordered through Blaupunkt Service.
Note: Provide a precise description of the problem and the software version currently installed on the car radio when contacting the service (see "SETTINGS" on how to display the software version).
Radiou analogic: Unde medii (FM/AM) 6
Radiou digital: DAB/ DAB+ (numai BPA 1124 DAB BT) 7
6. Radiou analogic: Unde medii (FM/MW)
text_image
SW1 SW2 RL FL AM/FM ANT MIC RR FR DAB ANT FUSEDE, EN, FR, ES, PT, IT, NL, HU, PL, CS, FI, EL, TR, RO, BG, SL, SK
Blaupunkt BPA 1123 BT, BPA 1124 DAB BT