
58G022 - Drill Graphite - Free user manual and instructions
Find the device manual for free 58G022 Graphite in PDF.
| Category | Cordless drill/driver |
| Brand | Graphite |
| Model | 58G022 |
| Nominal voltage | 18 V DC |
| No-load speed (1st gear) | 0 – 350 min⁻¹ |
| No-load speed (2nd gear) | 0 – 1250 min⁻¹ |
| Chuck capacity | 0,8 – 10 mm |
| Hex tool holder | 6,35 mm (1/4") |
| Max torque (soft drilling) | 28 Nm |
| Max torque (hard drilling) | 44 Nm |
| Weight | 1,1 kg |
| Battery type | Li-Ion (58G001 2Ah / 58G004 4Ah) |
| Charging time (2Ah battery) | 1 h |
| Charging time (4Ah battery) | 2 h |
| Sound pressure level | 84 dB(A) |
| Sound power level | 95 dB(A) |
| Vibration acceleration | 1,552 m/s² |
| Spindle brake | Yes, electronic |
| LED lighting | Yes |
| Torque adjustment | 19 positions + drilling |
| Speed change | 2 mechanical speeds |
| Rotation direction | Reversible |
| Year of manufacture | 2020 |
| Protection class | III |
| Maintenance and cleaning | Dry cloth; avoid water and solvents |
| Recommended safety | Safety goggles and ear protection |
| Reparability | Contact manufacturer or authorized service |
Frequently Asked Questions - 58G022 Graphite
User questions about 58G022 Graphite
0 question about this device. Answer the ones you know or ask your own.
Ask a new question about this device
Download the instructions for your Drill in PDF format for free! Find your manual 58G022 - Graphite and take your electronic device back in hand. On this page are published all the documents necessary for the use of your device. 58G022 by Graphite.
USER MANUAL 58G022 Graphite
58G022

natural_image
Icon of a person using a laptop inside a circle (no text or symbols)PL INSTRUKCJA ORYGINALNA (OBSŁUGI)......6
GB TRANSLATION OF THE ORIGINAL INSTRUCTIONS...... 10
DE ÜBERSETZUNG DER ORIGINALBETRIEBSANLEITUNG......13
RU ПЕРЕВОД ОРИГИНАЛЬНОЙ ИНСТРУКЦИИ.... 17
UA ПЕРЕКЛАД ІНСТРУКЦІЇ З ОРИГІНАЛУ 21
HU EREDETI HASZNÁLATI UTASÍTÁS FORDÍTÁSA 25
RO TRADUCERE A INSTRUCTIUNILOR ORIGINALE 29
PŘEKLAD PŮVODNÍHO NÁVODU K POUŽÍVÁNÍ...... 32
SK PREKLAD PÔVODNÉHO NÁVODU NA POUŽITIE....36
SL PREVOD IZVIRNIH NAVODIL 39
LT ORIGINALIOS INSTRUKCIJOS VERTIMAS.... 43
LV INSTRUKCIJU TULKOJUMS NO ORIGINÄLVALODAS 46
ALGUPÄRASE KASUTUSJUHENDI TÖLGE 50
BG ПРЕВОД НА ОРИГИНАЛНАТА ИНСТРУКЦИЯ 53
PRIJEVOD ORIGINALNIH UPUTA....57
SR PREVOD ORIGINALNOG UPUTSTVA 61
GR
ΜΕΤΑΦΡΑΣΗ ΤΟΥ ΠΡΩΤΟΤΥΠΟΥ ΤΩΝ ΟΔΗΓΙΩΝ ΧΡΗΣΗΣ...... 64
ES TRADUCCIÓN DEL MANUAL ORIGINAL 68
IT TRADUZIONE DELLE ISTRUZIONI ORIGINALI 72
NL VERTALING VAN ORIGINELE GEBRUIKSAANWIJZING 76
FR TRADUCTION DE LA NOTICE ORIGINALE 80


INSTRUKCJA ORYGINALNA (OBSŁUGI)
WIERTARKO – WKRETARKA AKUMULATOROWA 58G022
UWAGA: PRZED PRZYSTAPIENIEM DO UŻYTKOWANIA URZĄDZENIA NALEŻY UWAŻNIE PRZECŻYTAĆ NINIEJSZĄ INSTRUKCJĘ I ZACHOWAĆ JĄ DO DALSZEGO WYKORZYSTANIA.
SZCZEGÓŁOWE PRZEPISY BEZPIECZEŃSTWA
SZCZEGÓLNE PRZEPISY DOTYCZĄCE BEZPIECZNEJ PRACY WIERTARKO - WKRETARKA


TRANSLATION OF THE ORIGINAL INSTRUCTIONS CORDLESS DRILL 58G022
CAUTION: BEFORE USING THE POWER TOOL READ THIS MANUAL CAREFULLY AND KEEP IT FOR FUTURE REFERENCE.
DETAILED SAFETY REGULATIONS
SPECIFIC REGULATIONS REGARDING SAFE USE OF THE DRILL
- Use ear protectors and safety goggles when operating the drill. Exposure to noise may cause hearing loss. Metal dust and other particles floating in the air may cause permanent eye injury.
- When carrying out tasks when work tool can hit hidden electric wires, hold the tool by insulated areas of the handle. Contact with power supply line may transfer voltage to metal parts of the tool and cause electric shock.
ADDITIONAL RULES FOR SAFE DRILL OPERATION
- Use only recommended batteries and chargers. Do not use batteries and chargers for other purposes.
- Do not change direction of spindle rotation when the tool is operating. Otherwise the drill may be damaged.
- Use soft, dry cloth to clean the drill. Never use detergents or alcohol.
- Do not repair damaged device. Repairs are allowed only at the manufacturer service or in an authorised workshop.
CORRECT OPERATION AND USE OF BATTERIES
- Battery charging process should be supervised by the user.
- Avoid charging the battery in temperature lower than 0^ .
- Use only the charger recommended by the manufacturer. Using charger designed for other type of battery brings the risk of fire.
- When the battery is not in use, store it away from metal objects such as paper clips, coins, keys, nails, screws or any other small metal objects that can short-circuit the battery connectors. Short-circuit of battery connectors may cause burns or fire.
- In case of battery damage and/or improper use it may produce gas. Ventilate room and seek medical attention in case of medical symptoms. Gas can damage respiratory tract.
- In extreme conditions liquid may leak out of the battery. The liquid coming out of the battery may cause irritations or burns. When a leak is found, follow the below procedure:
- Carefully wipe the liquid with a cloth. Avoid contact of the liquid with skin and eyes.
- In case the liquid gets onto skin, immediately wash the spot abundantly with clean water, you can also neutralize the liquid with a mild acid, e.g. lemon juice or vinegar.
- When the liquid gets into eyes, wash it immediately with a lot of clean water for at least 10 minutes. Seek medical advice.
- Do not use damaged or modified battery. Damaged or modified batteries may behave unpredictably, causing fire, explosion or risk of injuries.
- Do not expose the battery to humidity or water.
- Always keep the battery away from sources of heat. Do not leave the battery for a long time in high temperature (in direct sunlight, in proximity of heaters and wherever the temperature exceeds 50^ ).
- Do not expose the battery to fire or excessive temperature. Exposure to fire or temperature above 130^ C may cause explosion.
CAUTION! Temperature of 130°C can be also defined as 265°F.
- Observe all charging instructions. Do not charge the battery in temperature outside of range defined in the rating data table from the instruction manual. Incorrect charging or charging in temperature outside of defined range may damage the battery and increase the risk of fire.
BATTERY REPAIRS
- Do not repair damaged batteries. Battery can be repaired only by the manufacturer or in an authorised workshop.
- When disposing of the worn out battery, take it to a service point where you can utilize such dangerous wastes.
SAFETY REGULATIONS FOR THE CHARGER
- Do not expose the charger to humidity or water. Ingress of water into the charger increases risk of electric shock. Use the charger only in
dry rooms.
- Disconnect the charger from power supply before starting any maintenance or cleaning.
- Do not use the charger when placed on flammable surface (e.g. paper, textiles) or in proximity of flammable substance. Greater charger temperature when charging increases risk of fire.
- Check condition of the charger, cable and plug before each use. Do not use the charger if any damage is found. Do not try to disassemble the charger. All repairs should be made at an authorized service workshop. Improper charger assembly may cause electric shock or fire.
- Children or persons who are physically, emotionally or mentally disabled and other persons, whose experience or knowledge is insufficient to use the charger while following all safety rules should not use the charger without supervision of person responsible for their safety. Otherwise there is a risk of improper use and injuries in consequence.
- When the charger is not in use, it should be disconnected from the mains network.
- Observe all charging instructions. Do not charge the battery in temperature outside of range defined in the rating data table from the instruction manual. Incorrect charging or charging in temperature outside of defined range may damage the battery and increase the risk of fire.
CHARGER REPAIRS
- Do not repair damaged charger. The charger can be repaired only by the manufacturer or in an authorised workshop.
- When disposing of the worn out charger, take it to a service point where you can utilize such wastes.
CAUTION! This device is designed to operate indoors.
The design is assumed to be safe, protection measures and additional safety systems are used, nevertheless there is always a small risk of injuries at work.
Li-lon batteries may leak, set on fire or explode when heated to high temperature or short-circuited. Do not store the batteries in a car in hot and sunny days. Do not open the battery. Li-lon batteries contain electronic protection devices that, if damaged, may cause fire or explosion of the battery.
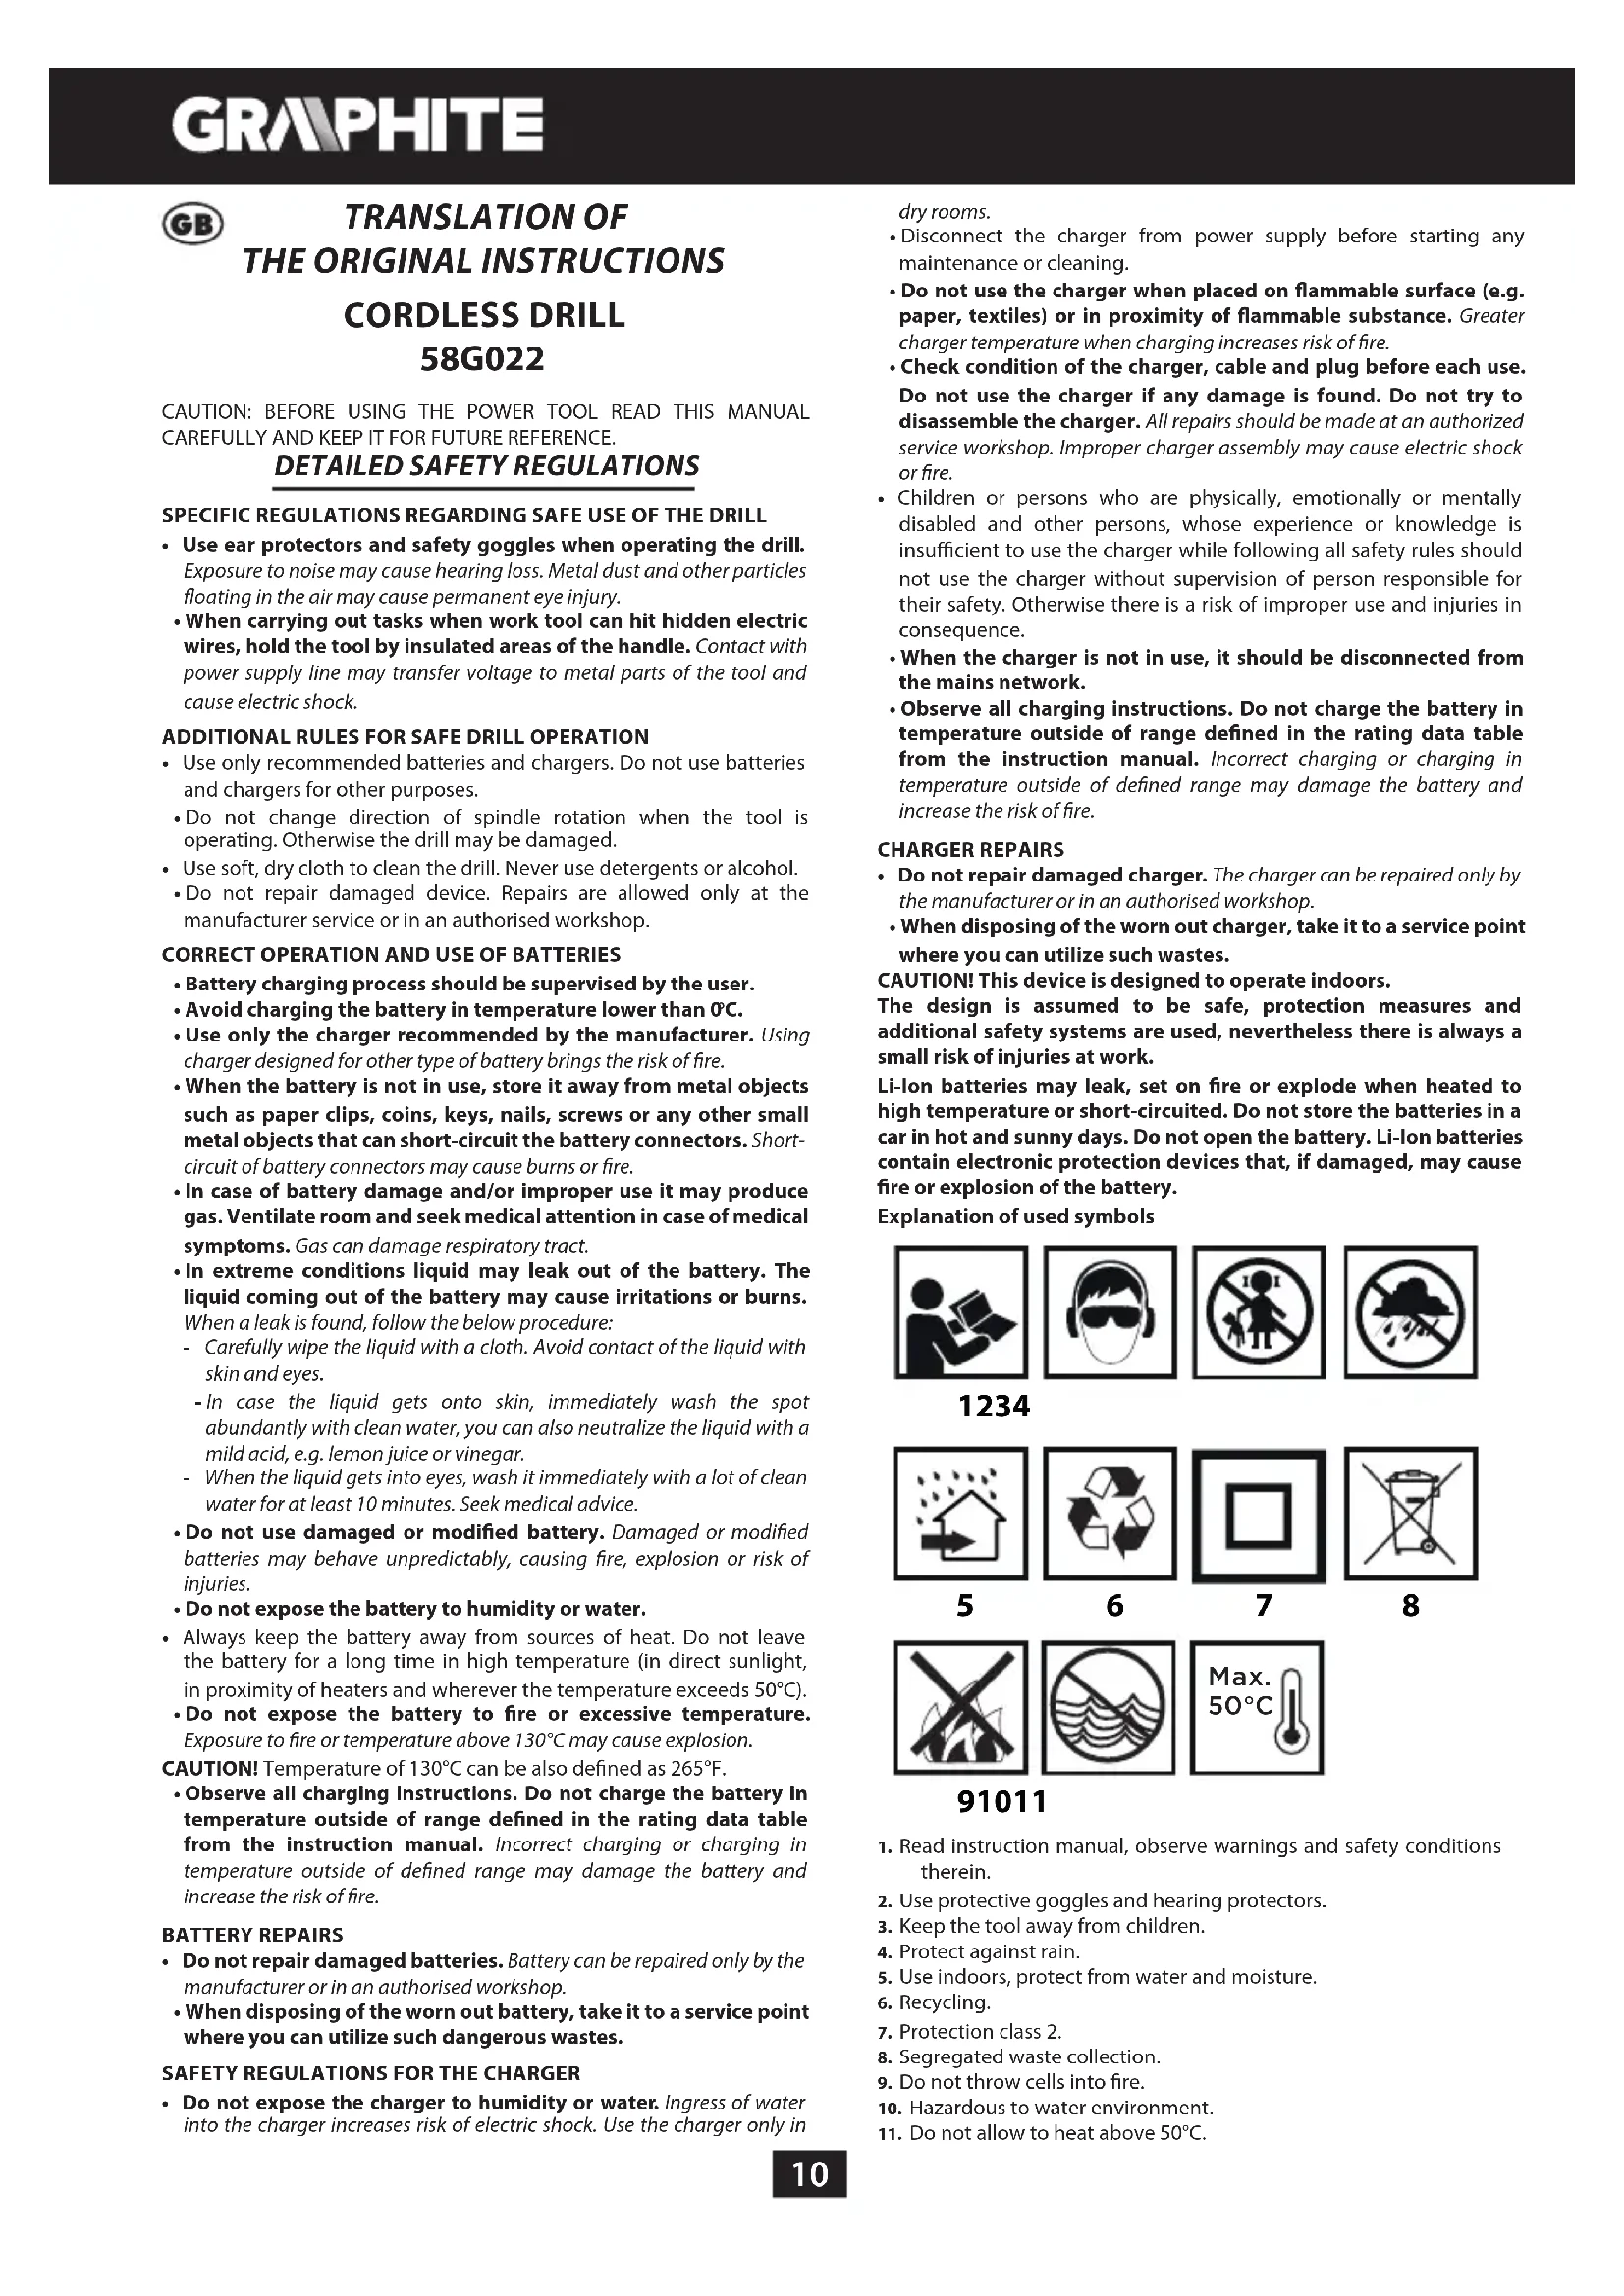
Explanation of used symbols

1234

6

7

8
5

6

7
8

91011


- Read instruction manual, observe warnings and safety conditions therein.
- Use protective goggles and hearing protectors.
- Keep the tool away from children.
- Protect against rain.
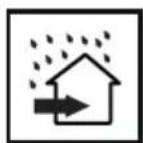
- Use indoors, protect from water and moisture.
- Recycling.
- Protection class 2.
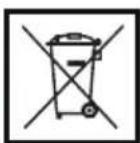
- Segregated waste collection.
- Do not throw cells into fire.
- Hazardous to water environment.
- Do not allow to heat above 50°C.
CONSTRUCTION AND USE
Drill is a battery powered tool. Drive consists of a commutator DC motor with planetary gear. The drill is designed for screwing in and out screws and bolts in wood, metal, plastics and ceramics, and for drilling holes in such materials. Quick and tool-free removal of the drill chuck allows to install single-ended driver bits with different lengths and with hexagonal shanks, sized 6.35 mm (1/4"), directly on the spindle. An advantage of the solution is operability in hard to reach areas. Cordless, battery-powered power tools are especially useful for works in interior furnishing, adaptation of premises etc.

Use the power tool in accordance with the manufacturer's instructions only.
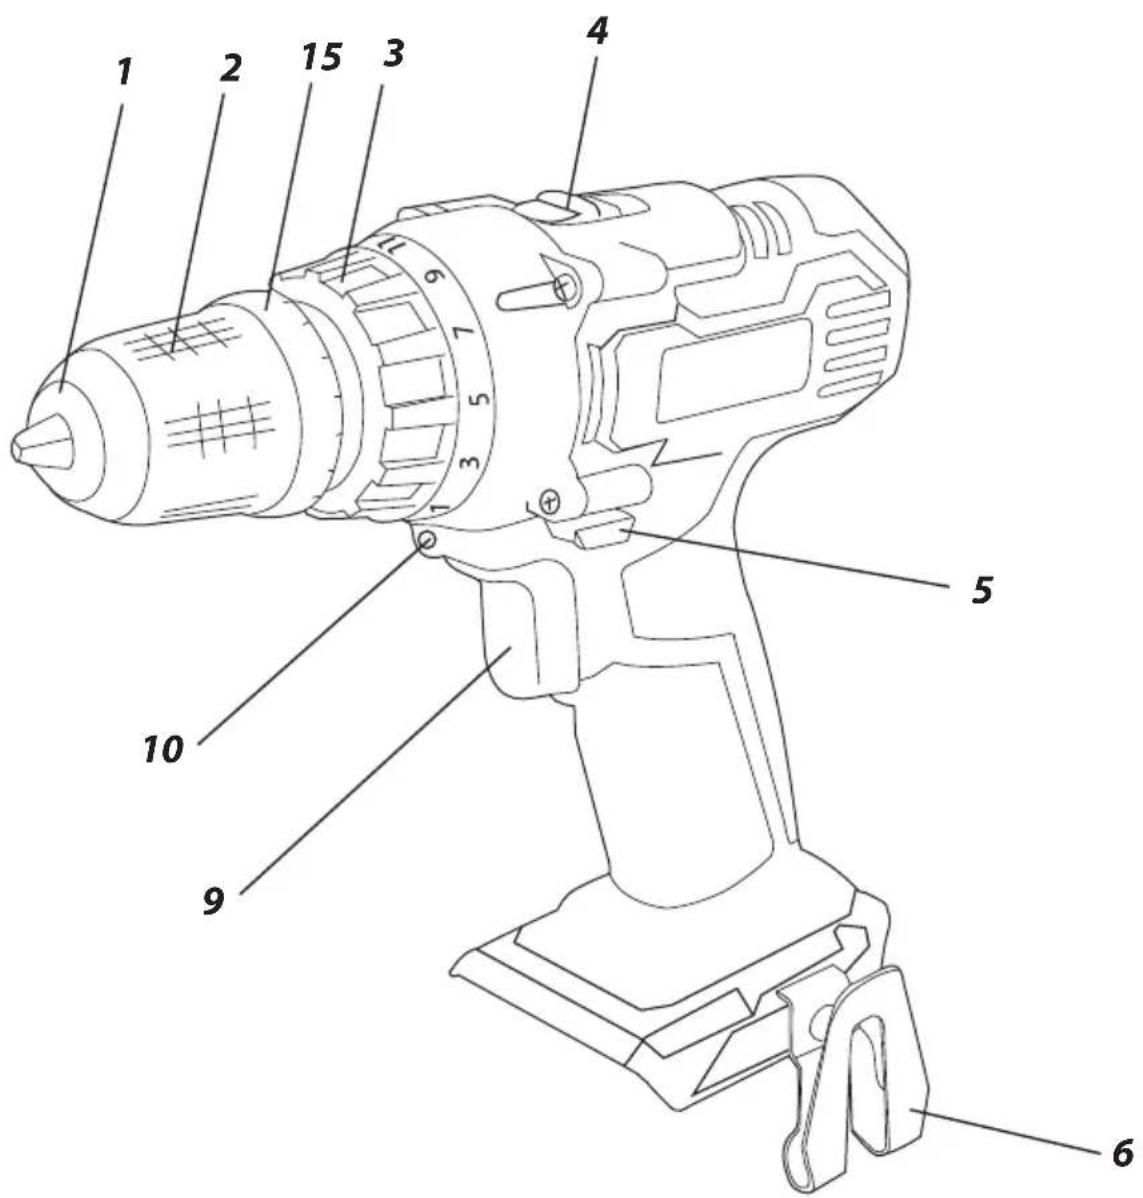
DESCRIPTION OF DRAWING PAGES
Below enumeration refers to the device elements depicted on the drawing pages of this manual.
-
Quick-release chuck
-
Ring of the quick release chuck
-
Torque adjustment ring
-
Gear switch
-
Direction selector switch
-
Holder
-
Battery
-
Battery lock button
-
Switch
-
Illumination
-
LED diodes
-
Charger
-
Button for battery level indication
-
Battery level indicator (LEDs)
-
Locking ring
-
Spindle
* Differences may appear between the product and drawing.
MEANING OF SYMBOLS

CAUTION

WARNING

ASSEMBLY / SETTINGS

INFORMATION
EQUIPMENT AND ACCESSORIES
-
angular adapter - 1 pc. (applies to 58G022-AD)
-
edge adapter - 1 pc. (for 58G022-AD)
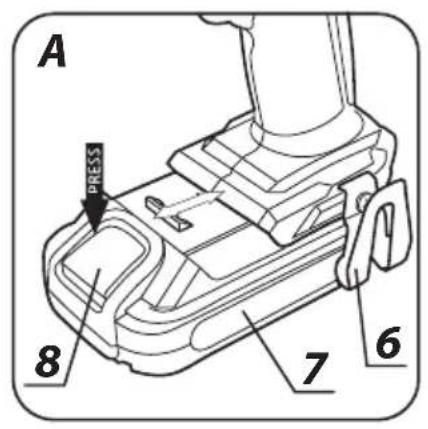
REMOVING AND INSERTING THE BATTERY

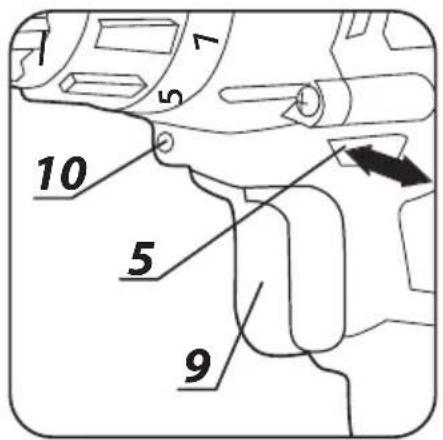
- Set the direction selector switch (5) in middle position.
- Push the battery lock button (8) and slide out the battery (7) (fig. A).
- Insert charged battery (7) into the handle holder, you should hear when the battery lock button (8) snaps.
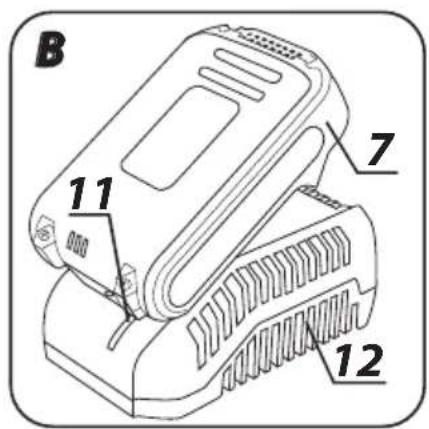
BATTERY CHARGING

The battery for the device is supplied partially charged. Charge the battery in ambient temperature between 4°C and 40°C. New battery, or one that has not been used for a long time, will reach full efficiency after approximately 3 to 5 charge/discharge cycles.
- Remove the battery (7) from the device (fig. A).
- Connect the charger to mains socket (230 V AC).
- Slide the battery (7) into the charger (12) (fig. B). Make sure the battery is properly fitted (pushed to the end).

When the charger is connected to a mains socket (230 V AC), the green diode (11) on the charger turns on to indicate connected supply.
When the battery (7) is placed in the charger (12), the red diode (11) on the charger turns on to indicate that the charging is in progress. At the same time green diodes (14) of the battery level indication are flashing in different configurations, see description below.
- All diodes are flashing - battery is empty and requires charging.
- 2 diodes are flashing - the battery is partially discharged.
- 1 diode is flashing - the battery level is high.

Once the battery is charged, the diode (11) on the charger lights green, and all battery level diodes (14) light continuously. After some time (approx. 15 s) battery level indication diodes (14) turn off.

Do not charge the battery for more than 8 hours. Exceeding this time limit may cause damage to battery cells. The charger does not turn off automatically when the battery is full. Green diode on the charger will remain on. Battery level indication diodes turn off after some time. Disconnect power supply before removing the battery from the charger socket. Avoid consecutive short changings. Do not charge the battery after short use of the tool. Significant decrease of the period between changings indicates the battery is worn out and should be replaced.

Batteries heat up when charging. Do not operate just after charging – wait for the battery to cool down to room temperature. It will prevent battery damage.
BATTERY LEVEL INDICATION

The battery is equipped with signalisation of the battery level (3 LED diodes) (14). To check battery level status, press the button for battery level indication (13) (fig. C). When all diodes are lit, the battery level is high. When 2 diodes are on, the battery is partially discharged. When only one diode is lit, the battery is discharged and must be recharged.
SPINDLE BRAKE

Drill is equipped with electronic brake that stops the spindle immediately after the switch button (9) is released. The brake ensures precision when screwing or drilling and prevents free spindle rotation after switching off.
SWITCHING ON / SWITCHING OFF

Switching on - press the switch button (9).
Switching off – release the switch button (9).
Each time the switch button (9) is pressed, the LED diode (10) lights up to illuminate the workplace.

ROTATIONAL SPEED CONTROL

Increase or reduce pressure on the switch button (9) to adjust drilling or driving speed while operating. Speed adjustment allows for a soft start, which prevents dill slipping when drilling holes in gypsum or glaze, and allows for operation control when driving screws in and out.
OVERLOAD CLUTCH

Set the torque adjustment ring (3) in appropriate position to permanently set overload clutch to defined torque value. When the set torque is reached, overload clutch disconnects automatically. It prevents from driving screws too deep or damaging the drill.

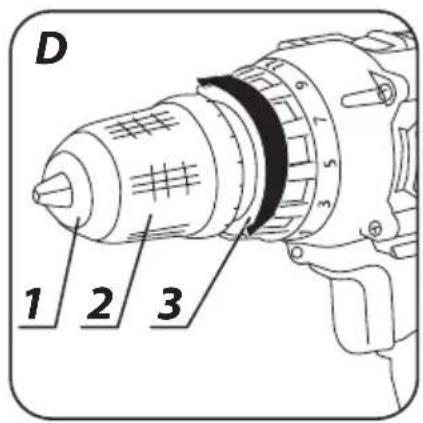
TORQUE ADJUSTMENT
- Different screws and materials require different torque to be applied. - The bigger the number corresponding to given position, the bigger is the torque (fig. D).
- Set the torque adjustment ring (3) to appropriate torque value.
• Always start operation with low torque.
- Increase the torque gradually until obtaining desired results.
- Use higher settings to undo screws.
- When drilling, choose setting marked with the drill symbol. The torque is the greatest with this setting.
- Knowledge how to choose appropriate torque setting comes with practice.

Setting the torque adjustment ring in the drilling position deactivates the overload clutch.
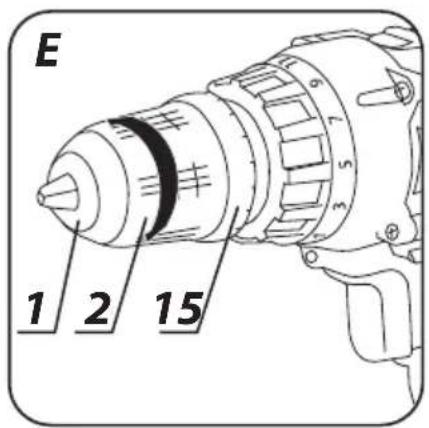
INSTALLATION OF WORKING TOOL IN THE DRILL CHUCK
- Set the direction selector switch (5) in the middle position.
- By turning the ring of the quick release chuck (2) counter clockwise (see mark on the ring) you can spread jaws enough to insert drill or driver bit (fig. E).
- To fix the working tool, turn the ring of the quick release chuck (2) clockwise and tighten firmly.

Deinstallation of the working tool is similar to installation, only the sequence of actions is reversed.

Make sure the tool position is correct when installing drill or driver bit in the quick release chuck. Use additional magnetic adapter as an extension when using short driver bits.
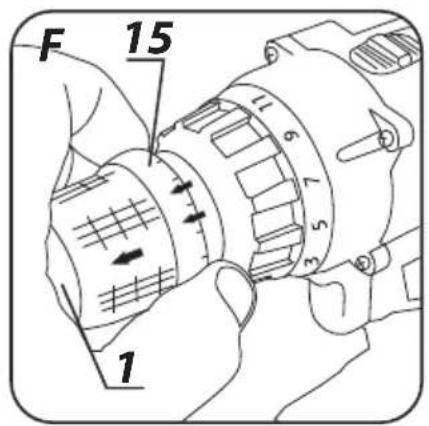
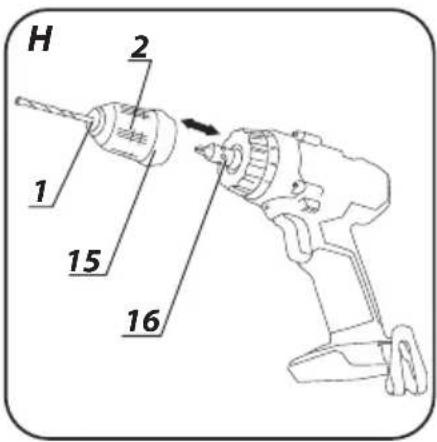
DRILL CHUCK INSTALLATION AND REMOVAL
- Pull the locking ring (15) forward and slide the drill chuck (1) off the spindle (fig. F).
- Installation of the drill chuck (1) is similar to removal, only the sequence of actions is reversed.
- Pull the locking ring (15) away and slide the drill chuck (1) onto the spindle until you can clearly hear the lock snaps in (it may be necessary to rotate the drill chuck slightly so it can reach appropriate position).
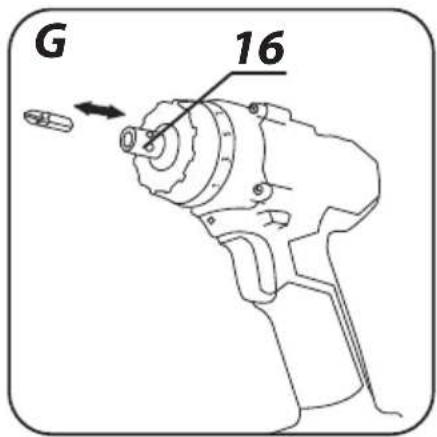
INSTALLATION AND REPLACEMENT OF WORKING TOOLS IN THE SPINDLE HOLDER

- Place appropriate working bit directly in the spindle holder (16) (fig. G).
- Ensure the bit is inserted to the end and is properly installed.
- To remove the working tool, pull the working bit out of the spindle holder.

Use additional driver bit adapter with short driver bits. It is recommended to always make a pilot hole before screwing screws with the screwdriver. When a short driver bit is installed in the spindle, it is not necessary to remove it when installing the drill chuck (fig. H).
RIGHT-LEFT DIRECTION OF ROTATION

Choose direction of spindle rotation with the direction selector switch (5) (fig. 1).
Clockwise rotation - set the switch (5) to the extreme left position.
Counter-clockwise rotation - set the switch (5) to the extreme right position.
* In certain cases position of the switch related to rotation may be different than specified. Please refer to graphic signs located on the switch or tool body.

Safe position of the direction selector switch (5) is in the middle, it prevents accidental starting of the power tool.
- Drill cannot be started, when the switch is in this position.
- Use this position of the switch to change drills or bits.
- Before starting the tool make sure the position of the direction selector switch (5) is correct.

Do not change direction of rotation when the drill spindle is rotating.
CHANGE OF GEAR

Gear switch (4) (fig. J) allows to increase the range of rotational speed. Gear I: small speed range, big torque
Gear II: greater speed range, small torque.

Set the gear switch in position appropriate for the works to perform. When the switch is blocked and cannot be moved, turn the spindle slightly.

Never change the gear switch position when the drill is operating. It may damage the power tool.

Long lasting drilling at low rotational speed of the spindle may cause motor overheating. Make periodic breaks in operation or allow the tool to operate at top speed without load for approximately 3 minutes.
HOLDER

The drill provides convenient holder (6) that allows to e.g. hang the tool on a tool belt when working at heights.
Remove the battery from the device before commencing any activities related to installation, adjustment, repair or maintenance.
MAINTENANCE AND STORAGE

- Cleaning the device after each use is recommended.
- Do not use water or any other liquid for cleaning.
- Clean the device with a dry cloth or blow through with compressed air at low pressure
- Do not use any cleaning agents or solvents, they may damage plastic parts.
- Clean ventilation holes in the motor casing regularly to prevent device overheating.
• Always store the tool in a dry place, beyond reach of children. - Store the device with the battery removed.

All defects should be repaired by service workshop authorized by the manufacturer.
TECHNICAL PARAMETERS
RATED PARAMETERS
| Cordless drill 58G022 | ||
| Parameter Value | ||
| Battery voltage 18 V DC | ||
| Range of idle rotational speed | gear I 0-350 rpm | |
| gear II 0-1250 rpm | ||
| Range of quick release chuck 0,8 - 10 mm | ||
| Tool holder 6,35 mm (1⁄4") | ||
| Torque control range 1–19 + drilling | ||
| Max. torque (soft drive) 28 Nm | ||
| Max. torque (hard drive) 44 Nm | ||
| Protection class III | ||
| Weight 1,1 kg | ||
| Year of production 2020 | ||
| 58G022 defines type and indication of the device | ||
| Graphite Energy+ System Battery | ||
| Parameter Value | ||
| Battery | 58G001 | 58G004 |
| Battery voltage 18 V DC 18 V DC | ||
| Battery type | Li-Ion | Li-Ion |
| Battery capacity | 2000 mAh | 4000 mAh |
| Ambient temperature range | 4^ - 40^ | 4^ - 40^ |
| Charging time for charger 58G002 | 1 h | 2 h |
| Weight | 0,400 kg | 0,650 kg |
| Year of production | 2020 | 2020 |
| Graphite Energy+ System Charger | |
| Parameter Value | |
| Charger type | 58G002 |
| Supply voltage | 230 V AC |
| Power supply frequency | 50 Hz |
| Charging voltage | 22 V DC |
| Max. charging current | 2300 mA |
| Ambient temperature range | 4°C – 40°C |
| Charging time of the battery 58G001 | 1 h |
| Charging time of the battery 58G004 | 2 h |
| Protection class | II |
| Weight | 0,300 kg |
| Year of production | 2020 |
NOISE LEVEL AND VIBRATION PARAMETERS
| Sound pressure | Lp_A = 84 dB(A) K = 3 dB(A) |
| Sound power | Lw_A = 95 dB(A) K = 3 dB(A) |
| Vibration acceleration | a_b = 1,552 m/s^2 K = 1,5 m/s^2 |

Noise and vibration information
Noise produced by the device is defined with: level of produced sound pressure Lp_A and level of sound power Lw_A (where K is measurement uncertainty). Vibrations produced by the device are defined with vibration acceleration value a_h (where K is measurement uncertainty). Sound pressure Lp_A sound power Lw_A and vibration acceleration ah specified in this manual have been measured in accordance with EN 60745-1:2009+A11:2010. Specified vibration level a_h can be used to compare tools and for initial evaluation of exposition to vibrations. Specified vibration level is representative for main applications of the device. When the device is used for other purposes or with different working tools, the vibration level may change. Insufficient or too rare maintenance may increase vibration level. The abovementioned factors may lead to higher exposure to vibrations during whole working time. To precisely define exposure to vibrations, include periods when the device is switched off and when it is switched on but not used for working. Once all factors have been carefully considered, total exposition to vibrations may be significantly lower.
To protect the user from results of exposure to vibrations, use additional safety measures such as: device and working tool periodic maintenance, proper hand temperature conditions, good work organisation.
ENVIRONMENTAL PROTECTION
Electrical equipment must not be disposed off with household waste and, instead, should be utilized at appropriate facilities. Information on utilization can be provided by the product vendor or the local authorities. Waste electrical and electronic equipment contains substances that are not neutral to the natural environment. Equipment that is not recycled constitutes a potential hazard to the environment and to human health.
Li-lon
Storage batteries/batteries must not be disposed with domestic waste, put in a fire or into the water. Damaged or used up storage batteries must be properly recycled in compliance with the current directive pertaining to disposal of storage batteries and batteries.
* Right to introduce changes is reserved.
"Grupa Topex Spółka z ograniczoną odpowiedzialnością" Spółka komandytowa with seat in Warsaw at ul. Pograniczna 2/4 (hereinafter Grupa Topex) informs, that all copyrights to this instruction (hereinafter Instruction), including, but not limited to, text, photographs, schemes, drawings and layout of the instruction, belong to Grupa Topex exclusively and are protected by laws accordingly to Copyright and Related Rights Act of 4 February 2004 (ustawa o prawie autorskim i prawach pokrewnych, Dz. U, 2006 No 90 item 631 with later amendments). Copying, processing, publishing, modifications for commercial purposes of the entire Instruction or its parts without written permission of Grupa Topex are strictly forbidden and may cause civil and legal liability.

m = 311

m = 311
GRAFISKÄS DALAS APRAKSTS
DARBVÄRPSTAS BREMZES

POSEBNI PROPISI O SIGURNOSTI
DODATNA SIGURNOSNA PRAVILA RADA BUŠILICOM-IZVIJAČEM
- Koristite štitnike sluha i zaštitne gogle za vrijeme rada s bušilicom-izvijačem. Ako se izlažete buci, to može dovesti do gubitka sluha. Metalna piljevina i druge leteće čestice mogu trajno oštetiti vid.
- Za vrijeme izvođenja radova kod kojih bi radni alat mogao zahvatiti skrivene električne vodove, uređaj držite za izolirane površine drške. Kod kontakta s mrežnim kablom može doći do prijenosa napona na metalne elemente električnog alata, što bi moglo uzrokovati strujni udar.
DODATNA SIGURNOSNA PRAVILA RADA BUŠILICOM-IZVIJAČEM
- Upotrebljavajte samo preporučenu aku-bateriju i punjač. Akubaterije i punjače ne koristite u druge svrhe.
- Zabranjeno je mijenjati smjer okretaja vretena alata dok je isti uključen. U suprotnom može doći do oštećivanja bušilice - izvijača
- Za čišćenje bušilice-izvijača koristite mekanu suhu krpicu. Nikada ne upotrebljavajte nikakve deterdžente ili alkohol.
- Zabranjeno je popravljati oštećen uređaj. Popravke smije izvoditi samo proizvođač i ovlaštena servisna radionica.
PRAVILNA PRIMJENA I EKSPLOATACIJA AKU-BATERIJA
- Korisnik mora nadzirati proces punjenja aku-baterije.
- Izbjegavajte punjenje aku-baterije na temperaturi manjoj od 0°C.
- Aku-baterije punite isključivo punjačom koji je preporučio proizvođač. Uporaba punjača namijenjenog za punjenje aku-baterija druge vrste predstavlja rizik od izbijanja požara.
- Kad ne koristite aku-bateriju čuvajte je dalje od metalnih predmeta kao što su spajalice za papir, kovanice, ključevi, vijci ili drugi mali metalni elementi, koji mogu spojiti kontakte aku-baterije. Spajanje kontakata aku-baterije može uzrokovati opekline ili požar.

m = 311
- Pročitajte Upute za uporabu, uzmite u obzir upozorenja i sigurnosne uvjete o kojima je riječ u uputama.
- Koristite zaštitne naočale i antifone.
- Čuvajte van dohvata djece.
- Štitite od kiše.
- Koristite u zatvorenim prostorijama, štitite od vode i vlage.
- Reciklaža.
- Druga klasa zaštita.
- Selektivno skupljanje.
- Karike ne bacajte u vatru.
- Predstavlja opasnost za vodeni okoliš
- Spriječite zagrijavanje na temperaturi većoj od 50°C.
KONSTRUKCIJA I NAMJENA
PROTUOPTEREĆUJUĆA SPOJKA

Postavljanje prstena za regulaciju okretnog momenta (3) u odgovarajući položaj uzrokuje trajno namještanje spojke na određenu veličinu okretnog momenta. Nakon postizanja postavljene brzine okretnog momenta automatski dolazi do isključivanja protuopterećujuće spojke. To će pomoći pri zaštiti od zavijanja vijka preduboko odnosno od oštećenja bušilice-izvijača.
REGULACIJA OKRETNOG MOMENTA

- Za različite vijke i različite materijale koristite razne veličine momenta.
OPBOUW EN BESTEMMING
Graphite Energy+ SYSTEEM ACCU
ACCOUPLEMENT DE SÛRETÉ

DONNÉES RELATIVES AU BRUIT ET AUX VIBRATIONS
IEC 62321-1:2013; IEC 62321-2:2013; IEC 62321-3-1:2013; IEC 62321-4:2013+A1:2017; IEC 62321-5:2013; IEC 62321-6:2015;
IEC 62321-7-1-2015; IEC 62321-7-2:2017; ISO 17075-1:2017; IEC 62321-8:2017
Deklaracja ta odnosi się wyłącznie do maszyny w stanie, w jakim została wprowadzona do obrotu i nie obejmuje części składowych dodanych przez użytkownika końcowego lub przeprowadzonych przez niego późniejszych działań. /This declaration relates exclusively to the machinery in the state in which it was placed on the market, and excludes components which are added and/or operations carried out subsequently by the final user.//Ez a nyilatkozat a gépnek kizárólag arra az állapotára vonatkozik, amelyben forgalomba hozták, és kizár minden olyan alkatrészt, amelyet hozzáadnak, és/vagy olyan műveletet, amit a végső felhasználó ezt követően végez rajta.//Toto vyhlásenie sa vztahuje výlučne na strojové zariadenie v stave, v akom sa uvddza na trh, a nezahrňa pridané komponenty a/alebo činnosti vykonávané následne koncovým používatelom.//Toto prohlásení se vztahuje výlučně na strojni zařízení ve stavu, v jakém było uvedeno na trh, a nevztahuje se na součásti, které byly následně přídány konečným uživatelem, nebo následně provedené zásahy konečného uživatele.//Tazu декларация се отнася изключително за машината в състояниемето, в което е пусната на пазара, и изключва компоненти, които са добавени и / или операции, извършени впоследствие om крайния потребumen.//Aceastá declarație se referá doar la mașina din starea în care a fost introdusă pe piață și nu acoperă componentele adăugate de utilizatorul final sau acțiunile ulterioare efectuate de utilizatorul final.//Diese Erklärung bezieht sich nur auf die Maschine in dem Zustand, in dem sie in Verkehr gebracht wurde, und gilt nicht für vom Endbenutzer hinzugefügte Komponenten oder nachfolgende vom Endbenutzer durchgeführte Aktionen.//La presente dichiarazione si riferisce solo alla macchina immessa sul mercato e non copre i componenti aggiunti dall'utente finale o le operazioni successive eseguite dall'utente finale./
- INSTRUKCJA ORYGINALNA (OBSŁUGI)
- WIERTARKO – WKRETARKA AKUMULATOROWA 58G022
- SZCZEGÓŁOWE PRZEPISY BEZPIECZEŃSTWA
- SZCZEGÓLNE PRZEPISY DOTYCZĄCE BEZPIECZNEJ PRACY WIERTARKO - WKRETARKA
- TRANSLATION OF THE ORIGINAL INSTRUCTIONS CORDLESS DRILL 58G022
- DETAILED SAFETY REGULATIONS
- SPECIFIC REGULATIONS REGARDING SAFE USE OF THE DRILL
- ADDITIONAL RULES FOR SAFE DRILL OPERATION
- CORRECT OPERATION AND USE OF BATTERIES
- BATTERY REPAIRS
- SAFETY REGULATIONS FOR THE CHARGER
- CHARGER REPAIRS
- CAUTION! This device is designed to operate indoors.
- Explanation of used symbols
- CONSTRUCTION AND USE
- DESCRIPTION OF DRAWING PAGES
- MEANING OF SYMBOLS
- EQUIPMENT AND ACCESSORIES
- REMOVING AND INSERTING THE BATTERY
- BATTERY CHARGING
- BATTERY LEVEL INDICATION
- SPINDLE BRAKE
- SWITCHING ON / SWITCHING OFF
- ROTATIONAL SPEED CONTROL
- OVERLOAD CLUTCH
- TORQUE ADJUSTMENT
- INSTALLATION OF WORKING TOOL IN THE DRILL CHUCK
- DRILL CHUCK INSTALLATION AND REMOVAL
- INSTALLATION AND REPLACEMENT OF WORKING TOOLS IN THE SPINDLE HOLDER
- RIGHT-LEFT DIRECTION OF ROTATION
- CHANGE OF GEAR
- HOLDER
- MAINTENANCE AND STORAGE
- TECHNICAL PARAMETERS
- Noise and vibration information
- ENVIRONMENTAL PROTECTION
- GRAFISKÄS DALAS APRAKSTS
- DARBVÄRPSTAS BREMZES
- POSEBNI PROPISI O SIGURNOSTI
- DODATNA SIGURNOSNA PRAVILA RADA BUŠILICOM-IZVIJAČEM
- PRAVILNA PRIMJENA I EKSPLOATACIJA AKU-BATERIJA
- KONSTRUKCIJA I NAMJENA
- PROTUOPTEREĆUJUĆA SPOJKA
- REGULACIJA OKRETNOG MOMENTA
- OPBOUW EN BESTEMMING
- ACCOUPLEMENT DE SÛRETÉ
Brand : Graphite
Model : 58G022
Category : Drill