Viper CEX410 - Vacuum Cleaner NILFISK - Free user manual and instructions
Find the device manual for free Viper CEX410 NILFISK in PDF.
| Product type | Carpet extractor vacuum (commercial use) |
| Brand | Nilfisk |
| Model | Viper CEX410 |
| Solution tank capacity | 35 L (9 gal) |
| Maximum water temperature | 50 °C (120 °F) |
| Power cord length (extension cord included) | 15 m (50 pi) |
| Power supply | Mains (grounded outlet) |
| Intended use | Indoor, carpet cleaning in hotels, schools, hospitals, factories, stores, offices |
| Main functions | Water/detergent spraying, rotary brushing, dirty water suction |
| Included accessories | Suction shoe, roller brush, extension cord |
| Daily maintenance | Drain and rinse tanks, clean nozzles, check filters and brush |
| Monthly maintenance | Check brush wear, hoses and seals, lubricate wheels, tighten screws |
| Safety | Grounding mandatory, do not vacuum flammable liquids, do not use outdoors |
| Repairability | Spare parts available through customer service; repairs by authorized center |
| Weight | Approximately 45 kg (estimate for a professional extractor) |
| Dimensions (L x W x H) | Approximately 110 x 50 x 90 cm (estimate) |
Frequently Asked Questions - Viper CEX410 NILFISK
User questions about Viper CEX410 NILFISK
0 question about this device. Answer the ones you know or ask your own.
Ask a new question about this device
Download the instructions for your Vacuum Cleaner in PDF format for free! Find your manual Viper CEX410 - NILFISK and take your electronic device back in hand. On this page are published all the documents necessary for the use of your device. Viper CEX410 by NILFISK.
USER MANUAL Viper CEX410 NILFISK
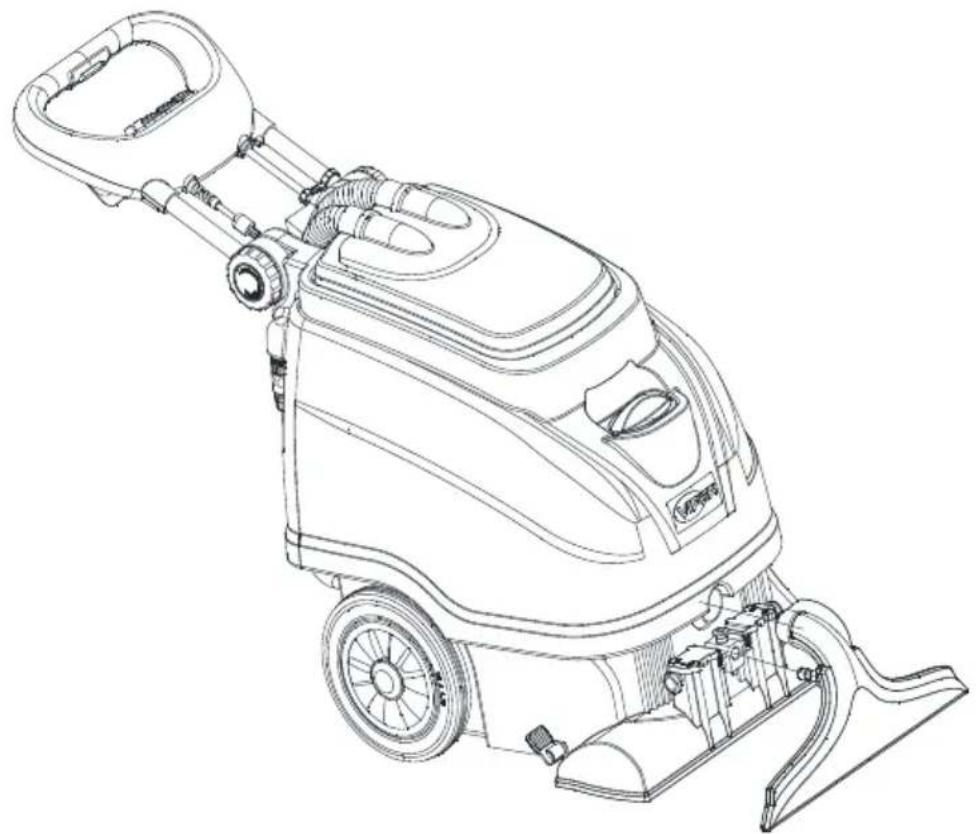
CEX410 Carpet Extractor
Owner's manual

text_image
CE ! i
natural_image
Line drawing of a VIEP cleaning machine with handlebars and wheels (no text or symbols)Models:CEX410-EU/UK
REV C (2021/05/26)
Form No:VV81256 Original instructions

Caution –Read the instructions before using the machine
Manufacturer / Výrobce / Hersteller / Fabrikant / Fabricante / Κατασκευαστής / Gyártó / Proizvođač / Fabbricante / Gamintojas / Ražotājs / Produsent / Fabrikant / Fabricante / Producent / Producător / производитель / Tillverkaren / Výrobca / Proizvajalec/ Üretici firma:
Nilfisk A/S, Kornmarksvej 1
DK-2605 Broendby, DENMARK
Product / Produkt / Producto, Toode, Produit, Tuote/ Produkt / Ppoïov / Termék / Proizvod / Prodotto / Produktas / Produkts / Artikel / Produtos / Produs / Izdelek / Ürün
CEX410
Description / Popis / Beschreibung / Beskrivelse / Descripción / Kirjeldus / La description / Kuvaus / Описание / Пεριγραφή / Leirás / Opis / Descrizione / Aprašymas / Apraksts / Beschrijving / Descrição / Descriere / Beskrivning / Popis / Açıklama
FC - Spray Extraction Machine
220-240V 50/60Hz, IPX4

We, Nilfisk hereby declare under our sole responsibility, that the above mentioned product(s) is/are in conformity with the following directives and standards.

Lars Gjødsbøl, Executive Vice President Global
Products & Services
June 28, 2018

UK Declaration of Conformity
We,
Nilfisk Ltd
Nilfisk House, Bowerbank Way Gilwilly Industrial Estate
Penrith Cumbria
CA11 9BQ UK
Hereby declare under our sole responsibility that the
Product: FC - Spray Extraction Machine
Description: 220-240V 50-60Hz, IPX4
Type: CEX410
Is in compliance with the following standards:
EN 60335-1:2012+A11:2014+A13:2017
EN 60335-2-68:2012
EN 55014-1:2017+A11:2020
EN 55014-2:2015
EN 61000-3-2:2014
EN 61000-3-3:2013
EN 63000:2018
Following the provisions of:
Supply of Machinery (Safety) Regulations 2008/1597
Electromagnetic Compatibility Regulations 2016/1091
The Restriction of the Use of Certain Hazardous Substances in Electrical and Electronic Equipment Regulations 2012/3032
Penrith, 3-3-2021
Stewart Dennett
GM/MD
TABLE OF CONTENTS
ENGLISH.... 2-14
FRANÇAIS.... 15-19
ESPAÑ OL.... 20-24
DEUTSCH.... 25-29
text_image
Technical diagram of a cleaning or cleaning machine with numbered parts for identification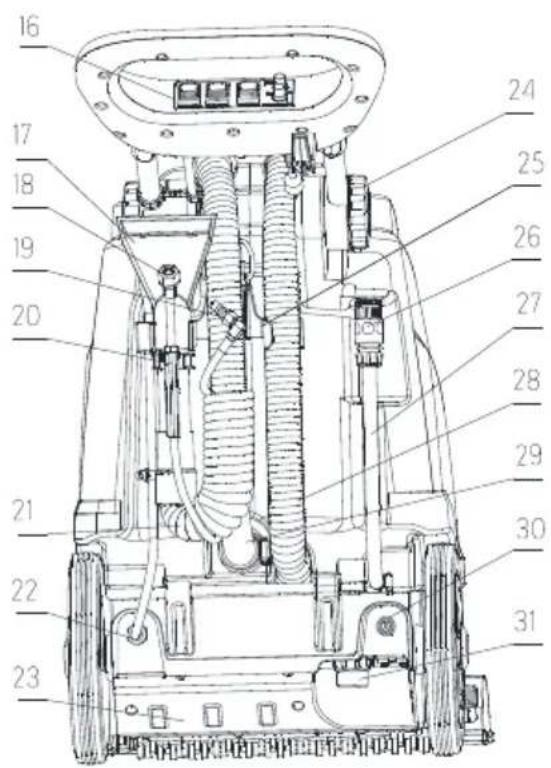
text_image
Technical diagram of a robotic device with numbered parts for identification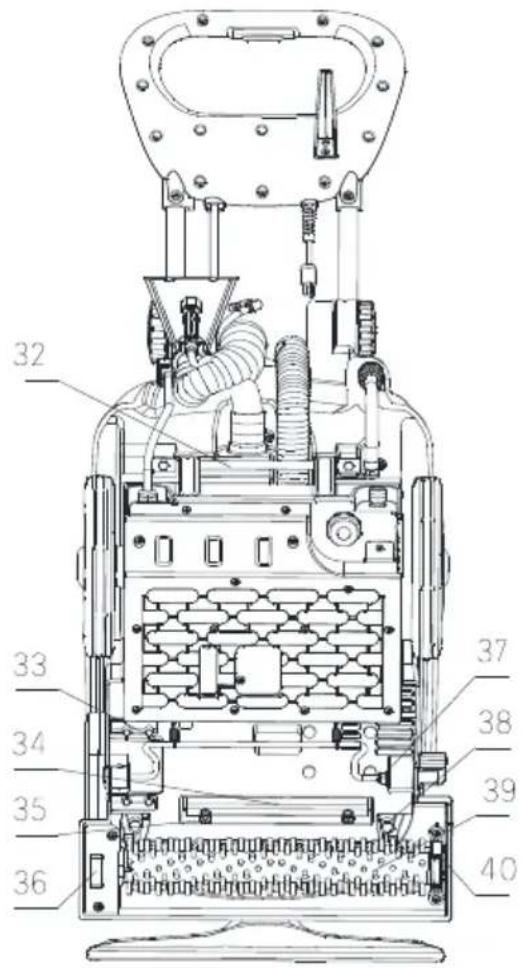
text_image
Technical diagram of a mechanical device with numbered components for identification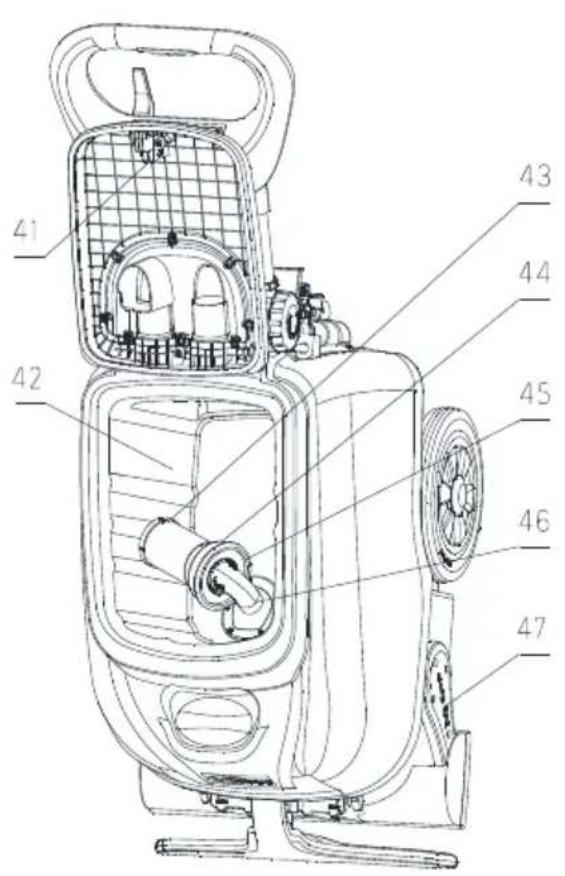
text_image
41 42 43 44 45 46 47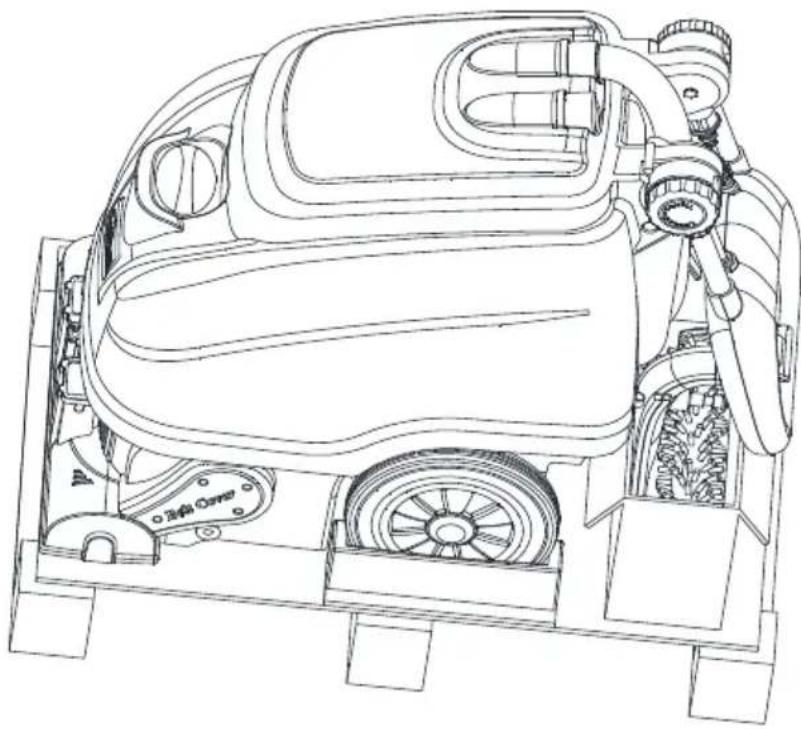
natural_image
Technical line drawing of a car interior showing engine, wheels, and exhaust components (no text or labels)F1
natural_image
Line drawing of a cleaning or cleaning service vehicle with handlebars and wheels (no text or symbols)F2
natural_image
Technical line drawing of a mechanical assembly with springs, gears, and housing (no text or labels)F3

natural_image
Technical line drawing of a cleaning or cleaning machine with visible components and directional arrows (no text or symbols)F4
text_image
1 2 3F5
text_image
1 2 3 4 Water Pump Vacuum Motor Brush Motor FU Vacuum Motor FU 5F6
natural_image
Line drawing of a cleaning or cleaning machine with hoses and control panel (no text or symbols)F7
natural_image
Line drawing of a cleaning or cleaning power supply unit with hoses and control panel (no text or symbols)F8
natural_image
Technical line drawing of a mechanical assembly with no visible text or symbolsF9
natural_image
Illustration of a faucet and two separate pipe fittings (no text or symbols)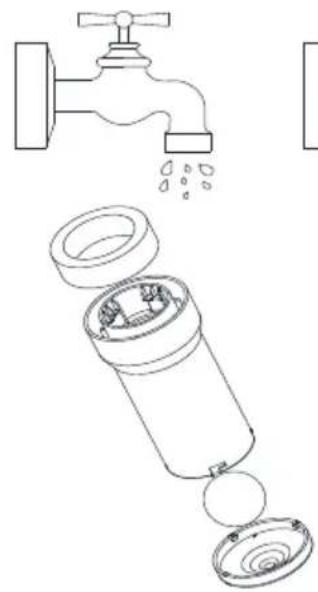
natural_image
Diagram showing a faucet with liquid and a cylindrical device with internal components (no text or symbols)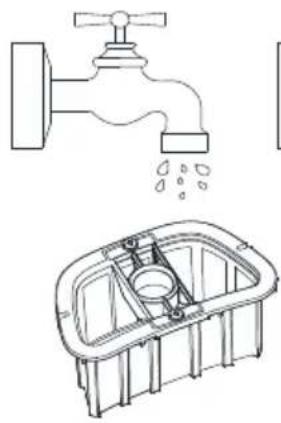
natural_image
Illustration of a faucet and a water dispenser (no text or symbols)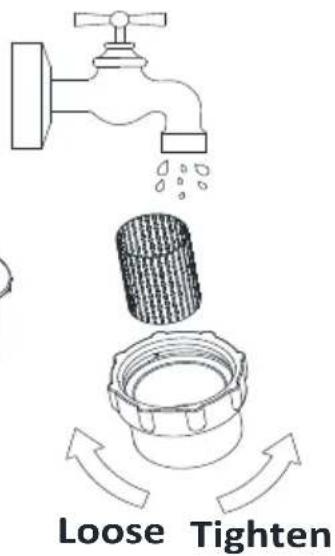
text_image
Loose TightenF10
F11
F12
F13
text_image
1 2 3 1 2 3F14
natural_image
Technical line drawing of a cleaning or cleaning machine with visible components and wiring (no text or labels)F15
natural_image
Technical line drawing of a mechanical device with no visible text or symbolsF16
natural_image
Line drawing of a person standing beside a cleaning machine (no text or symbols)F17
natural_image
Line drawing of a cleaning or cleaning industrial machine with wheels and control panel (no text or symbols)F18
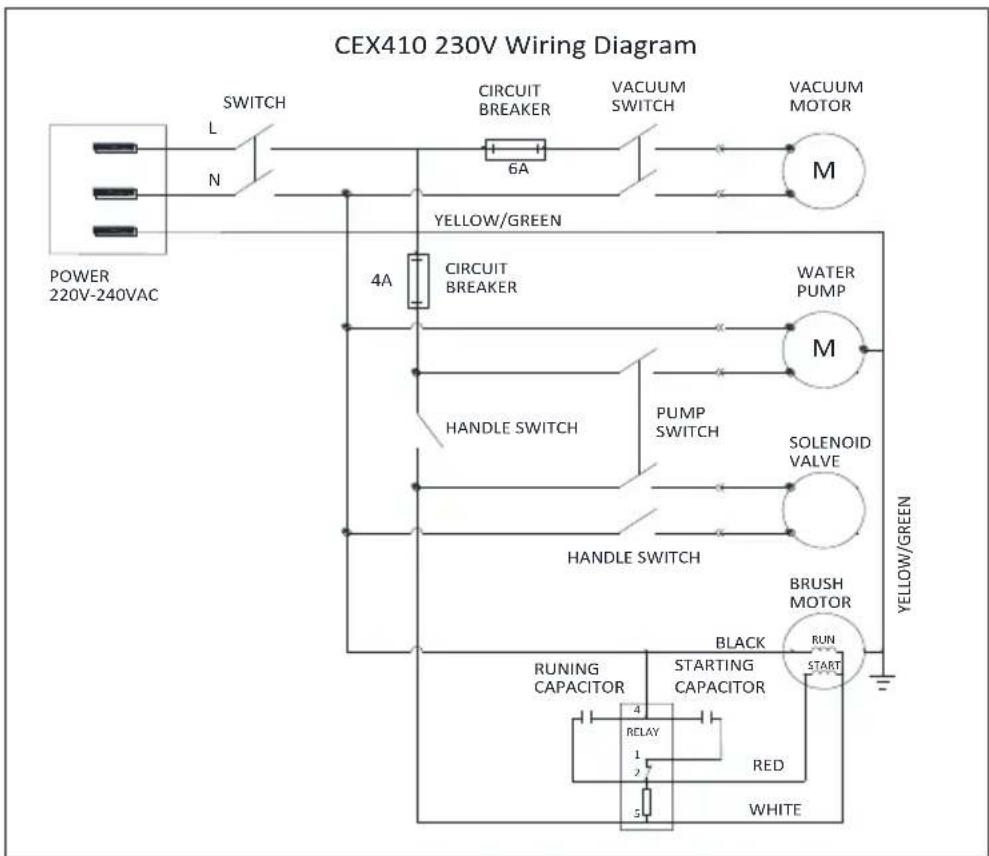
Wiring diagram (F19)
flowchart
graph TD
    A["POWER 220V-240VAC"] --> B["Switch L"]
    B --> C["CIRCUIT BREAKER"]
    C --> D["VACUUM SWITCH"]
    D --> E["VACUUM MOTOR"]
    E --> F["M"]
    F --> G["YELLOW/GREEN"]
    G --> H["4A CIRCUIT BREAKER"]
    H --> I["WATER PUMP"]
    I --> J["M"]
    J --> K["PUMP SWITCH"]
    K --> L["SOLENOID VALVE"]
    L --> M["HANDLE SWITCH"]
    M --> N["BRUSH MOTOR"]
    N --> O["RUN START"]
    O --> P["STARTING CAPACITOR"]
    P --> Q["RUNING CAPACITOR"]
    Q --> R["REPLAY"]
    R --> S["1"]
    S --> T["2"]
    T --> U["5"]
    U --> V["WHITE"]
    V --> W["RED"]
Technical specifications (F20)
| TECHNICAL SPECIFICATION | |
| MODLE | CEX410-EU |
| VOLTAGE(V) | 220~240 |
| RATED POWER(W) | 1850 |
| FREQUENCY(Hz) | 50/60 |
| CORD(M/ FEET) | 15M/50FEET |
| SOLUTION TANK (L/Gal) | 35L/9Gal |
| RECOVERY TANK (L/Gal) | 23L/6Gal |
| BRUSH MOTOR POWER(HP/W) | 400 W |
| VACUUM MOTOR POWER(HP/W) | 1200 W |
| VACUUM MOTOR STAGES AND TYPE | 3-stage tangential |
| VACUUM MOTOR WATERLIFT (INCH/MM H2O) | 3200 MMH2O |
| VACUUM MOTOR AIRFLOW(CFM,L/MIN) | 85CFM,2407L/MIN |
| SOUND PRESSURE LEVEL(dBA) | 70±3 |
| PUMP CUT OFF PRESSURE(Bar/PSI) | 8.3Bar/120PSI |
| PUMP WORKING PRESSURE 2 JETS(Bar/PSI) | 5.9Bar/85PSI |
| PUMP WORKING PRESSURE 1 JET(Bar/PSI) | 7.2Bar/105PSI |
| MACHINE SPRAY TIP MATERAIL | Brass |
| HAND TOOL SPRAY TIP MATERAIL | Stainless |
| SOLUTION FLOW 2 JETS (Gal/MIN ,L/MIN) | 0.7Gal/MIN,2.8L/MIN |
| SOLUTION FLOW 1 JET (Gal/MIN ,L/MIN) | 0.5Gal/MIN ,1.8L/MIN |
| BRUSH SPPED(RPM,Tr/Min) | 1100RPM,11Tr/Min |
| VIBRATION | ah, w=0.74m/s2 |
| CLEANING WIDTH (MM/INCH) | 410 MM/16 INCH |
| NOZZLE WIDTH (MM/INCH) | 460 MM/18 INCH |
| HAND TOOL WIDTH (MM/INCH) | 121 MM/4.7 INCH |
| FLOOR TOOL WIDTH (MM/INCH) | 254 MM/10 INCH |
| REAR WHEEL DIAMETER (MM/INCH) | 254 MM/10 INCH |
| MACHINE NET WEIGHT (Lbs./KG) | 121Lbs./55 KG |
| SHIPPING WEIGHT (Lbs./KG) | 143Lbs./65 KG |
| MACHINE WEIGHT WITH SOLUTION WATER(Lbs./KG) | 176Lbs./80 KG |
| MACHINE DIMENSION (L x W x H) (INCH/MM) | 46 x20 x35 inches1170 x 510 x 880 MM |
| SHIPPING DIMENSION (L x W x H) (INCH/MM) | 35.5 x24 x36.5 inches900 x 605 x 925 MM |
| HEIGHT WITHOUT HANDLE (INCH/MM) | 28.5 inches/725 MM |
SCRAPPING
Have the machine scrapped by a qualified scraper
Before scrapping the machine, remove and separate the following materials, which must be disposed of property according to the Law in force:
— Batteries
— Brushes
— Plastic hoses and components
— Electrical and electronic components(*)
(*) Refer to the nearest Nilfisk Center especially when scrapping electronic components.
CEX410 machine material composition and recyclability (F21)
| Type | Recyclable percentage | weight percentage |
| Aluminium | 100% | 6% |
| Electric motors-various | 35% | 25% |
| Ferrous materials | 100% | 8% |
| Wiring harness | 78% | 5% |
| Liquids | 0% | 0% |
| Plastic-non-recyclable material | 0% | 2% |
| Plastic-recyclable material | 100% | 44% |
| Polyethylene | 70% | 6% |
| Rubber | 20% | 4% |
Introduction: This appliance provides a smart and efficient cleaning solution for carpeted floors. The machine is intended for commercial use, in hotels, schools, hospitals, factories, shops, offices and rental businesses. It is constructed for use in an indoor environment. The purpose of this Manual is to provide the operator with necessary information to use the machine properly and safely. Read it through carefully before performing any operation and maintenance.

WARNING: Important
safety instructions
The machine needs to be grounded during operation. To reduce the risk of fire, electric shock, or injury, pay attention to these important warnings. Failure to follow these safety instructions could result in damage to the machine, damage to property or bodily injury.
1) Use this machine only as described in this manual. Do not use it in ways it was not intended. Use only manufacturer's recommended accessories.
2) Do not leave the machine unattended when it is plugged in. Turn off all switches and unplug the electrical cord when not in use and before servicing.
3) Machine shall not be used by children. Children should be supervised to ensure that they do not play with the appliance. Operators shall be adequately instructed on the use of these machines. The appliance is not intended for use by persons with reduced physical, sensory or mental capabilities, or lack of experience and knowledge, unless they have been given supervision or instruction concerning use of the appliance by a person responsible for their safety.
4) If the machine is not working as it should, has been dropped, damaged, or left outdoors, return it to a service center before using.
5) Avoid electrical shock, do not handle the plug or machine with wet hands. To unplug
the cord, grasp the plug. Do not pull on the cord.
6) Do not use extension cords or outlets with inadequate current carrying capacity. Do not use with damaged cord or plug. Connect the machine only to a properly grounded outlet.
Avoid damaging cord (closing doors on cord, pulling around sharp edges or corners, hot surfaces, or running machine over cord).
7) This machine creates suction and contains a revolving brush. Keep hair, loose clothing, fingers, and all other parts of the body away from openings and moving parts. Do not insert any object into any of the openings in the machine.
8) Do not pick up anything that is burning or smoking, such cigarettes, matches, or hot ashes.
9) Do not use the machine to pick up flammable or combustible liquids such as gasoline.
10) Do not use in areas where flammable and/or explosive vapor or dust is present to avoid the possibility of fire or explosion. Some cleaning fluids can produce such vapors. This machine is not suitable for picking up health endangering dust.
11) Use extra care when cleaning on stairs.
12) The machine is for indoor use only.
13) Store the machine in the ventilated, dry area.
Unpacking
When the machine is delivered, carefully inspect the shipping carton and the machine for damage. If any damage, make the carrier aware of the damage and before accepting the goods, reserve the right in compensation of the damage.
The packaging carton includes the following items:
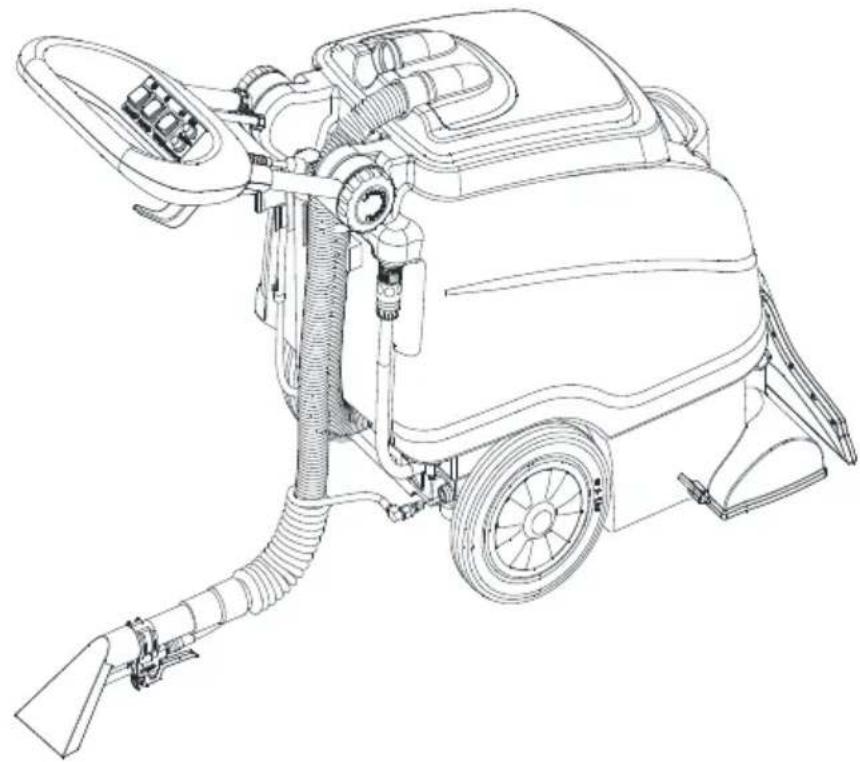
Contents (refer to F1):
- Carpet Extractor
- Vacuum shoe
- Rolling brush
- 50' extension power cable
Machine identification data
The machine serial number and model name
are marked on the serial label.
This information is useful. Use the following table to write down the machine identification data when requiring spare parts for the machine.
Machine model ....
Machine serial number ....
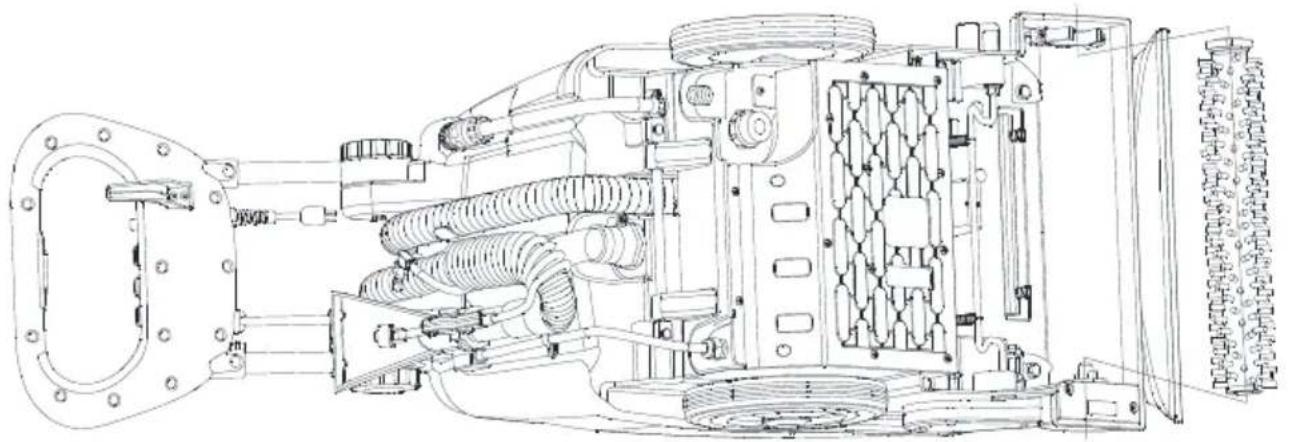
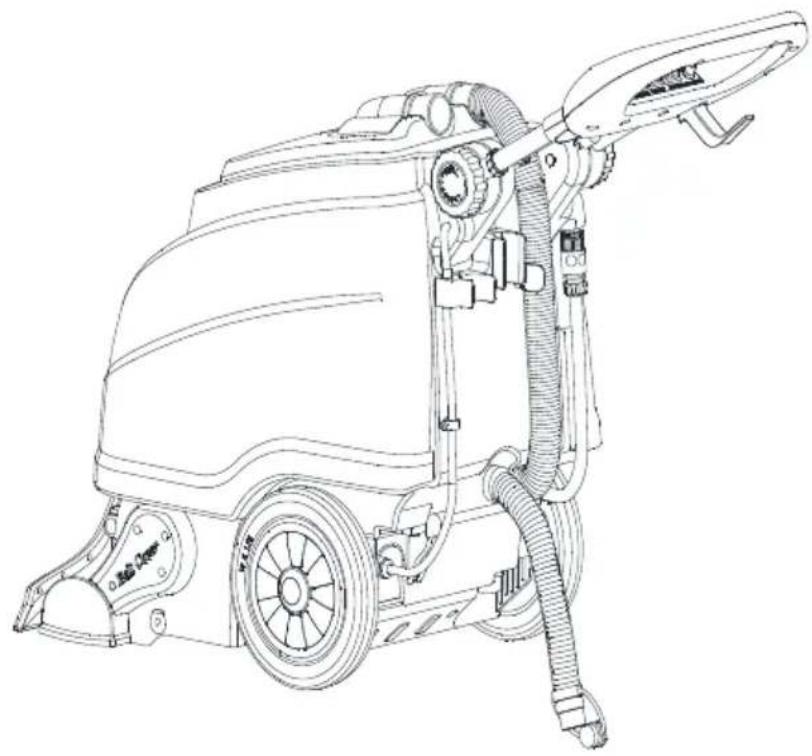
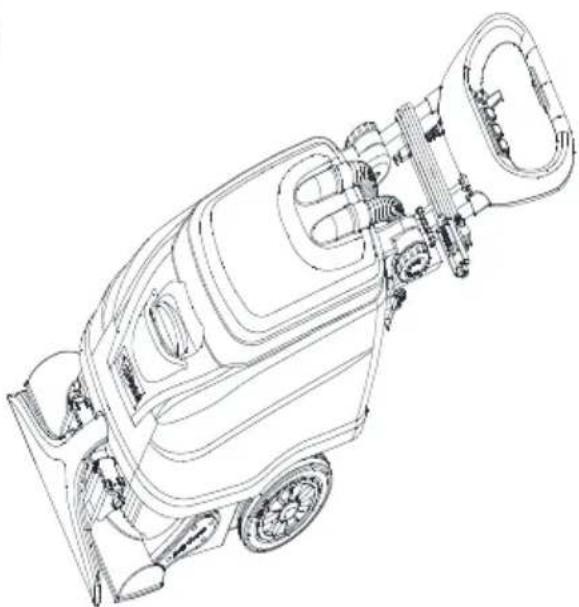
Machine components (refer to page 2)
- spray mode switch 2. power cable hook 3. power cord 4. handle tube (stainless) 5. solution tank 6. rear wheel 7. machine base 8. "Kickstand" pedal 9. base height adjusting knob 10. vacuum shoe knob 11. vacuum hose input 12. dome 13. filling port 14 .viper logo 15. vacuum shoe 16. control panel 17. hand tool (optional) 18. hand tool spray nozzle 19. hand tool quick connector 20. hand tool valve handle 21. hand tool vacuum hose 22. cable clamp 23. base panel 24. handle adjusting knob 25. hose clamp 26. sight tube coupling 27. sight tube 28. vacuum hose 29. recovery tank drain hose 30. accessory quick coupler 31. solution filter 32. shaft 33. "Kickstand" machine holder 34. nozzle base 35. spray nozzle 36. wear plate 37. "Kickstand" nut 38. machine assemble bolt 39. rolling brush 40. rolling brush holder 41. recovery tank dome catch 42. recovery tank 43. float filter cover 44. float cover 45. foam filter 46. float filter holder 47. V-belt cover
Vacuum shoe and rolling brush installation Vacuum shoe installation (refer to F2):
1) First, placed the machine upright on the floor.
2) Lift the vacuum shoe knob.
3) Insert the vacuum shoe to suction hose and mounting base in correct position.
4) Release the vacuum shoe knob.
5) pull back the vacuum shoe, if it doesn't move, the installation is complete.
Rolling brush installation (refer to F3):
1) Place the machine to side position.
2) Install one side of the rolling brush with the locating slot to bearing mounting rack and press in the other side to rolling brush holder. Tip: First, squeeze one side of brush
and ensure the end with a groove has been installed in place and then install the other side.
3) If the rolling brush rotates smoothly, the installation is complete.
Handle direction and Vacuum shoe / rolling brush height adjustment Handle direction adjustment (refer to F4)
1) The appliance can adjust the height of the handle according to use's stature or personal operation habit.
2) Holding the handle adjusting knob and rotate in the opposite direction to loosen the handle.
3) Adjust the handle to the appropriate position and tighten the knob.
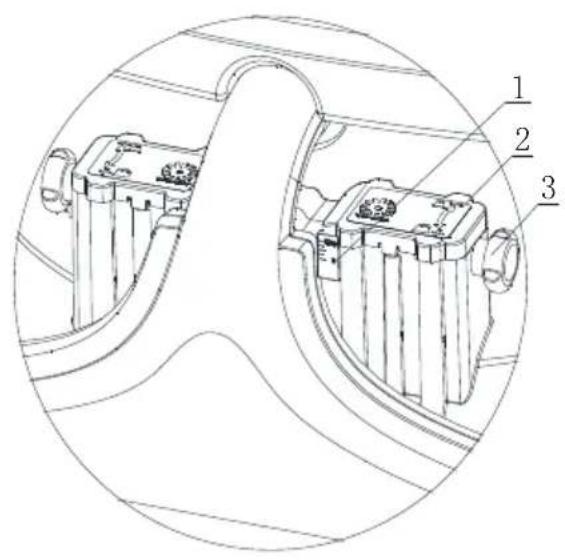
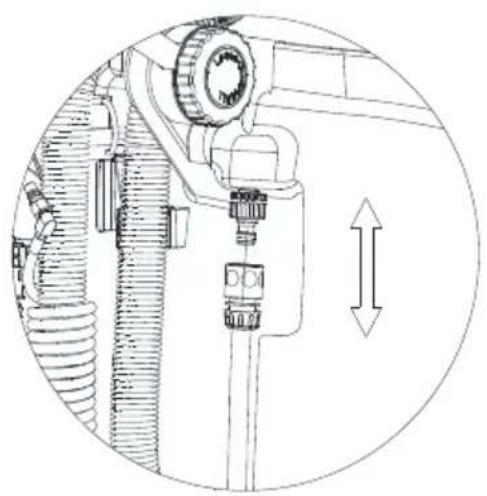
Vacuum shoe/rolling brush adjustment
When the machine working in different piles of carpet or the rolling brush has a certain amount of wear and tear, the operators can increase the cleaning performance of the machine by adjusting the height of the vacuum shoe and rolling brush (refer to F5)..
1) Machine running speed label (0 → MAX indicates the machine speed from slow to fast).
2) Rolling brush pressure label ( - + Indicates the pressure on the brush is increasing).
3) Vacuum shoe adjustment knob.
Holding the vacuum shoe adjustment knob and rotate it in the same direction, move the vacuum shoe up or down to the appropriate position.
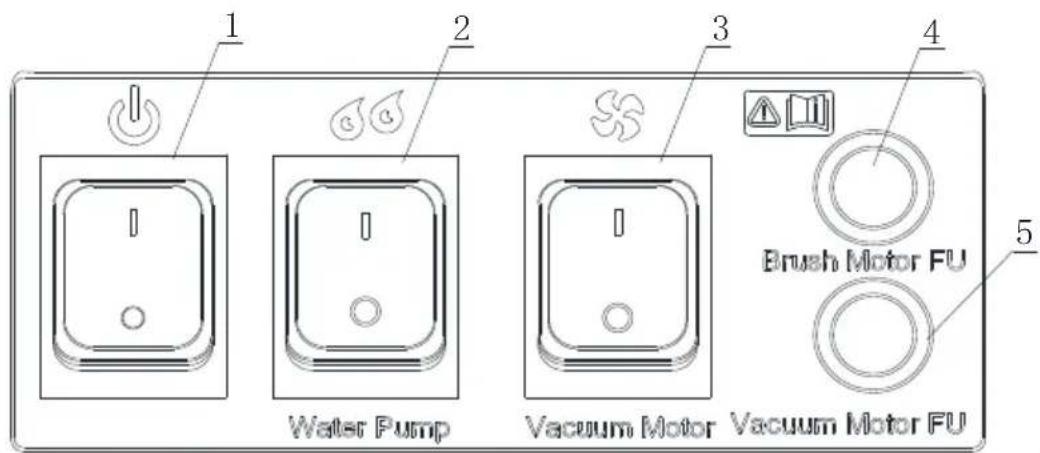
Control panel (refer to F6).
- Power switch 2. Water pump switch
- Vacuum motor switch 4. Fuse for roller brush motor 5. Fuse for vacuum motor
Machine operation
Prior to operation
1) Inspect power cable and extension cable for damage. Replace cable if damage is found.
2) Vacuum the area to be cleaned to remove most of the solid debris before using the machine to clean.
Operation

WARNING: Do not allow the cord to come into contact with the rotating brushes.
1) Using a hose or bucket, fill the solution tank with hot water. (max. 120^ F/50°C, capacity 9 Gal./35L).
2) Add distributor recommended detergent.
3) Connect the supplied extension power cable to the machine. Plug cord into a grounded wall outlet.
4) Turn on power switch and vacuum / pump switch.
5) To start cleaning, press the spray mode switch and begin to pull the machine backwards. (Note: appliance will only spray when the pump switch is ON and the spray mode switch is pressed.)
6) Release spray button at the end of the path and continue to pull machine back to pick up excess solution.
7) Tip machine back onto the transport wheels and push forward to begin next path.

Cleaning tips:
1) Run across the surface to be cleaned in overlapping paths.
2) Let the detergent solution soak for 5 to 10 minutes on heavily soiled areas and repeat cleaning several times.
3) Work away from power outlet and power cable in order to avoid damage to the power cable.
4) Continually check for foam buildup in recovery tank. Use a distributor recommended foam control solution. (Note: Excessive foam buildup will not activate the float shut-off and may cause damage to the vacuum motor.)
5) If the brush stops spinning, there may be an obstruction in the brush. Unplug the power cable, check the brush and remove the obstruction.
6) When recover tank is full, or the solution tank is empty, you must drain the recovery tank. (refer to draining reservoir)
Operation with accessory tools (Only recommended/authorized parts and accessories should be used).
An optional accessory hand tool can be attached to clean upholstery and stairs. Operation with hand tool (refer to F7):
1) Disconnect the normal vacuum hose out of the dome.
2) Insert the accessory vacuum hose into the dome instead of the normal vacuum hose.
3) Connect the accessory quick connector to the quick coupler located on the back of the machine.
4) Turn on power switch and vacuum motor/ water pump switch.
5) Use the lever on the hand tool to spray on detergent solution.
6) When cleaning is completed, turn off water pump /vacuum motor switch and then squeeze trigger 3 seconds to relieve water pressure from solution lines.
Shutting down
1) Turn off machine, unplug and remove power cable.
2) Empty the recovery tank and solution tank. (refer to Draining tanks)
Draining tanks
Draining recovery tank (refer to F8):
1) Move the machine to an appropriate draining location. (Please consider the environment)
2) Hold the drain hose for the recovery tank and lower it over the drain. Open the drain hose cover for recovery tank draining.
3) Replace the drain hose back onto machine.
Draining solution tank (refer to F9):
1) Move the machine to an appropriate draining location. (Please consider the environment)
2) Disconnect the hose coupling and lower the hose for solution tank draining.
3) Connect the hose coupling back onto the machine.
Machine maintenance

WARNING: Removing the plug from the socket-outlet when replacing parts or converting the machine to another function during cleaning or maintenance.
To keep the machine performing well and prolong its life time, please perform the following maintenance procedures.
Daily maintenance
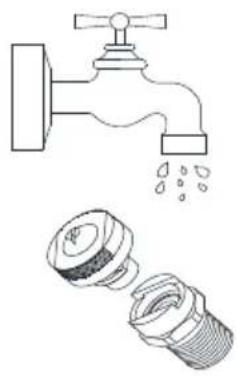
1) Drain and rinse the recovery tank and solution tank.
2) Check quick couplers and nozzles. Clean if required (Note: Never use a pointed object to clean nozzles, only rinse them with hot water) (refer to F10).
3) Remove float filter from the recovery tank and clean it with water (refer to F11).
4) Check filling port filter and clean it with water (refer to F12).
5) Check water pump filter below the machine and clean it with water (refer to F13).
6) Check rolling brush and remove any debris or carpet fibers.

WARNING: Turn off the power switch and disconnect the mains plug before check the rolling brush.
7) Check vacuum shoe and remove any debris or carpet fibers.
8) Clean machine with a soft after use.
9) Check power cable, extension cord and hoses for damage before each use of the machine.
Monthly maintenance
1) Check the rolling brush for any wear and tear. Replace if necessary.
2) Check hoses and seals to see if there are damages. Replace if necessary.
3) Check the machine for water leaks.
4) Lubricate wheels.
5) Check machine for loose or missing nuts, screws, bolts and replace if necessary.
6) Check the V-belt for any wear and tear. Replace if necessary.
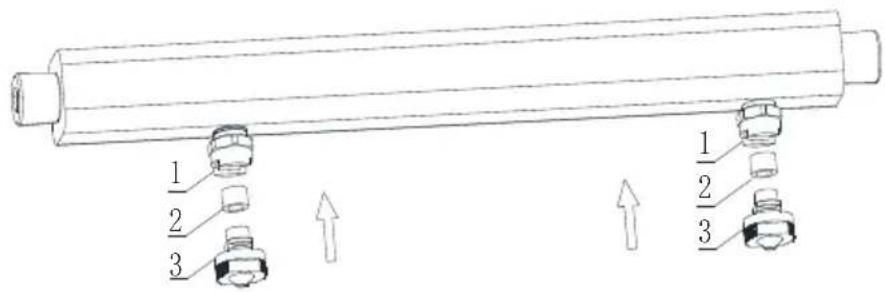
Nozzle installation (refer to F14).
- nozzle base 2. rubber seal ring
- Spray tip nozzle
After the nozzle is cleaned, the nozzle needs to be installed on the base. First, install the rubber ring to the correct position, then press down and rotate the nozzle for 90 degrees aligning the nozzle in a horizontal direction, the installation is complete.
Storage
Power cord storage
1) Bind the power cord by cable ties and stored on the power cord hook (refer to F15).
2) The power cord can also be wound around the handle tube (refer to F16).
Machine storage

Note: Empty the recovery tank and solution tank prior to storing the machine to keep the tanks fresh, and in case of freezing temperatures. This machine should be stored indoors only.
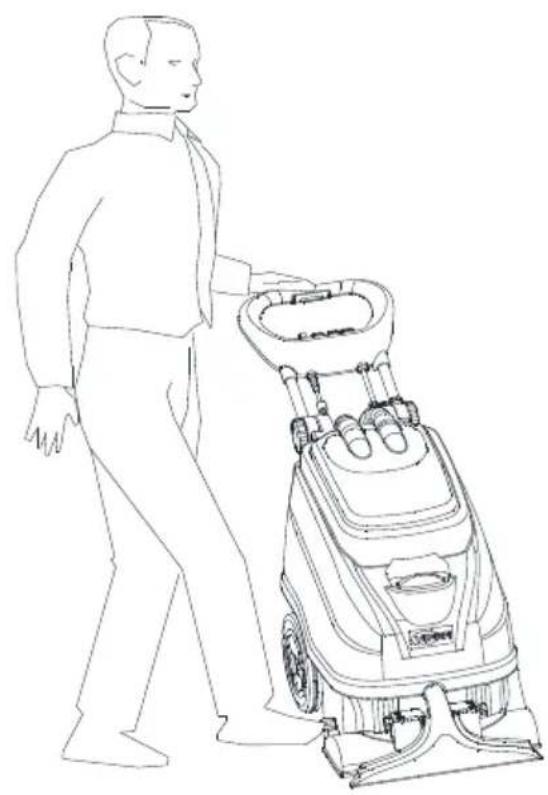
1) Store the machine in an upright position in a dry area and depress the pedal to keep the rolling brush off the floor (refer to F17).
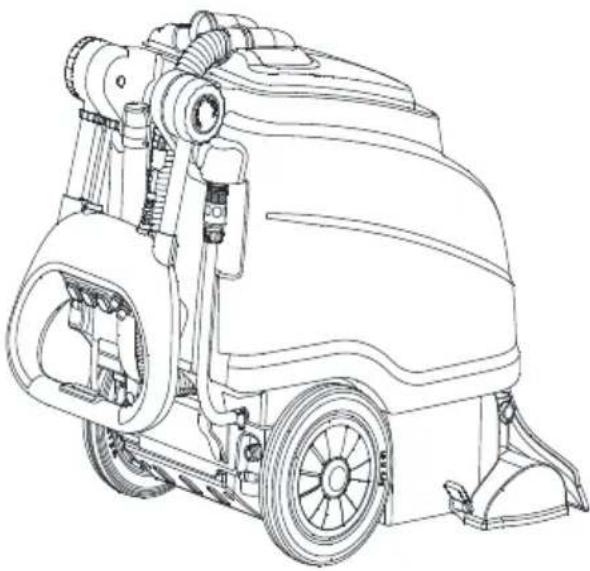
2) Fold the handle to the rear of the machine in order to reduce the storage space (refer to F18).
3) Remove the recovery tank dome to allow for air circulation.
Wiring diagram refer to F19
Technical specifications refer to F20
Machine material composition and recyclability refer to F21
Basic trouble shooting

Notice; Disconnect the mains plug before performing any maintenance.
If your problems are not mentioned in this table or your machine still doesn't work properly, please contact an authorized customer service person for help.
| Trouble | Countermeasure |
| Machine doesn't work at all | Plug the power cord into a grounded outlet |
| Try a replacement extension power cable | |
| Vacuum motor doesn't work | Turn on the vacuum motor switch |
| Reset the vacuum motor protection fuse (Circuit breaker) on control panel | |
| Roller brush motor doesn't work | Turn on the roller brush motor switch |
| Reset the roller brush motor protection fuse (Circuit breaker) on control panel | |
| Insufficient vacuum performance | Check the sealing ring of the recovery tank, clean or replace it if necessary |
| Drain the recovery tank | |
| Ensure vacuum hose is inserted probably | |
| Check the vacuum hose if any damage, replace it if necessary | |
| Slow down cleaning operation | |
| No water spray from nozzle | Re-fill the solution tank |
| Turn on the water pump switch | |
| Rinse the nozzle with hot water (max. 120° F/50°C) | |
| Clean or replace solution filter at the bottom of the machine | |
| Roller brush doesn't work | Turn on roller brush motor switch |
| Check the V-belt if any damage, replace it if necessary | |
| Check the assembly of roller brush | |
| Check the roller brush for carpet fibers, threads, or debris that are preventing the brush from turning properly. |
natural_image
Symbol of a trash bin with no text or labels, featuring a crossed-out box and a solid rectangle below (no readable text or symbols)Disposal:
Equipment marked with the crossed-out wheeled bin symbol indicates that used electrical and electronic equipment should not be discarded together with unseparated household waste. To avoid negative effects on human health and the environment the equipment must be collected separately at the designated collection points.
Users of electrical and electronic household equipment must use the municipal
collection schemes. Please note that commercially used electrical and electronic equipment, shall not be disposed of via municipal collection schemes. We will be pleased to inform you about suitable disposal options.
natural_image
Symbol of a trash bin with no text or labels, including a crossed-out box and a solid black rectangle below (no readable text or symbols)natural_image
Symbol of a trash bin crossed with diagonal lines, no text or labels presentnatural_image
Symbol of a trash bin crossed with a diagonal line, no text or numbers presentnatural_image
Simple line drawing of a trash bin with two crossed lines indicating no waste or prohibition (no text or symbols)
natural_image
Simple line drawing of a trash bin with two crossed lines indicating no waste or restriction (no text or symbols)
natural_image
Simple line drawing of a trash bin with crossed lines indicating no waste or discharge (no text or symbols)natural_image
Symbol of a trash bin crossed with diagonal lines, no text or labels presentnatural_image
Symbol of a trash bin crossed with diagonal lines, no text or labels presentnatural_image
Simple line drawing of a trash bin with crossed lines indicating no waste or discharge (no text or symbols)natural_image
Simple line drawing of a trash bin with two crossed lines indicating no waste or restriction (no text or symbols)
natural_image
Symbol of a trash bin crossed with no text or numbers, representing waste sorting or disposal (no text present)
natural_image
Simple line drawing of a trash bin with two crossed lines indicating no waste or discharge (no text or symbols)
Viper Cleaning Equipment Co. Ltd.
Viper Industrial Estate
Liangbian, Liaobu,
Dongguan, Guangdong
natural_image
Symbol of a trash bin with crossed lines indicating no waste, and a solid black rectangle below (no text or labels)Likvidácia:
natural_image
Simple line drawing of a trash bin with crossed lines indicating no waste or discharge (no text or symbols)natural_image
Simple line drawing of a trash bin with crossed lines indicating no waste or discharge (no text or symbols)natural_image
Simple line drawing of a trash bin with crossed lines indicating no waste or discharge (no text or symbols)natural_image
Simple line drawing of a trash bin with crossed lines indicating no waste or discharge (no text or symbols)natural_image
Symbol of a trash bin crossed with a diagonal line, representing waste sorting or disposal (no text or labels)