
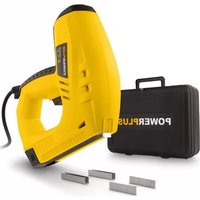
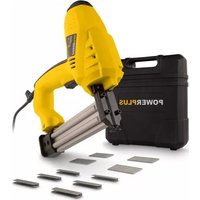
POWDP7010 - Stapler PowerPlus - Free user manual and instructions
Find the device manual for free POWDP7010 PowerPlus in PDF.
| Product type | Cordless Stapler/Nailer |
| Brand | PowerPlus |
| Model | POWDP7010 |
| Rated voltage | 20 V |
| Power supply | Lithium-ion battery (not included) |
| Fastening type | Staples and nails |
| Staple size | 15 – 25 mm |
| Nail size | 15 – 32 mm |
| Driving speed | 30 strokes/min |
| Driving force | Adjustable in 6 positions |
| Motor type | Brushed |
| Sound level (pressure) | 75 dB(A) |
| Sound level (power) | 86 dB(A) |
| Vibration | 3.6 m/s² |
| LED work light | Yes |
| Package contents | 1 nailer/stapler, 100 staples 20 mm, 100 nails 20 mm, instruction manual |
| Maintenance | Clean ventilation slots regularly |
| Safety | Safety goggles must be worn, nose safety device |
| Warranty | 36 months |
| Usage | Indoor, non-professional |
| Charging temperature | 4 °C to 40 °C |
| Battery storage temperature | 5 °C to 20 °C (ideal) |
Frequently Asked Questions - POWDP7010 PowerPlus
User questions about POWDP7010 PowerPlus
0 question about this device. Answer the ones you know or ask your own.
Ask a new question about this device
Download the instructions for your Stapler in PDF format for free! Find your manual POWDP7010 - PowerPlus and take your electronic device back in hand. On this page are published all the documents necessary for the use of your device. POWDP7010 by PowerPlus.
USER MANUAL POWDP7010 PowerPlus
2 BESCHRIJVING (FIG. A)
Certification Manager
17/09/2020, Lier - Belgium
Certification Manager
17/09/2020, Lier - Belgium
POWDP7010 EN
1 APPLICATION 3
2 DESCRIPTION (FIG. A) 3
3 PACKAGE CONTENT LIST 3
4 SYMBOLS 4
5 GENERAL POWER TOOL SAFETY WARNINGS 4
5.1 Working area 4
5.2 Electrical safety 4
5.3 Personal safety. 5
5.4 Power tool use and care 5
5.5 Service 5
6 SPECIAL SAFETY INSTRUCTIONS FOR STAPLERS 6
7 ADDITIONAL SAFETY INSTRUCTIONS FOR BATTERIES AND CHARGERS 6
7.1 Batteries 6
7.2 Chargers 6
8 CHARGING AND INSERTION OR REMOVAL OF BATTERY 7
8.1 Charger indications (Fig. 1). 7
8.2 Removal / insertion of battery (Fig. 2)
8.3 Battery capacity indicator (Fig. 3)
9 ASSEMBLY 8
9.1 Loading staples/nails (Fig. 4) 8
10 OPERATION 8
10.1 Hammer force preselection (Fig. 5). 8
10.2 Firing a staple or nail (Fig. 6). 8
11 TECHNICAL DATA 9
12 NOISE 9
13 CLEANING AND MAINTENANCE. 9
14 STORAGE 9
15 WARRANTY 10
16 ENVIRONMENT 10
17 DECLARATION OF CONFORMITY 11
NAIL/STAPLE GUN 20 V (NO ACCU) POWDP7010
1 APPLICATION
The machine is used for fastening wood, wire netting, felt, film, cardboard and fabric to wood or similar materials. Additional uses are not approved Not suitable for professional use.

WARNING! Read this manual and the general safety instructions carefully before using the machine, for your own safety. Your power tool should only be passed on together with these instructions.
2 DESCRIPTION (FIG. A)
- Handle
- Cooling vents
- Nose
- Nail & Staple magazine
- Trigger switch
- Magazine lever
- Depth adjustment wheel
-
Magazine level indicator
-
LED work light
- Button for LED work light
- Battery pack (NOT INCLUDED)
- Battery pack release button
- Charger (NOT INCLUDED)
- Battery capacity indicator
- Button for battery capacity indicator
3 PACKAGE CONTENT LIST
- Remove all packing materials.
- Remove remaining packaging and transit supports (if existing).
- Check the completeness of the packing content.
- Check the appliance, the power cord, the power plug and all accessories for transportation damages.
- Keep the packaging materials as far as possible till the end of the warranty period. Dispos it into your local waste disposal system afterwards.

WARNING: Packing materials are no toys! Children must not play with plastic bags! Danger of suffocation!
1 pc nail/staple gun Manual
100 pcs staples 20 mm
100 pcs nails 20 mm

When parts are missing or damaged, please contact your dealer.
POWDP7010 EN
4 SYMBOLS
In this manual and/or on the machine the following symbols are used:
| ! | Denotes risk of personal injury or damage to the tool. | CE | In accordance with essential requirements of the European directive(s). |
| Read manual before use. | Class II - The machine is double insulated; Earthing wire is therefore not necessary (only for charger). | ||
| MAX. 40°C | Ambient temperature 40 °C max. (only for battery). | Do not expose charger and battery pack to water. | |
| Use battery and charger only in closed rooms. | Do not incinerate battery pack or charger. | ||
| Mandatory use of eye protection. | Wear gloves. |
5 GENERAL POWER TOOL SAFETY WARNINGS
Read all safety warnings and instructions. Failure to heed warnings and follow instructions may result in electric shock, fire and/or serious injury. Keep safety warnings and instructions for future reference. The term "power tool" in the safety warnings refers to your mains-operated (corded) power tool or battery- operated (cordless) power tool.
5.1 Working area
- Keep working area clean and well lit. Untidy and dark areas can lead to accidents.
- Do not operate power tools in potentially explosive surroundings, for example, in the presence of inflammable liquids, gases or dust. Power tools create sparks which may ignite the dust or fumes.
- Keep children and bystanders at a distance when operating a power tool. Distractions can cause you to lose control of it.
5.2 Electrical safety
- Always check that the power supply corresponds to the voltage on the rating plate.
- Power tool plugs must match the outlet. Never modify the plug in any way. Do not use adapter plugs with earthed power tools. Unmodified plugs and matching outlets will reduce the risk of an electric shock.
- Avoid body contact with earthed surfaces such as pipes, radiators, kitchen ranges and refrigerators. There is an increased risk of an electric shock if your body is earthed.
- Do not expose power tools to rain or wet conditions. If water gets inside a power tool, it will increase the risk of an electric shock.
- Do not damage the cord. Never use the cord for carrying, pulling or unplugging the power tool. Keep the cord away from heat, oil, sharp edges or moving parts. Damaged or entangled cords increase the risk of an electric shock.
- When operating a power tool outdoors, use an extension cable suitable for outdoor use. Using a cord suitable for outdoor use reduces the risk of an electric shock.
POWDP7010 EN
- If operating a power tool in a damp location is unavoidable, use a power supply protected by a residual current device (RCD). Using an RCD reduces the risk of an electric shock.
5.3 Personal safety
- Stay alert, watch what you are doing and use common sense when operating a power tool. Do not use a power tool when you are tired or under the influence of drugs, alcohol or medication. A moment of inattention when operating a power tool may result in serious personal injury.
- Use safety equipment. Always wear eye protection. Using safety equipment such as a dust mask, non-skid safety shoes, a hard hat, or hearing protection whenever it is needed will reduce the risk of personal injury.
- Avoid accidental starts. Ensure the switch is in the off position before inserting the plug. Carrying power tools with your finger on the switch or plugging in power tools when the switch is in the on position makes accidents more likely.
- Remove any adjusting keys or spanners before turning on the power tool. A spanner or key left attached to a rotating part of the power tool may result in personal injury.
- Do not reach out too far. Keep your feet firmly on the ground at all times. This will enable you retain control over the power tool in unexpected situations.
- Dress properly. Do not wear loose clothing or jewellery. Keep your hair, clothing and gloves away from the power tool. Loose clothes, jewellery or long hair can become entangled in the moving parts.
If there are devices for connecting dust extraction and collection facilities, please ensure that they are attached and used correctly. Using such devices can reduce dust-related hazards.
5.4 Power tool use and care
- Do not expect the power tool to do more than it can. Use the correct power tool for what you want to do. A power tool will achieve better results and be safer if used in the context for which it was designed.
- Do not use the power tool if the switch cannot turn it on and off. A power tool with a broken switch is dangerous and must be repaired.
- Disconnect the plug from the power source before making adjustments, changing accessories, or storing power tools. Such preventive safety measures reduce the risk of starting the power tool accidentally.
- Store power tools, when not in use, out of the reach of children and do not allow people who are not familiar with the power tool or these instructions to operate it. Power tools are potentially dangerous in the hands of untrained users.
- Maintain power tools. Check for misalignment or jammed moving parts, breakages or any other feature that might affect the operation of the power tool. If it is damaged, the power tool must be repaired. Many accidents are caused by using poorly maintained power tools.
- Keep cutting tools sharp and clean. Properly maintained cutting tools with sharp cutting edges are less likely to jam and are easier to control.
- Use the power tool, accessories and cutting tools, etc., in accordance with these instructions and in the manner intended for the particular type of power tool, taking into account the working conditions and the work which needs to be done. Using a power tool in ways for which it was not intended can lead to potentially hazardous situations.
5.5 Service
- Your power tool should be serviced by a qualified specialist using only standard spare parts. This will ensure that it meets the required safety standards.
POWDP7010 EN
6 SPECIAL SAFETY INSTRUCTIONS FOR STAPLERS
- Before inserting staples or nails ensure the machine is switched off or remove the battery pack.
- Never point the machine at persons or animals.
- Only use staples or nails which are suitable for the machine.
Before using the machine, ensure that the safety device is operating properly. - Never block the safety device.
- Switch the machine off when you take a break and when the work is completed.
- Wear ear protectors.
- Do not activate the tool unless the tool is placed firmly against the workpiece. If the tool is not in contact with the workpiece, the fastener may be deflected away from your target.
- Do not use the tacker for fastening electrical cables. It is not designed for electric cable installation and may damage the insulation of electric cables thereby causing electric shock or fire hazard.
7 ADDITIONAL SAFETY INSTRUCTIONS FOR BATTERIES AND CHARGERS
7.1 Batteries
-
Never attempt to open for any reason.
-
Do not store in locations where the temperature may exceed 40^ .
-
Charge only at ambient temperatures between 4^ and 40^ .
-
Store your batteries in a cool dry place (5 °C-20 °C). Never store batteries in discharged state.
It is better for Li-ion batteries to discharge and reload them regularly (at least 4 times a year). The ideal charge for long-term storage of your Li-ion battery is 40% of capacity.
-
When disposing of batteries, follow the instructions given in the section "Protecting the environment".
-
Do not cause short circuits. If connection is made between the positive (+) and negative (-) terminal directly or via accidental contact with metallic objects, the battery is short circuited and an intense current will flow causing heat generation which may lead to casing rupture or fire.
-
Do not heat. If batteries are heated to above 100^ , sealing and insulating separators and other polymer components may be damaged resulting in electrolyte leakage and/or internal short circuiting leading to heat generation causing rupture or file. Moreover do not dispose of the batteries in fire, explosion and/or intense burning may result.
-
Under extreme conditions, battery leakage may occur. When you notice liquid on the battery, proceed as follows:
-
Carefully wipe the liquid off using a cloth. Avoid skin contact.
- In case of skin or eye contact, follow the instructions below:
Immediately rinse with water. Neutralize with a mild acid such as lemon juice or vinegar.
In case of eye contact, rinse abundantly with clean water for at least 10 minutes. Consult a physician.

Fire hazard! Avoid short-circuiting the contacts of a detached battery. Do not incinerate the battery.
7.2 Chargers
- Never attempt to charge non-rechargeable batteries.
- Have defective cords replaced immediately.
POWDP7010 EN
- Do not expose to water.
- Do not open the charger.
- Do not probe the charger.
The charger is intended for indoor use only.
8 CHARGING AND INSERTION OR REMOVAL OF BATTERY
8.1 Charger indications (Fig. 1)
Connect the charger to the power outlet socket:
Solid green: ready to charge.
- Flickering red: charging.
Solid green: charged.
Solid green and red: battery or charger damaged.

Note: if the battery does not fit properly, disconnect it and confirm that the battery pack is the correct model for this charger as shown on the specification chart. Do not charge any other battery pack or any battery pack that does not securely fit the charger.
- Frequently monitor the charger and battery pack while connected.
- Unplug the charger and disconnect it from the battery pack when finished.
- Allow the battery pack to cool completely before using it.
- Store the charger and battery pack indoors, out of reach of children.

NOTE: If battery is hot after continuous use in the tool, allow it to cool down to room temperature before charging. This will extend the life of your batteries.
8.2 Removal / insertion of battery (Fig. 2)

WARNING: Before making any adjustments ensure the machine is switched off or remove the battery pack.
- Hold the tool with one hand and the battery pack with the other.
- To install: push and slide battery pack into battery port, make sure the release latch on the rear side of the battery snaps into place and battery is secure before beginning operation.
- To remove: Press the battery release latch and pull the battery pack out at the same time.
8.3 Battery capacity indicator (Fig. 3)
There are battery capacity indicators (14) on the battery pack, you can check the capacity status of the battery if you squeeze the button (15) Before using the machine, please press switch trigger to check if the battery is full enough for properly working.
Those 3 LED might show the status of the capacity level of the battery:
3 LED's are lit: Battery fully charged.
2 LED's are lit: Battery 60% charged.
1 LED is lit: Battery almost discharged.
9 ASSEMBLY

Warning: This nailer/stapler is NOT suited for nailing or stapling into concrete, masonry, bricks or metal.

Warning: Do not fire if brad nails or staples are jammed in the nose (3) section.

Warning! Remove the battery from the device before loading it with staples/nails
9.1 Loading staples/nails (Fig. 4)
Depress the magazine release (a) on both sides and pull the magazine (b) out.
- Insert a row of staples/nails (c) into the slot (d) behind the nose piece.
- Carefully place the staples/nails in the slot according to the marking (e) on the nose.
- Push the magazine (b) back into the unit. It clips into place.

Note that the nail strip should be placed close to the bottom of the magazin. The nails may get stuck if the nail strip is placed in a wrong position.
10 OPERATION

Note: each time you fire the nailer / stapler, the safety (3) must be pressed firmly against the workpiece.
10.1 Hammer force preselection (Fig. 5)
- With the depth adjustment wheel preselection, it is possible to preselect the required hammer force. The required hammer force depends on the length of the staples or nails and on the strength of the material. The optimal hammer force setting, you can determine through practical testing. Turn the knob (f) clockwise to increase the hammer force and turn it counter-clockwise to reduce the hammer force, setting 1 is the weakest force, setting 6 is the strongest force.
10.2 Firing a staple or nail (Fig. 6)
- Place the tacker against the workpiece so that the nose piece of the tacker is where you want the staple/nail to be located.
- To fire the tacker squeeze the trigger.
- Additional pressure applied to the front of the tool will prevent recoil and increase the force applied to the nails or staples. This is especially important for ensuring that the nail or staple is driven the whole way into a hard surface.
Remove all nails/staples from the magazine after each use.

The machine is designed only for intermittent operation and will warm up with the contues use. The tracking force is reduced as a result of heating up/ therefore, allow the machine to cool off after 15 minutes (max) continuous operation.
POWDP7010 EN
There is a contact switch in your staple gun. The contact switch enables the staple gun only to be started on contact with the material surface.
11 TECHNICAL DATA
| Rated voltage | 20 V |
| Strike rate | 30 / min |
| Staple/nail size | 15-25 mm /15-32mm |
| Hammer force | Adjustable |
| Engine type | Brushed |
12 NOISE
Noise emission values measured according to relevant standard. (K = 3)
| Acoustic pressure level LpA | 78 dB(A) |
| Acoustic power level LwA | 86 dB(A) |

ATTENTION! Wear hearing protection when sound pressure is over 85 dB(A).
aw (Vibration)
3.6 m/s²
K = 1.5m / s^2
13 CLEANING AND MAINTENANCE
- The machine does not require any special maintenance.
- For safe and efficient working, always keep the machine and the ventilation slots clean.
- Always be sure that the tool is switched off and unplugged before carrying out any work on the tool.
14 STORAGE
Thoroughly clean the whole machine and its accessories.
- Store it out of the reach of children, in a stable and secure position, in a cool and dry place, avoid too high and too low temperatures.
- Protect it from exposure to direct sunlight. Keep it in the dark, if possible.
- Don't keep it in plastic bags to avoid humidity build-up.
POWDP7010 EN
15 WARRANTY
This product is warranted as provided by law for a 36-month period effective from the date of purchase by the first user.
- This warranty covers all material or production flaws excluding : batteries, chargers, defective parts subject to normal wear & tear such as bearings, brushes, cables, and plugs, or accessories such as drills, drill bits, saw blades, etc. ; damage or defects resulting from maltreatment, accidents or alterations; nor the cost of transportation.
- Damage and/or defects resulting from inappropriate use also do not fall under the warranty provisions.
We also disclaim all liability for any bodily injury resulting from inappropriate use of the tool.
- Repairs may only be carried out by an authorised customer service centre for Powerplus tools.
- You can always obtain more information at the number 00 32 3 292 92 90.
- Any transportation costs shall always be borne by the customer, unless agreed otherwise in writing.
- At the same time, no claim can be made on the warranty if the damage of the device is the result of negligent maintenance or overload.
- Definitely excluded from the warranty is damage resulting from fluid permeation, excessive dust penetration, intentional damage (on purpose or by gross carelessness), inappropriate usage (use for purposes for which the device is not suitable), incompetent usage (e.g. not following the instructions given in the manual), inexpert assembly, lightning strike, erroneous net voltage. This list is not exhaustive.
- Acceptance of claims under warranty can never lead to the prolongation of the warranty period nor commencement of a new warranty period in case of a device replacement.
Devices or parts which are replaced under the warranty therefore remain the property of Varo NV.
- We reserve the right to reject a claim whenever the purchase cannot be verified or when it is clear that the product has not been properly maintained. (Clean ventilation slots, carbon brushes serviced regularly, etc.).
- Your purchase receipt must be kept as proof of date of purchase.
- Your appliance must be returned undismantled to your dealer in an acceptably clean state, (in its original blow-moulded case if applicable to the unit), accompanied by proof of purchase.
- Your tool must be charged at least 1x per month to ensure optimal operation of this tool.
16 ENVIRONMENT
Should your appliance need replacement after extended use, do not discard it with the household rubbish but dispose of it in an environmentally safe way. Waste produced by electrical machine items should not be handled like normal household rubbish. Please recycle where recycle facilities exist. Check with your Local Authority or retailer for recycling advice.
17 DECLARATION OF CONFORMITY


VARO - Vic. Van Rompuy N.V. - Joseph Van Instraat 9 - BE2500 Lier - BELGIUM, declares that,
Product: NAIL/STAPLE GUN 20 V - Battery operated
Trade mark: PowerPlus
Model:POWDP7010
is in conformity with the essential requirements and other relevant provisions of the applicable European Directives, based on the application of European harmonized standards. Any unauthorized modification of the apparatus voids this declaration.
European Directives (including, if applicable, their amendments up to the date of signature):
2011/65/EU
2006/42/EC
2014/30/EU
European harmonized standards (including, if applicable, their amendments up to the date of signature):
EN60745-1:2009
EN60745-2-16:2010
EN55014-1:2017
EN55014-2:2015
Keeper of the Technical Documentation: Philippe Vankerkhove, VARO - Vic. Van Rompuy N.V.
The undersigned acts on behalf of the company CEO,

Ludo Mertens
Certification Manager
17/09/2020, Lier - Belgium
Certification Manager
17/09/2020, Lier - Belgium
Responsible de certifications
17/09/2020, Lier - Belgium
Certification Manager
17/09/2020, Lier - Belgium
Certification Manager
17/09/2020, Lier - Belgium
1 BRUKSOMRÄDE 3
2 BESKRIVELSE (FIG. A) 3
3 PAKKENS INNHOLD 3
4 SYMBOLFORKLARING 3
5 GENERELLE SIKKERHETSADVARSLER 4
5.1 Arbeidsplassen 4
5.2 Elektrisk sikkerhet 4
5.3 Personsikkerhet.. 4
5.4 Vær noyaktig og omhyggelig nár du omgås elektroverktøy... 5
5.5 Service 5
6 SPESIELLE SIKKERHETSREGLER FOR SPIKER/KRAMPEPISTOLER 5
7 EKSTRA SIKKERHETSREGLER FOR BATTERIER OG LADERE . 6
13 RENGJØRING OG VEDLIKEHOLD
Ma不同程度, but the temperature of the water is much higher than that of water in the atmosphere.
Certification Manager
17/09/2020, Lier - Belgium
1 ANVÄNDNINGSOMRADE 3
2 BESKRIVNING (FIG. A) 3
3 FÖRPACKNINGSINNEHÄLL 3
4 SYMBOLER 4
5 ALLMÄNNA SÄKERHETSANVISNINGAR FÖR ELEKTRISKA VERKTYG. 4
17/09/2020, Lier - Belgium
POWDP7010 EL
1 EΦAPMOrH 3
2 IEPIIRPAΦH (EIK. A) 3
3 AIZTA NEPIEXOMENON YZKEYAIAI
4 SYMBOAA 4
5 TENIKE Π P O E I ΔΟ N O I H Ε E I Α Σ Φ A Λ E I A Σ Γ I A T A H Λ E K T P I K A E P A Λ E I A 4
17/09/2020, Lier - Belgium
1 PRIMJENA 3
2 OPIS (SLIKA A) 3
3 POPIS SADRZAJA PAKETA 3
4 SIMBOLI. 4
5 OPÇA UPOZORENJA O SIGURNOSTI RUKOVANJA
ELEKTRICNIM ALATIMA 4
5.1 Radno mesto 4
5.2 Elektricna sigurnost 4
5.3 Osobna sigurnost 5
5.4 Uporaba i odrzavanje elektricnog alata 5
5.5 Servis 6
6 POSEBNE SIGURNOSNE UPUTE ZA PRIBIJAC
ČAVALA/SPOJNICA 6
7 DODATNE SIGURNOSNE UPUTE ZABATERIJE I PUNJACE.....6
7.1 Baterije 6
7.2 Punjači 7
8 PUNJENJE I UMETANJE ILI UKLANJANE BATERIJE 7
8.1 Indikatori punjača (slika 1)
8.2 Uklanjanje / umetanje baterije (sika 2)
8.3 Indikator kapaciteta baterije (sika 3) 8
9 SKLAPANJE I 8
9.1 Umetanje cava/ spojnica (sika 4) 8
10 RAD 8
10.1 Prethodni odabir sile pribijanja (sika 5) 8
10.2 Ispaljivanje spojnice ili cavla (sika 6) 8
11 TEHNICKI PODACI 9
12 BUKA 9
13 CiSCENJE I ODRZAVANJE 9
14 CUVANJE 9
15 JAMSTVO 10
16 OKOLIS 10
17 IZJAVA O SUKLADNOSTI 11
PRIBIJAC CAVALA/SPOJNICA 20 V (BEZ BATERIJE) POWDP7010
1 PRIMJENA
Stroj se koristi za pričvṛśćenjeDRVeta,žiçane mreze,pusta,folijekartona i tkanine na drvo te za slične materijale.Druge primjene nisu dozvoljene!Nije prikladno za profesionalnu uporabu.

UPOZORENJE! Prije uporabe alata, a radi vase vlastite sigurnosti pažljivo procitajte ovaj prisucnik i opce upute o sigurnosti. Ove upute cine sastavni dio opreme elektricnog alata, pa i u slučaju prodaje drugom vlasniku.
2 OPIS (SLIKA A)
- Ručka
- Otvori za hladenje
- Nos uredaja
- Spremnik Čavala i spojnica
- Sklopka okidača
- Ručica spremnika
- Kotačić za regulaciju dubine
-
Indikator razine spremnika
-
LED radna svjetiljka
- Gumb za LED radnu svjetiliku
- Baterija (NIJE UKLJUCENA)
- Osigurač baterijskog paketa
- Punjač (NIJE UKLJUCEN)
- Indikator kapaciteta baterije
- Gumb indicatora kapaciteta baterije
3 POPIS SADRžAJA PAKETA
Certification Manager
17/09/2020, Lier - Belgija
1 OBLASTPOUZITI 3
2 POPIS (OBRAZEK A) 3
3 OBSAH BALENI 3
4 SYMBOLY 4
5 OBECNÁ BEZPEČNOSTNI UPOZORNÉNÍ PRO ELEKTRICKÉ STROJE. 4
Certification Manager
17/09/2020, Lier - Belgicko
1 DOMENII DE UTILIZARE. 3
2 DESCRIERE (FIG. A) 3
3 CONTINUTUL PACHETULUI 3
4 SIMBOLURI 4
5 AVERTISMENTE GENERALE DE SIGURAN'TA PRIVIND
APARATUL ELECTRIC 4
5.1 Zona de lucru 4
5.2 Sigurantha electrica 4
5.3 Siguranţa personală 5
5.4 Folosirea 山 intretinerea aparatului electric.. 5
5.5 Service 6
6 INSTRUCTIONSpecale DE SIGURANPA PENTRU PISTOALELE ELECTRICE PENTRU CAPSE 6
7 INSTRUCTION SUPPLEMENTARE DE SIGURAN T A PENTRU ACUMULATORI S I INCARCATOARE 6
7.1 Accumulatorii 6
7.2 Incarcatoare 7
8 INCARCArea, INTRODUCEREA SAU SCOATEREA ACUMULATORULUI. 7
8.1 Indicaţii privind incărcătorul (Fig. 1)
8.2 Scoaterea/introducerea accumulatorului (Fig. 2). 7
8.3 Indicator al incarcarii accumulatorului (Fig. 3). 8
9 MONTARE. 8
9.1 Incarcarea cuielor / capselor (Fig. 4) 8
10 FUNCTIONARE 8
10.1 Preselectarea fortei ciocanului (Fig. 5) 8
10.2Lansarea unei capse sau a unui cui (Fig.6) 8
11 DATE TEHNICE 9
12 ZGOMOT 9
13 CURATAREA INTRETINEREA 9
14 DEPOZITAREA 9
15 GARANTIE 10
16 MEDIU 10
17 DECLARATIA DE CONFORMITATE 11
PISTOL PENTRU CUIE ŞI CAPSE 20 V (FÁRÁ ACUMULATOR) POWDP7010
1 DOMENII DE UTILIZARE
Certification Manager
17/09/2020, Lier - Belgia
1 ZASTOSOWANIE 3
2 OPIS (RYC. A) 3
3 LISTA ELEMENTOW W OPAKOWANIU 3
4 SYMBOLE 4
5 OGOLNE ZASADY BEZPIECZNEJ PRACY
ELEKTRONARZEDZIAMI 4
Certification Manager
17/09/2020, Lier - Belgium
1 OBJACTb PIPMEHEHn3
2 ONICAHNE (PNC.A) 3
3 CODEPJKMOE YNAKOBKN 3
4 YCJIOBHBIE O6O3HAUHIN 4
5OBsA HCTpyKU INo TEXHnke 6E3OnACHOCTn PnPABOTE C 3JektpOnHCTpyMeHTOM
5.1 Pa6oyee Mecmo 4
5.2 3eKmpo6e3onacHocmb 4
5.3IuHna 6e3oNaChocmb 5
5.4 3Kcnnyamaaua u yxod 3a 3neKmpouHcmpyMeHMOM 5
5.5 06cnykueaHue 6
6 CNEUJIbHbIE INHCTPyKcIIN IO TEXHnke B3ONACHOCTN DJI KCOBO3ABHBbIX NICTOJETOB. 6
7 DOnOHnHtJIbHbIe NHCTPyKcIIN NO TEXHnKE B3OpAChOCTN IJIy AKKUMyJIaTOPOB N 3APJdHbIX UCTPOICTB
7.1 Akkymyjnmopbl 7
7.2 3apnHbIe ycmpoucmea .7
8 3APRAKA N YCTAHOBKA INI IN CHRTNE AKKYMUYIYTOPA...
8.1 Hdukamopb3apno ycmpoucmea (Puc. 1) 8
8.2 Chmue /ycmaHo6ka akkymyamopa (Puc. 2) 8
8.3 HdukamopbI 3apra daakymyamopa (Puc. 3) 8
9 CBOPKA 9
9.1 3a2py3ka ck06/ae03deu (Puc. 4) 9
10 3KcPJIyATAU. 9
10.1 PnpdeapumelbHbI ebl6op cunbl ydapa (Puc. 5) 9
10.2 BbIcmpenueaHue ckobu uu 26o3dem (Puc. 6) 9
11 TEXHnueCKNE DAHHbIE 10
12 LlYM 10
13 YNCTKA N OBCJNYKIBAHNE 10
14 XPAHEHNE 10
15 TAPAHTNA 11
16 OKPYXAIOLJAR CPEA 12
17 DEKJIAPAUJIO COOTBETCTBUN 12
ГВОЗДЕЗАБИВ"HО/СКОБОЗАБИВ"HО ПИСТОЛET 20 B (БE3 AKKUMЛЯTOPA) POWDP7010
1 OBJACTb IPIPIMEHEHnA
MaunHa nCnoJb3yeTcI dIy KpeJIeHnI dpeBecHbI, npOBOnOuHO cETKn, BOJIIOKa, INeHOK, KapToHa nTKaHeN K DepeBy nII NODobHbIM MaTePnaIam. DOnoJIHnTeJIbHbIe o6JaCTn npImeHnI He corlacobAHb! He npedHa3NaueHa dJI KOMMepueckoro nCNoJb3ObaHnI.

PNEyPEXDEHNE!ДЯ Baewe JnHOB 6e3OnaChocT NtcaTeNbHO O3HaKombTeCb C daHHbIM pyKOBoDCTBOM N obuMn yka3aHnMaN NO TexHnke 6e3OnaChocTn nepeD Tem, KaK npcTynMb K pa6Ote c MaunHo. Pnp nepeDaue 3TORO 3JeKtpnueckoro HnCTpyMeHTa Dnra NOpb3OBaHnA dpyrnm Jnucam 6o3aTeNbHO npnloXnTE daHHbIe nHCTpyKcUH.
2 ONICAHNE (PNC.A)
- RykoTka
- OxnaKaJaIoUne OTBepCTnA
- HaKoHeuHnK
- Mara3nH dIJI rBO3eN n cKo6
- NycboBbblKIOuOaTeIb
- ΦικcaTOp MaRa3nHa
- PernyTOp rIy6nHb3a6nBaHn
- Yka3aTeJIb ypoBn 3anOpHeHnMaRa3nHa
-
CBeToOnoHa nOcBcTeKa
-
KhoNka BkIIOueHnCBeToIDNOHOI NODCBETKn
- Akkymyntop (HE BXOДNT B KOMПЛЕКТ)
- KhoIIka IJIa ChIITNIA AKKyMylTOpa
- 3apAnHoe yctpoiCTBO (HE BXOДNT B KOMnJIeKT)
14.ИндikatopЗapяdaakymyIaTopa - KhoNka INDnKaTopa 3apya aKKymyTopa
3 CODEPXMOE YNAKOBKN
- YdaJIInTe BCE ynaKOBOHyIe MaTePnAbI.
- YdaJInte ocTaKn ynaKOBKn I TpaHcnpTnpOBOUHbIe KpeNJIeHnA (ecJIIN eCTb).
- Поверпе NonHOTу KOMNNEKta NOCTaBKn.
- Поберпе annapat, синоь кабь, wTeNCel b I BCE npHaIeXHocTn Ha npeMet NOBpeKdEHH np TpaHCnopTupOBke.
XpaHnTe yIaKOBOHyBle MaTePnaJIbI NO BO3MOxHOCTN Do IcTeueHnraHTnHOro Cpoka. Pocne 3Toro n36abBtEcB OT HIX, NcNoJIb3yR MeCTHyO CNCTeMy yTINn3aunn 6bITOBbIX OTXODOB.

I P E D Y N P E X K D E H N E! Y n a k o B O u h b l e M a t e p h a l b i - 3T O He n r p y u s k n! H e n03B O J A I T E d e T A M n r p a T b c nla c t N K O B b i M n n a k e T a M n! E c t b o n a c h o c t b yd u s h e n y!
1 3JIeKtpUyeckn
100 cko6 pa3mepom 20 MM
TBO3e3a6NBHO/CKo6o3a6NBHO INCTOJE
100 rbo3e pa3mepom 20 MM
1pykoBOdTO BO nO 3KcnnyatauN

Ecnn deTann OTCyTcByIoN Nn NOBpeKdHebl, o6paTntecb K CBOeMy dHnepy.
4 YCJIOBHBIE O6O3HAUHENIA
B daHHOM pyKOBOCTBe H/IN Ha cAMOM INHCTpyMeHTe NCNOb3yOTc CNeDyUOune CMBOJIbI:
HnB KOem cIyuae He nbItaTecb BCKpbIBaTb aKKMyJrTOpbl.
He xpaHnTe aKKMyJrTopbI B MeCTax, rde TempeaTypa MoKet npeBbIaTb 40 ^ C
3apjkaTe aKkymyIaTOpbl TOnbko npn TeMnepaTypax OkpykaIoUeN cpebl O T 4 ^ C do 40 ^ C
XpaHnTe Baunn akymyIaTOpb I cyxom npoxnaHOM mecTe (5^ - 20^) . HnkOrda He xpaHnTe aKKymyIaTOpb I pa3pJxehHom COCTOHN.
-
IINTN-NOHbIe akKMyJIaTOpbl lyUWe BCero peryJpHo pa3prKaTb n nepe3apKAtb (MnHmym 4 pa3a B roD). Ppi dIITeBHom xpaHeHn INTN-NOHOrO aKKMyJrToPa nDeaIbHO JBIIaTcE rO 3apdka do 40% MoUHocTn.
-
Ipn ytnn3aunn akkymyIATOPOB, pykoBDCTByITeCB IHCTpyKUIMN, npNBedeHHbIMN B pa3dene «3aunTa OkpykaOuSei cpebl|.
-
He BB3bBAIte KOpOTKne 3aMbIKAHn. EcIn Co3daeTc coEiINHeHne MeKdy NOIOXHTeJIbHOJ (+) n OTPuCaTeJIbHOJ (-) KJIeMMoH HAnpMyU INn Upe3 CnyaHbIK KOHTAKT C MetaJIINueCKIMN PpeDMETAMN, BO3HnKaET KOpOTKoe 3aMbIKAHne AKKyMylAToPA, n 6ByET NpOTeKaTb 60JIbWoN TOK, Bbl3BBAr BblJeLHeHne TepNa, KOTOPOE MOKeT PrNBecTI K pa3pbIBy KOpNyCA INn BO3RopaHnIO.
He harpeBaIte akKymJrTopbI. Ecnn akKymJrTopbI HarpBeBaIOrca Do TeMnepaTypbl Bblie 100 ^ C MoryT NOBpeINtbcra yNIOHTHeHna, INOJIpyIOUne cenapaTopbI n DpyrHe NOIMepHbIe KOMNOHEHTbl, Bbl3bIBaYTeUYKy 3JeKTPoJINaTa N/INn BHyTpEHHee KOPOTKoe 3aMbIKAHne, PpNBODAaee K BbldeJIeHNIO TEnPa C NocJeDyIOUm pa3pbIbOM NIN BO3rOpAHnEM. Kpome TORo, He 6pocaTe akKymJrTopbI B OROHb - MOKeT npOn3OHTN B3pbIB n/INn CInhHOe rOpEHne.
B 3KCTpeMaIbHbIX yCNOBnX MoKeT npOn3OHTyTeUka AKKymJrToPA. EcNn Bbl 3aMeNTe XIKoCTb Ha aKKymJrTOpe, cJeNaIte CneDyUoee:
-OctopokHO COPTPe JnDkoCTb C NOMOUsb BO BetoUN. 36eRanTe KOHTaKTa c KoxeJ.
-ПрконтakTe c kokeилга3amn,слdeуnte yka3aHnmaHnke:
HemeHnno npomOte BDOJ. HeItpaun3yJTE cna6o KncnToT, TaKo KaK JIMOHbI COK INN YKCyc.
V Ipn KOHTaKTe C rna3amn, npomOte B 60JbWOM KOnIueCTBe YNCTOIN BObl B TeueHne MInmym 10 mHyT. O6paTntecb K BpaCy.

Onachocb Bo3ropaHn! He donyckaIte KOPOTKOro 3ambikaHn KOHTaKTOB OTCoeDInHeHHoro aKKymJrTopa. He cXnraTe aKKymJrTOpbI.
7.2 3apnHbIe ycmpoUcmea
Hikorda He nbitaTecb 3apXaTb Henepe3apXaemble aKKyMyJrTOpbI.
- HemeJeHHO 3aMeHryTe DepeKThbIe UHypbl.
He noDBepraTte DeIcTBnIO BObl.
He BckpbBaIte 3apAHOe ycTpoIcTBO.
He ncbtbBaIte 3apdHoe yctpoCTBO.
3apraHoe yctpoNCTBO npedHa3HaeHO TOIbKO dIg NcIOJIb3OBAHNB IOMeueHIN.
POWDP7010 RU
8 3APЯДКA И YCTAHOBKA ИЛN CHЯТNE AKKUMYJITOPA
8.1 Hhukamopbi 3apdno ycmpoucmea (Puc. 1)
IopKJIIOHTe 3apJHoe yCTPOINCTBO K 3JeKTPnuecko pO3ETke:
TOpNT NOCTOARHHO 3eJIeHBIM CBETOM: rTOB K 3apJKe.
Muraet KpacbIM CBETOM:3aprka.
- TOpNT NOCTOARHNO 3eJIeHbIM CBETOM: 3apJxKeHO.
- TOpNT NOCTOARHNO 3eIeHbIM IN KpaCHbIM CBeTOM: aKKyMnyTAOP NIN 3apraIDHOE yCTPOIcTBONOBpeXdEhbl.

IpImeuaHHe: ecn aKkMyJrTO HeBO3MOxHO NOkNIOHTb JIA 3apAKn, OTCoeHNHTe ero n y6eINTeCb, YTO MOJeNb 6aTapeu COOTBeTCTByeT MoJeN 3apAHorO yCTpoiCTBa, KaN NOKa3aHO B Ta6JIue TexHnuecknx XapaKTePncTnK. He 3apJXAte aKkMyJrTOpbI dpyRnx MoJeNe HnN aKKMyJrTOpbI, KOTOpblc HeBO3MOxHO HaDeXHO 3aKpeINtB B 3apAHDom yCTpoiCTBe.
1.Периончесн поверяпсocToHHe 3apdHOrO yctpoiCTBa n aKKymyIaTopa npn noKIOUeHn.
2. OTKIIOUaIte 3apAIDHOe yCTPOINCTBO OT cETN IOTCOEINHnTe erO OT aKKyMylrTopa nocne OKOHuaHn 3apAik.
3.пердинрьбOBaHemakKуMnyTopaДaTe emY NOINHOCTbO OCTbITb.
4. XpaHnte 3aprIHOe yCtpoiCTBO u AKKMyJrTOp B NOMEuEHN, B HeIOCTyHOM dIaTei MeTe.

ПРИМЕЧАНЕ:Есп nocle npodoxнтьнг 3кплyaрази эльктуонстумета akумларTop сишkom сиьног Harpenc, под началом 3apdkn ДайTe emy octbITb Do KOMHaTHOH TeMnepaTpybl. 3TO no3BOHNT npodnTB cpoK cnyk6bl akkymlyaTOPOB.
8.2 Chmue /ycmaHOeKa aKKMyIamopa (Puc. 2)

IPEyPPEXJEHNE: PepeB BbIOJHHeHem IIO6bIX peryInpOBOK y6eIntecb, YTO MaunHa OTKnIOUeHa, NJI CHMnTe aKKymyIaTOp.
Bo3bMHTe HCTpyMeH T OODHy pyky, a AKKyMyJrTOp - B DpyryIO.
IyctaHOBKn: HaxMITE N BCTaBBte aKKMyJrTOp B aKKMyJrTOpHbI OtceK. Ipeed Haayanom pa6oTbI y6eDntecb, YTO 3aJeNka Ha 3aDHei cToPoHe aKKMyJrTopa BCTana Ha MecTO n aKKVMYJrTOp HAdEHXO 3aKpENHe.
-Дя сгета:ODHOBpeMeHHo HaxMITE 3aueKv aKKyMVJrTOpa N3BJIeKITe aKKyMVJrTOp.
8.3 INdukamopbi 3apra daakmynmaopa (Puc. 3)
Ha akkymyIaTOPHOM 6Ioke npedyCMOTpeHb INHdkaTOpbI 3apyaakkymyIaTOPa (14),
6IaOJapra KOTOpbIM MOxHO OueHHT bOCTaBwNcY yPOBeHb 3apra da AkkymyIaTOPa HaxaTNEM
KhONKn (15). Npeed nCNoJIb3OBAHNem 3JIeKTponHCTpyMeHTa, HXKaB KHONKy, Y6eINTEcb, YTO
3apra da AkkymyIaTOPa DOCTaTOUHO dJa HOpMaJIbHOJ paBOtbl.
YPOBeHb 3apra da AkkymyIaTOPa NOKa3bIBaeTcR TpeM CBToIOHDbIMN INHdkaTOPaMn.
FoprT 3CBToIODa: akkymyIaTOP noJIHOCTbIO 3apRAKeH.
FoprT DBa CBeToIODa: akkymyIaTOP 3apRAKeH Ha 60 %.
Foprt 1 CBToIOD: akkymyIaTOP noTu PA3pRAKeH.
9 CEOPKA

IpeynpeKdHne: 3TOT rBO3e-/cKO6O3a6NBHO nNCToNET HE IpeHa3NaueH dIy 3a6NbAHnRA rBO3deI nn cKO6 B 6eTOH, KaMeHHyU nJI KnpNHyO KlaDky nJl MeTAn.

IpeynpejdeHne: He BbICTePnBaIte, ecn rBO3n 6e3 uJnKu nN cKO6bl 3aCtprnn B 30He hakoHeuHaKa (3).
IpeynpejdeHne! Ipeed 3arpy3KoB yctpoiCTBO cko6/ro3Dee CHMnTe aKKymyIaTOp.
9.1 3a2py3ka cko6/ae03deu (Puc. 4)
Haxmnte KhoNky cNKcaTopa MaRa3nHa (a) c 06eNX CTOpOH n CHmnte MaRa3nH (b).
BCTaBbTe pRd cko6/ΓBO3eN (c) B CNOT (d) nO3aDn HakoHeuHnka.
AkkypaTHO NOMECTUte CKO6bl/ΓBO3nB CNOT B COOTBEcTBn C MapKInpOBkOe (e) Ha HakoHeuHKe.
BCTaBbTe mara3nH (b) o6paTHO b yctpoiCTBO. OH BcTaET Ha MeCTO co IeNtOM.

06paTHe BnMaHne Ha To, YTO oOIMa C rBO3dMn DOJXHa paCnoJaTaBcB 6JIu3n HxKHe yactn Mara3nHa. TBO3m MOryT 3acTpBeBaTb, ecIn oOIma C rBO3dMn pacNoIaraeTcB HENpaBnIbHom NIOJOKeHN.
10 3KcπIyATAU

Приимechанe: Кадыпа3, Когд Вbl npOn3BODHTe BbICTppeI rBO3de-/ cko6o3a6nBHBIM nHcToJeTOM, npeOxpaHnteJIbHbI ynpO (3) hyxHo Kpenko npnxMaTb K 3aRotOBKe.
10.1 PpeepumelbHbI eB6Op cunbl ydapa (Puc. 5)
IpeyctahOBKO peYJToppa rIy6Hb3abBaHn moKHO ppeBapTeNbHO Bb6paTb Tpe6yEmyo cnny ydapa. Tpe6yemaCnna ydapa 3aBcNT OT dNHBi cKOB nIu IBO3eN ot npouhOCTMaTePnAna. ONtImaIbHyo HAcTpOky Cnbl ydapa Bbl MoKeTe onpeJeHTb npOBepkOHa npakTke. PObepHnte pyky (f) no YacOBn CTpeJIke dJa YBeJIneHn Cnbl ydapa n npOTNB YacOBn CTpeJIKn dJa YMeHbSeHn Cnbl ydapa. HAcTpOka 1 COOTBeTCTByET MInHMaJIbHO NcNe ydapa, HAcTpOka 6 - MaKcIMaJIbHO n Cnne ydapa.
10.2 BbicmpenueaHue cko6ou uu 28o3dem (Puc. 6)
-Пижмte cko6o3a6nBHOI nCTOJET K 3aTOOBke TaK, YTO6bI HAKOHeHIK NICTOJIeTa HaxOuINcra TAm, Ie Bbl XOTIne paCNOLOXmTb cKO6y/RO3Db.ДЯ BBICTpENBaHnR cKO6o3a6NBHbIM NCTOJeTOM HAXMTE Ha NYCKOBo BBIKNHOaTeJIb.
- DonoJIHnTeJIbHOe DaBHeHne, npInOKeHHoe K nepeJHe yAcTn HcTpymEHTa, npeoTbpaTNT OTdauy uYBeJIuHT ycIIue, npNKJaIbIbAeMOe K rBO3dM nN cKobam. 3To OCObEHNO BaxHO dIra ObecNeueHn TOrO, YTO6bl rBO3db Nn cKOBaBnncb NOJIHOCTbU B TBepdyIO NobepxHOCTb.
POWDP7010 RU
YdaHTe Bce rBO3n/CKo6bI n3 MaRa3Ha NocJe KaXdOrO nCNoJIb3OBaHn.

Maunha npedHa3NaYeHa TOnbKO dIpa6Otbl B NOBTOpHOKpaTkoBpeMeHHOM pexnme n 6ydet HArpeBaTbcr npHEnpepbIBHomncNoIb3OBaHnn. B pe3yIbTaTe HarpeBa OTCnxNBAeMoe ycInneymHeBaetc. Io3ToMy yepe3 15 MmHyT (MaKcnMym) HenpepbIBHO pa6Otbl daTe MaunHe OCTbITb.
B BaWem cKo6o3a6NBHOM NcTOJTe NMeeTc KOnTaKTHbI BbIKIOuAteJIb. KOHTaKTHbI BBIKIOUaTeJIb No3BOJraT 3aNyCKaTb cKo6o3a6NBHO INCTOJE TOJbKO npi KOHTaKTe C NOBepXHOCTbIO MaTePnJa.
11 TEXHnueCKNE DAHHbIE
| HominaNbHoe NaPRAJKeHne | 20 B |
| UcaTota yIapOB | 30 yd./ mN H |
| Pa3Mep cKo6bI/ΓB03ДЯ | 15 - 25 MM / 15 - 32 MM |
| Tin ДВигател: | ШeToчнь |
12 LYM
3HaueHn ypoBnIyMa, n3MepeHHbIe COJIaCHO COOTBeTCTByIOUcEmy CTAnapTy (K=3)
YPOBHeB 3ByKOBOrO daBJeHnR LpA 75 dE(A)
YpOBeHb 3ByKOBmOuHocTn LwA 86 dE(A)

BHIMAHNE! HadeBaTe cpeCTBa 3aunTbI opraHOB cnyxa, ecn 3BykoBoe daBneHne npebbiwaet 85 d5 (A).
aw (Bn6paun)
3,6 M/c²
K=1,5M/c²
13 UNCTKA N OBCJYKINBAHNE
CTaHOK He Tpe6yeT CneuNaIbHoro 06cnyKBaHHa.
-Дябз�анHиэфсжгнвHо pa6ObI cNeIte 3a YnCTOTOn WnФMaHnHbI NBEHTINRAUHOHBIX OTBepCTN.
Bcerda BbIKnOauTe INHCTpymeHT N BbIHMaIte WTeNCEJIb I3 po3eTKI nepeI npoBeHeHem IIO6bIX pa60T Ha INHCTpymeHTe.
14 XPAHEHNE
TtataeBHO Ounchnte Becb cTaHOK I erO ochactky.
XpaHnTe ee BHe IOCTyNa IJRA DeTeR,ByCTOuYNBOM 6e3OJaCHOM NOJIOKeHN, B npoxnaHOM n Cyxom MeCTe, H36eraTc CnNtKOM BbICOKNX n CnNtKOM Hn3Knx TEMnepaTyp.
3aunuane ero ot BO3dienCTBnI npMbx COHHehIx Lyuee. XpaHnte ero B TEMHO, ECNI BO3MOXHO.
He xpaHnte ero B noJIn3TnEHObBix MeWKax BO n36exKaHne HAKONJIeHn BJaXKHOCTN.
POWDP7010 RU
15 TAPAHTIN
B COOTBeTCTBmC 3aKHOdaTeJIbHbIMn Tpe6oBaHnmaM, daHHbI npOdyKT ObecneuBaetcra rapaHTneHa cpoK 36 MecaeB, nCycnAeMbI C DaTbI npNo6peTeHnI nepBBIM NOKyNaTeJem.
JaHHa rapaHTnpaCnpocTpaHraeTcHa Bce DeΦeKbI MaTePnaIOB I npO3BOoCTBa, Ho OHa He BKIOuAeT DeΦeKThbIe DetAn, NOBBePraEMbIe eCTeCTBeHHOMy N3HOcy, TaKne Ka K IOUHNIKN, UeTKN, KaBEN N WTeNCelbHbIe BNKN, INN PpHADNeXHOCTN, TaKne Ka CBePNa, TOLOBKn CBepN, NIIbHbIe NIOToHa N T. D.; NOBpeXJeHNA INN DeΦeKtbl, BO3HnKaIOUe BCNEcTBVe HeHaNDJekaUero ObaPaSeHNA, HecuaCTHbIX CnyaEB INN BHeCEHNA N3MeHEN B KOHCTpyKcUHO, a TAKKe HE BKIOuAeT TpaHCnOpTbIe paCXOdbI.
- IOBpeKdEHHn n/nnn DeΦeKtbl, Bo3HnKaIOuIne BCJIeCDTBne HEnpaBnIbHOJ 3KcNpyaTcuIN, TAKKe He NOpnaIaIOT NOI rapaHTnHbIe O6ra3aTeIbCTBa.
MbI TAKKe OTKa3bIBaEMcR OT BCEx 68a3aTeJIbCTB B OTHoWeHn JIO6bIX TeNEChbIX NOBpeKJdeHn, BO3HnKaHOUx BCJeDCTBHe HEnpaBUNbHOh 3KcNJIyatauH INHCTpyMeHTa.
- PemOH T MoKET BbINONHrTbcra TOIbKO B aBTOpN3ObaHHOM cHTpe 06cJyXnBaHn NOKyNaTeNe INCTpyMeHTOB Powerplus.
IOnoHnTeJIbHyIO INHΦopMaUIO Bbl BceIa MoKeTe NOJyHTb NO TeNeΦOHy 00 32 3 292 92 90.
Bce TpaHcnopTHbIe pacxOdbI nokpbBaHTcra nokyNaTeNm,ecn He corlacobaHO uHOE B nucbMeHHo fOpme.
BmecTe C TeM, He MoXeT 6bITb IpeIbYBHeHO HnKaOu IpTeH3n No rapaHTn, ecnn NOBpeXdEHe yCTpOcTBa YBnETCa pe3yJIbTaTOM He6peXHOro 06CnyXnBaHnN nn neperpy3Kn.
- OnpeJeHNO NCKJIOUaETcra 13 rapaHTn NOBpeXdEHNBE BCNECTBne IPOHKnHOBeHn JxNkOCTn, CNbHOrO 3aNbIeHnry, PpeHaMepeHHoro NOBpeXdEHNRA (HapOCHNo IIN No rpy6oH He6peXhOCTn), HenaDJIeXaUero NCNOJb3OBAHnRA (NCNOJb3OBAHnDAIeJe, DJIa KOTOpbIX yCTpoiCTBO He PpeDHa3HaueHO), HEKOMTeENTHO NCNOJb3OBAHnRA (HaNP., PpeHe6peXeHnRA INCTpyKzmaMn, PpNBEdEHbIMN B pyKOBoDCTBe), c6OpKN HeCNEuaJIInCTOM, Ydapa MoHnN, IODKJIIOUeHnRA K CETN C HECOOTBETCTBYIOUM HAmpKeHnEM. DaHbI cnCOK He RaJIaERTCr NcYePbIBaIOUm.
IpnHrTne npTeH3n no rapaHTn He yBnETCs OCHOBaHNEM nI npOJIeHnraPapHTnHO repnoDa nn Ha3NaueHnHOBOrO rapaHTnHOro nepNoDa B cnUyae 3aMeHbY VCTPOINCTBa.
YcTPOIcTBa IIN DeTaII, 3aMeHeHHbIe No rapaHTnN, OCTaIOTc Co6CTBeHHOCTbIO KOMNaHNN VArO NV.
Mb coxpaHЯem 3a co6o npaBO OTka3aTb B yOOBnetBopeHn IpTeH3n BO BCex CnyaJX, KOrJa He MoKet 6bITb NODTBepKdEh fakT NOKyPkN, INI KOrJa OYeBuIDHO, YTO 3a H3deJIHem He npoIN3BOUNcra HaIIeKaUH yXoD. (OuNCTka BEHTnJIauNoHHbIX OTBepCTn, peryIrpHoe ObcIyKInBaHne yroJIbHbIX UeTOK n T. n.).
Дя поТьержденя ДаТы NOKУКИ СLEDEYET XpaHHTb Yek.
Bahe yctpoictBO cneDyeT Bo3BpaaTaB nocTaBnky B Hepa3o6paHHom Bnde, B npHemMeO uHCTOM COCTOHN, (BOpHnHaJIbHOI nPoTHBOyApHOY naKOBKe, ecN TaKOBa YMeJAcb), pINIOXINB DOKVMeHT O NOKVNke.
IJa o6ecneueHn ONTMmaJIbHOJ pa6OTbI 3TOrO INHCTpyMeHTa erO Heo6xoDmO 3apKaTb MHNMyM 1 pa3 B MeCra.
16 OKPYXKAIOUCAPEDA
EcnB Bau nHCTpymeT Tpe6yET 3aMeHbI NocJIe dINTeHbHO rCNOJb3OBaHH, He Bbl6paCbBaIte erO BmecTe C DomaunHM MycOpOM, a NCIOJIb3yIte 3KoJIoRnueckn 6e30nachbI cnOCo6 Ira erO ytnn3aun.
C OTXoAMN 3NEKTPnuecknx npnbopOB HeNb3r NOCTynaTb, KAc C O6bIHyBMN 6blTOBbIMN OTXoAMN. I03a6oTbTeCb 6bYtIN3aun TAm, rDe dIy 3TOrO eCTb COOTBeTcTByUHne yCTaHOBKn. IpOKOHcyIbTnpuYTEcb y MeCThIx OPraHOB Bnactn INy npoDaBua O BO3MOxHOCTHyTIN3aUnn.
17ДЕКЛAPALUNO COOTBETCTBIM

varo
VARO - Vic. Van Rompuy N.V. - Joseph Van Instraat 9 - BE2500 Lier - BEJbIy, HACTOIM 3aABJrE, yTO,
IpoDyKT: TBO3e3a6NBHOn/Cko6o3a6NBHO INCTOJET 20 B-c nHTaHHeM OT aKKMyJIrTopa
Mapka: PowerPlus
MoeIb:POWDP7010
COOTBETCTByET OCHOHBHIM Tpe6OBaHNM INHbIM COOTBeTCTBYIOUIM NOJIOKeHNMA
IeNCTByOuix Ebponecknx DnpeKTNB, OCHOBaHHbx Ha Ebponecknx rapMOH3npoBaHHbx
CTaHdaptax. IIO6a HecaHKUHOHPOBaHHa nepeJeIka annapata DeJaet daHnyo
DeKnapaunu HeDenCTBNTbHoH.
Ebponeckne nipeKTHBbI (BkIIOUa, ecn npimeHmO, nx nonpaBKn Do daTbI noDnncnA:
2011/65/EU
2006/42/EC
2014/30/EU
Ebponeckne rapMOHn3npOBaHHbIe cTaHdapTbI (BKnIOUay, ecN npIMeHMo, nx nonpaBkn do DaTbI nOnnncAHNA):
EN60745-1:2009
EN60745-2-16:2010
EN55014-1:2017
EN55014-2:2015
Держател Тхнческо Дokум entaци: Флпь Ванkepxов (Philippe Vankerkhove), VARO -Vic.Van Rompuy N.V.
HnKeNoDnncabwnc daeCTbyeT OT nMeHN IcnoJIHnteJbHoro dIpeKTopa KOMnaHIn,
Mertens Ludo
Ludo Mertens
MeheJKepeTnKauu
17/09/2020,Lier-Belbna
POWDP7010 BG
1 IPEdHA3HauEHNHe HA EJEKTPOHCHTPyMeHTA. 3
2 ONICAHNE (ΦNΓ. A) 3
3 CnncbK HA CbIbPxAHNETO HA ONAKOBKATA 3
4 CnMBOJIH 4
5OBuIN PEPdUYPeKJDEHn3A B63OpACHOCT INI 3IOJ3BAHE HA MEXAHN3UPAHN IHCTPymEHTN
5.1 Pa6omHa 3oHa 4
5.2 EneKmpuuecka 6e3onacHocm.. 4
5.3IuHa 6e3oJacHocm 5
5.4 3no3eaHe u apuxu 3a Mexau3upaHua UhcmpymeHm.. 5
5.5 Cepu3Ho o6cnykeaHe 6
6 CNEUJIH NHCHTPYKUN 3A BE3ONACHOCT 3AEJEKTPNueCKN INCTOJET 3A INPOHN I TEJBOI.
7ДОПьЛНITEЛНИНСТРУКЦИ 3AБE3ОПАСHОCT3A AKUMYЛATOPHINБATEPиN3APДHNYCTPOICTBA...6
7.1 Bamepuu 6
7.2 3apnHu ycmpoUcmea .7
8 3APEXDAHE, NOCTABRHE N CBAJARE HA AKYMYLATOPHATA BATEPNA
8.1 Hdukau npu 3apejdahe (Pua.1)
8.2 NocmaeHe / c6aJIHe Ha akymyamopHama 6amepu (Fua. 2)
8.3 Hdukamop Ha 3apexdaHemo (Fua. 3) 8
9 CΓIO6BAHE 8
9.1 3apekdahe Ha ckobu/nupohu (Ua.4) 8
10 PA5OTA. 9
10.1 Ipepeapumenu u36op Ha ydaphama cuna (Uz. 2) 9
10.2 3a6uehe Ha cko6a unu npoh (Fua. 4) 9
11 TEXHnueCKXAPAKTEPNCNU 9
12 10
13 IOUHCTBAHE IIOIDPRbXKA. 10
14 CbXPAHEHNE 10
15 TAPAHU 11
16 OKoJIHACPEDA 12
17 DEKJIAPAUJRA 3A CbOTBETCTBNE 12
ПИСТОЛET 3A ПИРОНи I TEЛБOD 20В (БЕЗ BATEРЯ) POWDP7010
1 ПЕДHA3HAUHNE HA ELEKTPOHCTPUMEHTA
Инстументыт се Изпольа 3a 3akpenbahe Ha дьрBO, Мраха, Филц, Филм, KapToH и пат Кьм ДьрBO Или пообни матерпал. Тон He e Odoбрен 3a Изпольаhe 3a дугп сени.Нендхаяш 3a npoфесноанна уnotpe6a.

IpeynpexdHne! Ipei Da n3no3BaTe HNCTpyMeHTA, npOteTe BHNMaTeJIHO TOBa pBkoBOcTBo N O6uHTe HNCTpyKcUN 3a 6e3OnaCHocT, 3apaN BaWata Co6CTBeHa cHrypHocT. Baunr eNeKtpONHCTpyMeHT Tp8bBa Da ce IpeDaBa Ha dpyr Camo 3aeDnO C HactOaUNTe HNCTpyKcUN.
2 ONICAHNE (ФИг.А)
- PbkoXBaTka
- OTBOPn 3a oxJaKaDaHe
- HακραHηκ
- Marga3nH 3a nipoHn Tef6oD
- Cnycbk
- JIoCT 3a MaRa3nHa
- PerynatoPHaIbIbOuHnHaTa
- INHdkaTOp 3a HNBOTo Ha Mara3nHa
- LED pa6oTHa CBETJINHa
-
ByToH 3a LED pa6oTHa CBeTInHa
-
AkymynaTopeH 6JIOK (HE E BKJIIOUYEHO)
- ByToH 3a ocB6oKdBaHe Ha aKymyataOpHna 6nok
- 3apraHNO yctpoiCTBO (HE E BKJIIOUYEHO)
14.Индikatop Ha 3apyaHa akymynatophata 6atepna - ByToH Ha HnDnKaTopa Ha 3apJaHa aKymyIaTopHaTa 6aTepeRia
3 CπисьК HA CьдьРжAHNETO HA ONAKOBKATA
- OTctpaHete BCnKoOnakOBbHyMaTePnaJI.
OTCTpaHete octHaHnTE onaKOBbUHN bPemeHHn oCtABKN (aKO nMa TaKnBa).
PpOBepeTe DaII NaKeTbT CbIbpxa BCNUK KOMNoHEHTN.
IpoBepTe daHn ypeBt, 3axpaHbAunrKa6eJ, uencenT n akcecoapnte He ca 6nn noBpeDeHn npn TpaHcnOpTnpaHe. - Ia3eTe onakOBbUHIne MaTePnAnNoTn Do KpaHa rapaHcNooHHnepnoD.CneTobu n3XbPnTe BnyHKT 3a Cb6pAhe Ha OTnaDbu.

BHIMAHHE! OnakobvHnTe MaTePnaHn He ca nrpauKn! He no3BoJbAte Ha deca da npraT c HainloHOBn Top6uKn! Puck ot 3aDywaBaHe!
16poi nncToIeT 3a npOnn TeIbOd
1006poa cko6n 16 MM
16poHapbUHnKHa nOtpe6nteJia
1006poI npOHI 25 MM

B cnya, Ye hKoN qactn IInCBat nIe ca nobpeHn, CBbpxTe ce C MeCTHnI dIcTpN6yTop.
4 CUMBOJIH
B HacToaHnHaPbUHNK n/nnn Bbpxy MaunHaTa ca n3NoJ3BaHn CJIeDnTe CmBOJN:
BeIexka: ako akymyNaTopHaTa 6aTepeH He Jra Do6pe B rHe3doTo Ha 3apAHOTo yCTpoiCTBO, n3BaTee R npOBepTe B Ta6nuaTcBc CneuΦnKaUH, daH ToBa e npABnHm MoeJ 3a ToBa 3apAHO yCTpoiCTBO. He 3apeXdaTe DpyrN akymyNaTopHn 6aTeepHn nn AkymyNaTopHn 6aTePn, KOHTo He OTRObApT Ha 3apAHOTo yCTpoiCTBO.
- PpOBepBaIe YecTo BkJIIOueHOTo 3apJdHOTo yCTpoiCTBO n akymylaTOpHaTata 6aTepeia.
- Cnei npiknouBaHe Ha 3apeKdaHTo n3BaTe 3apdHOTO yCTPOINCTBO OT KOHTaKaTaNakymyIaTophata 6atepna OT 3apdHOTO yCTPOINCTBO.
- Octabete akymylatophata 6aTePnna n3CTnHe, npedn da na n3noJ3BaTe.
POWDP7010 BG
- CbXpaHbAaTe 3apdHOTO yCTpOcTBO n akymyIaTOPHaTa 6aTePnB 3aTBOpEHO NOMEeHHe n N3BbN o6cera Ha deca.

БЕLEЖKA: Ако akумлалopна та 6ateря ce 3arpee npи порьлжntелна paбота с Инструмента, OCTaBeTeЯда n3ctnHe do CTaHa Temnepatура,праздя в BKIOUHTe 3a 3apeжdahe. ToBa Удьлжи кИВOTa Ha akумлалopнatura 6ateря.
8.2 NocmaaHe / caaHne Ha akymy lamophama 6amepu (Fue. 2)

IPEyPEXEHN: Ipei Da npaBte perynpoBc ce ybepe, ye HnCTpyMeHTbTe n3KnOueH nn CBaNeTe akymylaTophata 6aTeprna.
XbaHete HCTPVMeHTa C eHaTa PbKa n aKymyNaTOPHaTa 6aTePnC dpyrata.
IocTabaHe Ha akymlyaTopHaTa 6aTePn: HATncHete N Pb3HeTe akymyIaTopHaTa 6aTePnB CnTo Ha yCTpoiCTBOTo, YBepeTe ce, Ye OTKnIOuBaUaTa PnactInHa OT 3aHaTa cTpaHa Ha 6aTePnTa UpaKba Ha MAcTo Ha akymyaIaTopHaTa 6aTePnE e cnrypHo 3akpeNa HPeDn 3aNoVbHe Ha pa6ota.
- 3BaXdaHe Ha akymyIaTOPHaTa 6aTepeRJa: EJHOBpeMeHHO HaTnCHete OTKIOUbaaata PJIaCTnHa N 3DbpaNaTe akymyIaTOPHaTa 6aTepeRJa.
8.3 Ndukamop Ha 3apekdaHemo (Fua. 3)
AkymyaTopHaTa 6aTePnI Ma HndkaTOpn Ha 3apeXdaHeTo (14) - MoKe da npOBepnte CbCToHneTo N, KaTO hATncHete 6yToHa (15). PpeN Da n3noJ3BaTe nHcTpymEHTa, MOnI, HAtncHete 6yToHa, 3a Da npOBepNTe daJIu akMyaTopHaTa 6aTePnI e DoCTaTbUHO 3apeDeHa 3a HopMaIIHa pa6ota.
Tpnte cBeToNDIOda noka3BaT HnBTo Ha 3apeKdaHe Ha akymyNaTopHata 6aTepe:
CBeTATPte CBeToDnOda: AkymyNatopHaTa 6aTepeH e HantbIHO 3apeDeHa.
CBETT DBA CBEToDIOa: AkymyIaTOPHaTa 6aTePnE e 3apeDeHa Ha 60%.
CBeTN eINH cBeToDIOI: AkymyNaTophata 6aTepye nOuTn pa3peDeHa.
9 CΓΠΟΥBAHΕ

IpeynpexdeHne: To3n nncToJET 3a npOnn/TeN6oD HE e noDxOJaU 3a 3a6nBaHe Ha npOnn nn TcN6oD B 6eToH, 3ndapn, Tyxnn nn Metan.

IpeynpeKdHHe: He 3a6nBaTe, aKO napKeTHn npoHn nn cko6n ca 3aceHaJI B ceKcIra Ta Ha HApKaHnka (3).

IpeynpejdeHne!N3BaTe akyMylatopHaTa 6aTePnOyCTPONCBOTO, npEn da ro 3apeDnte cbc cko6n/nnpOnn
9.1 3apekdahe Ha ckO6u/nupohu (Fue.4)
HaTnCHTe nIaCTnHata 3a OcBO6OxJaBAHe Ha MaRa3nHa (a) OT DBeTe CTPaHn H3IbPnAte MaRa3nHa (b) HABbH.
BmbkHeTe eHn pei cKo6n/npOnn (c) B npope3a (d) 3aHaKaPaHnka.
BHHMaTeHNO NoCTaBeTe CkO6n/InpoHN B npope3a CbIacHO MapKIpOBKaTa (e) Bbpxy HAppaHnka.
- 136yTaIe MaRa3nHa (b) Ha3aB yCTpOJCTBOTo. Toi ce fHKcnpa Ha MRCTO.
POWDP7010 BG

ObpheTe BnMaHne, ye JeHTnte OT NpOHn Tp6Ba Da ce NoCTaBrt NbTHO Do DbHoto Ha Mara3Ha. NpOHnTe Morat Da 3aceDnat, aKO JeHTata C NpOHn e NoctabeHa B rpeuHa No3uJia.
10 PABOTA

3a6eJekka: Bcekn nT, kOrato 3a6nBaTe c HnctpyMeHa 3a npOnn/TeIbOd, npEdna3ntelr (3) Tp86Ba da 6bDe npNTuChat NtBTHo KbM DeaJa.
10.1 Ppebapumenu u36op Ha ydaphama cuna (Fue. 2)
C npedBapntHaTn HAcToKa Ha KOJIeIOTo Ha peryIaTopa Ha nbIbOCHHaTa e Bb3MOxHe npedBapnteHn36Op Ha ydapHaTa cnla. Heo6xoDImata ydapHa cnla 3aBcNOT dJbIXHHaTa Ha cKobTe nII NIpOHte n OT kocCTTa Ha MaTePnAJa. ONTIMAnHaTn HAcToKa Ha ydapHaTa cnla MoKe Da 6bJe onpeDeJeHa Ype3 npakTtuecko TectBaHe. 3aBbPtTe 6byToHa No YacOBHKnOBaTa CTpeJIka 3a YBeJInuBaHe Ha ydapHaTa cnla N ObpaTHo Ha YacOBHKnOBaTa CTpeJIka 3a HamaJIbaHe Ha ydapHaTa cnla. HAcToKa 1 e Na-MAkata cnla, a HAcToKa 6 e Na-ronMaTa cnla.
10.2 3a6ueaHe Ha ckO6a UJU npoH (Fua.4)
- NocTabete INCTOJeta KbM DeTaN, Taka Ye HApauHKnBt Ha NCTOJeta Da e TaM, KbdeTo NCKaTe Da ce Hamupa Cko6ata/NipoHbT.
3a da 3aeneCTBaTe nctOneta,HaTncheTe cnycbka. - DOnbHnTeHeH HATNCK npINoxKeH KbM npEdHaTa YAcT Ha IHCTpyMeHTa ige npedOTbpaTH OTkata n ue yBeJIuH cInIa TnpINarHa Bbpx NpOHNTE nn CKObTe. ToBa e ocobeno BaxHo 3a rapaHTnpaH He Ha TOBa, Ye NpOHBt IIN CKObTa ce 3aDnBxKBaT NO ueJna Cn PbT BbpXy TBbpda NOBbpXHOCT.
OTcTaHbAite BCnUKNnpoOnn/CKo6n OT Mara3Ha cneB C8ka ynoTpe6a.

MaunHata e npoeKTHpHa 3a pa6oTa c npekcbAHn n ige 3arpee npn HnpekcbHata ynotpe6a. Cnata Ha npntncKaHe HamaJIbBa B pe3yIITat OT nperpRABaHTo, nopadn Koeto octabTne MaunHata da ce oxJaDi Cnei (MaKc.) 15 mnHytn HnpekcbHata pa6oTa.
BbBaunnncToJET 3a nnpOnn TcN6oMa KOHTaKTeH PpeBKnUoyBaTeJ. KOHTaKTHnT npeBKnIOuYBaTeI N03BOJRA Ba CTApTnpAHe Ha NtCTOJeTa cMo npN KOHTaKT C NOBapXHOCTTA Ha MaTePnAna.
11 TEXHnueCKN XAPAKTEPnCTnKN
HnBO Ha 3ByKOBoTo HanaRe He LpA 75 d6(A)
HnBO Ha 3BykoBaTa MoUHOCT LwA 86 dE(A)

BHIMAHHE! HocTe INHINBnDyalnn npedna3n cpeCTBa 3a cnlya (aHTnfoHN), ako 3ByKObTo HaJraHe npebuN 85 d6(A).
aw (Bn6paun)
3.6 M/c² K = 1.5 M/c²
13 NOUICTBAHE I NOIDPbJKA
MaunHata He n3nckBa cneuaHa noDpBxka.
3a da pa6oTnTe 6e3oNaCHO n eΦeKTHBHO, BnHaN NOdIbPkaTe YnCTn MaHnHaTa N BEHTNJlauNoHHnTe OTBOpN.
IpeNn da n3BbPWBate KaKBOTOn Da e onepaun, n3KnHouTe en. Ka6eJ OT MpeKaTa.
14 CbXPAHEHNE
Nouchte HantbHIO ypea N BCNUKHTe My DonbHHTeHNu actn.
CbxaHraBaTe Ha HeoCTbHn 3a Deca MeCTa B Cta6uHIO H6e3OnaCHO NOJoxHe,Ha CTyJeHO n cyxo MRCTo, KATO N368RaBte CbXpaHeHneTO pN INpeKaJIeHO BNCOKn IIN HnCKn TEMnepaTpyn.
3aunTe ypeo aT doctbna Ha npka cHueBa CBETnHa. CbxpaHraBte Ro Ha TBMHO, aKO e B3MOxHO.
He cxbxpaHbAaTe ypeBa B nonneTnIeHOBn PnIKOBe, 3a da ce n36erHe OBnaXHbAhe.
POWDP7010 BG
15 TAPAHÇΥ
B cboTBeTcBnE cb3aKOHOBnTe pa3nope6n To3n npOyKT nMa rapaHnOHeH cpoK 36 Meceua, KOITo Bnna B Cnla OT daTata Ha NOKynka Ha nbpBnra Notpe6nten.
Ta3n rapaHnI NOKPbBA BCNUKn DepeKTn Ha MaTePnAIn N Ipon3BOJCTBeHN DepeKTn, HO He BKNIOyBa: 6aTePN, 3apADn YcTPOINCTBa, DepeKTn YacTN BCNECDTBne Ha HopMaJIHO n3HOCBaHe n N3TPBbAHe KaTo NaRePN, YeTK, Ka6eNn UcenCeNn INN akcecoApN KATO CBPeDn, HkPaHnCn 3a IpoNBHN IHCTpyMeHTn, PexEeN dNCKOB e T.H., NOBpeN I DepeKTn Ipn3TNaAsn OT HenpaBnHa ynoTpe6a, 3IonoJyKn INN HApRaBeHn IIpOMeHn, HTO TpaHCNOPTHIne pa3XoN.
-Поврд n/nnДeфektn npo3TuHaaun OT He npabuHNo ynoTpe6a He ce 0xbauat OT Te3n rapaHcHOnHH ycNoBn.
Ocbe ToBa He Hocm HnKaKbA OTROBOpHcT 3a TeNEChn HapaHbAHn Ipon3TuHaUN OT HnpabuHnHaTa yNtpe6a Ha IHCTpyMeHTa.
PemOHn Morat da 6bDat N3BpWbaHc mo OT yNbHOMOeH nOTpe6ntckn cepBN3EH cHTbp 3a eNEKTPoHnCTpyMeHTn.
Moxete da noJyute DonbHnTeHa HOpMaun Ha Homep 00 32 3 292 92 90.
BcnuKn TpaHcnpTH npa3xoOni ige 6bDat noeTn OT nOte6nten, OCBEN Ako nncMeHo He e dorobopeHO dpyro.
B cbto Bpeme, He Morat da ce npedraBaT npTeHcNn no rapaHcnaTa, aKo nobpeDaTa Ha ypeDa e BCneDCTBHe OT nphe6perBaHe Ha TexHueckoto o6cnykBaHe nI npetOBapBaHe.
- Ot rapaHnraTa KaTeOpuHo Ce n3KnUOvBa NOBpeJa, KOrTO e B pe3yIITaT OT npOHKBaHe Ha TeuHOCT, MHOro npax, NpeHaMepeHa NobpeDa (ymNJNeHa nn Iopadn TotAnHO 6e3prKne), HeNoDxOJaIo No3NoJ3BaHe (n3NoJ3BaHe 3a ZeEN, 3a KOnTO ypeDbT He e NODXODA), HEKOMNETeHTHO n3NOJ3BaHe (HaNP. Hecna3BaHe Ha IHCTpyKUnTE B pBkoBOdCTBOTO), HEKOMNETeHTeMH MoTAtk, rpbMOTeBuYeH yAp, HeppaBnHb HO HanpeKeHne. To3n cnncbk He e n3uepNaTeJeH.
- IpiNeMaHTo Ha rapaHcNoHHn npeTeHcHn HNKora He MoKe Da DoBcE Do yDbJXKaBaHe Ha rapaHcNoHHn cPoK, Hnto Do 3aNoUbaHe Ha HOB rapaHcNoHc HcPOK B CnyaH Ha 3amHa Ha yCTpoiCTBO.
- UcTpoICTBaTa nJIn DeTaNJIte, KOnTO ca 3aMeHeH cBo6pa3HO rapaHcIOHHnte ycNoBnA, CJIeIOBaTeJIHo OCTaBAt CO6CTBeHOCT Ha Varo NV.
Hne cn 3ana3BaMe npaBTo Da OTXBpJIM BCRA KpTeHcIg, B Cnyuaye NOKyNkata He MoKe Da 6bJe npOBepHa IIN, KOrato E aCHO, Ye npOdyKTbT He e NODbpxaHn pabUNHO. (NouchTaBe Ha BeHTnlaucnoHHte OTBOp, peoBHa NOdRpXka Ha KapboHOBNTe YETKN,...)
CbxpaHbAaTe fakTypaTa 3a NOKyPkata KaTO DOKa3aTeNCTBO 3a DaTATA, Ha KOrTo e HappabeHa T.
Tp6Ba Da BbPHeTe HeDcMoHTnpaHn HNCTpyMeH Na npOdaBau B nPneMJIbO YnCTo CbCTOHNHe, BOpHnHaHTo My JIto Kyapue, aKO yCTPOINCTBOTo IMa TAKOBa, PnDpyKaBaHO OT DOKa3aTeJCTBOTo 3a NOKyPkata.
BaunrHnCTpyMeHT Tp6Ba Da 6bJe 3apeKdHaH MaNko 1x MeceHo, 3a da ce Ocnrypn ONTmAlHaTa pa6ToHa To3n HnCTpyMeHT.
16 OKOJIHA CPEDA
3a cnyuante kORATO MaunHaTa ce HxJae OT CmHa Ha qactn Cnei npOdbJnxTeJIHa ynotpe6a, cbnte da He ce n3XbPnT B KoΦnte 3a 6ntOBn OTnaDbu, a da ce n3XBpIant no ekONOrNuHO cbo6pa3eH hauH.
EneKtpoTeXnueckTe npOdykTu 3a 6paKa Da He ce n3xBbPJIaT 3aeDHO B KoΦnTe 3a DoMaKnHcN OTnaDbu. CbInte Da ce peuNKnIpaT, aKO Ima cbOpBXeHn 3a ToBa. 3a NobeYe NoDpo6HoCTn No npenopbkNTe 3a peuKnIpaHe da Ce HappBn 3aINTBaHcNo MeCTHIne Bnactn NII do.
17ДЕКЛAPALUNA 3ACbOTBETCTBNE


VARO - Vic. Van Rompuy N.V. - Joseph Van Instraat 9 - BE2500 Lier - Bellenia deklapnpaT, ye
PpOdyKT: NcToJET3aNipOnHnTeJ6oD20B-pa6oteuC6aTepey
Mapka: PowerPlus
Moden:POWDP7010
e B cboTBeTcBHe C OCHOBHInTe N3NCKBaHnry I DpyrN CbOTBeTHn pa3Nope6n Ha npNIOXIMnTe Ebponeckn DnpeKtNB, 6a3npaHn Bbpx y npNlaHaTe Ho Ebponeckn Te xapMOHNpaHn CTaHdaptn. Bcya HeynbHNOMoUeHa MoNpKauny Ha anapaTa anynpa Ta3n DeKnapaun.
Ebponeckn DnpekTbN (BKnHouHTeHNO TexHNTe npomeH NkM daTaTa Ha nOndncBaHe, aKO ca npnoxmm):
2011/65/EU
2006/42/EC
2014/30/EU
Ebponeckx xapMOHN3npaHn CTaHapTN (BKNIOHTeHNO TexHNTe npOMEH N KbM daTata HnOINCBaHe, aKO ca npINOJXIMN):
EN60745-1:2009
EN60745-2-16:2010
EN55014-1:2017
EN55014-2:2015
CbXpaHnteHaTexHnueckaTaDokyMeHTaun:ΦuInn BaHkepKxOB,VARO-Vic.Van Rompuy N.V.
DonyoIINCAHnT DeiCTBa OT IMeTo Ha N3nbJIHnTeJIHnI DupeKTop Ha KOMnaHnTa,
MertarsLdo
Ludo Mertens
Certification Manager
17/09/2020, Lier - Belgium


- BESCHRIJVING (FIG. A)
- POWDP7010 EN
- NAIL/STAPLE GUN 20 V (NO ACCU) POWDP7010
- APPLICATION
- DESCRIPTION (FIG. A)
- PACKAGE CONTENT LIST
- SYMBOLS
- GENERAL POWER TOOL SAFETY WARNINGS
- Working area
- Electrical safety
- Personal safety
- Power tool use and care
- Service
- SPECIAL SAFETY INSTRUCTIONS FOR STAPLERS
- ADDITIONAL SAFETY INSTRUCTIONS FOR BATTERIES AND CHARGERS
- Batteries
- Chargers
- CHARGING AND INSERTION OR REMOVAL OF BATTERY
- Charger indications (Fig. 1)
- Removal / insertion of battery (Fig. 2)
- Battery capacity indicator (Fig. 3)
- ASSEMBLY
- Loading staples/nails (Fig. 4)
- OPERATION
- Hammer force preselection (Fig. 5)
- Firing a staple or nail (Fig. 6)
- TECHNICAL DATA
- NOISE
- CLEANING AND MAINTENANCE
- STORAGE
- WARRANTY
- ENVIRONMENT
- DECLARATION OF CONFORMITY
- RENGJØRING OG VEDLIKEHOLD
- POWDP7010 EL
- PRIBIJAC CAVALA/SPOJNICA 20 V (BEZ BATERIJE) POWDP7010
- PRIMJENA
- OPIS (SLIKA A)
- POPIS SADRžAJA PAKETA
- PISTOL PENTRU CUIE ŞI CAPSE 20 V (FÁRÁ ACUMULATOR) POWDP7010
- DOMENII DE UTILIZARE
- ГВОЗДЕЗАБИВ"HО/СКОБОЗАБИВ"HО ПИСТОЛET 20 B (БE3 AKKUMЛЯTOPA) POWDP7010
- OBJACTb IPIPIMEHEHnA
- ONICAHNE (PNC.A)
- CODEPXMOE YNAKOBKN
- YCJIOBHBIE O6O3HAUHENIA
- 3apnHbIe ycmpoUcmea
- POWDP7010 RU
- 3APЯДКA И YCTAHOBKA ИЛN CHЯТNE AKKUMYJITOPA
- Hhukamopbi 3apdno ycmpoucmea (Puc. 1)
- Chmue /ycmaHOeKa aKKMyIamopa (Puc. 2)
- INdukamopbi 3apra daakmynmaopa (Puc. 3)
- CEOPKA
- 3a2py3ka cko6/ae03deu (Puc. 4)
- 3KcπIyATAU
- PpeepumelbHbI eB6Op cunbl ydapa (Puc. 5)
- BbicmpenueaHue cko6ou uu 28o3dem (Puc. 6)
- TEXHnueCKNE DAHHbIE
- LYM
- UNCTKA N OBCJYKINBAHNE
- XPAHEHNE
- TAPAHTIN
- OKPYXKAIOUCAPEDA
- 17ДЕКЛAPALUNO COOTBETCTBIM
- POWDP7010 BG
- ПИСТОЛET 3A ПИРОНи I TEЛБOD 20В (БЕЗ BATEРЯ) POWDP7010
- ПЕДHA3HAUHNE HA ELEKTPOHCTPUMEHTA
- ONICAHNE (ФИг.А)
- CπисьК HA CьдьРжAHNETO HA ONAKOBKATA
- BHIMAHHE! OnakobvHnTe MaTePnaHn He ca nrpauKn! He no3BoJbAte Ha deca da npraT c HainloHOBn Top6uKn! Puck ot 3aDywaBaHe!
- CUMBOJIH
- NocmaaHe / caaHne Ha akymy lamophama 6amepu (Fue. 2)
- Ndukamop Ha 3apekdaHemo (Fua. 3)
- CΓΠΟΥBAHΕ
- 3apekdahe Ha ckO6u/nupohu (Fue.4)
- PABOTA
- Ppebapumenu u36op Ha ydaphama cuna (Fue. 2)
- 3a6ueaHe Ha ckO6a UJU npoH (Fua.4)
- TEXHnueCKN XAPAKTEPnCTnKN
- NOUICTBAHE I NOIDPbJKA
- CbXPAHEHNE
- TAPAHÇΥ
- OKOJIHA CPEDA
- 17ДЕКЛAPALUNA 3ACbOTBETCTBNE
Brand : PowerPlus
Model : POWDP7010
Category : Stapler