POWAIR0312 - Stapler PowerPlus - Free user manual and instructions
Find the device manual for free POWAIR0312 PowerPlus in PDF.
| Product type | 2-in-1 pneumatic nailer/stapler combo |
| Brand | PowerPlus |
| Model | POWAIR0312 |
| Category | Stapler |
| Maximum air pressure | 8.3 bar (120 psi) |
| Recommended operating pressure | 60-100 psi (4-8 bar) |
| Average air consumption | 51 l/min |
| Magazine capacity | 100 nails |
| Activation mode | Single sequential action |
| Air inlet dimensions | 1/4" (6.35 mm) |
| Recommended lubricant | White mineral oil |
| Sound pressure level (LpA) | 87 dB(A) |
| Sound power level (LwA) | 100 dB(A) |
| Vibration (aw) | 1.9 m/s² (K=0.8 m/s²) |
| Warranty | 36 months (wear and abuse excluded) |
| Power source | Compressed air (via compressor) |
| Main functions | Nailing and stapling, depth adjustment |
| Included items | 2 wrenches, 500 nails of 25 mm, 500 nails of 50 mm, 500 staples of 40 mm, 500 staples of 25 mm, empty bottle, molded case |
| Maintenance | Regular lubrication (2-6 drops of oil per day or after 2 hours) |
| Safety | Safety glasses, hearing protection, gloves mandatory; never point at yourself or others; disconnect air before maintenance |
Frequently Asked Questions - POWAIR0312 PowerPlus
User questions about POWAIR0312 PowerPlus
0 question about this device. Answer the ones you know or ask your own.
Ask a new question about this device
Download the instructions for your Stapler in PDF format for free! Find your manual POWAIR0312 - PowerPlus and take your electronic device back in hand. On this page are published all the documents necessary for the use of your device. POWAIR0312 by PowerPlus.
USER MANUAL POWAIR0312 PowerPlus
natural_image
Exterior view of a PowerPlus electric drill press tool (no text or symbols visible on the device body)
text_image
Icon showing an information symbol and a folded document with a rotation arrow, likely representing information exchange or document processing.NL NEDERLANDS VERTAALDE VERSIE VAN DE ORIGINELE HANDLEIDING
FR FRANÇAIS TRADUCTION DU MODE D'EMPLOI D'ORIGINE
EN ENGLISH ORIGINAL INSTRUCTION MANUAL
2 BESCHRIJVING (FIG. A)
natural_image
Illustration of a hand using a tool to adjust or install a mechanical component (no text or symbols visible)9 SMERING
13 PROBLEEMOPLOSSING
10/02/2022, Lier - Belgium
POWAIR0312 FR
1 UTILISATION PRÉVUE....2
2 DESCRIPTION (FIG. A)....2
3 LISTE DES PIECES CONTENUES DANS L'EMBALLAGE ....2
4 PICTOGRAMMES ....3
5 CONSIGNES DE SÉCURITÉ GÉNÉRALES ....3
5.1 Lieu de travail....3
5.2 Sécurité électrique....3
5.3 Sécurité des personnes....4
5.4 Précautions de manipulation et d'utilisation d'outils électriques ....5
5.5 Entretien....5
6 CONSIGNES DE SÉCURITÉ SPÉCIFIQUES POUR
CLOUEUSES/AGRAFEUSES....5
7 RÈGLES DE SÉCURITÉ (FIG. B) ......6
8 UTILISATION....7
9 GRAISSAGE....8
9.1 Réglage de profondeur (Fig. 1)....8
10 ENTRETIEN....9
11 DONNEES TECHNIQUES....9
12 BRUIT....10
13 DÉPANNAGE....10
14 GARANTIE 11
15 ENVIRONNEMENT....12
16 DÉCLARATION DE CONFORMITÉ....13
CLOUEUSE PNEUMATIQUE COMBINÉE 2 EN 1 POWAIR0312
1 UTILISATION PRÉVUE
natural_image
Illustration showing two steps of a mechanical device: top view with tool and component, bottom view with tool and component (no text or symbols)9 GRAISSAGE
natural_image
Simple line drawing of a trash bin with crossed lines indicating no waste or discharge (no text or symbols)10/02/2022, Lier - Belgium
POWAIR0312 EN
1 INTENDED USE 2
2 DESCRIPTION (FIG. A)....2
3 PACKAGE CONTENT LIST 2
4 SYMBOLS 3
5 GENERAL POWER TOOL SAFETY WARNINGS....3
5.1 Working area ....3
5.2 Electrical safety....3
5.3 Personal safety....4
5.4 Power tool use and care....4
5.5 Service....5
6 SPECIAL SAFETY INSTRUCTIONS FOR ELECTRIC STAPLERS ....5
7 SAFETY RULES (FIG. B)....5
8 TOOL USE....6
9 LUBRICATION 7
9.1 Depth adjustment (fig. 1)....8
10 MAINTENANCE....8
11 TECHNICAL DATA 9
12 NOISE....9
13 TROUBLESHOOTING....9
14 WARRANTY....10
15 ENVIRONMENT....11
16 DECLARATION OF CONFORMITY 12
PNEUMATIC 2 IN 1 COMBI NAILER POWAIR0312
1 INTENDED USE
Use for almost any finish, furniture, cabinetry, paneling, trim, or craft application. Not suitable for professional use.

Warning Read this manual and general safety instructions carefully before using the appliance, for your own safety.
2 DESCRIPTION (FIG. A)
-
Trigger exhaust vent
-
14 " coupler
-
Magazine lock
-
Magazine
-
Nailer nose
-
Grease shaft lock
-
Trigger
-
Depth adjustment knob
3 PACKAGE CONTENT LIST
■ Remove all packaging materials.
- Remove remaining packaging and packing inserts (if included).
- Check that the package contents are complete.
- Check the appliance, the power cord, the power plug and all accessories for transportation damage.
- Keep the packaging materials as far as possible until the end of the warranty period. Then take it to your local waste disposal system.

WARNING Packaging materials are not toys! Children must not play with plastic bags! There is a danger of suffocation!
1 x 2 in 1 combi nailer
2 x keys
500 x 25mm nails
500 x 50mm nails
500 x 40mm staples
500 x 25mm staples
1 x empty bottle
1 x BMC
1 x Manual

If any parts are missing or damaged, please contact your dealer.
4 SYMBOLS
In this manual and/or on the machine the following symbols are used:
 | Denotes risk of personal injury or damage to the tool. |  | Read manual before use. |
 | In accordance with essential safety standards of applicable European directives. |  | Class II - The machine is double insulated; Earthing wire is therefore not necessary. |
 | Mandatory use of eye protection. |  | Wear gloves. |
 | Important information. |  | Electrical products must not be disposed with the domestic waste. |
5 GENERAL POWER TOOL SAFETY WARNINGS
Read all safety warnings and instructions. Failure to heed warnings and follow instructions may result in electric shock, fire and/or serious injury. Keep safety warnings and instructions for future reference. The term "power tool" in the safety warnings refers to your mains-operated (corded) power tool or battery-operated (cordless) power tool.
5.1 Working area
- Keep working area clean and well lit. Untidy and dark areas can lead to accidents.
- Do not operate power tools in potentially explosive surroundings, for example, in the presence of inflammable liquids, gases or dust. Power tools create sparks which may ignite the dust or fumes.
- Keep children and bystanders at a distance when operating a power tool. Distractions can cause you to lose control of it.
5.2 Electrical safety

Always check that the power supply corresponds to the voltage on the rating plate.
■ Power tool plugs must match the outlet. Never modify the plug in any way. Do not use adapter plugs with earthed power tools. Unmodified plugs and matching outlets will reduce the risk of a lethal electric shock.
- Avoid body contact with earthed surfaces such as pipes, radiators, kitchen ranges and refrigerators. There is an increased risk of a lethal electric shock if your body is earthed.
POWAIR0312 EN
- Do not expose power tools to rain or wet conditions. If water gets inside a power tool, it will increase the risk of a lethal electric shock.
- Do not damage the cord. Never use the cord for carrying, pulling or unplugging the power tool. Keep the cord away from heat, oil, sharp edges or moving parts. Damaged or entangled cords increase the risk of a lethal electric shock.
- When operating a power tool outdoors, use an extension cable suitable for outdoor use. Using a cord suitable for outdoor use reduces the risk of a lethal electric shock.
- If operating a power tool in a damp location is unavoidable, use a power supply protected by a residual current device (RCD). Using an RCD reduces the risk of a lethal electric shock.
5.3 Personal safety
- Stay alert, watch what you are doing and use common sense when operating a power tool. Do not use a power tool when you are tired or under the influence of drugs, alcohol or medication. A moment of inattention when operating a power tool may result in serious personal injury.
- Use safety equipment. Always wear eye protection. Using safety equipment such as a dust mask, non-skid safety shoes, a hard hat, or hearing protection whenever it is needed will reduce the risk of personal injury.
- Avoid accidental starts. Ensure the switch is in the off position before inserting the plug. Carrying power tools with your finger on the switch or plugging in power tools when the switch is in the on position makes accidents more likely.
- Remove any adjusting keys or spanners before turning on the power tool. A spanner or key left attached to a rotating part of the power tool may result in personal injury.
- Do not reach out too far. Keep your feet firmly on the ground at all times. This will enable you retain control over the power tool in unexpected situations.
- Dress properly. Do not wear loose clothing or jewellery. Keep your hair, clothing and gloves away from the power tool. Loose clothes, jewellery or long hair can become entangled in the moving parts.
- If there are devices for connecting dust extraction and collection facilities, please ensure that they are attached and used correctly. Using such devices can reduce dust-related hazards.
5.4 Power tool use and care
- Do not expect the power tool to do more than it can. Use the correct power tool for what you want to do. A power tool will achieve better results and be safer if used in the context for which it was designed.
- Do not use the power tool if the switch cannot turn it on and off. A power tool with a broken switch is dangerous and must be repaired.
- Disconnect the plug from the power source before making adjustments, changing accessories, or storing power tools. Such preventive safety measures reduce the risk of starting the power tool accidentally.
- Store power tools, when not in use, out of the reach of children and do not allow people who are not familiar with the power tool or these instructions to operate it. Power tools are potentially dangerous in the hands of untrained users.
- Maintenance. Check for misalignment or jammed moving parts, breakages or any other feature that might affect the operation of the power tool. If it is damaged, the power tool must be repaired. Many accidents are caused by using poorly maintained power tools.
POWAIR0312 EN
- Keep cutting tools sharp and clean. Properly maintained cutting tools with sharp cutting edges are less likely to jam and are easier to control.
- Use the power tool, accessories and cutting tools, etc., in accordance with these instructions and in the manner intended for the particular type of power tool, taking into account the working conditions and the work which needs to be done. Using a power tool in ways for which it was not intended can lead to potentially hazardous situations.
5.5 Service
- Your power tool should be serviced by a qualified specialist using only standard spare parts. This will ensure that it meets the required safety standards.
6 SPECIAL SAFETY INSTRUCTIONS FOR ELECTRIC STAPLERS
■ Before inserting staples or nails the power plug should always be removed from the socket.
■ Never point the machine at persons or animals.
- Only use staples or nails which are suitable for the machine.
■ Before using the machine, ensure that the safety device is operating properly.
■ Never block the safety device.
- Switch the machine off when you take a break and when the work is completed.
■ Wear ear protectors.
- Do not activate the tool unless the tool is placed firmly against the workpiece. If the tool is not in contact with the workpiece, the fastener may be deflected away from your target.
- Do not use the tacker for fastening electrical cables. It is not designed for electric cable installation and may damage the insulation of electric cables thereby causing electric shock or fire hazard.
7 SAFETY RULES (FIG. B)
■ Use only following fixing devices:
– Ga. 18 nail & staple
– Nails length: 15-50mm
- Staple crown: 5.7mm
- Staple length: 16-40mm
- Tools with an inverted triangle can only be used with security elements: this stapler/nailer is equipped with a safety yoke.
- To prevent injuries to yourself and bystanders, refer to tool use, maintenance and troubleshooting sections for additional information (fig 1)
- To prevent eye injuries, always wear safety glasses with hard plastic side shields. Be sure everyone in your work area is wearing the same type of safety glasses (fig 2)
■ Always wear hearing protection and hard hat. (fig 3) - Never use hydrogen oxygen, carbon dioxide or any other bottled gas as a power source for this tool, the tool will explode and cause serious injury. (fig4)
- Remove finger from trigger when not driving fasteners. Never carry tool with finger on trigger, tool will eject fastener If safety is bumped. (fig5)
- Never conned tool to an air hose with pressure exceeds 200 psi or 13.7 BAR (fig6)
- Air compressors must comply with requirement ANSI B19.3 1981 (U.S.), "Safety Standard For Compressors For Process Industries." (fig 7)
POWAIR0312 EN
- Air hose minimum working pressure rating of 150 psi (10.3 BAR) or 150% of the maximum pressure produced in the system is absolutely necessary. (fig 8)
- The tool and air supply hose must have a hose coupling such that all pressure is removed from the tool when the coupling Joint is disconnected. (fig 9)
■ Use only compressed air coming through 3 pieces set. (fig 10) - Never load fastener before tool connected to air supply (fig 11)
- Never use tool if safety element, trigger or springs have become inoperative, missing or damaged, It is hazardous to remove safety element, trigger or spring. (fig 12)
■ Before using this tool, make sure trigger, screw and cap are securely tightened. (fig 13) - Do not modify tool without authorization. (fig 14)
■ Disconnect tool from air whenever the tool stops working (fig15) - Keep the tool pointed away from yourself and others. (fig 16)
■ Fire fasteners into work surface only, never into materials too hard to penetrate. (fig 17) - Do not drive fasteners on top of other fasteners. Tool fired in an inclined angle is also forbidden. (fig 18)
- Do not push safety element on work surface until a second fastener is desired (fig 19)
- Do not drive fasteners close to the edge of the work surface. The work piece is likely to split and the fastener could fly free and hit someone. (fig 20)
- Do not load fasteners with trigger or safety element depressed. (fig 21)
- Do not use tool without Danger label on tool. (fig 22)
■ Never use a tool that leaks air or needs repair. (fig 23) - Be sure you are in a balanced position when using or handling the tool (fig 24)
- Operate tool at recommended pressure of 4-8 bar
8 TOOL USE
| 1. Read "Safety Warnings" before using tool |  | ||
| 2. Push magazine lock lever and slide upper magazine to open magazine. | 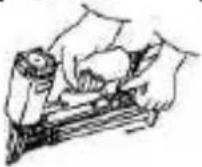 | ||
| 3. Place strip of nails or staples into the magazine with the point resting on the fastener guide. Do not load with trigger depressed. |  | ||
| 4. Push upper magazine back until magazine lock latches. |  |
| 5. Keep the nailer pointed away from yourself and others and connect to the hose. |  |
| 6. Position the nailer nose against work piece and pull the trigger | 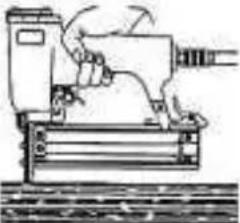 |
| 7. Disconnect air supply in case a nail or stapler is jammed |  |
| 8. Pull the grease shaft and pull the upper part of the nailer nose open the magazine in the front. Remove jammed nails or staples and close the front cover. |  |
| 9. Keep the tool pointed away from yourself and others and connect back to the hose. | 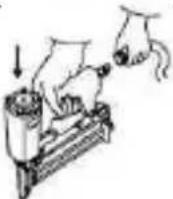 |
9 LUBRICATION
An automatic in-line filter-regulator-lubricator is recommended (Fig 1) as it increases tool life and keeps the tool in sustained operation. The in-line lubricator should be regularly checked and filled with air tool oil.
Proper adjustment of the in-line lubricator is performed by placing a sheet of paper next to the exhaust ports and holding the throttle open approximately 30 seconds. The lubricator is properly set when a light stain of oil collects on the paper. Excessive amounts of oil should be avoided.
In the event that it becomes necessary to store the tool for an extended period of time (overnight, weekend, etc.), it should receive a generous amount of lubrication at that time. The tool should be run for approximately 30 seconds to ensure oil has been evenly distributed throughout the tool. The tool should be stored in a clean and dry environment.
- It is most important that the tool be properly lubricated by keeping the air line lubricator filled and correctly adjusted. Without proper lubrication the tool will not work properly and parts will wear prematurely.
POWAIR0312 EN
- Use the proper lubricant in the air line lubricator. The lubricator should be of low air flow or changing air flow type, and should be kept filled to the correct level. Use only recommended lubricants, specially made for pneumatic applications. Substitutes may harm the rubber compounds in the tools, O-rings and other rubber parts.
9.1 Depth adjustment (fig. 1)
The depth to which a fastener is driven is controlled by the depth adjustment knob (8). The depth of drive is factory adjusted to a nominal setting. Test fire a fastener and check depth. If a change is desired, rotate the adjustment knob (8). Rotate the knob (8) clockwise to increase the depth of drive, rotate the knob counter clockwise to decrease the depth of drive. Test fire another fastener and check depth again. Repeat as necessary to achieve desired results. The amount of air pressure required will vary depending on the size of the setting to determine the lowest setting that will consistently perform the job at hand. Air pressure in excess of that required can cause premature wear and/or damage to the tool.
IMPORTANT!
If no filter/ pressure regulator/ lubricator is installed in the compressed air system, then pneumatic tools must be lubricated with 2 to 6 drops of oil at least once a day or after every two hours of use. This must be done directly along the male coupler or the screw (OIL) provided for the purpose on the side of the tool's housing.
Fig. 2
-
Tool
-
Quick connector
-
Quick coupler
-
Air hose
-
Quick connector
-
Quick coupler
-
Lubricator
-
Regulator (0-8.3 bar)
-
Filter
-
Cut-off valve
-
Air compressor
10 MAINTENANCE

Disconnect the tool from the compressor before adjusting, clearing jams, servicing &maintenance, relocating and during non operation.
- Regular lubrication, if your tool without using the in-liner automatic oilier, place 2 or 6 drops of pneumatic tool oil into the air inlet before each work day or after 2 hours of continuous use depending in the characteristic of work piece or type of fasteners.
- Air-operated tools must be inspected periodically, and worn or broken parts must be replaced to keep the tool operating safely and efficiently. Check and change all worn or damaged O-ring, Seals, etc. Tight all the screws and caps in case personal injury.
- Make regular inspection for free movement of trigger, Spring and safety mechanism to assure safe system is complete and functional: no loose and missing parts, no building or stocking parts.
- Keep magazine and nose of tool clean and free of any dirt lint or abrasive particles.
- When temperatures are below freezing, tools should be kept warm by any convenient, safe method.
11 TECHNICAL DATA
| Model | POWAIR0312 |
| Activation mode | Single sequential action |
| Max. allowable pressure | 120PSI(8.3 bar) |
| Operating pressure | 60-100PSI(4-7bar) |
| Air inlet size | 14" |
| Avg. air consumption | 51 l/min |
| Recommended lubricant | White mineral oil |
| Nail capacity | 100pcs |
12 NOISE
Noise emission values measured according to relevant standard. (K=3)
| Acoustic pressure level LpA | 87 dB(A) |
| Acoustic power level LwA | 100 dB(A) |

ATTENTION! Wear hearing protection when sound pressure is over 85 dB(A).
aw (Vibration)
1.9 m/s²
K = 0.8 ~m / s^2
13 TROUBLESHOOTING
| SYMPTOM | PROBLEM | SOLUTIONS |
| Air leak near top of tool or in trigger area | O-ring in trigger valve is damaged. | Check and replace O-ring. |
| Trigger valve head are damage. | Check and replace. | |
| Trigger valve stem, seal or O-ring are damaged. | Check and replace trigger valve stem, seal or O-ring | |
| Air leak near bottom of tool. | Loose screws. | Tighten screws. |
| Worn or damaged O-rings or bumper. | Check and replace O-rings or bumper. | |
| Air leak between body and cylinder cap. | Loose screws. | Tighten screw. |
| Worn or damaged O-rings or seals. | Check and replace O-rings or bumper. | |
| Blade driving fastener too deep. | Worn bumper. | Replace bumper. |
| Air pressure is too high. | Adjust the air pressure. | |
| Tool does not operate well: can not drive fastener or operate sluggishly. | Inadequate air supply. | Verify adequate air supply. |
| Inadequate lubrication. | Place 2 or 6 drops of oil into air inlet. | |
| Worn or damaged O-rings or seals. | Check and replace O-rings or seal. |
POWAIR0312 EN
| Exhaust port in cylinder head is blocked. | Replace damaged internal parts. | |
| Tool skips fasteners. | Worn bumper or damaged spring. | Replace bumper or pusher spring. |
| Dirt in front plate. | Clean drive channel on front plate. | |
| Dirt or damage prevents fasteners from moving freely in magazine. | Magazine needs to be cleaned. | |
| Worn or dry O-ring on piston or lack of Lubrication. | O-ring needs to be replaced and lubricate. | |
| Cylinder covers seal leaking. | Replace Sealing washer. | |
| Tool jams. | Incorrect or damaged fasteners. | Change and use correct fastener. |
| Damaged or worn driver guide. | Check and replace the driver. | |
| Magazine or nose screw loose. | Tighten the magazine. | |
| Magazine is dirty. | Clean the magazine. |
14 WARRANTY
- This product is warranted as provided by law for a 36-month period effective from the date of purchase by the first user.
- This warranty covers all material or production flaws excluding : batteries, chargers, defective parts subject to normal wear & tear such as bearings, brushes, cables, and plugs, or accessories such as drills, drill bits, saw blades, etc. ; damage or defects resulting from maltreatment, accidents or alterations; nor the cost of transportation.
- Damage and/or defects resulting from inappropriate use also do not fall under the warranty provisions.
- We also disclaim all liability for any bodily injury resulting from inappropriate use of the tool.
- Repairs may only be carried out by an authorised customer service centre for Powerplus tools.
- You can always obtain more information at the number 00 32 3 292 92 90.
- Any transportation costs shall always be borne by the customer, unless agreed otherwise in writing.
- At the same time, no claim can be made on the warranty if the damage of the device is the result of negligent maintenance or overload.
- Definitely excluded from the warranty is damage resulting from fluid permeation, excessive dust penetration, intentional damage (on purpose or by gross carelessness), inappropriate usage (use for purposes for which the device is not suitable), incompetent usage (e.g. not following the instructions given in the manual), inexpert assembly, lightning strike, erroneous net voltage. This list is not exhaustive.
POWAIR0312 EN
- Acceptance of claims under warranty can never lead to the prolongation of the warranty period nor commencement of a new warranty period in case of a device replacement.
- Devices or parts which are replaced under the warranty therefore remain the property of Varo NV.
- We reserve the right to reject a claim whenever the purchase cannot be verified or when it is clear that the product has not been properly maintained. (Clean ventilation slots, carbon brushes serviced regularly, etc.).
- Your purchase receipt must be kept as proof of date of purchase.
- Your appliance must be returned undismantled to your dealer in an acceptably clean state, (in its original blow-moulded case if applicable to the unit), accompanied by proof of purchase.
15 ENVIRONMENT

Should your appliance need replacement after extended use, do not dispose of it with the household refuse, but in an environmentally safe way. Please dispose of used motor oil in a manner that protects the environment. We suggest you take it in a sealed container to your local service station for recycling. Do not throw it into the refuse or pour it on the ground
16 DECLARATION OF CONFORMITY


VARO – Vic. Van Rompuy N.V. - Joseph Van Instraat 9 - BE2500 Lier - BELGIUM, declares that,
product: Pneumatic 2 in 1 combi nailer
trade mark: PowerPlus
model: POWAIR0312
is in conformity with the essential requirements and other relevant provisions of the applicable European Directives, based on the application of European harmonized standards. Any unauthorized modification of the apparatus voids this declaration.
European Directives (including, if applicable, their amendments up to the date of signature); 2006/42/EC
European harmonized standards (including, if applicable, their amendments up to the date of signature);
EN ISO1148-13 : 2018
Keeper of the Technical Documentation : Philippe Vankerkhove, VARO – Vic. Van Rompuy N.V.
The undersigned acts on behalf of the company CEO,
Mertens Ludo
Ludo Mertens
Regulatory Affairs – Compliance Manager
10/02/2022, Lier - Belgium
POWAIR0312 DE
10/02/2022, Lier - Belgium
POWAIR0312 ES
natural_image
Simple line drawing of a trash bin with crossed x-axes and no text or symbols10/02/2022, Lier - Belgium
POWAIR0312 IT
natural_image
Illustration of a hand using a tool to adjust or install a mechanical component (no text or symbols visible)9 LUBRIFICAZIONE
natural_image
Simple line drawing of a trash bin with crossed x-axes and a circular symbol inside, no text or labels present.10/02/2022, Lier - Belgium
POWAIR0312 PT
natural_image
Illustration of hands operating a mechanical device with a downward arrow indicating motion (no text or symbols)9 LUBRIFICAÇÃO
natural_image
Simple line drawing of a trash bin with crossed lines indicating no waste or discharge (no text or symbols)10/02/2022, Lier - Belgium
POWAIR0312 NO
1 TILTENKT BRUK....2
2 BESKRIVELSE (FIG. A)......2
3 PAKKENS INNHOLD....2
4 SYMBOLFORKLARING....3
5 GENERELLE SIKKERHETSADVARSLER....3
5.1 Arbeidsplassen....3
5.2 Elektrisk sikkerhet....3
5.3 Personsikkerhet....4
5.4 Vær nøyaktig og omhyggelig når du omgås elektroverktøy....4
5.5 Service....5
6 SPESIELLE SIKKERHETSREGLER FOR SPIKER-/KRAMPEPISTOLER....5
7 SIKKERHETSREGLER (FIG. B)......5
8 BRUK 6
9 SM∅RING....7
9.1 Justere dybden (Fig. 1)....8
10 VEDLIKEHOLD....8
11 TEKNISKE DATA....8
12 ST∅Y....9
13 FEILS∅KING....9
14 GARANTI....10
15 MILJ∅....11
16 SAMSVARSERKLÆRING....11
LUFTDREVET 2-I-1 KOMBINERT NAGLEMASKIN POWAIR0312
1 TILTENKT BRUK
10/02/2022, Lier - Belgium
POWAIR0312 DA
1 TILSIGTET BRUG 2
2 BESKRIVELSE (FIG. A)....2
3 MEDF∅LGENDE INDHOLD....2
4 SYMBOLER....3
5 ALMINDELIGE SIKKERHEDSANVISNINGER FOR EL-VÆRKT∅J......3
5.1 Arbejdsområde....3
5.2 Elektrisk sikkerhed ....3
5.3 Personlig sikkerhed....4
5.4 Omhyggelig håndtering og anvendelse af el-værktøjer....4
5.5 Service .... 5
6 SÄERLIGE SIKKERHEDSHENVISNINGER FOR EL-SÖMPISTOLER ....5
7 SIKKERHEDSFORSKRIFTER (FIG. B) 5
8 BETJENING....6
9 SM∅RING....7
9.1 Dybdeindstilling (fig. 1)....8
10 VEDLIGEHOLDELSE....8
11 TEKNISKE DATA....9
12 ST∅J....9
13 FEJLFINDING....9
14 GARANTI....10
15 MILJ∅....11
16 KONFORMITETSERKLÆRING....12
KOMBINERET TRYKLUFT HÆFTE/S∅MPISTOL POWAIR0312
1 TILSIGTET BRUG
10/02/2022, Lier - Belgium
POWAIR0312 SV
3 FÖRPACKNINGSINNEHÅLL
natural_image
Illustration of a hand using a tool to adjust or install a mechanical component (no text or symbols visible)9 SMÖRJNING
13 TROUBLESHOOTING PROBLEM
10/02/2022, Lier - Belgium
POWAIR0312 FI
10/02/2022, Lier - Belgium
POWAIR0312 EL
10/02/2022, Lier - Belgium
POWAIR0312 HR
1 NAMJENA 2
2 OPIS (SL. B)....2
3 POPIS SADRŽAJA PAKIRANJA....2
4 SIMBOLI 3
5 OPĆA UPOZORENJA O SIGURNOSTI RUKOVANJA ELEKTRIČNIM ALATIMA 3
5.1 Radno mjesto 3
5.2 Električna sigurnost....3
5.3 Osobna sigurnost ....4
5.4 Uporaba i održavanje električnog alata....4
5.5 Servis....5
6 POSEBNE SIGURNOSNE UPUTE ZA PRIBIJAČ ČAVALA/SPOJNICA......5
7 SIGURNOSNA PRAVILA (SL. B)......5
8 UPOTREBA....6
9 PODMAZIVANJE....7
9.1 Podešavanje dubine (slika 1)....8
10 ODRŽAVANJE 8
11 TEHNIČKI PODACI....9
12 BUKA....9
13 RJEŠAVANJE PROBLEMA....10
14 JAMSTVO....11
15 OKOLIŠ....11
16 IZJAVA O SUKLADNOSTI....12
PNEUMATISKI 2 U 1 KOMBINIRANI ZAKIVAČ POWAIR0312
1 NAMJENA
Koristi se za gotovo svako presvlačenje, namještaj, izradu ormara, ploča, prilagođavanje ili rukotvorine. Nije prikladno za profesionalnu uporabu.

10/02/2022, Lier - Belgium
POWAIR0312 SR
1 NAMENJENA UPOTREBA 2
2 OPIS (SL. A)....2
3 LISTA SADRŽAJA PAKETA....2
4 SIMBOLI 3
5 OPŠTA BEZBEDNOSNA UPUTSTVA ZA ELEKTRIČNE ALATE ....3
5.1 Radna oblast....3
5.2 Električna bezbednost....3
5.3 Lična bezbednost....4
5.4 Korišćenje i održavanje električnog alata....4
5.5 Servisiranje....5
6 SPECIJALNE BEZBEDNOSNE INSTRUKCIJE ZA ELEKTRIČNE
KLAMERICE ....5
7 BEZBEDNOSNA PRAVILA (SL. B)....5
8 RUKOVANJE....6
9 PODMAZIVANJE....7
9.1 Podešavanje dubine (Sl. 1)....8
10 VAŽNO!!! 8
11 ODRŽAVANJE 9
12 TEHNIČKI PODACI....9
13 BUKA....9
14 DIJAGNOZA I OTKLANJANJE PROBLEMA....10
15 GARANCIJA....11
16 ŽIVOTNA SREDINA....12
17 IZJAVA O USKLAĐENOSTI 12
PNEUMATSKI KOMBINOVANI ZAKIVAČ 2 U 1 POWAIR0312
1 NAMENJENA UPOTREBA
10/02/2022, Lier - Belgium
POWAIR0312 CS
10/02/2022, Lier - Belgium
POWAIR0312 SK
1 ZAMÝŠL'ANÉ POUŽITIE 2
2 POPIS (OBR. A) 2
3 OBSAH BALENIA 2
4 SYMBOLY 3
5 VŠEOBECNÉ BEZPEČNOSTNÉ VAROVANIA PRE ELEKTRICKÉ NÁRADIE 3
10/02/2022, Lier - Belgium
POWAIR0312 RO
1 DOMENII DE UTILIZARE 2
2 DESCRIERE (FIG. A) 2
3 CONTINUTUL PACHETULUI....2
4 SIMBOLURI....3
5 AVERTISMENTE GENERALE DE SIGURANTĂ PRIVIND APARATELE ELECTRICE ....3
10/02/2022, Lier - Belgium
POWAIR0312 HU
natural_image
Illustration of hands operating a mechanical device with a downward arrow indicating motion (no text or symbols)9 OLAJOZÁS
10/02/2022, Lier - Belgium
POWAIR0312 RU
natural_image
Simple line drawing of a trash bin with crossed lines indicating no waste or discharge (no text or symbols)10/02/2022, Lier - Belgium
POWAIR0312 BG
1 ПРЕДНАЗНАЧЕНИЕ НА УПОТРЕБАТА....2
2 ОПИСАНИЕ (ФИГ. А)......2
3 СПИСЪК НА СЪДЪРЖАНИЕТО НА ПАКЕТА....2
4 СИМВОЛИ ....3
10/02/2022, Lier - Belgium

text_image
POWERPLUS POWERPLUS 7 8 3 6 4 5Fig. A
 Fig1 Fig1 |  Fig 2 Fig 2 |  Fig 3 Fig 3 |  Fig 4 Fig 4 |
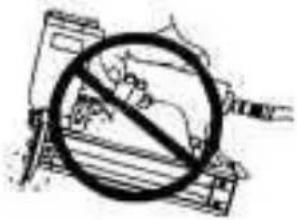 Fig 5 Fig 5 | 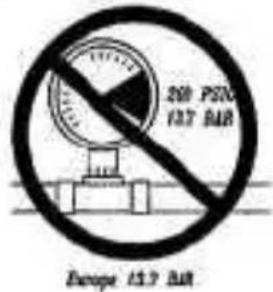 Fig 6 Fig 6 | 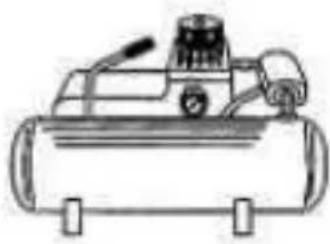 Fig 7 Fig 7 |  Fig 8 Fig 8 |
 Fig 9 Fig 9 | 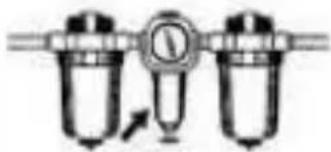 Fig 10 Fig 10 | 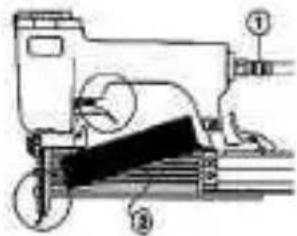 Fig 11 Fig 11 | 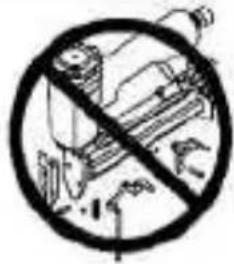 Fig 12 Fig 12 |
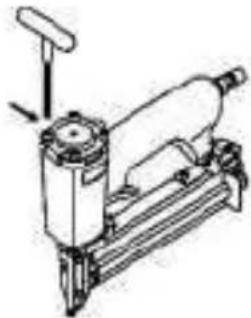 Fig 13 Fig 13 |  Fig 14 Fig 14 |  Fig 15 Fig 15 |  Fig 16 Fig 16 |
 Fig 17 Fig 17 | 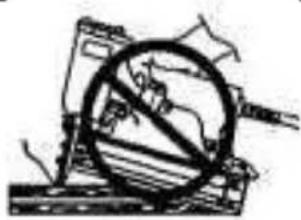 Fig 18 Fig 18 |  Fig 19 Fig 19 | 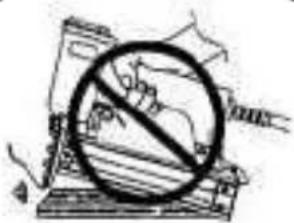 Fig 20 Fig 20 |
 Fig 21 Fig 21 |  Fig 22 Fig 22 |  Fig 23 Fig 23 |  Fig 24 Fig 24 |
Fig B

text_image
POWERPLUS 8Fig. 1

flowchart
graph LR
    1["1"] --> 2["2"]
    2 --> 3["3"]
    3 --> 4["4"]
    4 --> 5["5"]
    5 --> 6["6"]
    6 --> 7["7"]
    7 --> 8["8"]
    8 --> 9["9"]
    9 --> 10["10"]
    10 --> 11["11"]
Fig. 2

natural_image
Exterior view of a gray and black NRP Nepal pad kit (no text or symbols visible)varo
WWW.VARO.COM
DESIGNED AND MARKETED BY VARO
©copyright by varo
VARO - VIC. VAN ROMPUY nv
JOSEPH VAN INSTRAAT 9 - 2500 LIER - BELGIUM
OFFICES: