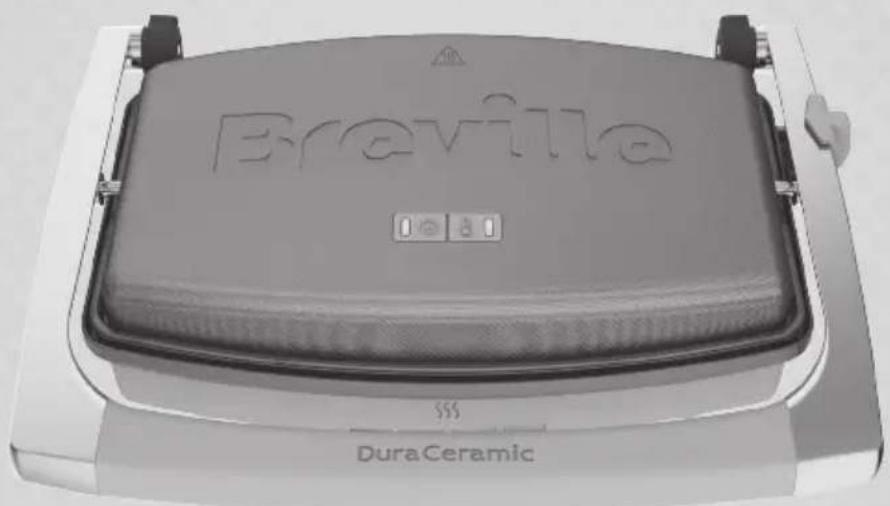
DuraCeramic VST071X - Toaster BREVILLE - Free user manual and instructions
Find the device manual for free DuraCeramic VST071X BREVILLE in PDF.
| Product type | Sandwich toaster (panini press) |
| Brand | Breville |
| Model | DuraCeramic VST071X |
| Plate coating | DuraCeramic™ non-stick (PTFE and PFOA free) |
| Temperature selector | Variable (low, medium, high positions) |
| Indicator lights | Power (green) and Ready (orange) |
| Hinge | Graduated with transport lock |
| Capacity | 2 standard sandwiches or 1 large panini |
| Power | 750 W (estimated) |
| Voltage | 220-240 V ~ 50/60 Hz |
| Dimensions (L × W × H) | Approximately 25 × 20 × 10 cm |
| Weight | Approximately 1.5 kg |
| Cord length | Approximately 0.8 m |
| Exterior material | Heat-resistant plastic |
| Main functions | Toasting sandwiches, paninis, Turkish bread, reheating pastries |
| Care and cleaning | Wipe plates with a damp cloth; do not immerse; avoid abrasive products |
| Safety | Do not use with an external timer; do not leave unattended; keep out of reach of children under 8 years |
| Spare parts and repairability | Not specified; contact Breville after-sales service |
| Warranty | 2 years |
| General information | Made in China; distributed by Jarden Consumer Solutions (Europe) Limited |
Frequently Asked Questions - DuraCeramic VST071X BREVILLE
User questions about DuraCeramic VST071X BREVILLE
0 question about this device. Answer the ones you know or ask your own.
Ask a new question about this device
Download the instructions for your Toaster in PDF format for free! Find your manual DuraCeramic VST071X - BREVILLE and take your electronic device back in hand. On this page are published all the documents necessary for the use of your device. DuraCeramic VST071X by BREVILLE.
USER MANUAL DuraCeramic VST071X BREVILLE
Turn on your creativity®
text_image
Breville DuraCeramicUK Sandwich press
Instructions for Use......4
FR Appareil à sandwich
Instructions 9
DE Sandwichpresse
Bedienungsanleitung....14
ES Sandwichera
Instrucciones de uso.... 19
PT Tostadeira
Instruções de Utilização 24
Piastra pressa sandwich
Istruzioni per l'uso....29
NL Sandwichgrill
Gebruiksaanwijzing 34
FI Voileipäpuristin
Käyttöohjeet.... 39
SE Smörgåsgrill
Návod k použití......43
DK Sandwichgrill Brugsanvisning 48
NO Sandwichpresse Bruksanvisning 52
PL Tostownica
Instrukcja użytkowania 56
CZ Sendvičovač
Návod k použití......61
RO Presă pentru sandvișuri
Instrucțiuni de utilizare....65
BG Преса за сандвичи
Инструкции за употреба 69
HR Preša za sendviče
Upute za upotrebu....75
GK Πρέσα σάντουιτς
Οδηγίες χρήσης....79
text_image
Labeled diagram of a mechanical device with numbered parts for identificationIMPORTANT SAFETY INFORMATION
Please read these instructions before operating the appliance and retain them for future use.
This appliance can be used by children aged from 8 years and above and persons with reduced physical, sensory or mental capabilities or lack of experience and knowledge if they have been given supervision or instruction concerning use of the appliance in a safe way and understand the hazards involved. Children shall not play with the appliance. Cleaning and user maintenance shall not be made by children unless they are older than 8 and supervised. Keep the appliance and its cord out of reach of children less than 8 years old.
Bread can burn therefore do not use the appliance near or below combustible materials such as curtains. Never use the appliance below wall cupboards or shelves. Never operate the appliance by means of an external timer or separate remote-control system.
Do not touch the metal parts of the appliance during use as they may become very hot.
Never use this appliance for anything other than its intended use. This appliance is for household use only. Do not use this appliance outdoors.
If the supply cord is damaged, it must be replaced by the manufacturer, its service agent or similarly qualified persons in order to avoid a hazard.
- Always ensure that hands are dry before handling the plug or switching on the appliance.
- Always use the appliance on a stable, secure, dry and level surface.
- Care is required when using the appliance on surfaces that may be damaged by heat. The use of an insulated pad is recommended.
-
This appliance must not be placed on or near any potentially hot surfaces (such as a gas or electric hob).
-
Never let the power cord hang over the edge of a worktop, touch hot surfaces or become knotted, trapped or pinched.
- Do not use the appliance if it has been dropped or if there are any visible signs of damage.
- Ensure the appliance is switched off and unplugged from the supply socket after use and before cleaning.
• Always allow the appliance to cool before cleaning or storing. - Never immerse any part of the appliance or power cord and plug in water or any other liquid.
- Never leave the appliance unattended when in use.
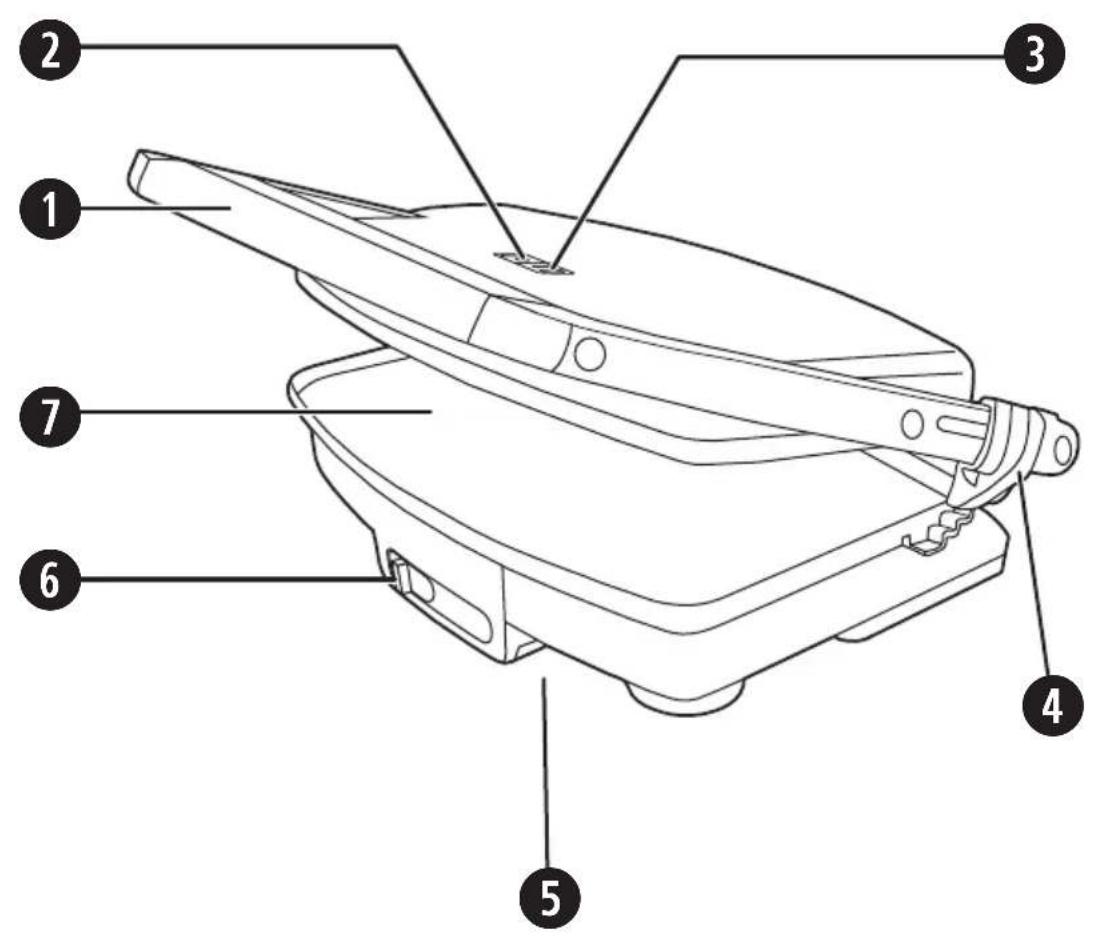
PARTS
1 Handle
2 Power light - green
3 Ready light - amber
4 Floating step hinge
5 Cord storage (underneath)
6 Variable temperature control
7 Cooking plates with DuraCeramic ^™ coating
FEATURES
DuraCeramic™ coated cooking plates
The cooking plates feature the exclusive DuraCeramic™ coating. This specialised natural ceramic coating is designed to transfer heat quicker and more efficiently than standard non-stick coatings – meaning faster cooking times for your delicious home-cooked snacks. In addition, the DuraCeramic™ coating is scratch resistant and 4 times more durable than standard non-stick coatings – this is a product built to last. Peace of mind comes from the fact that the DuraCeramic™ coating is PTFE and PFOA free, so this exclusive coating is durable and easy to clean.
DuraCeramic ^™ coating – designed to handle whatever you throw at it with ease.
Variable temperature control
The variable temperature control allows you to change the heat setting for cooking different types of food. A low temperature setting is ideal for cooking foods with a high sugar content (e.g. pastries and croissants). A higher temperature setting is recommended for breads and panini rolls.
Locking and unlocking the step hinge
The floating step hinge must be unlocked ☐ before using the sandwich press otherwise the lid cannot be opened. The weight of the top cooking plate will gradually press down on the sandwich during cooking, unless you have moved the floating step hinge to position 1, 2, or 3. When storing or transporting the sandwich press, the floating step hinge must be locked ☐ You must not use the lock to clamp down the top plate when the sandwiches are in your sandwich press or for pre-heating.
Using the floating step hinge
You can adjust the floating step hinge of your sandwich press to move the top cooking plate. This lets you place food on the bottom cooking plate (open sandwiches, bacon, eggs, etc.) and the top cooking plate will not come into contact with the food during cooking. You can move the top cooking plate to 3 different positions, depending on the thickness of the food that you are cooking, and how close to the food you want the cooking plate to be.
BEFORE FIRST USE
- Remove any promotional labels or stickers from your sandwich press before use.
- Place your sandwich press on a flat, level surface. Move the floating step hinge to unlocked 🔍 to release the top plate and open it.
- Check that the cooking plates are clean and free of dust. If necessary, wipe over with a damp cloth.
USING YOUR SANDWICH PRESS
Take care around hot surfaces. The hot plates get VERY HOT. DO NOT touch any parts until completely cooled.
Steam will escape from all around the sandwich press during cooking and when opening the lid.
Note: During first use there may be a small amount of smoke and a slight burning odour. This is completely normal and will clear within a few minutes.
- Always fully unwind the power cord from the cord storage area of the appliance before use. Insert the plug into a mains supply socket and switch the socket on.
- Check that the cord is not overhanging the work surface. The power light and the ready light will both illuminate.
- Select the required heat setting (low, medium or high) using the variable temperature control.
-
Allow the sandwich press to preheat in the closed position until the ready light goes out. The ready light will turn on and off during use.
-
Place the prepared sandwich onto the bottom cooking plate. Always place sandwiches towards the rear of the bottom cooking plate.
-
Close the top cooking plate which has a floating plate that is designed to evenly press down on the sandwich. The lid must be closed for cooking. If you are cooking thicker sandwiches, or open sandwiches, move the floating hinge step to setting 1, 2 or 3 to position the top cooking plate higher.
-
Toasting should take approximately 5–8 minutes. The exact toasting time will depend on the type of bread and the type of filling used.
-
When the sandwich is cooked, open the lid. Remove it using a plastic or wooden spatula. Never use metal tongs or a knife as these can cause damage to the DuraCeramic™ coating.
CLEANING
Always unplug your appliance before cleaning it.
Never immerse any part of the appliance or power cord and plug in water or any other liquid.
- Switch off and unplug the sandwich press from the mains supply.
- Allow your sandwich press to cool slightly. The unit is easier to clean when slightly warm.
- Always clean your sandwich press after each use to prevent a build up of baked on foods.
- Wipe the cooking plates with a soft cloth. If cooked-on food is not removed by this method, reheat the unit for 1–2 minutes, then brush with a little oil or melted butter. Allow to stand for five minutes then wipe with a damp cloth.
- To clean the outside of the sandwich press wipe over with a damp cloth. Polish with a soft dry cloth.
To avoid damaging the DuraCeramic ^™ coating on the cooking plates, do not use harsh or abrasive cleaning materials.
Do not use spray-on non-stick coatings because they will affect the performance of the DuraCeramic™ coatings on the cooking plates.
STORAGE
- Allow the sandwich press to cool fully before storing and ensure that the unit is clean.
- Wrap the cord in the cord storage area below the unit.
- Lock the plates together by first lowering the top plate and then moving the floating step hinge to locked 🔒. This will secure the plates together.
- Store the unit upright. Alternatively, on a flat, level surface, away from the edge and where it cannot be easily knocked over.
TURN ON YOUR CREATIVITY™
Let the Breville® team help you turn on your creativity with a gateway to a world of food and drinks without limits. You don't have to travel far—just to your computer, tablet or mobile—where you will discover our FREE website with top tips and recipes to inspire your imagination. Join us now at: www.turnonyourcreativity.com
Turn on your creativity®
RECIPE IDEAS
Bread
Most types of bread can be used; white, wholemeal, kibbled wheat, wholegrain, raisin loaf and so on. Your sandwich press is ideal for toasting foccacia, Turkish bread, baguettes as well as bread rolls. Raisin bread, brioche or other sweet breads which contain a high sugar content will tend to brown quicker, so we recommend using a lower heat setting.
Fillings
Try to use canned or pre-cooked fruit as fresh fruit may give off excessive juices when heated. Be careful when biting into sandwiches containing fillings such as cheese and tomato or jam, because they retain heat and can burn if eaten too quickly.
Never overfill your sandwich, especially when using ingredients that contain food colouring, or coloured cheeses. Too much filling can leak out and may stain the housing of your sandwich press.
Toasting bread
The unique flat plate design makes your sandwich press ideal for toasting plain breads, and Turkish bread, without any fillings or spreads. Try toasting Turkish bread with jams for a great alternative to standard breads at breakfast.
Reheating
If the sandwich is not being eaten immediately, place it on a paper napkin to absorb condensation. To keep for longer, place on a rack in an oven-proof dish to keep warm in a low oven, about 100^ C. The sandwich will keep hot for up to 20 minutes this way, but will then begin to dry out.
Fat-free snacks
Due to the non-stick ceramic flat plate design, it is not necessary to use any butter or margarine on the outside of your toasted snacks.
RECIPES
Warming / toasting table
| Food item Temperature setting | Cooking time | |
| Warming croissants | Low to Medium 3–4 minutes | |
| Warming Danish pastries | Low to Medium 3–4 minutes | |
| Warming flat breads | Medium 2–3 minutes | |
| Toasting fruit bread | Medium 2–3 minutes | |
| Toasting flavoured bagels | Medium 2–3 minutes | |
| Toasted Madeira cake | Medium to High 2–3 minutes | |
Smoked ham bocadillo - serves 1
• 1 pre-cooked baguette, sliced lengthways
- 50g smoked ham
- 80g sliced cheese, Iberico or Manchego work well
- Optional – aioli, ketchup or mustard
- Adjust the temperature setting to medium–high.
- Preheat your sandwich press until the ready light goes out.
- Arrange the ham and cheese slices onto the baguette, top with a little sauce of your choice, close the baguette and place onto the hot sandwich press.
- Adjust the hinge lid so that the top plate is just resting onto the bread and cook for 6–7 minutes, until the cheese has melted and the bread is crisp and golden.
Toasted Mexican style tortillas - serves 2
- 2 soft floury tortillas
- 1 tsp chipotle paste
-
75g salsa
• 2 tbsp cooked mixed beans
• 1 tbsp chopped coriander
• 2 large handfuls of grated cheddar -
Adjust the temperature setting to medium–high.
- Preheat your sandwich press until the ready light goes out.
- Assemble the tortillas by mixing together the chipotle paste, salsa, mixed beans, coriander and cheddar.
- Divide between the 2 tortillas, placing the ingredients into the centre of the wrap. Carefully fold to encase the filling.
- Place onto the hot press, adjusting the hinge lid so that it covers the tortilla without touching the top.
- Cook for 7–8 minutes until piping hot.
Delicious served with some creamy guacamole and a green salad.
Toasted Italian focaccia - serves 2
• 2 small olive focaccia breads
- 1 12 tbsp pesto
• 150g vine tomatoes, sliced
• 100g mozzarella, drained and sliced
- 1 large roasted red pepper from a jar of antipasto, sliced
- Small handful of torn basil leaves
- Adjust the temperature setting to medium–high.
- Preheat your sandwich press until the ready light goes out.
- Assemble the focaccias by splitting the bread and filling with the ingredients.
- Place onto the hot press, adjusting the lid so that it covers the sandwiches without pressing them.
- Cook for 7–8 minutes until golden.
Antipasto rye bread - serves 2
- 4 slices rye bread
- 2 tbsp pesto
• 2 tbsp mixed antipasti, drained -
6 slices of salami
• 4 slices Gruyère or Emmental cheese -
Adjust the temperature setting to medium–high.
- Preheat your sandwich press until the ready light goes out.
- Spread the rye bread with the pesto and top with the remaining ingredients.
- Adjust the hinge lid so that it covers the sandwiches without pressing them.
- Cook for 6–7 minutes, until golden, crisp and heated through.
Brie, caramelized pecans and dark chocolate crisp - serves 2
- 30g whole pecans
- 15g butter
• 1 tbsp brown sugar - Softened butter for spreading
• 4 slices of white crusty bread -
100g sliced Brie
• 30g dark chocolate, chopped -
Place a small frying pan over low heat, melt the butter and brown sugar together.
- Add the pecans and increase the heat slightly until the pecans are lightly toasted in the buttery mixture.
- Remove from the heat and allow to cool.
- Adjust the temperature setting to medium-high.
- Preheat your sandwich press until the ready light goes out.
- Spread the softened butter onto each slice of bread on 1 side only.
- Assemble the sandwiches with the Brie, a scattering of the chocolate and the cooled pecans, ensuring that the buttered side of the bread is to the outside.
- Place the closed sandwiches onto the hot press, adjust the hinge lid so that it covers the sandwiches until just resting on the top slice.
- Cook for 5–6 minutes until piping hot and golden.
Crispy brioche with berries and ice cream - serves 2
• 1 handful of strawberries, hulled and sliced
• 1 handful of blueberries
• 1 handful of raspberries, lightly crushed
• 2 slices of brioche, thickly cut
• Vanilla ice-cream or sweetened mascarpone
- Icing sugar, sifted
-
Adjust the temperature setting to medium.
-
Preheat your sandwich press until the ready light goes out.
-
Place the sliced brioche onto the hot press, adjusting the hinge lid so that it just covers and rests on top of the bread.
- Toast for 2–3 minutes until golden.
Serve warm with the mixed berries, vanilla ice cream and a dust of icing sugar. This recipe is also delicious made with toasted Madeira cake slices.
Sweet fig and maple glazed bacon focaccia - serves 2
- 2 small focaccia rolls
- 4 slices of cooked and crispy maple-glazed bacon rashers
-
80g ricotta cheese
• 3 fresh figs, thinly sliced
• 1 tbsp maple syrup -
Adjust the temperature setting to medium–high.
-
Preheat your sandwich press until the ready light goes out.
- Split the focaccias in half and toast until golden and crisp. Spread with ricotta cheese, top with the bacon, figs and a drizzle of maple syrup.
- Place onto the hot press and cook for 4–5 minutes until warmed through.
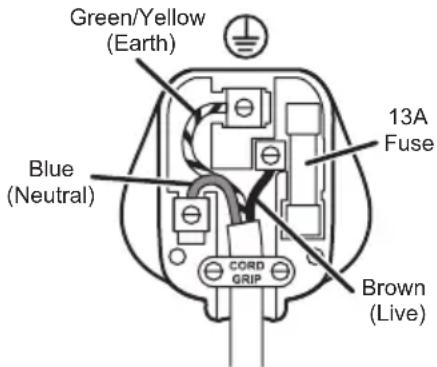
FITTING OF A PLUG - FOR U.K. AND IRELAND ONLY
This appliance must be earthed.
If the plug is not suitable for the socket outlets in your home, it can be removed and replaced by a plug of the correct type.
If the fuse in a moulded plug needs to be changed, the fuse cover must be refitted. The appliance must not be used without the fuse cover fitted.
If the plug is unsuitable, it should be dismantled and removed from the supply cord and an appropriate plug fitted as detailed. If you remove the plug it must not be connected to a 13 amp socket and the plug must be disposed of immediately.
If any other plug is used, a 13 amp fuse must be fitted either in the plug or adaptor or at the distributor board.
Plug should be ASTA approved to BS1363
Fuse should be ASTA approved to BS1362
text_image
Green/Yellow (Earth) Blue (Neutral) 13A Fuse CORD GRIP Brown (Live)Ensure that the outer sheath of the cable is firmly held by the cord grip
GUARANTEE
Please keep your receipt as this will be required for any claims under this guarantee.
This appliance is guaranteed for 2 years after your purchase as described in this document.
During this guaranteed period, if in the unlikely event the appliance no longer functions due to a design or manufacturing fault, please take it back to the place of purchase, with your till receipt and a copy of this guarantee.
The rights and benefits under this guarantee are additional to your statutory rights, which are not affected by this guarantee. Only Jarden Consumer Solutions (Europe) Limited (“JCS (Europe)”) has the right to change these terms.
JCS (Europe) undertakes within the guarantee period to repair or replace the appliance, or any part of appliance found to be not working properly free of charge provided that:
- you promptly notify the place of purchase or JCS (Europe) of the problem; and
- the appliance has not been altered in any way or subjected to damage, misuse, abuse, repair or alteration by a person other than a person authorised by JCS (Europe).
Faults that occur through, improper use, damage, abuse, use with incorrect voltage, acts of nature, events beyond the control of JCS (Europe), repair or alteration by a person other than a person authorised by JCS (Europe) or failure to follow instructions for use are not covered by this guarantee. Additionally, normal wear and tear, including, but not limited to, minor discoloration and scratches are not covered by this guarantee.
The rights under this guarantee shall only apply to the original purchaser and shall not extend to commercial or communal use.
If your appliance includes a country-specific guarantee or warranty insert please refer to the terms and conditions of such guarantee or warranty in place of this guarantee or contact your local authorized dealer for more information.
Waste electrical products should not be disposed of with Household waste. Please recycle where facilities exist. E-mail us at enquiries enquiriesEurope@jardencs.com for further recycling and WEEE information.
Jarden Consumer Solutions (Europe) Limited 5400 Lakeside
Cheadle Royal Business Park
Cheadle
SK8 3GQ
UK

FR
INSTRUCTIONS DE SÉCURITÉ IMPORTANTES
Turn on your creativity®
IDÉES DE RECETTE
Pain
Jarden Consumer Solutions (Europe) Limited 5400 Lakeside
Cheadle Royal Business Park
Cheadle
SK8 3GQ
UK

Turn on your creativity®
REZEPTVORSCHLÄGE
Brot
Jarden Consumer Solutions (Europe) Limited 5400 Lakeside
Cheadle Royal Business Park Cheadle
SK8 3GQ
Großbritannien

Turn on your creativity®
IDEAS PARA RECETAS
Pan
Jarden Consumer Solutions (Europe) Limited
Edif. Vázquez Krasnow
Turn on your creativity®
IDEIAS PARA RECEITAS
Pão
Jarden Consumer Solutions (Europe) Limited
Edif. Vázquez Krasnow
Turn on your creativity®
IDEE DI RICETTE
Pane
Jarden Consumer Solutions (Europe) Limited 5400 Lakeside
Cheadle Royal Business Park
Cheadle, SK8 3GQ, UK

BELANGRIJKE VEILIGHEIDSINSTRUCTIES
ZORGVULDIG LEZEN EN BEWAREN VOOR TOEKOMSTIG GEBRUIK.
Turn on your creativity®
RECEPTIDEEËN
Brood
Jarden Consumer Solutions (Europe) Limited 5400 Lakeside
Cheadle Royal Business Park
Turn on your creativity®
RESEPTI-IDEOITA
Leipä
Jarden Consumer Solutions (Europe) Limited 5400 Lakeside
Cheadle Royal Business Park
Cheadle
SK8 3GQ
UK

VIKTIGA SÄKERHETSANVISNINGAR
LÄS NOGA OCH SPARA DEM OM DU BEHÖVER LÄSA DEM IGEN
Turn on your creativity®
RECEPT
Bröd
Jarden Consumer Solutions (Europe) Limited 5400 Lakeside
Cheadle Royal Business Park
Cheadle
SK8 3GQ
UK

VIGTIGE SIKKERHEDSOPLYSNINGER
Turn on your creativity®
OPSKRIFTSIDEER
Brød
Jarden Consumer Solutions (Europe) Limited 5400 Lakeside
Cheadle Royal Business Park
Cheadle
SK8 3GQ
UK

VIKTIGE SIKKERHETSINSTRUKSJONER
Turn on your creativity®
OPPSKRIFTSIDEER
Brød
Jarden Consumer Solutions (Europe) Limited 5400 Lakeside
Cheadle Royal Business Park Cheadle
SK8 3GQ
UK

WAŻNE ZASADY BEZPIECZEŃSTWA
UWAŻNIE PRZECZYTAJ I ZACHOWAJ NA PRZYSZŁOŚĆ.
KORZYSTANIE Z TOSTOWNICY
Turn on your creativity®
Jarden Consumer Solutions (Europe) Limited 5400 Lakeside
Cheadle Royal Business Park
Turn on your creativity®
NÁPADY NA PŘÍPRAVU
Slané pečivo
Jarden Consumer Solutions (Europe) Limited 5400 Lakeside
Cheadle Royal Business Park
Cheadle, SK8 3GQ, UK

INFORMATII IMPORTANTE PRIVIND SIGURANTA
Turn on your creativity®
IDEI DE RETETE
Pâinea
Jarden Consumer Solutions (Europe) Limited 5400 Lakeside
Cheadle Royal Business Park
Cheadle, SK8 3GQ, UK

Turn on your creativity®
ИДЕИ ЗА РЕЦЕПТИ
Хляб
Jarden Consumer Solutions (Europe) Limited 5400 Lakeside
Cheadle Royal Business Park
Cheadle
SK8 3GQ
UK

VAŽNE SIGURNOSNE INFORMACIJE
Turn on your creativity®
IDEJE ZA RECEPTE
Kruh
Može se upotrijebiti većina vrsti kruha: bijeli, od neprosijanog brašna, izlomljenog zrna, integralnog brašna, kruh s groždicama i tako dalje. Vaša preša za sendviče idealna je da izradu tosta od foccacije, somuna, baguetta, kao i žemlja. Kruh s groždicama, brioche ili ostale vrste slatkog kruha koje sadrže visoki udio šećera brže poprimaju smeđu boju, pa preporučujemo nižu postavku topline.
Nadjevi
Pokušajte s upotrebom konzerviranog ili sušenog voća jer svježe voće prilikom zagrijavanja može puštati previše sokova. Pazite kada jedete sendviče s nadjevima kao što su sir, rajčica ili džem, jer oni zadržavaju toplinu i možete se opeći ako ih prebrzo jedete.
Jarden Consumer Solutions (Europe) Limited 5400 Lakeside
Cheadle Royal Business Park Cheadle
SK8 3GQ
UK

Turn on your creativity®
Ιδέες για συνταγές
Ψωμί
Jarden Consumer Solutions (Europe) Limited 5400 Lakeside
Cheadle Royal Business Park Cheadle, SK8 3GQ, UK

Breville®
UK: Jarden Consumer Solutions (Europe) Limited Cheadle Royal Business Park, Cheadle, SK8 3GQ, United Kingdom e-mail: enquiriesEurope@jardencs.com Tel: +44 (0)161 621 6900
France: Jarden Consumer Solutions (Europe) Limited 420 Rue D'Estienne D'Orves, 92700 Colombes, France email: serviceinfoFrance@jardencs.com Téléphone: +33 (0)1 49 64 20 60
España: Jarden Consumer Solutions (Europe) Limited Edif. Vázquez Krasnow C/ Camino de la Zarzuela, 21 1º - Oficina 1B, 28023 – Aravaca, Madrid, España Tlf: +34 90 251 55 88
© 2016 Jarden Consumer Solutions (Europe) Limited.
All rights reserved. Imported and distributed by Jarden Consumer Solutions (Europe) Limited, 5400 Lakeside, Cheadle Royal Business Park, Cheadle, SK8 3GQ, United Kingdom. Jarden Consumer Solutions (Europe) Limited is a subsidiary of Newell Brands Inc. (NYSE: NWL).
The product supplied may differ slightly from the one illustrated due to continuing product development. Printed In China