
EO1 - Oven AENO - Free user manual and instructions
Find the device manual for free EO1 AENO in PDF.
| Product type | Electric oven |
| Brand | AENO |
| Model | EO1 |
| Dimensions (Width × Depth × Height) | 530 mm × 380 mm × 300 mm |
| Volume | 30 L |
| Rated voltage | 220–240 V~, 50/60 Hz |
| Rated power | 1600 W |
| Temperature range | 38–230 °C |
| Maximum cooking time | 120 minutes |
| Number of heating elements | 4 |
| Control type | Electronic touch |
| Automatic programs | 8 (Bread, Pie, Pizza, Cookies, Steak, Chicken, Dough Resting, Defrost) |
| Special functions | Grill, Convection, Backlit camera |
| Included accessories | Baking tray, chrome grill, handle, rotisserie, quick guide |
| Maintenance and cleaning | Clean with damp sponge and soapy water after each use; avoid abrasive products |
| Safety instructions | Do not use with damaged cable; do not touch hot surfaces; leave 10 cm of ventilation space |
| Warranty period | 2 years |
| Manufacturer | ASBISC Enterprises PLC, Cyprus |
| Origin | Made in China |
Frequently Asked Questions - EO1 AENO
User questions about EO1 AENO
0 question about this device. Answer the ones you know or ask your own.
Ask a new question about this device
Download the instructions for your Oven in PDF format for free! Find your manual EO1 - AENO and take your electronic device back in hand. On this page are published all the documents necessary for the use of your device. EO1 by AENO.
USER MANUAL EO1 AENO
aeno.com/documents
C

flowchart
graph TD
    A["Feedling with a mouse"] --> B["Add feed into chicken"]
    B --> C["Add feed into fish"]
    C --> D["Add feed into chicken again"]
    D --> E["Add feed into fish again"]
    E --> F["Add feed into chicken again"]
    F --> G["Add feed into fish again"]
    G --> H["Add feed into chicken again"]
    H --> I["Add feed into fish again"]
    I --> J["Add feed into chicken again"]
    J --> K["Add feed into fish again"]
    K --> L["Add feed into chicken again"]
    L --> M["Add feed into fish again"]
    M --> N["Add feed into chicken again"]
    N --> O["Add feed into fish again"]
    O --> P["Add feed into chicken again"]
    P --> Q["Add feed into fish again"]
    Q --> R["Add feed into chicken again"]
    R --> S["Add feed into fish again"]
    S --> T["Add feed into chicken again"]
    T --> U["Add feed into fish again"]
    U --> V["Add feed into chicken again"]
    V --> W["Add feed into fish again"]
    W --> X["Add feed into chicken again"]
    X --> Y["Add feed into fish again"]
    Y --> Z["Add feed into chicken again"]
6 aeno.com/documents

aeno.com/documents
E

8 aeno.com/documents
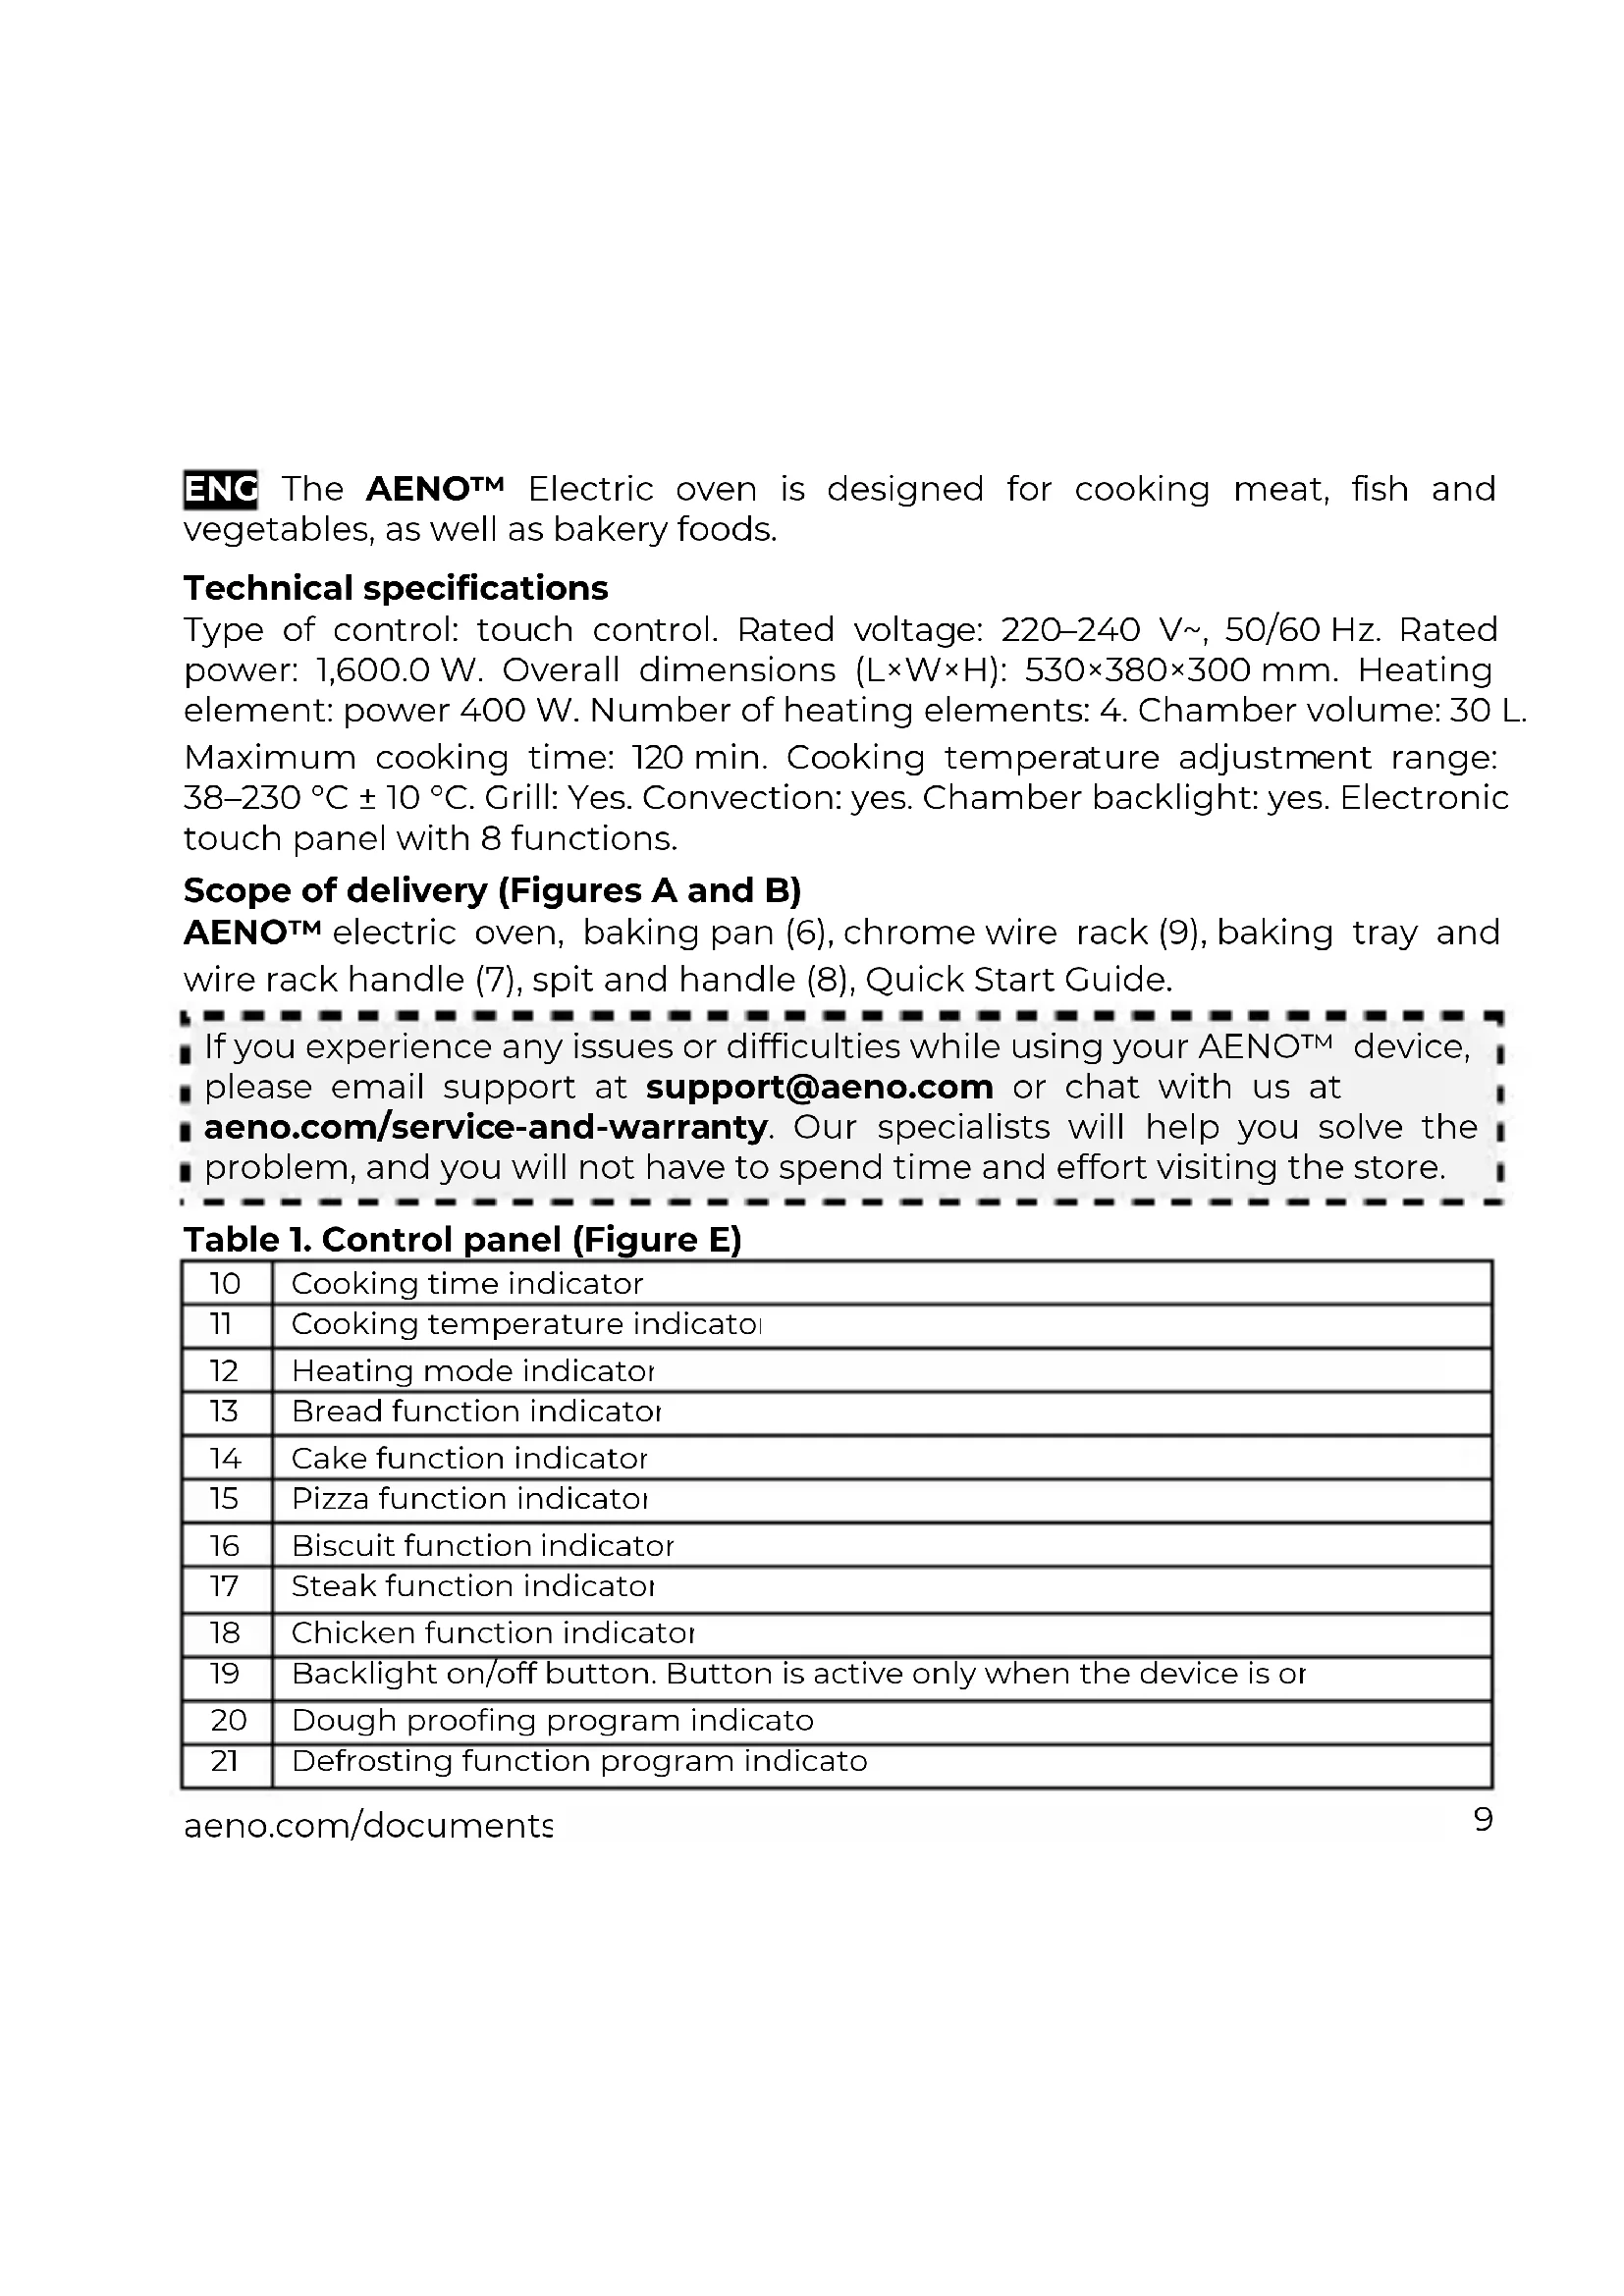
ENC The AENOTM Electric oven is designed for cooking meat, fish and vegetables, as well as bakery foods.
Technical specifications
Type of control: touch control. Rated voltage: 220–240 V\~, 50/60 Hz. Rated power: 1,600.0 W. Overall dimensions (L×W×H): 530×380×300 mm. Heating element: power 400 W. Number of heating elements: 4. Chamber volume: 30 L. Maximum cooking time: 120 min. Cooking temperature adjustment range: 38–230 °C ± 10 °C. Grill: Yes. Convection: yes. Chamber backlight: yes. Electronic touch panel with 8 functions.
Scope of delivery (Figures A and B)
AENOTM electric oven, baking pan (6), chrome wire rack (9), baking tray and wire rack handle (7), spit and handle (8), Quick Start Guide.
If you experience any issues or difficulties while using your AENO™ device, please email support at support@aeno.com or chat with us at aeno.com/service-and-warranty. Our specialists will help you solve the problem, and you will not have to spend time and effort visiting the store.
Table 1. Control panel (Figure E)
| 10 | Cooking time indicator |
| 11 | Cooking temperature indicator |
| 12 | Heating mode indicator |
| 13 | Bread function indicator |
| 14 | Cake function indicator |
| 15 | Pizza function indicator |
| 16 | Biscuit function indicator |
| 17 | Steak function indicator |
| 18 | Chicken function indicator |
| 19 | Backlight on/off button. Button is active only when the device is or |
| 20 | Dough proofing program indicato |
| 21 | Defrosting function program indicato |
aeno.com/documents
| 22 | Time adjustment. Press to activate the time display, then adjust the time with buttons (25) and (27) |
| 23 | Heating mode selection (top, bottom, top and bottom, top and bottom with convection, top and bottom with grill, top and bottom with convection and grill) |
| 24 | Temperature control. Press to activate the temperature indicator, then adjust temperature with buttons (25) and (27) |
| 25 | Reducing time or temperature (one short press – one-unit increment, long press – continuous reducing until the button is released) |
| 26 | Start/Pause:Press to switch on the oven.After selecting the mode, time and temperature, press to start the program.During cooking, press to interrupt the program execution, and activate the control panel by botton (28) firstly, and then change the mode and/or program setting. If the stop time exceeds 5 minutes, the oven enters standby mode.Press to start or pause the program: the first press will start the program, the second will pause the program |
| 27 | Increasing time or temperature (one short press – one-unit increment, long press – continuous increasing until the button is released) |
| 28 | Activating the control panel. The panel is active for seconds after pressing the button. If there is no action, the oven will go into power off.Turn on or turn off power. If you want to turn off the oven during cooking, need to pause the program firstly by botton (26), and then the first press botton (28) will re-activate the control panel, the second will turn off the oven |
Limitations and Warnings
WARNING! This appliance is designed for domestic use only, industrial use is not considered as intended use and results in breach of warranty.
Before connecting the device to the mains make sure that the mains parameters correspond to the technical specifications. To prevent grease
10 aeno.com/documents
building, clean the oven with a cloth or sponge after each use. Allow the device to cool completely before cleaning. For cleaning, you can use a sponge/cloth dampened with soapy water or liquid/creamy cleaners designed for stainless steel. The use of abrasive cleaning agents and sharp objects is prohibited. Unplug the unit after use, during cleaning or moving. Unplug the power cord from the power outlet with dry hands, holding the plug. Do not use the device with a damaged power cord. Do not expose the appliance to moisture. Do not place objects filled with liquids, such as vases, on top of the oven. The temperature of accessible surfaces may be high when the appliance is operating. Do not touch hot surfaces, use oven mitts or kitchen gloves to handle accessories. Open the oven door only by the handle (1). Do not allow the ventilation slots (5) to be blocked. Provide air access for ventilation from all sides: at least 10 cm on the top, at least 10 cm on the right and left sides of the oven, and 4–5 cm on the back side (figure D). Place the appliance on a heat-resistant mat.
Before you begin. First start
Unpack the electric oven and accessories and remove the packing materials. Place the appliance according to the rules described in the "Limitations and Warnings" section. Make sure that the oven is not plugged in. Wash all removable parts with warm soapy water and dry. Thoroughly wipe the interior and exterior of the oven with a damp cloth. Dry thoroughly. Plug the power cord into a power outlet. The oven alert will sound and the control panel indicators will light up for a second and then go off. Press the control panel activation button (28). Use the heating mode selection button (23) to select the upper and lower heating modes, use the temperature control button (24) and the "+/-" buttons (25), (27) to set the temperature to 230 °C, use the time control button (22) and the "+/-" buttons (25), (27) to set the time to 15 minutes. Start the process by pressing the Start/Pause button (26). Wait until the operation is finished. The oven is now ready to use.
WARNING! When the oven is turned on for the first time, it may emit vapors and unpleasant odor. This is temporary.
aeno.com/documents
Operation
- Place the food to be cooked on a baking pan, wire rack or spit and load into the oven. Press button (28) to activate the control panel.
- Select the desired function (Table 2), adjust the temperature and time settings if necessary.
- Press the Start/Pause button (26).
Note: If desired, you can set your own electric oven operation parameters by selecting the desired heating mode, time, and temperature.
Table 2 - Automatic functions
| Function | Description |
| Bread | Default settings: top and bottom heating at 170 °C for 2C minutes. Adjustment options: temperature range 150–210 °C, time range 10–40 minutes |
| Pie | Default settings: top and bottom heating at 170 °C for 40 minutes. Adjustment options: temperature range 150–210 °C, time range 30–60 minutes |
| Pizza | Default settings: top and bottom heating at 180 °C for 15 minutes. Adjustment options: temperature range 160–200 °C, time range 10–20 minutes |
| Steak | Default settings: top and bottom heating at 2C°C for 20 minutes Adjustment options: temperature range 150–230 °C, time range 5–30 minutes |
| Biscuit | Default settings: top and bottom heating at 170 °C for 30 minutes. Adjustment options: temperature range 150–200 °C, time range 20–50 minutes |
| Chicken | Default settings: top and bottom heating at 23 °C for 40 minutes. Adjustment options: temperature: no, time range 55–90 minutes |
| Dough proofing | Default settings: 60 minutes at 38°C ; temperature adjustment: n; time adjustment: 30–90 minutes |
| Defrosting | Default settings: 100 minutes at 50 °C; temperature adjustment: no; time adjustment: 30–120 minutes |
12 aeno.com/documents
Troubleshooting
- The oven does not switch on. Possible causes: the device is not connected to the mains; the socket is defective. Solution: connect the device to the mains; connect the device to a working socket.
- No heating. Possible cause: incorrect program selection or mode settings. Solution: Set the correct program or adjust the modes accordingly.
- Noise during operation. Possible causes: elements heating, fan operation. Solution: actions are not required.
WARNING! If none of the possible solutions solves your problem, contact your supplier or service center. Do not disassemble or attempt to repair the unit yourself.
ASBISC reserves the right to modify the device and to revise and change this document without prior notice to users.
The warranty period and service life are 2 years from the date of retail sale of the device. Manufacturer: ASBISC Enterprises PLC, Iapetou, 1, Agios Athanasios, 4101, Limassol, Cyprus. Tel.: +48732080077, info@asbis.com, asbis.com. Made in China. All trademarks used herein are the property of their respective owners. The date of manufacture is marked on the package.
Up-to-date information about and a detailed description of the device, as well as connection instructions, certificates, and details about the companies that deal with quality and warranty claims are available at aeno.com/documents. This device complies with applicable safety requirements.
RoHS Directive. The device complies with the requirements of the Directive 2011/65/EU on the Restriction of Hazardous Substances (RoHS), including the requirements of the RoHS Directive 2015/863/EU.
aeno.com/documents
Unjnlwly 2 – ‘wnnpwwundwi wylnnduwn dpwqptn
| Đnwnqħn Ğlwnwnqnlpəjnli | |
| Üw Lntjuwjü lwnqnulnpniufutp. ütpluh lü ütprpluh unwpugniú 170 °Cztpnüwwunh6wūnliú 20 pnwlth püəwgpniú: 150–210 °C ühqwulwypniúztpnüwwunh6wūh 62qnundwú hāwnwnlnpnijaņniú, dwnüwūwln` 10–40pnwt | |
| Üwnlqwūnwul Lntjuwjü lwnqnulnpniufutp. ütpluh lü ütprpluh unwpugniú 170 °Cztpnüwwunh6wūnliú 40 pnwlth püəwgpniú: 150–210 °C ühqwulwypniúztpnüwwunh6wūh 62qnundwú hāwnwnlnpnijaņniú, dwnüwūwln` 30–60 pnwt | |
| Thggw Lntjuwjü lwnqnulnpniufutp. ütpluh lü ütprpluh unwpugniú 180 °Cztpnüwwunh6wūnliú 15 pnwlth püəwgpniú: 160–200 °C ühqwulwypniúztpnüwwunh6wūh 62qnundwú hāwnwnlnpnijaņniú, dwnüwūwln` 10–20pnwt | |
| Uptjär Lntjuwjü lwnqnulnpniufutp. ütpluh lü ütprpluh unwpugniú 200 °Cztpnüwwunh6wūnliú 20 pnwlth püəwgpniú: 150–230 °C ühqwulwypniúztpnüwwunh6wūh 62qnundwú hāwnwnlnpnijaņniú, dwnüwūwln` 5–30 pnwt | |
| Ehuylhra Lntjuwjü lwnqnulnpniufutp. ütpluh lü ütprpluh unwpugniú 170 °Cztpnüwwunh6wūnliú 30 pnwlth püəwgpniú: 150–200 °C ühqwulwypniúztpnüwwunh6wūh 62qnundwú hāwnwnlnpnijaņniú, dwnüwūwln` 20–50pnwt | |
| Üw Lntjuwjü lwnqnulnpniufutp. ütpluh lü ütprpluh unwpugniú 230 °Cztpnüwwunh6wūnliú 40 pnwlth püəwgpniú: Ωtpnuwwunh6wūh 62qnunnlú `ns;dwnüwūwln` 62qnundwú ühqwulwypn` 55–90 pnwt | |
| Iuünphhuunu#wgnniú | Lntjuwjü lwnqnulnpniufutp. 60 pnwt 38 °C ztpnuwwunh6wūnliú; ztpnuwwunh6wūh62qnunnlú `ns, dwuówuwlgh 62qnunnlú` 30–90 pnwt |
| Üwltgnniú Lntjuwjü lwnqnulnpniufutp. 100 pnwt 50 °C ztpnuwwunh6wūnliú;ztpnüwwunh6wūnliú; ztpnuwwunh6wūh 62qnunnlú `ns, dwuówuwlgh 62qnunnlú` 30–120pnwt | |
<δωρωμην ωδωρωρηλεηλύθην ιτρωμην
RoHS ηhptiynh: Uwnp hwnwwnwnwnwnwntnf t qwnwnwnwnn pwnpwnwnwnwnpwn wwhdwwnwnwnwnwnwnwnwnwnwnwnwnwnwnwnwnwnwnwnwnwnwnwnwnwnwnwnwnwnwnwnwnwnwnwnwnwnwnwnwnwnwnwnwnwnwnwnwnwnwnwnwnwnwnwnwnwnwnwnwnwnwnwnwnwnwnwnwnwnwnwnwnwnwnwnwnwnwnwnwnwnwnwnwnwnwnwnwnwnwnwnwnwnwnwnwnwnwnwnwnnn
70 aeno.com/documents
ENG Recycling information. This symbol indicates that you must follow the Waste Electrical and Electronic Equipment (WEEE) and Waste Battery and Battery Regulations when disposing of the device, its batteries and accumulators, and its electrical and electronic accessories. According to the rules, this equipment must be disposed of separately at the end of its service life. Do not dispose of the device, its batteries and accumulators, or its electrical and electronic accessories together with unsorted municipal waste, as this will harm the environment. To dispose of this equipment, it must be returned to the point of sale or turned in to a local recycling facility. You should contact your local household waste disposal service for details.
KAT Ḋśśśśśśśśśśśśśśśśśśśśśśśśśśśśśśśśśśśśśśśśśśśśśśśśśśśśśśśśśśśśśśśśśśśśśśśśśśśśśśśśśśśśśśśśśśśśśś Ś Ś Ś Ś Ś Ś Ś Ś Ś Ś Ś Ś Ś Ś Ś Ś Ś Ś Ś Ś Ś Ś Ś Ś Ś Ś Ś Ś Ś Ś Ś Ś Ś Ś Ś Ś Ś Ś Ś Ś Ś Ś Ś Ś Ś Ś Ś Ś Ś Ś Ś Ś Ś Ś Ś Ś Ś Ś Ś Ś Ś Ś Ś Ś Ś Ś Ś Ś Ś Ś Ś Ś Ś Ś Ś Ś Ś Ś Ś Ś Ś Ś Ś Ś Ś Ś Ś Ś Ś Ś Ś Ś Ś Ś Ś Ś Ś Ś Ś ŚŚŚŚŚŚŚŚŚŚŚŚŚŚŚŚŚŚŚŚŚŚŚŚŚŚŚŚŚŚŚŚŚŚŚŚŚŚŚŚŚŚŚŚŚŚŚŚŚŚŚŚŚŚŚŚŚŚŚŚŚŚŚŚŚŚŚŚŚŚŚŚŚŚŚŚŚŚŚŚŚŚŚŚŚŚŚŚŚŚŚŚŚŚŚŚŚŚŚŚŚ śṃṃṃṃṃṃṃṃṃṃṃṃṃṃṃṃṃṃṃṃṃṃṃṃṃṃṃṃṃṃṃṃṃṃṃṃṃṃṃṃṃṃṃṃṃṃṃṃṃṃṃṃṃṃṃṃṃṃṃṃṃṃṃṃṃṃṃṃṃṃṃṃṃṃṃṃṃṃṃṃṃṃṃṃṃṃṃṃṃṃṃṃṃṃṃṃṃṃṃṃ Municipal Council of the Secretary of the Secretary of the Secretary of the Secretary of the Secretary of the Secretary of the Secretary of the Secretary of the Secretary of the Secretary of the Secretary of the Secretary of the Secretary of the Secretary of the Secretary of the Secretary of the Secretary of the Secretary of the Secretary of the Secretary of the Secretary of the Secretary of the Secretary of the Secretary of the Secretary of the Secretary of the Secretary of the Secretary of the Secretary of the Secretary of the Secretary of the Secretary of the Secretary of the Secretary and the Secretary of the Secretary of the Secretary of the Secretary of the Secretary of the Secretary of the Secretary of the Secretary of the Secretary of the Secretary of the Secretary of the Secretary of the Secretary of the Secretary of the Secretary of the Secretary of the Secretary of the Secretary of the Secretary of the Secretary of the Secretary of the Secretary of the Secretary of the Secretary of the Secretary of the Secretary of the Secretary of the Secretary of the Secretary of the Secretary of the Secretary of the Secretary of the Secretary of that
natural_image
Symbolic icon of a person walking with arrows, enclosed in a circle (no text or symbols)FR
natural_image
Abstract black-and-white icon depicting a person moving with arrows, enclosed in a circle (no text or symbols)FR
ÉLÉMENT(S) D'EMBALLAGE


natural_image
Abstract black-and-white icon of a person moving with arrows, enclosed in a circle (no text or symbols)FR


Please contact our online support team if you have any questions or issues with your AENO device.
This is a better option than visiting the store and will save you time and effort

Get support


aeno.com/service-and-warranty
UKR Отримати підтримку BOS Dobijte podršku BUL Получаване на поддръжка CES Ziskojte podporu DEU Support erhalten ELL Λήψη υποστήριξης EST Saama toetuse FRA Obtenir de l'aide HRV Tražite pomoć na HUN Támogatás megszerzése HYE Ugwulgniajnia uwnwiiwi ITA Ottieni supporto KAT მხიțφομθμιν მოება KAZ Kolday any LAV Sanermt atbalstu LIT Gauti palaikymą NLD Ondersteuning krijgen POL Uzyskaj pomoc POR Obter apoio RON Obtineți asistentă RUS Получить поддержку SLK Ziskat podporu SLV Pridobite podporo SPA Obtener apoyo SRP Tražite pomoć na UZB Qollab quvatlash xizmatidan foydalanish


Brand : AENO
Model : EO1
Category : Oven