skimmarine 100 - Water filter EHEIM - Free user manual and instructions
Find the device manual for free skimmarine 100 EHEIM in PDF.
| Product type | Protein skimmer for saltwater aquarium |
| Brand | EHEIM |
| Model | Skimmarine 100 |
| Recommended aquarium volume | Up to 100 liters |
| Recommended air flow rate | 100 L/h |
| Recommended air pump | EHEIM 100 (ref. 3701010) |
| Mounting type | Magnetic (glass mounting) |
| Diffuser material | Linden wood |
| Diffuser replacement frequency | Approximately every 4 weeks |
| Main functions | Removal of metabolic waste by skimming |
| Maintenance and cleaning | Regular cleaning of components with clear water; periodic replacement of diffuser |
| Safety | Disconnect pump before maintenance; strong magnetic fields (distance >30 cm for implants) |
| Spare parts available | Complete magnet holder (ref. 4010800), complete cassette (ref. 7373280), set of 3 linden wood diffusers (ref. 7373328) |
| Repairability | Spare parts available; user maintenance |
| General information | Manual available in multiple languages; indoor use only |
Frequently Asked Questions - skimmarine 100 EHEIM
User questions about skimmarine 100 EHEIM
0 question about this device. Answer the ones you know or ask your own.
Ask a new question about this device
Download the instructions for your Water filter in PDF format for free! Find your manual skimmarine 100 - EHEIM and take your electronic device back in hand. On this page are published all the documents necessary for the use of your device. skimmarine 100 by EHEIM.
USER MANUAL skimmarine 100 EHEIM
natural_image
Technical line drawing of a mechanical device with no visible text or symbols3551000
| de | Bedienungsanleitung |
| en | Operating instructions |
| fr | Mode d'emploi |
| it | Istruzioni per l'uso |
| es | Manual de instrucciones |
| pt | Manual de instruções |
| nl | Bedieningshandleiding |
| da | Betjeningsvejledning |
| sv | Bruksanvisning |
| no | Bruksanvisning |
| fi | Käyttöohje |
| pl | Instrukcja obsługi |
| cs | Návod k obsluze |
| sk | Návod na obsluhu |
| hu | Használati utasítás |
| sl | Navodilo za upravljanje |
| ro | Manual de utilizare |
| ru | Руководство по обслуживанию |
| el | Однгієх хрі́юнє |

text_image
A ① ② ③
text_image
B ⑤ ④
text_image
C ④ ⑥
natural_image
3D technical diagram of a mechanical component with a pipe and housing, showing directional movement (no text or symbols)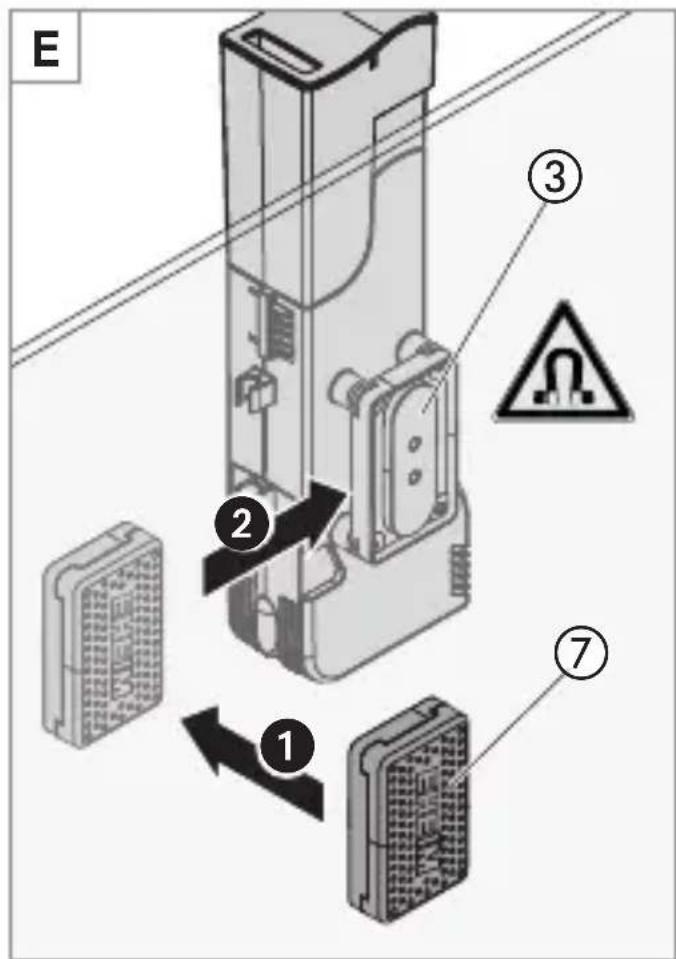
text_image
E ① ② ③ ⑦
text_image
F ⑧
text_image
G 1 2 ⑨ ②
natural_image
Mechanical assembly diagram showing a component being rotated, with an inset close-up of its internal structure (no text or symbols)Translation of the original operating manual nano skimmer skim marine 100
1. General user instructions
Information on using the operating manual

▶ Before using the appliance for the first time, the operating manual must be read fully and understood.
- Consider the operating manual as part of the product and keep in a safe and accessible location.
- Enclose this operating manual if passing the appliance on to a third party.
Explanation of symbols and notes

Risk of personal injury from dangerous voltage
The symbol denotes imminent danger causing severe personal injury or death if the corresponding measures are not taken.

Danger from magnetic fields
The symbol denotes imminent danger causing severe personal injury or death if the corresponding measures are not taken.

Risk of personal injury and material damage from a general source of danger
The symbol denotes imminent danger causing minor personal injury or material damage if the corresponding measures are not taken.

Note with useful information and tips.

Reference to a figure, in this case, reference to figure A

You are prompted for an action.
2. Application
Intended use
The appliance and all parts included in the scope of delivery are intended for private use and must only be used for the removal of metabolic products in saltwater aquariums up to 100 l.
3. Safety instructions
Risks for persons and property can arise from this appliance if the appliance is improperly used or not used as intended or if the safety instructions are not heeded.
- Do not let the appliance packaging get into the hands of children as hazards can arise (danger of suffocation!).
- This appliance can be used by children from the age of 8 and by persons with reduced physical, sensory or mental capabilities or lack of experience and/or knowledge if they are supervised and have been instructed in the safe use of the appliance and have understood the resulting dangers. Children must not play with the appliance. Cleaning and user maintenance must not be carried out by children unless they are supervised.
Safe operation

- The appliance is operated using an air pump. Heed the operating manual for the pump, especially the chapters on safety, commissioning, operation and maintenance!
· Do not use the appliance if there is obvious damage. - Only use original spare parts and accessories for the appliance.
- The appliance has a magnet with a strong magnetic field that can affect pacemakers or implanted defibrillators (ICD). Maintain a distance of at least 30 cm between the implant and magnet.

4. Commissioning
Installing the magnet holder (☒A)

Attention! Strong magnets! Danger of crushing!
▶ Separate the magnets by twisting them.
- Place the magnets at a distance of 30 cm away from each other.
- Secure the dampening rubbers ② into the pertinent bores ① with gentle twisting motions.
- At all four corners, press the magnet half without logo ③ onto the dampening rubbers.
- Check the grip by moving the magnet.
Installing the lime wood airstone
- Pull the box ④ out of the body ⑤ (☒B).
- Screw the airstone ⑥ onto the thread in the box until it stops (☒C).

- The hose and pump are not included in the scope of delivery.
- For optimal operation, an airflow of 100 l/h must be guaranteed. We recommend that you use the EHEIM air pump 100 (art.no. 3701010).
-
Please note that the actual airflow is reduced when a check valve is used, and a higher pump performance may be required as a result.
-
Connect your pump's hose to the connecting pieces of the box (☒D).

Hang the box in your aquarium and check the tightness of the connection. Ensure that no large air bubbles appear!
- Place the box at the lower edge and fold it into the body.
Installation in the aquarium (☒E)
- With one hand, hold the skimmer at the desired position in the aquarium from the inside.
-
With the other hand, carefully place the magnet half with logo ⑦ onto the glass panel at a distance from the skimmer (from the outside). Ensure that the magnet does not strike against the glass panel!
-
Move the magnet half in the direction of the skimmer on the glass until both magnet halves lie one above the other.
5. Operation
Start position
- Position the skimmer so that the water level of your aquarium matches the wavy line ⑧ (water level characteristic line) on the skimmer.
- Set your air pump to the middle level.

Following initial commissioning, the skimmer must “run in”. This can take up to one week. The skimmer usually starts to produce foam within the first 2 days. During this time, residual air may escape at the outlet. This is no cause for concern. Following the running-in period, no further residual air will escape.
Fine adjustment
You can adjust the skimming performance according to the air volume of the pump. You can also change the installation height of the skimmer. However, adjustment according to the air volume is preferred.
6. Maintenance

Attention! Electrocution!
▶ Before maintenance work, remove the mains plug of the pump.

Caution Material damage.
▶ Do not use hard objects or cleaning agents for cleaning.

The following sections describe maintenance work necessary for optimum and fault-free operation. Regular maintenance prolongs the service life and assures functionality of the skimmer over a long period.
Cleaning the skimmer
- Before maintenance work, remove the mains plug of the pump.
-
Hold the skimmer with one hand.
-
With the other hand, move the magnet half with logo on the glass panel away from the skimmer.
- Remove the skimmer.
- Remove the box (☒B).
- Loosen the hose and then disassemble the airstone (☒C/D).
- Pull the foam cup ⑨ away with the cover facing upwards (☒G1).
- Open the body by pressing in the two side latches at the same time (☒G2).
- Unfold the body ( H ).
- Using a brush, clean all components under a jet of water.
- Install the skimmer again in reverse order.

When assembling, make sure that the hinge for both halves of the body interlocks correctly ( H ).
Changing the lime wood airstone
The airstone must be changed approximately every 4 weeks.
To do so, proceed as follows:
- Before maintenance work, remove the mains plug of the pump.
- Hold the skimmer with one hand.
- With the other hand, move the magnet half with logo on the glass panel away from the skimmer.
- Remove the skimmer.
- Remove the box (☒B).
- Loosen the hose and then disassemble the airstone (☒C/D).
- Change the airstone

Lime wood airstone art. no. 7373328
- Install the skimmer again in reverse order.

In order to prevent the wood pores of the airstone from swelling, put the skimmer into operation immediately after the change.
7. Clearing faults

Attention! Electrocution!
▶ Before clearing faults, remove the mains plug of the pump.
Faults Possible cause Remedy
| Residual air at the outlet | Can occur after the water is changed | ► This ends automatically ly after approx. 1 day |
| Skimmer is too low ► Position the skimmer higher | ||
| No air bubbles Pump does not run ► Check the pump | ||
| Lime wood airstone swollen | ► Replace lime wood airstone | |
| · No skimming · Extremely weak air production · Large air bubbles at the airstone | The lime wood airstone has reached the end of its service life | ► Replace lime wood airstone |
| Defective skimming The skimmer position is incorrect | ► Please note the water level characteristic line! | |
| Skimming too strong (overflow) | Skimmer is too low ► Position the skimmer higher | |
| Air volume too high ► Reduce air volume | ||
For other faults, please contact EHEIM Service.
8. Decommissioning
Disposal
The appliance may be disposed of with the municipal or household waste. The appliance will be accepted free of charge at municipal collection points or recycling centres. The product packaging is made up of recyclable materials. Dispose of them in an environmentally responsible manner and take them for recycling.
9. Spare parts
See page 140.
| Item Description Art. no. | ||
| 1 | Magnet holder, complete 4010800 | |
| 2 | Box, complete 7373280 | |
| 3 | Lime wood airstone, 3-pack 7373328 | |
text_image
Exploded view diagram of a device showing internal components and assembly steps with numbered labelsReproduction or copying – even parts thereof – only with the express permission of the producer.