
WG349E.9 - Saw WORX - Free user manual and instructions
Find the device manual for free WG349E.9 WORX in PDF.
| Brand | Worx |
| Model | WG349E.9 |
| Product type | Cordless telescopic pole saw |
| Power source | Lithium-ion battery 20 V max (18 V nominal) |
| Guide bar length | 20 cm (8 inches) |
| Cutting length | 18 cm (7 inches) |
| Cutting speed | 5.0 m/s |
| Oil tank capacity | 80 ml |
| Chain pitch | 3/8" (0.95 cm) |
| Chain thickness (gauge) | 1.1 mm (0.043") |
| Number of drive links | 33 |
| Weight (with bar and chain) | 3.3 kg |
| Total reach | 3.6 m |
| Handle length (retracted/extended) | 1.8 m to 2.3 m |
| Saw head rotation angles | 0°, 15°, 30° (3 positions) |
| Rear handle rotation | 180° |
| Battery type | WA3551 (20 V, Li-ion) |
| Charging time | 1 hour |
| Sound pressure level (LpA) | 79.07 dB(A) |
| Sound power level (LwA) | 89.7 dB(A) |
| Vibration (ah) | 1.83 m/s² (uncertainty K=1.5 m/s²) |
| Lubrication | Automatic (biodegradable oil ISO VG32) |
| Kickback safety | Safety chain and anti-kickback guide bar |
| Included accessories | WA3551 battery, WA3880 charger, shoulder strap, bar and chain scabbard, head attachment WA0307 |
Frequently Asked Questions - WG349E.9 WORX
User questions about WG349E.9 WORX
0 question about this device. Answer the ones you know or ask your own.
Ask a new question about this device
Download the instructions for your Saw in PDF format for free! Find your manual WG349E.9 - WORX and take your electronic device back in hand. On this page are published all the documents necessary for the use of your device. WG349E.9 by WORX.
USER MANUAL WG349E.9 WORX
natural_image
Technical line drawing of a mechanical tool or device with multiple ports and shafts (no text or symbols)| 20V Cordless Pole Saw | EN | P09 |
| 20V Akku-Pole-Kettensäge | D | P21 |
| Scie à colonne sans fil 20V | F | P35 |
| 20 V Sega Potatrice a batteria | I | P48 |
| 20V Motosierra inalámbrica | ES | P62 |
| 20V Draadloze kettingzaag | NL | P76 |
| 20 V Akumulatorowa piła łańcuchowa | PL | P90 |
| 20 V Vezeték nélküli láncfúrész | HU | P104 |
| 20V Fierăstrău cu poli fără fir | RO | P118 |
| 20 V Akumulátorová řetězová pila | CZ | P132 |
| 20 V Akumulátorová ret'azová píla | SK | P146 |
| Serra de pólo sem fio 20V | PT | P160 |
| 20V Sladdlös motorsåg | SV | P174 |
| 20V Brezžična motorna žaga | SL | P186 |
natural_image
Technical line drawing of a chain-linking tool with labeled part (8), no text or symbols present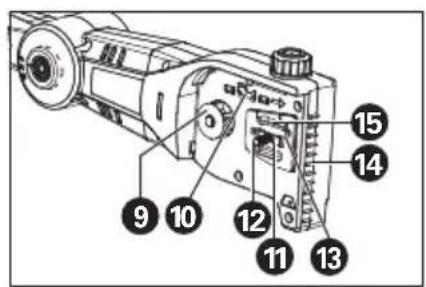
text_image
Labeled diagram of a mechanical device with numbered parts for identification
text_image
WORK 16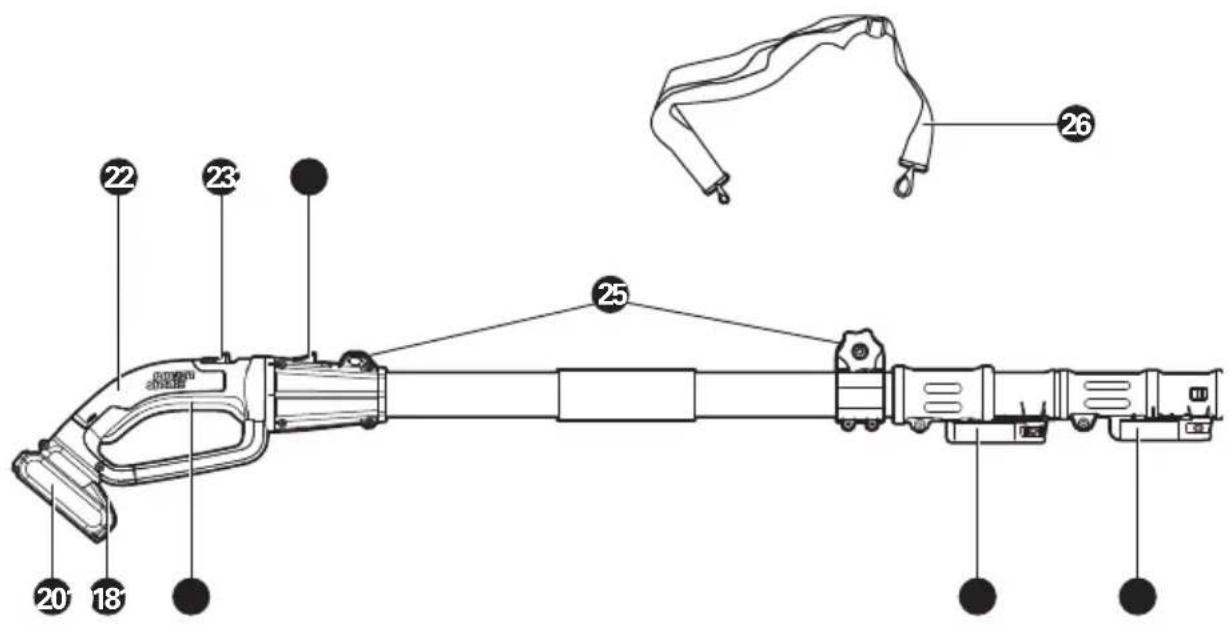
text_image
20 18 22 23 25 26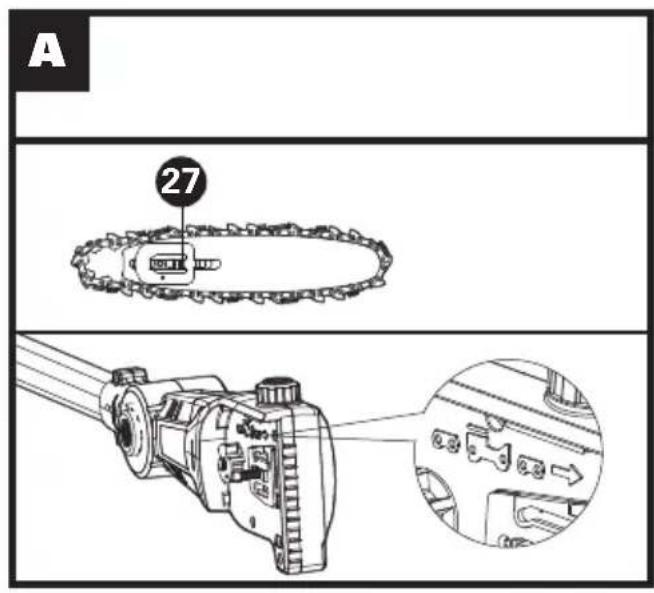
text_image
A 27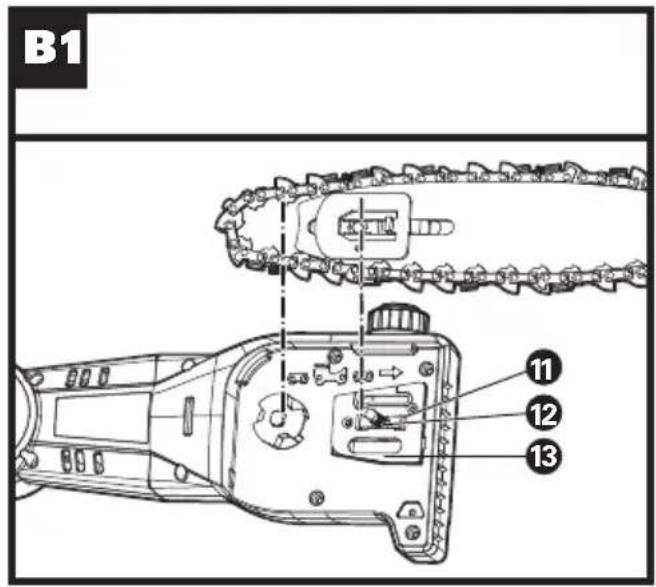
text_image
B1 11 12 13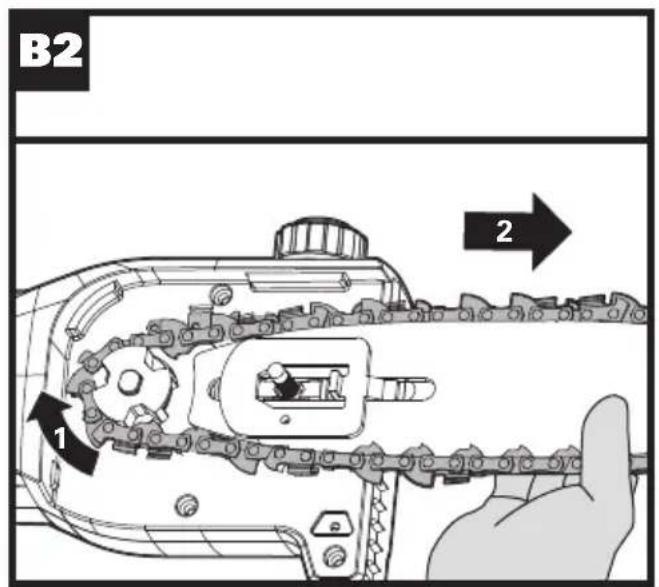
text_image
B2 1 2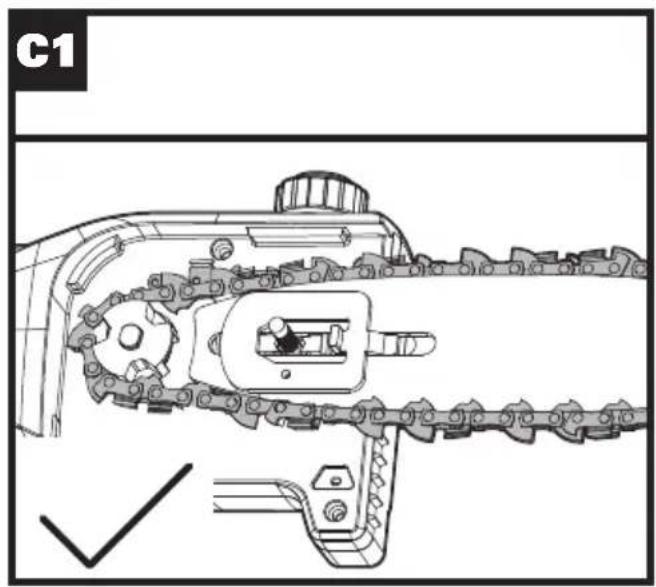
text_image
C1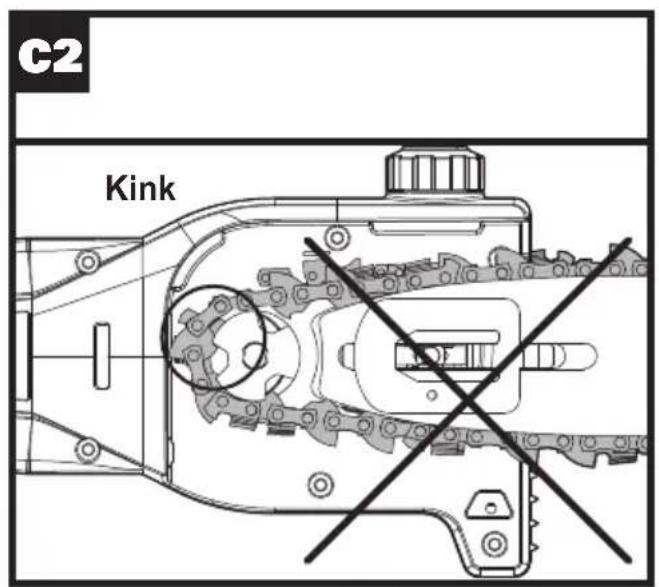
text_image
C2 Kink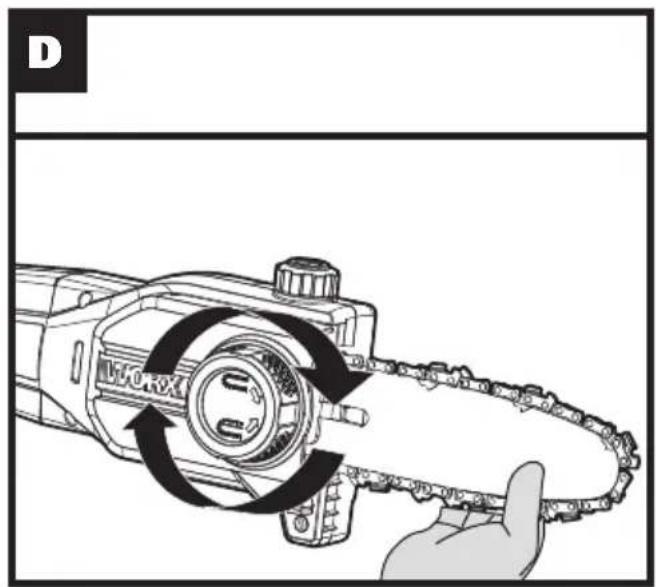
natural_image
Diagram of a chain drive mechanism with arrows indicating rotational motion (no text or symbols)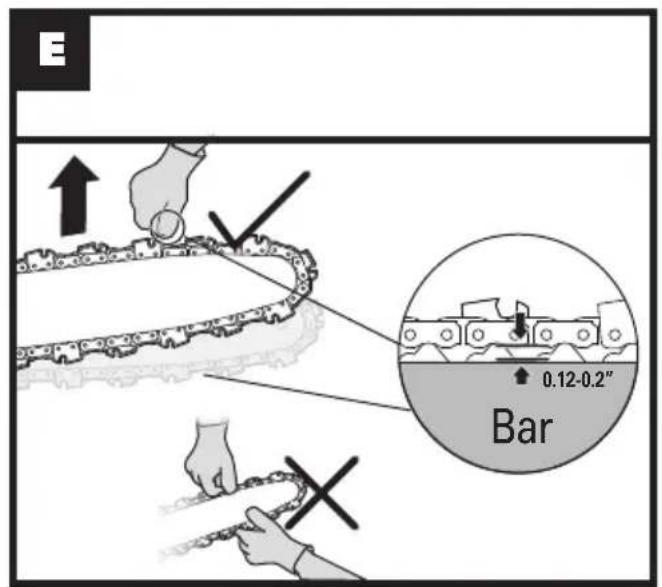
text_image
E 0.12-0.2" Bar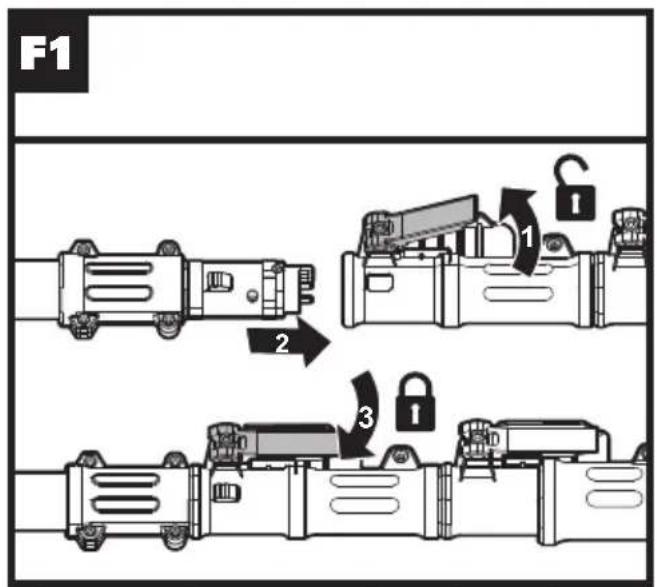
text_image
F1 2 3 1 I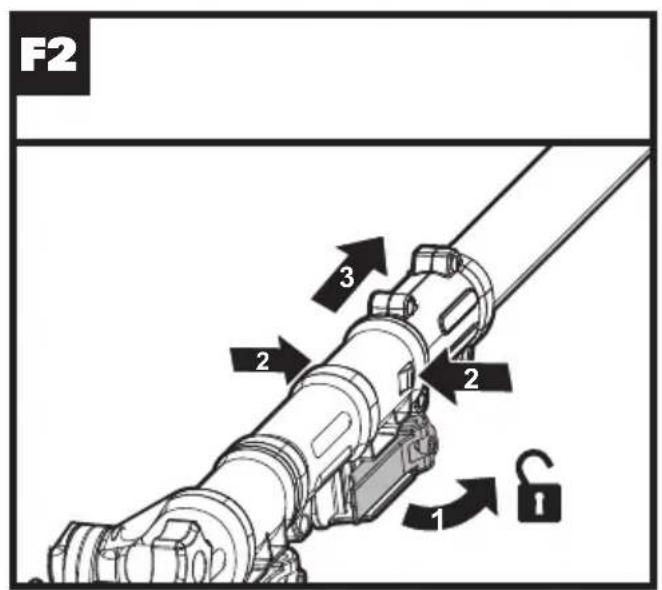
text_image
F2 1 2 3 2 1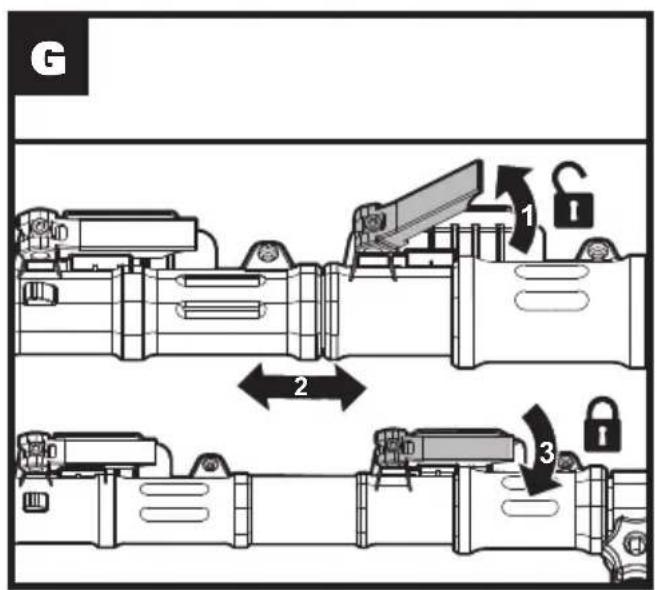
text_image
G 1 2 3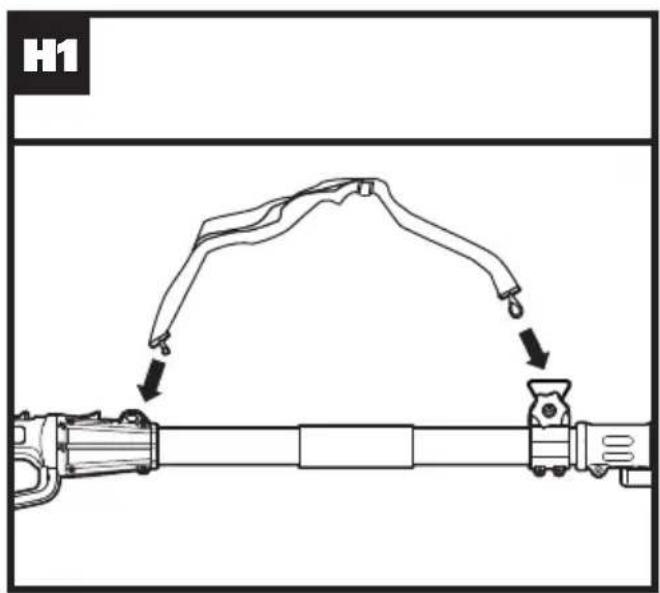
text_image
H1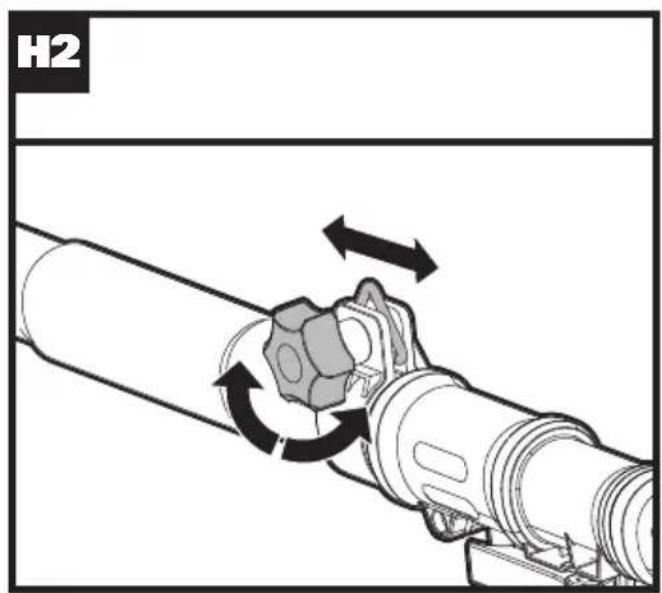
text_image
H2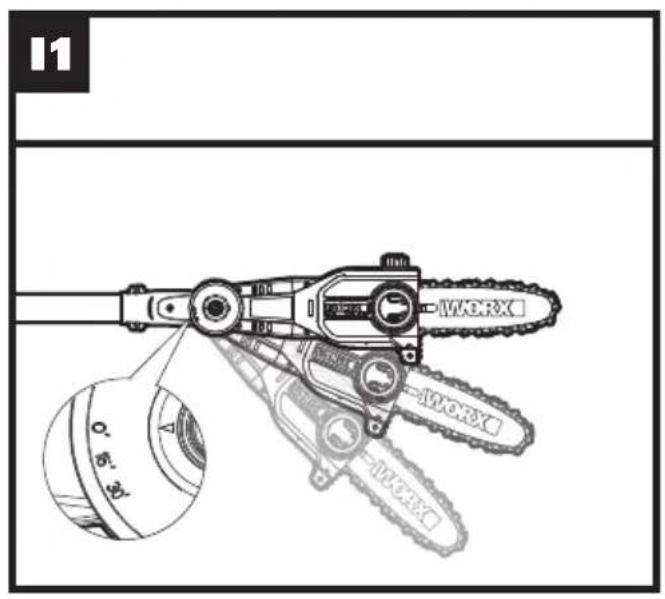
text_image
11 WORX WORX WORX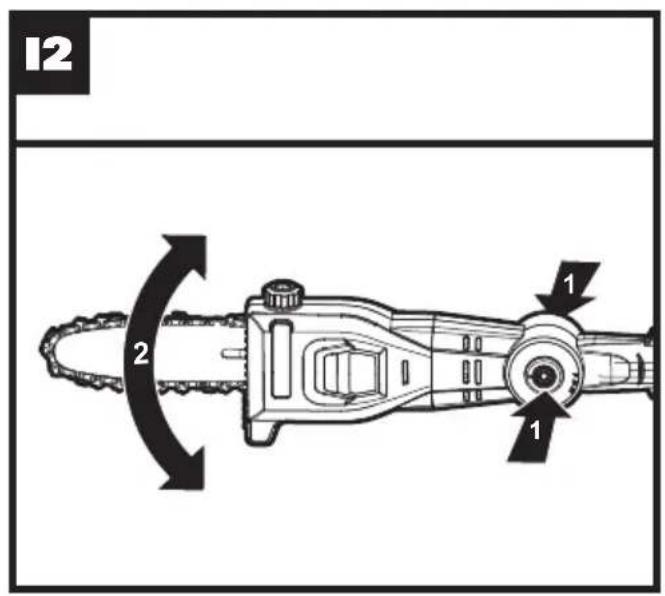
text_image
12 2 1 1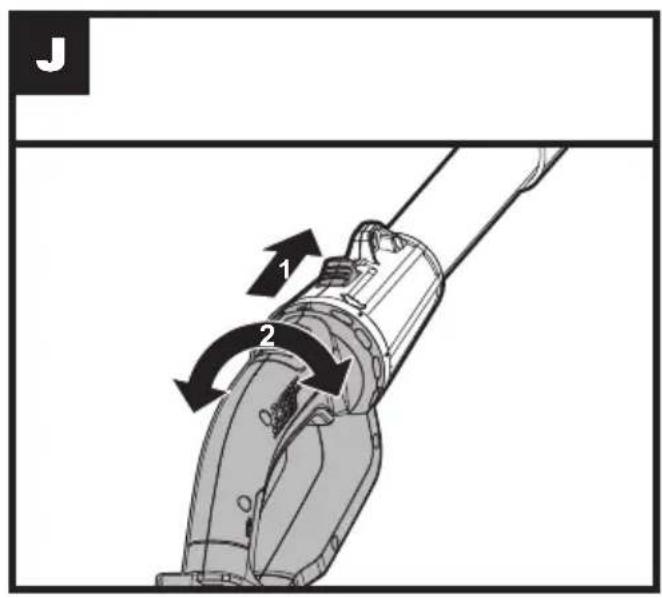
text_image
J 1 2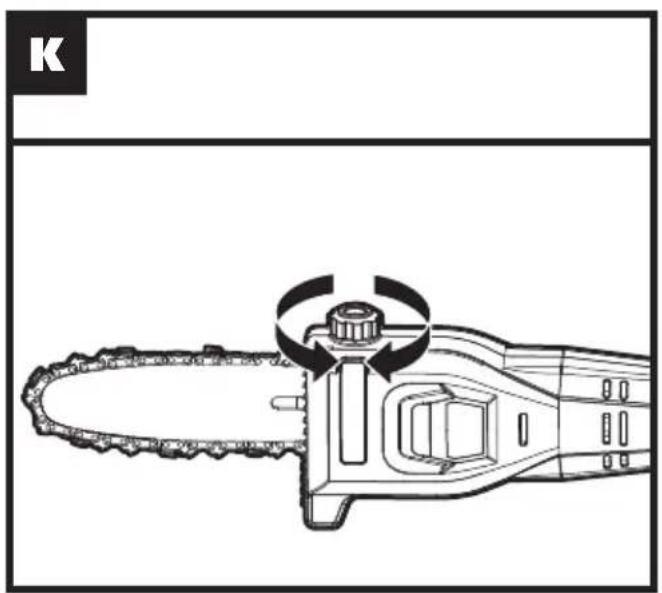
natural_image
Technical line drawing of a chain saw with gear and central knob (no text or symbols)
natural_image
Illustration of a person using a rifle to lift a tree trunk, no text or symbols present
text_image
06 z x 6" (15 cm) W Y 2" to 4" (5 a 10 cm) Y 1/3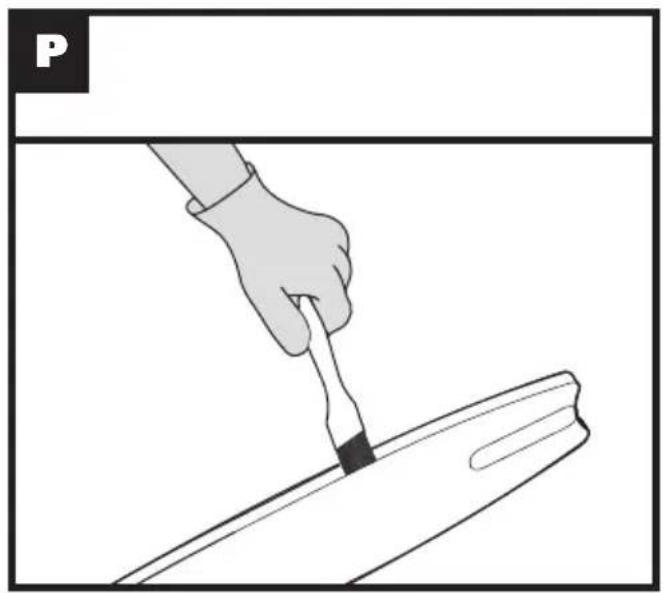
natural_image
Illustration of a hand using a tool to cut or mark a piece of paper (no text or symbols present)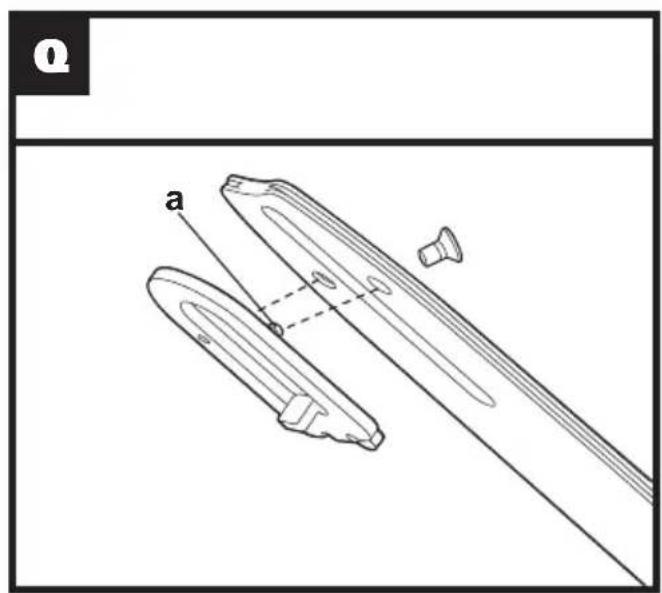
text_image
Q aPRODUCT SAFETY ORIGINAL INSTRUCTIONS GENERAL POWER TOOL SAFETY WARNINGS

WARNING: Read all safety warnings and all instructions. Failure to follow the
warnings and instructions may result in electric shock, fire and/or serious injury.
Save all warnings and instructions for future reference.
The term "power tool" in the warnings refers to your mains-operated (corded) power tool or battery-operated (cordless) power tool.
1) Work area safety
a) Keep work area clean and well lit. Cluttered or dark areas invite accidents.
b) Do not operate power tools in explosive atmospheres, such as in the presence of flammable liquids, gases or dust. Power tools create sparks which may ignite the dust or fumes.
c) Keep children and bystanders away while operating a power tool. Distractions can cause you to lose control.
2) Electrical safety
a) Power tool plugs must match the outlet. Never modify the plug in any way. Do not use any adapter plugs with earthed (grounded) power tools. Unmodified plugs and matching outlets will reduce risk of electric shock.
b) Avoid body contact with earthed or grounded surfaces, such as pipes, radiators, ranges and refrigerators. There is an increased risk of electric shock if your body is earthed or grounded.
c) Do not expose power tools to rain or wet conditions. Water entering a power tool will increase the risk of electric shock.
d) Do not abuse the cord. Never use the cord for carrying, pulling or unplugging the power tool. Keep cord away from heat, oil, sharp edges or moving parts. Damaged or entangled cords increase the risk of electric shock.
e) When operating a power tool outdoors, use an extension cord suitable for outdoor use. Use of a cord suitable for outdoor use reduces the risk of electric shock.
f) If operating a power tool in a damp location is unavoidable, use a residual current device (RCD) protected supply. Use of an RCD reduces the risk of electric shock.
3) Personal safety
a) Stay alert, watch what you are doing and use common sense when operating a power tool. Do not use a power tool while you are tired or under the influence of drugs, alcohol
or medication. A moment of inattention while operating power tools may result in serious personal injury.
b) Use personal protective equipment. Always wear eye protection. Protective equipment such as dust mask, non-skid safety shoes, hard hat, or hearing protection used for appropriate conditions will reduce personal injuries.
c) Prevent unintentional starting. Ensure the switch is in the off-position before connecting to power source and/or battery pack, picking up or carrying the tool. Carrying power tools with your finger on the switch or energising power tools that have the switch on invites accidents.
d) Remove any adjusting key or wrench before turning the power tool on. A wrench or a key left attached to a rotating part of the power tool may result in personal injury.
e) Do not overreach. Keep proper footing and balance at all times. This enables better control of the power tool in unexpected situations.
f) Dress properly. Do not wear loose clothing or jewellery. Keep your hair, clothing and gloves away from moving parts. Loose clothes, jewellery or long hair can be caught in moving parts.
g) If devices are provided for the connection of dust extraction and collection facilities, ensure these are connected and properly used. Use of dust collection can reduce dust-related hazards.
4) Power tool use and care
a) Do not force the power tool. Use the correct power tool for your application. The correct power tool will do the job better and safer at the rate for which it was designed.
b) Do not use the power tool if the switch does not turn it on and off. Any power tool that cannot be controlled with the switch is dangerous and must be repaired.
c) Disconnect the plug from the power source and/or the battery pack from the power tool before making any adjustments, changing accessories, or storing power tools. Such preventive safety measures reduce the risk of starting the power tool accidentally.
d) Store idle power tools out of the reach of children and do not allow persons unfamiliar with the power tool or these instructions to operate the power tool. Power tools are dangerous in the hands of untrained users.
e) Maintain power tools. Check for misalignment or binding of moving parts, breakage of parts and any other condition that may affect the power tool's operation. If damaged, have the power tool repaired before use. Many accidents are caused by poorly maintained power tools.
f) Keep cutting tools sharp and clean.
Properly maintained cutting tools with sharp cutting edges are less likely to bind and are easier to control.
g) Use the power tool, accessories and tool bits etc. in accordance with these instructions, taking into account the working conditions and the work to be performed. Use of the power tool for operations different from those intended could result in a hazardous situation.
5) Battery tool use and care
a) Recharge only with the charger specified by the manufacturer. A charger that is suitable for one type of battery pack may create a risk of fire when used with another battery pack.
b) Use power tools only with specifically designated battery packs. Use of any other battery packs may create a risk of injury and fire.
c) When battery pack is not in use, keep it away from other metal objects, like paper clips, coins, keys, nails, screws or other small metal objects, that can make a connection from one terminal to another. Shorting the battery terminals together may cause burns or a fire.
d) Under abusive conditions, liquid may be ejected from the battery; avoid contact. If contact accidentally occurs, flush with water. If liquid contacts eyes, additionally seek medical help. Liquid ejected from the battery may cause irritation or burns.
6) Service
a) Have your power tool serviced by a qualified repair person using only identical replacement parts. This will ensure that the safety of the power tool is maintained.
POLE SAW SAFETY WARNINGS
- Keep the pole saw a sufficient distance away from overhead electrical power lines.
- Be aware of the dangerous of operating positions, as well as the risk of being struck by falling branches or branches that, having hit the ground, rebound, the operator may be struck by falling branches or by those that rebound after hitting the ground. Remove the branches in sections.
SAFETY WARNINGS FOR BATTERY PACK
a) Do not dismantle, open or shred cells or battery pack.
b) Do not short-circuit a battery pack. Do not store battery packs haphazardly in a box or drawer where they may short-circuit each other or be short-circuited by conductive
materials. When battery pack is not in use, keep it away from other metal objects, like paper clips, coins, keys, nails, screws or other small metal objects, that can make a connection from one terminal to another. Shorting the battery terminals together may cause burns or a fire.
c) Do not expose battery pack to heat or fire. Avoid storage in direct sunlight.
d) Do not subject battery pack to mechanical shock.
e) In the event of battery leaking, do not allow the liquid to come into contact with the skin or eyes. If contact has been made, wash the affected area with copious amounts of water and seek medical advice.
f) Seek medical advice immediately if a cell or battery pack has been swallowed.
g) Keep battery pack clean and dry.
h) Wipe the battery pack terminals with a clean dry cloth if they become dirty.
i) Battery pack needs to be charged before use. Always refer to this instruction and use the correct charging procedure.
j) Do not maintain battery pack on charge when not in use.
k) After extended periods of storage, it may be necessary to charge and discharge the battery pack several times to obtain maximum performance.
I) Battery pack gives its best performance when it is operated at normal room temperature (20 °C ± 5 °C).
m) When disposing of battery packs, keep battery packs of different electrochemical systems separate from each other.
n) Recharge only with the charger specified by WORX. Do not use any charger other than that specifically provided for use with the equipment. A charger that is suitable for one type of battery pack may create a risk of fire when used with another battery pack.
o) Do not use any battery pack which is not designed for use with the equipment.
p) Keep battery pack out of the reach of children.
q) Retain the original product literature for future reference.
r) Remove the battery from the equipment when not in use.
s) Dispose of properly.
t) Do not mix cells of different manufacture, capacity, size or type within a device.
u) Do not remove battery pack from its original packaging until required for use.
v) Observe the plus (+) and minus (−) marks on the battery and ensure correct use.
SAVE THESE INSTRUCTIONS
SYMBOLS
| To reduce the risk of injury, user must read instruction manual | |
| Warning | |
| Wear ear protection | |
| Wear eye protection | |
| Wear head protection | |
| Wear protective gloves | |
| Wear protective footwear | |
| Do not expose to moisture. | |
| Warning of danger from overhead electric-power lines | |
| Waste electrical products must not be disposed of with household waste. Please recycle where facilities exist. Check with your local authorities or retailer for recycling advice. |
| Li-lon | Li-lon battery This product has been marked with a symbol relating to 'separate collection' for all battery packs and battery pack. It will then be recycled or dismantled in order to reduce the impact on the environment. Battery packs can be hazardous for the environment and for human health since they contain hazardous substances. |
| Do not burn | |
| Batteries may enter water cycle if disposed improperly, which can be hazardous for ecosystem. Do not dispose of waste batteries as unsorted municipal waste. | |
| Unlock | |
| Lock |
COMPONENT LIST
- CHAIN
- CHAIN TENSIONING KNOB
- CHAIN COVER
- SAW HEAD ADJUSTMENT KNOB
- SAW HEAD LOCKING-BUTTONS
- OIL FILLER CAP
- GUIDE BAR
- OIL LEVEL WINDOW
- DRIVE SPROCKET
- CHAIN DIRECTION SYMBOL
- BAR LOCATING TABS
- FASTENING BAR BOLT
- BAR PAD
- BUMPER SPIKE
- OIL OUTLET
- BAR AND CHAIN SHEATH
- POLE SAW ASSEMBLY LEVER
- INNER POLE CLAMPING LEVER
- ON/OFF TRIGGER
- BATTERY PACK*
- BATTERY PACK RELEASE BUTTON*
- REAR HANDLE
- EXTENSION POLE LOCK-OFF BUTTON
- EXTENSION POLE ROTATION BUTTON
- SHOULDER STRAP HOOKS
- SHOULDER STRAP
- BAR TENSIONING PLATE (SEE FIG. A)
TECHNICAL DATA
Type WG349E WG349E.9 (3 - designation of machinery, representative of pole saw)
| WG349E WG349E.9 | ||
| Voltage 20V | --- Max. ** | |
| Bar length 20cm | ||
| Cutting length 18cm | ||
| Chain speed 5.0m/s | ||
| Oil tank capacity 80ml | ||
| Chain pitch 0.95cm(3/8") | ||
| Number of chain drive links 33 | ||
| Chain gauge 1.1mm(0.043") | ||
| Adaptive Chain type | Trilink Huihuang: CL14333XJinfeng Garden Tools: 90X-33 | |
| Adaptive Bar type | Trilink Huihuang: N1430833-1041TLJinfeng Garden Tools: ES084SDEA041(A) | |
| Charging time 1hr / | ||
| Weight (chain & bar included) 3.7kg 3.3kg | ||
| Total reach | 3.6m | |
| Machine length | from 1.8m to 2.3m (fully extended) | |
| Saw head rotation angle | 0^ , 15^ , 30^ (3 positions) | |
| Handle rotation angle | 180 degrees total | |
** Voltage measured without workload. Initial battery voltage reaches maximum of 20 volts. Nominal voltage is 18 volts.
ACCESSORIES
| WG349E | WG349E.9 | |
| Charger (WA3880) | 1 | / |
| Battery pack (WA3551) | 1 | / |
| Shoulder strap 1 1 | ||
| Bar & Chain Sheath | 1 1 | |
| Pole saw head attachment (WA0307) | 1 | 1 |
We recommend that you purchase your accessories listed in the above list from the same store that sold you the tool. Refer to the accessory packaging for further details. Store personnel can assist you and offer advice.
NOISE DATA
A weighted sound pressure L _nA = 79.07 dB(A)
A weighted sound power L = 89.7dB(A)
Wear ear protection.

VIBRATION INFORMATION
Vibration total values (triax vector sum) determined according to EN ISO 11680-1.
Vibration emission value: ah = 1.83 m/s² Uncertainty K = 1.5 m/s²
The declared vibration total value may be used for comparing one tool with another, and may also be used in a preliminary assessment of exposure.
WARNING: The vibration emission value during actual use of the power tool can differ from the declared value depending on the ways in which the tool is used dependant on the following examples and other variations on how the tool is used:
How the tool is used and the materials being cut or drilled.
The tool being in good condition and well maintained Using the correct accessory for the tool and ensuring it is sharp and in good condition.
The tightness of the grip on the handles and if any anti vibration accessories are used.
And the tool is being used as intended by its design and these instructions.
This tool may cause hand-arm vibration syndrome if its use is not adequately managed.
WARNING: To be accurate, an estimation of exposure level in the actual conditions of use should also take account of all parts of the operating cycle such as the times when the tool is switched off and when it is running idle but not actually doing the job. This may significantly reduce the exposure level over the total working period.
Helping to minimise your vibration exposure risk.
ALWAYS use sharp chisels, drills and blades.
Maintain this tool in accordance with these instructions and keep well lubricated (where appropriate).
If the tool is to be used regularly then invest in anti vibration accessories.
Plan your work schedule to spread any high vibration tool use across a number of days.
INTENDED USE
The pole saw is intended for sawing of trees, tree trunks, branches, wooden beams, planks, etc. Cuts can be sawed with or across the grain. This product is not suitable for sawing mineral materials.
ASSEMBLY
WARNING! Do not install the battery pack before it has been completely assembled. Always use gloves when handling the chain.
CHAIN AND GUIDE BAR ASSEMBLY
- Unpack all parts carefully.
- Place the saw on a solid, level surface.
- Use only genuine WORX chains or those recommended for Guide Bar.
- Slide the Chain (1) in the slot around the Guide Bar (7). Ensure the Chain is in correct running direction by comparing it to the chain icon on the guide bar, or referring to the Chain Direction Symbol (10) found on the saw body. Ensure the Bar Tensioning Plate (27) is facing outward. (See Fig. A)
- Fit the Chain onto the Drive Sprocket (9), so that the Fastening Bar Bolt (12) and the two Bar Locating Tabs (11) on the Bar Pad (13) fit into the keyway of the opening on the Guide Bar (7). (See Fig. B1, B2)
- Assure all parts are seated properly. Make sure the drive links are fully seated in the drive sprocket (See Fig. C1), avoiding a kink as shown in Fig. C2. If kink occurs, pick up on the chain at the guide bar just ahead of the kink and then pull the kink out.
NOTE: Chain should rotate freely and be free of kinks.
- Fit the Chain Cover (3) and tighten the Chain Cover by turning the Chain Tensioning Knob (2) clockwise until it is tight. (See Fig. D)
WARNING: The chain is not yet tensioned. Tensioning the chain applies as described under "TENSIONING
CHAIN". The chain now needs to be inspected to make sure it is properly tensioned.
TENSIONING CHAIN (See Fig. E)
NOTE: New saw chains will stretch. Check the chain tension frequently when first used and tighten when the Chain (1) becomes loose around the Guide Bar (7).

WARNING:
- Removing the battery pack before adjusting saw chain tension.
- Cutting edges on chain are sharp. Use protective gloves when handling chain.
-
Maintain proper chain tension always. A loose chain will increase the risk of kickback. A loose chain may jump out of guide bar groove. This may injure operator and damage chain. A loose chain will cause chain, bar, and sprocket to wear rapidly.
-
Place the saw on any suitable flat surface.
-
Turn the Chain Tensioning Knob (2) clockwise until it is hand tight.
NOTE: The tension is automatically increased while the Chain Tensioning Knob (2) is being turned in a clockwise direction. The built-in ratchet mechanism prevents the chain tension from loosening.
- Double check the tension set by the automatic Chain Tensioning Knob. The correct chain tension is reached when the Chain (1) can be raised approx. half the drivelink depth from the Guide Bar (7) in the center. This should be done by using one hand to raise the chain against the weight of the machine. (See Fig. E)
NOTE: The Chain (1) is properly tensioned when it can be lifted off of the Guide Bar (7) and the drivelink is within the rail of the Guide Bar (7). NOTE: The Chain (1) will stretch while cutting and lose proper tension. When the chain becomes loose, completely unscrew the Chain Tensioning Knob (2) or turn the knob around three full turns in a counter-clockwise direction, then retighten the Chain Tensioning Knob (2) to properly reset the chain tension by repeating Steps 1-4 listed above.
ASSEMBLING THE EXTENSION POLE TO THE MACHINE (See Fig. F1)
Step 1: Loosen the pole saw assembly lever (17) as shown in Fig F1. Align and insert the machine into the extension pole.
Step 2: Press the pole saw assembly lever to tighten the extension pole to the machine.
NOTE: Make sure the extension pole is locked into position securely before operation.
REMOVING THE EXTENSION POLE (See Fig. F2)
Step 1: Unlock the pole saw assembly lever (17) as shown.
Step 2: Slide saw to disconnect the extension pole with the saw while pressing both saw head locking-buttons (5) simultaneously.
ADJUSTING POLE LENGTH (See Fig. G)
The pole saw has a telescoping pole assembly that will extend from 1.8m(fully retracted) to 2.3m (fully extended).
Inner pole clamping level (18) is used to hold the pole in position at any extended length.
-
To extend the pole, loosen the inner pole clamping lever (18) as shown in Fig. G. Pole will slide freely.
-
Pull inner pole section out to desired length of extension.
NOTE: only extend pole to minimum length required to reach limb that is being cut.
- To lock pole in position, tighten clamping lever as shown in Fig. G.
ATTACHING AND ADJUSTING THE SHOULDER STRAP (See Fig. H1, H2)
Attach the shoulder strap to the hooks on the pole with the included carabiner hook, as shown in Fig. H1. To adjust the position of the shoulder strap, loosen the Locking knob by turning it counter-clockwise. Move it to the desired position. Tighten the Locking Knob clockwise to lock, as indicated.
ADJUSTING THE SAW HEAD ANGLE (See Fig. I1, I2)
The saw head can be rotated for different cutting angles for 0^ , 15^ , and 30^ . (See Fig. I1)
- Rotate the pole saw head to the desired cutting angle while pressing the Saw Head Adjustment Knobs located on both sides simultaneously. (See Fig. I2)
- Release the knobs when the pole saw head is set to the desired angle.
NOTE: Failure to properly secure the pole saw head may result in personal injury and/or property damage.

WARNING! Always ensure the pole saw head is securely locked! Do not attempt to use the pole saw with the head in any position or unlocked!
ADJUSTING THE REAR HANDLE (See Fig. J)
Push the extension pole rotation button forward to unlock. Hold the rear handle and rotate it to the most comfortable and balanced position. Release the extension pole rotation button to lock the rear handle.

WARNING: Always make sure that the handle is locked in the desired position before operation. Do not rotate the handle the saw is being operated.
LUBRICATION

Important: The pole saw is not filled with oil. It is essential to fill with oil before use. Never operate the pole saw without oil or at an empty oil tank level, as this result in extensive damage to the product. Chain life and cutting capacity depend timum lubrication. Therefore, the chain is naturally oiled during operation.
FILLING OIL TANK (SEE FIG. K)

WARNING: Removing the battery pack before filling the oil tank.
- Set pole saw on any suitable surface with Oil Filler Cap (6) facing upward.
- Clean area around the Oil Filler Cap with cloth and unscrew the cap by turning it counter clockwise.
- Add bar and chain oil (not included) until tank is full.
- Avoid dirt or debris entering oil tank, refit Oil Filler Cap (6) and tighten by turning clockwise until hand tight.

Important: To allow venting of the oil tank, small breather channels are provided between the Oil Filler Cap and
the strainer, to prevent leakage, and ensure machine is left in a horizontal position (Oil Filler Cap (6) uppermost) when not in use.
It is important to use only the recommended standard bar and chain oil (Grade: ISO VG32) to avoid damage to the pole saw. This can be found at the location where you purchased this saw or your local hardware store. Never use recycled/old oil. Use of non approved oil will void the warranty.
Do not swallow. If swallowed, call a physician
immediately. Keep out of reach of children. Store away from heat or open flame.
Checking the Automatic Oiler
Proper functioning of the automatic oiler can be checked by running the pole saw and pointing the tip of the Guide Bar (7) towards a piece of cardboard or paper on the ground. If an increasing oil pattern develops on the cardboard, the automatic oiler is operating fine. If there is no oil pattern, despite a full oil reservoir, contact WORX customer service agent or WORX approved service agent.

CAUTION: Do not touch the ground with the chain. Ensure safety clearance of 3.6m
OPERATION
WARNING! The charger and battery pack are specially designed to work together so do not attempt to use any other devices. Never insert or allow metallic objects into your charger or battery pack connections because of an electrical failure and hazard will occur.
NOTE: Your battery pack is UNCHARGED and you must charge once before use.
The battery charger supplied is matched to the Li-ion battery installed in the machine. Do not use another battery charger.
The Li-ion battery is protected against deep discharging. When the battery is empty, the machine is switched off by means of a protective circuit.
In a warm environment or after heavy use, the battery pack may become too hot to permit charging. Allow time for the battery to cool down before recharging.
3. TO REMOVE OR INSTALL BATTERY PACK (See Fig. L1, L2)
Depress the Battery Pack Release Button to remove the Battery Pack from your tool. After recharging, insert the Battery Pack into the battery port. A simple push and slight pressure will be sufficient until a click is heard. Check to see if the battery is fully secured.
NOTE: When removing the battery pack, hold it firmly to avoid dropping and injury.
4. SWITCHING ON AND OFF (See Fig. M)

ATTENTION: Check the battery pack before using your cordless tool. Only use the battery pack listed in the accessories
section.
For switching on the tool, press the extension pole lock-off button (23), then fully press the On/Off Trigger (19) and hold in this position. The extension pole lock-off button can now be released.
For switching off, release the On/Off Trigger.
5. CUTTING

Important: Is the oil tank filled? Check the Oil Level Window (8) prior to starting and regularly during operation (See Fig.
N1). Refill oil when oil level is low. A full oil tank will last approx. 35 minutes of cutting depending on sawing intensity and stops. Check recent replaced chain tension about every 10 minutes during operation.
(1) Installing the battery pack into the machine.
(2) Make sure section of log to be cut is not laying on the ground. This will keep the chain (1) from touching the ground as it cuts through the log.
Touching the ground while the Chain is moving is dangerous and will dull the Chain.
(3) Use both hands to grip saw. Always use left hand to grip main handle and right hand to grip Rear Handle (22). Use a firm grip. Thumbs and fingers must wrap around saw handles. (See Fig. N2)
(4) Make sure your footing is firm. Keep feet-shoulder width apart. Distribute your weight evenly on both feet.
(5) When ready to make a cut, push the extension pole lock-off button (23) completely in with the right thumb and squeeze the trigger. This will turn saw on. Releasing the trigger will turn the saw off. Make sure the saw is running at full speed before starting a cut.
(6) When starting a cut, slowly place moving chain against the wood. The wood should be as close to the saw body as possible. Hold saw firmly in place to avoid possible bouncing or skating (sideways movement) of saw.
(7) Guide the saw using light pressure and do not put excessive force on the saw, letting the saw do its work. The motor will overload and can burn out. It will do the job better and safer at the rate for which it was intended.
(8) Remove the saw from a cut with the saw running at full speed. Stop the saw by releasing the On/off Trigger (19). Make sure the chain has stopped before setting the saw down.
(9) Keep practicing on scrap logs in a secure working area until you are comfortable, using a fluid motion and a steady cutting rate.
Kickback Safety Devices on This Saw
This saw has a low-kickback chain and reduced kickback Guide Bar. Both items reduce the chance of kickback. However, kickback can still occur with this saw.
The following steps will reduce the risk of kickback.
- Use both hands to grip saw while saw is running. Use firm grip. Thumbs and fingers must wrap around saw handles.
- Keep all safety items in place on saw. Make sure they work properly.
- Keep solid footing and balance at all times.
- Stand slightly to the left side of saw. This keeps your body from being in direct line with chain.
- Do not let Guide Bar nose touch anything when chain is moving.
- Never try cutting through two logs at same time.
Only cut one log at a time.
- Do not bury the Guide Bar nose or try plunge cut (boring into wood using Guide Bar nose.
- Watch for shifting of wood or other forces that may pinch chain.
- Use extreme caution when re-entering a previous cut.
- Use only the low-kickback chain and Guide Bar (7) that were supplied with this pole saw or recommended.
- Never use a dull or loose chain. Keep chain sharp with proper tension.
Cutting with shoulder strap (See Fig. N2)
The extension pole is supplied with a shoulder strap that gives extra support when hoisting the pole saw in the air. Hook the shoulder strap to the extension pole and wrap around your shoulder. The shoulder strap can also soften the impact if the pole saw is dropped after the completion of a cut.
Cutting with extension pole
- Install the battery pack into the machine.
- Before cutting a high branch, consider all the same points detailed in the previous section "Trimming Branches" but pay particular attention to the likely path of the falling branch.

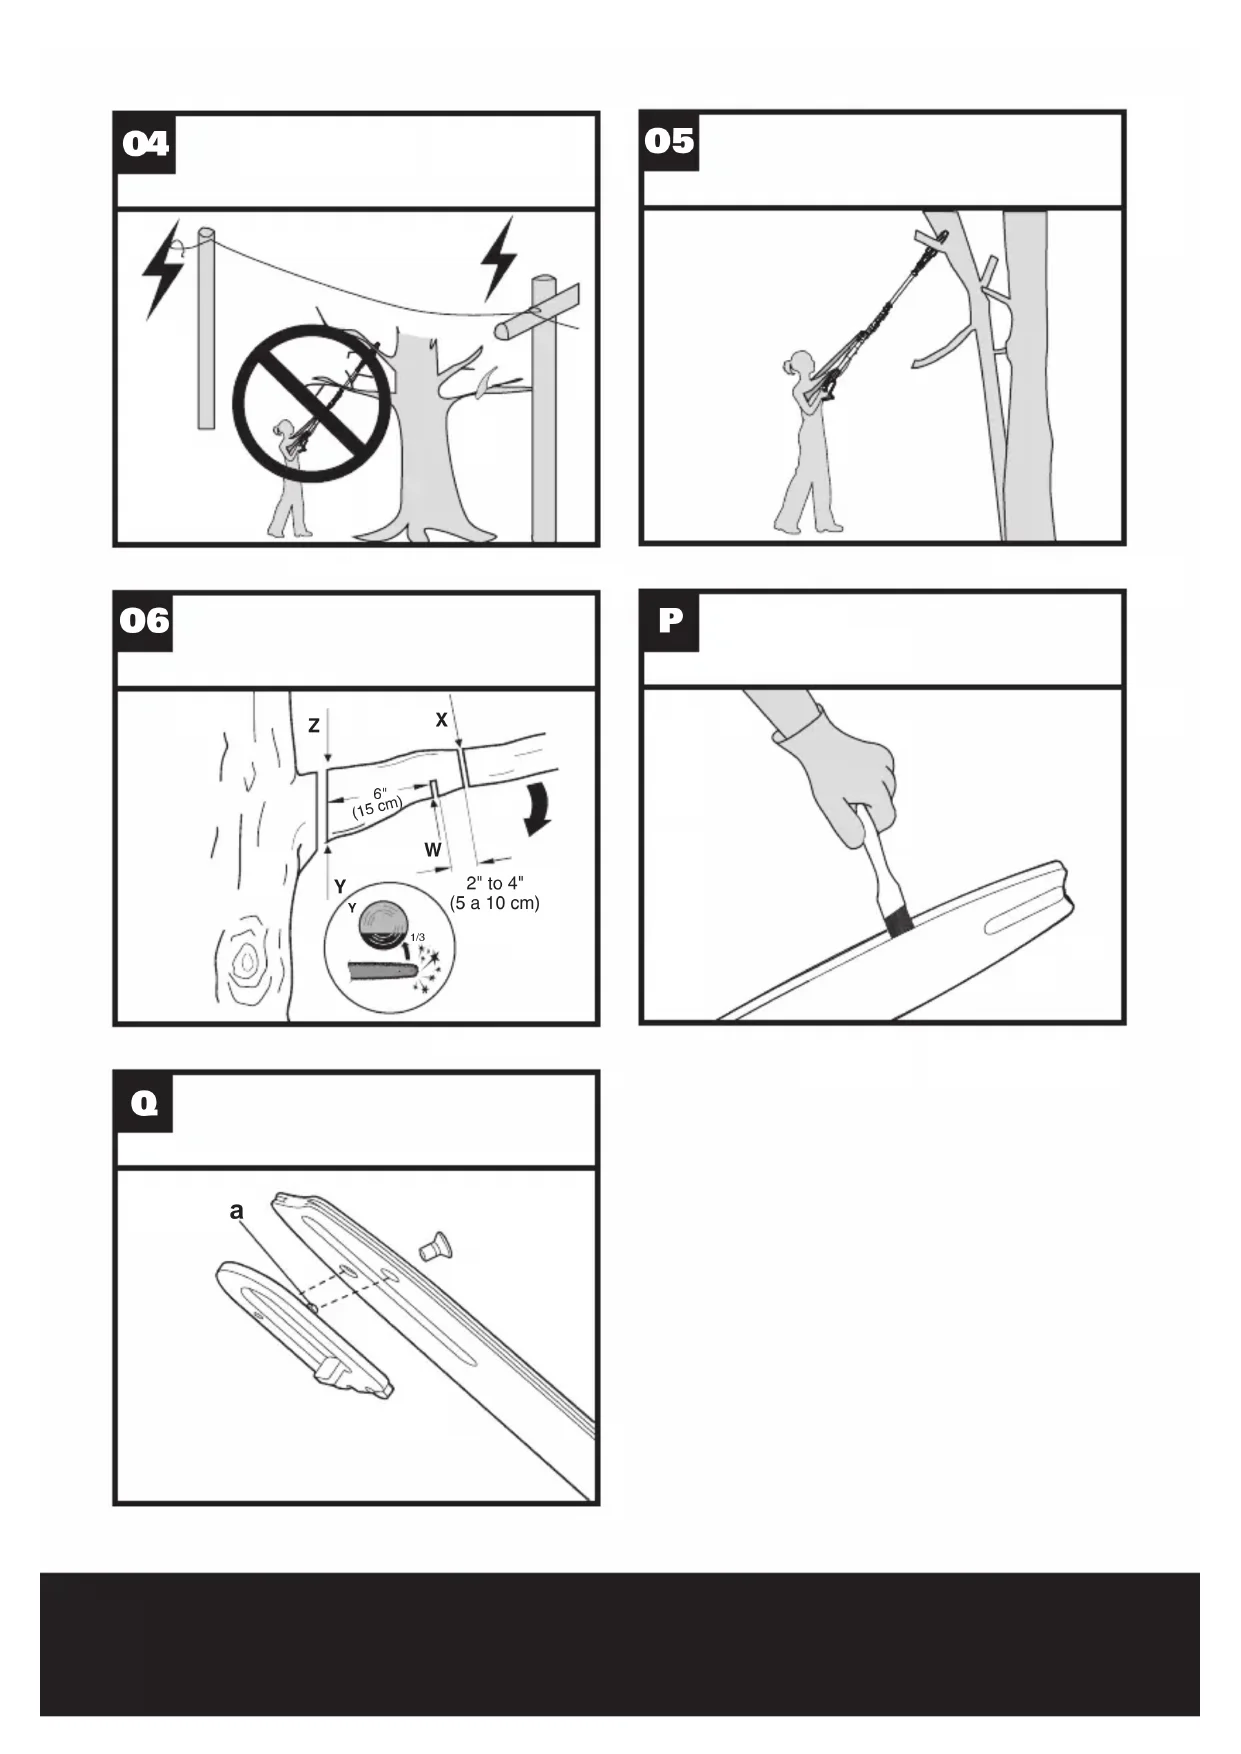
WARNING: Do not stand directly below a branch being cut. Keep bystanders far
away. Do not stand on a ladder or other type of unstable support while using the tool. Do not use the tool near cable, electrical power or telephone lines. Keep 3m away from all power lines. (See Fig. 01-04)
- Use both hands to grip Pole Saw. Use only designated grip areas when operating Pole Saw (See Fig. O5). Use firm grip. Thumbs and fingers must wrap around Pole Saw handle and pole.
- Make sure your footing is firm. Keep feet apart. Divide your weight evenly on both feet.
- When ready to make a cut, press the extension pole lock-off button (23), then fully press the On/off Trigger (19) (See Fig. M). This will turn Pole Saw on. Releasing On/off Trigger will turn Pole Saw off. Make sure saw is running at full speed before starting a cut.
- When starting a cut, place moving chain against wood. Hold Pole Saw firmly in place to avoid possible bouncing or skating (sideways movement) of saw.
- Guide Pole Saw using light pressure. Do not force Pole Saw. The motor will overload and can burn out. It will do the job better and safer at the rate for which it was intended.
- Remove Pole Saw from a cut with saw running at full speed. Stop Pole Saw by releasing trigger. Make sure chain has stopped before setting Pole Saw down.
TRIMMING A TREE (PRUNING)
WARNING: Avoid kickback. Kickback can result
in severe injury or death.
See Kickback, to avoid risk of kickback.
WARNING: Do not operate Pole Saw while
- in a tree
• on a ladder or any other unstable surface
• in any awkward position
You may lose control of Pole Saw causing severe injury.
WARNING: Do not extend arms above shoulders when using Pole Saw.
CAUTION: Seek professional help if facing conditions beyond your ability.
Trimming a tree is the process of cutting limbs from a living tree. Make sure your footing is firm. Keep feet apart. Divide your weight evenly on both feet.
Follow directions below to trim a tree.
- Make first cut six inches from tree trunk on underside of limb. Use top of guide bar to make this cut. Cut 1/3 through diameter of limb (See Fig. O6).
- Move two to four inches farther out on limb. Make second cut from above limb. Continue cut until you cut limb off.
- Make third cut as close to tree trunk as possible on underside of limb stub. Use top of guide bar to make this cut. Cut 1/3 through diameter of stub.
- Make fourth cut directly above third cut. Cut down to meet third cut. This will remove limb stub.
SAW MAINTENANCE
Follow maintenance instructions in this manual. Proper cleaning of saw and chain and Guide Bar maintenance can reduce chances of kickback. Inspect and maintain saw after each use. This will increase the service life of your saw.
NOTE: Even with proper sharpening, risk of kickback can increase with each sharpening.
MAINTENANCE AND STORAGE OF POLE SAW
- Remove the battery pack
- When not in use
• Before moving from one place to another - Before servicing
- Before changing accessories or attachments, such as saw chain and guard
- Inspect pole saw before and after each use. Check saw closely if guard or other part has been damaged. Check for any damage that may affect operator safety or operation of saw. Check for alignment or binding of moving parts. Check for broken or damaged parts. Do not use pole saw if damage affects safety or operation. Have damage repaired by authorized service center. To locate an authorized service center, visit www.worx.com.
- Maintain pole saw with care.
-
Never expose saw to rain or direct moisture.
-
Keep chain sharp, clean, and lubricated for better and safer performance.
- Follow steps outlined in this manual to sharpen chain.
- Keep handles dry, clean, and free of oil and grease.
- Keep all screws and nuts tight.
- When servicing, use only identical replacement parts.
- When not in use, always store pole saw
- in a high or locked place, out of children's reach
- in a dry place
• with bar and chain cover (3) in place
Bar Maintenance
To maximize bar life, the following bar maintenance is recommended.
The bar rails that carry the chain should be cleaned before storing the tool or if the bar or chain appear to be dirty.
The rails should be cleaned every time the chain is removed.
To clean the Bar rails.
- Remove chain cover and bar and chain. (see section ASSEMBLY)
- Using a wire brush, screwdriver or similar tool, clear the residue from the inner groove of the bar. (See Fig. P)
- Make sure to clean oil passages thoroughly.
Conditions which require Chain (1) and Guide Bar (7) maintenance:
- Saw cuts to one side or at an angle.
- Saw has to be forced through the cut.
- Inadequate supply of oil to the bar and chain.
Check the condition of the Guide Bar each time the chain is sharpened. A worn Guide Bar will damage the chain and make cutting difficult.
After each use, remove the battery pack, clean all sawdust from the Guide Bar and sprocket hole.
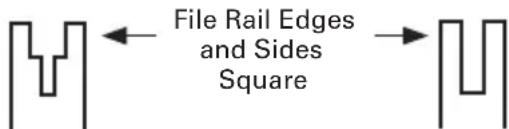
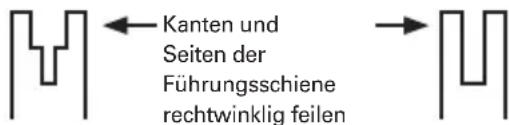
When rail top is uneven, use a flat file to restore square edges and sides.
text_image
File Rail Edges and Sides SquareWorn Groove Correct Groove
Replace the Guide Bar when the groove is worn, the Guide Bar is bent or cracked, or when excess heating or burring of the rails occurs. If replacement is necessary, use only the Guide Bar specified for your saw in the repair parts list or on the decal located on the pole saw.
Replacing Bar & Chain
Replace chain when cutters are too worn to sharpen or when chain stops. Only use replacement chain noted in this manual.
Inspect Guide Bar before sharpening chain. A worn or damaged Guide Bar is unsafe. A worn or damaged Guide Bar will damage chain. It will also make cutting
harder.
Fit the Bar Tensioning Plate (27) Tab into the new bar by tightening the screw clockwise. The tab protrusion (a) must be fitted into the bar hole. (See Fig. Q)
SHARPENING SAW CHAIN
WARNING: Remove the battery pack before servicing. Severe injury or death could occur from electrical shock or body contact with moving chain.
Cutting edges on chain are sharp. Use protective gloves when handling chain.
Keep chain sharp. Your saw will cut faster and more safely. A dull chain will cause undue sprocket, Guide Bar, chain, and motor wear. If you must force chain into wood and cutting creates only sawdust with few large chips, chain is dull.
ENVIRONMENTAL PROTECTION
Waste electrical products must not be disposed of with household waste. Please recycle where facilities exist. Check with your local authorities or retailer for recycling advice.
Replacing Bar & Chain
20V Cordless Pole Saw
EN
ROUBLESHOOTING TABLE
The following table gives checks and actions that you can perform if your machine does not operate correctly. If these do not identify/remedy the problem, contact your service agent.
WARNING: Switch off and remove the battery pack before investigating fault.
| Symptom Possible Cause Remedy | ||
| Pole saw fails to operate | Out of battery.Fuse faulty. | Charge the battery pack.Replace fuse. |
| Pole saw operates intermittently | Over heatingApplying too much pressure while cutting.Loose connection.Internal wiring defective.On/OffTrigger defective. | Place the machine in a cool, ventilated place to cool it downApplying relatively less pressure while cuttingContact service agent 1-866-354-WORX (9679). |
| Dry chain | No oil in reservoirVent in oil filler cap cloggedOil passage clogged | Refill oilClean capClean oil passage outlet |
| Chain/chain bar over-heats | No oil in reservoirVent in oil filler cap cloggedOil passage cloggedChain is over tensionedDull chain | Refill oilClean capClean oil passage outletAdjust chain tensionSharpen chain or replace |
| Pole saw rips, vibrates, does not saw properly | Chain tension too looseDull chainChain worn outChain teeth are facing in the wrong direction | Adjust chain tensionSharpen chain or replaceReplace chainReassemble with chain in correct direction |
DECLARATION OF CONFORMITY
We,
Positec Germany GmbH
Grüner Weg 10, 50825 Cologne, Germany
Declare that the product
Description Battery-powered pole saw
Type WG349E WG349E.9 (3 - designation of machinery, representative of pole saw)
Function Cutting high branch
Complies with the following Directives:
2006/42/EC, 2014/30/EU,
2011/65/EU&(EU)2015/863, 2000/14/EC
amended by 2005/88/EC
The notified body involved
2000/14/EC amended by 2005/88/EC:
- Conformity Assessment Procedure as per Annex V
- Measured Sound Power Level 89.7 dB(A)
- Declared Guaranteed Sound Power Level 93 dB(A)
Standards conform to
EN 60745-1, EN ISO 11680-1, EN ISO 3744, EN 55014-1, EN 55014-2
The person authorized to compile the technical file, Name: Marcel Filz
Address: Positec Germany GmbH, Grüner Weg 10, 50825 Cologne, Germany

text_image
A##
2019/9/26
Allen Ding
Deputy Chief Engineer, Testing & Certification
Positec Technology (China) Co., Ltd.
18, Dongwang Road, Suzhou Industrial
Park, Jiangsu 215123, P. R. China
When rail top is uneven, use a flat file to restore
square edges and sides.
10, 50825 Cologne, Germany

text_image
M A
2019/9/26
Allen Ding
18, Dongwang Road, Suzhou Industrial
Park, Jiangsu 215123, P. R. China
NOTICE ORIGINALE SECURITE DU PRODUIT AVERTISSEMENTS GÉ- NERAUX DE SECURITE POUR L'OUTIL

INFORMATIONS RELATIVES AU BRUIT
INFORMATIONS RELATIVE AUX VIBRATIONS
DECLARATION OF CONFORMITY
Nous,
POSITEC Germany GmbH
Grüner Weg 10, 50825 Cologne, Germany
18, Dongwang Road, Suzhou Industrial
Park, Jiangsu 215123, P. R. China
ISTRUZIONI ORIGINALI SICUREZZA DEL PRODOTTO ISTRUZIONI ORIGINALI AVVISI GENERALI PER LA SICUREZZA DEGLI UTENSILI A MOTORE

18, Dongwang Road, Suzhou Industrial
Park, Jiangsu 215123, P. R. China
Inner pole clamping level (18) is used to hold the pole in position at any extended length.
18, Dongwang Road, Suzhou Industrial
Park, Jiangsu 215123, P. R. China
VEILIGHEIDSWAARSCHUWINGEN VOOR VERMOGENSMACHINE

ROD ZAG VEILIGHEIDSWAARSCHUWING
18, Dongwang Road, Suzhou Industrial
Park, Jiangsu 215123, P. R. China
18, Dongwang Road, Suzhou Industrial
Park, Jiangsu 215123, P. R. China
ELEKTROMOS KÉZISZ- ERSZÁMOK BIZTON- SÁGOS HASZNÁLA- TÁVAL KAPCSOLATOS ÁLTALÁNOS FIGYEL- MEZTETÉSEK

18, Dongwang Road, Suzhou Industrial
Park, Jiangsu 215123, P. R. China
AVERTISMENTE GENERALE DE SIGURANTĂ PENTRU UNELTE ELECTRICE

18, Dongwang Road, Suzhou Industrial
Park, Jiangsu 215123, P. R. China
OBECNÁ BEZPEČNOSTNÍ UPOZORNĚNÍ PRO ELE- KTRICKÉ NÁSTROJE

TYTO POKYNY USCHOVEJTE
SYMBOLY
18, Dongwang Road, Suzhou Industrial
Park, Jiangsu 215123, P. R. China
VŠEOBECNÉ BEZPEČNOSTNÉ VAROVANIA NA POUŽÍVANIE ELEK- TRICKÉHO NÁRADIA

TIETO POKYNY USCHOVAJTE
SYMBOLY
18, Dongwang Road, Suzhou Industrial
Park, Jiangsu 215123, P. R. China
AVISOS GERAIS DE SEGURANÇA DE FERRAMENTAS ELÉCTRICAS

18, Dongwang Road, Suzhou Industrial
Park, Jiangsu 215123, P. R. China
GENERELLA SÄKER- HETSVARNINGAR FÖR ELVERKTYG

18, Dongwang Road, Suzhou Industrial
Park, Jiangsu 215123, P. R. China
SPLOŠNA VARNOS- TNA NAVODILA ZA ELEKTRIČNA ORODJA

L _pA = 79.07 dB(A)
$$ K _ {P A} = 3 \mathrm{dB(A)} $$
18, Dongwang Road, Suzhou Industrial
Park, Jiangsu 215123, P. R. China
WORX
it's your nature
www.worx.com
Copyright © 2019, Positec. All Rights Reserved.