58G003 - Grinder Graphite - Free user manual and instructions
Find the device manual for free 58G003 Graphite in PDF.
| Product Type | Cordless Angle Grinder |
| Brand | Graphite |
| Model | 58G003 |
| Battery Voltage | 18 V DC |
| No-load Speed | 10000 min⁻¹ |
| Maximum Disc Diameter | 115 mm |
| Disc Inner Diameter | 22.2 mm |
| Spindle Thread | M14 |
| Weight (without battery) | 1.5 kg |
| Compatible Battery Capacity | 2000 mAh (58G001) or 4000 mAh (58G004) |
| Charging Time battery 58G001 | 1 hour |
| Charging Time battery 58G004 | 2 hours |
| Sound Pressure Level (LpA) | 85.06 dB(A) |
| Sound Power Level (LwA) | 96.06 dB(A) |
| Vibration (rear handle) | 6.151 m/s² |
| Vibration (front handle) | 4.144 m/s² |
| Protection Class | III |
| Power Supply | 18 V lithium-ion battery (230 V AC charger) |
| Main Functions | Grinding, cutting, sanding, brushing |
| Safety | Disc guard, spindle lock, safety switch, auxiliary handle |
| Maintenance | Clean ventilation slots with dry compressed air |
| Repairability | Repair by authorized service center only |
| Included Accessories | Disc guard, special wrench, auxiliary handle |
Frequently Asked Questions - 58G003 Graphite
User questions about 58G003 Graphite
0 question about this device. Answer the ones you know or ask your own.
Ask a new question about this device
Download the instructions for your Grinder in PDF format for free! Find your manual 58G003 - Graphite and take your electronic device back in hand. On this page are published all the documents necessary for the use of your device. 58G003 by Graphite.
USER MANUAL 58G003 Graphite
natural_image
Line drawing of a GRAPHTE industrial grinding tool with no visible text or symbols on the device itselfPL SZLIFIERKA KĄTOWA AKUMULATOROWA
GB CORDLESS ANGLE GRINDER
DE AKKU-WINKELSCHLEIFER
RU АККУМУЛЯТОРНАЯ УГЛОВАЯ ШЛИФОВАЛЬНАЯ МАШИНА
UA
МАШИНА ШЛІФУВАЛЬНА КУТОВА (БОЛГАРКА) АКУМУЛЯТОРНА
HU AKKUMULÁTOROS SAROCSISZOLÓ
POLIZOR UNGHIULAR CU ACUMULATOR
CZ AKUMULÁTOROVÁ UHLOVÁ BRUSKA
SK UHLOVÁ AKUMULÁTOROVÁ BRÚSKA
SL AKUMULATORSKI KOTNI BRUSILNIK
AKUMULIATORINIS, KAMPINIS ŠLIFUOKLIS
LV AKUMULATORA LENKA SLIPMAŠINA
AKUTOITEL NURKLIHVIJA
ВО АКУМУЛАТОРНА ЂГЛОВА ШЛАЙФМАШИНА
HR AKUMULATORSKA KUTNA BRUSILICA
SR AKUMULATORSKA UGAONA BRUSILICA
ΕΠΑΝΑΦΟΡΤΙΖΟΜΕΝΟΣ ΓΩΝΙΑΚΟΣ ΛΕΙΑΝΤΗΡΑΣ
ES AMOLADORA ANGULAR A BATERÍA
IT SMERIGLIATRICE ANGOLARE SENZA FILI
NL ACCU HAAKSE SLIJPER
FR MEULEUSE D'ANGLE SANS FIL
10* LAT DOSTĘPNOŚCI CZĘŚCI ZAMIENNYCH
58G003

PL INSTRUKCJA OBSŁUGI 6
GB INSTRUCTION MANUAL 14
DE BETRIEBSANLEITUNG....20
RU РУКОВОДСТВО ПО ЭКСПЛУАТАЦИИ ..... 27
UA ІНСТРУКЦІЯ З ЕКСПЛУАТАЦІЇ ..... 35
HU HASZNÁLATI UTASÍTÁS. 42
RO INSTRUCTIUNI DE DESERVIRE 49
© INSTRUKCE K OBSLUZE....56
SK NÁVOD NA OBSLUHU 62
SL NAVODILA ZA UPORABO 69
LT APTARNAVIMO INSTRUKCIJA. 75
LV LIETOŠANAS INSTRUKCIJA 82
EE KASUTUSJUHEND 88
BG ИНСТРУКЦИЯ ЗА ОБСЛУЖВАНЕ ..... 94
HR UPUTE ZA UPOTREBU....102
SR UPUTSTVO ZA UPOTREBU 108
GR OΔΗΓΙΕΣ ΧΡΗΣΗΣ 115
ES INSTRUCCIONES DE USO....123
IT MANUALE PER L'USO 130
NL GEBRUIKSAANWIJZING 137
FR MANUEL D'INSTRUCTION ..... 144

natural_image
Line drawing of a person using a grinding tool on a workbench (no text or symbols)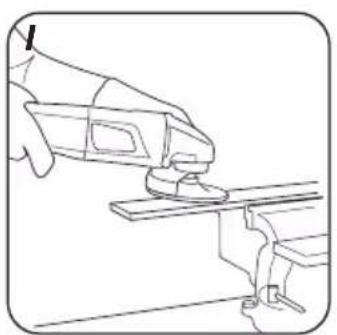
natural_image
Line drawing of a hand using a tool to lift or lift a workpiece (no text or symbols present)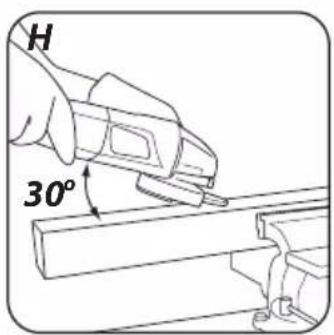
natural_image
Line drawing of a tool using a power tool to cut a cylindrical object (no text or symbols present)
INSTRUKCJA ORYGINALNA (OBSŁUGI)
SZLIFIERKA KĄTOWA AKUMULATOROWA 58G003
UWAGA: PRZED PRZYSTĄPIENIEM DO UŻYTKOWANIA URZĄDZENIA NALEŻY UWAŻNIE PRZECZYTAĆ NINIEJSZĄ INSTRUKCJĘ I ZACHOWAĆ JĄ DO DALSZEGO WYKORZYSTANIA.
SZCZEGÓŁOWE PRZEPISY BEZPIECZEŃSTWA
SZCZEGÓLNE PRZEPISY DOTYCZĄCE BEZPIECZNEJ PRACY SZLIFIERKI KĄTOWEJ
WSKAZÓWKI BEZPIECZEŃSTWA DOTYCZĄCE SZLIFOWANIA, SZLIFOWANIA PAPIEREM ŚCIERNYM, PRACY Z UŻYCIEM SZCZOTEK DRUCIANYCH I PRZECINANIA ŚCIERNICA
GTX
SERVICE
C E
/EC Declaration of Conformity/
/The above listed product is in conformity with the following UE Directives:/
/and fulfils requirements of the following Standards:/
/Name and address of the person who established in the Community and authorized to compile the technical file:/
/GRUPA TOPEX Quality Agent/
CAUTION: BEFORE USING THE POWER TOOL READ THIS MANUAL CAREFULLY AND KEEP IT FOR FUTURE REFERENCE.
DETAILED SAFETY REGULATIONS
SPECIFIC REGULATIONS REGARDING SAFE USE OF ANGLE GRINDER
SAFETY GUIDELINES FOR GRINDING, PAPER SANDING, WORKING WITH WIRE BRUSHES AND USE OF CUTTING WHEELS
- This tool can be used as a regular grinder, for use with sanding paper, wire brushes and cutting wheels. Follow all safety guidelines, instructions, descriptions and data supplied with the device. Failure to observe below guidelines may create risk of electric shock, fire and/or serious body injury.
- Do not use this tool for polishing. Using the device for purposes other than it is designed for may create risks and cause body injuries.
- Do not use equipment not designed and not recommended by the manufacturer for use with this power tool. Possibility of equipment installation in the device alone does not guarantee safe use.
- Maximum permissible rotary speed of a working tool must not be lower than maximum rotary speed specified for the device.
Working tool that exceeds permissible rotary speed may crack and part of it may splinter.
- Outer diameter and thickness of working tool must match to the device dimensions. Working tools with incorrect dimensions may be insufficiently shielded or controlled.
- Working tools with threaded insert must exactly match to spindle thread. In case of working tools fixed with collar, the working tool hole diameter must match to the collar diameter. Working tools that do not allow for precise attachment onto the device rotate unevenly, vibrate very hardly and can lead to loss of control over the device.
- Do not use damaged working tools under any circumstances. Before each use check equipment, e.g. grinding wheels for dents and cracks, grinding plates for cracks, abrasion or heavy wear, wire brushes for loose or broken wires. In case of dropping the device or working tool, make sure it is not damaged or use other, undamaged tool. Once the working tool has been checked and installed, switch on the device and let it work for one minute at maximum speed. Make sure that operator and bystanders are beyond range of rotating tool. Damaged tools mostly break within such test time.
- Wear personal protection equipment. Depending on the task, use protective mask that shields whole face, eye protection or safety glasses. When necessary use anti-dust mask, hearing protectors, work gloves or special apron that protects against small particles of grinding and grinded material. Protect eyes against particles produced at work and floating in the air. Anti-dust mask and respiratory protection must filter dust produced at work. Prolonged exposure to noise may lead to hearing loss.
- Make sure to keep bystanders at safe distance outside of the range of the device. Each person close to operating device must use personal protection equipment. Splinters
of processed piece or cracked working tool can chip off and cause damage also beyond direct range.
- When carrying out tasks when the tool can hit hidden electric wires, hold it only by insulated areas of the handle. Contact with power supply line may transfer voltage to metal parts of the device and cause electric shock.
- Never put away the device before working tool comes to complete stop. Rotating tool can contact the surface it is put on, which can cause loss of control over the device.
- Do not carry the device when it is rotating. Accidental contact of rotating working tool with clothes may cause catching and plunging of working tool into operator's body.
- Clean ventilation holes of the device on regular basis. Motor blower sucks dust into casing and large depositions of metal dust may cause electric hazards.
- Do not use the device in proximity of flammable materials. Sparks can cause ignition.
- Do not use tools that require liquid coolant. Use of water or other liquid coolants may cause electric shock.
KICKBACK AND RELEVANT SAFETY GUIDELINES
- Kick back is a sudden device reaction to locking or catching of rotating work tool, such as grinding wheel, disc, wire brush etc. Catching or locking causes sudden stopping of rotating work tool. Uncontrolled device is then pulled in direction opposite to work tool rotations. E.g. when grinding wheel jams itself in processed piece, wheel edge plunged in material may lock and cause breaking off or kick back. Grinding wheel movement (towards or away from operator) depends then on grinding wheel movement direction at the place it locked. Grinding wheel may also break.
-
Kick back is a result of inappropriate use of the device. It can be avoided by observing below mentioned safety precautions.
-
Hold the device firmly, position your hands and body to limit kick back effect. Always use additional handle when it is included in standard equipment, to have the greatest possible control of kick back forces and counter torque during start up. Tool operator can control sudden pulling and kick back effect by observing appropriate safety precautions.
• Always keep your hands away from rotating working tools. As a result of kick back, working tool may cause hand injury. - Stay away from zone of device potential movement at kick back. At kick back, the device moves in direction opposite to movement of grinding wheel at the place of jamming.
- Be very careful when processing corners, sharp edges etc. Prevent rebound or jamming of work tools.
- Rotating work tool is more susceptible to jamming when processing corners, sharp edges or after rebound. It can cause loss of control or kick back.
- Do not use cutting blades for wood or toothed blades.
- Work tools of this type often cause kick back or loss of control over the device.
DETAILED SAFETY GUIDELINES FOR GRINDING AND CUTTING WITH A WHEEL
- Only use grinding wheels designed for the device and shield designed for that wheel. Grinding wheels that are not proper accessories for the device may not be sufficiently shielded and safe.
- Offset grinding wheels must be installed in such a way that the grinding surface does not protrude beyond edge of the safety guard. Unprofessionally installed grinding wheel that protrudes beyond edge of the safety guard cannot be shielded sufficiently.
- The guard must be securely attached to the device to guarantee the greatest safety possible. It must be positioned in such a way, that the grinding wheel section
that is unguarded and facing the operator is reduced to minimum. The guard protects the operator from splinters, accidental contact with the grinding wheel, and sparks that otherwise could light up clothes.
- Use grinding wheels only for tasks they are designed for.
- For example, do not use side surface of a cutting wheel for grinding. Grinding wheels for cutting are designed to remove material with wheel edge. Side forces applied to the wheel may cause it to crack.
- Always use undamaged fixing flanges with size matching to the grinding wheel. Proper flanges support grinding wheel and reduce risk of breaking. Grinding wheels for cutting use flanges that may be different from flanges designed for other types of grinding wheels.
- Do not use worn out grinding wheels from bigger devices. Grinding wheels for bigger devices are not designed for higher rotational speed, which is specific for smaller devices, and therefore they may break.
ADDITIONAL DETAILED SAFETY GUIDELINES FOR CUTTING WITH A GRINDING WHEEL
- Avoid jamming of cutting wheel and excessive pressure. Do not make too deep cuts. Overloading the cutting wheel increases its load and risk of jamming or locking, and in consequence kick back or wheel breaking.
- Avoid areas in front and behind rotating cutting wheel. In the event of kick back, cutting wheel advance in work piece away from you may cause bouncing of the device with rotating wheel towards your hand.
- In the event of jamming of cutting wheel or having a break in work, switch off the device and wait until the wheel comes to complete stop. Never attempt to remove rotating wheel from cut material, as this may cause kick back. Find and remove cause of jamming.
- Do not switch on the device back, when it is still in processed material. Before cutting again, cutting wheel should reach its full rotational speed. Otherwise the cutting wheel may catch material, bounce out of work piece or cause kick back.
- Support sheets and large objects before processing to minimise risk of kick back caused by jammed blade. Large objects can bend under own weight. Support work piece on both sides, at cutting line and near edge.
Be careful when cutting holes in walls and operating in other areas with reduced visibility. Wheel plunging into material may cause kick back after hitting gas lines, water pipes, electric wires and other objects.
DETAILED SAFETY GUIDELINES FOR PAPER SANDING
- Do not use too large sheets of abrasive paper. When choosing size of abrasive paper follow manufacturer instructions. Abrasive paper that protrudes beyond sanding pad may cause injuries, and also lead to locking or tearing abrasive paper or kick back.
DETAILED SAFETY GUIDELINES FOR WIRE BRUSHING
- Remember that brush loses pieces of wire even during normal use. Do not overload wires by excessive pressure. Flying pieces of wire can easily penetrate through thin clothes and/or skin.
- Whenever use of guard is recommended, avoid contact of brush and guard. Diameter of wheel and cup brushes may increase at pressure and centrifugal forces.
- Always wear protective glasses when using wire brushes.
ADDITIONAL SAFETY GUIDELINES
- Remove the battery from the device before any equipment installation.
- Check grinding tools before use. Grinding tool must be installed properly and must be free to rotate. To check the device, start it, keep in safe position and let it run with no load for at least one minute. Do not use damaged or vibrating grinding tools. Grinding tools must be round. Damaged grinding tools can break and cause injuries.
- After grinding tool installation, and before starting the grinder, make sure the grinding tool is properly fixed, it is free to rotate and does not come in contact with the shield.
- Spindle lock button can be activated only when the grinder spindle is not moving.
- When using tools designed for grinding wheels with threaded hole, make sure that the length of the wheel thread matches the length of the spindle thread.
- Secure processed material. Secured material in a fixing tool or a vice is safer than holding it in hand.
- Fix processed material securely if its own weight does not guarantee stable position.
- Do not touch cutting and grinding wheels before they cool down.
- Do not apply side force on grinding or cutting wheel. Do not cut processed material thicker than maximum cutting depth of cutting wheel.
- When a quick release flange is used, make sure that inner flange seated on the spindle is equipped with rubber O-ring and this ring is not damaged. Also surfaces of the outer flange and the inner flange must be clean.
- Use quick release flange only with cutting and grinding wheels. Use only flanges that are free from defects, that operate correctly.
CORRECT OPERATION AND USE OF BATTERIES
- Battery charging process should be supervised by the user.
- Avoid charging the battery in temperature lower than 0^ .
- Use only the charger recommended by the manufacturer. Using charger designed for other type of battery brings the risk of fire.
- When the battery is not in use, store it away from metal objects such as paper clips, coins, keys, nails, screws or any other small metal objects that can short-circuit the battery connectors. Short-circuit of battery connectors may cause burns or fire.
- In case of battery damage and/or improper use it may produce gas. Ventilate room and seek medical attention in case of medical symptoms. Gas can damage respiratory tract.
-
In extreme conditions liquid may leak out of the battery. The liquid coming out of the battery may cause irritations or burns. When a leak is found, follow the below procedure:
-
Carefully wipe the liquid with a cloth. Avoid contact of the liquid with skin and eyes.
- In case the liquid gets onto skin, immediately wash the spot abundantly with clean water, you can also neutralize the liquid with a mild acid, e.g. lemon juice or vinegar.
- When the liquid gets into eyes, wash it immediately with a lot of clean water for at least 10 minutes. Seek medical advice.
- Do not use damaged or modified battery. Damaged or modified batteries may behave unpredictably, causing fire, explosion or risk of injuries.
- Do not expose the battery to humidity or water.
- Always keep the battery away from sources of heat. Do not leave the battery for a long time in high temperature (in direct sunlight, in proximity of heaters and wherever the temperature exceeds 50°C).
- Do not expose the battery to fire or excessive temperature. Exposure to fire or temperature above 130^ may cause explosion.
CAUTION! Temperature of 130°C can be also defined as 265°F.
- Observe all charging instructions. Do not charge the battery in temperature outside of range defined in the rating data table from the instruction manual. Incorrect charging or charging in temperature outside of defined range may damage the battery and increase the risk of fire.
BATTERY REPAIRS
- Do not repair damaged batteries. Battery can be repaired only by the manufacturer or in an authorised workshop.
- When disposing of the worn out battery, take it to a service point where you can utilize such dangerous wastes.
SAFETY REGULATIONS FOR THE CHARGER
- Do not expose the charger to humidity or water. Ingress of water into the charger increases risk of electric shock. Use the charger only in dry rooms.
- Disconnect the charger from power supply before starting any maintenance or cleaning.
- Do not use the charger when placed on flammable surface (e.g. paper, textiles) or in proximity of flammable substance. Greater charger temperature when charging increases risk of fire.
- Check condition of the charger, cable and plug before each use. Do not use the charger if any damage is found. Do not try to disassemble the charger. All repairs should be made at an authorized service workshop. Improper charger assembly may cause electric shock or fire.
• Children or persons who are physically, emotionally or mentally disabled and other persons, whose experience or knowledge is insufficient to use the charger while following all safety rules should not use the charger without supervision of person responsible for their safety. Otherwise there is a risk of improper use and injuries in consequence.
- When the charger is not in use, it should be disconnected from the mains network.
- Observe all charging instructions. Do not charge the battery in temperature outside of range defined in the rating data table from the instruction manual. Incorrect charging or charging in temperature outside of defined range may damage the battery and increase the risk of fire.
CHARGER REPAIRS
- Do not repair damaged charger. The charger can be repaired only by the manufacturer or in an authorised workshop.
- When disposing of the worn out charger, take it to a service point where you can utilize such wastes.
CAUTION! This device is designed to operate indoors.
The design is assumed to be safe, protection measures and additional safety systems are used, nevertheless there is always a small risk of injuries at work.
Li-lon batteries may leak, set on fire or explode when heated to high temperature or short-circuited. Do not store the batteries in a car in hot and sunny days. Do not open the battery. Li-lon batteries contain electronic protection devices that, if damaged, may cause fire or explosion of the battery.
Explanation of used symbols

1

2

3

4

5
6

7
8

9

1
0

1 12

13

14
- Read instruction manual, observe warnings and safety conditions therein.
- Use protective goggles and hearing protectors.
- Work with protective mask on.
- Keep the tool away from children.
- Protect against rain.
- Use indoors, protect from water and moisture.
- Be careful, sharp edges!
- Use protective gloves
- Recycling.
- Protection class 2.
- Segregated waste collection.
- Do not throw cells into fire.
- Hazardous to water environment.
- Do not allow to heat above 50°C.
CONSTRUCTION AND USE
Angle grinder is a hand held, battery powered tool. Drive consists of a DC commutator motor with permanent magnets, whose rotational speed is transferred with angle gear transmission. It can be used for grinding and cutting. This type of power tool is widely used for removal of burrs from metal surfaces, weld surface treatment, cutting tubes and other metal objects etc. With the right equipment the angle grinder can be used not only for cutting or grinding, but also removal of rust, paint coats etc.
Range of use covers all areas of repairs and construction in internal furnishing, adaptation of premises etc.

The device is designed for dry operation only and cannot be used for polishing. Use the power tool in accordance with the manufacturer's instructions only.

Inappropriate use.
- Do not process materials that contain asbestos. Asbestos is a carcinogen.
- Do not process materials that produce flammable or explosive dust. During operation power tool produces sparks that can ignite produced fumes.
- Do not grind with wheels designed for cutting. Cutting wheels work with front edge surface and grinding with side surface of the wheel can cause damage, and in consequence personal injuries of the operator.
DESCRIPTION OF DRAWING PAGES
Below enumeration refers to the device elements depicted on the drawing pages of this manual.
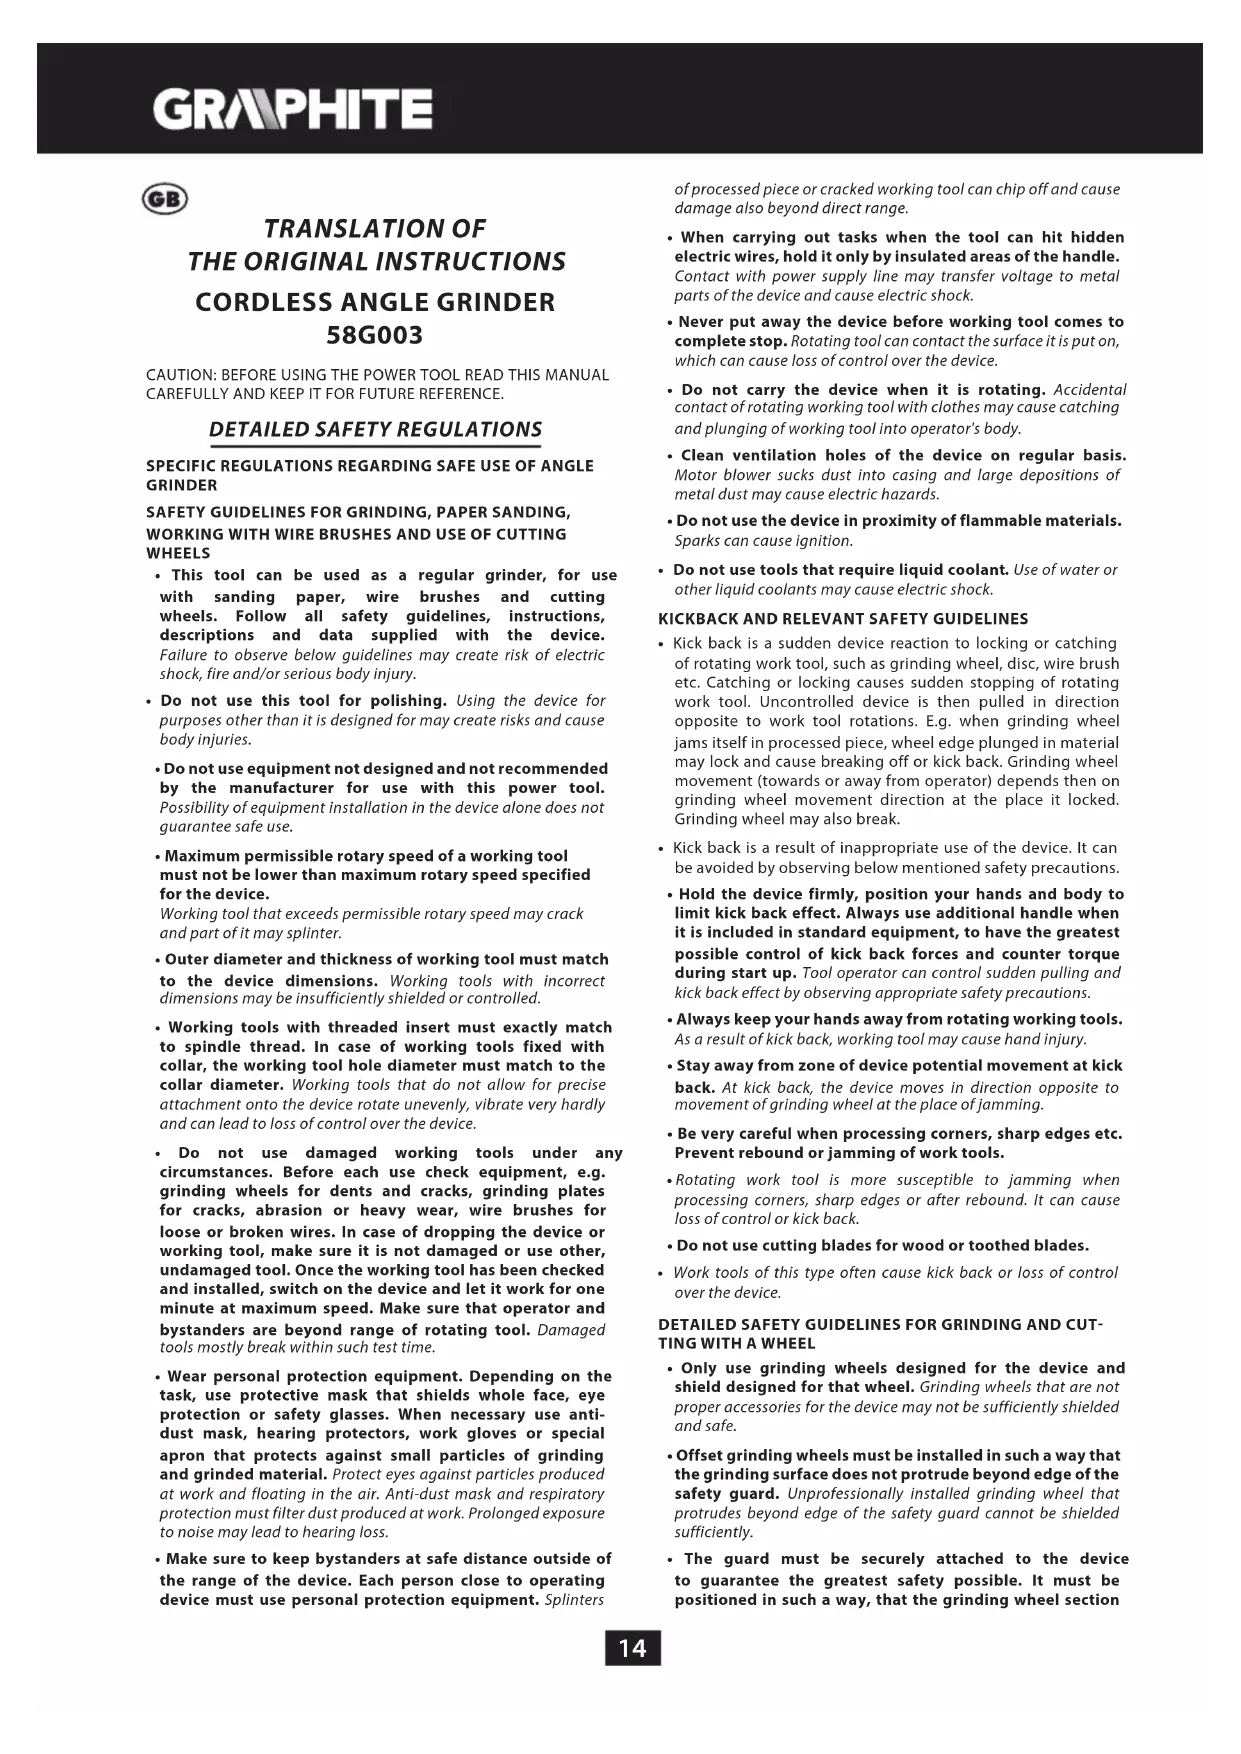
-
Spindle lock button
-
Switch lock button
-
Switch
-
Additional handle
-
Wheel guard
-
Outer flange
-
Inner flange
-
Lever (wheel guard)
-
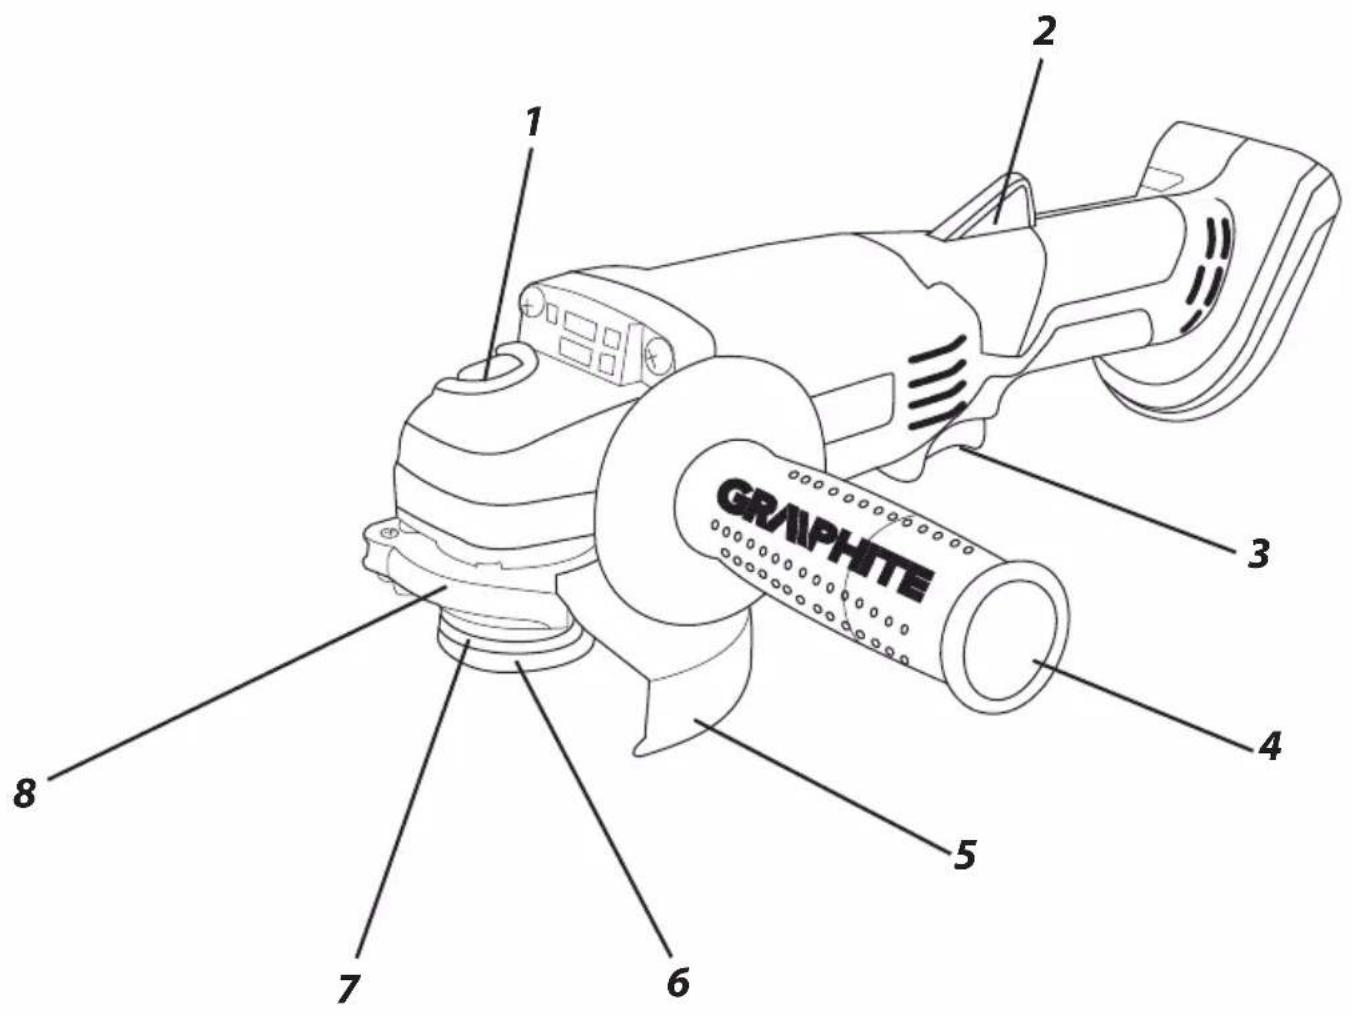
Battery
-
Battery lock button
-
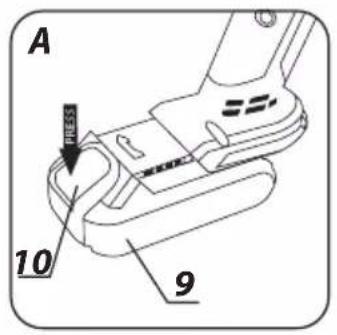
LED diodes
-
Charger
-
Button for battery level indication
-
Battery level indicator (LED)
* Differences may appear between the product and drawing.
MEANING OF SYMBOLS

CAUTION

WARNING

ASSEMBLY / SETTINGS

INFORMATION
EQUIPMENT AND ACCESSORIES
- Wheel guard - 1 pce
- Special key - 1 pce
- Additional handle - 1 pce
REMOVING AND INSERTING THE BATTERY

- Push the battery lock button (10) and slide out the battery (9) (fig. A).
- Insert charged battery (9) into the handle holder, you should hear when the battery lock button (10) snaps.
BATTERY CHARGING

The device is supplied with partially charged battery. The battery should be charged in ambient temperature between 4^ C and 40^ C. New battery, or one that has not been used for a long time, will reach full efficiency after approximately 3 to 5 charge/discharge cycles.

- Remove the battery (9) from the device (fig. A).
- Connect the charger to mains socket (230 V AC).
- Slide the battery (9) into the charger (12) (fig. B). Ensure the battery is properly fitted (pushed to the end).
- Slide the battery (9) into the charger (12) (fig. B). Ensure the battery is properly fitted (pushed to the end).

When the charger is connected to a mains socket (230 V AC), the green diode (11) on the charger turns on to indicate connected supply.
When the battery (9) is placed in the charger (12), the red diode (11) on the charger turns on to indicate that the charging is in progress.
Simultaneously, green diodes (14) of the battery level indication

are flashing in different configurations, see description below.
- All diodes are flashing - battery is empty and requires charging.
- 2 diodes are flashing - the battery is partially discharged.
- 1 diode is flashing - the battery level is high.
Once the battery is charged, the diode (11) on the charger lights green, and all battery level diodes (14) light continuously. After some time (approx. 15 s) battery level indication diodes (14) turn off.

Do not charge the battery for more than 8 hours. Exceeding this time limit may cause damage to battery cells. The charger will not turn off automatically when the battery is full. Green diode on the charger will remain on. Battery level indication diodes turn off after some time. Disconnect power supply before removing the battery from the charger socket. Avoid consecutive short changings. Do not charge the battery after short use of the tool. Significant decrease of the period between changings indicates the battery is worn out up and should be replaced.

Batteries heat up when charging. Do not operate just after charging – wait for the battery to cool down to room temperature. It will prevent battery damage.
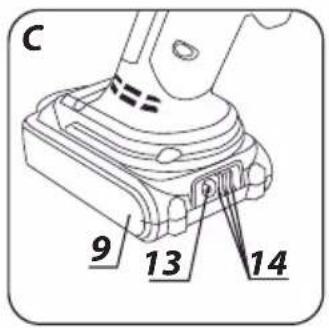
BATTERY LEVEL INDICATION

The battery is equipped with signalisation of the battery level (3 LED diodes) (14). To check battery level status, press the button for battery level indication (13) (fig. C). When all diodes are lit, the battery level is high. When 2 diodes are on, the battery is partially discharged. When only one diode is lit, the battery is discharged and must be recharged.

INSTALLATION AND ADJUSTMENT OF THE WHEEL GUARD
Wheel guard protects the operator from splinters, accidental contact with the working tool or sparks. It should be installed at all times. Make sure that protective section faces the operator.

The wheel guard design allows for setting the guard tool free in an optimal position.
- Loosen and pull away the lever (8) on the wheel guard (5).
- Turn the wheel guard (5) to desired position.
- Lower the lever (8) to lock.

Deinstallation and setting of the wheel cover are similar to installation, only the sequence of actions is reversed.
REPLACEMENT OF WORKING TOOLS
Wear work gloves during working tool replacement.
Spindle lock button (1) is used only to lock the grinder spindle for installation or removal of working tool. It cannot be used as a brake button when the wheel is rotating. Otherwise the grinder may be damaged or the user may be injured.

WHEEL INSTALLATION

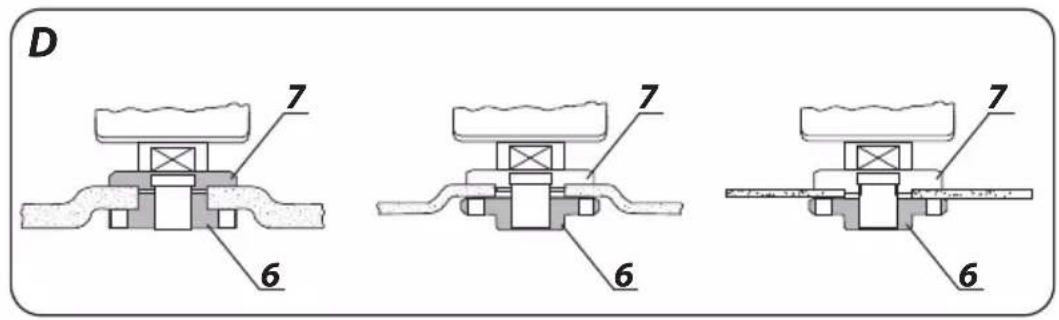
For grinding and cutting wheels below 3 mm thickness, screw the outer flange (6) nut onto the flat surface on the wheel side (fig. D).
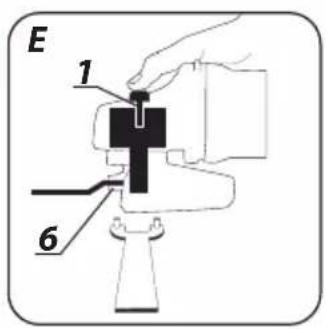
- Press the spindle lock button (1).
- Insert the special key (included) into holes of the outer flange (6) (fig. E).
- Turn the key to loosen and remove the outer flange (6).
- Install wheel, make sure it is pressed against the inner flange surface (7).
- Screw the outer flange (6) on, slightly tighten with the special key.
You can remove the wheel by following the installation procedure in reverse sequence. During installation, the wheel should be pressed against surface of the inner flange (7) and centred when seated on its neck.
INSTALLATION OF WORKING TOOLS WITH THREADED HOLE
- Press the spindle lock button (1).
- Remove previously installed working tool, if any.
- Remove two flanges before installation: inner flange (7) and outer flange (6).
- Screw threaded part of the working tool onto the spindle, then slightly tighten.

Remove working tools with threaded hole by following installation procedure in reversed order.
INSTALLATION OF THE ANGLE GRINDER ON AN ANGLE GRINDER SUPPORT

It is possible to use the angle grinder in special support for angle grinders. The angle grinder must be correctly fixed in accordance with installation procedure provided by the support manufacturer.
Check the grinding wheel condition before using the grinder. Do not use wheels with dents, cracks or other damages. Replace worn out wheel or brush with a new one before operation. After work is finished always switch the grinder off and wait until the work tool comes to complete stop. Only then you can put the grinder away. Do not brake rotating grinding wheel by pushing it against processed material.

- Do not overload the grinder. The power tool weight creates enough pressure to work efficiently. Overloading and too strong pressure may cause dangerous crack of the working tool.
- In case the grinder is dropped during operation, make sure to check and replace the working tool when necessary, if it is found damaged or deformed.
- Never hit processed material with working tool.
- Avoid knocking off and tearing off material with the wheel, especially when processing knives, sharp edges etc., as this can cause loss of control over the power tool and kick back.
- Never use wood cutting blades designed for circular sawing machines. Use of such blades often results in the power tool kickback, loss of control and may cause operator body injury.
SWITCHING ON / SWITCHING OFF

Hold the grinder with both hands when starting and during operation. The grinder is equipped with the switch, which protects against accidental starting.
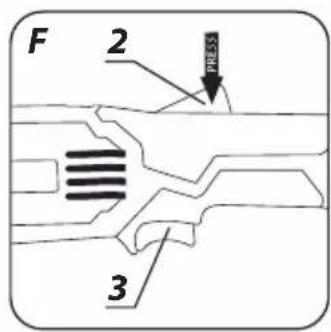
- Press the switch lock button (2).
- Press the switch button (3) (fig. F).
- Releasing the switch button (3) will stop the grinder.

Wait a while after starting the grinder until the wheel reaches its top speed; only then you can proceed with your work. When working, do not use the switch of the grinder to switch it on or off. Switch button may only be used when the grinder is away from the processed material.
CUTTING

- Use the angle grinder to make cuts in straight line only.
- Do not cut material while holding it in hand.
- Support large pieces and make sure that points of support are located near the cutting line and near end edges of the material. Stable material does not tend to shift during cutting.
- Fix small pieces, e.g. in a vice or with clamps. Fix material so the cutting place is located near fixing tool. This will ensure greater precision when cutting.
-
Do not allow vibrations or cutting wheel bouncing on material, it can adversely affect cut quality and may cause crack in the cutting wheel.
-
When cutting, do not apply side pressure on a cutting wheel.
- Use cutting wheel appropriate for the type of processed material.
- When cutting, it is recommended to match advance direction with direction of cutting wheel rotation.
Cutting depth depends on the wheel diameter (fig. G).
- Use only wheels with rated diameters equal or smaller than recommended for the given grinder type.
- In case of deep cutting (e.g. sections, building blocks, bricks etc.), avoid contact of fixing flanges with processed material.
Cutting wheels heat up to high temperatures during operation – do not touch them with unprotected parts of your body before they cool down.
GRINDING


With the angle grinder you can use grinding wheels, cup wheels, flap wheels, wheels with abrasive cloth, wire brushes, elastic discs for abrasive paper etc. Each type of wheel and processed material requires the right working technique and use of appropriate personal protection equipment.

When grinding do not use wheels designed for cutting.
Grinding wheels are designed to remove material with wheel edge.
- Do not use side surface for grinding. Optimum work angle for such wheels is 30^ (fig. H).
- Perform grinding tasks only with grinding wheels appropriate for processed material.

When using flap wheels, abrasive cloth wheels and elastic discs with abrasive paper make sure to keep the right work angle (fig. 1).
- Do not use whole wheel surface for grinding or sanding.
- Such wheels are used for processing flat surfaces.

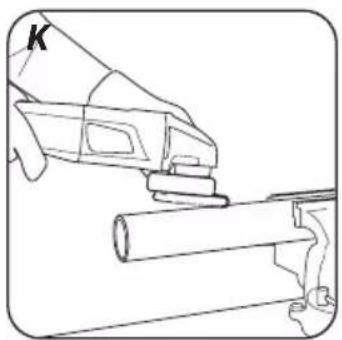
Wire brushes are mainly used for cleaning sections and hard to reach areas. Use them to remove rust, paint coatings, etc. (fig. K).

Use only working tools whose allowable rotary speed is higher or equal to maximum angle grinder speed with no load.
Remove the battery from the device before commencing any activities related to installation, adjustment, repair or maintenance.
MAINTENANCE AND STORAGE
- Cleaning the device after each use is recommended.
- Do not use water or any other liquid for cleaning.
- Clean the tool with a dry cloth or blow through with compressed air at low pressure.
- Do not use any cleaning agents or solvents, they may damage plastic parts.
- Clean ventilation holes in the motor casing regularly to prevent device overheating.
- In case of excessive commutator sparking, have the technical condition of carbon brushes of the motor checked by a qualified person.
• Always store the tool in a dry place, beyond reach of children. - Store the device with the battery removed.

All defects should be repaired by service workshop authorized by the manufacturer.
TECHNICAL PARAMETERS
RATED PARAMETERS
| Cordless Angle Grinder | |
| Parameter Value | |
| Battery voltage 18 V DC | |
| Rated rotational speed | 10000 rpm |
| Maximum wheel diameter 115 mm | |
| Inner wheel diameter 22,2 mm | |
| Spindle thread M14 | |
| Protection class III | |
| Weight 1,5 kg | |
| Year of production 2018 | |
| Graphite Energy+ System Battery | ||
| Parameter Value | ||
| Battery 58G001 58G004 | ||
| Battery voltage 18 V DC 18 V DC | ||
| Battery type Li-Ion Li-Ion | ||
| Battery capacity | 2000 mAh | 4000 mAh |
| Ambient temperature range | 4^ - 40^ | 4^ - 40^ |
| Charging time for charger 58G002 | 1 h | 2 h |
| Weight 0,400 kg 0,650 kg | ||
| Year of production | 2018 | 2018 |
| Graphite Energy+ System Charger | |
| Parameter Value | |
| Charger type | 58G002 |
| Supply voltage | 230 V AC |
| Power supply frequency | 50 Hz |
| Charging voltage | 22 V DC |
| Max. charging current | 2300 mA |
| Ambient temperature range | 4°C – 40°C |
| Charging time of the battery 58G001 | 1 h |
| Charging time of the battery 58G004 | 2 h |
| Protection class | II |
| Weight | 0,300 kg |
| Year of production | 2018 |

NOISE LEVEL AND VIBRATION PARAMETERS
Noise and vibration information
Parameters of produced noise level, such as sound pressure level Lp_A and sound power level Lw_A with measurement uncertainty K are specified below in this manual, in compliance with EN 60745. Vibration values a_h and measurement uncertainty K are determined in accordance with EN 60745 and specified below. Vibration level specified below in this manual was measured in accordance with measurement procedure defined in EN 60745 and can be used to compare power tools. It can also be used for initial assessment of exposure to vibrations.
Specified vibration level is representative for main applications of the power tool. Vibration level may change if the power tool is used for other purposes, with different working tools or will not
be maintained properly. The abovementioned factors may lead to higher exposure to vibrations during whole working time. To precisely define exposure to vibrations, include periods when the power tool is switched off and when it is switched on but not used for working. This way total exposure to vibrations may be significantly lower. Use additional safety measures to protect the user against results of exposure to vibrations, such as: power tool and working tool maintenance, proper hand temperature conditions, good work organisation.
Sound pressure level: LpA = 85,06 dB (A) K=3dB (A)
Sound power level: LwA=96,06 dB (A) K=3dB (A)
Vibration acceleration value (rear handle):
ah = 6,151 m/s² K = 1,5 m/s²
Vibration acceleration value (front handle)::
ah = 4,144 m/s ^2 K = 1,5 m/s ^2
ENVIRONMENTAL PROTECTION

Electrical equipment must not be disposed off with household waste and, instead, should be utilized at appropriate facilities. Information on utilization can be provided by the product vendor or the local authorities. Waste electrical and electronic equipment contains substances that are not neutral to the natural environment. Equipment that is not recycled constitutes a potential hazard to the environment and to human health.

Storage batteries/batteries must not be disposed with domestic waste, put in a fire or into the water. Damaged or used up storage batteries must be properly recycled in compliance with the current directive pertaining to disposal of storage batteries and batteries.
Li-Ion
* Right to introduce changes is reserved.
"Grupa Topex Spółka z ograniczoną odpowiedzialnością" Spółka komandytowa with seat in Warsaw at ul. Pograniczna 2/4 (hereinafter Grupa Topex) informs, that all copyrights to this instruction (hereinafter Instruction), including, but not limited to, text, photographies, schemes, drawings and layout of the instruction, belong to Grupa Topex exclusively and are protected by laws accordingly to Copyright and Related Rights Act of 4 February 2004 (ustawa o prawie autorskim i prawach pokrewnych, Dz. U. 2006 No 90 item 631 with later amendments). Copying, processing, publishing, modifications for commercial purposes of the entire Instruction or its parts without written permission of Grupa Topex are strictly forbidden and may cause civil and legal liability.
GRAFISKÄS DALAS APRAKSTS
POSEBNI PROPISI O SIGURNOSTI
POSEBNI PROPISI VEZANI ZA SIGURAN RAD S KUTNIM BRUSILICAMA.
SIGURNOSNI NAPUCI VEZANI ZA BRUŠENJE, BRUŠENJE POMOĆU BRUSNOG PAPIRA, RAD S KORIŠTENJEM ČELIČNIH ČETKI I REZANJE POMOĆU PLOČE.
- Taj električni alat možete koristiti kao običnu brusilicu, brusilicu za brušenje pomoću brusnog papira, za brušenje čeličnim četkama i kao uređaj za rezanje pomoću ploče. Poštujte sve sigurnosne naputke, upute, opise i podatke koje ste dobili zajedno s električnim alatom. Nepoštivanje dolje navedenih pravila može predstavljati opasnost od strujnog udara, požara i/ili težih tjelesnih povreda.
PORATNI UDAR I ODGOVARAJUĆE SIGURNOSNE NAPUTKE
- Povratni udar je iznenadna reakcija uređaja zbog radnog alata koji se je zaglavio ili blokirao, kao što su brusne ploče, brusni tanjuri, čelične četke itd. Zbog zaglavljivanja ili blokiranja dolazi do naglog zaustavljanja rotirajućeg radnog alata. Nekontrolirani električni alat zbog toga bude naglo odbačen u smjeru suprotnom do smjera okretaja radnog alata. Kad se na primjer ploča zaglavi ili ukliješti u obrađivanom predmetu, rub ploče uronjen u materijal može se blokirati i uzrokovati njeno ispadanje ili povratni udar. Gibanje ploče (prema korisniku ili u suprotnom smjeru) je u toj situaciji ovisno o smjeru gibanja ploče na mjestu blokiranja. Osim toga može doći i do loma ploče.
PRIBOR I DODATNA OPREMA
- Štitnik ploče - 1 kom.
- Poseban ključ - 1 kom.
- Dodatna drška - 1 kom.
PRIPREMA ZA RAD
VAĐENJE / STAVLJANJE AKU-BATERIJE

- Pritisnite gumb za pričvršćivanje aku-baterije (10) i izvadite aku-bateriju (9) (crtež A).
- Napunjenu aku-bateriju (9) postavite na mjesto u dršci, sve dok ne čujete klik na gumbu za pričvršćivanje aku-baterije (10).