
59G220 - Grinder Graphite - Free user manual and instructions
Find the device manual for free 59G220 Graphite in PDF.
| Product type | Angle grinder |
| Brand | Graphite |
| Model | 59G220 |
| Supply voltage | 230 V AC |
| Frequency | 50 Hz |
| Rated power | 1200 W |
| Speed range | 3000 - 11000 min⁻¹ |
| Maximum wheel diameter | 125 mm |
| Wheel bore diameter | 22.2 mm |
| Spindle thread | M14 |
| Protection class | II |
| Weight | 3.8 kg |
| Year of manufacture | 2019 |
| Sound pressure level | 97.1 dB(A) |
| Sound power level | 108.1 dB(A) |
| Vibration acceleration value (grinding) | 13.716 m/s² |
| Main functions | Grinding, cutting, sanding with abrasive paper, metal brushing |
| Maintenance and cleaning | Clean ventilation slots regularly; use a dry cloth or low-pressure compressed air; do not use water or solvents |
| Safety | Use personal protective equipment (goggles, mask, gloves); hold the tool by insulated surfaces; do not use damaged tools; follow kickback instructions |
| Spare parts and repairability | Replaceable carbon brushes; replaceable power cord; repair by authorized service |
| General information | Class II electric tool; indoor use only; do not process materials containing asbestos |
Frequently Asked Questions - 59G220 Graphite
User questions about 59G220 Graphite
0 question about this device. Answer the ones you know or ask your own.
Ask a new question about this device
Download the instructions for your Grinder in PDF format for free! Find your manual 59G220 - Graphite and take your electronic device back in hand. On this page are published all the documents necessary for the use of your device. 59G220 by Graphite.
USER MANUAL 59G220 Graphite
natural_image
Line drawing of a GRAPHITE angle grinder with visible blade and handle (no text or symbols beyond branding)PL SZLIFIERKA KĄTOWA
GB ANGLE GRINDER
DE WINKELSCHLEIFER
RU МАШИНА ШЛИФОВАЛЬНАЯ УГЛОВАЯ
UA ШЛІФМАШИНКА КУТОВА
HU SAROKCSISZOLÓ
RO MASINA DE SLEFUIT UNGHIULARA
cz ÚHLOVÁ BRUSKA
SK UHLOVÁ BRÚSKA
SI KOTNI BRUSILNIK
LT KAMPINIS ŠLIFUOKLIS
10* LAT DOSTĘPNOŚCI CZĘŚCI ZAMIENNYCH
natural_image
Line drawing of a person using a radial tool on a workbench (no text or symbols)
natural_image
Line drawing of a robotic arm gripping a tool, with no visible text or symbols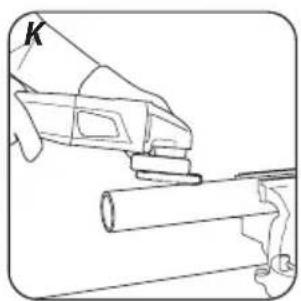
natural_image
Line drawing of a hand using a tool to lift or lift a cylindrical object (no text or symbols)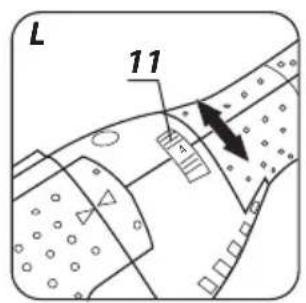

INSTRUKCJA ORYGINALNA (OBSŁUGI)
SZLIFIERKA KĄTOWA 59G220
1 2 3 4

5678
GTX SERVICE

/EC Declaration of Conformity/
/The above listed product is in conformity with the following UE Directives:/
/and fulfils requirements of the following Standards:/
/Name and address of the person who established in the Community and authorized to compile the technical file:/
/GRUPA TOPEX Quality Agent/
DETAILED SAFETY REGULATIONS

ANGLE GRINDER, SAFETY WARNINGS
Safety guidelines for grinding, sanding with sandpaper, working with wire brushes and cutting using the grinding wheel.
- This power tool can be used as a regular grinder, sander for sanding with sandpaper, grinder for grinding with wire brushes and for cutting with a cut-off wheel. Observe all safety guidelines, instructions, descriptions and data provided with the power tool. Failure to observe the following recommendations may cause danger of electric shock, fire and/or serious injuries.
- This power tool cannot be used for polishing. When the power tool is used for other works than it is designed for, it may contribute to hazards and injuries.
- Do not use equipment, which is not designed and recommended by the manufacturer specifically for this device. The fact that it can be fastened to the power tool, does not guarantee safe operation.
- The permissible rotational speed of a working tool used cannot be lower than the maximum rotational speed given on the power tool. A working tool rotating faster than the permissible speed may break and its parts may chip off.
- The outside diameter and thickness of a working tool must correspond to dimensions of the power tool. A working tool of incorrect dimensions may not provide sufficient control and covering of the power tool.
- Working tools with threaded inserts must perfectly fit the thread in the spindle. In case of working tools that are fastened using a flange, the hole diameter of a working tool must fit the flange diameter. Working tools, which cannot be precisely seated in the power tool, rotate unevenly, vibrate heavily and may result in loss of control over the power tool.
- Under no circumstances, should damaged working tools be used. Before the power tool is used, accessories such as cut-off wheels should be checked for chips and cracks, grinding wheels should be checked for cracks, abrasion or heavy wear, while wire brushes for loose or broken wires. When the power tool or a working tool is dropped, it must be checked for damage or another, undamaged tool should be used. If a working tool is checked and fastened, the power tool should be switched on for a minute at the highest speed, paying attention so that the operator and bystanders are beyond the zone of the rotating tool. Damaged working tools often break in this test period.
• Always wear personal protective equipment. Depending on a type of work, a full face mask, eye protection or safety glasses should be worn. A dust mask, ear protection, protective gloves or a special apron protecting against small particles of abrasive material and workpiece should be worn, if needed. Protect your eyes against airborne foreign bodies occurring during operation. A dust mask and protective mask for the respiratory system must filter dust occurring during work. The influence of noise for a longer period of time may lead to deterioration of the hearing.
• Always make sure bystanders are in a safe distance from the power tool reach zone. All people staying in the vicinity of the operating power tool must use personal protective equipment. Chips of a workpiece or broken working tools may chip off and cause injuries also beyond the direct reach zone.
- When works are performed, during which the power tool may encounter hidden electric conductors or own power cord, the power tool should be held by the isolated surfaces of the handle. A contact with the power mains network may transfer voltage onto metal parts of the power tool, which may result in electric shock.
• The power cord must be kept away from the rotating working tools. When the control over the tool is lost, the power cord may be cut or caught, and your hand or the entire arm may get into the rotating working tool.
- Do not put the power tool aside, before the working tool comes to complete stop. The rotating working tool may come in contact with a surface, which it is put aside onto, and you may lose control over the tool.
- Do not carry the power tool, which is in motion. An accidental contact with the rotating working tool may caught in your clothes and drill into an operator's body.
- Clean ventilation slots of the power tool on a regular basis. The motor blower sucks dust into the casing, while large accumulation of metal dust may cause electric hazard.
- Do not use the power tool near flammable materials. Sparks may cause ignition.
- Do not use tools, which require liquid cooling agents. The use of water or other cooling agents may cause electric shocks.
Recoil and proper safety guidelines
- Recoil is a sudden reaction of the power tool to seizure or blocking of a rotating working tool, such a grinding wheel, cut-off wheel or a wire brush, etc.
The seizure and blocking may suddenly stop a rotating working tool. The power tool without control will be jerked in the opposite direction to the working tool.
When the grinding wheel stops or catches in the workpiece, an edge of the grinding wheel immersed in the workpiece may lock and cause recoil or rejection. The movement of the grinding wheel (towards or away from the operator) depends on the movement of the grinding wheel in a place, where it is locked. The grinding wheels may also break.
Recoil is a consequence of incorrect operation of the power tool. This can be avoided by observing the following precautions.
• The power tool must be held firmly, while your body and hands should be positioned to alleviate recoil. If the additional handle is included as standard equipment, it should be used at all times to provide the highest control over recoil forces or rejecting moment during start-up. An operator can take control of recoil and jerking by taking proper precautions.
- Never hold your hands in the vicinity of rotating working tools. A working tool may injure your hand as a result of recoil.
• Always stay away from the reach zone, in which the power tool moves during recoil. As a result of recoil, the power tool moves in the opposite direction to the movement of the grinding wheel, where it locks.
- Corners, sharp edges, etc. should be worked with special attention. Recoil or locking of the working tools should be prevented. A rotating working tool is more prone to seizure, when working angles, corners, sharp edges or when it is rebound. This may result in loss of control or recoil.
- Do not use discs for wood or toothed discs. Working tools of this type often cause recoil or loss of control over the working tool.
GRAPHITE
Special safety guidelines for grinding and cutting with the grinding wheel.
• Always use the grinding wheel intended for a given power tool and guard intended for a given grinding wheel. Grinding wheel that are not part of equipment of a given power tool may be insufficiently covered or safe.
- Offset grinding wheels should be fastened so that their grinding surface does not protrude beyond the protective guard. Incorrectly seated grinding wheel and protruding beyond the edge of the protective guard may not be sufficiently covered.
- The guard must be secured to the power tool to ensure the highest possible safety level and positioned so that the uncovered part of the grinding wheel facing the operator is as small as possible. The guard protects the operator against chips, accidental contact with the grinding wheel and sparks, which may set clothing on fire.
- Grinding wheels can only be used according to its purpose.
- The side surface of the grinding wheel should not be used for cutting. Cut-off grinding wheels are designed for removal of material with the disc edge. The influence of lateral forces on the grinding wheels may break them.
- Undamaged fastening flanges of a correct size and shape should always be used for a selected grinding wheel. Proper flanges support the grinding wheel and reduce the risk of its breaking. Flanges for cut-off wheels may differ from flanges designed for other grinding wheels.
- Do not use worn grinding wheels from larger power tools. Grinding wheels for larger power tools are not designed for higher rotational speed, which is specific to smaller power tools. Thus, such grinding wheels may break.
Additional specific safety guidelines for cutting with a cut-off wheel
• Always prevent a cut-off wheel from seizure and avoid excessive pressure. Do not make too deep cuts. The overload of a cut-off wheel increases its load and tendency for seizure or locking, and thus may result in recoil or breaking of a cut-off wheel.
- Avoid areas in front of and behind a rotating cut-off wheel. When a cut-off wheel is moved onto a workpiece away from the operator, it may cause the power tool to kick back as a result of recoil, with a rotating cut-off wheel pointing directly towards the operator.
- When a cut-off wheel seizes or you take a break from work, switch off the power tool and wait until it comes to a complete stop. Do not attempt to remove a rotating cut-off wheel from a cutting place, since it may cause recoil. Find and eliminate a cause of seizure.
- Do not switch the power tool back on, if it is still sunk in a workpiece. Before you continue to cut, a cut-off wheel must reach its full rotational speed. Otherwise, a cut-off wheel may catch, spring back from a workpiece and cause recoil.
- Boards and large objects should be supported to reduce the risk of recoil caused by a seized cut-off wheel. Large objects may bend under their own weight. A workpiece should be supported from both sides, both near the cut line and its edge.
- Special caution should be exercised, when holes are cut in a wall or in confined spaces. As a cut-off wheel sinks into a workpiece, it may cause the power tool to recoil, when it encounters a gas or water supply line, power conductors or other objects.
Specific safety guidelines for sanding with sandpaper
- Do not use too large sheets of sandpaper. Always follow guidelines of a manufacturer, when the size of a sandpaper is selected. Sandpaper protruding beyond a grinding disc may cause injuries and result in locking and tearing of sandpaper, or recoil.
Specific safety guidelines for working with wire brushes
- It should always be remembered that pieces of wire are lost even during normal use. Do not overload wires by putting excessive pressure. Airborne pieces of wire may easily puncture thin clothing and/or skin.
- If a guard is recommended to be used, prevent a brush from touching the guard. A brush diameter for plates and pots may increase due to the pressure and centrifugal forces.
Additional safety guidelines
- Before connecting to the power source, always make sure the supply voltage is compatible with the value specified on the nameplate of the tool.
- Before the grinder is connected, always check the power cord. In case of damage, have it repaired in an authorised workshop.
- Before all installation works, the plug should be taken out of the receptacle.
- Grinding tools should be checked before each use. A grinding tool must be correctly fastened and should rotate freely. As part of the test, the tool should be switched on with no load for at least one minute in a safe position. Do not use damaged or vibrating grinding tools. Grinding tools should be round. Damaged grinding tools may break and cause injuries.
- Once a grinding tool is installed and before the grinder is switched on, check the grinding tool for correct installation and free rotations, and whether it does not catch the guard.
- The spindle lock button can be activated, only when the grinder spindle does not move.
- In case of tools adapted for fastening of grinding wheels with a threaded opening, make sure the grinding wheel thread length is suitable for the spindle thread length.
• Always secure the workpiece. It is always preferable to secure the workpiece in a vice or other fastening tool than holding it in your hand. - If own weight of the workpiece does not guarantee a stable position, it should be fastened.
- Do not touch cut-off and grinding wheels, before they cool down.
- Do not exert lateral pressure on the grinding or cut-off wheel.
- Do not cut a workpiece of a thickness larger than the maximum cutting depth of the cut-off wheel.
- When quick release flange is used, make sure that inner flange seated on the spindle is equipped with rubber O-ring and this ring is not damaged. Also surfaces of the outer flange and the inner flange must be clean.
- Use quick release flange only with cutting and grinding discs. Use only flanges that are free from defects, that operate correctly.
- In case of temporary mains power failure or after disconnecting plug from mains socket with the switch in ON position, unlock the switch and set it to OFF position before starting the tool again.
NOTE: The tools is intended for indoor works.
Despite using the construction, which is safe by design itself, protection means and additional safety features, there is always a residual risk of injuries during operation.
Descriptions of used pictograms.

1 2 3 4

5678
- Warning, take special precautions.
- Read the instruction manual, observe warnings and safety conditions included in it!
- Use personal protection equipment (safety goggles, ear protectors).
- Use safety gloves.
- Disconnect the power cord, before maintenance or repair works are begun.
- Keep out of reach of children.
- Protect against rain
- Protection class II
DESIGN AND APPLICATION
The angle grinder is a hand-held power tool with the II class isolation. The power tool is driven with a single-phase, commutator motor, whose rotational speed is reduced by means of an intersecting axis gear. The power tool can be used both for grinding and cutting. This type of power tools is widely used for removal of burrs from metal surfaces, weld surface processing, cutting light-wall tubes and other small metal objects etc. They are used in engineering industry, automotive and chemical industry. With the use of proper tools, the angle grinder can be used not only for cutting or grinding, but also for rust and paint coats removal.
The areas of its application include repair and construction works, not only related to metals. The angle grinder can also be used for cutting and grinding of construction materials, such as brick, paving stones, ceramic tiles, etc.

The power tool is designed for dry operation only and it must not be used for polishing. The power tool should be used according to its purpose.

Use inconsistent with its purpose
- Do not work materials that contain asbestos. Asbestos is carcinogenic.
- Do not work materials, whose dust is inflammable or explosive. During operation, the power tool produces sparks, which may ignite emitted vapours.
- Do not use cut-off wheels for grinding. The cut-off wheels are used to cut with its face, while grinding with lateral surface of such a cut-off wheel threatens with its damages and puts the operate in danger of injuries.
DESCRIPTION OF GRAPHIC PAGES
The below list refers to device components shown in the graphic pages of this instruction manual.
- Spindle lock button
- Switch
- Additional handle
- Grinding wheel cover
- External flange
-
Internal flange
-
Switch lock button
- Carbon brush cover
- Main handle lock
- Lever (grinding disc guard)
- Speed control dial
* There can be differences between the drawing and actual product.
DESCRIPTION OF USED GRAPHIC SIGNS

NOTE

WARNING

FITTING/SETTING

INFORMATION
EQUIPMENT AND ACCESSORIES
- Grinding wheel guard - 1 pce
- Socket spanner - 1 pce
- Additional handle - 1 pce
PREPARATION FOR WORK
ATTACHING THE ADDITIONAL HANDLE

The additional handle (3) is installed in one of the holes in the grinder head. It is recommended to use the grinder with the additional handle. When holding the grinder with both hands (also using the additional handle), there is less risk of touching the grinder wheel or brush with your hand, as well as of injuries during recoil.
ADJUSTABLE MAIN HANDLE

Before starting operation you can adjust the main handle to the position most comfortable for the task. Before starting operation you can adjust the main handle to the position most comfortable for the task. The handle can be fixed in 3 different positions by rotating it by 90° to the left or right in relation to the base position.
-
Press the main handle lock button (9) (fig. D).
-
Rotate the main handle to a desired position.
• The main handle will automatically lock in the position.
INSTALLING AND ADJUSTING THE GRINDING WHEEL GUARD
The wheel guard protects the operator against flying broken pieces and accidental contact with a working tool or sparks. The guard should always be fitted. Special attention should be paid so that its covering part faces the operator.

The design of the wheel guard mounting allows for toolless setting of the guard in an optimum position.

- Loosen and pull back the lever (10) on the wheel guard (4).
- Rotate the wheel guard (4) in a selected position.
- Lock by lowering the lever (10).
The removal and adjustment of the wheel guard are performed in a reverse order to its installation.

REPLACEMENT OF WORKING TOOLS
When working tools are replaced, wear working gloves at all times.

The spindle lock button (1) is only designed to lock the grinder spindle, when a working tool is installed or removed. Do not use it as a braking button, when the wheel rotates. Otherwise, the grinder may become damaged or the user may be injured.

INSTALLING THE WHEELS

When grinding or cut-off wheels with the thickness below 3 mm are installed, the outer flange nut (5) should be tightened with the flat surface from the wheel side (fig. B).


- Press the spindle lock button (1).
- Insert the special key (included) into two holes of the outer flange (5) (fig. A).
- Rotate the key to loosen and remove the outer flange (5).
- Place the wheel so it is pressed against the surface of the inner flange (6).
- Tighten the outer flange (5) and slightly tighten it with the special key.


The wheel is removed in the reverse order. During installation, the wheel should be pressed against the surface of the inner flange (6) and seated centrally in the neck.

INSTALLING THE WORKING TOOLS WITH THREADED HOLES

- Press the spindle lock button (1).
- Remove a previously installed working tool, if it is installed.
- Both flanges should be removed before installation – the inner flange (6) and outer flange (5).
- Put the threaded part of a working tool onto the spindle and slightly tighten.

Working tools with threaded holes are removed in the reverse order.
INSTALLING THE ANGLE GRINDER ON A TRIPOD FOR ANGLE GRINDERS

The angle grinder can be used on a dedicated tripod for angle grinders, provided that it is correctly installed according to instructions of the manufacturer of a tripod.
Before the grinder is used, check condition of the grinding wheel. Do not use chipped, broken or otherwise damaged grinding wheels. Worn grinding wheel or brush should be immediately replaced with new one before use. Once your work is completed, you should switch off the grinder and wait until it comes to a complete stop. Only then the grinder can be put aside. Do not brake a rotating grinding wheel by pressing it against a workpiece.

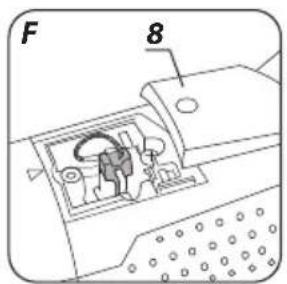
The cutting depth depends on a wheel diameter (fig. G).
- Only wheels with nominal diameters not larger than recommended for a given grinder model should be used.
- Do not allow the fastening flanges to contact a workpiece in case of deep cuts (e.g. sections, building blocks, bricks, etc.).

Cut-off wheels reach high temperatures during operation. It cannot be touched with uncovered body parts, before they cool down.

- Do not overload the grinder. The weight of the power tool exerts sufficient pressure to efficiently work with the tool. Overloading and excessive pressure may lead to dangerous cracking of the working tool.
- If the grinder is dropped during operation, it should be checked and a working tool might need to be replaced, when it is damaged or deformed.
- Never strike the workpiece with a working tool.
- Do not use the grinding wheel for hammering or stripping of the workpiece, especially when corners, sharp edges are worked, etc. (this may cause loss of control of the power tool and recoil).
- Do not use discs from circular saws intended for wood cutting. Failure to observe this recommendation may result in recoil of the power tool, loss of control and may lead to injuries of the operator.
SWITCHING ON / SWITCHING OFF

When the grinder is switched on and operated, it should be held with both hands. The grinder is equipped with the switch protecting against accidental activation.
- Press the safety button (7).
- Press the switch button (2) (fig. C).

Grinding wheel, cup-type grinding wheels, flap wheels, wheels with abrasive fibre, wire brushes and flexible discs, etc. should be used for grinding. Each type of discs and workpiece requires proper working method and personal protective equipment.

Cut-off wheels should not be used for grinding.

Grinding discs are intended for removal of material with an edge of the disc.
- Do not use the lateral surface for grinding. The optimum working angle for this disc type is 30^ (fig. H).
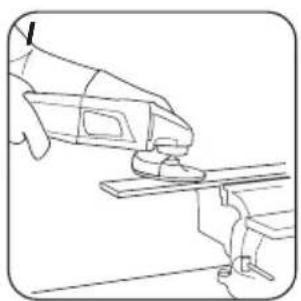
- Works related to grinding can be performed only, when proper grinding discs are used for a given workpiece.
When flap wheels, discs with abrasive fibre and flexible discs for sandpaper are used, attention should be paid to the proper tool angle (fig. 1).
- Do not grind with the entire surface of a wheel.
• This disc type should be used for working flat surfaces.

Wire brushes are mainly used for cleaning sections and hard-to-reach spaces. They can be used to remove rust, painting coats, etc. from a workpiece surface (fig. K).

Only such working tools can be used, whose permissible rotational speed is higher or equal to the maximum no load speed of the grinder.
Before any operations related to installation, adjustment, repairs or maintenance are commenced, the plug of the power cord should be disconnected from the socket.
MAINTENANCE AND STORAGE

- It is recommended to clean the tool after each use.
-
Do not use water or other fluids for cleaning.
-
The tool should be cleaned with a dry piece of cloth or blown with compressed air of low pressure.
- Do not use any cleaning agents or solvents, since they may damage plastic parts.
- Venting slots in the motor housing should be cleaned on a regular basis not to overload the tool.
- When the power cord is damaged, it should be replaced with the power cord of the same parameters. It should be performed by a qualified professional or the tool should be delivered to an authorised service shop.
- When the commutator sparks excessively, have the condition of motor carbon brushes checked by a qualified person.
- The tool should be always stored in a dry place and out of reach of children.
REPLACING THE CARBON BRUSHES

Immediately replace worn out (shorter than 5 mm), burnt or cracked motor carbon brushes. Always replace both carbon brushes at a time.
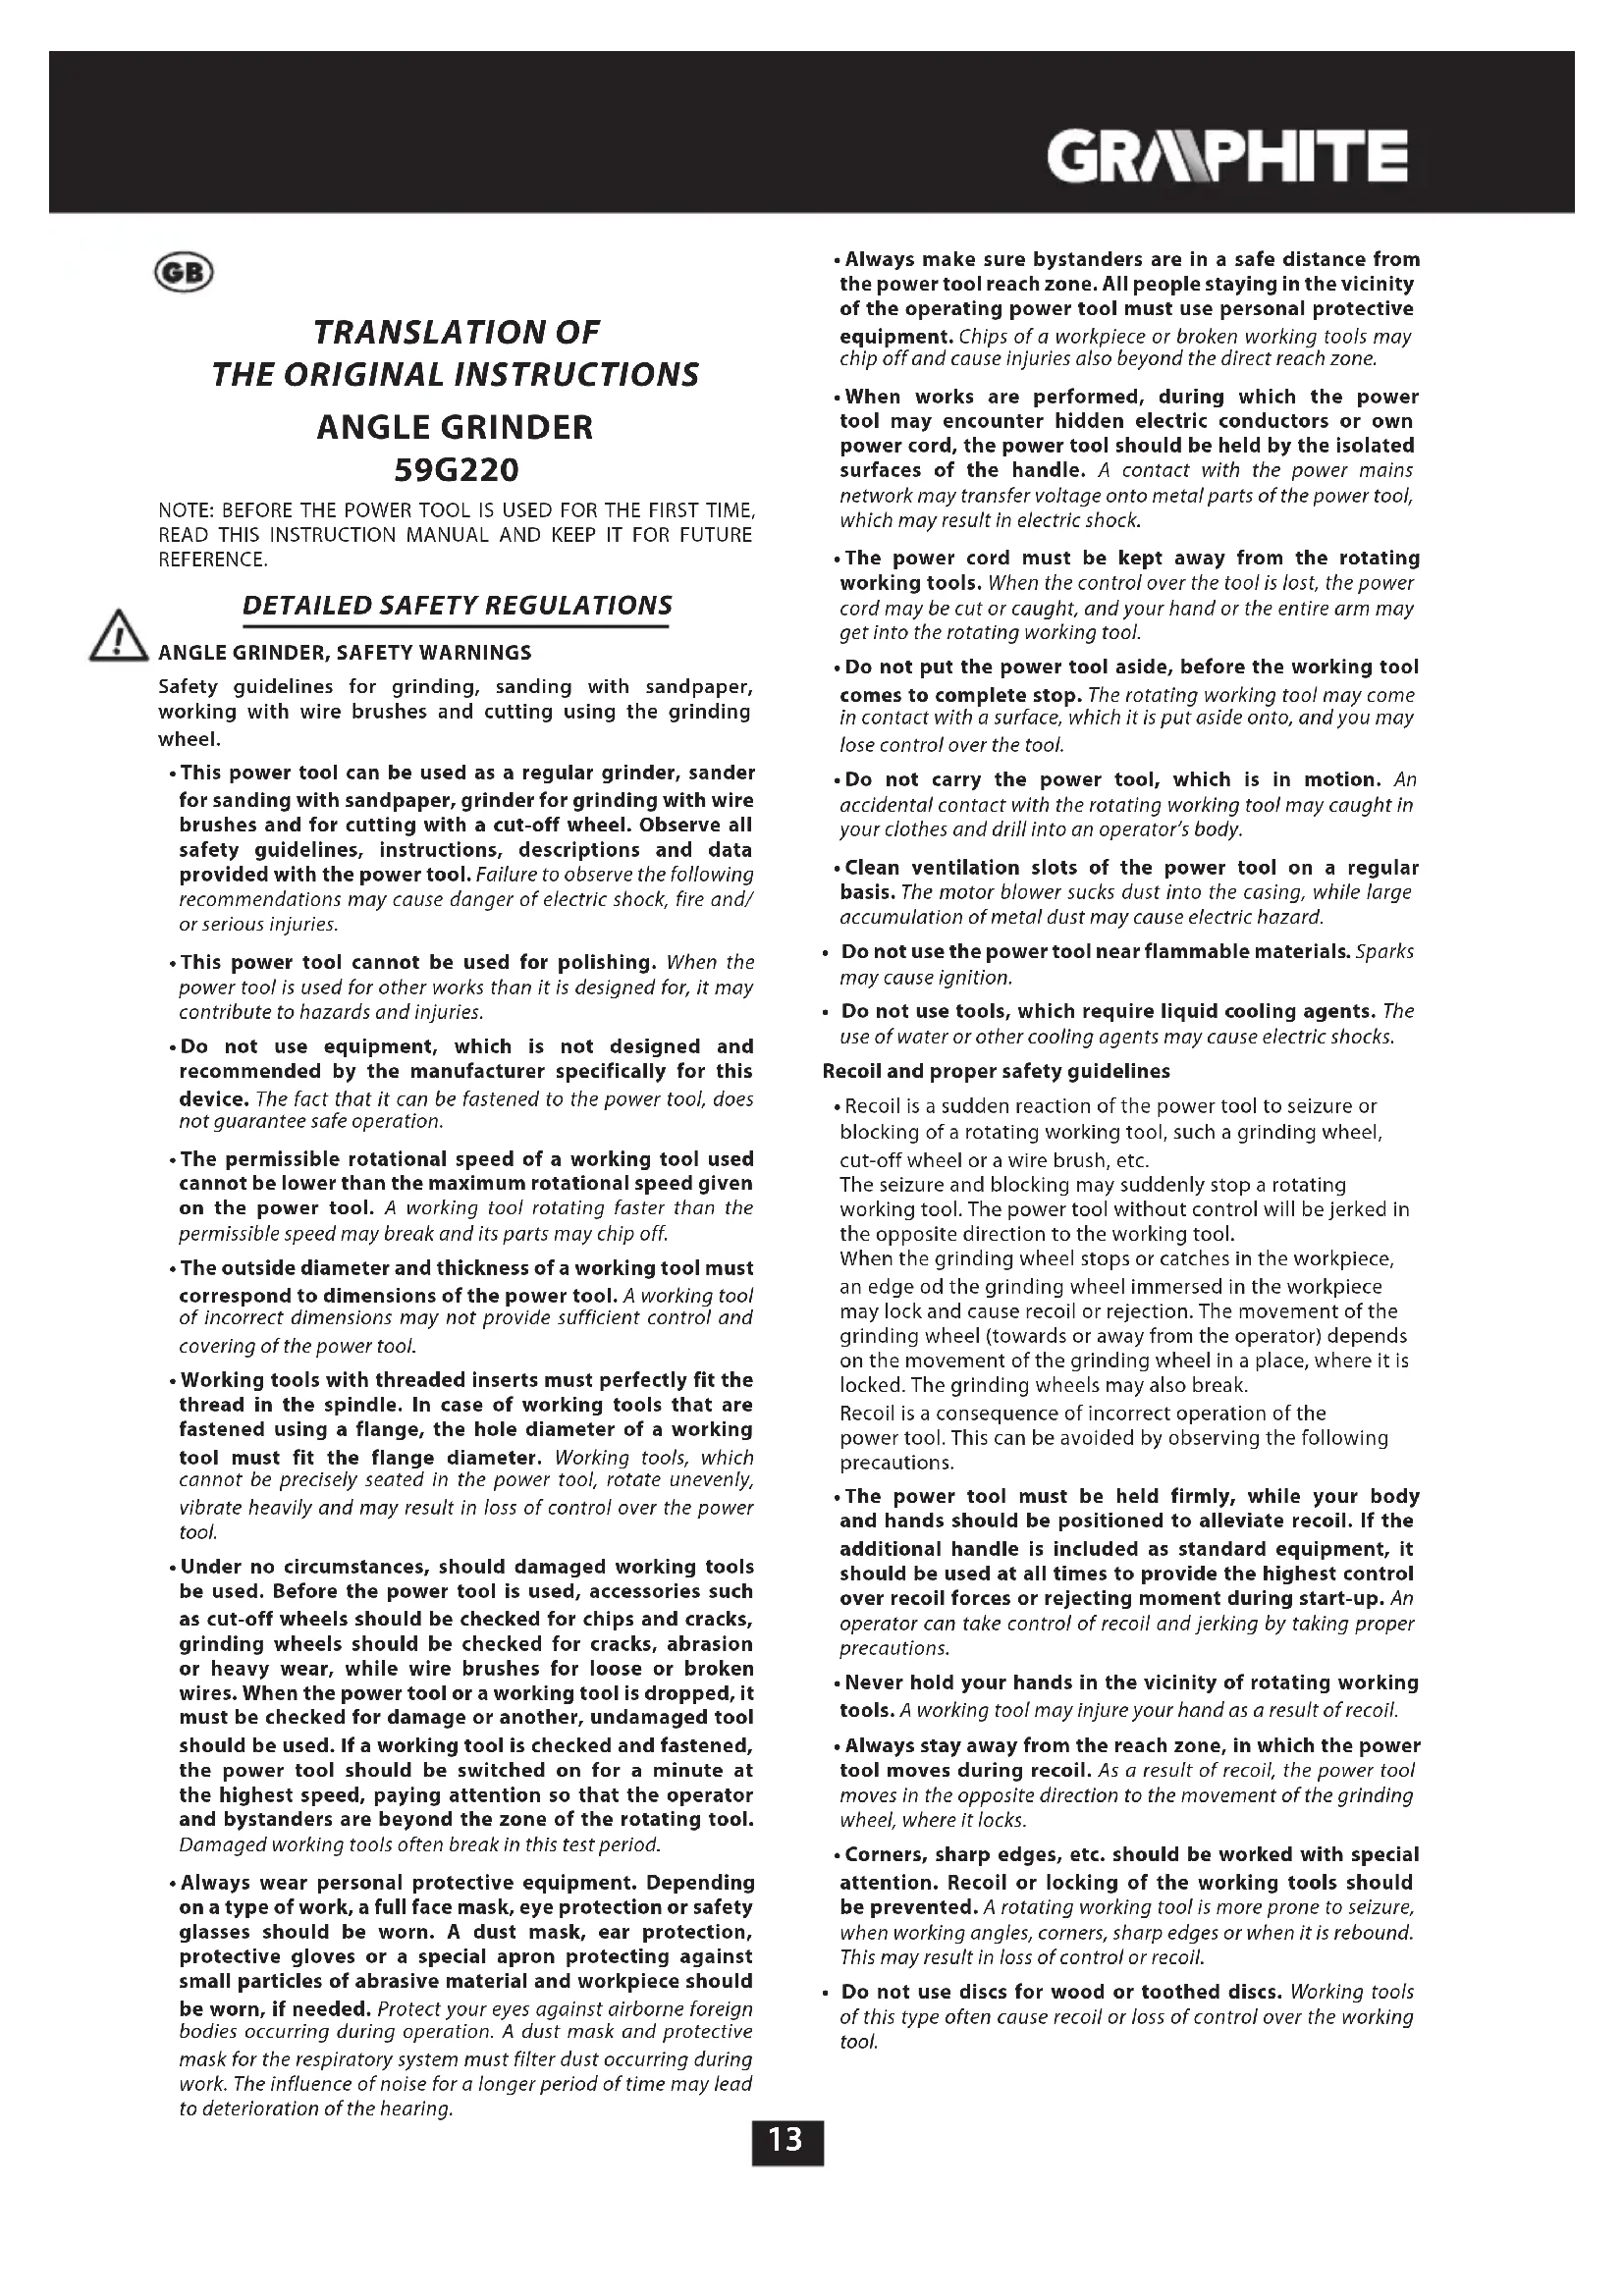
- Unscrew and remove carbon brush covers (8) (fig. E).
- Pull the pressure spring away, snap out and remove worn out carbon brushes.
- Remove any carbon dust with compressed air.
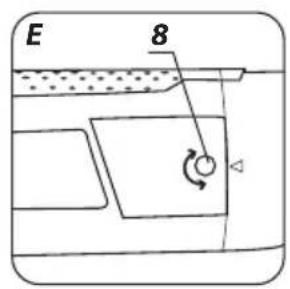
- Install new carbon brushes (they should easily slide into the brush holders) and reinstall the pressure spring (fig. F).
• Fix carbon brush covers (8).

After the carbon brushes are replaced, switch on the grinder with no load and wait for 1-2 minutes to make the carbon brushes fit the motor commutator. Carbon brushes should be replaced by a qualified person using original spare parts only.

All types of faults and defects should be eliminated by an authorised service of the manufacturer.
SPECIFICATIONS
RATED DATA
| Angle Grinder 59G220 | |
| Parameter Value | |
| Power supply voltage 230 V AC | |
| Power supply frequency 50 Hz | |
| Rated power 1200 W | |
| Rotational speed adjustment range 3000 - 11000 min ^-1 | |
| Max. grinding wheel diameter 125 mm | |
| Inner disc diameter 22,2 mm | |
| Spindle thread M14 | |
| Protection class II | |
| Weight 3,8 kg | |
| Year of manufacture 2019 | |
NOISE AND VIBRATION DATA
Information regarding noise and vibration

The following levels of emitted noise, such as emitted acoustic pressure Lp_A and acoustic power level Lw_A and measurement uncertainty K have been given in the instruction manual as defined in the EN 60745 standard.
The following vibration value (acceleration value) a_h and measurement uncertainty K have been determined as defined in the EN 60745 standard.
The vibration level provided in this instruction manual have been determined according to the measurement procedure as defined in the EN 60745 standard and can be used for comparison of power tools. This can be used for preliminary assessment of exposure to vibrations.
The provided vibration level is representative for main applications of the power tool. If the power tool is used for other applications or with other working tools, and if it is not sufficiently maintained, the vibration level may vary. The aforementioned reasons may increase the exposure to vibrations during the entire operating period.
In order to precisely estimate the exposure to vibrations, periods should be accounted for, in which the power tool is switched off, or when it is switched on, but not operated. Thus, the total exposure to vibration may prove considerably lower.
Additional safety measures should be taken to protect the user against effects of vibrations, such as: maintenance of the power tool and its working tools, ensuring proper temperature of the hands and proper organisation of work.
Acoustic pressure level: Lp_A=97,1 dB(A) K=3 dB(A)
Acoustic power level: Lw_A=108,1 dB(A) K=3 dB(A)
Vibration acceleration value: a_b = 13,716 m/s^2 K = 1,5 m/s^2
ENVIRONMENTAL PROTECTION

Electrical equipment must not be disposed off with household waste and, instead, should be utilized at appropriate facilities. Information on utilization can be provided by the product vendor or the local authorities. Waste electrical and electronic equipment contains substances that are not neutral to the natural environment. Equipment that is not recycled constitutes a potential hazard to the environment and to human health.
* Right to introduce changes is reserved.
"Grupa Topex Spółka z ograniczoną odpowiedzialnością" Spółka komandytowa with seat in Warsaw at ul. Pograniczna 2/4 (hereinafter Grupa Topex) informs, that all copyrights to this instruction (hereinafter Instruction), Including, but not limited to, text, photographies, schemes, drawings and layout of the instruction, belong to Grupa Topex exclusively and are protected by laws accordingly to Copyright and Related Rights Act of 4 February 2004 (ustawa o prawie autorskim i prawach pokrewnych, Dz. U. 2006 No 90 item 631 with later amendments). Copying, processing, publishing, modifications for commercial purposes of the entire Instruction or its parts without written permission of Grupa Topex are strictly forbidden and may cause civil and legal liability.

1 2 3 4

5678
1 2 3 4

5678
1 2 3 4

5678
1 2 3 4

5678
1 2 3 4

5678
1 2 3 4

5678
1 2 3 4

5678
1 2 3 4

5678
1 2 3 4

5678
1 2 3 4

5678
GRAFISKÄS DALAS APRAKSTS
1 2 3 4

5678
DETALJNI PROPISI O SIGURNOSTI
KUTNA BRUSILICA, UPOZORENJA VEZANA UZ SIGURNOST
Sigurnosni napuci vezani za brušenje, brušenje pomoću brusnog papira, rad s korištenjem čeličnih četki i rezanje pomoću ploče.
- Taj električni alat možete koristiti kao običnu brusilicu, brusilicu za brušenje pomoću brusnog papira, za brušenje čeličnim četkama i kao uređaj za rezanje pomoću ploče. Poštujte sve sigurnosne naputke, upute, opise i podatke koje ste dobili zajedno s električnim alatom. Nepoštivanje dolje navedenih pravila može predstavljati opasnost od strujnog udara, požara i/ili težih tjelesnih povreda.
- Zabranjeno je koristiti dotičan alat za poliranje. Primjene za koje alat nije predviđen mogu uzrokovati ugrožavanje ili tjelesne povrede.
- Ne koristite opremu koja nije predviđena i preporučena od strane proizvođača tog alata. Sama činjenica da neku opremu možete montirati na električni alat, ne podrazumijeva sigurnu upotrebu te opreme s uređajem.
- Dopuštena brzina okretaja korištenog radnog alata ne smije biti manja nego što je maksimalna brzina okretaja navedena na električnom alatu. Radni alat koji se okreće s brzinom većom od dopuštene, može se slomiti a njegovi dijelovi rasprsnuti.
- Vanjski promjer i debljina radnog alata moraju odgovarati dimenzijama električnog alata. Radni alati neodgovarajućih dimenzija ne mogu biti dovoljno zaštićeni niti kontrolirani.
- Radni alati s navojnim umetkom moraju se točno poklopiti s navojima na vretenu. Ako su u pitanju radni alati pričvršćivani pomoću prirubnice, promjer otvora radnog alata mora biti prilagođen promjeru prirubnice. Radni alati koji ne mogu biti precizno namješteni na električni alat, nejednolično se okreću, jako vibriraju i mogu dovesti do gubitka kontrole nad uređajem.
- Ni u kojem slučaju ne koristite oštećene radne alate. Prije svake upotrebe kontrolirajte opremu, kao što su brusne ploče, na odlamanje komadića i pukotine, brusne tanjure na pukotine, trošenje ili veću istrošenost, čelične četke na popuštene ili odlomljene žice. Ako sam uređaj ili njegov radni alat padne, provjerite nije li oštećen ili upotrijebite drugi, neoštećen alat. Ako je uređaj provjeren i pričvršćen, uključite ga na minutu s najvećim okretajima obraćajući pri tom pozornost da radnik i druge osobe koje se nadu u blizini, ostanu van radne zone rotirajućeg alata. Oštećeni alati najčešće se lome u vrijeme takvih ispitivanja.
- Nosite sredstva individualne zaštite. Ovisno o vrsti radova, nosite zaštitnu masku za lice, zaštitu za oči ili zaštitne naočale. Ako je to potrebno, upotrijebite masku za zaštitu od prašine, antifone, zaštitne rukavice ili posebnu kutu koja služi za zaštitu od malih komada brušenog i obrađivanog materijala. Štitite oči od kontakta sa stranim tijelima koji se nalaze u zraku, a nastali su tokom rada. Maska protiv prašine i sredstva za zaštitu dišnih puteva moraju filtrirati prašinu koja nastaje tokom rada. Duža izloženost na djelovanje buke može uzrokovati gubitak sluha.
GRAPHITE
1 2 3 4

5678
- Pozor, budite posebno oprezni.
- Pročitajte upute za upotrebu, poštujte upozorenja i sigurnosne uvjete koje su u njima navedene!
- Koristite sredstva individualne zaštite (zaštitne gogle, antifone).
- Koristite zaštitne rukavice.
- Isključite mrežni kabel prije početka svih aktivnosti na podešavanju ili popravljanju uređaja.
- Uređaj držite van dohvata djece.
- Štitite od kiše.
- Druga klasa zaštite.
KONSTRUKCIJA I NAMJENA
Kutna brusilica je ručni električki alat s izolacijom II klase. Uređaj pokreće jednofazni komutatorski motor čija je brzina okretaja reducirana uz pomoć zupčanog kutnog prijenosa. Možete ga koristiti za brušenje ili za rezanje. Električni alati tog tipa se koriste za odstranjivanje iz površine metalnih predmeta svakojakih neravnina, za površinsku obradu spojeva, za rezanje cijevi sa tankim stjenkama te malih metalnih elemenata itd. Koristeći odgovarajući alat uz pomoć kutne brusilice možete koristiti ne samo za rezanje i brušenje, ali također za čišćenje, na primjer hrđe, bojanih slojeva i slično.
1 2 3 4

5678
1 2 3 4

5678
1 2 3 4

5678
1 2 3 4

5678
1 2 3 4

5678


- INSTRUKCJA ORYGINALNA (OBSŁUGI)
- SZLIFIERKA KĄTOWA 59G220
- DETAILED SAFETY REGULATIONS
- ANGLE GRINDER, SAFETY WARNINGS
- Recoil and proper safety guidelines
- GRAPHITE
- 5678
- DESIGN AND APPLICATION
- Use inconsistent with its purpose
- DESCRIPTION OF GRAPHIC PAGES
- DESCRIPTION OF USED GRAPHIC SIGNS
- EQUIPMENT AND ACCESSORIES
- PREPARATION FOR WORK
- ATTACHING THE ADDITIONAL HANDLE
- ADJUSTABLE MAIN HANDLE
- INSTALLING AND ADJUSTING THE GRINDING WHEEL GUARD
- REPLACEMENT OF WORKING TOOLS
- INSTALLING THE WHEELS
- INSTALLING THE WORKING TOOLS WITH THREADED HOLES
- INSTALLING THE ANGLE GRINDER ON A TRIPOD FOR ANGLE GRINDERS
- SWITCHING ON / SWITCHING OFF
- MAINTENANCE AND STORAGE
- REPLACING THE CARBON BRUSHES
- SPECIFICATIONS
- NOISE AND VIBRATION DATA
- ENVIRONMENTAL PROTECTION
- GRAFISKÄS DALAS APRAKSTS
- DETALJNI PROPISI O SIGURNOSTI
- KUTNA BRUSILICA, UPOZORENJA VEZANA UZ SIGURNOST
- KONSTRUKCIJA I NAMJENA
Brand : Graphite
Model : 59G220
Category : Grinder