Combi Care 36 E Comfort - Lawn mower AL-KO - Free user manual and instructions
Find the device manual for free Combi Care 36 E Comfort AL-KO in PDF.
Download the instructions for your Lawn mower in PDF format for free! Find your manual Combi Care 36 E Comfort - AL-KO and take your electronic device back in hand. On this page are published all the documents necessary for the use of your device. Combi Care 36 E Comfort by AL-KO.
USER MANUAL Combi Care 36 E Comfort AL-KO
1 ABOUT THESE OPERATING
The German version is the original operating instructions. All additional language versions are translations of the original operating in- structions.
It is essential to carefully read through these operating instructions before start-up. This is essential for safe working and trouble-free handling.
Always safeguard these operating instruc- tions so that they can be consulted if you need any information about the appliance.
Only pass on the appliance to other persons together with these operating instructions.
Comply with the safety and warning informa- tion in these operating instructions.
1.1 Legends and signal words
DANGER! Denotes an imminently dangerous situation which will result in fatal or serious injury if not avoided. WARNING! Denotes a potentially dan- gerous situation which can result in fatal or serious in- jury if not avoided. CAUTION! Denotes a potentially dan- gerous situation which can result in minor or moderate injury if not avoided. IMPORTANT! Denotes a situation which can result in material dam- age if not avoided. NOTE Special instructions for ease of under- standing and handling. 2 PRODUCT DESCRIPTION
This scarifier is intended for loosening and aerat- ing a lawn (scarifying) in private applications, and is only allowed to be used on dried lawns which have been mown short. Any other use, as well as unauthorised conver- sions or add-ons, are regarded as contrary to the intended use and will result in invalidation of the warranty as well as loss of conformity (CE mark); the manufacturer will thus decline any responsib- ility for damage and/or injury suffered by the user or third parties.
2.2 Possible foreseeable misuse
The appliance is not designed for commercial use in public parks and sports facilities or for use in farming and forestry. It must not be used for trimming bushes and hedges or for levelling the ground.
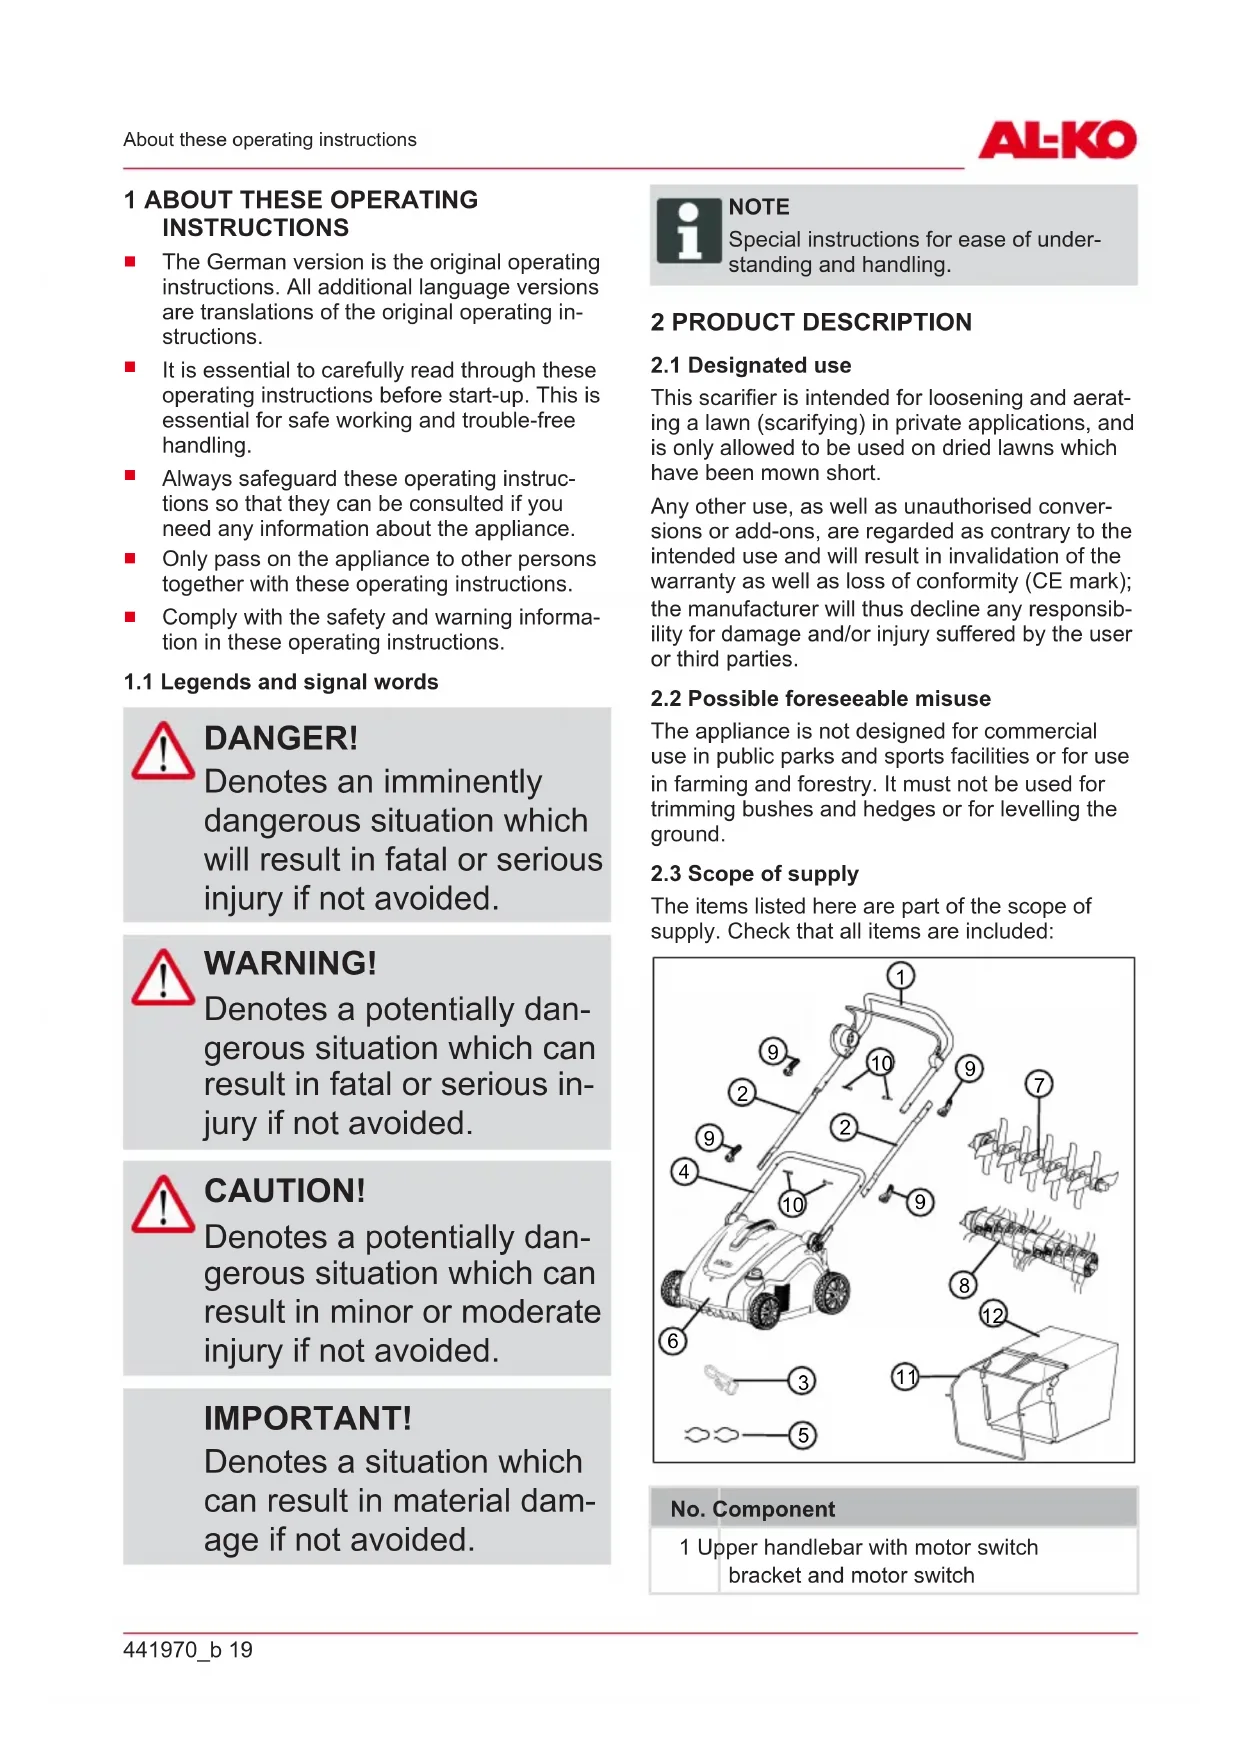
The items listed here are part of the scope of supply. Check that all items are included:
No. Component 1 Upper handlebar with motor switch bracket and motor switchGB 20 COMBI-CARE 36 E comfort Product description No. Component 2 Handlebar middle parts (2x) 3 Cable strain relief 4 Lower handlebar 5 Cable clamps (2x) 6 Scarifier 7 Scarifying roller 8 Aerator roller 9 Quick release for handlebar (6x) 10 Push-through pins for quick release (4x) 11 Frame for grass collector 12 Grass collector
2.4 Symbols on the machine
Sym- bol Meaning Read the operating instructions before starting operation. Keep other people out of the danger area. Maintain a safety distance. Keep your hands and feet away from the blade system! Disconnect the ap- pliance from the mains supply before maintenance and care as well as cleaning work. Do not run over the mains cable. Danger of electric shock if the mains cable is damaged. Sym- bol Meaning Wear hearing and eye protection. Dis- connect the mains cable from the mains supply if it has been caught or damaged. Procedure for starting the motor (see
chapter 6.5 "Starting and stopping the
No. Component 1 Upper handlebar, folding 2 Lower handlebar, rotatable 3 Motor switch bracket 4 Motor switch with safety push switch and integrated mains plug 5 Cable strain relief 6 Quick release for folding back the handlebar441970_b 21 Safety instructions No. Component 7 Rotary/snap-in joint with quick release for the handle height adjustment 8 Appliance carrying handle 9 Adjuster wheel for working depth 10 5-level working depth indicator 11 Blade system with scarifier or aerator roller 12 Baffle 13 Grass collector 14 Grass collector carrying handle 3 SAFETY INSTRUCTIONS
Young people under 16 years of age and people who do not know the instructions for use are not allowed to use the ap- pliance. Heed any country- specific safety regulations concerning the minimum age of the user.
Do not operate the machine if you are under the influence of alcohol, drugs or medication.
Wear clothing and protective equipment in accordance with the regulations in order to avoid injuries to the head and limbs, as well as to avoid hearing impairment.
The personal protective equipment comprises:
Hearing protection and pro- tective eyewear
Long trousers and solid shoes
During maintenance and care: Protective gloves
3.3 Safety in the workplace
Before working, remove any dangerous objects from the working area, e.g. branches, glass or metal pieces, stones.
3.4 Safety of persons and
Only use the appliance for the purposes for which it is inten- ded. Any non-intended use can lead to injuries and prop- erty damage.
Only switch on the appliance when there are no persons and/or animals in the working area.
Keep hands, feet and other parts of the body away from the running blade system.
3.5 Appliance safety
Only use the appliance under the following conditions:
The appliance is not soiled.
The appliance show no signs of damage. The mains cable, in particular, must not be damaged.GB 22 COMBI-CARE 36 E comfort Assembly
All controls function prop- erly.
Do not overload the machine. It is intended for light work in the private sphere. Overload can lead to damage to the ap- pliance.
3.6 Electrical safety
WARNING! Danger of electric shock Touching live parts of damaged appliances or mains cable can result in serious or fatal injury due to electric shock.
Make sure that the ap- pliance and mains cable are not damaged.
Do not touch live parts and disconnect the damaged appliance or mains cable immedi- ately from the mains supply.
Using the technical data of this appliance, check that the mains voltage of the plug socket matches the appliance. A different mains voltage must not be used.
Safety of the mains cable:
Only use a mains cable that is intended for outdoor use.
Check if the mains cable is damaged or perished. A defective mains cable must not be used.
Protect the plug connectors of the mains cable against moisture.
Keep the mains cable away from the blade system and do not run over it.
Fully unwind cable drums to avoid overheating and fires.
To avoid short-circuits and destroying electrical compon- ents:
Protect the appliance against humidity and do not use it in the rain.
Do not spray the appliance with water. 4 ASSEMBLY Assembly: See images (01) to (04). NOTE The machine is not allowed to be oper- ated unless it has been fully assembled.441970_b 23 Start-up 5 START-UP
5.1 Providing the mains cable and checking
the mains connection Heed the safety instructions for the mains cable (see chapter 3.6 "Electrical safety", page22). Requirements for the mains cable Provide a mains cable that complies with the fol- lowing requirements:
3 conductors with a minimum cross-section of 2.5 mm (i.e. with protective conductor)
Maximum length of 40 m
Spray water protected (protection category IP44)
Suitable for outdoor use (H05RN-F quality, i.e. rubber hose cable) Requirements for the mains connection Check that the mains connection complies with the following requirements:
Fault current circuit breaker with max. 30 mA trigger current
5.2 Carrying out visual inspection
1. Check the appliance for damage and loose
screws. Replace the defective appliance parts and tighten the screws.
2. Check the mains cable for damage. Replace
the defective mains cable.
3. Check the appliance for coarse soiling. Re-
move soiling. 6 OPERATION NOTE Always mow the grass before scarifying (max. grass height: 4cm). Remove any foreign bodies from the grass surface.
6.1 Folding the handlebar in and out (05)
CAUTION! Danger of crushing Fingers or other parts of the body can be crushed between the loose parts of the handlebar.
Hold the loose parts of the handlebar tightly.
Do not hold any fingers or other parts of the body between the loose parts. IMPORTANT! Danger of damaging the power cable The motor and mains cables can be crushed and damaged between the loose parts of the handle- bar.
Do not jam the cables when folding the handlebar in/out. Folding in the handlebar
1. Release the quick release on the rotary/snap-
in joints (05/1) until the entire handlebar (05/2) can be folded forward into the hori- zontal position (pos.a).
2. Release the bottom quick release (05/3) and
fold the top handlebar incl. middle part (05/4) to the rear (pos.b).
3. Release the top quick release (05/5) and fold
the handlebar (05/6) forward into the hori- zontal position (pos.c).
4. Slightly tighten all quick releases.GB
24 COMBI-CARE 36 E comfort Operation Folding out the handlebar Proceed in reverse order.
6.2 Adjusting the handlebar to the body
1. Loosen the quick release on the rotary/snap-
2. Turn the handlebar to the desired height
(pos.a) at the handle (06/2). The rotary movement is limited by the end stops (06/3) of the rotary/snap-in joint.
3. Tighten the quick releases (06/1).
6.3 Setting the working depth(07)
The setting of the working depth depends on:
Grass condition (well-kept: low working depth, overgrown: large working depth)
Blade wear (new: low working depth, worn: large working depth) If the working depth is too large: The appliance stands still and the motor does not run. IMPORTANT! Danger of damage to the appliance Setting the working depth with the appliance running causes damage.
Only set the working depth when the motor and blade system have stopped.
1. Turn the adjuster wheel (07/1) to HIGH, i.e.
level1 on the working depth indicator (07/2). The blade system is raised to the maximum.
2. Checking the working depth:
Start the appliance (see chapter 6.5 "Starting and stopping the motor (09)", page24).
Move a little way onto the grass and check the result. If the grass is too short or irregularly scarified, the blade system must be lowered.
3. Stop the appliance and wait until the blade
4. Turn the adjuster wheel (07/1) a little towards
LOW, i.e. levels 2 to 5. The blade system is lowered.
5. Repeat the previous steps until the grass is
uniformly scarified.
cable into the plug (08/2) on the motor switch.
2. Clamp the mains cable (08/3) in the cable
strain relief (08/4) (pos.a, pos.b) so it cannot be pulled off the motor switch.
6.5 Starting and stopping the motor (09)
IMPORTANT! Danger of damage to the appliance The motor and blade sys- tem can be damaged by consecutively switching on and off briefly several times.
Only switch the motor on when the blade sys- tem has stopped. Starting the motor
1. Press and hold the safety push switch (09/1)
2. Pull the motor switch bracket (09/2) to the
handlebar (09/3) (pos.b). The motor and blade system are started.
3. Release the safety push switch (09/1) and
hold the motor switch bracket (09/2). NOTE The motor switch bracket does not lock in place. Hold it tight against the handle- bar during the entire working period. Stopping the motor
1. Release the motor switch bracket (09/2). It
automatically returns to the initial position (pos.c). The motor stops immediately. The blade system keeps running until it stops.441970_b 25 Maintenance and care CAUTION! Danger of lacerations There is a danger of lacer- ations when reaching into the blade system while it is running on.
Wait until the blade sys- tem has stopped.
6.6 Attaching and removing the grass
collector(10) The appliance can be operated with and without grass collector. Attaching the grass collector
1. Raise the impact flap (10/1) (pos.a).
2. Attach the grass collector (10/2) in the hold-
ers (pos.b) from behind.
3. Release the impact flap.
Removing and emptying the grass collector
1. Stop the appliance and wait until the blade
3. Lift the grass collector (10/2) out of the hold-
ers and take off to the rear.
4. Empty the grass collector.
5. Attach the grass collector (see above).
6.7 Moving the appliance on the grass(11)
Guide the appliance (11/1) over the grass (as shown in the image) in such a way to avoid dam- aging the mains cable (11/2). Heed the safety in- structions (see chapter 3 "Safety instructions", page21).
Watch out for objects in the grass and re- move them from the working area.
Guide the mains cable by hand.
Only control the appliance by the handlebar.
Move the appliance at walking speed.
Always move the appliance across the slope.
If the motor suddenly stops: The motor circuit breaker has triggered due to an overload. Wait a few minutes and then attempt to start the motor again.
In the following cases, visit the customer ser- vice workshop:
Motor no longer starts.
Appliance has moved onto an obstruc- tion.
Appliance vibrates and does not run smoothly.
The blades of the scarifier roller or steel spring prongs of the aeration roller are bent.
7 MAINTENANCE AND CARE
CAUTION! Danger of lacerations There is danger of lacera- tions when reaching into the blade system while it is running on or the stopped blade system.
Stop the appliance and wait until the blade sys- tem has stopped.
Disconnect the mains plug to power down the appliance.
7.1 Cleaning the blade system
IMPORTANT! Danger from water Water in the appliance causes short-circuits and destroys electrical com- ponents.
Do not spray the appli- ance with water.
Only use a broom or a brush for cleaning.
1. Stop the appliance and wait until the blade
3. Remove the grass collector (see chapter 6.6
"Attaching and removing the grass col- lector(10)", page25).
4. Tip the appliance onto the side and clean the
blade system with a broom or brush.
7.2 Replacing the scarifier or aeration
roller(12, 13, 14) The scarifier roller is intended for coarse scarify- ing work and the aeration roller for fine scarifying work (see chapter 2.3 "Scope of supply", page19). Removing the roller
1. Stop the appliance and wait until the blade
3. Turn the underside of the appliance upwards.
4. Unscrew and lift out the socket head screws
5. Lift the roller (13/1) at one side on the de-
6. Pull the bearing shell (13/2) off the roller
(pos.d). Installing the roller Proceed in reverse order. 8 TRANSPORT IMPORTANT! Danger of damage to the appliance The blade system will be damaged if the appliance is moved over a solid sur- face with the blade system lowered.
To raise the blade sys- tem, turn the adjuster wheel for the working depth to HIGH (level1).
1. Stop the motor and wait until the blade sys-
2. Turn the adjuster wheel for the working depth
3. Remove the mains plug from the power
socket, fold up the mains cable. Transporting the appliance between two working areas
Move the appliance to the working area with the blade system raised.
To carry the appliance: Lift the appliance by the carrying handle. Transporting the appliance in a vehicle
Fold in the handlebar.
Secure the appliance in the vehicle against falling over and sliding.
Secure the appliance against impacts from loose objects.
Do not place objects on the appliance.441970_b 27 Storage 9 STORAGE
1. Disconnect the mains plug.
2. Turn the adjuster wheel for the working depth
to HIGH (level1) (see chapter 6.3 "Setting the working depth(07)", page24).
3. Fold in the handlebar (see chapter 6.1 "Fold-
ing the handlebar in and out (05)", page23).
4. Thoroughly clean the appliance (see chapter
7.1 "Cleaning the blade system", page26).
5. Rub a thin coat of oil or silicon onto all metal
parts for corrosion protection.
6. Store the appliance in a dry, clean location
protected from frost. Cover with a breathable tarpaulin to protect against dust. Do not use plastic film in order to avoid the accumulation of moisture.
Pull the motor switch bracket to the end stop for the handlebar. The blade system is blocked by lawn felt and moss.
Set a lower working depth.
Clean the blade system. Immediate short-circuit when in- serting the mains plug Defective electrical components in the appli- ance.
Contact a customer ser- vice work- shop. The blade system does not turn. The blade system is blocked by lawn felt and moss.
Set a lower working depth.
Set a lower working depth.
Mowing the grass. Scarifier blades are worn.
Replace scari- fier roller. Appliance vibrates and does not run smoothly. Scarifier blades are damaged.
Contact a customer ser- vice work- shop. 11 DISPOSAL Information on the German Electrical and Electronic Equipment Act (ElectroG)
Electrical and electronic appliances do not belong in household waste, but should be collected and disposed of separately.
Used batteries or rechargeable batter- ies that are not installed permanently in the old appliance must be removed be- fore disposal. Their disposal is regu- lated by the battery law.
Owners or users of electrical and elec- tronic appliances are obliged by law to return them after use.
The end user bears personal responsibil- ity for deleting his personal data from the old appliance to be disposed of. The symbol of the crossed-through rubbish bin means that electrical and electronic appliances may not be disposed of in the household rubbish. Electrical and electronic appliances can be handed in at no charge at the following places:
Public service disposal or collection points (e.g. municipal building yards)
Points of sale of electrical appliances (station- ary and online) provided traders are obliged to take them back or offer this voluntarily. These statements only apply to appliances that are installed and sold in the countries of the European Union and are subject to European Directive 2012/19/EU. Different provisions may apply to the disposal of electrical and electronic appliances in countries outside the European Union.GB 28 COMBI-CARE 36 E comfort After-Sales / Service 12 AFTER-SALES / SERVICE In the event of questions of warranty, repair or spare parts, please contact your nearest AL-KOService Centre. These can be found on the Internet at: www.al-ko.com/service-contacts 13 GUARANTEE We will resolve any material or manufacturing faults on the appliance during the legal warranty period for claims relating to faults, in accordance with our choice either to repair or replace. The legal warranty period is determined by the legislation of the country in which the appliance was purchased. Our warranty promise applies only if:
These operating instructions are heeded
The appliance is handled correctly
Original spare parts have been used The warranty becomes void in the case of:
Unauthorised repair attempts
Unauthorised technical modifications
Non-intended use The guarantee excludes:
Paint damage that can be attributed to normal wear and tear
Wear parts that are marked with a frame xxxxxx (x) on the spare parts card The guarantee period commences with purchase by the first end user. The date on the proof of pur- chase is decisive. In the event of a guarantee claim, please take this guarantee declaration and the ori- ginal proof of purchase, and contact your dealer or the nearest authorised customer service centre. This statement does not affect the purchaser's statutory claims for defects against the vendor.
14 EU DECLARATION OF CONFORMITY
We hereby declare that this product in its marketed form conforms to the requirements of the harmon- ised EU Directives, EU safety standards and the product-specific standards. Product Electric scarifier Serial number G1411415 Manufacturer AL-KO Geräte GmbH Ichenhauser Str. 14 D-89359 Kötz Germany Duly authorised person Andreas Hedrich Ichenhauser Str. 14 D-89359 Kötz Germany Type Combi Care 36 E comfort Sound power level EN ISO 3744 measured/guaranteed