
RCV 5 - Robot vacuum Kärcher - Free user manual and instructions
Find the device manual for free RCV 5 Kärcher in PDF.
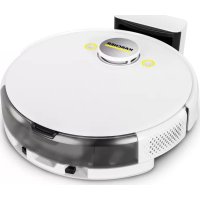


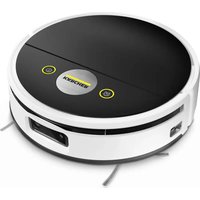
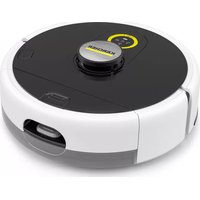
| Product type | Robot vacuum |
| Brand | Kärcher |
| Model | RCV 5 |
| Dimensions (L x W x H) | 350 x 350 x 97 mm |
| Robot weight | 3.9 kg |
| Charging station weight | 0.4 kg |
| Charging station dimensions | 135 x 150 x 99 mm |
| Power supply | Li-Ion battery 14.4 V, 4800 mAh (nominal capacity 5200 mAh) |
| Charger | 100-240 V ~ 0.8 A |
| Runtime | 120 minutes |
| Dust bin capacity | 330 ml |
| Water tank capacity | 240 ml |
| Connectivity | Wi-Fi IEEE 802.11 b/g/n 2.4 GHz |
| Sensors | Laser LiDAR, 3D camera, ultrasonic, tilt, collision |
| Cleaning modes | Dry, wet, combined |
| Adjustable suction power | Silent, Standard, Medium, Turbo |
| Adjustable water flow | Low, Medium, High |
| Smart functions | Mapping, no-go zones, virtual barriers, auto return to station |
| Noise level | Not specified (silent mode available) |
| Maintenance | Washable filter (replace every 3-6 months), main brush (replace 6-12 months), side brush (3-6 months) |
| Safety | Cliff sensors, obstacle detection, auto-stop, Class 1 laser |
Frequently Asked Questions - RCV 5 Kärcher
User questions about RCV 5 Kärcher
0 question about this device. Answer the ones you know or ask your own.
Ask a new question about this device
Download the instructions for your Robot vacuum in PDF format for free! Find your manual RCV 5 - Kärcher and take your electronic device back in hand. On this page are published all the documents necessary for the use of your device. RCV 5 by Kärcher.
USER MANUAL RCV 5 Kärcher
German 6
English 15
French 25
Italian 35
Dutch 45
Spanish 55
Portuguese 65
Danish 75
Norwegian 84
Swedish 93
Finnish 102
Greek 111
Turkish 121
Russian 131
Hungarian 142
Czech 151
Slovenian 160
Polish 170
Romanian 180
Slovak 190
Croatian 199
Serbian 209
Bulgarian 218
Estonian 229
Latvian 238
Lithuanian 247
Ukrainian 256
Kazakh 267
Arabic 278
A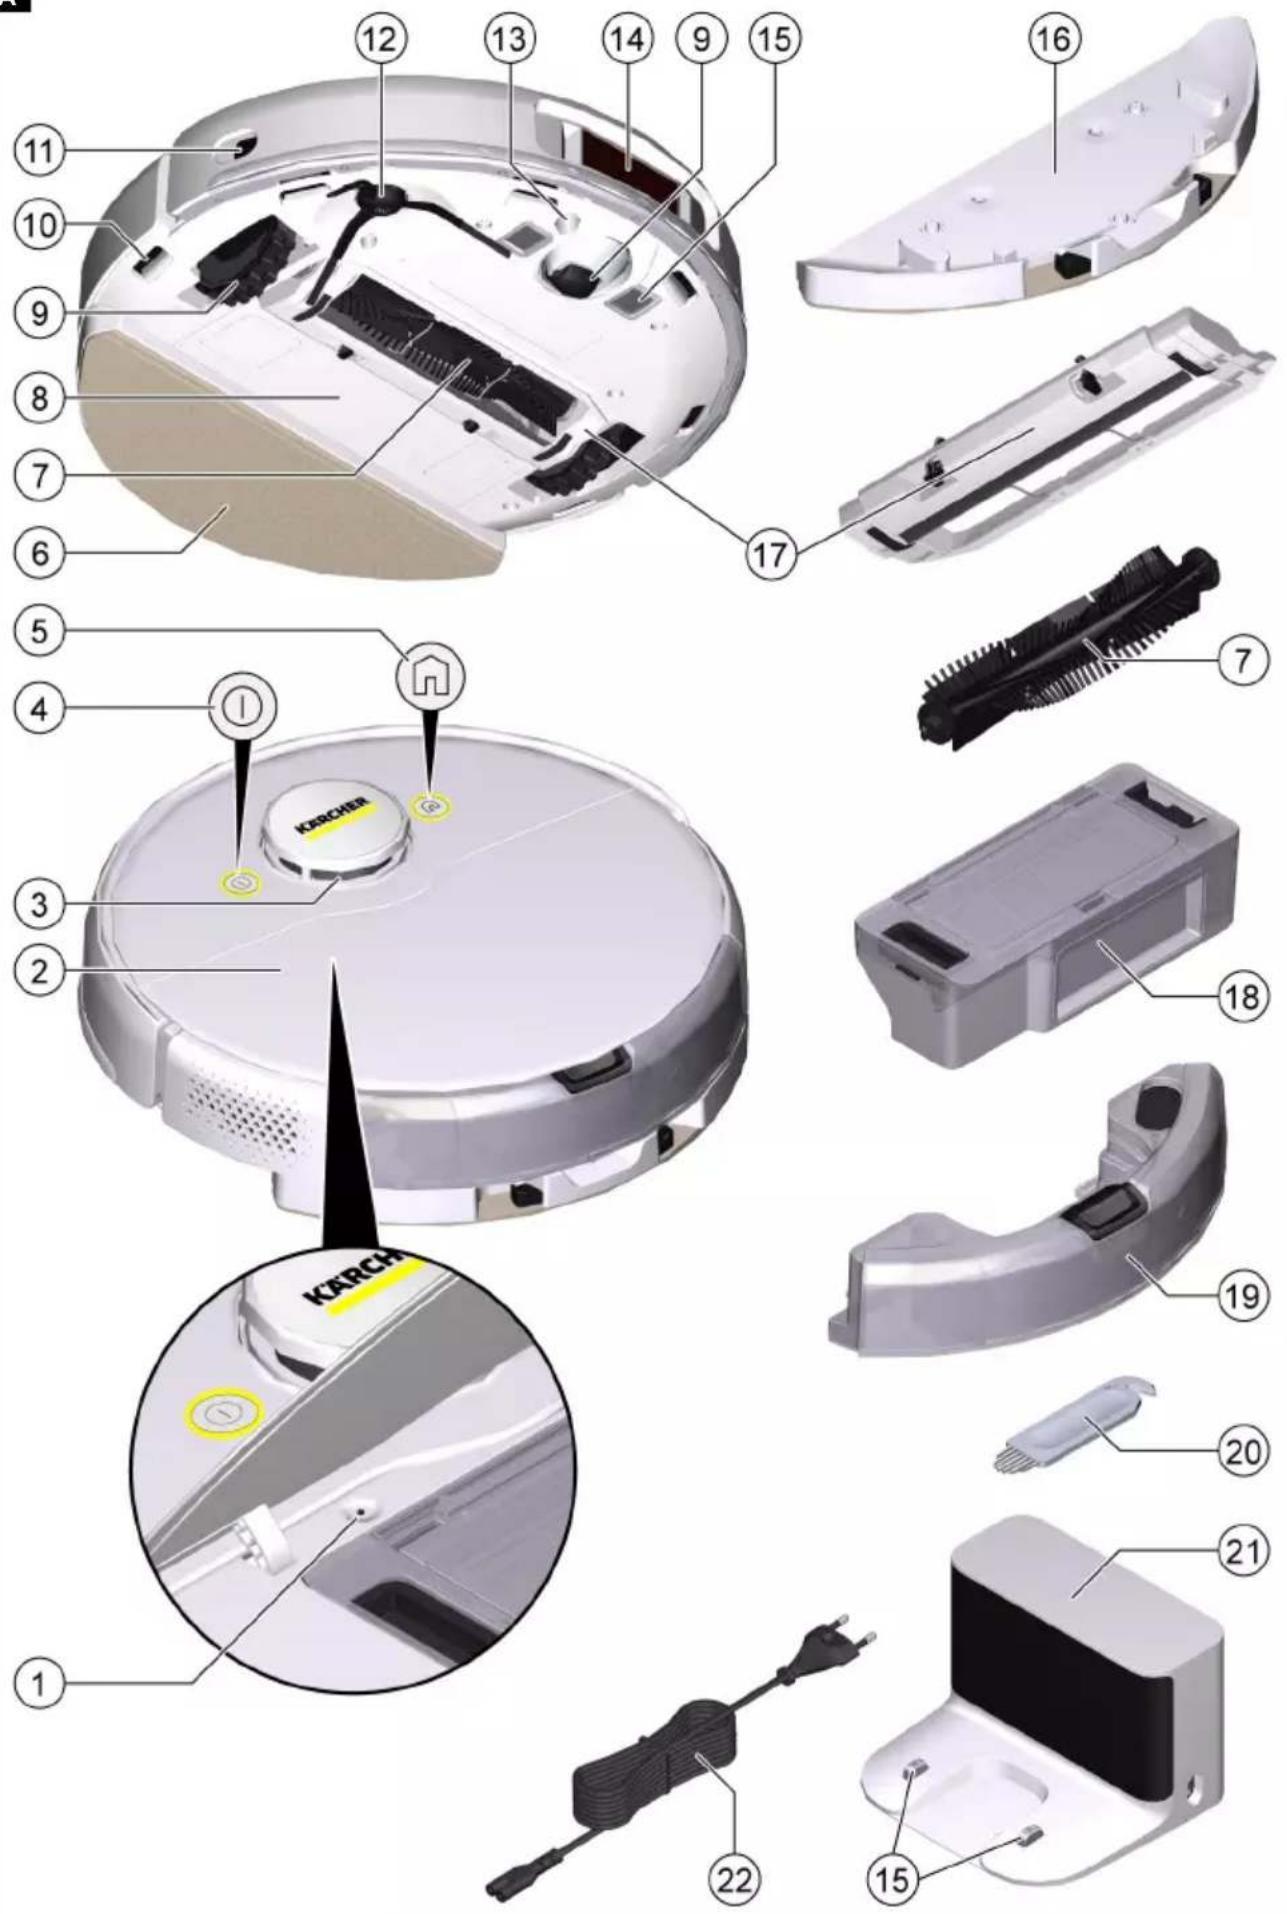
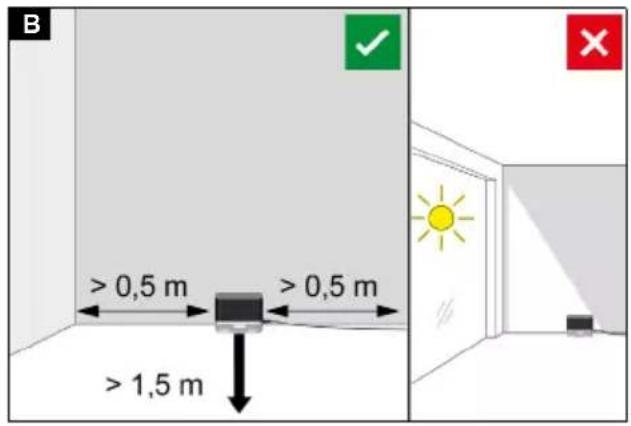
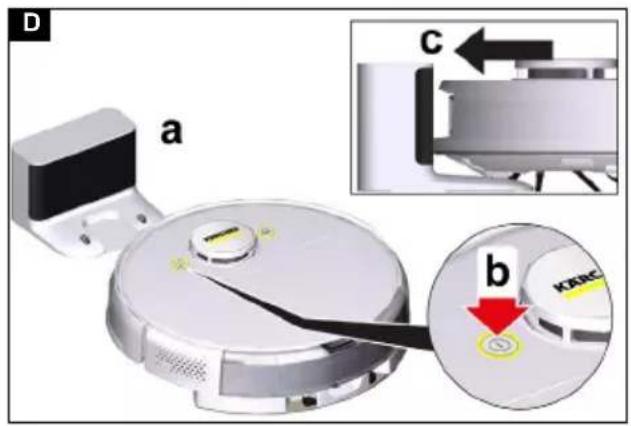
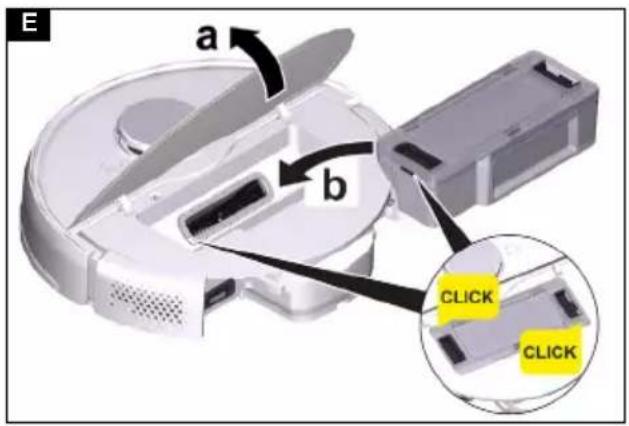
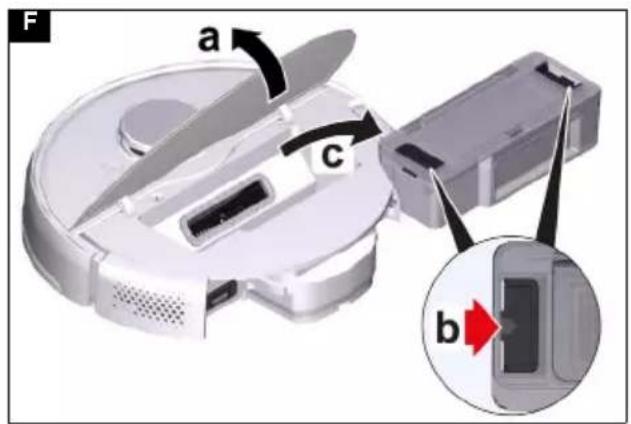
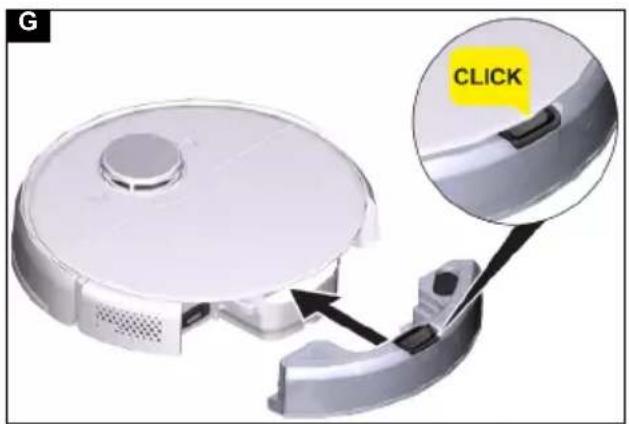
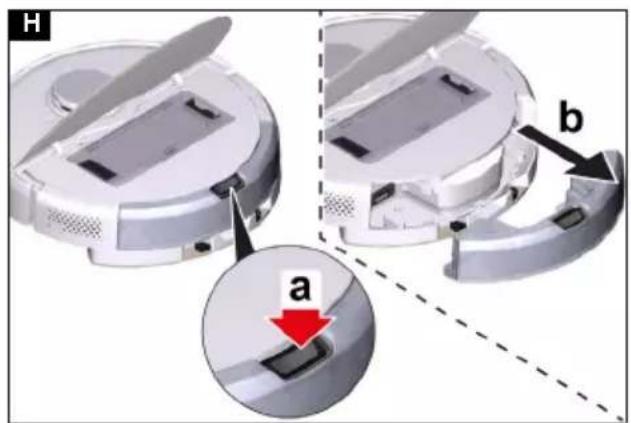
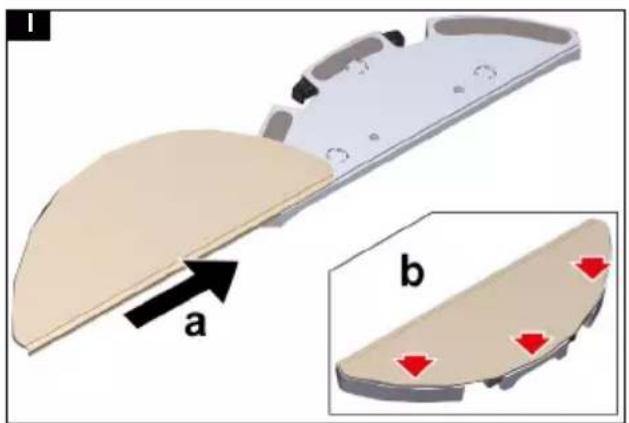
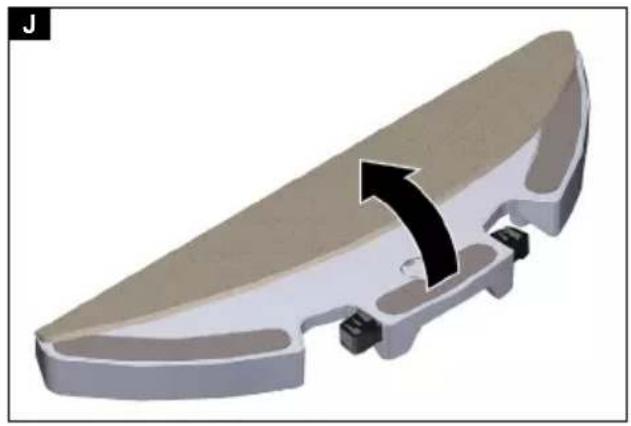
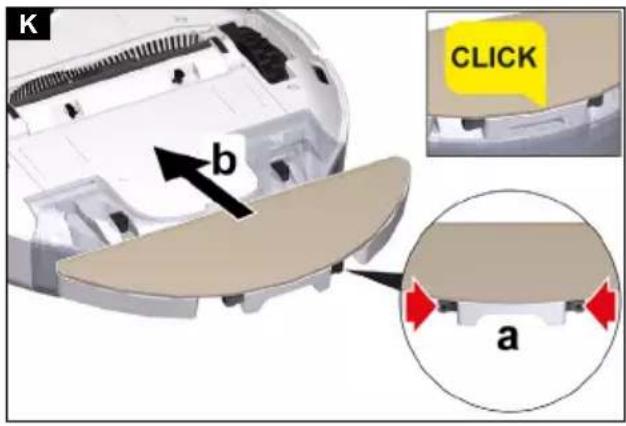
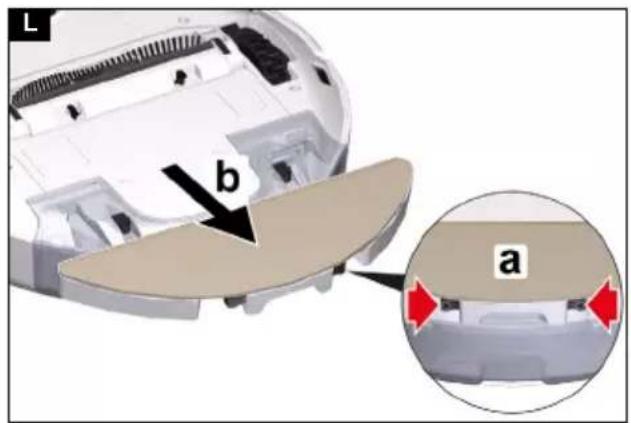
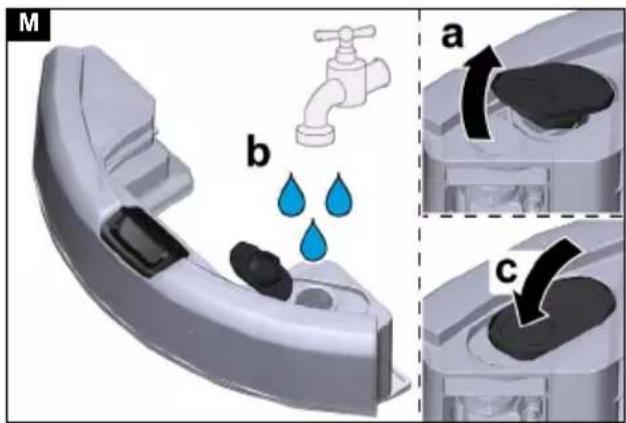
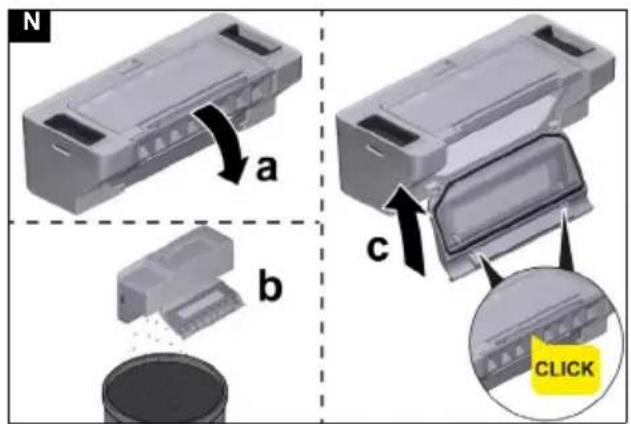
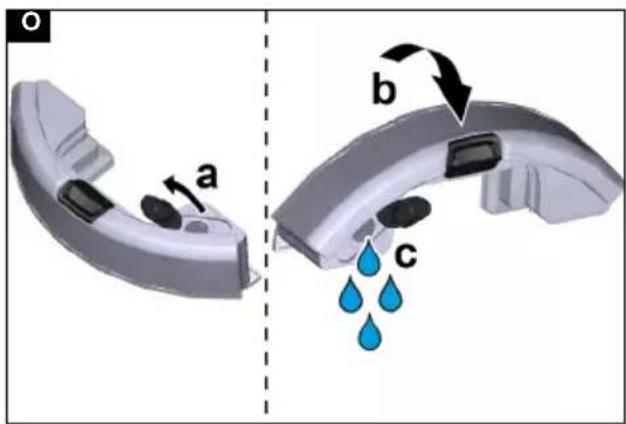
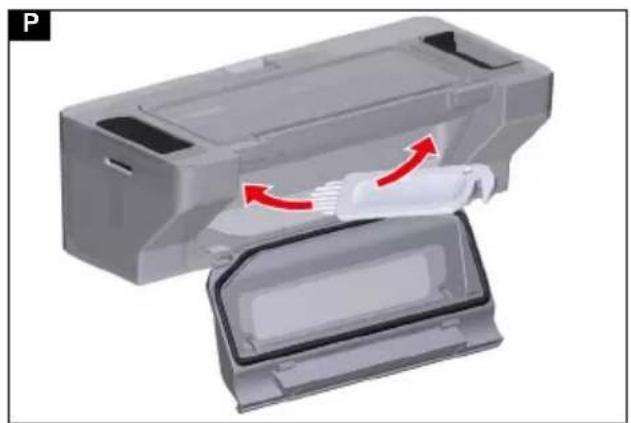
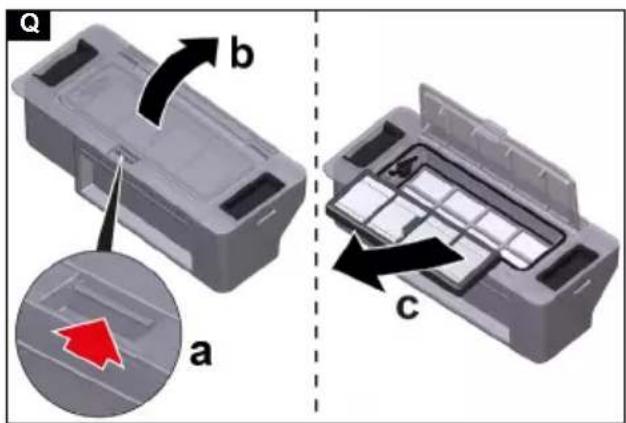
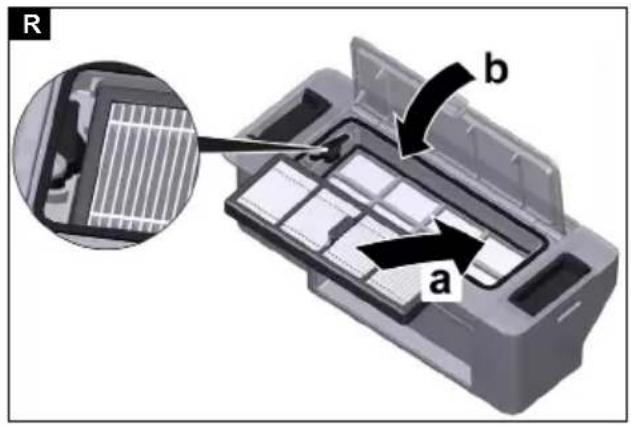
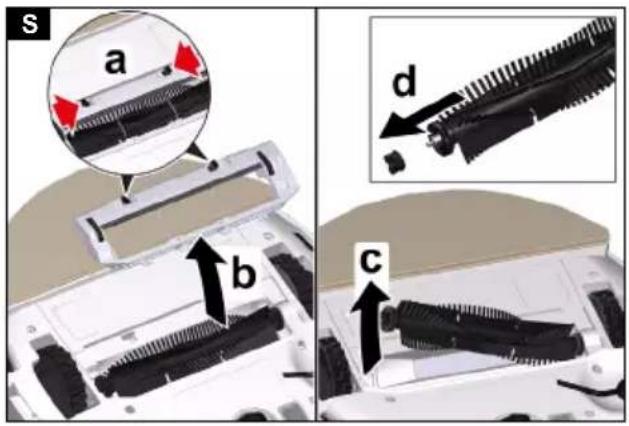
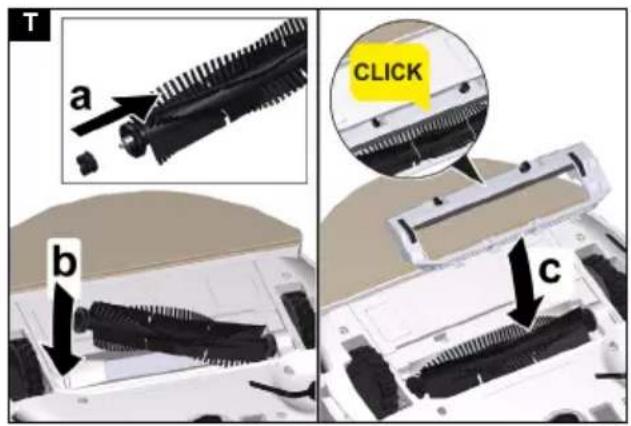
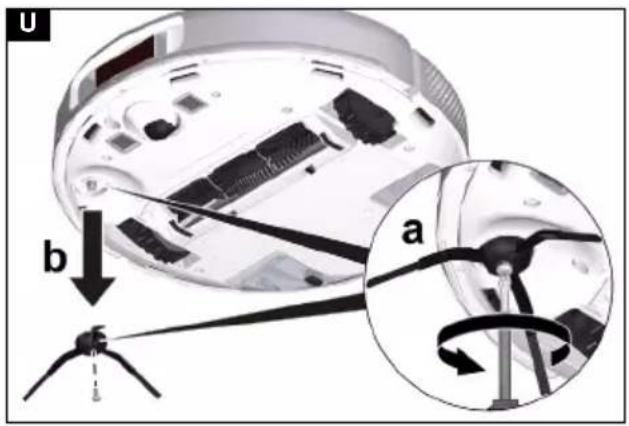
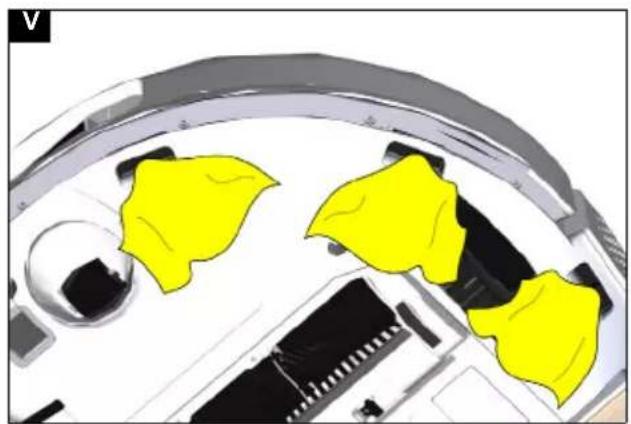
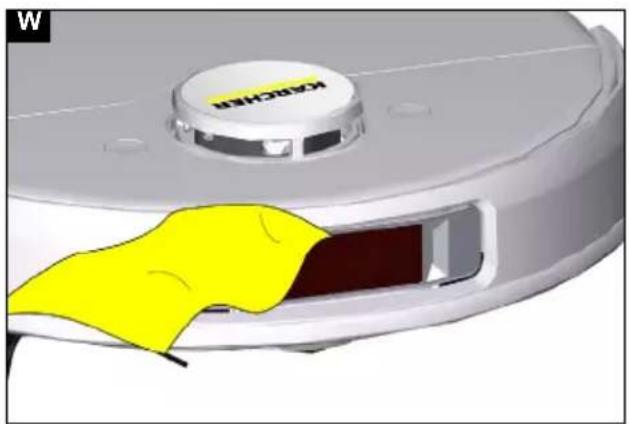
Table of contents

General instructions 15 Safety instructions.... 16 Intended use 17 Environmental protection 17 Accessories and spare parts.... 17 Scope of delivery.... 17 Device description.... 17 Functional description 17 Initial start-up.... 18 Initial startup.... 19 Operation 19 transport 21 Storage.... 21 Care and service 21 Troubleshooting guide.... 22 Disposal 24 Warranty.... 24 Technical data 24 EU Declaration of Conformity.... 25
General instructions


Read these original operating instructions and the enclosed safety instructions before using the device for the first time. Act in accordance with them.
Keep these original operating instructions for future reference or for future owners.
Keep these original operating instructions for future reference or for future owners.
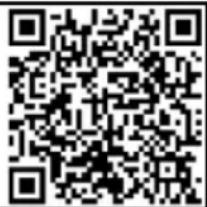
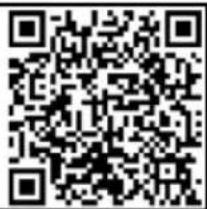
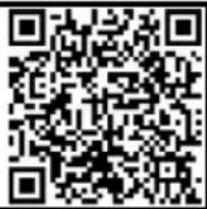
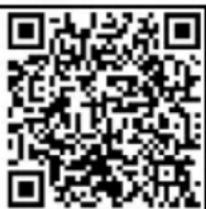
You will find a QR code to call up the online operating instructions in:

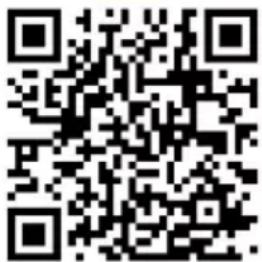
QR-Code is a registered trademark of DENSO WAVE INCORPORATED.
QR-Code® is a registered trademark of DENSO WAVE INCORPORATED.
Hazard levels
DANGER
- Indication of an imminent threat of danger that will lead to severe injuries or even death.
- Indication of an imminent threat of danger that will lead to severe injuries or even death.
- Indication of a potentially dangerous situation that may lead to severe injuries or even death.
- Indication of a potentially dangerous situation that may lead to severe injuries or even death.
CAUTION
Indicates a potentially dangerous situation that may lead to minor injuries.
ATTENTION
Indicates a potentially dangerous situation that may lead to damage to property.
Safety instructions for cleaning robot
In addition to the notes in the operating instructions, the general safety regulations and accident prevention guidelines applicable by law must be adhered to. The laser radar of the device complies with IEC 60825-1:2014 for Class 1 laser product safety and does not produce laser radiation that is hazardous to the human body.
DANGER • Risk of asphyxiation. Keep packaging film out of the reach of children. • Operation in explosive atmospheres is prohibited. • Do not operate the device in rooms where the air contains flammable gases from petrol, heating oil, paint thinner, solvents, petroleum or spirit (risk of explosion). • Do not operate the device in rooms with a burning fire or embers in an open fireplace without supervision. • Do not operate the device in rooms with burning candles without supervision.
WARNING • Persons with reduced physical, sensory or mental capabilities and persons lacking experience and knowledge may only use the appliance if they are properly supervised, have been instructed on use of the appliance safely by a person responsible for their safety, and understand the resultant hazards involved. • Children from the minimum age of 8 may use the appliance if they are properly supervised or have been instructed in its use by a person responsible for their safety, and if they have understood the resultant hazards involved. • Children must be supervised to prevent them from playing with the appliance. • Children may only perform cleaning work and user maintenance under supervision. • The appliance contains electrical
components - do not clean the appliance under running water. • Switch off the device immediately and remove the mains plug before performing any care and service work. • Do not open the battery pack. Repairs are only to be carried out by qualified personnel. • The cleaning robot RCV 5 may only be charged on the charger of a charging station with the part number 9.773-014.0 or 2.269-643.0.
⚠ CAUTION • Have repair work and work on electrical components carried out by the authorized customer service only. • Switch off the device and unplug the mains plug before performing cleaning/maintenance. • Risk of injury when loose fitting clothing, hair or jewelry is caught by moving parts of the device. Keep clothing and jewelry away from moving parts of the device. Tie long hair back. • Risk of injury. Never touch the rotating roller brush of the device with fingers or tools during operation. • Be aware of the risk of tripping due to the cleaning robot moving around. • Risk of accidents and injuries. Take into account the weight of the device for transportation and storage. See chapter Technical data in the operating instructions. • Safety devices are provided for your own protection. Never modify or bypass safety devices.
ATTENTION • Do not use scouring agents, glass or multi-purpose cleaner for cleaning. • Do not operate the device at temperatures below 0 °C. • Only use the device indoors. • Do not operate the device in rooms that are secured with an alarm system or motion sensor. • Protect the device from extreme weather conditions, moisture and heat. • Operate the device only at temperatures from 0°C to +35 °C. • Damage to the device. Do not stand on the device or place children, objects or pets on it. • Objects, e.g. on tables or small pieces of furniture, can fall over if the device bumps into the furniture. • The device can get caught in hanging electric cables, tablecloths, cords, etc. and knock over objects. • Pick up all cables from the floor before using the device to prevent it from dragging them when cleaning. • Pick up any fragile or loose objects from the floor, such as vases, to prevent the device from bumping into them and causing damage. • Do not use the device in an area that is above the floor, e.g. on a sofa. • Cordon off all areas where there is a risk of the device falling down. E.g. stairways or galleries without barriers. • Do not use the device on floors with liquids or sticky substances. • Do not use the device for cleaning high pile carpets. • Damage to the laser radar (LiDAR). Do not place the device upside down (the housing of the laser radar (LiDAR) should never touch the ground or hard surfaces). • Do not carry the device by the cover of the laser radar (LiDAR). • Do not pick up sharp or larger objects with the device, such as e.g. glass shards, gravel or toy parts. • Do not spray any liquids into the device and make sure the dust container is dry before fitting it. • Store the device fully charged and switched off in a cool and dry place.
Note • Black carpets can have a negative influence on the driving behavior.
Safety instructions for charging station
⚠️ DANGER • Only connect the device to an AC power source. The voltage indicated on the type plate must match the mains voltage of the power source.
- For safety reasons we recommend operating the device only via a fault current protection switch (maximum
30 mA). ● Never touch the mains plug and socket with wet hands.
⚠ WARNING • Only connect the device to an electrical connection which has been set up by a qualified electrician as per IEC 60364-1. • Check that the mains voltage corresponds with the voltage stated on the type plate of the charger. • The appliance contains electrical components - do not clean the appliance under running water. • Short circuit hazard. Keep conductive objects (e.g. screwdrivers or similar tools) away from the charging contacts. • Short circuit hazard. Only clean the charging contacts of the charging station dry. • Only charge the appliance using the original charger enclosed or with a charger approved by KÄRCHER. • Danger of explosion. Do not charge non-rechargeable batteries. • Check the mains cable for damage each time before every operation. Do not use a damaged mains cable. If damaged, replace the mains cable with an approved replacement. You can get a suitable replacement from KÄRCHER or one of our service partners. • Applies to RCV 3 devices: Only the cleaning robot model "RCV 3" may be charged. • Applies to RCV 5 devices: Only the cleaning robot model "RCV 5" may be charged.
ATTENTION • Use the charging station indoors only. • Do not place the charging station near heat sources, e.g. heaters. • Store the charging station indoors only, in a cool, dry place. • Charge the cleaning robot at least once a month to avoid deep discharge of the battery. • Switch off the charging station before all care and maintenance work.
Intended use
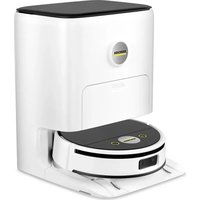
The device consists of two units, a charging station and a battery-powered cleaning robot.
- The device is intended for fully automatic cleaning of textile and hard floor coverings indoors. It can be used for autonomous, continuous maintenance cleaning on all common floor coverings.
- This device has been developed for use in private households and is not intended for the load imposed by commercial use.
Environmental protection

The packing materials can be recycled. Do not dispose of packaging as household rubbish but place it in recycling.
Old devices contain valuable, recyclable materials that should be recycled. Batteries and battery packs contain substances which should not be released into the environment. Therefore, please dispose of old devices, batteries and battery packs using suitable collection systems.
Adhere to the recommendations of the legislature regarding the handling of lithium ion batteries. Dispose of used and defective battery packs in accordance with the applicable regulations.
Notes on the content materials (REACH)
Current information on content materials can be found at: www.kaercher.de/REACH
Accessories and spare parts
Only use original accessories and original spare parts. They ensure that the appliance will run fault-free and safely.
Information on accessories and spare parts can be found at www.kaercher.com.
Scope of delivery
The scope of delivery for the appliance is shown on the packaging. Check the contents for completeness when unpacking. If any accessories are missing or in the event of any shipping damage, please notify your dealer.
Device description
Illustration A
① Reset switch ② Top cover ③ Laser sensor (LiDAR) ④ On/Off button ⑤ "Return to charging station" button ⑥ Wiper cloth ⑦ Brush ⑧ Battery compartment ⑨ Wheel ⑩ Fall sensor ⑪ Collision sensor ⑫ Side brush ⑬ Ultrasound sensor ⑭ 3D sensor with camera ⑮ Battery terminals ⑯ Wiper cloth holder ⑰ Brush cover ⑱ Dust container ⑲ Water reservoir ⑳ Cleaning tool ㉑ Charging station ㉒ Mains plug
Functional description
The device consists of a charging station and a battery-powered cleaning robot.
The mobile cleaning robot obtains its energy from a built-in rechargeable battery. The cleaning robot can clean for up to 120 minutes with a single battery charge. It automatically returns to the charging station to recharge when the battery charge decreases.
The cleaning robot moves systematically. It scans the room with a 3-D laser sensor with camera (LiDAR) and then cleans the room step-by-step. It avoids obstacles that are at least as high as the LiDAR tower.
Artificial intelligence helps the cleaning robot to avoid complex obstacles such as cables or shoes without interference.
Due to the calculation of the intelligent driving strategy by the artificial intelligence and the subsequent obstacle avoidance, it can take a few seconds, depending on the obstacle situation, until the robot resumes its regular travel path to clean the free area in straight paths.
The flat design of the cleaning robot allows it to clean under furniture such as beds, sofas and cupboards.
The ultrasound sensor detects carpets and avoids them during wet cleaning or combination cleaning. For dry cleaning only, the unit increases its suction performance on carpets (auto-boost).
Fall sensors that detect stairs and landings can prevent falls.
Collision sensors detect obstacles and avoid them. The battery for the cleaning robot is charged in the charging station.
If the cleaning robot starts the cleaning work from the charging station, it returns to the charging station when the battery charge is insufficient.
As soon as the charging process is finished, the cleaning robot automatically leaves the charging station and continues the cleaning work. The cleaning robot also returns to the charging station when it has finished cleaning.
Status displays
| LED display Status | |
| Lights up blue Driving | autonomously |
| Flashes blue slowly Autonomous driving paused | |
| Flashes blue fast WLAN connection mode | |
| Flashes green slowly Cleaning robot charging | |
| Lights up green Cleaning robot fully charged or successfully connected | |
| Flashes red slowly Battery too empty to start | |
| Flashes red fast Error situation | |
Functions
Sleep mode
The cleaning robot automatically switches to sleep mode after 5 minutes of inactivity. Press any button to wake it up.
- The cleaning robot does not switch to sleep mode when it is on the charging station.
- The cleaning robot switches off automatically if it is in sleep mode for more than 6 hours.
Error mode
If the cleaning robot encounters an error during operation, the display flashes red and a signal sounds.
For a solution, see chapter Troubleshooting guide. If no action is taken within 5 minutes, the cleaning robot automatically switches to sleep mode.
"Do not disturb" mode
The "Do not disturb" mode is set by default. In "Do not disturb" mode, the cleaning robot does not resume an interrupted cleaning, does not perform scheduled cleaning and does not give audible warnings.
"Do not disturb" mode can be deactivated in the App. Downloading the App is described in the chapter Connecting cleaning robots with WLAN and App.
Initial start-up
Setting up the charging station
⚠ WARNING
The cleaning robot RCV 5 may only be charged on the charger of a charging station with the part number
9.773-014.0 or 2.269-643.0.
- Select the location so that the cleaning robot can easily reach the charging station.
- Ensure a distance of at least 0.5 m to the left and right of the charging station and a distance of at least 1.5 m in front of the charging station.
- The location must not be exposed to direct sunlight.
- Set up the charging station.
Illustration B
- Plug the mains cable device plug into the cable holder on the side of the charging station. Illustration C
- Connect the mains plug.
Connecting the cleaning robot with the charging station
Illustration D
- Place the cleaning robot on the floor in front of the charging station.
- Press and hold the on/off switch for 3 seconds. The cleaning robot switches on.
- As soon as the display lights up, place the cleaning robot manually on the charging station and make sure that the charging contacts have a good contact.
After the initial start-up, the cleaning robot automatically moves to the charging station.
Connecting cleaning robots with WLAN and App
The cleaning robot can be controlled directly via buttons on the device or via an App using a WLAN-enabled mobile device. To be able to use all available functions we recommended controlling the cleaning robot via the Kärcher Home Robots App.
Before you download the App, make sure you have the following:
• The mobile device is connected to the Internet. • The 2.4 GHz WLAN of the router is activated. - Sufficient WLAN coverage is guaranteed.
Download the Kärcher Home Robots App from the Apple App Store ® or from the Google Play ™ store.

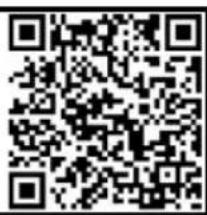

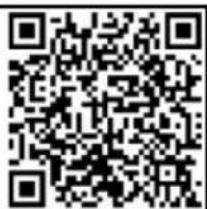
- Google Play™ and Android™ are trademarks or registered trademarks of Google Inc.
- Apple ® and App store ® are trademarks or registered trademarks of Apple Inc.
The Kärcher Home Robots App offers the following main functions, among others:
• Mapping of the rooms and several floors - Setting of time schedules • Definition of no-go zones and virtual walls - Notes on faults or malfunctions and the cleaning progress - Setting of cleaning preferences (suction modes) • Establishment of cleaning zones - Activation/deactivation of the "Do not disturb" mode • FAQ with detailed troubleshooting
- Contact details for the KÄRCHER Service Centres Connecting the cleaning robot with the Kärcher Home Robots App and WLAN:
- Download the KÄRCHER Home&Garden App from the Apple App Store or from the Google Play Store.
- Open the Kärcher Home Robots App.
- Create an account (if you are not already registered).
- Add the desired cleaning robot.
- Follow the step-by-step instructions in the App.
Initial startup
Installing the dust container
For dry cleaning, remove the wiper cloth and the wiper cloth holder, see chapter Removing the wiper cloth holder.
Illustration E
- Open the cover at the top.
- Press the dust container into position until it audibly latches into place.
- Close the cover at the top.
Removing the dust container
Illustration F
- Open the cover at the top.
- Press the clamp.
- Remove the dust container.
Installing the water reservoir
The water reservoir may contain a small amount of residual water due to quality control. This is normal.
Illustration G
- Push the water reservoir horizontally into the cleaning robot until it audibly latches into place.
Removing the water reservoir
- Press any button. The cleaning robot stops.
- Remove the water reservoir. a Press the lock button down. b Pull the water reservoir horizontally out of the cleaning robot.
Illustration H
Installing the wiper cloth
- Insert the wiper cloth into the slot of the wiper cloth holder and fix it to the Velcro fastener.
Illustration I
Removing the wiper cloth
- Press any button. The cleaning robot stops.
- Pull the wiper cloth off the Velcro fastener of the wiper cloth holder.
Illustration J
Installing the wiper cloth holder
- Install the wiper cloth holder. a Press the clamps together. b Push the wiper cloth holder horizontally into the cleaning robot until it audibly latches into place.
Illustration K
Removing the wiper cloth holder
- Press any button. The cleaning robot stops.
- Remove the wiper cloth holder. a Press the clamps together. b Remove the wiper cloth holder.
Illustration L
Reset WLAN connection
If you switch to a new router or change your WLAN password, you must reset the cleaning robot's WLAN connection.
Note
Only 2.4 GHz WLAN networks are supported.
- Switch on the cleaning robot, see chapter Switching on the cleaning robot.
- Press the On/Off button and the "Return to charging station" button simultaneously for 7 seconds until a voice says: "Resetting the WLAN connection and entering network configuration mode".
- Connect the cleaning robot to the charging station, see chapter Connecting the cleaning robot with the charging station.
Restoring the factory settings
- Press and hold the reset button for 3 seconds. The factory settings are restored. The latest version of the firmware is installed.
- Press and hold the reset button for 10 seconds. The factory settings are restored. All network connection information, map information, scheduled tasks and do-not-disturb information, and customisation information are deleted. The suction performance is reset to the default value.
Setting up cleaning zones
The cleaning robot only cleans within the selected area. Cleaning zones can only be set up with the App. Downloading the App is described in the chapter Connecting cleaning robots with WLAN and App.
- Follow the step-by-step instructions in the App.
Setting up virtual walls
Virtual walls and restricted areas prevent the cleaning robot from entering areas that should not be cleaned. Virtual walls can only be set up with the App. Downloading the App is described in the chapter Connecting cleaning robots with WLAN and App.
- Follow the step-by-step instructions in the App.
Activating mapping
The cleaning robot starts from the charging station and automatically updates its map after completing a cleaning task and after charging.
Mapping can only be set up with the App. Downloading the App is described in the chapter Connecting cleaning robots with WLAN and App.
Note
To avoid losing the map, wait a few seconds after the first mapping until the map is saved.
- Follow the step-by-step instructions in the App.
Operation
ATTENTION
Damage due to moisture
Remove the wiper cloth with wiper cloth holder before charging and when not in use, see chapter Removing the wiper cloth holder.
Remove the water reservoir before charging and when not in use, see chapter Removing the water reservoir.
Protect carpets using virtual walls, see chapter Setting up virtual walls.
Switching on the cleaning robot
Note
Place the cleaning robot directly on the charging station if it cannot be switched on due to a too low charging state, see chapter Initial start-up.
- Keep the On/Off button pressed when the cleaning robot is in standby and not on the charging station. The indicator light flashes for approx. 15 seconds while the cleaning robot starts up and then lights up constantly. The cleaning robot emits an acoustic signal when the start-up is complete.
- Place the cleaning robot directly on the charging station.
- Press the On/Off button.
At initial start-up, the cleaning robot starts mapping. In operation, the cleaning robot starts cleaning.
Setting cleaning modes
Cleaning modes can only be set up with the App. Downloading the App is described in the chapter 'Connecting cleaning robots with WLAN and App'.
The following cleaning modes are available:
- Dry cleaning
- Combination cleaning
- Wet cleaning
The suction power and water quantity can be set in each of the cleaning modes.
Suction power:
- Quiet
- Standard
- Medium
- Turbo
Water quantity:
- Low
- Medium
- High
Switching off the cleaning robot
Note
The cleaning robot cannot be switched off when it is on the charging station.
Note
Fully charge the cleaning robot before longer work interruptions.
ATTENTION
Damage due to moisture
Remove the wiper cloth with the wiper cloth holder, see chapter. Removing the wiper cloth holder.
To remove the water reservoir, see chapter Removing the water reservoir.
- Keep the On/Off button pressed when the cleaning robot is in standby and not on the charging station. The cleaning robot switches off.
Interrupting cleaning
- Press any button during cleaning. The cleaning robot stops.
- Press the On/Off button. Cleaning continues.
- Press the "Return to charging station" button. Cleaning is cancelled and the cleaning robot returns to the charging station.
Manually sending the cleaning robot for recharging
- If the cleaning robot is moving, press any button. The cleaning robot stops.
- Press the "Return to charging station" button.
The cleaning robot moves to the charging station for recharging.
The cleaning robot automatically returns to the charging station for recharging when it has completed a cleaning task or when it is low on energy during a cleaning process.
Dry wipe
- Empty the dust container if necessary, see chapter Emptying the dust container.
- Insert the dry wiper cloth into the wiper cloth holder, see chapter Installing the wiper cloth.
- Press the On/Off button. The cleaning robot starts cleaning.
Wet wipe
Note
After emptying the water reservoir, drops may remain in the hoses. If the cleaning robot is started with an empty water reservoir, these drops can be discharged.
ATTENTION
Damage to the water reservoir due to corrosion and chemical content materials
Do not put detergents, disinfectants or other cleaning products in the water reservoir.
Do not pour hot water into the water reservoir.
Do not immerse the water reservoir in water.
Dry the metal contacts of the water reservoir before inserting the water reservoir.
- Press any button.
The cleaning robot stops.
- Remove the water reservoir, see chapter Removing the water reservoir.
- Fill with water.
Illustration M
a Open the water reservoir lid. b Fill the water reservoir. c Close the water reservoir lid.
- Push the water reservoir into position until it audibly latches into place.
Illustration G
- Dampen the wiper cloth under running water and wring out to remove excess water.
- Install the wiper cloth holder, see chapter Installing the wiper cloth holder.
- Install the wiper cloth, see chapter Installing the wiper cloth.
- Press the On/Off button.
The cleaning robot starts cleaning.
Refilling water
- Press any button.
The cleaning robot stops.
- Remove the water reservoir, see chapter Removing the water reservoir.
- Fill with water.
Illustration M
a Open the water reservoir lid. b Fill the water reservoir. c Close the water reservoir lid.
- Push the water reservoir horizontally into the cleaning robot until it audibly latches into place.
Illustration G
- Press the On/Off button. Cleaning continues.
Draining the water reservoir
- Press any button.
The cleaning robot stops.
- Remove the water reservoir, see chapter Removing the water reservoir.
- Open the water reservoir lid.
- Turn the water reservoir upside down and empty the water from the opening.
Illustration O
- Push the water reservoir horizontally into the cleaning robot until it audibly latches into place.
Illustration G
- Press the On/Off button.
Cleaning continues.
Emptying the dust container
- Press any button.
The cleaning robot stops.
- Remove the dust container (see chapter "Removing the dust container").
- Empty the dust container.
Illustration N
a Open the filter flap.
b Remove the filter flap.
c Empty the dust container.
d Fit the filter flap.
e Close the filter flap.
- Install the dust container (see chapter "Installing the dust container").
- Press the On/Off button.
Cleaning continues.
Cleaning the wiper cloth
The wiper cloth can be cleaned during a cleaning process.
- Press any button.
The cleaning robot stops.
- Remove the wiper cloth, see chapter Removing the wiper cloth.
- Clean the wiper cloth.
- Install the wiper cloth, see chapter Installing the wiper cloth.
- Press the On/Off button.
Cleaning continues.
transport
Where possible, always transport or return the device in the original packaging. Please contact our Service Department if the original packaging is not available.
Safety instructions for transporting
The lithium-ion battery is subject to the requirements of dangerous goods regulations.
An undamaged and functional battery pack can be transported by the user in public traffic areas without any further restrictions.
When shipping by third parties (transport companies), special requirements for packaging and labelling must be observed.
Observe the national regulations.
Storage
ATTENTION
Damage to the cleaning robot due to incorrect storage
Do not store the cleaning robot upside down. The housing of the laser radar (LiDAR) should never come into contact with the ground or objects.
Do not place any objects on the cleaning robot.
Store the cleaning robot fully charged and switched off in a cool and dry place.
Note
To avoid a deep discharge of the battery, fully recharge the cleaning robot after 5 months at the latest.
- Clean the cleaning robot, see chapter Cleaning.
- Fully charge the cleaning robot, see chapter Manually sending the cleaning robot for recharging.
- Unplug the charger from the mains socket and the station.
- Switch off the cleaning robot, see chapter Switching off the cleaning robot.
- Store the cleaning robot in a cool and dry place.
Care and service
Cleaning
Cleaning the dust container
- Press any button.
The cleaning robot stops.
- Remove the dust container (see chapter "Removing the dust container").
- Empty the dust container (see chapter "Emptying the dust container").
ATTENTION
Damage to electronic components
Do not clean the dust container with water.
- Clean the dust container with the cleaning tool supplied.
Illustration P
- Close the filter flap.
- Install the dust container (see chapter "Installing the dust container").
- Press the On/Off button.
Cleaning continues.
Cleaning the water reservoir
- Press any button.
The cleaning robot stops.
- Remove the water reservoir, see chapter Removing the water reservoir.
- Turn the water reservoir upside down and empty it.
- Clean the water reservoir.
- Push the water reservoir horizontally into the cleaning robot until it audibly latches into place.
Illustration G
- Press the On/Off button.
Cleaning continues.
Cleaning the filter
We recommend cleaning the filters regularly. This prevents them from becoming clogged.
- Press any button.
The cleaning robot stops.
- Remove the dust container (see chapter "Removing the dust container").
- Remove the filter.
Illustration Q
a) Press the clamp.
b) Open the cover.
c) Remove the filter.
- Clean the filter under running water with the cleaning tool supplied.
- Allow the filter to dry completely.
- Install the filter.
Illustration R
a Press the filter into position.
b Close the cover of the dust container.
- Install the dust container, see chapter Installing the dust container.
- Press the On/Off button. Cleaning continues.
Cleaning the brush
- Remove the brush.
Illustration S
a Press the clamps together. b Remove the brush cover. c Remove the brush. d Remove the brush bearing.
- Clean the brush and brush bearing with the cleaning tool supplied.
- Install the brush.
Illustration T
a Fit the brush bearing. b Fit the brush. c Fit the brush cover and press it down until it audibly latches into place.
Cleaning the side brush
Note
To avoid damage, do not place the robot on the laser sensor (LiDAR).
- Turn the cleaning robot upside down.
- Remove the side brush with a Phillips screwdriver and clean it.
Illustration U
- Tighten the side brush with a Phillips screwdriver.
Cleaning the fall sensors
Clean the fall sensors monthly.
Illustration V
- Wipe the fall sensors with a soft cloth.
Cleaning the 3-D sensor
Dirt and dust on the 3-D sensor can affect the obstacle detection of the cleaning robot.
Illustration W
- Wipe the 3D sensor with a soft, dust-free cloth.
Replacing components
Replacing the filter
We recommend replacing the filter after 3 to 6 months.
- Press any button.
The cleaning robot stops.
- Remove the dust container (see chapter "Removing the dust container").
- Remove the filter.
Illustration Q
a Press the clamp.
b Open the cover. c Press the levers. d Remove the filter.
- Clean the filter under running water with the cleaning tool supplied.
- Allow the filter to dry completely.
- Install the filter.
Illustration R
a Press the filter into position. b Close the cover of the dust container.
- Install the dust container, see chapter Installing the dust container.
Replacing the brush
We recommend replacing the brush after 6 to 12 months.
- Remove the brush.
Illustration S
a Press the clamps together. b Remove the brush cover. c Remove the brush. d Remove the brush bearing.
- Install the new brush.
Illustration T
a Fit the brush bearing. b Fit the brush. c Fit the brush cover and press it down until it audibly latches into place.
Replacing the side brush
We recommend replacing the side brush after 3 to 6 months.
Note
To avoid damage, do not place the robot on the laser sensor (LiDAR).
- Turn the cleaning robot upside down.
- Remove the side brush with a Phillips screwdriver. Illustration U
- Tighten the new side brush with a Phillips screwdriver.
Replacing the rechargeable battery
The rechargeable battery has reached the end of its life if the cleaning robot constantly drives to the station for charging after a short cleaning operation.
- Switch off the cleaning robot, see chapter Switching off the cleaning robot.
- Send the cleaning robot to the Customer Service. Observe the regulations for shipping lithium-ion batteries, see Chapter transport.
Troubleshooting guide
Malfunctions often have simple causes that you can remedy yourself using the following overview. When in
doubt, or in the case of malfunctions not mentioned here, please contact your authorised Customer Service.
| Fault Cause Rectification | ||
| Battery does not charge | Charging contacts are dirty. | 1. Wipe the charging contacts on both the charging station and the cleaning robot with a dry cloth. |
| Ambient temperature below 0 °C or above 35 °C. | 1. Use the cleaning robot at temperatures above 0 °C and below 35 °C. | |
| The cleaning robot produces unusual noises | A foreign object could be caught in the brush, the side brush or in a wheel. | 1. Switch off the cleaning robot.2. Remove any foreign objects. |
| The cleaning robot does not clean efficiently or leaves dust behind | The dust container is full. 1. Empty the dust container, see chapter Emptying the dust container. | |
| The filter is clogged. 1. Clean the filter, see chapter Cleaning the filter | ||
| A foreign object has become caught in the brush | 1. Clean the brush, see chapter Cleaning the brush.2. Clean the side brush, see chapter Cleaning the side brush. | |
| The cleaning robot does not continue cleaning | The cleaning robot is in "Do not disturb" mode. | 1. Ensure that the cleaning robot is not in "Do not disturb" mode. |
| The cleaning robot is being charged manually or has been placed in the charging station. | 1. Wait until the cleaning robot is fully charged. | |
| The cleaning robot is not returning to the charging station | Battery is discharged. 1. Manually place the cleaning robot on the charging station and let it charge completely. | |
| The cleaning robot is too far away from the charging station. | 1. Move the cleaning robot closer to the charging station.2. Manually place the cleaning robot on the charging station. | |
| Not enough space around the charging station. | 1. Ensure that there is sufficient space around the charging station, see chapter Setting up the charging station. | |
| There are too many obstacles around the charging station. | 1. Place the charging station in a more open area, see chapter Setting up the charging station. | |
| The cleaning robot remaps its environment when it has been moved over a longer distance. | 1. Manually place the cleaning robot on the charging station. | |
| The cleaning robot was not started from the charging station. In this case, it only returns to the place from which it was started. | 1. Manually place the cleaning robot on the charging station. | |
| The cleaning robot does not start | Ambient temperature is below 0 °C or above 35 °C. | 1. Use the cleaning robot at temperatures above 0 °C and below 35 °C. |
| Charging state is too low. 1. Charge the cleaning robot. | ||
| Laser distance sensor (LiDAR) is blocked. | 1. Clean the laser distance sensor with a dry cloth.2. Remove obstacles blocking the laser distance sensor.3. Move the cleaning robot to another location and start it. | |
| Collision sensor is dirty or too close to the virtual wall. | 1. Remove foreign objects by carefully tapping on the collision sensor.2. Move the cleaning robot to another location and start it. | |
| Fall sensors are dirty. 1. Clean the fall sensors with a dry cloth. | ||
| The water reservoir or dust container is not installed or incorrectly installed. | 1. Ensure the water reservoir or the dust container is installed and correctly latched into place, see chapter Installing the water reservoir or. Installing the dust container | |
| Filter not installed or incorrectly installed. | 1. Make sure that the filter is correctly installed. | |
| Filters dirty. 1. Clean the filter, see chapter Cleaning the filter.2. If the error persists, replace the filter, see chapter Replacing the filter. | ||
| Wiper cloth or wiper cloth holder not or incorrectly installed. | 1. Ensure that the wiper cloth and wiper cloth holder are correctly installed, see chapter Installing the wiper cloth or Installing the wiper cloth holder. | |
| The cleaning robot is jammed or stuck. 1. Remove obstacles. | ||
| The cleaning robot or one of its wheels has no floor contact. | 1. Place the cleaning robot on a flat surface. | |
| The cleaning robot cannot connect to the WLAN/The cleaning robot goes offline | The cleaning robot is not connected to the network or is not within the range of the WLAN signal. | 1. Make sure that the cleaning robot is connected to the network and is within the range of the WLAN signal.2. Make sure that the WLAN password is correct.3. Reset the WLAN and connect again (5 GHz WLAN networks are not supported). |
| The WLAN signal is too weak. 1. Make sure that the cleaning robot is within range of the WLAN signal. | ||
Disposal

WARNING
This device contains Lithium-Ion rechargeable batteries. The removal and proper disposal of lithium-ion batteries must be carried out in accordance with national and state regulations.
Warranty
The warranty conditions issued by our sales company responsible apply in all countries. We shall remedy possible malfunctions on your device within the warranty period free of cost, provided that a material or manufacturing defect is the cause. In a warranty case, please contact your dealer (with the purchase receipt) or the next authorised customer service site. (See overleaf for the address)
Technical data
Electrical connection
| Nominal power W 36 | ||
| Nominal voltage of battery V 14,4 | ||
| Battery pack type | Li-ION | |
| Nominal voltage of charger | V 100-240 | |
| Rated current charger | A 0,8 | |
| Battery capacity | mAh | 4800 |
| Rechargeable battery nominal ca-pacity | mAh | 5200 |
| Operating time when battery is ful-ly charged in normal operation | min | 120 |
| Wireless connections IEEE | |
| 802.11b/g/n 2.4GHz | |
| Frequency MHz 2400- | 2483.5 |
| Max. signal strength, WLAN dBm <20 |
| Device performance data |
| Dust container capacity ml 330 |
| Water reservoir capacity ml 240 |
| Dimensions and weights of cleaning robot |
| Weight kg 3,9 |
| Length x width x height mm | 350 x |
| 350 x 97 |
| Dimensions and weights of charging station |
| Weight kg 0,4 |
| Length x width x height mm | 135 x | 150 x 99 |
Subject to technical modifications.
EU Declaration of Conformity
| Device | Type | Frequency band, MHz | Power, max. EIRP, mW |
| RCV5 | WLAN | 2400-2483.5 | 100 |
Alfred Kärcher SE & Co. KG hereby declares that the radio device type Robo Cleaner complies with the 2014/53/EU directive. The full text of the EU Declaration of Conformity can be found at www.kaercher.com/RCV5.
Declaration of Conformity
| Device | Type | Frequency band, MHz | Power, max. EIRP, mW |
| RCV5 | WLAN | 2400-2483.5 | 100 |
Alfred Kärcher SE & Co. KG hereby declares that the radio device type Robo Cleaner complies with the UK regulation S.I. 2017/1206 (as amended). The full text of the Declaration of Conformity can be found at www.kaercher.com/RCV5.
Content
Trademark
Marchi
Handelsmerken
Volume water tank ml 240
Marcas registradas

- Google Play™ and Android™ are trademarks or registered trademarks of Google Inc.
- Apple® and App Store® are trademarks or registered trademarks of Apple Inc.
Registered trademark

Trademark

Trademark
QR-Code® is a registered trademark of DENSO WAVE INCORPORATED.

Download on the
App Store
Send the cleaning robot manually for charging
Trademark
Trademarks
Trademark
Trademark


Trademark

Trademark
The QR-Code ® is a registered trademark of DENSO WAVE INCORPORATED.
Safety instructions
Danger levels
⚠️DANGER

- Google Play™ and Android™ are trademarks or registered trademarks of Google Inc.
- Apple ® and App Store ® are trademarks or registered trademarks of Apple Inc.
c Remove the filter.
d Remove the filter.
Trademark
Trademark
Trademark
QR code® is a registered trademark of DENSO WAVE INCORPORATED.
Safety instructions
Danger levels
⚠DANGER

Trademark

Download on the App Store
- Google Play™ and Android™ are trademarks or registered trademarks of Google Inc.
- Apple® and App Store® are trademarks or registered trademarks of Apple Inc.
Trademark

Trademark

Download on the
App Store
Installing the device
Trademark
QR code ® is a registered trademark of DENSO WAVE INCORPORATED.
Safety instructions
Risk levels
⚠️DANGER

Trademark

Download on the
App Store
Trademark



Trademark
THANK YOU!
MERCI! DANKE! iGRACIAS!

Register your product and benefit from many advantages.
www.kaercher.com/welcome


Rate your product and tell us your opinion.
www.kaercher.com/dealersearch
Alfred Kärcher SE & Co. KG
Alfred-Kärcher-Str. 28-40
71364 Winnenden (Germany)
- TABLE OF CONTENTS
- GENERAL INSTRUCTIONS
- QR-CODE IS A REGISTERED TRADEMARK OF DENSO WAVE INCORPORATED
- HAZARD LEVELS
- DANGER
- INDICATION OF AN IMMINENT THREAT OF DANGER THAT WILL LEAD TO SEVERE INJURIES OR EVEN DEATH
- INDICATION OF A POTENTIALLY DANGEROUS SITUATION THAT MAY LEAD TO SEVERE INJURIES OR EVEN DEATH
- CAUTION
- ATTENTION
- SAFETY INSTRUCTIONS FOR CLEANING ROBOT
- SAFETY INSTRUCTIONS FOR CHARGING STATION
- INTENDED USE
- ENVIRONMENTAL PROTECTION
- NOTES ON THE CONTENT MATERIALS (REACH)
- ACCESSORIES AND SPARE PARTS
- SCOPE OF DELIVERY
- DEVICE DESCRIPTION
- ILLUSTRATION A
- FUNCTIONAL DESCRIPTION
- FUNCTIONS
- SLEEP MODE
- ERROR MODE
- DO NOT DISTURB" MODE
- INITIAL START-UP
- SETTING UP THE CHARGING STATION
- ⚠ WARNING
- ILLUSTRATION B
- CONNECTING THE CLEANING ROBOT WITH THE CHARGING STATION
- ILLUSTRATION D
- CONNECTING CLEANING ROBOTS WITH WLAN AND APP
- INITIAL STARTUP
- INSTALLING THE DUST CONTAINER
- ILLUSTRATION E
- REMOVING THE DUST CONTAINER
- ILLUSTRATION F
- INSTALLING THE WATER RESERVOIR
- ILLUSTRATION G
- REMOVING THE WATER RESERVOIR
- ILLUSTRATION H
- INSTALLING THE WIPER CLOTH
- ILLUSTRATION I
- REMOVING THE WIPER CLOTH
- ILLUSTRATION J
- INSTALLING THE WIPER CLOTH HOLDER
- ILLUSTRATION K
- REMOVING THE WIPER CLOTH HOLDER
- ILLUSTRATION L
- RESET WLAN CONNECTION
- NOTE
- RESTORING THE FACTORY SETTINGS
- SETTING UP CLEANING ZONES
- SETTING UP VIRTUAL WALLS
- ACTIVATING MAPPING
- OPERATION
- DAMAGE DUE TO MOISTURE
- SWITCHING ON THE CLEANING ROBOT
- SETTING CLEANING MODES
- SUCTION POWER
- WATER QUANTITY
- SWITCHING OFF THE CLEANING ROBOT
- INTERRUPTING CLEANING
- MANUALLY SENDING THE CLEANING ROBOT FOR RECHARGING
- DRY WIPE
- WET WIPE
- DAMAGE TO THE WATER RESERVOIR DUE TO CORROSION AND CHEMICAL CONTENT MATERIALS
- ILLUSTRATION M
- REFILLING WATER
- DRAINING THE WATER RESERVOIR
- ILLUSTRATION O
- EMPTYING THE DUST CONTAINER
- ILLUSTRATION N
- CLEANING THE WIPER CLOTH
- TRANSPORT
- SAFETY INSTRUCTIONS FOR TRANSPORTING
- STORAGE
- CARE AND SERVICE
- CLEANING
- CLEANING THE DUST CONTAINER
- DAMAGE TO ELECTRONIC COMPONENTS
- ILLUSTRATION P
- CLEANING THE WATER RESERVOIR
- CLEANING THE FILTER
- ILLUSTRATION Q
- ILLUSTRATION R
- CLEANING THE BRUSH
- ILLUSTRATION S
- ILLUSTRATION T
- CLEANING THE SIDE BRUSH
- ILLUSTRATION U
- CLEANING THE FALL SENSORS
- ILLUSTRATION V
- CLEANING THE 3-D SENSOR
- ILLUSTRATION W
- REPLACING COMPONENTS
- REPLACING THE FILTER
- REPLACING THE BRUSH
- REPLACING THE SIDE BRUSH
- REPLACING THE RECHARGEABLE BATTERY
- TROUBLESHOOTING GUIDE
- DISPOSAL
- WARNING
- WARRANTY
- TECHNICAL DATA
- DECLARATION OF CONFORMITY
- CONTENT
- TRADEMARK
- MARCHI
- HANDELSMERKEN
- MARCAS REGISTRADAS
- REGISTERED TRADEMARK
- SEND THE CLEANING ROBOT MANUALLY FOR CHARGING
- SAFETY INSTRUCTIONS
- DANGER LEVELS
- ⚠️DANGER
- ⚠DANGER
- DOWNLOAD ON THE APP STORE
- DOWNLOAD ON THE
- APP STORE
- INSTALLING THE DEVICE
- RISK LEVELS
- THANK YOU
- MERCI! DANKE! IGRACIAS
Brand : Kärcher
Model : RCV 5
Category : Robot vacuum