360 Grill CV - Camping CAMPINGAZ - Free user manual and instructions
Find the device manual for free 360 Grill CV CAMPINGAZ in PDF.

| Brand | Campingaz |
| Model | 360 Grill CV |
| Product type | Grill / Camping stove |
| Fuel | Butane or propane gas (depending on country) |
| Calorific power | 2200 W |
| Mass flow rate | 160 g/h (G30) / 157 g/h (G31) |
| Gas pressure (Fr/Be/Lu) | Butane 28-30 mbar / Propane 37 mbar |
| Dimensions (approx.) | 40 x 40 x 30 cm |
| Weight (approx.) | 4 kg |
| Materials | Plastic, steel, non-stick coating |
| Number of burners | 1 |
| Cooking surface | Reversible plate (grill / griddle) |
| Ignition | Built-in piezo (also possible with match) |
| Functions | Grill, griddle, stove |
| Water tray | Grease collection, removable, dishwasher safe |
| Dishwasher-safe parts | Lid, plate, tub, pot support |
| Safety | Manual gas shutoff, leak test recommended |
| Included accessories | Lid, plate, diffuser, pot support, water tray, storage bag |
| Usage | Outdoor only, distance >20 cm walls, >1 m ceiling |
| Warranty | Consult the retailer |
Frequently Asked Questions - 360 Grill CV CAMPINGAZ
User questions about 360 Grill CV CAMPINGAZ
0 question about this device. Answer the ones you know or ask your own.
Ask a new question about this device
Download the instructions for your Camping in PDF format for free! Find your manual 360 Grill CV - CAMPINGAZ and take your electronic device back in hand. On this page are published all the documents necessary for the use of your device. 360 Grill CV by CAMPINGAZ.
USER MANUAL 360 Grill CV CAMPINGAZ
| REVISION HISTORY | ||||
| REV. DATE NAME ECN NO. | MODIFICATIONS | |||
| A | 16 NOV 2021 | NEW - Spins-off from 4010054343. | Jenny D. | 0036850 |
| B | 02 DEC 2021 | Corrected some translations in language NO. Updated ECN number. | Jenny D. | 0045612 |
| DO NOT PRINT THIS PAGE Printing Notes: Material: 64 GSM (International) bond paper, white Ink: Black Resolution: 150 DPI or above Printing method: Offset Printing / 1 Sheet, 2-side printed Folded Size: A5 - 148 x 210 mm (W x H) Binding: Perfect binding | ||||
CAMPINGAZ
360 Grill
DE BEDIENUNGSANLEITUNG 6
IT ISTRUZIONI PER L'USO 10
FR MODE D'EMPLOI 14
GB INSTRUCTIONS FOR USE 18
NL GEBRUKSAANWIJZING 22
ES INSTRUCCIONES DE EMPLEO 26
PT MODO DE EMPREGO 30
DK BETJENINGSVEJLEDNING 34
NO BRUKSANVISNING 38
SE BRUKSANVISNING 42
KÄYTTÖOHJE 46
TR KULLANIM KILAVUZU 50
GR O△HΓIEΣ XPHΞHΞ 54
RU INHCTPYKUNI NO 3KCNJYATAUIN 58
AR 62 82
FIG.1A

FIG.2
DK/ES/FI/HU
FR/CZ/BE/IE/IT/LU/
NL/NO/PL/PT/SE/GB
/SI/SK/HR/GR/RO/
BG/TR/UK/CY
FIG. 3
B
B
B
B
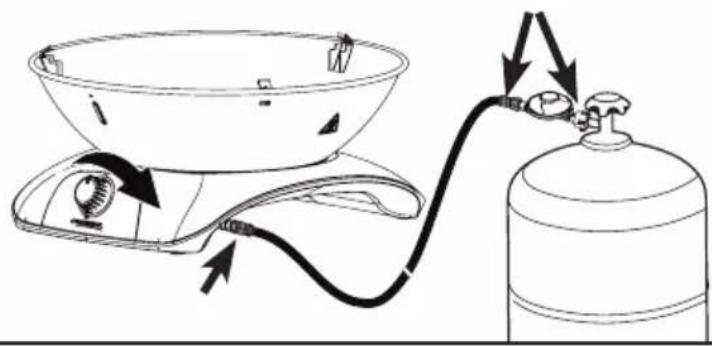
FIG. 4
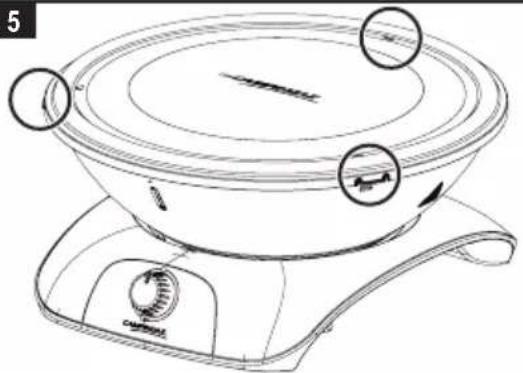
FIG.5
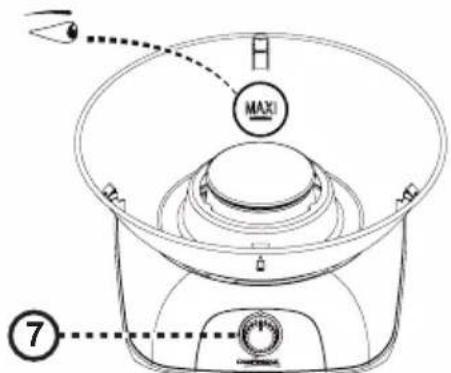
FIG.6A

FIG.6B
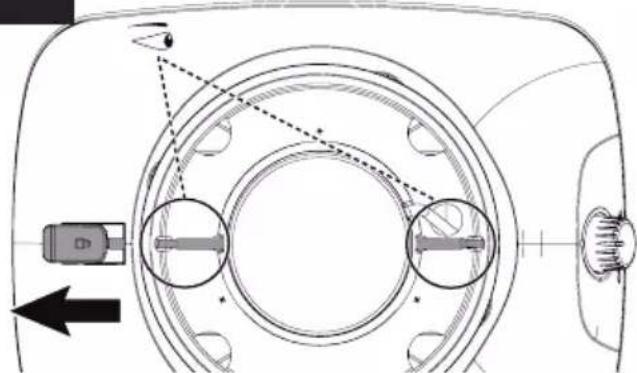
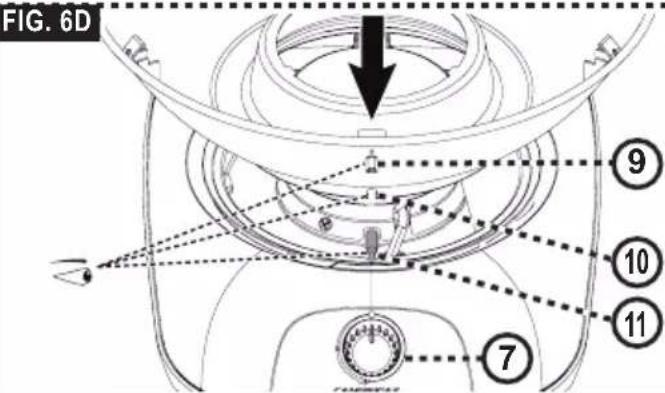
FIG.6D
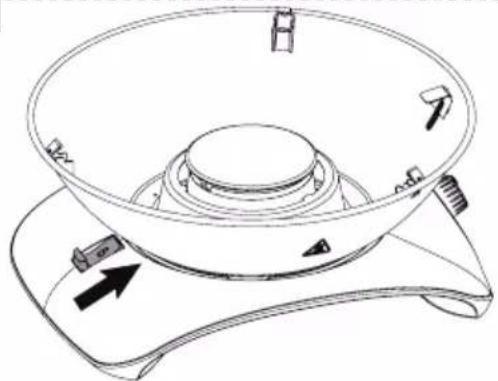
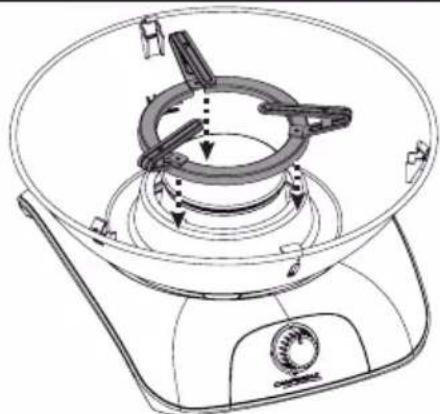
FIG.7
13/14

FIG.9A
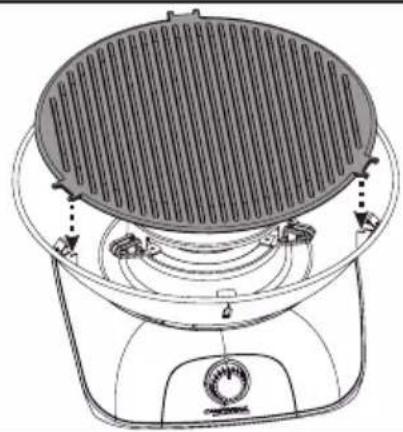
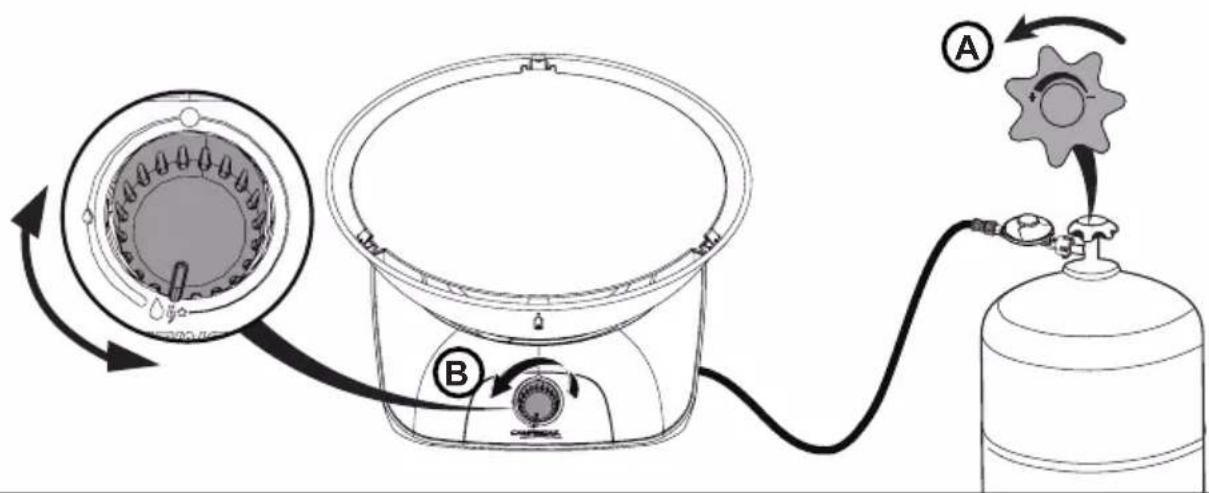
FIG. 10
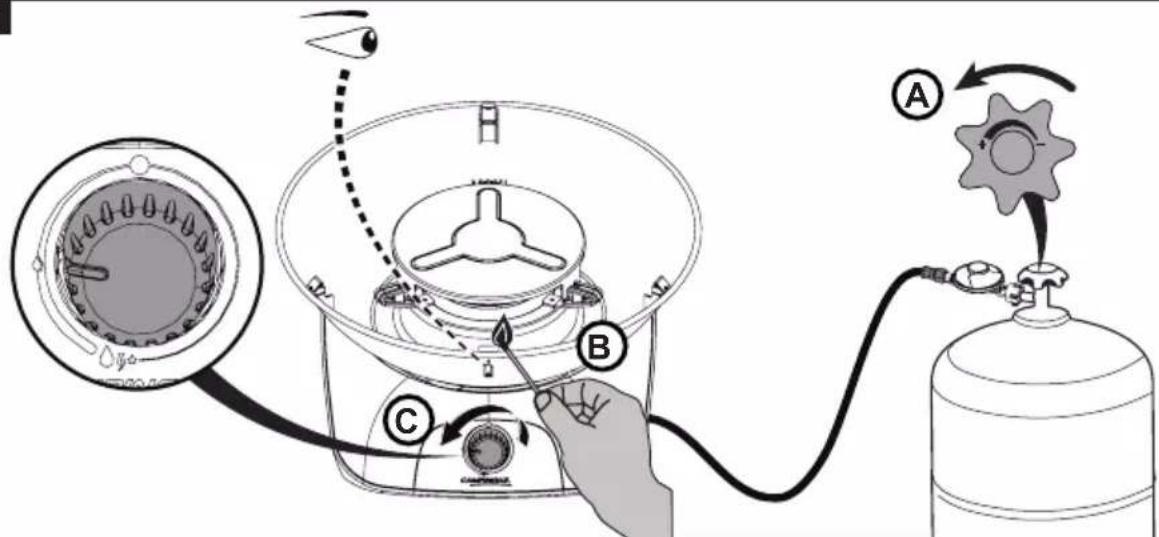
FIG. 11
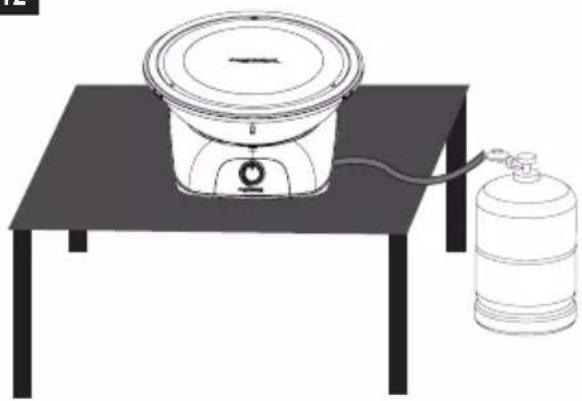
FIG. 12
NOTE: Unless otherwise specified, following generic terms "appliance / unit / product / equipment / device" appeared in this instruction manual all refer to the product "360 Grill".
Thank you for choosing a Campingaz® product!
A - IMPORTANT: ALWAYS BE CAREFUL WHEN USING GAS!
- This operation manual will help you use your Campingaz® unit properly and in complete safety.
- Consult the manual to familiarise yourself with the appliance prior to assembling the gas cylinder.
- Abide by the instructions given in this manual. Failure to do so may be dangerous for the user and anyone else close by.
Always keep this manual in a safe place, readily available for reference if necessary. - This unit is manufactured to use either butane or propane, with a suitable regulator and a hose or flexible hose, which are sold separately.
- This device must be used outside only and away from flammable materials.
- Do not use appliance which leaks, is damaged or functions incorrectly. Instead, return it to your retailer who will inform you of your nearest aftersales service.
- Never modify this appliance or use it for purposes for which it is not intended. Any modification of the appliance could be dangerous.
- Parts which are protected by the manufacturer or the manufacturer's representative must not be manipulated by the user.
- All appliances running on gas consume oxygen and emit other potentially dangerous substances and gases such as carbon monoxide (CO).
- Carbon monoxide is an odorless, clear gas that can cause flu-like symptoms, sickness, illness, and possibly death if emitted in aforesaid enclosed areas through use of the appliance without proper ventilation.
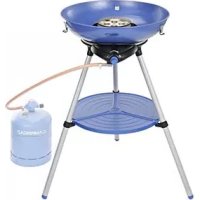
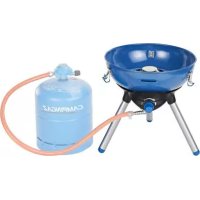
B - YOUR APPLIANCE
Unpack and discover your appliance. (Fig. 1A & 1B)
(1) Plastic lid (6) Base
(2) Cooking griddle (7) Control knob
(3) Heat diffuser (8) Lock button
(4) Pan support (12) Carry bag
(5) Water tank
C - PREPARATION FOR USE
When connecting or changing a cylinder, always operate in an open, well-ventilated place, and never in the presence of a flame, spark or any other source of heat.
This unit can be used with a CAMPINGAZ butane cylinder type 904 or 907 and the CAMPINGAZ 28-30 mbar regulator.
It can also be used with other, larger, butane or propane cylinders (5 15~kg) and the appropriate relief valves (consult your dealer):
France,Belgium,Luxembourg,UnitedKingdom,Ireland, Portugal, Spain, Italy, Greece, Cyprus: butane 28 mbar / propane 37 mbar.
Netherlands, Norway, Sweden, Denmark, Finland, Hungary, Slovenia, Slovakia, Czech Republic, Bulgaria, Turkey, Romania, Croatia: butane 30 mbar / propane 30 mbar.
Hose length should not exceed 1.50 meter. It must be replaced if it is damaged or cracked, when required by national regulations or when the expiry date on the hose is passed. Do not pull on the hose or twist it. Keep the hose away from any parts that may become hot. (Fig. 12) ** When the hose connection is set up, check for gas leaks following the instructions in section D.
France: (Fig. 2&3)
The device must be used with a flexible hose designed to be fitted into a threaded end piece on the device side and held in place on the regulator with clamps (Standard XP D 36-110), recommended length 1.25m .
Install the hose as described in the assembly instructions, supplied with the hose and collars.
Belgium, Luxembourg, United Kingdom, Ireland, Portugal, Spain, Italy, Croatia, Greece, Netherlands, Czech Republic, Slovakia, Hungary, Slovenia, Norway, Sweden, Denmark, Finland, Bulgaria, Turkey, Romania, Poland, Cyprus: (Fig. 2&3)
The appliance is equipped with a circular connector. It should be used with flexible hose that is suitable for use with butane and propane gas.
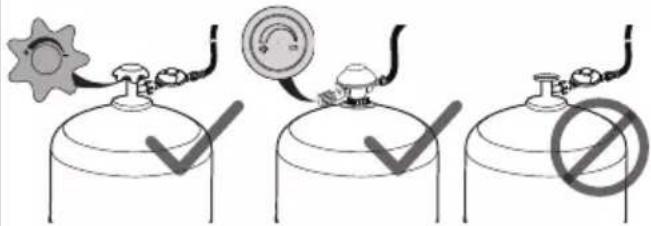
D-CONNECTING THE GAS CYLINDER
Use a regulator compliant with EN 12864 or EN16129. Campingaz's regulator is recommended (see section C). An adjustment valve must be present on the gas cylinder or on regulator.
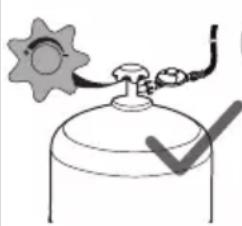
When replacing an empty cylinder, read Section F: "Removing or changing the gas cylinder".
When installing or removing a gas cylinder, always operate in an open, very well-ventilated place, never in the presence of a flame, spark or any other source of heat (cigarette, electrical appliance, etc.), and away from other persons or inflammable materials.
- Place the gas cylinder on the ground, behind or next to the appliance. Keep it far away from parts that can become hot.
- Close the valve on the regulator or gas cylinder. (Fig. 3A)
- Close the control knob on the appliance by turning it towards "O". (Fig. 3B)
- Screw or push the regulator onto the cylinder or onto the valve on the gas cylinder.
- Connect the flexible hose to the appliance and the regulator. Secure the connections thanks to the clamps provided with the hose (Fig. 3C)
- Check that the air holes in the burner tube, close to the injector, are not obstructed by dust or cobwebs.
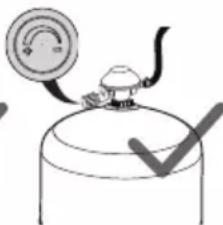
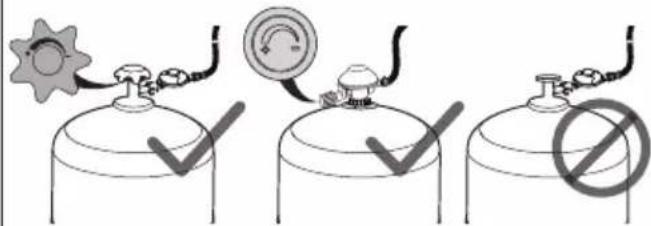
CHECKING FOR GAS LEAKS (Fig. 4)
Do not check for leaks using a flame. Use a gas leak detecting liquid.
- Close the valve on the regulator or gas cylinder. (Fig. 3A)
- Apply gas leak detecting liquid to the cylinder/regulator / hose / appliance joints. The control knob should remain closed: off position (O). (Fig. 4)
- Open the gas supply (valve on the regulator or cylinder). (Fig. 3D)
- Any gas leaks will be indicated by bubbles.
- Shut off the gas supply (valve on the regulator or cylinder).
- The leak can be stopped by tightening any hose connection or replacing any faulty component. The appliance must not be used until the leak is stopped.
Important:
An overall inspection and leaks check must be carried out at least annually and always after changing the gas cylinder.
E-OPERATION
SAFETY PRECAUTIONS
Do not use your appliance at a distance closer than 20~cm to a wall or flammable object, nor closer than 1 metre to a ceiling.
Before lighting the appliance in Grill or Plancha setting, make sure to fill the reservoir with water to "MAXI" level.
Protect your appliance from wind, its performances will be increased.
WARNING: Accessible parts may be very hot. Keep young children away.
Never touch the burner during or just after using the equipment.
Position the appliance on a stable, horizontal surface and do not move when in use.
Do not use a cooking vessel smaller than 12cm or larger than 26cm in diameter.
Never leave the cooking plate on fire without foodstuffs longer than one minute (except for the initial pre-heating period) otherwise the special coating will be damaged.
To avoid damaging the non-stick coating, always use cooking utensils in silicone or wood to manipulate your dishes.
In the event of a leak (smell of gas), close all valves.
Wait for the appliance to cool down completely before handling it for storage.
After use, always close the valve on the regulator or gas cylinder.
It is recommended protective gloves to be worn to handle components which may be very hot.
Important: check the presence of flame through the window located on the firebox over the control knob (9) (Fig. 1A). In case the burner extinguishes whilst grilling, close the gas valve immediately and wait 5 minutes to let the gas be evaporated. Re-ignite the appliance after this waiting time.
A-Plastic lid :
The plastic lid is fastened on the top of the firebox thanks to clips (Fig. 5). He keeps all the inside parts in place during the transport. Remove it before use.
B - Use of the water tank :
Place the appliance on a flat ground. Fill the tank with water till the MAX setting. (Fig. 6A) Pay attention not to spill water on the burner.
After the cooking session, you may disconnect the water tank to throw the mixture of water and grease and clean it. You can use a sponge impregnated with non-abrasive detergent product or put the tank in the dishwasher.
Disconnect the water tank by pulling the lock button (8). Keeping the button pulled till its stop setting, remove the tank by moving it upwards. (Fig. 6B)
After the cleaning, put the tank back on the base:
1-Pull the lock button (8) (Fig. 6C)
2- Align the flame viewing window (9) with the control knob (7). The notches (10) of the base of the tank must be aligned with the locking axle (11) (Fig. 6D)
3- Place the tank on its support
4- Release the button, the tank is locked (Fig. 6E)
Fill in the tank with water till the MAX setting if you want to use it again. (Fig. 6A)
C-Pan support :
Put the pan support in place. Pay attention to insert the 3 notches of its base in the 3 flaps of the center of the firebox. The rotation of the support is blocked. Your appliance is ready to be used as a stove. (Fig. 7)
D - Heat diffuser :
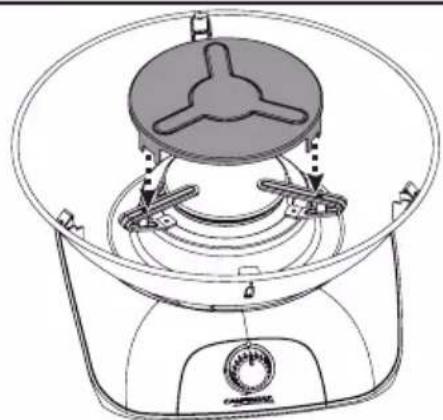
Place the heat diffuser on the top of the arms of the pan support aligning the notches of its 3 supports with each arm of the support. (Fig. 8)
E-Cooking griddle:
Place the cooking griddle on its 3 supports on top of the firebox, paying attention to put the surface that you wish on the top. (Fig. 9A & 9B)
Your appliance is ready to operate in Plancha or Grill model
IMPORTANT :
The heat diffuser must be placed underneath the cooking plate before use in Grill or Plancha setting.
Never place the cooking utensils (frying pan, pan...) over the cooking plate or the heat diffuser.
Warning :
If you see abnormal yellow flames or partial absence of flame at the burner ports, it can be due to accidental spilling water on the burner. Let it dry, the flame will return to normal.
LIGHTING UP
Piezo Ignition (Fig. 10):
- Open the gas supply turning the valve on the regulator or the cylinder towards ^+ . (Fig. 10A)
- Turn the control knob counterclockwise to ignition position (O). (Fig. 10B) When you hear a click, a spark is created at the burner, it is lit at its Max power. You can turn the control knob in the opposite direction to reduce the power (between and ).
- If the burner fails to light, turn the control knob clockwise to the off position (O) until it stops. Wait 5 minutes before repeating the operation.
- If the burner does not ignite after 4 or 5 attempts, you may A. proceed to Match Ignition at below section, or B. read troubleshooting instructions in section H.
Match Ignition (Fig. 11):
If the piezo ignition doesn't work:
IMPORTANT: Wait until the appliance is cool, and wear protective gloves before conducting following operations.
- Open the gas supply turning the valve on the regulator or the cylinder towards ^+ . (Fig. 11A)
- If need to be, remove the cooking griddle, then put a lit match near the burner. (Fig. 11B)
- Turn the control knob to low heat setting (towards 0"). (Fig. 11C)
- Place the cooking plate back on.
- Adjust the power following your preference (between 0 and 0.9)
COOKING
A - Using the appliance as a grill
- Make sure that reservoir is filled with water to the "MAXI" level and the pan support & cooking plate are installed as described in section E.
-
Pre-heat the cooking plate for around 10 minutes at maximum power in order to reach the ideal temperature for cooking. Place your ingredients on the plate and adjust the temperature with the control knob according to your tastes.
-
After 1 hour of cooking, check the quantity of water in the tank. Add water till the MAX level if need to be.
The cooking plate is covered with a high quality non-sticking material which ensures healthy cuisine without adding fat or oil.
Fatty substances are collected in the water reservoir, your meal is perfectly healthy (no residual or carbonised fats), your ingredients retain all their savor.
A bluish discolouration of the cooking plate is due to the strong heat development. This is without any impact on the quality of the used material.
B - Using the appliance as a stove
IMPORTANT: Cooking plate must be taken away when using the appliance as a stove. Never place cooking vessels on the cooking plate or on the diffuser.
Place the cooking vessel (frying pan, pan...) on the pan support, centered over the burner. Ensure that the flame does not exceed the underside of the cooking vessel.
Do not use a cooking vessel smaller than 12cm or larger than 26cm in diameter.
SHUTTING DOWN
Close the valve on the regulator or gas cylinder. (Fig. 3A) When the flames have gone out, turn the control knob on appliance to off position (O). (Fig. 3B)
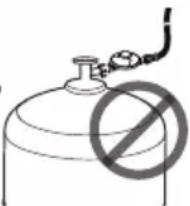
F - REMOVING OR CHANGING THE GAS CYLINDER
Always work in a well-ventilated area, never in the presence of a flame, spark of heat source.
- Close the control knob on the appliance by turning it towards "O". (Fig. 3B)
- Close the valve on the regulator or gas cylinder. (Fig. 3A)
- Disconnect the regulator from the gas cylinder.
- Install the new gas cylinder.
- Connect the regulator to the new gas cylinder (check the condition of the regulator seal, before connecting it to the gas cylinder).
- Check for gas leaks as instructed in section D.
If you take care of your appliance properly, you will be able to enjoy using it for many years.
- Do not clean your appliance when it is being used. Wait until it has cooled down to avoid burns caused by hot parts (griddle, grid, pan support, reservoir etc.).
- Once the unit is cold (approximately 15 minutes) remove the cooking plate and pan support. Unlock the water tank from the base. Empty the water.
- Clean greasy parts with soap and water or a non-abrasive detergent product.
- To simplify cleaning, the lid, the cooking plate, the water tank and pan support can be washed in a dishwasher. You can wash the plastic base with a sponge.
- When cleaning, be careful to avoid clogging the burner holes. If the holes are clogged, for example by food that has spilled over, open them with a non-metal brush.
After cleaning, assemble the pieces of the unit, put the lid back on and lock it thanks to the clips.
The unit should be stored in a safe, secure, and dry place, out of the reach of children and never in a cellar. - If the device has not been used for 30 days, check to see that cobwebs are not clogging the burner hose openings; this could lead to decreased burner efficiency or to a dangerous ignition of gas outside the burner.
- If the appliance will not be used for a long period of time, disconnect the cylinder as indicated in section F.
Regularly check the condition of the hose and change it if it shows signs of ageing or cracking (see section C). - Store your appliance in the bag (12). This bag allows you to carry your appliance easily or to store it away from dust.
H - TROUBLESHOOTING
In case of burn back (ignition under the burner cap) switch the product off, allow it to cool down (approximately five minutes), then reignite the appliance. If the problem of burn back persists, then please contact your local Campingaz® representative.
| Possible problems Probable causes / Corrective action | |
| The burner does not light up | ·Poor gas supply ·Regulator not operating properly ·Pipe, valve, venturi tube or burner holes obstructed. Clean the venturi. |
| The burner does not burn smoothly or goes out | ·Check that gas is present ·Check the pipe connection ·Contact your servicing agent. |
| Unstable blowing flames | ·New cylinder may contain air. Allow the appliance to operate and the fault will clear itself ·Presence of residual water after cleaning of the burner or filling/emptying of the tank. Allow the appliance to operate and the fault will clear itself. ·Contact your servicing agent. |
| Large plume of flame on the burner surface | ·The venturi is obstructed (possibly cobwebs) ·Contact your servicing agent. |
| Flame at the injector | ·The cylinder is almost empty ·Change the cylinder and the fault will clear itself ·Contact your servicing agent. |
| Burning leak around a union | ·Shut off the gas supply immediately ·Leaking union: tighten nuts or change pipe ·Contact your servicing agent. |
| Insufficient heat | ·Injector or venturi tube obstructed. Clean the venturi. ·Contact your servicing agent. |
| Burning leak behind the adjustment knob | ·Defective valve ·Shut down the stove ·Contact your servicing agent. |
GEBRUIKSAANWIJZING
G-ARRUMACAO-MANUTENCAO
D-MONTERINGAVGASSBEHOLDEREN
Bruk en regulator som er i samsvar med EN 12864 aller EN16129. Campingaz' regulator anbefaler (se avsnitt C). En justeringsventil ma vare tilstede pa gassylinderen eller pa regulatoren.
D - Varme Dispenser:
Plasser varme dispenseren pa toppen av pannens stentarmer, og juster sprekkene pa de 3 stottene med haver stotte arm. (Fig.8)
G-LAGRING-VEDLIKEHOLD
Hvis du behandler apparatet ditt riktig, vil du ha glede av det i mange År.
G - SAILYTYS - HUOLTO
B-KOMNOHEHTbI TPNJIa
PacnakyTe n ocmOTpnTe np6op (Pnc.1A u 1B)
(6)OchobaHne npi6opa
(2) PeWetka
IopKIOUHeHne IIN 3aMeHy ra3OBo rKaTpndJa cJeNyET npBOoNTb BHe NOMEueHnB XOpOio BeHTUNpyeMOM MecTe BdaIOn OT nCTOuHnKOB PnAmEHn, NCKP INn DpyrNX BO3MOXhblx NCTOuHnKOB BO3RopaHn.
3TOT np60p MoKeT nCIOJIb3OBAtbcra C Ra3OBbIMN KapTpIaKAMn Campingaz 904 nIIN 907,3aIpaBJeHHbIMN 6yTaHOM,a TaKke ra3oBbIM peDyKTOpom Campingaz Ha 28-30 M6ap.
Pnp6op MoKHO NcNoJb3oBaTb C dpYHMN KapTpndKaMn 60JIbIeO oBema (5-15 Kr) C 6yTaHOM nIN npOnaHOM BMeCTe C COOTBeTCTByIOUIMN peDyKTopaMn (3a INΦopMauné O6paNTTeCb K npOdaBu rpnIa):
ДЯ Фразун, Белги, Локсem6ypra, BeNKo6pntaHn, ИрnaHdN, Португан, Истан, Италн, Геци, Кпра: 6утан—28 m6ap, nponaH—37 m6ap.
HnepnaHOB, Hopbernn, IWeucn, DaHn, HnHnHn, BeHrpnn, CNoBHeHH, CNoBaKn, Yexnn, BOnrapnn, TypuNN, PyMbIHnN, XOpBaTH: 6ytan-30 m6ap, nponaH-30 m6ap.
Дл Ппьш: nponaH - 37 m6ap.
WJAH
Динha shaHa He doJnxHa npeBbIaTb 1,5 MeTpa. 3anpeeHNOJB3OBaTbCRA NOBpeXdeHHbIM INn paCTpeCKABWMcRshArom.Takke shaHr CneDyET 3ameHnTB corNaCHO Tpe6oBaHnM HOpM IN npabnIN, DeiCTByuNX B CTpAnE NCNoJIb3OBAHn Pnp6opa, INN NO nCTeueHn Cpoka roHocTN shaHa. 3anpeeHo TarytB 3a shaHr INN nepeKpyuNbTa erO. He donyckaTe KOHTaTa shaHa rCa TropYHMn NOBepxHOCTm Np6opa. (Pnc.12) ** Nocne noDcoEdHHeHn shaHa rCaDeyET npOBepNTb HaHnue yteek ra3a corNaCHO yka3AHm pa3denaF.
ДлЯФанци:(Pnc.2n3)
IIN NOIDCOEINHeHNAKAPTpNIXKA K npnbopy CneNyET NcNOJb3OBaTb I6kMn WnHaHr DmHHO1,25M,IMeIOUm COOTBETCTByIOUyO pe3b6y dN yCTaHOBKn B KpENNEHRea3OBORo peDyKTopa c 3axImamn (CTAHdapt XP D 36-110).
Ppoecc NoDcoeMHHeHnIJNaHra OINcaH B pykoBocCTBe, NOCTaBnREmOM CO JHaHROM pa3bemamn.
IJIbHn, JIOKcem6ypra, BeNKo6pTaHn, HpaHnn, NopTyraHnn, McnaHnn, YtaHnn, XopBaTn, TpeuH, HndeprHaHDoB, Yeewcko Pecny6JnKn, CNoBaKn, BeHrpN, CNoBeHN, HopBerHn, WBeuHn, DaHn, FInHnHn, BoIrapn, TypuHn, PyMbHn, IOnbHn, Knnpa: (Pnc. 2 n 3)
Pnp6op ochaueh cinnHprneck m pa3bemom. K hemy nOIOcoeINHraTcIIO6bIe INaHr, paccHTaHHbIe Ha pa60Ty c nponaHOM 6yTaHOM.
Pnp6op CHOBA MOXHO NcNoB3OBAbC yCTaHOBNEHHo nnahne nnn peWetKo.
BAXHO!
Ipeep nCnoJIb3OBaHnEM rPnJIc peWSeTKo nII nnHaHcy cnEpyET yCTaHOBNTb paccKaTeNb nnameHn.
3anpeueHNO nomeuTaB nocdy (CKOBOPOy, kactpIIOH np.) Ha pnaHcy nn pacceKaTeB pIaMeHn.
BHIMAHHE!
KeIbIy CEBT IaMeHn Nn YactNHyoe OTCytCTBne IaMeHN B HEKOTOpbIX OTBepCTnX KOHΦopKn MOKeT 6blb BbI3BaHO NnonaHaHHeM BObl Ha KOHΦopKy. OCTaTKN BObl INcaprTa Pn DaJIbHeHWe HArpeBaHIn KOHΦopKn IaNam BerpETcK HopMaJIbHOMy COCTOHHIO.
3AXUNFAHNE KOHΦOPKN
Nbe3o-3axnraHne (Pnc. 10):
- Повернite ВENTINь поачи有很大а有很大оро Kaptpindжma Ип редуктора по наразвлеси К OTмтKE «+» (Pnc. 10A).
- NOBEPHNTe peryIaTOp nIaMeHn npOTuB yacBOB CTpeJIKN B NOIOXKeHne 3aKInraHn (O) (Pnc. 10B). B 3TOM NIOXKeHn NODaHa rA3a MaKcImaJIbHa N IeJIyOK O3HaayE, YTO Ha KOHΦopKe BO3HNKna NcKpa dJa 3aXIRaHn. PpOKoHTpOINpyUte HAnuYe OTHryepe3 OTBepCTne HAD peryIaTOpM nIaMeHn. DaJe e NOBEPHNTe peryIaTOp B npOTuBOIOnIOxHm HApBaJIeHn, YTObI yMeHbWntb nIaMa (MeKdy O nO
- Ecnn 3axeyb konfoopky He noIyunocb, nobepnTe peYnTOp no yacobO B noIoxKeHne BkUoyehn (OTMeTKA «O»). IIOJokDnte 5 MNHT nepei NOBTOpeHnem Oepaunn.
- Ecnn KOnΦopky He nonyunlocb 3axeuy nocne 4-5 nonbyok, nonpo6ynte 3axeuy ee cnnykamn, KaK onncaHO Hxke, INI npOHTte INHOpMaUIO B pa3dene 3.YctpaHeHne HEnCnpaBHOcteN.
3axnraHne cnnuKamn (Pnc. 11):
Ecnn nbe3o-3axnraHne He pa6oTaet:
BAXHO! Doxntecb octbHaHn np6opa n HaedeHbTe 3aunThbIe nepuATKn nepei npoBeHnem CneDyUux onepau.
- NObepHnTe BeHTnIb IOnaun Ra3a Ra3OBorO KaptnJka nIpeDyKTopa No HapPabHeHIO K OTMeTke + (Pnc. 11A).
2.Плжкite 3axkceHnyCnUky prdOM c KOHΦoPko, CHRBpeWETky npn HeO6xOuMocTn.(Pnc.11B) - NObepHnTe peryJnTOp nIaMeHN B NOJoxKeHne cna6oOr HRA (KOTMeTKe Pnc.11C).
- NomeCTnte nnaHuy o6paTHo B npn6op.
- OtperynpyTe XeIaEMyIO BbICOTy PnAmEHn (MeKdy
PnFOTOBNEHNE Nn
Lggs Lggs Jia jai 1dai jaoa aall g
aai jia jia 1 jia jia
jdua 1
. S ACD = S COD + S_ DCE
a 1000
jaiall jiey 1000 Aysall ayiy gssall o jy jy
J 1
0juloo jgl jgall alilal gail gall y
aaii iiaai y ciie gai jai
26 12 12 jao jao jao jao jao jao jao jao jao jao jao jao jao jao jao jao jao jao jao jao jao jao jao jao jao jao jao jao jao jao jao jao jao jao jao jao jao jao
sial y sial 15al 15al 15al
alld 1yall yalal yalw 1, (y)
gill lalil piali jwailn piiee oohy jy
aaii 1
aalaaal (jie aaiy)
cll Jaaal alai (1A Sill) (9)
5 5 5 5
a jilii 8i jie jiljia jilai sll
A
(5)
a 1
.
: pall jjz plssil-B
a a a a a a a a a a a a a a a a a
Jalal alal kwlq 6A
a aal 1
j jall gai gaii jie iiaiaiaiaiaiaiaiaiaiaiaiaiaiaiaiaiaiaiaiaiaiaiaiaiaiaiaiaiaiaiaiaiaiaiaiaiaiaiaiaiaiaiaiaiaiaiaiaiaiaiaiaiaiaiaiaiaiaiaiaia
1
(8)(201
(6B)
siall jjll sji 1
(6C) (8)
j,jai 7) (9) -2
(6D J) (11) jai jai jai sai (10)
4a aalld aed 1 j j 3
(6EJ)JzJzJzJzJzJzJzJ-4
ydo aodolai yg k 1 MAX aale g stal jall S
(6A
: e 1
j 3 1 1 1 1 1 1 1 1 1
a 1
(7) 1,2,3,4 ,若 a ≤ 3 ,则 a > 4 ,求 a > 4 的值.
:5jai 5jui-D
g 1500000000000000000000000000000000000000000
(8)
:abai -E
yololj 100
(9B,9A)
aai iai jai jai jai jai jai
:aagaa
a 1 a 1 1 1 1 1 1 1 1 1 1 1 1
L
EN16129 Jgall 12864 EN Jgall gai lalbi p
g 1 (z) Campingaz
a
"glsl jall al glwll all j"(s) pwl l jal ale jia al glwai chnlwie
A
1 2
()
aai aai jai ai jai jai i
jss jSs yll
(3A)
(3A J). jiall alj lal j 1 jaiil al j plalll jie-1
a 2
(O)
(4
(3D) (a1ab21 1 a1 b1al all palaall plaaal) jall-3
4-4
(aill 51 5 5 5 5 5 5 5 5 5 5 5 5 5 5 5 5 5 5 5 5 5 5 5 5 5 5 5 5 5 5 5
6
a a
:
aaiiie 1
jlll al glal l jaiy
gjgl jilai jilai jilai j
1 1
(3B
jiall jiljwJie jiall Jai-3
s211 jai ai gai 4
g wlll aill lal l 5 gai) sall jilai glaly pail
jaiil jaii jaii jaii
a aal gall gll lgl 6 6-6
jzil-aii11
ydi daii daii jn jaiu
gll gll gll gll gll gll gll gll gll gll gll gll gll
p. qaiiall gabll aai 15 gaa) jay 2y loic . clal gji sclll jol clal jj
AaBisS yie aiaia sola oalldiy jydually jydo gill aljai
olll 1j jll gall 2g 0ll Jut say iill Jaue Juii
gill alll gall gail gai jie jia jie jie jie jie jie jie jie jie jie jie jie jie jie jie jie jie jie jie jie jie jie jie jie jie jie jie jie jie jie jie jie jie jie jie
Gdall 1 jll gdl aag 2 3
aai 100000000000000000000000000000000000000000000
j )i aaiy jg jg jgl jgsaag gaaag
128, 245
B
111 111 111 111 111 111 111
Jaaal 5e Jaaie jie aie ae (aee) gae gaa
26 105 2, 12 105
clicbly
(3A)
(3B J. (O) 0aia aiaaa aiaaa aaai iiaai I
Campingaz