
Party Grill 600 - Camping CAMPINGAZ - Free user manual and instructions
Find the device manual for free Party Grill 600 CAMPINGAZ in PDF.
| Product type | Portable gas barbecue |
| Brand | Campingaz |
| Model | Party Grill 600 |
| Category | Camping |
| Gas supply | Butane (G30) or Propane (G31) |
| Gas pressure (France/Belgium/Luxembourg) | Butane 28-30 mbar / Propane 37 mbar |
| Gas pressure (Switzerland) | Butane 50 mbar / Propane 50 mbar |
| Heat output | 4000 W |
| Gas consumption | 291 g/h (G30) / 286 g/h (G31) |
| Injector reference | 97 (EU) / 85 (CH) |
| Cooking surface | Reversible plate (ridged side for meats, smooth side for fish/vegetables) and grill |
| Usage | Grill, oven, pan |
| Material | Steel, non-stick coating on the plate |
| Water tank | Yes, to collect grease |
| Ignition | Integrated piezoelectric |
| Maintenance | Removable parts dishwasher safe (lid, plate, tank, support) |
| Safety | Outdoor use only, gas shut-off after use, leak test recommended |
| Warranty | 2 years |
Frequently Asked Questions - Party Grill 600 CAMPINGAZ
User questions about Party Grill 600 CAMPINGAZ
0 question about this device. Answer the ones you know or ask your own.
Ask a new question about this device
Download the instructions for your Camping in PDF format for free! Find your manual Party Grill 600 - CAMPINGAZ and take your electronic device back in hand. On this page are published all the documents necessary for the use of your device. Party Grill 600 by CAMPINGAZ.
USER MANUAL Party Grill 600 CAMPINGAZ
Thank you for choosing a Campingaz® product!
These operation instructions are common to all PARTY GRILL 600 units concerning their accessories and operation.
A - IMPORTANT: ALWAYS BE CAREFUL WHEN USING GAS!
This operation manual will help you use your Campingaz® unit properly and in complete safety.
Consult the manual to familiarise yourself with the appliance prior to assembling the gas cylinder.
Abide by the instructions given in this manual. Failure to do so may be dangerous for the user and anyone else close by.
Always keep this manual in a safe place, readily available for reference if necessary.
This unit is manufactured to use either butane or propane, with a suitable regulator and a hose or flexible hose, which are sold separately.
This device must be used outside only and away from flammable materials.
Do not use appliance which leaks, is damaged or functions incorrectly. Instead, return it to your retailer who will inform you of your nearest after-sales service.
Never modify this appliance or use it for purposes for which it is not intended. Any modification of the appliance could be dangerous.
Parts which are protected by the manufacturer or the manufacturer's representative must not be manipulated by the user.
All appliances running on gas consume oxygen and emit other potentially dangerous substances and gases such as carbon monoxide (CO).
Carbon monoxide is an odorless, clear gas that can cause flu-like symptoms, sickness, illness, and possibly death if emitted in aforesaid enclosed areas through use of the appliance without proper ventilation.
B - ASSEMBLY OF THE APPLIANCE
Remove the appliance from its packaging. Unlock latch by following step sequence A, B, C, then open the lid (Fig. 1).
Remove components within the appliance (Fig. 2).
(1) Screw and washer (2) Handle
(3) Heat Shield (4) Lid
(5) Griddle (6) Grid
(7) Heat Distributor (8) Grade
(9) Water Reservoir (10) Shelf
(11) Upper leg (12) Lower leg
- (Fig. 3) Place heat shield (3) on lid (4) by aligning screw holes. Attach handle to heat shield and lid by installing two screws and two washers to screw holes.
- (Fig. 4) Assemble legs by inserting the lower portion to the upper portion until the button snaps into place.
-
(Fig. 5) Flip the appliance upside down. Screw legs into the sockets at the bottom of the appliance, stand the appliance in upright position on level ground.
-
(Fig. 6-A) Install the water reservoir by resting it on the base, with the viewing window facing front.
- Make sure that the notches on the inner circle of the reservoir are in line with the locking tabs on the base, then lock the reservoir into place by turning it clockwise until it stops (Fig. 6-B). The viewing window should face front in line with the control knob (Fig. 6-C) when the reservoir is installed.
- (Fig. 7) Install the shelf by inserting its three feet into the supporting brackets on the legs and check its stability.
C - PREPARATION FOR USE
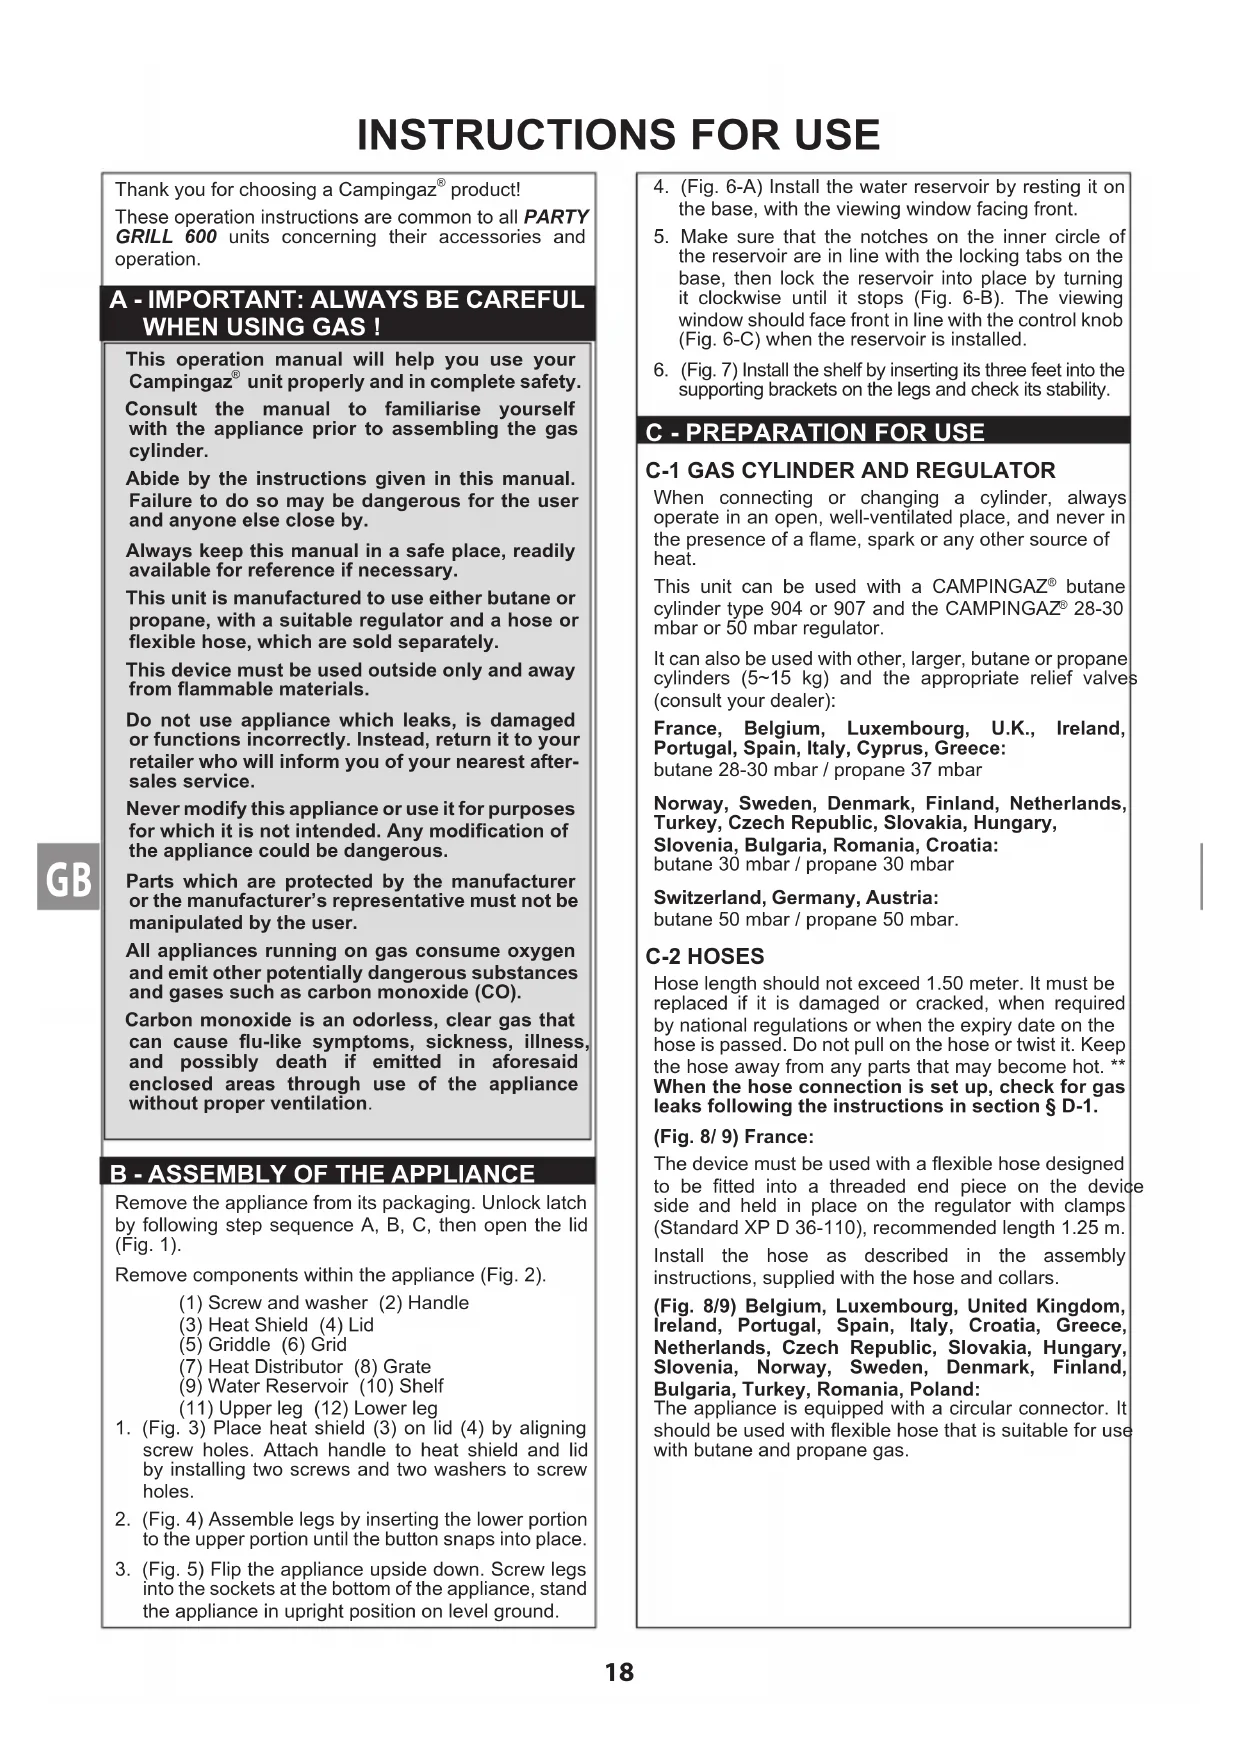
When connecting or changing a cylinder, always operate in an open, well-ventilated place, and never in the presence of a flame, spark or any other source of heat.
This unit can be used with a CAMPINGAZ® butane cylinder type 904 or 907 and the CAMPINGAZ® 28-30 mbar or 50 mbar regulator.
It can also be used with other, larger, butane or propane cylinders (5 15~kg) and the appropriate relief valves (consult your dealer):
France, Belgium, Luxembourg, U.K., Ireland, Portugal, Spain, Italy, Cyprus, Greece:
butane 28-30 mbar / propane 37 mbar
Norway, Sweden, Denmark, Finland, Netherlands, Turkey, Czech Republic, Slovakia, Hungary,
Slovenia, Bulgaria, Romania, Croatia:
butane 30 mbar / propane 30 mbar
Switzerland, Germany, Austria:
butane 50 mbar / propane 50 mbar.
C-2 HOSES
Hose length should not exceed 1.50 meter. It must be replaced if it is damaged or cracked, when required by national regulations or when the expiry date on the hose is passed. Do not pull on the hose or twist it. Keep the hose away from any parts that may become hot. ** When the hose connection is set up, check for gas leaks following the instructions in section § D-1.
(Fig. 8/9) France:
The device must be used with a flexible hose designed to be fitted into a threaded end piece on the device side and held in place on the regulator with clamps (Standard XP D 36-110), recommended length 1.25m . Install the hose as described in the assembly instructions, supplied with the hose and collars.
(Fig. 8/9) Belgium, Luxembourg, United Kingdom, Ireland, Portugal, Spain, Italy, Croatia, Greece, Netherlands, Czech Republic, Slovakia, Hungary, Slovenia, Norway, Sweden, Denmark, Finland, Bulgaria, Turkey, Romania, Poland:
The appliance is equipped with a circular connector. It should be used with flexible hose that is suitable for use with butane and propane gas.
(Fig. 8/10) Switzerland, Germany, Austria:
The appliance should be used with flexible tubing that is suitable for use with butane and propane gas.
To connect the hose to the connector on the appliance, tighten the nut on the hose firmly but without excess force using two wrenches:
no. 10 wrench to tighten the gas inlet on appliance no. 17 wrench to tighten the nut on the hose
Connect the other end to the regulator outlet.
D-CONNECTING THE GAS CYLINDER
(Fig. 11) Use a regulator compliant with EN 12864 or EN16129. Campingaz's regulator is recommended (see section § C-1). An adjustment valve must be present on the gas cylinder or on regulator.
When replacing an empty cylinder, read Section F "Removing or changing the gas cylinder".
When installing or removing a gas cylinder, always operate in an open, very well-ventilated place, never in the presence of a flame, spark or any other source of heat (cigarette, electrical appliance, etc.), and away from other persons or inflammable materials.
- Place the gas cylinder on the ground, behind or next to the appliance (Fig.12-A). Do not put the gas cylinder on the shelf (Fig.12-B).
- Whatever the height H and diameter D or the maximum width of the gas cylinder, do not put the gas cylinder under the appliance (Fig.12-A/C).
- (Fig.12-A) Check that the flexible hose is in place normally, with no torsion or traction. Keep the hose away from any parts that may become hot.
- (Fig. 9-A) Close the valve on the regulator or gas cylinder.
- (Fig. 9-B) Close the control knob on the appliance by turning it towards "O".
- Screw or push the regulator onto the cylinder or onto the valve on the gas cylinder.
- Check that the air holes in the burner tube, close to the injector, are not obstructed by dust or cobwebs.
D-1 CHECKING FOR GAS LEAKS
Do not check for leaks using a flame. Use a gas leak detecting liquid.
- (Fig. 13-A) Close the valve on the regulator or gas cylinder.
- Apply gas leak detecting liquid to the cylinder / regulator / hose / appliance joints (Fig. 13-B). The control knob should remain closed: off position (O) (Fig. 13-C).
- (Fig. 13-D) Open the gas supply (valve on the regulator or cylinder).
- Any gas leaks will be indicated by bubbles.
- (Fig. 13-A) Shut off the gas supply (valve on the regulator or cylinder).
- The leak can be stopped by tightening any hose connection or replacing any faulty component. The appliance must not be used until the leak is stopped.
Important:
An overall inspection and leaks check must be carried out at least annually and always after changing the gas cylinder.
E - OPERATION
SAFETY PRECAUTIONS
Do not use your appliance at a distance closer than 20~cm to a wall or flammable object, nor closer than 1 metre to a ceiling.
Before lighting the appliance, make sure to fill the reservoir with water to "MAXI" level, regardless whether the appliance is to be used as a stove or a grill.
WARNING: Accessible parts may be very hot. Keep young children away.
Never touch the burner during or just after using the equipment.
Position the appliance on a stable, horizontal surface and do not move when in use.
Do not use a cooking vessel smaller than 20~cm or larger than 40~cm in diameter.
In the event of a leak (smell of gas), close all valves.
Wait for the appliance to cool down completely before handling it for storage.
After use, always close the valve on the regulator or gas cylinder.
E-1 INSTALLING COOKING PLATES
Using the appliance as a grill (Fig. 14-A/B).
- (Fig. 14-ii) Fill the reservoir with water to the "MAXI" level (marked on wall of reservoir).
- (Fig. 14-ii) Place in the grate (8), with its three feet resting on the supports on the wall of the reservoir.
- (Fig. 14-ii) Place the heat distributor (7) over the grate, with its edge resting on the notches of the grate feet.
- Place one of the cooking plates (griddle (5) or grid (6) over the grate (8), with its edge resting on the notches of the grate feet.
Griddle (5) placement (Fig. 14-A)
The three feet on grate (8) must be in align with and inserted through the three slits around the edge of the griddle (5). (Fig. 14-i)
Grid (6) placement (Fig. 14-B)
Make sure to rotate the grid (6) to a position that the u-shap spacer rests right on the feet of the grate (8) (Fig. 14-iv).
IMPORTANT: Never use more than one cooking plate at the same time. Heat distributor must be placed beneath the cooking plate prior to use. Never put cooking vessels (pan, wok etc.) on cooking plate (5/6) or heat distributor (7).
Using the appliance as a stove (Fig. 15).
- (Fig. 15) Fill the reservoir with water to the "MAXI" level (marked on wall of reservoir).
- (Fig. 15) Place in the grate (8), with its three feet resting on the supports on the wall of the reservoir.
- Place cooking vessel (pan etc.) on the grate, centered over the burner. Ensure that the flame does not exceed the underside of the cooking vessel.
IMPORTANT: Cooking plate (5 / 6) and heat distributor (7) must be taken away when using the appliance as a stove. Never put cooking vessels (pan, wok etc.) on cooking plate (5 / 6) or heat distributor (7).
E-2 LIGHTING UP
Never light the appliance with the lid closed, only with the lid removed.
Piezo Ignition (Fig. 16):
- (Fig. 16-A) Open the gas supply (valve on the regulator or cylinder) (towards "+").
- (Fig. 16-B) Turn the control knob counter-clockwise to ignition position () . When you hear a click, and the burner is lit (check flame through the window on the front of the reservoir), turn the control knob in reverse direction (Fig. 16-C) to a desired heat setting position (between and ).
- If the burner fails to light, turn the control knob clockwise to the off position (O) until it stops. Wait 5 minutes before repeating the operation.
- If the burner does not ignite after 4 or 5 attempts, you may A. proceed to Match Ignition at below section, or B. read troubleshooting instructions in section S F.
Match Ignition (Fig. 17):
If the Piezo ignition doesn't work:
IMPORTANT: Wait until the appliance is cool, and wear protective mittens before conducting following operations.
- (Fig. 17-A) Open the gas supply (valve on the regulator or cylinder).
- (Fig. 17-B) Remove heat distributor / cooking plates that cover the burner, then put a lit match near the burner.
- (Fig. 17-C) Turn the control knob to low heat setting (towards "").
- Place the heat distributor / cooking plates back on.
E-3 OPERATION
It is recommended protective gloves to be worn to handle components which may be very hot.
Preheating: Before grilling, preheat the appliance for about 2 minutes in full flame.
A bluish discolouration of the cooking plate is due to the strong heat development. This is without any impact on the quality of the used material.
Note: In case the burner extinguishes whilst grilling, close the gas valve immediately and wait 5 minutes to let the gas be evaporated. Re-ignite the appliance after this waiting time.
E-4 COOKING
IMPORTANT: Make sure water reservoir is filled with water as instructed in section E-1. Never leave the cooking plate on fire without foodstuffs longer than one minute (except for the initial pre-heating period) otherwise special coating will be damaged.
The griddle has two cooking surfaces: one corrugated side for the searing of meats and one smooth side for fish, shellfish, vegetables, etc...
The griddle is covered with a high quality non-sticking material which ensures healthy cuisine without adding fat or oil.
When using the grid, fatty substances are collected in the water reservoir, your meal is perfectly healthy (no residual or carbonised fats), your ingredients retain all their savor.
It is also possible to adjust the speed of cooking according to where the ingredients are placed on the cooking plate: maximum in the center, less intense towards the edge.
Cooking can be done with the lid closed when using the appliance as a grilling oven. There's a thermometer on the lid to help you monitor the cooking temperature (Fig. 3).
E-5 SHUTTING DOWN
Close the valve on the regulator or gas cylinder (Fig. 9-A).
When the flames have gone out, turn the control knob on appliance to off position (O) (Fig. 9-B).
F - REMOVIDING OR CHANGING THE GAS CYLINDER
Always work in a well-ventilated area, never in the presence of a flame, spark of heat source.
- Close the control knob on the appliance by turning it towards "O" (Fig. 9-B).
- Close the valve on the regulator or gas cylinder (Fig. 9-A).
- Disconnect the regulator from the gas cylinder.
- Install the new gas cylinder.
- Connect the regulator to the new gas cylinder (check the condition of the regulator seal, before connecting it to the gas cylinder).
- Check for gas leaks as instructed in section D-1.
G-STORAGE-SERVICING
If you take care of your appliance properly, you will be able to enjoy using it for many years.
Do not clean your appliance when it is being used. Wait until it has cooled down to avoid burns caused by hot parts (griddle, grate, reservoir etc.).
Once the unit is cold (approximately 15 minutes) remove the cooking plate and grate. Empty the water. Unscrew legs from base.
Clean greasy parts with soap and water or a non-abrasive detergent product.
To simplify cleaning, the lid (wok), the cooking plates, grate, can be washed in a dishwasher. The legs can be cleaned with a sponge (no washing powder).
When cleaning, be careful to avoid clogging the burner holes. If the holes are clogged, for example by food that has spilled over, open them with a non-metal brush.
After cleaning, assemble the pieces of the unit, put the lid back on and lock by reversing steps A, B, C in Fig. 1.
The legs should be stored as shown in Figure 18. Make sure to rotate the grid (6) to a position so that the u-shape spacer doesn't rest on the grate feet (Fig. 14-iii), otherwise the lid couldn't be closed.
The unit should be stored in a safe, secure, and dry place, out of the reach of children and never in a cellar.
If the device has not been used for 30 days, check to see that cobwebs are not clogging the burner hose openings; this could lead to decreased burner efficiency or to a dangerous ignition of gas outside the burner.
If the appliance will not be used for a long period of time, disconnect the cylinder as indicated in section F
Regularly check the condition of the hose and change it if it shows signs of ageing or cracking (see section C-2).
In the case of the injector becoming clogged (the cylinder still contains gas but the appliance will not light), do not try to unclog it yourself. Return the appliance to your retailer.
H - POSSIBLE PROBLEMS / CORRECTIVE ACTION
| Possible problems Probable causes / Corrective action | |
| The burner does not light up | Poor gas supply regulator not operating properly Pipe, valve, venturi tube or burner holes obstructed Clean the venturi |
| The burner does not burn smoothly or goes out | Check that gas is present Check the pipe connection Contact your servicing agent." |
| Unstable blowing flames | New cylinder may contain air. Allow the appliance to operate and the fault will clear itself Residual water, following the washing of the burner caps Contact your servicing agent. |
| Large plume of flame on the burner surface | The venturi is obstructed (possibly cobwebs) Contact your servicing agent." |
| Flame at the injector | The cylinder is almost empty Change the cylinder and the fault will clear itself Contact your servicing agent. |
| Burning leak around a union | Shut off the gas supply immediately Leaking union: tighten nuts or change pipe Contact your servicing agent. |
| Insufficient heat | Injector or venturi tube obstructed Contact your servicing agent. Clean the venturi |
| Burning leak behind the adjustment knob | Defective valve Shut down the stove Contact your servicing agent. |
I - WARRANTY PERIOD
Years 2
GEBRUIKSAANWIJZING
D-1 LUCHTDICHTHEIDSTEST
VOORZORGSGMAATREGELEN:
G - ARRUMACAO - MANUTENCAO
D - MONTERING AVGASSBEHOLDEREN
(Fig. 11) Bruk en regulator som er i samsvar med EN 12864 aller EN16129. Campingaz' regulator anbefaler (se avsnitt § C-1). En justeringsventil ma vare tilstede pa gassylinderen aller pa regulatoren.
G-LAGRING-VEDLIKEHOLD
Hvis du behandler apparatet ditt riktig, vil du ha glede av det i mange ar.
G - SÄLYTYS - HUOLTO
Using the appliance as a grill (Sekil 14-A/B)


- A - IMPORTANT: ALWAYS BE CAREFUL WHEN USING GAS!
- B - ASSEMBLY OF THE APPLIANCE
- C - PREPARATION FOR USE
- C-2 HOSES
- (Fig. 8/9) France:
- (Fig. 8/10) Switzerland, Germany, Austria:
- D-CONNECTING THE GAS CYLINDER
- D-1 CHECKING FOR GAS LEAKS
- Important:
- E - OPERATION
- SAFETY PRECAUTIONS
- E-1 INSTALLING COOKING PLATES
- Griddle (5) placement (Fig. 14-A)
- Grid (6) placement (Fig. 14-B)
- Using the appliance as a stove (Fig. 15).
- E-2 LIGHTING UP
- Piezo Ignition (Fig. 16):
- Match Ignition (Fig. 17):
- E-3 OPERATION
- E-4 COOKING
- E-5 SHUTTING DOWN
- F - REMOVIDING OR CHANGING THE GAS CYLINDER
- G-STORAGE-SERVICING
- H - POSSIBLE PROBLEMS / CORRECTIVE ACTION
- I - WARRANTY PERIOD
- GEBRUIKSAANWIJZING
- D-1 LUCHTDICHTHEIDSTEST
- VOORZORGSGMAATREGELEN:
- G - ARRUMACAO - MANUTENCAO
- D - MONTERING AVGASSBEHOLDEREN
- G-LAGRING-VEDLIKEHOLD
- G - SÄLYTYS - HUOLTO
- Using the appliance as a grill (Sekil 14-A/B)
Brand : CAMPINGAZ
Model : Party Grill 600
Category : Camping