
ZBHTR10WT - Thermostat NEDIS - Free user manual and instructions
Find the device manual for free ZBHTR10WT NEDIS in PDF.
| Product type | Zigbee radiator thermostat |
| Brand | Nedis |
| Model | ZBHTR10WT |
| Dimensions (L x W) | 89 x 57 mm |
| Interface nut | M30 x 1.5 mm |
| Weight | 192 g |
| Power supply | 3 VDC (2 AA batteries not included) |
| Max. radio transmission power | 9 dBm |
| Frequency range | 2405 - 2480 MHz |
| Wireless range | ≥30 meters outdoors |
| Temperature range (auto/manual mode) | 5°C to 30°C |
| Temperature range (frost protection mode) | 5°C to 15°C |
| Measurement temperature | 0°C to 50°C |
| Measurement intervals | 2 minutes |
| Valve stroke | 6 mm max |
| Noise level | <35 dBA |
| Ambient temperature | -20°C to 65°C |
| Storage temperature | 0°C to 40°C |
| Max. water temperature | 90°C |
| Environmental standards | RoHS |
| Main features | Auto, manual, frost protection modes; child lock; window detection; valve detection |
| Connectivity | Zigbee (requires Nedis Zigbee gateway) |
| Compatible app | Nedis SmartLife (iOS/Android) |
| Maintenance and cleaning | Clean with a soft, dry cloth. Do not use chemical products. |
| Safety | Use only non-rechargeable AA batteries. Observe polarity. Keep out of reach of children under 8 years old without supervision. |
| Spare parts and repairability | Repair only by a qualified technician. No user-serviceable parts. |
Frequently Asked Questions - ZBHTR10WT NEDIS
User questions about ZBHTR10WT NEDIS
0 question about this device. Answer the ones you know or ask your own.
Ask a new question about this device
Download the instructions for your Thermostat in PDF format for free! Find your manual ZBHTR10WT - NEDIS and take your electronic device back in hand. On this page are published all the documents necessary for the use of your device. ZBHTR10WT by NEDIS.
USER MANUAL ZBHTR10WT NEDIS
Zigbee Radiator Control
requires gateway WIFIZBxxx
ZBHTR10WT


Quick start guide 5

Kurzanleitung 10

natural_image
Cross-sectional diagram of a cylindrical battery with internal gears and external components (no text or symbols)
Zigbee Radiator Control
ZBHTR10WT
For more information see the extended manual online: ned.is/zbhtr10wt
Intended use
The Nedis ZBHTR10WT is a radiator thermostat.
This product requires the Nedis Zigbee Gateway (WIFIZBxxx) to use the product wirelessly.
The temperature can be set manually or via the Nedis SmartLife App.
The product is intended for indoor use only.
The product is not intended for professional use.
This product can be used by children aged from 8 years and above and persons with reduced physical, sensory or mental capabilities or lack of experience and knowledge if they have been given supervision or instruction concerning use of the product in a safe way and understand the hazards involved. Children shall not play with the product. Cleaning and user maintenance shall not be done by children without supervision.
Any modification of the product may have consequences for safety, warranty and proper functioning.
Specifications
| Product Zigbee Radiator Control | |
| Article number ZBHTR10WT | |
| Dimensions (I x w) 89 x 57 mm | |
| Interface nut M30 x 1.5 mm | |
| Weight 192g | |
| Power input DC3V (2x AA not included) | |
| Max. radio transmit power 9 dBm | |
| Frequency range 2405 - 2480 MHz | |
| Wireless distance ≥30 meters in open air | |
| Temperature settings range Automatic mode | 5 °C ~ 30 °C |
| Manual mode | 5 °C ~ 30 °C |
| Anti-freezing mode | 5 °C ~ 15 °C |
| Measurement temperature 0 °C ~ 50 °C | |
| Measurements intervals 2 minutes | |
| Valve stroke Max. 6 mm | |
| Noise level <35 dBa | |
| Environment temperature -20 °C ~ 65 °C | |
| Storage temperature 0 °C ~ 40 °C | |
| Max. water temperature 90 °C | |
| Environment standards RoHS | |
Main parts (image A)
① Ring nut
② Body
③ Thermostat wheel
④ LCD display
⑤ Fault
⑥ Low battery
⑦ Set temperature
⑧ Window detection
⑨ Automatic mode
⑩ Child lock
⑪ Network indicator
⑫ Installation mode
⑬ Manual mode
App overview (image B)
① Battery status
② Set temperature
③ Room temperature
④ Manual mode
⑤ Automatic mode
⑥ Child lock
⑦ Valve detection
⑧ Temperature dial
⑨ Temperature range
⑩ Anti-freezing mode
⑪ Window detection
Safety instructions
WARNING
- Ensure you have fully read and understood the instructions in this document before you install or use the product. Keep this document for future reference.
-
Only use the product as described in this document.
-
Do not use the product if a part is damaged or defective. Replace a damaged or defective product immediately.
- This product may only be serviced by a qualified technician for maintenance to reduce the risk of electric shock.
- Do not drop the product and avoid bumping.
- Keep distance from flammable objects.
- Do not expose the product to water or moisture.
- Children should be supervised to ensure that they do not play with the product.
- Always purchase the battery recommended by the product manufacturer for the product.
- Do not use any battery which is not designed for use with the equipment.
- Use only the cell or battery in the application for which it was intended.
- Do not mix cells of different manufacture, capacity, size or type within a product.
- Observe the plus (+) and minus (−) marks on the cell, battery and equipment and ensure correct use.
- Some wireless products may interfere with implantable medical devices and other medical equipment, such as pacemakers, cochlear implants and hearing aids. Consult the manufacturer of your medical equipment for more information.
- Do not use the product at locations where the use of wireless devices is prohibited due to potential interference with other electronic devices, which may cause safety hazards.
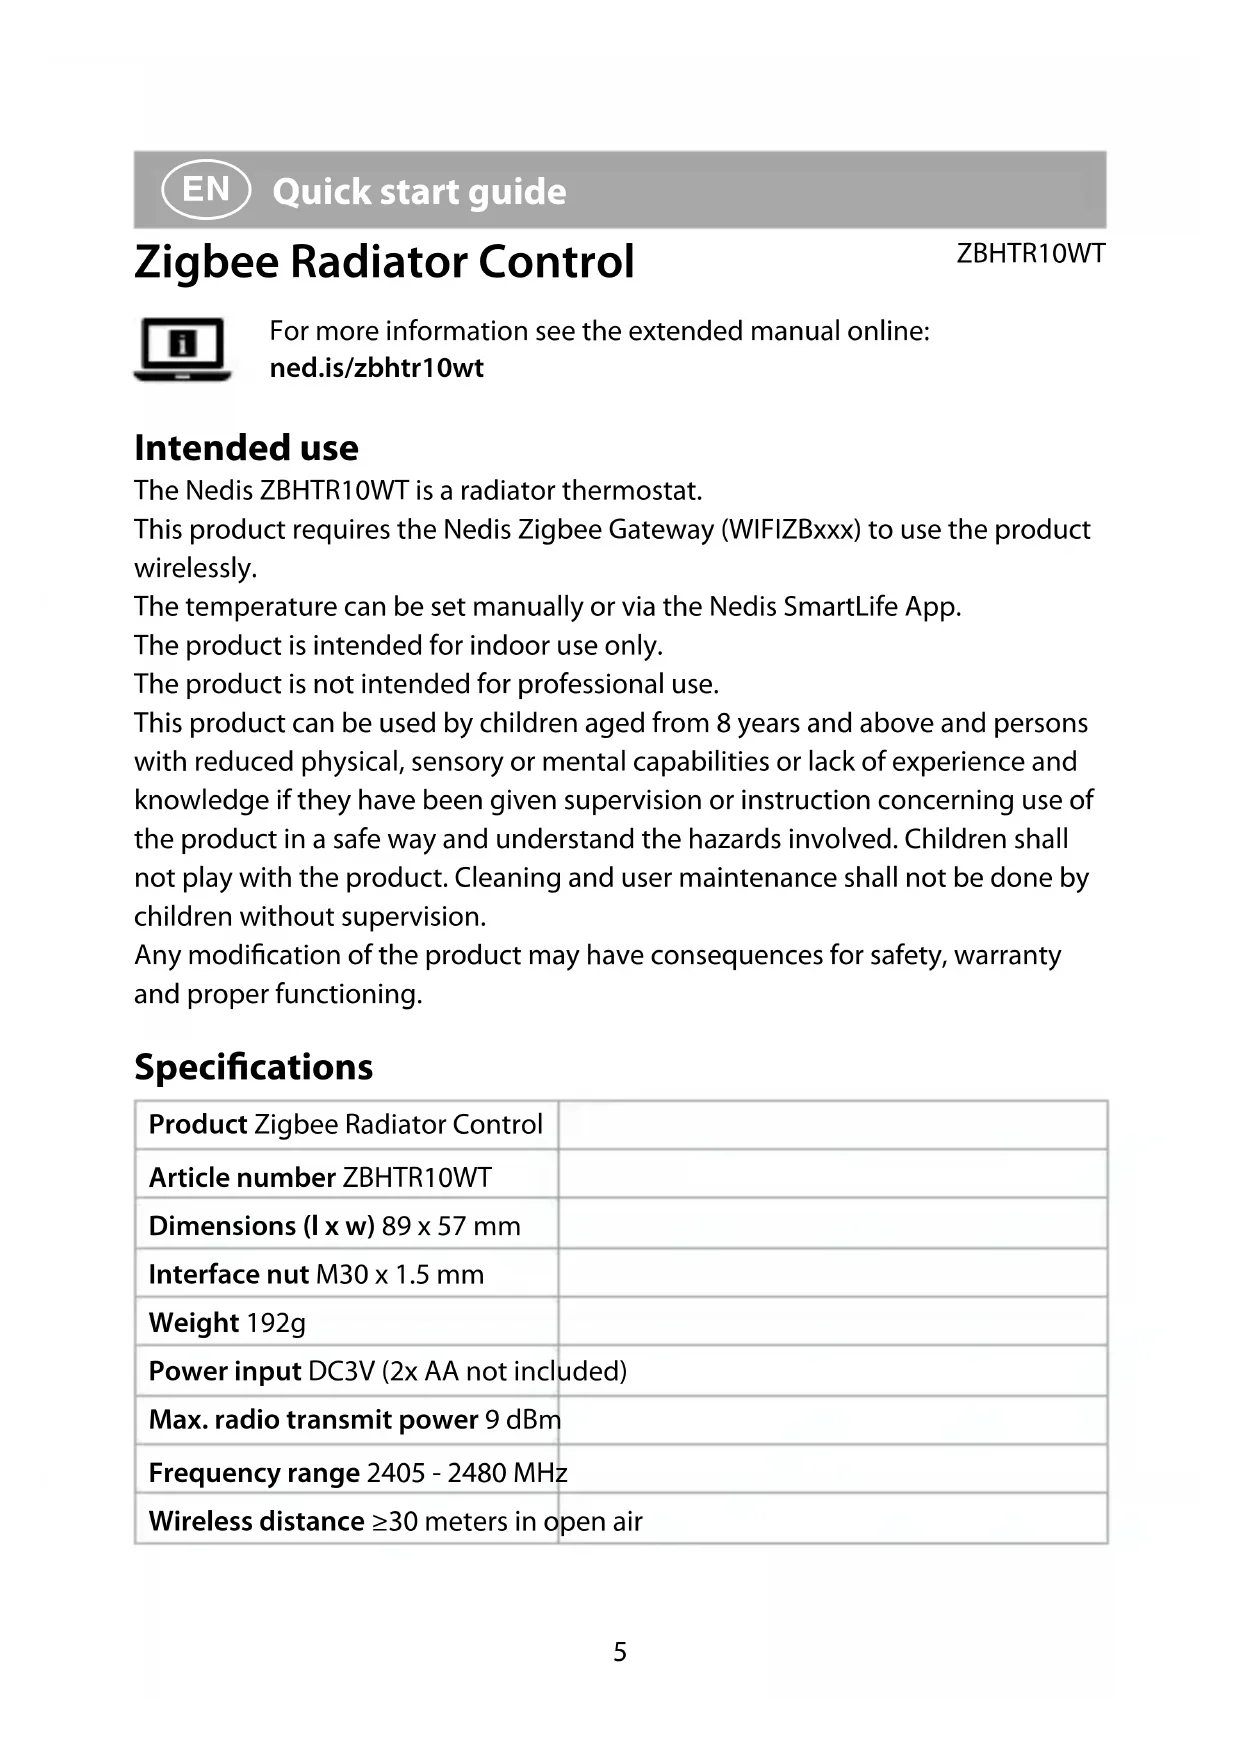
Placing the batteries (image C)
Use only size AA batteries for this product.
not use rechargeable batteries.
-
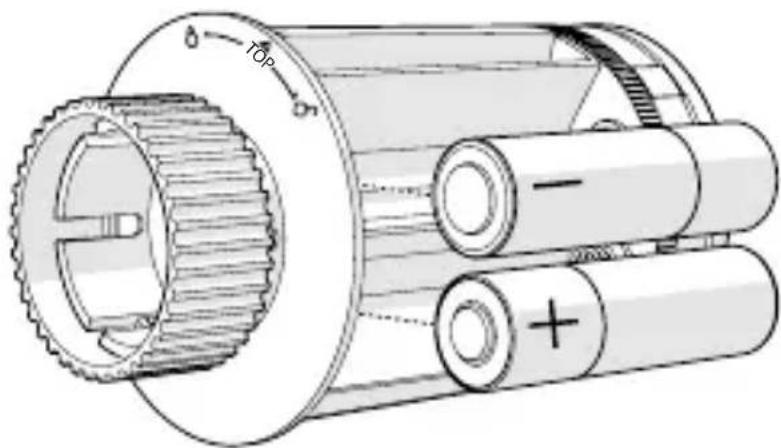
Rotate the body A② counterclockwise, and pull the body open.
-
Place 2 size AA batteries (not included) into the battery compartment.
Make sure to match the (+) and (-) polarity markings.
The current temperature A⑦ and installation mode A⑫ lights up on the LCD display A④.
-
Align the marking on A② to the 'TOP' marking on the ring nut A①.
-
Rotate A2 clockwise.
Switching between modes
- Press A④ to switch between three modes. Automatic mode A⑨, Manual mode A⑬ and Anti-freezing mode.
Automatic mode
To use the automatic mode, make sure that the thermostat is connected to the Nedis Zigbee gateway and your wi-fi network.
The thermostat automatically switches to the desired temperature.
- Double tap automatic mode B⑤ to add or change time schedules.
Automatic mode can be set at multiple temperatures.
For example: 21^ C when you are at home, 17^ C while you are sleeping and set at 15^ C when you are away from home.
Manual mode
- Rotate A4 to manually set the temperature.
The temperature will stay the same, unless you change the temperature again.
The temperature range is 5\~30°C.
Anti-freezing mode
- Set the thermostat at anti-freezing mode if you leave your home for a longer time. This will protect the water pipes from freezing at low temperatures.
The temperature range is 5\~15°C.
Set child lock
Set the child lock to prevent children from playing with the thermostat.
If the child lock is set, it locks all operations on the product.
- Press and hold A④ for more than 3 seconds to switch on the child lock.
The child lock symbol A ^10 appears on the display.
Press and hold A④ for more than 3 seconds to switch off the child lock.
Installing the Nedis SmartLife app
- Download the Nedis Smartlife app for Android or iOS on your phone via Google Play or the Apple App Store.
- Open the Nedis SmartLife app on your phone.
- Create an account with your mobile phone number or your e-mail address and tap Continue.
- Enter the received verification code.
-
Create a password and tap Done.
-
Tap Add Home to create a SmartLife Home.
- Set your location, choose the rooms you want to connect with and tap Done.
Connecting to the Zigbee gateway
Make sure the Zigbee gateway is connected to the Nedis SmartLife app.
For information on how to connect the gateway to the app, consult the manual of the gateway.
- Open the Nedis SmartLife app on your phone.
- Select the Zigbee gateway to enter the gateway interface.
- Tap Add subdevice.
- Quickly press A④ three times.
The network indicator A ^11 flashes.
The product appears in the app when the product is successfully connected to the gateway.
Using the app
- Open the Nedis SmartLife app on your phone.
Set the mode selection
- Tap the automatic button B⑤ for automatic mode. Tap it again to add or change time schedules.
- Tap the manual button B ④ for manual mode.
- Tap the anti-freezing button B⑩ for anti-freezing mode.
Set the temperature
- Drag the temperature dial B⑧ to set the temperature.
Set child lock
The child lock can be switched on or off in the app.
- Tap the child lock button B⑥ to switch the child lock on or off.
A⑩ switches on or off automatically.
Set window detection
If the thermostat detects an open window, the valve will be closed for 30 minutes to save energy.
The window detection is on by default.
- Tap the window detection button B⑪ to switch the window detection function on or off.
Set valve detection
The valve detection is on by default.
- Tap the valve detection button B⑦ to switch the valve detection function on or off.
Declaration of Conformity
We, Nedis B.V. declare as manufacturer that the product ZBHTR10WT from our brand Nedis ^® , produced in China, has been tested according to all relevant CE standards and regulations and that all tests have been passed successfully. This includes, but is not limited to the RED 2014/53/EU regulation.
The complete Declaration of Conformity (and the safety datasheet if applicable) can be found and downloaded via:
nedis.com/zbhtr10wt#support
For additional information regarding the compliance, contact the customer service:
Web: www.nedis.com
E-mail: service@nedis.com
Nedis B.V., de Tweeling 28
5215 MC 's-Hertogenbosch, the Netherlands

Kurzanleitung
ZBHTR10WT
Still inn barnesikring
Still inn temperaturen
- Dra temperaturskiven B⑧ for å stille inn temperaturen.
Still inn barnesikring
Barnesikringen kan slås av eller på i appen.
5215 MC 's-Hertogenbosch, the Netherlands
De Tweeling 28, 5215 MC 's-Hertogenbosch – The Netherlands 10/20
- Zigbee Radiator Control
- requires gateway WIFIZBxxx
- Intended use
- Main parts (image A)
- App overview (image B)
- Safety instructions
- WARNING
- Placing the batteries (image C)
- Switching between modes
- Automatic mode
- Manual mode
- Anti-freezing mode
- Set child lock
- Installing the Nedis SmartLife app
- Connecting to the Zigbee gateway
- Using the app
- Set the mode selection
- Set the temperature
- Set window detection
- Set valve detection
- Declaration of Conformity
- Kurzanleitung
- Still inn barnesikring
- Still inn temperaturen
Brand : NEDIS
Model : ZBHTR10WT
Category : Thermostat