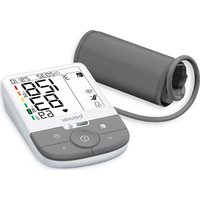
BC 87 - Blood pressure monitor BEURER - Free user manual and instructions
Find the device manual for free BC 87 BEURER in PDF.
| Product type | Wrist blood pressure monitor |
| Measurement method | Oscillometric, non-invasive |
| Measurement range (cuff pressure) | 0 – 299 mmHg |
| Measurement range (systolic pressure) | 60 – 230 mmHg |
| Measurement range (diastolic pressure) | 40 – 130 mmHg |
| Measurement range (pulse) | 40 – 199 beats/minute |
| Accuracy (pressure) | ±3 mmHg |
| Accuracy (pulse) | ±5% of displayed value |
| Memory | 2 x 120 values (2 users) |
| Wrist circumference | 13.5 – 21.5 cm |
| Power supply | 2 AAA 1.5 V batteries |
| Battery life | Approx. 200 measurements |
| Display | LCD screen with risk indicator |
| Positioning indicator | Integrated into the ON/OFF button (red/green) |
| Irregular heartbeat detection | Yes (symbol displayed) |
| Rest indicator (HSD) | Yes |
| Data transfer | Bluetooth Low Energy (2.402 – 2.480 MHz) |
| Operating conditions | +5°C to +40°C, 15 – 90% RH |
| Storage conditions | -20°C to +60°C, ≤93% RH |
| Protection rating | IP22 |
| Classification | Type BF, internal power supply |
| Supplied accessories | Cuff, instruction manual, quick guide, storage box, 2 AAA batteries |
| Cleaning | Slightly damp cloth, no detergent |
| Warranty | See provided warranty certificate |
Frequently Asked Questions - BC 87 BEURER
User questions about BC 87 BEURER
0 question about this device. Answer the ones you know or ask your own.
Ask a new question about this device
Download the instructions for your Blood pressure monitor in PDF format for free! Find your manual BC 87 - BEURER and take your electronic device back in hand. On this page are published all the documents necessary for the use of your device. BC 87 by BEURER.
USER MANUAL BC 87 BEURER
EN Blood pressure monitor
Instructions for use 22
FR Tensiometre
Mode d'emploi 39
ES Tensiometro
RU Pnp6op nIy I3MepeHnKpoBHaHO daBJIeHn
HCTpykui npnpimHeHHIO 110
PL Cisnieniomierz
Quelle: WHO, 1999 (World Health Organization)
Read these instructions for use carefully and keep them for later use. Make them accessible to other users and note the information they contain.
Table of contents
- Included in delivery 22
- Signs and symbols 23
- Intended use 24
4.Warnings and safety notes 24 - Device description 26
-
Initial use 27
-
Usage 29
- Cleaning and maintenance 35
- Remedy 36
- Disposal 37
- Technical specifications 37
12.Warranty/service 38
1. INCLUDED IN DELIVERY
Check that the exterior of the cardboard delivery packaging is intact and make sure that all contents are present. Before use, ensure that there is no visible damage to the device or accessories and that all packaging material has been removed. If you have any doubts, do not use the device and contact your retailer or the specified Customer Services address.
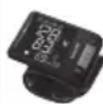
1 x wrist blood pressure monitor with cuff
1 x instructions for use
1 x quick guide
1x storage box
2 x 1.5 V LR03 AAA batteries
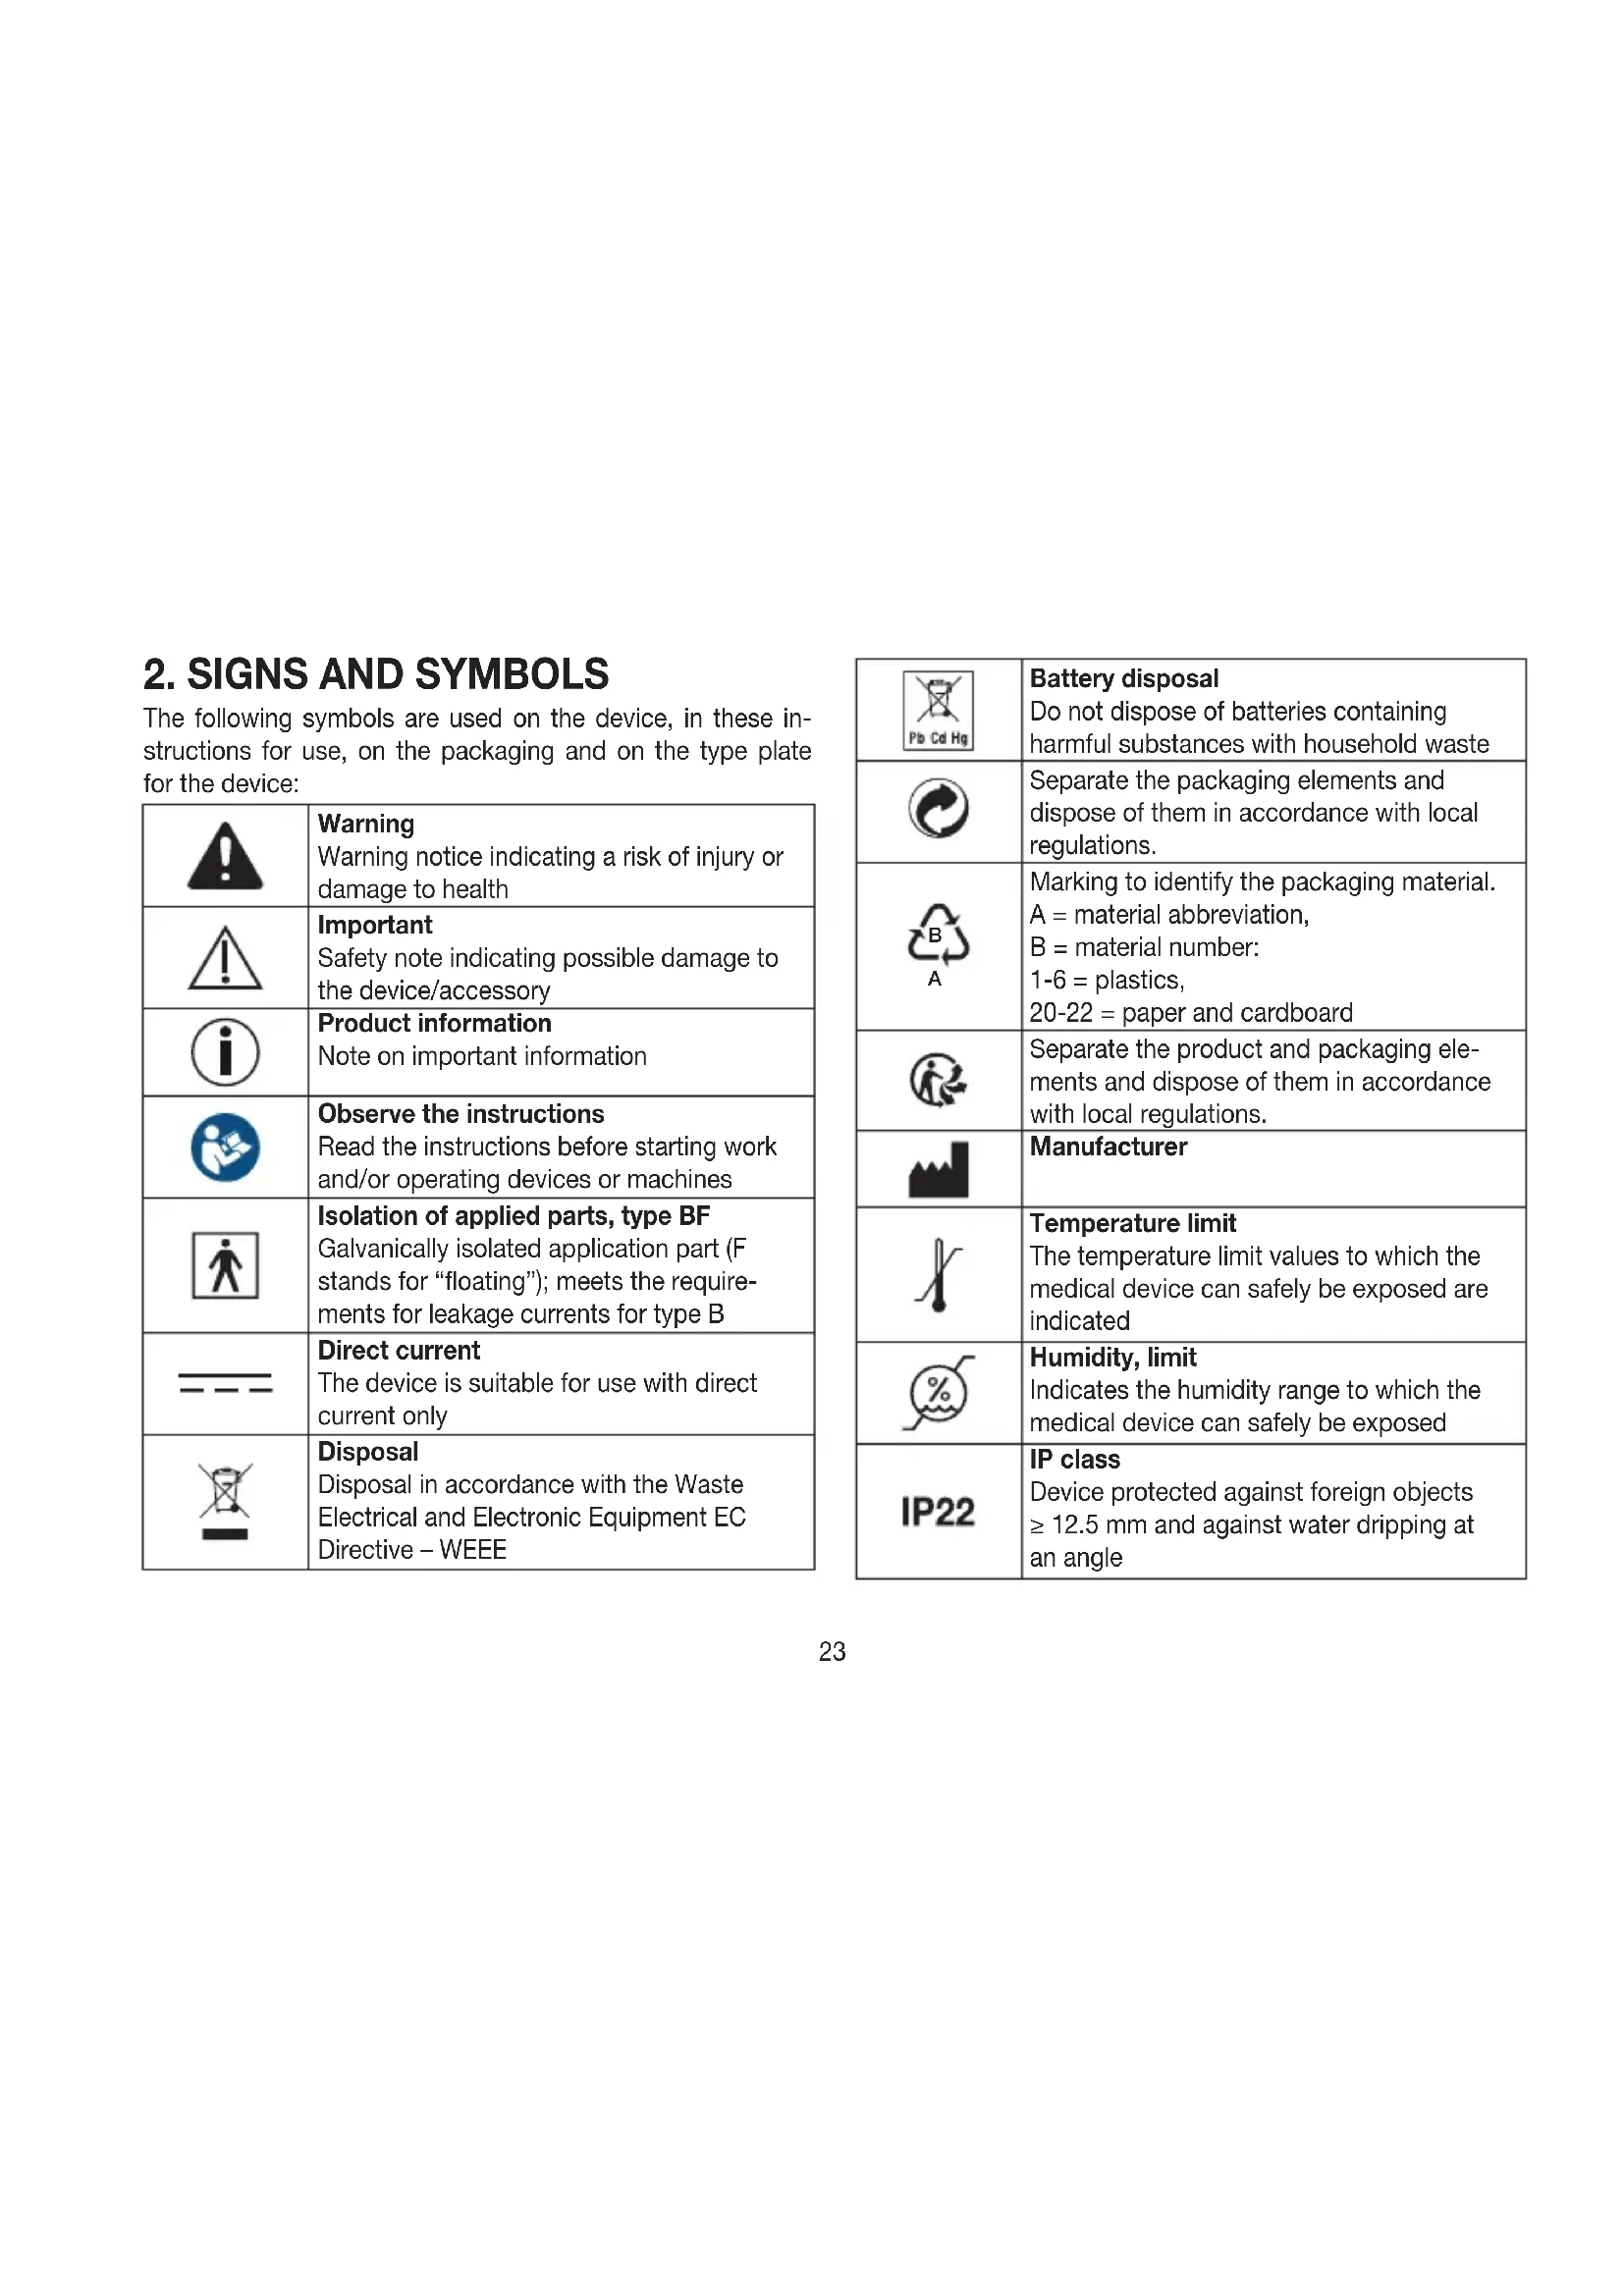
2. SIGNS AND SYMBOLS
The following symbols are used on the device, in these instructions for use, on the packaging and on the type plate for the device:
| Warning Warning notice indicating a risk of injury or damage to health | |
| Important Safety note indicating possible damage to the device/accessory | |
| Product information Note on important information | |
| Observe the instructions Read the instructions before starting work and/or operating devices or machines | |
| Isolation of applied parts, type BF Galvanically isolated application part (F stands for “floating”); meets the requirements for leakage currents for type B | |
| --- | Direct current The device is suitable for use with direct current only |
| Disposal Disposal in accordance with the Waste Electrical and Electronic Equipment EC Directive - WEEE |
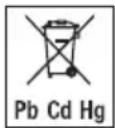
| Pb Cd Hg | Battery disposal Do not dispose of batteries containing harmful substances with household waste |
| Separate the packaging elements and dispose of them in accordance with local regulations. | |
| B A | Marking to identify the packaging material. A = material abbreviation, B = material number: 1-6 = plastics, 20-22 = paper and cardboard |
| Separate the product and packaging elements and dispose of them in accordance with local regulations. | |
| Manufacturer | |
| Temperature limit The temperature limit values to which the medical device can safely be exposed are indicated | |
| Humidity, limit Indicates the humidity range to which the medical device can safely be exposed | |
| IP22 | IP class Device protected against foreign objects ≥ 12.5 mm and against water dripping at an angle |
| SN | Serial number |
| REF | Item number |
| MD | Medical device |
| CE | CE labelling This product satisfies the requirements of the applicable European and national directives. |
| EC REP | Authorised representative in the European Community |
3. INTENDED USE
Purpose
The blood pressure monitor is intended for the fully automatic, non-invasive measurement of arterial blood pressure and pulse values on a wrist with a wrist circumference of 13.5cm to 21.5cm . It is intended for use indoors and by adults only.
Target group
It is designed for self-measurement by adults in the home environment and is suitable for users whose wrist circumference is within the range printed on the cuff.
Indication/clinical benefits
The user can record their blood pressure and pulse values quickly and easily using the device. The recorded values are classified according to internationally applicable guidelines
and evaluated graphically. The device saves the recorded measurements and can also output average values of previous measurements.
4. WARNINGS AND SAFETY NOTES
Contraindications
- Do not use the blood pressure monitor on newborns, children or pets.
- People with restricted physical, sensory or mental skills should be supervised by a person responsible for their safety and receive instructions from this person on how to use the device.
- If you have any of the following conditions, it is essential you consult your doctor before using the device: irregular heartbeat, circulatory problems, diabetes, pregnancy, pre-eclampsia, hypotension, chills, shaking
- People with pacemakers or other electrical implants should consult their doctor before using the device.
- The blood pressure monitor must not be used in connection with a high-frequency surgical unit.
- Do not use the cuff on people who have undergone a mastectomy.
- Do not place the cuff over wounds as this may cause further injury.
- Make sure that the cuff is not placed on a wrist in which the arteries or veins are undergoing medical treatment, e.g. intravascular access or intravascular therapy, or an arteriovenous (AV) shunt.

General warnings
- The measurements taken by you are for your information only - they are no substitute for a medical examination! Discuss the measured values with your doctor and never make your own medical decisions based on them (e.g. regarding dosages of medicines).
- The device is only intended for the purpose described in these instructions for use. The manufacturer is not liable for damage resulting from improper or incorrect use.
- Using the blood pressure monitor outside your home environment or whilst on the move (e.g. whilst travelling in a car, ambulance or helicopter, or whilst undertaking physical activity such as playing sport) can influence the measurement accuracy and cause incorrect measurements.
- Cardiovascular diseases may lead to incorrect measurements or have a detrimental effect on measurement accuracy.
- Do not use the device at the same time as other medical electrical devices (ME equipment). This could lead to a malfunction of the measuring device and/or an inaccurate measurement.
- Do not use the device outside of the specified storage and operating conditions. This could lead to incorrect measurements.
- Only use the cuffs included in delivery or cuffs described in these instructions for use for the device. Using another cuff may lead to measurement inaccuracies.
-
Note that when inflating the cuff, the functions of the limb in question may be impaired.
-
Do not perform measurements more frequently than necessary. Due to the restriction of blood flow, some bruising may occur.
- During the blood pressure measurement, the blood circulation must not be stopped for an unnecessarily long time. If the device malfunctions, remove the cuff from the wrist.
- Place the cuff on your wrist only. Do not place the cuff on other parts of the body.
- Small parts may present a choking hazard for small children if swallowed. They should therefore always be supervised.

General precautions
- The blood pressure monitor is made from precision and electronic components. The accuracy of the measurements and service life of the device depend on its careful handling.
- Protect the device from impacts, moisture, dirt, marked temperature fluctuations and direct sunlight.
- Ensure the device is at room temperature before measuring. If the measuring device has been stored close to the maximum or minimum storage and transport temperatures and is placed in an environment with a temperature of 20^ , it is recommended that you wait approx. 2 hours before using the measuring device.
- Do not drop the device.
-
Do not use the device in the vicinity of strong electromagnetic fields and keep it away from radio systems or mobile telephones.
-
We recommend that the batteries be removed if the device will not be used for a prolonged period of time.
Measures for handling batteries

- If your skin or eyes come into contact with battery fluid, rinse the affected areas with water and seek medical assistance.
- Choking hazard! Small children may swallow and choke on batteries. Therefore, batteries should be stored out of the reach of small children.
- Risk of explosion! Do not throw batteries into a fire.
- If a battery has leaked, put on protective gloves and clean the battery compartment with a dry cloth.
- Do not disassemble, open or crush the batteries.

-
Observe the plus (+) and minus (-) polarity signs.
-
Protect batteries from excessive heat.
- Do not charge or short-circuit the batteries.
- If the device is not to be used for a long period of time, remove the batteries from the battery compartment.
- Use identical or equivalent battery types only.
Always replace all batteries at the same time. - Do not use rechargeable batteries.

Notes on electromagnetic compatibility
- The device is suitable for use in all environments listed in these instructions for use, including domestic environments.
- The use of the device may be limited in the presence of electromagnetic disturbances. This could result in issues
such as error messages or the failure of the display/device.
- Avoid using this device directly next to other devices or stacked on top of other devices, as this could lead to faulty operation. If, however, it is necessary to use the device in the manner stated, this device as well as the other devices must be monitored to ensure they are working properly.
- The use of accessories other than those specified or provided by the manufacturer of this device can lead to an increase in electromagnetic emissions or a decrease in the device's electromagnetic immunity; this can result in faulty operation.
- Failure to comply with the above can impair the performance of the device.
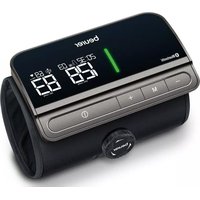
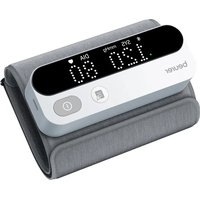
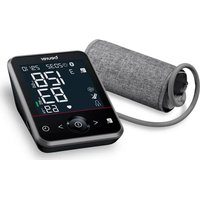
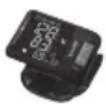
5. DEVICE DESCRIPTION
The corresponding drawings are shown on page 3.
1 Risk indicator
Memory button M2
2 Display
6 Battery compartment lid
3 Memory button M1
7 Wrist cuff
4 START/STOP button with integrated position indicator
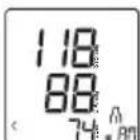
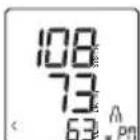
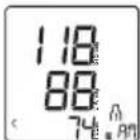
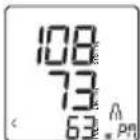
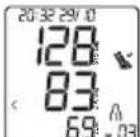
Information on the display:
The corresponding drawings are shown on page 3.
Time and date
7 Calculated pulse rate
2 Battery indicator
8 Symbol for irregular heartbeat Symbol for pulse
3 Symbol for Bluetooth® transfer
9 Risk indicator 10 Diastolic pressure
4 Resting indicator display
Systolic pressure
5 User memory
6 Number of memory spaces / memory display for average value (A), morning evening () Pn
6. INITIAL USE
Inserting the batteries
- Remove the battery compartment lid on the left side of the device A.
- Insert two 1.5 V AAA micro (alkaline type LR03) batteries. Make sure that the batteries are inserted the correct way round in accordance with the markings A Do not use rechargeable batteries.
- Close the battery compartment lid again carefully.
- Batches on the display. Now set the date and time as described below.
If the battery change symbol is flashing and BATE appears, no further measurements are possible and you must replace all batteries. Once the batteries have been removed from the device, the date and time must be set again. Any saved measured values are retained.
Adjusting the settings
You must make sure that the device has the correct settings before use in order to be able to make full use of all functions. Only by doing so can your measurements with associated date and time be saved and accessed later by you.
There are two different ways to access the menu from which you can adjust the settings:
- Before initial use and after each time you replace the battery:
When inserting batteries into the device, you will be taken to the relevant menu automatically. - If the batteries have already been inserted: With the device switched off press and hold the START/ STOP button for approx. 5 seconds.
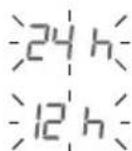
In this menu you can adjust the following settings in succession:

Hour format
The hour format flashes on the display.
- Select the desired hour format using the M1 or M2 memory button and confirm with the START/STOP button ①
Date
The year flashes on the display.
- Select the desired year using the M1 or M2 memory button and confirm with the START/STOP button

The month flashes on the display.
- Select the desired month using the M1 or M2 memory button and confirm with the START/STOP button ①.

The day flashes on the display.
- Select the desired day using the memory button M1 or M2 and confirm with the START/STOP button ①.

If the hour format is set as the day/month display sequence is reversed.
Time
The hours flash on the display.
- Select the desired hour using the M1 or M2 memory button and confirm with the START/STOP button ①

The minutes flash on the display.
- Select the desired minute using the M1 or M2 memory button and confirm with the START/STOP button ①.

Bluetooth®
The Bluetooth® symbol is shown on the display.
-
Use the M1 or M2 memory button to select whether automatic Bluetooth® data transfer should be activated (Bluetooth® symbol is shown) or deactivated (Bluetooth® symbol is not shown) and confirm with the START/STOP button ①
-
If automatic data transfer via Bluetooth® has been activated, data transfer is started automatically after the measurement.
Bluetooth® transfers will reduce the battery life.
User
The user symbol flashes in the display.
- Use the M1 or M2 memory button to select the desired user.

- Confirm your selection with the START/STOP button ①
- The device then switches off automatically.
7. USAGE
General information about blood pressure
- Blood pressure is always stated in the form of two values:
- The highest pressure is systolic blood pressure. This arises when the heart muscle contracts and blood is pumped into the blood vessels.
- The lowest pressure is diastolic blood pressure. This arises when the heart muscle has completely stretched back out and the heart fills with blood.
- Fluctuations in blood pressure are normal. Even during repeat measurements, considerable differences between the measured values may occur. One-off or irregular measurements therefore do not provide reliable information about the actual blood pressure. Reliable assessment is only possible when you perform the measurement regularly under comparable conditions.
Attaching the cuff
- Fundamentally, blood pressure can be measured on both wrists. Certain deviations between the measured blood pressure on the right wrist and left wrist are due to physiological causes and completely normal. You should always perform the measurement on the wrist with the highest blood pressure values. Before starting self-measurement, consult your doctor in this regard. From this point on, always take measurements on the same wrist.
- The device may only be operated with the cuff attached when supplied. Before using the device, the user should
check the fit of the cuff and, in doing so, ensure that their wrist circumference is within the range printed on the cuff.
- Uncover your wrist. Ensure that the circulation of the wrist is not hindered by tight clothing or similar.
- Now place the cuff on the wrist so that the palm of your hand and the device display are facing upwards [B1].
- Position the cuff so that there is a distance of 1.0 - 1.5cm between it and the heel of your hand [B2]
- Now fasten the cuff tightly around your wrist using the hook-and-loop fastener. Make sure that it is tight but that it does not cut into your wrist B3
Adopting the correct posture
- To carry out a blood pressure measurement, make sure you are sitting upright and comfortably. Lean back so your back is supported.
- Place your arm on a surface [C]
- Place your feet flat on the ground next to one another.
- The cuff must be level with your heart.
- Stay as still as possible during the measurement and do not speak.
Position indicator
As an additional application aid, the device has a position indicator built into the START/STOP button This is intended to help you determine the correct measuring position of the device at heart level and depends on the angle of observation.
| Display Interpretation | |
| Position indicator is coloured red D. | You have not yet reached the recommended position of the measuring device at heart level – your wrist is either positioned too high or too low. |
| Position indicator is coloured green; the word “OK” also appears E. | You have reached the recommended position of the measuring device at heart level and can start the measurement by pressing the START/STOP button ① |
In the vast majority of use cases, the position indicator provides an excellent guide as to whether the measuring device is at heart level. Due to physical differences such as size and/or physique on the user side, this function may not be helpful in all cases. If you feel that the wrist position according to the position indicator does not match the level of the heart, use your own judgement. You can also start the measurement in these cases at any time by pressing the START/STOP button ①.
Selecting the user
This device has 2 user memories with 120 memory spaces each in order that you can save measurements from 2 different people separately from each other.
If multiple people are using the device, make sure that the relevant user is set before each measurement.
Please refer to the section "Adjusting the settings" for information on how to select the desired user.
Performing the blood pressure measurement
Measurement
Press the START/STOP button to start the blood pressure monitor. All display elements are briefly displayed.
- The blood pressure monitor will begin the measurement automatically after approx. 3 seconds.
- The cuff inflates automatically while the actual measurement process starts. As soon as a pulse is found, the pulse symbol is displayed.
You can cancel the measurement at any time by pressing the START/STOP button
- The remaining air is released quickly once the measurement is complete.
- Systolic pressure, diastolic pressure and pulse measurements are displayed. A symbol in the display also appears which shows you whether you were sufficiently relaxed during the blood pressure measurement or not ( symbol = sufficiently at rest; symbol = not at rest). Observe the chapter on evaluating results/resting indicator measurement in these instructions for use.
- Press the START/STOP button ① to switch off the blood pressure monitor. The measurement is then stored in the selected user memory.
-
Appears if the measurement could not be performed properly. In this case, please read the section "What if there are problems?".
-
If the Bluetooth® function has been activated, the data transfer to the "beurer HealthManager Pro" app starts automatically after the measurement.
- The Bluetooth® symbol flashes on the display. The device now attempts to connect to the app for approx. 30 seconds.
- The Bluetooth® symbol stops flashing as soon as a connection is established. All measurement data is transferred to the apps. Once the data transfer is successfully complete, the device switches off automatically.
- If a connection to the smartphone cannot be established after 30 seconds, the Bluetooth® symbol goes out and the device switches off automatically after 1 minute.
- If you forget to turn off the device, it will switch off automatically after approx. 1 minute. In this case too, the value is stored in the selected or most recently used user memory.
Transfer of measurements via Bluetooth®
In addition to displaying and saving your measurements locally on the device, you have the option of transferring your measurements to your smartphone using Bluetooth® low energy technology.
For this, you will need the "beurer HealthManager Pro" app. These apps are available for free in the Apple App Store and from Google Play.
System requirements: List of compatible
- iOS ≥ 12.0 / Android™ ≥ 8.0
- Bluetooth® ≥ 4.0

devices:
To transfer the measured values, proceed as follows:
Step 1: BC 87
Activate the Bluetooth® function on your device as described in the "Adjusting the settings" section.

Step 2: "beurer HealthManager Pro" app
In the "beurer HealthManager Pro" app, add the BC 87 under Settings / Devices and follow the instructions.
Step 3: BC 87
Take a measurement.


Step 4: BC 87
(Data transfer immediately following the measurement):
If the Bluetooth® function is activated, data will be automatically transferred after the measurement.
Step 4: BC 87
(Data transfer at a later point):
Go into the memory recall mode for the desired user memory (see "Saving, accessing and deleting measured values"). The data transfer starts automatically.
Also note the following information:
- When connecting for the first time, a randomly generated six-digit PIN code is displayed on the device, and at the same time an input field appears on the smartphone in which you must enter this six-digit PIN code. After successfully entering the code, the device will be connected to your smartphone.
- Ensure that the "beurer HealthManager Pro" app on your smartphone is always activated and launched when you start the data transfer on the device.
- You can tell that the data transfer is in progress by the Bluetooth® symbol shown on the display.
- If your smartphone has a protective cover, remove it to ensure that there is no interference during the transfer.
Evaluating the results
General information about blood pressure
- Blood pressure is the force with which the bloodstream presses against the arterial walls. Arterial blood pressure constantly changes in the course of a cardiac cycle.
-
Blood pressure is always stated in the form of two values: - The highest pressure in the cycle is called systolic blood pressure. This arises when the heart muscle contracts and blood is pumped into the blood vessels.
-
The lowest is diastolic blood pressure, which is when the heart muscle has completely stretched back out and the heart fills with blood.
-
Fluctuations in blood pressure are normal. Even during repeat measurements, considerable differences between the measured values may occur. One-off or irregular measurements therefore do not provide reliable information about the actual blood pressure. Reliable assessment is only possible when you perform the measurement regularly under comparable conditions.
Risk indicator
The World Health Organization (WHO) has defined the internationally recognised classification for the evaluation of measured blood pressure values listed in the table below:
| Measured blood pressure value range | Classification | Colour of the risk indicator | |
| Systole (in mmHg) | Diastole (in mmHg) | ||
| ≥180≥110 | High blood pressure stage 3 (severe) | Red | |
| 160–17910 | 0–109 | High blood pressure stage 2 (moderate) | Orange |
| 140–15990 | –99 | High blood pressure stage 1 (mild) | Yellow |
| 130–13985 | –89 High normal | normal Green | |
| 120–12980 | –84 Normal | Green | |
| <120<80 Optimal Green | |||
Source: WHO, 1999 (World Health Organization)
The risk indicator (the arrow in the display and the associated scale on the device) shows which category the recorded blood pressure values fall into. If the measured values are in two different classifications (e.g. systole in the high normal category and diastole in the normal category), the risk indicator then always shows you the higher category - "high normal" in the example described.
Please be aware that these standard values can only serve as a general guideline, as the individual blood pressure varies in different people and different age groups, etc.
Furthermore, it must be noted that measurements taken yourself while at home are generally lower than those that are taken by the doctor. For this reason, it is important that you regularly consult your doctor for advice. Only they are able
to give you your personal target values for controlled blood pressure – in particular if you receive medicinal therapy.
Irregular heartbeat
This device can identify any irregular heartbeat disturbances as part of the analysis of your recorded pulse signal during blood pressure measurement. In this case, after the measurement, the device will indicate any irregularities in your pulse by displaying the symbol in the display. This can be an indicator for irregular heartbeat.
If the symbol appears on the display after the measurement, the measurement must be repeated as the measurement accuracy may be impaired. To assess your blood pressure, only use the results that have been recorded without corresponding irregularities in your pulse. If the symbol appears frequently, please consult your doctor. Only they can establish the existence of an arrhythmia during a checkup, using their means of diagnosis.
Resting indicator
One of the most common errors made when taking a blood pressure measurement is not ensuring that the user's circulatory system is sufficiently at rest when taking the measurement. In this case, the measured systolic and diastolic blood pressure values do not correspond to the blood pressure at rest. However, it is this blood pressure at rest that should be used to assess the measured values.
This blood pressure monitor uses integrated haemodynamic stability diagnostics (HSD) to measure the user's haemodynamic stability when taking the blood pressure measurement.
This enables it to indicate whether the blood pressure was taken when the user's circulatory system was sufficiently at rest.
| The measured blood pressure value was ob-tained when the user's circulatory system was sufficiently at rest and reliably corresponds to the blood pressure at rest. | |
| Indicates that the value was obtained when the user's circulatory system was not sufficiently at rest. The blood pressure values measured in this case generally do not correspond to the blood pressure at rest. The measurement should therefore be repeated after a period of physical and mental rest lasting at least 5 minutes. | |
| No resting indicator symbol is displayed | During the measurement it was not possible to determine whether the user's circulatory system was sufficiently at rest. In this case too, the measurement should be repeated after a period of rest lasting at least 5 minutes. |
If the user's circulatory system was not sufficiently at rest, this can be caused by various factors such as physical or mental strain or distraction, speaking, or experiencing irregular heartbeat during the measurement.
In an overwhelming number of cases, HSD will give a very good guide as to whether the user's circulatory system is rested when taking a blood pressure measurement.
However, certain patients suffering from irregular heartbeat or chronic mental conditions may remain haemodynamically unstable even in the long-term, something which persists even after repeated periods of rest. The accuracy of the results for the blood pressure at rest is reduced in these users.
Like any medical measurement method, the precision of HSD is limited and can lead to incorrect results in some cases. Nevertheless, the blood pressure measurements taken when the user's circulatory system is sufficiently at rest represent particularly reliable results.
Saving, accessing and deleting measured values
User memory
The results of every successful measurement are stored together with the date and time. The oldest measurement is overwritten in the event of more than 120 measurements.
- To select the relevant user memory, press the memory button M1 (for user or M2 (for user memory when the device is switched off. Then confirm your selection by pressing the START/STOP button ①
- If Bluetooth® is activated (the 3 symbol flashes on the display), the blood pressure monitor attempts to connect to the app. The buttons are deactivated and the 3 symbol ceases to flash as soon as a connection is established and the data is transferred.
If you press the M1 or M2 memory button during this process, the transfer is cancelled. The symbol is no longer shown.
Average values
Press the M1 memory button. Then confirm your selection by pressing the START/STOP button ①
- R shown in the display.
The average value of all saved measured values in this user memory is displayed.
Press the M1 memory button.
- is shown in the display.
The average value of the morning measurements for the last 7 days is displayed (morning:5 a.m.-9 a.m.).
Press the M1 memory button.
- P is shown in the display.
The average value of the evening measurements for the last 7 days is displayed (evening:6 p.m.-8 p.m.).
Individual measured values
- When you press the memory button M1 again, the last individual measurement is displayed (in this example, measurement 03).
- When you press the memory button M1 again, you can view your individual measurements.
- To switch the device off again, press the START/STOP button ①


Deleting measured values
- In order to delete a user memory, first select the user memory to be deleted by pressing the M1 or M2 memory button when the device is switched off and confirming your selection by pressing the START/STOP button ①
- The average value of all measurements for the selected user memory appears on the display; at the same time R lights up on the display.
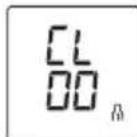
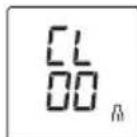
- Now press and hold the memory buttons M1 and M2 at the same time for 5 seconds.
CL00 appears on the display.
All the values in the selected user memory have now been deleted.
You can exit the menu at any time by pressing the START/STOP button
8. CLEANING AND MAINTENANCE
- Clean the device and cuff carefully using a slightly damp cloth only.
- Do not use any cleaning agents or solvents.
- Under no circumstances hold the device and cuff under water, as this can cause liquid to enter and damage the device and cuff.
- If you store the device and cuff, do not place heavy objects on the device and cuff. Remove the batteries.
9. REMEDY
| Error message | Possible cause Solution | tion |
| Er1 | Unable to record a pulse. | Please wait one minute and repeat the measurement. Ensure that you do not speak or move during the measurement. |
| Er2 | You moved or spoke during the measurement. | |
| Er3 The cuff is not attached correctly. | Please observe the information in chapter “Attaching the cuff” and take another measurement after one minute. | |
| Er4 | An error occurred during the measurement. | Please wait one minute and repeat the measurement. Ensure that you do not speak or move during the measurement. If the error occurs repeatedly, consult a doctor to check you are healthy. |
| Error message | Possible cause Solution | |
| Er5 | The inflation pressure is higher than 300 mmHg. | Please take another measurement to check whether the cuff can be correctly inflated. |
| The measured values are outside the specified measurement range. | ||
| BATE LO The | The batteries are almost empty. | Insert new batteries into the device. |
| Er7 | Unable to transfer the data via Bluetooth®. | Please observe the information in the section “Transfer of measurements via Bluetooth®”. |
| Er8 | A device error has occurred. | Please wait one minute and repeat the measurement. |
If the problem still occurs despite the suggested corrective actions, please contact Customer Services.
10. DISPOSAL

Repairing and disposing of the device
- Do not repair or adjust the device yourself. Proper operation can no longer be guaranteed in this case.
- Do not open the device. Failure to comply with this instruction will void the warranty.
- Repairs must only be carried out by Customer Services or authorised retailers. Before making a claim, please check the batteries first and replace them if necessary.
- For environmental reasons, do not dispose of the device in the household waste at the end of its useful life.
Dispose of the device at a suitable local collection or recycling point in your country. Dispose of the device in accordance with EC Directive - WEEE
(Waste Electrical and Electronic Equipment). If you have any questions, please contact the local authorities responsible for waste disposal.


Disposing of the batteries
- Batteries must not be disposed of in the household waste. They may contain poisonous heavy metals and are subject to special refuse treatment.
- The codes below are printed on batteries containing harmful substances:
Pb = Battery contains lead,
Cd = Battery contains cadmium, Hg = Battery contains mercury.
11. TECHNICAL SPECIFICATIONS
Model no. BC 87
Measurement method Oscillometric, non-invasive blood pressure measurement on the wrist
Measurement range Cuff pressure 0-299 mmHg,
systolic 60-230 mmHg,
diastolic 40-130 mmHg,
pulse 40-199 beats/minute
Display accuracy Systolic ± 3 mmHg,
diastolic ± 3mmHg
pulse ± 5% of the value shown
Measurement uncertainty
Max. permissible standard deviation
according to clinical testing:
systolic 8mmHg /
diastolic 8mmHg
Memory 2 x 120 memory spaces
Dimensions L 72 mm x W 96 mm x H 71 mm
Weight Approximately 119g
(without batteries, with cuff)
Cuff size 135 to 215mm
Permissible operating conditions
+5°C to +40°C, 15-90% relative humidity (non-condensing),
700-1060 hPa ambient air pressure
Permissible storage
-20°C to +60°C,
and transport
≤ 93% relative humidity
conditions
| Power supply 2 x 1.5 V AAA batteries |
| Battery life For approx. 200 measurements, depending on blood pressure and inflation pressure levels |
| Classification Internal supply, IP22, no AP or APG, continuous operation, application part type BF |
| Software version A01 |
| Data transfer 2402 MHz – 2480 MHz frequency bandMax. -2.5 dBm transmission powerThe blood pressure monitor usesBluetooth® low energy technologyCompatible with Bluetooth® ≥4.0 smartphones/tablets |
The serial number is located on the device or in the battery compartment.
Technical information is subject to change without notification to allow for updates.
- This device complies with the European standard EN 60601-1-2 (in compliance with CISPR 11, IEC 61000-4-2, IEC 61000-4-3, IEC 61000-4-8) and is subject to special precautionary measures with regard to electromagnetic compatibility. Please note that portable and mobile HF communication systems may interfere with this device.
- This device complies with EU Directive 93/42/EEC concerning medical devices, the Medizinproduktegesetz
(German Medical Devices Act) and IEC 80601-2-30 (Medical electrical equipment - Part 2-30: Particular requirements for basic safety and essential performance of automated non-invasive sphygmomanometers).
- The accuracy of the blood pressure monitor has been carefully checked. No calibration is required.
- The device has been developed with regard to a long useful life. The expected operating life is 5 years.
- If the device is used for commercial medical purposes, it must be regularly tested for accuracy by appropriate means. Precise instructions for checking accuracy may be requested from the service address.
- We hereby confirm that this product complies with the European RED Directive 2014/53/EU. The CE Declaration of Conformity for this product can be found at: www.beurer.com/web/we-landingpages/de/cedclarationofconformity.php
12. WARRANTY/SERVICE
Further information on the warranty and warranty conditions can be found in the warranty leaflet supplied.
FRANÇAIS

Mesures relatives aux piles

Dimensions L 72 mm x I 96 mm x H 71 mm
Poids Environ 119 g
Passo 2: App "beurer HealthManager Pro"
Ekranda gun goftergesi yanip soner.
OchOBHbIe Mepbl IpeDoctopoxKHOCTN
He pa36npaTe, He oKpbBaIte n He pa36nBaIte 6aTapeiKn.

- 06paaIte BHMaHne Ha o6o3HaHeHne nOJIaPHOCTn: pIOc (+) mHyc (-)
3aunuaiTe 6aTapeKn ot Ype3MepHoro Bo3dienCTBnA Tennla.
He 3apjaKeTe n He 3ambikaKe 6aTapeeKn HakoPOTKO.
-
Ecπn npnbop dntteNbHoe BpeM He nCnoNb3yeTc, n3BneKeTe n3 Hero 6aTaapeKn.
-
IcnoIb3yIte 6aTapeKn TOnbKO Ondoro Tnna nn paBHOeHHbIX TnIOB.
Bcerda 3aMeHnTe Bce 6aTapeKn cpa3y.
He nCnoIb3yIte aKkymyIaTOpbl!

Yka3aHnI NO 3JIeKTPOMarHnTHoB BMECTUMOCTN
- Pnp6op npedHa3NaeH nIpa6oTb I yCIOBnX, nepeHNCJIeHHbIX B HAcTOJUeN IHCTpyKUIN IO npIMHeHnIO, B TOM YNCNE B DOMaWHNX YCIOBnX.
-Пин haINuHn 3JIeKTpOMaRHTbIX NOMEX BO3MOXHOCTn nCpOJIb3OBaHnI np6opa MOrYT 6bITb OrpaHueHbI. B 3tOM cIyae BO3MOxHbI, K npIMepy, COo6UeHnIob OwN6kax IIn BBIXoD n3 CTPOJ DNcPJIe IIn Camoro np6opa.
He nCnoNb3yIte daHnBbI np6Op pIOM C dpYrMn yCTpoIcTBaMn I He ycTaHaBJIbAaIe erO Ha Hnx - 3TO MOKeT Bbl3BaTb c6oN B pa6Ote. EcIn np6Op BCE Jx
PnIXoIITcA NCIOJIb3OBAbB OINCAHHbIX BblIe YCIOBNyx, CneJyET Ha6JIHOaTb 3a HIM IN dpyrMn yCTpOiCTBaMN, YTO6bI y6eINTbcR B IN HAJIeXaUe paOte.
- PpimHeHne cToPOHHx npHaJnHexKHOCTe, OTNuAIOUxC8 OYka3aHHbIX pOn3BOJTeJem NIN pPnIaRaEmbIX K DaHHOMy np6Opy, MOKeT pPnBeCTN K Bo3paCTaHIO 3JIeKTPoMaHHTbIX NOMex NIN OcJa6NeHIO NOMExOyCTOuHBOCTN np6Opa N TEM CaMbIM Bbl3BaTbOu6Kn B erO pa6Ote.
- HecobJIOeHHe daHHoro yka3aHnMoKeT OTPucaTeNbOcKa3aTbCra Ha pa6oHx xapaKTePncTnKax np6opa.
5.ОПИСАНЕ ПИБОРА
PncyHKn, COOTBETCTBYUJIe O6O3HaueHnM HnKe, npeIcTaBJIeHbI Ha cTp. 3.
1 INHdkaTOp pncka
5 KhoNka coXpaHeHnMa2
2 Ducnnne
6 KpbuKa oTceKa dna 6a-Tapeek
3 KhoIIka coXpaHnM1
7 MaHKeTa Ha 3aIpaTbe
4 KhoNka BkJI./BbIKI. ①BCTpoEHHoi INHnKauMe npaBnIbHO rnoJKeHHa
HdkauaHa dncnnee
PncyHKn, COOTBETCTBYUOJIne 06o3HaueHnIaM HIXKe, npeIcTaBJIeHbI Ha cTp.3.
1 Bpemn ndata
7 N3MepeHHoe 3NaueHne 即CTOTbI NyIbCa
2 INHdkaTop ypoBn3apya 6aTaapeek
8 CmBol hapuweHn cepdeHoro pITMa CmBol npIbca
3 Cnmbon npepaun daHbIX no Bluetooth®
4 DnCnneNnHnKaTopa COCTOHNIOKOR
9 INHdkaTOp pncka
5 TJIb3OBaTeNbckaTnAMrTb
10ДиactoJIuYeCKoe daB-NeHne
6 HmepaeyeKn namrN/HHnKauncoxpaHeHoroBnamrN cpeHero 3HaueHnra, yTpeHero n3MepeHnaBeueHero n3MepeHna()Pn
Ha nciPiee Mrraet HndnKaZna DnA.
C NOMOJI KHOKN COXpAHEN M1nnM2 Bbl6epNTe HxKnBn DeHb N NOITBepDte Bbl- 6op HaxaTneM KHONK BKJl./BblKI. ①


EcnIyBpeMeHn Bb6npaetc foOpMaTTo6paKeHHNHaNCna N MecaUa MeHraTc MeCTaM.
Bpem
Ha nciJIee 3amirae HndkaZna Yacob.
C NOMOsbIO KHONKn COxpaHeHnM1 nIIM2 BbI6epNTe HxKHOe 3HaueHne IaYacOB INoDTBepDnTe BbI6Op HaxKaTHem KhoNKn BKJI./BbIKJI. ①
Ha nncnnee 3amirae tHndkaunmNHyT.
C NOMOsbIO KHONKo CoxpaHeHnM1 nM2 BbI6epTe HyXHoe 3HaueHne InMa MNHyT N IOdTBePdTe BbI6Op HxKaTHeM KHONKn BKJI./BbIKJ. ①
Bluetooth®
Ha nciPiee mIraeT cIMBON Bluetooth®.
C NOMOUIKHOOK COXPAHnM1nnM2 BKNIOHTe (3amraet CMBON Bluetooth®) nn OTKIOHTe (CMBON Bluetooth® He 6ydt OTObpaKaTbcr Ha DnCnJIee) ABTomaTHueCKyIO aKTIBaUIO nepeaun daHHbIX NO Bluetooth® n noTBePdTe BbIOp HaxKaTneM KHOIKN BKJ./BblKn. ①
- Пи akTиВиPoBaHmДaHHoN ФунКцИч epe3 Bluetooth 3aIyckпepeaun DaHHbIX nPOnCXOdNT aBToMaTuYeCKn cpa3y nocIe u3MepeHn.
Ipnpepaee daHbix c nOmoBIO Bluetothcpok cnjx6bl 6aataeek cokpauaetcra.
Pojlb3OBaTeJIb
Ha dncnlee 3amnraet cmboI noJIb3OBAteBckOn naMRTN.
C nOMOJIbIO KHOJOK COXpAHEnIaM1 uIN M2 BbI6epITe HxKHyIO NOLb3OBaTeJIbCKyIO naMRTb.
-ПодтбердTe Bыбop НжаТиЕм KнОпКВКЛ./БыКЛ. ①.
- Pocne 3toro np6op aBToMaTHeCKn BbIKIOHTcra.
7. ПРУМЕHEHNE
06zaHΦopMaζηo KpOByHOM daBJIeHn
KpoBraHoe daBJIeHne BceIa yKa3bIbaETcB BnIe DByx 3HaueHn.
CnCTOJIuHecKoe aptepnaIbHOe daBHeHne -3TO MaKcIMaJIbHOe daBHeHne B apTepaJIbHOH cnCTeme. OHO pa3BnuBaETcra 3a CHT COKpaUeHHa cepDeHOn MbIuCbI, TEm CAMblbIaBnBAra KPOBb B COcybl.
-ДиactoJIuueckoe apTepeNaJIbHoe daBJeHne -3TO MnHIMaJIbHoe daBJeHne B apTepeNaJIbHOJ cnCTeMe. Oho pa3BnBaetc3a cHT paccna6JIeHncapeHuMbIuCiI n cepDze 3anOJIHReTc KPOBIO.
Kone6aHApTePnAIBHOrO DaBHeHn - HopMaIbHoe RaBHeHne. JAnke npNIOBTOPHOM N3MepeHHN NOKa3aTeJIN DaBHeHn MOyT 3aMeTHO OTNIuATbcra Dpyr OTdpyra. OTeJIbHbIE INHeperyIrpHbIE N3MepeHHN He No3BOJIaIOT COCTABITb OBekTNBHOe cyXKeHne O paKTtueckOM DaBHeHn. IOCTOBepHna OceHKa BO3MOxHa JINb B TOM
cIyue,ecn pepyraHPO npoBOuNTb N3MepeHnB OOnHaKOBbIX ycIOBnX.
HaioxheMeHxkTebl
- KaK npaBnIO, KpOBAHoe DaBJIeHne MoXHO n3MepeTb Ha o6oNx 3aIaCTbJx. OnpedeJIeHHbIe OTKNOHeHn MExkDy n3MepeHHbIM apTePnAJIbHbIM DaBJIeHnEM Ha npaBOM I JeBOM 3aIaCTbe obycIOBJIeHbI φn3IOJorUeCKnM NOC6eHHocTAMn I a6COJIOTHO HopMaJIbHbI. Bcerda npOBODTe n3MepeHnHa 3aIaCTbe C 60Jee BbICOKIMN POKa3aTeJIaMn DaBJIeHn. Ipeed TEM KApNCtynaTb K n3MepeHHo CBOero DaBJIeHn, IpPOKcYbTIpyITcBc C BpaOHm. IocNe 3TOrO n3MepeTte DaBJIeHne Bcerda Ha ODNOM I TOM Xe 3aIaCTbe.
- Pππδop pa3pewaaetcN CNOJb3OBaTb TOLbKO C npOHO pπKpεπJIeHHo K Hemy MaHXeToB B NOCTaBJrEMOM COCTOHN. Ipeep N CNOJb3OBaHHeM pπδopa N OJIb3OBaTeNb DOnJKeH NPOBepNT, NODXoNT JIM MaHXeTa N Opa3mepy, N y6eNTbC8 B TOM, YTO dInHa 0xbata 3aIЯCTbHaxoDTcB NpeDeJax yka3aHHOrO Ha MaHXeTe Dnana3OHa.
- OroJnte 3aIacTbe. CneJnte 3a Tem, YTO6bl KPOBOcHa6-JxHHe 3aIcTb He 6blNO HApUSeHO n3-3a CnIIJKOM y3-Koro pykaba BaWei OJekDbl n T. n.
- HanoxxTe MaXkety Ha 3aIaCTbe TaK, YTO6bl JaHObH nDnCnIe npu60pa 6blnn O6paueHb BBepx B1
- PpocneIte 3a TEM, yTo6bI MExdy MaHKeToI n NoDyWueKoY oCHOBaHn8 BoIbWoTO nAJIbUa OCTaBAnOcbpacCToRHe1,0-1,5cm B2
Почно 3acteHNTe MaXkety BOKpyr 3anrCTbC NOMO- ьо 3actexkn-lnyu. CneHnte 3a Tem, YTO6bl MaHxeta nnotHO npnIerana, HO He cdaBnBaNA 3anrCTbe B3.
PpabnJIbHoe nOIOXeHne TeJa
- Iydo6Hoe noIOxKeHne. PnucnoHTecb cINHOI K POBHOI NOBepxHOCTN.
- Плобжктуpeун ha onopy C
- NocTaBbTe cTynHn poBHO Ha nOJI.
MaHKeTa DoJXHa HaxOuTbCra Ha yPoBHe cepIua. - Bo Bpemn 3MpeHn CneJeT BcTe N cNoKoHn H He pa3roBapnBaTb.
Hnka npabnbHoro noJoxehna
IINOMOUII ONb3OBATEIO B pIn6ope IMeETcN HINKIAU INPABUNBHOI NOJXEHNA, BCTPOEHHA B KONKY BKNI./ BblKn. 10Ha DOnjXHa NMOUY ONpeDenITb pABUNBHOE NOJXEHNE pIn6opa Ha ypoBHe cepua n 3aBnCnT OT Yrna 3peHn.
TbI n3MepeHn Ha cMapTfoH npn NMOuN BluteoH low energy technology.
ДяЗТOro Bam Tpe6yETc npIIOxKeHne «beurer HealthManager Pro».ОндocTynblДЯбecПаTHoro cka-ИваньВApple App Store n Google Play.
CnCTeMHbIe Tpe6oBaHm: Cnncok noDepxuBae
MbIXyCTpOINCTB:

Ipeepaunn3MepeHHbIX 3HaueHn BblONHHTe CneDyUoune DeJCTBn:
War 1: BC 87
AknBupyTe yHKuHb Bluetooth Ha CBOEM np6ope, kAc 3To OnicaHO BrnaBe «BbIOnHeHne HacTpoEK


War 2:пучения «beurer HealthManager Pro»
(OTNoXeHHa nepeDaay daHHbIX)
IpeeIITBe B pexkM Bbl30Ba namrTn (cm. «CoxpaheneHne, Bbl3OB u ydaenHe N3-MepeHHbIX 3HaueHnI») Inny HxKHOIb3ObaTeNbCKoI naTn.Ipepaa daHHbIX 3aNyCTTcra ABTomatueckn
Kpome toro,obpatnte BHIMAHHe Ha cJeIyIOJIe yKa3aHnA.
- Ppi nepbOM coeHHeHH Ha npnbOpoe 6ydet noka3aH cnUaHc ReheepnOBaHHb IeCTn3HaHbI INH-KoD, OndHOBPemHHO Ha cMapTfoHe NOBHTcN POJIe IJRA BBOda 3toro INH-KoDA. Pocne ycneuHorO BBOda npnbOp coeHNHReTcC o CMapTfoHOM.
- Y6eIntecb, yTO npu 3ayncKe nepedaH daHHbIX C npi6o-pa Ha BaWem cMapTfohe 3aynueHo n OTkpBTo npinoo-JxHe beurer HealthManager Pro.
Tekyu npereaay daHHbIX MOXHO ONpeJeNTb NO CmBOJy Bluetooth® oTo6paxKaemomy Ha ducnnee. - Uto6bI o6ecneuHb 6ecpebeHyu nepeaHy daHHbIX, npn Heo6xOUMOCTN CHIMITE yexon co CMapTfoHa.
OueHka pe3yIbTaTOB
06za HOpMaun O KpOBAHOM DaBJeHN
KpOBAHoe DaBHeHne npEcdTAbJreT co6o Cnny, c KOTOpoi KpOBoToK DaBHT Ha CTeHN apTePN. ApTePNaIbHOe DaBHeHne NocToHHO I3MeHReTCB TeueHne cepDeHOro UIKna.
KpoBraHoe daBHeHne Bcerda yKa3bIBaETcB BnIe DByX 3HaueHn.
-Bepxhee daBneHne B cepJeHOM zKJHe Ha3bIbaeTc
CnCTOJIuueckm apTepeaIbHbIM daBHeHem. OHO BO3Hkaet, KOrda cepJeHra MblUca cokpauaeTcR, BBdABINBAKPOBB B COcybl.
HnxHe TaBHe - nAcToIueCKe apTePnaHbHOe DaBHe, KOtOpoe Bo3nKaeT npN pONHom paCCna6BeHm cepDeHou MbIuBy HAnOJIHeHn CepDkaKPOBbIO.
Kone6aHnApTePnAInbHoro DaBHeHn - HopMaIbHoe RaBHeHne. Daxe npNIOBTOPHOM N3MepeHn NOKa3aTeLnn DaBHeHn MOyT 3aMeTHO OTINuATbcr dpyr OT dpyra. OTeJbHbIE INN HeperyJIrpHbE IN3MepeHn He I03BOJIaIOT COCTaBtB ObBeKTNBHOe CyXdHne O fakTueckOM DaBHeHn. DoCTOBepHa OceHka BO3MOxHa JINuB B TOM Cnyuae, ecn peRyIpaHo IpOBoDHTb IN3MepeHn B ODNHAKOBbIX YcNOBnX.
HdMkaTOp pncKa
B Tablne Hxke npuBeHa onpeJeHna BO3 (BceMnPHoI opraHn3auee 3paBOOxApeHna) n npn3HaHHa
BO BCem Mipe KJIaccnФkaucny IJRA OUeHKN N3MepeHHbIX 3HaueHNI KPOBraHOrO daBHeHIN:
HdkaTop coctoHn nokO
Onda n3 Han6oee pacnpoctpaHbIx Own6ok npn n3MepeHHKPOBHO rAabHeHr -OTcyTCTBne y NOnb3OBaTeJIaDOCTaTOHcNOKOHOro KPOBOO6paueHnHa MOMeHT n3MepeHHra. B 3tOM cnyae n3MepeHHoe 3NaueHne CnCTOJIueckoRo n dnaCTOJIueCKoro daBHeHn He OTobpaKaet KPOBHOe daBHeHne NOKo, Ho erO BCE Je CJeDuYET NcNoJb3OBaTb dIraOceHKn n3MepeHHbIX 3HaueHn.
B daHOM np6ope nI IN3Mepen H KPOBHO rABHeHn IcNoJIb3yeTcBCTpoEHnA dHaHOctNk rEmOInHAMHeCKo CTa6NJbHOCTn (HSD), KOtOpA IN3MepaET rEmOINHAMueCKyIO cTA6NJbHOCTb NOJb3OBaTeNl BO BpEM IN3Mepen H KPOBHO rABHeHn I N03BOJrE TNOJyUHTb INΦOpMaHIO O TOM, IN3MepeHO JN KPOBHOe DABHeHne pN DOCTaTOHOCnOKOHOM KPOBOO6paueHm.
Cnmbol
HdN-
KaTopa
coCTO-
JHIN
IOKO
He
OTobpa-
Xaetc
Bo Bpemn 3MpeHn He ydaIocb onpeJeITb,
YBJIeTcnn KPOBOO6paueHne DoCTaTOH0
CtOKoHbIM. IN B 3Tom Cnyae n3MepeHne Heo6-
XODIMO NOBOTOpNb NocNe OTdbIXa PPODOnKIn-
TeJbHOCTbIO He MeHee 5 MNHyT.
HedocTaTOUHO CnOKoHoe KpOBoo6paueHne MoKet 6bITb Bbl3BaHO pa3JIuHbIMN npuHAMN, HApuMep fN3UHeCKmHnHaPpy3kAMN, MeHTaJIbHbIM HapRjXeHMe/OTBJeUeHMe BHNMaHn, pa3ROBopAMn IIN HApUWeHnMn CepDeHOro pNTMa BO Bpem N3MpeHn.
B noDabJIIOUeM 6oJIbUIINHCTBe CnyaEB DnaIHOCTnKa TEmOHNAMHHeCKoI CTaBUNbHOCTN Daet DOCTOBepHbIe CBeDeHnO TOM, I3MepeJIOcB JN KPOBIAHOE daJIeHne PnCNOKOHOM KPOBOO6paueHn.
HekotopbIe naueHbI c HapuWeHnMn cepdeHoro pHTMa IIN B COCToAHN MInTeJIbHOrO yMCTBeHHORo HAnpJxHeH NMOy T DOnIroe Bpem AocBaTbcra ReMoDInHaMHcckn Hecta- 6nIbHbIMn DaKe NocLe HECKOJIbKnx NepepbIOB Ha OTdbIX. ToUHOCTb OnpedeneHnApTePnAJIbHOrO daBJIeHn NOKoB B DAHHOM Cnyae MoKeT 6blb OrpaHnYeHa.
IinaHocTnKa remOHaHmUeCKo CTa6bJbHOCTN, KaK n IIO6a I3MePntelbHaer MeToDnKa, IMeet OraPAnuHcyTOuyHOCTb ONpeJeHnI N MOKeT B OTdEhBbIX Cnyaax npIBoNDtB K OTObpaXeHnO HnPaBnJbHbIX NOKa3aTeJIe. Pe3yIbTaTbI 3MepEnr KpOBaHOrO daBHeNry, pni KOtOpOM
6bIyo yCTaHOBJIeHO HAIUNHe CNOKOINHO KPOBOO6paUeHnA, YBJIaOTc HAnEXHHbIMN.
CoxpaHeHne, npocMoTp u ydaJeHne pe3yIbTaTOB n3MepeHn
PoiIb3OBAteJIbCKa IamrTb
Pe3yNbTaTb KaKdOrO yCNeuHoro n3MepeHn coXpaHIOTCc cYka3aHHeM DaTb N BpeMeHn n3MepeHn. KOrda konIueCTBO coXpaHeHHbIX pe3yNbTaTOB n3MepeHn npEbbIaet 120,6oJIee paHHne daHHbe nepe3aNNcbIAOTc.
-Дя Вьбopa COOTBeTCTByUошe NOlb3OBaTeNbckOЯ
namrHa BbIKIIOueHHOM np6ope HaxMITE KhONKy coXpaHEnMa M1 (ДЯ NOlb3OBaTeNЯ NmN M2
(ДЯ NOlb3OBaTeNbCKOЯ namrNЯ).ПОТВерпTe Bbl6op haxTaHem KhoNkBKN./BbIKI. ①
- Ecnn Bluetooth® aktubipoban (ha dinclnee oTo6pkaetcmaHouu cnmboJ, npnbop dIy n3MepenKPOBHOIO DaBHeNn PbItaeTcY cTaHOBNTb CoeHNHeHne C npNJIOXeHem. NocJe yCTaHOBHeNn CoeHNHeHn B IpoceCEpepaDn daHHbIX KHOKN HeaKTNBbl, a CNMBO1 TOpNT NOCTOARHNO.
EcnB3TO BpemHaKaTb KhoNky CoXpaHeHnM1nn M2,peepaHa npepBeTc.CmB0n 8ncye3Het c dnc- nIe.
CpeHnne 3NaueHnna
Haxmnte KhoNky coxpaHEny M1. NoTBePdTe BbIOp HaxaTneM KhoNKn BKJI./BblKJI. ①

Ha dncnnee 3amnraet
- OTo6pa3ntcpeDHee 3HaueHHe BCex COxpaHeHHbIX B DaHHo NOpIb3OBaTeJIbCKO nAmrTn pe3yIbTaTOB n3MepeHn.
HaxmTe KhONky coXpaHeHnM1.
Ha dncnnee 3amnraet
- OTo6pa3ntcrapeHHe 3NaueHne pe3yIbTaTOB yTpeHHnx n3MepeHn 3a nocJeHne 7 dHe (ytpo:05:00-09:00).
HaxmTe KhONky coXpaHeHnM1.
Ha dncnnee 3amnraet Pn.
- OTo6pa3ntcrapeDHee 3NaueHne pe3yIb-TaTOB BeuePnX n3MepeHn 3a noCJeHne 7 dHei (Beep: 18:00-20:00).
OTdIbHbIe pe3yIbTaTbI n3MepeHn
- Pn NOBTOPH M HAKATN KHONK COxpaHEnM1 Ha nCJIeE OTO6pa3NTcpe3yJbTat NocJeHrO n3MepeHn (B KaYeCTBe PnpMepa nCNOJb3yETc n3MepeHne 03).
- EcJn eUe pa3 HaxaTb KHOHky COXpaHeHMa M1, MoKHO npOCMOTpeTb pe3yNbTaTbI OTJeHBbIX N3MepeHn.
- Yto6bI BHO8b BBIKJIOHTb npn6op, HaxMMTe KhoNky BKJI./BbIKJI. ①
YdaJIeHne pe3yNbTaTOB n3MepeHnA
YTO6bI ydaJIITb CODEpKIMoe COOTBeTCTByIOUeIN NOB3OBaTeJIbCKoN NaMRTN, CHaJALBaBI6epNTe NOLb3OBATeJIbCKyIO NaMRTb, HAXaB Ha BIKLIHOHOM PnIbOpe KHOJky COxpaHeHm M1 IN M2 IN NOITBepDInTe BblOp HaxKaTneM KHOJKN BKJl./BbIKL. ①
Ha nucnnee oTo6paxkaetc CpeHee 3NaueHne BCex n3mepenBbI6paHHo Nolb3OBaTeBJCKO NaMRTN, naPapJIeJbHO Ha nucnnee ropnt R
- Haxmnte o6e KhoNk CoXpaHeHnM1 u M2 u yepKuBaIte ux HaxaTbIMn B TeueHne 5 cekyHd.
Ha ducnnee noBntcCL00
Bce 3NaueHnra Tekyu e nnoIb3oBaTeIbckOINamrtn6ydyT ydaJeHbl.
BbIITN3 MeHIO MOXHO BJIIO6OE BpEma HaxKaB KHONky BKJ./BbIK. ①
8. OYNCTKA N YXOD
OuetaTe np6op mMaHKeTy cOctopoXHoCTbIO. NcNoIb3yTe TOnbKO CnERKa yBnaXHeHHyO CaIpeTKy.
He nCnoJIb3yIte yHCTaIe cpeIcTBa nn pactBOpNTeJn.
- Hn B Koem Cnyae He onyckaIte npnbOp mHaXkeTy B BODY, TAK KAK nonaHaHne BoDbI npNBeTe K nobpeXdeHIO np6opa n MaXKeTbl.
- Pn xpaHEn Hc CtaBbTe Ha npnbop mHaJKeTyr TaKeIy IpeMeTbI. N3BLeKnte 6aTapeKn.
9. YCTPAHEHNE ПОБЛЕмbl
11. TEXHnueCKne DAHHbIE
No moDen BC 87
Zródlo: WHO, 1999 (World Health Organization)
12. GWARANCJA/SERWIS
4. WAARSCHUWINGEN EN VEILIGHEIDSRICHTLIJNEN
Contra-indications
BESCHRIJVING VAN HET APPARAAT
Bron: WHO, 1999 (World Health Organization)
Kilde: WHO, 1999 (World Health Organization)
8 Symbol for oregelbunden härtrytm Symbol for puls
3 Symbol for Bluetooth®-overföring 8
Kilde: WHO, 1999 (World Health Organization)
Pa displayet vises CL 00
The ME EQUIPMENT or ME SYSTEM is suitable for home healthcare environments.
Warning Don't near active HF surgical equipment and the RF shielded room of an ME system for magnetic resonance imaging, where the intensity of EM disturbances is high.
Warning Use of this equipment adjacent to or stacked with other equipment should be avoided because it could result in improper operation. If such use is necessary, this equipment and the other equipment should be observed to verify that they are operating normally.
Warning Use of accessories, transducers and cables other than those specified or provided by the manufacturer of this equipment could result in increased electromagnetic emissions or decreased electromagnetic immunity of this equipment and result in improper operation.
Warning Portable RF communications equipment (including peripherals such as antenna cables and external antennas) should be used no closer than 30~cm (12 inches) to any part of the equipment BC 87, including cables specified by the manufacturer. Otherwise, degradation of the performance of this equipment could result.
Technical description
1.1 all necessary instructions for maintaining BASIC SAFETY and ESSENTIAL PERFORMANCE with regard to electromagnetic disturbances for the excepted service life.
2. Guidance and manufacturer's declaration -electromagnetic emissions and Immunity
Table 1
| Guidance and manufacturer's declaration - electromagnetic emissions | |
| Emissions test Compliance | |
| RF emissions CISPR 11 | Group 1 |
| RF emissions CISPR 11 | Class B |
| Harmonic emissions IEC 61000-3-2 | Not applicable |
| Voltage fluctuations/flicker emissions IEC 61000-3-3 | Not applicable |
Table 2
| Guidance and manufacturer's declaration - electromagnetic Immunity | ||
| Immunity test IEC 60601-1-2 Test level | Compliance level | |
| Electrostatic discharge (ESD) IEC 61000-4-2 | ±8 kV contact ±2 kV, ±4 kV, ±8 kV, ±15 kV air | ±8 kV contact ±2 kV, ±4 kV, ±8 kV, ±15 kV air |
| Electrical fast transient/burst IEC 61000-4-4 | Not applicable Not applicable | applicable |
| Surge IEC61000-4-5 | Not applicable Not applicable | applicable |
| Voltage dips, short interruptions and voltage variations on power supply input lines IEC 61000-4-11 | Not applicable | Not applicable |
| Power frequency magnetic field IEC 61000-4-8 | 30 A/m 50Hz/60Hz | 30 A/m 50Hz/60Hz |
| Conduced RF IEC61000-4-6 | Not applicable | Not applicable |
| Radiated RF IEC61000-4-3 | 10 V/m80 MHz - 2,7 GHz80 % AM at 1 kHz | 10 V/m80 MHz - 2,7 GHz80 % AM at 1 kHz |
| NOTE UT is the a.c. mains voltage prior to application of the test level. | ||
Table 3
| Guidance and manufacturer's declaration - electromagnetic Immunity | |||||||
| Radiated RF IEC61000-4-3 (Test specifications for ENCLOSURE PORTIMMUNITY to RF wireless communications equipment) | Test Frequency (MHz) | Band (MHz) | Service Modulation Modulation Modulation (W) | Distance (m) | MMUNITY TEST LEVEL (V/m) | ||
| 385 380-390 TETRA | 400 | Pulse modulation b) 18Hz | 1.8 0.3 27 | ||||
| 450 430-470 GMRS 460 | FRS 460 | FM c) 5kHz deviation 1kHz sine | 2 0.3 28 | ||||
| 710 704-787 LTE Band | 13,17 | Pulse modulation b) 217Hz | 0.2 0.3 9 | ||||
| 745 | |||||||
| 780 | |||||||
| 810 800-960 GSM | 800/900, TETRA 800, iDEN 820, CDMA 850, LTE Band 5 | Pulse modulation b) 18Hz | 2 0.3 28 | ||||
| 870 | |||||||
| 930 | |||||||
| 1720 1700-1990 | GSM 1800;CDMA 1900;GSM 1900;DECT;LTE Band 1,3,4,25; UMTS | Pulse modulation b)217Hz | 2 0.3 28 | ||||
| 1845 | |||||||
| 1970 | |||||||
| 2450 2400-2570 | Bluetooth,WLAN,802.11b/g/n, RFID2450,LTEBand 7 | Pulse modulation217 Hz | 2 0.3 28 | ||||
| 5240 5100-5800 | WLAN802.11a/n | Pulse modulation217 Hz | 0.2 0.3 9 | ||||
| 5500 | |||||||
| 5785 | |||||||
TheeBtooth word mark and logos are registered trademarks owned by Bluetooth SIG, Inc. and any use of such marks by Beurer GmbH is under license. Other trademarks and trade names are those of their respective owners.
Apple and the Apple logo are trademarks of Apple Inc., registered in the U.S. and other countries. App Store is a service mark of Apple Inc., registered in the U.S. and other countries.
Google Play and the Google Play logo are trademarks of Google LLC.
Android is a trademark of Google LLC.
| Guangdong Transtek Medical Electronics Co., Ltd. Zone A, No.105, Dongli Road, Torch Development District, Zhongshan, 528437, Guangdong, China | |
| EC|REP| | Medical Device Safety Service GmbH, Schiffgraben 41, 30175 Hannover, Germany |
| BEURER GmbH, Söflinger Str. 218, 89077 Ulm (Germany) www.beurer.com, www.beurer-blutdruck.de www.beurer-gesundheitsratgeber.com, www.beurer-healthguide.com | |
CE0123