
BM 96 Cardio - Blood pressure monitor BEURER - Free user manual and instructions
Find the device manual for free BM 96 Cardio BEURER in PDF.

User questions about BM 96 Cardio BEURER
0 question about this device. Answer the ones you know or ask your own.
Ask a new question about this device
Download the instructions for your Blood pressure monitor in PDF format for free! Find your manual BM 96 Cardio - BEURER and take your electronic device back in hand. On this page are published all the documents necessary for the use of your device. BM 96 Cardio by BEURER.
USER MANUAL BM 96 Cardio BEURER
natural_image
Medical device with digital display and cord, no visible text or symbols on main bodyDE Blutdruckmessgerät mit EKG-Funktion Gebrauchsanweisung....2
EN Blood pressure monitor with ECG function Instructions for use....37
FR Tensiomètre avec fonction ECG
Mode d'emploi .... 70
ES Tensiómetro con función de ECG
Instrucciones de uso......103
IT Misuratore di pressione con funzione ECG
Istruzioni per l'uso .... 137
natural_image
Illustration of a human wrist with a bandage and cord (no text or symbols)natural_image
Illustration of a medical procedure showing a hand holding a tool near the forearm (no text or symbols present)natural_image
Illustration of a hand holding a cable or wire inside a circular opening (no text or symbols)natural_image
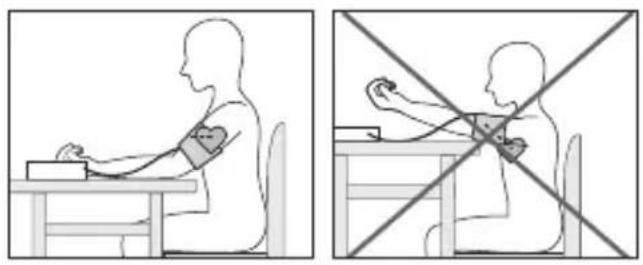
Two-panel illustration showing a person performing a heart valve on a table and another seated in a chair with an X-shaped barrier symbol (no text or labels)Quelle: WHO, 1999 (World Health Organization)
Vorhofflimmern
Read these instructions for use carefully and keep them for later use, be sure to make them accessible to other users and observe the information they contain.
Dear customer,
Thank you for choosing a product from our range. Our name stands for high-quality, thoroughly tested products for applications in the areas of heat, weight, blood pressure, body temperature, pulse, gentle therapy, massage, beauty, baby and air.
With kind regards,
Your Beurer team
Table of contents
- Included in delivery ....38
- Signs and symbols....38
- Intended use ....39
- Warnings and safety notes....41
- Device description....44
- Initial use 46
-
Usage (blood pressure) 47
-
Usage (ECG)....55
- Cleaning and maintenance....63
- Accessories and replacement parts 63
- What if there are problems? 64
- Disposal 66
- Technical specifications ....66
- Warranty/service 68
1. Included in delivery
Check that the exterior of the cardboard delivery packaging is intact and make sure that all contents are present. Before use, ensure that there is no visible damage to the device or accessories and that all packaging material has been removed. If you have any doubts, do not use the device and contact your retailer or the specified Customer Service address.
1x blood pressure monitor with ECG function
1x ECG stick
1x upper arm cuff (22-42 cm)
1x USB cable
4x 1.5V AA batteries (LR6)
1x storage pouch
1x instructions for use
1x quick start guide
1x annex for attending doctor
2. Signs and symbols
The following symbols are used on the device, in these instructions for use, on the packaging and on the type plate for the device:
 | WarningWarning notice indicating a risk of injury or damage to health |  PAP PAP | Dispose of packaging in an environmentally friendly manner |
 | ImportantSafety note indicating possible damage to the device/accessory |  | Manufacturer |
 | Product informationNote on important information | Storage/Transport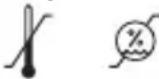 | Permissible storage and transport temperature and humidity |
 | Observe the instructionsRead the instructions before starting work and/or operating devices or machines | Operating | Permissible operating temperature and humidity |
 | Isolation of applied parts, type BFGalvanically isolated application part (F stands for “floating”); meets the requirements for leakage currents for type BF | IP21 | Protected against solid foreign objects 12.5 mm in diameter and larger, and against vertically falling drops of water |
 | Application part type CF Serial number | SN | |
 | Direct currentThe device is suitable for use with direct current only | CE0483 | CE labellingThis product satisfies the requirements of the applicable European and national directives. |
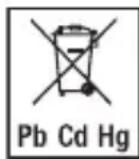
 | Disposal in accordance with the Waste Electrical and Electronic Equipment EC Directive – WEEE | Pb Cd Hg | Do not dispose of batteries containing hazardous substances with household waste |
3. Intended use
Intended use
The blood pressure monitor with ECG function is used to carry out non-invasive measurement and of the arterial blood pressure values on the upper arm and to calculate the heart rhythm.
The device provides information about the average pulse as well as changes in the heart rhythm. Using a Bluetooth ^® connection, the recorded electrocardiogram (ECG) can be read out on a smartphone and printed out for further examination by a doctor.
It is designed for self-measurement by adults in the home environment.
Target group
When taking the ECG measurement, the device provides information about the average pulse and any changes in the heart rhythm. The blood pressure measurement is suitable for adult users whose upper arm circumference is within the range printed on the cuff. The ECG measurement is suitable for all adult users who can independently take a recording based on lead one, two or three (see chapter 8 on using the ECG).
Clinical benefits
The user can record their blood pressure and pulse values quickly and easily using the device. The ECG stick is used to calculate the heart rhythm. The device provides information about your average pulse value as well as any divergence from a normal ECG.
The recorded values of blood pressure measurement are classified according to internationally applicable guidelines and evaluated graphically. Furthermore, the device can detect any irregular heart beats that occur during measurement and inform the user via a symbol in the display. The device saves the recorded measurements and can also output average values of previous measurements. This blood pressure monitor also has a haemodynamic stability display, which is referred to as a resting indicator throughout these instructions for use. This shows whether you, and consequently your circulatory system, are sufficiently at rest when the blood pressure measurement is being taken, and whether the measured blood pressure thus corresponds to your blood pressure when at rest. Read more about this under “Resting indicator” in the section on using the device. The recorded data can provide healthcare service providers with support during the diagnosis and treatment of blood pressure problems, and therefore plays a part in the long-term monitoring of the users health.
Indication
In the event of hypertension or hypotension, the user can independently monitor their blood pressure and pulse values as well as arrhythmia at home. However, the user does not need to be suffering from hypertension or arrhythmia in order to use the device.
Contraindications
- Do not use the blood pressure monitor with ECG function on newborns, children or pets.
- People with restricted physical, sensory or mental skills should be supervised by a person responsible for their safety and receive instructions from this person on how to use the device.
- If you have any of the following conditions, it is essential you consult your doctor before using the device: cardiac arrhythmia, circulatory problems, diabetes, pregnancy, pre-eclampsia, hypotension, chills, shaking.
- Do not use the device if you have implanted electrical implants (e.g. pacemaker).
- Do not use the device if you have metal implants.
- Do not use the cuff on people who have undergone a mastectomy.
- Do not place the cuff over wounds as this may cause further injury.
- Make sure that the cuff is not placed on an arm in which the arteries or veins are undergoing medical treatment, e.g. intravascular access or intravascular therapy, or an arteriovenous (AV) shunt.
- Do not use the device with persons with sensitive skin or allergies.
4. Warnings and safety notes

General warnings
- The measured values taken by you are for your information only – they are no substitute for a medical examination. Discuss the measured values with your doctor and never make your own medical decisions based on them (e.g. regarding dosages of medicines).
- The device is only intended for the purpose described in these instructions for use. The manufacturer is not liable for damage resulting from improper or incorrect use.
- Using the blood pressure monitor outside your home environment or whilst on the move (e.g. whilst travelling in a car, ambulance or helicopter, or whilst undertaking physical activity such as playing sport) can influence the measurement accuracy and cause incorrect measurements.
- Cardiovascular diseases may lead to incorrect measurements or have a detrimental effect on measurement accuracy.
- Do not use the device at the same time as other medical electrical devices (ME equipment). This could lead to a malfunction of the device and/or an inaccurate measurement.
- Do not use the device outside of the specified storage and operating conditions. This could lead to incorrect measurements.
- Only use the cuffs included in delivery or cuffs described in these instructions for use for the device. Using another cuff may lead to measurement inaccuracies.
- Please note that when inflating the cuff, the functions of the limb in question may be impaired.
- Do not perform measurements more frequently than necessary. Due to the restriction of blood flow, some bruising may occur.
- During the blood pressure measurement, the blood circulation must not be stopped for an unnecessarily long time. If the device malfunctions remove the cuff from the arm.
- Place the cuff on your upper arm only. Do not place the cuff on other parts of the body.
- Place the cuff on your upper arm only. Do not place the cuff on other parts of the body.
- The air line poses a risk of strangulation for small children. Furthermore, included small parts pose a risk of suffocation for small children if swallowed. They should therefore always be supervised.
- The ECG cable presents a risk of strangulation for small children.
- The blood pressure monitor must not be used in connection with a high-frequency surgical unit.
- Do not use the device with a defibrillator.
- Do not use the device during an MRT examination.
- Do not expose the device to static electricity. Always ensure that you are free of static electricity before operating the device.
-
Do not place the device in pressure vessels or gas sterilisation devices.
-
Do not allow the device to fall and do not step on or shake the device.
- Do not dismantle the device, as this could cause damage or malfunctions or impede the operation of the device.
- Do not allow the electrodes of the ECG stick to come into contact with other conductive parts (including earth).

General precautions
- The blood pressure monitor is made from precision and electronic components. The accuracy of the measurements and service life of the device depend on its careful handling.
- Protect the device from impacts, humidity, dirt, marked temperature fluctuations and direct sunlight.
- Ensure the device is at room temperature before measuring. If the measuring device has been stored close to the maximum or minimum storage and transport temperatures and is placed in an environment with a temperature of 20 °C, it is recommended that you wait approx. 2 hours before using the measuring device.
- Do not drop the device.
- Do not use the device in the vicinity of strong electromagnetic fields and keep it away from radio systems or mobile telephones.
- We recommend that the batteries be removed if the device is not to be used for a prolonged period of time.
- Avoid any mechanical restriction, compression or bending of the cuff line.
Measures for handling batteries

- If your skin or eyes come into contact with battery fluid, rinse the affected areas with water and seek medical assistance.
- Choking hazard! Small children may swallow and choke on batteries. Therefore, store batteries out of the reach of small children.
- Risk of explosion! Do not throw batteries into a fire.
- If a battery has leaked, put on protective gloves and clean the battery compartment with a dry cloth.
- Do not disassemble, open or crush the batteries.

- Observe the plus (+) and minus (-) polarity signs.
- Protect the batteries from excessive heat.
- Do not charge or short-circuit batteries.
- If the device is not to be used for a relatively long period, take the batteries out of the battery compartment.
- Use identical or equivalent battery types only.
• Always replace all batteries at the same time.
- Do not use rechargeable batteries!

Notes on electromagnetic compatibility
- The device is suitable for use in all environments listed in these instructions for use, including domestic environments.
- The use of the device may be limited in the presence of electromagnetic disturbances. This could result in issues such as error messages or the failure of the display/device.
- Avoid using this device directly next to other devices or stacked on top of other devices, as this could lead to faulty operation. If, however, it is necessary to use the device in the manner stated, this device as well as the other devices must be monitored to ensure they are working properly.
- The use of accessories other than those specified or provided by the manufacturer of this device can lead to an increase in electromagnetic emissions or a decrease in the device's electromagnetic immunity; this can result in faulty operation.
- Failure to comply with the above can impair the performance of the device.
•
5. Device description
Blood pressure monitor with ECG stick and cuff
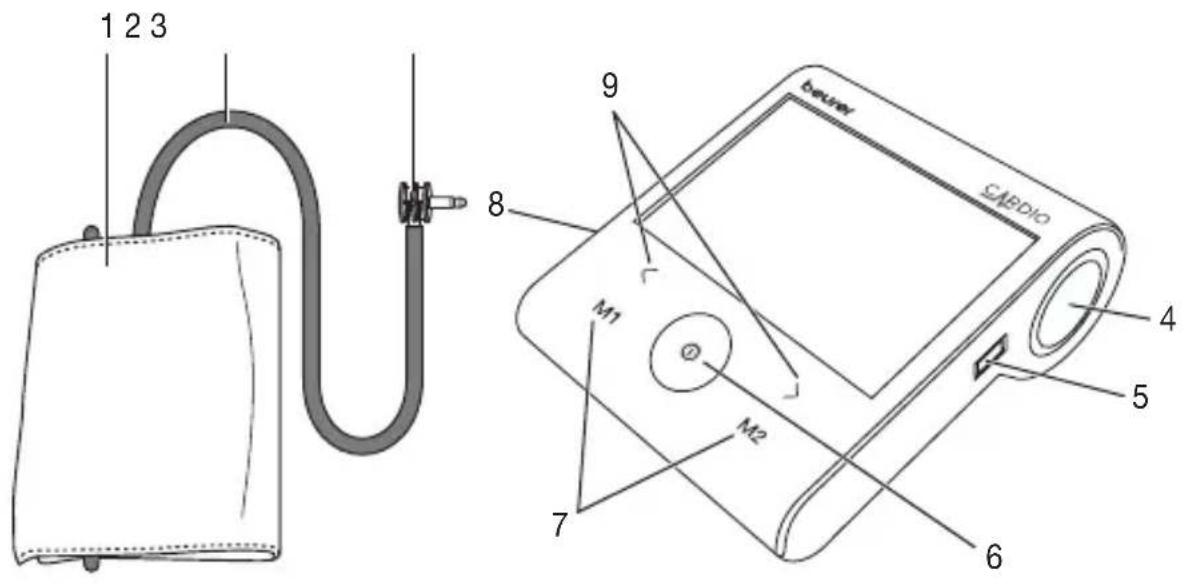
- Cuff
- Cuff line
- Cuff connector
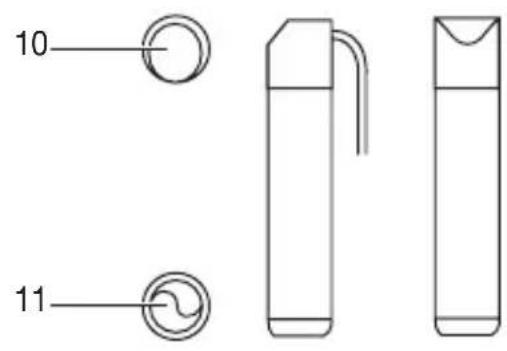
- ECG stick holder
- Connector for ECG stick and USB cable
- START/STOP button①
- Memory buttons M1 and M2
- Connection for cuff connector
- Setting buttons
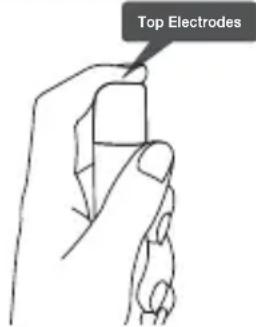
- Upper electrode
- Lower electrode
Display
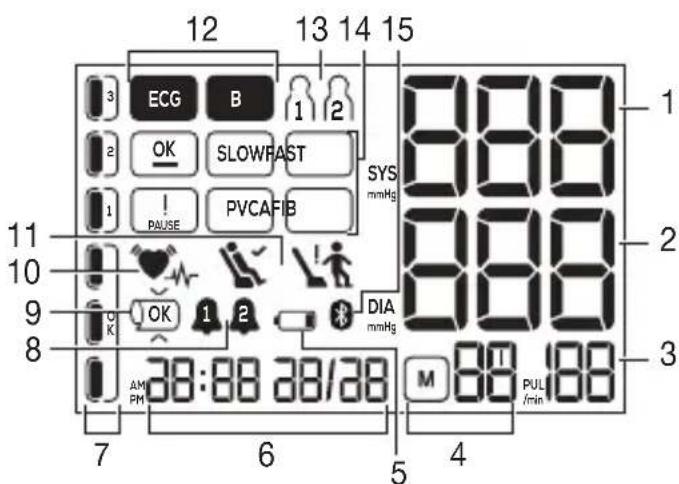
- Systolic pressure, ECG measurement = countdown
- Diastolic pressure
- Heart rate: shows the average heart rate during the record
- Memory display: average value ▶R morning ▶RM evening ▶PM memory space number ▶01... ▶60
- Low battery status symbol
- Time and date
- Risk indicator
- Alarm function
- Cuff position control
- 🧑 indicates Heart Beat during BP and ECG measurement; 🧑 Irregular Heart Beat symbol for Blood pressure measurement
- Resting indicator display
- Measurement mode (blood pressure = BP, ECG = ECG)
- Current User Memory
- ECG result display
- Bluetooth® connection symbol
6. Initial use
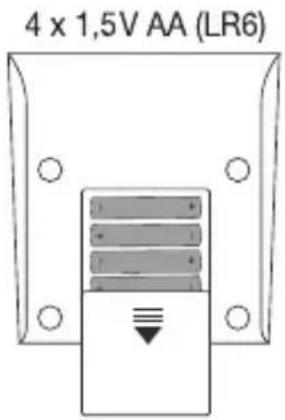
Inserting the batteries
- Open the battery compartment lid.
- Insert four 1.5 V AA (alkaline type LR6) batteries. Make sure that the batteries are inserted the correct way round in accordance with the markings. Do not use rechargeable batteries.
- Carefully close the battery compartment lid again.
- All display elements are briefly displayed. Now set the date and time as described below.
If the battery replacement symbol flashes, you can no longer perform any measurements and must replace all batteries. Once the batteries have been removed from
the device, the date and time must be set again. Any saved measured values are retained.
Set the hour format, time, date, alarm, Bluetooth® and ECG settings
It is essential that you set the date and time. Otherwise, you will not be able to save your measured values correctly with a date and time and access them again later.
In this menu you can adjust the following settings in succession:

flowchart
graph LR
    A["Hourformat"] --> B["Time"]
    B --> C["Date"]
    C --> D["Alarm"]
    D --> E["Bluetooth®"]
    E --> F["ECG"]
Press and hold the START/STOP button① on the device when switched off for approx. 5 seconds.
- Select 12h or 24h mode using the function buttons / . Press M2 to confirm. The hour display will start to flash. Set the hour with the function buttons / and confirm with M2.
- Set the minute, year, month and day and confirm each with the setting button M2.
You can go to the previous settings by pressing M1.
You can set 2 different alarm times to remind yourself to take the measurement. To set the alarm, proceed as follows:
- Alarm 1 is shown in the display, or flashes. With the function buttons </>, choose whether alarm 1 should be activated (flashes) or deactivated (flashes) and confirm with M2.
- If alarm 1 is deactivated (i), you automatically switch to setting alarm 2.
- If alarm 1 is activated, the hours flash on the display. Select the desired hour using the function buttons / and confirm with M2. The minutes flash on the display.
- Select the desired minute using the function buttons / and confirm with M2.
- Alarm 2 is shown in the display, or off flashes.
- To set, proceed as for alarm 1.
You can either turn on or turn off Bluetooth ^® . To make the settings, proceed as follows:
- Use the < / > function buttons to choose whether automatic Bluetooth® data transfer is activated (Bluetooth® lights up, flashes) or deactivated (Bluetooth® lights up, flashes).
- Confirm your setting with pressing the M2 button.
i Bluetooth® transfers will reduce the battery life.
You can choose between four different ECG measurement times (30 seconds, 60 seconds, 90 seconds and 120 seconds). To set the ECG measurement time, proceed as follows:
- Select the desired ECG measurement time using the function buttons / and confirm with M2
- The blood pressure monitor switches itself off automatically.
7. Usage (blood pressure)
General rules when measuring blood pressure yourself
- In order to generate as informative a profile of the progression of your blood pressure as possible and ensure that the measured values can be compared, you should measure your blood pressure regularly and always at the same times of day. It is recommended that you measure your blood pressure twice a day: once in the morning after getting up and once in the evening.
- You should always carry out the measurement when you are sufficiently physically rested. You should therefore avoid taking measurements during stressful periods.
- Do not take a measurement within 30 minutes of eating, drinking, smoking or exercising.
- Before the initial blood pressure measurement, make sure always to rest for 5 minutes.
- Furthermore, if you want to take several measurements in succession, make sure always to wait for at least 1 minute between the individual measurements.
- Repeat the measurement if you are unsure of the measured value.
-
Place the cuff on your upper arm only. Do not place the cuff on other parts of the body.
-
The blood pressure monitor can only be operated with batteries. Please note that data transfer and data storage is only possible when your blood pressure monitor is supplied with power. As soon as the batteries are empty, the blood pressure monitor loses the date and time.
- To conserve the batteries, the blood pressure monitor switches off automatically if you do not press any buttons for two minutes.
Attaching the cuff
- Fundamentally, blood pressure can be measured on both arms. Certain deviations between the measured blood pressure on the right arm and left arm are due to physiological causes and completely normal. You should always perform the measurement on the arm with the highest blood pressure values. Before starting self-measurement, consult your doctor in this regard. From this point on, always take measurements on the same arm.
- The device may only be operated with one of the following cuffs. This should be selected in accordance with your upper arm circumference. The fit should be checked before measurement using the index mark described below.
| Ref. no Designation Arm circumferences | ||
| 164.279* Universal cuff 22-42 cm |
*Included in standard delivery
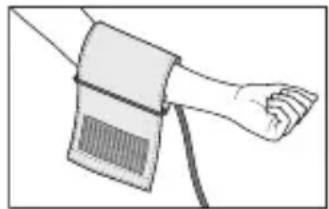
Place the cuff onto the bare upper arm. The circulation of the arm must not be hindered by tight clothing or similar.
natural_image
Illustration of a human wrist with a bandage and cord (no text or symbols)The cuff must be placed on the upper arm so that the bottom edge is positioned 2-3 cm above the elbow and over the artery. The line should point to the centre of the palm here.
natural_image
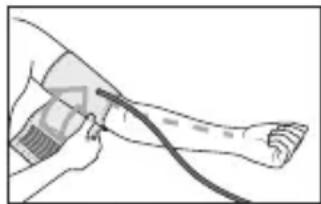
Illustration of a person's leg with a medical device attached to the lower arm (no text or symbols present)Guide the end of the cuff that is sticking out through the metal ring, fold it back over the arm and close the cuff using the hook-and-loop fastener. The cuff should be fastened tightly, but not too tightly, so that two fingers can still fit under the closed cuff.

natural_image
Illustration of a hand holding a curved cable or tube, no text or symbols presentNow insert the cuff line into the connection for the cuff connector.
The cuff is suitable for you if the index mark (▼) is within the OK range after fitting the cuff.
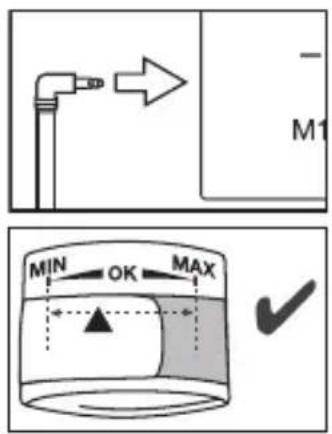
If the measurement is performed on the right upper arm, the line should be located on the inside of your elbow. Ensure that your arm is not pressing on the line.
Adopting the correct posture
- To carry out a blood pressure measurement, make sure you are sitting upright and comfortably. Lean back and place your arm on a surface. Do not cross your legs. Place your feet next to each other flat on the floor.
• Always make sure that the cuff is at heart level. - To avoid distorting the measurement, you should remain as still as possible during the measurement and not speak.
Select the user memory
The device has two user memories. Each user memory can store up to 60* measured values of the two categories blood pressure and ECG. Once all memory spaces in a user memory have been used, the oldest measured values are replaced by the most recent.
- Press the START/STOP button ⏱ on the switched-off device.
- Select the desired user by pressing the memory buttons M1 (for user 1) or M2 (for user 2).
- Confirm your selection by pressing the START/STOP button ① again. You can now proceed with ECG measurement or go to blood pressure measurement by pressing START/STOP button ① again.
* With 30-second measurement. Deviation possible in the event of a longer measurement duration.
Performing the blood pressure measurement
- As described above, attach the cuff and adopt the correct posture.
- Press the START/STOP button ① once and select the desired user memory as described in chapter 4.6.
-
After you have made your selection, press the START/STOP button ⓘ two more times until BP is shown in the display.
• After approx. 3 seconds, the measurement starts automatically. -
The cuff automatically inflates. The measurement is taken while the cuff is being pumped up. As soon as a pulse has been detected, the pulse symbol will be displayed. After this, the cuff air pressure will be released again. The measurement results for systolic pressure, diastolic pressure and pulse will be displayed.
- The device has a cuff position control. This function allows the device to automatically check the correct fit of the cuff on your upper arm during the measurement. If the cuff has been correctly applied, the symbol OK will appear during the inflation process. It remains there until the measurement has been completed successfully and is then displayed together with the measured values determined.
If the cuff is applied too tightly or too closely, the symbol will be shown together with [in-3] the display. In such cases, the measurement is cancelled after approx. 5 seconds and the device switches itself off. Apply the cuff correctly and take a new measurement.
- The systolic pressure, diastolic pressure and pulse rate measurements are displayed. A symbol is displayed to indicate whether you were sufficiently relaxed during the blood pressure measurement ( = sufficiently at rest; = not at rest). Details on this function can be read in chapter 5.4, section “Resting indicator”.
- You can cancel the measurement at any time by pressing the START/STOP button ①.
- Er_ appears if the measurement could not be performed properly. Observe the chapter "What if there are problems?" in these instructions for use and repeat the measurement.
- To switch off the device, hold the START/STOP button Ⓐ for 3 seconds or wait for 1 minute until the device switches off automatically. The measurement is automatically stored in the selected user memory.

Wait for at least 1 minute before taking another measurement.

Evaluating blood pressure measurement results
General information about blood pressure
- Blood pressure is the force with which the bloodstream presses against the arterial walls. Arterial blood pressure constantly changes in the course of a cardiac cycle.
• Blood pressure is always stated in the form of two values:
- The highest pressure in the cycle is called systolic blood pressure. This arises when the heart muscle contracts and blood is pumped into the blood vessels.
- The lowest is diastolic blood pressure, which is when the heart muscle has completely stretched back out and the heart fills with blood.
- Fluctuations in blood pressure are normal. Even during repeat measurements, considerable differences between the measured values may occur. One-off or irregular measurements therefore do not provide reliable information about the actual blood pressure. Reliable assessment is only possible when you perform the measurement regularly under comparable conditions.
Cardiac arrhythmia
This device can identify potential disruptions of the heart rhythm when measuring and if necessary, indicates this after the measurement with the symbol ♥. This can be an indicator for arrhythmia. Arrhythmia is an illness in which the heart rhythm is abnormal because of flaws in the bioelectrical system that regulates the heartbeat. The symptoms (skipped or premature heart beats, pulse being slow or too fast) can be caused by factors such as heart disease, age, physical make-up, excess stimulants, stress or lack of sleep. Arrhythmia can only be determined through an examination by your doctor. If the symbol ♥ is shown on the display after the measurement has been taken, repeat the measurement. Please ensure that you rest for 5 minutes beforehand and do not speak or move during the measurement. If the symbol ♥ appears frequently, please consult your doctor. Selfdiagnosis and treatment based on the measurements can be dangerous. Always follow your GP's instructions.
Risk indicator
The measurements can be classified and evaluated in accordance with the following table.
However, these standard values serve only as a general guideline, as the individual blood pressure varies in different people and different age groups etc.
It is important to consult your doctor regularly for advice. Your doctor will tell you your individual values for normal blood pressure as well as the value above which your blood pressure is classified as dangerous. The bar chart on the display and the scale on the device show which category the recorded blood pressure values fall into.
If the values of systole and diastole fall into two different categories (e.g. systole in the high normal category and diastole in the normal category), the graphical classification on the device always shows the higher category; for the example given this would be high normal.
| Blood pressure value category Systole(in mmHg) | Diastole(in mmHg) | Action |
| Level 3: severe hypertension ≥180≥1 | 10 Seek medical attention | |
| Level 2: moderate hypertension 160– | 179 100–109 Seek medical attention | |
| Level 1: mild hypertension 140–159 | 0–99 Regular monitoring by doctor | |
| High normal 130–13985–89 Regular | monitoring by doctor | |
| Normal 120–12980–84 Self-monitoring | ||
| Optimal <120<80 Self-monitoring |
Source: WHO, 1999 (World Health Organization)
Atrial fibrillation
This device can identify atrial fibrillation when measuring the blood pressure and if necessary, indicates this after the measurement with the symbol AFIB. If you have atrial fibrillation, the displayed blood pressure value may not be correct. Atrial fibrillation is defined by an irregular and oftenrapid heart rate increasing the risk of strokes, heart failure and other heart-related complications. Atrial fibrillation can only be determined through an examination by your doctor. If the symbol AFIB is shown on the display after the measurement has been taken, repeat the measurement. Please ensure that you rest for 5 minutes beforehand and do not speak or move during the measurement. If the symbol AFIB appears frequently, please consult your doctor. Selfdiagnosis and treatment based on the measurements can be dangerous. Always follow your GPs instructions.
Resting indicator measurement (using HSD diagnostics)
The most frequent error made when measuring blood pressure is taking the measurement when not at rest (haemodynamic stability), which means that both the systolic and the diastolic blood pressures are incorrect in this case. While measuring the blood pressure, the device automatically determines whether you are at rest or not. If there is no indication that the circulatory system is not sufficiently at rest, the symbol (haemodynamic stability) appears in the display and the measurement can be recorded as a reliable blood pressure at rest value.

Haemodynamically stable
The systolic and diastolic pressure measurements have been recorded when the circulatory system is sufficiently at rest and are a very reliable indicator of resting blood pressure.
However, if there is an indication that the circulatory system is not sufficiently at rest (haemodynamic instability), the symbol appears in the display. In this case, the measurement should be repeated after a period of physical and mental rest. The blood pressure measurement must be taken when the patient is physically and mentally rested, as it will be the basis for diagnosing the blood pressure level and therefore regulating the patient's medical treatment.

Lack of haemodynamic stability
It is very probable that the systolic and diastolic blood pressures have been measured whilst the patient was not at rest and the measurements therefore deviate from the blood pressure at rest. Repeat the measurement after a minimum period of 5 minutes' rest and relaxation. Go to a sufficiently quiet and comfortable spot and remain there calmly; close your eyes, breathe deeply and evenly and try to relax. If the next measurement also shows insufficient stability, you can repeat the measurement after another resting period. If the measurements continue to show some instability, identify these blood pressure measurements as having been taken when the circulatory system had not been sufficiently rested. In this case, nervousness or inner anxiety may be the cause and this cannot be cured by brief periods of rest. Existing cardiac arrhythmias may also prevent a stable blood pressure measurement. A lack of resting blood pressure can have various causes, such as physical or mental strain or distraction, speaking or experiencing cardiac arrhythmias during the blood pressure measurement. In an overwhelming number of cases, the HSD diagnosis will give a very good guide as to whether the circulatory system is rested when taking the measurement. Certain patients suffering from cardiac arrhythmia or chronic mental conditions can remain haemodynamically unstable in the long term, something which persists even after repeated periods of rest. The accuracy of the blood pressure at rest results is reduced in these users. Like any medical measurement method, the precision of the HSD diagnosis is limited and can lead to incorrect results in some cases. The blood pressure measurements taken when the circulatory system was at rest represent particularly reliable results.
Saving, displaying and deleting measured values
The results of every successful measurement are stored together with the date and time. If there are more than 60 measurements, the oldest measurement is lost.
- Press the START/STOP button ①. Select the relevant user memory by pressing the memory button M1 (for user ①) or M2 (for user ②).
- Confirm your selection by pressing the START/STOP button ① 3 seconds. The device will automatically switches itself off.
- Press the START/STOP button ^① . The last stored measured value in the selected user memory is displayed.
- Press the function button >. ▼R lights up on the display. The average value of all saved measured values in this user memory is displayed.
- Press the function button >. □AM lights up on the display. The average value of the morning measurements for the last 7 days is displayed (morning: 5 a.m. – 9 a.m.).
- Press the function button >. ☐PM lights up on the display. The average value of the evening measurements for the last 7 days is displayed (evening: 6 p.m. – 8 p.m.).
- When the function button > is pressed again, the last individual measured values in each case are displayed with the date and time (for example 0.03
- By pressing the function button >again, you can view your individual measured values.
- To switch the device off, hold the START/STOP button for 3 seconds.
- To delete the memory of the selected user, press the function button<for 5 seconds.
- [L] appears on the display. All the values in the selected user memory have now been deleted.
8. Usage (ECG)

General notes on using the ECG stick
- The ECG measuring device is a single-channel electrocardiogram (ECG) device that you can use to rapidly record an electrocardiogram (ECG). In addition, the device provides a clear evaluation of the recording, particularly as regards any disruption of the heart rhythm.
- The ECG measuring device displays changes in the heart rhythm, which may have various different causes. These may be harmless, but may also be triggered by illnesses or diseases of differing degrees of severity. Please consult a medical specialist if you believe you may have an illness or disease.
- Electrocardiograms recorded using the ECG measuring device show the heart's function at the time of the measurement. As such, any changes occurring before or after the measurement is taken may not necessarily be detected.
- ECG measurements, such as those taken with the ECG measuring device, cannot identify all heart diseases. Regardless of the measurement taken, you should consult your doctor immediately if you experience symptoms that could indicate acute heart disease. Such symptoms could include (but are not limited to):
- pain or pressure on the left of the chest area or abdomen,
- radiating pain in the area of the mouth/jaw/face, or in the shoulders, arm or hands,
- back pain,
- nausea,
- burning sensation in the chest,
- tendency to collapse,
- breathlessness,
- rapid heartbeat or irregular heart rhythm
- or, in particular, a combination of these symptoms.
- ALWAYS consult a doctor IMMEDIATELY if you experience any of these symptoms. If you have any doubts, seek an emergency medical examination.
- Do not self-diagnose or self-medicate on the basis of the measurement without consulting your doctor. In particular, do not start taking any new medication or change the type and/or dosage of any existing medication without prior approval.
- The ECG measuring device is not a substitute for a medical examination of your heart function or for medical electrocardiogram recordings, which require more complex measurements.
- It is not possible to use the ECG measuring device to diagnose illnesses or diseases that may be causing an ECG change. This is exclusively the responsibility of your doctor.
- We recommend that you record the ECG results and provide them to your doctor if required. This applies in particular if the status messages of the ECG measuring device do not show the "OK" symbol.
Preparing the ECG measurement
Observe the following before beginning the ECG measurement:
- Never use the ECG stick on top of clothing.
- If the electrode surfaces of the ECG stick are dirty, clean them with a damp cloth.
- If your skin or hands are dry, moisten them using a damp cloth before the measurement.
- Please note that there must be no skin contact between your right and left hand (measurement method C) or hand and chest (measurement methods A/B). Otherwise, the measurement cannot be taken correctly.
- Ensure that your right hand does not come into contact with your body during the measurement. To ensure an accurate measurement, press only lightly on the upper and lower electrodes of the ECG stick.
- Never use the ECG stick upside down.
- Do not speak or move while carrying out the ECG measurement as this can cause inaccuracies during the measurement.
- When taking the measurement, please keep the device lying flat (horizontally) on the table.
Measurement methods
There are three different methods of taking the measurement. Start with measurement method A, “right index finger-chest”. If this method does not deliver measurements, or delivers only unstable measurements (“E” is frequently displayed), switch to method B “left index finger-chest” and, if necessary, to method C “left hand-right hand”.
The most suitable method/procedure depends on the heart configuration (shape of the heart) of each individual user. If it is not possible to take stable measurements using a given measurement method, this could have a harmless cause such as the shape of the heart. However, the cause may also be an illness or disease.

Measurement method C offers maximum comfort, but offers a much lower measurement stability than methods A or B.
| Measurement method A | “right index finger-chest” (approximately corresponds to “lead 2”) |
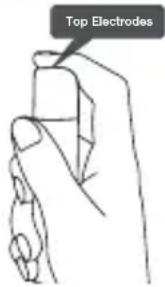 | Place your right index finger on the upper electrode on the device and hold the device vertically in your hand. |
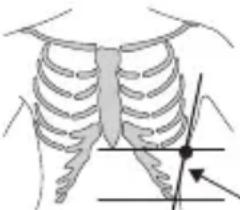
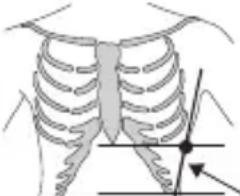
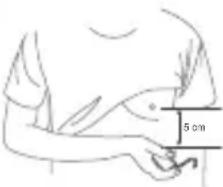 | You can determine the correct position for placing the lower electrode of the device against your chest using the following methods:Draw an imaginary line from the front of your armpit downwards.At the same time, draw an imaginary line going up 10 cm from the lowest rib on the left side of your body. Place the lower electrode of the device at the point where these two lines meet.orDraw an imaginary line from the bottom of the centre of your breastbone (sternum) to the left. At the same time, draw an imaginary line from the front of your armpit downwards. Place the lower electrode of the device at the point where these two lines meet. |
 | |
| Lightly press the electrode against your chest.Important: Do not press the device too firmly against your skin. | |
| Measurement method B | “left index finger-chest” (approximately corresponds to “lead 3”) |
 | Place your left index finger on the upper electrode on the device and hold the device vertically in your hand. |
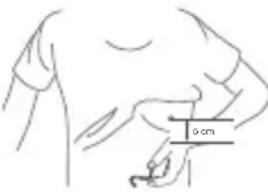 | You can determine the correct position for placing the lower electrode of the device against your chest using the following methods:Draw an imaginary line from the front of your armpit downwards.At the same time, draw an imaginary line going up 10 cm from the lowest rib on the left side of your body. Place the lower electrode of the device at the point where these two lines meet.orDraw an imaginary line from the bottom of the centre of your breastbone (sternum) to the left. At the same time, draw an imaginary line from the front of your armpit downwards. Place the lower electrode of the device at the point where these two lines meet. |
 | |
| Lightly press the electrode against your chest.Important: Do not exert excessive pressure on the electrodes with your fingers. | |
| Measurement method C | “left hand-right hand” (approximately corresponds to “lead 1”) |
| Place your right index finger on the upper electrode on the device. Place a finger of your left hand on the lower electrode. | |
| Important: Do not press the device too firmly against your skin. | |

Please note that there must be no skin contact between your right and left hand (measurement method C) or hand and chest (measurement methods A/B). Otherwise, the measurement cannot be taken correctly. Stay still during the measurement, do not speak and hold the device still. Movements of any kind will falsify the measurements.
Maintain constant pressure during the measurement. Do not press the electrodes too firmly against the skin as this can cause the muscles to tense and give rise to inaccurate measured values.
Performing the ECG measurement
Measurement
- Insert the ECG stick cable into the connection for the ECG stick on the main unit.
- Press the START/STOP button Ⓐ and press either M1 or M2 to select the desired user memory.
- Press the START/STOP button ① again to switch to the ECG Mode. ECG and the set measurement time are shown in the display. The Measurement starts automatically after approx. 10 seconds, if there is sufficient contact to the electrodes on the stick and the signal is stable.
- A countdown on the right side of the display indicates the progress of the measurement. During the measurement, the current heart rate is displayed in real time. At the same time, the heart symbol washes.
- A summary of the ECG measurement and the average heart rate appear on the display after the countdown has elapsed.
- To switch off the device, hold the START/STOP button ① for 3 seconds. Alternatively, the device will switch off automatically after 1 minute.
Incorrect ECG measuring methods
NEVER take an ECG measurement if:
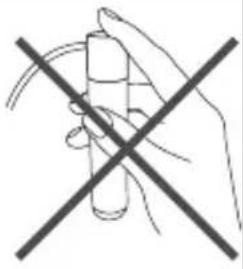 | The right index finger is not in sufficient contact with the upper electrode. | 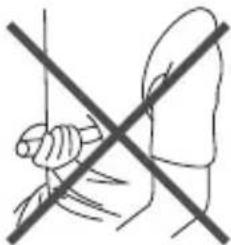 | The measurement is being taken through clothing. |
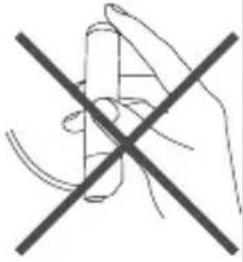 | The ECG stick is upside down. | 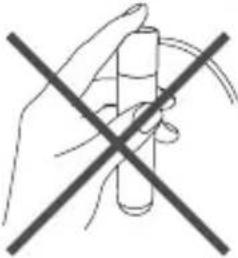 | The left index finger is not in sufficient contact with the upper electrode. |
Evaluating ECG measured values
Once you have taken the measurement, the following results may appear on the LCD display.
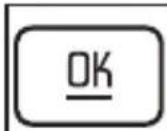 | ECG recording is OK. |  | Indicates atrial fibrillation (also read Atrial fibrillation at Evaluating blood pressure measurement results). |
 | Indicates a decreased heart rate (bradycardia) of less than 60 [bpm]. |  | Indicates an increased heart rate (tachycardia) of greater than 100 [bpm]. |

A flashing heart rate on the display indicates unstable or weak ECG signals. In this case, please repeat the measurement.
Background information and medical statistics for your doctor can be found in the “Annex for attending doctor” document included with your device.
Displaying and deleting ECG measured values
The device has two user memories. Each user memory can store up to 60* measurements. Once all memory spaces in a user memory have been used, the oldest measurements are replaced by the most recent.
You can access stored measurements on the device at any time. Proceed as follows:
- With the device switched off, press the START/STOP button ①. The last stored measured value in the selected user memory is displayed.
To access the measured values in the second user memory, press M2.
- To navigate between the individual measurements, press the function buttons I .
- To delete the memory of the selected user, press the function button <for 5 seconds.
- [L] appears on the display. All the values in the selected user memory have now been deleted.
Transferring measurements
Transfer via Bluetooth ^® low energy technology
It is also possible to transfer the measured values saved on the device to your smartphone using Bluetooth ^® low energy technology. You will need the “beurer HealthManager Pro” / “beurer HealthManager” app for this. The apps are available free of charge on the Apple App Store and from Google Play.

When connecting for the first time, a randomly generated six-digit PIN code is displayed on the device, and at the same time an input field appears on the smartphone in which you must enter this six-digit PIN code. After successfully entering the code, the device will be connected to your smartphone. If your smartphone has a protective cover, remove this to ensure that there is no interference during the transfer.
* With 30-second measurement. Deviation possible in the event of a longer measurement duration.
System requirements for the “beurer HealthManager Pro” / “beurer HealthManager” app
- iOS ≥ 12.0, Android™ ≥ 8.0
- Bluetooth ^® ≥ 4.0
List of compatible devices:

Transfer via USB
The device also allows you to transfer your measured values via USB. To do this you require the included USB cable and the , USB-Uploader for the free “beurer HealthManager Pro” web application.
System requirements for the USB-Uploader
– from Windows 8.1
– from USB 2.0 (Type-A)
Proceed as follows to transfer values:
Data is transferred if Bluetooth ^® has been activated in the settings menu. The Bluetooth ^® symbol appears on the display.

Step 1: BM 96
Activate Bluetooth ^® on your device (see chapter 6.2).

Step 2: "beurer HealthManager Pro" / "beurer HealthManager" app
Add the BM 96 in the “beurer HealthManager Pro” / “beurer HealthManager” app.
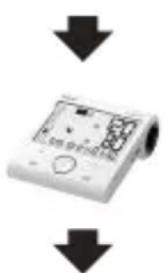
natural_image
White handheld device with black downward arrows indicating download or download steps (no visible text or symbols)Step 3: BM 96
Take a measurement.
Step 4: BM 96
Go to memory mode. Bluetooth ^® data transfer starts automatically.
The "beurer HealthManager Pro" / "beurer HealthManager" app must be active to allow data transfers.
9. Cleaning and maintenance
- Clean the main unit, ECG stick and cuff carefully using a slightly damp cloth only.
- Do not use any corrosive cleaning agents or solvents.
- If the electrode surfaces of the ECG stick are dirty, clean them with a damp cloth.
- When you are not using the ECG stick, disconnect it from the main unit.
- Under no circumstances should you hold the main unit, ECG stick or cuff under water, as this can cause liquid to enter and damage the device internally.
- No heavy objects should be placed on top of the device when in storage. Remove the batteries. The cuff line should not be bent sharply.
10. Accessories and replacement parts
Accessories and replacement parts are available from the corresponding service address (according to the service address list). Please state the corresponding order number.
| Designation Item number and/or order number | |
| Universal cuff (22-42 cm) 164.279 | |
| USB cable 164.322 | |
| ECG Stick 164.317 |
- What if there are problems?
| Problem /Error Message | Possible cause Solution | |
| Error Code Er 1 It was not | possible to correctly record the pulse. | Please repeat the measurement.Make sure that the cuff tube is properly inserted and that you do not move or talk.Re-insert the batteries if necessary, or else replace them. |
| Error Code Er2 No measu | rement could be taken. | |
| Error Code Er3 The cuff is | fastened too tightly or loosely. | |
| Error Code Er4 Errors occur during the meas-urement. | Please repeat the measurement.Make sure that the cuff tube is properly inserted and that you do not move or talk.Re-insert the batteries if necessary, or else replace them. | |
| Error Code Er5 The pump | pressure is higher than 300 mmHg. | |
| Error Code Er6 There is a system error. If this error message appears, please contact Customer Services | ||
| Error Code Er7 | The ECG signal is unstable or too weak. No ECG signal found. | Repeat the measurement as per the instructions in these Instructions for use. |
| Error Code Er8 | Contact pressure on the skin is too weak.The measurement was inter-rupted. | Repeat the measurement as per the instructions in these Instructions for use. |
| The batteries are almost empty. Replace the batteries. | ||
| The device will not switch on. | The batteries are flat. Replace the batteries. | |
| The batteries have been inserted incorrectly. | Re-insert the batteries, observing the correct polarity (-/+). | |
| The cuff does not inflate. | The cuff line is not correctly inserted into the device. | Ensure that the cuff line is correctly inserted into the device. |
| The cuff is ruptured. Replace the cuff. Contact Customer Services. | ||
| The blood pressure measurements are very high/low. | The cuff was not attached correctly. | Re-attach the cuff. |
| You moved or talked during the measurement. | Do not move or talk during the measurement. | |
| The measurement was obstructed by clothing. | Ensure that clothing cannot obstruct the arm cuff during the measurement. | |
| Stored measured values can no longer be retrieved from the memory. | Old measured values have been overwritten by more recent values as the memory is full. | Download the stored measured values to your computer every so often. |
| The ECG measurement does not start even though there is contact with the skin. | Insufficient contact pressure. Ensure that the lower electrode is pressed firmly against the skin. | |
| Bluetooth® connection failed. | Connection problems between the smartphone/tablet and the app. | Switch off the main unit, close the app, and deactivate and reactivate Bluetooth® on your smartphone/tablet. Try to re-establish the connection. |
| Unknown error messages. Remove batteries, reinsert batteries. Should the problem persist, contact Customer Services. | ||
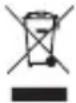
12. Disposal

Repairing and disposing of the device
- Do not repair or adjust the device yourself. Proper operation can no longer be guaranteed in this case.
- Do not open the device. Failure to comply will invalidate the warranty.
- Repairs must only be carried out by Customer Services or authorised retailers. Before making a claim, please check the batteries first and replace them if necessary.
- For environmental reasons, do not dispose of the device in household waste at the end of its service life. Dispose of the device at a suitable local collection or recycling point in your country. Dispose of the device in accordance with EC Directive – WEEE (Waste Electrical and
Electronic Equipment). If you have any questions, please contact the local authorities responsible for waste disposal.

Disposing of the batteries
- The empty, completely flat batteries must be disposed of through specially designated collection boxes, recycling points or electronics retailers. You are legally required to dispose of the batteries.
- The codes below are printed on batteries containing harmful substances:
Pb = Battery contains lead,
Cd = Battery contains cadmium,
Hg = Battery contains mercury.
13. Technical specifications
Model No. BM 96
| Measurement method Oscillometric, non-invasive blood pressure measurement on the upper arm.Single-channel ECG in freely selectable front positions / ECG signal ground (earth) referenced. | |
| Measurement range Cuff pressure | 0 – 300 mmHg,systolic 60–280 mmHg,diastolic 30–200 mmHg,Pulse 30–199 beats/minute |
| ECG range/sample rate | 0.05 to 40 Hz/500 Hz |
| Display accuracy Systolic ± 3 mmHg, Diastolic ± 3 mmHg, Pulse ± 5% of the value shown | |
| Measurement inaccuracy Max. permissible standard deviation according to clinical testing: Systolic 8 mmHg/diastolic 8 mmHg | |
| Memory 2x 60 memory spaces (With 30-second measurement. Deviation possible in the event of a longer measurement duration.) | |
| Dimensions Main unit: L 120 mm x W 144 mm x H 53 mm ECG stick: D 22 mm x H 120 mm | |
| Weight Main unit: Approximately 490 g (without batteries, with cuff) ECG stick: Approximately 40 g | |
| Cuff size 22 to 42 cm | |
| Permissible operating conditions +10 °C to +40 °C, 10 to 85 % relative humidity (non-condensing) | |
| Permissible storage and transport conditions -20 °C to +55 °C, 10 to 90 % relative humidity, 800 – 1050 hPa ambient pressure | |
| Power supply 4x 1.5 V AA batteries | |
| Battery life For approx. 300 measurements, depending on levels of blood pressure, pump pressure and ECG measurement length | |
| Classification | Internal supply, IP21, no AP or APG, continuous operation Blood pressure: Application part, type BF ECG stick: Application part type CF |
| Data transfer via Bluetooth® wireless technology | The product uses Bluetooth® low energy technology, frequency band 2.400 – 2.483 GHz, maximum transmission power radiated in the frequency band < 20 dBm, compatible with Bluetooth® ≥ 4.0 smart phones / tablets |
The serial number is located on the device or in the battery compartment.
Technical information is subject to change without notification to allow for updates.
- This device conforms with the European standard EN 60601-1-2 (in accordance with CISPR 11, IEC 61000-4-2, IEC 61000-4-3, IEC 61000-4-8) and is subject to particular precautions with regard to electromagnetic compatibility. Please note that portable and mobile HF communication systems may interfere with this device.
- The blood pressure monitor complies with the EU Medical Devices Directive 93/42/EEC, the German Medical Devices Act (Medizinproduktgesetz) and the standards EN1060-1 (non-invasive sphygmomanometers – Part 1: General requirements), EN1060-3 (non-invasive sphygmomanometers – Part 3: Supplementary requirements for electro-mechanical blood pressure measuring systems) and IEC80601-2-30 (Medical electrical equipment – Part 2 – 30: Particular requirements for the basic safety and essential performance of automated non-invasive sphygmomanometers).
- The ECG stick complies with the EU Medical Devices Directive 93/42/EEC, the German Medical Devices Act (Medizinproduktgesetz) and the standards IEC 60601-2-25 (Medical electrical equipment - part 2-25: Particular requirements for the safety of electrocardiographs).
- The safety class of the ECG stick is CF.
- The accuracy of this blood pressure monitor has been carefully checked and developed with regard to a long useful life. If the device is used for commercial medical purposes, it must be regularly tested for accuracy by appropriate means. Precise instructions for checking accuracy may be requested from the service address.
- We hereby confirm that this product complies with the European RED Directive 2014/53/EU. The CE Declaration of Conformity for this product can be found under:
www.beurer.com/web/we-landingpages/de/cedeclarationofconformity.php
14. Warranty/service
Beurer GmbH, Söflinger Straße 218, 89077 Ulm, Germany (hereinafter referred to as "Beurer") provides a warranty for this product, subject to the requirements below and to the extent described as follows.
The warranty conditions below shall not affect the seller's statutory warranty obligations which ensue from the sales agreement with the buyer.
The warranty shall apply without prejudice to any mandatory statutory provisions on liability.
Beurer guarantees the perfect functionality and completeness of this product.
The worldwide warranty period is 5 years, commencing from the purchase of the new, unused product from the seller.
The warranty only applies to products purchased by the buyer as a consumer and used exclusively for personal purposes in the context of domestic use.
German law shall apply.
During the warranty period, should this product prove to be incomplete or defective in functionality in accordance with the following provisions, Beurer shall carry out a repair or a replacement delivery free of charge, in accordance with these warranty conditions.
If the buyer wishes to make a warranty claim, they should approach their local retailer in the first instance: see the attached “International Service” list of service addresses.
The buyer will then receive further information about the processing of the warranty claim, e.g. where they can send the product and what documentation is required.
A warranty claim shall only be considered if the buyer can provide Beurer, or an authorised Beurer partner, with
– a copy of the invoice/purchase receipt, and
– the original product.
The following are explicitly excluded from this warranty:
– deterioration due to normal use or consumption of the product;
– accessories supplied with this product which are worn out or used up through proper use (e.g. batteries, rechargeable batteries, cuffs, seals, electrodes, light sources, attachments and nebuliser accessories);
- products that are used, cleaned, stored or maintained improperly and/or contrary to the provisions of the instructions for use, as well as products that have been opened, repaired or modified by the buyer or by a service centre not authorised by Beurer;
– damage that arises during transport between manufacturer and customer, or between service centre and customer;
– products purchased as seconds or as used goods;
– consequential damage arising from a fault in this product (however, in this case, claims may exist arising from product liability or other compulsory statutory liability provisions).
Repairs or an exchange in full do not extend the warranty period under any circumstances.
FRANÇAIS

natural_image
Illustration of a human wrist with a bandage and cord, no text or symbols presentnatural_image
Illustration of a medical procedure showing a hand holding a tube connected to a leg (no text or symbols present)natural_image
Illustration of a hand holding a cable with a circular inset showing the cable (no text or symbols)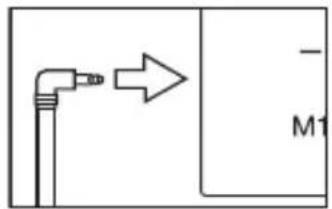
natural_image
Two-panel illustration showing a person performing a blood pressure monitor on the left and a person sitting at a desk with an IV catheter, crossed out by a diagonal line (no text or symbols)Source : WHO, 1999 (World Health Organization)
Fibrillation atriale
natural_image
Medical device with digital display and downward arrows indicating flow (no text or symbols)Étape 3 : BM 96
Prenez une mesure.
Étape 4 : BM 96
natural_image
Illustration of a human wrist with a bandage and cord, no text or symbols presentnatural_image
Illustration of a hand holding a medical device with a curved line extending from the wrist (no text or symbols present)natural_image
Illustration of a hand holding a cable with a circular inset showing the cable (no text or symbols)
natural_image
Two-panel illustration showing a person performing a blood pressure measurement on the left and another in a cross-section of the same position on the right (no text or symbols)Fuente: WHO, 1999 (World Health Organization)
natural_image
Illustration of a human wrist with a bandage and cord, no text or symbols presentnatural_image
Illustration of a medical procedure showing a hand holding a catheter connected to a leg, with no visible text or symbols.natural_image
Illustration of a hand holding a cable with a circular inset showing the cable (no text or symbols)
natural_image
Two-panel illustration showing a person receiving pressure and seated posture with a medical device, separated by a diagonal line (no text or symbols)Fonte: WHO, 1999 (World Health Organization)
Passo 2: app "beurer HealthManager Pro" / "beurer HealthManager"
natural_image
Illustration of a human forearm wearing an arm-wearing device (no text or symbols visible)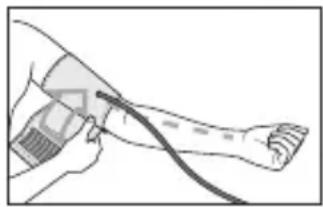
natural_image
Illustration of a person using a medical or surgical instrument to interact with a human leg (no text or symbols visible)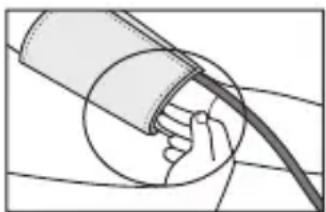
natural_image
Illustration of a hand holding a curved cable or tube, no text or symbols presentnatural_image
Two-panel illustration showing a person's arm and hand positioning, no text or symbols present.Kaynak: WHO, 1999 (World Health Organization)
Atriyal fibrilasyon
www.beurer.com/web/we-landingpages/de/cedeclarationofconformity.php
14. Garanti/servis
natural_image
Illustration of a human hand wearing a wristwatch (no text or symbols)natural_image
Illustration of a medical procedure showing a hand holding a tool near a leg, with no visible text or symbols.natural_image
Illustration of a hand holding a medical device with a curved cable (no text or symbols)natural_image
Side profile illustration of a person using a blood pressure monitor (no text or symbols)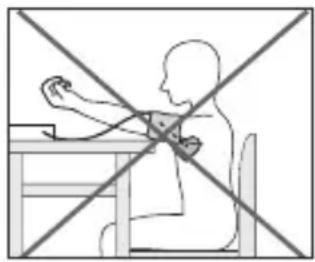
natural_image
Simple line drawing of a person sitting at a desk with crossed-out diagonal lines indicating no text or symbolswww.beurer.com/web/we-landingpages/de/cedeclarationofconformity.php
natural_image
Illustration of a human forearm wearing a wristband (no text or symbols)natural_image
Illustration of a medical procedure showing a hand holding a catheter connected to a leg, with no visible text or symbols.natural_image
Side profile illustration of a person sitting at a desk using a medical device (no text or symbols visible)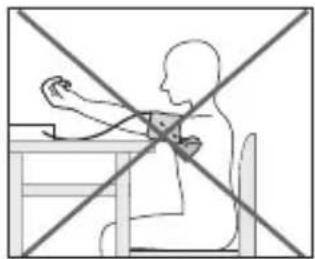
natural_image
Simple line drawing of a person sitting at a desk with crossed diagonal lines indicating no text or symbols (no text or symbols present)The Bluetooth ^® word mark and logos are registered trademarks owned by Bluetooth SIG, Inc. and any use of such marks by Beurer GmbH is under license. Other trademarks and trade names are those of their respective owners.
Apple and the Apple logo are trademarks of Apple Inc., registered in the U.S. and other countries. App Store is a service mark of Apple Inc., registered in the U.S. and other countries.
Google Play and the Google Play logo are trademarks of Google LLC.
Android is a trademark of Google LLC.

Beurer GmbH • Söflinger Straße 218 • 89077 Ulm, Germany