USER MANUAL PAN Minimeter Pancontrol
- Introduction ...... 19
- Scope of delivery....19
- Safety Instructions.... 20
- Symbols Description 22
- Panel Description ...... 23
- Symbols of the Display 24
- General Specifications 25
- Operating Instructions 27
- Maintenance 29
- Guarantee and Spare Parts 31
1. Introduction
Thank you for purchasing PANCONTROL. Since 1986 the PANCONTROL brand is synonymous with practical, economical and professional measuring instruments. We hope you enjoy using your new product and we are convinced that it will serve you well for many years to come.
Please read this operating manual carefully before using the device to become familiar with the proper handling of the device and to prevent faulty operations. Please follow all the safety instructions. Nonobservance cannot only result in damages to the device but in the worst case can also be harmful to health.
The technical progress is subject to change.
2. Scope of delivery
After unpacking please check the package contents for transport damage and completeness.
- Measurement device
- Test leads
- Operating manual
3. Safety Instructions
To ensure the safe use of the device, please follow all the safety and operating instructions given in this manual.
- Before using the device, make sure that test leads and the device are in good condition and the device is working properly (e.g. by connecting to known voltage sources).
- The device may not be used if the housing or the test leads are damaged, if one or more functions are not working, if functions are not displayed, or if you suspect that something is wrong.
- If the safety of the user cannot be guaranteed, the device may not be operated and secured against use.
- While using this device, hold the test leads only behind the finger guards - do not touch the probes.
- Never ground yourself while making electrical measurements. Do not touch any exposed metal pipes, fittings etc., which could have a ground potential. Ensure that your body is isolated by using dry clothes, rubber shoes, rubber mats or other approved insulation materials.
- Operate the device in a way that it is not difficult to operate the network separators.
- Always adjust the rotary switch to the desired measuring range before starting the measurement and engage the switch in the proper measuring range.
- If the magnitude of the signal to be measured is not known, always start with the highest measuring range on the rotary switch and then reduce step-by-step.
- If the measuring range needs to be changed during the measurement, remove the probes from the circuit first.
- Never turn the rotary switch during measurement, but always in the disconnected condition.
-
Never connect the device to voltage or current sources that exceed the specified maximum values.
-
Disconnect the power supply and discharge the filter capacitors in the power supply before measuring resistance or testing diodes.
- Never connect the test leads of the device to a voltage source, if the rotary switch is set to measure current, resistance or test diodes. This can damage the device.
- If the battery symbol appears in the display, replace the battery immediately.
- Always switch off the appliance before opening the device to exchange the battery or the fuse.
- Never use the device with the rear cover removed or with the battery and fuse compartment open!
- Do not use the device near strong magnetic fields (for e.g. welding transformer), as this can distort the display.
- Do not use the device outdoors, in humid surroundings or in environments that are subjected to extreme temperature fluctuations.
- Do not store the device in places which are exposed to direct sunlight.
- Remove the battery if the device is not used for a long time.
- If changes or modifications are made to the device, the operational safety is no longer guaranteed and the warranty becomes void.
- Before each measurement, check the function on a reliably functioning voltage source.
4. Symbols Description
| CE | Conforms to the relevant European Union directive (EN-61010) |
 | Product is protected by double insulation |
 | Risk of Danger. Important information See instruction manual |
 | Hazardous voltage! |
 | This product should not be disposed along with normal domestic waste at the end of its service life but should be handed over at a collection point for recycling electrical and electronic devices. |
| CAT III | The device is designed for making measurements in building installations. Examples are measurements on junction boards, circuit breakers, wiring, switches, permanently installed sockets, devices for industrial use as well as permanently installed motors. |
| 600 V | max. voltage to earth (AC / DC) |
| FUSED | Fused current measuring range |
 | DC voltage / current (DC) |
| AC voltage (AC) |
 | Fuse(s) |
 | Battery compartment / Battery test |
 | Ground / Earth (max. voltage to earth) |
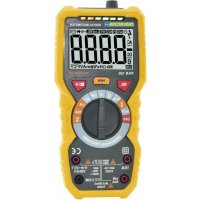
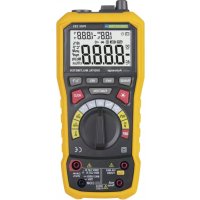
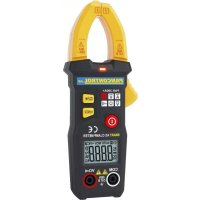
5. Panel Description
Note Fig. 1
- Non Contact Voltage tester (NCV) - Sensor
- NCV - Display (green / red / red)
- Display
- Point Illumination (Flashlight)
- Function keys (meaning see below.)
- Rotary switch
- Multi-function jack
- 10 A-jack
- Common jack (COM)
The function keys and their meanings
 | Point Illumination (Flashlight) |
 | BacklightDATA HOLD (keep displayed value) |
Symbols of the rotary switch
| OFF | Device switched off |
| NCV | Non Contact Voltage tester |
| V ~ | AC Voltage measurement |
 | Battery test |
 | DC current measurement(Alternating current measurements are not possible.) |
 | Continuity test / Diode test |
 |
| Ω | Resistance measurement |
| V = | DC Voltage measurement |
6. Symbols of the Display
Note Fig. 2
| Device switched on |
| DC | DC voltage / current |
| AC | AC voltage |
| V | DC Voltage measurement / AC Voltage measurement |
| A | DC current measurement(Alternating current measurements are not possible.) |
| Ω | Resistance measurement |
 | Diode test |
| Audible continuity test active |
 | Minus sign |
| DATA HOLD |
| Non Contact Voltage tester |
| ### | Battery low |
| OL | Overload indicator |
7. General Specifications
| Display: | 3 1/2 Digits (to 1999) |
| Overload indicator: | OL |
| Polarity: | automatically (minus sign for negative polarity) |
| Category | CAT III 600 V |
| max. voltage to earth: | 600 V AC / DC |
| Overload protection: | 600 V |
| Continuity test: | Beeping sound in less than 30 Ω |
| Diode test: | Open circuit voltage: max. 2,4 V |
| Power supply: | 2 x 1,5 V (AAA) Battery(s) |
| Fuse(s): | F 200 mA / 600 VF 10A / 600 V |
| Operating temperatute: | 0o C to 40o C / <80% Humidity |
| Storage temperature: | -10o C to 50o C (Remove the battery if Humidity >70%) |
| Weight: | ca. 195 g |
| Dimensions: | 150 x 70 x 50 mm |
| Function | Range | Resolution | Accuracy of the value displayed in % *) |
| DC voltage (V=) | 200 mV | 0,1 mV | ±(0,5% +2 digits) |
| 2 V | 0,001 V |
| 20V | 0,01 V |
| 200 V | 0,1 V |
| 600 V | 1 V | ±(0,8% + 2 digits) |
| AC voltage (V~) | 200 V | 0,1 V | ±(1,2% + 10 digits) |
| 600 V | 1 V |
| DC current (A=) | 2000 μA | 1 μA | ±(1,0% + 2 digits) |
| 200 mA | 0,1 mA | ±(1,5% + 2 digits) |
| 10 A | 0,01 A | ±(3,0% + 2 digits) |
| Resistance (Ω) | 200 Ω | 0,1 Ω | ±(0,8% + 3 digits) |
| 2 kΩ | 0,001 kΩ | ±(0,8% + 2 digits) |
| 20 kΩ | 0,01 kΩ |
| 200 kΩ | 0,1 kΩ |
| 20 MΩ | 0,01 MΩ | ±(1,2% + 3 digits) |
| Function | Range | Display |
| Diode test | 1 V | Voltage drop |
| Audible continuity | < 30 Ω | LED green / Acoustic signal |
| Non Contact Voltage tester | Low | LED green / Acoustic signal |
| High | LED red / Acoustic signal |
| Batt. Test | 1,5 V / Internal load 100 Ω | Voltage measurement with Load |
| 9 V / Internal load 400 Ω |
8. Operating Instructions
- Be aware of the Safety Instructions (Chapter 3)
- Please refer to the sketches on the first pages of this manual.
- Always switch OFF the device when it is not in use.
Point Illumination (Flashlight)
In low light conditions, you can illuminate the measuring point. To turn on and off, press the button (3). (Turns off atomically after 3 minutes.)
Backlight
To turn the backlight on or off, press for two seconds the button (3).
DATA HOLD (keep displayed value)
If the reading could not be read during measurement due to difficult operation the „HOLD“-button (3) could be pressed to freeze the display reading.
- Press the „HOLD“-button to freeze the display reading.
- The display shows the „HOLD“-symbol to indicate the activated HOLD function.
- Press the „HOLD“-button again to return to standard operation.
Auto power off
If no further measurements are carried out, the device switches off automatically after 10 minutes.
Voltage measurement (AC / DC)
- Set the rotary switch to the position V^ or V=
- Touch the measuring points with the probe tips.
- Once the reading stabilizes, read the value.
DC: If the polarity is reversed a "Minus sign" is displayed.
(only AC)
- Set the rotary switch to the position NCV
- Hold the top of the meter to an electrical outlet or cable (<5 mm). When it comes to alternating voltage, the LED display (3) lights up.
At low alternating voltage - or greater distance - the indicator shows "L" (low), the green LED lights up and a beep sounds.
At higher alternating voltage, the display shows "H" (high), the two red LEDs light up and a higher signal sound sounds.
Attention!
Even without an alarm, dangerous voltage can be concerned! This depends on various factors. Therefore, if necessary, check the zero voltage with the voltmeter.
DC current measurement (DC)
(Alternating current measurements are not possible.)
- Set the rotary switch to the position A=
- Switch off the power source and open the circuit to be tested at the position you are going to measure the current.
- Turn on the current and touch the measuring points with the test tips.
- Once the reading stabilizes, read the value. If the polarity is reversed a "Minus sign" is displayed.
Attention!
To avoid electric shocks, turn off the current of the device being tested and unload all capacitors before performing the following measurements.
Resistance measurement
- Set the rotary switch to the position
- Touch the measuring points with the probe tips.
- Once the reading stabilizes, read the value.
Diode test / Audible continuity
The device automatically distinguishes between audible continuity and diode testing.
- Set the rotary switch to the position
- Touch the measuring points with the probe tips.

Diode test:
- The forward voltage shows 400 to 700mV. The counter voltage shows „OL”. Defective devices show a value about 0 mV or „OL” in both polarities.
Audible continuity:
- If there is a resistor < 30 Ω, you hear a beep. When the circuit is open, the display shows "OL".
Battery test
- Set the rotary switch to the position
- Touch the measuring points with the probe tips.
- Once the reading stabilizes, read the value. The device displays the voltage of the tested battery under load.

9. Maintenance
Only authorized service technicians may repair the instrument.
If the instrument is malfunctioning, please test:
- Battery condition and polarity
- Condition of the fuse(s) if available.
- Condition of the test leads.
Attention!
Always switch off the appliance and remove the test leads from all voltage sources before opening the device to exchange the battery or the fuse.
Changing the battery(s)
Replace the battery(s) when the battery symbol or BATT is displayed on the LCD.
- Open the device.
- Replace the spent battery with a new one - note the correct polarity
- Close the device.
- Disposal of the flat battery should meet environmental standards.
Changing the fuse(s)
- Open the device.
- Remove the broken fuse carefully from ist holder.
- Reinset the new fuse and ensure proper fitting. Use equivalent fuses only.
- Close the device.
Cleaning
If the instrument is dirty after daily usage, it is advised to clean it by using a humid cloth and a mild household detergent. Prior to cleaning, ensure that instrument is switched off and disconnected from external voltage supply and any other instruments connected. Never use acid detergents or dissolvent for cleaning.
10. Guarantee and Spare Parts
PANCONTROL instruments are subject to strict quality control. However, should the instrument function improperly during daily use, your are protected by a 24 months warranty from the date of purchase (valid only with invoice).
Only trained technicians may carry out repairs to this device.
Further information on complaint handling can be found at:
In case of spare part requirement or in case of queries or problems, please get in touch with your vendor or:
KRYSTUFEK.at
Dipl.Ing. Ernst KRYSTUFEK GmbH & Co KG
Error and misprints reserved.
Vienna, April 2021
PANCONTROL.at
(alleen AC)
Non-stika napetost tester (NCV)
(samo AC)
(numai AC)