
HF920P 011 - Broom HOOVER - Free user manual and instructions
Find the device manual for free HF920P 011 HOOVER in PDF.

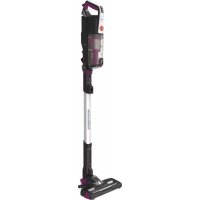
| Product Type | 2-in-1 Cordless Stick Vacuum (stick and handheld vacuum) |
| Brand | Hoover |
| Model | HF920P 011 |
| Category | Stick |
| Operating Modes | 3 modes: stick, height, handheld |
| Battery | Removable lithium-ion, full charge in 3.5 h, runtime varies by mode |
| Charger | Original double-insulated charger, 230 V (240 V UK) |
| LED Screen | Yes: displays battery level, selected mode, and error codes |
| Brush LED Lighting | Yes |
| Filtration System | Foam pre-motor filter + exhaust filter, washable |
| Dustbin Capacity | Approx. 0.5 L (max fill line) |
| Anti-tangle | Yes, ANTI-TWIST system with built-in comb |
| Included Accessories | Mini turbo brush, 2-in-1 all-surface/furniture brush, crevice tool, additional battery, wall mount with screws |
| Weight | Approx. 2.5 kg (assembled) |
| Dimensions (approx.) | Adjustable height with telescopic tube |
| Battery Warranty | 2 years from date of purchase |
| Safety | Use by children over 8 under supervision; do not use on wet surfaces or outdoors; unplug before maintenance |
| Maintenance | Empty dustbin after use; wash filters every 5 empties; clean main brush and mini turbo brush |
| Error Codes | E1: filter missing; E2: battery fault; E3: cover not closed properly; E4: brush problem; E5: blockage; E6/E8: technical problem; E7: unauthentic charger; E9: mini turbo brush blockage |
| Standards | Compliant with European directives 2014/35/EU, 2014/30/EU, 2011/65/EU |
Frequently Asked Questions - HF920P 011 HOOVER
User questions about HF920P 011 HOOVER
0 question about this device. Answer the ones you know or ask your own.
Ask a new question about this device
Download the instructions for your Broom in PDF format for free! Find your manual HF920P 011 - HOOVER and take your electronic device back in hand. On this page are published all the documents necessary for the use of your device. HF920P 011 by HOOVER.
USER MANUAL HF920P 011 HOOVER
This appliance should only be used for domestic cleaning, as described in this user guide. Please ensure that this guide is fully understood before operating the appliance.
Always switch off and remove the charger from the socket before cleaning the appliance or any maintenance task.
This appliance can be used by children aged from 8 years and above and persons with reduced physical, sensory or mental capabilities or lack of experience and knowledge if they have been given supervision or instruction concerning use of the appliance in a safe way and understand the hazards involved. Children shall not play with the appliance.
Cleaning and user maintenance shall not be made by children without supervision.
If the power cord is damaged stop using the appliance immediately. To avoid a safety hazard, an authorised Hoover service engineer must replace the power cord.
Use only the original charger supplied with the appliance.
Check that your supply voltage is the same as that stated on the charger. This appliance is supplied with a double insulated battery charger which is only suitable for insertion in a 230V (UK 240V) socket outlet.
Plug the charger in to suitable socket outlet and connect the charger jack plug to the appliance.
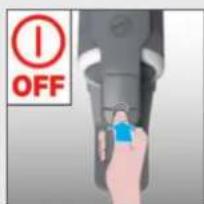
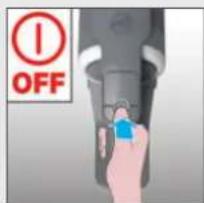
When charging the appliance, the power switch lever must be in the off position.
The battery pack LED light will illuminate Red during charging and will turn white when fully charged.
Re-connect the appliance to the charger after use to recharge the battery.
Never charge the batteries in temperatures above 37^ or below 0^ . It is normal for the charger to become warm to the touch when charging.
Unplug the charger in the event of prolonged absence (holidays, etc.). Recharge appliance again before use as batteries may self discharge over increased periods of storage.
Use only attachments, consumables or spares recommended or supplied by Hoover.
Static electricity: some carpets can cause a small build up of static electricity. Any static discharge is not hazardous to health.
Keep hands, feet, loose clothing and hair away from rotating brushes.
Do not unplug the charger by pulling on the power cord.
Do not use your appliance out of doors or on any wet surface or for wet pick up. Do not pick up hard or sharp objects, matches, hot ashes, cigarette ends or other similar items.
Do not spray with or pick up flammable liquids, cleaning fluids, aerosols or their vapours.
Do not run over the power cord when using your appliance or remove the plug by pulling on the power cord. Do not continue to use your appliance or charger if it appears faulty.
Do not use the appliance to clean animals or people. Do not replace the batteries with non-rechargeable batteries.
Hoover service: To ensure the continued safe and efficient operation of this appliance we recommend that any servicing or repairs are only carried out by an authorised Hoover service engineer.
End of product Life disposal
If the appliance is to be disposed of the batteries must be removed. The appliance must be disconnected from the supply mains when removing the battery. Dispose of the batteries safely. Run the appliance until it stops because the batteries are fully discharged. Used batteries should be taken to a recycling station and not disposed of with household waste. To remove the batteries, please contact the Hoover Customer Centre or proceed according to the following instructions.
IMPORTANT: Always fully discharge the batteries before removal.
Run the cleaner until the batteries are completely empty. Remove the charger jack plug from the appliance.
Press the battery pack release buttons and slide to remove.
Note: Should you experience any difficulty in dismantling the unit or for more detailed information on treatment, recovery and recycling of this appliance, please contact your local city office or your household waste disposal service.
The Environment
The symbol on this appliance indicates that this appliance may not be treated as household waste. Instead it must be handed over to the applicable collection point for the recycling of electrical and electronic equipment. Disposal must be carried out in accordance with local environmental regulations for waste disposal. For more detailed information about treatment, recovery and recycling of this appliance, please contact your local city office, your household and waste disposal service or the shop where you purchased the appliance.

This appliance complies with the European Directives 2014/35/EU, 2014/30/EU and 2011/65/EU.
CANDY HOOVER GROUP S.r.l. Via Privata Eden Fumagalli, 20861 Brugherio (MB) Italy
2. IMPORTANT INFORMATION
Hoover Spares and Consumables
Always replace parts with genuine Hoover spares. These are available from your local Hoover dealer or direct from Hoover. When ordering parts always quote your model number.
Quality
Hoover's factories have been independently assessed for quality. Our products are made using a quality system which meets the requirements of ISO 9001.
Your Guarantee
The guarantee conditions for this appliance are as defined by our representative in the country in which it is sold. Details regarding these conditions can be obtained from the dealer from whom the appliance was purchased. The bill of sale or receipt must be produced when making any claim under the terms of this guarantee.
2 Year battery warranty
IMPORTANT: The battery in this cleaner is guaranteed for 2 years from the date of purchase. After 2 years the customer is liable for the cost of a new battery.
Subject to change without notice.
MAIN COMPONENTS:
A. Handheld unit
B.Mode button
C. Turbo button
D. On/Off Power button
E. LED Display
F. Dust bin release button
G. Dust bin
H. Dust bin flap release button
1. Handheld release button
J. Battery
K. Battery release button
L. Tube
M. Floor nozzle
N. Nozzle LED lights
O. Nozzle window
P. Brushbar release latch
Q. Brushbar staus light
R. Nozzle window release latch
S. Nozzle release pedal
T. Wall mount
U. Wall mount screws & fixings
V. Charger
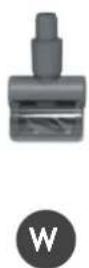
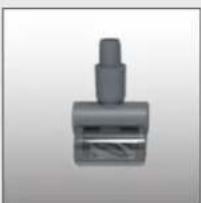
W. Mini-turbo nozzle
X. 2-in-1 Dusting brush/Furniture tool
Y. Crevice tool
Z. Extra battery


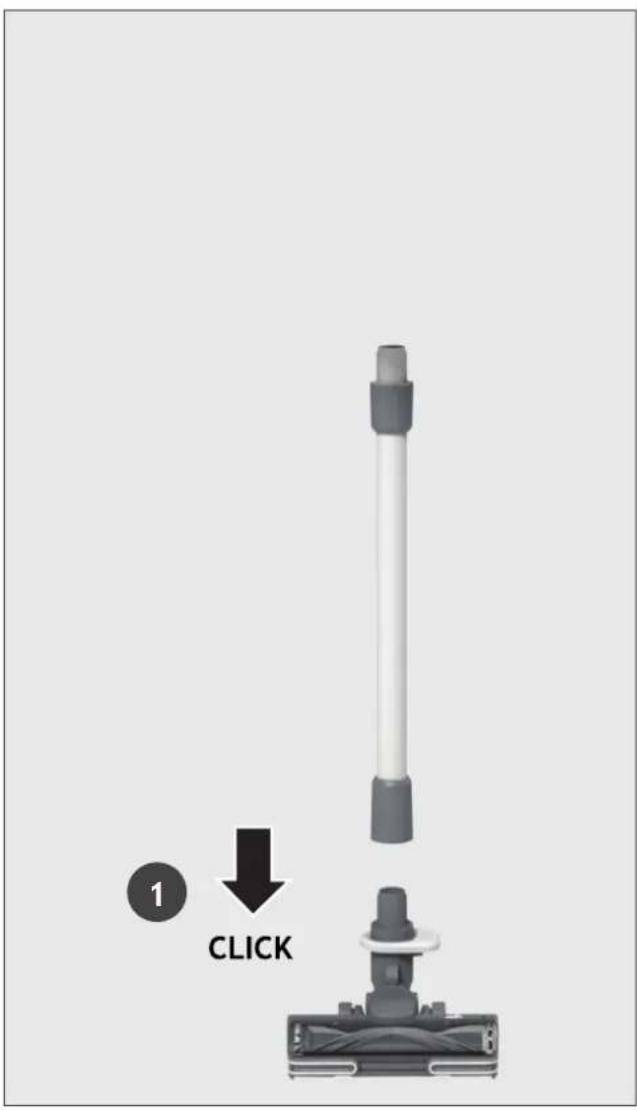
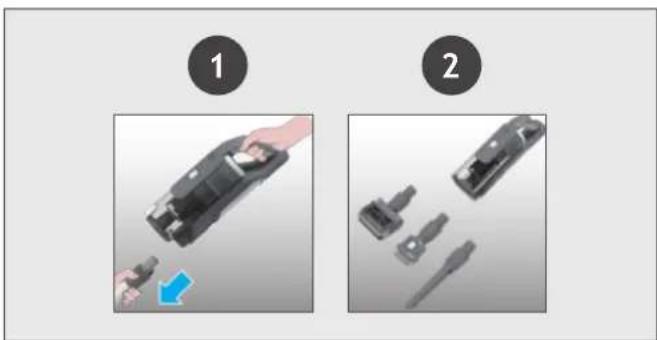
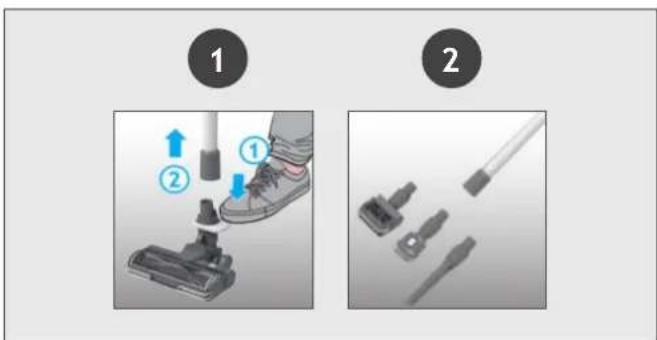
Remove all product parts from the packaging and assemble your cleaner.
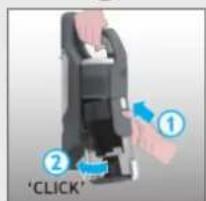
STEP 1: Fit the tube into the floor nozzle.
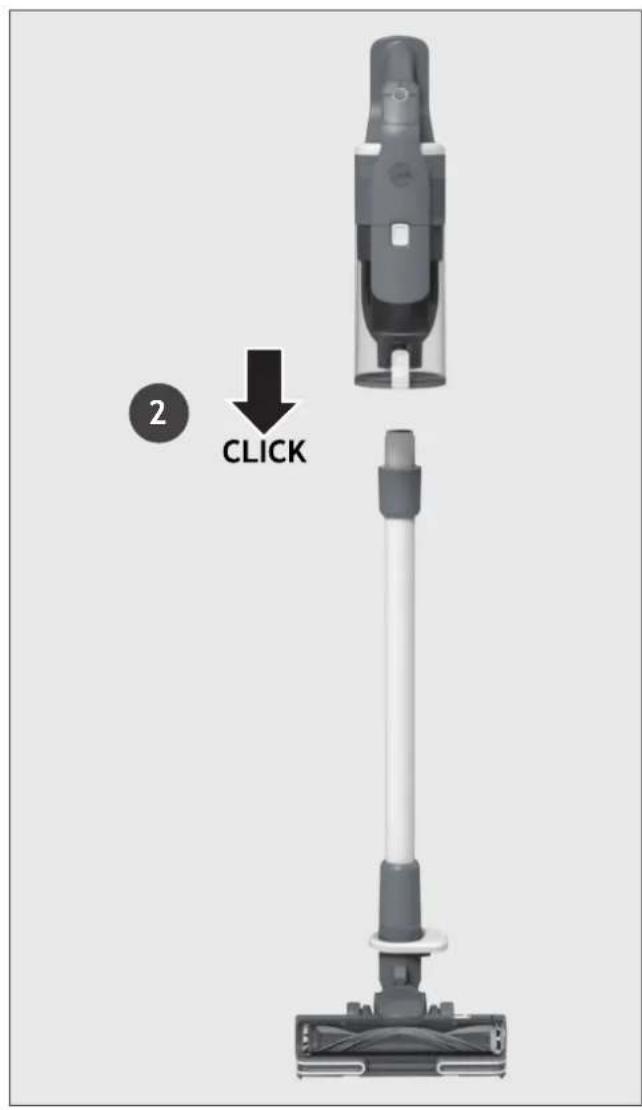
STEP 2: Fit the handheld unit onto the tube.
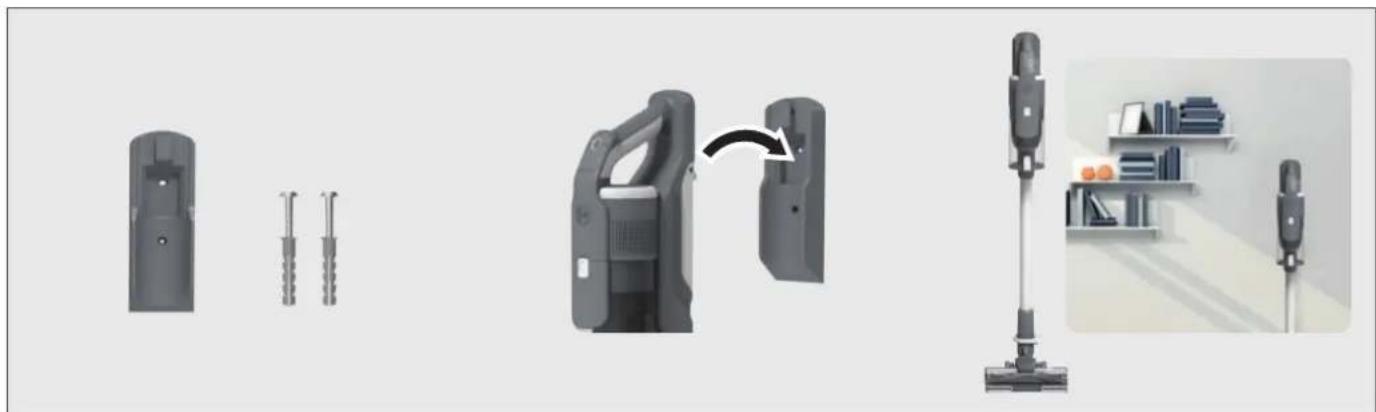
We provide a wall mount for optional storage.
If you wish to use it, fix the wall mount to a suitable wall using the screws and fixings provided.
5. CHARGING THE BATTERY
The battery in your product does not come fully charged.
Before first use, please charge it completely: this should take around 3.5 hours.
For your convenience, the battery can be charged in 3 different conditions.
- With the product fully assembled in stick mode or located in the wall mount, the battery status will be indicated on the LED display.
- With the product In the handheld mode, the battery status will be indicated on the LED display.
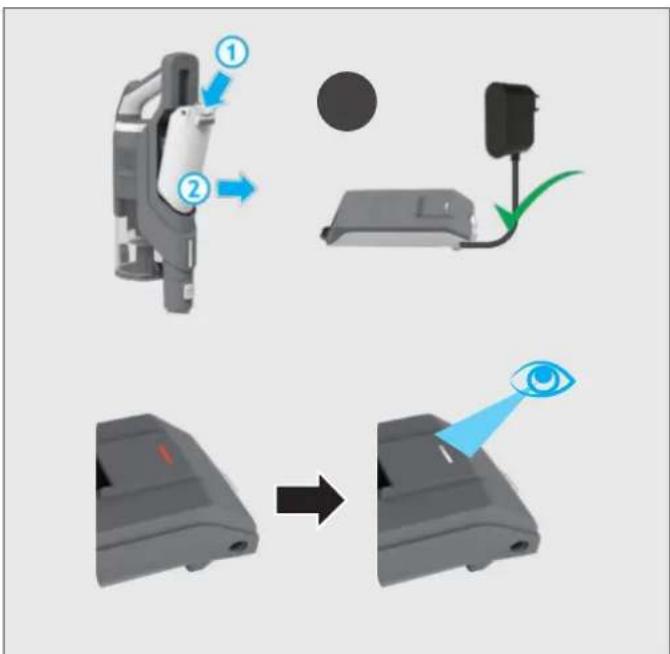
- With the battery removed from the product, the battery pack led will illuminate RED when charging and turn WHITE when fully charged.
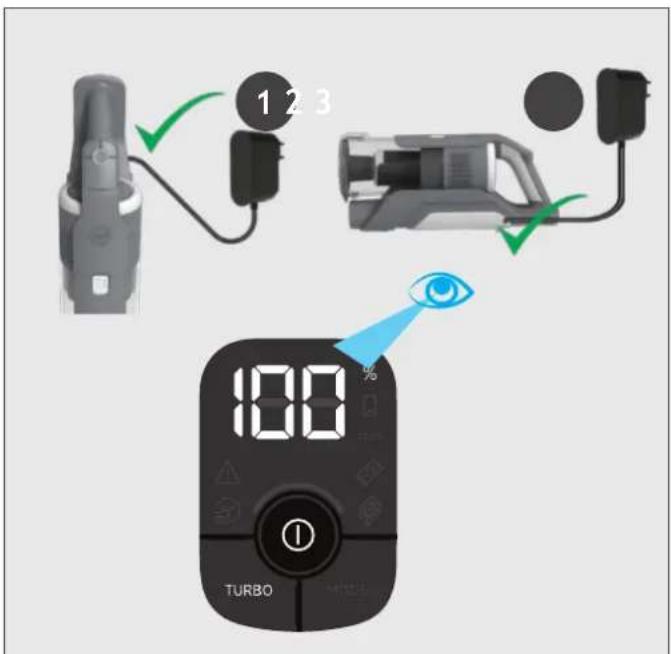
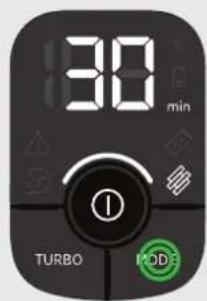
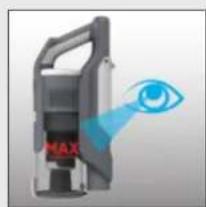
When using your product, the real time charge level of your battery is indicated on the LED display located on the handheld.
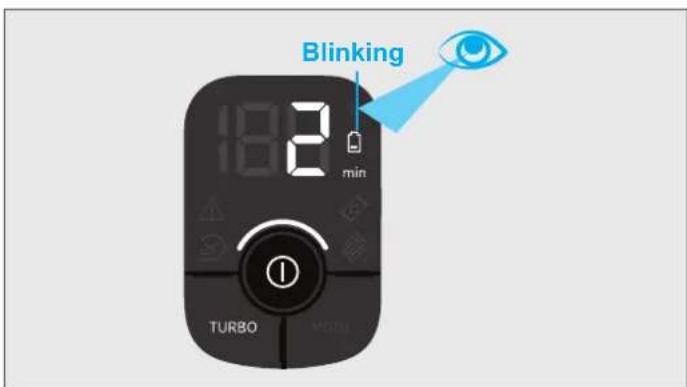
When the remaining run time is reduced to 2 mins, the LED display icons will begin to blink.
It is recommend you switch off your product and recharge the battery.
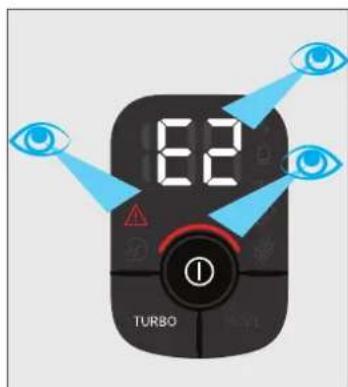
In the unlikely event that your LED display shows an error code E2, this indicates a fault with your battery.
It is recommend that you immediately switch off your product, remove the battery and contact your local Hoover service centre.
6. USING YOUR CLEANER
There are 3 different working modes for your cleaner:
- Stick mode.
- Above Floor mode.
- Handheld mode.
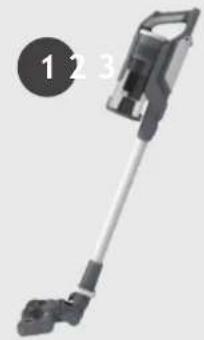
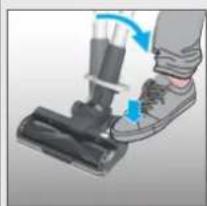
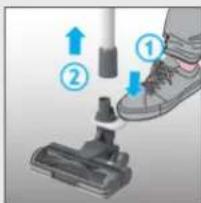
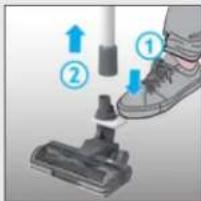
6.1 STICK MODE
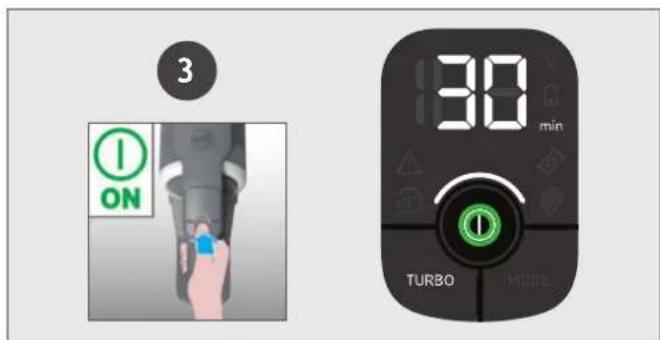
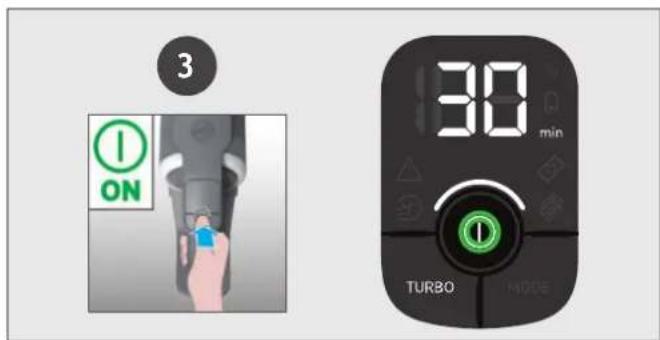
To use your product in Stick mode:
- Place your foot on the nozzle and pull back to recline the tube.
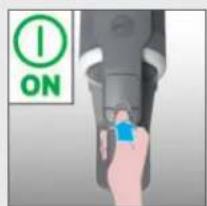
- Press the On/Off power button to begin cleaning.
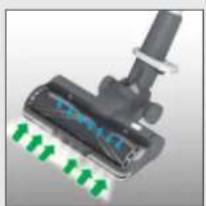
NOTE: The nozzle LED lights are always on and the brushbar is always rotating.
1
2
Controls settings:
Press the MODE button to select your desired floor surface, the LED display icon of HARD FLOOR or CARPET will illuminate to confirm your setting.
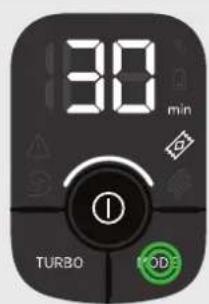
If you require a deeper clean when using your product in Stick mode, press the turbo button to increase the power.
The turbo icon will illuminate on the LED display to confirm your selection.
Please note this will reduce your battery runtime.
To return to standard mode, press the turbo button, the icon on the display will turn off.
机

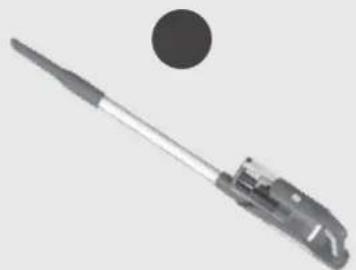
To use your product in Above Floor mode:
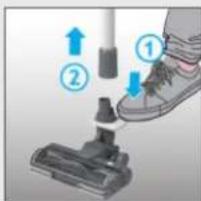
- Remove the tube from the nozzle by pressing the nozzle release pedal and pull the tube from the floor nozzle.
- Fit your desired accessory to the end of the tube. All of your available accessories will fit onto the end of the tube.
- Press the On/Off power button to begin cleaning.

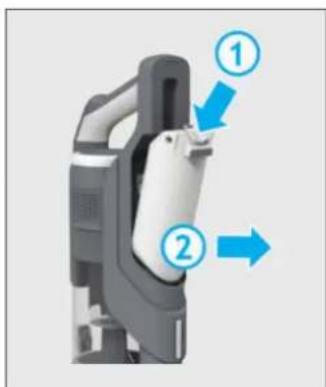
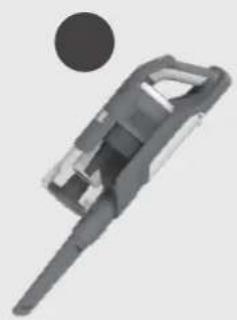
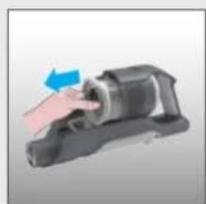
To use your product in handheld mode:
- Remove the Handheld unit from the tube by pressing the handheld release button and pulling apart.
- Fit your desired accessory to the end of the handheld unit.
The floor nozzle and all of your available accessories will fit onto the end of the handheld unit. - Press the On/Off power button to begin cleaning.
Control settings:
If you require a deeper clean when using your product in Above floor or Handheld mode, press the turbo button to increase the power.
The turbo icon will illuminate on the LED display to confirm your selection.
Please note this will reduce your battery runtime.
To return to standard mode, press the turbo button, the icon on the LED display will turn off.

7. CLEANER MAINTENANCE
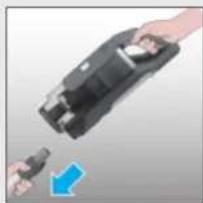
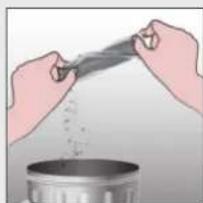
7.1 EMPTYING THE DUST BIN
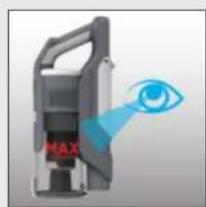
When the debris in your dust bin reaches the max fill line, empty your bin.
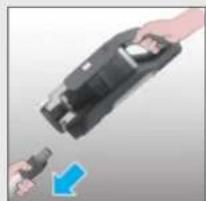
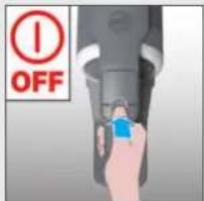
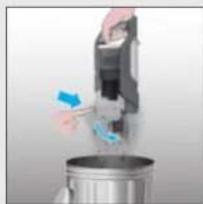
- Switch off your product.
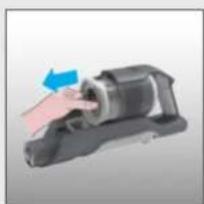
- Press the handheld release button and remove the handheld unit from the tube.
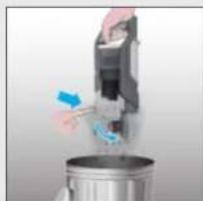
- Hold the handheld unit over a bin and press the bin flap release button to open the flap and release the debris into the trash.
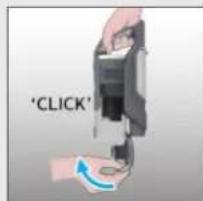
- Close the bin flap.
1234


7. CLEANER MAINTENANCE
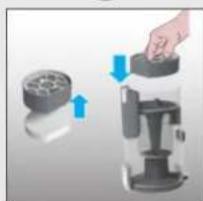
7.2 FILTERS
It is recommended to wash your filters after every 5 bin empties.
- Ensure your product is switched off.
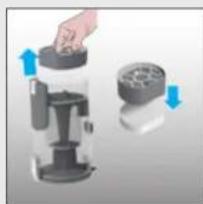
- Press the bin release button and remove the bin assembly from the handheld unit.
- Remove the pre-motor filters from the bin and separate the foam filter.
- Remove the exhaust filter from the handheld unit.
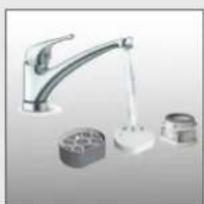
- Remove any excess debris from the filters and wash all 3 filters using lukewarm water.
- Leave to dry for 24hrs before refitting to your product.
- Use the cleaning tool provided to remove any excess debris from inside the dust bin.
- Re-fit the foam filter to the pre-motor filter and re-fit into the bin.
- Re-fit the exhaust filter to the handheld unit.
- Re-fit the bin to the handheld unit.
123456


7
8910


7. CLEANER MAINTENANCE
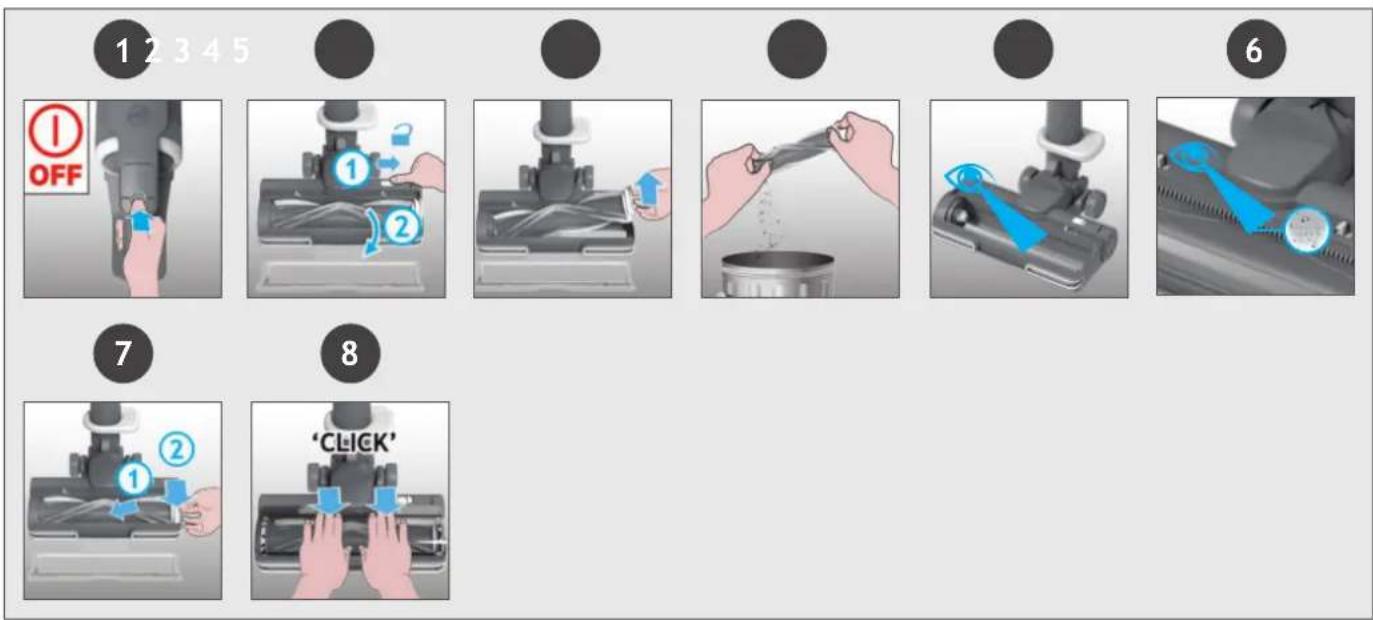
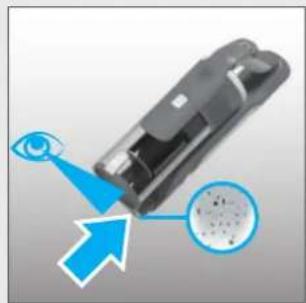
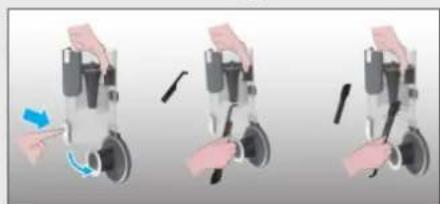
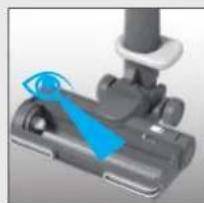
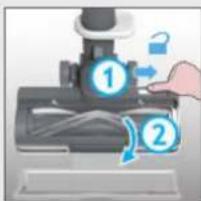
7.3 FLOOR NOZZLE
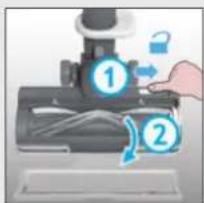
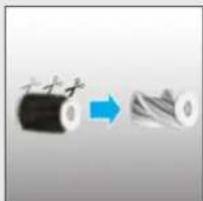
Thanks to ANTI-TWIST, your Hoover vacuum features an integrated comb which radically reduces hair wrapping around the brushbar. However, if your cleaner is not picking up efficiently your brushbar may need to be cleaned.
- Switch off your product.
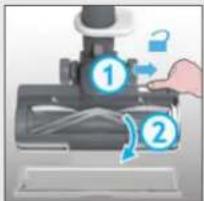
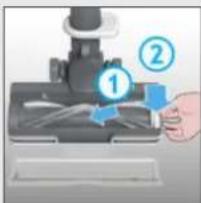
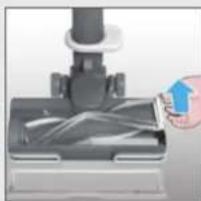
- Unlock the nozzle window sliding the nozzle window release latch and remove.
- Using the brushbar release latch, remove the brushbar from the nozzle.
- Remove any excess debris from the brushbar.
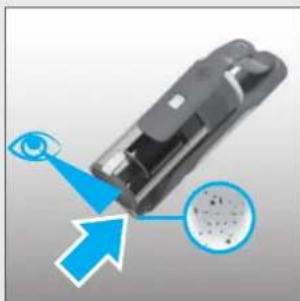
- Check for and remove any large debris from inside the nozzle.
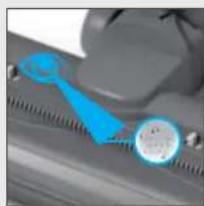
- Carefully check for and remove any tangled debris from the comb.
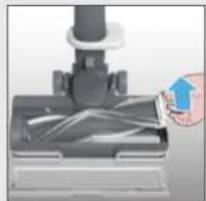
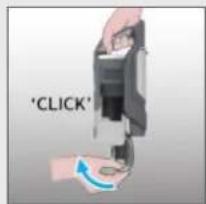
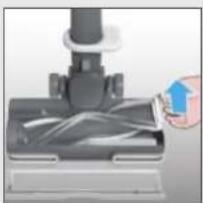
- Refit the brushbar to the nozzle ensuring the latch is fully in place.
- Refit the nozzle window by locating at the front of the nozzle and closing firmly into location.
IMPORTANT: Ensure the window is fully closed. If the nozzle window is not correctly reassembled, the nozzle LED lights will flash, the brushbar status light will turn red and error E03 will appear on the user interface.
7. CLEANER MAINTENANCE
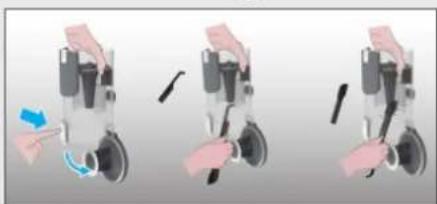
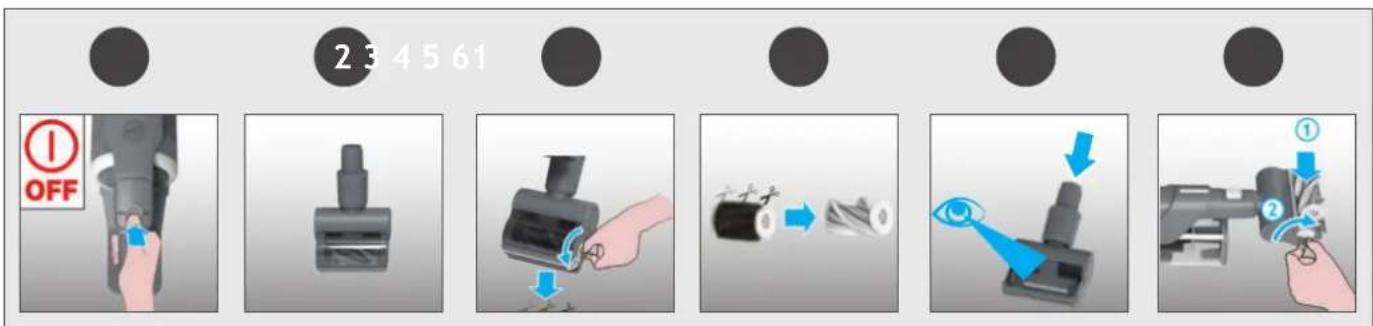
7.4 MINI-TURBO NOZZLE*
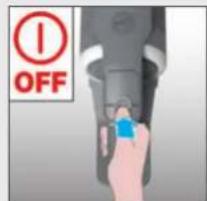
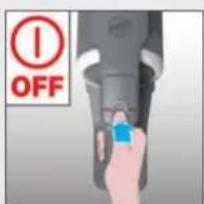
- Switch off your product.
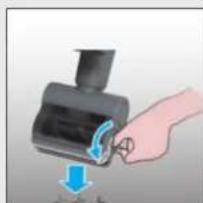
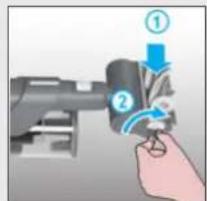
- Remove the mini-turbo nozzle from your product and turn over.
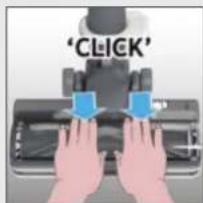
- Using a coin, open the brushbar release lock and remove the brush bar.
- Using scissors, remove any tangled fibres or debris from the brushbar.
- Look inside the nozzle and remove any debris.
- Refit the brushbar into the nozzle and using a coin, lock into position.
7. CLEANER MAINTENANCE
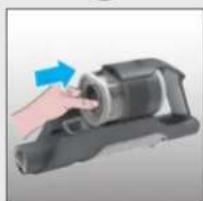
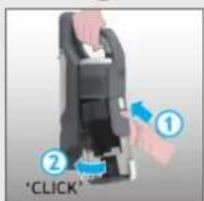
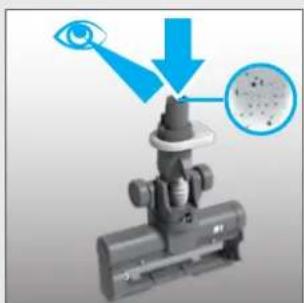
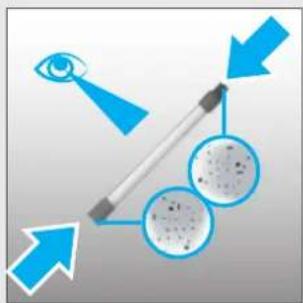
7.5 BLOCKAGES
If your product is still working but has low or no suction, you may have a blockage.
Carry out all maintenance instructions included in sections, 7.1, 7.2 & 7.3.
The following additional areas of your product should also checked for any debris or blockages:
- Switch off your product.
- Separate the Floor nozzle, tube and handheld unit as per previous instructions.
- Remove the nozzle window and brushbar from the nozzle as per previous instructions.
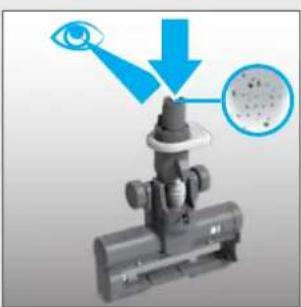
- Position the nozzle neck vertically and visually check for any debris or obstructions and clear.
- Visually check the handheld inlet connection area for any debris or obstructions and clear.
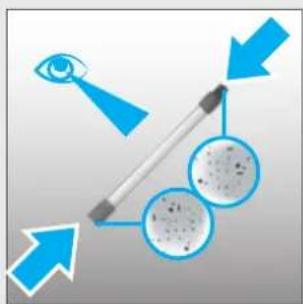
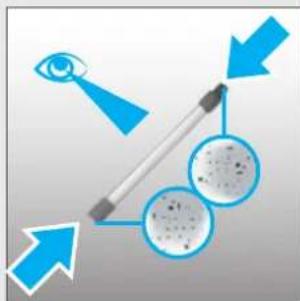
- Visually check both ends of the tube and remove any debris or obstructions.
Re-Assemble your product.

1
2

3

456
The following is a list of error codes & solutions that your product will identify and indicate on your LED display should you product encounter problems:
| ERROR CODE | FAULT & SOLUTION | |
| EO | The pre motor filter is missing!1. Press bin release button to remove the bin.2. Reassemble the pre motor filter in the correct position.3. Reassemble the bin. | |
| EI | Check if there is any obstruction in the nozzle.Go to section 7.3 and carry out ALL maintenance requirements. | |
| E2 | There is a technical issue in the battery pack.Remove the battery from your product and contact your local Hoover service centre. | |
| E3 | Check if the window nozzle is correctly assembled in the nozzle.1. Make sure the window is in place correctly.2. Press the window down gently to click it in securely. | |
| E4 | There is a technical issue in the main nozzle.Switch off your product and wait for 20mins.If the product still does not work, Contact your local Hoover service centre. | |
| E5 | E5 indicates there is a blockage in your product.Go to section 7 and carry out ALL maintenance requirements,Empty the bin, clean the filters, clean the nozzle & brushbar and check for blockages. | |
| E6 | There is a technical issue in the main vacuum止 stop using your product.Contact your local Hoover service centre. | |
| E7 | There is a technical issue in the charger.Please ensure you are using a genuine HOOVER charger.If the problem persists, stop using your product and contact your local Hoover service centre. | |
| E8 | There is a technical issue in the main vacuum止 Switch off your product and wait for 20mins.If the problem persists, stop using your product and contact your local Hoover service centre. | |
| E9 | E9 indicates there is a blockage in the mini turbo nozzle.Go to section 7.4 and perform the indicated maintenance task. |

m = 311 ;

7.1 POLYSÄILION TYHJENNYS
FI
Uvapmooynoe gava to npoiov oac.
1
2

3
456

Akooueiiaiaotkaowvopaatwkyauoeovnou to pioov oac aayvwipai kai thuodieoi otynoovnLED eepintwnouavtuptwiote npoBmaatae to pioiv:
He pacnbIyIte nn He co6npaTe ropOue XnKocTn, YnCTaUne cpeCTBa, a3p030Jn nn npOue napbl.
He nepebo3nte nbileocc uepe3 npoBOd nHTaHnI H He TAHnte 3a npoBOD, BbIHMaBnIKy I3 p03eTKn. He nCnoJIb3yUte np6Op nII 3apJdHoe yCTpOJCTBO, eCIn OHN HeNCnPpABHbl.
He nCnoIb3yIte npH6Op IJRA OUHCTKN XHBOTbIX HJI JIOJe. He nCnoIb3yIte o6bIuHbIe Henepe3apXaEMblc 6bTapeN BMeCTO nepe3apXaEMblx aKKMyJlTOpHbIX 6bTapeN.
CepBnchoe 6cbnyxHbAHne: Ira oecneueHHIPOdoJXHTeJbHO, 6e3oNaCHOH N OeKTHBOHpa60TbI daHHoro 6bITOBORO 3JeKTPoPnp6opap IIO60BnpeMOHTa peKOMeHdyeTCr POn3BOdntbTOJIbKO CNEuHaJIcCTOM aBTOpN3OBAHHORO cepBnchoro ceHTpa PpON3BOdNTeJI.
OKOHuaHne cpoKa HcNoJIb3OBAHnA
Pn Heo6xoJIMocTyn yTHIN3aun np6opa, BbInbTe n3 Hero 6atapeu. Npeed Tem, KaKdoCTaB 6atapeU,OTKNIOHTe np6op OT 3JeKTPocETn. Co6IouaIte npabHna
TexHnK 6e3oNaChOCTn npy yTHIn3aunn aKKymJlAToPHoN 6aTapeu. HcnoJIb3yIte npH6op do Tex nop, noka 6aTapee noHocTbU He pa3pAHTcR. HcnoJIb3OBAHHbIe
aKKymyIATOpHbIe 6aTapeH Heo6xOIMo CdaBaTb B CneUHaJIbHbI NpHKT npHeMa H He Bbl6paCbIBaTb C 6bIuHbIMn 6bITOBbIMN OTxOdAmN. YTo6bl N3BLeueb 6aTapeU, CBJXITecb C aBTOpN30BaHHbIM CepBnCHbIM cEHTPOM NII CNJeDyIte PnBBeDeHHbIM DaJIeE INHCTpyKcIaM BHIMAHNE! IpeTe TEm KaK N3BLeueb 6aTapeU N3 NblncocA, y6eINTEcb, YTO OHa NOJIHoCTbIO pa3prjKeHa.
m = 311 ;
1
m = 311
4To6bI nCnoJIb3OBA Tb npOdyKT BpeKHe HaJ noJOM:
- Chmnte Tpy6ky C hacaikn, Haxab Ha neaJIb pa36IOKIPOBKn Hacaikn, N BbITaIHTe Tpy6ky n3 Hacaikn IJI NOJa.
- YctaHOBHTe Heo6xOdIMbI akceccyap Ha KOHe Tpy6Kn.
Bce HmEoUneecy Bac akceccyapbl NOMEuaTcHa KOHcTe Tpy6Kn. - Haxmnte KhoNky BkIIOueHnry/BbIKIOueHnry NITaHnry, YTO6bl Haatb y60pKy.

YTo6bI HcNoJIb3OBA Tb yCTpoiCTBO B pyuHOM peKIMe:
- ChIMITE puHOn 6Iok C Tpy6Kn, HaxaB Ha KHOkny OcBO6OxJdeHnry puHOro 6Ioka n NotaHyB B CTOpOHy.
- YctaHOBHTe Heo6xOdHMbI akceccyap Ha KOHeu pyHoro 6noka.
HacaKa Iy noLa N Bce HMeIOUneCe y Bac akceccyapbI 6ydyT yCTaHOJIeHbI Ha KOHcpe pyHoro 6Joka. - HaxMMTe KhoNkY BkIIOueHn/ BbIKIOueHn IITaHn, YTO6bl Haatb y60pKy.


Hactpoynu npableny:
EcnBam Tpe6yeTc 60Jee rIy6okaj ouHCTka npn HcNoJIb3OBAHH yCTpoiCTBa B peKmme "HaI IOnom" HIN "PyHoi", HaKMITE KHOJky Typ6o, YTO6bl yBeJIuHTb MOUHOCTb.
3HaOK turbo 3aROpNTc Ha CBeToIOHOHOM dncnlee, noTBePxxJa Baw BbI6op.
06paHTe BHHMaHHe, yTO 3TO npBBeTeK cokpaueHnIO BpeMeHn pa6oTbI 6aTapen.
YTO6bI BepHyTbcB CtAHdApTHbIpeKIM, HAKMITE KNONKy Typ6o,3HaQOK Ha CBETOIOHOM DnCnJIee NOraCHET.

7. TEXHINCHECKOE OBCJYXHBAHNE NblIECOCA
7.1 ONOPOXHEHNE KOHTENHEPA DJIY CBOPA NblIN
Korda KoJIyEcTBo Mycopa B KOHTeHHepe dIa c6opa nbIIN DOCTnHET IHHN MaKcMaJIbHOrO 3aONHeHn, ONOpOXHnTE KOHTeHep.
- BbIKHIOUHTe yCTPOINCTBO.
- Haxmte Ha KhoNky OTCoeHHeHnO OCHOBHO yCTPOHCTBa IJr TORo, YTO6bl OTcoeHNHTb erO OTpy6bl.
- YdepKnBa pyHoe yctpoNCTBO Ha MycOpHbIM BeDpOM, HaxMITE KHNky OCB6OxJDeHnA 3acIOHKn MycOpHOro BeDpa, YTO6bl OTKpbITb 3aCIOHky N BbIyCTNTb MycOp B MycOpHoe BeDpo.
4.3akponTe 3acNoHKy KOHTeHepa.
1234


7. TEXHINUECKOE OBCJNYKUBAHNE NblIECOCA
7.2ФИЛbTPbl
PekomeHdyetc npombBaT b nIbTpbl nocJe KaXdbix 5 onopoxHeHH KOHTeHepa.
- y6eHNTecb, yTO yCTPOINCTBO BbIKJIIOUHeHO.
- HaxMMTe KHOIIky OCB60KJdHnRA KOHTeINHePA n CHIMMTe y3eJI KOHTeINHePA c pyuHoro 6Ioka.
- N3BLeKHTe 0nIbTpbl npEIMOTOPHOrO 0nIbTppa H3 KOHTeINHePa HOTDeJIte NOpOJOHOBbI 0nIbTp.
- CHIMnTe BbInyckHOn ΦnJIbTp c pyuHoro 6JIOka.
- YdaHnTe IHHm MycOp c HnbTpoB n npomOte Bce 3 HnbTpa TeNoB BOdoN.
- Octabte cyuHbCnHa 24 yaca nepei ycTaHOBKOHa yCTPOcTBO.
7.Испοльзуг Te npилагаembl nHctpymeHT dЯ OUHCTKN, yTO6bl ydaJIITb JINSHHm MycOp n3 KOHTeHepa dЯ c6opa nbIIn. - YcTaHOBtPe NopOIoHObBi NJIbTp Ha IpeDMOTOpHbI NJIbTp IN CHOBa YcTaHOBtPe erO B KOHTeHep.
9.3aHOBO yCTaHOBHTe BbITJxHON HnIbTp Ha pyuHoe yCTpOncTBO. - YctaHOBInTe KOHTeINHep Ha pyuHoe yCTpOINCTBO.
123456


7
8910


7. TEXHINUCKOE OBCJNUXKUBAHNE NblIECOCA
7.3 HACADKAДЯ NOJA
BlaoradapcncTeMe ANTI-TWIST Bau nIeoc Hoover ochaen BCTpoehHOn rpe6eHko, KOTopa 3HaHTeNbHO yMeHbShaet HamaTbIBaHne BOLOc Ha 9eTKy. Odako ecnn Baaw nIeococ co6npaet nbIb He3oEKTNBHO, MoKETnOTpe6oBaTbcra YNCTKa 9eTKn.
- BbIKHouHTe yCTPOINCTBO.
- Pa36Jokpyte OKHO HacaK, CdbnHyB 3aueKy fckatopa OKHa HacaK, IN CHIMTe erO.
3.CnOMObIO 3aueJKN CHHmnte 9eTky C HacdKn. - YdaJInte JInuHm MycOp co 5eTkn
- IpoBepbTe HauHne n ydaJIHTe KpyNbMycOp n3HyTpHn HacdKn.
- TuaTeNbHO npOBepbTe n ydaJIte CnyTaHHbIe cactnbln H3 rpe6eHNK.
- YctaHOBHTe 9ETKHa HacaIKy, y6eINBWHscb, yTO 3aIeJka NOLHOCTbIO BCTaJa Ha MeCTO.
- YctaHOBHTe Ha MeTO OKHO HacaIKH, pacnoIOXHB erO B nepeJHeu qACTn HacaIKN I NLOTHO 3aOKCnpOBAB. BHIMAHNE! U6eINTecb, yTO OKHO NOIHOCTbIO 3akpbITo. EcNI OKHO HacaIK CO6paHO He npabNtbo, CBETOHOIDHbe INdNKATOpbl HacaIK 6ydyT MHRaTb, INdNKATOP COCTOHHN tETKN CTAHET KpacHbIM, a HA NOJIb3OBaTeNbckOM INTEPoeCe NOBHTcR Own6ka E03.
12345


7.4 MHHN-TYPEBOLUETKA*
- BbIKHIOHTe yCTPOINCTBO.
- CHIMITE MHHI-Typ6oJcKy c yctpoiCTBa H nepeBepHnTe.
- C NOMOJIIO MOHETBI OTKPOITe 3AMOK OHKCATOPA UETKN H CHHMTTE UETKY.
4.CnOMObIO HOXHNu ydaJIHnTe cnyTaHHbIe BOJOKHa Hm MycOp CO CTepKHa UeTKN. - 3aIJIHHTe BHyTpB HacaIKN I ydaJIHTe Mycop.
- YctaHOBHTe 8ETky B Hacaiky I C NOMObIO MOHeTb3aHcNpyTe ee B HyXHom NOJIOKeHH.

234561


7. TEXHINUeCKOE OBCJYKINBAHNE IbIIECOCA 7.53ACOPbl
EcInBaIe yCTpoHCTBO npoOJIkaeT pa60TaB, HO BCaCbIBaHHe Cna6oe HIN OTCyTCTByET, BO3MOKHO, y Bac 3acop. BInOnHHTe BCE INCHCTpyKUnn NO o6cnyXHBaHHIO, npNBedeHHbE B pa3deJax 7.1, 7.2 n 7.3.
CneyuHnne doonHnTeBHeIe oNactn yctpoiCTBa TaKke CneDyET npOBepNTb Ha HauuHcMycopa nn 3acopenH:
- BbIKHIOUHTe yCTPOINCTBO.
- OTeJIInTe HacaKy IaI nona, Tpy6ky n pyuHoi 6Jok B COOTBeTCTBnC npebldyuIMM HHCTpykUmaMn.
- CHMnTe OKHO HacaKn H zETky C HacaKn B COOTBeTcTBn C npebldyuHmN HHCTpyKUaMn.
- YcTaHOBInTe rOpIOBHy hAcAnKn BepTnKaJIbHo N BV3yaJIbHo npOBepbTe Ha HAIuYHe MyCopa IINI ppeIaTcBm I OChCTHtE.
- Bn3yaIbHo npOBepbTe o6IacTb BnYcKHoro natpy6ka pyHOn HacaKn Ha HaNue Mycopa nn npenrTcbn n OChCTHte.
- Bn3yaIbHo npOBepbTe o6a KOHc Tpy6Kn u ydaJIte IIO6oMycOp nI npenrTCTBna.
Co6epnte yctpoiCTBO 3aHOBO.
1
2

3

456
Hnke npBedeH cnncok Koob Oun6ok n peweHH, KOtOpbIe 6ydyT onpeJeHbI n Noka3aHbHa CBToDnOHDHom dncnlee B clyae Bo3HKnHOBeHHn npo6m B pa6oTe yctpoNCTBa:
7.4 SSAWKA MINITURBO*

m = 311
| Manufacturer Name | E-TEK Electronics Manufactory Co.LTD |
| Manufacturer Address | 101, Workshop 1, No. 5, Jingye Road, Yanchaun Community, Yanlo Street, Bao'an District, 518105, Shenzen, Guangdong, (PRC) |
| Model | ZD024M268120BS |
| Input Voltage | 100-240 V |
| Input AC Frequency | 50/60 Hz |
| Output Voltage | 26.8 V DC |
| Output Current | 1.2 A |
| Output Power | 32.16 W |
| Average Active Efficiency | 87.2 % |
| Efficiency at load 10% | 86.0% |
| No-Load Power Consumption | 0.10 W |


- The Environment
- IMPORTANT INFORMATION
- Hoover Spares and Consumables
- Quality
- Your Guarantee
- Year battery warranty
- MAIN COMPONENTS:
- CHARGING THE BATTERY
- USING YOUR CLEANER
- STICK MODE
- Control settings:
- CLEANER MAINTENANCE
- EMPTYING THE DUST BIN
- FILTERS
- FLOOR NOZZLE
- MINI-TURBO NOZZLE*
- BLOCKAGES
- POLYSÄILION TYHJENNYS
- TEXHINCHECKOE OBCJYXHBAHNE NblIECOCA
- ONOPOXHEHNE KOHTENHEPA DJIY CBOPA NblIN
- TEXHINUECKOE OBCJNYKUBAHNE NblIECOCA
- 7.2ФИЛbTPbl
- TEXHINUCKOE OBCJNUXKUBAHNE NblIECOCA
- HACADKAДЯ NOJA
- MHHN-TYPEBOLUETKA*
- TEXHINUeCKOE OBCJYKINBAHNE IbIIECOCA 7.53ACOPbl
- SSAWKA MINITURBO*
Brand : HOOVER
Model : HF920P 011
Category : Broom