
Duo Smart - Car seat Chipolino - Free user manual and instructions
Find the device manual for free Duo Smart Chipolino in PDF.
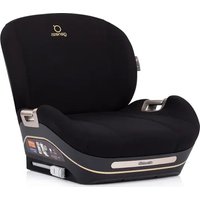
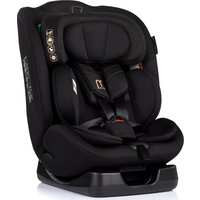
| Product Type | Enhanced universal child restraint system i-Size with harness |
| Brand | Chipolino |
| Model | Duo Smart |
| Category | Car seat |
| Homologation | UN Regulation 129/03 (i-Size) |
| Use | Rear-facing only |
| Child height | 40 to 87 cm |
| Child weight | Up to 13 kg |
| Vehicle attachment | ISOFIX + support leg |
| Harness | 5-point, height adjustable (6 positions) |
| Headrest | Height adjustable |
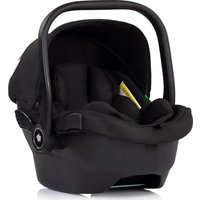
| Carry handle | Yes, multiple positions |
| Canopy | Removable and foldable |
| Additional padding | For child from 40 to 75 cm |
| Seat weight (base included) | Approx. 10 kg (estimation) |
| Dimensions (L x W x H) | Approx. 44 x 66 x 56 cm (estimation) |
| Cover material | Hand-washable damask |
| Care and cleaning | Hand wash at 30°C with mild detergent; do not bleach, wring, tumble dry, or iron; clean harness with mild soap |
| Safety | Do not install on a seat with active airbag; only use UN Regulation 16 approved 3-point seatbelt; check attachment before each use |
| Spare parts and repairability | Contact authorized service center; only use original parts |
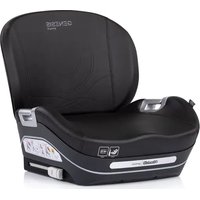
| Base compatibility | Compatible with Duo Smart, Elite and Encanto seats |
Frequently Asked Questions - Duo Smart Chipolino
User questions about Duo Smart Chipolino
0 question about this device. Answer the ones you know or ask your own.
Ask a new question about this device
Download the instructions for your Car seat in PDF format for free! Find your manual Duo Smart - Chipolino and take your electronic device back in hand. On this page are published all the documents necessary for the use of your device. Duo Smart by Chipolino.
USER MANUAL Duo Smart Chipolino
natural_image
Line drawing of a baby car seat with green safety clips, no text or symbols presentChipolino
продуктов номер / item number / cikkszám / número de artículo / codice articolo / artikelnummer / numéro d'article/ broj proizvoda / αριθμός προϊόντος / numărul produsului / número de produto / productnummer / číslo produktu / ʒmɒŋəŋʃnɒ 6mɒŋʃnɔ:
STKBS0251DE
ФИГУРИ / FIGURES / ÁBRÁK / CIFRAS / FIGURE / FIGUREN / LES FIGURES /
FIGURE / ΦΙΓΟΥΡΕΣ / FIGURILE / FIGURAS / FIGUREN / OBRÁZKY / uznaymugon
flowchart
graph TD
    A["Start: Laparoscopic Implant"] --> B["Step ①: Rear joint placement"]
    B --> C["Step ②: Mid-point positioning"]
    C --> D["Step ③: End of laparoscopic implant"]
    D --> E["Step ④: Final orthopedic implant placement"]
flowchart
graph TD
    A["Step ①: Seedling with leaves and a handle"] --> B["Step ②: Plant opening with green seeds"]
    B --> C["Step ③: Seedling with leaves and a handle"]
    C --> D["Step ④: Plant opening with green seeds"]
    D --> E["Step ⑤: Seedling with leaves and a handle"]
    E --> F["Step ⑥: Plant opening with green seeds"]

natural_image
Line drawing of a portable device with accessories and a label '10-210-3' below (no readable text or symbols on the device itself)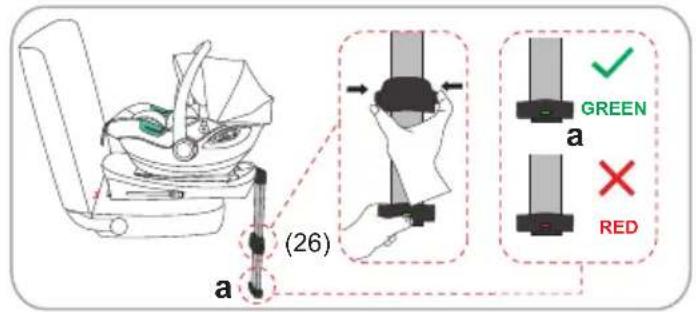

ФИГУРИ / FIGURES / ÁBRÁK / CIFRAS / FIGURE / FIGUREN / LES FIGURES /
FIGURE / ΦΙΓΟΥΡΕΣ / FIGURILE / FIGURAS / FIGUREN / OBRÁZKY / uznaymugon
natural_image
Line drawing of a portable toilet with a green seat and blue tray, labeled '11-211-3' below (no text on diagram itself)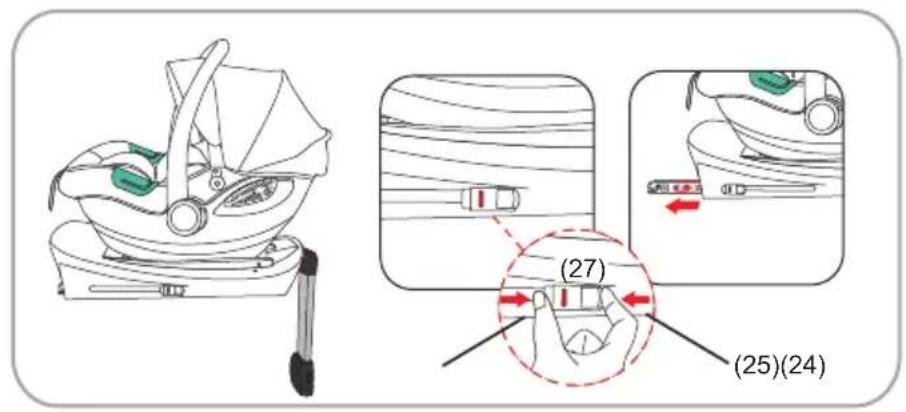

natural_image
Line drawing of a car seat assembly with no text or symbols


natural_image
Side profile line drawing of a car showing two seated individuals inside the seat (no text or symbols)

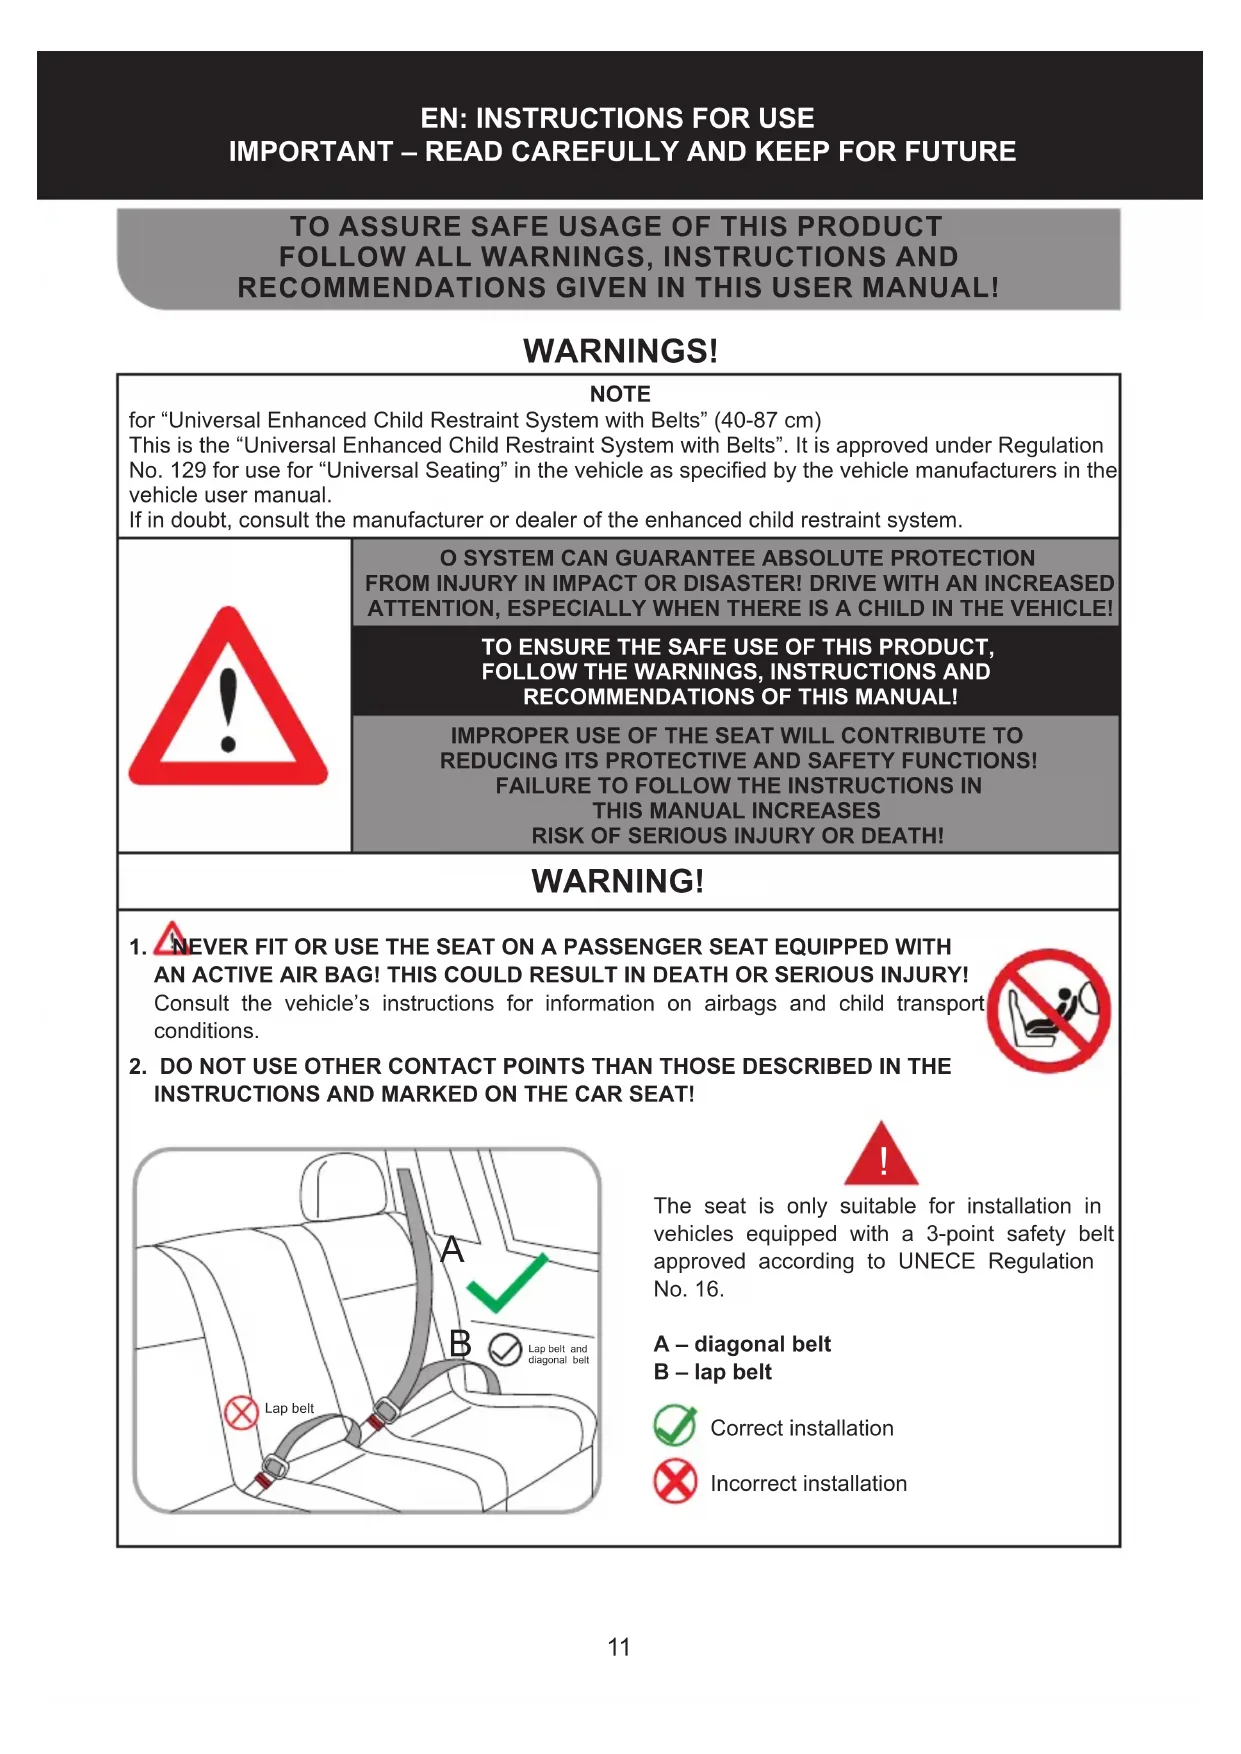
TO ASSURE SAFE USAGE OF THIS PRODUCT
FOLLOW ALL WARNINGS, INSTRUCTIONS AND
RECOMMENDATIONS GIVEN IN THIS USER MANUAL!
WARNINGS!
NOTE
for "Universal Enhanced Child Restraint System with Belts" (40-87 cm)
This is the “Universal Enhanced Child Restraint System with Belts”. It is approved under Regulation No. 129 for use for “Universal Seating” in the vehicle as specified by the vehicle manufacturers in the vehicle user manual.
If in doubt, consult the manufacturer or dealer of the enhanced child restraint system.

O SYSTEM CAN GUARANTEE ABSOLUTE PROTECTION
FROM INJURY IN IMPACT OR DISASTER! DRIVE WITH AN INCREASED ATTENTION, ESPECIALLY WHEN THERE IS A CHILD IN THE VEHICLE!
TO ENSURE THE SAFE USE OF THIS PRODUCT,
FOLLOW THE WARNINGS, INSTRUCTIONS AND
RECOMMENDATIONS OF THIS MANUAL!
IMPROPER USE OF THE SEAT WILL CONTRIBUTE TO
REDUCING ITS PROTECTIVE AND SAFETY FUNCTIONS!
FAILURE TO FOLLOW THE INSTRUCTIONS IN
THIS MANUAL INCREASES
RISK OF SERIOUS INJURY OR DEATH!
WARNING!
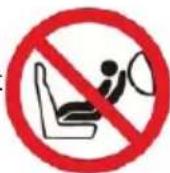
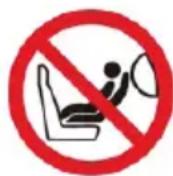
- NEVER FIT OR USE THE SEAT ON A PASSENGER SEAT EQUIPPED WITH AN ACTIVE AIR BAG! THIS COULD RESULT IN DEATH OR SERIOUS INJURY!
Consult the vehicle's instructions for information on airbags and child transport conditions.
- DO NOT USE OTHER CONTACT POINTS THAN THOSE DESCRIBED IN THE INSTRUCTIONS AND MARKED ON THE CAR SEAT!
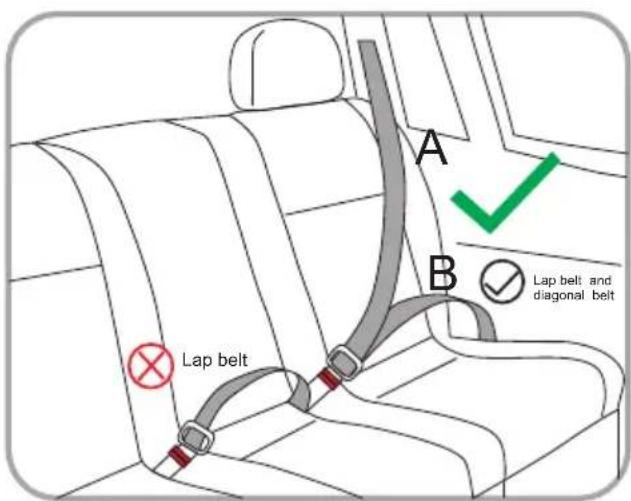

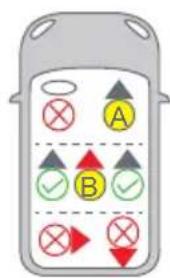
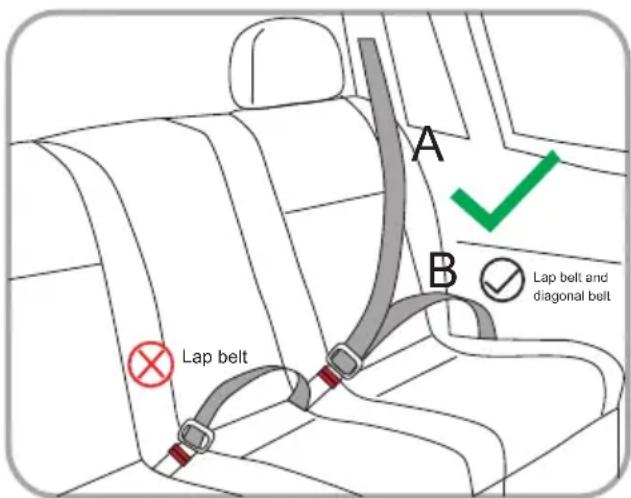
The seat is only suitable for installation in vehicles equipped with a 3-point safety belt approved according to UNECE Regulation No. 16.
A – diagonal belt
B - lap belt

Correct installation

Incorrect installation
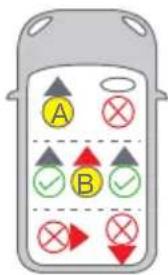
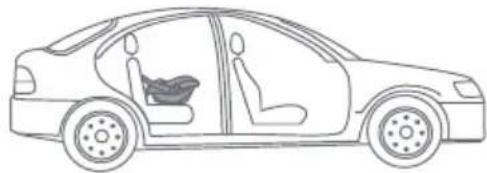
SEATS IN THE VEHICLE


natural_image
Side profile line drawing of a car showing two seated individuals inside the seat (no text or symbols)

It is not allowed to mount the seat

Installation of the seat is allowed

Do not install the seat if the car seat is equipped with an active airbag.

Install in this seat only if equipped with a 3-point seat belt.
ATTENTION! WARNINGS!
WARNING! NEVER LEAVE CHILD UNATTENDED!
✿ WARNING! DO NOT USE ANY OTHER SUPPORT CONTACT POINTS OTHER THAN THOSE DESCRIBED IN THE INSTRUCTIONS AND MARKED ON THE BASE TO MOUNT THE CAR SEAT
✿ WARNING! NEVER PLACE THE CAR SEAT MOUNTING BASE ON A PASSENGER SEAT EQUIPPED WITH AN ACTIVE AIRBAG! THIS COULD RESULT IN DEATH OR SERIOUS INJURY!
✿ WARNING! THE VEHICLE SEAT BELTS THAT HOLD THE BASE TO THE VEHICLE SEAT MUST BE TIGHTENED AND SECURED
WARNING! THE SEAT BELTS HOLDING THE CHILD MUST BE TIGHTENED AND FASTENED PROPERLY, ADJUSTED TO THE CHILD'S BODY AND SIZE SO THAT THEY COVER THE CHILD WELL.
WARNING! THE LAP BELT MUST BE POSITIONED LOW DOWN AND ANY SAFETY BARRIER MUST BE FITTED CORRECTLY SO THAT THE CHILD'S PELVIS IS FIRMLY GRIPPED WITHOUT BEING PINCHED.
✿ WARNING! DO NOT MAKE ANY ALTERATIONS, ADDITIONS OR MODIFICATIONS TO THE BASE AND CAR SEAT WITHOUT THE APPROVAL OF THE NOTIFYING AUTHORITY! IT IS DANGEROUS NOT TO FOLLOW EXACTLY THE INSTRUCTIONS FOR USE PROVIDED BY THE MANUFACTURER
WARNING! BEWARE OF FIRE!
To ensure maximum protection for your child, please read, install and use the car seat carefully as described in this instruction manual.
This product is not intended for home use. Only use it installed in the vehicle.
Do not use the product for home use. Use the car seat mounted on the base, facing BACK only and for children with a height of 40-87 cm and a weight of no more than 13 kg.
❖ ALWAYS place the child in the seat with the seat belt to avoid the risk of falling.
Only an adult should install the product on the car seat and restrain the child!
Rigid parts and parts of the child restraint system made of plastic must be positioned and installed so that when the vehicle is in normal use they cannot be jammed by a sliding seat or vehicle door.
Do not allow the seat belts to be twisted, frayed or torn, the latches and buckles (toggles) must always be in working order and securely fixed.
If you find any insecurity or malfunction in the construction, fixings, belts, locking mechanisms and ISOFIX attachments of the base and seat, discontinue use until the damaged parts have been removed and replaced with new parts.
❖ Replace the base with a new one if it has been subjected to destructive loads in an accident.
Do not use a “second-hand” base or stool as you do not know what loads it has been subjected to.
Do not use the seat without the padding and do not replace it with any other than the one provided by the manufacturer, as it is an integral part of the child restraint system.
✿ Any luggage or other objects that could cause injury in the event of a collision must be properly secured. Remove or secure at a safe distance from the base and seat and child any luggage that could cause injury in the event of a sudden stop or accident while moving.
Always check that the base is securely fastened to the car seat, even when you are not going to place a child in the car seat. A loose base, even without a child in the seat, can cause injury in the event of a collision.
✿ NEVER make adjustments or move moving parts of the seat when a child is in it.
Check buckles frequently for dirt and clean them as needed. Reliability can be affected by penetration of dirt, dust, food particles, etc.
Do not place additional pads in the seat other than those provided by the manufacturer!
Do not use spare parts or other components not supplied by the manufacturer! The manufacturer accepts no responsibility for safety in the event that spare parts other than those original to the approved type or recommended by the manufacturer are used.
- Keep the instruction manual in the space provided by the seat or in the vehicle in which you will use the seat.
Do not use a car seat without a dash cover on it.
Do not expose the base and seat to direct sunlight to prevent possible burning of the child, deformation of the seat and especially the plastic parts.
The seat is not a substitute for a child's cot or bed. When the child needs to sleep, you should place him in a suitable baby stroller, cot or bed.
Do not allow the child to play with the seat belt.
Do not place extra cords and ties on the product to avoid the risk of suffocation!
✿ Never place the seat on beds, sofas or similar soft surfaces!
Do not allow children to play with the product!
Do not remove the labels and warnings placed on the seat! They are important for everyone who uses it!
Before using the ISOFIX attachments, you should familiarise yourself with the ISOFIX anchorages in your vehicle's instruction manual.
- Keep the plastic wrapping away from children to avoid the risk of suffocation!
INSTRUCTIONS FOR USING THE SAFETY SYSTEM
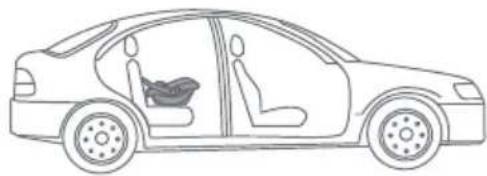
This is an i-Size universal ISOFIX car restraint system for children 40 - 87 cm tall and weighing ≤ 13 kg. It is approved to regulation R129/03 and is fitted to the car seat with ISOFIX tips and a support leg. The car seat is mounted on the base only in the “LOOKING BACK” position and the child in the car seat is secured with the car seat harness.
WARNING!
THIS ISOFIX BASE IS COMPATIBLE WITH CAR SEAT MODELS "DUO SMART", „ELITE" and "ENCANTO"
IMPORTANT! Follow exactly the instructions and sequence for installing and using the product from the text and illustrations enclosed in the instructions. Check the security of the fixing after performing each operation! ALWAYS CHECK THE SECURITY OF THE BELT FIXING! After each installation, make sure that the car seat belts are not twisted and are in the correct position.
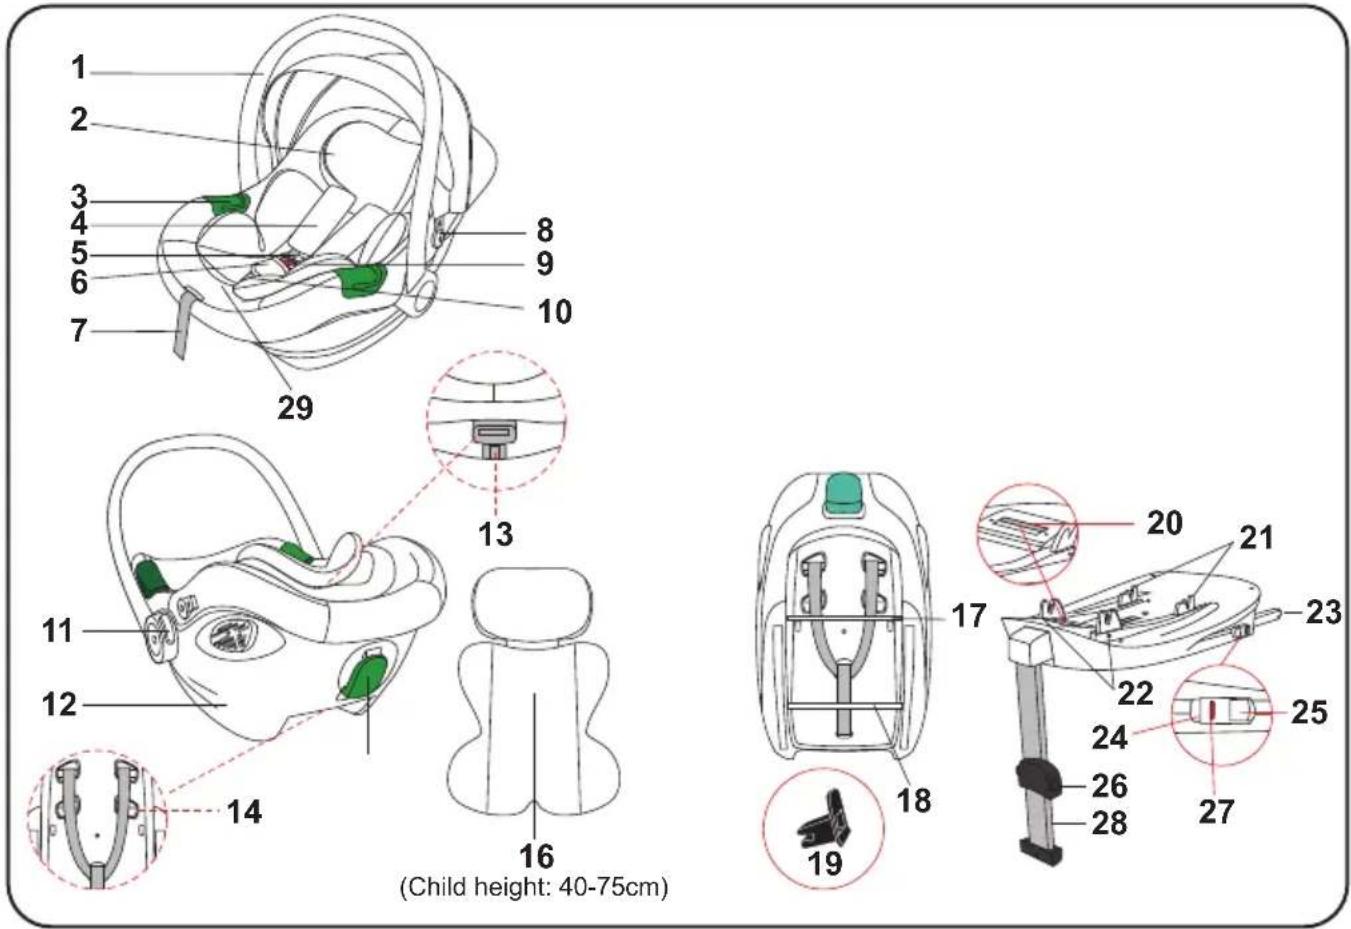
BASIC PARTS:
1 - Handle;
2 - Headrest;
3 - Vehicle lap belt guide;
4 - Soft shoulder belt pads;
5 - Shoulder belts;
6 - Soft pad for between the legs;
7 - Belt adjustment strap;
8 - Canopy frame;
9 - Unifying buckle;
10 - Between the legs belt;
11 - Handle tilt adjustment knob;
12 - Body;
13 - Headrest height adjustment lever;
14 - Belt hole;
15 - Diagonal belt guide;
16 - Additional pad;
17 - Axle;
18 - Axle;
19 - ISOFIX guide;
20 - Release handle;
21 - Hook;
22 - Hook;
23 - ISOFIX tips;
24 - ISOFIX release button;
25 - ISOFIX release button;
26 - Support leg adjustment button;
27 - ISOFIX indicator;
28 - Support leg;
29 - Seat belt adjustment button (below the Press sign).
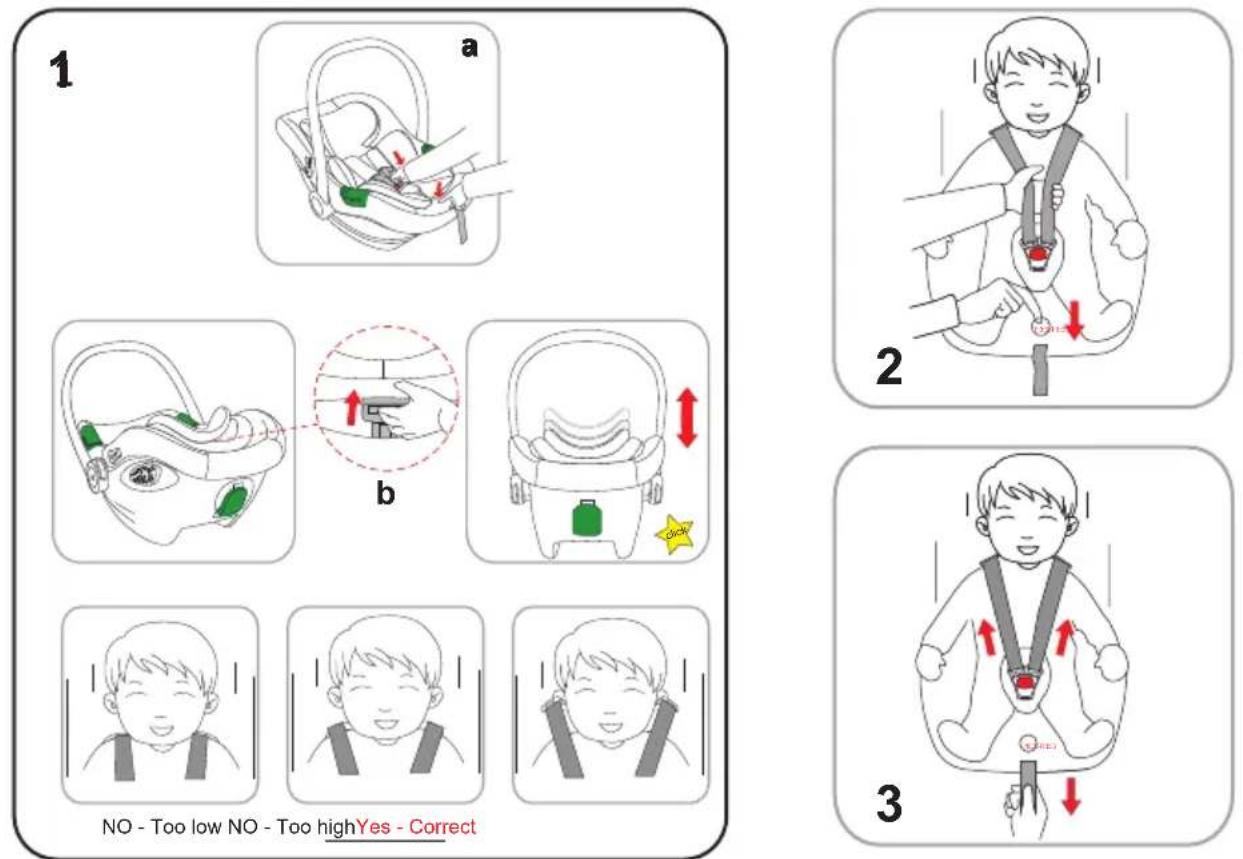
1. HEADREST AND SHOULDER HARNESS HEIGHT ADJUSTMENT
The shoulder belts and head restraint can be adjusted in 6 positions according to the height of the child. Press the harness adjustment button (Press) and pull the shoulder harness outwards to release (a). Press the headrest height adjustment lever (b) and move up or down to the desired height. Release the lever to fix the selected height. You will hear a "click/click" sound when fixing.
CAUTION! Check that the headrest is correctly fixed by sliding it down slightly.
IMPORTANT! Always check that the shoulder harness is at the correct height for your child.
The belts should pass through the holes in the upholstery and body closest to the child's shoulders (See figure: Yes-Correct).
2. LOOSENING THE SHOULDER BELTS:
Step 1: Press the harness adjustment button located under the "PRESS" sign on the front of the seat and at the same time grasp the shoulder harness as shown in the figure.
Step 2: While holding the button down, pull the shoulder straps forward to loosen them.
3. TIGHTENING THE SHOULDER BELTS
Pull the adjustment strap to tighten the shoulder belts.
IMPORTANT! Note: Check and always tighten the harness when placing the child in the seat.
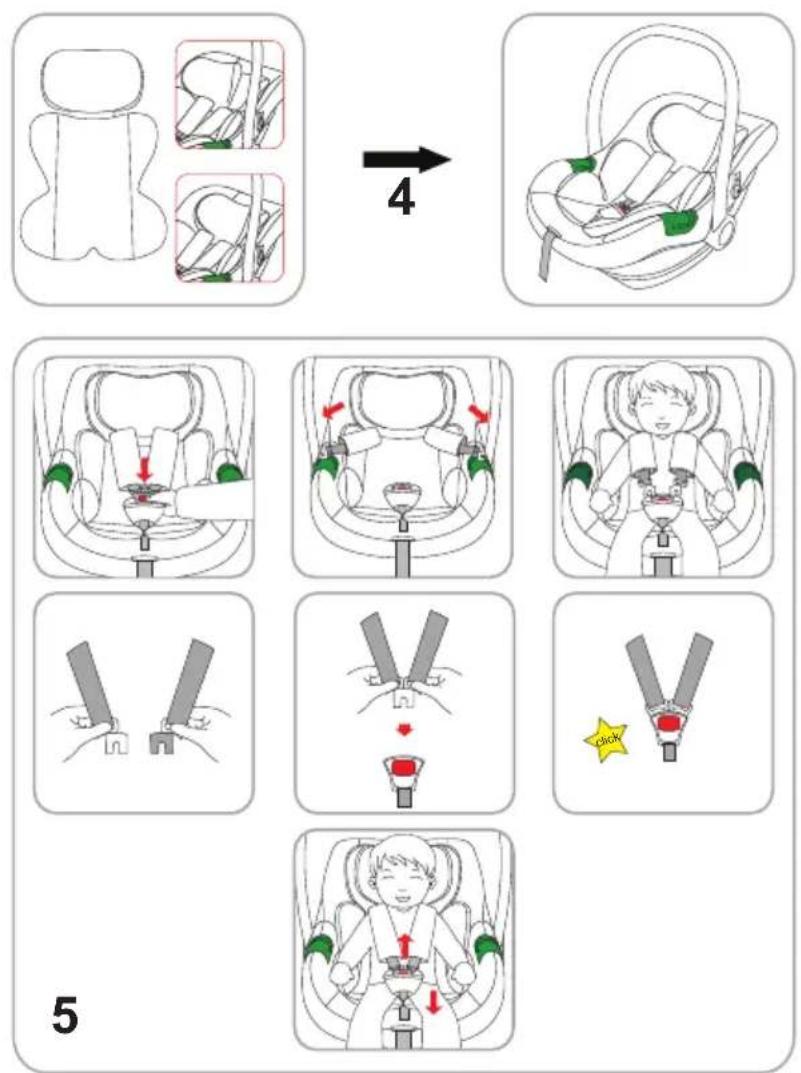
4. ADDITIONAL PADDING
Use for a child between 40 and 75 cm tall. Insert the pad into the car seat. Pass the shoulder straps through the top of the pad as shown in the figure. Pass the unifying buckle with the harness and the between-legs pad through the holes in the bottom. To remove the additional pad, perform the described steps in reverse order.
5. BEFORE PLACING THE CHILD IN THE CAR SEAT
Before placing the child in the seat, you must loosen the shoulder belts (See item 2), adjust the height of the shoulder belts and head restraint (See item 1), and install the inner pad (See item 4). Press the red button on the uniting buckle (a) to release the belts from the buckle and place them to the sides (b). Place the child in the seat and the shoulder harness on his shoulders (c). Connect the two metal tips and insert them into the unifying buckle (d). When fixing, you will hear a "click/click" sound.
IMPORTANT! Make sure the tips are firmly fixed to the toque by trying to pull the shoulder straps up (e). To remove the child from the seat, perform the described actions in reverse order.
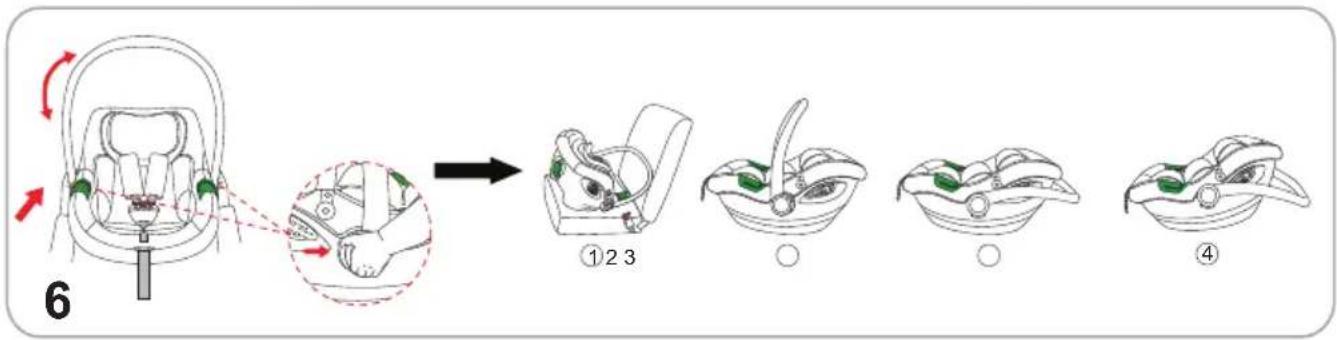
6. HANDLE ADJUSTMENT
To turn the handle, press the buttons on both sides of the seat simultaneously. Place the handle in one of the four (4) positions:
1 - Forward Position (when installing the car seat in the rear-facing position);
2 - Up Position (when carrying the seat by hand);
3 - Back Position (when using the rocking function of the seat);
4 - Down Position (when feeding the baby and playing).
WARNING! Before using the car seat, you must make sure that the handle is securely fixed in the selected position, the harness is correctly placed around the child and is fastened in the uniting buckle!
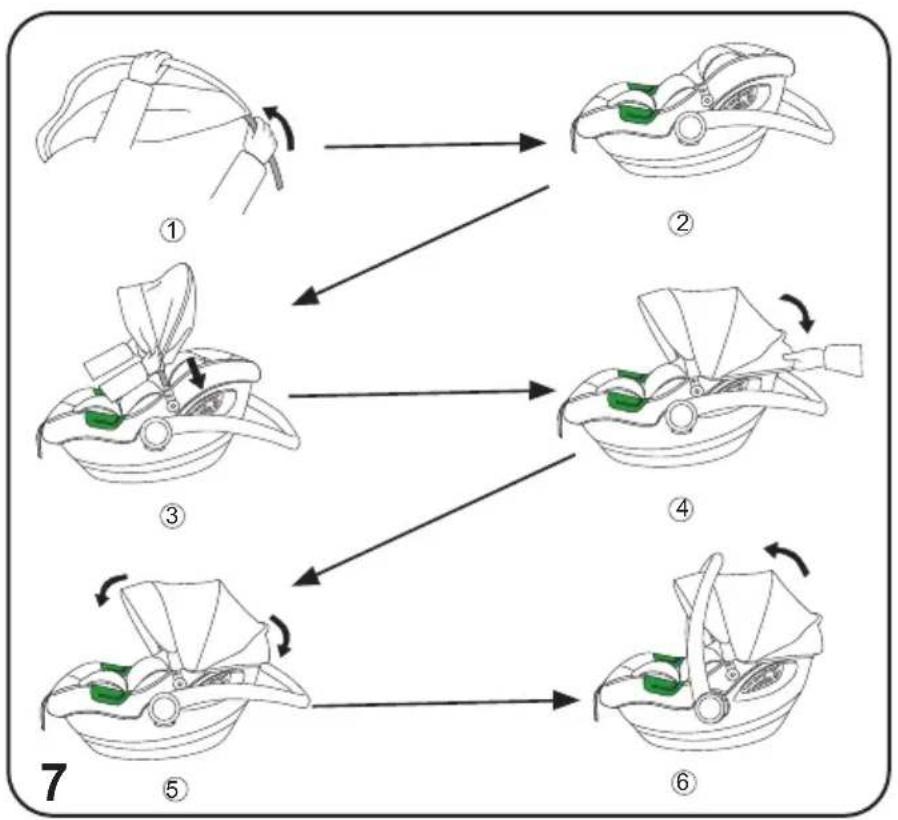
7. MOUNTING THE CANOPY
Rotate the handle and lock it in the BACK position as shown in fig. ②.
① Insert the canopy frame into the hole in the damask.
③ Insert the two ends of the canopy on either side of the seat.
④ Attach the bottom edge of the canopy to the seat body as shown in the figure.
⑤ Unfold the canopy by pulling the canopy forward to the desired position.
⑥ Move the handle to the desired position as described in item 6 "Adjusting the handle". To remove the canopy, reverse the steps described.
MOUNTING BASE ON THE CAR SEAT
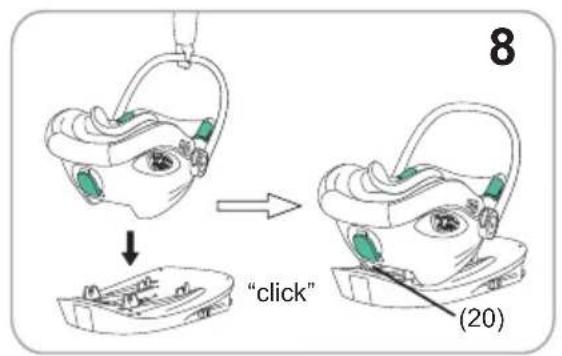
8. INSTALL THE SEAT ON THE BASE
Place the seat on the base facing BACK so that both axles are in the hooks and push it down. You will hear a “click/click” sound when it locks into place, and the indicator on the base handle (20) should be blue. Make sure the base handle (20) and the canopy are on the same side.
9. REMOVE THE SEAT FROM THE BASE
Pull the base handle (20) until the indicator turns red and you hear a "click/click" sound. The two axles will release from the hooks. Remove the stool from the base.
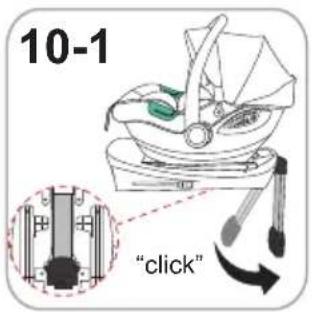
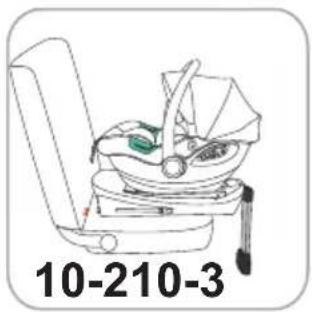
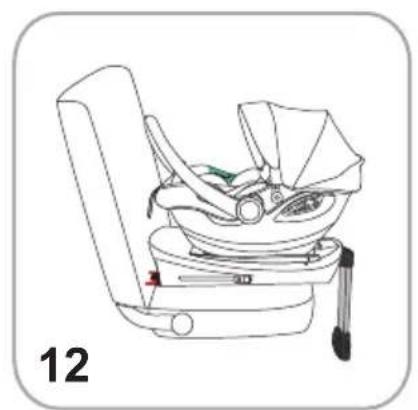
10. SUPPORT LEG:
10-1 - Unfold and pull the support leg from the bottom of the base until you hear a "click/ click" sound is locked in place.
10-2 - Place the seat with the base on the car seat as shown in the figure.
10-3 - Press and hold the support leg adjustment button (26) and at the same time pull down the support leg (28) until it rests firmly in the floor.
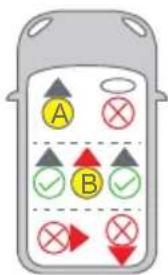
CAUTION! The support leg is fixed when the indicator (a) is completely green.
Note: If the indicator (a) is red, carry out the installation again, following the sequence of actions described above.
IMPORTANT! DO NOT PLACE OBJECTS UNDER THE SUPPORT LEG! Make sure the support leg is firmly touching the floor and there is no empty space or objects underneath it! Make sure the support leg does not lift the base off the car seat surface.
10-4 - To retract the support leg, repeat the above steps in reverse order.
Push the support leg back to the bottom of the base, then release the swivel handle, is retract the leg to the bottom.
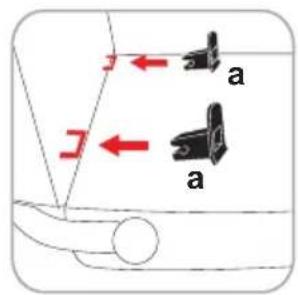
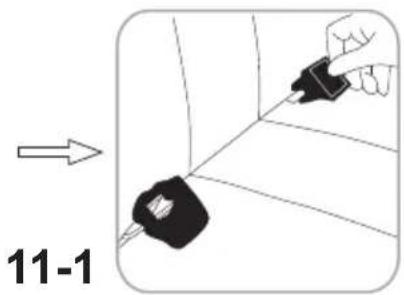
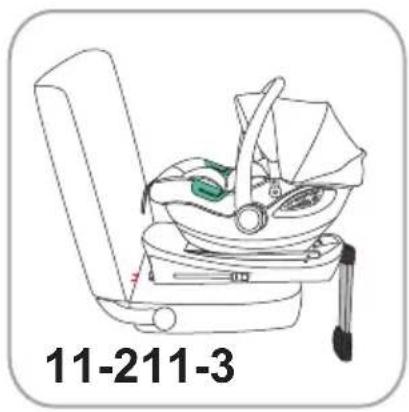
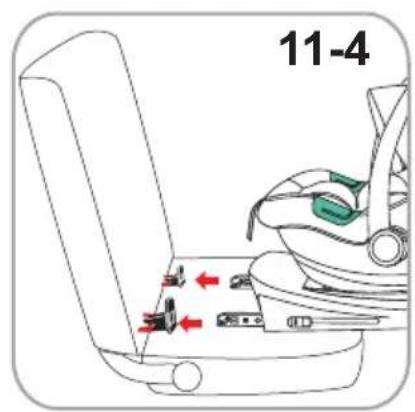
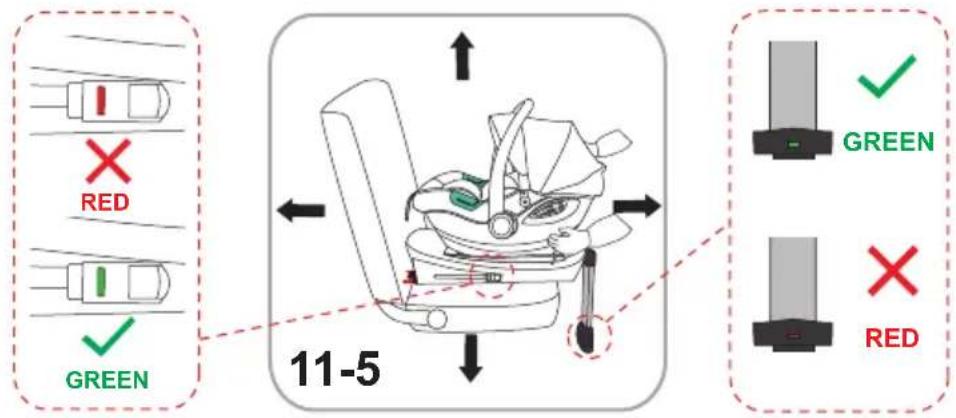
11. ISOFIX anchorage:
11-1 - Place the ISOFIX guides (a) on the vehicle anchorage points to assist in installing the ISOFIX tips.
11-2 - Place the base with the seat facing BACK on the vehicle seat.
11-3 - Grasp and press the ISOFIX release buttons (24 and 25) and at the same time move the ISOFIX tips as far out as they will go. The ISOFIX indicators (27) should show red.
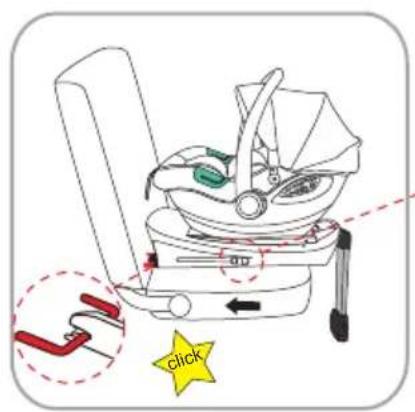
11-4 - Insert the ISOFIX tips into the ISOFIX anchorage points of the vehicle. Push the base back until you hear a "click/click" sound and it locks into place.
Note: When properly installed, the ISOFIX tip indicators (27) will be completely green. If the indicators are red, carry out the installation again, following the sequence of actions described above.
11-5 - WARNING! Shake the installed base with your hands to make sure it is firmly and securely fixed. Make sure that the indicators on the ISOFIX lugs (27) show green.
12. Securing the child in the car seat
To secure the child in the car seat, see section 5 "SECURING THE CHILD IN THE CAR SEAT".
PREVENTIVE MAINTENANCE INSTRUCTIONS
Clean contaminated plastic or metal parts with a soft cotton cloth or sponge dampened with water or mild detergent.
- Hand wash damask and soft pads at 300°C with mild detergent
Do not bleach! Do not spin! Do not machine dry! Do not iron!
Do not clean with harsh detergents containing abrasive particles, ammonia, bleach or alcohol.
✿ After cleaning, allow the chair to dry completely and then use or store. - Clean belts externally only with mild soap and a damp cloth!
Do not wet or remove labels! They contain important information!
- Store the product in a clean and dry place. Do not expose to the direct effects of the environment - sun, rain, moisture, or sudden temperature changes!
In case of problems related to normal operation, contact the authorized service centers for consultation or repair.
A TERMÉK BIZTONSÁGOS HASZNÁLATÁNAK BIZTOSÍTÁSA
ÉRDEKÉBEN KÖVESSE A FELHASZNÁLÓI KÉZIKÖNYVBEN
SEMMILYEN RENDSZER NEM GARANTÁLJA AZ ABSZOLÚT VÉDELEMET ÚTÉS VAGY KATASZTRÓFA SÉRÜLÉSÉTŐL! VEZETÉS EMLÉKEZTETŐVEL FIGYELEM, KÜLÖNÖSEN, HA GYERMEK VAN A JÁRMÜBEN!


natural_image
Side profile line drawing of a car showing two seated individuals inside the seat (no text or symbols)


natural_image
Side profile line drawing of a car showing two seated individuals inside the seat (no text or symbols)

¡IMPORTANTE! Always check that the shoulder harness is at the correct height for your child.
NESSUN SISTEMA PUÒ GARANTIRE UNA PROTEZIONE ASSOLUTA
DA LESIONI IN IMPATTO O DISASTRO! GUIDA CON UNA


natural_image
Side profile line drawing of a car showing two seated individuals inside the seat (no text or symbols)

IMPORTANTE! Always check that the shoulder harness is at the correct height for your child.


natural_image
Side profile line drawing of a car showing two seated individuals inside the seat (no text or symbols)

2. LOCKERN DER SCHULTERGURTE:
7. MOUNTING THE CANOPY
AUCUN SYSTÈME NE PEUT GARANTIR UNE PROTECTION ABSOLUE
DES BLESSURES LORS D'UN IMPACT OU D'UNE CATASTROPHE !
CONDUIRE AVEC UNE AUGMENTATION
ATTENTION, SURTOUT QUAND IL Y A UN ENFANT DANS LE VÉHICULE !
POUR GARANTIR UNE UTILISATION SÉCURISÉE DE CE PRODUIT,
SUIVEZ LES AVERTISSEMENTS, INSTRUCTIONS ET
RECOMMANDATIONS DE CE MANUEL !
UNE MAUVAISE UTILISATION DU SIÈGE CONTRIBUERA À RÉDUIRE
SES FONCTIONS DE PROTECTION ET DE SÉCURITÉ !
LE NON-RESPECT DES INSTRUCTIONS DE CE MANUEL AUGMENTE
RISQUE DE BLESSURES GRAVES OU DE MORT !
AVERTISSEMENTS !


natural_image
Side profile line drawing of a car showing two seated individuals inside the seat (no text or symbols)

Pull the adjustment strap to tighten the shoulder belts.
NIJEDAN SUSTAV NE MOŽE JAMČITI APSOLUTNU ZAŠTITU OD OZLJEDA U UDARU ILI KATASTROFI! VOZI S POVEĆANOM PAŽNJA, POSEBNO KADA SE U VOZILU NALAZI DIJETE!
DA BISTE OSIGURALI SIGURNU UPOTREBU OVOG PROIZVODA, PRIDRŽAVAJTE SE UPOZORENJA, UPUTA I PREPORUKA IZ OVOG PRIRUČNIKA!
NEPRAVILNA UPORABA SJEDALA ĆE DOPRINIJETI SMANJENJU NJEGOVIH ZAŠTITNIH I SIGURNOSNIH FUNKCIJA! NEPRIJEDANJE UPUTSTAVA U OVOM PRIRUČNIKU POVEĆAVA RIZIK OD TEŠKIH OZLJEDA ILI SMRT!
UPOZORENJA!

Sjedalo je prikladno samo za ugradnju u vozila opremljena sigurnosnim pojasom u 3 točke homologiranim prema UNECE Pravilniku br. 16.


natural_image
Side profile line drawing of a car showing two seated individuals inside the seat (no text or symbols)

MOUNTING BASE ON THE CAR SEAT
8. POSTAVITE SJEDALO NA BAZU


natural_image
Side profile line drawing of a car showing two seated individuals inside the seat (no text or symbols)

NICIUN SISTEM NU POATE GARANTA PROTECTIE ABSOLUTĂ DIN RĂNIRE ÎN IMPACT SAU DEZASTRU! CONDUCĖTI CU O MĂSURĂ ATENȚIE, MAI ȘI CÂND ÎN VEHICUL ESTE UN COPIL!
PENTRU A ASIGURA UTILIZAREA SIGUR A ACESTUI PRODUS, URMAȚI AVERTISMENTELE, INSTRUCTIILE ȘI RECOMANDĂRILE ACESTUI MANUAL!
UTILIZAREA NEPRODUTĂ A SCAUNULUI VA CONTRIBUIE LA REDUCEREA FUNCTIILOR DE PROTECTIE ȘI DE SIGURANTĂ A ACESTUIA!
NERESPECTAREA INSTRUCTIUNILOR DIN ACEST MANUAL SE CREŞTE RISC DE RĂNIRE GRAVĂ SAU DE DECES!
AVERTISMENTE!


natural_image
Side profile line drawing of a car showing two seated individuals inside the seat (no text or symbols)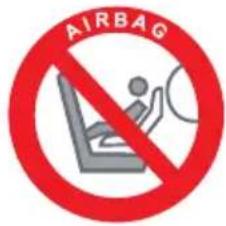

IMPORTANT! Always check that the shoulder harness is at the correct height for your child.
NENHUM SISTEMA PODE GARANTIR UMA PROTEÇÃO ABSOLUTA DE LESÕES POR IMPACTO OU DESASTRE! CONDUZA COM UM AUMENTO ATENÇÃO, PRINCIPALMENTE QUANDO HÁ UMA CRIANÇA NO VEÍCULO!
PARA GARANTIR A UTILIZAÇÃO SEGURA DESTE PRODUTO, SIGA OS AVISOS, INSTRUÇÕES E RECOMENDAÇÕES DESTE MANUAL!
A – cinto diagonal B – cinto abdominal

Instalação correta


natural_image
Side profile line drawing of a car showing two seated individuals inside the seat (no text or symbols)

GEEN ENKEL SYSTEEM KAN ABSOLUTE BESCHERMING
GARANDEREN VAN LETSEL DOOR IMPACT OF RAMP!
RIJD MET EEN VERHOOGD LET OP, VOORAL ALS ER EEN
KIND IN HET VOERTUIG BEZIT!
OM EEN VEILIG GEBRUIK VAN DIT PRODUCT TE GARANDEREN,
VOLG DE WAARSCHUWINGEN, INSTRUCTIES EN
AANBEVELINGEN VAN DEZE HANDLEIDING!
ONJUISTE GEBRUIK VAN DE ZITTING ZAL BIJDRAGEN AAN HET
VERMINDEREN VAN DE BESCHERMENDE EN VEILIGHEIDSFUNCTIES!
HET NIET VOLGEN VAN DE INSTRUCTIES IN DEZE HANDLEIDING STIJGT
GEVAAR VOOR ERNSTIG LETSEL OF DOOD!
WAARSCHUWINGEN!


natural_image
Side profile line drawing of a car showing two seated individuals inside the seat (no text or symbols)

✿ WAARSCHUWING! PAS OP VOOR BRAND!
ŽÁDNÝ SYSTÉM NEMŮŽE ZARUČIT ABSOLUTNÍ OCHRANU OD ZRANĚNÍ PŘI NÁRAZU NEBO KATASTROFA! JEĎTE SE ZVÝŠENÝM POZOR, ZVLÁŠTĚ KDYŽ JE VE VOZU DÍTĚ!
ABYSTE ZAJIŠTĚLI BEZPEČNÉ POUŽÍVÁNÍ TOHOTO PRODUKTU, DODRŽUJTE VAROVÁNÍ, POKYNY A DOPORUČENÍ V TOMTO NÁVODU!
NESPRÁVNÉ POUŽÍVÁNÍ SEDAČKY PŘISPĚJE K SNÍŽENÍ JEJÍ OCHRANNÝCH A BEZPEČNOSTNÍCH FUNKCÍ! NEDODRŽENÍ POKYNŮ V TOMTO NÁVODU SE ZVYŠUJE RIZIKO VÁŽNÉHO ZRANĚNÍ NEBO SMRT!
VAROVÁNÍ!
-
⚠NIKDY SEDAČKU NEINSTALUJTE ANI NEPOUŽÍVEJTE NA SEDADĚ SPOLUJEZDCE VYBAVENÉ AKTIVNÍM AIRBAGEM! TO MŮŽE ZPŮSOBIT SMRT NEBO VÁŽNÉ ZRANĚNÍ! Informace o airbagech a podmínkách přepravy dětí najdete v návodu k vozidlu.
-
NEPOUŽÍVEJTE JINÉ KONTAKTNÍ BODY, NEŽ POPSANÉ V NÁVODU A VYZNAČENÉ NA AUTOSEDAČCE!


natural_image
Side profile line drawing of a car showing two seated individuals inside the seat (no text or symbols)


natural_image
Side profile line drawing of a car showing two seated individuals inside the cab and seat (no text or symbols)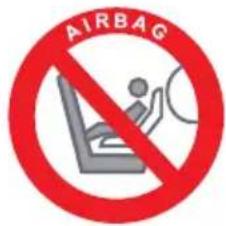

العربية

7. 356m3n100s0m60s0g0s
✿ amplitude modulation ωs amplitude modulation χ, ψ, and modulation of the frequency.

- TO ASSURE SAFE USAGE OF THIS PRODUCT
- FOLLOW ALL WARNINGS, INSTRUCTIONS AND
- RECOMMENDATIONS GIVEN IN THIS USER MANUAL!
- WARNINGS!
- NOTE
- WARNING!
- SEATS IN THE VEHICLE
- ATTENTION! WARNINGS!
- INSTRUCTIONS FOR USING THE SAFETY SYSTEM
- BASIC PARTS:
- HEADREST AND SHOULDER HARNESS HEIGHT ADJUSTMENT
- LOOSENING THE SHOULDER BELTS:
- TIGHTENING THE SHOULDER BELTS
- ADDITIONAL PADDING
- BEFORE PLACING THE CHILD IN THE CAR SEAT
- HANDLE ADJUSTMENT
- MOUNTING THE CANOPY
- MOUNTING BASE ON THE CAR SEAT
- INSTALL THE SEAT ON THE BASE
- REMOVE THE SEAT FROM THE BASE
- SUPPORT LEG:
- ISOFIX anchorage:
- Securing the child in the car seat
- PREVENTIVE MAINTENANCE INSTRUCTIONS
- A TERMÉK BIZTONSÁGOS HASZNÁLATÁNAK BIZTOSÍTÁSA
- ÉRDEKÉBEN KÖVESSE A FELHASZNÁLÓI KÉZIKÖNYVBEN
- LOCKERN DER SCHULTERGURTE:
- AVERTISSEMENTS !
- UPOZORENJA!
- POSTAVITE SJEDALO NA BAZU
- AVERTISMENTE!
- WAARSCHUWINGEN!
- VAROVÁNÍ!
- 356m3n100s0m60s0g0s
Brand : Chipolino
Model : Duo Smart
Category : Car seat