BD 4325 C Classic Bp - Floor cleaner Kärcher - Free user manual and instructions
Find the device manual for free BD 4325 C Classic Bp Kärcher in PDF.
User questions about BD 4325 C Classic Bp Kärcher
0 question about this device. Answer the ones you know or ask your own.
Ask a new question about this device
Download the instructions for your Floor cleaner in PDF format for free! Find your manual BD 4325 C Classic Bp - Kärcher and take your electronic device back in hand. On this page are published all the documents necessary for the use of your device. BD 4325 C Classic Bp by Kärcher.
USER MANUAL BD 4325 C Classic Bp Kärcher
natural_image
Line drawing of a cleaning or cleaning service robot (no text or symbols present)Deutsch 3
English 11
Français 19
Italiano 29
Nederlands 37
Español 45
Português 54
Dansk 63
Norsk 71
Svenska 79
Suomi 87
Ελληνικά 95
Türkçe 105
Русский 113
Magyar 123
Čeština 131
Slovenščina 139
Polski 147
Românește 156
Slovenčina 164
Hrvatski 172
Srpski 180
Български 188
Eesti 198
Latviešu 206
Lietuviškai 214
Українська 222
Indonesia 232
中文 240
ไทย 247
العربية 261
text_image
Technical diagram of a cleaning or cleaning device with numbered parts for identification.text_image
Technical diagram of a vehicle's internal components with labeled parts 1 and 2, including a zoomed-in detail view.natural_image
Technical line drawing of a mechanical assembly with rollers and a housing component (no text or symbols)natural_image
Mechanical assembly diagram showing a vehicle with springs and rotating components (no text or symbols)natural_image
Mechanical assembly diagram showing a spring-loaded component mounted on a rail with rotating arms (no text or symbols)natural_image
Diagram showing a hand connecting a flexible hose to a device with arrows indicating force or connection (no text or symbols present)natural_image
Technical line drawing of a mechanical component with a circular head and cylindrical body (no text or symbols)natural_image
Technical line drawing of a mechanical device with no visible text or symbolstext_image
Technical diagram showing a vehicle's internal components with labeled parts 1 and 2, including a directional arrow indicating rotation.text_image
Technical diagram showing mechanical assembly with numbered components and rotation indicatorsnatural_image
Technical line drawing of a cleaning or cleaning machine component with a black arrow indicating a detail (no text or symbols present)natural_image
Technical line drawing of a cleaning or cleaning machine (no text or symbols)text_image
Technical diagram of a vehicle's internal components with numbered parts labeled 1 to 4text_image
Technical diagram showing labeled components of a mechanical assembly, with numbered parts 1 to 4.Chairman of the Board of Management

S. Reiser
Director Regulatory Affairs & Certification
71364 Winnenden (Germany)
Tel.: +49 7195 14-0
Fax: +49 7195 14-2212
Winnenden, 2021/02/01
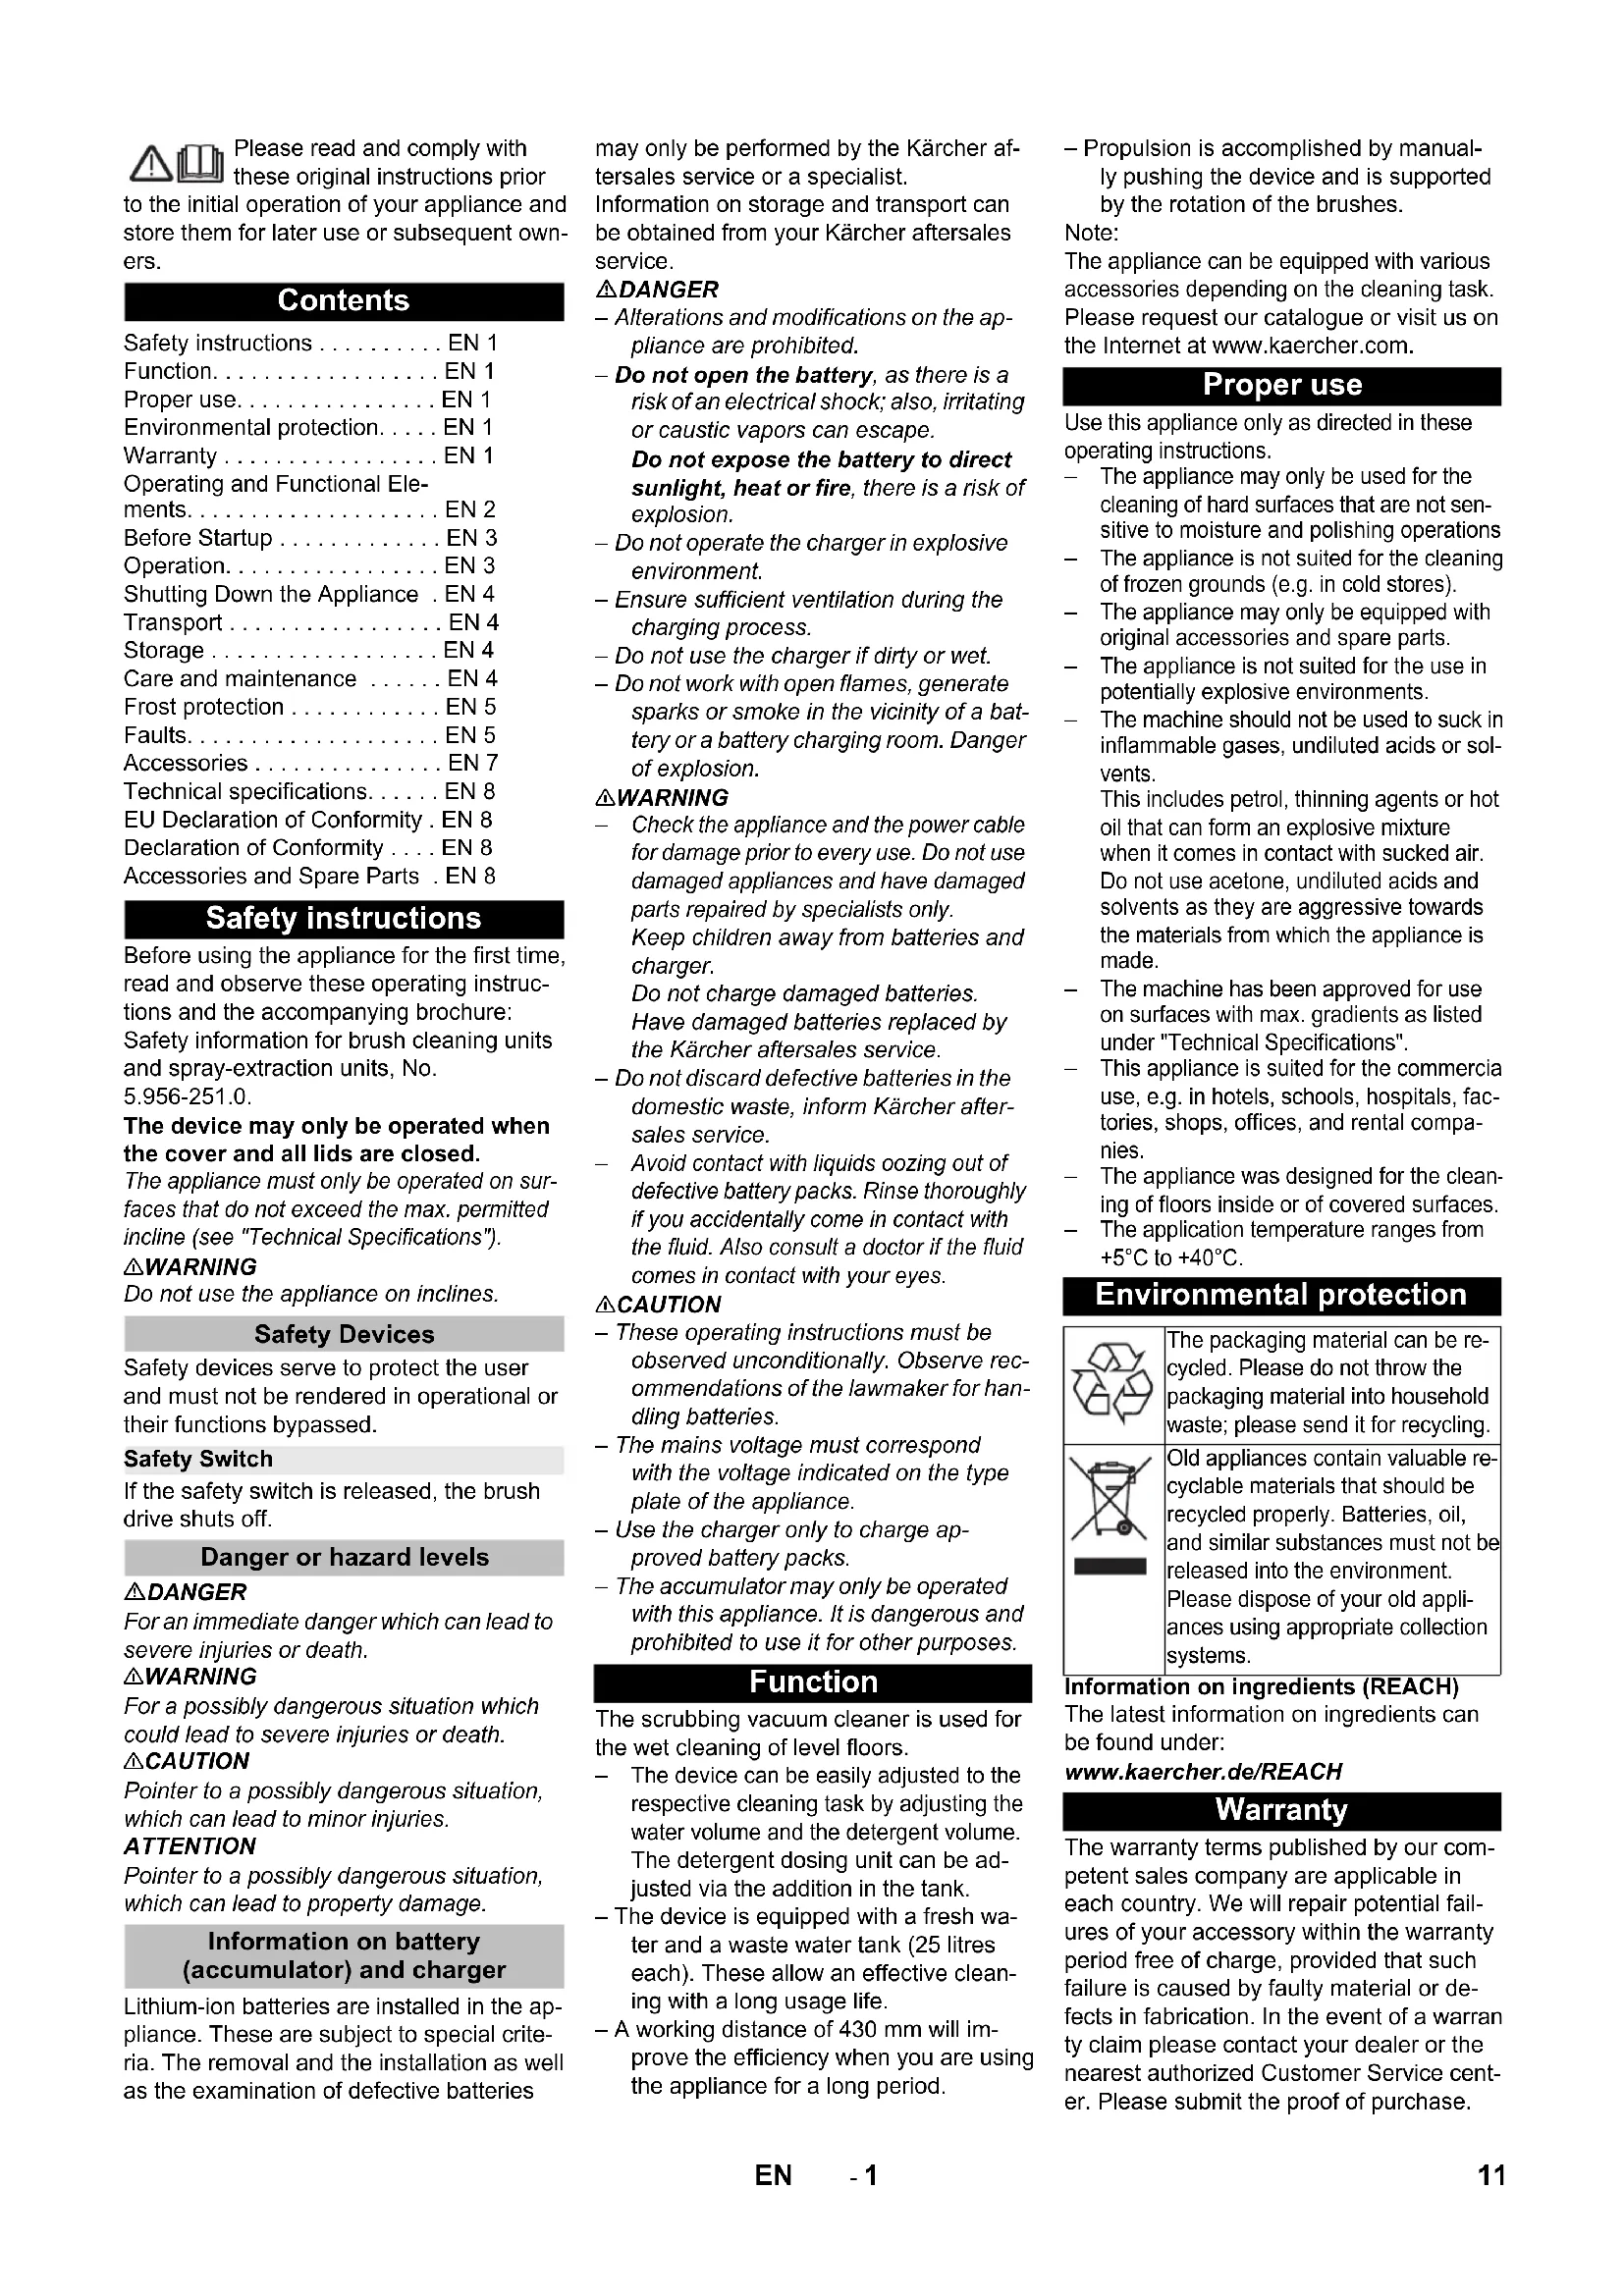
Please read and comply with these original instructions prior
to the initial operation of your appliance and store them for later use or subsequent owners.
Contents
| Safety instructions | EN 1 |
| Function | EN 1 |
| Proper use | EN 1 |
| Environmental protection | EN 1 |
| Warranty | EN 1 |
| Operating and Functional Elements | EN 2 |
| Before Startup | EN 3 |
| Operation | EN 3 |
| Shutting Down the Appliance | EN 4 |
| Transport | EN 4 |
| Storage | EN 4 |
| Care and maintenance | EN 4 |
| Frost protection | EN 5 |
| Faults | EN 5 |
| Accessories | EN 7 |
| Technical specifications | EN 8 |
| EU Declaration of Conformity | EN 8 |
| Declaration of Conformity | EN 8 |
| Accessories and Spare Parts | EN 8 |
Safety instructions
Before using the appliance for the first time, read and observe these operating instructions and the accompanying brochure: Safety information for brush cleaning units and spray-extraction units, No. 5.956-251.0.
The device may only be operated when the cover and all lids are closed.
The appliance must only be operated on surfaces that do not exceed the max. permitted incline (see "Technical Specifications").
⚠ WARNING
Do not use the appliance on inclines.
Safety Devices
Safety devices serve to protect the user and must not be rendered in operational or their functions bypassed.
Safety Switch
If the safety switch is released, the brush drive shuts off.
Danger or hazard levels
DANGER
For an immediate danger which can lead to severe injuries or death.
⚠ WARNING
For a possibly dangerous situation which could lead to severe injuries or death.
△CAUTION
Pointer to a possibly dangerous situation, which can lead to minor injuries.
ATTENTION
Pointer to a possibly dangerous situation, which can lead to property damage.
Information on battery
(accumulator) and charger
Lithium-ion batteries are installed in the appliance. These are subject to special criteria. The removal and the installation as well as the examination of defective batteries
may only be performed by the Kärcher aftersales service or a specialist. Information on storage and transport can be obtained from your Kärcher aftersales service.
△DANGER
– Alterations and modifications on the appliance are prohibited.
- Do not open the battery, as there is a risk of an electrical shock; also, irritating or caustic vapors can escape.
Do not expose the battery to direct sunlight, heat or fire, there is a risk of explosion.
- Do not operate the charger in explosive environment.
- Ensure sufficient ventilation during the charging process.
- Do not use the charger if dirty or wet.
- Do not work with open flames, generate sparks or smoke in the vicinity of a battery or a battery charging room. Danger of explosion.
⚠ WARNING
- Check the appliance and the power cable for damage prior to every use. Do not use damaged appliances and have damaged parts repaired by specialists only. Keep children away from batteries and charger.
Do not charge damaged batteries. Have damaged batteries replaced by the Kärcher aftersales service. - Do not discard defective batteries in the domestic waste, inform Kärcher after-sales service.
- Avoid contact with liquids oozing out of defective battery packs. Rinse thoroughly if you accidentally come in contact with the fluid. Also consult a doctor if the fluid comes in contact with your eyes.
△CAUTION
- These operating instructions must be observed unconditionally. Observe recommendations of the lawmaker for handling batteries.
- The mains voltage must correspond with the voltage indicated on the type plate of the appliance.
- Use the charger only to charge approved battery packs.
- The accumulator may only be operated with this appliance. It is dangerous and prohibited to use it for other purposes.
Function
The scrubbing vacuum cleaner is used for the wet cleaning of level floors.
- The device can be easily adjusted to the respective cleaning task by adjusting the water volume and the detergent volume. The detergent dosing unit can be adjusted via the addition in the tank.
- The device is equipped with a fresh water and a waste water tank (25 litres each). These allow an effective cleaning with a long usage life.
- A working distance of 430 mm will improve the efficiency when you are using the appliance for a long period.
- Propulsion is accomplished by manually pushing the device and is supported by the rotation of the brushes.
Note:
The appliance can be equipped with various accessories depending on the cleaning task. Please request our catalogue or visit us on the Internet at www.kaercher.com.
Proper use
Use this appliance only as directed in these operating instructions.
- The appliance may only be used for the cleaning of hard surfaces that are not sensitive to moisture and polishing operations
- The appliance is not suited for the cleaning of frozen grounds (e.g. in cold stores).
- The appliance may only be equipped with original accessories and spare parts.
- The appliance is not suited for the use in potentially explosive environments.
- The machine should not be used to suck in inflammable gases, undiluted acids or solvents.
This includes petrol, thinning agents or hot oil that can form an explosive mixture when it comes in contact with sucked air. Do not use acetone, undiluted acids and solvents as they are aggressive towards the materials from which the appliance is made. - The machine has been approved for use on surfaces with max. gradients as listed under "Technical Specifications".
- This appliance is suited for the commercial use, e.g. in hotels, schools, hospitals, factories, shops, offices, and rental companies.
- The appliance was designed for the cleaning of floors inside or of covered surfaces.
- The application temperature ranges from +5°C to +40°C.
Environmental protection

The packaging material can be recycled. Please do not throw the packaging material into household waste; please send it for recycling.
Old appliances contain valuable recyclable materials that should be recycled properly. Batteries, oil, and similar substances must not be released into the environment. Please dispose of your old appliances using appropriate collection systems.
Information on ingredients (REACH)
The latest information on ingredients can be found under:
The warranty terms published by our competent sales company are applicable in each country. We will repair potential failures of your accessory within the warranty period free of charge, provided that such failure is caused by faulty material or defects in fabrication. In the event of a warranty claim please contact your dealer or the nearest authorized Customer Service center. Please submit the proof of purchase.
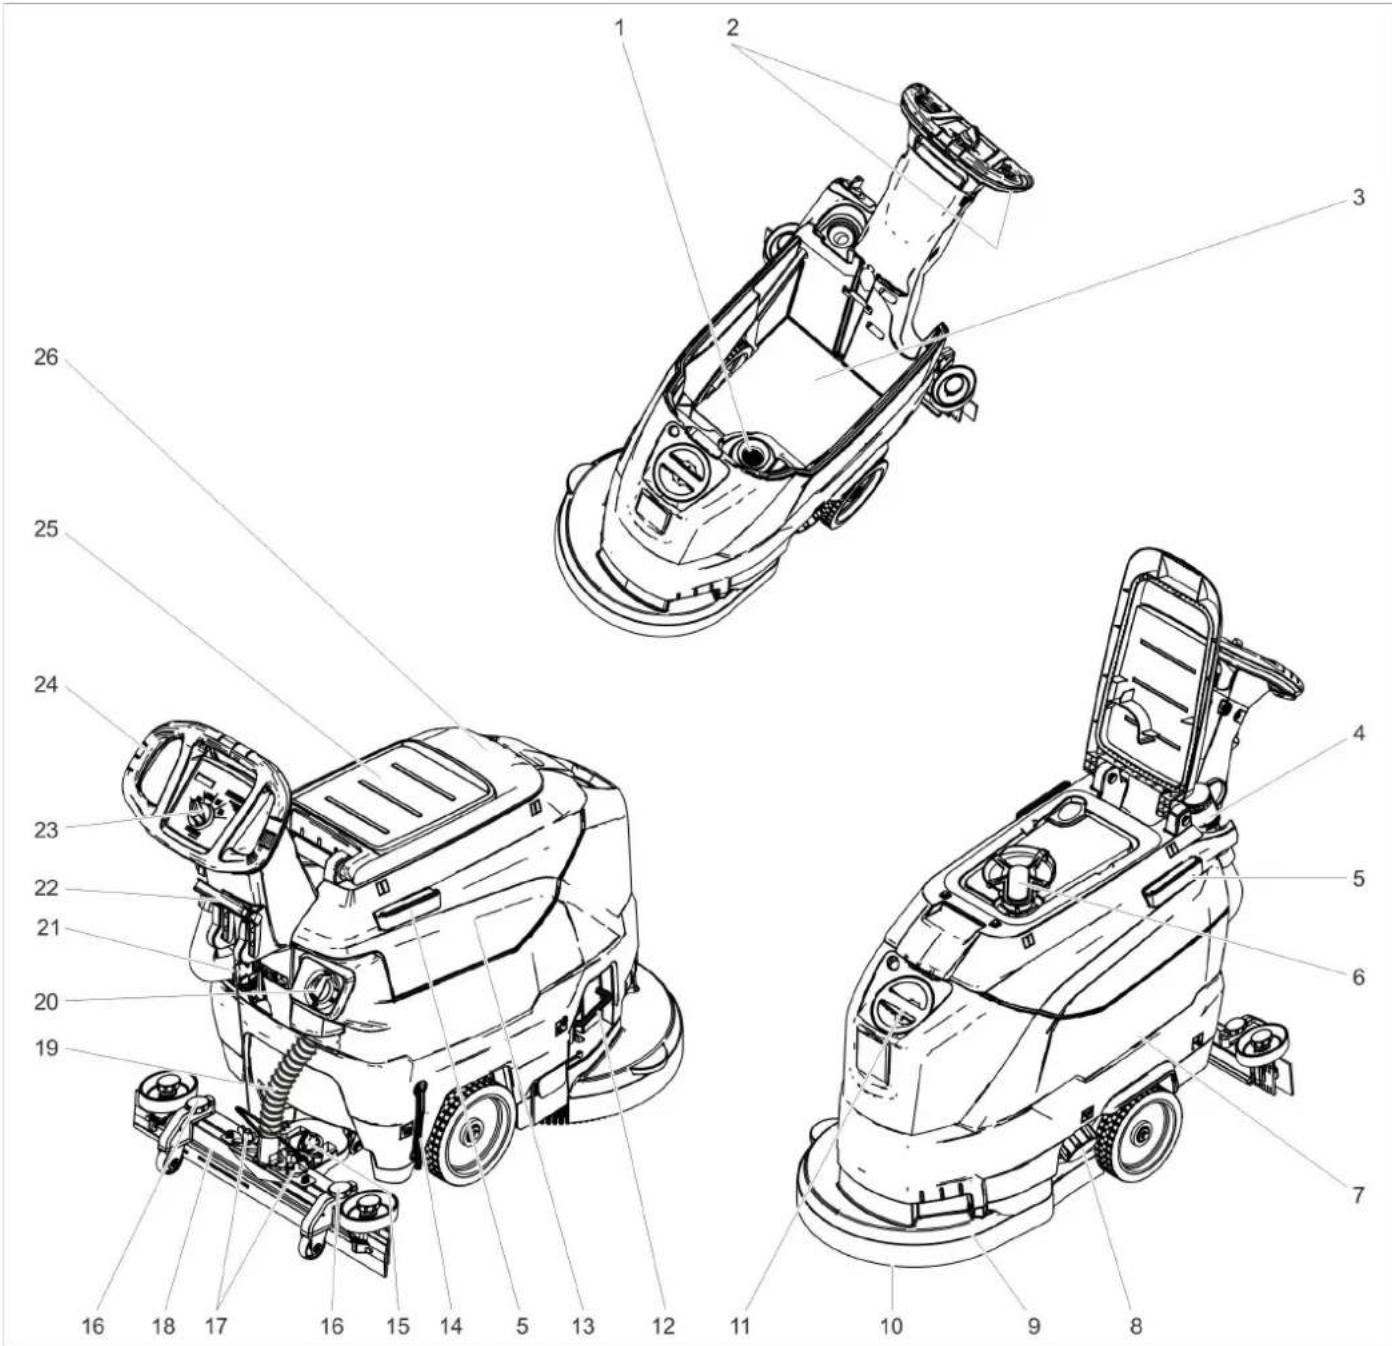
Operating and Functional Elements
text_image
Technical diagram of a cleaning or cleaning device with numbered parts for identification.1 Fluff filter
2 Safety button
3 Battery *
4 Drain hose for wastewater with dosing unit
5 Holding rail for home base
6 Float
7 Fresh water tank
8 Fresh water tank lock
9 Cleaning head
10 Disc brush
11 Fresh water reservoir filler neck
12 Bow brush change
13 Waste water tank
14 Fresh water level display
15 Rotary handle to incline the vacuum bar
16 Height adjustment of suction bar *
17 Wing nuts for fastening the vacuum bar
18 Vacuum bar *
19 Suction hose
20 Water quantity regulator
21 Battery socket
22 Vacuum bar lowering lever
23 Operator console
24 Push handle
25 Storage surface for cleaning set "Home base box"
26 Cover waste water tank
* not included in the delivery
Colour coding
- The operating elements for the cleaning process are yellow.
- The controls for the maintenance and service are light gray.
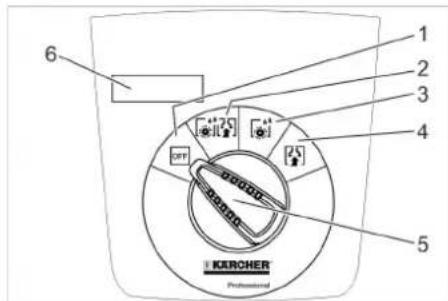
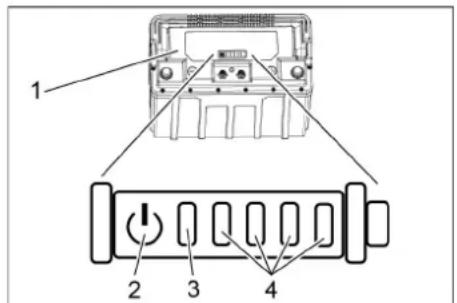
Operator console
text_image
1 2 3 4 5 6 KURCHER Professional1 OFF
Device is switched off
2 Normal mode
Wet clean the floor and vacuum up dirt water.
3 Intense mode
Wet clean the floor and allow the detergent to react.
4 V a c u u m m o d e
Suck in the dirt fleet.
5 Program selection switch
6 Display
Symbols on the machine
| Battery socket | |
| Lashing point | |
| Mop holder ** | |
| Filling level fresh water tank 25% | |
| Bow brush change | |
| Vacuum bar lowering lever | |
| Drain outlet fresh water tank | |
| Dirt water discharge hose |
** option
Before Startup
Unloading
→ Unscrew the screws from the middle board of the pallet.
→ Push down the device holding the push handle and pull out the middle board.
→ Remove the chocks in front of and next to the wheels.
→ Push down the device holding the push handle and push it forwards up to the edge of the pallet.
→ Lift the device off the pallet and set it on the floor.
Check battery
→ Check that the circular connectors and the screw connections of the battery poles are tight.
→ If necessary, retighten the cables on the battery poles with a torque wrench:
Screw M8: 18 Nm
Screw M10: 23 Nm
Charging battery
Note:
The device is equipped with a safety mechanism to prevent total discharge, i.e. when the permissible minimum capacity is reached, the brush motor and the turbine are switched off.
→ Drive the machine directly to the charging station; avoid any steep gradients in the process.
△DANGER
Danger of injury due to electric shock. Observe the mains voltage and fuse protection on the type plate of the device.
Charging process
The charging time depends on the battery condition and the charger.
When the battery is empty, the charging time is approximately:
| Charger Charging time, approx. [h] | |
| 6.654-479.0 8 | |
| 6.654-480.0 2 | |
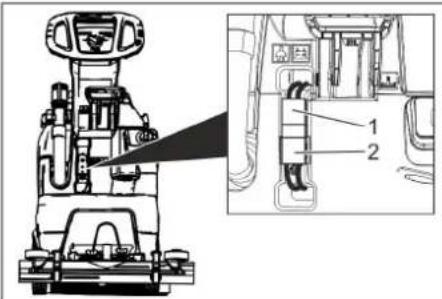
The appliance must not be used during the charging process.
ATTENTION
Risk of damage. Do not clean the device with water while the tank is removed.
text_image
Technical diagram of a vehicle's internal components with labeled parts 1 and 2, showing assembly details and component layout.1 Battery plug, appliance side
2 Battery plug, battery side
→ Detach the battery plug on the unit side.
ATTENTION
Risk of damage!
- Do not connect the charger with the battery plug on the unit side.
- Only use a charger that is suitable for the installed battery type:
Battery type Charger
| 6.654-454.0 | 6.654-479.0 |
| 6.654-480.0 |
Note: Please read the operating instructions of the charger manufacturer, especially the chapters on safety instructions!
→ Connect the battery plug on the battery side with the charger.
→ Plug the mains plug of the charger into a power outlet.
→ Execute the charging process according to the information in the operating instructions of the charger.
→ Disconnect the battery connector from the charger.
→ Connect the battery plug on the device side with the battery plug on the battery side.
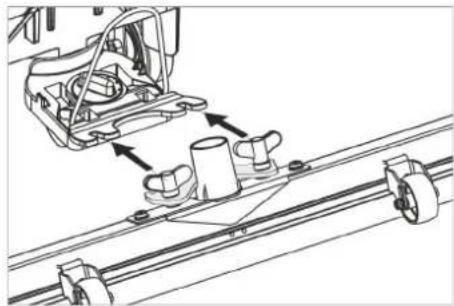
Installing the Vacuum Bar
→ Insert the vacuum bar into the vacuum bar suspension in such a manner that the profiled sheet is positioned above the suspension.
→ Tighten the wing nuts.
natural_image
Technical line drawing of a mechanical assembly with rollers and guide rails (no text or symbols)→ Insert the suction hose.
Operation
△DANGER
Risk of injury!
In dangerous situations, release the safety switch/drive lever.
Filling in detergents
Fresh water
→ Open the lock of the fresh water reservoir.
→ Fill up fresh water (maximum 50 °C) until the lower edge of filling nozzle.
→ Close the lock of the fresh water reservoir.
Detergent
⚠ WARNING
Risk of damage. Only use the recommended detergents. With other detergents, the operator bears the increased risk regarding the operational safety and danger of accident.
Only use detergents that are free from solvents, hydrochloric acid and hydrofluoric acid.
Follow the safety instructions for using detergents.
Note:
Do not use highly foaming detergents.
Recommended detergents:
| Application Detergent | |
| Routine cleaning of all water resistant floors | RM 746RM 780 |
| Routine cleaning of glossy surfaces (e.g. granite) | RM 755 es |
| Routine cleaning and basic cleaning of industrial floors | RM 69 ASF |
| Routine cleaning and basic cleaning of fine stoneware tiles | RM 753 |
| Routine cleaning of tiles in sanitary areas | RM 751 |
| Cleaning and disinfection in sanitary areas | RM 732 |
| Removal of coating from all alkali-resistant floors (e.g. PVC) | RM 752 |
| Removal of coating from li-noleum floors | RM 754 |
→ Add the detergent to the fresh water reservoir.
Note:
If the fresh water tank is empty, the cleaning head continues working without liquid supply.
Setting the water quantity
→ Adjust the water quantity using the regulating button according to the dirt on the floor covering.
Note:
Carry out initial cleaning attempts with low water volume. Increase water volume step-by-step until the desired cleaning result is achieved.
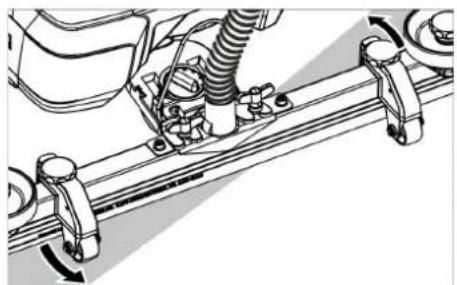
Setting the Vacuum Bar
Oblique position
To improve the vacuuming result on tiled floors the vacuum bar can be turned to an oblique position of up to 5°.
→ Loosen the wing nuts.
→ Turn the vacuum bar.
natural_image
Mechanical assembly diagram showing a vehicle with springs and connecting brackets (no text or symbols)→ Tighten the wing screws.
Inclination
If the vacuum result is unsatisfactory the inclination of the straight vacuum bar can be modified.
→ Adjust the rotary handle to incline the suction bar.
Height
The bend of the suction lips upon contact with the floor is influenced with the height adjustment.
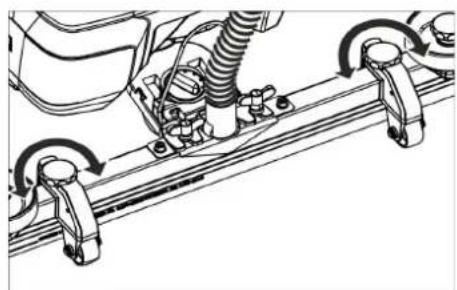
natural_image
Technical line drawing of a mechanical assembly with rotating components (no text or symbols)→ Try adjusting the twist handles of the height adjustment until the best vacuuming result is achieved.
Cleaning
ATTENTION
Risk of damage to the floor covering. Do not operate the appliance on the spot.
→ Turn the program selection switch to the desired cleaning program.
Lower the vacuum bar
→ Pull the lever out and press it down; the vacuum bar is lowered.
Note:
- For cleaning tiled floors, adjust the straight suction bar in such a way that cleaning is not done at an angle of 90 degrees to the joints.
- The inclined position and the inclination of the suction bar can be adjusted to achieve better suction results (see "Adjusting the suction bar").
- If the waste water tank is full, the float closes the suction opening and the suction turbine runs at an increased speed. If this is the case, shut the vacuum off and drive to empty the waste water tank.
Shutting Down the Appliance
→ Release the safety switch.
→ Set the program selection switch to suction or vacuuming.
→ Briefly drive forward and suck of the remaining water.
→ Raise the vacuum bar.
→ Charge battery, if required.
Drain off dirt water
△WARNING
Please observe the local provisions regarding the wastewater treatment.
→ Take the water discharge hose from the support and lower above a suited collection device.
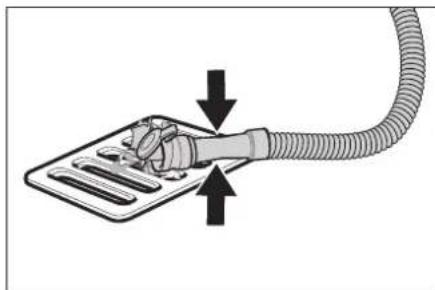
natural_image
Diagram of a medical device with a coiled tube and tubing, showing fluid flow direction (no text or symbols)→ Crush or bend the dosing equipment.
→ Open the lid of the dosing equipment.
→ Drain off the dirt water - regulate the water quantity by pressing or bending.
→ Rinse the waste water tank with clear water.
Drain off clean water
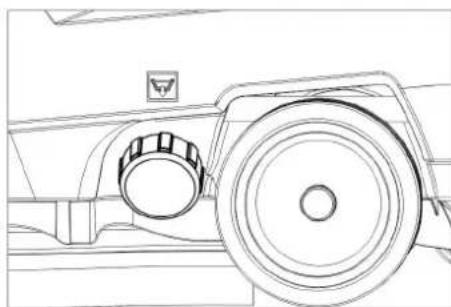
natural_image
Technical line drawing of a mechanical component with a circular head and handle (no text or symbols)→ Unscrew the lock of the fresh water reservoir.
Transport
△DANGER
Risk of injury! When loading or unloading the machine, it may only be operated on gradients up to the maximum value (see "Technical Specifications"). Drive slowly.
△CAUTION
Risk of personal injury or damage! Mind the weight of the appliance during transport.
→ Use the pushing handle to push the appliance.

natural_image
Technical line drawing of a mechanical device with no visible text or symbols→ When transporting in vehicles, secure the appliance according to the guidelines from slipping and tipping over.
Storage
△CAUTION
Risk of personal injury or damage! Consider the weight of the appliance when storing it. This appliance must only be stored in interior rooms.
Care and maintenance
△DANGER
Risk of injury! Set the programme selector switch to "OFF" and pull the mains plug of the charger prior to performing any work on the appliance.
Remove the battery plug from machine.
→ Drain and dispose of the dirt water and the residual fresh water.
Maintenance schedule
After each operation
ATTENTION
Risk of damage. Do not sluice the appli- ance with water and do not use aggressive detergents.
→ Drain off dirt water.
→ Rinse the waste water tank with clear water.
→ Clean the outside of the appliance with a damp cloth which has been soaked in mild detergent.
→ Check the fluff filter, clean if required.
→ Clean the vacuum lips and the wiping lips, check for wear and replace if required.
→ Check the brush for wear and replace i required (see "Maintenance tasks").
→ Charge the battery if required.
Weekly
→ When used regularly, charge the battery fully and without interruption at least once a week.
Monthly
→ Check battery poles for oxidation.
→ Check that the battery cables are tight,
→ Clean the seals between waste water tank and cover and check for tightness, replace if required.
→ Clean sieve.
→ For long periods of disuse, only turn the device off when the battery is fully charged. Fully recharge the battery at least every month.
Yearly
→ Have the prescribed inspection carried out by the customer service.
Maintenance Works
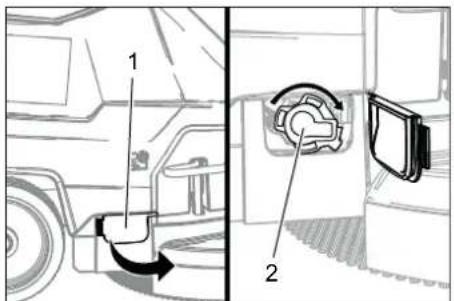
Cleaning the sieve
text_image
Technical diagram showing a vehicle's internal components with labeled parts 1 and 2, including a directional arrow indicating rotation.1 Cover
2 Cover
→ Open the cover.
→ Turn cover the clockwise and remove it.
→ Remove and clean the sieve lying beneath it.
→ Insert the sieve.
→ Replace the cover and lock it by turning it anti-clockwise.
→ Close cover.
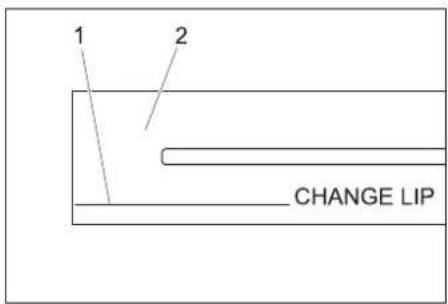
Replace or turn vacuum lips
text_image
1 2 CHANGE LIP1 Wear indicator
2 Vacuum lip
The vacuum lips must be replaced or reversed if they are worn down to the wear indicator.
→ Remove the vacuum bar.
→ Unscrew the star grips.

text_image
Technical diagram showing mechanical assembly with numbered components and rotation indicators→ Remove the plastic parts.
→ Remove the vacuum lips.
→ Insert new or reversed vacuum lips.
→ Insert the plastic parts.
→ Screw in and tighten the star grips.
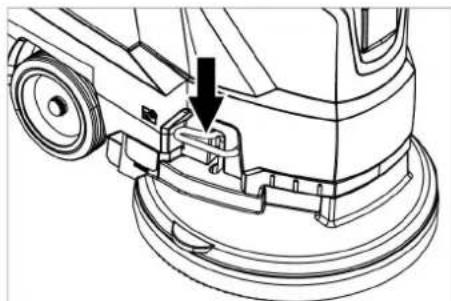
Replacing the disk brushes
→ Push down the device holding the push handle so that the cleaning head is raised.
→ Press the pedal for changing the brushes downward beyond its resistance.
natural_image
Technical line drawing of a cleaning or cleaning machine component with a downward arrow indicating a detail (no text or symbols present)→ Pull the device towards the back so that the disc brush becomes accessible.
→ Place a new disc brush on the floor in front of the device.
→ Drive the device with the raised cleaning head over the new disc brush and lower the cleaning head.
The brush locks into the drive.
Removing the waste water tank
→ Drain off dirt water.

natural_image
Technical line drawing of a cleaning or cleaning machine (no text or symbols)→ Lift up the waste water tank and put it aside.
Batteries
△DANGER
Risk of explosion. Do not place tools or the like on the battery, i.e. on the terminal poles and cell connectors.
Recommended batteries
| Order No. | |
| 80 Ah 6.654-454.0 | |
Insert batteries and connect
→ Drain off dirt water.
→ Lift up the waste water tank and put it aside.
→ Pull out the battery plug.
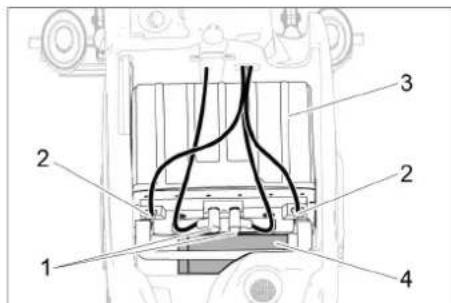
text_image
Technical diagram of a mechanical component with numbered parts labeled 1 to 41 Round plug
2 Battery pole
3 Battery
4 Spacer
→ Place the battery into the device as shown above.
→ Insert the spacer between the battery and the device on the side indicated in the picture.
△CAUTION
When removing and installing the battery, the position of the machine might become unstable. Please ensure that it is in a secure position.
→ Clamp the connecting cables supplied onto the (+) and (-) battery terminals.
→ Plug both circular connectors into the battery.
ATTENTION
If the polarity is reversed (positive and negative terminals), the control electronics are destroyed.
Pay attention to correct poles.
→ Place the waste water tank on the appliance.
Note:
Charge the batteries before commissioning the appliance.
See also "Charging the batteries".
Removing the batteries
→ Set the programme selector switch to "OFF".
→ Pull out the battery plug.
→ Lift up the waste water tank and put it aside.
→ Unplug both circular connectors from the battery.
→ Clamp off the minus pole of the battery
→ Disconnect the cable from positive terminal of the battery.
→ Remove the support blocks or the foam pieces.
△CAUTION
When the batteries are installed and removed, the stability of the appliance can be compromised; ensure a safe stance.
→ Remove the batteries.
→ Dispose of the used batteries according to the local provisions.
Maintenance contract
To ensure a reliable operation of the appli- ance maintenance contracts can be conclud- ed with the competent Kärcher sales office.
Frost protection
In case of danger of frost:
→ Empty the fresh and waste water tank.
→ Store the appliance in a frost-protected room.
Faults
△DANGER
Risk of injury! Set the programme selector switch to "OFF" and pull the mains plug of the charger prior to performing any work on the appliance.
Remove the battery plug from machine.
→ Drain and dispose of the dirt water and the residual fresh water.
Faults with display
| Display Correction | |
| ERR B Check if foreign objects block the brush; remove foreign object if required.Set the programme selector switch to "OFF", release the safety switch, wait for 3 seconds, restart. | |
| ERR T | Set the programme selector switch to "OFF", release the safety switch, wait for 3 seconds, restart.If the event recurs, call Customer Service. |
| LOW BAT Charge battery.If the error is still displayed, check the two circular connectors on the battery are properly connected.If the event recurs, call Customer Service. | |
| ERR TEMP Allow device to cool down. | |
| HANDS OFF | Release the safety switch and wait until the operating hours or the battery status are displayed. Then operate the safety switch again. |
| ERR REL | Set the programme selector switch to "OFF", release the safety switch, wait for 3 seconds, restart.If the event recurs, call Customer Service. |
| ERR PWM | Set the programme selector switch to "OFF", release the safety switch, wait for 3 seconds, restart.If the event recurs, call Customer Service. |
Battery status display
text_image
1 2 3 41 Battery
2 Button
3 "Status" LED
4 Indicator LED
→ Press the button for 5 seconds.
No LED lights up:
Charge the battery.
The status LED lights up green:
Together, all 5 LEDs indicate the battery's charging state.
The status LED lights up red:
The indicator LEDs indicate a malfunction. Malfunctions described in the following table can be remedied by the user. Contact KÄRCHER Customer Service for all malfunctions indicated not described above.
 | Cause Correction | |||||
| red | - | - | - | - | Battery too hot. | Allow the battery to cool down. |
| red -- | green | Battery management system too hot. | Allow the battery to cool down. | |||
| red | - | - | green | - | Battery too cold for charging. | Move the device to a warmer place and wait until the battery has warmed up. |
| red | - | - | green | green | Current consumption too high during charging. | Unplug the mains plug of the charger. Wait 10 seconds. Reinsert the mains plug. If the malfunction is displayed again, replace the charger. |
| Device current consumption too high. | Switch off the device. If the malfunction occurs again after switching on, look for a fault in the device. | |||||
| red | - | green | - | green | Short-circuit | Check all battery connections. |
| red | - | green | green | - | Cell voltage too low during discharge. | Charge battery. |
| red | - | green | green | green | Cell voltage too high during charging. | Discharge battery to 20% remaining capacity. Then charge the battery. |
| red | green | - | - | green | Battery voltage too low. | Charge battery. |
| red | green | - | green | - | Malfunction during charging process. | Unplug the mains plug of the charger. Wait 10 seconds. Reinsert the mains plug. If the malfunction is displayed again, replace the charger. |
| red | green | - | green | green | ||
| red | green | green | - | - | Battery too cold to output power. | Move the device to a warmer place and wait until the battery has warmed up. |
| red | green | green | green | - | Power output malfunction. | Switch off the device. If the malfunction persists, contact Customer Service. |
Faults without display on the console
| Failure Correction | |
| Appliance cannot be started | Turn the program selection switch to the desired programme. |
| Operate the safety switch. | |
| Insert battery plug. | |
| Check battery; charge it if required. | |
| Make sure that all battery terminals are connected. | |
| Insufficient water quantity | Check fresh water level, refill tank if necessary. |
| Increase the water volume on the regulating knob for water volume. | |
| Clean sieve. | |
| Insufficient vacuum performance | Clean the seals between waste water tank and cover and check for tightness, replace if required. |
| Wastewater reservoir is full; shut off the appliance and empty the wastewater reservoir | |
| Clean the fluff filter. | |
| Clean the vacuum lips on the vacuum bar, replace if required | |
| Check if the cover on the dirt water discharge hose is closed | |
| Check the setting of the vacuum bar. | |
| Check suction hose for blockages; clean if required. | |
| Check the suction hose for tightness; replace if required. | |
| Insufficient cleaning result | Check the brushes for wear, replace if required. |
| Increase the water volume. | |
| Check the brush type and the detergent for their suitability. | |
| Suction turbine is running rough | Clean the swimmer. |
| Brush does not turn | Check if foreign objects block the brush; remove foreign object if required. |
| If over-current switch in the electronics system has been triggered, turn programme selection switch to "OFF". Afterwards, set it back to the desired programme. | |
| Vibrations during cleaning | You might need to use a softer brush. |
| In case of faults that cannot be remedied using the table below please contact the customer service. | |
Cleaning the floater
→ Open the cover of the waste water tank.
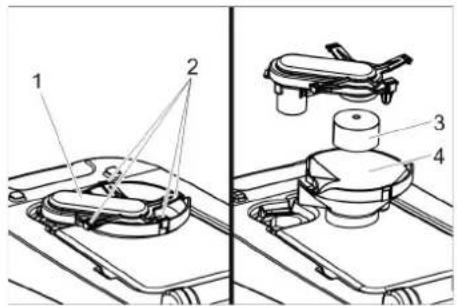
text_image
Technical diagram showing labeled components of a mechanical device, including parts 1, 2, 3, and 4.1 Swimmer casing
2 Lock hook
3 Float
4 Lower part
→ Pull out the float casing towards the top.
→ Detach locking hooks.
→ Clean float and bottom part.
→ Assemble the float casing and insert it into the device.
Accessories
| Description Part no.: Description | ||
| Disc brush, white (very soft) | 4.905-024.0 | For the gentle cleaning of sensitive surfaces. |
| Disk brush, natural (white) | 4.905-023.0 | Made of natural fibres for spot cleaning and polishing. |
| Disk brush, red (medium, standard) | 4.905-022.0 | For the use with all common cleaning tasks. |
| Disk brush, black (hard) 4.905-025.0 For heavy soiling and for deep cleaning. For robust floorings only. | ||
| Driver plate pad | 4.762-533.0 | For cleaning with pads. With quick change coupling and center lock. |
| Pad, red (medium soft) 6.369-470.0 For cleaning and cleanering of all floors. | ||
| Pad, green (medium hard) | 6.369-472.0 | For cleaning heavily soiled floors and for deep cleaning. |
| Pad, white | 6.369-469.0 | For polishing floors. |
| Pad, black (hard) | 6.369-473.0 | With stubborn soiling and for deep cleaning. |
| Microfiber pad | 6.905-526.0 | Routine cleaning and basic cleaning of fine stoneware tiles |
| Pad, beige (natural hair proportion) | 6.371-081.0 | For polishing and refreshing of hard and flexible floorings. |
| Diamond pad, white | 6.371-256.0 | For coarse cleaning and upvaluation. Removes small scratches and ensures a clean, semi-gloss surface. |
| Diamond pad, yellow | 6.371-257.0 | For coarse cleaning and upvaluation. Removes fine scratches and ensures an even more homogenous and shiny surface. |
| Diamond pad, green | 6.371-238.0 | For polishing high-gloss coated floor coverings and for quick polishing of terrazzo and natural stone surfaces. |
| Suction bar, 850 mm, straight | 4.777-401.0 | |
| Suction bar, 850 mm, bent | 4.777-411.0 | |
| Set homebase box | 4.035-406.0 | |
| Description Part no.: Description | ||
| Mop holder 9.753-023.0 | ||
| Adapter Homebase 5.035-488.0 | ||
| Double hook 6.980-077.0 | ||
| Mop clip 6.980-078.0 | ||
| Bottle hook 6.980-080.0 | ||
| Universal hook 4.070-075.0 |
Technical specifications
| Power | ||
| Nominal voltage V 24 | ||
| Battery capacity Ah | (5h) | 80 |
| Average power consumption | W 1100 | |
| Rated power suction turbine | W | 500 |
| Rated power brush drive | W 600 | |
| Vacuuming | ||
| Vacuum power, air volume (max.) | l/s 24 | |
| Vacuuming power, negative pressure (max.) | kPa (mbar) | 12 (120) |
| Type of protection | IPX 3 | |
| Cleaning brushes | ||
| Brush speed | 1/min | 155 |
| Brush diameter | mm | 430 |
| Dimensions and weights | ||
| Theoretical surface cleaning performance | m^2/h | 1600 |
| Max. working range in-cline | % | 2 |
| Fresh/waste water tank volume | I | 25/25 |
| Max. water temperature | °C | 50 |
| Ambient temperature | °C | 5...40 |
| Net weight (transport weight) | kg | 76 |
| Total weight (ready to operate) | kg | 102 |
| Dimensions of battery compartment | mm | 350 x 350 |
| Values determined as per EN 60335-2-72 | ||
| Total oscillation value | m/s^2 | <2,5 |
| Uncertainty K | m/s^2 | 0,2 |
| Sound pressure level L_pA | dB(A) | 66 |
| Uncertainty K_pA | dB(A) | 1 |
| Sound power level L_WA + Uncertainty K_WA | dB(A) | 81 |
EU Declaration of Conformity
We hereby declare that the machine described below complies with the relevant basic safety and health requirements of the EU Directives, both in its basic design and construction as well as in the version put into circulation by us. This declaration shall cease to be valid if the machine is modified without our prior approval.
Product: Floor cleaner
Type: 1.127-xxx
1.515-xxx
Relevant EU Directives
2006/42/EC (+2009/127/EC)
2014/30/EU
2011/65/EU
Applied harmonized standards
EN 60335-1
EN 60335-2-72
EN 55012: 2007 + A1: 2009
EN 61000-6-2: 2005
EN 62233: 2008
EN IEC 63000: 2018
Applied national standards
The signatories act on behalf of and with of the authority of the company management.
Chairman of the Board of Management

S. Reiser Director Regulatory Affairs & Certification
Documentation supervisor:
S. Reiser
Alfred Kärcher SE & Co. KG
71364 Winnenden (Germany)
Tel.: +49 7195 14-0
Fax: +49 7195 14-2212
Winnenden, 2021/02/01
Declaration of Conformity
We hereby declare that the product described below complies with the relevant provisions of the following UK Regulations, both in its basic design and construction as well as in the version put into circulation by us. This declaration shall cease to be valid if the product is modified without our prior approval.
Product: Floor cleaner
Type: 1.127-xxx
1.515-xxx
Currently applicable UK Regulations
S.I. 2008/1597 (as amended)
S.I. 2016/1091 (as amended)
S.I. 2012/3032 (as amended)
Designated standards used
EN 60335-1
EN 60335-2-72
EN 55012: 2007 + A1: 2009
EN 61000-6-2: 2005
EN 62233: 2008
EN IEC 63000: 2018
National standards used
The signatories act on behalf of and with of the authority of the company management.

H. Jenner Chairman of the Board of Management
S. Reiser Director Regulatory Affairs & Certification
Documentation supervisor:
S. Reiser
Alfred Kärcher SE & Co. KG
71364 Winnenden (Germany)
Tel.: +49 7195 14-0
Fax: +49 7195 14-2212
Winnenden, 2021/02/01
Accessories and Spare Parts
Only use original accessories and spare parts, they ensure the safe and trouble-free operation of the device.
For information about accessories and spare parts, please visit www.kaercher.com.
Entreposage .... FR 5
text_image
Technical diagram of a cleaning or cleaning device with numbered parts for identification.text_image
Technical diagram of a vehicle's internal components with labeled parts 1 and 2, including a zoomed-in detail view.natural_image
Technical line drawing of a mechanical assembly with rollers and a housing component (no text or symbols)natural_image
Technical line drawing of a mechanical assembly with springs and brackets (no text or symbols)natural_image
Technical line drawing of a mechanical assembly with springs and rotating components (no text or symbols)natural_image
Diagram of a hand connecting a flexible hose to a device with arrows indicating force or connection (no text or symbols present)natural_image
Technical line drawing of a mechanical component with no visible text or symbolsnatural_image
Technical line drawing of a mechanical assembly with no visible text or symbolstext_image
Technical diagram showing a vehicle's internal components with labeled parts 1 and 2, including a directional arrow indicating rotation.1 Capot
2 Capot
text_image
Technical diagram showing three-step assembly of a mechanical component with labeled parts and rotation indicatorsnatural_image
Technical line drawing of a cleaning or cleaning machine component with a downward arrow indicating a detail (no text or symbols present)natural_image
Technical line drawing of a cleaning or cleaning machine (no text or symbols)text_image
Technical diagram of a vehicle engine component with numbered parts labeled 1 to 4text_image
Technical diagram showing labeled components of a mechanical assembly, including parts 1, 2, 3, and 4.
Chairman of the Board of Management

Director Regulatory Affairs & Certification
71364 Winnenden (Germany)
Tel.: +49 7195 14-0
Fax: +49 7195 14-2212
Winnenden, 2021/02/01
text_image
Technical diagram of a cleaning or cleaning device with numbered parts for identification.text_image
Technical diagram of a robotic device with labeled parts and an inset view showing internal components.natural_image
Technical line drawing of a mechanical assembly with no visible text or symbolsnatural_image
Mechanical assembly diagram showing a spring-loaded component mounted on a rail with mounting brackets (no text or symbols visible)natural_image
Mechanical assembly diagram showing a spring-loaded component mounted on a rail with rotating arms (no text or symbols)natural_image
Diagram showing a hand holding a flexible hose with arrows indicating force or movement (no text or symbols)natural_image
Technical line drawing of a mechanical component with a circular head and handle (no text or symbols)natural_image
Technical line drawing of a mechanical assembly with no visible text or symbolstext_image
Technical diagram showing a vehicle's internal components with labeled parts 1 and 2, including a curved arrow indicating rotation.text_image
Technical diagram showing mechanical assembly with numbered components and rotation indicatorsnatural_image
Technical line drawing of a cleaning or cleaning machine component with a downward arrow indicating a detail (no text or symbols present)natural_image
Technical line drawing of a cleaning or cleaning machine (no text or symbols)text_image
Technical diagram of a vehicle's internal components with numbered parts labeled 1 to 4text_image
Technical diagram showing labeled mechanical components with numbered parts 1 to 4Chairman of the Board of Management

S. Reiser
Director Regulatory Affairs & Certification
71364 Winnenden (Germany)
Tel.: +49 7195 14-0
Fax: +49 7195 14-2212
Winnenden, 2021/02/01
Accessori e ricambi
Accessoires ....NL 8
text_image
Technical diagram of a cleaning or cleaning device with numbered parts for identification.text_image
Technical diagram of a robotic device with labeled parts and an inset view showing internal components.1 Batterijstekker, apparaatkant
natural_image
Technical line drawing of a mechanical assembly with rollers and guide rails (no text or symbols)natural_image
Mechanical assembly diagram showing a vehicle with springs and rotating components (no text or symbols)natural_image
Technical line drawing of a mechanical assembly with springs and levers (no text or symbols)natural_image
Diagram showing a hand connecting a flexible hose to a device with directional arrows indicating movement (no text or symbols)natural_image
Technical line drawing of a vehicle wheel assembly (no text or symbols)natural_image
Technical line drawing of a mechanical device with no visible text or symbolstext_image
Technical diagram showing a vehicle's internal components with labeled parts 1 and 2, including a directional arrow indicating rotation.1 Afdekking
2 Deksel
text_image
Technical diagram showing mechanical assembly with numbered components and rotation indicatorsnatural_image
Technical line drawing of a cleaning or repair machine component with a black arrow indicating a detail (no text or symbols present)natural_image
Technical line drawing of a cleaning or cleaning machine component (no text or symbols)→ Vuilwaterreservoir optillen en opzij zetten.
Accu's
⚠ GEVAAR
text_image
Technical diagram of a vehicle engine component with numbered parts labeled 1 to 41 Ronde stekker
2 Accupool
3 Accu
4 Afstandhouder
text_image
Technical diagram showing labeled components of a mechanical assembly, with numbered parts 1 to 4.Chairman of the Board of Management

S. Reiser
Director Regulatory Affairs & Certification
71364 Winnenden (Germany)
Tel.: +49 7195 14-0
Fax: +49 7195 14-2212
Winnenden, 2021/02/01
text_image
Technical diagram of a cleaning or cleaning device with numbered parts for identification.text_image
Technical diagram of a robotic device with labeled parts and an inset showing internal componentsnatural_image
Technical line drawing of a mechanical assembly with rotating components and alignment arrows (no text or symbols)natural_image
Mechanical assembly diagram showing a vehicle with springs and levers on a rail, no text or symbols presentnatural_image
Technical line drawing of a mechanical assembly with springs and clamps (no text or symbols)natural_image
Diagram showing a hand holding a flexible hose with arrows indicating force or movement (no text or symbols)natural_image
Technical line drawing of a vehicle wheel assembly (no text or symbols)natural_image
Technical line drawing of a mechanical assembly with no visible text or symbolstext_image
Technical diagram showing a vehicle's internal components with labeled parts 1 and 2, including a directional arrow indicating rotation.1 Cubierta
2 Tapa
text_image
Technical diagram showing three labeled mechanical components with rotational indicators and directional arrows indicating motion or assembly.natural_image
Technical line drawing of a cleaning or cleaning machine component with a downward arrow indicating a detail (no text or symbols present)natural_image
Technical line drawing of a cleaning or cleaning machine component (no text or symbols)text_image
Technical diagram of a vehicle engine component with numbered parts labeled 1 to 4text_image
Technical diagram showing labeled mechanical components in two views, with numbered parts 1 to 4 visible.
Chairman of the Board of Management
Director Regulatory Affairs & Certification
71364 Winnenden (Germany)
Tel.: +49 7195 14-0
Fax: +49 7195 14-2212
Winnenden, 2021/02/01
text_image
Technical diagram of a cleaning or cleaning device with numbered parts for identification.text_image
Technical diagram of a robotic device with labeled parts and an inset view showing internal components.natural_image
Mechanical assembly diagram showing a vehicle chassis with attached components and alignment lines (no text or labels)natural_image
Mechanical assembly diagram showing a car body with springs and connecting brackets (no text or symbols)natural_image
Technical line drawing of a mechanical assembly with rotating components and spring (no text or symbols)natural_image
Diagram showing a hand connecting a flexible hose to a device with arrows indicating direction (no text or symbols)natural_image
Technical line drawing of a vehicle wheel assembly (no text or symbols)natural_image
Technical line drawing of a mechanical assembly with no visible text or symbolstext_image
Technical diagram showing a vehicle's internal components with labeled parts 1 and 2, including a directional arrow indicating rotation.1 Cobertura 2 Tampa
text_image
Technical diagram showing three-step assembly of a mechanical component with labeled parts and rotation indicatorsnatural_image
Technical line drawing of a cleaning or cleaning machine component with a downward arrow indicating a detail (no text or symbols present)natural_image
Technical line drawing of a cleaning or cleaning machine (no text or symbols)text_image
Technical diagram of a mechanical component with numbered parts labeled 1 to 4Desmontar as baterias
text_image
Technical diagram showing mechanical assembly with labeled parts 1, 2, 3, and 471364 Winnenden (Germany)
Tel.: +49 7195 14-0
Fax: +49 7195 14-2212
Winnenden, 2021/02/01
text_image
Technical diagram of a cleaning or cleaning device with numbered parts for identification.text_image
Technical diagram of a vehicle's internal components with labeled parts 1 and 2, including a zoomed-in detail view.1 Batteristik, maskinside
2 Batteristik, batteriside
→ Træk batteristikket ud på maskinsiden.
BEMAERK
Risiko for beskadigelse!
natural_image
Technical line drawing of a mechanical assembly with no visible text or symbolsnatural_image
Mechanical assembly diagram showing a vehicle with springs and rotating components (no text or symbols)→ Stram vingeskruerne.
Hældning
natural_image
Technical line drawing of a mechanical assembly with springs and levers (no text or symbols)natural_image
Diagram showing a hand pressing down on a device with a coiled cable, indicating fluid or mechanical operation (no text or symbols present)natural_image
Technical line drawing of a mechanical component with a circular dial and handle (no text or symbols)→ Skru friskvandtankens låg af.
Transport
⚠️FARE
natural_image
Technical line drawing of a mechanical assembly with no visible text or symbolstext_image
Technical diagram showing a vehicle's internal components with labeled parts 1 and 2, including a directional arrow indicating rotation.1 Afdækning
2 Dæksel
text_image
Technical diagram showing mechanical assembly steps with numbered components and rotation indicatorsnatural_image
Technical line drawing of a cleaning or cleaning machine component with a downward arrow indicating a detail (no text or symbols present)natural_image
Line drawing of a cleaning or cleaning machine component (no text or symbols)text_image
Technical diagram of a vehicle's internal components with numbered parts labeled 1 to 41 Rundstik
2 Batteripol
3 Batteri
4 Afstandsholder
text_image
Technical diagram showing labeled mechanical components with numbered parts 1, 2, 3, and 41 Svømmerhus
2 Stopstifter
3 Svømmerventil
4 B u n d
71364 Winnenden (Germany)
Tel.: +49 7195 14-0
Fax: +49 7195 14-2212
Winnenden, 2021/02/01
text_image
Technical diagram of a cleaning or cleaning device with numbered parts for identification.text_image
Technical diagram of a vehicle's internal components with labeled parts 1 and 2, showing assembly details and component layout.1 Batterikontakt på siden av maskinen
2 Batterikontakt på siden av batteriet
→ Trekk ut batterikontakten på maskinen.
OBS
Fare for skader!
natural_image
Technical line drawing of a mechanical assembly with no visible text or symbols→ Monter slangen.
Drift
⚠️FARE
Fare for personskade!
natural_image
Mechanical assembly diagram showing a spring-loaded component mounted on a rail with mounting brackets (no text or symbols visible)natural_image
Mechanical assembly diagram showing a vehicle with springs, pulleys, and mounting brackets (no text or labels)natural_image
Diagram showing a hand holding a flexible hose connected to a device with arrows indicating force or movement (no text or symbols present)natural_image
Technical line drawing of a mechanical component with a cylindrical head and circular base (no text or symbols)natural_image
Technical line drawing of a mechanical assembly with no visible text or symbolstext_image
Technical diagram showing vehicle door and door assembly with labeled parts 1 and 21 Deksel
2 Deksel
text_image
Technical diagram showing mechanical assembly with numbered components and rotation indicators→ Ta av kunststoffdelene.
→ Trekk av sugeleppen.
→ Skyv inn de nye elle snudde sugelippene.
→ Sett på plass kunststoffdelene.
→ Sett på plass kryssgrepskruen og skru den godt til.
Skifte skivebørste
natural_image
Technical line drawing of a cleaning or cleaning machine component with a black arrow indicating a detail (no text or symbols present)natural_image
Technical line drawing of a cleaning or cleaning machine (no text or symbols)text_image
Technical diagram of a mechanical assembly with numbered parts labeled 1 to 41 Rund plugg
2 Batteripol
3 B a t t e r i
4 Avstandsholder
text_image
Technical diagram showing labeled components of a mechanical device, including parts 1, 2, 3, and 4.1 Flottørkasse
2 Låseknaster
3 F l o t t ø r
4 Underdel
Type: 1.127-xxx 1.515-xxx
Chairman of the Board of Management
S. Reiser
Director Regulatory Affairs & Certification
71364 Winnenden (Germany)
Tel.: +49 7195 14-0
Fax: +49 7195 14-2212
Winnenden, 2021/02/01
text_image
Technical diagram of a cleaning or cleaning device with numbered parts for identification.text_image
Technical diagram of a vehicle's internal components with labeled parts 1 and 2, including a zoomed-in detail view.1 Batterikontrakt, maskinsida
2 Batterikontakt, batterisida
→ Dra ur batterikontkaten på maskinsidan.
OBSERVERA
Risk för skada!
natural_image
Technical line drawing of a mechanical assembly with no visible text or symbolsnatural_image
Mechanical assembly diagram showing a vehicle suspension system with rotating components (no text or labels)→ Dra fast vingskruvar.
Lutning
natural_image
Technical line drawing of a mechanical assembly with rotating components (no text or symbols)natural_image
Diagram showing a hand holding a flexible hose with arrows indicating force or movement (no text or symbols)natural_image
Technical line drawing of a vehicle wheel assembly with no visible text or symbolsnatural_image
Technical line drawing of a mechanical assembly with no visible text or symbolstext_image
Technical diagram showing a vehicle's internal components with labeled parts 1 and 2, including a directional arrow indicating rotation.1 Skydd
2 L o c k
text_image
Technical diagram showing mechanical assembly with numbered components and rotation indicatorsnatural_image
Technical line drawing of a cleaning or cleaning machine component with a black arrow indicating a detail (no text or symbols present)natural_image
Line drawing of a cleaning or cleaning machine component (no text or symbols)text_image
Technical diagram of a mechanical assembly with numbered components labeled 1 to 41 Rundkontakt
2 Batteripol
3 Batteri
4 Distanshållare
text_image
Technical diagram showing labeled components of a mechanical device, including parts 1, 2, 3, and 4.71364 Winnenden (Germany)
Tel.: +49 7195 14-0
Fax: +49 7195 14-2212
Winnenden, 2021/02/01
text_image
Technical diagram of a cleaning or cleaning device with numbered parts for identificationtext_image
Technical diagram of a vehicle's internal components with labeled parts 1 and 2, showing assembly details and component layout.natural_image
Technical line drawing of a mechanical assembly with no visible text or symbols→ Liitä imuletku.
Käyttö
⚠ VAARA
Loukkaantumisvaara!
natural_image
Mechanical assembly diagram showing a vehicle with springs and mounting brackets (no text or symbols)natural_image
Technical line drawing of a mechanical assembly with springs and levers (no text or symbols)natural_image
Diagram showing a hand connecting a flexible hose to a device with arrows indicating force or connection (no text or symbols present)natural_image
Technical line drawing of a mechanical component with a circular head and adjustment knob (no text or symbols)natural_image
Technical line drawing of a mechanical assembly with no visible text or symbolstext_image
Technical diagram showing a vehicle's internal components with labeled parts 1 and 2, including a directional arrow indicating rotation.1 P e i t e
2 K a n s i
text_image
Technical diagram showing mechanical assembly with numbered components and rotation indicatorsnatural_image
Technical line drawing of a cleaning or cleaning machine component with a black arrow indicating a detail (no text or symbols present)natural_image
Technical line drawing of a cleaning or cleaning machine (no text or symbols)text_image
Technical diagram of a vehicle engine component with numbered parts labeled 1 to 4text_image
Technical diagram showing labeled mechanical components in two views, with numbered parts 1 to 4 visible.1 Uimurikotelo
2 Pidätinhaka
3 Uimuri
4 A I a o s a
71364 Winnenden (Germany)
Tel.: +49 7195 14-0
Fax: +49 7195 14-2212
Winnenden, 2021/02/01
text_image
Technical diagram of a cleaning or cleaning device with numbered parts for identification.text_image
Technical diagram of a robotic device with labeled parts and an inset showing internal wiring or wiring connections.natural_image
Mechanical assembly diagram showing a bracket with attached parts and railings (no text or symbols)natural_image
Technical line drawing of a mechanical assembly with springs and connectors (no text or symbols)natural_image
Technical line drawing of a mechanical assembly with rotating components (no text or symbols)natural_image
Diagram showing a hand holding a flexible hose connected to a device with arrows indicating force or movement (no text or symbols present)natural_image
Technical line drawing of a mechanical component with no visible text or symbolsnatural_image
Technical line drawing of a mechanical assembly with no visible text or symbolstext_image
Technical diagram showing a vehicle's internal components with labeled parts 1 and 2, including a directional arrow indicating rotation.text_image
Technical diagram showing mechanical assembly with numbered components and rotation indicatorsnatural_image
Technical line drawing of a cleaning or cleaning machine component with a black arrow indicating a detail (no text or symbols present)natural_image
Technical line drawing of a mechanical cleaning or inspection device (no text or symbols)text_image
Technical diagram of a vehicle engine component with numbered parts labeled 1 to 4text_image
Technical diagram showing labeled components of a mechanical assembly, including parts 1, 2, 3, and 4.
Chairman of the Board of Management

Director Regulatory Affairs & Certification
71364 Winnenden (Germany)
Tel.: +49 7195 14-0
Fax: +49 7195 14-2212
Winnenden, 2021/02/01
text_image
Technical diagram of a cleaning or cleaning device with numbered parts for identification.text_image
Technical diagram of a vehicle's internal components with labeled parts 1 and 2, including a zoomed-in detail view.natural_image
Technical line drawing of a mechanical assembly with no visible text or symbolsnatural_image
Mechanical assembly diagram showing a vehicle with springs and rotating components (no text or symbols)natural_image
Technical line drawing of a mechanical assembly with springs and rotating components (no text or symbols)natural_image
Diagram showing a hand pressing down on a device with a coiled cable, indicating fluid flow or mechanical operation (no text or symbols present)natural_image
Technical line drawing of a mechanical component with a circular head and adjustment knob (no text or symbols)natural_image
Technical line drawing of a mechanical assembly with no visible text or symbolstext_image
Technical diagram showing a vehicle's internal components with labeled parts 1 and 2, including a directional arrow indicating rotation.1 Kapak
2 Kapak
text_image
Technical diagram showing three-step assembly of a mechanical component with labeled parts and rotation indicatorsnatural_image
Technical line drawing of a cleaning or cleaning machine component with a black arrow indicating a detail (no text or symbols present)natural_image
Technical line drawing of a cleaning or cleaning machine (no text or symbols)text_image
Technical diagram of a vehicle engine component with numbered parts labeled 1 to 41 Yuvarlak fiş
2 Akü kutbu
3 Akü
4 Mesafe parçası
text_image
Technical diagram showing labeled mechanical components with numbered parts 1, 2, 3, and 471364 Winnenden (Germany)
Tel.: +49 7195 14-0
Fax: +49 7195 14-2212
Winnenden, 2021/02/01
text_image
Technical diagram of a cleaning or cleaning device with numbered parts for identification.text_image
Technical diagram of a vehicle's internal components with labeled parts 1 and 2, showing assembly details and component layout.natural_image
Technical line drawing of a mechanical assembly with rollers and a housing (no text or symbols)natural_image
Mechanical assembly diagram showing a spring-loaded component mounted on a rail with mounting brackets (no text or symbols visible)natural_image
Technical line drawing of a mechanical assembly with springs and rotating components (no text or symbols)natural_image
Diagram showing a hand holding a flexible hose connected to a tray device, with arrows indicating direction of movement (no text or symbols present)natural_image
Technical line drawing of a mechanical component with a circular head and central hub (no text or symbols)natural_image
Technical line drawing of a mechanical assembly with no visible text or symbolstext_image
Technical diagram showing a vehicle's internal components with labeled parts 1 and 2, including a directional arrow indicating rotation.text_image
Technical diagram showing three-step assembly of a mechanical component with labeled parts and rotation indicatorsnatural_image
Technical line drawing of a cleaning or cleaning machine component with a downward arrow indicating a adjustment or repair point (no text or symbols present)natural_image
Technical line drawing of a cleaning or cleaning machine (no text or symbols)text_image
Technical diagram of a vehicle's internal components with numbered parts labeled 1 to 41 Круглый штек
text_image
Technical diagram showing labeled components of a mechanical assembly, with numbered parts 1 to 4.1 Корпус поплавка
2 Фиксирующие крюки
3 П оп л а в о к
4 Нижняя часть

Chairman of the Board of Management
Director Regulatory Affairs & Certification
71364 Winnenden (Germany)
Tel.: +49 7195 14-0
Fax: +49 7195 14-2212
Winnenden, 2021/02/01
text_image
Technical diagram of a cleaning or cleaning device with numbered parts for identification.text_image
Technical diagram of a robotic device with labeled parts and an inset view showing internal components.natural_image
Technical line drawing of a mechanical assembly with no visible text or symbolsnatural_image
Mechanical assembly diagram showing a vehicle suspension system with rotating components (no text or labels)natural_image
Technical line drawing of a mechanical assembly with springs and clamps (no text or symbols)natural_image
Diagram showing a hand connecting a flexible hose to a device with arrows indicating force or connection (no text or symbols present)natural_image
Technical line drawing of a mechanical component with a circular head and cylindrical shaft (no text or symbols)natural_image
Technical line drawing of a mechanical assembly with no visible text or symbolstext_image
Technical diagram showing a vehicle's internal components with labeled parts 1 and 2, including a directional arrow indicating rotation.1 Borítás
2 Fedél
text_image
Technical diagram showing three-step assembly of a mechanical component with labeled parts and rotation indicatorsnatural_image
Technical line drawing of a cleaning or cleaning machine component with a downward arrow indicating a detail (no text or symbols present)natural_image
Technical line drawing of a cleaning or cleaning machine (no text or symbols)text_image
Technical diagram of a vehicle engine compartment with numbered parts labeled 1 to 41 Kerek dugó
2 Akkumulátor pólus
3 Akkumulátor
4 T á v t a r t ó
text_image
Technical diagram showing labeled components of a mechanical assembly, including parts 1, 2, 3, and 4.1 Úszóház
2 Tartó kampó
3 Úszó
4 A l s ó r é s z
Chairman of the Board of Management
S. Reiser
Director Regulatory Affairs & Certification
71364 Winnenden (Germany)
Tel.: +49 7195 14-0
Fax: +49 7195 14-2212
Winnenden, 2021/02/01
text_image
Technical diagram of a cleaning or cleaning device with numbered parts for identificationtext_image
Technical diagram of a robotic device with labeled parts and an inset view showing internal components.natural_image
Technical line drawing of a mechanical assembly with no visible text or symbols→ Nasad'te sací hadici.
Provoz
⚠NEBEZPEČÍ
Nebezpečí úrazu!
natural_image
Mechanical assembly diagram showing a vehicle with springs and rotating components (no text or symbols)natural_image
Technical line drawing of a mechanical assembly with rotating components (no text or symbols)natural_image
Diagram showing a hand connecting a flexible hose to a device with arrows indicating direction (no text or symbols)natural_image
Technical line drawing of a vehicle wheel assembly (no text or symbols)natural_image
Technical line drawing of a mechanical device with no visible text or symbolstext_image
Technical diagram showing a vehicle's internal components with labeled parts 1 and 2, including a directional arrow indicating rotation.1 K r y t
2 K r y t
→ Otevřete zakrytí.
text_image
Technical diagram showing mechanical assembly with numbered components and rotation indicatorsnatural_image
Technical line drawing of a cleaning or cleaning machine component with a black arrow indicating a detail (no text or symbols present)natural_image
Technical line drawing of a cleaning or cleaning machine (no text or symbols)text_image
Technical diagram of a vehicle engine component with numbered parts labeled 1 to 4text_image
Technical diagram showing labeled mechanical components in two views, with numbered parts 1 to 4 visible.Chairman of the Board of Management

S. Reiser
Director Regulatory Affairs & Certification
71364 Winnenden (Germany)
Tel.: +49 7195 14-0
Fax: +49 7195 14-2212
Winnenden, 2021/02/01
text_image
Technical diagram of a cleaning or cleaning device with numbered parts for identification.text_image
Technical diagram of a vehicle's internal components with labeled parts 1 and 2, including a zoomed-in detail view.1 Vtič baterije, stran naprave
2 Vtič baterije, stran baterije
→ Izvlecite vtič baterije, ki je na strani naprave.
POZOR
Nevarnost poškodbe!
natural_image
Technical line drawing of a mechanical assembly with no visible text or symbols→ Nataknite gibko sesalno cev.
Obratovanje
⚠NEVARNOST
Nevarnost poškodbe!
natural_image
Mechanical assembly diagram showing a vehicle chassis with springs and rotating components (no text or symbols)→ Pritegnite krilate vijake.
Nagib
natural_image
Technical line drawing of a mechanical assembly with rotating components (no text or symbols)natural_image
Diagram showing a hand holding a flexible hose connected to a device with arrows indicating direction (no text or symbols)→ Dozirno pripravo stisnite skupaj ali jo prepognite.
→ Odprite pokrov dozirne priprave.
→ Izpustite umazano vodo - s stisnjenjem ali prepognjenjem regulirajte količino vode.
→ Rezervoar za umazano vodo izperite s čisto vodo.
natural_image
Technical line drawing of a mechanical component with a circular head and handle (no text or symbols)natural_image
Technical line drawing of a mechanical assembly with no visible text or symbolstext_image
Technical diagram showing a vehicle's internal components with labeled parts 1 and 2, including a directional arrow indicating rotation.1 Pokrov
2 Pokrov
→ Odprite pokrov.
→ Pokrov zavrtite v smeri urnega kazalca in ga snemite.
→ Odstranite in očistite sito, ki je pod pokrovom.
→ Vstavite sito.
→ Namestite pokrov in ga privijte v nasprotni smeri urinega kazalca.
→ Zaprite pokrov.
text_image
Technical diagram showing mechanical assembly with numbered components and rotation indicators→ Snemite plastične dele.
→ Izvlecite sesalne brisalce.
→ Vstavite nove ali obrnjene sesalne nastavke.
→ Nataknite plastične dele.
→ Privijte zvezdaste ročaje in jih zategnite.
Zamenjava kolutne krtače
→ Napravo za potisno streme pritisnite navzdol, da se čistilna glava dvigne.
→ Pedal za zamenjavo krtač potisnite navzdol preko upora.

natural_image
Technical line drawing of a cleaning or cleaning machine component with a black arrow indicating a detail (no text or symbols present)→ Napravo povlecite nazaj, tako da je kolutna krtača dostopna.
→ Novo kolutno enoto postavite pred na-pravo na tla.
→ Napravo z dvignjeno čistilno glavo za-
peljite čez novo kolutno krtačo in spusti-
te čistilno glavo.
Krtača se zaskoči v pogon.
Snemanje rezervoarja za umazano vodo
natural_image
Technical line drawing of a cleaning or cleaning machine (no text or symbols)→ Rezervoar za umazano vodo dvignite in postavite na stran.
Baterije
⚠NEVARNOST
text_image
Technical diagram of a mechanical assembly with numbered components labeled 1 to 41 Okrogli vtič
2 Pol baterije
3 Baterija
4 Distančnik
text_image
Technical diagram showing labeled mechanical components in two views, with numbered parts 1 to 4 visible.1 Ohišje plovca
2 Zaskočni kavelj
3 P I o v e c
4 Spodnji del
→ Ohišje plovca izvlecite navzgor.
→ Sprostite zaskočni kavelj.
→ Očistite plovec in spodnji del.
→ Sestavite ohišje plovca in ga vtaknite v napravo.
Pribor
71364 Winnenden (Germany)
Tel.: +49 7195 14-0
Fax: +49 7195 14-2212
Winnenden, 2021/02/01
Pribor in nadomestni deli
Uporabljajte samo originalen pribor in originalne nadomestne dele, ki zagotavljajo varno in nemoteno delovanje naprave. Informacije o priboru in nadomestnih delih najdete na www.kaercher.com.
text_image
Technical diagram of a cleaning or cleaning device with numbered parts for identification.text_image
Technical diagram of a robotic device with labeled parts and an inset showing internal componentsnatural_image
Technical line drawing of a mechanical assembly with no visible text or symbolsnatural_image
Mechanical assembly diagram showing a spring-loaded component mounted on a rail with mounting brackets (no text or symbols visible)natural_image
Technical line drawing of a mechanical assembly with rotating components (no text or symbols)natural_image
Diagram showing a hand connecting a medical device to a coiled tube, with arrows indicating force or movement (no text or symbols present)natural_image
Technical line drawing of a mechanical component with no visible text or symbolsnatural_image
Technical line drawing of a mechanical assembly with no visible text or symbolstext_image
Technical diagram showing a vehicle's internal components with labeled parts 1 and 2, including directional arrows and a close-up of the component.1 Ostona
2 Pokrywa
→ Otworzyć osłone.
text_image
Technical diagram showing three-step assembly of a mechanical component with labeled parts and rotation indicatorsnatural_image
Technical line drawing of a cleaning or cleaning machine component with a black arrow indicating a detail (no text or symbols present)natural_image
Line drawing of a cleaning or cleaning machine with no visible text or symbolsZalecane akumulatory
text_image
Technical diagram of a vehicle's internal components with numbered parts labeled 1 to 4text_image
Technical diagram showing labeled components of a mechanical assembly, with numbered parts 1 to 4.Typ: 1.127-xxx 1.515-xxx

Chairman of the Board of Management

S. Reiser
Director Regulatory Affairs & Certification
71364 Winnenden (Germany)
Tel.: +49 7195 14-0
Fax: +49 7195 14-2212
Winnenden, 2021/02/01
text_image
Technical diagram of a cleaning or cleaning device with numbered parts for identification.text_image
Technical diagram of a robotic device with labeled parts and an inset view showing internal components.natural_image
Technical line drawing of a mechanical assembly with no visible text or symbolsnatural_image
Mechanical assembly diagram showing a car suspension system with springs and levers (no text or labels)→ Strângeti şuruburile-fluture.
Înclinatie
natural_image
Technical line drawing of a mechanical assembly with springs and brackets (no text or symbols)natural_image
Diagram showing a hand connecting a device to a coiled cable with arrows indicating force or connection (no text or symbols present)natural_image
Technical line drawing of a vehicle wheel assembly with no visible text or symbolsnatural_image
Technical line drawing of a mechanical assembly with no visible text or symbolstext_image
Technical diagram showing vehicle door and door assembly with labeled parts 1 and 21 Capac
2 Capac
text_image
Technical diagram showing three-step assembly of a mechanical component with labeled parts and rotation indicatorsnatural_image
Technical line drawing of a cleaning or cleaning machine component with a black arrow indicating a detail (no text or symbols present)natural_image
Technical line drawing of a mechanical device with no visible text or symbolstext_image
Technical diagram of a vehicle engine component with numbered parts labeled 1 to 4text_image
Technical diagram showing labeled components of a mechanical device, including parts 1, 2, 3, and 4.Tip: 1.127-xxx 1.515-xxx
Directive UE respectate:
2006/42/EG (+2009/127/EG)
2014/30/EU
2011/65/EU
Norme armonizate utilize:
EN 60335-1
EN 60335-2-72
EN 55012: 2007 + A1: 2009
EN 61000-6-2: 2005
EN 62233: 2008
EN IEC 63000: 2018
71364 Winnenden (Germany)
Tel.: +49 7195 14-0
Fax: +49 7195 14-2212
Winnenden, 2021/02/01
text_image
Technical diagram of a cleaning or cleaning device with numbered parts for identification.text_image
Technical diagram of a vehicle suspension system with labeled components and an inset view showing internal components.natural_image
Technical line drawing of a mechanical assembly with no visible text or symbols→ Nasad'te saciu hadicu.
Prevádzka
⚠NEBEZPEČENSTVO
Nebezpečenstvo zranenia!
natural_image
Mechanical assembly diagram showing a vehicle with springs and mounting brackets (no text or symbols)natural_image
Technical line drawing of a mechanical assembly with springs and rotating components (no text or symbols)natural_image
Diagram of a medical device with a coiled tube and directional arrows indicating movement or force (no text or symbols)natural_image
Technical line drawing of a mechanical component with circular and ring features (no text or symbols)natural_image
Technical line drawing of a mechanical assembly with no visible text or symbolstext_image
Technical diagram showing a vehicle's internal components with labeled parts 1 and 2, including a curved arrow indicating rotation.1 K r y t
2 V e k o
→ Otvorte kryt.
→ Kryt otočte v smere pohybu hodinových ručičiek a odoberte ho.
→ Vyberte sito pod ním a očistite ho.
→ Vložte sito.
→ Nasad'te kryt a zablokujte ho otočením proti smeru pohybu hodinových ručičiek
→ Uzavrite kryt.
text_image
Technical diagram showing three-step assembly of a mechanical component with labeled parts and rotation indicatorsnatural_image
Technical line drawing of a cleaning or cleaning machine component with a downward arrow indicating a detail (no text or symbols present)natural_image
Technical line drawing of a cleaning or cleaning machine (no text or symbols)text_image
Technical diagram of a vehicle engine component with numbered parts labeled 1 to 41 Okrúhle zástrčky
2 Póly batérie
3 Akumulátor
4 Udržiavač vzdialenosti
text_image
Technical diagram showing labeled components of a mechanical device, including parts 1, 2, 3, and 4.H. Jenner Chairman of the Board of Management

S. Reiser Director Regulatory Affairs & Certification
71364 Winnenden (Germany)
Tel.: +49 7195 14-0
Fax: +49 7195 14-2212
Winnenden, 2021/02/01
text_image
Technical diagram of a cleaning or cleaning device with numbered parts for identification.text_image
Technical diagram of a vehicle's internal components with labeled parts 1 and 2, showing assembly details and component layout.1 Akumulatorski utikač, strana uređaja
2 Akumulatorski utikač, akumulatorska strana
natural_image
Technical line drawing of a mechanical assembly with no visible text or symbols→ Nataknite usisno crijevo.
U radu
△OPASNOST
Opasnost od ozljeda!
U slučaju opasnosti pustite sigurnosnu sklopku/voznu polugu.
Punjenje radnih medija
Svježa voda
natural_image
Mechanical assembly diagram showing a vehicle suspension system with rotating components (no text or labels)→ Zategnite krilne vijke.
Nagib
natural_image
Technical line drawing of a mechanical assembly with springs and levers (no text or symbols)→ Pomičite okretnu ručku namještanja visine tako da dobijete najbolji rezultat usisavanja.
Čišćenje
PAŽNJA
natural_image
Diagram showing a hand connecting a flexible hose to a device with arrows indicating force or connection (no text or symbols present)→ Sabijte ili preklopite dozator.
→ Otvorite poklopac dozatora.
→ Ispustite prljavu vodu - pritiskanjem ili pre-savijanjem prilagođavajte količinu vode.
→ Spremnik prljave vode isperite čistom vodom.
natural_image
Technical line drawing of a mechanical component with a circular head and handle (no text or symbols)→ Odvijte zatvarač spremnika svježe vo- de.
Transport
△OPASNOST
natural_image
Technical line drawing of a mechanical assembly with no visible text or symbolstext_image
Technical diagram showing a vehicle's internal components with labeled parts 1 and 2, including directional arrows indicating movement.1 Poklopac
2 Poklopac
text_image
Technical diagram showing three-step assembly of a mechanical component with labeled parts and rotation indicatorsnatural_image
Technical line drawing of a cleaning or cleaning machine component with a black arrow indicating a detail (no text or symbols present)→ Izvucite uređaj unatrag da pločasta četka bude lako dostupna.
→ Položite novu pločastu četku na tlo ispred uređaja.
→ Uređaj s podignutim blokom čistača na- vezite na novu pločastu četku pa spusti- te blok čistača.
Četka se uglavljuje u pogon.
Skidanje spremnika prljave vode
→ Ispustite prljavu vodu.
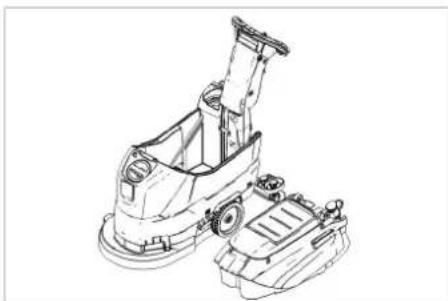
natural_image
Technical line drawing of a cleaning or cleaning machine (no text or symbols)→ Podignite spremnik prljave vode i stavi- te ga u stranu.
Akumulatori
△OPASNOST
text_image
Technical diagram of a mechanical assembly with numbered parts labeled 1 to 4text_image
Technical diagram showing labeled components of a mechanical assembly, including parts 1, 2, 3, and 4.Tip: 1.127-xxx 1.515-xxx
Alfred Kärcher SE & Co. KG Alfred-Kärcher-Straße 28-40 71364 Winnenden (Germany) Tel.: +49 7195 14-0 Fax: +49 7195 14-2212
Winnenden, 2021/02/01

Chairman of the Board of Management

S. Reiser
Director Regulatory Affairs & Certification
text_image
Technical diagram of a cleaning or cleaning device with numbered parts for identification.1 Mrežica za skupljanje vlakana
2 Sigurnosni prekidač
3 Akumulator*
4 Crevo za ispuštanje prljave vode sa dozatorom
5 Potporna šina za Homebase
6 P l o v a k
7 Rezervoar za svežu vodu
8 Zatvarač rezervoara sveže vode
9 Blok čistača
10 Pločasta četka
11 Otvor za punjenje rezervoara za svežu vodu
12 Kuka za zamenu četki
13 Rezervoar za prljavu vodu
14 Indikator napunjenosti rezervoara
sveže vode
15 Obrtna ručka za naginjanje usisne
konzole
16 Podešavanje visine usisne konzole *
17 Leptir navrtke za pričvršćenje usisne konzole
18 Usisna konzola *
19 Usisno crevo
20 Dugme za regulisanje količine vode
21 Akumulatorski utikač
22 Poluga za spuštanje usisne konzole
23 Komandni pult
24 Potisna ručica
25 Mesto za odlaganje kompleta za čišćenje "Homebase Box"
26 Poklopac rezervoara za prljavu vodu
* nije u obimu isporuke
Oznaka u boji
- Komandni elementi za proces čišćenja su žuti.
- Komandni elementi za održavanje i servis su svetlo sivi.
Komandni pult

text_image
1 2 3 4 5 6 KURCHER Professional1 OFF
text_image
Technical diagram of a vehicle's internal components with labeled parts 1 and 2, showing assembly details and component layout.1 Akumulatorski utikač, strana uređaja
2 Akumulatorski utikač, akumulatorska strana
natural_image
Mechanical assembly diagram showing a bracket with mounting holes and rotating components (no text or labels)→ Nataknite usisno crevo.
Rad
△OPASNOST
Opasnost od povreda!
U slučaju opasnosti pustite sigurnosni prekidač odnosno voznu polugu.
Punjenje radnih medija
Sveža voda
→ Otvorite zatvarač rezervoara sveže vode.
→ Doliti svežu vodu (maksimalno 50 °C) do donje ivice nastavka za punjenje.
→ Zatvorite zatvarač rezervoara sveže vode.
Deterdžent
⚠UPOZORENJE
Opasnost od oštećenja. Koristite samo preporučene deterdžente. Za druge deterdžente korisnik na sebe preuzima povećan rizik od nesreća i remećenja sigurnosti pri radu.
natural_image
Mechanical assembly diagram showing a vehicle suspension system with rotating components (no text or labels)→ Zategnite leptir zavrtnje.
Nagib
natural_image
Technical line drawing of a mechanical assembly with rotating components (no text or symbols)→ Pomičite obrtnu ručku namještanja visine tako da dobijete najbolji rezultat usisavanja.
Čišćenje
PAŽNJA
natural_image
Diagram of a hand holding a flexible hose with arrows indicating force or movement (no text or symbols)→ Sabijte ili preklopite dozator.
→ Otvorite poklopac dozatora.
→ Ispustite prljavu vodu - pritiskanjem ili presavijanjem prilagođavajte količinu vode.
→ Rezervoar prljave vode isperite čistom vodom.
Ispuštanje sveže vode
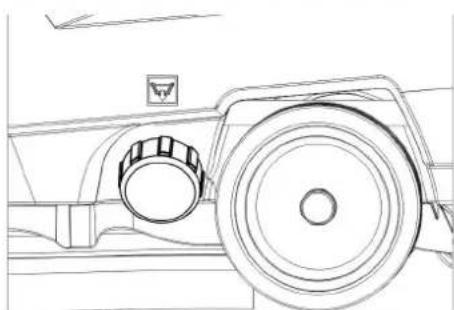
natural_image
Technical line drawing of a vehicle wheel assembly with no visible text or symbolsnatural_image
Technical line drawing of a mechanical assembly with no visible text or symbolsPrilikom transporta vozilima osigurajte uređaj od klizanja i nakretanja u skladu sa odgovarajućim važećim propisima.
Skladištenje
△OPREZ
Opasnost od povreda i oštećenja! Pri skladištenju imajte u vidu težinu uređaja. Ovaj uređaj se sme skladištiti samo u zatvorenim prostorijama.
Nega i održavanje
△OPASNOST
Opasnost od povreda! Pre svih zahvata na uređaju prekidač za izbor programa postavite na "OFF" i izvucite strujni utikač purjača.
Izvucite akumulatorski utikač uređaja.
→ Ispustite i uklonite prljavu i preostalu svežu vodu.
Plan održavanja
Posle svake primene
PAŽNJA
text_image
Technical diagram showing vehicle door panel and internal component with labeled parts 1 and 21 Oplata
2 Poklopac
text_image
Technical diagram showing three labeled mechanical components with rotational indicators and directional arrows indicating motion or assembly.natural_image
Technical line drawing of a cleaning or cleaning machine component with a downward arrow indicating a detail (no text or symbols present)→ Izvucite uređaj unazad da pločasta četka bude lako dostupna.
→ Položite novu pločastu četku na tlo ispred uređaja.
→ Uređaj sa podignutim blokom čistača
navezite na novu pločastu četku pa
spustite blok čistača.
Četka se uglavljuje u pogon.
Skidanje rezervoara za prljavu vodu
→ Ispustite prljavu vodu.

natural_image
Technical line drawing of a cleaning or cleaning machine (no text or symbols)→ Podignite rezervoar za prljavu vodu i sklonite ga na stranu.
Akumulatori
△OPASNOST
text_image
Technical diagram of a vehicle engine component with numbered parts labeled 1 to 41 Okrugli utikač
2 Pol akumulatora
3 Akumulator
4 Odstojnik
text_image
Technical diagram showing labeled components of a mechanical device, divided into two views with numbered parts.1 Kućište plovka
2 Uskočna kuka
3 Plovak
4 Donji deo
Chairman of the Board of Management
S. Reiser
Director Regulatory Affairs & Certification
71364 Winnenden (Germany)
Tel.: +49 7195 14-0
Fax: +49 7195 14-2212
Winnenden, 2021/02/01
Pribor i rezervni delovi
text_image
Technical diagram of a cleaning or cleaning device with numbered parts for identification.text_image
Technical diagram of a vehicle's internal components with labeled parts 1 and 2, showing assembly details and component layout.natural_image
Technical line drawing of a mechanical assembly with no visible text or symbolsnatural_image
Mechanical assembly diagram showing a vehicle with springs and rotating components (no text or symbols)→ Затегнете крилчатите винтове.
Наклон
natural_image
Technical line drawing of a mechanical assembly with springs and rotating components (no text or symbols)natural_image
Diagram showing a hand holding a flexible hose connected to a device with arrows indicating direction (no text or symbols)natural_image
Technical line drawing of a mechanical component with circular and ring features (no text or symbols)natural_image
Technical line drawing of a mechanical assembly with no visible text or symbolstext_image
Technical diagram showing a vehicle's internal components with labeled parts 1 and 2, including a directional arrow indicating rotation.1 K a n a k 2 K a n a k
text_image
Technical diagram showing mechanical assembly with numbered components and rotation indicatorsnatural_image
Technical line drawing of a cleaning or cleaning machine component with a black arrow indicating a detail (no text or symbols present)natural_image
Technical line drawing of a cleaning or cleaning machine (no text or symbols)text_image
Technical diagram of a vehicle engine component with numbered parts labeled 1 to 41 Кръгъл щепсел
text_image
Technical diagram showing labeled components of a mechanical assembly, including parts 1, 2, 3, and 4.
Chairman of the Board of Management

Director Regulatory Affairs & Certification
71364 Winnenden (Germany)
Tel.: +49 7195 14-0
Fax: +49 7195 14-2212
Winnenden, 2021/02/01
text_image
Technical diagram of a cleaning or cleaning device with numbered parts for identification.text_image
Technical diagram of a robotic device with labeled parts, showing front and side views1 Akupistik, seadme pool
2 Akupistik, aku pool
natural_image
Technical line drawing of a mechanical assembly with no visible text or symbols→ Pange imivoolik kohale.
Käitamine
△OHT
Vigastusoht!
natural_image
Mechanical assembly diagram showing a vehicle with springs and mounting brackets (no text or symbols)→ Pingutage tiibmutreid.
Kalle
natural_image
Technical line drawing of a mechanical assembly with springs and rotating components (no text or symbols)natural_image
Diagram showing a hand holding a flexible hose with arrows indicating direction of movement (no text or symbols)natural_image
Technical line drawing of a vehicle wheel and dashboard (no text or symbols)→ Kruvige maha puhta vee paagi lukk.
Transport
A OHT
natural_image
Technical line drawing of a mechanical assembly with no visible text or symbolstext_image
Technical diagram showing a vehicle's internal components with labeled parts 1 and 2, including a circular component and directional arrow.1 Kate
2 K a a s
text_image
Technical diagram showing mechanical assembly with numbered components and rotation indicatorsnatural_image
Technical line drawing of a cleaning or repair machine component with a black arrow indicating a detail (no text or symbols present)natural_image
Line drawing of a cleaning or cleaning machine component (no text or symbols)text_image
Technical diagram of a mechanical assembly with numbered parts labeled 1 to 41 Ümarpistik
2 Akupoolus
3 Aku
4 vahehoidik
Akude mahamonteerimine
text_image
Technical diagram showing labeled components of a mechanical device, including parts 1, 2, 3, and 4.1 Ujuki korpus
2 Kremoon
3 Ujuk
4 Alumine osa
71364 Winnenden (Germany)
Tel.: +49 7195 14-0
Fax: +49 7195 14-2212
Winnenden, 2021/02/01
text_image
Technical diagram of a cleaning or cleaning device with numbered parts for identification.text_image
Technical diagram of a robotic device with labeled parts and an inset view showing internal components.1 Akumulatora kontakts, aparāta puse
2 Akumulatora kontakts, akumulatora puse
→ Atvienojiet akumulatora kontaktu aparāta pusē.
IEVÉRÍBAI
Bojājumu risks!
natural_image
Technical line drawing of a mechanical assembly with rotating components and alignment arrows (no text or symbols)natural_image
Mechanical assembly diagram showing a vehicle with springs, bolts, and connecting brackets (no text or labels)→ Pievelciet spärnskrüves.
Slipums
natural_image
Technical line drawing of a mechanical assembly with rotating components (no text or symbols)natural_image
Diagram showing a hand connecting a flexible hose to a device with arrows indicating force or connection (no text or symbols present)natural_image
Technical line drawing of a vehicle wheel assembly with no visible text or symbolsnatural_image
Technical line drawing of a mechanical assembly with no visible text or symbolstext_image
Technical diagram showing a vehicle's internal components with labeled parts 1 and 2, including directional arrows and a close-up of the component.1 Pārsegs
2 V ā k s
→ Atveriet pārsegu.
text_image
Technical diagram showing a mechanical assembly with numbered components and rotation indicatorsnatural_image
Technical line drawing of a cleaning or cleaning machine component with a downward arrow indicating a detail (no text or symbols present)natural_image
Technical line drawing of a cleaning or cleaning machine (no text or symbols)text_image
Technical diagram of a mechanical component with numbered parts labeled 1 to 41 Apalais spraudnis
2 Akumulatora pols
3 A k u m u l a t o r s
4 Starplika
text_image
Technical diagram showing labeled components of a mechanical device, including parts 1, 2, 3, and 4.
Chairman of the Board of Management

S. Reiser
Director Regulatory Affairs & Certification
71364 Winnenden (Germany)
Tel.: +49 7195 14-0
Fax: +49 7195 14-2212
Winnenden, 2021/02/01
text_image
Technical diagram of a cleaning or cleaning device with numbered parts for identification.1 Filtro tinklelis
2 Apsauginis jungiklis
3 Baterija *
4 Nešvaraus vandens išleidimo žarna su dozatoriumi
5 Homebase laikomasis bégelis
6 Plūduras
7 Švaraus vandens bakas
8 Švaraus vandens bako dangtelis
9 Valymo galva
10 Diskinis šepetys
11 Švaraus vandens bako pildymo anga
12 Šepečio keitimas svirtis
13 Užteršto vandens bakas
14 Švaraus vandens lygio indikatorius
15 Sukamoji rankena, skirta siurbimo ré-meliui pakreipti
16 Siurbimo rémelio aukščio reguliavimas
*
17 Sparninés veržlès, skirtos siurbimo ré- meliui pritvirtinti
text_image
Technical diagram of a robotic device with labeled parts and an inset view showing internal components.natural_image
Technical line drawing of a mechanical assembly with rotating components and alignment arrows (no text or symbols)natural_image
Technical line drawing of a mechanical assembly with springs and connectors (no text or symbols)→ Atsukite sparnuotasias veržles.
Pakreipimas
natural_image
Technical line drawing of a mechanical assembly with springs and rotating components (no text or symbols)natural_image
Diagram showing a hand holding a flexible hose connected to a device with arrows indicating force or connection (no text or symbols present)natural_image
Technical line drawing of a mechanical component with a circular head and handle (no text or symbols)→ Nusukite švaraus vandens talpyklos dangtelj.
Transportavimas
⚠PAVOJUS
natural_image
Technical line drawing of a mechanical assembly with no visible text or symbolstext_image
Technical diagram showing a vehicle's internal components with labeled parts 1 and 2, including a directional arrow indicating rotation.1 Dangtis
2 Dangtis
text_image
Technical diagram showing three-step assembly of a mechanical component with labeled parts and rotation indicatorsnatural_image
Technical line drawing of a cleaning or cleaning machine component with a black arrow indicating a detail (no text or symbols present)natural_image
Technical line drawing of a cleaning or cleaning machine (no text or symbols)text_image
Technical diagram of a vehicle engine component with numbered parts labeled 1 to 41 Apvalusis kištukas
2 Akumuliatoriaus polius
3 Baterija
4 T a r p i k l i s
text_image
Technical diagram showing labeled components of a mechanical device, including parts 1, 2, 3, and 4.
Chairman of the Board of Management

Director Regulatory Affairs & Certification
71364 Winnenden (Germany)
Tel.: +49 7195 14-0
Fax: +49 7195 14-2212
Winnenden, 2021/02/01
text_image
Technical diagram of a cleaning or cleaning device with numbered parts for identification.text_image
Technical diagram of a robotic device with labeled parts and an inset view showing internal components.natural_image
Technical line drawing of a mechanical assembly with no visible text or symbolsnatural_image
Mechanical assembly diagram showing a vehicle suspension system with rotating components (no text or labels)natural_image
Mechanical assembly diagram showing a vehicle with springs and rotating components (no text or symbols)natural_image
Diagram showing a hand holding a flexible hose with arrows indicating force or movement (no text or symbols)natural_image
Technical line drawing of a mechanical component with a circular head and handle (no text or symbols)natural_image
Technical line drawing of a mechanical assembly with no visible text or symbolstext_image
Technical diagram showing a vehicle's internal components with labeled parts 1 and 2, including a directional arrow indicating rotation.text_image
Technical diagram showing mechanical assembly with numbered components and rotation indicatorsnatural_image
Technical line drawing of a cleaning or cleaning machine component with a black arrow indicating a detail (no text or symbols present)natural_image
Technical line drawing of a cleaning or cleaning machine (no text or symbols)text_image
Technical diagram of a mechanical assembly with numbered parts labeled 1 to 4text_image
Technical diagram showing labeled mechanical components with numbered parts 1 to 4
Chairman of the Board of Management
Director Regulatory Affairs & Certification
71364 Winnenden (Germany)
Tel.: +49 7195 14-0
Fax: +49 7195 14-2212
Winnenden, 2021/02/01
text_image
Technical diagram of a cleaning or cleaning device with numbered parts for identification.text_image
Technical diagram of a robotic device with labeled parts and an inset view showing internal components.1 Steker baterai, sisi perangkat
2 Steker baterai, sisi baterai
→ Lepaskan steker baterai di sisi perangkat.
PERHATIAN
Risiko kerusakan!
natural_image
Technical line drawing of a mechanical assembly with no visible text or symbols→ Pasang selang penyedot.
Pengoperasian
⚠BAHAYA
Bahaya kecelakaan!
Lepaskan tombol pengaman/engkol layan saat bahaya.
Mengisi cairan pengoperasian
Air bersih
natural_image
Mechanical assembly diagram showing a spring-loaded component mounted on a rail with clamps (no text or symbols visible)→ Kencangkan sekrup sayap.
Kecondongan
natural_image
Mechanical assembly diagram showing a spring-loaded component with rotating arms and mounting brackets (no text or symbols)natural_image
Diagram showing a hand connecting a cable to a device with arrows indicating connection (no text or symbols present)natural_image
Technical line drawing of a vehicle wheel assembly (no text or symbols)natural_image
Technical line drawing of a mechanical assembly with no visible text or symbolstext_image
Technical diagram showing a vehicle's internal components with labeled parts 1 and 2, including a directional arrow indicating rotation.1 Penutup
2 Penutup
text_image
Technical diagram showing mechanical assembly with numbered components and rotation indicatorsnatural_image
Technical line drawing of a cleaning or cleaning machine component with a black arrow indicating a adjustment point (no text or symbols present)natural_image
Technical line drawing of a cleaning or cleaning machine (no text or symbols)| No. order | |
| 80 Ah 6.654-454.0 | |
text_image
Technical diagram of a vehicle engine component with numbered parts labeled 1 to 41 Plug bulat
2 Kutub baterai
3 Baterai
4 Sakang antara
text_image
Technical diagram showing labeled components of a mechanical device, including parts 1, 2, 3, and 4.text_image
Technical diagram of a cleaning or cleaning device with numbered parts for identification.text_image
Technical diagram of a robotic device with labeled parts and an inset view showing internal components.1 电池插头,设备侧
2 电池插头,电池侧
→ 拔出设备侧电池插头。
注意
有损坏危险!
natural_image
Technical line drawing of a mechanical assembly with no visible text or symbols→ 插上抽吸软管。
设备运作
△ 危险
存在受伤危险!
natural_image
Mechanical assembly diagram showing a vehicle with springs and rotating components (no text or symbols)→ 拧紧翼型螺栓。
倾斜度
natural_image
Mechanical assembly diagram showing a vehicle with springs and rotating components (no text or symbols)natural_image
Illustration of a hand connecting a flexible hose to a device with arrows indicating force or connection (no text or symbols)natural_image
Technical line drawing of a vehicle wheel and dashboard (no text or symbols)→ 拧下净水箱的盖子。
运输
危险
natural_image
Technical line drawing of a mechanical assembly with no visible text or symbolstext_image
Technical diagram showing a vehicle's internal components with labeled parts 1 and 2, including a directional arrow indicating rotation.1 盖
2 顶盖
text_image
Technical diagram showing mechanical assembly with numbered components and rotation indicatorsnatural_image
Technical line drawing of a cleaning or cleaning machine component with a black arrow indicating a detail (no text or symbols present)natural_image
Technical line drawing of a cleaning or cleaning machine (no text or symbols)→ 抬起污水箱并置于一侧。
电池
危险
text_image
Technical diagram of a vehicle engine component with numbered parts labeled 1 to 4text_image
Technical diagram showing labeled components of a mechanical assembly, with numbered parts 1 to 4.text_image
Technical diagram of a cleaning or cleaning device with numbered parts for identification.text_image
Technical diagram of a vehicle's internal components with labeled parts 1 and 2, showing assembly details and component layout.natural_image
Technical line drawing of a mechanical assembly with no visible text or symbols→ ไชบสายยางดูด
การใช้งาน
อันตราย
natural_image
Mechanical assembly diagram showing a vehicle suspension system with rotating components and mounting brackets (no text or labels)→ ขันสกรหางปลา
ความเอียง
natural_image
Technical line drawing of a mechanical assembly with springs and components (no text or symbols)natural_image
Diagram showing a hand inserting a plug into a device with a coiled cable, indicating fluid or electrical connection (no text or symbols present)natural_image
Technical line drawing of a mechanical component with a circular head and cylindrical body (no text or symbols)natural_image
Technical line drawing of a mechanical device with no visible text or symbolstext_image
Technical diagram showing a vehicle's internal components with labeled parts 1 and 2, including a directional arrow indicating rotation.1 ฟ้าครอบ
2 ฝาปิด
text_image
Technical diagram showing mechanical assembly with numbered components and rotation indicatorsnatural_image
Technical line drawing of a cleaning or cleaning machine component with a black arrow indicating a detail (no text or symbols present)natural_image
Technical line drawing of a cleaning or cleaning machine (no text or symbols)text_image
Technical diagram of a vehicle's internal components with numbered parts labeled 1 to 4text_image
Technical diagram showing labeled mechanical components in two views, with numbered parts 1 to 4 visible.text_image
Technical diagram of a vehicle engine component with numbered parts labeled 1 to 4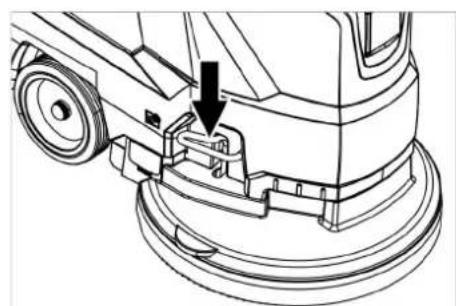
natural_image
Technical line drawing of a cleaning or repair mechanism with a downward arrow indicating a component (no text or symbols present)9.1
•
-
θ
1 + u1 - 1 = ( 1 + u) u1 < 1 = u
m = 311
[Non-Text]
[Non-Text]
[Non-Text]
[Non-Text]
[Non-Text]
[Non-Text]
[Non-Text]
[Non-Text]
[Non-Text]
[Non-Text]
[Non-Text]
[Non-Text]
[Non-Text]
[Non-Text]
[Non-Text]
[Non-Text]
[Non-Text]
[Non-Text]
[Non-Text]
[Non-Text]
ال tangزين
تُويه ①
text_image
Technical diagram showing a vehicle's internal components with labeled parts 1 and 2, including directional arrows indicating movement.1 الغطاء
غطاء 2
فتح الغطاء.
natural_image
Diagram showing a hand holding a flexible hose with arrows indicating force or movement (no text or symbols)natural_image
Technical line drawing of a mechanical assembly with no visible text or symbolsnatural_image
Technical line drawing of a mechanical assembly with springs and clamps (no text or symbols)←
natural_image
Technical line drawing of a mechanical assembly with no visible text or symbolstext_image
Technical diagram of a robot with labeled parts and an inset view showing internal componentstext_image
Technical diagram of a cleaning or inspection device with numbered parts for identification.التمييز اللوني
3 AR .詰詰詰詰詰詰詰詰詰詰詰詰詰詰詰詰詰詰詰詰詰詰詰詰詰詰詰詰詰詰詰詰詰詰詰詰詰詰詰詰詰詰詰詰詰詰詰詰詰詰詋
3 AR ......التشغيل
natural_image
Black silhouette of a hand giving a thumbs-up gesture (no text or symbols)THANK YOU!
MERCI! DANKE! iGRACIAS!

Register your product and benefit from many advantages.
www.kaercher.com/welcome


Rate your product and tell us your opinion.
natural_image
Icon showing a gear and wrench inside a square frame (no text or symbols)www.kaercher.com/dealersearch
Alfred Kärcher SE & Co. KG
Alfred-Kärcher-Str. 28-40
71364 Winnenden (Germany)
Tel.: +49 7195 14-0
Fax: +49 7195 14-2212