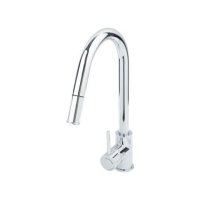
HG05765 - Kitchen faucet Livarno Lux - Free user manual and instructions
Find the device manual for free HG05765 Livarno Lux in PDF.
| Product Type | Bathtub/shower mixer |
| Brand | Livarno Lux |
| Model | HG05765 |
| Connection centers | 136–164 mm |
| Water connections | G 1/2 (approx. 21 mm) |
| Connection nuts | 28.5 mm |
| Supply | Hot and cold water, compatible with pressurized system |
| Main functions | Bathtub/shower diverter, water-saving function (flow limited to 50%), adjustable temperature limiter |
| Use | Domestic, not medical or commercial |
| Material | Chrome-plated brass body (estimate) |
| Maintenance | Clean with clear water and neutral detergent, regularly unscrew the nozzle to descale |
| Safety | Check tightness of connections, risk of burns if temperature is excessive, attention to water leaks |
| Spare parts | Washers and seals (wear parts), mixing cartridge available |
| Repairability | Cartridge and seals replaceable, tools provided (Allen key, aerator key) |
| General information | Residential use, water potability to be checked locally, do not use stagnant water |
Frequently Asked Questions - HG05765 Livarno Lux
User questions about HG05765 Livarno Lux
0 question about this device. Answer the ones you know or ask your own.
Ask a new question about this device
Download the instructions for your Kitchen faucet in PDF format for free! Find your manual HG05765 - Livarno Lux and take your electronic device back in hand. On this page are published all the documents necessary for the use of your device. HG05765 by Livarno Lux.
USER MANUAL HG05765 Livarno Lux
WANNENFÜLL-/BRAUSE-ARMATUR/BATH & SHOWER MIXER TAP/MITIGEUR DE BAIGNOIRE/DOUCHE
DE AT CH
WANNENFÜLL-/BRAUSE-ARMATUR
Kurzanleitung
FR BE
MITIGEUR DE BAINOIRE/DOUCHE
GB/IE Short manual Page 11
natural_image
Technical line drawings of three different tools: a pliers, an adjustable wrench, and a pulley (no text or symbols present)

Description of parts......Page 12
Technical data......Page 12
Safety advice....Page 12
Installation......Page 13
Installing the tap....Page 13
Flushing the tap....Page 13
Operation Page 13
Bringing into use......Page 13
Changeover knob water inlet bath / shower head......Page 14
Water-saving function....Page 14
Setting the temperature limiter......Page 14
Maintenance and cleaning......Page 14
Tap care and cleaning Page 14
Information......Page 15
Potability of mains water Page 15
Bath & Shower Mixer Tap
- Introduction

This document is a shorter printed version of the complete instruction manual. By scanning the QR code, you will be taken straight to the Lidl service website (www.lidl-service.com) where you can view and download the complete instruction manual by entering the article number (IAN) 384413_2107
WARNING! Observe the complete instruction manual and safety notes to prevent personal injury and property damage. The short guide forms an integral part of this product. Prior to using the product, familiarize yourself with all operation and safety notes. Keep the short manual well preserved and if you hand the product on to third parties, all documentation should be passed on as well.

- Proper use
This product is suitable for all pressure-tight hot water systems such as central heating boilers, instantaneous water heaters, pressurised boilers and the like. It is not suitable for low-pressure water heaters such as wood or coal burning bath geysers, oil or gas bath geysers, open electrically heated water tanks. If in doubt please seek the advice of a plumber or heating engineer. Any use other than that described here or modification to the product is not permitted and may lead to damage to persons or property. There is also the risk of injury and loss of life. The product is
intended for personal use only and not for medical or commercial use. The manufacturer accepts no liability for loss or damage arising from improper use.
• Description of parts
12S-connectors
2 2Rosettes
3 2 Sealing rings
4 1 Tap body
4a 1 Changeover button
4b 1 Threaded connector (for the shower hose)
4c 1 Mixer nozzle
5 2 Nuts (for S-connectors)
6 | 1 Control lever
7 1 Locking screw
8 1 Plastic cover
9 1 Cartridge end ring
10 1 Cartridge locking ring
11 1 Cartridge
12 1 Setting ring
13 1 Hexagon key
14 1 Key for aerator
●Technicaldata
Connectionspacing: 136–164mm
Connections (Shower hose): G ^1/2
(approx. 21 mm)
Water connection nut: approx. 28.5 mm

Safety advice
WARNING! RISK OF LOSS OF LIFE OR ACCIDENT TO INFANTS AND CHILDREN! Never
leave children unsupervised with the packaging materials. Danger of suffocation. Keep the product away from children. The product is not a toy.
CAUTION - RISK OF ELECTRIC SHOCK! Leaks or the escape of water can lead to danger to life from electric shock. Check all connections for leaks
carefully. In addition, ensure that all cables from electrical devices are correctly and safely installed.
■ CAUTION! RISK OF INJURY! Please ensure that no parts are damaged and that all parts are correctly assembled. Incorrect assembly could lead to injury. Please note that seals are wear parts and therefore will require to be replaced from time to time. Damaged parts could adversely affect safety and proper function.
■ CAUTION! RISK OF DAMAGE TO PROPERTY! Have the installation done by experienced persons only. Leaks or escape of water can lead to serious damage to buildings or household fittings and furniture. Check all connections for leaks carefully.
■ Ensure that all seals are correctly seated to prevent leakage of water.
■ CAUTION! DANGER OF SCALDING!
When making the hot water setting please ensure that the temperature of the water is not too high.
Before installation, make yourself familiar with all the existing services, e.g. water connection and stopcocks.
Please read carefully through these operating instructions before installing and using the product. Keep all the safety advice and instructions in a safe place for future reference!
●Installation
- Installing the tap
Note: To protect the parts from scratches while being screwed together cover them with a damp cloth or use plastic clamps.
■ Before you start installation turn off the main water supply to prevent serious leakage of water.
☐ Install the tap at the wall connection as shown in Figure A.
Connecting the accessories (shower head and shower hose)\*:
Note: So that the parts do not get scratched while being screwed together, protect them with a damp cloth or use plastic clamps.
□ Screw an ordinary shower hose* firmly on to the thread [4b].
☐ Attach an ordinary shower head* to the shower hose*.
☐ Observe the installation instructions for the accessories.
* (not included)
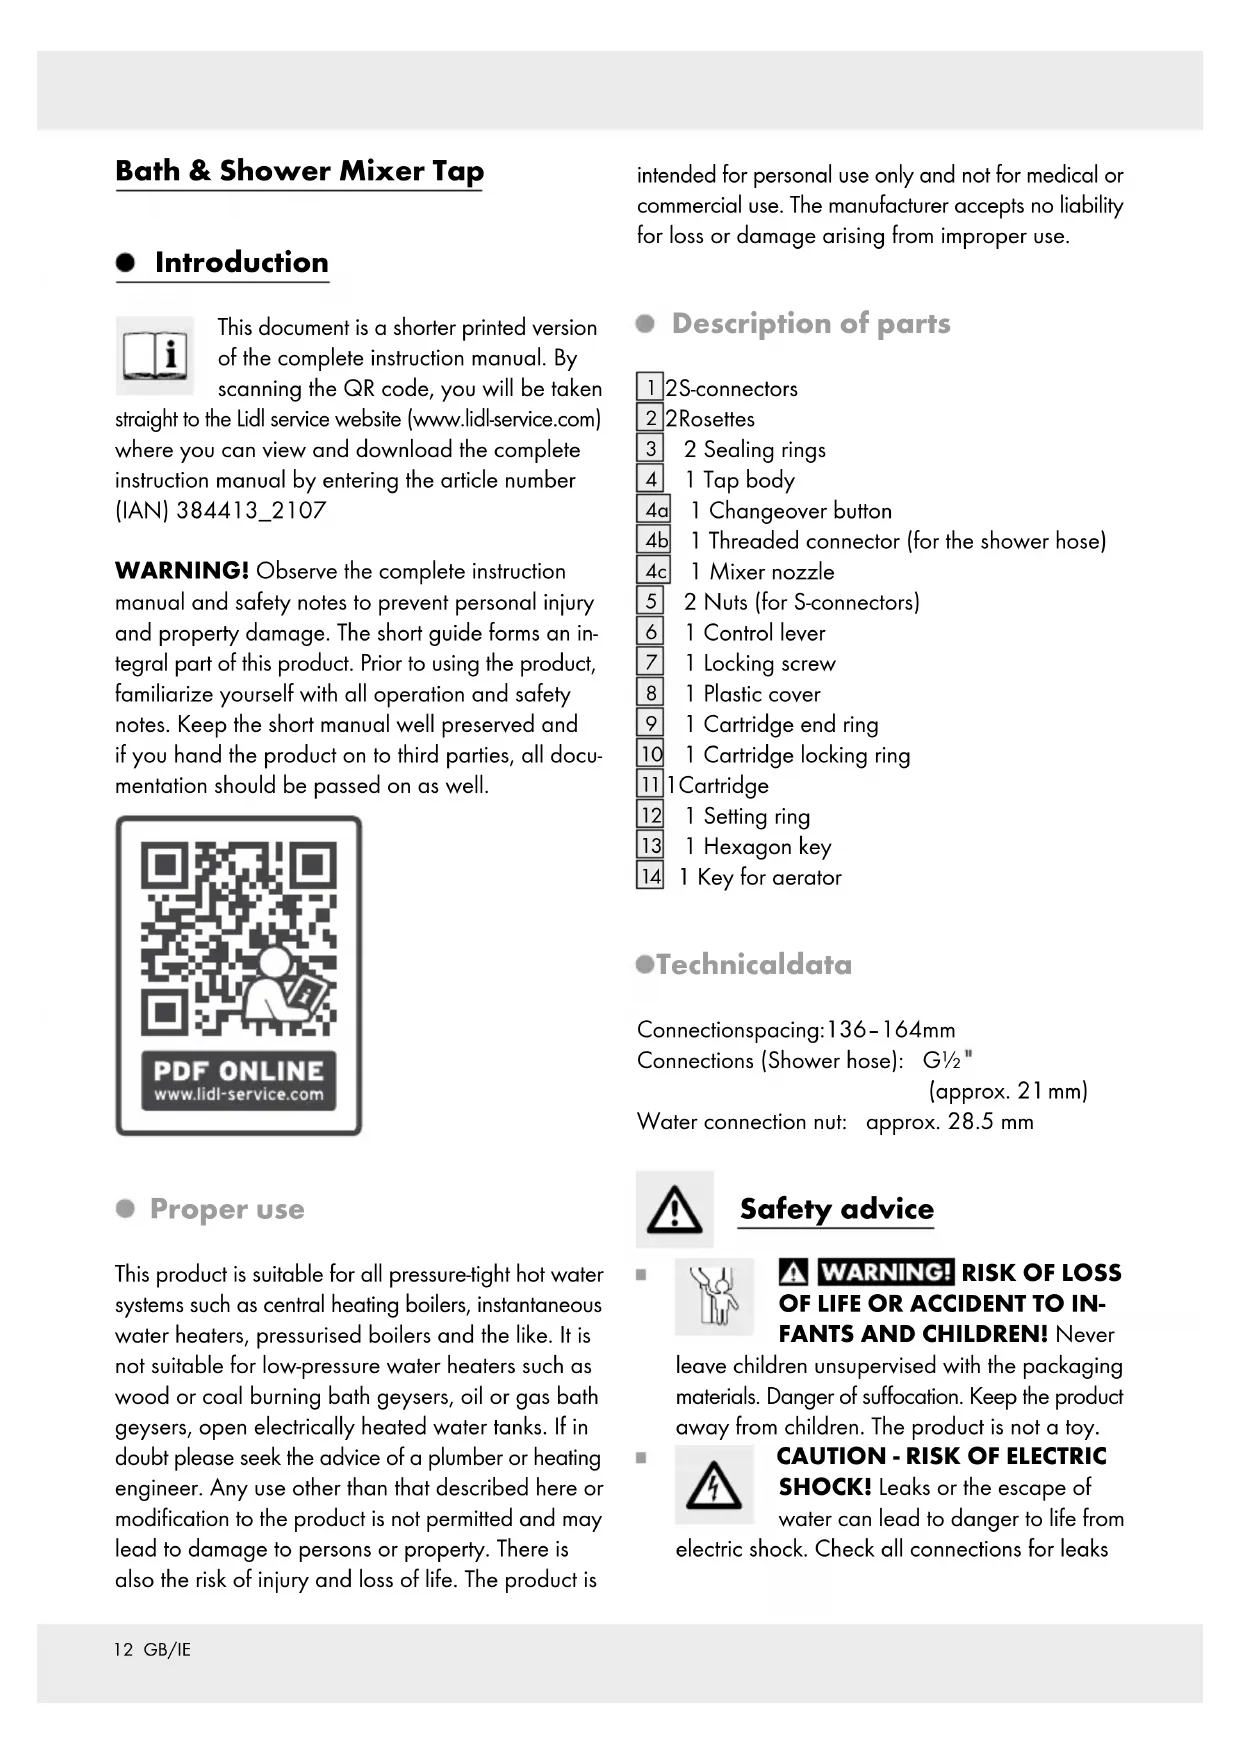
- Flushing the tap
☐ The tap must be flushed through before first use to remove any dirt. To do this, follow these steps (see Fig. B):
☐ Screw the mixer nozzle 4c off.
Before using the tap for the first time, open the main water supply. and allow the water to run for two minutes so that any residues are dissolved away.
☐ Then screw the mixer nozzle on again.
Operation
- Bringing into use
Note: If the tap has not been used for a long period flush the pipes through thoroughly in order to avoid stagnation and build-up of residues in the drinking water supply.
Open the main water supply.
☐ Lift the control lever 6 and swivel it to the right or left to regulate the strength or temperature of the water flow.
Hot water:
□ Swivel the control lever to the left.
Cold water:
□ Swivel the control lever to the right.
☐ Check that the mixer tap is working properly. To do this, swivel the lever into all the possible positions. Please check the connections regularly for leaks.
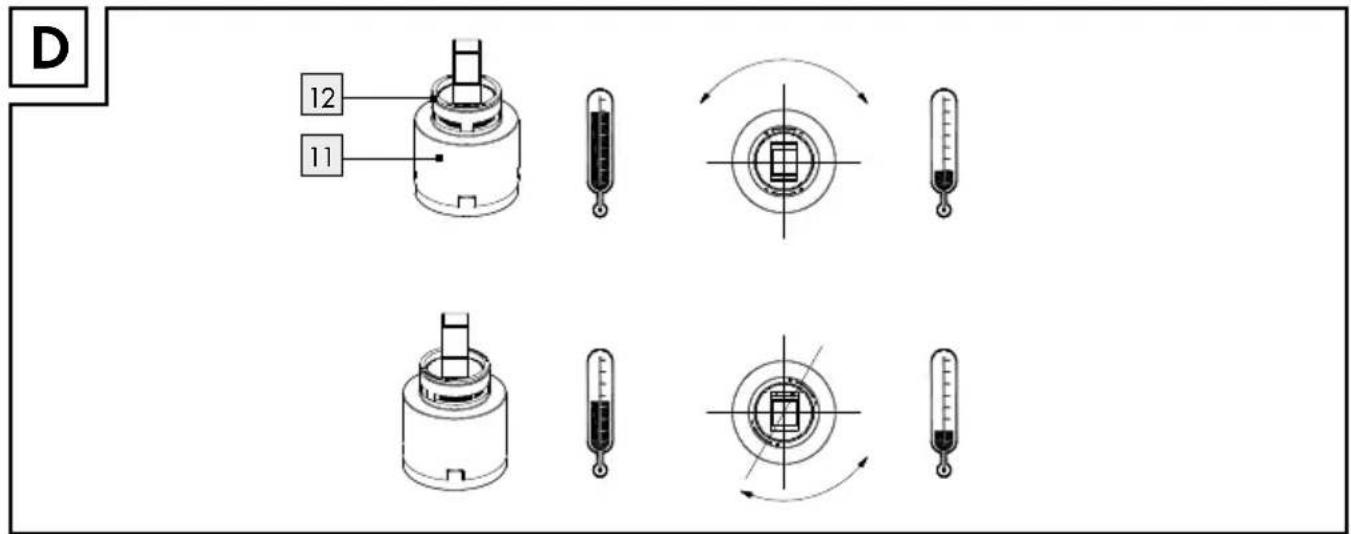
- Changeover knob water inlet bath/shower head
Filling the bath:
☐ Press down the changeover button 4a. The water flows through the mixer nozzle 4c.
Showering:
☐ Lift up the changeover button. The water flows through the shower hose and the connected shower head.
Note: If you turn off the water flow using the control lever 6 then the fitting automatically switches to bath filling.
●Water-savingfunction
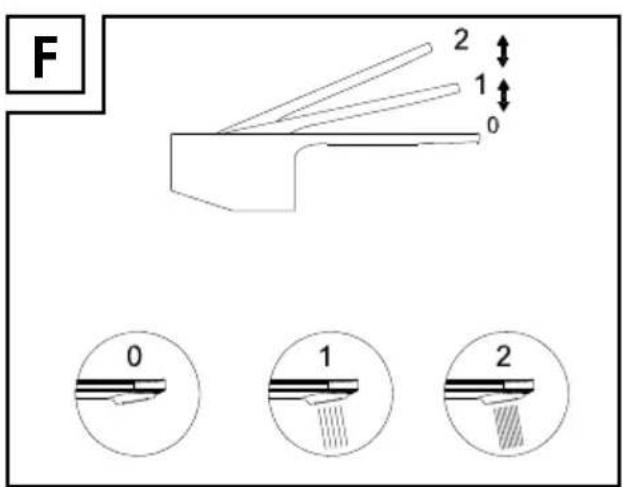
☐Thecartridge 11 in this tap has an Eco-Click function. This feature limits the water flow through the tap. This means you can save up to 50 % water (see fig. F).
☐ Lift the lever 6 until you notice a slight resistance. This resistance will cause a stop in case of partial opening and will therefore simply limit the flow of water.
☐ If you want to increase the flow rate, exert slight pressure on the lever 6 until you overcome the resistance.
- Setting the temperature limiter
The cartridge 11 in this unit has a temperature limiter. This function is not activated in the factory (neutral setting).
CAUTION! Change the temperature limiter setting only after the tap has been installed.
☐ Turn off the main water supply.
☐ Remove the plastic cover 8 carefully by a small flat screwdriver (see Fig. C).
☐ Release the locking screw 7 by turning it anticlockwise using a hexagon key 13.
CAUTION! Do not take the screw completely out; just loosen it until the control lever 6 can be easily taken off.
☐ Take off the control lever 6.
☐ Loosen the cartridge end ring 9 by hand, then screw off the cartridge locking ring 10 by using a pipe wrench.
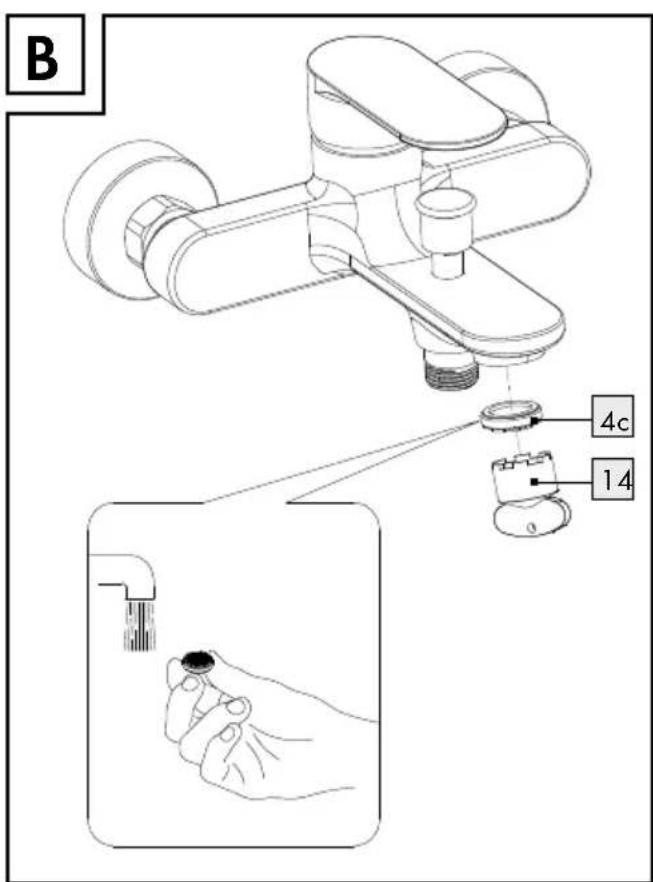
☐ Now pull the setting ring 12 upwards with the help of a screwdriver.
Note: Do not remove the cartridge.
Place the setting ring in the desired position as shown in Fig. D.
Note: The setting ring can limit the turning angle of the handle, so that the amount of hot water can be limited.
☐ Tighten the cartridge locking ring 10 onto the tap body 4 again by using a pipe wrench, then tighten the cartridge end ring 9 by hand.
Place the control lever 6 back on to the tap body 4 and tighten the locking screw by turning it clockwise using the hexagon socket screw key 13.
☐ Press the plastic cover 8 into the opening.
☐ Turn on the main water supply and check the temperature limiter.
● Maintenance and cleaning
Tap care and cleaning
Please note that sanitary fittings require special care and attention. Therefore you should follow the following advice:
■ Never use corrosive or alcohol-based materials for cleaning, as these could damage the product.
☐ Clean your fittings with clean water, mild detergent and a soft cloth or leather only.
☐ Screw out the mixer nozzle 4c at regular intervals and remove lime deposits or foreign bodies.
Non-observance of the above care advice can be expected to result in damage to the surface of the fittings. In this event your rights under the warranty may be invalidated.
Information
- Potability of mains water
☐ Find out about the potability of your mains water supply. Your local water authority or water supply company will be able to inform you.
The following general recommendations apply to the potability of the water from your pipework:
- Let the water run freely for a short time if it has been stagnating in the pipework for more than four hours. Do not use any of this stagnant water in the preparation of food or for drinking. This applies particularly as far as babies and infants are concerned. Failure to observe this advice may result in risks to health. Fresh water can be readily distinguished from stagnant as fresh water is noticeably cooler.
- Do not use stagnant water from chromium-plated pipework for the preparation of food or for drinking or for personal hygiene if you are allergic to nickel. This water may contain high quantities of nickel and trigger an allergic reaction.
Do not use water from lead pipework for preparing food or drink for babies or infants. Do not use it for preparing food or drink during pregnancy. Lead dissolves in drinking water and is particularly damaging to the health of babies and young children.
Introduction......Page 17
Montering....Side 48
Installation of armaturet....Side 48
Gennemskylning af armaturet....Side 48
Betjening....Side 48
Ibrugtagning....Side 48
Omskifter til vandindtag badekar / bruser....Side 49
Vandspare-funktion ....Side 49