ERSP20 - Razor PANASONIC - Free user manual and instructions
Find the device manual for free ERSP20 PANASONIC in PDF.



| Product Type | Rechargeable Shaver |
| Brand | Panasonic |
| Model | ER-SP20 |
| Dimensions (main body) | 6.4 x 12.9 x 3.9 cm |
| Weight (main body) | 145 g |
| Power Supply | AC Adapter (automatic voltage conversion) |
| Motor Voltage | 3.6 V --- |
| Charging Time | Approximately 1 hour |
| Usage Time | Approximately 70 minutes of continuous use |
| Battery Type | Built-in rechargeable lithium-ion |
| Usage | Professional: beard and hair cutting |
| Cleaning | Washable with water and hand soap; sonic vibration cleaning mode |
| Lubrication | Lubricating oil after each use (recommended Panasonic WES003P) |
| Replacement Parts | Protective foil + inner blade (WER9013Y1361); lubricating oil (WES003P) |
| Safety | Protective foil, overload cutoff, heat protection |
| Recommended Charging Temperature | 10 °C – 35 °C |
| Minimum Operating Temperature | Approximately 5 °C |
Frequently Asked Questions - ERSP20 PANASONIC
User questions about ERSP20 PANASONIC
0 question about this device. Answer the ones you know or ask your own.
Ask a new question about this device
Download the instructions for your Razor in PDF format for free! Find your manual ERSP20 - PANASONIC and take your electronic device back in hand. On this page are published all the documents necessary for the use of your device. ERSP20 by PANASONIC.
USER MANUAL ERSP20 PANASONIC
Operating Instructions
AC/Rechargeable Professional Shaver
Model No. ER-SP20
natural_image
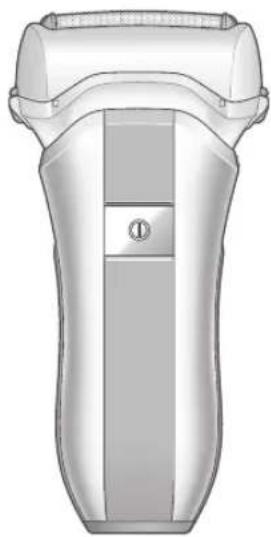
Illustration of a handheld electric shaver with a handle and internal slot (no text or symbols)| English | 3 | Dansk | 77 | Česky | 149 |
| Deutsch | 15 | Português | 89 | Slovensky | 161 |
| Français | 29 | Norsk | 101 | Magyar | 173 |
| Italiano | 41 | Svenska | 113 | Română | 185 |
| Nederlands | 53 | Suomi | 125 | Türkçe | 197 |
| Español | 65 | Polski | 137 |
Panasonic
Operating Instructions AC/Rechargeable Professional Shaver Model No. ER-SP20
Contents
Safety precautions.... 5 Maintenance ....10
Important information ....7 Troubleshooting ....11
Parts identification 8 Disposal of the appliance 13
Charging 8 Specifications 13
How to use 9
Thank you for purchasing this Panasonic product.
Before operating this unit, please read these instructions completely and save them for future use.
WARNING
- This appliance can be used by children aged from 8 years and above and persons with reduced physical, sensory or mental capabilities or lack of experience and knowledge if they have been given supervision or instruction concerning use of the appliance in a safe way and understand the hazards involved. Children shall not play with the appliance. Cleaning and user maintenance shall not be made by children without supervision.
- The supply cord cannot be replaced. If the cord is damaged, the AC adaptor should be scrapped.
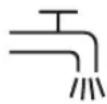
- The symbol on the right means suitable for cleaning under an open water tap.
- Do not clean with water when the AC adaptor is attached.
- Do not use anything other than the supplied AC adaptor and the charging stand for any purpose. Also, do not use any other product with the supplied AC adaptor and the charging stand. (See page 8.)
- The symbol on the right indicates that a specific detachable power supply unit is required for connecting the electrical appliance to the supply mains. The type reference of power supply unit is marked near the symbol.
Safety precautions
Make sure to follow these instructions.
To prevent accidents, injuries or damage to property, please follow the instructions below.
■ The following chart indicates the degree of damage caused by improper operation.

DANGER
Indicates potential hazard that will result in serious injury or death.

WARNING
Indicates potential hazard that could result in serious injury or death.

CAUTION
Indicates potential hazard that could result in minor injury or property damage.

WARNING
▶ This appliance
- This appliance has a built-in rechargeable battery. Do not throw into fire or apply heat.
Do not charge, use or leave in high temperature environment. - Doing so may cause overheating, ignition, or explosion.
- Do not modify or repair.
- Doing so may cause fire, electric shock, or injury. Contact an authorized service centre for repair (replacement of battery etc.).
- Never disassemble except when disposing of the appliance.
- Doing so may cause fire, electric shock, or injury.
▶ Power supply
- Do not connect or disconnect the adaptor to a household outlet with a wet hand.
- Doing so may cause electric shock or injury.
- Do not immerse the AC adaptor and the charging stand in water or wash it with water.
- Do not place the AC adaptor and the charging stand over or near water filled sink or bathtub.
- Do not use when the AC adaptor is damaged or when the fitting into the household outlet is loose.
- Do not damage the cord or the power plug.
- Do not deface, modify, forcefully bend or pull the cord or the power plug. Also, do not place anything heavy on, twist or pinch the cord.
- Doing so may cause electric shock or fire due to a short circuit.
- Do not use in a way exceeding the rating of the household outlet or the wiring.
- Exceeding the rating by connecting too many plugs to one household outlet may cause fire due to overheating.
• Fully insert the adaptor.
Failure to do so may cause fire or electric shock.
- Regularly clean the power plug, the appliance plug and the charging plug to prevent dust from accumulating.
- Failure to do so may cause fire due to insulation failure caused by humidity.
▶ Preventing accidents
- Do not place within reach of children or infants. Do not let them use it.
- Putting parts or accessories in the mouth may cause an accident or injury.
WARNING
- If the lubrication oil is consumed accidentally, do not induce vomiting, drink a large amount of water, and contact a physician.
- If the lubrication oil comes into contact with eyes, immediately wash thoroughly with running water, and contact a physician.
- Failure to do so may result in physical problems.
▶ In case of an abnormality or malfunction
- Immediately stop using and remove the adaptor if there is an abnormality or malfunction.
- Failure to do so may cause fire, electric shock, or injury.
- The main body, charging stand or AC adaptor is deformed or abnormally hot.
- The main body, charging stand or AC adaptor smells of burning.
- There is an abnormal sound during use or charging of the main body.
- Immediately request inspection or repair to an authorized service centre.
CAUTION
▶ Protecting the skin
- Check the system outer foil for cracks or deformations before use.
- Failure to do so may cause injury to the skin.
- Do not apply the system outer foil directly to blemishes or injured skin.
- Doing so may cause injury.
- Do not use excessive pressure to apply the system outer foil to your lip or any other part of your face.
- Do not touch the blade section (metallic section) of the inner blade.
- Doing so may cause injury to skin, ears or hands.
- Do not use the appliance for any purpose other than trimming beards, hair on nape of neck, back of head and side of head.
- Doing so may cause injury.
- Do not forcefully press the system outer foil. Also, do not touch the system outer foil with fingers or nails when in use.
- Doing so may cause injury to skin or reduce the life of the system outer foil.
▶ Note the following precautions
- Do not allow metal objects or trash to adhere to the power plug, the appliance plug or the charging plug.
- Doing so may cause electric shock or fire due to a short circuit.
- Disconnect the adaptor from the household outlet when not in use.
- Failure to do so may cause electric shock or fire due to electrical leakage resulting from insulation deterioration.
Handling of the removed battery when disposing
!DANGER
- The rechargeable battery is exclusively for use with this appliance. Do not use the battery with other appliances.
- Do not charge the battery after it has been removed from the appliance.
- Do not throw into fire or apply heat.
- Do not hit, disassemble, modify, or puncture with a nail.
! DANGER
- Do not let the positive and negative terminals of the battery get in contact with each other through metallic objects.
- Do not carry or store the battery together with metallic jewellery such as necklaces and hairpins.
- Do not use or leave the battery where it will be exposed to high temperatures, such as under direct sunlight or near other sources of heat.
- Never peel off the tube.
- Doing so may cause overheating, ignition, or explosion.
WARNING
• After removing the rechargeable battery, do not keep it within reach of children and infants.
- The battery will harm the body if accidentally swallowed. If this happens, consult a physician immediately.
- If the battery fluid leaks out and comes in contact with the eyes, do not rub the eyes, and thoroughly rinse with clean water, such as tap water.
- Failure to do so may cause eye injury. Consult a physician immediately.
CAUTION
- If the battery fluid leaks out and comes in contact with the skin or clothes, rinse off with clean water, such as tap water.
- Failure to do so may cause inflammation.
Important information
- This appliance is designed for professional use to trim hair and beards. It can be operated on either an AC adaptor or rechargeable battery.
- Apply the lubrication oil to the blade after use. (See page 11.) Failure to apply the lubrication oil may cause the following problems.
- The appliance has become blunt.
- Shorter operating time.
- Louder sound.
- The appliance may become warm during operation and/or charging. This is normal.
- Do not use any blade other than the one dedicated as it may cause defect in performance.
- You should not allow permanent wave lotion, hair dyeing or hair spray to come into contact with the main body or the blade. Doing so may result in cracking or corrosion.
- Note the following precautions to avoid malfunction or deformation.
- Do not bring the system outer foil into contact with hard objects.
- Do not drop or hit against other objects.
- Be sure to place the protective cap on the appliance when carrying around or storing.
- Charge the appliance correctly according to these Operating Instructions. (See page 8 "Charging".)
- This appliance contains battery that is only replaceable by skilled persons. Please contact an authorized service centre for the details of repair.
Parts identification
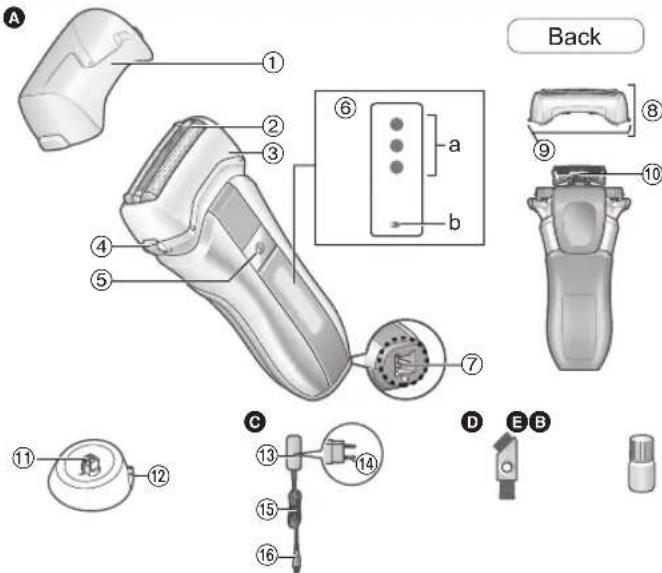
A Main body
① Protective cap
② System outer foil
③ Foil frame
④ Foil frame release buttons
⑤ Power switch
⑥ Lamp display
a. Battery capacity lamp
b. Charge status lamp (→)
⑦ Appliance socket
⑧ Outer foil section
⑨ System outer foil release buttons
⑩ Inner blades
B Charging stand (RC9-86)
⑪ Charging plug
⑫ Stand socket
© AC adaptor (RE9-82)
⑬ Adaptor
⑭ Power plug
⑮ Cord
⑯ Appliance plug
Accessories
D Cleaning brush
E Lubrication oil
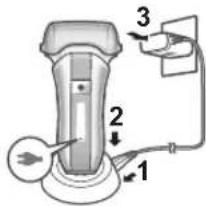
Charging
- Turn the appliance off.
- Wipe off any water droplets on the appliance socket.
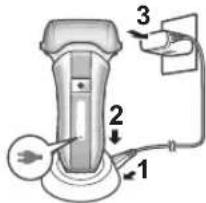
1 Connect the appliance plug to the stand socket.
2 Place the appliance on the charging stand.
3 Insert the adaptor into a household outlet.
- Charging is completed after approx. 1 hour.
▶ Display while charging
| While charging (Low battery capacity) | While charging | After charging is completed | 5 seconds later after charging is completed |
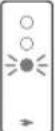 | 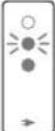 | 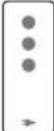 | 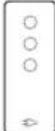 |
( :Glows, :Blinks, / :Turns off)
4 Disconnect the adaptor after charging is completed. (For safety and energy saving)
Insert the main body again after removing it from the charging stand. If the lamps glow and then turns off after 5 seconds, charging is completed.
Notes
- Recommended ambient temperature for charging is 10^ - 35^ . It may take longer to charge, or the charge status lamp () will blink quickly and the battery may fail to charge properly in extremely high or low temperatures. - 1 full charge will provide approximately 70 minutes of continuous operation. (Based on dry using at 20^ - 30^ ) The operating time may differ depending on the frequency of use and the operating method.
- When charging the main body for the first time or when it has not been in use for more than 6 months, the charging time may change or the charge status lamp (→) may not glow for a few minutes. It will eventually glow if kept connected. - If there is noise from the radio or other sources while using or charging the appliance, move to a different location to use the appliance. - Charging each time does not affect battery life, because it uses a lithium-ion battery.
- The battery will deteriorate if not used for over 6 months, so make sure to perform a full charge at least once every 6 months. - To keep charging the battery will not affect battery performance.
Charging without the charging stand
Plug the AC adaptor into the main body and the household outlet.
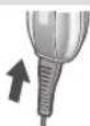
AC operation
If you connect the AC adaptor to the appliance in the same way as for charging, and turn on the power, you can use it.
- If the remaining battery is too low, the blades may move slowly or stop, even with the AC operation. In this case, charge the battery for 1 minute or more. - The battery will be discharged, even with the AC operation
How to use
- Check that the blades are not damaged or deformed before use. - The appliance may not operate in an ambient temperature lower than approximately 5^ . - Clean and apply the lubrication oil to the blade after use.
Turn on the power, trimming.
- The desired results may not be achieved if hair is too long. In this case, trim the hair shorter (about 0.3 mm) before using the appliance.
▶ About the approximate remaining charge

flowchart
graph LR
    A["High battery capacity"] --> B["Low battery capacity"]
    C["Two variants with battery symbols"] --> D["Two variants with battery symbols"]
(●Glows, /:Blinks, /:Turns off)
Notes
- The lamps will turn off approximately 5 seconds after operating the switch. However, if the battery remaining is low, it will not turn off and one battery capacity lamp and the charge status lamp blinks. (When the power is turned off, the lamps turn off after 5 seconds.) Charging is required when the one battery capacity lamp and the charge status lamp blinks. You can trim 5 minutes after this is displayed. (This will differ depending on usage.) - The charge status lamp (▶) glows when using AC operation.
Maintenance
• Make sure that the main body is turned off.
- Remove the AC adaptor from the main body.
- Lubricate after cleaning and store the main body with the protective cap attached.
How to clean
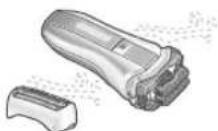
With water
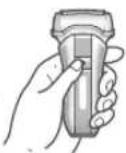
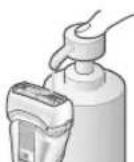
1 Apply some hand soap and some water to the system outer foil.
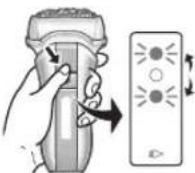
2 Press for more than 2 seconds to activate the sonic vibration cleaning mode.
- Splashing of foam is suppressed.
- The battery capacity lamps blink in order.
• After about 20 seconds, it will be automatically turned off, or you can turn it off by pressing the power switch.
3 Remove the outer foil section. (See page 11.)
4 Rinse them with running water.
- Splashing is reduced by rinsing the appliance in sonic vibration cleaning mode.
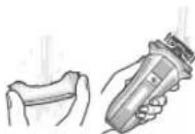
5 Shake up and down several times to remove the water.
- Be careful not to hit the appliance on the sink or any other object while draining the water.
6 Wipe off the water with a dry cloth and dry it well.
- Leave the main body to dry whilst avoiding direct sunlight.
- Do not dry the appliance with a dryer or a fan heater.
Notes
- Do not use thinner, benzine, alcohol* or other chemicals. Doing so may cause failure, cracking or discoloration of the parts.
*Parts other than blades
- Do not use any kitchen or bathroom detergents other than hand soap. Doing so may cause malfunction.
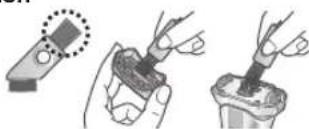
With the brush
Remove the outer foil section and the inner blades. (See page 11.)
▶ Cleaning with the long brush
Clean the outer foil section, system outer foil, and the main body using the long brush.
natural_image
Illustration of three hand tools: a remote control device, a close-up of a plug plug, and a base with wires (no text or symbols)▶ Cleaning with the short brush
- Clean the inner blades using the short brush by moving it in direction as illustrated.
- Do not move the short brush perpendicularly against the blades as it will damage the inner blades and affect their sharpness.
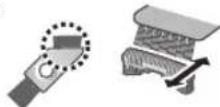
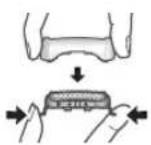
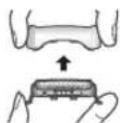
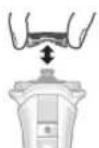
Removing and mounting the outer foil and the inner blades
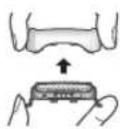
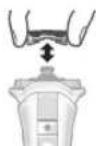
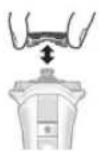
▶ Outer foil section
Remove the frame by pushing the frame release buttons.
Align as illustrated, securely attach the outer foil section to the head until it clicks.
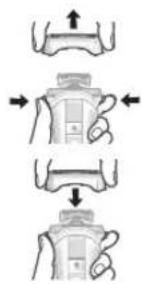
▶ System outer foil
- Do not throw away the foil frame.
Press the system outer foil release buttons and pull down the system outer foil.
- Do not press the system outer foil release buttons with excessive force. Doing so may bend the system outer foil, preventing complete attachment to the foil frame.
Align as illustrated, securely attach the system outer foil to the foil frame until it clicks.
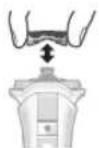
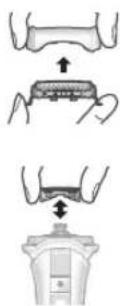
▶ Inner blades
Remove the inner blades one at a time. Insert the inner blades one at a time.

Replacement parts
Replacement parts are available at your dealer or Service Centre.
| System outer foil and inner blade WER9013Y1361 | |
| Lubrication oil WES003P | |
• We recommend Panasonic lubrication oil WES003P.
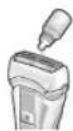
Lubrication
Apply the lubrication oil to the blade after use.
- Apply one drop of lubrication oil to each of the system outer foils.
- Turn on the power and allow to run it for approximately 5 seconds.
- Turn off the power and wipe off any excess lubrication oil from the system outer foil with a soft cloth.
Troubleshooting
Problem Action
The appliance has become blunt.
Operating time is short.
Appliance stopped functioning.
Until problems are solved, please follow each procedure as follows;
- Charge the appliance. (See page 8.)
- Clean the blade and apply lubrication oil. (See pages 10 and 11.)
- Replace the blade. (See this page.)
| Problem Action | |
| The appliance cannot be charged. | Push the main body into the charging stand or appliance plug all the way.Charge within the recommended charging temperature of 10 °C – 35 °C. |
| Makes a loud sound. | Apply lubrication oil.The blades will not move smoothly when there is no oil on the blades, requiring more power.Confirm that the blade is properly attached.The appliance makes a high-pitched sound due to the linear motor drive. This does not indicate a problem.Clean the system outer foil with the brush. |
| Appliance does not operate even after charging. | Use the appliance in an ambient temperature approximately 5 °C or higher.The battery has reached the end of its life. In this case, the appliance will not operate when the power is turned on with the AC adaptor connected. |
| The odor is getting stronger. | This can be improved by always cleaning after trimming. |
| Problem Action | |
| Shavings fly out in all directions. | This can be improved by always cleaning after trimming.Clean the inner blades with the brush when shavings are adhering to the inner blades. |
| System outer foil gets hot. | Apply lubrication oil.Replace the system outer foil if it is damaged or deformed.(See page 11.) |
If the problems still cannot be solved, contact your dealer or a service centre authorized by Panasonic for repair.
Disposal of the appliance
Remove the built-in rechargeable battery before disposing of the appliance.
• The battery is to be disposed of safely.
- This figure must only be used when disposing the appliance, and must not be used to repair it. If you dismantle the appliance yourself, it may cause malfunction.
How to remove the battery
- Remove the appliance from the AC adaptor.
- Press the power switch to turn on the power and then keep the power on until the battery is completely discharged.
- Perform following steps and lift the battery, and then remove it.
• Take care not to short circuit the positive and negative terminals of the removed battery, and insulate the terminals by applying tape to them.

For environmental protection and recycling of materials
This appliance contains a Lithium-ion battery. Please make sure that the battery is disposed of at an officially assigned location, if there is one in your country.
Specifications
| Power source | See the name plate on the AC adaptor. (Automatic voltage conversion) |
| Motor voltage | 3.6 V--- |
| Charging time Approx. 1 hour | |
For more information about the energy efficiency of the product, please visit our website, www.panasonic.com, and enter the model number in the search box.
Disposal of Old Equipment and Batteries
Only for European Union and countries with recycling systems
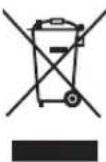
These symbols on the products, packaging, and/or accompanying documents mean that used electrical and electronic products and batteries must not be mixed with general household waste.
For proper treatment, recovery and recycling of old products and batteries, please take them to applicable collection points in accordance with your national legislation.
By disposing of them correctly, you will help to save valuable resources and prevent any potential negative effects on human health and the environment.
For more information about collection and recycling, please contact your local authority.
Penalties may be applicable for incorrect disposal of this waste, in accordance with national legislation.
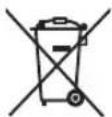
Note for the battery symbol (bottom symbol)
This symbol might be used in combination with a chemical symbol. In this case it complies with the requirement set by the Directive for the chemical involved.
Importer:
Panasonic Marketing Europe GmbH
Authorized Representative in EU:
Panasonic Testing Centre
Winsbergring 15, 22525 Hamburg, Germany
Manufactured by:
Panasonic Corporation
1006, Oaza Kadoma, Kadoma City, Osaka, Japan
Panasonic
Bedienungsanleitung
© Netzadapter (RE9-82)
Anzeige beim Laden
natural_image
Three-step diagram showing a handheld device, a hand holding a plug, and a close-up of the plug being inserted (no text or symbols present)Panasonic Testing Centre
1006, Oaza Kadoma, Kadoma City, Osaka, Japan
Panasonic
Mode d'emploi
© Adaptateur CA (RE9-82)
natural_image
Three-step diagram showing a hand holding a small electronic component, with no visible text or symbols.Panasonic Testing Centre
© Adattatore CA (RE9-82)
Display durante la carica
natural_image
Three-step diagram showing a hand holding a small electronic device, with no visible text or symbols.Lamina esterna del sistema
Panasonic Testing Centre
Winsbergring 15, 22525 Amburgo, Germania
Fabbricato da:
Panasonic Corporation
Specifications....64
© Wisselstroomadapter (RE9-82)
⑬ Adapter
⑭ Stekker
⑮ Netsnoer
⑯ Apparaatstekker
Accessoires
D Reinigingsborstel
E Smeerolie
Opladen
natural_image
Illustration of three hand tools: a remote control device, a close-up of a plug, and a base with wires (no text or symbols)Panasonic Testing Centre
natural_image
Three-step diagram showing a hand holding a plug, with a magnified inset highlighting the top-left corner (no text or symbols)Panasonic Testing Centre
© AC-adapter (RE9-82)
⑬ Adaptor
⑭ Strømstik
⑮ Ledning
⑯ Stik til apparat
Tilbehør
D Rensebørste
E Smøreolie
Opladning
natural_image
Three-step illustration showing a handheld device, a close-up of its screen, and a hand holding a plug (no text or symbols)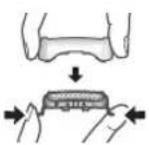
Reservedele
Panasonic Testing Centre
Winsbergring 15, 22525 Hamburg, Tyskland
Fremstillet af:
Panasonic Corporation
1006, Oaza Kadoma, Kadoma, Osaka, Japan
Panasonic
natural_image
Three-step illustration showing a handheld device, a hand holding a plug, and a cup with a fork (no text or symbols)Panasonic Testing Centre
© Vekselstrømsadapter (RE9-82)
Lampenes lys under lading
| Under lading(Lav batterika-pasitet) | Under lading | Etter atladingen erferdig | Fem sekunderetter atladingen erferdig |
(/:Lyser, :Blinker, / :Slås av)
natural_image
Three-step diagram showing a handheld device, a close-up of a plug, and a hand holding a plug (no text or symbols present)Systemets ytre folie
- Ikke kast folierammen.
Panasonic Testing Centre
Winsbergring 15, 22525 Hamburg, Tyskland
Produsert av:
Panasonic Corporation
1006, Oaza Kadoma, Kadoma, Osaka, Japan
Panasonic
Bruksanvisning
Visa under laddning
natural_image
Three-step diagram showing a handheld device, a close-up of its component, and a hand holding a small electronic device (no text or symbols present)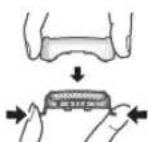
Utbytbara delar
Panasonic Testing Centre
Winsbergring 15, 22525 Hamburg, Tyskland
Tillverkad av:
Panasonic Corporation
1006, Oaza Kadoma, Kadoma, Osaka, Japan
Panasonic
Käyttöohjeet
natural_image
Three-step illustration showing a handheld device interacting with a plug, then holding a test tube (no text or symbols present)Panasonic Testing Centre
Winsbergring 15, 22525 Hampuri, Saksa
Valmistaja:
Panasonic Corporation
1006, Oaza Kadoma, Kadoma-kaupunki, Osaka, Japan
Panasonic
Instrukcja obsługi
natural_image
Three-step diagram showing a hand holding a small electronic component, with a magnified inset highlighting the top-left corner (no text or symbols present)Panasonic Testing Centre
natural_image
Three-step illustration showing a handheld device, a close-up of its component, and a hand holding a plug (no text or symbols)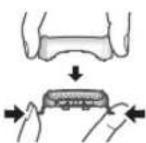
Náhradní díly
Panasonic Testing Centre
Zobrazenie počas nabíjania
natural_image
Three-step illustration showing a handheld device, a close-up of its screen, and a hand holding a plug (no text or symbols)Panasonic Testing Centre
Winsbergring 15, 22525 Hamburg, Nemecko
Výrobca:
Panasonic Corporation
1006, Oaza Kadoma, Kadoma City, Osaka, Japonsko
Panasonic
Használati utasítás
natural_image
Three-step illustration showing a handheld device, a hand holding a screwdriver, and a close-up of its tip (no text or symbols)Panasonic Testing Centre
© Adaptor c.a. (RE9-82)
⑬ Adaptor
⑭ Ștecăr de alimentare
⑮ Cablu
⑯ Şecher aparat
Accesorii
D Perie de curățare
E Ulei de lubrifiere
Încărcare
natural_image
Three-step diagram showing a hand holding a small electronic component, with a magnified inset highlighting the device (no text or symbols present)Panasonic Testing Centre
Winsbergring 15, 22525 Hamburg, Germania
Fabricat de:
Panasonic Corporation
1006, Oaza Kadoma, Kadoma City, Osaka, Japonia
Panasonic
© AC adaptörü (RE9-82)
⑬ Adaptör
⑭ Elektrik fişi
⑮ Kablo
⑯ Cihazın fışı
Aksesuarlar
D Temizleme fırçası
EYag
Şarj etme
Şarj göstergeleri
natural_image
Three-step illustration showing a handheld device, a close-up of a plug, and a hand holding a plug (no text or symbols)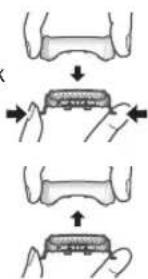
Yedek parçalar
Panasonic Testing Centre
Winsbergring 15, 22525 Hamburg, Almanya
© Panasonic Corporation 2022
⑤ EN, DE, FR, IT, NL, SP, DA, PT, NB, SV, FI, PL, CS, SK, HU, RO, TR
Printed in Japan
ER9710SP201E Y0622-0

- Panasonic
- Contents
- WARNING
- Safety precautions
- DANGER
- CAUTION
- ▶ This appliance
- ▶ Power supply
- ▶ Preventing accidents
- ▶ Protecting the skin
- Handling of the removed battery when disposing
- !DANGER
- ! DANGER
- Important information
- Parts identification
- A Main body
- B Charging stand (RC9-86)
- © AC adaptor (RE9-82)
- Accessories
- D Cleaning brush
- E Lubrication oil
- Charging
- Connect the appliance plug to the stand socket.
- Place the appliance on the charging stand.
- Insert the adaptor into a household outlet.
- Disconnect the adaptor after charging is completed. (For safety and energy saving)
- Notes
- Charging without the charging stand
- AC operation
- How to use
- Turn on the power, trimming.
- Maintenance
- How to clean
- With water
- With the brush
- Removing and mounting the outer foil and the inner blades
- ▶ Outer foil section
- ▶ System outer foil
- ▶ Inner blades
- Replacement parts
- Lubrication
- Troubleshooting
- Problem Action
- Disposal of the appliance
- Remove the built-in rechargeable battery before disposing of the appliance.
- How to remove the battery
- For environmental protection and recycling of materials
- Disposal of Old Equipment and Batteries
- Only for European Union and countries with recycling systems
- Note for the battery symbol (bottom symbol)
- Importer:
- Authorized Representative in EU:
- Manufactured by:
- © Netzadapter (RE9-82)
- © Adattatore CA (RE9-82)
- Lamina esterna del sistema
- Panasonic Testing Centre
- Fabbricato da:
- © Wisselstroomadapter (RE9-82)
- Opladen
- © AC-adapter (RE9-82)
- Opladning
- Reservedele
- © Vekselstrømsadapter (RE9-82)
- Systemets ytre folie
- Utbytbara delar
- Tillverkad av:
- Náhradní díly
- Výrobca:
- Încărcare
- Fabricat de:
- © AC adaptörü (RE9-82)
- D Temizleme fırçası
- Şarj etme
- Yedek parçalar
Brand : PANASONIC
Model : ERSP20
Category : Razor