USER MANUAL Solution S2 iFix CYBEX


natural_image
Three-step line drawing of a hand holding a small object, showing motion and assembly (no text or symbols)

GO TO WWW.CYREX-ONLINE.COM TO WATCH AN INSTRUCTIONAL VIDEO
DE....2
EN....5
IT 8
FR....11
NL 14
PL 17
HU 20
CZ 23
SK 26
ES....29
PT 32
SE 35
NO 38
FI 41
DK....44
SL 47
HR 50
RU 53
UK 56
EE....59
LT 62
LV 65
TR....68
AR....71
BG 74
SR....77
EL 80
RO 83
SQ 86
BS 89
MK 92
CNR 95
HI 98
TH....101
VI 104
MS 107
HY....110
CMN 113
YUE 116
JA....119
KO 122
DE ZULASSUNG
UN R129/03
CYBEX Solution S2 i-Fix
100 – 150 cm
approx. 3 years to 12 years
Thank you for deciding on the Solution S2 i-Fix when choosing your child seat.
Carefully read the instructions before installing the seat in your car and always keep these instructions to hand in the designated compartment (1).

Without the approval of the Type Approval Authority, the child seat may not be modified or added to in any way.
In order to keep your child properly protected, it is absolutely essential that you use the child seat as described in this manual.
This child seat may only be installed on vehicle seats which are approved for the use of child restraint systems according to the vehicle manual.
Only suitable for vehicle seats with automatic three-point belts approved in accordance with UN regulation 16 or a comparable standard.
- Do not use any load bearing contact points other than those described in the instructions and marked on the child restraint.
•The full surface of the backrest of the child seat must make contact with the backrest of the vehicle.
•The shoulder belt must run upwards and back at a recline. It must never run forward to the upper belt point in your vehicle.
•The vehicle belt buckle must never cross the belt guide of the seat. If the belt whip is too long, the child seat is not suitable for use in this position in the vehicle. In case of doubt please contact the child restraint manufacturer.
The three-point vehicle belt must only be passed through the designated routings. The belt routings are described in detail in this manual and are marked in green on the child seat.
- The lap belt must run as low as possible across your child's groin to have optimum effect in the event of an accident.
Before each use make sure that the automatic three-point vehicle belt is correctly adjusted and fits tightly to the child's body. Never twist the belt!
Only an optimally adjusted headrest can offer your child maximum protection and comfort while ensuring that the shoulder belt can be fitted smoothly.
The child seat must always be secured correctly with the vehicle belt in the vehicle even when not in use.
Always ensure that the child seat is never jammed when closing the car door or adjusting the back seat.
The child seat is also tested and homologated without the Linear Side impact Protectors.
If using the car seat on the middle seat of the vehicle's back bench, the linear side-impact protection (L.S.P.) must never be folded out.
Luggage or any other objects present in the vehicle must always be firmly secured. Otherwise, they may be thrown within the car, which could cause fatal injuries.
- The child seat must never be used without the seat cover. Ensure that only an original CYBEX seat cover is used, as the cover is a key element of the seat's function.
Never leave your child unattended in the car.
- The parts in the child restraint system heat up in the sun and could potentially burn your child's skin. Protect your child and the child seat from direct sun exposure.
An accident may cause damage to the child seat that is not identifiable with the naked eye. Please replace the seat after an accident. In case of doubt, please consult your dealer or the manufacturer.
Do not use this child seat for more than 9 years. The child seat is exposed to high stress during its product life span, which leads to changes in the quality of the material with increasing age.
•The plastic parts can be cleaned with a mild cleaning agent and warm water. Never use harsh cleaning agents or bleaches!
On some vehicle seats made of sensitive materials, the use of child seats may leave marks and/or cause discolouration. To prevent this, you can place a blanket or towel or similar underneath the child seat to protect the vehicle seat.
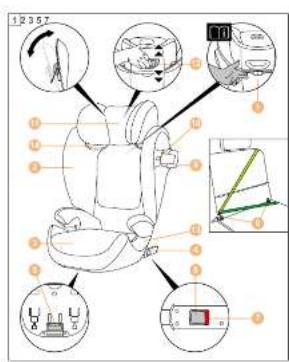
PRODUCT PARTS
(1) User Guide Storage Compartment
(2) Backrest
(3) Booster
(4) ISOFIX Locking Arms
(5) ISOFIX Adjustment Handle
(6) ISOFIX Anchorage Points
(7) ISOFIX Safety Indicator
(8) ISOFIX Release Button
(9) Linear side impact protection (L.S.P.)
(10) L.S.P. Operating button
(11) Adjustable Headrest
(12) Headrest Height Adjuster
(13) Lap Belt Guide
(14) Shoulder Belt Guide
PREPARING FOR INSTALLATION
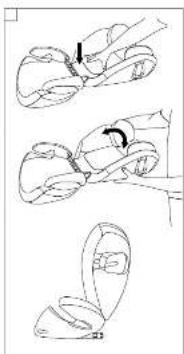
Connect the backrest (2) to the booster (3) by hooking the guide lug on the axis of the booster. The backrest (2) is then folded forward. When taking the product out of the box, the Linear side-impact protection (9) is activated on both sides of the seat.
THE CORRECT POSITION IN THE VEHICLE
The child seat can be used on vehicle seats which are equipped with an automatic three point belt. Please refer to the enclosed vehicle type list for approved vehicles. You can obtain the most up-to-date version from www.cybex-online.com.
In case your car is not equipped with ISOFIX connection points, there is always the possibility to use the SOLUTION S2 i-FIX with retracted ISOFIX locking arms.
Above a child's stature of 135 cm, the compatibility between the SOLUTION S2 i-FIX and your vehicle might be reduced. Please review the vehicle type list to check whether the child seat can be used in all headrest positions without restrictions.
In exceptional cases, the child car seat may also be used on the front passenger seat. Always comply with the recommendations of the vehicle manufacturer.
INSTALLING THE CHILD SEAT IN THE VEHICLE
-
Always ensure that...
-
the backrests in the vehicle are locked in their upright position.
-
when installing the child seat on the front passenger seat, it is adjusted as far back as possible without affecting the belt routing.
-
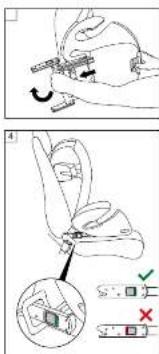
Use the ISOFIX adjustment handle (5) under the booster (3) and pull the two ISOFIX locking arms (4) to their furthest extent.
- Now twist the ISOFIX locking arms (4) 180° so that they are facing the direction of the ISOFIX anchorage points (6).
- Place the child seat on the appropriate seat in the car.
- Push the two ISOFIX locking arms (4) into the ISOFIX anchorage points (6) until these lock into place with an audible "CLICK".
- Use the ISOFIX adjustment handle (5) and push the car seat against the vehicle seat.
- Ensure that the entire surface of the backrest (2) of the child seat is placed against the backrest of the vehicle seat.
If the headrest of the vehicle is in the way, pull it upwards to its furthest extent or remove it completely (except in rear-facing vehicle seats).
- Ensure the seat is secure by trying to pull it out of the ISOFIX anchorage points (6). The green safety indicators (7) must be clearly visible on both sides of the seat.
- In case the seat is used without ISOFIX, it can be stored away on the bottom of the seat.
By using ISOFIX, a connection to the vehicle is created which increases your child's safety. Your child still needs to be secured with the three-point belt of the vehicle.
- If the "Linear Side-impact Protection" (L.S.P.) (9) is in conflict with the car door or if it affects the space on the passenger seat, it is possible to close the L.S.P. Press the L.S.P Operating button (10), hold it pressed and fold in the L.S.P. (9) with slight push. Then, release the L.S.P. Operating button (10).
The car seat can also be used without the L.S.P. in use, if there is not enough space in the vehicle.
REMOVING THE CHILD SEAT FROM THE VEHICLE
Perform the installation steps in the reverse order.
- Unlock the ISOFIX locking arms (4) on both sides by pushing the ISOFIX release buttons (8) and pulling them back simultaneously.
- Pull the seat away from the ISOFIX anchorage points (6).
- Remove the child seat and store the ISOFIX in reverse order to installation.
RECLINING HEADREST
The Reclining Headrest (11) helps to prevent the child's head from dangerously tipping forward during sleep. It can be set to one of 3 positions. Push the Reclining Headrest (11) forward until the desired position is reached.
The child's head should always be in contact with the Reclining Headrest.
ADJUSTING THE HEADREST
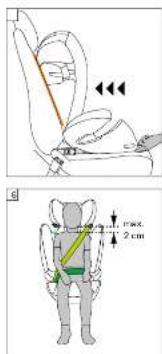
The headrest (11) can be adjusted by using the headrest height adjuster (12) at the back of the headrest (11). Adjust the headrest (11) so that max. 2 cm (approx. 2 finger's width) remain between the child's shoulder and the headrest (11).
The height of the headrest can still be adjusted while the seat is installed in the car.
SECURING THE CHILD
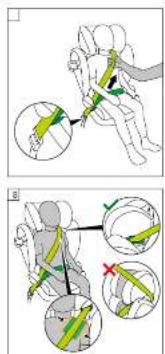
- Route the vehicle seat belt around your child and insert the belt tongue into the belt buckle. It must lock into place with an audible "CLICK".
- Place the lap belt in the green coloured lap belt guides (13) of the child seat.
- Pull the shoulder belt to tighten the lap belt.
- On the side of the car seat next to the belt buckle, the shoulder belt and the lap belt must be inserted together in the lap belt guide (13).
- Feed the shoulder belt through the shoulder belt guide (14) until it is inside the belt guide.
- Ensure that the shoulder belt runs across your child's clavicle and does not touch your child's neck. If necessary, adjust the height of the headrest (11) to change the position of the belt.
REMOVING AND REATTACHING THE SEAT COVER
The cover of the child seat consists of 4 parts (headrest (2x), backrest and booster). These are held in position at several places by press-studs. Once all studs have been released, the single parts of the cover can be removed.
In order to put the covers back on the seat, follow the removal instructions in the reverse order.
The cover may only be washed at 30 °C with a delicate wash program otherwise it may result in discolouration of the cover fabric. Please wash the cover separately from other laundry and do not dry in the dryer or in direct sunlight!
MANUFACTURER'S WARRANTY AND DISPOSAL REGULATIONS
CYBEX GmbH (Riedingerstr. 18, 95448 Bayreuth, Germany) gives you 3 years warranty on this product. The warranty is valid in the country, where this product was initially sold by a retailer to a customer. The contents of the warranty and all essential information required for the assertion of the warranty can be found on our homepage
go.cybex-online.com/manufacturer-warranty-car-seats. If a warranty is shown in the article description, your legal rights against us for defects remain unaffected.
Please observe the waste disposal regulations in your country.
CERTIFICAZIONE
UN R129/03
CYBEX Solution S2 i-Fix
100 – 150 cm
REPOSACABEZAS RECLINABLE
FÖRBEREDA FÖR INSTALLATION
MONTERA BARNSTOLEN I FORDONET
LUTNINGSBART NACKSTÖD
Uptluwjh dwlywlywu lwnwuntpn luwl yhnawnlyutl u hwnwnwnytl E wnwug Ynnwjhu wqntgnjajwul qdwjhl wwzwnwulutnh:
### ###
Snwluwwnnwnjhu uhgngnuu wnlyw nnntptpn yuw guwlywgud wjl wnwnjwu wfang t Uznuwutu wufnwgulw dih: Ujwnwtu, nnwup lwnnn tiu gultuti unpwluwwnnwnjhu uhgngh dtg, nnp lwnnn t hwuqtgtutl uwhugni yuwuuwubputnh:
Uptiluwj dwllwylwlu luunwuntng tnptp syutug t oqnwqnpóti unuwg luunwuntnh wjuinwuh: 3wudnqtp, np ihwuj onhqhluwj CYBEX luunwuntnh wjuinwul t oqnwqnpólnu, puih nn wjuinwulu luunwuntnh qnpouwnnyah luunwupuw huwufn qhuwuln unuwt t:
tnptp uh pantp tnthuwjhu wnwug hulynnlpajwu utptluwjnu:
tnthwutnh hwuww wwhu wulunwugnupw huwulwungh dwutng lwnnn tu unpwuww wnuh 6wnwqwjutphg u lwynn tu wjnti 2tn tnthuwh uw2yn: Tw2nwuwutp 2tn tnthuwhlu utptbluwh luunwuntnu wnuh nunhn 6wnwqwjutnh wantgnupnjuh: