YT73126 - Rangefinder Yato - Free user manual and instructions
Find the device manual for free YT73126 Yato in PDF.
| Product Type | Laser Distance Meter |
| Brand | Yato |
| Model | YT73126 |
| Measuring Range | 0.2 to 40 m |
| Measurement Accuracy | ± 2.0 mm + 5x10⁻⁵D |
| Laser Class | 2 |
| Laser Power | < 1 mW |
| Laser Wavelength | 630-670 nm |
| Power Supply | 3 AAA batteries 1.5 V or 3 Ni-MH rechargeable batteries 1.2 V (rechargeable via USB-C) |
| Dimensions (L x W x H) | 115 x 49 x 26 mm |
| Weight (without batteries) | 0.1 kg |
| Protection Rating | IP65 |
| Operating Temperature | 0 to +40 °C |
| Storage Temperature | -10 to +50 °C |
| Measurement Units | meters, feet, inches, feet+inches |
| Main Functions | Direct, continuous, area, volume, indirect (Pythagorean), angle, addition/subtraction, memory for 20 values |
| Memory | Last 20 measurements |
| Display | LCD with backlight |
| Audible Beeper | Enable/disable |
| Connectivity | USB Type-C port (for charging) |
| Included Accessories | Carrying case, USB-C cable, batteries (not specified) |
| Maintenance | Clean with a soft, damp cloth. Remove batteries during prolonged periods of non-use. |
| Safety | Do not point the laser at eyes or animals. Do not disassemble the device. |
| Repairability | Contact after-sales service in case of persistent hardware error. |
Frequently Asked Questions - YT73126 Yato
Note: Ambient light that is too bright can also disturb the measurement.
User questions about YT73126 Yato
0 question about this device. Answer the ones you know or ask your own.
Ask a new question about this device
Download the instructions for your Rangefinder in PDF format for free! Find your manual YT73126 - Yato and take your electronic device back in hand. On this page are published all the documents necessary for the use of your device. YT73126 by Yato.
USER MANUAL YT73126 Yato
text_image
4 2 1 3 7 9 10 12 6 5 MEAS GREEN BUTTONS -88.0° -88.0" MIN MIN MAX MAX +88.0" -88.0" MIN MIN MIN MIN MIN MIN MIN MIN MIN MIN MIN MIN MIN MIN MIN MIN MIN MIN MIN MIN MIN MIN MIN MIN MIN MIN MIN MIN MIN MIN MIN MIN MIN MIN MIN MIN MIN MIN MIN MIN MIN MIN MIN MIN MIN MIN MIN MIN MIN MIN MINPL
- display
- laser indicator marker
- battery compartment cover
- laser indicator
- USB slot
- switch
- measurement
- measuring mode selector
- memory bank
- adding/subtracting
- measuring base / unit
- acoustic signal
- battery level
- single measurement symbol
- operative laser indicator symbol
- measuring base - head of range-finder
- measuring base - tripod slot
- measuring base - rear of range-finder
- angle indicator
- memory bank symbol
- measurement value 1
22.measurement value 2 / MIN - measurement value 3 / MAX
- sum / last measurement value / result of calculation
D
Read the operating instruction
Correct disposal of this product: This marking shown on the product and its literature indicates this kind of product mustn't be disposed with household wastes at the end of its working life in order to prevent possible harm to the environment or human health. Therefore the customers is invited to supply to the correct disposal, differentiating this product from other types of refusals and recycle it in responsible way, in order to re-use this components. The customer therefore is invited to contact the local supplier office for the relative information to the differentiated collection and the recycling of this type of product.
UMWELTSCHUTZ
natural_image
Exploded view diagram of a battery pack assembly showing internal components and battery casing (no text or labels)
text_image
203° 10.000 m 10.000 m 40.000 m 10.000 m IIIIV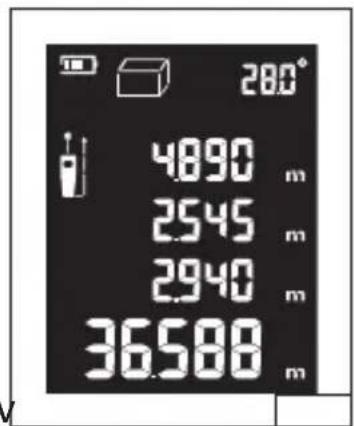
text_image
200° 4890 m 2545 m 2940 m 36588 m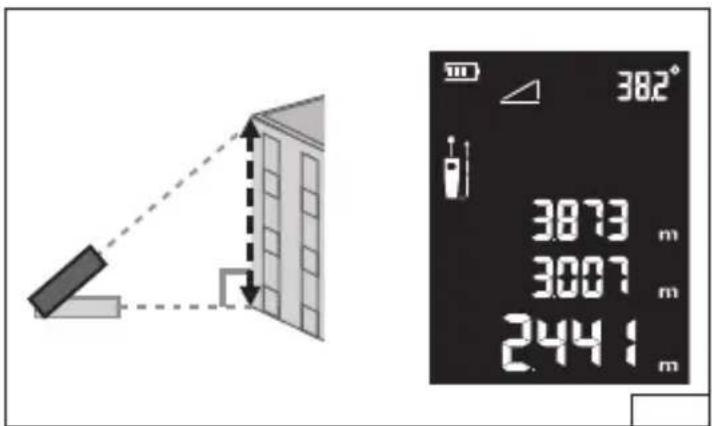
text_image
382° 3873 m 3007 m 2441 m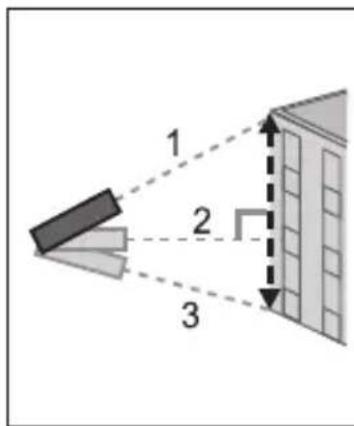
text_image
1 2 3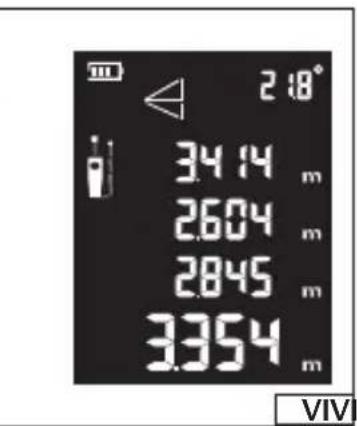
text_image
2:18° 34 14 m 2604 m 2845 m 3354 m VIVI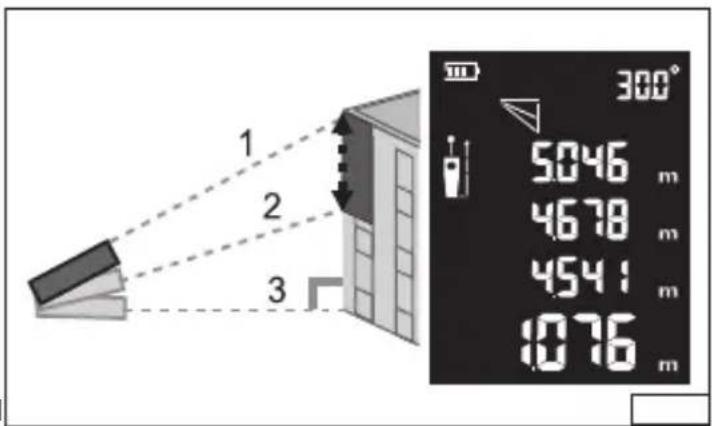
text_image
1 2 3 300° 5046 m 4678 m 4541 m 1076 m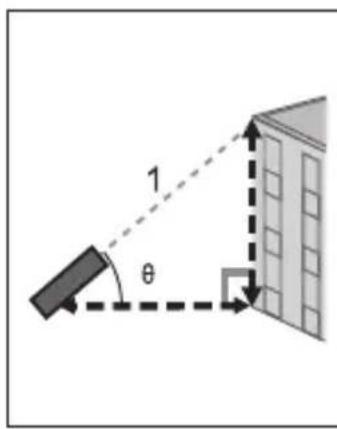
text_image
1 θ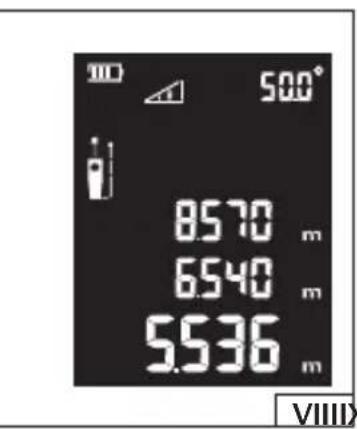
text_image
500° 8570 m 6540 m 5536 m VIIIIX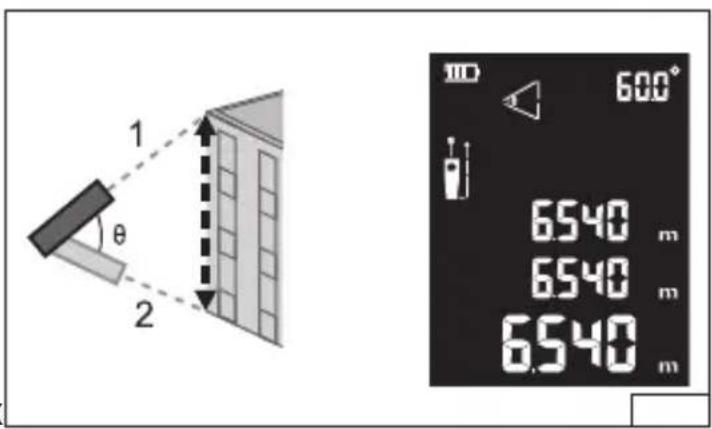
text_image
1 θ 2 600° 6540 m 6540 m 6540 mPL
CHARAKTERYSTYKA PRODUKTU
PRODUCT CHARACTERISTICS
Laser range-finder is a device that allows measuring a distance by means of laser beam. Distance is measured along straight line. Thanks to expanded functionalities it allows for direct measurement, indirect measurement, and also calculating the area and cubic capacity of rooms. Indoor use is recommended.
NOTE! The detector offered is not measuring instrument within the meaning of "Measurement Law".
EQUIPMENT
The product is delivered complete and does not require assembly. Only installation of batteries is required for proper operation. The product is supplied with slip-cover and C-type USB cable.
TECHNICAL DATA
| Parameter Measuring unit Value | |||
| Catalogue number YT-73126 YT-73127 | |||
| Measurement range [m] 0.2 - 40 0.2 - 60 | |||
| Length measurement accuracy - ±(2.0 mm + 5x10) | -5D)* | ||
| Angle measurement accuracy [°] | ±1 | ||
| Measurement unit Meters / feet / inches / feet + inches | |||
| Tripod slot size [“/mm] 1/4” UNC / 6.35 | |||
| Laser power [mW] | < 1 | ||
| Wavelength | [nm] | 630 - 670 | |
| Laser class | 2 | ||
| Battery supply | 3 x 1.5 V (AAA) / 3 x 1.2 V (AAA) | ||
| Operating temperature [°C] | 0 ~ +40 | ||
| Storing temperature | [°C] | -10 ~ +50 | |
| Dimensions | [mm] | 115 x 49 x 26 | |
| Weight (without batteries) | [kg] | 0.1 | |
| Protection class | IP65 | ||
*D - measured distance
GENERAL RECOMENDATIONS
Laser beam must never be directed towards people or animals. Do not look into laser beam. Laser is included in second class and emits a beam with a wavelength and of power specified in a technical data table. Such beam does pose a threat, however when directed directly towards eyeball may cause visual impairment. Do not disassembly this device unassisted, this may expose the user to laser radiation. Do not modify this device, especially its laser system.
Do not use this device in environment where the ambient temperature goes beyond operating range. If it is stored in temperature beyond the operating range, wait until the device reaches temperature within operating range.
The product is not resistant to water and dust penetration to the extent determined by a protection class. Do not immerse the product in water or other liquid.
Do not put the product with other tools into the tool box. Impacts may destroy a range-finder.
The device to be transported in protective case.
In case of prolonged brakes in using the device, remove batteries from a device. Do not store the laser range-finder at a temperature over 50^ C, this may damage the LCD display.
Clean the device using soft, clean and slightly wetted cloth.
GB
Laser beam must reach the target, than rebounds and returns to the device. Therefore the measurement conditions are subject to limitations. Light at the measurement point that is too bright, surface that reflects the light too much, e.g. glass, may obstruct or prevent the measurement. In this case, change the conditions of measurement or choose appropriate measurement method.
DEVICE OPERATION
Installation and replacement of batteries (II)
Open the cover of battery compartment placed at the bottom, rear part of the device, to do this slide the lock backwards and then lift the cover of battery compartment. Due to the presence of a seal, lifting the cover may require certain force. Install Ni-MH battery or storage-cell in sockets. Pay attention to the correct polarity. Batteries or storage cells should always be replaced as sets. To ensure correct and longest operation, it is recommended to use alkaline batteries of renowned manufacturers.
In case of using storage cell, they may be charged through C-type USB terminal.
It is forbidden to charge batteries! An attempt to charge them may cause an electrolyte leakage that may cause irreversible product damage and also may result in fire.
Note! Before each connecting the USB cable, open the cover of battery compartment and check whether batteries are inside.
It is possible to use computer's USB slot and network chargers fitted with USB slot. Only cable supplied with the product may be used for charging.
In order to prolong a service life of batteries or storage-cells, the device shall switch the laser indicator off after approx.
30 seconds, and after approx. 3 minutes after last pressing of a button it will switch off the power supply.
Device switching on / switching off
When switching on the device, press and hold down a switch for approx. 0.5 second. Release pressing after a display switches on.
When switching off the device, press and hold down a switch for approx. 0.5 second. Release pressing after a display switches off.
The product always starts on a single measurement mode and saves the measurement unit that was previously set and measurements that were previously entered into a memory. Measurements that were not saved are deleted at the moment of product switch-off, automatically or by the user.
Change of measurement units
With the device on, press and hold down for approx. 3 seconds the backlight/unit change button. Release the pressure after the change of measurement unit on a display. Units are changed in following cycle: meters / feet / inches / feet + inches
Single measurement mode
Start the device and by pressing the measurement base button select the point from which the distance is to be measured. Three settings are possible: from the upper edge of a range-finder, from the diameter of a tripod mounting hole and from the bottom edge of a range-finder. Selection is acknowledged by proper appearance of measurement base indicator.
Press the switch once, this will trigger the laser indicator, place the laser spot on a point to which distance is to be measured, and then press the switch again. The range-finder will make the measurement and the result shall be displayed in a field of last measurement. In case of subsequent measurements, results of previous measurements shall move on the display upward to the field of result of previous measurement and at the same time shall be registered in subsequent memory banks.
Continuous measurement mode
Continuous measurement is a type of measurement that allows making measurement in motion. The range-finder is being displaced, increasing or decreasing the distance measured, and the distance is continuously shown on a display.
GB
This allows, for example, determining a distance to be travelled while approaching or drifting away from the surface measured.
Start the device, press and hold down for approx. 2 seconds the switch/continuous measurement button. The device shall be switched to continuous measurement mode. This will be indicated by "MIN" and "MAX" symbols on a display. Displace the range-finder while reading indications on a display. The range-finder automatically saves the minimum and maximum distance measured and shows them on a display.
NOTE! Range-finder displacements that are too fast may result in erroneous indication. If "Error" message is shown on a display, reduce the speed of range-finder displacement. In order to go back to single measurement mode, press the switch / continuous measurement button.
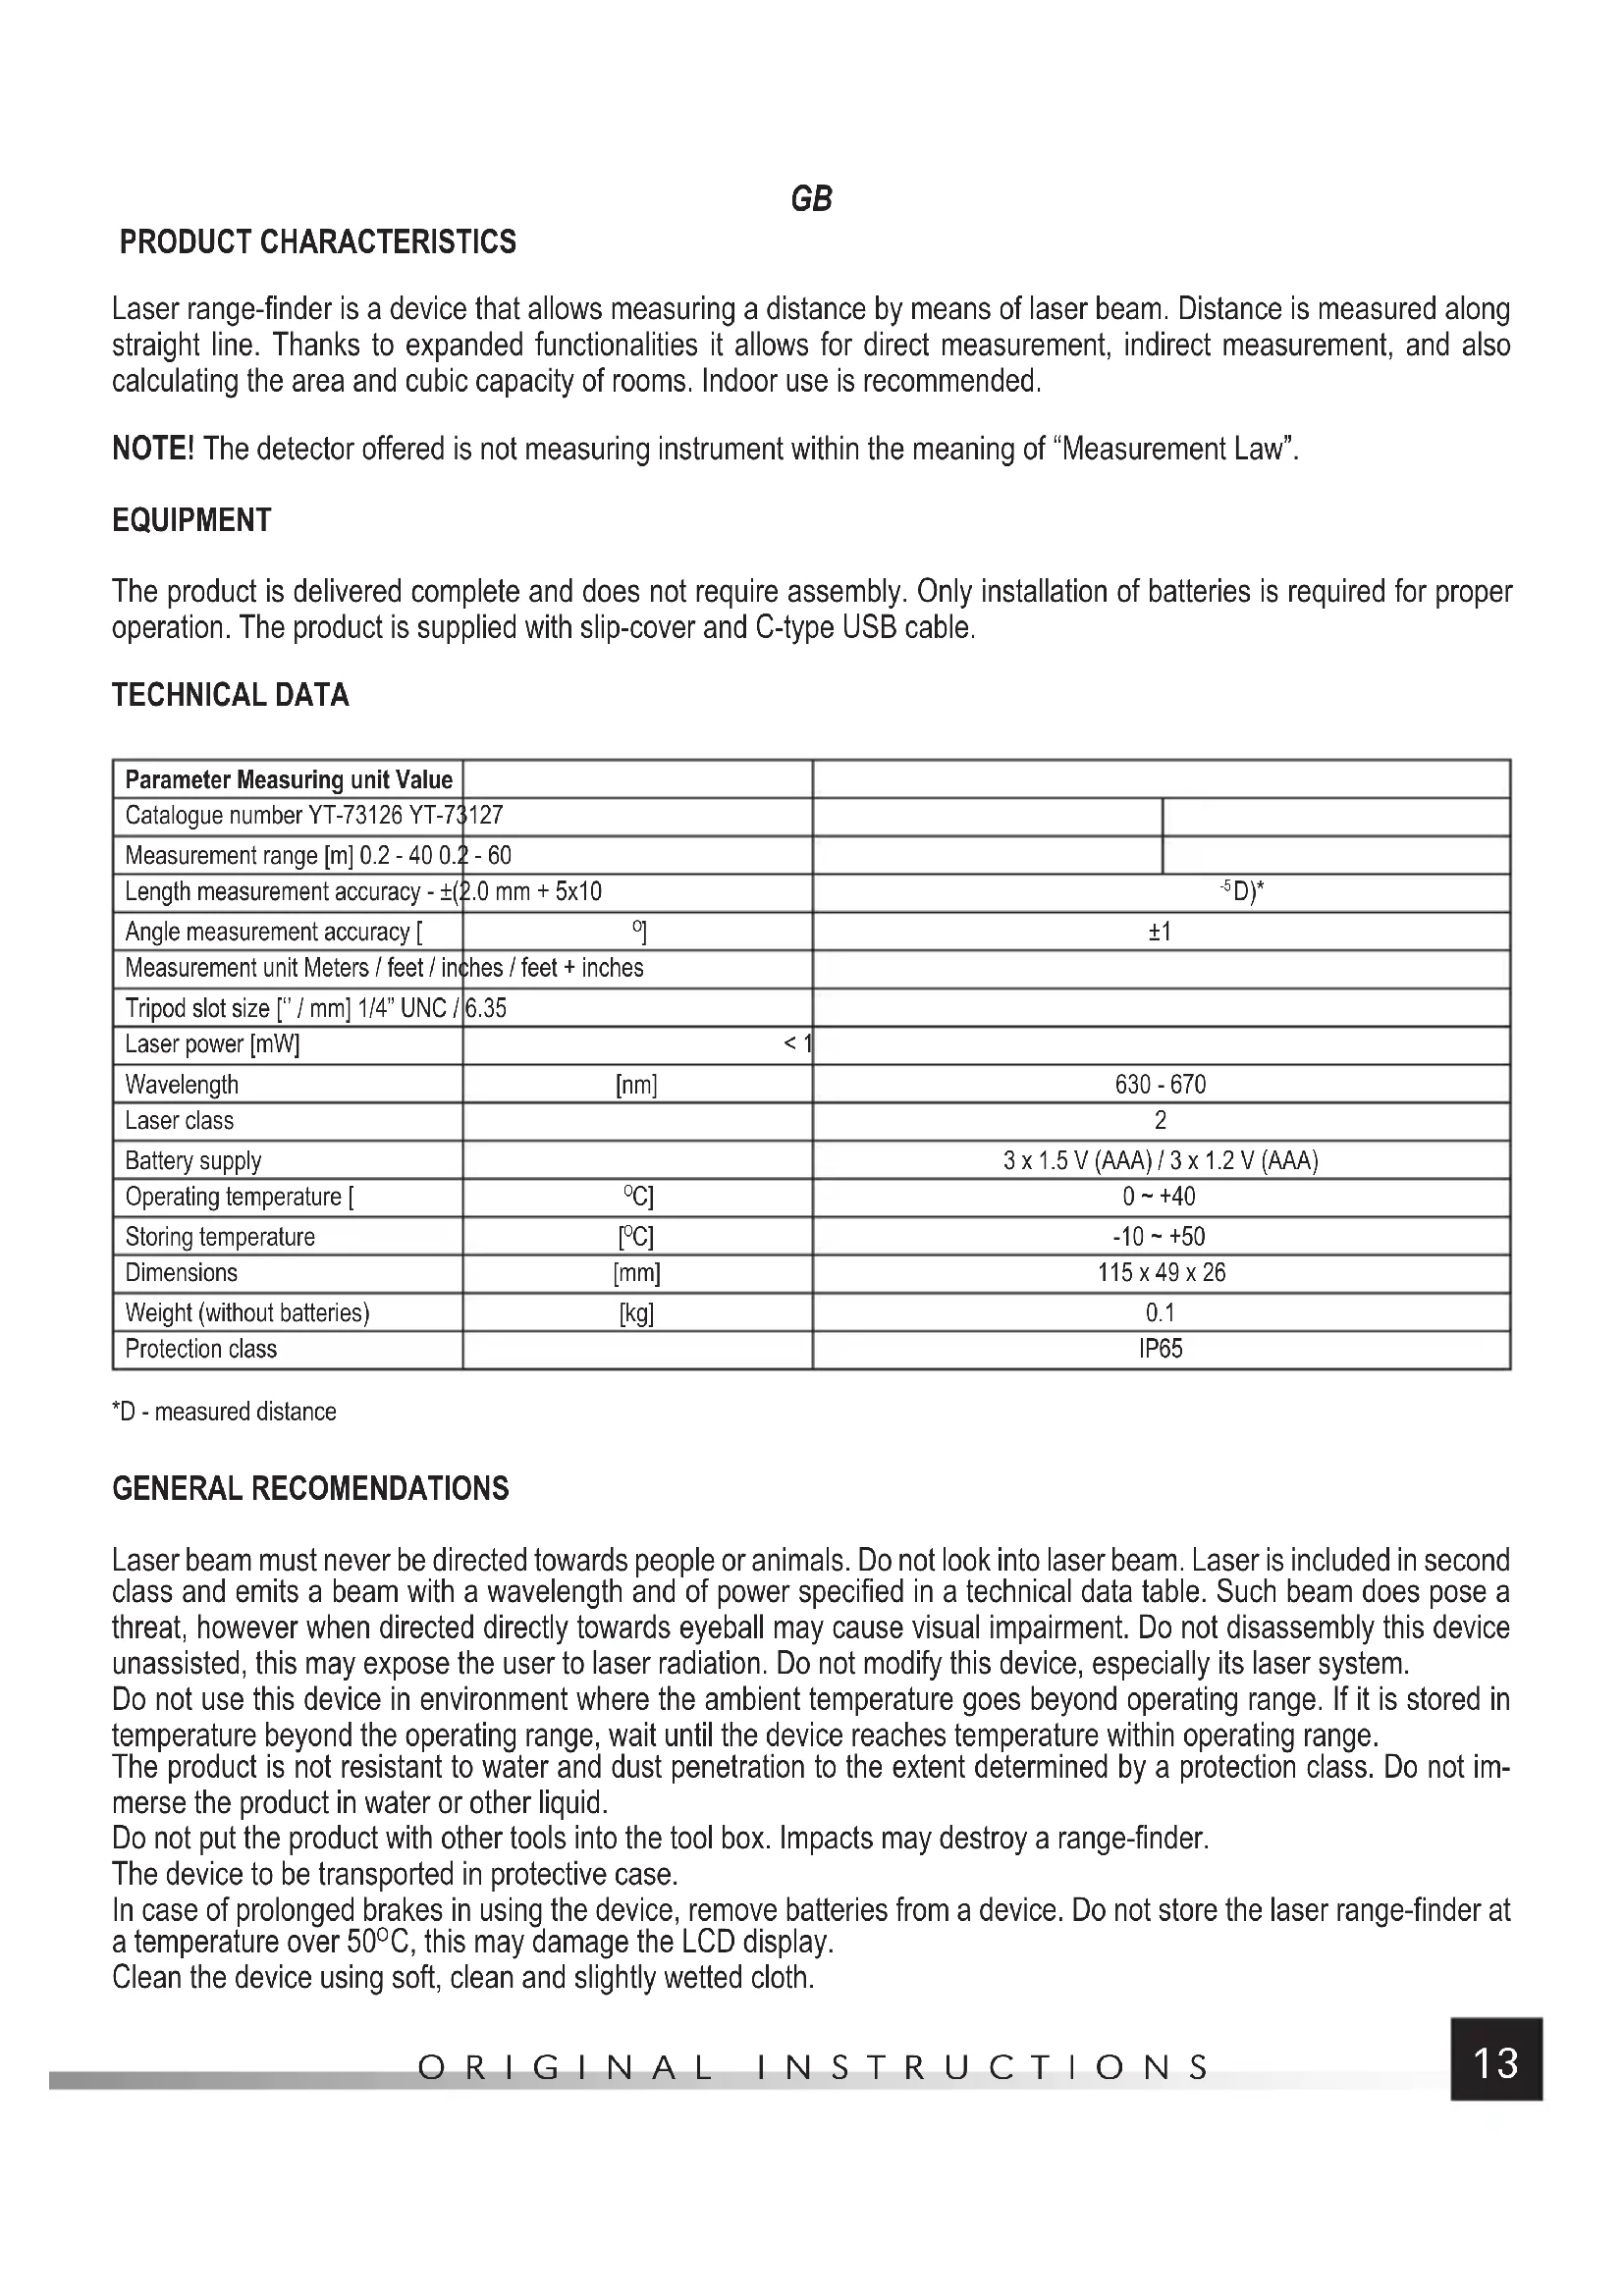
Area measurement (III)
NOTE! It is possible to measure the area of only one rectangle at a time. Areas of other shape should be split into rectangles, and then make the measurement of each one separately and then make the total.
Start the device and by pressing the measurement base button select the point from which the distance is to be measured. By pressing “Menu” button select the area measurement marked with a symbol of a rectangle. The display will show a symbol of measurement with pulsating edge, length of which is to be measured. Make the measurement as in the case of single measurement, and then measure the second distance. The measurement of a distance will be shown in the field of previous measurement, and area calculated shall be shown in the field of last measurement.
Pressing a switch for a short time deletes a distance previously measured, by pressing the switch again you may delete the previously measured distance.
Measurement of cubic capacity (IV)
NOTE! It is possible to measure the area of only one cuboid at a time. Cubature of other shape should be split into cuboids, and then make the measurement of each one separately and then make the total.
Start the device and by pressing the measurement data base button select the point from which the distance is to be measured. By pressing "Menu" button select the area measurement marked with a symbol of a cuboid. The display will show a symbol of measurement with pulsating edge, length of which is to be measured. Make the measurement as in the case of single measurement, and then measure the second and third distance. The measurement of a distance will be shown in the field of previous measurement, and the cubic capacity calculated shall be shown in the field of last measurement.
Pressing a switch for a short time deletes a distance previously measured, by pressing the switch again you may delete the previously measured distance.
Indirect measurement
Measurement applies to measuring distance in the case when direct measurement is not possible, for example there are obstacles on the path of a laser beam. Measurement may be used to measure the height, when the surface measured is not directly accessible. Due to the fact, that the result of measurement depends on calculations based on distances measured indirectly, the result of such measurement will be always prone to bigger error than direct measurement. It is required to thoroughly make the measurements of single indirect distances, this will result in small error of indirect measurement. In case of indirect measurements it is recommended to place the range-finder on a tripod and set the base of measurement in the axis of tripod hole.
Indirect measurement using right-angled triangle (V)
Start the device and by pressing the measurement base button select the point from which the distance is to be measured. By pressing "Menu" button select the area measurement marked with a symbol of right-angled triangle. The display will show a symbol of measurement with pulsating edge, length of which is to be measured. Make the measurement as in the case of single measurement, and then measure the second distance. The measurement of a distance will be shown in the field of previous measurement, and the distance calculated using Pythagoras formula shall be shown in the field of last measurement.
NOTE! First distance measured must be bigger than the second one. Otherwise the measurement result is wrong.
GB
Indirect measurement using dual right-angled triangle (VI)
The measurement is made in case the beginning and the end of a distance is above and below the point of measurement.
NOTE! The most accurate measurement results are obtained when the measurement point is in the middle of a distance measured. Any other placement of a measurement point will result in measurement error.
Start the device and by pressing the measurement base button select the point from which the distance is to be measured. By pressing "Menu" button select the area measurement marked with a symbol of dual right-angled triangle. The display will show a symbol of measurement with pulsating edge, length of which is to be measured. Make the measurement as in the case of single measurement, and then measure the second and third distance. The measurement of a distance will be shown in the field of previous measurement, and the distance calculated using Pythagoras formula shall be shown in the field of last measurement.
NOTE! First and third distance measured must be bigger than the second one. Otherwise the measurement result is wrong.
Indirect measurement using divided right-angled triangle (VII)
The measurement is made in case the beginning and the end of a distance is above or below the point of measurement.
Start the device and by pressing the measurement base button select the point from which the distance is to be measured. By pressing "Menu" button select the area measurement marked with a symbol of dual right-angled triangle. The display will show a symbol of measurement with pulsating edge, length of which is to be measured. Make the measurement as in the case of single measurement, and then measure the second and third distance.
The measurement of a distance will be shown in the field of previous measurement, and the distance calculated in the field of result of last measurement.
NOTE! First distance measured must be bigger than the second one, and the second one bigger than the third one.
Otherwise the measurement result is wrong.
Indirect measurement using the hypotenuse (VIII)
The measurement applies when the beginning of a distance is just in front of the range-finder and the end of a distance over or beyond the beginning of a distance. Place the range-finder horizontally, angle marker should indicate „0.0°“, and the laser spot indicates the beginning of a distance measured. Then lift or lower the range-finder and make the measurement. The display will show distances of all three sides of a right-angled triangle generated during the measurement, and value of an angle between cathetus and horizontal hypotenuse.
Indirect measurement using two hypotenuses (IX)
The measurements apply when the centre of a distance measured lies directly opposite the range-finder, one of the ends is over, and the second one below the centre. Place the range-finder horizontally, angle marker should indicate 0.0^ , and the laser spot indicates the centre of a distance measured. Lift the range-finder and make the measurement, than lower the range-finder by the same angle as lifted and make the measurement. The display will show both distances measured, an angle between them and the distance between the beginning and the end of the measurement.
Note! If the centre of a section measured shall not lie directly opposite the range-finder in horizontal position, then the result shall be erroneous.
Adding and subtracting distances
The range-finder allows adding or subtracting the measurements. Start the device, make direct measurement of the first distance, and then press the button "sum / difference" of distances, briefly, to add distances, or extendedly, to subtract distances. Depending on the selection the display will show "+" symbol for adding distances or "-" symbol for subtracting distances. Then make direct measurement of the second distance. The result will be displayed in the field of last measurement. Pressing again the adding or subtracting button will allow making subsequent measurement of distance and adding to or subtracting from the previous result.
GB
Measurements memory
The range-finder was fitted with a memory, where the results of last 20 measurements are automatically saved. Older results are deleted and automatically replaced with newer ones. To preview the results saved start the device and press the measurement memory button. Repeated pressing will allow previewing last 20 measurement results. Along with results, display will show the number of a memory register.
Continuous angle measurement
The range-finder measures continuously the angle of range-finder inclination. The measurement is made by means of internal position sensor and operates even with laser indicator off. The result of measurement is displayed on the screen.
Acoustic signal
By pressing a button marked with a symbol of loudspeaker you enable or disable acoustic signals.
Error messages
| Error code | Cause of error Solution | |
| 204 | Calculation error Repeat the measurement procedure according to instruction | |
| 208 | Excessive current Contact the technical service | |
| 220 | Low battery level Replace batteries or charge the storage cell | |
| 252 | Temperature is too high Cool down the device | |
| 253 | Temperature is too low Heat the device | |
| 255 | Return signal is too weak or time of measurement is too long | Change the measurement surface |
| 256 | Return signal is too strong Change the measurement surface | |
| 261 | Out of measurement range Object must stay within measurement range | |
| 500 | Hardware error Repeatedly switch in and off the device. If the error persists please contact the technical service | |