
ERCTN1 - Electric mower PANASONIC - Free user manual and instructions
Find the device manual for free ERCTN1 PANASONIC in PDF.
| Product type | Beard and hair trimmer |
| Brand | Panasonic |
| Model | ER-CTN1 |
| Power supply | Rechargeable (built-in battery) |
| Charging time | Approximately 1 hour (model ER-CBL1) or not specified |
| Run time | Up to 50 min (ER-CBN1) or 90 min (ER-CBL1) |
| Quick charge | 3 min charge gives 5 min use (ER-CBL1 only) |
| Cut height ranges | 0.5 mm (without comb), 1-10 mm (comb A), 11-20 mm (comb B) |
| Height adjustment | Dial and indicator on comb |
| Included accessories | Combs A and B, cleaning brush, lubrication oil |
| Cleaning | Washable with water (head, comb, blade); brush for hair |
| Maintenance | Lubricate blade before and after each use |
| Safety | Protected blade, use only the dedicated blade, do not use on irritated skin |
| Spare parts | Replacement blade available at seller or service center |
| Noise level | 67 dB(A) |
| Usage | Domestic |
Frequently Asked Questions - ERCTN1 PANASONIC
User questions about ERCTN1 PANASONIC
0 question about this device. Answer the ones you know or ask your own.
Ask a new question about this device
Download the instructions for your Electric mower in PDF format for free! Find your manual ERCTN1 - PANASONIC and take your electronic device back in hand. On this page are published all the documents necessary for the use of your device. ERCTN1 by PANASONIC.
USER MANUAL ERCTN1 PANASONIC
Operating Instructions
(Household use) Trimmer Head
Model No. ER-CTN1

natural_image
Line drawing of a hairbrush with bristles and a circular head (no text or symbols)

natural_image
Diagram showing a hair comb with a blade and a base, no text or symbols present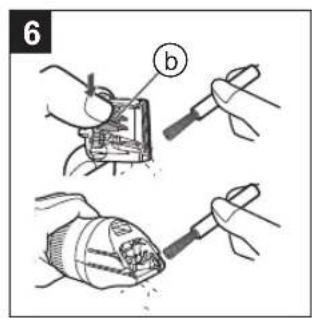
natural_image
Cross-sectional diagram of a mechanical component with internal springs and arrows indicating flow or force (no text or symbols)

4


1

③-1

③-2

③-4
2


③-3


4


| English | 5 | Dansk | 41 | Česky 77 | |
| Deutsch | 11 | Português | 47 | Slovensky 83 | |
| Français | 17 | Norsk | 53 | Magyar 89 | |
| Italiano | 23 | Svenska | 59 | Română 95 | |
| Nederlands | 29 | Suomi | 65 | Türkçe 101 | |
| Español | 35 | Polski | 71 |
Panasonic
Operating Instructions
(Household use) Trimmer Head
Model No. ER-CTN1
Contents
Safety precautions.... 6 Maintenance ....9
Important information ....6 Troubleshooting ....10
Parts identification ....6 Specifications ....10
How to use ....6
Thank you for purchasing this Panasonic product.
Before operating this unit, please read these instructions completely and save them for future use.
Safety precautions
Make sure to follow these instructions.
To prevent accidents, injuries or damage to property, please follow the instructions below.
■ The following chart indicates the degree of damage caused by improper operation.

WARNING
Indicates potential hazard that could result in serious injury or death.

CAUTION
Indicates potential hazard that could result in minor injury or property damage.

WARNING
▶ Preventing accidents
- Do not place within reach of children or infants. Do not let them use it.
- Putting parts or accessories in the mouth may cause an accident or injury.

CAUTION
▶ Protecting the skin
- Do not press the blade strongly against the skin.
- Do not use any blade other than the one dedicated.
- Do not use this appliance for any purpose other than trimming beard and hair.
- Do not directly apply the blades on ears or rough skin (such as swellings, injuries or blemishes).
- Doing so may cause injury to ears or uneven skin.
- Check the blades are not damaged or deformed before use.
- Failure to do so may cause injury to the skin.
Important information
- Apply the lubrication oil to the blade before and after each use. (See page 9.) Failure to apply the lubrication oil may cause the following problems.
- The appliance has become blunt.
- Shorter operating time.
- Louder sound.
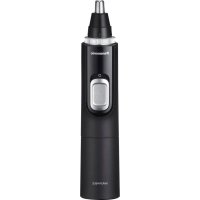
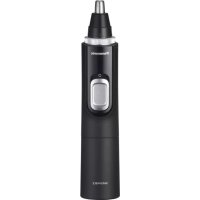
Parts identification (Fig. 1)
A Head
① Water inlet
② Trimming height indication mark
③ Dial (Height adjustment control)
④ Water outlet
⑤ Blade
Accessories
B Comb attachment [A] (1 mm to 10 mm)
© Comb attachment [B] (11 mm to 20 mm)
How to use
- Clean the appliance after use.
1 Mount the head to the main body until it clicks.
2 Mount the desired comb attachment and adjust the trimming height as needed.
- It can also be used without the comb attachment. (Trimming height: approx. 0.5 mm)
- Do not use the comb attachment on wet hair. Wet hair might clump or stick to the skin, becoming hard to trim.
- Setting of 10.5 mm is unavailable.
3 Turn on the power.
Note
- The use time after a full charge is as follows.
ER-CBL1: 90 minutes
ER-CBN1: 50 minutes
(Based on dry using at 20 °C – 30 °C)
The operating time may differ depending on the frequency of use and the operating method.
Quick charge (ER-CBL1 only)
Even though the battery runs out, you can use for 5 minutes after 3-minute charge.
(This will differ depending on usage.)
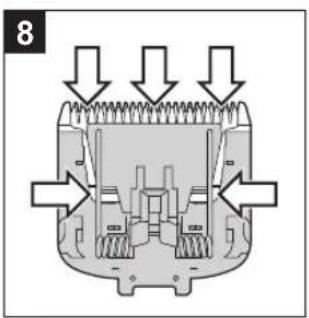
Removing and mounting the head (Fig. 2)
- Make sure that the main body is turned off.
Remove the head while pushing the head release button (a).
- Stand the head when it is removed.
Mount the head to the main body until it clicks.
Removing and mounting the comb attachment (Fig. 3)
- Be careful not to cut your hand with blade.
Remove the comb attachment from the head.
Mount the comb attachment to the head until it clicks.
Estimated cutting height
- Actual hair length will be a little longer than the height you set.

▶ Comb attachment [A]
| Indicator | 1 | * | 2 | 3 | 4 | 5 | * | * | * | ||||
| Trimming height (mm)(estimate) | 1 | 1.5 | 2 | 2.5 | 3 | 3. | 5 | 4 | 4.5 | 5 | 5.5 |
▶ Comb attachment [B]
| Indicator | 11 | • | 12 | 13•14 | • | • | ||
| Trimming height (mm)(estimate) | 11 | 11.5 | 12 | 12.5 13 | 13.5 | 14 | 14.5 |
| 15 | 16·17 | 18 | 19·20 | · | · | · | |||||
| 15 | 15.5 | 16 | 16.5 | 17 | 17 | 5 | 18 | 18.5 | 19 | 19.5 | 20 |
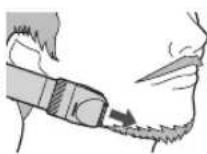
Trimming beard
Adjusting the beard length
Holding the trimmer with the power switch facing upward, trim by bringing the blade in contact with the skin and moving the trimmer against the flow of the beard. (Fig. 4-1)
- Hair trimmings may collect inside the comb attachment when a large volume of beard is cut, so discard hair trimmings after each use.
Trimming without the comb attachment/trimming the downy hair
Holding the trimmer with the power switch facing outwards, trim by bringing the blade in contact with the skin. (Fig. 4-2)
- The trimmer cannot trim hair to lengths less than 0.5 mm.
Beard shaping
Use the trimmer without any comb attachments to properly shape your beard.
▶ Above and below lips (Fig. 4-3-1)
Holding the trimmer with the power switch at the bottom, cut across a line with the blade at a 90^ angle to the skin.
▶ Ends of moustache (Fig. 4-③-2)
Holding the trimmer with the power switch facing outward, trim gradually from the ends by bringing the blade in contact with the skin.
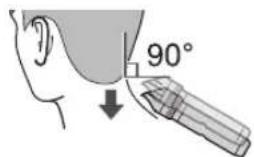
▶ Sideburns (Fig. 4-3-3)
Holding the trimmer with the power switch at the bottom, trim by moving the trimmer downward with the blade at a 90° angle to the sideburns.
▶ Beard (Fig. 4-③-4)
Holding the trimmer with the power switch facing outward, trim by bringing the blade in contact with the skin and cutting along a line while moving the trimmer forward.
Trimming hair
To maintain sharpness, remove hair trimmings between usages.
Trimming to an even length (Fig. 4-④)
1 Holding the trimmer with the power switch upward, trim by moving the trimmer slowly against the flow of hair and toward the crown of your head.
2 Trim slowly while crisscrossing from various directions to avoid missing any spots.
Adjusting the length around the ears and neckline (Fig. 4-5)
Holding the trimmer with the power switch upward, trim around the ears and neckline (by lifting the tip of the comb attachment little by little from the hairline.
Trimming the downy hair around the neckline (Fig. 4-6)
Holding the trimmer with the power switch at the bottom, touching the blade perpendicular to the area of downy hair, and move the trimmer downward along the skin.
- It is recommended to ask someone else to trim around your own ears and neckline.
Maintenance
- Make sure that the main body is turned off.
- Lubricate after cleaning and store the head with one of the comb attachments attached.
How to clean
▶ With water
To remove light dirt To remove heavy dirt
-
Remove the comb attachment, run water down the water inlet. (Fig. 5)
-
Remove the head, comb attachment and blade and rinse them with running water.
-
Shake up and down several times to remove the water.
- Be careful not to hit the appliance on the sink or any other object while draining the water.
- Wipe off the water with a dry cloth and dry it well.
- It will dry faster with the blade removed.
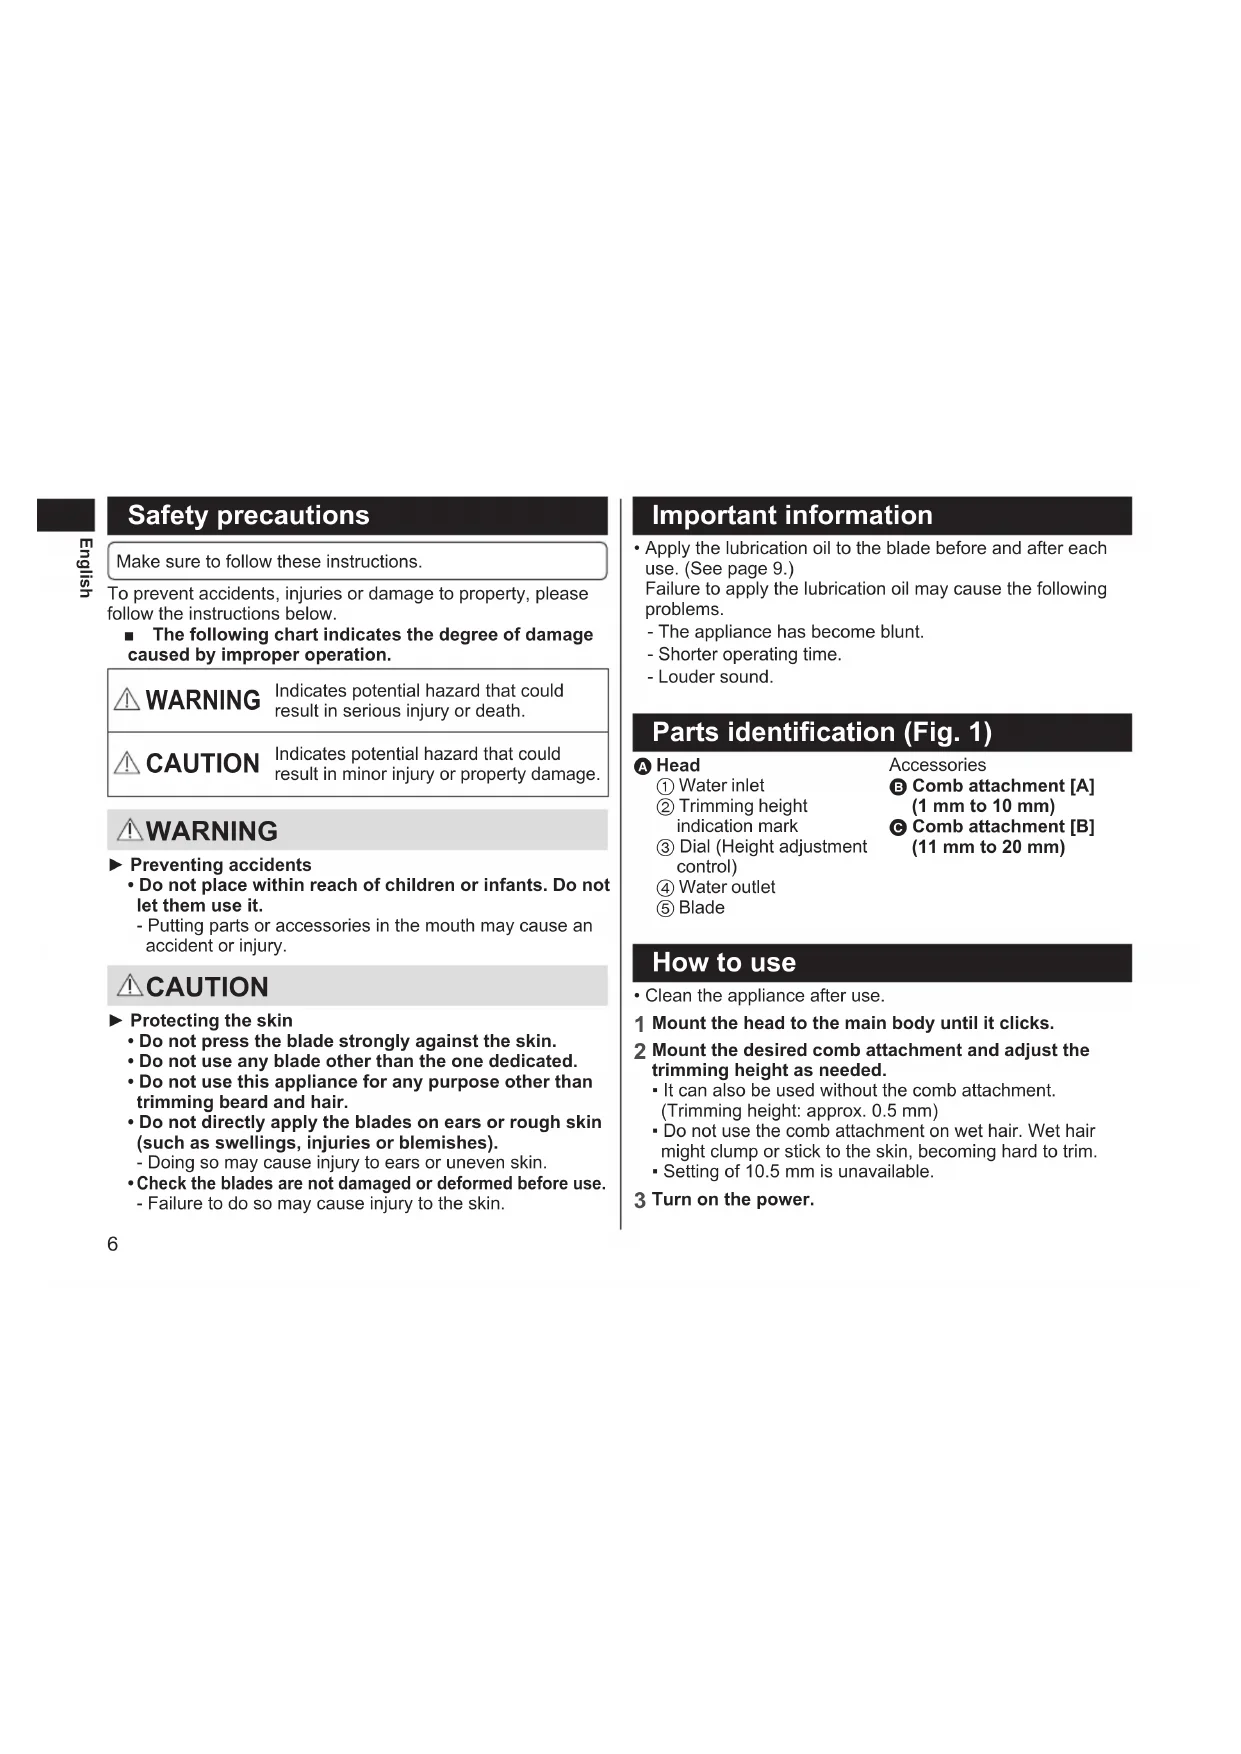
▶ With the cleaning brush (Fig. 6)
- Remove the head, comb attachment and blade.
- Brush off any hair trimmings from the head, comb attachment and from around the blade.
- Brush any hair trimmings out from between the stationary blade and the moving blade while pressing down the cleaning lever (b) to raise the moving blade.
Notes
- Do not wipe with thinners, benzine, alcohol etc. Doing so may cause malfunction, or cracking or discoloration of the parts.
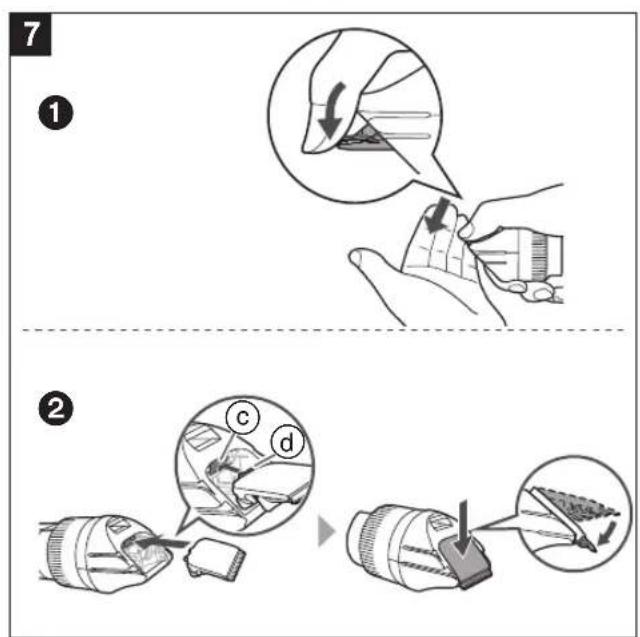
Removing and mounting the blade
To remove the blade, hold the head, place your thumb against the blades and then push them away from the head. (Fig. 7-1)
To mount the blade, fit the mounting hook (d) into the blade mounting on the head (c) and then push in until you hear a click. (Fig. 7-2)
Replacement parts
Replacement part is available at your dealer or Service Centre.
Lubrication oil WES003P
Lubrication
- Apply the lubrication oil to the blade before and after each use.
1 Remove the blade.
2 Apply a drop of the lubrication oil to each indicated point. (Fig. 8)
3 Attach the blade to the head, turn on the power and allow it to run for approximately 5 seconds.
Troubleshooting
Problem Action
The appliance has become blunt.
Operating time is short.
Appliance stopped functioning.
Makes a loud sound.
Until problems are solved, please follow each procedure as follows;
-
Charge the appliance.
-
Clean the blade and apply lubrication oil. (See page 9.)
-
Replace the blade. (See page 9.)
Clean the blade and apply lubrication oil. (See page 9.)
Confirm that the blade is properly attached.
If the problems still cannot be solved, contact your dealer or a service centre authorized by Panasonic for repair.
Specifications
Airborne Acoustical Noise 67 (dB (A) re 1 pW)
This product is intended for household use only.
Panasonic
Betriebsanleitung
▶ Pattes (Fig. 4-3-3)
Huile de lubrification WES003P
Lubrification
Ricarica rapida (solo ER-CBL1)
Specifications....34
▶ Baard (Afb. 4-3-4)
© Peine [B] (11 mm a 20 mm)
Cómo usar
ER-CBL1: 90 minutter
ER-CBN1: 50 minutter
ER-CBL1: 90 minutter
ER-CBN1: 50 minutter
▶ Broda (Rys. 4-3-4)
Akusticky hluk 67 (dB (A) re 1 pW)
Panasonic Manufacturing (Thailand) Co., Ltd. Navanakorn Industrial Estate Zone 3 No.106 Moo 18 Khlong 1, Khlong Luang, Pathum Thani, 12120, Thailand
YETKILI TEMSILCI
İthalatçı Firma:
Tesan İletişim A.Ş.
Çobançeşme Mah. Bilge 1 Sok. No:17 34196 Yenibosna-İstanbul Tel: 0212 454 60 70 Faks: 0212 454 60 20 www.tesan.com.tr
ÜRÜNÜN KULLANIM ÖMRÜ 7 YILDIR
Panasonic Corporation
https://www.panasonic.com
© Panasonic Corporation 2022
⑤ EN, DE, FR, IT, NL, SP, DA, PT, NB, SV, FI, PL, CZ, SK, HU, RO, TR
Printed in Thailand
ER921WCTN13011 F0422-0

- Panasonic
- Contents
- Safety precautions
- WARNING
- CAUTION
- Important information
- Parts identification (Fig. 1)
- How to use
- Note
- Quick charge (ER-CBL1 only)
- Removing and mounting the head (Fig. 2)
- Removing and mounting the comb attachment (Fig. 3)
- Estimated cutting height
- Trimming beard
- Adjusting the beard length
- Trimming without the comb attachment/trimming the downy hair
- Beard shaping
- Trimming hair
- Trimming to an even length (Fig. 4-④)
- Adjusting the length around the ears and neckline (Fig. 4-5)
- Trimming the downy hair around the neckline (Fig. 4-6)
- Maintenance
- How to clean
- ▶ With water
- To remove light dirt To remove heavy dirt
- ▶ With the cleaning brush (Fig. 6)
- Notes
- Removing and mounting the blade
- Replacement parts
- Lubrication
- Troubleshooting
- Problem Action
- Specifications
- Lubrification
- Ricarica rapida (solo ER-CBL1)
- Cómo usar
- YETKILI TEMSILCI
Brand : PANASONIC
Model : ERCTN1
Category : Electric mower