
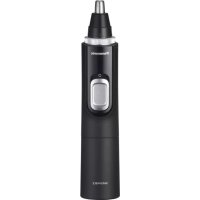
ERCNT1 - Electric mower PANASONIC - Free user manual and instructions
Find the device manual for free ERCNT1 PANASONIC in PDF.
| Product type | Electric trimmer for nose, ears, face |
| Brand | Panasonic |
| Model | ER-CNT1 |
| Use | Household only |
| Power | Rechargeable (built-in battery) |
| Quick charge | 3 min for 5 min of use (with charger ER-CBL1) |
| Sound level | 62 dB(A) |
| Main functions | Trims nose, ear, eyebrow, mustache, beard hair |
| Outer blade | Metal |
| Inner blade | Removable metal |
| Maintenance | Washable with water + cleaning brush |
| Water cleaning | Possible with hand soap |
| Cleaning brush | Included |
| Safety | Do not press hard, do not share, use on skin only |
| Spare parts | Head, outer blade, inner blade, trimmer housing, protective cover |
| Repairability | Blades replaceable by user |
| Included accessories | Protective cover, cleaning brush |
| Warranty | Consult your dealer or Panasonic authorized center |
Frequently Asked Questions - ERCNT1 PANASONIC
User questions about ERCNT1 PANASONIC
0 question about this device. Answer the ones you know or ask your own.
Ask a new question about this device
Download the instructions for your Electric mower in PDF format for free! Find your manual ERCNT1 - PANASONIC and take your electronic device back in hand. On this page are published all the documents necessary for the use of your device. ERCNT1 by PANASONIC.
USER MANUAL ERCNT1 PANASONIC
Operating Instructions
(Household use) Nose/Ear/Facial Trimmer Head
Model No. ER-CNT1
natural_image
Line drawing of a mechanical component with a tapered top and base (no text or symbols)

natural_image
Two technical illustrations of a mechanical component being exploded, showing disassembled parts (no text or symbols present)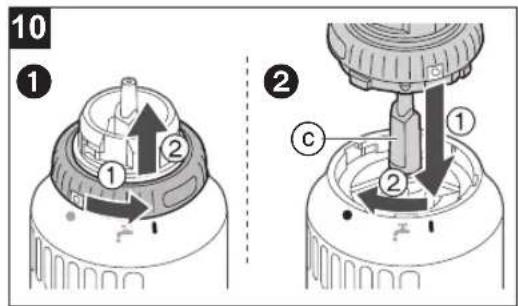

| English | 5 | Dansk | 36 | Česky 66 | |
| Deutsch | 10 | Português | 41 | Slovensky 71 | |
| Français | 16 | Norsk | 46 | Magyar 76 | |
| Italiano | 21 | Svenska | 51 | Română 81 | |
| Nederlands | 26 | Suomi | 56 | Türkçe 86 | |
| Español | 31 | Polski | 61 |
Panasonic
Operating Instructions
(Household use) Nose/Ear/Facial Trimmer Head
Model No. ER-CNT1
Contents
Safety precautions.... 6 How to use ....7
Important information ....6 Maintenance ....8
Parts identification ....6 Troubleshooting ....9
Before use ....6 Specifications ....9
Thank you for purchasing this Panasonic product.
Before operating this unit, please read these instructions completely and save them for future use.
Safety precautions
Make sure to follow these instructions.
To prevent accidents, injuries or damage to property, please follow the instructions below.
■ The following chart indicates the degree of damage caused by improper operation.

WARNING
Indicates potential hazard that could result in serious injury or death.

CAUTION
Indicates potential hazard that could result in minor injury or property damage.

WARNING
▶ Preventing accidents
- Do not place within reach of children or infants. Do not let them use it.
- Putting parts or accessories in the mouth may cause an accident or injury.

CAUTION
▶ Protecting the skin
- Do not press the blade strongly against the skin.
- Do not press the blade with excessive force or insert too deeply into your nostril/ear canal.
- Do not touch the blade section (metallic section) of the inner blade.
- Do not use this appliance for any purpose other than to cut nose hair, ear hair, outline eyebrows, moustache or beard.
- Doing so may cause injury to skin or hand.
- Check the blades are not damaged or deformed before use.
- Failure to do so may cause injury to the skin.
▶ Note the following precautions
- Do not share with your family or other people.
- Doing so may result in infection or inflammation.
Important information
- Note the following precautions to avoid malfunction or deformation.
- Do not bring the blade into contact with hard objects.
- Do not drop or hit against other objects.
- Be sure to place the protective cap on the head when carrying around or storing.
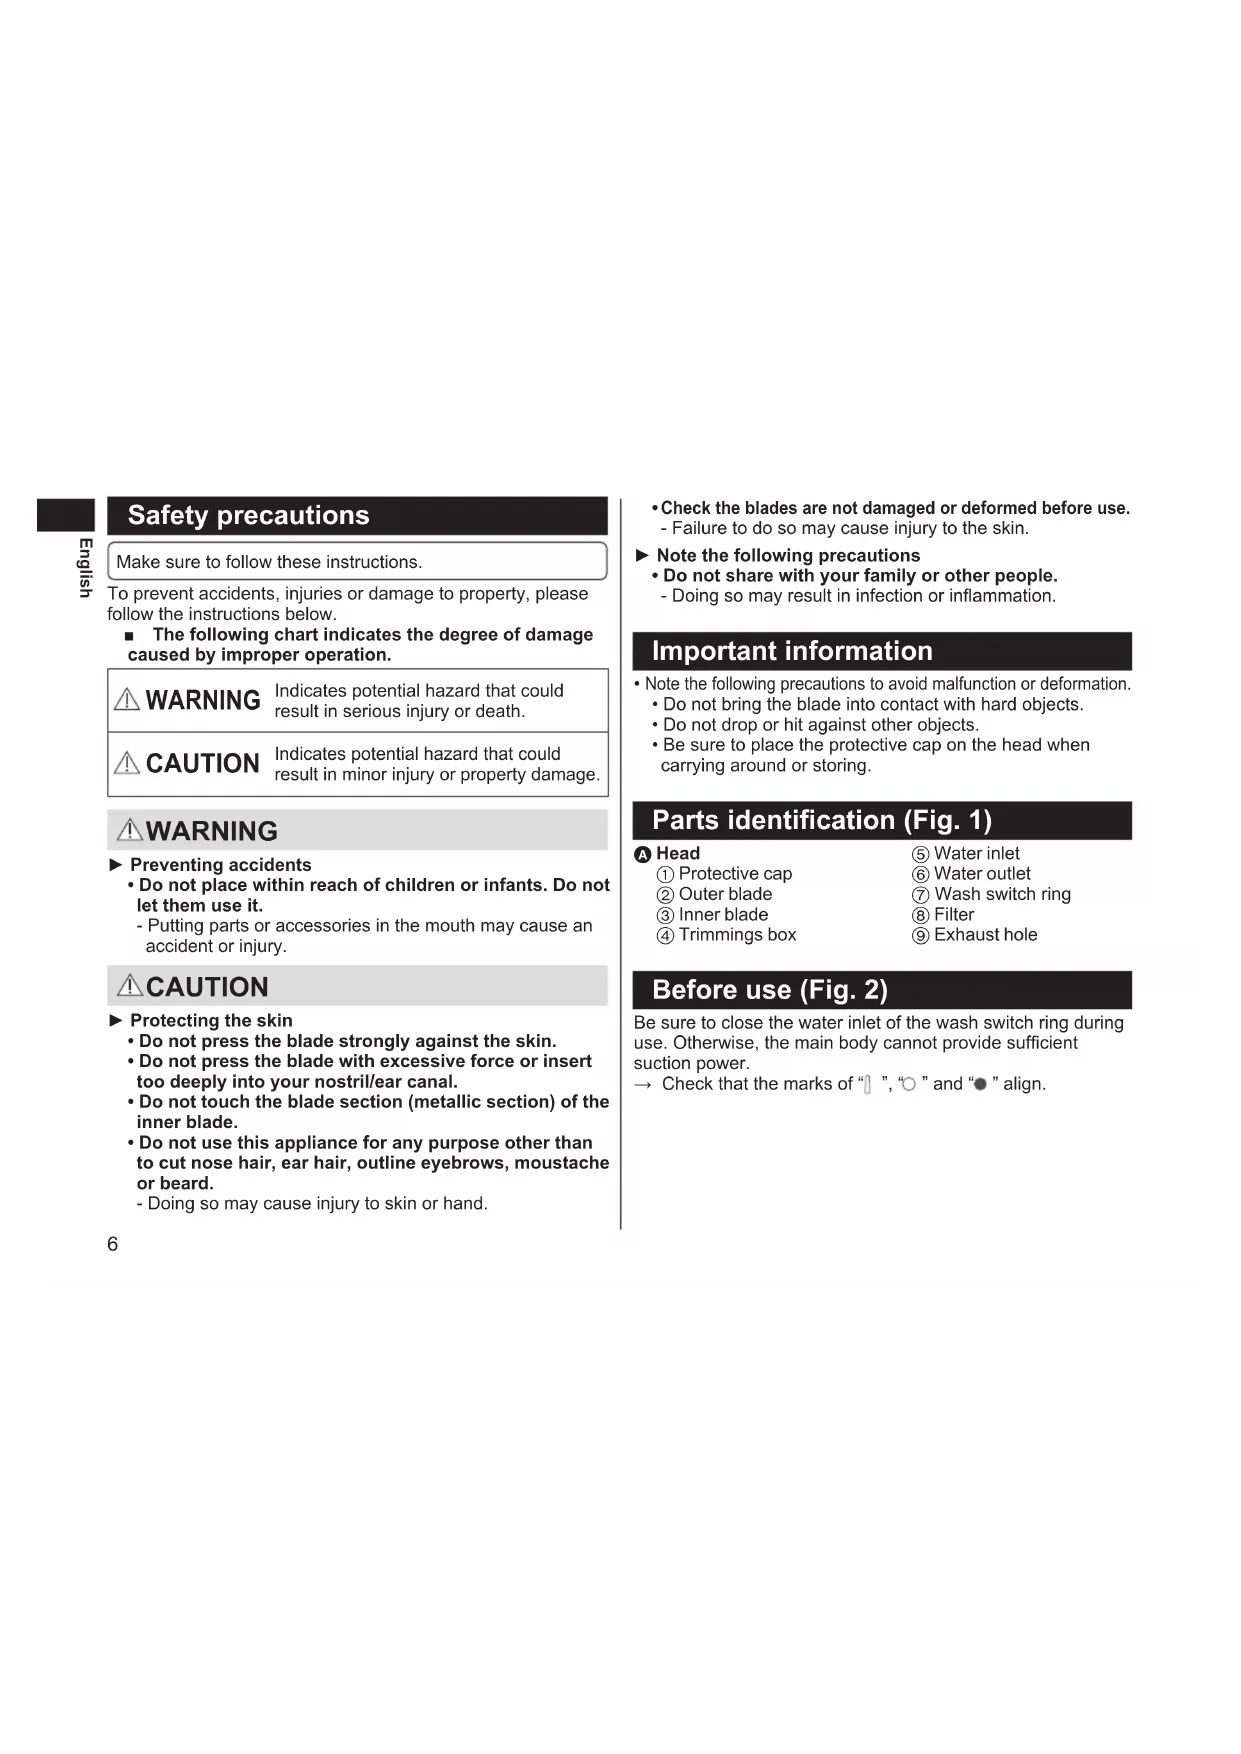
Parts identification (Fig. 1)
A Head
① Protective cap
② Outer blade
③ Inner blade
④ Trimmings box
⑤ Water inlet
⑥ Water outlet
⑦ Wash switch ring
⑧ Filter
⑨ Exhaust hole
Before use (Fig. 2)
Be sure to close the water inlet of the wash switch ring during use. Otherwise, the main body cannot provide sufficient suction power.
→ Check that the marks of “☐”, “○” and “●” align.
How to use
- Clean the appliance after use.
1 Mount the head to the main body until it clicks.
2 Remove the protective cap and hold the main body so as not to block the exhaust hole (a). (Fig. 3)
3 Turn on the power before putting the head in your nostril.
- Cut hairs using the tip of the outer blade (metallic part).
- The outer blade surface may get a little warm during use, but performance will not be affected.
Note
- The use time after a full charge is as follows.
ER-CBL1: 80 minutes
ER-CBN1: 60 minutes
(Based on dry using at 20 °C – 30 °C)
The operating time may differ depending on the frequency of use and the operating method.
Quick charge (ER-CBL1 only)
Even though the battery runs out, you can use for 5 minutes after 3-minute charge.
(This will differ depending on usage.)
Removing and mounting the head (Fig. 4)
- Make sure that the main body is turned off.
▶ Remove
Remove the head while pushing the head release button (b).
- Stand the head when it is removed.
▶ Mount
Mount the head to the main body until it clicks.
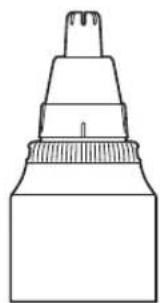
Trimming your nose hair and ear hair (Fig. 5)
1 Insert the tip of the outer blade into your nostril or ear canal.
- Insert it slowly so as not to injure your nostril or ear canal.
2 Cut the nose hair and ear hair by moving the main body.
- Some trimmings may remain inside your nostril or ear canal after cutting, so remove them using a tissue or similar.
Outlining your eyebrows, moustache, or beard (Fig. 6)
1 Apply the tip of the outer blade to the hair (eyebrow, moustache or beard) you would like to cut.
2 Cut the hair by moving the appliance slowly against the direction of hair growth.
- You cannot trim the hair to length with this head.
- It is not suitable for the hair below 0.5 mm.
Maintenance
- Make sure that the main body is turned off.
• After cleaning, be sure to store with the blades, the trimmings box and the protective cap attached.
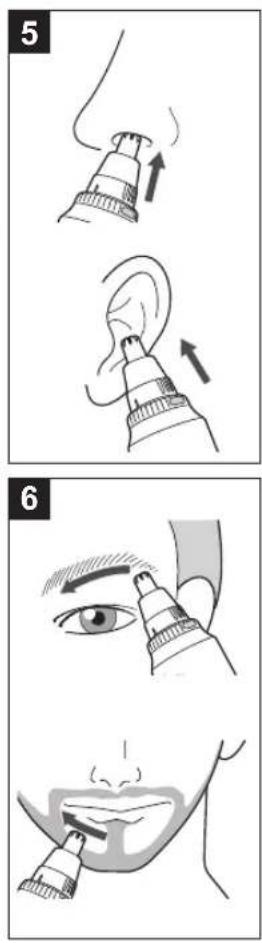
How to clean
▶ With water
- Apply some hand soap and some water to the outer blade.
- Turn on the power and turn off the power after 10 seconds. (Fig. 7-①)


To remove light dirt To remove heavy dirt
- Open the water inlet and turn on the power again.
- If the trimmings box is removed, open the water inlet after attaching the trimmings box.
- Run water down the water inlet (Fig. 7-2), rinse well and turn off.
e heavy dirt
- Remove the head, the blades and the trimmings box.
- Rinse them with running water. (Fig. 7-3)
- Cover the drainage outlet of washbasin to prevent the inner blade from flowing away.


- Wipe off the water with a dry cloth and dry it well.
- It will dry faster with the blades and the trimmings box removed.
Notes
- Note the following precautions to avoid malfunction and damage.
- Do not use hot water or any detergents other than hand soap.
- Do not wipe with thinner, benzine, alcohol etc.
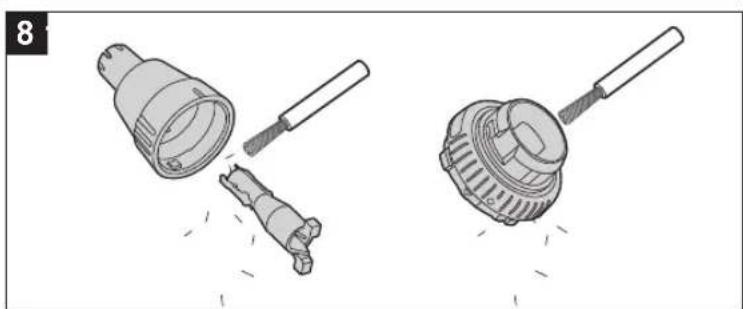
▶ With the cleaning brush (Fig. 8)
- Remove the head, blades and the trimming box.
- Brush off any hair trimmings from the head, blades and the trimming box.
- Be careful not to deform the inner blade.
- Be careful not to damage the filter.
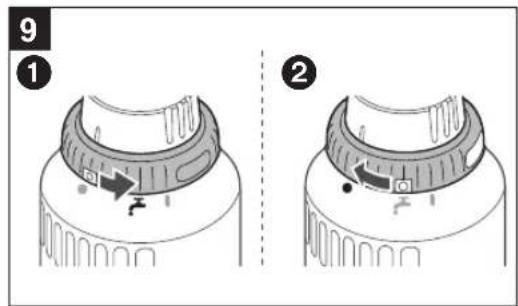
How to open and close the water inlet
▶ Open
Rotate the wash switch ring until its "○" mark aligns with the
“✗” mark of the head to open the water inlet. (Fig. 9-①)
▶ Close
Rotate the wash switch ring until its "○" mark aligns with the
“●” mark of head. (Fig. 9-②)
Removing and mounting the trimmings box
▶ Remove (Fig. 10-①)
Rotate the wash switch ring until its "○" mark aligns with the
“!”mark of the head.
▶ Mount (Fig. 10-②)
- Align the "○" mark of the trimmings box with the "☐" mark of the head.
- Be careful not to damage the filter with the shaft (©).
- Rotate the wash switch ring until its "○" mark aligns with the "●" mark of the head.
Removing and mounting the blade (Fig. 11)
▶ Outer blade
Remove
Rotate the outer blade in the direction of the arrow and remove the blade. (①)
Mount
Insert the head's shaft (①) into the hole of the inner blade. Rotate the outer blade to align its “☐” mark with the “●” mark of the head. (②)
▶ Inner blade
Remove
Pull to remove the inner blade.
Mount
Insert the inner blade straight into the outer blade.
Troubleshooting
Problem Action
| The cutting performance has reduced. | Replace the blade. |
| There is an odd odour. | Clean the inner blade. |
| Blade does not move/ rotate smoothly. | |
| The suction power is low. | Clean the trimmings box. |
| Close the water inlet. |
If the problems still cannot be solved, contact your dealer or a service centre authorized by Panasonic for repair.
Specifications
Airborne Acoustical Noise 62 (dB (A) re 1 pW)
This product is intended for household use only.
Panasonic
Betriebsanleitung
▶ Prévention des accidents
ER-CBL1 : 80 minutes
ER-CBN1 : 60 minutes
Ricarica rapida (solo ER-CBL1)
▶Monteren (Afb. 10-2)
ER-CBL1: 80 minutter
ER-CBN1: 60 minutter
For at fjerne let snavs For at fjer
ER-CBL1: 80 minutter
ER-CBN1: 60 minutter
▶ Mocowanie (Rys. 10-②)
Navanakorn Industrial Estate Zone 3 No.106 Moo 18 Khlong 1, Khlong Luang,
Pathum Thani, 12120, Thailand
YETKILI TEMSILCI
İthalatçı Firma:
Tesan İletişim A.Ş.
© Panasonic Corporation 2022
⑤ EN, DE, FR, IT, NL, SP, DA, PT, NB, SV, FI, PL, CZ, SK, HU, RO, TR
Printed in Thailand
ER921WCNT13011 F0422-0

- Panasonic
- Contents
- Safety precautions
- WARNING
- CAUTION
- Important information
- Parts identification (Fig. 1)
- Before use (Fig. 2)
- How to use
- Note
- Quick charge (ER-CBL1 only)
- Removing and mounting the head (Fig. 4)
- Trimming your nose hair and ear hair (Fig. 5)
- Outlining your eyebrows, moustache, or beard (Fig. 6)
- Maintenance
- How to clean
- ▶ With water
- To remove light dirt To remove heavy dirt
- e heavy dirt
- Notes
- ▶ With the cleaning brush (Fig. 8)
- How to open and close the water inlet
- ▶ Open
- ▶ Close
- Removing and mounting the trimmings box
- ▶ Remove (Fig. 10-①)
- ▶ Mount (Fig. 10-②)
- Removing and mounting the blade (Fig. 11)
- ▶ Outer blade
- Remove
- Mount
- ▶ Inner blade
- Troubleshooting
- Specifications
- Ricarica rapida (solo ER-CBL1)
- ▶Monteren (Afb. 10-2)
- For at fjerne let snavs For at fjer
- ▶ Mocowanie (Rys. 10-②)
Brand : PANASONIC
Model : ERCNT1
Category : Electric mower