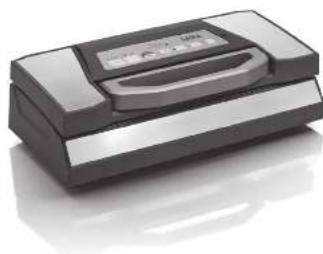
VT3225 - Vacuum Cleaner LAICA - Free user manual and instructions
Find the device manual for free VT3225 LAICA in PDF.
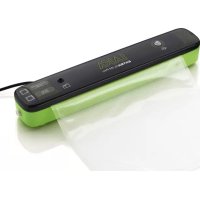
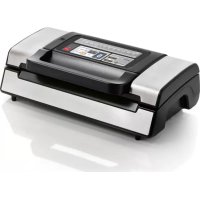
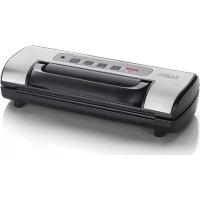
| Product type | Vacuum sealer |
| Brand | Laica |
| Model | VT3225 |
| Power supply | 220-240 V ~ 50 Hz |
| Power consumption | 120 W |
| Dimensions (approx.) | 40 x 15 x 10 cm |
| Weight (approx.) | 1.5 kg |
| Main functions | Vacuum, seal, quick marinate, partial vacuum |
| Adjustable suction power | Normal and Gentle |
| Adjustable seal time | 3 levels (1, 2, 3) |
| Compatible bag types | Vacuum bags and rolls |
| Included accessories | Tube for containers, removable drip tray |
| Sealing bar | Double |
| Indicator light | Cycle progress |
| Maintenance | Clean with a damp cloth; drip tray washable under running water |
| Safety | Thermal protection, automatic stop, do not immerse |
| Spare parts available | Gasket (AH033), tube for containers (AH039) |
| Warranty | 2 years |
| Usage | Household only |
| Certifications | CE, compliance with European standards |
Frequently Asked Questions - VT3225 LAICA
User questions about VT3225 LAICA
0 question about this device. Answer the ones you know or ask your own.
Ask a new question about this device
Download the instructions for your Vacuum Cleaner in PDF format for free! Find your manual VT3225 - LAICA and take your electronic device back in hand. On this page are published all the documents necessary for the use of your device. VT3225 by LAICA.
USER MANUAL VT3225 LAICA
The image is too blurry to recognize any text content.
m = 311
m = 311
MADCHIN
PER SOTICALS
H59-11/2019
LAICA®
LAICA S.p.A.
Vale del Lavoro, 10
36048 Barbarano Mossano (VI) - Italy
Tel. +39 0444.705314
Made in China
www.laica.it
LAICA®
natural_image
Exterior view of a modern office building (no signage)ISTRUZIONI E GARANZIA
VT3225
MACCHINA PER SOTTOVUOTO
pagina 4
Instructions and warranty page 10
VACUUM SEALER
Instrucciones y consentia
página 15
MÁQUINA PARA CONSERVAR AL VACÍO
Instruções o parentia
página 22
PT
MÁQUINA PARA VÁCUD
Anleihungen und Garanto. Seite 28
DE
ANALOGON CHG
VAKUMIERGERÖZ
— VAKUUMIERGERAT
FB Instructions et garan
MACHINE SOUS-VIDE
Дэгчес кал гушір
EL
ΜΗΥΑΝΙΗΜΑ ΚΕΝΟΥ ΑΕΡΟΣ
■ Industrial production
RO Instrucțuri și garantii
MAŞINA DE VIDAT
Navod a záruka shana 52
VAKUOVÁ BALIČKA POTRAVIN
■ Navzú a záruka
shang bíl
SK
STRO LREE VAKIUM
— SITROS PRE VAKOUM
HU Hasznalan üdésítások és garancia
Total 64
VAKUUMFOLIAZO GEP
Navodila in garancija stran 70
APARAT ZA VAKUUMSKO PAKIRANJE
■ Upute I amstvo stranica 78
VT3225 VT3225
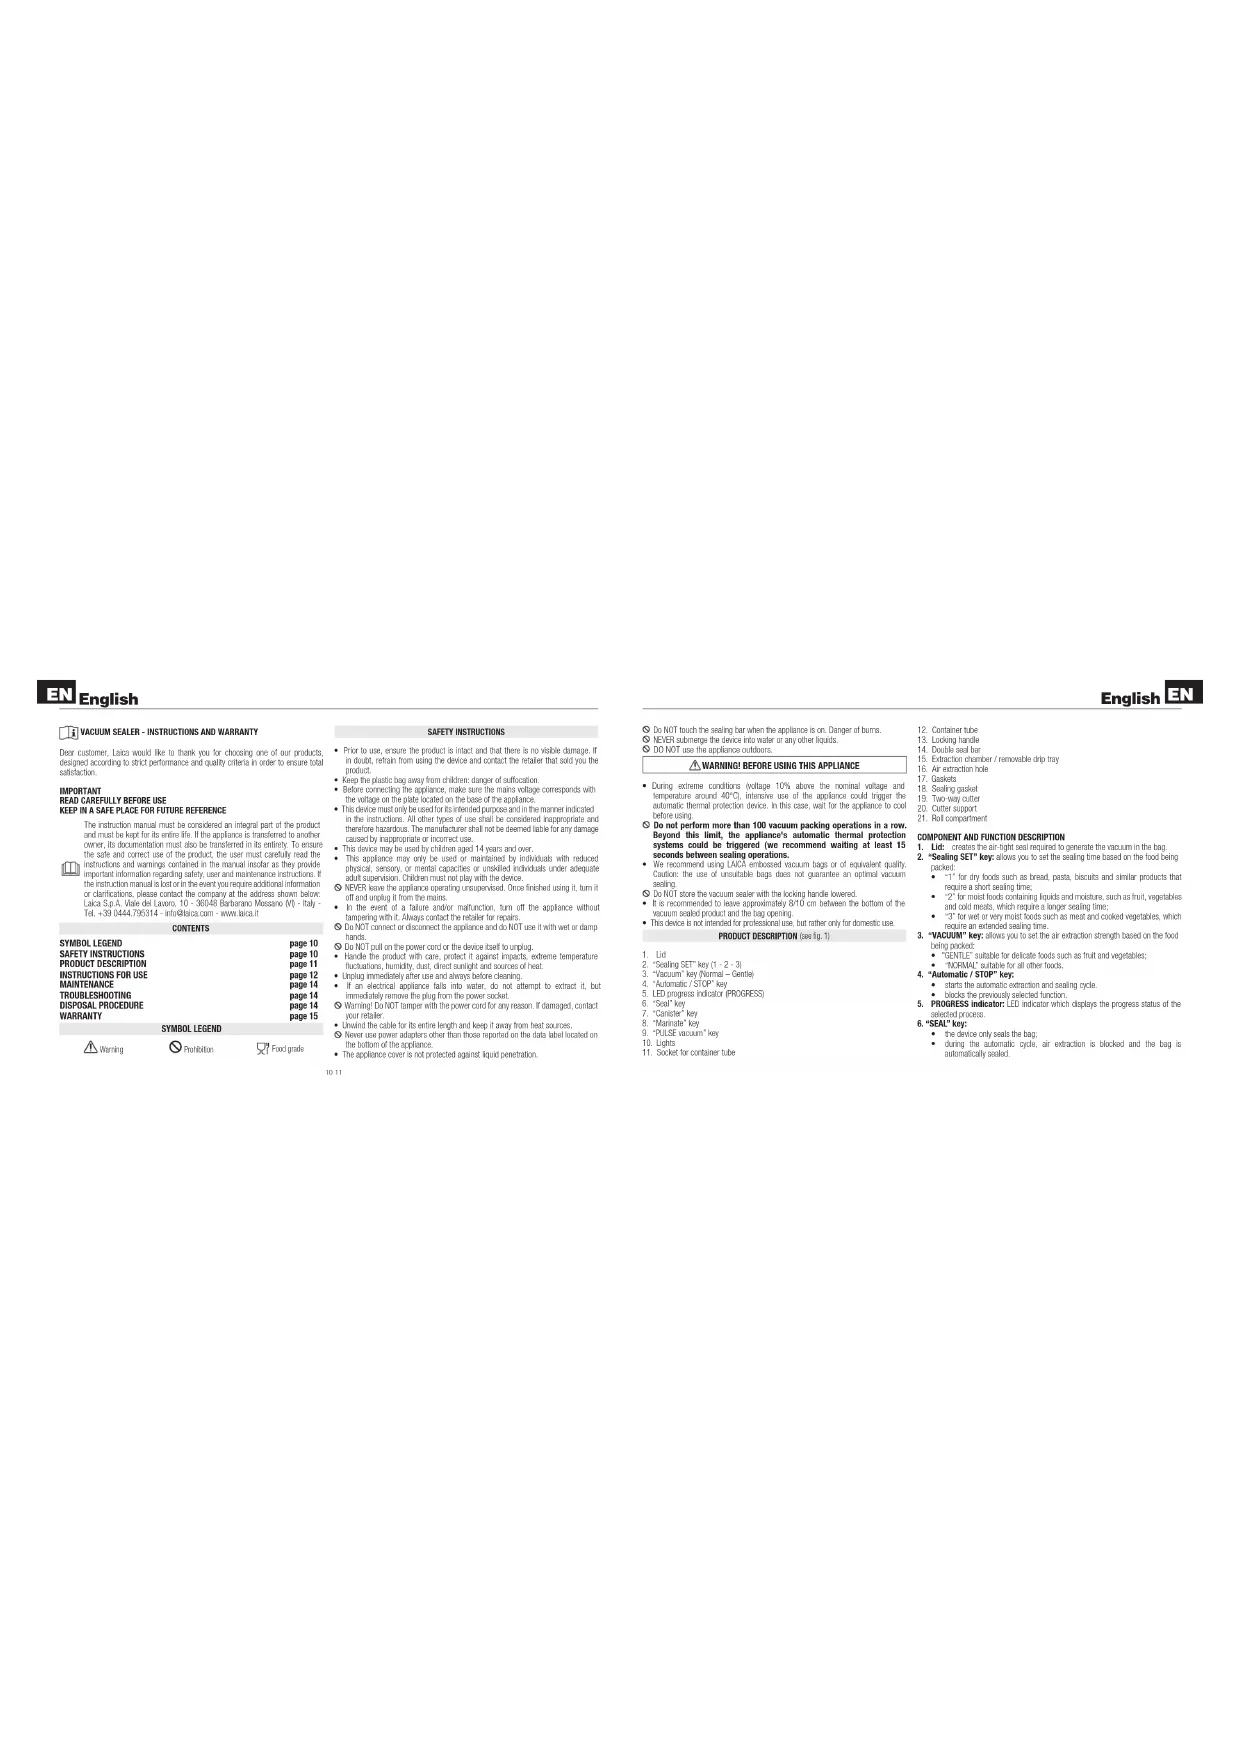
Fig. 1

text_image
10 5 11 LAICA View Off Display USB2 3 4 6 7 8 9
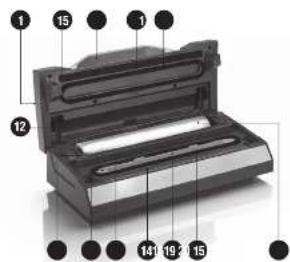
text_image
1 15 1 12 140 19 2 15Dear customer, Luca would like to thank you for choosing one of our products, designed according to strict performance and quality criteria in order to ensure total satisfaction.
IMPORTANT
READ CAREFULLY BEFORE USE
KEEP IN A SAFE PLACE FOR FUTURE REFERENCE
The instruction manual must be consistent an integral part of the product, and must be kept for its entire life. If the appliance is transferred to another owner, its documentation must also be transferred in its entirety. To ensure the sale and correct use of the product, the user must carefully read the instructions and warnings contained in the manual heater as they provide important information regarding safety, user and maintenance instructions. If the instruction manual is lost or in the event, you require additional information or clarifications, please contact the company at the address shown above. Labor S.p.A. Viale del Navco. 10 - 36548 Bartarano Massimo (K) - Italy - Tel.: +3 044 795314 info@labusa.com www.abusa.it
CONTENTS
| SYMBOL LEGEND | page 10 |
| SAFETY INSTRUCTIONS | page 10 |
| PRODUCT DESCRIPTION | page 11 |
| INSTRUCTIONS FOR USE | page 12 |
| MAINTENANCE | page 14 |
| TROUBLESHOOTING | page 14 |
| DISPOSAL PROCEDURE | page 14 |
| WARRANTY | page 15 |
Warning
YMBOL LEGEND
Prohibitor
Food grade
SAFETY INSTRUCTIONS
- Prior to use, ensure the product is intact and that there is no visible damage. If in doubt, retain from using the device and contact the retailer that sold you the product.
- Keep the plastic bag away from children: danger of suffocation.
- Before connecting the appliance, make sure the mains voltage corresponds with the voltage on the plate located or the base of the appliance.
- This device must only be used for its intended purpose and in the manner indicated in the instructions. All other types of use shall be considered inappropriate and therefore hazardous. The manufacturer shall not be deemed liable for any damage caused by inappropriate or incorrect use.
• This device may be used by children aged 14 years and over. - This appliance may only be used or maintained by individuals with reduced physical, sensory, or mental capaches or unskilled individuals under adequate adult supervision. Children must not play with the device.
MVR leave the appliance operating unsupervised. Once finished using r, turn it off and unplug it from the mains. - In the event of a failure and/or malfunction, turn off the appliance without tampering with it. Always conduct the retailer for repairs.
Do NOT correct or disconnect the appliance and do NOT use it with two, or lamp bands.
Do NOT pull on the power card or the device itself to unplug - Hands the product with cane, protect it agains, impacts, extreme temperature fluctuations, homogeneous dust levels, sunfield and sources of heat.
• Until it immediately after use and always before cleaning. - If an electrical appliance falls into water, do not attempt to extract it, but immediately remove the plug from the power socket.
Warning! Do NOT tamper with the power cord for any reason. If damaged, contact your reader.
• Unwind the cable for its entire length and keep it away from heat sources. - Never use power adapters other than those reported on the data label located on the bottom of the appliance.
• The appliance cover is not protected against liquid penetration.
12 11
© Co NOT touch the sealing bar when the appliance is on. Danger of burns
NEVER submerge the device into water or any other liquid.
DO NOT use the appliance outdoors.
WARNING! BEFORE USING THIS APPLIANCE
- During extreme conditions (voltage 10% above the nominal voltage and temperature around 40°C). Intensive use of the appliance could trigger the automatic thermal protection device. In this case, wait for the appliance to call before using.
Do not perform more than 100 vacuum packing operations in a row. Beyond this limit, the appliance's automatic thermal protection systems could be triggered (we recommend waiting at least 15 seconds between sealing operations. - We recommend using LNC4 embossed vacuum bags or of equivalent quality. Caution: the use of unsuitable bags does not guarantee an optimal vacuum scaling.
© Do NOT store the vacuum sealer with the locking handle lowered. - It is recommended to leave approximately 8/10 cm between the bottom of the vacuum seated products and the bag spacing.
• This code is not intended for professional use, but rather only for domestic use.
PRODUCT DESCRIPTION (SEE NO. 1)
- Ltd
- "Sealing SET" key (1 - 2 - 3)
- "vacuum" key normal - Geinej
- Automatic STOP key
- LED progress indicator (PROGRESS)
- "Seal"
- "Carister"
- "Marine"
- "FLS vacuum" key
- Lights
-
See set for container type
-
Container tube
-
Locking handle
-
Double sea bar
-
Extraction chamber / remprazole drip tray
-
Air ventral volume
-
Gaskup
-8. Seating market
-
Box-ray cuttle
-
This May Call
-
Del compartment
COMPONENT AND FUNCTION DESCRIPTION
-
Lid: cruise the air light and required to generate the vacuum in the bay.
-
"Sealing SET" key: allows you to set the sealing line based on the load using
packed
- "1" for dry foods such as bread, salsa, biscuits and similar products that require a short sealing time;
• "2" for moist foods containing liquids and moisture, such as fruit, vegetables
and can meats, which require a longer sealing time;
• "3" for wet or very moist foods such as meat and cooked vegetables, which
require an extended sealing time
- "VACUUM" key: allows you to set the air extraction strength based on the food
hang packed:
- "CB-TLE" suitape for delicate foods such as fruit and vegetables
• "NORMAL" suitable for all other foods
- "Automatic / STOP" key;
• starts the automatic extraction and sealing case.
- block the previously selected function.
- PROGRESS Indicator: LEO indicator which displays the progress status of the
selected pieces
- "SEAL" key:
• the device only seals the bag;
- during the automatic cycle, air extraction is blocked and the bag is automatically sealed.
EN English
English EN
- "Canister" key: starts the vacuum sealing cycle for the banisters (not supplied).
-
"MARINATE" key: pressing this key, starts the buck macrists eye.
-
PULSE vacuum" key"; starts the pulse vacuum process; air extraction is
started by pressing the key, which is then stopped. When it is released
-
Lights: For case the operations order way and the functions scheduled. 11.12 Tube socket for containers: to connect the machine to the containers using the tube supplied.
-
Locking handle; to look and release the lid order from the base of the machine.
- Double sealing bar: says the bags
15.16. Extraction chamber / removable and washable drip tray: area where the far open end of the bag is positioned to a low air extraction and the elimination of any excess fluids.
-
Gaskets: creates an optimal air light seal in the excision chamber to generate a vacuum in the bags.
-
Sealing gasket: ensures the bag adheres to the sealing bar.
- Two-way cutter: cuts the roll into bags of the required size.
TECHNICAL SPECIFICATIONS
- Voltage: AC 220-2439 50Hz
- Environmental operating conditions: +10°C +40°C relative humidity >65%
- Environmental storage conditions +10°C +50°C relative humidity ≤HH 85% - MAX bag width: 300 mm
The rvt supplied is 'or use with foodstuffs
INSTRUCTIONS FOR USE
PREPARATION
- Before each use, thoroughly clean the device as described in the "maintenance" paragraph.
- Place the device on a flat, rigid surface, leaving a sufficient obstacle-free space in front of the device in which to place the bags containing the food to be packed. - Check that the crp tray is inserted in ice slot.
- Plug the device into a power socket and check that the LED lights of the "Seating SET" and "Vacuum" keys run on.
- Insert the food to be packed evenly in the bag. Check that the bag is 9 cm longer than the food to be preserved.
• Lift held
You can select the air extraction strength and the sealing time based on the food being packed (see the "Function description" paragraph). The machine is automatically set to the "Seating Site - 1" and "Vacuum - Normal". To change the setting, lower the handle. Once the setting for air extraction strength and sealing time has been changed, it is stored and the device is unplugged from the power source.
USE WITH BAGS
-
Position the open end of the bag inside the vacuum chamber as shown in figure 2. Position the bag, which has only one embossed side, with the smooth side facing upwards. Make sure the sealing point, inside of the bag, is clean and free of any particle of food. The bag must be perfectly stretched and without any creases.
-
Lower the lid and secure it to the base of the machine by pressing the handle downwards, the first segment of the PROGRESS indicator lights up.
-
Press the "Automatic/STOP" key to start the automatic vacuum and sealing process. The segments of the PROGRESS indicator gradually light up. During the sealing phase, the light on the "Sea" key will come on.
-
Wall, and the LED lights of the "Seal" key and PROGRESS indicator turn off. Open the Id by filling the Handle.
5 Check that the bag is properly sealed and placed in the refrigerator, freezer or storeroom.
USE WITH ROLLS
Using the oil, it is possible to prepare bags of the desired length specific to the type of load being stored.
-
Lift the lid.
-
Determine the length of the bag by considering the length of the food being preserved and adding at least 6 cm.
-
Lower the outer support and cut the nut by sliding the cutter.
-
Position one of the two open ends of the bag on the sealing bar. With rolls that
have only one embossed side, position the smooth side facing upwards. 5. The box must not put on or from the vacuum chamber, i dinp tray or no the asset
-
This map is not a simple map to be used in the map that it is only one of the four seasons' seal.
-
Make sure that the bag is fully stretched out, clean and without any creases.
-
I want the fat and can go it in the frame of the clothes by ungrace the leads
-
Lower 0°C to 3°C isolate it to the Lase of this mode by clicking the filter diagrams; the first segment of the P-OGFLSS indicator lights up.
-
Press the "Seal" key to start sealing. When the light on the key goes out, the sealing has finished.
Seating has finished.
-
Check that the bank is properly sealed
-
Continue as described in the paragraph on "USE WITH BASIS".
PARTIAL VACUUM
Total air extraction using the automatic method ends to crush more delicate and fragile foods (such as strawberries, berries, breadstries, vegetables, etc.) in these cases. It is therefore possible to use the manual vacuum, interrupting air extraction when necessary.
- Position the bag and secure the lid of the machine as described in points 1 and 2 of the paragraph on "use with bags"
A vacuum can be manually generated in two ways:
a. Press the "AutomaticSTOP" key to start extracting the air. Keep a close eye on the extraction of the air from the bag and when you think it is ready, stop the vacuum process by pressing the "Sed" key.
b. Press the "PusselVacuum" key to extract the air, and when necessary stop the vacuum process by pressing the "Self" key.
- Lift the lid and check that the bag is properly sealed.
USE WITH CONTAINERS (not supplied)
Use the Laica containers codes V13304 and V13305.
Before using, make sure that the lid, container and container seal are completely clean and dry
-
Fill the container up to a maximum of 2 cm below the top edge.
-
Put the lid on and, for the VT3904 model only, turn the vent valve on the lid to the "SEAL" position.
-
Connect the container tube by inserting one of the two ends into the socket placed on the machine lid, and the other end into the socket placed on the container lid.
-
Hook the lid onto the base of the machine by lowering the locking handle.
-
Press the Canister' key to start the automatic an selection procedure: the indicator light on the key will come on. The segments of the PROGRESS indicator gradually light up. Wait until the ICC lights of the "Canister" key and PROGRESS indicator turn off.
-
Remove the tube from the container and the machine, place the container in the front, front or elevator.
"Quick marinate" function in container (not supplied)
This function reduces the amount of time required to manage food through 5 cycles, which alternate the suction and release of air inside the container.
: Fill the container and connect it to the machine as described above.
2 Set the machine vacuum power according to the food being narrated (see "Description of functions" section).
3: Hook the to onto the case of the machine by lowering the coding handle.
4) Press the "Maristate" key, the LED light of the key turns on, the first segment of the PROCESS indicator lights up and the first air extraction and release starts. The segments of the PROCESS indicator display the progress status of the maristating cycle. Wait until the LED light of the "Maristate" key turns off. The quick market process is complete.
- Lift the handle and remove the cube from the container and the machine.
- The machine can be stopped at any time by pressing the "Automatic/STOP" key. If the maintaining process needs to be repeated, the air will need to be released from the container before reconnecting it to the machine.
To vacuum pack liquids they should be pre-frozen. Put the liquid food in a suitable container, put it in the freezer for about 12-18 hours then remove it from the container and put it in the bag for vacuum packing. Remove the air and seal the bag as in section "instructions for use - use with bags" then put the bag in the freezer.
English
MAINTENANCE
- Wash hands thoroughly before cleaning the appliance.
- Before and after use, clean the appliance with a dry or slightly damp cloth, being careful to not let liquids penetrate inside.
- After each use, remove any infor load residue from the sealing bar using a soft cloth and being careful not to damage it. Clean the sealing bar only after it has cooled.
- After every use, remove the dry tray and wash it thoroughly under running water to remove any liquid residue. Make sure it is perfectly dry before putting it back in its slot.
- Never use chemicals or harsh products
- Store the appliance in a cool dry area. ○ Do not store the device with the locking handle lowered in order to prevent the deformation of the sealing gasket and gaskets.
Spare parts available
• gaskets and sealing gasket part no. A11038,
- container tube: AH069.
TROUBLESHOOTING
| Problem Possible cause Solution | ||
| The appliance is not working. | The appliance is not plugged it. | Plug the product into the electrical socket. |
| The thermoprotector was triggered. | Lut the appliance cool for at least 30 minutes and turn back on. | |
| The device does not create the complete vacuum in the bag. | The bag may be purchased. | Make sure the bag is intact or replace it. |
| The bag is not positioned correctly in the auction and liquid collection chamber. | Position the bag as described in section "the machine - use with hage". | |
| Problem Possible cause Solution | ||
| The device does not create the communicate vacuum in the bag. | The sealing bar could be discontinued. This happens when several seats are made consecutively and very quickly. | Wait a few minutes to allow the sealing bar to exit. Wait all least 15 seconds between seats. |
| The illuminated segments of the PROCESS indicator flash and the device case not work. | The sealing bar may be overhealed. This occurs often multiple seats are rapidly carried out one side for the other. | Wait a few minutes to allow the sealing bar to not touch. Use two more striking a 13 second interval between one seat and another. |
| The bag doesn't maintain its vacuum after sealing. | The bag may be punctured. | Make sure the bag is intact or replace it. |
| The edge of the bag is not perfectly clean. | Make sure there are no impurities using the seat such as crumble, grease, etc. Open the bag and dry open. | |
| The bag rolls are dead't seal properly. | The bag sealing area is dirty and not flat. | Make sure the mode of the bag is clean and the bag lies flat. |
DISPOSAL PROCEDURE
The symbol on the bottom of the device indicates the saturated selection of electric and electronic equipment (Dir. 2012/19/Eu-WEEE)
At the end of life of the device, do not dispose it as mixed solid municipal waste, but dispose it referring to a specific collection centre located in your area or returning it to the distributor, when buying a new device of the same type to be used with the same functions. If the appliance to be disposed of is less than
English
25 cm, it can be returned to a retail location that is over 400 m ^2 without having to purchase a new, similar device. This procedure of separated collection of electric and electronic devices is carried out, forecasting a European environmental policy arriving at safeguarding, protecting and improving environment quality, as well as avoiding potential effects on human health due to the presence of hazardous substances in such equipment or to an improper use of the same or of parts of the same. Cautious. The wrong disposal of electric and electronic equipment may involve sanctions.
This product is meant for domestic use.
The conformity certified by the CE-marking on the device, refers to the Directive 2014/030/Eu on electromagnetic compatibility and to the Directive 2014/035/Eu on electric material destined to be used within given range limits. This product is an electronic device that was tested to assure, according to the current technical knowledge, that it does not interfere with other nearby located equipment (electromagnetic compatibility) and that it is safe if used according to the advice given in the instructions for use.
In case of operation anomalies, do not seek using the device and if necessary, refer to the manufacturer directly.
WARRANTY
This equipment is covered by a 2-year warranty starting from the purchase rate, which has to be proven by means of the stamp or signature of the dealer and by the fiscal payment receipt that shall be kept enclosed to this document.
This warranty period complies with the laws in force and applies only in case the consumer is an individual. Laica produces are designed for domestic use only; therefore, their use for commercial purposes is forbidden.
The warranty covers only production defects and does not apply, if the damage is caused by accidental oversus, misuse negligence or improper use of the product. Use the supplied accessories only: the use of other accessories invalue the warranty cover. Do not open the equipment for any reason whatsoever; the opening or the tampering at the equipment, definitely revalue the warranty.
Warranty does not apply to parts subject to tear and wear along the use, as well as to batteries, when they are induced.
Warranty desays after 2 years from the purchase date. In this case, technical service interventions will be carried out against payment. Information on technical service interventions, under warranty terms or against payment, may be requested by writing at info@aika.com. Repair or replacement of products covered by the warranty terms are free of charge. In case of faults, refer to the dealer; DO NOT send anything directly to LAICA.
At interwirions covered by warranty including product replacement or the replacement of any of its parts shall not be meant to extend the duration of the original warranty period of the replaced product.
The manufacturer cannot be made liable for any damages that may be caused, clearly or indirectly to people, things and parts resulting from the incbeservice of the provisions contained in the suitable user manual, especially with reference to the instructions related to installation, use and maintenance of the equipment.
Being constantly involved in improving its own products, Laica reserves the right to modify its product, locally or partially, with reference to any production need, without that this involves any responsibility whatsoever by Laica or its dealers.
Español
Español ES

MÁQUINA PARA CONSERVAR AL VACÍO - INSTRUCCIONES Y GARANTÍA
PROBLEMAS E SOLUÇÕES
Lauresebocicaceae +107°C, EPC relative to the contact -95%
• Laijs 3 geni, Cnol, H10 CnK Mauralis Ruite gla Fcrtal, 279 mm
- 1.1
in Tasy, Sear, brasilicus
1900-09: Kehanlakum, 1900-1914. The first step of the process is to be completed by the following procedure:
- Ducturing linearizing curves with respect to the vertical axis, where the curve is a
- To sell, this is required at this time, which is likely to be a result
• character of interest:
scient and increment process at sec
Segment (1) 11062501 + 10011301 is broken, 24.8 million cycles, 1 billion cycles
In Repulsion, LE TAT DEI M.
© VHN (2017) 10. 04. 2017
3.1. Вели, 2017, 10:00
THE PIELKSHEN "Sealoo SET" KOI "Yasniln" OZARVAU.
An 4.5% of the project has been established in the research and development of the 2018-2020 period, which is a major role in the development of the research and development of the 2018-2020 period. The research and development of the 2018-2020 period was an important role in the research and development of the 2018-2020 period.
11.12.1.10.12.13.14.15.16.17.18.19.20.21.22.23.24.25.26.27.28.29.30.31.32.33.34.35.36.37.38.39.40.41.42.43.44.45.46.47.48.49.50.51.52.53.54.55.56.57.58.59.60.61.62.63.64.65.66.67.68.69.70.71.72.73.74.75.76.77.78.79.80.81.82.83.84.85.86.87.88.89.90.91.92.93.94.95.96.97.98.99.100
- Ručka za blokiranje: za postavljanje i odvajanje poklopca na.
osnovu stroja
5.1.2.3.4.5.6.7.8.9.10.11.12.13.14.15.16.17.18.19.20.21.22.23.24.25.26.27.28.29.30.31.32.33.34.35.36.37.38.39.40.41.42.43.44.45.46.47.48.49.50.51.52.53.54.55.56.57.58.59.60.61.62.63.64.65.66.67.68.69.70.71.72.73.74.75.76.77.78.79.80.81.82.83.84.85.86.87.88.89.90.91.92.93.94.95.96.97.98.99.100
DJELOMICNI VAKUUM
p. 100% of the total, p. 100% of the total, p. 100% of the total, p.
'SeeI'
b. Prifisnite tipku "Pulse/Vacuum" za usls zraka i kacia smatrate
prikladnim blokiralte proces vakuumirania pritiskom na tipku
"Seal".