
CSW9619ENGBW - Refrigerator HAIER - Free user manual and instructions
Find the device manual for free CSW9619ENGBW HAIER in PDF.
| Product Type | Fridge-freezer (wine cellar with freezer compartment) |
| Brand | Haier |
| Model | CSW9619ENGBW |
| Energy efficiency class | E (scale from A to G) |
| Annual energy consumption | 246 kWh/year |
| Total volume | 352 L |
| Wine cellar volume | 215 L |
| Freezer volume | 137 L (4 stars) |
| Freezing capacity | 9 kg/24 h |
| Ambient temperature range | 10 °C to 43 °C (SN-N-ST-T classes) |
| Noise level | 35 dB(A) - Class B |
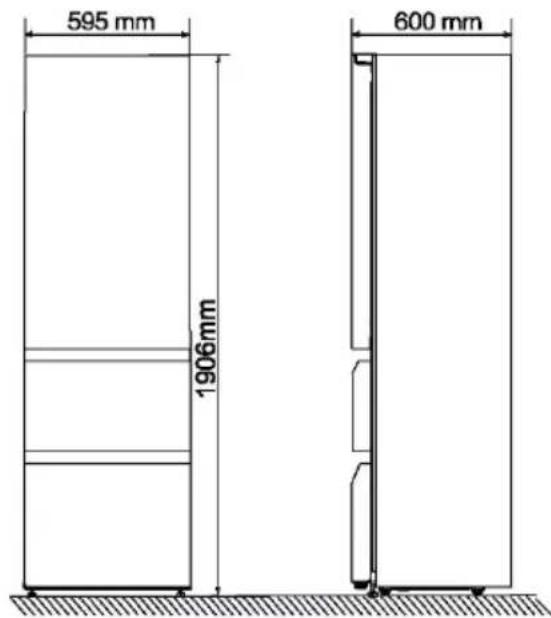
| Dimensions (H × W × D) | 1906 × 595 × 600 mm |
| Electrical supply | 220‑240 V ~ / 50 Hz |
| Refrigerant | R600a (isobutane, flammable) |
| Defrost | Automatic |
| Touch screen | Yes, with automatic lock |
| Connectivity | Wi-Fi 2.4 GHz via hOn app |
| Smart functions | Wine preservation, Smart Wine Search, decanting, super freeze |
| Alarms | Open door, operation anomalies |
| Supplied accessories | Quick guide, warranty card, safety manual, hole plug |
Frequently Asked Questions - CSW9619ENGBW HAIER
User questions about CSW9619ENGBW HAIER
0 question about this device. Answer the ones you know or ask your own.
Ask a new question about this device
Download the instructions for your Refrigerator in PDF format for free! Find your manual CSW9619ENGBW - HAIER and take your electronic device back in hand. On this page are published all the documents necessary for the use of your device. CSW9619ENGBW by HAIER.
USER MANUAL CSW9619ENGBW HAIER
WARNING: Risk of fire/flammable material
EN
The symbol indicates there is a risk of fire since flammable materials are used. Take care to avoid causing a fire by ingiting flammable material.
CnmbolbT NOKa3Ba, Ye CbIeCTByBa ONaCHOCT OT NOJap, TbN KaTO Ce N3NoJ3BaT 3aNaIMMaTePnAIn. BnImBaIte Da He npedn3BnKaTe NOJap Upe3 NoDnA1BaHe Ha 3aNaIMMaTePnAIn.
Thank you for purchasing a Haier Product.
Please read these instructions carefully before using this appliance. The instructions contain important information which will help you get the best out of the appliance and ensure safe and proper installation, use and maintenance.
Keep this manual in a convenient place so you can always refer to it for the safe and proper use of the appliance.
If you sell the appliance, give it away, or leave it behind when you move house, make sure you also pass this manual so that the new owner can become familiar with the appliance and safety warnings.
Accessories
Check the accessories and literature in accordance with this list:

Hole plug
Quik Guide
Energy lable

Warranty card

Safety Warning Manual
5 Safety information
10 Intended use
11 Product description
12 Use
22 Equipment
24 Energy saving tips
25 Care and cleaning
26 Troubleshooting
29 Installation
31 Technical data
33 Customer service
Before first use 6
Installation 6
Daily use 7
Refrigerant gas information 9
Before first use 12
Touch screen 12
First time power on setting 12
Connect with phone 13
Automatically locking function 14
Description for control panel 14
Wine Storage Zone function 14
Decanting Zone function 15
Freezer function 15
Smart Wine Storage 15
Smart Wine Search function 16
Decanting 17
System Settings 17
Open Door Alarm 19
Abnormal alarms 19
Power off memory 19
Wi-Fi information 20

WARNING-Important Safety Information

NOTICE- General information and tips

Environmental information
Disposal
Help protect the environment and human health. Put the packaging in applicable containers to recycle it. Help to recycle waste of electrical and electronic appliances. Do not dispose appliances marked with this symbol with the household waste. Return the product to your local recycling facility or contact your municipal office.

WARNING!
Risk of injury or suffocation!
Refrigerants and gases must be disposed of professionally. Ensure that the tubing of the refrigerant circuit is not damaged before being properly disposed of Disconnect the appliance from the mains supply. Cut off the mains cable and dispose of it. Remove the trays and drawers as well as the door catch and seals, to prevent children and pets to get closed in the appliance.
The fridge compartment of this appliance is to be used for the storage of wine. Before switching on the appliance for the first time read the following safety hints!

WARNING!
Before first use
Make sure there is no transport damage.
~ Remove all packaging and keep out of children's reach.
- Wait at least two hours before installing the appliance in order to ensure the refrigerant circuit is fully efficient.
~ Handle the appliance always with at least two persons because it is heavy.
Installation
The appliance should be placed in a well-ventilated place. Ensure a space of at least 9 cm above and 4mm round the appliance.
- Never place the appliance in a damp area or location where it might be splashed with water. Clean and dry water splashes and stains with a soft clean cloth.
- Do not install the appliance in direct sunlight or in the near of heat sources (e.g. stoves, heaters).
- Install and level the appliance in an area suitable for its size and use.
- Keep ventilation openings in the appliance or in the in-built structure clear of obstruction.
- Make sure that the electrical information on the rating plate agrees with the power supply. If it does not, contact an electrician.
- The appliance is operated by a 220-240 VAC/50 Hz power supply. Abnormal voltage fluctuation may cause the appliance to fail to start, or damage to the temperature control or compressor, or there may be an abnormal noise when operating. In such case, an automatic regulator shall be mounted.
Do not use multi-plug adapters and extension cables. - Do not locate multiple portable socket-outlets or portable power supplies at the rear of the appliance.
~ Ensure that the power cable is not trapped by the refrigerator-freezer,do not step on the power cable.

WARNING!
Use a separate earthed socket for the power supply which is easy accessible. The appliance must be earthed. Only for UK: The appliance's power cable is fitted with 3-cord (grounding) plug that fits a standard 3-socket. Never cut off or dismount the third pin (grounding). After the appliance is installed, the plug should be accessible.
Do not damage the refrigerant circuit.
Daily use
This appliance can be used by children aged from 8 years and above and persons with reduced physical, sensory or mental capabilities or lack of experience and knowledge if they have been given supervision or instruction concerning use of the appliance in a safe way and understand the hazards involved.
Children aged from 3 to 8 years are allowed to load and unload, but not allowed to clean or install the refrigerating appliances.
- Keep away children under 3 years of age from the appliance unless they are constantly supervised.
Children shall not play with the appliance.
If cool gas or other inflammable gas is leaking in the vicinity of the appliance, turn off the valve of the leaking gas, open the doors and windows and do not unplug a plug in the power cable of the refrigerator or any other appliance.
Notice that the appliance is set for operation at a specific ambient range between 10 and 43^ C . The appliance may not work properly if it is left for a long period at a temperature above or below the indicated range.
- Do not place unstable articles (heavy objects, c ontainers with on top of the refrigerator-freezer,to ovoid personal injury caused by falling or electricshock caused by contact with water.
Do not pull on the door. The door may be pulled slant, the bottle rack, may be pulled away, or the appliance may topple.
- Open and close the doors only with the handles. The gap between the door s and between the doors and the cabinet is very narrow. Do not extend your hands in these areas to av oid pinching yous. fopen or close the refrig- - erator-freezer or doors only when there are no children standing within the the range of door m ovement.
~ Do not store inflammable, xplosive or osive materials in the appliance or in the vicinity.
~ Do not store medicines, bacteria or chemical agents in the appliance. This happens a household appliance. It is n ommended materials that require strict temperatures.
~ Never store liquids in bottles or cans (besides high percentage spirits) especially carbonated beverages in the fre , as these will but during freezing.
Check the ondition of food if a warming in the fre zer has taken place.
Do not set unnecessarily! wtempe a ure in the refrige a compartment. Minus tempera ure s may occur at high set ting. Attention: Bottles can burst
Do not touch frozen goods with wet hands (wear gloves). Especially do not eat ice lollies immediately after removal from the freezer compartment. There is the risk to freeze or the formation of frost blisters. FIRST aid: keep immediately under running cold water. Do not pull away!
~ Do not touch the inside surface of the freezer storage compartment when in operation, especially with wet hands, as your hands may freeze onto the surface.
~ Unplug the appliance in the event of a power interruption or before cleaning. Allow at least 7 minutes before restarting the appliance, as frequent starting may damage the compressor.
Do not use electrical devices inside the food storage compartments of the appliance, unless they are of the type recommended by the manufacturer. Maintenance / cleaning
~ Make sure children are supervised if they carry out cleaning and maintenance.

WARNING!
~ Hold the plug, not the cable, when unplugging the appliance.
- Do not clean the appliance with hard brushes, wire brushes, detergent powder, petrol, amyl acetate, acetone and similar organic solutions, acid or alkaline solutions. Please clean with special refrigerator detergent to avoid damage.
Do not scrape off frost and ice with sharp objects. Do not use sprays, electric heaters like heater, hair dryer, steam cleaners or other sources of heat in order to avoid damage to the plastic parts.
- Do not use mechanical devices or other means to accelerate the defrosting process, other than those recommended by the manufacturer.
If the supply cord is damaged, it must be replaced by the manufacturer, its service agent or similarly qualified persons in order to avoid a hazard.
Do not try to repair, disassemble or modify the appliance by yourself In case of repair please contact our customer service.
Eliminate the dust on the back of the unit at least once in the year to avoid hazard by fire, as well as increased energy consumption.
Do not spray or flush the appliance during cleaning.
Do not use water spray or steam to clean the appliance.
Do not clean the cold glass shelves with hot water. Sudden temperature change may cause the glass to break.
Refrigerant gas information

WARNING!
The appliance contains the flammable refrigerant ISOBUTANE (R600a). Make sure the refrigerant circuit is not damaged during transportation or installation. Leaking refrigerant may cause eye injuries or ignite. If a damage has occurred, keep away open fire sources, thoroughly ventilate the room, do not plug or unplug the power cords of the appliance or any other appliance. Inform the customer service. In case of eyes get into contact with the refrigerant, rinse immediately it under running water and call immediately the eye specialist.
Intended use
This appliance is intended for Storing wine and freezing food. It has been designed exclusively for use in household and similar applications such as staff kitchen areas in shops, offices and other working environments; farm houses and by clients in hotels, motels and other residential type environments as well as in bed-and-breakfast and cateringbusiness. It is not intended for commercial or industrial use. Changes or modifications to the device are not allowed. Unintended use may cause hazards and loss of warranty claims.
Product description
EN

Notice
Due to technical changes and different models, some of the illustrations in this manual may differ from your model.
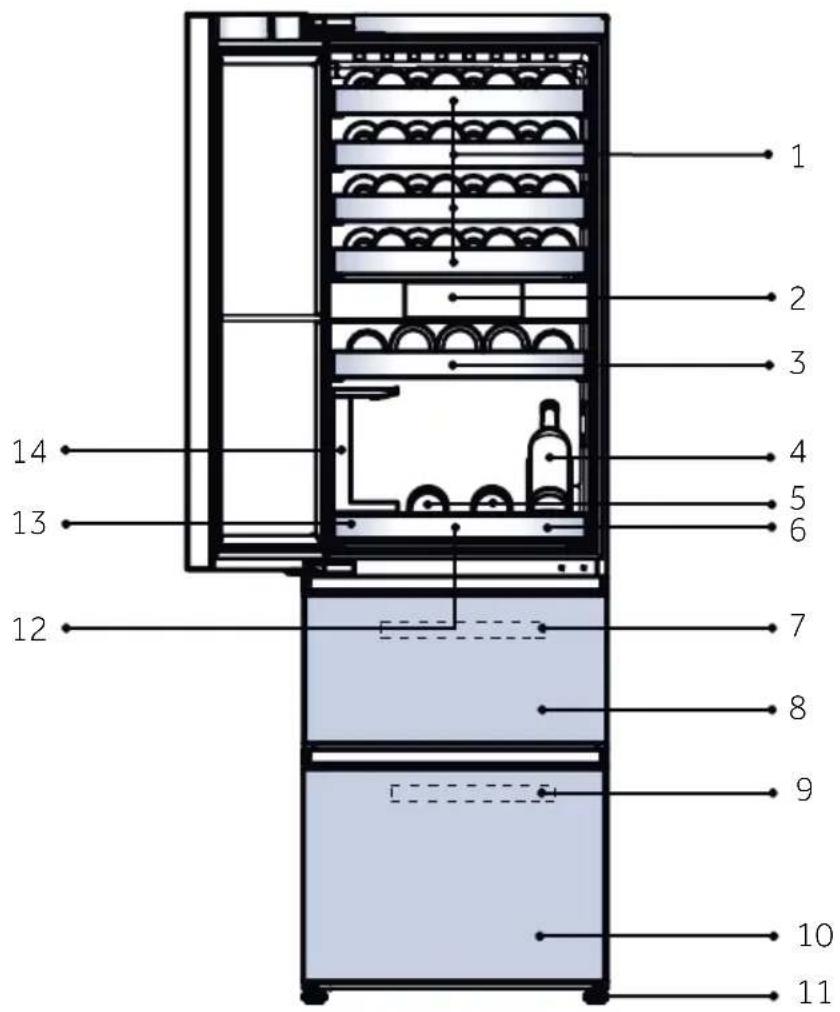
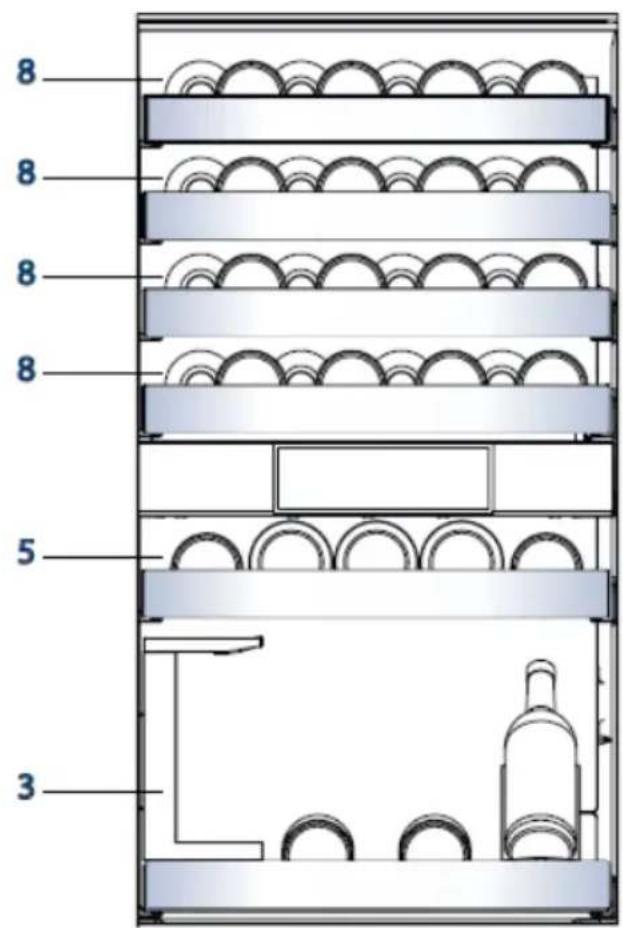
Picture of appliance
-
Large wine rack
-
Upper freezer storage drawer
-
Display
-
Freezer Tray
-
Small wine rack
-
Lower freezer storage drawer
-
Display Wine Holder
-
Adjustable feet
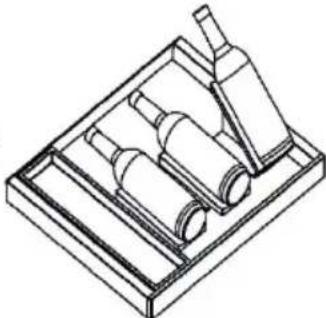
5.Wine serving wooden tray
-
Shock-absorbing pad for serving tray
-
Wine Serving Tray
-
Storage box
7.Freezer Tray
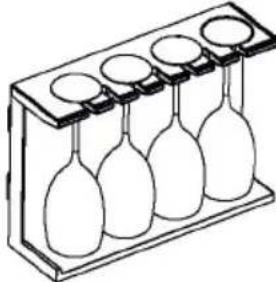
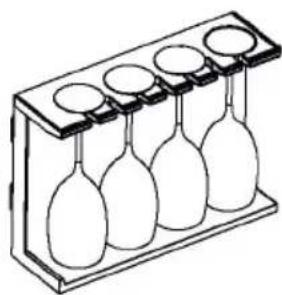
- Wine glass holder
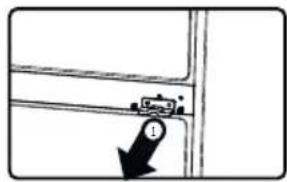
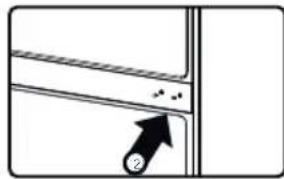
Remove the door supporter of the refrigerator-freezer
-
Remove the door body supporter after removing the door body fixing screws.
-
Remove the screw plug from the gift bag and install it to the screw hole.
1.Before first use
- Remove all packaging materials. This includes the foam base and all adhesive tape holding the wine cellar accessories inside and outside. Keep them out of children's reach and dispose them in an environmentally friendly manner.
Clean the inside and outside of the appliance with water and a mild detergent before putting any wine in it.
After the appliance has been levelled and cleaned, wait for at least 2 hours before connecting it to the power supply. If your refrigerator-freezer has been tilted for any reason, wait 24 hours before plugging it in. See section INSTALLATION.
~ Once you have plugged the unit into an electrical outlet, let the unit run for at least 30 minutes to acclimatize itself before making any adjustments.
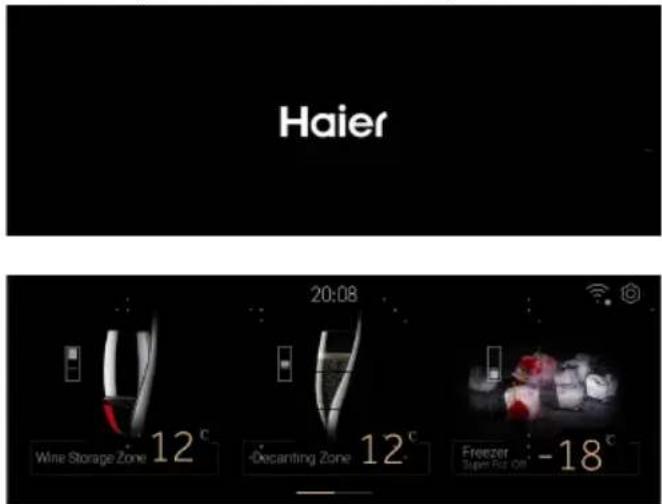
2. Touch screen
The display screen supports touch operation, which respond when lightly touched with the finger.
3. First power on setting
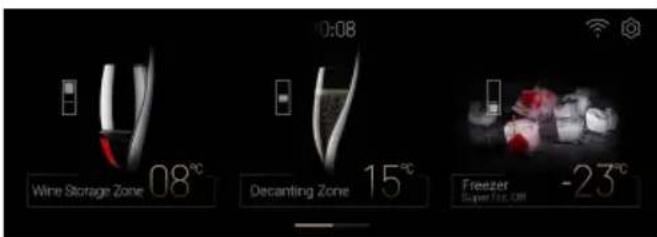
- When the product is powered on the first time, the display screen will automatically turn on. After entering the main interface, the wine storage zone is set to 12^ C by default, the decanting zone is set to 12^ C by default, the freezing area is set to -18^ C by default, and the Super Frz is turned off by default.
4..Connectwiththploone
Touch the "Setting"icon at the top right of the home page enter the system settings interface.
~ Touch [Network connection], and scan the QR code to download the hOn App and register to log in.
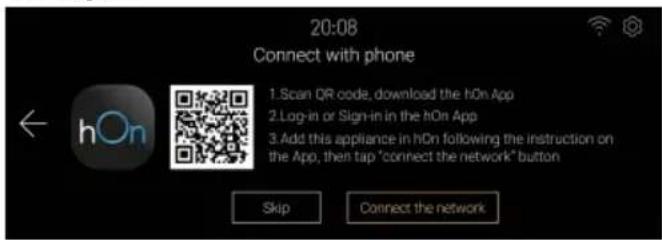
~ After setting the mobile App, touch the [Connect the network] button to enter the network configuration mode. Follow the instructions on the interface to use the hOn App to complete the device binding.


Notice
~ If you failed to connect the network after entering the network configuration mode, the mode will exit after a period of time, to continue connecting to the network, you need to re-enter the network configuration mode.
After the hOn App is connected successful, the device prompts that the network connection is successful. Click [Complete] to enter the home page.

5. Automatically locking function
With no operation in one minute and the human sensor detects that the user leaves after one minute, the display screen will turn off. And the display screen enters the lock screen interface when the human sensor function is triggered or the door is opened.
- The wine information is displayed according to the display setting of the system setting interface.
Swipe the screen to the left to unlock.

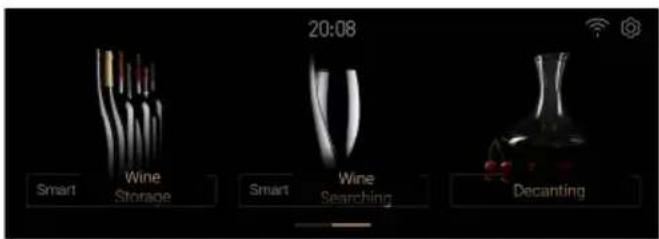
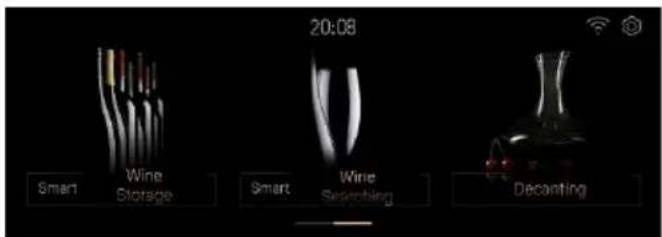
6.Description for control panel
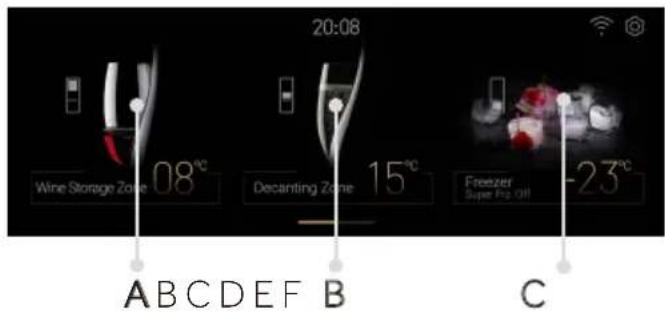
A Wine Storage Zone selector
B Decanting Zone selector
C Freezer/ Super Frz. On selector
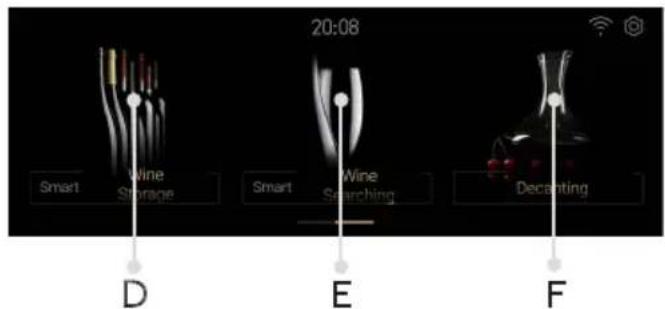
D Smart Wine Storage selector
E Smart Wine Searching selector
F Decanting selector
7.Wine Storage Zomeffunction
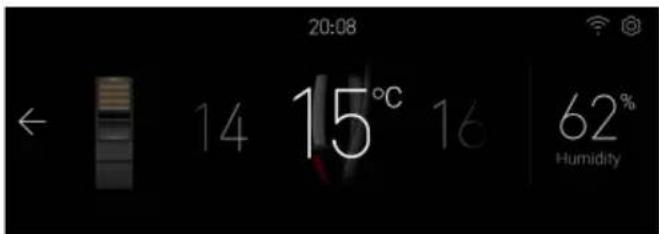
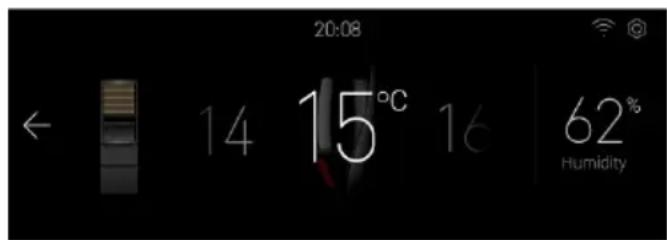
~ Touch the"A" enter the temperature adjustment interface of wine storage area.
~ Slide left and right in the temperature area to adjust the setting of wine storage area between 8~18 C, every slide, adjust 1 C, and the buzzer rings once.
~ The humidity display can not be adjust and indicate the humidity value in the wine storage zone.
8. Decanting Zone function
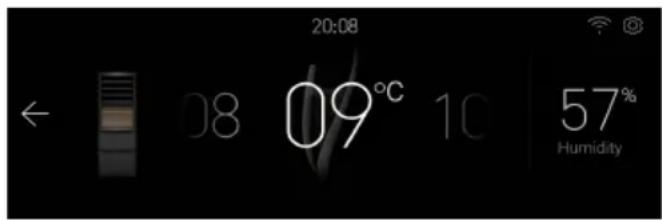
~ Touch"B"on the home page to enter the Sommelier temperature adjustment interface. Slide left or right in the temperature area to adjust the setting of the decanting zone between 8~18 C, every time you slide, adjust1 C, and the buzzer rings once.
~ The humidity display can not be adjust and indicate the humidity value in the decanting zone.
9. Freezer function
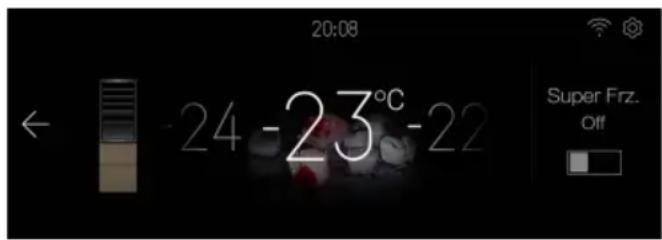
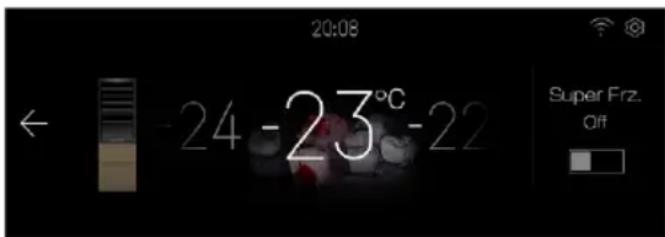
~ Touch "C"on the home page to enter the freezer zone temperature adjustment interface.
- When the Super Frz function is off, slide left and right in the temperature area to adjust the freezer zone setting gear between -14~24 C, every time you slide, adjust 1 C, the buzzer will ring once.
- Click the Super Frz icon to set the Super Frz function on / off .When the Super Frz is on, the temperature of the freezer compartment can not be adjusted.
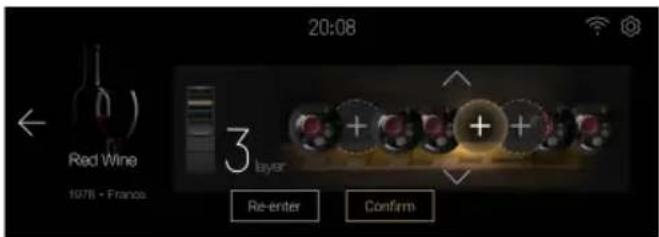
10. Smart Wine Storage
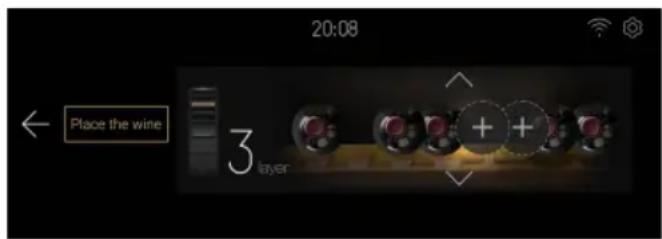
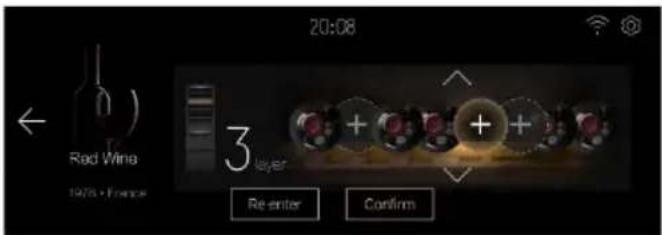
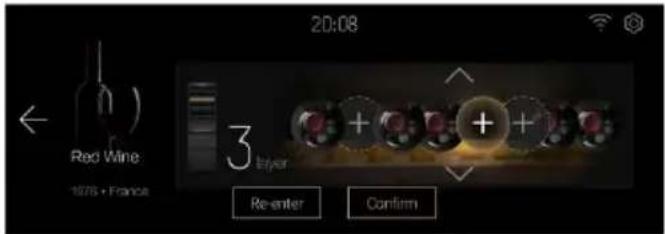
Touch "D" on the home page to enter the smart wine storage interface, where you can add wine, deposit wine, replace wine, delete wine and move wine.
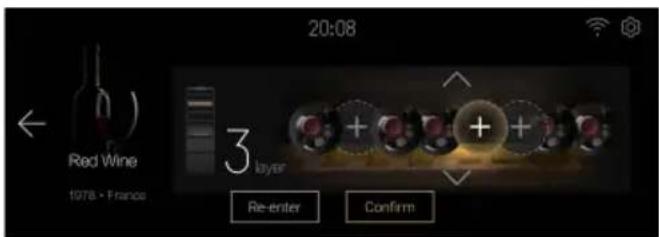
~ Touch [Place the Wine] to enter the interface of adding wine.
~ Touch the arrow to adjust the number of layers, click the "+" sign area(empty, no wine stored), select the location left and right, the area will be highlighted, and at the same time, the internal lighting of the wine cabinet will go out, and the selected position indicator is highlighted(the system setting"display setting" [Wine display location indicator] will be set to on state).
Click confirm, enter the wine information, and complete the wine storage.
For other operations, please refer to the on-screen instructions
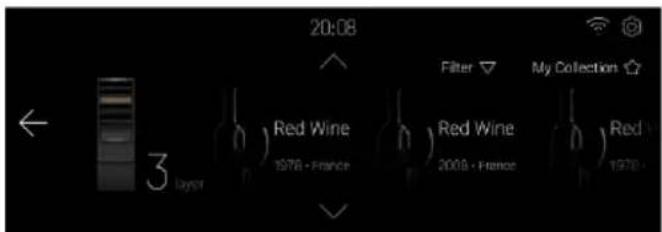
11. Smart Wine Searching function
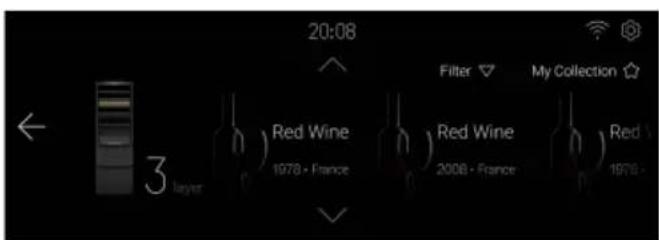
~ Touch "E" on the homepage to enter the Smart Wine searching interface: Conditional Filtering Wine Finder, Favorite Wine Finder, Favorite Deletion, Favorite Addition
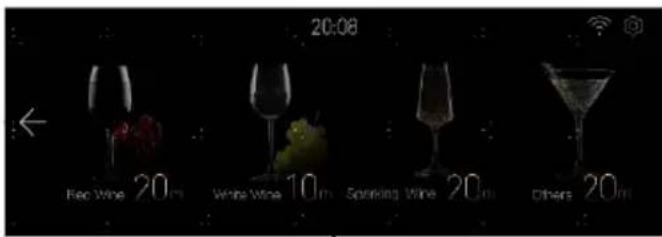
12.Decanting
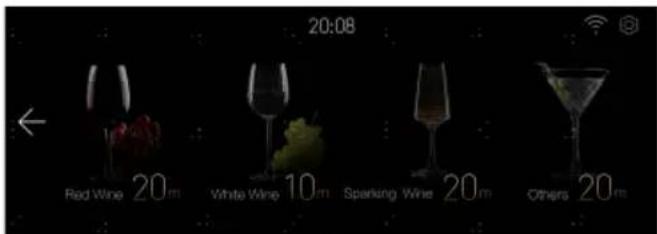
Touch "F "on the homepage to enter the wine selection interfacte.
- Click on the wine area to select the type, and then jump to the interface of this kind of wine decanting. While choosing "Others," the decanting time can be set by the user, and you can choose to start timing, pause, continue, and cancel timing. After the countdown is finished, the refrigerator will make abeep when the sobriety is completed, and the user will click [OK] to close thebeep.
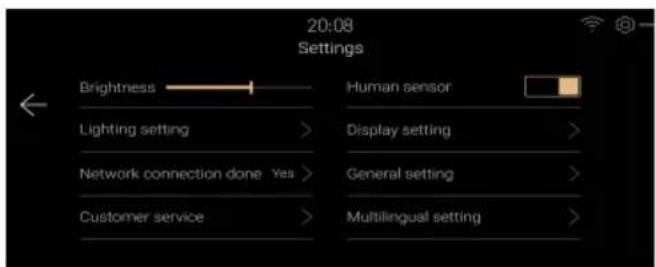
13. System Settings
Touch the setting icon at the top right of the home page to enter the setting page.
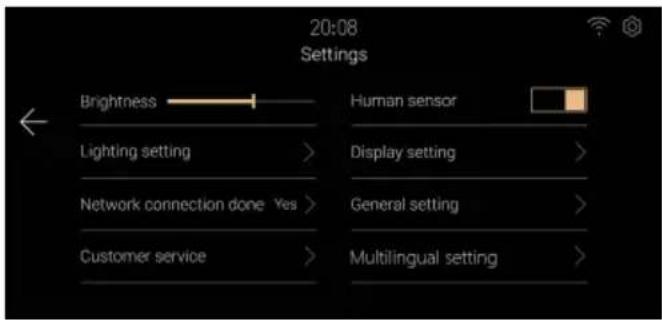
~ Brightness Settings
Drag or click the brightness bar to adjust the display brightness.
Human Sensor Settings
Click the [Human Sensor] button to set the refrigerator-freezer human sensor on or off.
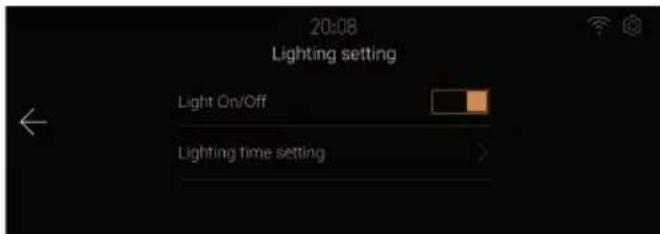
- Lighting Settings
Click [Lighting Setting] to enter the lighting setting interface
①[Light on/off], can set the refrigerator-freezer light function on or off.
② [Lighting time setting], you can set the lighting duration after closing the door, the default is 30s. the setting range is from 00 minutes 00 seconds to 59 minutes 59 seconds.
Display Settings
Click [Display Setting] to enter the display setting interface.
① Wine information display switch setting, you can set the wine information display function on or off in the refrigerator lock screen interface.
② Wine location indicator switch setting, can set the wine location indicator function on or off when storing or looking for wine.
General Settings
Click [General Settings] to enter the setting interface.
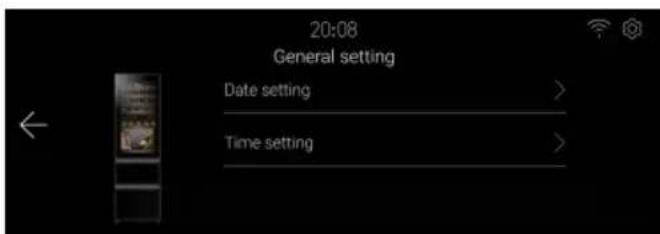
① Click [Date Setting] to enter the date setting interface, and you can set the date.
② Click [Time Setting] to enter the time setting interface and set the time.
Customer Service
Click [Customer service] to enter the customer service interface, prompting that the user's local customer service can be contacted through the mobile hOn App.

14. Open Door Alarm
If the door of the wine storage compartment remains open for more than 1 minutes, the refrigerator-freezer will emit an alarm sound to alert the user. The alarm will be canceled when the door is closed.
15.Abnormal alarms
~ When the temperature of the wine sensor is lower than 0^ , a pop-up window will prompt that the device may malfunction, in order to prevent damage to the wine, please turn off the power as soon as possible and contact customer service.
~ When the device pop-up window prompts "fan", "damper", "valve", or "communication fault", the device may malfunction, please inform the customer service for on-site inspection.
- When the door is opened for a long time, the screen prompts that the door switch fault is normal. If the door is always closed, the door may be out of order.
16. Power off memory
The instantaneous working status of power failure is memorized, and it still works according to the set gear before power failure after re-powering.
17. Wi-Fi Information
This product is not intended for commercial use.
Transmitter maximum output power: 2.4GHz Wi-Fi:15.64dBm
Bluetooth LE: 4.88dBm; Bluetooth BR/EDR): 9.60dBm.
Transmitter Working frequency: 2400MHz-24833.5MHz
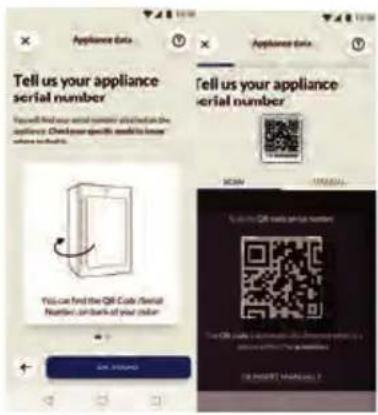
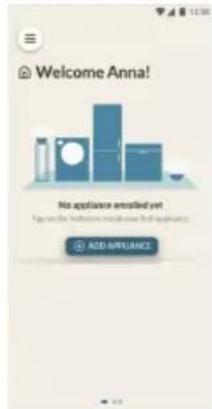
~ IN APP PAIRING PROCEDURE
Step 1
Download the hon App on the stores


Available on the
App Store

GETITON
Google Play

EXPLORE IT ON
AppGallery
Step 2
- Log in or sign up

Step 3
Add a new appliance selecting the wine cellar from the list

4Step
- Scan the QR or insert manually the serial number

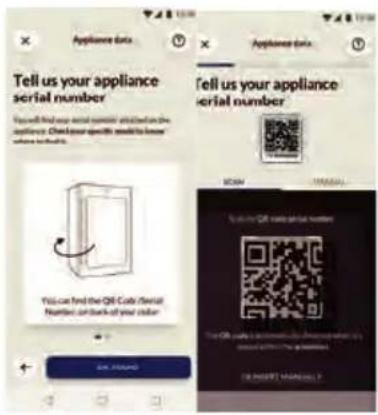
Step 5
Refer to the "Connect to network" chapter to operate the screen and set Wi-Fi into configuration mode, Follow the instructions on the App to complete the remaining steps.

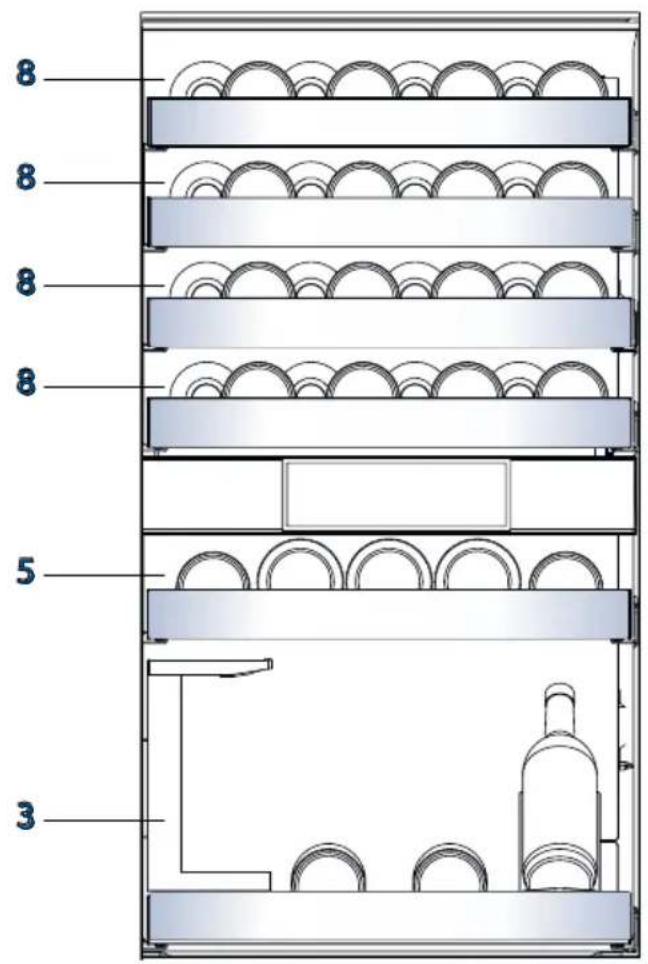
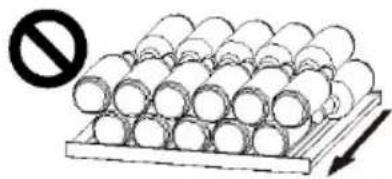
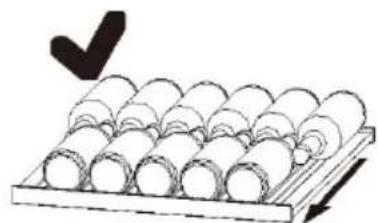
1.Shelf
- The shelves are designed for easy storage and easy removal of the wine. They can be cleaned with a soft towel.
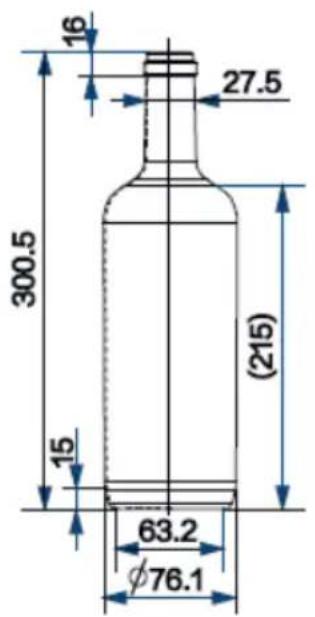
- Regualr bottles with diameter of 76mm can be stacked.
- Magnum bottles can be stacked on the bottom shelf.
- The quantity can vary from the depicted number or bottles if they are stacked in a different way.
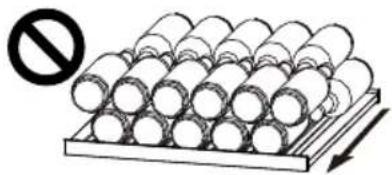
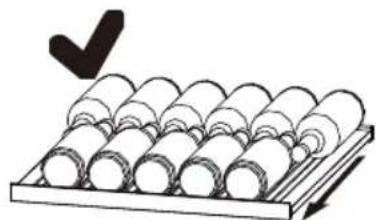
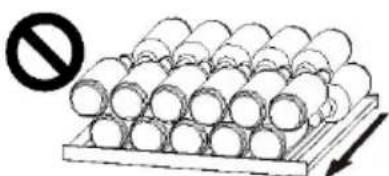
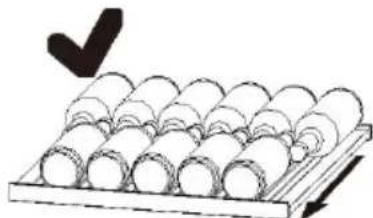
Advice for the layout of your refrigerator-freezer
Before placing the bottles inside the refrigerator-freezer, confirm whether the wines shelves are completely stable. In addition, confirm whether any bottle protrudes from the shelves in order to prevent bottles hitting the glass door upon closing.
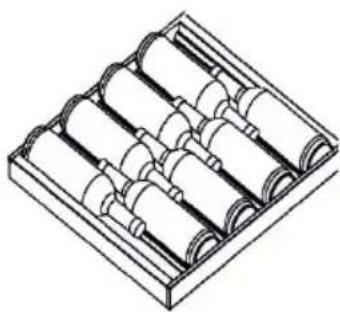
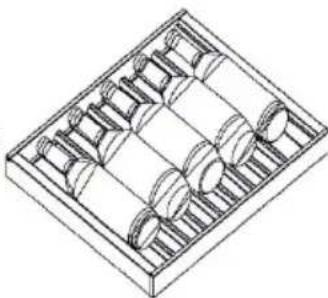
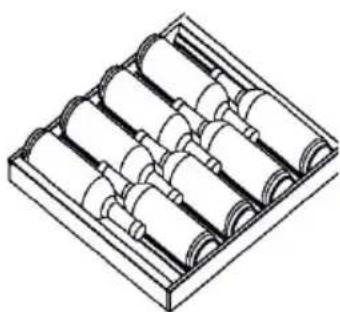
2.Bottling diagrams for different racks
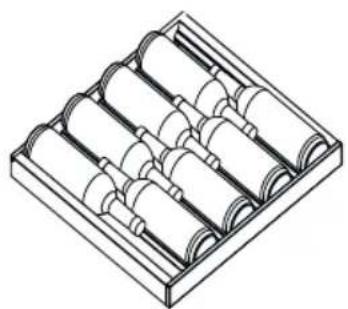
Large Wine Rack
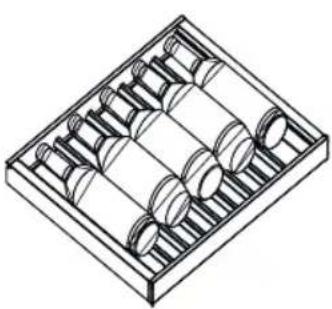
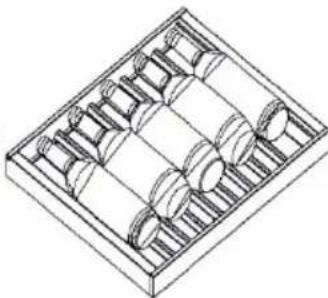
Small Wine Rack
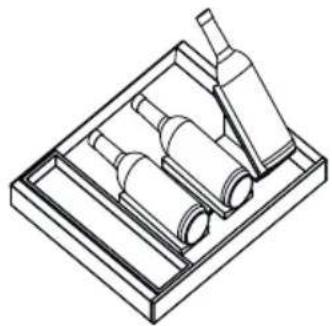
Sommelier Tray Bottling Diagram
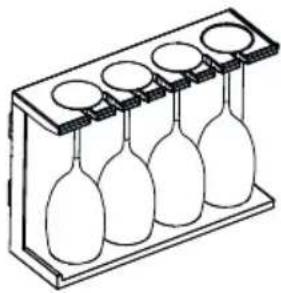
Wine Glass Rack
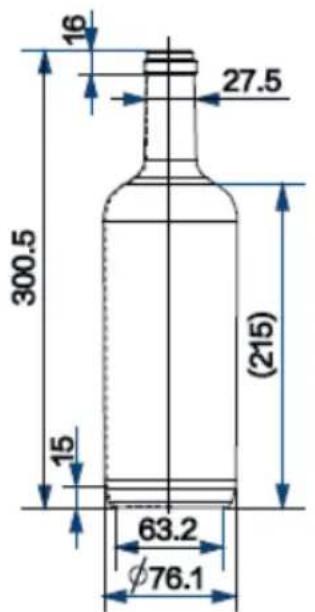
3. Bottling of ordinary wine bottles in the wine storage room
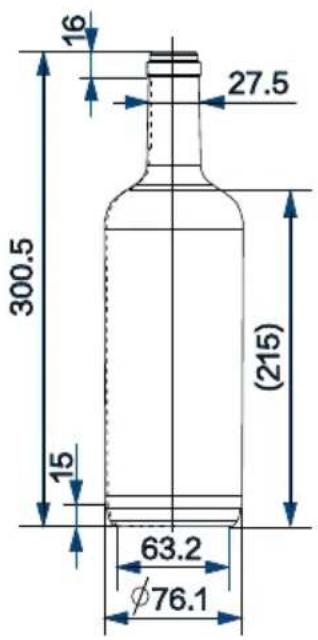
Standard bottles for determining bottling (volume in mm)
Maximum bottle size 40 bottles

Energy saving tips
~ Make sure the appliance is properly ventilated (see INSTALLATION).
Do not install the appliance in direct sunlight or in the near of heat sources (e.g. stoves, heaters).
~ Avoid unnecessarily low temperature in the appliance. The energy consumption increases the lower the temperature in the appliance is set.
~ Open the appliance door as little and as briefly as possible.
Do not exceed the designed amount of bottles to avoid obstructing the air flow. Keep door seals clean so that the door always closes correctly.
Care and cleaning
EN
1.Defrosting
The defrosting of the refrigerator-freezer is done automatically; no manual operation is needed.
2.Replacing the LED lamp
The lamp uses LED as its light source, featuring low energy consumption and long service life. If there is any abnormality, please contact the customer service. See CUSTOMER SERVICE.

WARNING!
Do not replace the LED lamp yourself. It must only be replaced by either the manufacturer or the authorised service agent.
Parameters of LED lamp:
Voltage12V
Max power:18W
LED efficiency class: G
3. Non-use for a longer period
Unplug the power cord.
Clean the appliance and door gaskets as described above.
Keep the door open to prevent the creation of bad odours inside.
4. Moving the appliance
-
Remove all bottles and unplug the appliance.
-
Secure shelves and other moveable parts in the refrigerator-freezer with adhesive tape.
-
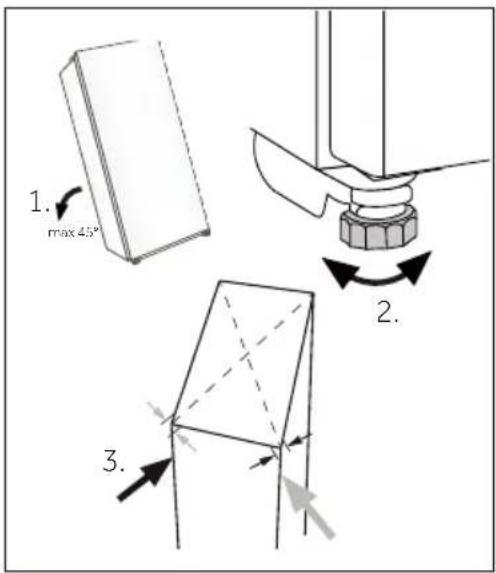
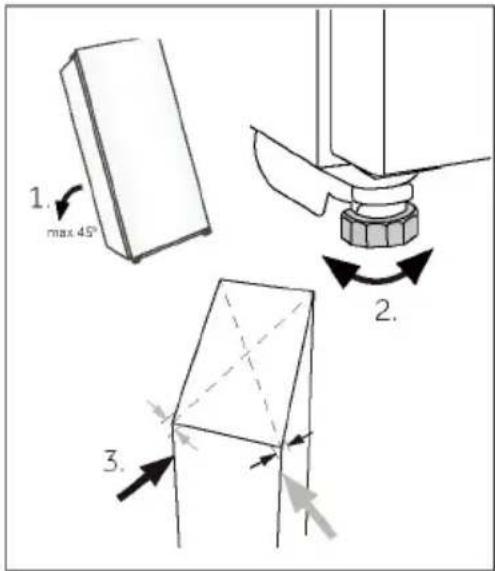
Do not tilt the refrigerator-freezer more than 45^ to avoid damaging the refrigerating system.
Many occurring problems could be solved by yourself without specific expertise. In case of a problem please check all shown possibilities and follow below instructions before you contact an after sales service. See CUSTOMER SERVICE.

WARNING!
~ Before maintenance, deactivate the appliance and disconnect the mains plug from the mains socket.
* Electrical equipment should be serviced only by qualified electrical experts, because improper repairs can cause considerable consequential damages.
A damaged supply should only be replaced by the manufacturer, its service agent or similarly qualified persons in order to avoid a hazard.
| Problem Possible | Cause | Possible Solution |
| The compressor does not work | •Mains plug is not connected in the connect the mains plug. | •Connect the mains plug. |
| The appliance runs frequently or runs for a too long period of time. | •The indoor or outdoor temperature is too high. •The appliance has been off power for a period of time. •A door of the appliance is not tightly closed. •The door has been opened too frequently or for too long. •The temperature setting for the freezer compartment is too low. •The door gasket is dirty, worn, cracked or mismatched. •The required air circulation is not guaranteed. | •In this case, it is normal for the appliance to run longer. •Normally, it takes 8 to 12 hours for the appliance to cool down completely. •Close the door/drawer and ensure the appliance is located on a level ground and there is no food or container jarring the door. •Do not open the door/drawer too frequently. •Clean the door/drawer gasket or replace them by the customer service. •Ensure adequate ventilation. |
| The inside of the refrigerator -freezer is dirty/or smells. | •The inside of the refrigerator -freezer needs cleaning. | •Clean the inside of the refrigerator -freezer. |
Troubleshooting
| Problem Possible Cause | Possible Solution | |
| It is not cold enough inside the appliance. | ·The temperature is set too high. ·Bottleshave been added recently. ·The door of the appliance is not tightly closed. ·The door/drawer has been opened too frequently or for too long. ·The door gasket are dirty, worn, cracked or mismatched | ·Reset the temperature. ·Allow time for recently added bottles to reach desired temperature ·Close the door/drawer ·Do not open the door/drawer too frequently ·Clean the doorgasket or replace them by the customer service. |
| It is too cold inside the appliance. | ·The temperature is set too low. | ·Reset the temperature. |
| Moisture formation on the inside of the wine cellar. | ·The climate is too warm and too damp. ·A door/drawer of the appliance is not tightly closed. ·The door/drawer has been opened too frequently or for too long. ·Food containers or liquids are left open. | ·Increase the temperature. ·Close the door. ·Do not open the door/drawer too frequently. |
| Moisture accumulates on the refrigerator -freezer outside surface or between the doors/door and drawer. | ·The climate is too warm and too damp. ·The door is not closed tightly. ·The cold air in appliance and warm air outside it condensates. | ·This is normal in damp climate and will change when the humidity decreases. ·Ensure that the door is tightly shut. |
| The display light works but does not feel cool | ·It is in demo mode. | ·Please note what condition it is in if it is in demo mode, exit it. Operation Entrance: enter the settings interface, and continue clicking the "Settings" icon enter the background interface, then click "Refrigerator commissioning" and click "Demo Mode" |
| Strong ice and frost in the freezer compartment. | ·The goods were not adequately packaged. ·A door/drawer of the appliance is not tightly closed. ·The door/drawer has been opened too frequently or for too long. ·The door/drawer gasket is dirty, worn, cracked or mismatched. ·Something on the inside prevents the door/drawer to close properly. | ·Always pack the goods well. ·Close the door/drawer. ·Do not open the door/drawer too frequently. ·Clean the door/drawer gasket or replace them by new ones. ·Reposition the shelves, door racks, or internal containers to allow the door/drawer to close. |
| The sides of the cabinet and door strip get warm. | ·- | ·This is normal. |
| The appliance makes abnormal sounds. | ·The appliance is not located on level ground. ·The appliance touches some object around it. | ·Adjust the feet to level the appliance. ·Remove objects around the appliance. |
| A slight sound is to be heard similar to that of flowing water. | ·- | ·This is normal. |
| You will hear an alarm beep. | ·The door is open | ·Close the door. |
| You will hear a faint hum. | ·The anti-condensation system is working | ·This prevents condensation and is normal |
| The interior lighting or cooling system does not work. | ·Mains plug is not connected in the mains socket. ·The power supply is not intact. ·The LED-lamp is out of order. | ·Connect the mains plug. ·Check the electrical supply to the room. Call the local electricity company! ·Please call the service for changing the lamp. |
1. Unpacking
~ Take the appliance out of the packaging.
Remove all packaging materials including the foam base and all adhesive tape holding the accessories.
2. Environmental conditions
The room temperature should always be between 10^ and 43^ , since it can influence the temperature inside the appliance and its energy consumption. Do not install the appliance near other heat-emitting appliances (ovens, refrigerators) without isolation.
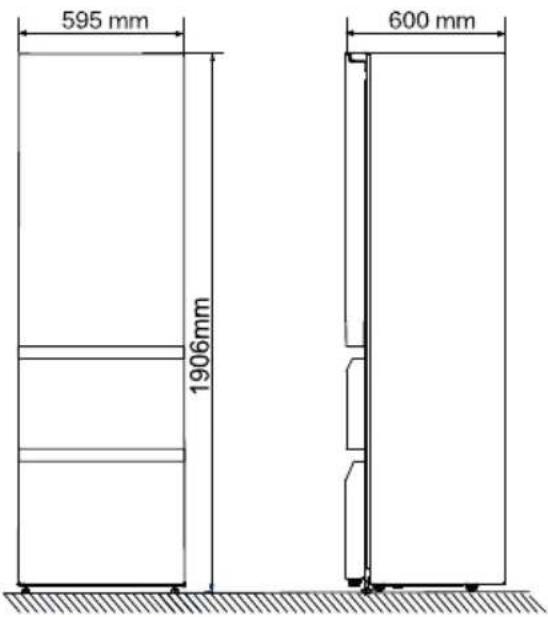
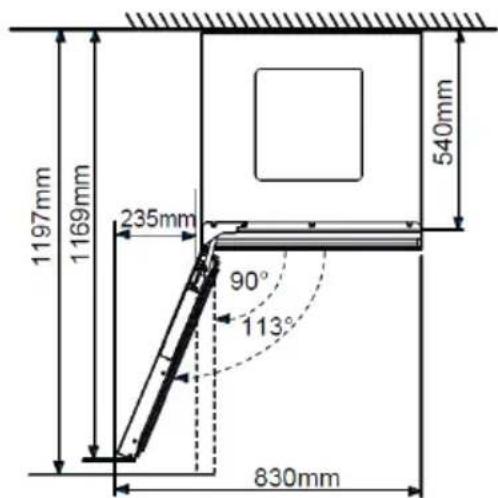
3. Space recommendation
~Dimensions of the refrigerator-freezer: width 595x depth 600x height 1906 (mm)
Recommended space when door is opened
To achieve sufficient ventilation of the appliance for safety reasons, the information of the required ventilation cross sections must be observed.

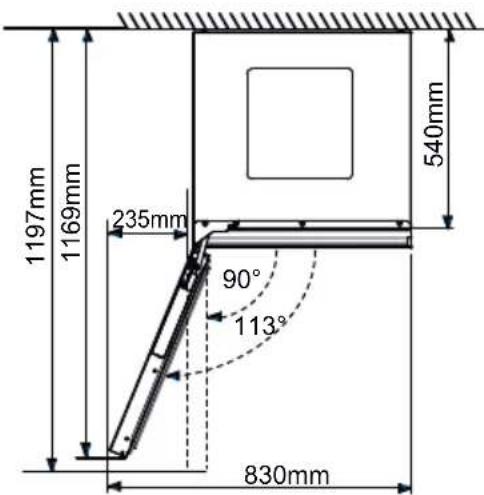

WARNING!
- Keep ventilation openings in the appliance or in the in-built structure clear of obstruction.
4. Aligning the appliance
surface.
- Tilt the appliance slightly backwards.
- Set the adjustable front feet to the desired level by turning them.
- The stability can be checked by alternately bumping on the diagonals. The slight swaying should be the same in both directions. Otherwise the frame can warp; possible leaking door seals are the result. A low tendency to the rear facilitates the closing of the door.
Product fiche according to regulation EU No. 2019/2016
| Brand Haier | |
| Model name / identifier | CSW9619ENGBW |
| Category of the model | Refrigerator-freezer |
| Energy efficiency class | E |
| Annual energy consumption(kWh/year)(1) 246 | |
| Total volume(L) 352 | |
| Volume refrigerator(L) 215 | |
| Volume freezer(L) 137 | |
| Volume chiller section(L) | / |
| Volume auto ice maker(L) | / |
| Star rating | 4 |
| Frost-free system | Yes |
| Freezing capacity(kg/24h) | 9 |
| Climate rating | SN-N-ST-T |
| Noise emission class and airborne acoustical noise emissions(db(A) re 1pW) | B(35) |
| Temperature rise time (h) | |
| Ice making capacity (Only for HTF-520IP7) | / |
| Type of appliance | Freestanding |

NOTICE
~ The annual energy consumption is 258 kWh/year, when the type of appliance is Built-in.
Explanations:
1)based on standard test results for 24 hours. The actual power consumption depends on the actual environment, the amount of bottling, the set temperature, the door opening and closing, etc.
2) The nominal power consumption is the value obtained according to the standard test when the wine cabinet does not turn on the internal light.
- extended temperate: 'this refrigerating appliance is intended to be used at ambient temperatures ranging from 10^ to 32^' ;
- temperate: 'this refrigerating appliance is intended to be used at ambient temperatures ranging from 16^ C to 32^ C' ;
- subtropical: 'this refrigerating appliance is intended to be used at ambient temperatures ranging from 16^ C to 38^ C' ;
- tropical: 'this refrigerating appliance is intended to be used at ambient temperatures ranging from 16^ C to 43^ C' ;
Standards and directives
This product meets the requirements of all applicable EC directives with the corresponding harmonised standards, which provide for CE marking.
Additional technical data
| Voltage / Frequency 220-240V ~/ | 50Hz |
| Input current (A) | 1.6 |
| Main fuse (A) | 16 |
| Coolant R600a | |
| Dimensions (H/W/D in mm) | 1906 / 595 / 600 |
We recommend our Haier Customer Service and the use of original spare parts.
If you have a problem with your appliance, please first check section TROUBLESHOOTING.
If you cannot find a solution there, please contact
~ your local dealer or
~ the Service & Support area at www.haier.com where you can find telephone numbers and FAQs and where you can activate the service claim.
To contact our Service, ensure that you have the following data available.
The information can be found on the rating plate.
Model_
Serial No.
Also check the Warranty Card supplied with the product in case of warranty.
For general business enquiries please find our addresses in Europe below:
| European Haier addresses | |||
| Country* Postal address Country Postal address | |||
| Italy | Haier Europe Trading SRL Via De Cristoforis, 12 21100 Verese ITALY | France | Haier Europe Trading SRL Via De Cristoforis, 12 21100 Verese ITALY |
| Spain | Haier Iberia SL Pg. Garcia Faria, 49-51 08019 Barcelona SPAIN | Belgium-FR Belgium-NL Netherlands Luxembourg | Haier Benelux SA Anderlecht Route de Lennik 451 BELGIUM |
| Portugal | |||
| Germany | Haier Deutschland GmbH Hewlett-Packard-Str. 4 D-61352 Bad Homburg GERMANY | Poland Czechia Hungary Greece Romania Russia | Haier Poland Sp. zo.o. Al. Jerozolimskie 181B 02-222 Warszawa POLAND |
| Austria | |||
| United Kingdom | Haier Appliances UK Co. Ltd. One Crown Square Church Street East Woking, Surrey, GU21 6HR UK | ||
AVAILABILITY OF SPARE PARTS: Thermostats, temperature sensors, printed circuit boards and light sources are available for a minimum period of seven years after placing the last unit of the model on the market. Door handles, door hinges, trays and baskets for a minimum period of seven years and door gaskets for a minimum period of 10 year, after placing the last unit of the model on the market
Minimum guarantee is: 2 years for EU Countries, 3 years for Turkey, 1 year for UK, 1 year for Russia, 3 years for Sweden, 2 years for Serbia, 5 years for Norway, 1 year for Morocco, 6 months for Algeria, Tunisia no legal warranty required.
For further information about the product, please consult https://eprel.ec.europa.eu/ or scan the QR on the energy label supplied with the appliance.
PbKOBOOCTBO 3a6b3a cnpabKa
Eheprn eTiket

IapauHIOHn KaPta

PbKOBOcTBo 3aIpeDynpexJeHnE 3a6e3oNaCHOCT
5Инфорmaця 3a6e30napocT
10ПреedingHa3NaYeHne
11Описане на пожукта
12 Ynotpe6a
Ppei nIbRpBOHaUaHa ynoTppe6a 6
Монтурапе 6
EkeHHeBHa ynoTpe6a 7
HfopMaun3aXlaNnHna 9
PpeiPiBpBOHaayaHa ynoTpe6a 12
Ceh3opeHekpaH 12
HacTpoiKa 3a nbpBO BkIIOUBaHe 12
CbpxeTe ce c TeJefoHa 13
ФУнклія 3a aВТOMаТиЧо 3aКЛЮЧБаHe 14
OncaHne Ha KOHTpOJIHnI NaHeI 14
Функця_3оназасьхpaHeHneHaBnHa"14
Функця"3oHa 3a DeKaHTnpaHe" 15
Функ,在"Фпзер" 15
HNTeJIrEHTHO CbXpaHeHne Ha BnHO 15
Функц,在HTeJIureHTHO TbpceHe Ha BnHa"16
Декантуране 17
CnCTeMHn HacTpoiKu 17
AnapMa 3a OTBopeHa Bpata 19
Heo6nuaHn anapMn 19
19 N3KJIIOU
Wi-Fi nHΦopMaζη 20
22 O6opyDbaHe
24CbBcTn3a necTeHe Haehepn
25 Гпжам поочтванe
26-OTCTpaHЯBaHe Ha Hen3npaBHOCTN
29 MoHTaX
31 TexHnueckn daHHN
33 O6cnyxBaHe Ha KIneHTN

ПРЕДУПРЕЖДЕHNE - Важна унформаця 3a 6e3oonaCHOCT

3A6EJIEXKKA-O67a nHΦopMaζηn CbBETN

HΦopMaζηa 3a OKoJHaTa cpeDa
O6e3BpeJdaHe
Помогнete 3a опаЗванeto Ha OKолнота среда и човшкOTO здраве. Роставete опаковьунITE матерпалы в поховшпente контейнера, за набда peцларни. Помогнete 3a peцларанeto Ha OTпадьси OT eilektpruychekn и eilektprohni у畴и. У畴и, обозанец с този символ, несява набда иЗврлanyн 3aednoс с bitobinte OTпадьси. Вьрнete пpoodyКТВ MeCTHOTO cboрьжени 3a peцларанe илс ce CBржeteс obшинckata служба.

ПЕДУПЕЖDEHNE!
Опасност Нараявае ял зашивае!
XlaIINHnTe aentn Ira3OBeTe Tp6Ba Da ce o6e3BpeKdA Tno
npofoecnoHaJIen HauHH. YBepete, ye Tpb6bnte Ha oxlaIInTeJHaTata
Bepira He ca nOBpeDeHN, ppei Da rN IN3XBbPInTe PNO NOxOJaU NaHH.
I3KIOuOte ypeDa OT mpeKoBOTo 3axpaHbaHe. OTrpeKeTe 3axpaHbaU
Ka6eI Iro IN3XBbPInTe. OTCtpaHete TaBnTe NyeKMeJKeTaTata, KaKTo
UYIbTHHeHnRA Ta HbPaTATA N MexAHn3Ma 3a 3aTBapRHeTO I, 3a da IpeDoT-
BpaNTe 3aTBapRHeTO Ha Deca N DomaShn JIO6mUv BypeDa.
XlaadinHToO tDeJeHne Ha To3n ypeI Tp86Ba Da ce N3noJ3Ba 3a CbXpaHeHne Ha BnHO. Ppei Da BKIOUHTe ypeJa 3a PbPBNbT, IpOueTeTe CJeHNTE CbBETN 3a 6e3oNaChocT!:

PPEyPExKdEHNE!
PpeiPiBpBOHaJaHa ynoTpe6a
YBepete ce,Ye Hama TpaHcnpTHN NOBpeNi.
OTCTpaHeTe BCnUKN ONaKOBbUH MaTePnaI N rN OCTaBeTe Ha MxCTO, HeNoCTbNHO 3a Deua.
I3aKaITe Ione Dba Yaca, npei Da MOHTnpaTe ypeia, 3a da Cte cnrypHn, ye OxlaIteJHaTa Bepnra e HanbIHO eΦeKTHBHa.
3a npemeCTBaHeTo Ha ypeJa ca HyxHn NOHe Dbama DyShn, 3aTOe TeKbK.
MOnTnpaHe
YpeBbT Tp86Ba Da 6bJe NocTaBeH Ha MЯCTO C Do6pa BeHTnlaCn. OcnIpyeTe npoctpaHcTBo OT Ha-NMaJIko 9 cm HaI ypeDa n 4 MM OKOJIo ypeDa.
Hnkora He noctabryte ypeda Ha BnaJHo MRCTO nIHa MRCTO, KbJeTo IMa OpanchocT da 6bde HnPbckan C BODa. PTeHa n npbCKn BOda Tp8Ba Da ce NouchTBaT n NOdCywaBAT C YnCTa MeKa KbPna.
He MoHTnpaIe UpeJa TaKa, Ye Da e N3IOJKeH Ha npraKa CJIbHueBa CBETInHa INI Da e B 6JN3OCT DO N3TOUHNi Ha TOJINHa (HaNP. rOTBapCKn NeuKn, HArpeBaTeJI).
IocTaBete HnBvEJIpaIte ypeDa B 3OHa, NODXODJa 3a HeROBn pa3Mep n ynoTpe6a.
He 3anpeuBaIe BeHTnlaucIOHHIte OTBOpn Ha ypeJa IIn Ha BrgpaJeHaTa KOHCTpyKcIy.
YBepTe Ce, Ye eJeKTpNueckaTa HnΦopMaunHa Ta6eJkata C daHn CbOTBeTCTBa Ha 3axpaHbAHeTo. Ako He cBoTBetCTBa, O6bpHeTe Ce KbM eJeKTPoTeXnK.
YpeiTppaOtn npn 3axpaHbAne 220-240 VAC/50 Hz. Heobuayn KolebaHn B eIeKtpnueckoTo HappeKeHne MoaT da DoBeaT do HeycneUHO cTapTnpaHe Na ypeDa, Da NobpeJrT cNCTemata 3a ynpaBLeHne Ha TeMpepatypaTa nll KOMPecopa nll Da npuHnT Heobuayen Shm npn pa6oTa. B TaKbB cLuyaN Tp8Ba Da ce MoHTnpa aBTomatuHepylaTop.
He n3noJ3BaIe pa3KIOHITeIN yDbJIxNTEJI.

PPEyPExKDEHNE!
He pa3noIaraiTe npehocmnpa3KIOHHTeINnI npehocmNn3ToHnUHa 3axpaHbAHe B 3aDHaTa YAcT Ha ypeDa.
YBepTe ce, Ye 3axpaHbAunr Ka6eI He e 3aKleueH PoJ XlaanlHnKa nΦpN3epa, He cTbPbAitE Bbpxy 3axpaHbAunr Ka6eI.
I3noJ3BaIte OTdElenH 3a3EmeH KOHTaKT 3a 3axpaHbAHeTo, KOITo e IecHOocTbpeH. YpeBbT Tp86Ba Da 6bDe 3a3EmeH. Camo 3a O6eHNHeHOTo KpaJIcTBO: 3axpaHbAunr Ka6eHa ypeDa e cHa6deH C TpoEH (3a3EmBa) UenCeI, KOITo OTROBapr Ha cTaHApTe H TpoEH (3a3EmeH) KOHTaKT. B HnKaKbB CnyaH He peKeTe n He dEmOHTnpaY Te TpeTna (3a3EmBa) UINΦT. CJeD MOHTpAHeTo Ha ypeDa Do UePceLa Tp86Ba Da NMa DOCTbI.
He npuHnBaIte noBpeiHa oxlaIteHaTa Bepira.
EkeDHeBHa ynoTpe6a
To3n ypei moje da ce n3noJ3Ba OT deca na 8- roJnHa Bb3pact n ot Iuca c HamaJIeHN fN3nueCKN, CeTINBHN IINI yMCTBeHn CNOco6HOCTNI IINIcA Ha ONIT N IO3HaHnA, aKO CE Na6IIOJaBaT IINI Ca INHCTpyKTIpaHn 3a n3NoJ3BaHeTo Ha ypea nO 6e3oJaceH Naunn pa36npaT CBbp3aHNTe CT TOBa ONaCHOCTN.
Deça Ha Bb3pacT OT 3do8roDNH MoRaT da TOBaprN pa3TOBapBaT, HO He MoRaT Da NouchTbaT Nll MOHTnpaT XlaDnllN ypeDi.
Deua noi 3- roiuHa Bb3pact Tpr6Ba da ce na3aT daJeu OTypeDa, Cn3KJIouHeHne Ha cnUaHTe, KOraTO ca noD nOCToHEn HAd3Op.
DeuTa He 6Ba da n3noJ3BaT ypeJa 3a ngpa.
AkoB6IIN3OCTdo ypeDa n3Tnua OxlaInteHra3nnIpyr 3aIaIIMra3, n3KJIouTe BeHTnlaHa n3TnuaIgra3,OTBOpTe BpaITte IN npo3OpIte N He BkIoUcbIte N He n3KJIouCbIte 3axpaHbIuTe Ka6eJI Na XlaIINHka IInn Ha dpyrgpei.
ObpHeTe BnMaHne, Ye ypeT e HacTpoeH 3a pa6oTa B onpeJeIen DnaIa30H Ha TempepaTypaHa Ha OKolHaTa cpea Mejdy 10 n 43°C. YpeT MoKe Ia He pa6OuPiPaBnHo, aKo e OCTaBeH 3a DbIbI nepNoI npi TempepaTypa HaI nn PoD NocOueHnaIa30H.
He nocTaBraIte HeCtabHn npEdmEt (TeKKn PpeDMeTn, CbDoBe, PbLnHc BODa) Bbpxy XlaadinHnKa c φpns3ep, 3a Da n36eRHeTe HapaHЯBaHe, PruHHeHO OT NaDaHe NlN TOKOB ydap, PruHHeH OT KOHTaKT C BODa.
He nbpnaTe pafoBeTe Ha BpaTata. BpaTata MoKe da 6bJe n3DbpnaHa noiHaKIOH, NoCTaBkata 3a 6yTuIka MoKe da 6bJe n3TeIeHa IInu ypeDbT MoKe da ce cb6Opn.

PPEyPExKDEHNE!
OTbaprTe n 3aTbaprTe BpaNTe cMo NocpeIcTBOM dpbkknte.
IpoIykaTa MeKdy BpaTnte N MeKdy BpaTnte N IokaΦa e MHOrO TcHa. He nocTabraIte pBcTe cN B Te3N 30Hn, 3a Da n36eHHeTe npuINBaHe Ha npbCTnte. OTBapRNe Hn 3aTbapRNe XlaAnlHnKa C φpnsep nIi BpaTnte cAmo KOraTO B o6cera Ha DBrJkeHnETo Hma Deua.
He cxbxaHbAte n He n3no3BaTe 3aPannM, eKcIIO3NBn nn Kopo3NBn MaTePnaJI N BypeDa nnB 6JN3OCT DO Hero.
He cxbxpanhaBaiTe IekapCTBa, 6aKtepnn nn xImnueckn aReHTN B ypeDa. ToBa e IomaknHcN ypei. He ce npenopbUba da cbxpanBaTe MaTePnAJI, KOINTO n3nCKBaT CTporn TeMnepaTypn.
Hnkora BbB φpni3epa He cxbxpaHЯBaIte TeuHocTn B 6yTuJIkn NII KOHcEpBn (OCBeH BnCOKoAJIKOXOJIHN CnIPTHN HaNTKn), OCObeHO r3npaHn HAnITKn, Tb' KaTO Te Ue Ce CnyKaT NO BpeMe Ha 3aMpa3YBaHeTo.
PpOBepeTe CbCToHHeTo Ha XpaHaTa, aKO BbB np3epa e HactbNiIO 3aTOnJIHe.
He 3aIaBaIe n3JIuHIO HnCKa TeMnepaTpa B XlaIINHOTo OTJeIeHne. Pn BnCOKn HaCTpoiKn MoRaT Da Bb3HnKHat MInHycOBn TeMnpaTpyn. BnHaHne: BytNkTe MoRaT da ce npcbchat
He dokocbaite 3aampa3eHn npodyktnc mokpn pbce (hocTe pkbAun). B hinkakbB cnyauHne JxKte IedeHn 6JI3aJKN BeDHa rCaIeN 3BaXdaHTo nM OT oPn3epHOTo OTJeIeHne. CbUcEeTByBa pNCK OT n3Mp3BaHe nll o6pa3yBaHe Ha mexypn. PbPBA nomO; He3a6abHO noCTaBeTe Pd Teuaa cTydeHa Boda. He dbpnaIte!
He doKocBaIe BbTpEshHaTa NOBbpxHOCT Ha OTdeJeHneTo 3a cbxpaHHeHnE Ha φpnsεpa, KOrato ypeBt pa6oTn, OcOBeHo C MOKpn PbUe, Tb' KaTO pBte TE BN Moat Da 3aMpb3HaT Bbpxy NOBbpxHOCTTa.
I3KlOyete ypeDa oTe eJeKtpnueckKaTa MpeJa B clyaH Na npeKbcBaHe Ha 3axpaHbaHeTo nII npEi NouchTbAHe. N3yaKaIte noHe 7 MNHyTN, npEi Da BkIoUHTe OTHOBo ypeDa, Tb' KaTO yeCTOTO cTapTnpaHe MoJke Da NOBpeDN KOMnPecopa.
He n3noJ3BaIte eIeKtpnueckn ypeiB OTdJeHnraTa 3a CbXpaHneHa xpaHa Ha ypeia, OCBen aKO He ca OT BnD, npenopbuaHOT pOn3BOInTeJI. POndpkKa/NouchTbaHe
Ako nouchTbaHe nnoDpBkKa ce n3BbPwBa OT deca, yBepTe ce, ye Te ca noD HaI3Op.
Prn n3KlouBaHe Ha ypea XBaUaIe UeIcEla, a He Ka6eLa.

PPEyPExKDEHNE!
He nouchBaIte ypeDa c TBbpDn YeTKn, TeJeHn YeTKn, npaxoo6pa3Hn npenapatn, 6eH3nH, amilaueTaT, aueToH nllnoDbHn opraHnU npa3TBopn, KncElnHHn nll ankcalHn pa3TBopn. MoJ, nouchBaIte cbc CneuaJIeH npenapat 3a XlaadinHnk, 3a da n36eHrHeTe NOBpeDi.
He ctbpkeTe cKpeK nJIeC oCTprn ppeMeTn. He n3noJ3BaIte cnpeIOBE, eJeKtpnueckn HaRpeBaTeJI Kato CeJoapn, napOuNCTaUKN IIN dpyrN n3ToUHnHa TOnnHa, 3a Da ce n36eRhe NOBpeDa Ha PnactMaCOBInTe YacTn.
He n3noJ3BaIte MexaHnHy yCTpoiCTBa IIn dpyri cpeiCTBa 3a yckopjBaHe npOeCa Ha pa3Mpa3BaHe, pa3JIuHr OT npenOpb- YAHnTe OT npOn3BOJNTeJI.
Ako 3axpaHbauT Ka6eI ce nobpeu, ToJ Tp8Ba da 6bJe 3aMeHe OT npOn3BOIndTeJI, HeROB O6cnyKBaU, PpeDCTaBnteI nn IInCe C NOIO6Ha KBaIIINΦnKaUria, 3a Da ce n36eHre NOTeHuaJHa ONaCHOCT.
He ce onntBaIte da peMOHTnpate, pa3IIO6BaTe nIIMoINΦnCIPaTe ypeDa cam. B Heo6xOДIMOCT OT peMOHT, MOJI, CBbpxKeTe ce c haShna OTdeJ 3a O6cLyKBAHe Ha KJIneHTN.
OTcTpaHbAa Te npaxa OT bP6a Ha ypeHa NOHe BeHbX RoIuH0, 3a Da ce n36eHne noxap, KaKTo u NobuWeH pa3XoJ Ha eHepnra.
He npbckaiTe n He pIinckaiTe ypeDa nO BpeMe Ha nouchTbaHe.
He n3noI3BaIte BoDHa cTpy IJI npa 3a noUcTbaHe Ha ypeJa.
He nouchBaIte cTydeHnte cTbKJIeHN paΦTOBe c ropeuHa BODa. PЯЗКATA npOMЯHaВ TempepaTypaTa MoKeДa npUHHn HanyKBaHe Ha cTbKNoTo.
D. CeIeKTop 3a nHTeJIrEHTHOcbXpaHeHne Ha BVnHO
E. CeIeKTop 3a nHTeJIrReHTHO TbpceHe Ha BnHO
F. CeilekTop 3a DekaHTnpaHe
7.Функця „3oHa 3a cbxpaHHe Na BnHa"
IokocheteA",3a da Bne3eTe BnHTepceIca 3a peryIipaHe Ha TempepaTypaTaHa 3oHaTa 3a cbXpaHHeHa BVHO.
Πльзhte HaЯBOи HaяСо, 3a Да HabТрОпTe TemпepаТуРаТа Ha 3OHaTа 3a cbхра themselves Ha BInHO mexIy 8 18^, Bcekn nbT, KOraTO npomehnte TempepaTypaTa c 1^, 3ymept Iue cnHahn3upa.
DnCnIeT 3a BnaJHoCT He MoKe 6bJe peRyInpaH N He NOKa3Ba HNBOTo Ha BnaJHoCT B 3OHaTa 3a CbXpaHeHne Ha BNHO.
8.Функця „3oHa 3a DeKaHTnpaHe"

IokocheTe "B" Na hauaHaHata cTpaHua, 3a Da Bne3eTe BnHTepFeiCa 3a Da HacTpOnTe TempePaTypaTa Ha "ComeJIneP". PJIb3HeTe HaNBAO NII NaIaCNo B TempePaTypHaTa 30Ha, 3a Da peryIinaPe HAcTpoIkaTa Ha 3oHaTa 3a DeKaHTnpaHe MeJdy 8 18^, BCEKN PbT, KOraTo npomeHte Tempe-paTypaTa c 1^, 3ymepbT ige cnHauNImpa.
ДиспелгТа ВлжногСТ He може Бдe рeгулран И He пoka3Ba HnBOTO Ha ВлжногСТВ знота 3a DeKaHTnpaHe.
9.Функця „Фризер"
Iokochete "C" Ha hauaHaTa cTpaHua, 3a da Bne3eTe BVnHTepfeiCa 3a peryIinaHe Ha TempePaTypaTa Ha 3oHaTa 3a 3ampa3YBaHe.
KoratoФункцяТa „Super Frz" e n3Клочena, moKeTe da NaCTpOnte TempePata B 30HaTа 3a 3aMpa3aBaHe cπIb3raHe HaJIBOи HaIЯСHо MeJy -14~-24°C,BceKN pT, Korato npOMEHnTe TempePata c 1°C,ЗуМерьт сигналИзIPA.
LpaKHeTe Bbpxu IKoHaTa Super Frz, 3a da BKJIIOUHTe/IN3KJIIOUHTe yHKnraTa "Super Frz". Korato yHKnraTa "Super Frz" e BkIIOUeHa, Tempepatpata Ha np3epHTo OTdEJIeHne He Moke da ce perylnpa.
10.ИnteIInrEHTHOcBxpaHHeHnEHa BnHO

IOKocheTe "D" Ha NaaHaHaTa CtpaHnUa, 3a Da Bne3eTe B nHTepceIca Ha yHKuYraTa "InTeJIInrEHTHO CbXpaHeHne Ha BnHO", KbDeTo MoKte Da Do6aBYe BnHO, Da CbXpaHbAte BnHO, Da 3aMeHrTe BnHO, Da TpneTe BnHO n Da MeCTITe BnHO.
Dokochete [Place the Wine], 3a da Bne3e Te B nHTeppeca 3a do6abRe Ha BVHO.
DokocheTe cTpeIkaTa, 3a da peryInpaTe 6poar CnoeBe, 7paKHeTe Bbpxy 3HaKa ^ (PpazHa 30Ha, 6e3 cbxpaHEno BVnHO), n36epete MeCTOIOJXeHNrTO OTJABO NOTdACHO, 3OHATA Ue CBETHe N BbTpEshHO TO OCBETJeHne Ha 5kaFa 3a BNHO Ue n3rache. N36paHata POniunr Ue 6bDe OCBeTeHa (CNCTeMaTa HAcTPOJa "HacTpoKa Ha dncnpeer" [Wine display location indicator] Ue 6bDe BKlNoyeHa).
LpaKHeTe Bbpy,NotBbpxJdeHne",BbBeJeTnHΦOpMaqraTa 3a BnHOTOn 3aBbPSeTe OepaunrTa No CbXpaHeHneTo Ha BNHO.
3a npu nponepaunn BnKTe nHCTpyKnnte Ha ekpanaHa
11.ФункцЯ „Интулг entho TbpceHe Ha BnHO"
DOKOCHTe "E" HaHaayalHaTa cTpaHnUa, 3a Da Bne3eTe B INHTepFeiCa 3a INHTeJIInrEHTHO TbpCeHe Ha BnHO": TbpCeHe Ha BnHO C yCIOBHO fNITpnpaHe, TbpCeHe Ha IIO6bIMn BnHa, N3TpNBaHe Ha IIO6bIMn, IIO6aBJeHa IIO6bIMn
12.ДекаHTиранe
Dokochete "F" HaHaayalHaTa cTpaHnca,3a DaBJe3eTe BInHTeppeNca 3a N36Op Ha BnHO.
LpaKHe Bbpxy 30HaTa 3a BnHO, 3a da n36peTe BnDa i Cnei TOBa npemHHe KbM INTEppeCa Ha To3n BnD DeKaHTnpaHe Ha BnHO. DokaTo n36npaTe ,Dpyr",BpeMeTo 3a DeKaHTnpaHe MoKe Da 6bDe 3aJaDEHo OT nOte N moKeTe Da n36peTe Da 3aNoHTe OTHTaHETo Ha BpeMeTo, Da NoCTaBe He Naay3a, Da npoDbJxNte N da OTMeHHe OTHTaHETo Ha BpeMeTo. CLei KaTo OTbPOBaHETo pRknIouChi, XlaDnIHKnBt 1ue n3daJe 3ByKOB CNHaJ, 3a Da NOKae, Ye n3Tpe3HBAHeTO e PpIKIOuHIO, I nOteBteJIaT Tp8Ba Da UpaKHe Bbpxy [OK], 3a Da npekbche 3BYKOBnCnHaJ.
Download the hon App on the stores


Available on the App Store

GETITON GooglePlay

EXPLORE IT ON AppGallery
Step 2
- Log in or sign up

Step 3
Add a new appliance selecting the wine cellar from the list

4Step
- Scan the QR or insert manually the serial number

Step 5
Refer to the "Connect to network" chapter to operate the screen and set Wi-Fi into configuration mode, Follow the instructions on the App to complete the remaining steps.

1. PaΦT
- PaΦTOBte ca npεДHa3NaueHn 3a IeCHO cbXpaHHe n IeCHO BaIeHnBa HnHOTo. Te MoRat Da ce NouchTBc MeKa Kbpna.
2.ObukHOBeHn 6yTuIKN C DnaMeTbp 76 MM MoTa Da ce NpOpeXdaT eHa BbPx dpyra - IIO-ROJEMHTe 6yTNIKMOraT Da ce IIOpeKdA T Ha DoJHnra paΦT.
- KolinyecTBoTo MoKe Ja Bapnpa OT n3o6pa3eHn8 6poi nn 6yTuIkn, aKO Ca NODpeHn NO pa3JIuEH HaunH.
CbBETn 3a pa3npedeJeHneTo BbB BaShnXlaAnlHnK c φpntep
IpeHn Da NocTaBnTe 6yTuKnTe B XHaDiuHnKa n φpnsεpa, npOBepe TaHn paΦTOBeTe 3a BnHa Ca HAnbJHo Cta6uHn. OcBeH ToBa npOBepe TaHn HraKo8 6yTuKnHa He CTbpyn OT paΦTOBeTe, 3a Da IpeDOrbPaTHe ydap Ha 6yTuKnTe npn 3aTBapRHe Ha CTbKneHaTa BpTa.
2.Cxemn 3a noctabYeHa 6yTnIKN Ha pa3JIuHn paΦTOBe
Tolm BnHe npaT
MaJIbK BInHeH paΦT
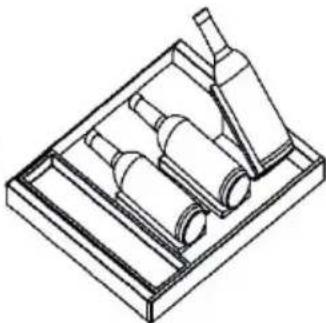
Диагама 3a NOCTaBЯн ha6yTNkN B NOCTaBKaTa "ComeJnep"
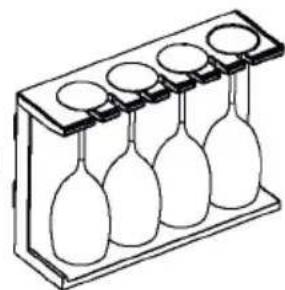
PaΦT 3a yαψn 3a BInHO
Pa3MepnHaXlaIINHcΦpN3ep: (山)595x(Д)600x(B)1906(MM)
3a da ce ocnrgyn Ha ypea doctaTbHOndo6po HnBO Ha BeHTnlaucn OTo Cbo6-paxeHna 3a 6e3oNaChOCT, Tp6Ba Da ce cna3BaT n3nCKBaHnra, NOKa3aHNBbB BeHTnlaCIOHNO HAnpeuHO CeueHne.
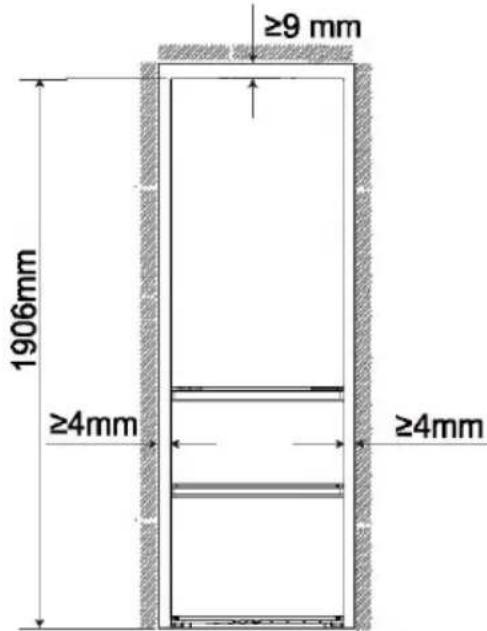
PpeopbUHTeHNO CBO6oHNo npocTpaHCTBO npn OTBopeHa BpTa.

PPEyPPEKDEHNE!
He 3aIpeuBaIte BeHTnlaCIOHnTe OTBOpn Ha ypeDa nIi Ha BrgpaDeHaTa KOHCTpyKcIy.
4.Подравнан ha NOBbpxHOCTTa
- HakoHeTe ypeJa IeKO Ha3aI.
- HarlaceTe peRyIpyEmTe npeHn KpaYeTa HaKeJahOTo HINBO, KaTO rN 3aBbPtNTe.
- Cta6nHocCTa MoKe Da ce npOBepn Upe3 NocJeIOBATEeNo yDpRHe No DnaFOnHaJIte. IN BDbTe NocOKn Tpr6Ba Da ce NolUyaba eHaKaBO JeKO JIoJIeEHe. B npOTuBeH cLyuApaMkTa MoKe Da ce N3KpNB, B pe3yIITa Ha KoEtO yNtBTHEnrTa Ha BpaTaTa HMa Da npIneBbTnBtHO. JeKnT hakLoH ha3aJyIeChraBa 3aTBapRHeTo Ha BpaTnte.
TexHnueckn daHHN
Download the hon App on the stores


Available on the
App Store

GETITON
Google Play

EXPLORE IT ON
AppGallery
Step 2
- Log in or sign up

Step 3
Add a new appliance selecting the wine cellar from the list

4Step
- Scan the QR or insert manually the serial number


Step 5
Refer to the "Connect to network" chapter to operate the screen and set Wi-Fi into configuration mode, Follow the instructions on the App to complete the remaining steps.

1. Police
Download the hon App on the stores


Available on the App Store

GETITON GooglePlay

EXPLORE IT ON AppGallery
Step 2
- Log in or sign up

Step 3
Add a new appliance selecting the wine cellar from the list

4Step
- Scan the QR or insert manually the serial number


Step 5
Refer to the "Connect to network" chapter to operate the screen and set Wi-Fi into configuration mode, Follow the instructions on the App to complete the remaining steps.

1. Einlegeboden
Download the hon App on the stores


Available on the
App Store

GETITON
Google Play

EXPLORE IT ON
AppGallery
Step 2
- Log in or sign up

Step 3
Add a new appliance selecting the wine cellar from the list

4Step
- Scan the QR or insert manually the serial number


Step 5
Refer to the "Connect to network" chapter to operate the screen and set Wi-Fi into configuration mode, Follow the instructions on the App to complete the remaining steps.

1. Páφι
Aaypauma tootheonc moukaawv sokou Sommelier
Paftnptpiv Kpaolou
3. Tonoetnon kavovikwv moukaawkpaolou otov xwpo aonkueo nks paolou
Katnyopia aπóðoʊnç LED: G
Download the hon App on the stores


Available on the App Store

GETITON Google Play

EXPLORE IT ON AppGallery
Step 2
- Log in or sign up

Step 3
Add a new appliance selecting the wine cellar from the list

4Step
- Scan the QR or insert manually the serial number


Step 5
Refer to the "Connect to network" chapter to operate the screen and set Wi-Fi into configuration mode, Follow the instructions on the App to complete the remaining steps.

1. Estante
Download the hon App on the stores


Available on the App Store

GETITON GooglePlay

EXPLORE IT ON AppGallery
Step 2
- Log in or sign up

Step 3
Add a new appliance selecting the wine cellar from the list

4Step
- Scan the QR or insert manually the serial number


Step 5
Refer to the "Connect to network" chapter to operate the screen and set Wi-Fi into configuration mode, Follow the instructions on the App to complete the remaining steps.

1. Clayette
Download the hon App on the stores


Available on the App Store

GETITON GooglePlay

EXPLORE IT ON AppGallery
Step 2
- Log in or sign up

Step 3
Add a new appliance selecting the wine cellar from the list
4Step
- Scan the QR or insert manually the serial number


Step 5
Refer to the "Connect to network" chapter to operate the screen and set Wi-Fi into configuration mode, Follow the instructions on the App to complete the remaining steps.

1. Polica
- Police su predvidene za Jednostavno skladištenje i Jednostavno vadenje boca vina. One se mogu očistiti mekim ručnikom.
- Mogu se slagati obične boce promjera 76 mm.
- Boce s magnezijem mogu se slagati na donju policu.
- Količina može varirati od prikazanog broja ili boca ako su složene na drukčiji način.
Download the hon App on the stores


Available on the App Store

GETITON Google Play

EXPLORE IT ON AppGallery
Step 2
- Log in or sign up

Step 3
Add a new appliance selecting the wine cellar from the list

4Step
- Scan the QR or insert manually the serial number


Step 5
Refer to the "Connect to network" chapter to operate the screen and set Wi-Fi into configuration mode, Follow the instructions on the App to complete the remaining steps.

1. Polc
- A polcok kialakitasa elosegiti a bor konnyu taroLasat es eltavolitasat.
Download the hon App on the stores


Available on the App Store

GETITON GooglePlay

EXPLORE IT ON AppGallery
Step 2
- Log in or sign up

Step 3
Add a new appliance selecting the wine cellar from the list

4Step
- Scan the QR or insert manually the serial number


Step 5
Refer to the "Connect to network" chapter to operate the screen and set Wi-Fi into configuration mode, Follow the instructions on the App to complete the remaining steps.

1. Ripiano
Classed efficiency LED: G
Download the hon App on the stores


Available on the App Store

GETITON GooglePlay

EXPLORE IT ON AppGallery
Step 2
- Log in or sign up

Step 3
Add a new appliance selecting the wine cellar from the list

4Step
- Scan the QR or insert manually the serial number


Step 5
Refer to the "Connect to network" chapter to operate the screen and set Wi-Fi into configuration mode, Follow the instructions on the App to complete the remaining steps.

1. Schap
Download the hon App on the stores


Available on the
App Store

GETITON
Google Play

EXPLORE IT ON
AppGallery
Step 2
- Log in or sign up

Step 3
Add a new appliance selecting the wine cellar from the list

4Step
- Scan the QR or insert manually the serial number


Step 5
Refer to the "Connect to network" chapter to operate the screen and set Wi-Fi into configuration mode, Follow the instructions on the App to complete the remaining steps.

1. Póltka
Download the hon App on the stores


Available on the App Store

GETITON GooglePlay

EXPLORE IT ON AppGallery
Step 2
Log in or sign up

Step 3
Add a new appliance selecting the wine cellar from the list

4Step
- Scan the QR or insert manually the serial number


Step 5
Refer to the "Connect to network" chapter to operate the screen and set Wi-Fi into configuration mode, Follow the instructions on the App to complete the remaining steps.

1. Prateleira
Download the hon App on the stores


Available on the App Store

GETITON Google Play

EXPLORE IT ON AppGallery
Step 2
- Log in or sign up

Step 3
·Add a new appliance selecting the wine cellar from the list

4Step
- Scan the QR or insert manually the serial number


Step 5
Refer to the "Connect to network" chapter to operate the screen and set Wi-Fi into configuration mode, Follow the instructions on the App to complete the remaining steps.

1. Raft
Standardisi directive C
Download the hon App on the stores


Available on the App Store

GETITON GooglePlay

EXPLORE IT ON AppGallery
Step 2
- Log in or sign up

Step 3
Add a new appliance selecting the wine cellar from the list

4Step
- Scan the QR or insert manually the serial number


Step 5
Refer to the "Connect to network" chapter to operate the screen and set Wi-Fi into configuration mode, Follow the instructions on the App to complete the remaining steps.

1. Polica
This product is not intended for commercial use.
Transmitter maximum output power: 2.4GHz Wi-Fi:15.64dBm
Bluetooth LE: 4.88dBm; Bluetooth BR/EDR): 9.60dBm.
Transmitter Working frequency: 2400MHz-24833.5MHz
~ IN APP PAIRING PROCEDURE
Step 1
Download the hon App on the stores


Available on the
App Store

GETITON
Google Play

EXPLORE IT ON
AppGallery
Step 2
Log in or sign up

Step 3
Add a new appliance selecting the wine cellar from the list

4Step
- Scan the QR or insert manually the serial number


Step 5
Refer to the "Connect to network" chapter to operate the screen and set Wi-Fi into configuration mode, Follow the instructions on the App to complete the remaining steps.

1. Polica
Standard in directive
Download the hon App on the stores


Available on the App Store

GETITON GooglePlay

EXPLORE IT ON AppGallery
Step 2
- Log in or sign up

Step 3
Add a new appliance selecting the wine cellar from the list

4Step
- Scan the QR or insert manually the serial number


Step 5
Refer to the "Connect to network" chapter to operate the screen and set Wi-Fi into configuration mode, Follow the instructions on the App to complete the remaining steps.

1. Raft
Download the hon App on the stores


Available on the App Store

GETITON Google Play

EXPLORE IT ON AppGallery
Step 2
Log in or sign up

Step 3
Add a new appliance selecting the wine cellar from the list

4Step
- Scan the QR or insert manually the serial number


Step 5
Refer to the "Connect to network" chapter to operate the screen and set Wi-Fi into configuration mode, Follow the instructions on the App to complete the remaining steps.

1. Polica
- Police su dizajnirane za lako skladiistenje i lako uklanjanje vina. Čiste se mekim peškirom.
- Mogu se skladišti uobičajene boce prečnika 76 mm.
- Veçé boce se moqu skladişiti na donjoi polici.
- Količina doit varirati od navenenog broja akso su boce složene na drugaciji način.
Saveti za rasporedu frižideru-zamrzivaču
Pre stavljanja Boca u frižider-zamrzivač, proverite da li su police za vino potpuno stabilne. Pored toga, potvrdite da li neka Boca viri sa police kako bi se sprećilo da boce udare u staklena vrata nakon zatvaranja.
2. Dijagrami slaganja boca za razlicite police
Veliki stalak za vino
Mali stalak za vino

Dijagram slaganja bocaza Sommelier pladanj
Stalak za chase za vino
3. Slaganje obicnih Boca vina u prostoru za skladištenje vina
Standardna boca za odredivanje načina slaganja (zapremina umm)
Maksimalna količina bocaje 40 boc

Saveti za uštedu energije
Uverite se da uredjai ima ispravnu ventilaciju (pogledajte MONTAZA).
Ne montirajte uredj na direktnoj suncevoj svetlosti ili u blizini izvora toplote (npr. rerna, grejalica).
Izbegavajte nepotrebno nisku temperaturu u uredaju. Potrosnja energije se povecava sto je niza temperatura podesena u uredaju.
- Otvarajte vrata uredaja sto je manje i sto krace moguce.
Ne prekoračujte predviženu količinu boca kako biste izbegli ometanje protoka vazduha. Održavajte Čistocu zaptivki vrata tak do se uvek zatvaraju ispravno.
1. Odmrzavanje
Odmrzavanje frižidera-zamrzivača se vrši automatski; nje potreban ručni rad.
2. Zamena LED lampice
Lampica koristi LED tehnologiju za izvor svetlosti, sto podrazumeva malu potrošnju energije i dugi vek trajanja. Ako postoji bilo kakva abnormalnost, obratite se korisničkoj sluzbi. Pogledajte odeljak KORISNIČKA SLUŽBA.

UPOZORENJE!
- WARNING: Risk of fire/flammable material
- Thank you for purchasing a Haier Product.
- Accessories
- Safety information
- Intended use
- Product description
- Use
- Equipment
- WARNING!
- Before first use
- Installation
- Daily use
- Refrigerant gas information
- Intended use
- Product description
- Notice
- Remove the door supporter of the refrigerator-freezer
- 1.Before first use
- Touch screen
- First power on setting
- 4..Connectwiththploone
- Automatically locking function
- 6.Description for control panel
- 7.Wine Storage Zomeffunction
- Decanting Zone function
- Freezer function
- Smart Wine Storage
- Smart Wine Searching function
- 12.Decanting
- System Settings
- Customer Service
- Open Door Alarm
- 15.Abnormal alarms
- Power off memory
- Wi-Fi Information
- ~ IN APP PAIRING PROCEDURE
- Step 1
- Step 2
- Step 3
- 1.Shelf
- Advice for the layout of your refrigerator-freezer
- 2.Bottling diagrams for different racks
- Bottling of ordinary wine bottles in the wine storage room
- Energy saving tips
- Care and cleaning
- 1.Defrosting
- 2.Replacing the LED lamp
- Parameters of LED lamp:
- Non-use for a longer period
- Moving the appliance
- Troubleshooting
- Unpacking
- Environmental conditions
- Space recommendation
- Aligning the appliance
- Explanations:
- Standards and directives
- 5Инфорmaця 3a6e30napocT
- ПРЕДУПРЕЖДЕHNE - Важна унформаця 3a 6e3oonaCHOCT
- 3A6EJIEXKKA-O67a nHΦopMaζηn CbBETN
- HΦopMaζηa 3a OKoJHaTa cpeDa
- O6e3BpeJdaHe
- ПЕДУПЕЖDEHNE!
- PPEyPExKdEHNE!
- PpeiPiBpBOHaJaHa ynoTpe6a
- MOnTnpaHe
- EkeDHeBHa ynoTpe6a
- 7.Функця „3oHa 3a cbxpaHHe Na BnHa"
- 8.Функця „3oHa 3a DeKaHTnpaHe"
- 9.Функця „Фризер"
- 10.ИnteIInrEHTHOcBxpaHHeHnEHa BnHO
- 11.ФункцЯ „Интулг entho TbpceHe Ha BnHO"
- 12.ДекаHTиранe
- PaΦT
- CbBETn 3a pa3npedeJeHneTo BbB BaShnXlaAnlHnK c φpntep
- 2.Cxemn 3a noctabYeHa 6yTnIKN Ha pa3JIuHn paΦTOBe
- PPEyPPEKDEHNE!
- 4.Подравнан ha NOBbpxHOCTTa
- TexHnueckn daHHN
- Police
- Einlegeboden
- Páφι
- Tonoetnon kavovikwv moukaawkpaolou otov xwpo aonkueo nks paolou
- Estante
- Clayette
- Polica
- Polc
- Ripiano
- Schap
- Póltka
- Prateleira
- Raft
- Standardisi directive C
- Standard in directive
- Saveti za rasporedu frižideru-zamrzivaču
- Dijagrami slaganja boca za razlicite police
- Slaganje obicnih Boca vina u prostoru za skladištenje vina
- Saveti za uštedu energije
- Odmrzavanje
- Zamena LED lampice
- UPOZORENJE!
Brand : HAIER
Model : CSW9619ENGBW
Category : Refrigerator