BV2126 - Blower JONSERED - Free user manual and instructions
Find the device manual for free BV2126 JONSERED in PDF.
| Brand | Jonsered |
| Model | BV2126 |
| Category | Leaf Blower / Vacuum |
| Engine Type | 2-stroke, 28 cm³ |
| Rated Power | 0.8 kW |
| Fuel Tank Capacity | 500 cm³ |
| Fuel Mixture | 50:1 (gasoline/2-stroke oil) |
| Max Blowing Speed | 8,600 min⁻¹ |
| Max Vacuum Speed | 7,500 min⁻¹ |
| Air Volume (Blow) | 425 cfm |
| Air Volume (Vacuum) | 445 cfm |
| Max Air Speed (Standard Nozzle) | 217 km/h |
| Max Air Speed (High Speed Nozzle) | 273 km/h |
| Weight (without fuel, with tube and nozzle) | 4.4 kg |
| Sound Pressure Level (Blow) | 99 dB(A) |
| Guaranteed Sound Power Level | 107 dB(A) |
| Spark Plug Electrode Gap | 0.6 mm |
| Recommended Spark Plug | RCJ-6Y |
| Fan Type | Radial |
| Included Accessories | Blower tube, standard nozzle, shoulder strap, collection bag (BV), vacuum tubes (BV) |
| Emissions Durability Period | 50 h |
Frequently Asked Questions - BV2126 JONSERED
User questions about BV2126 JONSERED
0 question about this device. Answer the ones you know or ask your own.
Ask a new question about this device
Download the instructions for your Blower in PDF format for free! Find your manual BV2126 - JONSERED and take your electronic device back in hand. On this page are published all the documents necessary for the use of your device. BV2126 by JONSERED.
USER MANUAL BV2126 JONSERED
EN Operator's manual 5-14
The initial language of this operator's manual is English.
Operator's manuals in other languages are translations from English.
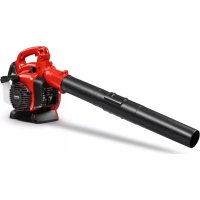
Overview
(Fig 1.)
- Shoulder strap (BV2126)
- Throttle trigger
- STOP switch
- Speed control
- Fan housing
- Fuel Tank Cap
- Air filter
- Choke
- Primer bulb
- Inlet cover
- Vacuum handle (BV2126)
- Cutters (BV2126)
- Fan impeller
- Standard nozzle
- High velocity nozzle (BV2126)
- Blower tube
- Tube clamp bolt
- Tube clamp nuts
- Muffler
- Ground wire
- Starter handle
- Starter device
- Carburetor adjustment screws
- Operator's manual
- Vacuum device with collection components that consists of items 26-30 below
- Collection bag tube
- Collection bag
- Vaccum tube in two sections
- Screw
- Shoulder strap
Symbols on the product
(Fig 2.) Warning
(Fig 3.) Read this manual
(Fig 4.) Use approved hearing protection
(Fig 5.) Use approved eye protection
(Fig 6.) Use approved dust mask
(Fig 7.) Use approved protective gloves
The product can cause objects to eject,
(Fig 8.) which can cause damage to the eyes
(Fig 9.) Safe distance
(Fig 10.) Do not go near the impeller as it turns
(Fig 11.) Do not let a child near the product
(Fig 12.) Sound power level
(Fig 13.) Noise level
Make sure that long hair is put up above
(Fig 14.) your shoulders
The product agrees with the applicable EC
(Fig 15.) directives
The product agrees with the applicable EAC
(Fig 16.) directives
The product agrees with the applicable
(Fig 17.) Ukraine directives
Note: Other symbols/decals on the product refer to certification requirements for other commercial areas.
Product liability
As referred to in the product liability laws, we are not liable for damages that our product causes if:
- the product is incorrectly repaired.
-
the product is repaired with parts that are not from the manufacturer or not approved by the manufacturer.
-
the product has an accessory that is not from the manufacturer or not approved by the manufacturer.
- the product is not repaired at an approved service center or by an approved authority.
SAFETY
Safety definitions
The definitions below give the level of severity for each signal word.

WARNING: Injury to persons.

CAUTION: Damage to the product.
Note: This information makes the product easier to use.
General safety instructions
- Use the product correctly. Injury or death is a possible result of incorrect use. Only use the product for the tasks found in this manual. Do not use the product for other tasks.
- Obey the instructions in this manual. Obey the safety symbols and the safety instructions. If the operator does not obey the instructions and the symbols, injury, damage or death is a possible result.
- Do not discard this manual. Use the instructions to assemble, to operate and to keep your product in good condition. Use the instructions for correct installation of attachments and accessories. Only use approved attachments and accessories.
- Do not use a damaged product. Obey the maintenance schedule. Only do the maintenance work that you find an instruction about in this manual. An approved service center must do all other maintenance work.
- This manual cannot include all situations that can occur when you use the product. Be careful and use your common sense. Do not operate the product or do maintenance to the product if you are not sure about of the situation. Speak to a product expert, your dealer, service agent or approved service center for information.
- Disconnect the spark plug cable before you assemble the product, put the product into storage or do maintenance.
-
Do not use the product if it is changed from its initial specification. Do not change a part of the product without approval from the manufacturer. Only use parts that are approved by the manufacturer. Injury or death is a possible result of incorrect maintenance.
-
Do not breathe in the fumes from the engine. Long term inhalation of the engine's exhaust fumes is a health risk.
- Do not start the product indoors or near flammable material. The exhaust fumes are hot and can contain a spark which can start a fire. Not sufficient airflow can cause injury or death because of asphyxiation or carbon monoxide.
- When you use this product the engine makes an electromagnetic field. The electromagnetic field can cause damage to medical implants. Speak to your physician and medical implant manufacturer before you operate the product.
- Do not let a child operate the product. Do not let a person, without knowledge of the instructions operate the product.
- Make sure that you always monitor a person, with decreased physical capacity or mental capacity, that uses the product. A responsible adult must be there at all times.
- Lock the product in an area that children and unapproved persons cannot access.
- The product can eject objects and cause injuries. Obey the safety instructions to decrease the risk of injury or death.
- Do not go away from the product when the engine is on.
- The operator of the product is responsible if an accident occurs.
Make sure that parts are not damaged before you use the product. - Make sure that you are at a minimum 15m (50 ft) away from other persons or animals before you use the product. Make sure that a person in adjacent area knows that you will use the product.
- Refer to national or local laws. They can prevent or decrease the operation of the product in some conditions.
Safety instructions for operation of the blower
- Use the product only for blowing or removal of leaves and other debris on the ground.
- Do not operate the product when you are tired, ill, or have used alcohol, drugs or medicine.
- Do not let bystanders or animals to be less than 15 m (50 ft) from the operator.
-
The product can eject objects at high speed that can ricochet and hit the operator. This can cause eye damage.
-
Do not point the blower nozzle in the direction of persons or animals.
Make sure that long hair is put above your shoulders. - Stop the engine before you assemble or disassemble the accessories or other components.
- Do not operate the product without the guard.
- Do not operate the product if there are persons in the work area. Stop the product if a person goes into the work area.
- Do not operate the product in a space with unsatisfactory airflow. If the airflow is not sufficient, it can cause injury or death because of asphyxiation or carbon monoxide.
- The muffler is very hot while the product is on, after it stops and when it runs at idle speed. Be careful near flammable materials and flammable fumes.
- Do not touch the inlet cover area. Keep jewelry and loosely hanging clothing away from the inlet area.
- Always keep correct footing and operate the product only on safe and level surfaces. Slippery or not stable surfaces, such as ladders, can cause a loss of balance or control.
- Do not operate the product in a high area, such as on a roof.
- Secure the product during transport.
- Operate the product only at recommended hour. Obey the local regulations. Usual recommendations are 9:00 a.m. to 5:00 p.m. Monday through Saturday.
- Operate the product at the lowest possible throttle to do the work.
- Make sure that you cannot fall when you use the product. Do not tilt when you operate the product.
- Make sure that the product is in good condition before operation, specially the muffler, air intake and air filter.
- Use a rake or a broom to loosen ground debris before operation of the product.
- If the work area is dirty, spray it with a hose.
- Use the product as an alternative to a hose to save water.
- Blow debris safely. Look out for children, animals, open windows or vehicles.
- Do not point the product at easily damaged plants.
- Do not blow air in the direction of objects such as walls, large rocks, vehicles and fences.
- If you do work at inner corners blow from the corner and into the center of the work area. If not, debris can hit your face and cause eye injury.
- Use the full nozzle extension to keep the air stream near the ground.
- It is necessary that bystanders wear eye protection.
- Dispose the debris in the waste receptacles after use of the product.
Safety instructions for operation of the vacuum
- Prevent damage to the fan. Do not vacuum large, solid objects such as wood, cans, rubber mulch or long pieces of string.
- Do not let the vacuum tube hit the ground.
- Stop the engine and disconnect the spark plug cap before you remove a blockage or clogged material.
Personal protective equipment
- Always use correct personal protective equipment when you operate the product. The personal protective equipment does not erase the risk of injury. The personal protective equipment decreases the grade of injury if an accident occurs.
- Always use an approved eye protection while you operate the product.
- Do not operate the product with bare feet or with open shoes. Always use heavy-duty slip-resistant boots.
- Use heavy, long pants.
- If it is necessary, use approved protective gloves.
- Use a helmet if it is possible that objects fall on your head.
- Always use approved ear protection while you operate the product. Noise for a long period can cause noise-induced hearing loss.
Always use an approved dust mask while you operate the product in dusty environments.
Make sure that you have a first aid kit near.
Protective devices on the product
-
Make sure that you regularly do the maintenance to the product.
-
The life of the product increases.
- The risk of accidents decreases.
Let an approved dealer or an approved service center regularly examine the product to do adjustments or repairs.
- Do not use a product with damaged protective equipment. If the product is damaged, speak to an approved service center.
Stop switch
Start the engine. Make sure that the engine stops when you move the stop switch to the stop position.
(Fig 18.)
Muffler

WARNING: Do not touch the muffler if it is hot. The muffler is very hot while the engine runs and after it stops. If you touch the muffler, it can cause burns.
- Do not use an engine with a damaged muffler. A damaged muffler increases the noise level and the risk of fire. Keep a fire extinguisher near.
- Examine regularly that the muffler is attached to the product.
- Do not touch the engine or the muffler when then engine is on. Do not touch the engine or the muffler for a while after the engine stops. Hot surfaces can cause injuries.
- A hot muffler can cause a fire. Be careful, if you use the product near flammable liquids or fumes.
- Do not touch the parts in the muffler, if the muffler is damaged. The parts can contain some carcinogenic chemicals.
- Some blower models are have a spark-arresting screen CLEAN and replace the screen at specified intervals. See the Maintenance section (MAINTENANCE on page 11).(Fig 19.)
Fuel safety
- Do not start the product if there is fuel or engine oil on the product. Remove the unwanted fuel/oil and let the product dry. Remove unwanted fuel from the product.
If you spill fuel on your clothing, change clothing immediately. - Do not get fuel on your body, it can cause injury. If you get fuel on your body, use a soap and water to remove the fuel.
- Do not start the engine if you spill oil or fuel on the product or on your body.
- Do not start the product if the engine has a leak.
Examine the engine for leaks regularly. - Be careful with fuel. Fuel is flammable and the fumes are explosive and can cause injuries or death.
- Do not breathe in the fuel fumes, it can cause injury.
Make sure that there is a sufficient airflow. - Do not smoke near the fuel or the engine.
-
Do not put warm objects near the fuel or the engine.
-
Do not add the fuel when the engine is on.
- Make sure that the engine is cool before you refuel.
- Before you refuel, open the fuel tank cap slowly and release the pressure carefully.
- Do not add fuel to the engine in an indoor area. Not sufficient airflow can cause injury or death because of asphyxiation or carbon monoxide.
- Tighten the fuel tank cap carefully or a fire can occur.
- Move the product at a minimum of 3m (10 ft) from the position where you filled the tank before a start.
- Do not put too much fuel in the fuel tank.
- Make sure that a leak cannot occur when you move the product or fuel container.
- Do not put the product or a fuel container where there is an open flame, spark or pilot light. Make sure that the storage area does not contain an open flame.
- Only use approved containers when you move the fuel or put the fuel into storage.
- Empty the fuel tank before long-term storage. Obey the local law on where to dispose fuel.
- Clean the product before long-term storage.
- Remove the spark plug cable before you put the product into storage to make sure that the engine does not start accidentally.
Safety instructions for maintenance

WARNING: Incorrect maintenance can result in serious engine damage or in serious injury.
The owner is responsible for the performance of all necessary maintenance as specified in the operator's manual. Disconnect the spark plug before maintenance. Do not disconnect the spark plug before carburetor adjustments.
ASSEMBLY

WARNING: Read the safety chapter before you assemble the product.
To install the the blower tube and nozzle on the product
Note: The bolt must be sufficiently loose to put the blower tube into the blower outlet. Turn the bolt counterclockwise with a screwdriver to loosen it.
-
Align the rib on the upper blower tube with the groove in the blower outlet. Move the tube into position.
-
Turn the bolt clockwise with a screwdriver to attach the tube.
Note: Do not use any tool on the nut.
- Align the slots on the lower blower tube with the tabs on the upper blower tube. Move the lower blower tube onto the upper blower tube.
- Turn the lower blower tube clockwise until there is a click.
To install the collection bag with the different vacuum tubes
The vacuum device is an accessory that is included in some models.

WARNING: Turn off the engine before you attach the the tubes to the product.
- Open the collection bag. Put the collection bag tube from the inner side of the bag to attach it to the vacuum inlet opening. Make sure that the elastic seats in groove. Close the zipper on the bag.
- Remove the blower tube and install the collection bag tube. Install and tighten the tube clamp bolt. Attach the strap to the collection bag loops.
- Align the arrow on the lower vaccum tube with the arrow on the upper vaccum tube. Push the lower
vacuum tube into the upper vaccum tube approximately 7cm (3 in). Push until the lower tube is safely attached in the upper tube. Assemble the two tubes with the supplied screw.
- Use a screwdriver to open the cover. Put the screwdriver at the arrow on the inlet cover. The arrow is below the edge of the cover on the opposite side of the hinge.
- Push the vaccum tubes into the large opening at the bottom of the blower. Align the tabs with the slots in the tubes. Turn until the bayonet mount locks. The lock symbols must be aligned.
OPERATION

WARNING: Read and understand the safety chapter before you operate the product.
Fuel
To use fuel

CAUTION: This product has a two-cycle engine. Use a mixture of gasoline and two-cycle engine oil. Make sure to use the correct quantity of oil in the mixture. Incorrect ratio of gasoline and oil can cause damage to the engine.
Gasoline

CAUTION: Do not use gasoline with an octane number less than 90 RON (87 AKI). This can cause damage to the product.

CAUTION: Do not use gasoline with more than 10% ethanol concentration (E10). This can cause damage to the product.
Always use new unleaded gasoline with a minimum octane number of 90 RON (87 AKI) and with less than 10% ethanol concentration (E10).
- Use gasoline with a higher octane number if you frequently use the product at continuously high engine speed.
Two-cycle engine oil
- Use only high quality two-cycle engine oil. Use only an air cooled engine oil.
- Do not use other types of oil.
- Mixture ratio 50:1 (2%)
| Gasoline Oil | |
| 1 U.S. Gal. 77 ml (2,6 oz) |
| Gasoline Oil | |
| 1 UK Gal. 95 ml (3,2 oz) | |
| 5 l 100 ml (3,4 oz) |
To make the fuel mixture
Note: Always use a clean fuel container when you mix the fuel.
Note: Do not make more than 30 days quantity of fuel mixture.
- Add half of the gasoline quantity.
- Add the full quantity of oil.
- Shake the fuel mixture to mix the contents.
- Add the remaining gasoline quantity.
- Shake the fuel mixture to mix the contents.
- Fill the fuel tank.
To add fuel
Always use a fuel container with an antispill valve.
- If there is some fuel on the container, remove the unwanted fuel and let the container dry.
- Make sure that the area near the fuel tank cap is clean.
- Shake the fuel container before you add the fuel mixture to the fuel tank.
To start and stop
Before you start the engine
- Examine the product for missing, damaged, loose or worn parts.
- Examine the collection bag. Make sure that the collection bag is not damaged and that the zipper is closed.
-
Examine the nuts, screws and bolts.
-
Examine the air filter.
- Examine the throttle trigger for correct operation.
- Examine the stop switch for correct operation.
- Examine the product for fuel leaks.
To start a cold engine

WARNING: Do not wind the starter rope around your arm.

CAUTION: Do not hold the product with your foot.

CAUTION: Do not pull the starter rope to the end position. Do not let go of the starter rope handle when the starter rope is extended. This can damage the product.
Note: If the engine stops, move the choke control to the closed position and do the starting steps again.
- Fill the fuel tank with a clean fuel mixture.
- Push the primer bulb 10 times until the fuel starts to fill the bulb. The primer bulb must not be full with fuel.(Fig 20.)
- Move the engine choke control to above the FULL CHOKE (closed) position.(Fig 21.)
- Push the variable speed control fully counterclockwise.(Fig 22.)
- Use your left hand to hold the body of the machine on the ground.
- Move the choke control to the 1/2 position and pull the starter rope handle until the engine starts and runs.(Fig 23.)
- Run the engine for approximately 10 seconds.
- Push and hold the throttle trigger fully through all remaining steps.
- Move the choke control to the OFF CHOKE (opened) position.(Fig 24.)
- Warm the engine up for 1 minute.
To start a warm engine
- Push and hold the throttle trigger.
- Move the choke control to 1/2 position.
- Pull the starter rope handle quickly while you pull the throttle trigger until the engine runs.
- Move the choke control to the OFF CHOKE (opened) position.
To stop the engine
- Push and release the engine STOP switch. The switch automatically returns to the ON position. Wait
7 seconds before you try to restart the product to make sure that the switch resets.
To use a nozzle
- Use the standard nozzle when precision and high air stream concentration is necessary.(Fig 25.)
- Use the high velocity nozzle when a wider airstream and large air velocity is necessary. (Fig 26.)
To adjust the blower nozzle
- Twist the nozzle to the left to disengage the bayonet mount.
- Move the nozzle to applicable position.
- Twist the nozzle to the right until you feel a click.
To vacuum
Before you vacuum, put on the necessary safety equipment.

WARNING: Make sure that the collection bag is not damaged and that the zipper is closed before use. Do not use a bag that is damaged. This prevents injury caused by flying debris. Left hand operation increases the risk. Do not let your body touch the exhaust outlet area.

WARNING: Do not start the blower if the inlet cover is open or damaged (except if the vacuum tube is fitted).
- During operation of the blower the collection bag must be hold by the shoulder strap. The strap must be worn on the top of the shoulder.
- Start the blower. Obey the instructions in the start and stop section Before you start the engine on page 9. Read the safety instructions SAFETY on page 6.
To empty the collection bag

WARNING: Always examine the collection bag. Make sure that it is not damaged and that the zipper is closed before use. Do not use a damaged bag. There is a risk of injury because of flying debris. Be careful if left hand operation is applied. Do not touch the exhaust outlet area.
- Stop the product.
- Open the zipper on the side.
- Empty the collection bag.
MAINTENANCE

WARNING: Read and understand the safety chapter before you clean, repair or do maintenance on the product.
Maintenance schedule
Make sure that you obey the maintenance schedule. The intervals are calculated from daily use of the product. The intervals are different if you do not use the product each day. Only do the maintenance work that is found in this manual. Speak to an approved service center about other maintenance work not found in this manual.
Daily maintenance
Clean the external surfaces.
- Examine the speed control and the throttle trigger function. Replace damaged parts.
- Examine the stop switch. If it is necessary, replace it.
- Examine the idle speed.
- Clean the air filter. If it is necessary, replace it.
- Make sure that the inlet cover can be locked in closed position. Make sure that the impeller is clean.
- Tighten all nuts and screws.
- Make sure that the housings are free of cracks.
- Make sure that the collection bag is not damaged and that the zipper works. Replace the bag if necessary.
Weekly maintenance
- Examine the condition of the starter device, the starter rope and the tension spring. Replace all damaged parts.
- Examine the condition of the air intake at the starter device. Remove debris if the air intake is clogged.
- Clean the external side of the spark plug. Remove it and examine the electrode gap. Adjust the distance to 6mm (0.024 in) or replace the spark plug.
- Clean the blades on the impeller.
- Clean the spark-arresting screen and replace it if necessary (not on mufflers with a catalytic converter).
- Clean the carburetor area.
Clean the air filter.
Monthly maintenance
- Examine the starter rope handle and the starter rope.
Clean the fuel tank. - Clean the carburetor and the area around it.
- Clean the blades on the impeller.
- Examine the fuel lines for cracks or other damage. Change if necessary
-
Change the fuel filter in the fuel tank.
-
Examine all cables and connections.
- Replace the spark plug.
- Change the air filter.
Yearly maintenance
- Examine the spark plug.
- Clean the external surface of the carburetor and its adjacent areas.
Clean the cooling system. - Examine the spark arrester screen.
- Examine the fuel filter.
- Examine the fuel hose for damage.
- Examine all cables and connections.
50 hours maintenance
- Have an approved service center repair or replace the muffler.
To adjust the idle speed
- Make sure that the air filter is clean and the air filter cover is attached before you adjust the idle speed.
- Adjust the idle speed with the idle adjustment screw T which is identified with "T" mark. (Fig 27.)
-
The idle speed is correct when the engine operates smoothly in all positions.
-
Turn the idle adjustment screw clockwise for higher speed.
- Turn the idle adjustment screw counterclockwise for lower speed.
To do maintenance on the spark arrester screen
Use a wire brush to clean the spark arrester screen.
To clean the cooling system
Clean the parts of the cooling system with a brush. (Fig. 28.)
To examine the spark plug

CAUTION: Always use the recommended spark plug type. Incorrect spark plug type can cause damage to the product.
- Examine the spark plug if the engine is low on power, is not easy to start or does not operate correctly at idle speed.
- To decrease the risk of unwanted material on the spark plug electrodes, obey these instructions:
a) Make sure that the idle speed is correctly adjusted.
b) Make sure that the fuel mixture is correct.
c) Make sure that the air filter is clean.
- If the spark plug is dirty, clean it and make sure that the electrode gap is correct, see TECHNICAL DATA on page 12.(Fig 29.)
- Replace the spark plug if it is necessary.
To do the maintenance to the air filter
To clean the air filter
-
Remove the air filter cover and remove the air filter. (Fig 30.)
-
Clean the air filter with warm soap water. Make sure that the air filter is dry before you install it.
- Replace the air filter if it is too dirty to fully clean it. Always replace a damaged air filter.
- If your product has a foam air filter, apply air filter oil. Only apply air filter oil to a foam filter. Do not apply oil to a felt filter.
TECHNICAL DATA
| unit B2126 | (125B28HV) | BV2126(125B28HV) | |
| Engine Specifications | |||
| Cylinder displacement cm | 3 | 28 28 | |
| Electrode gap mm 0.6 0.6 | |||
| Fuel tank volume cm | 3 | 500 500 | |
| Idling speed min | -1 | 2800 - 3200 2800 - | 3200 |
| Maximum power speed min | -1 | 8000 8000 | |
| Power output kW 0.8 0.8 | |||
| Spark plug | RCJ-6Y | RCJ-6Y | |
| Maximum speed blow mode | min-1 | 8600 8600 | |
| Maximum speed vaccum mode | min-1 | -- | 7500 |
| Emission durability period | h | 50 50 | |
| Noise and Vibration Data | |||
| Equivalent vibration level at handles equipped with blower tubes and nozzle (original)- see note 1 | m/s2 | 8.3 8.3 | |
| Equivalent vibration level at handles equipped with vaccum tubes (original), left/right - see note 1 | m/s2 | --/-- | 6.4/8.3 |
| Equivalent sound pressure level at the operators' ear measured according to ISO 22868 equipped with blower tubes and nozzle (original) | dB(A) | 94 99 | |
| Equivalent sound pressure level at the operators' ear measured according to ISO 22868 equipped with vaccum tubes (original) | dB(A) | -- | 99 |
| Sound power level, guaranteed (LWA) - see note 2 | dB(A) | 107 107 | |
| Sound power level, measured - see note 2 | dB(A) | 106 106 | |
| Product Dimensions | |||
| Weight (without fuel but with blower tube and standard nozzle fitted) | kg 4.3 4.4 |
Note 1: Reported data for equivalent vibration level has a typical statistical dispersion (standard deviation) of 1m / s^2
Note 2: Noise emissions in the environment measured as sound power (L_WA) in conformity with EC directive 2000/14/ EC. Reported sound power level for the machine has been measured with the original cutting attachment that gives the highest level. The difference between guaranteed and measured sound power is that the guaranteed sound power also includes dispersion in the measurement result and the variations between different machines of the same model according to Directive 2000/14/EC.
Note 3: Reported data for equivalent sound pressure level for the machine has a typical statistical dispersion (standard deviation) of 1 dB (A).
| Fan Unit B2126 BV2126 | |||
| Type Radial fan Radial fan | |||
| Max. air velocity, standard nozzle km/h 217 217 | |||
| Max. air velocity, high velocity nozzle* km/h 273 273 | |||
| Air volume blow mode cfm 425 425 | |||
| Air volume vaccum mode cfm -- 445 | |||
| *optional accessory for some models | |||
ACCESSIONS
| B2126 | |
| Approved accessories Type | |
| High velocity nozzle 545 119 502 | |
CONTENTS OF THE EC DECLARATION OF CONFORMITY
We, Husqvarna AB, SE 561 82 Huskvarna, SWEDEN, declare under our sole responsibility that the represented product:
| Description Gasoline Blower / Blower-Vacuum | |
| Brand Jonsered | |
| Platform / Type / Model | Platform125B28HV, repr-resenting model B2126, BV2126 |
| Batch | Serial number dating 2013 and onwards |
complies fully with the following EU directives and regulations:
| Directive/Regulation | Description |
| 2006/42/EC | “relating to machinery” |
| 2014/30/EU | “relating to electromagnet-ic compatibility” |
| 2000/14/EC | “relating to outdoor noise” |
Harmonized standards and/or technical specifications applied are as follows: EN ISO 12100, EN ISO 1186-1, CISPR 12, ISO 14982
In accordance with directive 2000/14/EC, Annex V, the declared sound values are stated in the technical data section of this manual and in the signed EC Declaration of Conformity.
SMP Svensk Maskinprovning AB has carried out a voluntary examination on behalf of Husqvarna AB, providing a Certificate of conformity to EC Council directive 2006/42/EC for machinery.
The certificate, as provided on the signed EC Declaration of Conformity, is applicable to all manufacturing locations and Countries of Origin, as stated on the product.
The supplied Gasoline Blower / Blower-Vacuum conforms to the example that underwent examination.
Inhalt
EINLEITUNG. 15
WARTUNG. 22
SICHERHEIT 16
TECHNISCHE DATEN 23
MONTAGE. 19
ZUBEHÖR 24
BETRIEB. 20
(Sorg for at langt hare settes opp over Fig 14.) skuldrene
Dette Produktet samsvarer med gjeldende (Fig 15.) EF-direktiver
Dette Produktet samsvarer med gjeldende (Fig 16.) EAC-direktiver
Dette Produktet samsvarer med gjeldende (Fig 17.) ukrainske direktiver
Merk: Øvride symboler/klistremerker angitt på produitet gjelder sertifiseringskrav for andre markeder.
Produktansvar
INNHOLDET I EF-SAMSVARSERKLÄERINGEN
Vi Husqvarna AB, SE 561 82 Huskvarna, SWEDEN, erklærer på eget ansvar at det representerteproduktet:
| Beskrivelse Gasoline Blower / Blower-Vacuum | |
| Merke Jonsered | |
| Plattform/type/modell | Plattform125B28HV, som representerer modellen B2126, BV2126 |
| Parti | Serienummer datert 2013 og senere |
TEKNISET TIEDOT. 107
ASENNUS. 103
LISAVARUSTEET 108
KAYTTO 104
EU:N VAATIMUSTENMUKAISUUSVAKUUTUS.108
JOHDANTE
Käyttoohjekirja
Opioi yia tv aaaaleia
Oi TapaKaTOW Opiouo TApexouv To a o oObaPOTnTAC Yia KAte TPOeIbOToINTIKn

NPOEIAONOHSH: TpauiatouoC atouwv.

PPOsOXH:ZnuiTou TpoiovToC.
IepiexoEvaautecoi IAnpoopiecdeltakoauovnu Xpnou Tou TpoioVTOC.
EviKcObnyieC aOpaAeiaC
Xpnoiopoioane owa ta to poiov. Aoyw tns eepaalmevc xnpang mtopeia va npokntheipauatioos n thavatox Xpnoiopoioane to pioov mvo yia tic epyaoc nou avapoeovta oTo npov Exyeipidio.Mnv xpnoiopoieite to poiov yia aAee c epyaoc
Tnpie Tc odnyie tsou npovtoe Exyeiipiou. Tnpie Ta oubla aopaaiaac kai tio odnyie c opaaiaac. Ea v xepiatnc dev npei tic odnyie c kta oubla, mtopei va pokanthei pauaataoos, nmu an thavatoc.
Mny aToppiyete auto to Exyepioio. Xpnaiotoinote TIC oyniec yia tn ouvapmooynon, tn xpnan kai tn biatnpn an Tou pioovtoe e ka h kataoan. Xpnaiotoinote TIG oyniec yia tn owtnykataoan TwV EApntmuaw kai twv TTapeAkoEvw. Xpnaiotoinite movo Eykekiueva EApntmaT kapanpalekoeva.
Myn xpnoipotioite npoiovta nou napouiaocuv Znui. Tnpeite to npoypaumau oovtnpnoang. EkTealeite mvo tic epyaiec ouvtnpnans Tou avapepovtai o odnyies tou npovtoc yxepidiou. OEs oi utoloitec epyaiec ouvtnpanncpietie va ekteauvtai ato eva EyKepiEvO KETPO ePbeta.
To npov Exyepio 0ev Tepiaaabei oec ts kataotaoic Tou u Tnpoei va Tpokuoukata n xpnoTou pioovtoc. Na eote TpoeKTikoai va xpnoipoiote tv Koivn loyik. Mny xnpoiopoite to npov kai mnv ekteale tuvtnpn an ae auto, ev 6ev eote oiyoupoi ia tv kataoana. Ateuuvthe
PpOToTeutIkec diataeic oTo Tpoiov
- Shoulder strap (BV2126)
- Throttle trigger
- STOP switch
- Speed control
- Fan housing
- Fuel Tank Cap
- Air filter
- Choke
- Primer bulb
- Inlet cover
- Vacuum handle (BV2126)
- Cutters (BV2126)
- Fan impeller
- Standard nozzle
- High velocity nozzle (BV2126)
- Blower tube
- Tube clamp bolt
- Tube clamp nuts
- Muffler
- Ground wire
- Starter handle
- Starter device
- Carburetor adjustment screws
- Operator's manual
- Vacuum device with collection components that consists of items 26-30 below
- Collection bag tube
- Collection bag
- Vaccum tube in two sections
- Screw
- Shoulder strap
Symbole znajdujace sie na Produkcie
| unit B2126 | (125B28HV) | BV2126(125B28HV) | |
| Engine Specifications | |||
| Cylinder displacement cm | 3 | 28 28 | |
| Electrode gap mm 0.6 0.6 | |||
| Fuel tank volume cm | 3 | 500 500 | |
| Idling speed min | -1 | 2800 - 3200 2800 - | 3200 |
| Maximum power speed min | -1 | 8000 8000 | |
| Power output kW 0.8 0.8 | |||
| Spark plug RCJ-6Y RCJ-6Y | |||
| Maximum speed blow mode | min-1 | 8600 8600 | |
| Maximum speed vaccum mode | min-1 | -- | 7500 |
| Emission durability period | h | 50 50 | |
| Noise and Vibration Data | |||
| Equivalent vibration level at handles equipped with blower tubes and nozzle (original)- see note 1 | m/s2 | 8.3 8.3 | |
| Equivalent vibration level at handles equipped with vaccum tubes (original), left/right - see note 1 | m/s2 | --/-- | 6.4/8.3 |
| Equivalent sound pressure level at the operators' ear measured according to ISO 22868 equipped with blower tubes and nozzle (original) | dB(A) | 94 99 | |
| Equivalent sound pressure level at the operators' ear measured according to ISO 22868 equipped with vaccum tubes (original) | dB(A) | -- | 99 |
| Sound power level, guaranteed (LWA) - see note 2 | dB(A) | 107 107 | |
| Sound power level, measured - see note 2 | dB(A) | 106 106 | |
| Product Dimensions | |||
| Weight (without fuel but with blower tube and standard nozzle fitted) | kg 4.3 4.4 | ||
| Note 1: Reported data for equivalent vibration level has a typical statistical dispersion (standard deviation) of 1 m/s2.Note 2: Noise emissions in the environment measured as sound power (LWA) in conformity with EC directive 2000/14/ EC. Reported sound power level for the machine has been measured with the original cutting attachment that gives the highest level. The difference between guaranteed and measured sound power is that the guaranteed sound power also includes dispersion in the measurement result and the variations between different machines of the same model according to Directive 2000/14/EC.Note 3: Reported data for equivalent sound pressure level for the machine has a typical statistical dispersion (stand- ard deviation) of 1 dB (A). | |||
| Fan Unit B2126 BV2126 | |||
| Type Radial fan Radial fan | |||
| Max. air velocity, standard nozzle km/h 217 217 | |||
| Max. air velocity, high velocity nozzle* km/h 273 273 | |||
| Air volume blow mode cfm 425 425 | |||
| Air volume vaccum mode cfm -- 445 | |||
| *optional accessory for some models | |||
ACCESSIONS
| B2126 | |
| Approved accessories Type | |
| High velocity nozzle 545 119 502 | |
TRESC DEKLARACJI ZGODNOSCI Z NORMAMI WE
TEXHUNECKOE OBCJNYKINBAHNE. 199
TEXHUNCHECKNE DAHHbIE 200
PPIHADJIEXKHOCTN. 202
CODEPXAHNE DEKJIAPAUINO COOTBETCTBUN EC. 202
BBEDEHNE
PykoBoDCTBO no 3KcPnyatau
NcxOdbHbTeKCTDaHHORo pyKOBOdCTBa no pa6oTe COCTaBHeHa aHrnnckOM 3bIke.PyKOBOdCTBa No
paBoTe Ha npyrnx Ra3bikax RaBnaOTcpeBODamn C aHJIINCKORO.
063op
(Fig 1.)
- HanneuHbI pemeHb (BV2126)
2.Пускobое устюп CTBOДрocseя - BbiknioateIb
- PerylnpobAHne ckopocTn BpauneHna
- Kopnyc BENTUNIaTopa
6.KpbIiKa TOnJIINBHO 6aKa
7.Bo3dyHbIyHnTp
8.Поцoc
9.Г руша - BnycknHa KpbIiKa
- Puyka nbilecoca (BV2126)
- Pekyüne 3BHeBb (BV2126)
- KpbIbuaTka BeHTnIaTopa
- CtaHndapThbHnHaKoHeuHnK
- BbICOKOCKOPoCTHa Ha cAaKa (BV2126)
- Tpy6ka Bo3dIyxoIyBKN
17.BoJITΦKcaunTpy6kn - Raik Kpennen XomyTa Tpy6k
19.Глштелb
20.Побовдзамления - Pучkaстарта.
- Ctraptrep
- BnHbI dIe peryu npOBKn Kap6iopaTopa
- RykoBoDCTBO IO 3KcPnyatauIN
- BcacbIbaIOue yCtpoIcTBO c HnHexepnBeDeHHbIMKOMNoHEHTAMn dJa c6opa 26-30
- Tpy6ka c6opHnka
27.C6OpHnK - BcacbBaioa TaP6ka, coCToiaa n3 dByxCeku
- BnHT
- HanneuHbI peMeHb
YcNoBhIe 06o3HaueHnHa n3dJIIN
(Fig 2.) IpdeynpeKdEHe
IpoHTnte daHHOe pyKOBOcTBO nO (Fig 3.) 3Kcnnyatauun
IcnoJb3yIte oOo6peHHbIe cpeIcTBA (Fig 4.) 3aunTbI opraHOB cnyxa
IcnoJb3yIte oO6peHHbIe cpeIcTBA (Fig 5.) 3aunTbI rna3
IcnoJIb3yIe Odo6peHHyIO nbIe3aunTHyO (Fig 6.) Macky
IcnoJb3yTe oOobpeHHbIe 3aunTHbIe (Fig 7.) nepuATkn
13dennme MoKeT O6paCbBaTb HaxoJnuecHa 3emJI ppeMeTb, YTO (Fig 8.) MoKeT npuHHTb BpeI rna3am
(Fig 9.)БezoNaChaJdNcTaHcUa He noDxOAnTe 6IIN3K K KpbIbYaTKe, KOrda (Fig 10.) OHa BpaAaETc
He no3B0JIaTe DeTAM haoOnTbCra pAOM (Fig 11.) n3dennem
(Fig 12.) UpoBHeB 3ByKOBoM MoUHOCTH
(Fig 13.) UpoBHeB uyma y6eIITecb, YTO IINHbIe BOIOcbl y6paHbI
(Fig 14.) BBiue ypoBnI neu
I3dennne COOTBeTCTByeT DeNCTBryUcIM (Fig 15.) dInpeKtubam EC
I3dennne COOTBeTCTBye T DeiCTBHyUcIM
(Fig 16.) DnpeKtBam EAC
I3dennne COOTBETCTByeT DeiCTBYUOM (Fig 17.) dInpeKTHbAM YkpanHbI
PpmeaHHe:OctaIbHbIe CmBOnbl/3TNKeTKn Ha n3JeINOTBeuHaOT Tpe6oBaHnM, PpeDbraBnEbmK CeptnΦnKaun BdpYnx KOMMepeCkNx 3OHax.
OTBETCTBEHHOCTb n3ROTOBNTEJIa
B COOTBETCTBmC 3aKoHAMn O6 OTBETCTBEHHOCHTN 13ROTOBNTeJI Mbl He Hecem OTBETCTBEHHOCHTN 3a yueep6,BbI3BaHHbI 3KcPlyaTaunE HaWero N3dJIINBA pe3yIbTate:
- HeHaIeJekaIero pemOHTa I3JeJIra;
-
nCnoJb3OBAHnI dIpypeMOHTa I3DeJIINr HeOpuRHaHbHbIX DeTaNEn NII DeTaNEn, HeoOObpeHHbIX npOn3BODInTeIeM;
-
IcNoJIb3OBAHnI HeOpuINHaNbHbIX DoONHITeJIbHbIX
- pInHaJdNeXHOCTe NII HEOO6peHHbIX
- IpOn3BOUInTEJIem;
- peMOHTa N3dEJIINB HeaABTOpN3OBaHHOM CepBnCHOM CEHTpe INHHeKBaJIInΦuIPOBaHHbIM CNEuaJIInCTOM.
MEPbI BE3OПАСHОCTN
IHCTpyKznn no 6e3oNaChOCTn
Hnke npBedeHbI onpepeHnHa ypoBH onaCHOCTn dna KaKdo rHaJIbHO rOBA.

CpeIcTBA ININBnDyaJbH0N 3aUNTbI
Bcerda nCnoIb3yIte COOTBeTCTByIOuIe 3aunTHoe chapxkeHne npn 3KcNpyatauIN u3deJIy. 3aunTHoe chapxkeHne He NCKIIOUaET pNCK TpaBMIpOBAHJ. OHO CHXkaet TjKeCTb TpaBMbl Pn HecCaCTHom clyuae.
Bcerda noIb3yItecOo6peHHbIMn cpeCTBaMn 3aunTbI rna3 npu nCNOJIb3OBaHn n3denn.
- Pn3KcNpyataunn 3aenna3anpeaaetca HaxoNTc8 6ocNKOM nHn HOCHTb OTKpbIITyO 06yB. Bcerda HaedeBaIte npouhle HeckoJIb3kne 6OTNHKn.
- HaedeBaIe npOuHbIe dIINHHbIe 6pIOKn.
- Pn Heo6xoJIMocTn nCNoJb3yJTe Odo6peHHbIe 3aunTHbIe nepuATkn.
HaeneBaIe IJNem,ecn cyuieCTByET BepoarHOCTb nonaDAnHNo6BeKToB B rOIOBy.
BcerdaHaedeBaIte Odo6peHHbIe 3aunTHbIe HayuHnK npu nCNOJb3OBaHm u3deJIy. IInTeNbHOe BO3dEICTBne Wyma MoKeT npNBecTn K CHNXeHHO cnyxa.
-ПиЗКССИУТАЦИ N3ДЕЛЯВ 3aNbIJIeHHО CpeDE BcERdA NcNoJIb3yIte Odo6peHHyIO NbJIe3aUHTHyO MACKY.
BceIa nmeIte npi ce6e anTeky dIy OKa3AHn IepBOH MeUNHcKoN NOMOuN.
3auntbte yctpoictba Ha n3deJIIN
PerynphOBbInonHnTeTexHueckoe 06cnykBaHne n3dennr.
- NobbiwaeTcCpOK Cnyk6bln3deJIn.
- yMeHbIaETC pNCK HeCuaCThBIX CnyaeB.
BaawabTOpN30BaHHbI dInepnJIc cepBncHbI ceHTp DonKeH peryJrpoNIOpeBeprN3dJeNne BbIOnHrTb Heo6xOIMMyo peRyJnpOBky n pemOH.
3anpeaetc3KcnnyatnpoBaTb n3dene,ecn 3aunTHoe o6opydoBaanoe nobpejdeHo. Pn npOBpeJHnn n3dennr o6paauTecb B aBTOpu3OBAHHb CepBnchbl CEHTp.
BbikluoyateIb
3anyte DBuratelb. Y6eintecb, yTO DBuratelb OCTaHaBnBaetc npy yCTaHOBKe BblIOHuaTeB NIOJOKeHne OCTaHOBKn.
(Fig 18.)
InyuHTeJIb

IPEyIeHHe: He npKacaiTecb K Iynten, noka OH He octbl. Bo Bpemra pabotb Dbratena rnyntenb CnblHO HarpeBaetc n octaetc oeyb TropuHm nocne ero octahOBKn. PpIKoCHOBHe N IyNTeHIO MOKeT Bbl3BaTb OXOriN.
3anpeaetcHcnoIb30BaTb Dnuratelbc NOBpeKdEHHbIM rIyuHTeJEM. NOBpeXdEHbIM rIyuHTeNb NOBIIaAET yPOBeHb IyMa n pCK noxapa. DePKeNTe ORHeTuHTeNb B npedeJax DOcraemocTn.
- PepnoDnueckn npOBepaTe HaedxHocTb KpeIeHnra TnyuTeJI K KopnyCy u3deJInr.
He npikacaiTecb K DnBraTeIIO nnr rnyuNTeIO BO Bpempa6oTb DnBraTeJIa. He npikacaiTecb K DnBraTeJIIO nnr rnyuNTeIO B TeueHne HeKOTOPORO BpemEHN NocJe BBKJIOUeHn A DnBraTeJIa. TOpAyne NOBepxHOCTN MOrYT CTaTB pUnHHoTpaBM.
-TopaHnIgNyUHTeJIb MoKET CTaTb npuHHOIpoXapa.CobJIOdaIteOCTOpOXHOCTB pNINcNoJIb3OBaHmN 13dEJIyB6NJ3INerKOBocPnMaHeHIOUxCxKJNUKOCTe INJrRa3OB.
He npikacatecK DeTajm TnyuHTeJI,ecn OH NOBpeXdH. Ha deTajx Moryt HaxoNTbc KaHeporeHHbIe XIMNueckne BeueCTBa.
- HeKoTOpbIe MoDeJIb BO3dUxOyBOK OcHaJIeHbI NCKporacnteJIbHOI cTeKoi. IpoBoIte OuNCTky N 3aMeHy cTeKN YpeE3 OnpedeJIeHHbIe IpomExKyTKN BpemeHN. CM. pa3dEn "TexHnueckoe o6cnykINBaHne" (TEXHnueCKOE O5CJIYKINBAHNE Ha cTp. 199). (Fig 19.)
ПразвILA 6e3oNaChOrO obpaueHnC TOnJIHBOM
3anpeaetc 3anyckaTb n3dene,ecnHa Hero nonano TOONIBO NIM MOTOPHoe MacNo. YdaNITe NOCTOPOHHe TOnIIBo/MACNO I daTe n3dEINHO BbICOXHyTB.YdaNITe NOCTOPOHHee TOINIBO C NOBepxHOCTn n3dEINIA.
- Ecnn TOnnBO nonaNo Ha oJekny, HEmeIneHcMehnte ee.
He donyckaIte nonaHaTOnnBa Ha TeNo,3To MoKET npuHHTb Bpe 3DopOBbIO. PpN nonaHaTOnnBa H a TeIO CMOITe eRO BOOc Mblom.
-3anpeaetc3anyckaTb dBVraTeIb,ecnBblnpoJlnMacJNO nNtONJIINBO Ha n3deJIne nnTeNo.
3anpeaetc3anyckatb n3deJnne npn Hauynuyn ytekn n3 DBnraTeIa. PeryIpaHn npOBepn Te DBnraTeIb Ha HauNue yteek.
C6bIIOaIte octopoxHocb npn 6paueHHN C TOIIIBOM. TOnIIBO YBJIeTcJ IERKOBOCIIaMeHraIOeIcR JIKKOCTbIO CO B3pbIBOONaCHbIMnnapAMN IMoXET pINBECTN K cepbe3HbIM NII CMepTeJIbHbIM TpaBMam.
3aIpeaaetcBbIxatabnapbToNnBa,T.K.30 MoKET npuHHTb BpeI 3doPoBBIO.Y6eINTecB HauuHIOCTaTOHOro NtOKa BO3dyxa.
3anpeaetcKypntbB6n3nTOJINBaHnDBNrTaTeI.
-3anpeaetcraCTaBnTBTeNbIe npedMeTbIpaOMC TOnJIbOBmNIN DBnIaTeJEM.
3anpeaetcdoJnBaTb TOnNBO npn pa6oTaOuem DBrTaTeNe.
-П配电电电电电电电电电电电电电电电电电电电电电电电电电电电电电电电电电电电电电电电电电电电电电电电电电电电电电电电电电电电电电电电电电电电电电电电电电电电电电电电电电电电电电电电电电电电电电电电电电电
-Перд зарраько.TОПИВаMeДпeнHo OТКpoIte KpbIshky TOПИBHorOБakaиOCTOPOXHOCbPocbTe DaBJIeHne.
3anpeaetc3nBaTbTONNBOBDBrAteNB B nomeeHnn. HeocTaOuHaB BeHTnlaunmaoKet npnbecTN K TpaBMe nn CmeTp N pe3yJbTaTe ydysbnn OTpaBneHny rapHbIM ra3OM.
- AkkypaTHo 3aTaNHe KpbIuKy TOnJIuBHOro 6aka BO n36exKaHne BO3ropaHn.
-Перемecnteи3dJIeMHHmymHa3M(10ФуTOB)OT MeCTa 3anpaBKN TOnJIbOM, npexJde yem3anyCTNTb erO.
- He haJIInBaIte B TOJIINBHyI 6aK CNIUkOM MHOrO TOnJIuBa.
- Y6eINTecb, YTO npn nepemeueHn n3deJnna nIeMKoCTn dJIr TOJIINBA HeBO3MOXHO BO3HKnHOBeHne yTeuKN.
3anpeaet pa3MeaTaB n3deJnne nn EMKocTb DnTOnnBa B6nn3n OTKpbIToro ORH, NCKP nn TropxNΦHTnne. Y6eINTecb, yTO B MecTe xpaHeHnOTcyTCTByET OTKpbITbI OOrh.
- IcnoJb3yIte TOnJIbKO Odo6peHHbIe EMKocTn DnI nepeHocKn I XpaHeHn TOnJIbBa.
CnBaTe TOnnBIO n3 TOnnNBHO 6aka nepepa3MeueHem N3DeNHa DnTEnbHOe XpAHHe. Co6IHOaTe Tpe6oBaHn MeCTHO3aKHOdaTeJIbCTBa B OTHoWeHn MeCTa yTnIN3aUNTOnnBa.
OuHCTnTe n3JeIne, npexKe yem NomeCTnTb ero Ha dJInteJbHoE xpaHeHne.
-П配电дуемnomecntbн3delenHaхpaehne, CHIMITE Ka6eBcEuy 3aJnraHn BO n36exaHne cIyuaHoro 3anycka DBuratela.
HCTpyKuIN NO TexHnke 6e3oNaCHOCTH BO BpeM TExHnueCKOTo O6cIyXnBaHn

PNEyPExEHNHeHaNexauee Texnueckoe 6cnyKbAHne MoKeT npBecTN K cepbe3HOI NOJOMKe DBrTaTeJI INI TReJeIO TpaBMe.
BnaJeue HeceT OTBeTCTBEHHoCTb 3a BblIOJIHeHne BCero HeobxOdomoro TexHnueCKOrO 6cIyKnBaHnB COOTBeTCTBnC pyKOBOdCTBOM NO 3KcIpyatauN IpexKe Yem BblIOJnRtB TexHnueCKoe 6cIyKnBaHne, OTOeDInHTe CBeUy 3axnraHn. IpeE peYnpOBkO Kap6opatopa He OTOeDInHnTe CBeUy 3axnraHn.
CEOPKA

PNEyPPEKDEHNE:PepeC6opko n3dJIaO3HaKoMbTeEc b pa3dJIOM 6e3OnacHOCTn.
YcTaHOBka Ha n3dJIne Tpy6Kn BO3dUxOyBKN HacaIkn
PnmeaHne: TTo6bI BCTaBnT bTy6ky Bo3dyxOyBKN B BbIXoHDHe OTBepCTne BO3dyxOyBKN, Ntpe6yETcA OCTaTOUHO Ocna6ntb 60JIT. NObepHnte 60JIT npOTNB YacobO CI CTpeIKN C NOMOuBO OTBePTKn, TTo6bl Ocna6ntb erO KpenneneHne.
- CoBMeCTnTe pe6po Ha BepxHEn Tpy6Ke BO3DyXoOyBKN C KaHaBKO B BbIXoHOM OTBepCTN BO3DyXoOyBKN. IpeMeCTnTe Tpy6ky B HuxHoe NOJIOKeHne.
- NobepeHnte 6oNT no yacoboi cTpeKe C NOMOu bHO OTBepTKU, YTO6bl npKpeNtB Tpy6ky.
Macno DnIyBvXtAkhbIX DnBraTeJeI
- IcnoIb3yIe TOJIbKO BbICOKoKaueCTBeHHeM MacNo DnA DBYXTaKTHbIX DnBraTeNe.IcnoIb3yIe TOJIbKO
MOTOPHOe MaCNo DnIaBnraTeNe C Bo3DyUHbIM OXJaXDeHMe.
- He nCloJb3yIte pyrIe BnDbl Macna.
- COOTHOUHeHne KOMnOHeHTOB Cmecn 50:1 (2%)
PpuroToBHeHne ToNnBHOm CMeCN
PpmeaHHe:IJI pnproTOBHeHnTOnnBHOcmecn BcerdaNCONb3yTe YnCTyO EMKoCTb IJI TOnnBa.
PnmeHHe He rTOBbTe TOnINBHyO Cmecb B KOJIueCTBe n3 paceta 6oJee Yem Ha 30 dHei.
- HaneTe NOJOBHy OT BCero KOJInueCTBa 6eH3nHa.
2.ДобавьтBE BCE KOJIINueCTBO MacNo.
3.BCTPAXHITe TOnnBHyO CMEcb, YTO6bI CMeWAtb KOMIOHEHTbl.
4.ДобавытEOCTABUINSC6eH3NH.
5.BCTPAXHITe TONINBHyIO CMEcb, YTO6bI CMeWaTB KOMNOHEHTbl. - 3anonHnTe TOnJINBbIb 6ak.
3anpaBka tonnBOM
Bcerda nCOnb3yTe emKocTb dIa TOnJIbBa c Klanahom ot nepenonHeHn.
- Ecni Ha emKoCTb nonaITo TOnJIInBO, ydaJIInTe erO n daIte emKOCTn BbICOXHyTb.
- Y6eDntecb, yTo o6NaCTb BOKpyr KpbIiKu TOnJIINBHO 6aKa YnCTa.
Bcpxhne emkocb dna tonnba, npexde yem HauNTb TOnnBHyO Cmecb B TonnBHyb6ak.
3anyckIOCTaHOBka
Peped 3anyckom DnurataTeJia
-ПоверьтЕи3делпe HaHaIINuYe BCex, NOBpeXdEHHbIX,OcJIa6JIeHHbIX INIIN I3HOUeHHbIX DeTaNJIe.
- PpOBepe c6OpHnK. Y6eIntecb, yTO c6OpHnK He NOBpeKeJHe, a MOJIHHa 3aCTeHyTa.
-Поверпгдзггкгаek,ВИNTOBи6OTOB.
-Пюоверы ВОЗдушни Фильтр.
- PpOBeBpTe NcnpaBnOcTb pa6oTbI pbUaray nppaBJeHn Ipoccenm.
-Поверьтейнспавноctыразовы BBIKHQUaTeЯДВURAteя.
-Поверьтейнделени Ha наличуе yteчек тонлina.
3anyck xoJIoHoro dBnraTeJIa

PNEyPExKDEHHe:HeNaKyuBaIteUHyp cTapTepa BOKpy pyKn.

BHUMAHNE: He ydepkubayte ycTpoiCTBO HOROJ.

BHIMAHHE:HeHaTgNBaTe Whyp cTApTepaOero KOHeuHoroNoLoXeHn. He BbIyckaTepN3pyKn pyKu shHypa cTApTepa npBbITaHyTOM wHype.3To MoKet npINBeCTN K NOBpeKdEHHIO N3deHn.
PnmeuHne: Ecn n Dnuratelb octaHOBNIC, nepeBeDInTe BO3dyuHyU 3acIOHky B 3aKpbIToe NOIOXKeHne IN CHOBA BbINOHnTE WaN 3aNyCkA.
- 3aNoJIHnTe TOnJIuBHybI 6aK YnCTOJ TOnJIuBHOJ CmEcSbIO.
- CoXmnte rpyu yI naKauKn TOnnBa 10 pa3, noka B rpyu He NaHcT NoCTynaTb TOnnBO. rpya He dOJIxHa 6bITb NOJHOCTbIO 3aONHeHa TOnNIBOM. (Fig 20.)
3.ПepeBeДиTe BO3dUshHy 3aCNoHky DBuRatEny BbIe noLoXKeHnFULL CHOKE (3acNoHka noJIHoCTbIO 3akpyTa).(Fig 21.)
4.Повернше рergyтор ckopocTN bpaценя пртув acobои стpeлк по уnapa.(Fig 22.) - Ппхмт ec kopny c n3dennn K 3eMne Jbeon pykoJ.
6.ПepeBédnte Bo3dUshHyIO 3acNoHky B noIooKeHne 1/2 N BBINOJIHnTe pbIBKn 3a pyuKy IHHypa CtapTepa Do Tex nOp, noka dBnIgatEnb He 3anycNTcra N He 3apa6oTaet.(Fig 23.)
7.ДаиTe DBnIraTeIIO nopa6oTaTb OKOJI 10 cekHyd. -
Haxmnte Ha pbiur ynpabJIeHnI dpoceIem n Depxnte ero nonHOCTbIO HxKaTbIM npN BblONHeHnBcex nocJeDyUOux Oepaun.
-
YctaHOBnTe BO3dyuHHyo 3acNoHky B NOJoxKeHne OFF CHOKE (3acNoHka OTkpbIta).(Fig 24.)
- PporpeTe DnBraTeJIb B TeueHne 1 MInHyTbI.
3anyck nporpetoro Dnuratae
- Haxmnte Ha pbuvar ynpabneHnA npoccen m n depxnte ero haxaTbim.
2.ПеревадиTe BO3dUshHyU 3acNoHky B noLoKeHne 1/2.
3.Cximarpbiyar ynpabneHnIpoccenempe3ko notAHnTe pyky uHypa cTapTepa, noka dBnraTeNb He 3anyctntcra. - YctaHOBnTe BO3dyuHnyo 3acNOHKy B NOJIOKeHne OFF CHOKE (3acNoHka OTKpbTa).
OctaHOBka DnurTaTeJra
- Haxmte n OTnyctnte nepeKIOuateIb DBuratela STOP (BblKI) NepeKIOUaTeIb aBTOMaTnueckn BepHeTcB noJoxeHne ON (BKJI) NepeD NOBTOpHO nnBtKO 3anycka n3dJeNna NoOxDiTe 7 cekyH, YTO6bl nepeKIOUaTeIb ycpeI c6pocntbcra.
IcnoJb3OBAHne HacaKn
Korda Heo6xOIMa ToHOCb N BbICOKa KOHTpaIg BO3dyHoro NOToka, NOIb3yITecb CTaHapTHbIM HakoHeuHkOM.(Fig 25.)
-Пи Heo6xOdMocTn 60JIe ⅢPOKOrO Bo3DyUHoro NOTOKa N BbICOKO CKOPoCTN NOTOKa NcNoIb3yIte BBICOKOCKOpocTHyO HacaIky. (Fig 26.)
PerylnpobKa hacaikn Bo3dyxOyBkn
1.ПовернITEн HabaIGNy BJIeBO, YTO6bI BbICBO6OДNTb 6aioHETbI 3aMOK.
2.ПеревадитЕнаскВТрбуемоположен.
3.ПовернITEнесадкВьравоdoиц�нka.
BcacbBaHne
PpeKeJeM npnctynatb K pa60Te C Bo3dyXoYbKO BpeKIMe Iblncocca, yCTaHOBNTe Heo6xoOImoe 3aunTHOE o6OpydoBaHne.

IPEyPExEHE:Pepe IcnoJb3oBaanm n3denny y6eHntecb,TO c6OpHNk He noBpeXdeH, a Monnra 3acteyta. He ncNoJb3yTe NOBpeXdeHHbI c6OpHNk.3To npedOTBpaTHTpABMy,BbI3BaHHyIO pa3JeTaUOUMNcra pEmetamn. Pnp ynpaBHeHnn n3dennm neBOy pyKo YBeInuHBaETcR pNCK Bo3HKnHOBeHn HwTaTHbIX CNTyaCNI. He npKacaiTeCB TeIOM KobnaCTN BbInyckHoro OTBepCTn.

PNEyPEXKDEHNE:He3anyckaTe BO3dyxOyBky,ecnI KpbIuKa BCacbBaOuIeroOTBepCTnO TkpbIta Nnn
IOBpeKJHe (3a HCK/HOeHEm TOrO ClyuHa, KOrJa yCTaHOBJEHa BCaCbIbAIOJIaTpy6Ka).
BoBpempa60tbyBO3Iyxo/yBKN C6OpHNK JOJKeH IINepKHBaTcH HJIeYHbIMpeHMeH.PeMeH Heo6xOIMHOHaJeBaTbIOBepXIIeHa.
3aIyCTHe BO3dyxOyBky. Co6IIOaIte HNCTpyKuHN, IpiBaeHHbIe B pa3dEax O 3aIyCKe N OCTaHOBKe H3JIINr IpeD 3aIyCkOM ABHrAteTn Ha cTp.198 IpoHTaIte HNCTpyKuHN NO TEXHnke 6e30NaCHOCTN MEPbI BE3OIACHOCTHa cTp.193
OnopoxKHeHne c6OpHnKa

IIPEIYIPEXKDEHNE: Bcerda npoBepaIte c6OpHN. IpeJnHIOJIb3OBAHHeM H3JeHIn
y6eHTecb, yTO c6OpHNK He IOBpeKJcH, a MOJIHHaCTeHTyTa. He HcIOJIb3yIte IOBpeKJdeHHb c6OpHNK. CyIeCTByer ONaCHOCt b TpaBMb I3-3a pHCKa pa3JeTa 06IOMKO. ByIbTe OCTopoKHb, eCIN Bbl DEpKHTe BO3dYxOyBky JeBOI pyKoH. He PnHKaIHTecb K O6NaCTN BblNyCKHOrO OTBepCTH.
1.OctaHOBHTe H3dJIHe.
2. PacCTeHHTe MOJIHHIO, HAXOJMyIOc c60ky.
3. OnopokHHnTe c6OpHNK.
TEXHINUECKOE OBCJUYKINBAHNE

IPEyIPEXKDEHNE: IpeoOuHCTKoi, pEMOHOM HIN TEXHNueCKHM 06ClyJKBaHHem N3JeJIbBHNMaTeJIbHO H3yUHTe pa3dJI TexHNKn 6e3ONaCHOCTN.
TpaΦHK TexHnueckoro 06CnyKbHaHHa
Co6IIOaIte rpaΦHK Texo6cIyKBAHn. INHTepBaIbI
pacCHTaHbHa OCHOBe eKeJHeBHO 3KcIIyatauH
H3JeHn. Ecln H3dJIne He HcIOJIb3yeTcKaJbI
deHb, INHTepBaJIb6yUyt dpyHMn. BblIOJIHnTe
camOCToTeJIbHO ToJIbKO Te pa60TbI NO
TEXo6cIyKBAHnIO, KOTOpbIE OINCAHbIB aHHOM
pyKOBoCTBe. dpyTne pa60TbI IIO Texo6cIyKBAHnHO, HE
OINCAHHBe B 3OTM pyKOBoCTBe, DOJKHbIBblIOJIHrTBcR
ABTOPH3OBAHHbIM CepBCHbIM ueHTpOM.
EkeHHeBHOeO6CJyKHBaHHe
OuCTHe BHeHHe NObepxHOCTH.
-Поверпгенспаьноctberpyялготаckopoctи npbivaraynpaBHeHnApocceIeM.3aMeHHTe NOBpeKdEHHbIe DeTaIIH.
IPOBepBe BbIKIOuATEJB DNHTAeJI.B CNYae Heo6XoHMOCTN 3aMeHHTeero.
-Поберп te ckopoctb xoIoCTOrO xOJa.
OuHCTHTe BO3/DYHHbIyHbTp. B CJIyuae Heo6XoDMOCTH 3aMeHHTe erO.
- Y6eIITecb B TOM, YTO KpbIHKY BCaCbIBaIOJIero OTBepCTnM OMOH0 3a6IOKHpOBaTb B 3aKpblTom NOIOKeHH. Y6eIITecb, YTO KpbIbHaTka He 3aIpa3HeHa.
- 3aTAAHNTe BCE raiKN H BHTbl.
- Y6eIITecB BOTcyTCTBnTH TpeiHn Ha KOpIycax.
- Y6eIHTecb, yTO c6OpHNK He NOBpeKJdeH, a MOJIHHa HcIIpaBHa. PnH Heo6xoHMOCTN 3aMeHHte c6OpHNK.
ExeHeJeBHoTeXo6CJyKnBaHne
- PpOBePbTe COCToHHe CTApTepa, HHypa CTApTepa H HATJxKHOIpyKHHbI. 3aMeHHTe BCE IOBpeKdEHHbIe DeTaJIH.
-ПроверътсocToHHe BO3dYxO3a6OpHnKa Ha CTapTepe.В cIyuae 3acopeHnBaBO3dyXo3a6OpHnKa ydaJIITe BEcMbycOp.
OuHHTe HApyKHyIO NOBepxHOCTb CBeun 3aKHaHH. CHMHTe ee N IPOBepbTe 3a3Op MeKdy 3JIeKTPoDAMN. OtperyIHPyIte erO 6 MM (0,024 dHm) HIN 3aMeHNTE CBeUy 3aKHaHH.
-ПочиТЕЛПОДСТИНаКрьльЧАТKE.
-ПрочNTHTe NCKPORACHTeIbHyTO ceTKy H nPH Heo6XoJHMOCTn 3aMeHHTe ee (3To HE OTHOCHTcK TnyIHTeJIaM C KaTaJIH3aTOPOM).
OuHCTte oBlaactb Kap6Hopatopa.
OuHCTHTe BO3dyHbI hHbTp.
ExemecuHoeTexo6cIyKbAHne
-Поверпгучкустаретаишурстарета.
-ПочNTHTe TOnINBHBn 6aK.
-ПиочпгітіеКарбіоратунБобlaactвВokpyr Hero.
-ПочиТЕ ЛОпаСн Ha KpbIbIyAтК.
IpoBepbTe TOJIINBOIPOBObI Ha HAIuHne TpeHH HIN npTnx IOBpeKdeHN. 3aMeHnTe Hx B Clyuae HEo6XoDMOCTN
-3aMeHHTe TOIINHBbI ΦIbTp B TOIINBHOM 6aKe.
-OCMOTRtE BCE IPOBOda H COeHHeHnA.
3aMeHHTe CBEuy 3aXnTaHHI.
3aMeHHTe BO3DyIHHbI ΦHbTp.
EkeeroHoeTexo6cnyKbAHnE
- PpOBepeBte CBeuy 3aKHaHn.
OuHCTHe BHEIHIOIO IOBepxHOCTb KAp6Iopatopa H IINJIeRAOHIXKHEMy yAcTkoB.
OuHCTHTe CHCTemy oxJaJcEHn.
-Поберп Te NckporacHTeJIbHyIO cTeKy.
-Поверпг TeToIINBHyн ΦИbTp.
-ПоверьтToPnINBHyншlaHrHaHAnuHne nobpeKdHn.
- OcmotpuTe BCE npoBoDa n coeDInHeHnA.
50-ycaboeTexo6nykBAHne
- O6paNTecb B aBTopn3OBaHHb CepBnCHbI ceHTp DJIpeMOHTA NJI 3AmHebl JnyuTeJIa.
PerynpoBka ckopocTn xoNocToro XoDa
-Перд рergyнорбксорoctи xonoctoro xoda y6eintecb,yTO BO3dyuHbI ΦnIbTp qnCTbI uYcTaHOBJIeHa KpbIuKa BO3dyuHOrOФnJIbTp.a
- Otperynpyte o6opotbXoNocToro xOda c nOMOsbH BuHTa peYyInpOBKn XoNocToro xOda T, 0603haeHHoro MeTKoJ "T". (Fig 27.)
- Ckopoocb xoNocToRo xOda npaBnIbHa, ecn DbIratae pbapTaet poBHO BO Bcex nIoXeHnx.
1.ДяувелочьяоборOTOB NOBepHHT BINT peryINPOBKN XOJOCTOX ODA NO YACOBI CTpeJIke.
2.ДяумьшениоборOTOB nobepHITe BnHT perylnipOBKN XOJOCTORO XODa npOTNB YacOBON CTpeNKn.
TexobcnykubHne nckporacntelbHOcETKn
Iy OYNCTK NCKporacntelbHOH CEKTHN CNOJIb3yNT MeTALNNueeCKyU 5ETKY.
OuNTka CnCTembl OXJaXdHnA
Дя Oунстки KOMПОЕНТВ CNTСТМБI OXЛЯЖDEHNY IcnoJIb3yIte UeTky. (Fig 28.)
PpOBePka CBeu 3aXnraHnA

BHIMAHHE: Bcerda nCnoB3yIe ToJbKO yka3aHHbI TnI CBeu. NcNoB3ObaHne
HnpaBnBHO Tnna CBeu 3axnraHn MoKET npNBecTN K NOBpeXeHnIO n3JeNIA.
-Поверпс CBeу 3axnraHn,ecnДBnraTeIb He Habnpaet MoUHcTb, nIOxo 3aBOuNTc IIN nIOxO paBoTaET Ha XoIOCTbIX O6OpOTax.
- UTo6bI yMeHbUHTb pNCK NOBJIeHn HExKeNaTeNbHO MaTePnaJa Ha 3JeKtpoJax CBeu 3aXnraHn, co6JIIOdaIte cJeDyIOJIne INHCTpyKUn:
a) Y6eIntecb B npabnIbHoctn peryInpOBKn YactOTbI o6oPOTOB XOIOCTORO xOda.
b) Y6eIntecb, yTo nCNoJIb3yETcra HaJIpeKaaJAR TOnJIuBHa r CmEcB.
c)Y6eIntecb,HTO Bo3dyHbHΦnJIbTp UNT.
- Ecnn Cbeya 3aXnIraHn 3aIrp3HeHa, OcNCTnTe ee n npOBepbTe 3a3Op Mekdy 3JIeKTpOdaMn, CM TEXHNueCKVE DAHHbIE Ha ctp. 200.(Fig 29.)
-Пин HeobxOДmOCTn 3aMeHHTe Cbey 3aJrAHa.
TexobcnykBaHne BO3dUshoro cnIbTpa
OuNCTKa BO3dyuHoro FnIbTpTa
- CHIMMTE KpbIuKy BO3yUHoro QnIbTpna IN BO3dyuHbI uNtP. (Fig 30.)
2.ПрмоTe BO3dUwHbI ΦnIbTp TeNIOМьIbHO BODI.пepeД yCTaHOBKoiФиIbTpRaHa MeTo y6eDNTecb,уTO OH nONHOCTbIO BbICox.
3.Ecnn BO3dyuHbI CnIbTp CnIuKOM rpa3HbI, UTO6blIOJIHOCTbIO erO ONUCTNb, 3aMeHNTe erO. Bcerda3aMeHraTe NOBpeXdeHHbI BO3dyuHbI CnIbTp. - Ecnn n3dene OcnaeHo npoJHObblm BO3dyuNbIM pNtPOM,HaHeCnTe Macno dJa BO3dyuHoro pNtPa.MacNo dJa BO3dyuHoro pNtPa HAnocTcT ToNbKO Ha nopOHOBbI pNtP. HeNb3ra HAnocTb MacNo Ha pTePobbl mNtP.
TEXHnueCKNE DAHHbIE
ACCESSORIES (Lisavarustus)
| B2126 | |
| Heakskiidetud lisavarustus Tüüp | |
| Körgsurveotsak 545 119 502 | |
EL-I VASTAVUSDEKLARATSIOONI SISU
TEXHUNECKX XAPAKTEPNUKNI 241
AKCECOAPN. 243
CbIbPXAHNE HA DEKJIAPAUJRA 3A
CbOTBETCTBNE HA EC. 243
BbBEDEHNE
HctpyKzna 3a ekcnloataza
OpnHaHaTaBepcnaHaHactoaTaHCTpyKUma 3a ekpnoataeHa aHnnckn e3nk. HCTpyKUmaTa 3a
eKcnpoataaHa npytn e3nue npebOD OT aHrnnckn e3NK.
Pperne
(Fig 1.)
- Pembk 3a paMo (BV2126)
2.CnycbKaHa ra3Ta
3.Ппевклчытелзспранe - YnpaBJIeHHe Ha o6oPoTnte
- Kanak Ha BeHTunaTopa
- Kanayka Ha pe3epBoapa 3a ro npBO
7.Bb3dywenΦnTbp
8.Дросел
9.Поdkачва заюма - BxOeH kanaK
- BakyumHa npbXka (BV2126)
- Pezni (BV2126)
- PoTOp Ha BENTnlaTopa
- CtaHdApTeH NaKpaHnIK
- BucokocopocTeH NaKpaHnK (BV2126)
- PpOdyXBaIa Tpb6a
- Bon Ha ckobata Ha Tpb6ata
18.3acTonopBaunraKnHa Tpb6aTa - Aycnyx
20.3a3eMBAuПpoBODHnK
21.ДрьжкаHa cTapTepa - CtapTePho ycTpoiCTBO
- Perynipauu BnHT Ha Kapbypatopa
24.Инстукшиаэ ekрлоataци - BakyymHo yctpoiCTBO c KOMnOHeHTn 3a cb6npaHc bCToIoo ce ot eJeMeHTnTe ot 26 do 30, n36poeHn IIO-dOly
- Tpb6a Ha Topbukka Ta 3a cbbupahe
- Top6nka 3a cb6npahe
- BaKyumHa Tpb6a O T Dbe CeKcH
- BnHT
30.Ппeзрамен pemьк
CIMBOJIIN Bbpxy MaunHaTa
(Fig 2.) Ipeynp.
(Fig 3.) IpooyeTeToBa pkoBOdCTBO
(Fig 4.) I3noJI3BaIte Odo6peHH aHTnfoHNI
I3noJI3BaIte Odo6peHn 3aunTHn CpeIcTBA
(Fig 5.) 3a ouHTe
I3noJ3BaIte Odo6peHa pecnupaTopHa
(Fig 6.) macka
(Fig 7.) I3noJ3BaIte oIo6peHn 3aunTHn pbKaBnU
Bb3MOxH0 e n3xBbpyaHe Ha npEmdetn OT npOyKta, KOeTO MOKe Da DOBeDe Do
(Fig 8.) yBpeKdaHe Ha oUHTe
(Fig 9.) Be3oNaCHO pa3ToHHe
He ce npmbjnaBaTe do poTopa, koraTo
(Fig 10.) pa6oTu
(Fig 11.) He donyckaite deca 6n3o do npodykta
(Fig 12.) Cunha ha 3Byka
- npodykTbTe HnnpaBnHOpemOnTupaH.
-
npOdyKTbTepeMOHTnpaH C YaCTN, KONTO He ca OT npOn3BOOnTEnI INn He ca OOn6peHn OT npOn3BOOnTEnI.
-
npOdykTbT mMa npHnAdnEeKHOCT, KOaTO He e OT npOn3BOoNTeJI NII He e ODo6peHa OT npOn3BOoNTeJI.
- npOdykTbT He e peMoHTupan B Odo6peh cepBn3eH ueHTbp INIOT Odo6peh opraH.
BE3OPIACHOCT
IeHnHn 3a 6e3oNaCHOCT
IeHnHnnte no-dony npedocTbRT HNBOTo Ha cepno3HOCT 3a BcraKa eHa npedynpeDHTJaHa dyma.

ПЕДУПЕЖDEHNE:НаняBaHeHaJIuça.

BHIMAHNE: NObpeHa Na npOdykTa.
3a6eIekKa: Ta3n INΦopMaζη npaBn npOdyKta no- neceH 3a n3noJ3BaHe.
O6uHnHCTpyKcnn 3a 6e30napocct
- I3noI3BaIte npabunHNo npodykTa. HapaHraHe nnCMBpTe Bb3MOxKeH pe3yIaT OT He npabUnHaTa ynoTp6a. I3noI3BaIte npodykTa camo 3a3aDaHTe, onncAHn B HAcToIeTO pbKOBoCTBO. He I3noI3BaIte npodykTa 3a DpyrN 3aDaUH.
Cn3BaIte HNCTpyKuNTe B Ta3n INHCTpyKUra 3a ekCnloataua. Cn3BaIte cIMBOJNTe 3a 6e3oNaCHOCT N INHCTpyKUNTe 3a 6e3oNaCHOCT. Ako OepaTOpBT He Cn3Ba INHCTpyKUNTe INCMBOJNTe, pe3yIITaTbT MOKe Da e HapAHRAHe, NOBpeDa IIN CMbPT.
He n3xbpnaTe Ta3n HNCTpyKcua 3a eknpoatau. N3non3BaIte NHCTpyKcuaTe 3a crno6baHe, 3a da eknpoatnpate u da noDbpxKaTe npOdykTa B do6po cbctoHne. N3non3BaIte NHCTpyKcuaTe 3a npabunHmaontHa npncnoc6JeHn I npHaJnxHoCTn. N3non3BaIte camo Odo6peHn npncnoc6JeHn I npHaJnxKHOCTn. - He n3no3BaIte noBpeDeH npOdykT. Cna3BaIte rpaФИka 3a TeXnUeCKo O6CnyKBAHe. N3BbPbWAite Camo DeHOCHTe NO TeXnUeCKo O6CnyKBAHe, 3a KOnTO HamePHTe INCTpyKUma B Ta3N INCTpyKUma 3a ekCnloaTaUma. ODo6peH cepBn3eH ueHTbp Tpr6Ba Da N3BbPshn BCNUKn DpyrN DeHocTN NO TeXnUeCKo O6CnyKBAHe.
-TaHnHCTpyKcIg 3a ekCnIooatauHa He MoKe Da BKNIOUcBA BCNUCK CNTyaCUN, KOINTO 6NxA MOIN Da Bb3HNKHaT npn n3NON3BaHe Ha npodykTa. BbTe Te BHIMATEJIHn I ce ocIaNJaIe Ha 3dpaBnCn pa3ym. He pa6oTe c npdykTa n He n3BbPwBaIte TexHnuecko O6cJyXbaHe, aKO He CTe CNrpyHn OTHOCHO CNTyaCmra. TOBopTe C eKcpeTn no npodykTa, Baun JInIbP, cepBn3 nn Odo6peh cepBn3eH ueTbp 3a INΦOpMaua.
Pa3kayeI npoBOHnka Ha 3anaNTenHaTa CBeU, npeIN crNo6BaHe Ha npOyKta, NoCTaBHe Ha npOdyKTa 3a cbxpaHeHne IIn TexHnuecko 06cnykBaHe.
He n3no3BaIte npOyKta, aKe e npomeHcnpaMO TbpBOHaayHnTe My cneuФkaun. He cmeHnTe Yact Ha npOyKta 6e3 Odo6peHne ot npOn3BOdnteJ. N3no3BaIte camo yactn, KOITo ca Odo6peHn OT npOn3BODnteJ. HapaHbAhe nn Cmbpt E Bb3MOxH pe3yIaT OT He npabHnHOTo TexHnuecko 06cnykBaHe.
- He BdNWBaIte n3napeHnO t dBVaTeJI. PpoIbJnxHTenHTo BdNWBaHe Ha oTpa6oTeHt e Ra30Be ot DbVaTeJI e onaCHO 3a 3dpabeTo.
- Heстпаре порукта на захuto поллбллдо заллимmaTeprann.ОразбoteнITE ra3Obe ca ropeии bixma Morn Da cblbpxaT nckpn, konTo da npedn3BnKAT noxap. HeocTaTbHnT Bb3dyweH notOK moKe Да дOBeDe Do HapaHЯBaHe Ил CMbpT nopadn 3aDywaBaHe Ил Вглрodeн Oknc.
Korato n3noJ3BaTe To3n npOdyKT, DBuRaTeJrT Cb3dAba eNeKtpomarHHTHO none. EneKtpomarHHTHO nOE moKeJa npEiN3Bvka noBpeDa Ha MeiHcNk NmIpaHTN. TObOpTe c Baunj Iekap nnC npOn3BoJnteHa MeiHcNckn IMnPaHT, npEi Da 3aNoChte pa6ota c npOdyKTA.
He no3B0JbAaTe Ha da pa6oTc npOyKta. He no3B0JbAaTe Ha nue, KoTo He e 3aNo3HaTO c HnCTpyKunTe, da pa6oTu c npOyKta.
- YBepete ce, Ye BnHaHn Ha6IIOdaBaTe Iuca C HamaJIeH fN3UeCKn IIN yMCTBeH KanaCITET, KOITO n3NoJ3BaT npOyKta. OTROBOpEH Bb3paCTeH TpR6Ba Da 6bDe TaT pE3 ZrJNTo BpeMe.
3aKJIIOUeTe npOdyKTa B 30Ha,do KOrTo HmAt DoCTbN Deca n HeoOobpeHn Iuca.
- PpOdyKbT MoKe Da n3XbPnI npEmdTu I da npuHnH HapaHbaHe. Cna3BaIte NHCtpyKmnte 3a 6e30NaCHOCT, 3a Da HamaJIte ONaCHOCTTa OT HapaHbaHe nn CMbPT.
He ce otdaeneaabaTe OT npOdykTa, KOrato DBnIgATEJrT pa60tN.
-OnepaTopbT Ha npOdykTa e OTROBOpEN npn Bb3HnKBAHeTo Ha NHnDent. - YBepTe Ce, Ye yactnte He ca nOBpeHn, npEi Da n3noJ3BaTe npOdykTa.
- YBepete ce, ye cte Ha pa3ctoHne ot Hau-MaJIko 15 m (50 ft) ot npyrn nua nn XNBOTn, npedn da n3noJ3BaTe npodykTa. YBepete ce, ye nue B 6n3ocT do Bac e hACHO, ye ue n3noJ3BaTe npodykTa.
- HanpaBete cnpaBka c HauNoHaJIHnTE nIIM MeCTHnTe 3aKoHn. Te 6nxMa mOrn Da npEDoTbPaTAT nIIN orpaHnUaT pa6OtaTa Ha npOdykTA npn OnpedeNeHn ycNoBnA.
Hnctpykun 3a 6e3oNaCHocT np npaboTa c KOMnPecOPHTo O6OpyDbaHe
- I3non3BaIte npOdyKta cAmo 3a n3dyXbaHe nIn OTCTpaHЯBaHe Ha NICTa n DpyrN OtnaDbuNo 3emrTa.
- He pa6oTeTe c npOdykTa, KOrato CTe yMopeHn, 60NHn nnn NOB Bb3JeCTBneTo Ha aNkoXoJ, HApKOTuN nn NekapCTBa.
He donyckaTe cTpaHnHy HabIoTaTei, HHTO XIBOTnHa No-MaIKo ot 15 m (50 ft) ot onepaTopa, n3noJ3BaU, npOdykTa.
Bb3MOxH0 e ot npOyKta da n3XbBypTa npEaMeTn C BvCoka ckopocT, KOTo MoKe Da pNkoUpaT n Da yApAyt onepaTopa. Toba MoKe da DoBeDe do yBpeXdaHe Ha OHTe.
He haoybaTe HakpaHnka Ha KOMnpecOpHTo 60bOpUdbaHe no nocoka Xopa nn JNBOTHN. - YBepete ce, ye nbjirata koca e BnHata haPameHete.
CnpaTe DnurTaTEnI npEIM MOHTnpaHe IIN DEMoHTnpaHe Ha npncnocO6JeHna IIN dpyrKOMIOHEHTN. - He pa6oTeTe c npOdykTa 6e3 npEa3nteJra.
- He pa6oTeTe c npOyKTA, ako nMa xopa B pa6oTHata 30Ha. CnpTe npOyKTA, aKO B pa6oTHata 30Ha BJIe3e YOBek.
He pa6oTe c npOyKta Ha MeTa C HeOCTaTbueh B3dyweH NOTOK. HeOCTaTbUHNr T B3dyweH NOTOK MOKe Da IOBeNe Do HapaHBAhe UIN CMbPT NopaUN 3aDywaBaHe UIN BmWBaHe Ha BbrIpeOeH OKNC.
AycnybTe n3BbHpeIHO ropeu,doKaTo npOdykTbTa 60Tu, BkIIOHTeNHO npu o6OpOTn Ha npa3EH XoJ, KaKTo u cNeI KaTO cnpe. BHNMaBaIte B 6JIn3OCT do 3anaJInteJIHm MaTePnaJn IIN n3napeHn. - He dokocbaite 30HaTa Ha BXOHNnKanak. YkpaSeHnI n WnpOKn dpexn Tpr6Ba da ca daaney ot 30HaTa Ha BXOHNn OTBOp.
BnharntbnaTe ctaunno npa6oTe c npodykTa cmo Ha cnrypha n paBHa NOBbpxHOCT. Xb3raBte nn HectabnHn NobbpxHOCTN, KaTO Hanpimep cTbnM, Morat da npedn3BnKaT 3aryba Ha banaHC nn KOHTpon.
- He paBOTete c npOyKTA, KOraTo ce HAMnPate Ha BnCOKO MRCTO, HAnPmEp Ha NOKPnB.
- 06e3onacete npodykta npi TpaHcnpTupahe.
Pa6oTe c npOyKaT caMo B npenOpbuaHnTe yacObe.Cb6IoudaBaIte MeCTHnTe pa3nopei6n. O6nKHO npenOpbKnte ca ot 09:00 do 17:00 u. OT NOHeJeHNIK Do nEbK.
- Pnp pa6oTa c npOdykTa u3noJ3BaIte HaH-HuCKnTe Bb3MOxHN o6OpOTn, Heo6xoJIMM 3a KOHKpeTHaTa pa6oTa.
- YBepTe ce, He MoKeTe Da NaHHeTe, KOraTo n3noJ3BaTe npOdyKta. He HauKaHaIe npu pa6oTa c npOdyKta.
- YBepTe Ce, Ye npOyKbT E B Do6po CbCToHne, npei Da 3anoHHeTe pa6Ota C Hero, Hai-BeYe aycnyxbT, CMyKaTeHNnT Bb3DyXOpBOd N Bb3DyWNHrT fNtTp.
- Pa3poBete OTnabIbIte No 3emra Tc rpe6IIO nnn MeTna, npedn da BkNIOHTe npOdyKta.
Ako pa6oTHaTa pIoU e 3AmbpcHe, HnPbckaiTe r C Mapkyu.
-ПоуктьТ може Да ce ИЗпОЛЗВа ВмecTo МарКУЧ 3a CпсесяBaHe Ha BOДa.
-3a Deua, Domaun HIO6umu, OTbopeHn PpO3Opu nn ppeBO3H CpeCTBa.
- He hacoubaite npodykta KbM Kpexkn paCTeHna.
He hacouBaTe dYxaJIkata KbM o6eKTH O pOda Ha CTehn, rOJEMN KAMbHN, IpeBO3HN CpeDCTBA Nnn orpaHn.
Ako pa6oTnte B bIIOB uacn, n3dyXbaTe ot bIJa KbM ceHTbpa Ha pa6oTHata 30Ha. B npOTnbEN cIyuae Bb3MOxHO OTnaDbuNTe da Bu ynapaT B IuTeTo n Da npedn3Bukat yBpeKdaHe Ha oHTe.
-ИзполбайтпьнгудьнгinteHaHakpaHnka, Taka Que Bb3dUwHnrt NOTOK da 6bde 6JIn3o Do 3emrTa.
Heo6xoDIMO e cTpaHnHnTe Ha6IHOaTeJn Da HocrT 3aUNTHn CpeCDtBa 3a OHTe.
Cnei n3no3BaHe Ha npOyKTA n3XBbpNeTe OTnabuNTe B KOHTeHepnte 3a 6okJyK.
Hnctpykun 3a 6e3onacnoCT npnpa60ta cbc cmykaJkata
- Na3eTe BeHTnIaTopo O T NobpeHa. He 3acMyKbAteToIeMn N TBbpNt OTNaDbuN O T CopTa Ha NapYeTaDbpBO, KyTn, KAYyKOB MyJU N IIN Dblr Nactn O T BbxE.
- He no3B0JBAaTe Ha BaKyUHaTa Tpb6a Da DOKOCHe 3emrTa.
Cnpete Dbratena n pa3kaute Nynata Ha 3anaNTeHata CBeu, npedn da npemaxheTe npeykata nn 3aDpbCTBaun MaTePnAn.
I\PuHn npeDna3Hn cpeDCTBa
BnHaHn H3No3BaIte npabunHInTe JnUHN npedna3Hn cpeDCTBa, KoraTo pa6oTIne C npodyKta. JnUHNte npedna3Hn cpeDCTBa He eJIMmHnpaT onacHOCTTa OT HapaHbAHe. JnUHNte npedna3Hn cpeDCTBa HamaJIbAT CTeneHTa Ha HapaHbAhe npi Bb3HnKBaHETo Ha INuDeHT.
- Binhari n3non3BaIte oOobpeHn 3aunTHn cpeiCTBa3a ouHTe, kOrato pa6oTnte C npOdykta.
- He pa6oTeTe c npOdykTa c roIi Kpaka uIi C oTbOpEni ObyKn. BuHaRn 3nON3BaIe yCTOnuBn Ha nIb3raHe 6otywn 3a TeKbK peKm Ha pa6oTa.
-Ⅲanon3BaIteDblnnaHTaIOHOnOT3npabnnat.
Ako Heo6xOIMo, n3noJ3BaIte Oo6peHn 3aUHTn pKabu.
-ⅢποπBaIteKaKa,akoEBa3MoXHo,3a da ce npεπa3nteOTnadauHa rnaBAta npεdMeTn.
BnHaHn 3nON3BaIte OoOpeHn aHTnFOHn, KOraTo pa6oTnte c npOdykTa. PpOdbJnxTeJIHNrT lym MoKe Da DoBeDe Do 3ary6a Ha cnIyxa, pNpuHHeHa OT lym.
- BvnHn n3non3BaIte oJIo6peHa pecnPapTopHa MaCKa, IOKaTo pa6OTnTe c npOdyKta B 3anpaWeHn CpeHn.
- YBepTe ce, ye 6n3o Do Bac nMa KOMnneKT 3a npbPba NOMOu.
UcTpoiCTBa 3a 6e30nacHOCT Ha npOdyKta
- YBepete ce, Ye peIOBHO n3BbPbBaTe texHnuecko 06cnykBaHe Ha npOyKta.
CpokbHaekcnnoataaHa npOyKta ce yBeJIuHaba.
- PuckbT OT 3Noononyka HamaJЯBa.
I03BOnTe Ha Oo6peH nnIb npnn Oo6peH cepBn3eH ueHTbp da n3BbPwBa peOOBHa npOBepKa Ha npOdykTa 3a KopeKUnn nn peMOHTn DeHOCtN.
He n3no3BaIte npOdyKT c nobpeHn npEJa3n CpeCTBa.AKO npOdyKbT e nobpeH, ce KOHCyItpaIte c oO6peh cepBn3e HcHTbp.
PpeBknIOuBaTeI 3a cnnpaHe
CtaptnpaTe DnurateJyBepTe ce, ye DnuratelaTcnpa, KOrato npemecnte npebkIIOUbaTeJra 3a cnupahe B cton no3uza. (Fig 18.)
Aycnyx

PNEyPEXKDEHNE:He DoKocBaTe aycnyxa,ako e ropeu. AycnyxbT e ropeu no Bpeme Ha pa6ota, Ho n cnei KaTo
DnBraTeTnT Cnpe. Pnp DoKocBaHe Ha aCyNya NMa Bb3MOxHOCrOT n3rapHnIa
He n3noJI3BaIte DnurateI c nobpeH aycnyx. NobpeHnT aycnyx NOBnUba HNBOTo Ha UyMa n pncKa OT noXap.CbXpaHraBaIte Ha6JIn30 noXaporacnteI.
- PeioBHO npOBepaBaiTe daH aycnybTe 3akpeH KbM npOdykTa.
He dokocbaTe Dbratela nn aycnyxa, koraTo DbratelaT E BkHoueH. He dokocbaTe Dbratela nn aycnyxa 3a n3BecTHo Bpeme cIed cnipaHe Ha Dbratela. FopeuTe NOBbpxHOCTn MORaT da npuHnT HapaHBAhe.
- Togeunaycnyx moke da npuynn noxkap. BbndeBHNMaTeJHn, aKo n3noJ3BaTe npOdykta 6n30 do3aJIInTeJHn TeUHOCTn INn n3napeHn.
He doKocBaIte yactnte B aycnyxa, ako e noBpeJeH. Yactnte Morat Da cblbpxaT KaHeporeHHN XUMNKAJN.
HЯко модени компесорно оборудане Иматпраздана Исторасьгни Мржа. Празспраздени Исторбалля поочьту Ипдеменшт. Вижт раздел "Погдьжka" (TEXHIVECKO OБСЛУЖBAHE Na CTpaHnua 240). (Fig 19.)
Бezonaacnoct npa6ota c ropnuBO
- Heстуарпглpoукta, akO bpyHero Иma roPnBO nIIM MOTOPHO macNo. OTcTpaHete HekeJahOTo rOpNBO/MacNo I OCTaBeTe pOdykTa da n3cbxHe. OTCtpaHete HekeJahOTo rOpNBO OT npOdykTa.
Ako pa3neete ropuBO no dpexnte cn, cmeHeTe n He3a6abHO. - He hahacayte ropno BO bpyx TaIOTo cn, TOBa moKe da doBeTe do HapaHbaHe. Ako rOpnoBIO nonaHe Bbpyx TaINoTo Bu, n3non3BaIte canyH n Boda, 3a da ro oTcpaHnTe.
- He CTapTnpaIte DnIgatTeIa, ako pa3JIeTe MacNo nIIN TOpNBO Bbpxy npOdykTa IIN TAnOTo CN.
He cnapaTe npodykta, ako OT dBnraTeIma Teu. PperJexKaIte peoBHO dBnraTeJIa 3a TeOBe.
BHHMaaTe C rOpuBOTo. TOpuBOTo e 3anaHMo, n3napeHnraTa ca B3pUBOOnaChn mOraT da DoBeDaT do HapaHaBaHnna UIN CMbPT. - He BДишваиTe rOpNBHnTe n3napeHnry, ToBa MoKe Da IOBede Do HapaHraBaHe. YBepete ce, Ye Ima DOCTaTbUeH Bb3dUWeH NOTOK.
-He nyuwe 6n3o do ronpBoto nIIN DBuratae.
He noctabaIte tonnn npedmetn 6n3o do ronpBOTOn nn DBnraTeJI. - He do6abryte ropnboto, koraTo dBnraTeenr pa60Tu.
- YBepTe ce, Ye DnBraTeIe T e N3CTnHaJI npei 3apeKdahe C rOpuBO.
-П repизаржданс roривОТворе 6abHo KaanaykaTаHa pe3epBoapa 3a ropiBOиocbo6oTe BHMaTeHNO HaJIraHTo.
He do6abayTe rOpBnKbM DnBnraTeIHa 3aKnTo. HeoCTaTbHnRT Bb3dyWeH NOTOK MOKe Da DoBeDe Io HapaHnBaHe IIN CmBpT NopAaN 3aDywaBaHe IIN BbIepOeH OKc.
3aterhe BHHMaTeHKO kanaKaTHa pe3epBoapa 3a rOpNBO NIM MOKe Da Bb3HNKHe NOxap.
-Ппемecтete npodykta Ha ha-NaMKo 3 m (10 ft) ot
ноицята, Кдeto cte 3apeДип peЗерваразпедистарпаhe.
He nocTabaTe npekaneHO MHORO rOpNBO Bpe3epBoapa 3a rOpNBO.
- YBepTe ce, Ye HMa TeOBe, KOraTo MeCTnte npOdyKta nnn pe3epBoapa 3a rOpNo.
He noctabaTe npOykTa nnpe3epBoapa 3a TOpNBO Ha MRCTO C HAnuHne HA OTKpNT PnAmbK, NCKpa nnIOCToRHHa MaJka RopeJIka. YBepTe ce, Ye B 3OHATA 3a CbXpaHeHne HMa OTKpNT ORhN.
-Използваite само одобрени peзервоги, когаю MeCTHTe rOPNBOTO ИПО OCTABTe rOpNBOTo 3a CBxpaHHeHne.
- N3npa3HeTe pe3epBoapa 3a rOpINBO npeDn DblirocpoUHO cbxpaHHe. Cna3BaIte MeCTHnte 3aKOHn 3a TOBa KbDe Da n3XbBpJIte rOpINBOTO.
-ПоунstTeпpoДуКТа npeДи Дьлroсрочьхра themselves.
- OTePAnHeTe npoBODHnka Ha 3anaNtEnHaTa CBeU, Ppei Da NoCTaBte NpOdykTA 3a CbXpaHeHne, 3a Da ce yBepuTe, Ye DnraTeJrT Hma Da ce CTapTnpa CnyauHIO.
Hnctpykun 3a 6e3oNaCHOCT 3a NOdpbXka

IPEyPExEHEHe: HenpaBunHo Texnuecko 06cJyKbaHe MoKe Da DoBeDe Do cepNo3Ha NoBpeDa Ha DBrTaTeJI NIM Do cepNo3HO HapaHbAe.
CobCTBHeHKnBT HOCN OTROBOPHOCT 3a CnA3BaHETo Ha BCnKHeO6xOdMn ONEpaun NTO TexHNueCKOTO 06cnyXbaHe, ONNCaHn B INHCTpyKUraTa 3a ekCnNoatauJa. Pa3KaueTe 3anaIteHaTc BSeU, npeNi TEXHNuecko 06cnyXbaHe. He pa3KaUbaTe CBeUta npeDi peryLnpaHe Ha Kap6bypatopa.
MOHTAK

PNEUYPPEKDEHNE: PpoyeTeTe rnaBaTa 3a6e3oNaChOcT Ppei crNo6yBaHe Ha npOdykta.
MOnTnpaHHe Ha npOdyXBaUaTa TpB6a HApKaHnKa Ha npOdyKta
3a6eJekka: BontbT pr6ba da 6bde docta bUHO pa3xna6eh, 3a da MoKe npOdyXbaaata Tpb6a da Bne3e Bn3xoHa KaOMnpecopHTo o6OpyDbaHe. C OTBepTk a3aBpTeTe 6oTa o6paTHo Ha YacOBHkoBaTa CTpeJka, 3a da ro pa3xa6nte.
1.Подрав overhe pe6poTo Ha rophata npodyxbaua Tpb6a c kne6obete Ha n3xoJa Ha KOMnpecopHOTO obopydBaHe. Премстete Tpb6bata B no3nua.
2.COTBeptKa3aBbPTeTe6oNTaNoYacOBHnKOBaT aCTpeJka,3aDa3aKaunTeTp6ata.
3a6eJekKa: He n3noJI3BaIte HnKakBn INHCTpyMeHTN 3a raIKaT.
3.Подравне порешende на долнахуваца Трьба сиздаинichte на Горнахуваца Трьба. Ппемecтete долнаха порodyхваца Трьба Вьрху рогната порodyхваца Трьбa.
4.3aBbptete DoHnHaT npOdyXbaUa Tp6bA no YacOBHNKOBaTcTeJIka,doKaTo ⅢpaKHe.
IocTaBraHe Ha Top6nUkKaTa 3a Cb6npaHe KbM pa3nUHn BaKyyMHN Tpb6n
BakyyMHOTo yctpoiCTBO e npucnocO6NeHne, Koeto ce npedocTabr c onpeJeHm MoJen.

PNEyPEXKDEHNE: N3KIOUeTe DnIraTeHa npOdyKa, npEi Da 3aKaunTe Tpb6nte.
-
OTBopete Top6nKata 3a cb6npahe. NocTaBeTe Tpb6ata Ha Top6nKata 3a cb6npahe OT BbTpeuHaTcTpaHa Ha Top6nKata, 3a DaЯ 3akaynte KbM BXoHnIy OTBop 3a Bakyym. YBepete ce, ye enactuHaTayactNONaBcbOTBeTHnJ Kne6. 3aTbopete uHa Ha Top6nKata.
2.ИЗвадепpoюухвацаТаТрьби И noctавeteТрьбатаHaTOp6nukata3aCb6npaHe.BkapaiTe6oItHa cKobataHa Tp6bataNTo3aTeHETe.3akayete pembkaHaXaJIKeTeHaTOp6nukata3aCb6npaHe.
3.Подравнete CTpeNKATA HaДОЛHATA BakyymHa Tpb6a CиЗдатиНe Ha rOpHATA BakyymHa Tpb6a. BkapaIte Okono 7 cm (3 in) ot ДОнHATA BakyymHa Tpb6aВ rOpHATA BakyymHa Tpb6a. ПрдьнжавTe Da BkapBaTe,ДOKATO DOnHATA Tpb6a ce 3akpeni Do6pe B rOpHATA.MoHTnpaIte DBete Tpb6n CпрсocTabeHnBnT. -
OTbopete kanaKa c NOMoTuHa oTBepTkA. NocTabeTe OTBeptkata npi CtpeNkata Ha BXODHn Kaak. CtpeNkata e npd p6a Ha kanaKa, ot dpyrata ctpaHa cpeu y nantata.
5.BkapaTe BakyMHTe Tpb6n B rOJemn O TBOpB DOnHaTa YAcT Ha KOMnPecOpHTo 0bOpyDbAHe.
IopabHHeTe qKCaTopuTe C npope3uTE B Tp6bTe. 3aBbPteTe, DOKATO baHOHTHO TO cBeINHeHne ce 3akJIOUcN.CmBOLNTe 3a 3akJIIOUcBaHe Tp6Ba Da ca IopapabHHeHn.
PABOTA

PNEyPExEHN: PpOeTeN pa36peTe rnaBata 3a 6e3oNaChocT npEn pa60Ta c npOdykTa.
TOpINBO
3a da n3noJ3BaTe ropuBO

BHUMAHNE:To3n npOdyKT pa3noIaracDByTaKTOB dBuraTeI.N3no3BaIte Cmec OT6eH3nH N MOTOPHO MacNo 3a DByTaKTOB dBuraTeI.He 3a6paBraTe Da n3no3BaTe npaBnHOTO KOJIueCTBO OT MacNo BCMeCTa.ΓpeuHOTo CbOTHOWeHne OT 6eH3nH IN MacNo MOKe Da DOBeDe Do NOBpeDa Ha dBuraTeIa.
Бeнзин

BHIMAHHE: He n3noJ3BaIte 6eH3nC OKtaHOBO YncNo NO-MaNko ot 90 RON (87 AKI). Toba moKe da nobpeDu npOdykTa.

BHUMAHNE: He n3no3BaIte 6eH3nC noBue ot 10% KOHcHTpaunHa eTaHON (E10).ToBa moKe da Nobpei npOdykTa.
BnHaHn 3nON3BaNte npecen 6e3oJOBen 6eH3nH c MInHMaJIHO OKTaHOBO YncNo OT 90 RON (87 AKI) n C no-MaIKO OT 10% KOHcHTpaun Ha etaHoi (E10).
- 3nON3BaIte 6eH3nH C NO-BnCOKo OKTaHOBO YNCNo, aKO YecTo N3NON3BaTe npOdykTa npN NOCToHHO BnCOKn ObOpOTn Ha DnIRaTeJIa.
Macno 3a DByTaKToBN DnBraTeJI
- INON3BaIe Camo BnCOKOKaYeCTBeHO MacNo 3a DByTakTOBn DnIRaTeJIN. INON3BaIe Camo MOTOPHO MAcNo 3a DnIRaTeJIN C Bb3DyUH OXJaXDaHe.
- He n3noJ3BaIe dpyrTINIOBe Macna.
- CboTHouHeHNeTo 3a cMecBaHe 50:1 (2%)
| Бенин Масло | |
| 1 amерkanckи галон 77 ml (2,6 oz) | |
| 1 immерски галон 95 ml (3,2 oz) | |
| 5 l 100 ml (3,4 oz) |
3a da HnpaBnte ropuBHaTa cmec
3a6eIekKa:BnHaHn n3nO13BaIte YIcT KOHTeHep 3a TropBO,KoTaTO CmecBATE RopNBOTo.
3a6eJekKa: He npabeTe noBce ot 30-ndHeBHO KOJIuYeCTBO OT rOpNBHa Cmec.
1.Добавete ПОЛOBинATAOT6EH3HOBaTcMec.
2.ДобавeteцялstoКоичecТВМACJO.
3. Pa3knataTe ropuBHaTa Cmec, 3a da CmecuTe CbIbpxKaHneTo.
4.ДобавeteOCTaHaNoToKoIuYeCTBo6eH3nH.
5. Pa3knataTe ropuBHaTa cMec, 3a da cMecuTe CbIbpxKaHneTo.
6. HanbHHepepeepBoapa3a rOpuBO.
3a da do6abnte ronpbo
BnHaHn 3nOJ3BaIte pe3epBoap 3a ropNBO c Klaanah npOTNB pa3nBaHe.
AkoBbpxype3epBoapaHMa rOpNBO,OTcTpaHeTe HekeJHaHOTo rOpNBO NocTaBeTe pe3epBoapa Da 13CbXHe.
- YBepete ce, Ye 30HaTa 6n3o Do KaNaYKaTa Hape3epBoapa 3a RopuBO e YnCTa.
- Pa3knatepe3epBoapa 3a ropnuBO, npeNi da do6abnte ropuBHaTa CMEc KbM pe3epBoapa 3a ropnuBO.
3a cTapTnpaHe n cnnpaHe
Ipei cTapTnpaHe Ha dBnraTeJIa
- PpOBepeTe npOdykTA 3a JInncBaUu, noBpeDeHn, pa3Xna6EHn nJn n3HOceHn Yactn.
-ПовереTe TOp6nKata 3a cb6npaHe.УвepeTe ce, Ye TOp6nKata 3a cb6npaHe He e NOBpeHa n Ye cInbTe 3aTBopeH.
-Поберетe raiknTe, BnHTOBete n 6oTobete.
-Поверетe Вьздушни Фнтbp. - PpOBepTe, Ye peryIaTOpbT Ha ra3Ta pa6Ot npabuHIO.
-Поверете певкюватя за сираhe за правлна pa6ota.
-Поберете npodykta 3a Teu ha ropnBO.

PNEyPPEKDEHNE:HeHaBnBaTe BbKeTo Ha cTapTepa OKOPObkata cn.

BHIMAHNE: He noDnnpaTe npOdykTa c KpaK.

BHIMAHHE: He n3dpbnaIte BbXeTo Ha cTapTepa DOKpaI. He nyckaIte dpBXkata Ha BbXeTo Ha cTapTepa, KOrato e m3TerHeo. Toba MoKe Da NobpeDi npOdykTa.
3a6eIekka: Ako DbIraTeJIaT cnpe, BbPHeTe CmyKaHa Ha N03uIyra "3aTBopeHO" IN NOBTOpe TcBnKlTe Ha CTapTnpaHe.
- HanbIhete pe3epBoapa 3a rOpNBO c YnCTa rOpNBa CMEc.
- Hatnche Te nokaBaata nomna 10 nbtn,doKaTo ropnBoto 3anoHe da 3aBnBA nomnata. NokaBaata nomna He Tp86Ba Da 6bDe n3zraNo nbnHa c ropno.(Fig 20.)
3.ПпемecтeteсмУкачаHa no3ицЯ ПьЛЕн CMYКА ("3aTBоpeHo").(Fig 21.) - Ппемесе Te ДOKрай Лостсево 3a уральенhoe Ha obopOTITE B NOcOKa O6paTHO Ha YacOBHnKOBaTa CTpeJIka.(Fig 22.)
5.CIyBaTc nppbKa 3aDpBxKTe KOpnyCa Ha MaunHaTa Ha 3emrTa.
6.ПпемecTeTeСмУКачHaNo3ицЯ1/2 ("ПОЛУТВОЕно")ИДрБНЕТeДрБЖКаТaHaВБЖЕTO HaCTapTepa,ЗаДаCEВКнOуДВURAteЯ.(Fig 23.) - Octabete DnurataTna pa60Tu B npOdbJKeHne Ha OKoJo 10 cekyHn.
- HatncheTe 3aPbXkTe peryIaTopa Ha ra3Ta no BpeMe Ha BCNUKIOCTaBaUcN CTbIKN.
9.ПпемecTeTeСмУКачаHa noЗицЯИЗКЛЮЧЕНСМУКА ("OTВОРЕно").(Fig 24.) - 3arpeiTe DnBraTeTn B npOdbNxKeHne Ha 1 MmHyTa.
3a cTApTnpaHe Ha TOnbJ DBrIraTeJ
- Hatnchete n 3aipbXkTe peryIaTopa Ha ra3Ta.
2.ПремecTeTe cmykaHa Na no3nua 1/2 ("NonyoTBopeHo").
3.ДрьнhteБьрзОдьжКаТаНаВьжKeTOHa cTapTepa, HATNCKaKN CnycbKa Ha ra3Ta,ДOKATOce BKNIOuN DBNrataJIЯT.
4.ПпемecтeteСмУКачHa noЗицЯИЗКЛЮЧЕH CMYKAU ("OTBOPeHO").
TEXHnuecko OBCJnyKBAHE

PNEyPEXEHEHNE: PpoyeTe H pa36epete rnaBata 3a 6e3oNaChocT, PpeN DaNouchte, peMOHTpaTe Nn Da nIbHNTe DeHOC T NO NoDpBxKkTa Ha npOdyKTa.
TpaΦnK 3a TexHnuecko 06cnykBaHe
YBepTe Ce, Ye cna3BaTe rpaFnka 3a TeXnuecko
06cnykBaHe. INTepBaInte ca n3uNCJIeHn OT
ExeJdHeBnata YnoTppe6a Ha npOdyKTA. INTepBaInte ca
pa3JIuNHy, aKO He n3NoJ3BaTe npOdyKTA BCEKn DeH.
N3BbPbBaIte cAmO DeHocHTnte NO TexHuecko
06cnykBaHe, KOtO Ca ONsCaHn B Ta3n INCTpyKzra 3a
EKCnloatauHa. TOBopTe C Odo6peH cepBn3eH zENTbP
OTHOCHO dpyrN DeHOCTHn PO TexHuecko 06cnykBaHe,
KoTTo He HAMnPate B Ta3n INCTpyKzra 3a
EKCnloatauHa.
BceKnDHeBHO TexHnuecko 06cnykBaHe
-ПоунICTeTe BbHUNHe NOBbpxHOCTn.
-ПовереTe Далун упавлениTo Ha obopotinte И Perулatorа На ra3Ta pa6OТг HopMaJIHo. 3aMeHete NOBpeDeHnTe YacTn.
- PpOBepeTe npeBkIIOvBaTeJIa 3a cnIpaHe. CmeHete ro, aKo e Heo6xoDnMo.
-Пюовере оборOTte Ha праЗня XOД.
-Почисте Вьздушни Фплтbp.Смehete ro,akoe Heo6xOIMO.
- YBepTe ce, Ye BXOHNrT KAnak MoKe Da ce 3aKnHouBa B 3aTBopeHo NOnOKeHne. YBepTe ce, Ye potOpBT e NcT.
3aTeHHeTBe BCnKr RaKu N BuHTOBe.
- YBepTe ce, ye KOpnyCite ca 3dpabn n 6e3 nyKHATINH.
- YBepTe ce, Ye TopbNkKaTa 3a cb6npaHe He e NOBpeHa n Ye cunbT pa6Otn HopMaJHo. CMeHete TopbNkKaTa, aKO e Heo6xOdmo.
CeMnHToTexHnuecko 06cnykBaHe
- PpOBepeTe CbCToHHeTo Ha CTapTepHOTO yCTpoiCTBO, BxKeTo 3a CTapTnpaHe N Hata Ta npyKHa. 3aMeHeTe BCnUKNIOBpeDeH Yuactn.
- PpOBepeTe CbCToHHeTo Ha CMyKaTeHnHa B3dYxONpOBoD Ha CTapTepHOTo ycTpoiCtBO. Ako CMyKaTeHnHrT B3dYxONpOBoD e 3anyuHe, npemaxHete OTnadbUnte.
-Почисте OTbH 3anaJInteJHaTa CBeu. CbaIeЯ n npOBepe pa3CToRHeTo Mekdy eJeKTpOJaTe. PerynpaIte pa3CToRHeTo Do 6 mm (0,024 in) inn cMeHeTe 3anaJInteJHaTa CBeu.
-Почисте Лonaаткite На ротopa.
-Почистепpeдпазнота ИСКРогсИТЕЛНа Мрека Ипри НeoбхоДIMОCTЯ СмeнeTe (He ce OTHACr 3a aycnyxa C KaTaNt3aTOP).
-Почисте зоната на kapбуразopa.
-NouHCTeBb3dUshnHnФnTbp.
MeceHn ToxHnuecko 06cIyKbaHe
-ПоверетдрьжкataHaВьжeto3aCTapTupaHeи Вьжeto3aCTapTupaHe.
-Почисте pe3epBoapa 3a roPBO.
-Поунсте КарбypаТopaи OKолНаТа 3Онa.
-Почисте Лонаткite Н ротopa.
-ПовереTe ropINBONpoBOdnte 3a pyKHaTnHn n npyrn noBpeDn. Ako e Heo6xOdmo, ro 3ameHeTe
Cmehe roPbHnBnA pntbp B pe3epBoapa 3a roPBO.
-Поберете BCnKи Ka6eIи Bp6kn.
-Поdmehete3anaNTenHaTa CBeu.
-CmeHeTe Bb3dUHHnHnФnTbp.
ExeroHa noDpBkKa
- PpOBepTe 3anaJIteJIHnHaTc CBeU.
-Почисте Вьншна ТОВьрхноct Ha KapбypаTopa И 30нHTe OKОЛУ Hero.
-Почисте симtemа за олдданe.
-Пюоверете Иckporacntelпя ekран.
-Проверете ratubnnaФJTbP. - Поверете маркуа за горувото за повда.
- Правerte BCnUKN KaBJI IN BpJ3KN.
TexHnuecko 06cIyKBaHe Ha 50 yaca
- PEmoHTbT nIN CMHaTa Ha aycnyx Ta p6Ba Da ce 3BbPwAT OT Odo6peH cepBn3eH ueHTbp.
3a da perynipate obopotnte ha npa3HxOd
-
YBepTe ce, Ye Bb3DyUHnT pHNTbp e uCT IN KanaKbT Ha Bb3DyUHnI nITbp e 3aKpeNen, npeIN da peryInpate o6OpOTne Ha npa3HNxOJ.
-
PerynpaTe o6oPoTHe Ha npa3HnXoD c perynpaunBnHT, 03NaueH cbc 3HaKa "T". (Fig 27.)
-
O6opotte Ha npa3HnXoD ca npaBnHn, koraTo DBnraTeJrT pa6Ot nIaBHO BbB BcKaO NOIOKeHne.
-
3a yBelenucaBaHe Ha ckOpocTTa 3aBbPteTepeRyIinaBnHT No NocKa Ha YacOBHnKOBaTaCTpeNka.
2.3aHaMaJIyBaHe Ha CKOpocTta 3aBbPTeTe peryIIPAuNBAHT o6paTHo Ha YacOBHnKOBaTa cTppeJka.
3aДаHa npabTeTexHnuecko 06cIyXbaHe Ha NCKporacnteHnna ekpaH
N3non3BaTe TeHeHa YeTka 3a NOuNCtBaHe Ha NCKporacntenHnEkpaH.
3a nouicTbaHe Ha cnCTeMaTa 3a oxJaXdaHe
IOnuCTeTe YactTe Ha CnCTemTa 3a OxJaXdaHe C YeTka. (Fig 28.)
3a npoBepka Ha 3anaIteHHaTa CBeU

BHIMAHHE: N3noJ3BaIte BnHaN 3aJaJIteJIHInTe CBeUg OT npEnOpbUaHn BnD. N3NoJ3BaHeTo Ha 3aJaJIteIeNa HcBeUOT He npabVIIeH TIN MoXe Da NOBpeDi npOdyKTA.
-Пюоверетаэлгнота CBeU,akOBuRaTeJrT e cnoHxkeHaMoUHOCT,CTapTnpa TpydHo nIIN pa60Tu HnppabOMepHo npu OobopTu Ha npa3EH XoI.
3a Da HamaJIte ONaHocCTTa OT nonaHaHe Ha HexeJAH MaTePnaJIb BbPxyeEneKTpoJnte Ha 3aJaJIteJIHaTcBWeU, CNeBaIte Te3N INHCTpyKuIN:
a)Поверете дали obopotite Ha npa3ня xoJ ca npabunho perynupaH.
b) YBepete ce, ye ropnBnHaTa Cmec e npaBnHa.
c) YBepTe ce, Ye Bb3dUshnTФnITbpe uHCT.
Ako 3anaHntHaTa CBeue e 3ambpcHe, nouCTeTe R npOBepTe daHn pa3cTOrHneTo MeKdy eNEKtpoDHTe e npaBnJHo, BnKTE TEXHvUeCKN XAPAKTEPUCTUKN Ha cTpaHnua 241.(Fig 29.)
CmeheTe 3anaJIteJIHaTa CBeU, aKO e Heo6xOJIMO.
3a da n3BbPwBaTe TexHnuecko 06cnyXbaHe Ha Bb3dUshnnaФnTbp
3a da nouchnte Bb3dyuHnna qnTbp
- CbaneTe Kanaka Ha Bb3dyuHnI T_Bp n camna Bb3dyueH T_Bp . (Fig 30.)
2.Почирете Вьздушни ФиNTьр с ТОпla canyHeHa BOДа.YВерете ce,ЧЕ ВьздушниФиNTьр e cyx, ПраздЯ Г мOLTирate.
3.CmeheteBb3dyuHnA qnItpb,ako e npekaneHo 3aMbpceH 3a NbIHO nouchTbaHe.BunHarn 3aMeHnTe NOpeDen B3dyuHnΦnItpb.
4.AkopoyktbT Bn pa3nonara c neheCt Bb3dyweH p,HaheCte Macno 3a Bb3dyweH p. HaHacIte Macno 3a Bb3dyweH p Camo Bpxy neHeCT pHp. He HaHacIte MacNo Bbpxy pOOB p.
TEXHINUeCKN XAPAKTEPNUCTUKN
| e diminisha | B2126 (125B28HV) | BV2126 (125B28HV) | |
| Спес��況 на двигателя | |||
| ОБем на цлиндану см | 3 | 28 28 | |
| Разstownные мени щейсятpondITE mm 0,6 0,6 | |||
| ОБем на рezерboa rapа за гориwo см | 3 | 500 500 | |
| Овороти на праzenхOD min | -1 | 2800 - 3200 2800 - | 3200 |
| Мakсимални обороти min | -1 | 8000 8000 | |
| Изховна мошист кW 0,8 0,8 | |||
| Запалителна сөш | RCJ-6Y | RCJ-6Y | |
| Мakсимални обороти пri реким "духане" | min-1 | 8600 8600 | |
| Мakсимални обороти рrips реким "Вakууm" min | -1 | -- 7500 | |
| Перiod на подьлжинец升降ост наемиспес h 50 50 | |||
| Данни заш汞 и вибрацни | |||
| Еквваелно НИВО на ВИБрациме Вырху рьковbatкite с моHTирални подухваши Трьби и Нарайник (оригинални)- вижte забелека 1 | m/s2 | 8,3 8,3 | |
| Еквваелно НИВО на ВИБрациме Вырху рьковbatкite с моHTирални вадуогмпн Trрьби (оригинални)- вижte забелека 1 | m/s2 | --/-- 6,4/8,3 | |
| Еквваелно НИВО на ЗУКовOTо нальгане Вырху ухOTO на оретаторa, Изөрөнөсыласno ISO 22868, с моHTирални подухваши Trрьби и Нарайник (оригинални) | dB(A) 94 | 99 | |
| Еквваелно НИВО на ZУКовOTо нальгане Вырху ухOTO на оретаторa, Изөрөнөсыласno ISO 22868, с моHTирални вадуогмпн Trрьби (оригинални) | dB(A) -- 99 | ||
| НИВО на ЗУКовATER мошноct, rapаNTирала (LWA)- вижte забелека 2 | dB(A) 107 | 107 | |
| НИВО на ZUKOBATER мошноct, Изөрөн - Вижт забелека 2 | dB(A) 106 | 106 | |
| Разөрөн пюдөрөн | |||
| Тergл (бeз горов, HO с моHTирални подухваши Трьби и стандартэн Нарайник) | kg 4.3 4.4 | ||
| Забелека 1: Otuvetehite данни за эльваленгто НИВО на ВИБрациме Имат тлична CTATINCTUHECKA диспеся (стандартэн оTKLOHENHe) ot 1 m/s2. | |||
| Забелека 2: Шуоби emись в okолнatable среда, Изөрөн КATO зУКова мошноct (LWA) в сбOTВETCTBVE с діректува на EO 2000/14/EO. Otuvetehite НИВа на Умma за машина та сизмөрөн с оригиналлөрөшо obopydvahe, koeto дава най-BICOKOTO НИВ. РAZКATA мени Гаротүларото Изөрөнөтүн BO на Умma в TOBA, чу rapаNTралото НИВа на Умma в БКЛЮЧа сыло и диспесята в pezUTATITE OT ИзөрbaHETO, кAKTO и Вариацлптмөжду разлочптм Maшини OT eDINH IN сыши мodyел в сбOTВETCTBVE с діректува 2000/14/EO. | |||
| Забелека 3: Otuvetehite данни за эльваленгто НИВО на ZUKOBOTо нальгане зы машина та машина т IMAT тлична статинстесka диспеся (стандартэн оTKLOHENHe) ot 1 dB (A). | |||
BcTaHOBJIeHHa NObITpOdyBHOI Tpy6n I HacAdKn Ha Bnpi6
3BepHt b yary: BoNT MaE 6yTN DoCTaTHbOIO mipoo Ocna6JIeHn, 06 MoKHa 6yNo BCTaBnTn NOBITPOyBHy Tpy6y Bnynckn OTbIP. 106 ocna6ntu 6oT, NOBepHt b Ioro npOTn rOINHHKOBoi cTpiIKN 3a DOnOMOrOIO BNkpyTKI.
- BupiBnIte 3ByxKeHNI KHeUb NobITpoyBHOITpy6N 3 Na3OM Ha BNpyCKHOMY OTBopi NobITPOdyBa. BCTaHOtB Tpy6y Ha Micue.
2.ДяЗakpinlenHЯТуБи NOBepHITb 6oNT3a roDHHNKOBHO CTpIKKOHO 3a DOnOMOROU BnKpyTKN.
3BepHt b yBary: 3a6opohReTbC8 TOpKaTHcRaIKN 6yDb-RAHM IHCTpymeHTOM.
- CymictiB npopizn Ha HxkHni NOBITPOyBHi Tpy6i 3 BnCTynamn Ha BepxHi Tpy6i. BCTaTe HxKHIO NOBITPOyBHy Tpy6y y BepxHIO.
4.Повертаинхию nobiитpoodybHy trpy6y 3a roDINHHNKOBOHO CTpiIKKO,ДOKИ He nouyeTe KnaцаHH.
BcTaHOBJIeHHa MiUka 3 pi3HnMn BCMOKTyBaJIbHnMn Tpy6amN
PpnaIaIg INa BCMOKTyBaHHe akceCyapOM, 0o NOCTABJIeTbC3 DeKMM MoJeIaMn.

PONEPENXEHH:PepeBCTaHOBNHEM Tpy6 He BnpiBnKnIOuHTb DnHyH.
- BiikpnTe Miok. BctaTe Tpy6ky dna Mioka 3 BHytpiHbOiT CTOpOHMioka TaK, 0o6 BOHa BBiWna y BXiHN OTBip Mioka. NepekoHaTecra, 0o6 eJactuHa DeTaIb BCTana Ha Mice y BuIMci. 3aCte6HtB 3AMOK-6JIncKaBky Ha MiUky.
2.3HIMITb NOBtPOyBHy Tpy6y i BCTaBTe Tpy6ky MiuKa. BCTAHOBiTb i 3aTnHiTb 3aTnCKnH 6oNT Tpy6n. PnCte6HiTb peMiNb Do neTeNb Ha MiKy. - BnpiBnIte cTpiKny Ha HnKHi BCMOKTyBaIbHi n Tpy6i 3i cTpiKOHO Ha BepXHi BCMOKTyBaIbHi Tpy6i. BcTaBTe HnXHIO BCMOKTyBaIbHy Tpy6y y BepXHIO np6Iu3HO Ha 7 cm. BcTaBTe HnXHIO Tpy6y y BepXHIO Ta, 106 HnXHry Tpy6a 6yna HadiHo 3aΦikCoBaHa Ha HaneXHOMy Micci BCEpeDnHi BepXhBoi. 3akpinItb OnbDi Tpy6n 3a DonomoroTo rBNHTa, 10 BXOnTb Do KOMNLeKty NoCTabKn.
- BiikpnIte KpnUky 3a DonomoroBnKpyTKn. Po3TaWyIe BnKpyTKy Ha CtpIniHa KpnUz i BnyCKHOro OTbOpy.CtpInka 3hAxOJntbcra HxKYe KpOMKn KpnUkn 3 npOtunExHoI CToPOHn WapHipy.
- BCTaBTe BCMOKtYBaJIbHi Tpy6n y BeNknn OTbip y HxHni YacTnHi NOBITPOyBa.Cymictb BnCTyn3 npopizamHa Tpy6i.KpyITb, NOKn 6aNoHeThe KpinIeHHNe 3aΦikCyETbcra.CmBOJn 3aMka MaOTb cnIBnadTu.
EKCПЛYATALJI

NOpEPeJXeHHa: NpeBnKOpNCtAHm BInpo6y yBaXHo npOHTaIte po3in npo npaBnlaTexHikn 6e3neKn.
PanibO
BnKOpncTaHH naJInBa

YBAFA: LcBnBip6OcHaueHn DBOtAKTHM DBNHyOM. BnKOpNCOTByte cymiu 6eH3nHy Ta MOTOPHOI OINBI DNRA BDTAKTHX DBNHyIB. Ia Cmii BnKOpNCOTByte npabunbHy kInbKiCTb ONNB. HeBipHe cnBbIDHOUeHHa 6eH3nHy Ta ONNB MoKe npn3BeCTn DO NOWkoJXeHHa.
BcH3nH

YBAG:He BnKOpNCToByTe 6eH3nH i3 OKtaHOBM YnCnOM HxKYe 90 RON (87 AKI). Lc MoKe npN3BeCTn Do NOnKoJKeHHBnPo6y.

YBAFA:He BnKOpNCToByTe 6eH3nH i3 KOHcHTpaJIeIO eTaHOny 6iNbJe 10% (E10). LcMoKe npu3BecTn Do noUkoJKeHHBnpo6y.
3aBKn BnKOpncToByNe HOBn HeeTNOBaHn 6eH3n3 mHiMaJIbHIM OKTaHOBm YIcJOM 90 RON (87 AKI) Ta KOHcHTpaqicIO eTaHOJy MeHwe 10% (E10).
- Y pa3i yactoro BnKOpncTaHHB BnPo6y 3 BnCOKOIO yactoTOIO o6epTaHHN DnBnHyHa, Heo6XiHNO BnKOpncToByBatn 6eH3nH 3 BNzIM OKTaHOBM NcJlOM.
BOTaKTHa MOTOPHa ONnBa
BukopncToByTe NlWe BnCOKoKICHy DBoTakTHy MOTOpHy OINBy. BnkOpncToByTe NlWe MToOpHy OINBy dNr NOBITpHOrO OxIoJKeHH.
- He BnKOpNCtOByIte iHsi TnIN OJINBn.
CnBbIDHOweHHKOMnHOENTIB50:1(2%)
3BepHt b yBary: He 3miuyIte o6'em cyMiwi, kky He 3MOxKeTe BnKOpNCTaTn npOTraFOM 30 dHB.
1.ДоаиTe noIOBHy KINbKoCTi 6eH3nHy.
2.ДоаиTe BCIO OJINBy.
3. 36obTaIte naiBHy cymiu Ina 3miuYBaHHKOMIOHeHTiB.
4.ДоаитpeewtSyбeнзину.
5.36oBtaTe nAnBHy cyMiU dIa 3MiUyBaHHKOMIOHeHTiB.
6. HanobHItb naIbHnB 6ak.
DoaBAnHaIbA
3aBKn BnKOpncToBynte naNHBy cMHiCTb 3 aHTnnpOpyckHm KnaHOM.
- KaHo Ha EMHOCTI 3HaXoDnTbCn pAnBO, np6epiB Ioro Ta daIte EMHOCTI npocOHyTN.
-ПepekoHaItecЯ,ио obnactb HabkoJIO KpUshKn naNBHorO 6aka YnCTa.
- PpeI dOaBaHHm naJINBHOI cyMIi B naJIbHn 6ak 36OBaTae cMHiCTb 3 naJIbOM.
3anyck i 3yynHeHHra po6oTu
Ipeed 3anyckOM DnBnyHa
- PnepeBipTe Bupi6 Ha npEMeT BiCyTHix, NOwkoDkeHnx, po3xHTaHx abo 3HOWeHnx DeTaJe.
- PnepebiTe MiOk. PnepeKoHaTecr, 00 MiOKe He noWKoDKeHn, a 3AMoK-6NnCKaBKa 3actiHytni.
- Penebipte raiKn, rBnHTu Ta 6oJTN.
-Перевпгет noBITРин Флтр. - IpeBipTe npaBnIbHicTb po60Tu KypKa ra3y.
- NpeBipTe npaBnIbHiCtBo60Tu BmMkaHa.
- IpeBipTe Bupi6 Ha HaraBHiCTb BnToKIB naNIMBa.
3anyck xoJIoHoro DbNryHa

PONEPENXEHH:He HAMOTyTe Tpoc CTapTepa Ha pyky.

YBAFA: He TpmaTe Bpi6 Horamn.

YBAFA:He doTaryte Tpoc cTapTepa Do KpaHbOro noLoXeHHa. He BiDnyckaIte pyKy TpoCa cTapTepa, KOJIu BIn IOBHiCTHO BnTARHyTNI. Ie MoKe NOwKOdNTu Bpi6.
3BepHt b ybary: RaIIO DnBuryn 3ynuHnBcR, nepeBeiTb nobITpy 3acNIHKy B 3akPte noJoxKeHHra Ta nobTopitb onncahi panihe iI.
- 3aJIInTe Do naJIbHOrO baka YnCTy naJIbHBy cyMiI.
- Hatncitb KhoNky Hacoca 10 pa3iB,doKn naHBO He NOUHe HAnXoDHTB 6aJNoH.KHOJa HAcoca He NOBHHa 6yTN NobHCTIO 3aJINaTaNabom.(Fig 20.)
3.Пелевдіть керуванні поітprану 3асінінку дыruha Bпложенfull CHOKE(Пobні 3acnH, 3akpnte noLoxhenh).(Fig21.) - NobHicTIO nobepHITb peryIaTOp WbNkoCTI npOTn roDHHNKOBOI CTPIKN.(Fig 22.)
- JIIBOIO pykoIO npTnCHiTB KOpNyc IHCTpyMeHTa Do 3emJI.
6.ПepeBéπiTb nobitpyh y noJoxeHHy 1/2 i notarHtib pyKcCTapTepa, nOKn DBuRyH He 3anpauc.(Fig 23.)
7.ДаиTe DBnHyH nonpaHOBaTH npHbNIm3HO 10 cekyHd.
8.ПовситюНатиспь дросьн ретултор i He BiДпунчай Te И�о,пOKи He BИКОHAeTe Bci dii,цo 3aJIINuINICr. - Пераевдіповітprану заслінky у положенг OFF CHOKE (Бe3 засл氧н, BiДкрпті положенг).(Fig 24.)
- PporpiTe Dvuryn npotraom 1 xBvuiHn.
3anyck TenIoro DbIryHa
- HatnchItb i ytpmmyTe dpocenbHn perynTOp.
2.Перевдов Вадимь ДрocьНоиу поожжн 1/2. - Ctnckaoun kypok rasy, pi3ko notarHitb 3a pyky cTapTepa, 06 3anyctntn DnHyh.
4.ПepeBéπiNb nobitpyHy 3acniHky y noIoxKeHHA OFF CHOKE (Be3 acIoHny, Biikpnte noIoxKeHHa).
3yHHHeHHaBnryHa
- Hatncitb i BiDnyctItb nepemnkau DnBryHa STOP (CtoI). Npeemnkau aBTOMaTnUHO NOBepHetbcya y noJoxHenr ON (YBIMK.). Npeed cnpo6yio nepe3anycky Bnpo6y 3auekaTe 7 cekHyd, 06nepekoHaTnC, 10 nepemnaq npeJeB noaTKOBni CTAH.
BnKopncTaHHHaacdKn
-
Y pa3i, KONI NOtpi6H NoPaIIOBAtn 3 6IbIb W BnCOKO ToUHicTIO I NOTpi6Ha BnCOKA KOHcHTpaIg NOtOKy NOBITp, 3aCTOCOBYte CTaHdApTHy HacaIky.(Fig 25.)
-
JKIO noTpi6eH uRpHn noTik nobITpr i 6Ibua WBnDkICTB, 3aCTOCOBYte BUCOKoWBnDkICHy Hacaiky. (Fig 26.)
PeryIIOBaHnHa cAsdKn NObITpoDyBa
- NobephiH hacaiky liBopyu, 0o6 nocna6ntu 6aioheThe KpInneHHra.
2.ПepeBediH hacaiky y BiDnOBiDHe noJIOKeHHa. - NobeHitb HacaKy npabOpuy, DOKn He noyecTe KnaaHHa.
BCMOKtyBaHHa
IepH HIX NOUHaTn npaIOBaTn B pexMIMBCMOKtyBaHHra, HADrHiTb Heo6XiDHe 3axNCHe0bnHaHH.

PONPEJXEHH:PepeBVKOpCTaHHaM nepekoHaTeC, 0oMiOKe He noKoJKeHn,a 3amok-6bnckabky 3actbHyTo.He BkOpncTOByTe noKoJKeHn MiOKe.Lc donomOke yHNKHTn TpaBM BiD CmTTA, 0o MoKe oINHITNCB NobiTi. Po6ota 3 Bnp6oM JIBOO pyKOIO nIDBnUye pN3NKn. He dOnyckaIte, 0o6 qactHn TiNa TOpKaIncs 3OH NbxNony.

IIOPEJXEHH: HiKoN He 3anyckaTe NOBITPOyB, KUO KPNsKa BnYCKHO OTBOPy BiKpNTa a60 noKoDKeHa (3a BNHTKOM BnnaKIB, KOJI NID'EdHa BCMOKtyBaJIbHa Tpy6a).
Плд quac po6oTn 3 nobitpo7yBOM, MiOk Heo6xidno nIDTPmMyBaTu 3a DOnomoroH pNeUOBOro peMeHa. PemNb Heo6xidHo HndraTn Ha BepxHIO qactHy npeya.
3anyctitb nobitpoody.BKOKHyte iHCTpykui 3 po3iny no 3anycky ta 3ynnHi Pepei 3anyckom DBNrHa Ha cTopin269. IpoHTaIe iHCTpykui 3 6e3neKn B3NEKA Ha cTopin265.
CnpoxHeHHmIka

PONEPENKHH:3aBKnInepeBipraTe Miok. Npeed BnKopncTahm IpekoHaNTec, 0o BiH He NoiKOxKeH, a 3amok-6nNcKabKa 3acti6HyTu. He KOpCTyntec NaIKoDKeHMM iWkOM. lChyc pN3NK TpaBMyaBHcMITTAM, 0o MoKe 3 HbOrO BinetTI. BybTe oBepeXHi, kKpo npauoTe JIBOpyko. He TopkaTecr 3OHN BnXNONy.
- 3ynnHItb Bnpi6.
- BiikpnTe 3amok-6nckkky Ha MiKy.
3.CnopoXHiB MiWok.
TEXHlUHe OBCJnyROByBAHHa

NONEPEDKEHH: NpeoOnueHnM, peMOHTyBaHHm YI TexHiuHm 06cnyroBvBaHHm yBaXHO npOHTaIte po3dIn npO npaBnA texhIKs be3neKn.
Tpaik texhiHoro o6cnyroByBaHHa
3aBxDi DoTpmyTecr rpaifika texHnHoro
06cnyrobyBaHH. IHTeBaNIN BnPaxOByIbC93
ypaxyBaHHm 0eHnHO BnKOpNCtAHn BnPo6y.
3NaueHHn IHTeBaNIB 6yDe IHuM, RaKIO BN He
BnKOpNCTOByIte BnI6 0eDHe BnKOHyTe NIIe Te
06cnyrobyBaHH, RaKe OnUcaHE B cBOMy Noci6Hnky.
IHopMaio 0do IHnx BnIDB OHcyroByBaHH, He
HaBeDeHNx yCbOMy Noci6Hnky, MoXHa OTpIMaTN B
ABTOP3OBaHOMy CepBICHOMy ceHTpi.
LQeHHeTexHneO6cnyroByBaHHa
OuHHeHH3OBHiHIX IOBepXOHb.
-Перевірka роботи ретулітopa wвнікості та кypka rasy.Заміна пошкоadingи Deталe.
- Ipebeipka BmMkaua. 3a Heo6xidHocTi 3amHITb Horo.
-Переверkaшвидкостixхолoctoroху.
OuHHeHHNoBITpHoro pIbTpTa.3a Heo6xHocTi 3amHtB yoro.
-ПepekoHaItecA,икрИшkaВnyckHOrOOTbOpy
ФikcyETbcRy 3akpITOMyNoLOXKeHHI.
ПepekoHaItecA,икрИьчATkaЧИСТа.
3aTgHtB BcI TBnHTTa raKn.
- PepekoHaHTec, 10 Ha Kopnycx Hema TpiH.
- PenekoHaTeCra, 0o MiOKe He NooKOJKeHn, a 3amok-6JIncKabKa npaioe. 3amHITb MiOKe y pa3i notpe6n.
LToNkHeBTEXHnHeO6cLyroByBaHHa
- Ipebipka cTHy cTApTepa, TpOca cTapTepa i npTnCKHOI npyKHH. 3aMIHiTB Bci NOnKoJKeHi detani.
- PepeBipka cTany nobitpo3a6ipHnka Ha cTapTepi.
Kkuo BCMOKTyBauch Nobitpr 3abBCra, 3bIbHiB Noro BID CMITT.
OuHHeHH3OBHIHb0I YactINH CBiUKN 3anaJIIOBAAHH. BnTARHITb II Ta nepeBipTe npomixOK mIX eNEKTPoAMn. BiDperyIHOte 3aOp MIX eJekTPoAMn Do 0,6 MM nn 3amHtB CBiKy 3anaJIIOBAHH.
OunueHHaHaKpnilbuaTci.
OuHHeHHIckporachnka Ta Noro 3aMiHa B paai notpe6n (ue He CTocyeTbcra rJyUHNKIB i3 kataJIITNUHM DonaJIIOBauem ra3iB).
Ounuennn 30Hn Kap6opatopa.
OunueHHnOBITpHoro fInbTpa.
LOMICYHETexHHeO6cnyROyBaHH
-Пелеверka руки Трoca стапета та Трoca cтапета.
-Почисты паловнибak.
-Почисту Карбюратop Та 3Ону HabkoJO HbOTo.
- OuHsEHHa nonaTeHa KpInbUaTci.
- IpebeipTe Tpy6kn naiNBHOI CnCTeMn Ha npEpmet TpiuH a6o iHux noxkoJKeHb. Y pa3i Heo6xidHocti 3amHtB ix
- 3amihTb naINBHH pfIbTp y naINBHomy 6aui.
- NepeBipka BCix ka6enib Ta 3'eHaHb.
3aMiHa CBiUKN 3anaJIIOBaHHra.
- 3amHa nobitprHoro qinbtpy.
UOpiuHe 06cIyroByBaHHa
- PeneBipka CbiuKni 3anaJIOBaHHa.
OuHHeHH3OBHIHb0I NOBepxHi Kap6iopaTopa Ta npJnerJnx Do Hboro DInrHOK.
OuHHeHHcCTEmOxOIOKeHHa.
-ПepeВірka ickporacnka.
-Перевірka палвного рпьтpa. - IpeBipka ⅢaHra noaqui nalbHoro Ha NOWKODXeHH.
- NepeBipka BCix Ka6enib Ta 3'eHaHb.
Texhne 6cbnyrobyaHHn nicna 50 roHn ekcnnyatauii
Heo6xidHO BiDpemOHyBaTHaO 603amHHTn rIyWHNK B aBTOPn3OBAHOMCy cepbICHOMy ceHTpi.
HanauTyBaHHa WbNdkoCTi XoNoctoro XOdy
-Перет haJaTuBaHHaM WbUdKoCTi XOJIocTO XOyu nepekoHaItecra, lo nobitprnH pIbTp uCtN, a Kpuioka nobitprno oIbTpba BCTaHOBNeHa.
HanaTuIe WbNkICTb XOIOCToro XoOy 3a DOnOMOrIO peryNJIOBaJIbHO rBnHTa T, kKIN no3NaueHn JITEpoIO «T». (Fig 27.)
- WbuiKicTb xonocToro xOdy BiDperynboBaHa npaBnIbHo, kUo DnBryH npaue pIBHomipHO B 6yIb-kyOMy noIOxKeHHi.
- 36iBbHnT WbNdkicTb NOePtaTe rBHT perynIOBaHHX XONOCTO XOy 3a rOHNKOBIO CTPIKIO.
- 506 3MeHnTn WbNkicTB NOBepTaIe TBnHT peryIOBAHH XOIOCTOro XOdy npOTn rOuHHNKOBoi CTpiKN.
Texhne 06cnyroByBaHHiaKporachnka
Для ouHЯ iKporachnka BnKOpncToByTe dpoTHy uity.
OuHHeHHcNCTeMn OxJIoJxKeHHa
OuIyTe eIeMeHTn CNTeMn OxOnoJxHn 3a donomoroo utkn. (Fig 28.)
IpeBipka CBiUKN 3aNaJIIOBaHHN

YBAFA: 3aBkDn KOpNCTyITeC8 peKomeHDoOBaHMn CbiUcAMn 3anaJIeHHra. HenpaBnIbHn Tn CbiUcN 3anaJIIOBaHH MoKe npIN3BeCTn Do nouKOdXeHH BInO6y.
- Y pa3i, kkuo DnBryh Btpaue nOtJxHicTb, noRo Baxko 3anyctntu a6o BiN noraHo npauoe Ha xOIOCTOMy XOy, Heo6XiDHO nepeBipTu CBiyKy 3anaJIIOBaHHra.
- 3meHHTn pN3NK IOTpanJHH 3aBnx npedmetiHa eNEKTPoDn CBiHKN 3anaJIIOBaHH, DToPMyTEcTaTakx IHCTpykui:
a) nepekoHaTecra, 0u WbUdkictb XoNocToro XOy BCTaHOBHeNo npabunlHo;
b) nepekoHaTeC8 npaBnIbHocTi 3MiUyBaHH naJIINBHOi cymi;
c) nepekoHaTeC, 10 nobitprHn fIbTp uHtN.
- KaCbiKa 3a6pydHeHa, II cIiO uNCTHTu Ta nepekoHaTcA, 0o MIX eNEKToPdAm BCTaHOBneHo
npabnblhni3a3Op,DVB.TEXH/4HI
XAPAKTEPUCTUKHa cToPiHy 272.(Fig 29.)
- 3a Heo6xHocti 3amHtcb CbiKy 3anaIIObaHHa.
Texhiue o6cnyroByBaHHn NOBITpHoro fInbTpa
OuHennnnoBipraHoro pIbtpa
- 3Himits KpnKny nobitprnoo fipbtpa Ta BntraHITb nobitprn nnbp. (Fig 30.)
- YnCTHTN NOBITpHn FINbTp Ntpi6HO TENIO MInbHO BOIOI. PepeB BCTaHOBHeHHM nepeKoHaTeC8, 10 NOBITpHn FINbTp cyxN.
3.Якso nobitprnHn pifnbTp 3aHaTTo 6pydHn dny ouuueHHra,3amHtB noRo. NookoJxehn nobitprHn pifnbTp Heo6XiDHO 3amHOBaTH o6OB'r3KOBO.
4.ЯкwoBaW Bpi6 OchaueHn rHybactm NOBITpHnM fIbtpom, BnkOpuctOByTe OINBy dIra NOBITpHnx fIbtpib.OINBy dIra NOBITpHX fInbtpiC nID HaHocHTn NIIe Ha rHybacti fIbtpi. 3abopohrEtbcra HAnOCHTn OINBy Ha fepTPOBNI fIbTp.
TEXHICHI XAPAKTEPNUCKI
| ODINHUNI BIMIPU | B2126 (125B28HV) | BV2126 (125B28HV) | |
| Texhni xi xapaKterpncntn DvinyuHa | |||
| O6'Em quinlindepa cm | 3 | 28 28 | |
| Ppomixok mIXe eJeKtpoamn MM 0,6 0,6 | |||
| O6'Em pAniBnHO 6aka cm | 3 | 500 500 | |
| SbvnckicTB xolocToGO xOdy o6/xv 2800-3200 2800-3200 | |||
| Makcimalha notyXnictb ob/xv 8000 8000 | |||
| BnxiHa noTayXnictb kBv 0,8 0,8 | |||
| CbiUka 3apaleHnHa | RCJ-6Y | RCJ-6Y | |
| Makcimalha shvnckicTB b peximi nobitpoodyBa | ob/xv 8600 | 8600 | |
| Makcimalha shvnckicTB b peximi nnilococa | ob/xv -- | 7500 | |
| IperioD ctiikocsti xapaKterpncntk BInpominHOBAHnHa | roD | 50 50 | |
| DaHl zuoDo 7uymu ta Bi6pauii | |||
| EkbivaienHnI pIBn I bi6pauii Ha puykax 3 BCTaHOBJIeHmII NobiITPOyBnMI Tpybami Ta HacadkoI (opriHaI) - dinB. npimitky 1 | m/c2 | 8,3 8,3 | |
| ЕквівіаLENTHI piBHi Bi6paцii Ha ryчкх 3 BCTANOBLEHIMN BCMOKTUBAJIbHIMN Trpy6amn (opriiHaI), NiBopyr/npaBOpuy -ДИВ.ПримiTу 1 | M/c2 | --/-/- 6,4/8,3 | |
| ЕквівіаLENTHI рівень shymoborOТиCKU y Byci onepatopa, ВIMIPЯн y BiDNoBIDNoCTi 3i StAndapTamn ISO 22868 Ta BCTAHOBLEHIMN NOBITPOyBHMN Trpy6amn Ta HacadkoIO (opriiHaI) | ДБ(A) 94 | 99 | |
| ЕквівіаLENTHI рівень shymoborOТиCKU y Byci onepatopa, ВIMIPЯн y BiDNoBIDNoCTi 3i StAndapTamn ISO 22868 Ta BCMOKTUBAJIbHIMN Trpy6amn (opriiHaI) | ДБ(A) -- 99 | ||
| Рівень 3BykoBoI notyJxHocSti, rapaHToBaHm (LWA) -ДИВ.ПримiTу 2 | ДБ(A) 107 | 107 | |
| Рівень 3BykoBoI notyJxHocSti, ВIMIPЯн -ДИВ.ПримiTу 2 ДБ(A) | 106 106 | ||
| Розмірі ВиPoБY | |||
| Bara (6e3 пально,鉴定 3i BCTAHOBLEHIO NOBITPOyBHOIO Trpy6oTo Ta STAndapTHOIO HacadkoIO) | Кг 4,3 4,4 | ||
| П顺序Та 1:Прedingленидani по ekвівALENTHI рівень Bi6paцii MaIoTB TINOBY CTATNCTNUHу диспесio (STAndapThE BiXInelENH)В 1 M/c2. | |||
| П顺序Та 2:ВиpopOMiHOBaHnY shUMy B sepeDobuIse, ВIMIPяне як 3BykoBa notyJxHicTb (LWA), BiDNoBIAe DipeKTeBIVI CC 2000/14/EC. 3a3NaChen pIBeH 3BykoBOI notyJxHocTi Дпmaшин БуВ ВIMIPЯн 3 opriiHaJIbHIMpi3aJIbHIM yCTaTkyBaHnYAM, до дe NaHbUssni pIBeH. Pi3NciMaix rapaHToBaHm i ВIMIPROBaHm pIBHem 3BykoBOInotyJxHocTi ПОЯraeВ TOMU, до rapaHToBaHaHa 3BykoBa notyJxHicTb BkInuOaE TAOKJ DlncPecSiO pe3yIbTaTIB ВIMIPROBaHnA Ta BiDmiHOCtI mix P3HIMMi MaunHAmn Tiöi camoi Modeni BiDnobiDINO do DipeKTeBIVI 2000/14/EC. | |||
| П顺序Та 3:Прedingленидani по ekвівALENTHORO рівя 3BykoBOI TINCKU Дпmaшин МaIoTB TINOBY CTATNCTNUHу диспесio (STAndapThE BiXInelENH)В 1 Μ(B(A)). | |||
Original instructions
Originalanweisungen