BD 5060 C Ep Classic - Scrubber Kärcher - Free user manual and instructions
Find the device manual for free BD 5060 C Ep Classic Kärcher in PDF.
User questions about BD 5060 C Ep Classic Kärcher
0 question about this device. Answer the ones you know or ask your own.
Ask a new question about this device
Download the instructions for your Scrubber in PDF format for free! Find your manual BD 5060 C Ep Classic - Kärcher and take your electronic device back in hand. On this page are published all the documents necessary for the use of your device. BD 5060 C Ep Classic by Kärcher.
USER MANUAL BD 5060 C Ep Classic Kärcher
Chairman of the Board of Management
S. Reiser
Director Regulatory Affairs & Certification
71364 Winnenden (Germany)
Tel.: +49 7195 14-0
Fax: +49 7195 14-2212
Winnenden, 2019/03/01

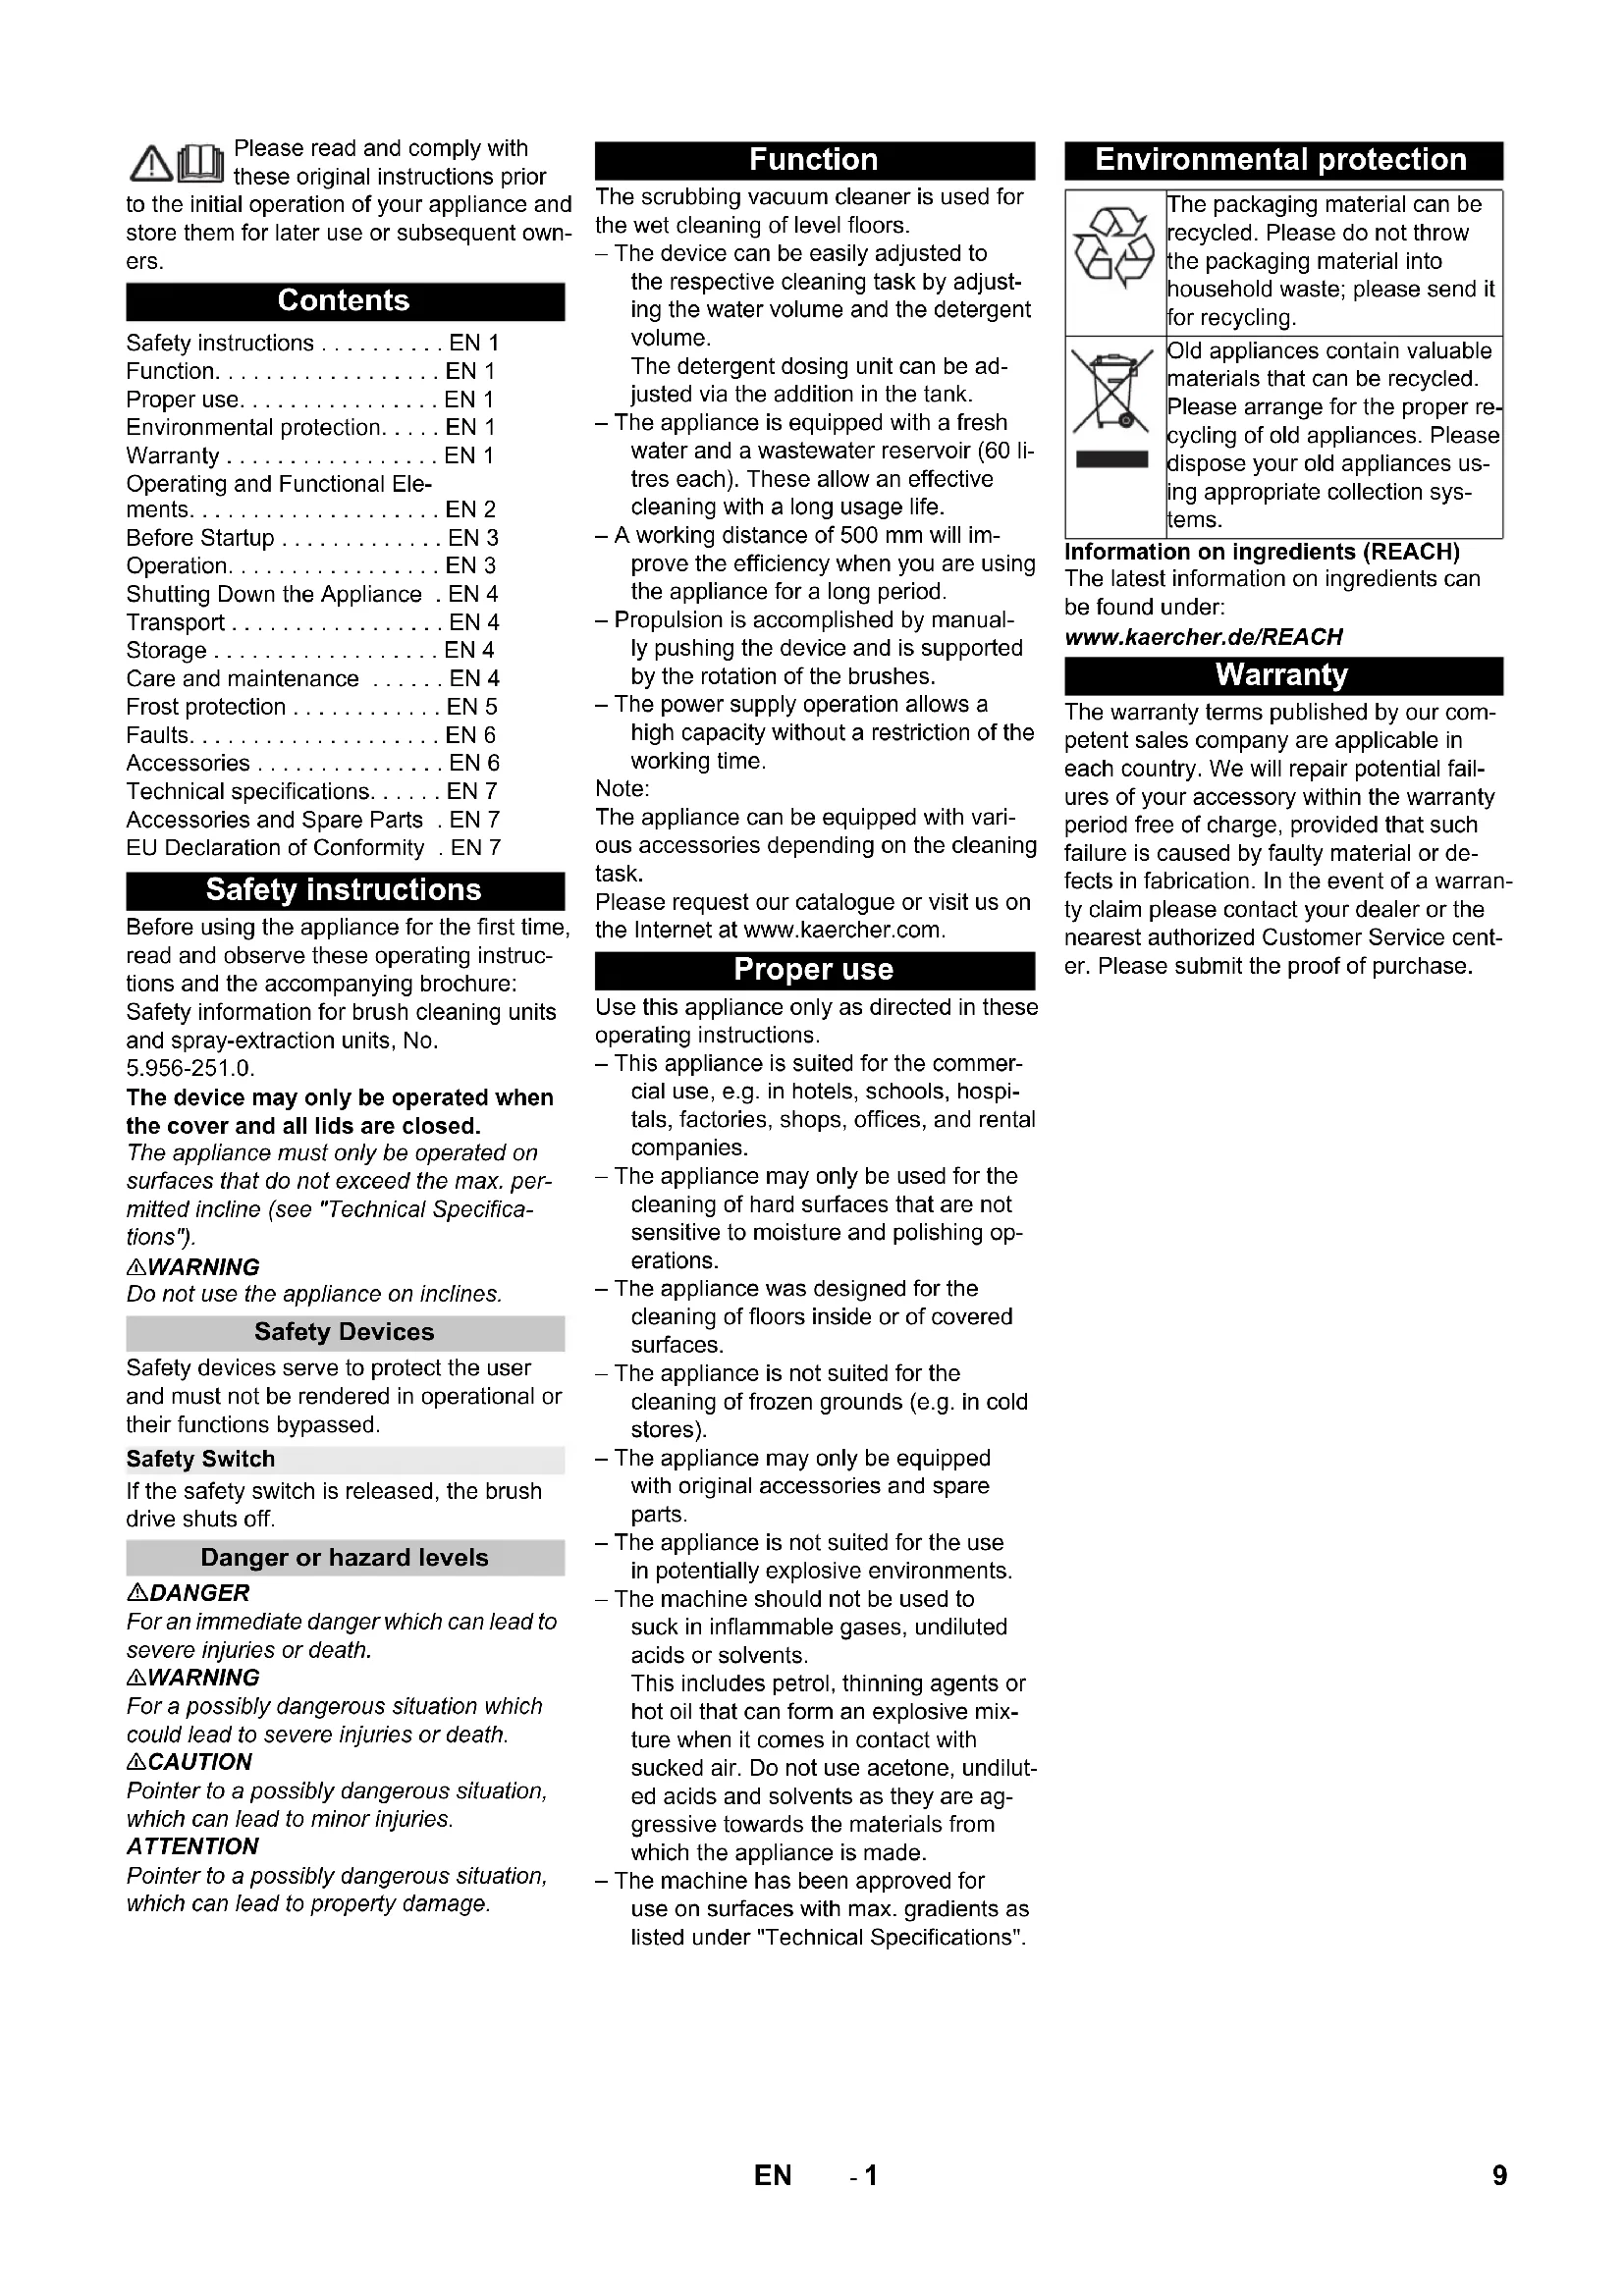
Please read and comply with these original instructions prior
to the initial operation of your appliance and store them for later use or subsequent owners.
Contents
Safety instructions EN 1
Function. EN 1
Proper use. EN 1
Environmental protection. . . . EN 1
Warranty EN 1
Operating and Functional Elements. EN 2
Before Startup EN 3
Operation. EN 3
Shutting Down the Appliance . EN 4
Transport EN 4
Storage EN4
Care and maintenance .EN 4
Frost protection EN 5
Faults. EN 6
Accessories EN 6
Technical specifications. EN 7
Accessories and Spare Parts . EN 7
EU Declaration of Conformity. EN 7
Safety instructions
Before using the appliance for the first time, read and observe these operating instructions and the accompanying brochure: Safety information for brush cleaning units and spray-extraction units, No. 5,956-251.0.
The device may only be operated when the cover and all lids are closed.
The appliance must only be operated on surfaces that do not exceed the max. permitted incline (see "Technical Specifications").
WARNING
Do not use the appliance on inclines.
Safety Devices
Safety devices serve to protect the user and must not be rendered in operational or their functions bypassed.
Safety Switch
If the safety switch is released, the brush drive shuts off.
Danger or hazard levels
△DANGER
For an immediate danger which can lead to severe injuries or death.
WARNING
For a possibly dangerous situation which could lead to severe injuries or death.
CAUTION
Pointer to a possibly dangerous situation, which can lead to minor injuries.
ATTENTION
Pointer to a possibly dangerous situation, which can lead to property damage.
Function
The scrubbing vacuum cleaner is used for the wet cleaning of level floors.
- The device can be easily adjusted to the respective cleaning task by adjusting the water volume and the detergent volume.
The detergent dosing unit can be adjusted via the addition in the tank.
- The appliance is equipped with a fresh water and a wastewater reservoir (60 litres each). These allow an effective cleaning with a long usage life.
- A working distance of 500mm will improve the efficiency when you are using the appliance for a long period.
- Propulsion is accomplished by manually pushing the device and is supported by the rotation of the brushes.
The power supply operation allows a high capacity without a restriction of the working time.
Note:
The appliance can be equipped with various accessories depending on the cleaning task.
Please request our catalogue or visit us on the Internet at www.kaercher.com.
Proper use
Use this appliance only as directed in these operating instructions.
- This appliance is suited for the commercial use, e.g. in hotels, schools, hospitals, factories, shops, offices, and rental companies.
- The appliance may only be used for the cleaning of hard surfaces that are not sensitive to moisture and polishing operations.
- The appliance was designed for the cleaning of floors inside or of covered surfaces.
- The appliance is not suited for the cleaning of frozen grounds (e.g. in cold stores).
- The appliance may only be equipped with original accessories and spare parts.
- The appliance is not suited for the use in potentially explosive environments.
- The machine should not be used to suck in inflammable gases, undiluted acids or solvents.
This includes petrol, thinning agents or hot oil that can form an explosive mixture when it comes in contact with sucked air. Do not use acetone, undiluted acids and solvents as they are aggressive towards the materials from which the appliance is made.
- The machine has been approved for use on surfaces with max. gradients as listed under "Technical Specifications".
Environmental protection

The packaging material can be recycled. Please do not throw the packaging material into household waste; please send it for recycling.

Old appliances contain valuable materials that can be recycled. Please arrange for the proper recycling of old appliances. Please dispose your old appliances using appropriate collection systems.
Information on ingredients (REACH) The latest information on ingredients can be found under:
The warranty terms published by our competent sales company are applicable in each country. We will repair potential failures of your accessory within the warranty period free of charge, provided that such failure is caused by faulty material or defects in fabrication. In the event of a warranty claim please contact your dealer or the nearest authorized Customer Service center. Please submit the proof of purchase.
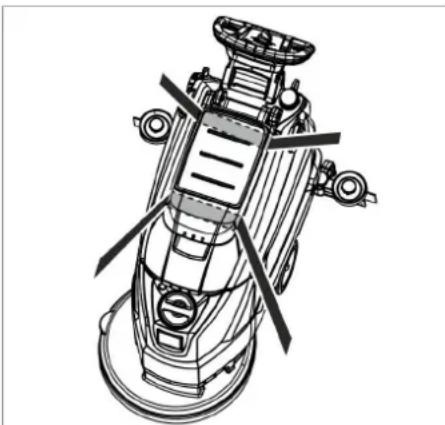
Operating and Functional Elements
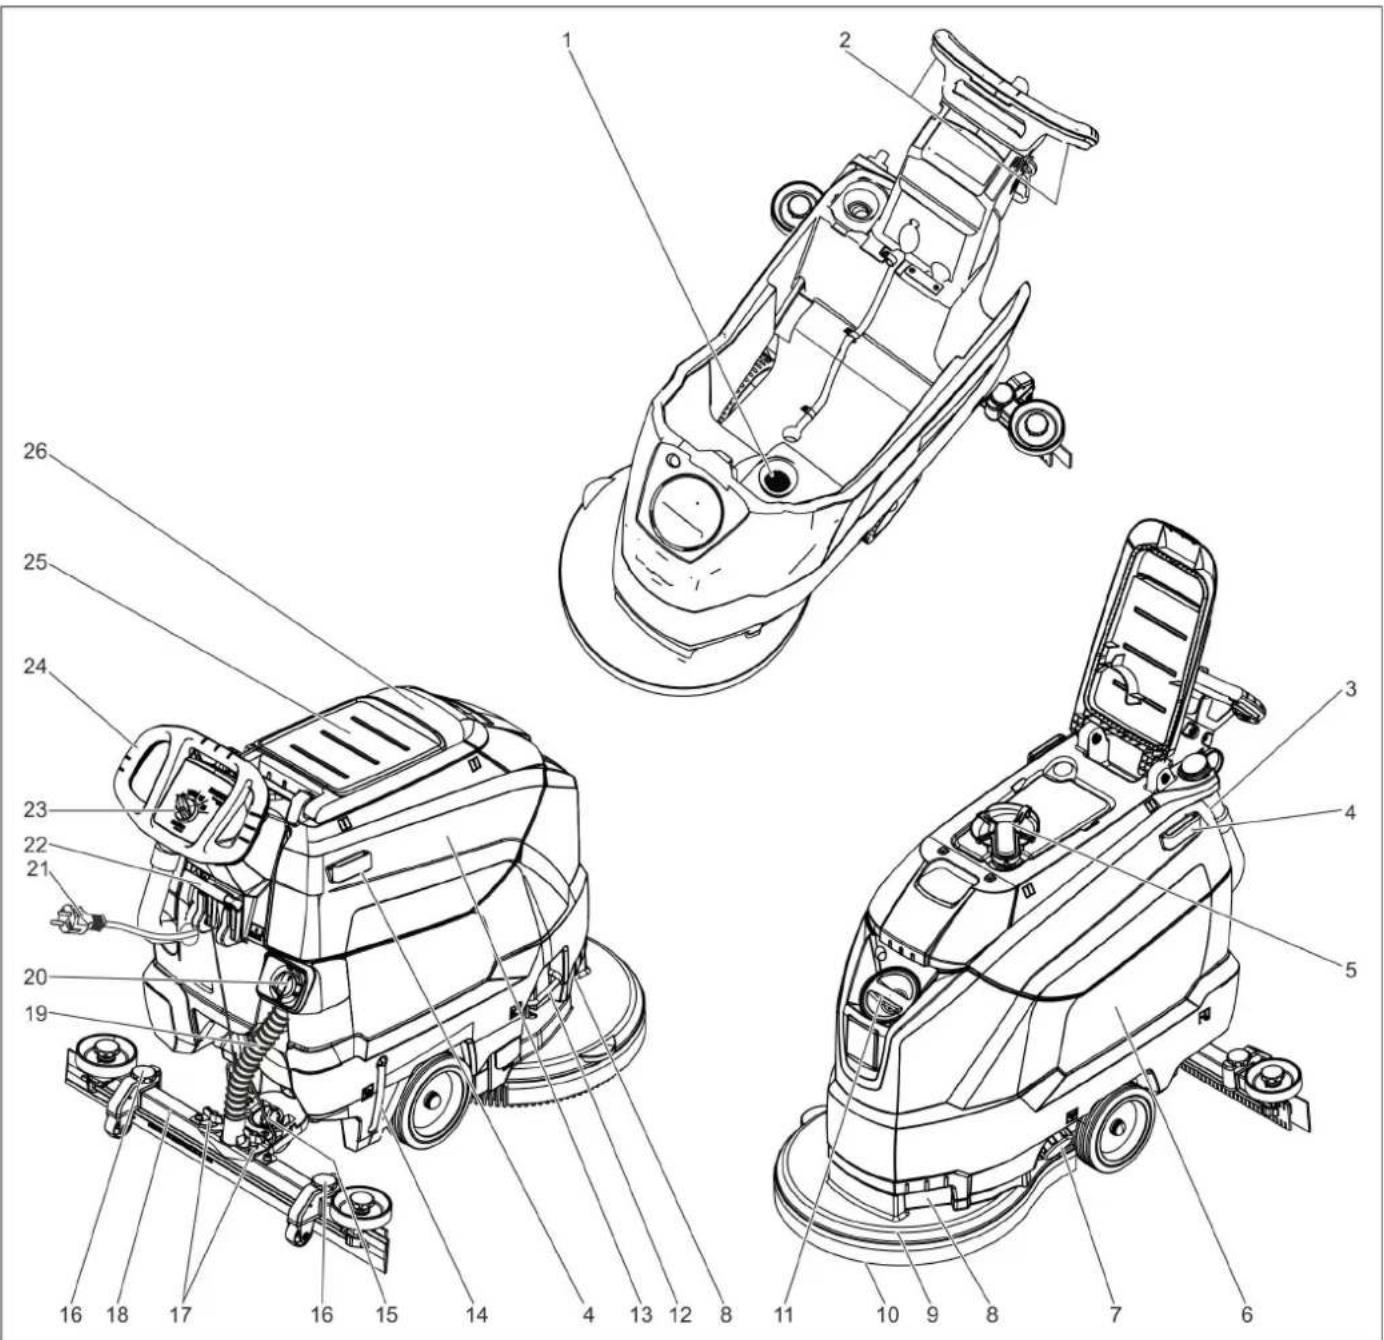
1 Fluff filter
2 Safety button
3 Drain hose for wastewater with dosing unit
4 Holding rail for home base
5 Float
6 Fresh water tank
7 Fresh water tank lock
8 Recessed grip
9 Cleaning head
10 Disc brush
11 Fresh water reservoir filler neck
12 Bow brush change
13 Waste water tank
14 Fresh water level display
15 Rotary handle to incline the vacuum bar
16 Height adjustment of suction bar *
17 Wing nuts for fastening the vacuum bar
18 Vacuum bar
19 Suction hose
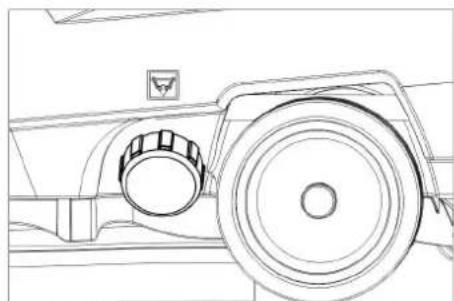
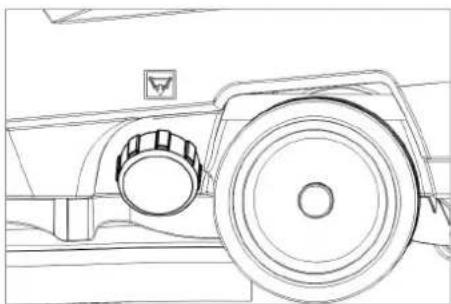
20 Water quantity regulator
21 Mains cable with mains plug
22 Vacuum bar lowering lever
23 Operator console
24 Push handle
25 Storage surface for cleaning set "Home base box"
26 Cover waste water tank
* not included in the delivery
Colour coding
The operating elements for the cleaning process are yellow.
- The controls for the maintenance and service are light gray.
Operator console
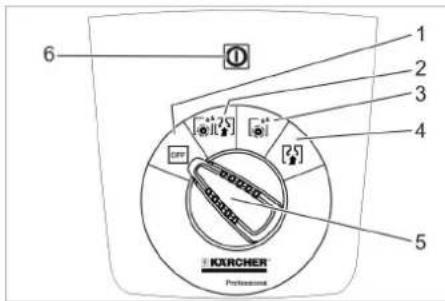
1 OFF
Device is switched off
2 Normal mode
Wet clean the floor and vacuum up dirt water.
3 Intense mode
Wet clean the floor and allow the detergent to react.
4 Vacuum mode
Suck in the dirt fleet.
5 Program selection switch
6 Indicator light voltage supply
Glows when the mains plug is inserted and when there is mains voltage.
Symbols on the machine
| Mains plug | |
| Lashing point | |
| Mop holder ** | |
| 1/4 | Filling level fresh water tank 25% |
| Bow brush change | |
| Vacuum bar lowering lever | |
| Drain outlet fresh water tank | |
| Dirt water discharge hose |
\*\* option
Before Startup
Unloading
Unscrew the screws from the middle board of the pallet.
Push down the device holding the push handle and pull out the middle board.
Remove the chocks in front of and next to the wheels.
Push down the device holding the push handle and push it forwards up to the edge of the pallet.
Lift the device off the pallet and set it on the floor.
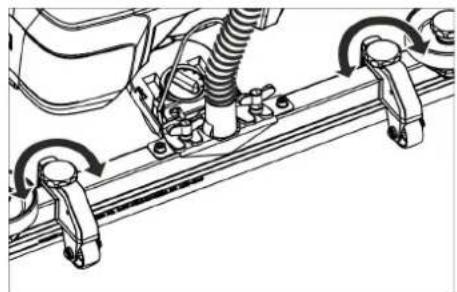
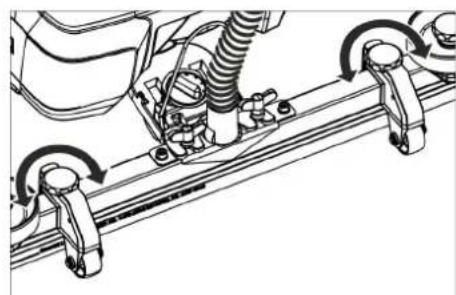
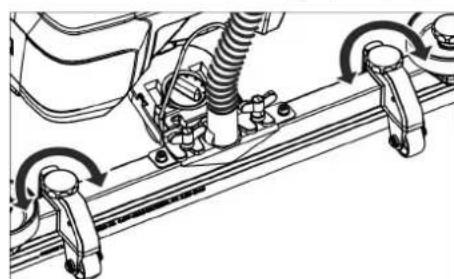
Installing the Vacuum Bar
Insert the vacuum bar into the vacuum bar suspension in such a manner that the profiled sheet is positioned above the suspension.
Tighten the wing nuts.
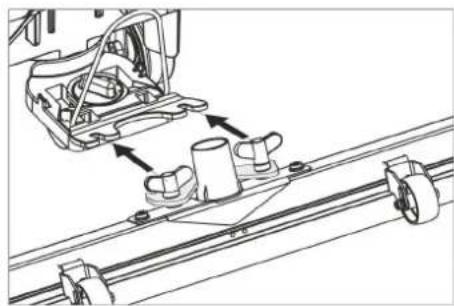
Insert the suction hose.
Operation
△DANGER
Risk of injury! In dangerous situations, release the safety switch/drive lever.
Filling in detergents
Fresh water
Open the lock of the fresh water reservoir.
Fill fresh water (maximum 60^ ) until the lower edge of the filling nozzle.
Close the lock of the fresh water reservoir.
Detergent
△WARNING
Risk of damage. Only use the recommended detergents. With other detergents, the operator bears the increased risk regarding the operational safety and danger of accident.
Only use detergents that are free from solvents, hydrochloric acid and hydrofluoric acid.
Follow the safety instructions for using detergents.
Note:
Do not use highly foaming detergents.
Recommended detergents:
| Application Detergent | |
| Routine cleaning of all water resistant floors | RM 746 RM 780 |
| Routine cleaning of glossy surfaces (e.g. granite) | RM 755 es |
| Routine cleaning and basic cleaning of industrial floors | RM 69 ASF |
| Routine cleaning and basic cleaning of fine stoneware tiles | RM 753 |
| Routine cleaning of tiles in sanitary areas | RM 751 |
| Cleaning and disinfection in sanitary areas | RM 732 |
| Removal of coating from all alkali-resistant floors (e.g. PVC) | RM 752 |
| Removal of coating from li-noleum floors | RM 754 |
Add the detergent to the fresh water reservoir.
Note:
If the fresh water tank is empty, the cleaning head continues working without liquid supply.
Setting the water quantity
Adjust the water quantity using the regulating button according to the dirt on the floor covering.
Note:
Carry out initial cleaning attempts with low water volume. Increase water volume step-by-step until the desired cleaning result is achieved.
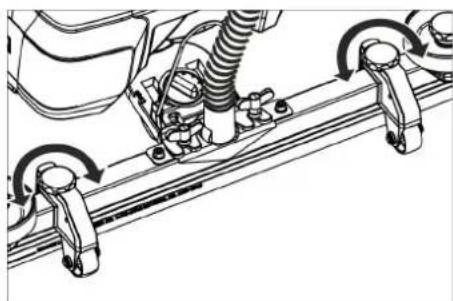
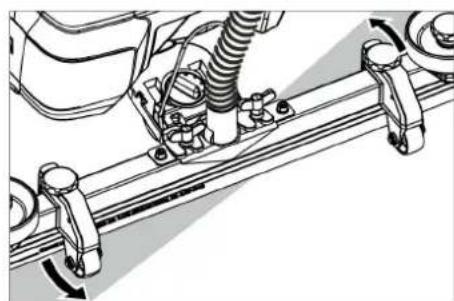
Setting the Vacuum Bar
Oblique position
To improve the vacuuming result on tiled floors the vacuum bar can be turned to an oblique position of up to 5^
Loosen the wing nuts.
Turn the vacuum bar.

Tighten the wing screws.
Inclination
If the vacuum result is unsatisfactory the inclination of the straight vacuum bar can be modified.
Adjust the rotary handle to incline the suction bar.
Height
The bend of the suction lips upon contact with the floor is influenced with the height adjustment.
Try adjusting the twist handles of the height adjustment until the best vacuuming result is achieved.
Cleaning
ATTENTION
Risk of damage to the floor covering. Do not operate the appliance on the spot.
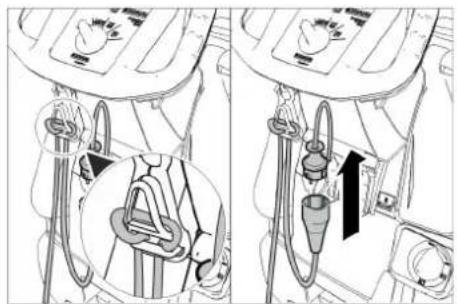
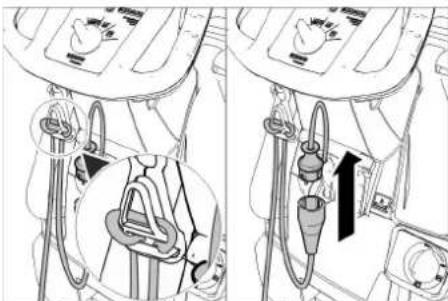
Insert the end of the extension cable as a loop in the strain relief clamp.
Connect the mains plug of the device to the extension cable.
Insert the mains plug of the extension cable into a socket.
Turn the program selection switch to the desired cleaning program.
Operatethesafety switch.
Lower the vacuum bar
Pull the lever out and press it down; the vacuum bar is lowered.
Note:
-For cleaning tiled floors, adjust the straight suction bar in such a way that cleaning is not done at an angle of 90 degrees to the joints.
- The inclined position and the inclination of the suction bar can be adjusted to achieve better suction results (see "Adjusting the suction bar").
If the waste water tank is full, the float closes the suction opening and the suction turbine runs at an increased speed. If this is the case, shut the vacuum off and drive to empty the waste water tank.
Shutting Down the Appliance
Set the program selection switch to suction or vacuuming.
Briefly drive forward and suck of the remaining water.
Raise the vacuum bar.
Set the programme selector switch to "OFF".
Disconnect the mains plug from the socket.
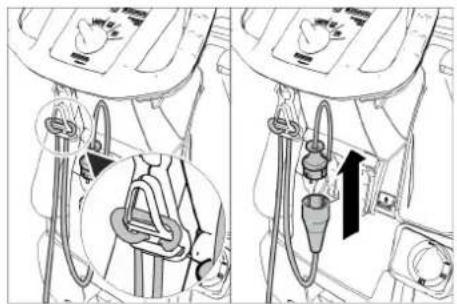
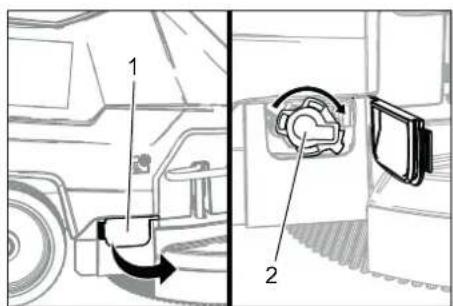
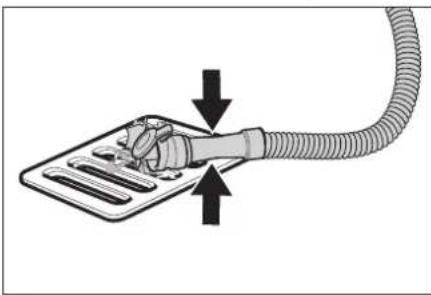
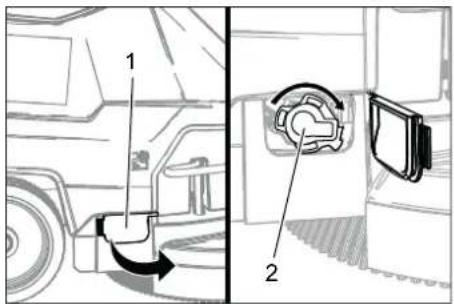
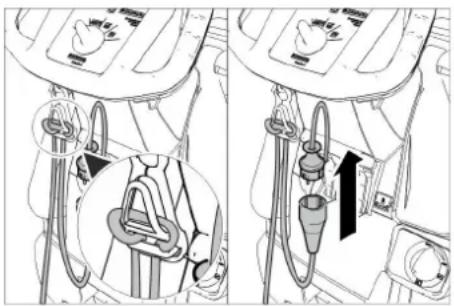
Drain off dirt water
△WARNING
Please observe the local provisions regarding the wastewater treatment.
Take the water discharge hose from the support and lower above a suited collection device.

Crush or bend the dosing equipment.
Open the lid of the dosing equipment.
Drain off the dirt water - regulate the water quantity by pressing or bending.
Rinse the waste water tank with clear water.
Drain off clean water
Unscrew the lock of the fresh water reservoir.
Transport
△DANGER
Risk of injury! When loading or unloading the machine, it may only be operated on gradients up to the maximum value (see "Technical Specifications"). Drive slowly. CAUTION
Risk of personal injury or damage! Mind the weight of the appliance during transport.
Press down and push the device using the push handle.
When transporting in vehicles, secure the appliance according to the guidelines from slipping and tipping over.
Storage
CAUTION
Risk of personal injury or damage! Consider the weight of the appliance when storing it.
This appliance must only be stored in interior rooms.
Care and maintenance
△DANGER
Risk of injury! Set the programme selector switch to "OFF" and disconnect the mains plug prior to performing any work on the device.
Drain and dispose of the dirt water and the residual fresh water.
Maintenance schedule
After each operation
ATTENTION
Risk of damage. Do not sluice the appliance with water and do not use aggressive detergents.
Drain off dirt water.
Rinse the waste water tank with clear water.
Clean the outside of the appliance with a damp cloth which has been soaked in mild detergent.
Check the fluff filter, clean if required.
Clean the vacuum lips and the wiping lips, check for wear and replace if required.
Check the brush for wear and replace if required (see "Maintenance tasks").
Monthly
Clean the seals between waste water tank and cover and check for tightness, replace if required.
Clean sieve.
Yearly
Have the prescribed inspection carried out by the customer service.
Maintenance Works
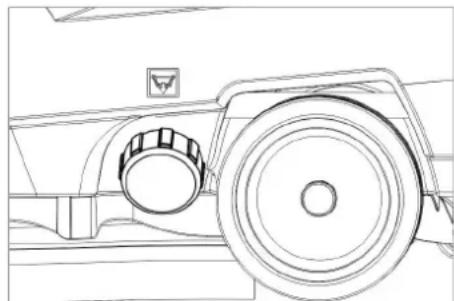
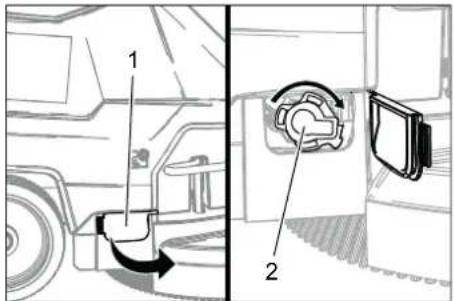
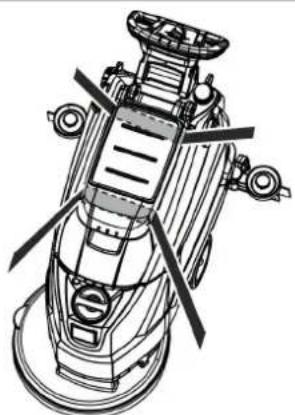
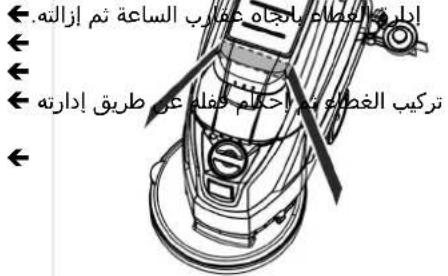
Cleaning the sieve
1 Cover
2 Cover
Open the cover.
Turn cover the clockwise and remove it.
Remove and clean the sieve lying beneath it.
Insert the sieve.
Replace the cover and lock it by turning it anti-clockwise.
Close cover.
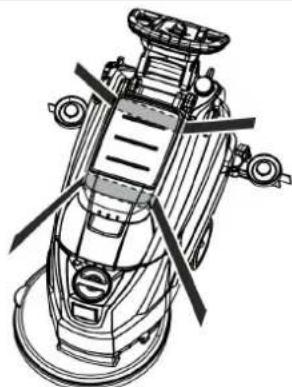
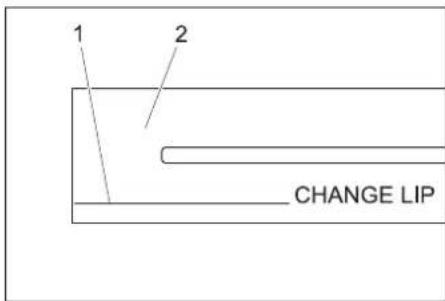
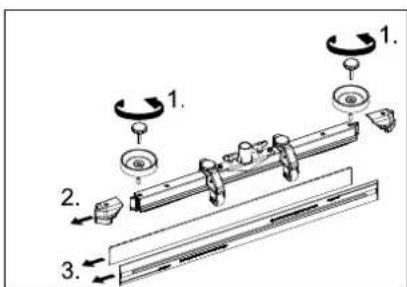
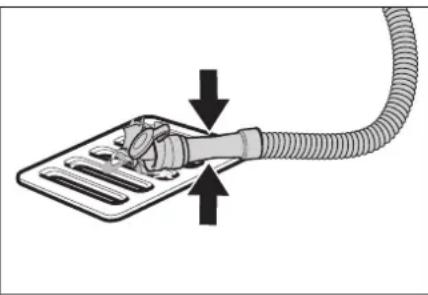
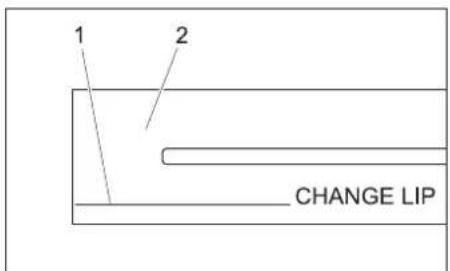
Replace or turn vacuum lips
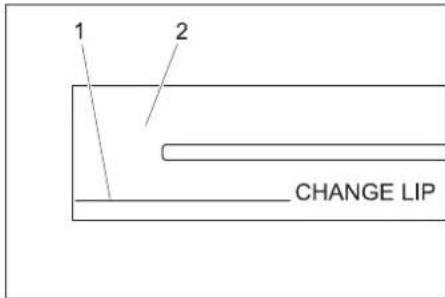
1 Wear indicator
2 Vacuum lip
The vacuum lips must be replaced or reversed if they are worn down to the wear indicator.
Remove the vacuum bar.
Unscrew the star grips.

Remove the plastic parts.
Remove the vacuum lips.
Insert new or reversed vacuum lips.
Insert the plastic parts.
Screw in and tighten the star grips.
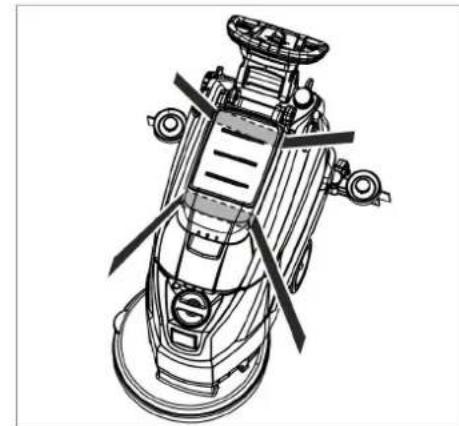
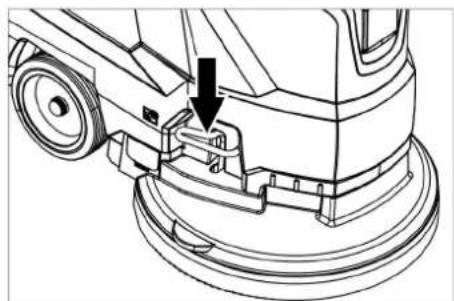
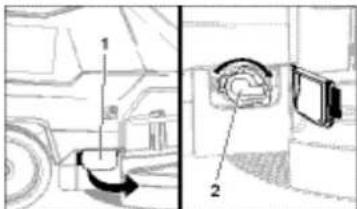
Replacing the disk brushes
Push down the device holding the push handle so that the cleaning head is raised.
Press the pedal for changing the brushes downward beyond its resistance.
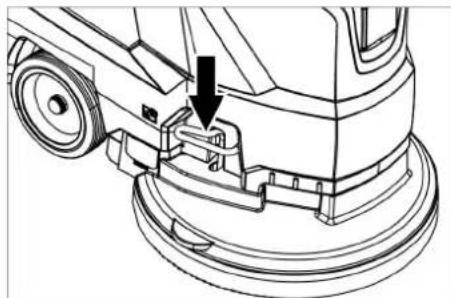
Pull the device towards the back so that the disc brush becomes accessible.
Place a new disc brush on the floor in front of the device.
Drive the device with the raised cleaning head over the new disc brush and lower the cleaning head. The brush locks into the drive.
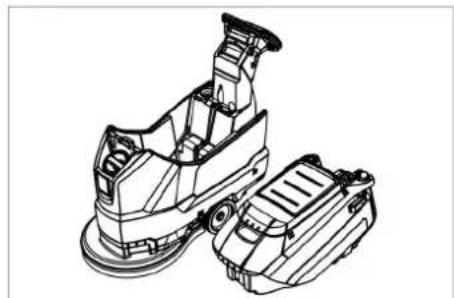
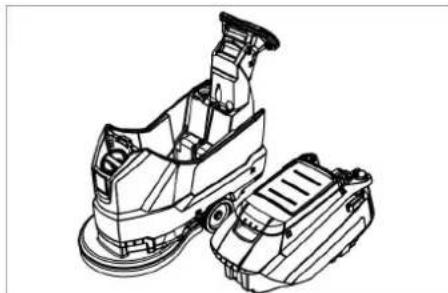
Removing the waste water tank
Drain off dirt water.

Lift up the waste water tank and put it aside.
Maintenance contract
To ensure a reliable operation of the appliance maintenance contracts can be concluded with the competent Kärcher sales office.
Frost protection
In case of danger of frost:
Empty the fresh and waste water tank.
Store the appliance in a frost-protected room.
Faults
△DANGER
Risk of injury! Set the programme selector switch to "OFF" and disconnect the mains plug prior to performing any work on the device.
Drain and dispose of the dirt water and the residual fresh water.
| Failure Correction | |
| Appliance cannot be started | Turn the program selection switch to the desired programme. |
| Operate the safety switch. | |
| Insert the mains plug into the socket. Is the indicator light voltage supply on? | |
| Insufficient water quantity | Check fresh water level, refill tank if necessary. |
| Increase the water volume on the regulating knob for water volume. | |
| Clean sieve. | |
| Insufficient vacuum performance | Clean the seals between waste water tank and cover and check for tightness, replace if required. |
| Check the seals between waste water tank and fresh water tank for damage, replace if necessary. | |
| Wastewater reservoir is full; shut off the appliance and empty the wastewater reservoir | |
| Clean the fluff filter. | |
| Clean the vacuum lips on the vacuum bar, replace if required | |
| Check if the cover on the dirt water discharge hose is closed | |
| Check the setting of the vacuum bar. | |
| Check suction hose for blockages; clean if required. | |
| Check the suction hose for tightness; replace if required. | |
| Insufficient cleaning result | Check the brushes for wear, replace if required. |
| Suction turbine is running rough | Clean the swimmer. |
| Brush does not turn Check | Check if foreign objects block the brush; remove foreign object if required. |
| Release the safety switch. Wait for a while. Operate the safety switch. | |
| Vibrations during cleaning | You might need to use a softer brush. |
| In case of faults that cannot be remedied using the table below please contact the customer service. | |
Accessories
| Description Part no.: Description | ||
| Disk brush, red (medium, standard) 4.905-026.0 For the use with all common cleaning tasks. | the use with all common cleaning tasks. | |
| Disk brush, natural (white) 4.905-027.0 Made of natural fibres for spot cleaning and polishing. | ring and for deep cleaning. For robust floorings only. | |
| Disk brush, black (hard) 4.905-029.0 For heavy soil ing and for deep cleaning. For robust floorings only. | Driver plate pad 4.762-534.0 For cleaning with pads. With quick change coupling and center lock. | |
| Pad, red (medium soft) 6.369-079.0 For cleaning and cleaning of all floors. | Pad, red (medium soft) 6.369-079.0 For cleaning and cleaning of all floors. | |
| Pad, green (medium hard) 6.369-078.0 For cleaning | heavily soiled floors and for deep cleaning. | |
| Pad, black (hard) 6.369-077.0 With stubborn soiling and for deep cleaning. | Pad, black (hard) 6.369-077.0 With stubborn soiling and for deep cleaning. | |
| Pad, beige (light grain) 6.369-468.0 For polishing and refreshing of hard and flexible floorings. | Pad, beige (light grain) 6.369-468.0 For polishing and refreshing of hard and flexible floorings. | |
| Pad, beige (natural hair proportion) | 6.371-146.0 | |
| Suction bar, 850 mm, straight | 4.777-401.0 | |
| Suction bar, 850 mm, bent | 4.777-411.0 | |
| Set homebase box | 4.035-406.0 | |
| Mop holder | 9.753-023.0 |
Technical specifications
| 1.127-002.0 | 1.127-005.0 | ||
| Power | |||
| Nominal voltage V 230 220 | |||
| Current type Ph/Hz 1~/50 1~60 | |||
| Average power consumption W 1350 1250 | |||
| Rated power suction turbine W 550 450 | |||
| Rated power brush drive W 800 | |||
| Vacuuming | |||
| Vacuum power, air volume (max.) | l/s | 20 | 19 |
| Vacuuming power, negative pressure (max.) | kPa (mbar) | 14,0 (140) | 12,0 (120) |
| Cleaning brushes | |||
| Brush speed | 1/min | 140 172 | |
| Brush diameter | mm | 510 | |
| Dimensions and weights | |||
| Theoretical surface cleaning performance | m²/h | 2000 | |
| Max. working range incline | % | 2 | |
| Fresh/waste water tank volume | I | 62/62 | |
| Max. water temperature | °C | 60 | |
| Ambient temperature | °C | 5...40 | |
| Net weight (transport weight) | kg | 60 | |
| Total weight (ready to operate) | kg | 122 | |
| Values determined as per EN 60335-2-72 | |||
| Total oscillation value | m/s² | <2,5 | |
| Uncertainty K | m/s² | 0,2 | |
| Sound pressure level LpA | dB(A) | 67 | 65 |
| Uncertainty KpA | dB(A) | 2 | |
| Sound power level LwA + Uncertainty KwA | dB(A) | 81 | |
Accessories and Spare Parts
Only use original accessories and spare parts, they ensure the safe and trouble-free operation of the device. For information about accessories and spare parts, please visit www.kaercher.com.
EU Declaration of Conformity
We hereby declare that the machine described below complies with the relevant basic safety and health requirements of the EU Directives, both in its basic design and construction as well as in the version put into circulation by us. This declaration shall cease to be valid if the machine is modified without our prior approval.
Product: Floor cleaner
Type: 1.127-xxx
1.515-xxx
Relevant EU Directives
2006/42/EC (+2009/127/EC)
2014/30/EU
Applied harmonized standards
EN 55012: 2007 + A1: 2009
EN 60335-1
EN 60335-2-72
EN 61000-6-2: 2005
EN 62233: 2008
Applied national standards
The signatories act on behalf of and with the authority of the company management.

Chairman of the Board of Management

Director Regulatory Affairs & Certification
Documentation supervisor:
S. Reiser
Alfred Kärcher SE & Co. KG
71364 Winnenden (Germany)
Tel.: +49 7195 14-0
Fax: +49 7195 14-2212
Winnenden, 2019/03/01

2006/42/CE (+2009/127/CE)
2014/30/UE

Chairman of the Board of Management
Director Regulatory Affairs & Certification
Responsible de la documentation :
S. Reiser
Alfred Kärcher SE & Co. KG
71364 Winnenden (Germany)
Tel.: +49 7195 14-0
Fax: +49 7195 14-2212
Winnenden, 2019/03/01

2006/42/CE (+2009/127/CE)
2014/30/UE

Chairman of the Board of Management

S. Reiser
Director Regulatory Affairs & Certification
71364 Winnenden (Germany)
Tel.: +49 7195 14-0
Fax: +49 7195 14-2212
Winnenden, 2019/03/01


Chairman of the Board of Management
S. Reiser
Director Regulatory Affairs & Certification
71364 Winnenden (Germany)
Tel.: +49 7195 14-0
Fax: +49 7195 14-2212
Winnenden, 2019/03/01

2006/42/CE (+2009/127/CE)
2014/30/UE

Chairman of the Board of Management

S. Reiser
Director Regulatory Affairs & Certification
Responsible de documentacion:
S. Reiser
Alfred Kärcher SE & Co. KG
71364 Winnenden (Germany)
Tel.: +49 7195 14-0
Fax: +49 7195 14-2212
Winnenden, 2019/03/01
2006/42/CE (+2009/127/CE)
2014/30/UE

Chairman of the Board of Management
S. Reiser
Director Regulatory Affairs & Certification

2006/42/EF (+2009/127/EF)
2014/30/EU

Chairman of the Board of Management
S. Reiser
Director Regulatory Affairs & Certification
71364 Winnenden (Germany)
Tel.: +49 7195 14-0
Fax: +49 7195 14-2212
Winnenden, 2019/03/01

Før forste gangs bruk av apparatet, les dette originale bra克斯
2006/42/EF (+2009/127/EF)
2014/30/EU
Chairman of the Board of Management
S. Beiser
Director Regulatory Affairs & Certification
71364 Winnenden (Germany)
Tel.: +49 7195 14-0
Fax: +49 7195 14-2212
Winnenden, 2019/03/01

Chairman of the Board of Management
S. Reiser
Director Regulatory Affairs & Certification
Dokumentationsbefullmaktigad:
S. Reiser
Alfred Kärcher SE & Co. KG
71364 Winnenden (Germany)
Tel.: +49 7195 14-0
Fax: +49 7195 14-2212
Winnenden, 2019/03/01

Chairman of the Board of Management

S. Beiser
Director Regulatory Affairs & Certification
71364 Winnenden (Germany)
Tel.: +49 7195 14-0
Fax: +49 7195 14-2212
Winnenden, 2019/03/01
Piv xpoaioioane Tn oukeun aq yia npwtn opa, diaaote autes tic npwotutncs onyiecs xon, evpynoe ouqwva e auteckai kpanote tic yia heaovtikxpon n ia tov EIOKtntn.
Nivakac Tepiexouevwv
Ytnoeieic aogaaiaa .EL1
Aeitouyia EL 1
Xpnoaupwva e touc kavoVioouc . EL 1
PpOoTaia TepiBaaovToS...EL1
Eyyunon EL 1
TToiXeia XeiPiOou Kai Aeioupyi- aC. EL 2
Piv tn 0eon oE aeitoupyia .EL 3
Aetoupyia EL 3
Tataon kai 0eon EKToc Aetoupyi- aC. EL4
Metapopá EL 4
AToθκεuση EL 4

Chairman of the Board of Management
S. Reiser
Director Regulatory Affairs & Certification
YTeuovos Yyypaw TKunpiowns:
S. Reiser
Alfred Kärcher SE & Co. KG
71364 Winnenden (Germany)
Tel.: +49 7195 14-0
Fax: +49 7195 14-2212
Winnenden, 2019/03/01


Chairman of the Board of Management

Director Regulatory Affairs & Certification
71364 Winnenden (Germany)
Tel.: +49 7195 14-0
Fax: +49 7195 14-2212
Winnenden, 2019/03/01

Ipeed nepBbim npImeHneHemBaWero npmbopa npouHTaTe
3TyOpnHaIbHyIO INCTpyKUIO NO 3KcNly-atauIN, NocNE 3TOro DeiCTByTE COOTBETCTBEHNO I COxpaHNTe ee IJRA DaIbHeIWeIro IONb3OBAHNI INI DJIa CNeDyUoERO BnaJeNBua.
Ornabnene
Yka3aHnno TExHnke 6e30na
CHOCTN RU1
Ha3naueHne. RU 1
IcnoJb3ObaHne no Ha3Haue- HNIO. RU 1
3aunTa okpykaiouei cpebl.RU 1
Tapaantna RU 1
OncnHne 3JeMeHTOB ynpabJIeHHn pa6oHx y3IOB .RU2
Ipeed haayamop pa60tbl. .RU 3
3Kcnpnyataua RU 3
OctaHOBka n napKOBka .RU 4
TpaHcnpOpTnpoBka.RU4
XpahHeHne RU4
YxOД n TexHnueckoe o6cIyKnBaHne. RU 4
3aunTa oT 3amep3aHnra . . .RU 5
Henonadkn RU6
PnHaJneJxHocTn RU6
Texnueckne daHHbIe RU7
PpHaJnEJXHOCHTn 3aNaChbIe
TeTNI. RU7
3aBHeHne O COOTBeTCTBUN EURU 7
Yka3aHnno NO TexHnke 6e3oNaCHOCTn
Ipeepnepbim nCOnB3OBAHHe m np6bopa npounaTe n co6nloaTe daHHoe PykoBOcTBo n 3KcnPlyatauM n npuiIraeMyd 6poukopy no Texnke 6e0nacHocTn np pa6oTe C 5eTOUHbIM MMOUIMn np6bopaMn m MOUIMnp6bopAMn paCNblNTeJIyMn No 5.956-251.0 n 3aTe m DeiCTbYte. YcTpoIcTBo pa3peSeHo nCOnB3OBAtB TOJbKO TOrda, KOrDa KaNOT n BCE KpbIKN 3aKpbITbl.
Ycmpoucmeo npedha3aueho dna paobombl Ha noepxHocmX c yknHOm, MaKcuMaJbHa benuuHa Komopo2O He npebIwaem yka3aHHy e pa3dene,TexHuYeCKue daHHie"
△PENEYNPEXKDEHNE
He ucnolb3o6amb npubop Ha noeepxHocmex c yknnoHOM.
3aunTHbIe ycTpoCtBa
3aunTHbIe npncnocobJeHnnpedHa3Ha-ueHbI dIy 3aunTbI onepaTopa.Ix OTKIOueHne, a TaKke pa6oTa B o6xoJnx fynKcH He DOnyCKaIOTc.
PpeoXpaHnTeBbHbBbIKNoaTeB
Ecnn OTnycnttB npedeoxpaHnteHbHbI BblKIOUaTeN,TO npOn3OJeT OTKIOUeHne 1eTOCHoro npINBOda.
CTeneHb onachoctn
ONACHOCTb
Yka3aHue omHocumelbHO HenocpeDcmeHHO ap03aueo onachocmu, Komopar npueodum K mXKeIbIM yeebAm UUNK Cmepmu.
PNEyPExDEHNE
Yka3aHue omHocumelbHo 603MoxHOJ noMeHuaIbHO onaCHO cumyaUU, KOMopaAR MoKem npueecMu K mXeJIbIM yee-Byam UNU K Cmepmu.
△OCTOPOXHO
Yka3aHue Ha nomehuaJIbHo ONachyU Cu Myauu, Komopaa MoKem npueecmu K noJyuHuO ne2kux mpaem.
BHIMAHNE
Yka3aHue omHocumelbHo 603MoXHOJ noMeHuaJIbHO ONaCHO CmuaUu, KOMopaJ MOKem NOBLeb MamepuJIbHi yuep6.
Ha3haeHne
Maunha nla yxoda 3a noIamn npedHa3na-ueHa nlaBnaXHOy6OpKn POBbIX NOOB.
-3a cHT Bb6opa npamaetpo KOnnueCTBa BOdy NCHTaeO CpeCTBaMOxHO JERKO PPOBecTN HAcTPOykyCTPOIcTBa DnBbINOJIHeHr COOTBeCTByUoSe 3aDaH.N.03npOBKy MOIOeO CpeCTBa MOxHOKOppeKTIpOBAtB, DoabJra B 6ak.
- YcTpoIcTBO OCHaUeHOp pe3epByapamn DnA CBExKe I rpa3HO B0bI (oBem KaKdoRo pe3epByapa 60 NITPOB). OHn ObecneuBAOT 3ΦΦeKTHBHyO MoKy npN dNITeNBHO 3KcNlyaTaun.
-Pa6o7a 500 MM N03B0JraTe o6ecneuTb 3ΦΦeKTHBHOe PnIMHeHHe np3HaHTeJIbHOJ DnITeJIbHOCTn pa6oTbl.
- IepemeueHne BnepedocyueCTBnjaTc BpyuHyu NIOdEprKnBaetc Bpa- uHeHem UeTOK.
-Питане ot cetn obecneuBaet BbICO KyIO npOn3BODnteJIbHocTb 6e3 orpaHnueHn BpeMeHn pa6oTbl.
Yka3aHne:
KaKdIpa3BCOOTBETCBNc3aayenno OYNCTEyCCTPOINCTBOMOKETOCHAaATbcpa3nUHbIMPiHaNDJEXHOCTaMn.
CnpaunBaIte IN no HauMey KataIory
HIN NOCEtNE HaA CaIT B INTEpHete
www.kaercher.com.
IcnoJIb3OBAHne no Ha3HaueHnK
IcnoJIb3yIte DaHHbI np6Op nckHIOuHTeJIbHO B COOTBETCTBUN yKa3aHnAIM daHHO pyKOBOdCTBa no 3Kcnnyataun.
-3TOT npnbop npedHa3haueH dIy npo- feccnoHaBHO nCnOb3OBaHnY, T.e. B roCTHHuaX, shKoJax, 60JIbHuaX, Ha npOMbIJIeHHbIX npedpNpyTnx, B MaRa3Hax, oOpcaX N apeHdyembIX NoMeueHnx.
-Пибор может пименяс тольк
ДЯ мойки падкinx плоб, HeЧВCTи-
Тeльные К сырости и полpoваню.
-Пиборбылразработандя мокп NOLOВ BHyTpINOMeшENIIN NOBepxHOCTeH,HAxOДЯUXСЯнКрblSeH.
-Пибор He npirodeHДЯ MoKn 3a-Mep3xHx NIOB (HaNPmEp, B XOJIO-DINbHbIX yCTaHOBkax).
-ПиборразpeшаetсяОсhaцаТToЛБ-koОпгИнавьнБIMn ПиИАДлЕЖНOCTЯMN 3aIapChbIMN YaCTaMn.
-Пибор He npirodeHЯ nCnoB3OBA-HNBA BO B3pbIBOONaCHO CpeJe.
C nOmoIbI npIbopa He pa3peIaETCa coIpaTb rOpUHe ra3bl, Hepa36abIeH HbIe KNCIObl IIN PaCTBOPITEN.
K HIM OTHOCATC 6eH3nH, pactBOpnteNB INM Ma3yT, KOtOpbIe PnI 3aBnxpeHN C BCacbIBaEMbIM BO3dyXOM MoryT o6pa30BbIBaTB B3pbIBOONaChIbe CmecN. He NCIOJIb3OBaTB aUeTOH, Hepa36abNeHHBe KNCOTbI N pACTBOpNTeIN, TAK KAK OHN pa3py7aHOT MaTePnaNbI, I3 KOtOpbIX n3-ROTOBNEH np6Op.
- YcTpoIcTBo npEHa3HaueHo dIpa60-TbI Ha IOBepXHOCTx C yKIOHOM, MaK-CmMaJIbHa BEnuHnA KoTOporo yKa3a-Ha B pa3dJe ,TexHneckne daHHbe".
3aunTa OkpykaIooue CpeDbI

YnakoBOUHbIe MaTePnaJIbI npIroDhblIyBTOpNHOI nepepa-60tKn. IoxaIyNCTa, He Bbl6pa-cBbAte ynakOBky BMeCe C 6blTOBbIMN OTXoAMn, a cdaIte ee B OINH nIpyHKTOB pInema BTOPOHOrO cbIpJb.
CTapbIe yctpoiCTBa coepkataeHHbIe nepepa6aTbIbAembIe MaTePnAbI, noDnEkaUne nepeedaueB NyKtbl npMeKN BTOpHOroCbIpB.Io3TOMy yTNIN3npYIteNX uepe3 COOTBETCTBYIOUne CNCTMbI npMeKN OTXODOB.
Hnctpyknn no npmehenko Komno-heHTOB (REACH)
AkybHbCBeEHNOKOMNoHcTAX npBHeHbHa Be6-y3ne no CnEduoemy aDpecy:
3aTMyTb 6apaKOBbIe BnHTbl.
HaKNoH BCacbBaHOe nHaHKn
Pn HeIOCTaOHTHO MOUHOCTN BCaBHA HNMOXHO N3MeHNTb HAKNOH CTOIe BepTKaJIbHO BCaCbIAOJIe IJaHKn.
PepctabntbBpaauohyocpyky DnHaKIOHa BcAcBaIaOe KpOMKn.
BbICota
Perynpobka BbICOTbBnReT Ha n3rno BCacbBAOuei PnAHKn npN KOHTaKTe C dHOM.
→ Nepemecntb BpaauouecepyknperynpoBKn BblcOTBI ONbTHBM nyTEM, noka He 6ydt DOCTNHyT HAnnyuHn pe3yNbTaT BCacBBAHna.
MoiKa
BHIMAHHE
Onachocmb nopekdeHua HanoBHOO nokpbimura. Ycmpoucmeo He 3Knnnyamupoeamb Ha oOHOM Mecme.
KOHeu yDInHHTeNbHOIshypa yNoXHTbNETJEnB KpOKdJaKa6en,
CoeHNHTb WTeNCEJbHyIO BNky npi-6opa C yDnHNTeJbHbIM Ka6enEM.
BCTaBnTb wTeNCeNBHyIO BUNIky yDINHNTeJIbHOrO Ka6eNBA3JekTpopo3EtKy.
→ NObepHyb nepeKIOuYaTeNb BbIbopa npo- rpaMMbHa Tpe6yEmyIO nporpaMMy.
3aeneCTBOBaT npedoxpaHntbHbB BIKNIOATeJIb.
OnyckaHne BCacbIBaHOe PnHaHKN
→NotarybpbHarHaKaTbBHN3;BCaCbBaIOUaKpOMKaOnyCTNTcA.
Yka3aHne:
-ДЯ MOКИ KAFeBbIX NOIOB pRMyO BCaCbIbAIOUyIO pIaNHy yCTaHOBnTb TAK, YTO6bI YNCTKa IPOIN3BOIDnAcB NOD pRmblM yTlOM K CTbIKAM.
-Дяушеняофкгнвocn BcaCbIbAHNMOXHOYCTaHOBnTBHaKIOHBCacbIbAOUeIINaHKn(CM."PeynpoBkABcCabIbAOUeIINaHKn").
-Ecnpe3epByapIgrrp3HOBbIa- NOHNHe, NnNAbOK 3akpbBaet BCacblBAIOOe OTBepCTne IBCacBIBAOUaTpybHa paobotaC NOBbIeHHbIM YcCnOM O6OpOTOB. B 3tOM cnyae CneDyET PpeKpaTntb BCacBbAHne HnPaBNTbcr B MeTO ONOpOXHEnpe3epByapaIgrrp3HOBbI.
OctaHOBka n napKOBka
YcTaHOBnTe nepeKIOuOaTeIb BbIOpa nporpamM BnoIOxKeHne „BcacbBaHne".
PpoexaTb HEMHOro BnpeI N BCocatb OCTabWeeecr KOJIueCTBO BObl.
→ NpOHTb BcacbBaIOUyIO nnaHky.
YcTaHOBnTb NepeKnOuAtenb Bbl6opa nporpammbl BOJNOxKeHne "OFF".
BbItaunTe WtencelbHyu BnIky n3 po-3ETKn.
Cnntb rpa3Hyo Body
△PENEYNPEXKDEHNE
Cobnodaume MecmHbIe npednucHua no obaueHuO co cmouhBIMU bOaMu.
→ BbHyTb n3 ĀpeKαTeJIra CnVBHoi shaHr DnI rρa3HOBdI INOMeCTNTb eRO B npi-ROHbI dnn 3TNX CEJIe Nc6OpHk BObl.
CxaTb nnnepeHryTb Do3aTop.
OTKpbItb KpbIiKy D03aTopa.
→ Cnntb rpa3Hyo BODy - c nMOoBHO daBJIeHnI nn npOdoJbHoro n3r6a OtpreRyInpoBaTb paCXoD BoDbI.
→ PpOMbITb pe3epByap dIa rpa3HOB BObI YNCTO BDOI.
Cnntb uctylo Body
OTBnHTb KpbIuKy 6aKa dJa CBexKei BODbI.
TpaHcnOpTnupOBKa
ONACHOCTb
Onachocmbmpaembl!Ycmpoucmeo doJHKHO npueodumbc8 deucmbue dno noepy3KU u 6bipy3ku Ha noobemax moIbko doMAKCUManbH02O 3NaueHuRA (CM.《TexHueckue xapaekmuCmku》).DeuazambcMeDJIeHNO.
△OCTOPOXHO
OnachocmbmpaBmblu nopexkdHua! Obpamumb eHumaHue Ha eec ycmpoucm- ea npmu pahcnopmupoeke.
HajkaTb 6yKcnpHyo cko6y npu6opa BHN3 npepeMeCTNTb.
→PnnepeBo3Ke annapataB TpaHcnopTHbIX CpeIcTBax CneJyET yUHTbIBaTbDeIcTBYIOUe MECTHbIE RocyApCTBeHNbIe HOpMbI, HanpaBHeHHbe Ha 3aunTyOT CKONbJEHHN ONpOKNbIBaHIN.
XpaHHeHne
OCTOPOXHO
OnachocmbmpaBmblu nopegxdeHua!
Obpammb eHumaHue Ha bec ycmpooucm- 8a npxpaneHuU.
3To yctpoictBO paapeaetc xpaHnTb
TolbKO BO BHYptEHHX NOMEueHHX.
YxOД n TexHnueeCKoe 06cnyXnBaHne
ONACHOCTb
OnachocmbmpaBm!Ipeo npoeedeHEmnlobixpaobomcnpuobopomycmaHOumb npeeknoyamel bibopa npoepaMM e noLoxHe "OFF" u bimaumb wmenCeNBHyUeKu y3po3mku.
→ Cnntb n3 npnbopa rpa3HyIO BDOy IOCTABWyoCnCTyIO BDOy IYTNIM3OBaTb.
TnahTexHnueckoro 06cnykBaHn
Pocne kaxdo3Kcnpnyataun
BHIMAHHE
Onachocmb nopekdeHua. He onpbickuBamb ycmpoucmBo odou u He uonb3oBamb aapeccuHble yucmuae cpecm8a.
→ Cnntb rpa3Hyo BOy.
→ PpOmbIbpe3epByap dIra rpa3HOI BOdbI YNCTOIN BOIOI.
OuHCTnTb npHbOp cHApyKn, nCOnJb3yA DnA 3TOBO BLnXHyTO TpRnKy, pPONHTAHHyOM MRAKIM UeIOUHbIM PACTBOPOM.
→ npOBepntb ceTatbIh qHnltp, npH He-06xOJIMOCCTN -PON3BECTN UcTky,
OuHCTnTB BCacbIbAHOUne N UcTaeUne KpOMKn, pOBepNTb INx Ha N3HOC, pN Heo6XoUMOCTN 3aMeHHTb.
PpOBepntb Ha n3Hoc 电Ky, npn Heo6XoDmOCTn 3aMeHHTb (CM. "Pa60tI noTEXHNueCKOMY OBCnyxNBAHIO").
ExemecyaH0
→PpOBepnBHa repMeTnHocThyynIOnThe HmMekdy6aKOMrpa3HOBoBnKpbIu-Ko,piNeHo6xOIMOCtN3aMeHHTb.
OuHCTHTb CNTeTuKo.
ExeroDno
OBeCneuHTb npoBeHHe npeDncaH Horo ocmToPa cepBnCHOn cnYk60n.
Pa60TbI NO TexHnueckomy 06cJyKnBaHHIO
OuHCTka cetkn
1 Koxy
2 Kpbiiuka
OTkpblbKpbliuKy.
→ NObepHyb KpbIuKy no YacOBoC TpeJIKe I CHrTb ee.
→ CHaTb paCnONOKeHHbI NOd HeH CETHaTbI qNtBtp NOnCTHTb eRc.
BCTaBnTbΦnTbp.
YCTaHOBnTb Kpblkky N3aФNKCuPOBaTb NOBOPOTOM IpOTNB YACOBOCTpeJIKN.
3akpbblkpbliKy.
3aMeHHTb HnnepeBepHyTb BCacblBaHOUne KpOMKn

1OTmETKnN3HOca
2 BcabBaiouaa Kpomka
BcacbBaIOUne KpOMKn CneIyET NOBopa- YnBaTb N MeHrTb, ECJN OHN N3HOUeHbI BnIOb DO OTMeTOK N3HOca.
CHMNITe BCacbIBaIOyIO NnHaNKy.
BbBepHnTe rpn6koBbIe pyKoTkn.

CHrTb nIaCTmacCOBbie 3nemeHTbl.
CHMMTe BcacbIbaUoune KpOMKn.
BCTaBnTb HOBbI e nnpepebpHytbe BCacbBaOuJe KpOMKn.
YCTAHOBITEINACTMACCOBBEIETAII.
BCTaBbTe n 3aTaNHe rpn6KOBbIe pyko-RTKN.
3aMeHa DnCKOBbIX TeTOK
→ PnixKaTb 6yKcNpHyo CkO6y npi6opa Bn3, YTO6bl NOHnaCb YnCTaJra Ro-IOBka.
BbIXaTb BnH3 neJaJIb 3aMeHbI UeTKn Uepe3 cOpOTuBHeHne.

OTTHyTb np6Op Ha3a, YTO6bI OTKpbIT DOCTyN K DnCKOB0U SETke.
PacnoJIOKHTb HOByIO DnCKOByIO UeTky nepeMaunHOHaNoIy.
→ Nepemecntb npnbop c nohdarTo qnCTauei rnoBkoHnAD HOBOI NCKOBIOUeTKoN ONyCTNb YnCTrauYIO rnoBky. UeTKa fHKcnpyeTcB nPnBOe.
ChTne pe3epByapa dnn rpr3HOBbI
→ Cnntb rpa3Hyo BDOy.
→ CHaTb pe3epByap dIra rpa3HOB BOdBi nOTCTaBnTB B CTOpOHy.
OroBOp O TexHnueeCKOM 06cnyKnBaHHN
IHaJeKHOpa60bI np60pa CcooTBeCTBMyUIM TOPRObIM OTDeJeHHeMΦnMpbl Kdrcher MoXHO 3aKJIIOHTb DOrOBOP OTEXHHeCKOM ObcnyKBAHN.
3auntata ot 3aMep3aHnA
PnOnaChOCTN 3aMOp03KOB:
→ CNTb BODy n3 pe3epByapOB dnny CTOnn rpa3HOBoB,
NoCTaBtB np6Op Ha xpaHeHne B He-3aMeP3aOuE MOneUeHN.
Henoladkn
△ONACHOCTb
OnachocmbmpaBm! Npeod npoeedeHu emnlo6bixpaobomcnpu6bopomycmaHOeumnbpeeknluoyamenbblbopa npoqpamM
e nooxenue "OFF" u ebimauumb wmen- cebHyIO eunky u3 po3emku.
→ Cnntb n3 npnbopa rpa3HyO B0dy nocTaBsyIOc yNCTyIO B0dy NytIN3OBaTb.

Chairman of the Board of Management

S. Reiser
Director Regulatory Affairs & Certification
YNoJIHOMOeHHbI COTpydHNK NO BeDeHnIO DOKyMeHToo6Opota:
S. Reiser
Alfred Kärcher SE & Co. KG
71364 Winnenden (Germany)
Tel.: +49 7195 14-0
Fax: +49 7195 14-2212
Winnenden, 2019/03/01

71364 Winnenden (Germany)
Tel.: +49 7195 14-0
Fax: +49 7195 14-2212
Winnenden, 2019/03/01

2006/42/ES (+2009/127/ES)
2014/30/EU
Director Regulatory Affairs & Certification
71364 Winnenden (Germany)
Tel.: +49 7195 14-0
Fax: +49 7195 14-2212
Winnenden, 2019/03/01

Pred prvo uporabo Vase naprave preberite to originalno navo-
Zadevne directives EU:
2006/42/ES (+2009/127/ES)
2014/30/EU

Chairman of the Board of Management

S. Reiser
Director Regulatory Affairs & Certification
71364 Winnenden (Germany)
Tel.: +49 7195 14-0
Fax: +49 7195 14-2212
Winnenden, 2019/03/01
Typ: 1.127-xxx 1.515-xxx
Winnenden, 2019/03/01
Directive UE respectate:
2006/42/CE (+2009/127/CE)
2014/30/UE
Norme armonizate utilizezate:
EN 55012: 2007 + A1: 2009
EN 60335-1
EN 60335-2-72
EN 61000-6-2: 2005
EN 62233: 2008
Norme de aplicare nationale:
一
Chairman of the Board of Management

S. Reiser
Director Regulatory Affairs & Certification
71364 Winnenden (Germany)
Tel.: +49 7195 14-0
Fax: +49 7195 14-2212
Winnenden, 2019/03/01

Pred prvym pouzitim vasho zaradenia si precitajte tento po
2006/42/ES (+2009/127/ES)
2014/30/EU
Chairman of the Board of Management

S. Reiser
Director Regulatory Affairs & Certification
71364 Winnenden (Germany)
Tel.: +49 7195 14-0
Fax: +49 7195 14-2212
Winnenden, 2019/03/01

Prijpe prve uporabe Vaseg ure-daja procitajte ove originalne
71364 Winnenden (Germany)
Tel.: +49 7195 14-0
Fax: +49 7195 14-2212
Winnenden, 2019/03/01

Pre prve upotrebe Vaseg uredaja procitajte ove originalno
2006/42/EZ (+2009/127/EZ)
2014/30/EU
Primenjene uskladene norme:
EN 55012: 2007 + A1: 2009
EN 60335-1
EN 60335-2-72
EN 61000-6-2: 2005
EN 62233: 2008

Chairman of the Board of Management

Director Regulatory Affairs & Certification
71364 Winnenden (Germany)
Tel.: +49 7195 14-0
Fax: +49 7195 14-2212
Winnenden, 2019/03/01

IpeNnBpBOTo N3No13BaHe Ha BaWnYpeN npOyTeTe TOBa
OpHnHaHNO HNCTpyKUy 3a pa6Ota,
IeHCTBaIte CnopeI Hero Iro 3ana3eTe 3a
IO-KbCHO N3NoTBAHe IIN 3a CJeDBAuIy
IpuTEkATEJ.
CbDbpxaHne
Yka3aHn 3a 6e3oNaChOCT...BG1
Функця BG1
YIIOTe6a no IpeHa3NaueHne BG 1
Ona3BaHe Ha okonHaTa cpea BG 1
TapaunB. BG 1
PpHnHaJIeKHOCTn np3epBHN
chaTn BG7
EC DeKlapaun 3a cbOTBeT-
CTBNE BG7
Yka3aHna 3a6e3oNaCHOCT
Ipei Da ekCnloaTnpate YpeJa 3a NbpBn nbl, npoTeTe n cbIoJdaBaIte HactoIyntOeYbTBaHe 3a ekCnloaTaunu I npIIOKeHATA bpoUpa Yka3aHna 3a 6e3onacHOCT 3a NOcTBAUn ypeDi C YeTKn UpeDn CBpBckBaAa ekCTpakunr No 5.956-251 n cnca3BaIte.
YpeT Moke da ce ekcnloatnpa cmo, KOrato ca 3aTbopeHn rnaBnrt Kanak n BCuKN OctaHaJI N Kana.
H3non36aHemOHa ypeDa e no3eOnHe cAmo Bbpxy No6bpxHocmu, Koumo He Hadeuwaam MakcumAnHO pa3peueHua KaIOH, buXme pa3deN "TexHuuecku daHHU".
△PENEYNPEXKDEHNE
He u3no13eaume ypeo no haknoheHu noe bpxHocmu.
PpeDn3H npncno6JeHn
PpeIpa3HnTe npncno6bneHn Cnykat 3a 3aunTa Ha notpe6nteHa Tp8Ba Da ce I3KIOuBAt nI Na da Ce npomeHrT cyHKuNTe IM.
PpeDn3eH npeKbcBau
Ako Ce Iyche npEJa3HnI npEkbCBAU, 3aBnKBAHeTo Ha YeTKeTe Ce NkIOuBa.
CTeneHH Ha onaCHOCT
ONACHOCT
3a Hnocpeoemno ap0raua onachocm, KOmo bdu do mekku melechu nopeu unu do cmbpm.
△PENEYNPEXDEHNE
3a 6b3MOxHa onachacumyauc, KOAMoBu Mozna da doeede do mexku menechu nopedu unu cmbpm.
△PENEIA3NHBOCT
Yka3aHue 3a 8b3MOxHa ONaCha cumya- uia, KOaMo MoKe da doeede do Jeku Ha- paHraeaHua.
BHIMAHNE
Yka3aHue 3a 6b3MOxHa onacha cumya- uja, KoJMo MoKe da doeede do Mamepu- anHu uemu.
Функун
Tbpkaata Na3cmykbaaMaMwHa ce n3- NOI3Ba 3a MOKPO NOpCTBaHe Ha paBHN OIOBE.
- NocpeIcTBOM hAcTpoiKa Ha KOJIuYeCTBOTO Ha BOJaTa Hn HA KOJIuYeCTBOTO NOHCTBaU npenapat ypeBt MOKe da 6bJe IeCHO aAnTIpaH KbM CbOTBeHTHaT3aDaHa 3a NoHCtBAHe. Io3npaHeTo Ha NoHCtBaU npenapaTn MoKe Da 6bJe HnAchaTo npn Do6aBByHeTo IM B pe3epBoapa.
- YpeBt npntexkaba pe3epBoap 3a nCTa n 3a Mpbcha B0da (cboTBeTHo 60 NITpa).TOBa No3BOJRAepeKTHBNO NOYnCTBaHe npn rOJaMa npOdbJINTeNHOCT Ha pa60ta.
-Pa60Tha 申nHa oT 500 MM yIeChraBa eΦeKTHBHO n3IOn3BaHe npN dblra npOdbJnxTeHNOCT Ha pa60Ta.
-ПиДВИЖBAHETO HanpeI CE n3BbPwBa C ByTaHe Ha pKa I CE NOdkpenr OTo BbPtEHTo Ha YeTKeTe.
-3aIeCTBaHeTo B MPexaT aDaBa Bb3-MoXHOCT 3a BnCOKa IPOUN3BOIDNTeJIHOCT6e3 OpranuHueHne Ha pa6OHTO BpeMe.
Yka3aHHe:
B cboTBcTbne cbc 3aapaata Ha noHCTBaHe ypeBt MoKe da 6bde o6OpyDbAH cpa3nHn npHaADNeKHOCTN.
Ponitata 3a Hauin KaTalor Hn Hn Nocetete B INtepHET Ha aDpec www.kaercher.com.
UnoTpe6a noDeHa3HaueHne
N3noJI3BaIe TO3n ypeI cAMo B cbOTBETCTBHe CbC 3aJaHTe B HAcTOAOTO YnbTBAHe 3a EKcnloatauia.
To3n ypeE e roeH 3a npoepcnoHaJha ynoTpe6a, Hapr. B XOTeIN, YUINIua, 60HNiC, fApBnK, Maar3HH, Ofncn I NOMeueHn Pd Haem.
- YpeBt MoKe Da 6bDe H3NoI3BaH CAmO 3a NOpICTBaHe Ha He CyBCTBnTeHN Ha BJIaRa I He CyBCTBNTeHN Ha NOIpaHe rJaKn NoBbPxHOCTN.
- YpeIbTe pa3pa6oTeH 3a NoocTbaHe Ha NIOObE BbB BbTpewHn PocTpaHCTBa peCn. Ha NOKpTN NOBbpxHOcTn.
- YpeIbT He e NOxOJa3a NoUcTBaHe Ha 3ampb3HaJIIN NoIOBe (HaIp. B Xla-DnJIHNI NOMeueHna).
- YpeBToMKe Da ce obOpyDba cAmO c opuHaJIHn pInHaJLeKHOCTN pe3epBHN uactN.
- YpeBbT He e noDxOJa 3a npNIOKeHne B 3acTpawEHn OT ekCnIO3nn O6-KpbJkeHn.
-Cypeda da He ce noeMaT roPMn ra3oBe,He pa3peDeHn KncEHNn nn pa3- TBOpHTeN.
KbM Tx CnadT 6eH3nH, pa3peDnteJIn 3a 60n nn Ma3yT, KOtO MoRat npn BcMykBaHe da o6pa3yBat EKCIIIO3NBHN Cmecn. OcbEN ToBa He n3IIOJI3BaTeN He 3acMykBaTe aUeTOH, He pa3peDeHN KNCeINHn Pa3TBOPNTeJN, 3auToTe aAtakyBAT n3IOJI3BAHNTe BypeJa MaTePnaJn.
- YpeBbT ce donycka 3a n3noI3BaHe Bbpxy NOBbpxHOCTn C MaKcImaJIeH KaIOH, nocOeH B pa3dEi „TexHnueckn DaHHN".
Ona3BaHe Ha OKJHaTa cpeDa

OnakOBbUHnTe MaTePnAaN MoTat Da ce peuKnIpaT. Mona He XbPnIte OnakOBKIne Pnp DoMaunHIne OTnaDbu, a rnppeaIte Ha BTOpUHN CypOBuHN C ueI NOBTOHa yNoTpe6a.
CTapnte ypei CbIbpxaT cEH H MaTePnAII, NODJExaIu Ha peUKNipAne, KOITo MOrat Da 6bDat ynoTpBeHen NOBtOpHo. IopAn ToBa MoJr OTcTpanH BaiTe CTapnte ypei, n3NoJ3- BaiKn POxOJaun 3a CEJTa cnCTemN 3a CbBipaHe.
Yka3aHnna 3a cbcTaBKnTe (REACH)
AkyHa HOpMaun 3a cbCTaBKnTe HeHamePHTe Ha:
CMHa Ha DnCKOBA YeTKa
→ Hatahe yepa ot nIb3raaata cko-6a hao, 3a da 6bde noBdnrHata noYnCTBaata rna.
→ ΠeДанзмэнэнэчETКNTeДаCEHaTNCHeHdCbIpOTnBnEHNetoB NOCOKaHADONY.
→ N3terTne Te ypeHa Ha3aI, 3a Da IMa DOCTbI Do DnCKOBaTa YetKa.
→Пложete HOBATAДИСКОВAЧETKaHa noda nped ypeda.
→ПиДВИЖЕТурEDA c NOBIMHATA noYnCTBaUa Tnaba HAD HObATA DnCKOBa YETKa n CnYChTe NOuNCTBaUaTAta TnBA.
YeTKaTa ce fHKcnpa B 3aDbNKBaHeto.
CbaHHe Ha pe3epBoapa 3a Mpbcha B0da
→ N3nycheTe Mpbchata B0da.

→ПОВДИНЕпeзерваразу Мьсан BOДА И Го NOCTaBeTe HAcTpahN.
DorOBop 3a noOpBxKka
3a HndexkHa pa60Ta Ha ypeHa MoKeTe DaCKHouHTe DOrOBOpn 3a NpDpBka C OToPn3npaHO 6bpo 3a npOdaKb Ha Kepxep.
3aunTa ot 3ampb3BaHe
PnOnaCHOCTOTn3Mp63BaHe:
→ Da ce n3npa3HrT pe3epBoapnte 3a HnCTa N MpbCHA BOda.
Ypea da ce npnbepe B nomueHne, 3aunTeHOOT3ampb3BaHe.
Pobpeu
ONACHOCT
Onachocm om Hapnhae! Ppeu da pa
6omume no ypeda, nocmaeeme npoapa
Mamopa Ha, OFF" u u3eade me uencena.
Mpbchata BOda n octahanata uCTa BOda da ce n3nychat n da ce otctpaHrt.
| Helen3npabnoct Otrctpa | Явае |
| Уретът не моче да сстарtnа | Настошte пекьсвача 3a Избор на пporpама на щенината пPORPAM. |
| Задейстави te песпазду пекьсвач. | |
| Вклочete Мржовя сеньг в контакт. | |
| СBetи ль контолната лamna 3a зханвае с наразжени? | |
| HelenocstatbTuNo колчес-стBO Na BODATA | Да с повери НИВОТо на чИстATERВODA, рпн Heo6xODIMOCТ да с дылпн Pe3eRBOAPa. |
| Повишete КOLIчecTBOTO Na BODATA OT KONHTO 3a PeruLipanpe Na KolIuCCTBOTO Na BODATA. | |
| Да с поиси цEDКа.Ta. | |
| HelenocstatbUHa MOU-HocT Na I3CMyKBAHe | Да с поис_TуПЛБТнEHЯТа МEXДу pe3eRBOAPa 3a МрьСнA ВODA И Kanaka, Да с поверяТа ХермETNCHOT, рп Heo6xODIMOCТ дa ce smehг.T. |
| Поверete УлльТнEHЯТа МEXДу pe3eRBOAPa 3a МрьСнA ВODA И pe3eRBOAPa 3a ChSTa ВODA 3a урждану рп Heo6xODIMOCТ ГСmehTe. | |
| Рe3eRBOAPbT 3a МрьСнA ВODA e Пьlen, ИЗКlJOYeTe UрEDA И ИЗПра3Hete pe3eRBOAPa 3a МрьСнA BODA | |
| Поч检тete седКаТa. | |
| Да с поис_TуСМуKВAsHTe e3iChETa Na Лenta 3aCMyKBaHe, рп Heo6xODIMOCТ дa ce smehг.T. | |
| Поверete, Далу КANAKbT Na I3PysKATEЛнry МарКуч 3a МрьСнA ВODA e 3aTbopeH. | |
| Поверete НастошКаТа Na Лenta 3aCMyKBaHe. | |
| СMuKATeJIHЯ МарКуч Дa ce пвери 3a 3aPyUShBaHe, рп Heo6xODIMOCТ дa ce поиси. | |
| СMuKATeJIHЯ МарКуч Дa ce пвери 3a XeRMeTnHOCCT, рп Heo6xODIMOCТ дa ce smehg.T. | |
| HelenocstatbUeH pe3yI-TAT OT поисТВанeto | ПоверяВайte cheTKaTA 3a ИЗнOCBAHe, рп Heo6xODIMOCТ сMuHЯTe. |
| ВсмуВашata turtbHa paBOTи ekSceNTpruchno | Поч检тete пonsLavbka. |
| Четкata Ne ce Bvptи Пр | Роверete, Далу ChyЖдп Тета Ne He ca 6blokиралп cheTKaTA, рп Heo6xODIMOCТ Г ONCTPahete. |
| Пуснete п徴пЗня пекьсвач. | |
| ИЗчakayte Кратko. | |
| Задейстави te п徴пAZнIHЯпepeKbCBaW. | |
| Вибраши рп поис-Ванe | ЕveHt. ИЗПОЛЗВайte lo-MeKa Yetka. |
| При поиси, кOnTO He MoRAT dA sbdAT OTcTpaneHIn C NOMOZTa Na HacStOZaTа TabLiMa, NOVIIkaIte cepBn3a. | |
PnHaJneJxHocTn
PpHaJnEJXHOCTN pe3epBHN YactN
I3noJI3BaIe caMo opuHaJIHn akceCoapu I opuHaJIHn pe3epBHN qactN, noTo3n NaHn OcnIpyraBe 6e3oNaChata n6e3np6IemHa ekCnloaTaun Ha ypea. MoKeTe Da HamePte INHΦopMaun 3a akceCoapu n pe3epBHN qactn Ha www.kaercher.com.
ECДeКларачи3a CbOTBETCTBHe
C HactoIto DeKnapaMe, Ye IITnnpaHa- Ta NO-DIOJy MaunHa CbOTBcTCTBa NO KOHcIe- U N KOHCTpyKUIN, KAKTO IN No HAuHN Ha IpOuN3BOdCTBO, PpNJarAH OT HAC, HA CbOTBeTHIn- TE OCHOBH N3NUCKBAHHa 3a TEXHnuecka 6e30- NaHOCHT N 6e3BpeDHOCT Ha DnpeKtNBte Ha EC. PpN PpOMEH Ha MaunHaTa, KONTO He ca
CbINaCyBaHn C HAc, HAcToaTa DeKnapaZuYr6BaNIOHOCT.
IpoDyKT: YpeJ 3a nouCTBaHe Ha nO
Tun: 1.127-xxx
1.515-xxx
Hamnpaun npnloxhenne DnpekTbNHa EC:
2006/42/EO (+2009/127/EO)
2014/30/EC
Hamepnn npnloxeHne xapmoHn3npaHN CTaNdapTu:
EN 55012: 2007 + A1: 2009
EN 60335-1
EN 60335-2-72
EN 61000-6-2: 2005
EN 62233: 2008
PpnooxmHaonohnCTaHdaptN
IopnncBaunte Jnca DeNCTBaT OT NMeTo n KaTO PbJHOMOuHnU Ha ynpaBNTeHnOpraH.

Chairman of the Board of Management

S. Reiser
Director Regulatory Affairs & Certification
ПьнOMOUINК NO DOKUMeHTaUNrTa:
S. Reiser
Alfred Kärcher SE & Co. KG
71364 Winnenden (Germany)
Tel.: +49 7195 14-0
Fax: +49 7195 14-2212
Winnenden, 2019/03/01

Imiotsaku Iangetamine
Vahetage imihuued valja voi poorakened umber
1 Kulumistähis
2 Imihuul
Imihuuled tuleb valja vahetada voi umber poora, kui need on kulumismargini kulunud.
Imivarmbahovtta.
Tähtnupud valja kruvida.
Tömmake plastmassist osad maha.
Tömmake imihuued maha.
Lukake kohale ued voi umberpooratud imihuled.
Lukake peale plastmassist osad.
Kruvige sisse tahrnupud ja keerake kinni.

Chairman of the Board of Management
S. Reiser
Director Regulatory Affairs & Certification
71364 Winnenden (Germany)
Tel.: +49 7195 14-0
Fax: +49 7195 14-2212
Winnenden, 2019/03/01

Pirms ierices pirmas lietosanas izlasiet instrukcijas originalvalo
da, rikojieties saskaar noradijumiem taja un uzglabajiet to velakai izmantoisanai vai turpmakiem lietotajiem.
Satura raditājs
Drosibas noradijumi .LV 1
Darbiba .LV1

Chairman of the Board of Management
Director Regulatory Affairs & Certification
Pilvarotais sagatavot dokumentaciju:
S. Reiser
Alfred Kärcher SE & Co. KG
71364 Winnenden (Germany)
Tel.: +49 7195 14-0
Fax: +49 7195 14-2212
Winnenden, 2019/03/01
Produks: Gridas mazgasanis iekarta
Padomi: 1.127-xxx
1.515-xxx
Chairman of the Board of Management

S. Reiser
Director Regulatory Affairs & Certification
71364 Winnenden (Germany)
Tel.: +49 7195 14-0
Fax: +49 7195 14-2212
Winnenden, 2019/03/01

Ipeepnepm3actocyBaHHMa Baworo npncTPOIO pOuHTaTe
OOpriHaBHy IHCTpyKuio 3 EKcnNyatau, nCnIe Cboro dIte BiINOBiHO He Ta 36peXitb II DnI NOaIbWoro KOpNCTyBaHnA bdo Ira HAcTynHOro Bnachka.
IpepiK
Ppavna 6e3neKn .UK1
Pn3NaeHn. UK 1
PpabunbHe 3actocyBaHHa. UK 1
3axnCT HABKoJIuHbOrO cepe
IOBua UK 1
TapaHTia UK 1
EJemeHTn ynpabJIHHH i fynKIOHaJIbHi By3NJ. UK 2
Ipeed noatakom po6otn. UK 3
Eknnnyataia. UK 3
3yHHKa Ta napkyBaHHa UK 4
TpaHcnpTyBaHHa UK 4
36epirahnna UK 4
Dorna Ta texhiue o6cyrobyBaHHa. UK 4
3axnCT BiMop03IB. UK 5
Henonapkn UK 6
Akcecyapu UK 6
TexhiHxapaKtepncnK .UK 7
OblaHaHHa Ta 3anachi YactnH.. UK7
3aRa npB iDnOBiHicTb CbponeNcbKoro cnIBTOBapncTba...UK 7
PpaBnla 6e3neKn
Ipeep nepwn BnKOpncTaHHm npouH TaTe Ta DotpmyTecb cié i HcTpkyi3 ekCnyatauT Ta 6poWypn 3 npaBn 6e3neKN JIA MNoUHX UtKOBnx TaekCTpareHTHNX npnnaib Ne 5.956-251.0.
Pnncpii Do3BOJnEbCcKcnNyatyBaTn Nnne KOnn 3aunHehi Kanot Ta Bci KpnuKn.
Ppucpi npu3haeHu dna po6om Ha noepxHx 3 yxunom, MaKcumaIbHa eenuHa kko2 He nepeeuue 6ka3aHy e po3di "TexHihi daHI."
△NONEPEDXEHN
He donyckaembcyaekopucmaHH npu-cmpoH na noxunx noeepxHx.
3axnchi 3ac06n
YcTaKyBaHHaTexHikn63neKn npu3HaueHe dIaXnCTy KopncTyBaiv, BOHO He NOBHHO BnKOpNCTOByBaTncb 3a Mekamn Bnpo6HNTBa Ta He 3a npu3HaueHHM.
3an06iXHHBIMNKaY
KIO BIDNCTTN 3ANOBIKH NBMNKaU,TO CTAHETBCBIKNUOeHHIitKOBOrnpBOy.
CtyniHb He6e3neKe
HEBE3NEKA
Bka3ieka uodo He6e3neku, kka 6e3nocepdeHbO 3a2pOxye ma npu3bodumb do mxxmpaem yu cmepi.
△NONEPEDKEHH
Bka3ieKa 0do nomeuHIO MOxNueoI He63neHoI cumyaui, 0o MoKe npu3eecmu do mxxmpaem qu Cmepmi.
△OSEPEXHO
Bka3ieka zuodo nomenuHno He63neuHOI cumyaui, kA moKe cnpuunmu opmuHaHHn neekuxmpaM.
YBATA
Bka3ieKa 0do MoKJIuBOI nomHeH He63neHiI cumyaui, 0o MoKe cnpuHuMu MamepiAnHi 36umku.
Pn3HaueHH
Maunha dny dojry 3a nipnoramnpn-3naheHa Dny BONORO npnbpannaPiBHOi niDnOrn.
-Пистп може 6углserкн haana- StTyBaTN Ha BnKoHaHHB BiДnoBIdHorO 3aBdaHЯ NO YIuSeHHU Yepe3 Bn6ip napapMeTpIB KINbKocTi BOu Ta 3acOby dЯ NIIuSeHHA.
IozyBaHHa 3acoby IyNueHn MoKHa KopuYBaTN DoaBaHHm y pe3epByap.
-Пистпй осашип pe3epByapamnДя CBIXOЯ 6pydHoi BOI (o6'EMKoxHoro pe3epByapy 60 nITpiB).BOH3a6e3neuYIOb epeKTHBHe MHTTЯ npITpINBaIOMy BIKOPNCTAHHI npICTpOIO.
-Po60a 500 MM Do3BOJRAe 3a-6e3neuHTn efeKTNBHe 3aCTOCyBaHH npn 3NaHn TpNbAIOCTi po60TN.
- IpeceybaHnBnepei3iIChIOeTbcB BpyHy Ta niTpmyeTbcObeptaHHm ⅢITOK.
- KInBneHn BID MepeKi 3a6e3neUyE BnCOKy npOdykTNbHicTb 6e3 o6mExeHHaCypo60tN.
Bka3ibKa:
BiinobiHNO KOKxHoro i3aBdaHb no Oun-
IeHHIO npicpi MoKJINBO OCHaUyBaTN
pi3HM oBnaHaHHM.
3aHTyIe 3a HaIIM KaTaNorom a6o BiDbIaIe Hau caN B lInTePHeTi www.kaercher.com.
PpabnIbHe 3acTocyBaHHa
BnKOpNCToBvBaTn DaHn npnnaBnHrtKOBOy BiNObiHoctI Do Bka3iBOK daHOIHCTpykui 3 ekcnnyataui.
-Le npicpi npaatn n pomncnoBoro 3actocyBaHH, Hapnkna,B roTeJx, kOanax, iKapHx, Ha pa6pnkax, y Maraunhax, oicax Ta openndnx niDnpemCTbax.
-Пилад мохнавикористовати дя
чшенин Нechутлбинdo BOLOTN Ta
пONIPYBAHн рIBNX rnaKnx niDnor.
-Пистpii 6by Po3po6nHmДЯ MmKn iIIOr ycepeuHni npMiuEeHb aO NOBepxOH, uO nepe6yBaIoT bId daxOM.
-Пипад Ненрдатнй ДяпnpибраннЯ замерзлnx пдlor (Hanp., y xoJIoDnIbHnKax).
- Y npncptpoI O3B0JIeTbcra BnKOpncTObByBaTu NmIe opirihJIbe O6NaJHaHnTa OpirihJIbHi 3anachi YaCTnHi.
-Пилад He npizhaueHn Дя ВИКОпCTанну y Bn6yxoHe6e3neuHOMy cepeDOBnii.
-3a6bOpOHeTbcra BCMOKTyBaHH npIlaDOM roPouHx ra3iB, Hepo3BeDeHx KICNOT a6o po3uHHNKIB.
I O TaKnx peOBoH HanExKaTb 6eH3nH, po3piJxByBaui fap6u Yn Ma3yT, BOHN MoKyTb CTBOpJBaTu B6yXoHe6e3neHi CyMIiU, 3MiUyOuNc b3i BCMOKTyBaHIM NOBITpM. AuTeOH, Hepo3BeDeHi
KNCLOTn Ta po3uHHHKn MOxTyb N0U-KoDHTMaTepiAn, 0O BuKOpNCTObyIOTbcr npnaJI.
-Пистрип ризнayechen дя роботи на NOBEREXHIX 3 yxINOM, MAKcIMaJIbHa BEINUHа RAKO BkA3aHa B pO3dini "TexHicHi dahi".
3axnct NaBKOJIuHbOrcpeoBnu

Materi ynakOBK nIddaIObTc nepepobci dna nobtophoro BnkopucanH. Bynb nacka, He BkndaTe nakyBaBHi MaepiaI np a3om i3 domaunHim cmITTM, BiDnaiTe ix nHa nepepobky.
CTapi npnctrooi MicTb ciHHi MaTepiAIn, kI MoKyTb nepepo6BnTcna Ta nIinraHOp b nepedaHi BnykTN npHOMy BtopnHHO CnpOBHN. Tomy, 6yNb Iacka, yTuNl3yIte cTapi npnctrooi 3a DonomoroIO CneuaJIbHNx CNTem 360py CMITRA.
Ihctpykuii i3 3actocybaHHKOMnoHHTiB (REACH)
AkyaIbHi BiOMOCTI npo KOMnHOENTn HabeHeH Ha Be6-By3JI 3a aDpecoIo:
BoIore npnbpapnHn iJnorn i3 TpnaJIIM BIIINBOM MmHOrO 3ac0y.
4 Pekim BCMOKTyBaHH
3ibpatn 6pyd.
5 Nepemkau Bn6opy nporpaM
6KoHTpOJIbHnIHdNkATOp eNeKTpUHOrO XNBJIeHHRA
3aoropctbpcnBCTabHeHomy MepeXeBNIHTeKep Ta BiNobiHn Hanpy3IyMepeXi.
CmBOnHa npicTpoi
BCTaHOBnTbIINOBiHDo3a6pydHeH HNOKPITrNiIIOrKJIbKicTBNoaBaHoHaRonIByBODn
Bka3iBka:
Nepu npnue HnnpoBnnpn He Bnki KnbKcTi BOIN.36IbWByaTn KbcKcTB BOIN KpOK 3a KpOKOM,POK6yde DOcRHyto 6kaHoro peynty nueHH.
BcTaHOBJIeHHBcMOKTyBaJIbHoiI nlaCTnH
Koce po3TaUyBaHn
Дя noinweHnpe3yIbTaTIB MmKn NiIJI, NOKPITnx NNITKHO, yCMOKTyBaJIbHa nJaHka MoKe 6yTu NoBepHeHa Do 5°
Pocna6ntn rBHTn-6apauu
→ NObepHyTu yCMOKTyBaJbHy nHaHky
3aTMyCmUkoBIBuHTN.
Haxn
Pn HeoctaTHI NOyKHOCTYCMOKTyBaH HMOXHa 3MInHTN HaxIN BapTOBepTN KaNbHO YCMOKTyBaNbHOI NpAHKn
→ PpectabnIpyky,IOoOeptaetbcra, DnHaxnnyBCMOKTyBaIbHoI KpaIKN.
BNCOTA
PeryIIOBaHHB BNCOTN BNIIBaC Ha BNIN BCMOKryBaJIbHOI PnAKn npN KOHTAKTI 3 niDnorO.
→ NepemictnnoBopOthe pykib'peryIIOBaHH BUCOTn MeTODom Cnpo6 TaK,IO6doCraTn HauKpaUoro pe3yNbTaTYBCMOKtyBaHH.
MUTT
YBAGA
Hebe3neka yukodkeHHn oKpumma nioa. He npauoeamu 3 npucmpoem Ha odHomy Micui.
KHeuB noOBoXyBaIbHoro UHypa BKnA CTn neTneYo KpOk dJa Ka6eJIO.
3'εdHaTι ΜτeNCEJIbHy BUNIky npuIaIy 3 NOOBKyBaIeM.
BCTaBttn wTeNceJIbHy BUNKy noIOB-xyBaHa B wTeNceJIbHy po3eTKy npICtpoI.
→ NObepHyTn nepemMkau Bn6bpy nporpaMaHa Heo6xHny nporpamy.
3aiaTn 3ano6ixHn BmNka.
OnyckaHHBcMOKTyBaNbHoi Tpy6Kn.
→ NotaryHTn Baxin Ta HATNCHyTHBHN3; BCMOKTyBaIbHa KpaIka ONyCTNTbcr.
Bka3ibka:
-ДЯ MИК KAXEJIbHIN XIINOR npMBy BCMOKTyBaJIbHy INaHKy BCTaHOBNTn TAK, IO6 YIuSeHHN BIDyBaIIOc nI npMIM KYtOM Do CTIKIB.
-ДЯ NOЛINWEHЯ epeKTHBHOCTI BCMOKTyBaHHa MOXHa BCTaHOBTn HaxNJ BCMOKTyBaJIbHOI ПАнКИ (ДИВ. "PeryIHOBAHHA BCMOKTyBaJIbHOI ПАнКИ").
-JaKIOpe3epByapIJI6pyHoI BOIN 3a-nOBHeHn, nonIabeueZ3akpNBacOTBip IJRA BCMOKTyBaHHa, a BCMOKTyBaJIbHaTypbiHa npauoE 3 niDBuIeHm YIcIOM o6eptIB. B Ucbomy BInpaIky cIiD npinnHHTN BCMOKTyBaHHa Ta nonpMyBaTN B Micue cnopoxKHeHHpe3epByapy dIJI6pyHOI BOIN.
3ynnHka Ta napkyBaHHa
BcTaHOBnTn nepemnkau Bn6Opny npo- rpaM y noJoxeHHN,BCMOKtyBaHnH".
→Повьети пилад трахи впешед та BiДКаЧТИЗнБОВЗАЛИСКВОДN.
PiHrTn BCMOKTyBaJbHy nlaCTnHy.
YctahOBHTn nepemukay Bn6opy npo-rgpamB noJIOKeHH,OFF".
BntraHitb mepexHn wTekep 3i wTenCeIbHOI po3ETKn.
3nnt 3a6pydHEnHy BODy
△NONEPEDXEHH
Cniodyume Micueeum Hopmam uodo cmiu Hux bod.
→ BnMItb i3 TpMaaya 3NHBHn WnAHT nOMICTMb NOrO B npu3HaueHn DnA Cbo-0rO 36ipHnK BoDn.
→ Ωo3aTOp CTnCHyTu a6o nepeRHyTu.
→ BiDkPrtu Kpuiuky do3aTopa.
→ CnyctnTn 6pydHy BOy - peryIHObATN BNTIK BOO CTNCHEHHaM YI nepeRHaH- HAM.
→Помпгпpe3epByapдябуноь BodичсTOI BOHOJ.
CnyckaHHy HcToB ODo
3aKpntn 3amok pe3epByapy nIra cBikoI BOJN.
TpaHcnoptyBaHHa
HE6E3NEKA
He6e3neKa mpaBmyeAHnI Ina 3aabaHmaXenHn a6o buaHmaceHH npucmpiMoKe nepecyamuc minbku Ha cxunax, Kym kux He nepeeuuyE MaKcumalbHo2O 3NaueHH (du. 己 TexhuiX xapakmepucmuKu)).Pepeyeamuc noeInbHo.
OSEPEXHO
Hebe3neka mpaam ma nowokxeh!Pmu pmaHcnopmyaHaHHi cnid 3eepHymu yeaY naBaay npucmpoio.
→ PnTnChTyN 6yKcnpy CkO6y npnCTpoBn3 Ta nepemictnT.
→Пи nepebeeHHi anapatyВ trpaHcnpOTnIX 3ac06ax cnIb BpaxOByBatu Mic-ueBi diouci depkabHi HOpMn, HanpabJIeHi Ha 3axnCT BiKD KOB3aHHra TepeKndaHHa.
36epirannn
△OBEPEKHO
He6e3neka mpaam ma nowkodkeh! Ppu 36epiaaHHi 3eephymu ybaay Ha bae npucmpo.
Lepnnae 36epiratncn y BHTpiHix npimuienHHx.
Dorra TaTexHicHe 06cnyrobyBaHHa
△HE5E3NEKA
Hebe3neKa mpa6MyBaHnHa! NpeoepdeHHm pemohmy a6o obcnyo8yBaHn npucmpoIO cmaHObum nepeMukau b60py npoapam y noJoxeHH "OFF" i umaHymu umencenbHy uNKy 3 po3emku.
→ Cnyctntu Ta yTuNi3yBaTu peuTkn 6pydHoi Ta YnCTOI BOIN.
TnahTexorny
Nicra Koxhoro BnKOpncTahHr
YBAGA
He6e3neKa yukodxehn. He obnpuckyme npucmpiu eooio ma He bukopcuMoeyume aepcunhi 3acobu onyueHHN.
→ 3πmtn 3a6pydneHy B0dy
→Помпгпpe3epByapдябуноьвичNTOBOdoHO.
OuHCTnTn npnla3 3OBHi, BHKOpncToBbUOnH dIra cIbOro BOIory raHhipky, npocOcYeH Cna6kM JyKHM po3HHOM.
→ npebipntn ciTcaTn pfInbTp, npn He-06xHocTi -3pObTu NUnenHn.
OuNTNU BCMOKTyBaJIbHi Ta 3'EMHIaNk, NpeBipNTn IX Ha npEIMeT 3HOyBaHH, pni Heo6xIDHOCTI 3amHHTN.
IpebipuHa 3HouyBaHHuTky, npn Heo6xIHOCTi 3aMInTu (INB. "Po6OtN 3 TexHiHOrO o6cnyroByaHHa").
Uomica
→ Ppoknaadkn mixk pe3epByapom 6pydnoi BODn Ta KPNKIOO ONUCTNTa NepeBipnTixHIO UINbHicTB, npn Heo6xidHO-cti 3amInHTn.
OuInCTnTn ciTky.
UoiH
→ Пюводптп pekomeндовану nepebipky y cepbichomy ueHtri.
PpOphiJnakTuHi p6oTu
OuHCTHTn ciTuactn fInbTp
1 Koxy
2 Kpnka
Bidkpntn kpnuKy.
→ NObepHyTN KpUkky 3a roDHHNKOBIOCTpiKoIO i 3HrTn II.
3Hrtnpo3TaOBoAHnPiHHeoCtuaCTnΦiNbTp Ta OuNCTNTn NOrO.
BCTaBHTn ciTuaCTn pIbTp.
BcTaHOBnKpnuKy i 3aΦikcyBaTu II, NOBepTaOCh II npOTn rOINHHNKOBOI CTpINK.
→ 3aKpntKpnuKy.
3amHHTn a6o nepeBepHyTn BCMOKTyBaIbHi r3NcK
1 BiDmitkn 3Hocy
2BCMOKryBaIbHnRA3N0K
BCMOKTyBaNbHi KpaIKn CnId NOBepTaTu Ta MiHrTu, RkUO BOHn 3HOWeHi Ax Do BIDMITOK 3HOCy.
3HimItb yCMOKTyBaIbHy INaHky
BnBepHItb rpn6KObi pykoTkn

3HimtbnactmacoBidetani
BCTaBnT KpaKn
BCTaBHTNHOBI a6o nepeBepHyTI BCMOK-TyBaJIbHi KpaIKN.
BCTABITN nIacMacoBI deTani
BCTABTe 3aTARHITb rpi6KOBI pyKoRTkn
3aMiHa DnCKOBuX uTOK
→ PnTnCHyTu 6yKcnHy CkOby nPnCTpoB Bn3, 06 niDnHaacra rOiBka dIa YI-
BnuabntdojinnnbneaJIb3amHn 1tKuyepe3 onip

→ BiTyrHytn npntpi Ha3a, 0o6 oTpMaTH DOCTyN DO NCKOBoi uitkn.
Po3aUyBaTu HOBy DnCKOBy uITky nepei npncTpoem Ha nio3i.
→ Nepemictn npicpti3 niHnroTO roIOBKOIO nra YuueHHaH HOBOIO nCKOBOU uTkoHO i onyCTnTn rOIOky dnyuueHH. Uitka fikcyetbca y npnbDi.
3HIMAHnpe3epByapydna 3a6pydHeoi BOIN
3nnt3a6pydHeHy B0dy.

3Hrtn pe3epByap Ira 6pydHOI BOu Ta BiCTaBHTy6ik.
Dorobip Ha Texo6cyroByBaHHa
Дпг.TORO IO6 rapaHTyBAtи HadiHу ekCnIpyaTauio npuJaDy, MoKHa 3akNHOHTINdoROBip IOdo TEXHIO HO6cIyROBaHHnpICrpo3 KOMNeTeHTHM 6Ipo npoDAxky Karcher.
3axnCT BiD Mopo3iB
Bpa3i He6e3neK 3amep3aHHa:
3BilbHn pe3epByapn HcToi Ta 6pydHOI BOIN.
36epiraTe npuiaB 3axnueHomy BiMOPo3y npmuiEHHI.
Henonada
HE6E3NEKA
Hebe3neka mpaamyeaHn! Npeod npoe- deHHm peMOHy a6o obcnyoeyaHn npucmpoIO cmaHObum npemukau Eb6opy npoapam y nooxeHH "OFF" i umaHymu umencbHy bunky 3 po3emku.
CnyctnTuTaYtNi3yBaTupeuTkN 6pydHO Ta YnCTOIBoHn.
| Hecnpabnictb Ucynenry | |
| Прилад He zanuckaCTb Ся | Встановпts baxану prorpamy 3a дономою поемпача вибору prorpam. |
| Задятns залобіжни Вимькч. | |
| Вставе мерекевий sttekeр у розтуk. | |
| Горпь конт polьни indидахетр eелкгчног ожвлени? | |
| Hedocstatня кilbkic'tb ВODи | Перевирtni рівенчпсто вodи, пri Neobxidnocti dojentn |
| Збільшпtni kILbkic'tb BODи 3a дономою кногп рergуловань кilbkocsti BODи. | |
| Очnstitns citk. | |
| Hedocstatня Notuyknichtb ВCMOKTuBaHnry | Прokладдmіж pezeрвуарom bpydnoі BODи Ta Kpiшкою ochncttntu Ta nepebiprtns iXHHU OJIbHic'tb, пri Neobxidnocti 3aminHtN. |
| Перевирtni yuzilbneHnny mixk pezeрвуapom dny bpydnoі BODи Ta pezeрвуapom dny ChSTO'BODи Ha NaHЯВHic'te yuzkoJxKHeB, пri Neobxidnocti 3aminHtN. | |
| Pezeрвуар dny bpydnoі BODи 3anOBHnien, ВIMKHytN prncstpri Ta BINOPoJHNTn pezeрвуap dny bpydnoi BO- dN. | |
| Очnstitns φільт дny 3atprimyBaHnry BoJokOH. | |
| Прочstитns BCMOKTuBaIbHni JazuchnHa BCMOKTuBaIbHni Trp6zi, пri Neobxidnocti 3aminHtN | |
| Перевирtni, ч зakрпа Кршka ЗлИВу bpydnoi BODи. | |
| Перевирtni uystahOBky BCMOKTuBaIbHoi Пл actHn. | |
| Перевирtni shlaHr ha predmet 3abpydHnry, пri Neobxidnocti nochncttntn. | |
| Перевирtni szilbHic'tb BCMOKTuBaIbHoro ShlaHry, пri Neobxidnocti 3aminHtN. | |
| Hedocstatня pezylbtaT OuNiSeHnry | Перевирtni Ha 3nouYBaHnry 3izk, пri Neobxidnocti 3aminHtN. |
| BCMOKTuBaIbHa tpybI- ha npaioe 3 nepebOa- Mn | Очnstitns nonnaBeCb. |
| UcItka He obepTaTcBcra | Перевирtni, ч He 3abloKOBaHni 3izk TcSTOpONHIMn PrpeMetAmn, пri Neobxidnocti BIDaJIHTN CTopOnHni ppeD- MeTn. |
| ЗactocvBaTI 3anobixHni BIMKaCh. | |
| Трахи zachaeКуTe. | |
| Задятns 3anobixHni BIMKaCh. | |
| Bispaцii pri OuyuHnHi | Можлво 3actocyBaHnry M'Якx 3izTok. |
| В рazi Виннння lozkdoxeHь, як He moxna ycuHyt n 3a donomorogo zuic i TaBnzi, tepefohyte do cebpichoro ceHTpy. | |
Akececyapn
PpOdyKT: OuHcyBaHnIaHnI
Tun: 1.127-xxx
1.515-xxx
BidnoiHa npektna BC
2006/42/EC(+2009/127/EC)
2014/30/EU
PpNklaDi rapMOH3yUOi HOpMn
EN 55012: 2007 + A1: 2009
EN 60335-1
EN 60335-2-72
EN 61000-6-2: 2005
EN 62233: 2008
3anponoHObaHnauioHaJIbHi HOpMn
Oco6n, 10 HxKHe nIINCAIncra, DIOITb BID IMehi Ta 3a DOBipHeHCTIO KepIBNtBa.

H.Jenner Chairman of the Board of Mar
S. Reiser
Director Regulatory Affairs & Certification
YnOBHOBaKeHm cnIbPo6ITMn NO BeDeHHIO
DOKyMeHToo6iY:
S. Reiser
Alfred Kärcher SE & Co. KG
71364 Winnenden (Germany)
Tel.: +49 7195 14-0
Fax: +49 7195 14-2212
Winnenden, 2019/03/01

Bacalah panduan
pengoperasian asli sebelum
nunnuu .TH1
nunnuu uu uu uu uu uu uuuu uuuu uuuuuuuuuuuuuuuuuuuuuuuuuuuuuuuuuuuuuuuuuuuuuuuuuuuuuuuuuuuuuuuuuuuuuuuuuuuuuuuuuuuuuuuuuuuuuuuuuuuuuuuuuuuuuuuuuuuuuuuuuuuuuuuuuuuuuuuuuuuuuuuuuuuuuuuuuuuuuuuuuuuuuuuuuuuuuuuuuuuuuuuuuUUUUUUUUUUUUUUUUUUUUUUUUUUUUUUUUUUUUUUUUUUUUUUUUUUUUUUUUUUUUUUUUUUUUUUUUUUUUUUUUUUUUUUUUUUUUUUUUUUUUUUUUUUUUUUUUUUUUUUUUUUUUUUUUUUUUUUUUUUUUUUUUUUUUUUUUUUUUUUUUUUUUUUUUUUUUUUUUUUUUUUUUUUUUUUUUUUUUUUUU
y
nanaanrnnnaaunnnnnaeauon
Iurannnaaunnnnnaeauonnnnaeauon
ae annnnnnaeauonnnnaeauon 5.956-251.0
dnnaaunnnnaeauonnnnaeauon
raanu Spray extraction uuuuuuuu
uaanuunnnnaeauon
nuanuunnnnaeauon
nuanuunnnnaeauon
nuanuunnnnaeauon
nuanuunnnnaeauon
nuanuunnnnaeauon
nuanuunnnnaeauon
xuunJnueuaaau
Taaanannnnnnaaennnnnnnnnnnnnnnnnnnnnnnnnnnnnnnnnnnnnnnnnnnnnnnnnnnnnnnnnnnnnnnnnnnnnnnnnnnnnnnnnnnnnnnnnnnnnnnnnnnnnnnnnnnnnnnnnnnnnnnnnnnnnnnnnnnn
a
wnnnnnaaannnnnne
2020vua7u
△
aunnnnnaanannnnaeau
nnuuunnuuunnuuuuau u
△nau
aunnuuunnuuunnuuuuauuauu u
nuuunnuuunnuuuuuuuuuuuuuuuuuuuuuuuuuuuuuuuuuuuuuuuuuuuuuuuuuuuuuuuuuuuuuuuuuuuuuuuuuuuuuuuuuuuuuuuuuuuuuuuuuuuuuuuuuuuuuuuuuuuuuuuuuuuuuuuuuuuuuuuuuuuuuuuuuuuuuuuuuuuuuuuuuuuuuuuuuuuuuuuuuuuuuuuuuuuuuuuuuuuuuuuuuUU
mnnn
y
-
1
-
10427235678901234567890123456789012345678901234567890123456789012345678901234567890123456789012345678901234567890123
- 500 m.
- 1
-wwwannnnnwnnnnnnnnnnnnnnnnnnnnnnnnnnnnnnnnnnnnnnnnnnnnnnnnnnnnnnnnnnnnnnnnnnnnnnnnnnnnnnnnnnnnnnnnnnnnnnnnnnnnnnnnnnnnnnnnnnnnnnnnnnnnnnnnnnnnnnnnnnnnnnnnnnnnnnnnnnnnnnnnnn nn nannnannnannnannnannnannnannnannnannnannnannnannnannnannnannnannnannnannnannnannnannnannnannnannnannnannnannnannnannnannnannnannnannnannnannnannnannnannnannnannnannnannnannnannnannnannnannnannnannnannnann
nlaananaa
iuaaunuayauanrnnnnuuui
yannnnnnaaannnnnaananaananaananaananaananaananaananaananaananaananaananaananaananaananaananaananaananaananaananaananaananaananaananaananaananaananaananaananaananaananaananaananaananaananaananaananaananaananaananaananaananaananaananaananaananaananaananaananaananaananaanara
→
#
nnuuunnuuauan
nuuunnuuuuuuuuuuuuuuuuuuuuuuuuuuuuuuuuuuuuuuuuuuuuuuuuuuuuuuuuuuuuuuuuuuuuuuuuuuuuuuuuuuuuuuuuuuuuuuuuuuuuuuuuuuuuuuuuuuuuuuuuuuuuuuuuuuuuuuuuuuuuuuuuuuuuuuuuuuuuuuuuuuuuuuuuuuuuuuuuuuuuuuuuuuuuuuuuuuuuuuuuuUUUUUUUUUUUUUUUUUUUUUUUUUUUUUUUUUUUUUUUUUUUUUUUUUUUUUUUUUUUUUUUUUUUUUUUUUUUUUUUUUUUUUUUUUUUUUUUUUUUUUUUUUUUUUUUUUUUUUUUUUUUUUUUUUUUUUUUUUUUUUUUUUUUUUUUUUUUUUUUUUUUUUUUUUUUUUUUUUUUUUUUUUUUUUUUUUUUUUUUU
unnuuusuuu uuaaauu uuuuuaaauuuuuuuuuuu
nna
#
nnuuuaanrnnnnaaennnnnnnnnnnnnnnnnnnnnnnnnnnnnnnnnnnnnnnnnnnnnnnnnnnnnnnnnnnnnnnnnnnnnnnnnnnnnnnnnnnnnnnnnnnnnnnnnnnnnnnnnnnnnnnnnnnnnnnnnnnnnnnnnnnnnnnnnnnnnn
nnaaannnnn
△
nannnnnnnnnnnnnnnnnnnnnnnnnnnnnnnnnnnnnnnnnnnnnnnnnnnnnnnnnnnnnnnnnnnnnnnnnnnnnnnnnnnnnnnnnnnnnnnnnnnnnnnnnnnnnnnnnnnnnnnnnnnnnnnnnnnnnnnnnnnn
→
ununun
n
#
nnaanrnnnnaaannnnae
→
→
→ 1uunwnnna n
→
→ nauuunnuuunnuuunnuuuuuuuuuuuuuuuuuuuuuuuuuuuuuuuuuuuuuuuuuuuuuuuuuuuuuuuuuuuuuuuuuuuuuuuuuuuuuuuuuuuuuuuuuuuuuuuuuuuuuuuuuuuuuuuuuuuuuuuuuuuuuuuuuuuuuuuuuuuuuuuuuuuuuuuuuuuuuuuuuuuuuuuuuuuuuuuuuuuuuuuuuuuuuuuuuuuuuuuuuUU

→
→nnnnaaunnnnnnnnnnnnna
→ 1aauwawwaaanwaaanwnu u wuuuunuunuunuun uunuunuunuunuun uunuunuunuunuun
nauanuana
→
→
nannnnnnnn
aannnnnnae annnnnne nnnnnnne nnne
wannnnnnaaennnnnneaaanrnnnnnna
nJavnnnu
wnlueanrnnnnae
| bihिकuin ্पानिकuin | bhun | bhun |
| uhuunlal, uau (nau, uauwur) | 4.905-026.0 | bhuwul lue wununununununununununununununununununununununununununununununununununununununununununununununununununununununununununununununununununununununununununununununununununununununununununununununununununununum |
| uhuunlal, bu (nau) | 4.905-027.0 | bhuwul lue wununununununununununununununununununununununununununununununununununununununununununununununununununununununununununununununununununununununununununununununununununununununununununum |
| uhuunlal,lau (uau) | 4.905-029.0 | bhuwul lue wunununununununununununununununununununununununununununununununununununununununununununununununununununununununununununununununununununununununununununununununununununununununununun |
| ahuunlal wunwu 4.762-534.0 4.762-534.0 wunwu | bhunlal wunwu | bhunlal wunwu |
| uhu, uau (aauhunanu) | 6.369-079.0 | bhuwul lue wununununununununununununununununununununununununununununununununununununununununununununununununununununununununununununununununununununununununununununununununununununununununun |
| uhu, uau (uauhunanu) | 6.369-078.0 | bhuwul lue wununununununununununununununununununununununununununununununununununununununununununununununununununun |
| uhu, uau (uau) | 6.369-077.0 | bhuwul lue wununununununununununununununununununununununununununununununun |
| uhu, uau (uauu uau) | 6.369-468.0 | bhuwul lue wunununununununununununununununununununununununun |
| uhu, uau (uauu uauu uauu uau) | 6.371-146.0 | |
| uauuua, 850 uu., 850 4.777-401.0 | ||
| uauuua, 850 uu., 850 4.777-411.0 | ||
| uauuua uauu uauu uauu uauu uauu uauu uauu uauu uauu uauu uauu uauu uauu uauu uauu uauu uauu uauu uauu uauu uauu uauu uauu uauu uauu uauu uauu uauu uauu uauu uauu uauu uauu uauu | ||
| vwwuuuuuuuuuuuuuuuuuuuuuuuuuuuuuuuuuuuuuuuuuuuuuuuuuuuuuuuuuuuuuuuuuuuuuuuuuuuuuuuuuuuuuuuuuuuuuuuuuuuuuuuuuuuuuuuuuuuuuuuuuuuuuuuuuuuuuuuuuuuuuuuuuuuuuuuuuuuuuuuuuuuuuuuuuuuuuuuuuuuuuuuuuuuuuuuuuuuuuuuuuUUuuuuuuuuuuuuuuuuuuuuuuuuuuuuuuuuuuuuuuuuuuuuuuuuuuuuuuuuuuuuuuuuuuuuuuuuuuuuuuuuuuuuuuuuuuuuuuuuuuuuuuuuuuuuuuuuuuuuuuuuuuuuuuuuuuuuuuuuuuuuuuuuuuuuuuuuuuuuuuuuuuuuuuuuuuuuuuuuuuuuuuuuuuuuuuuuuuuuuu uuuuuuuuuuuuuuuuuuuuuuuuuuuuuuuuuuuuuuuuuuuuuuuuuuuuuuuuuuuuuuuuuuuuuuuuuuuuuuuuuuuuuuuuuuuuuuuuuuuuuuuuuuuuuuuuuuuuuuuuuuuuuuuuuuuuuuuuuuuuuuuuuuuuuuuuuuuuuuuuuuuuuuuuuuuuuuuuuuuuuuuuuuuuuuuuuuuuuuuuucuuuuuuuuuuuuuuuuuuuuuuuuuuuuuuuuuuuuuuuuuuuuuuuuuuuuuuuuuuuuuuuuuuuuuuuuuuuuuuuuuuuuuuuuuuuuuuuuuuuuuuuuuuuuuuuuuuuuuuuuuuuuuuuuuuuuuuuuuuuuuuuuuuuuuuuuuuuuuuuuuuuuuuuuuuuuuuuuuuuuuuuuuuuuuuuuuuuuuuuuuuuuuuuuuuuuuuuuuuuuuuuuuuuuuuuuuuuuuuuuuuuuuuuuuuuuuuuuuuuuuuuuuuuuuuuuuuuuuuuuuuuuuuuuuuuuuuuuuuuuuuuuuuuuuuuuuuuuuuuuuuuuuuuuuuuuuuuuuuuuuuuuuuuuuuuuuuuuuuuuuuuuuuuuuuuuuuuuuuuuuuuuuuuuuuuuuuuUUUUUUUUUUUUUUUUUUUUUUUUUUUUUUUUUUUUUUUUUUUUUUUUUUUUUUUUUUUUUUUUUUUUUUUUUUUUUUUUUUUUUUUUUUUUUUUUUUUUUUUUUUUUUUUUUUUUUUUUUUUUUUUUUUUUUUUUUUUUUUUUUUUUUUUUUUUUUUUUUUUUUUUUUUUUUUUUUUUUUUUUUUUUUUUUUUUUUUUUuuUUUUUUUUUUUUUUUUUUUUUUUUUUUUUUUUUUUUUUUUUUUUUUUUUUUUUUUUUUUUUUUUUUUUUUUUUUUUUUUUUUUUUUUUUUUUUUUUUUUUUUUUUUUUUUUUUUUUUUUUUUUUUUUUUUUUUUUUUUUUUUUUUUUUUUUUUUUUUUUUUUUUUUUUUUUUUUUUUUUUUUUUUUUUUUUUUUUUuuuuuuuuuuuuuuuuuuuuuuuuuuuuuuuuuuuuuuuuuuuuuuuuuuuuuuuuuuuuuuuuuuuuuuuuuuuuuuuuuuuuuuuuuuuuuuuuuuuuuuuuuuuuuuuuuuuuuuuuuuuuuuuuuuuuuuuuuuuuuuuuuuuuuuuuuuuuuuuuuuuuuuuuuuuuuuuuuuuuuuuuuuuuuuuuuuuuUUUUUUUUUUUUUUUUUUUUUUUUUUUUUUUUUUUUUUUUUUUUUUUUUUUUUUUUUUUUUUUUUUUUUUUUUUUUUUUUUUUUUUUUUUUUUUUUUUUUUUUUUUUUUUUUUUUUUUUUUUUUUUUUUUUUUUUUUUUUUUUUUUUUUUUUUUUUUUUUUUUUUUUUUUUUUUUUUUUUUUUUUUUUUUUUUUUUUUUUUUCUUUUUUUUUUUUUUUUUUUUUUUUUUUUUUUUUUUUUUUUUUUUUUUUUUUUUUUUUUUUUUUUUUUUUUUUUUUUUUUUUUUUUUUUUUUUUUUUUUUUUUUUUUUUUUUUUUUUUUUUUUUUUUUUUUUUUUUUUUUUUUUUUUUUUUUUUUUUUUUUUUUUUUUUUUUUUUUUUUUUUUUUUUUUUUUUUUUUUUUGUUUUUUUUUUUUUUUUUUUUUUUUUUUUUUUUUUUUUUUUUUUUUUUUUUUUUUUUUUUUUUUUUUUUUUUUUUUUUUUUUUUUUUUUUUUUUUUUUUUUUUUUUUUUUUUUUUUUUUUUUUUUUUUUUUUUUUUUUUUUUUUUUUUUUUUUUUUUUUUUUUUUUUUUUUUUUUUUUUUUUUUUUUUUUUUUUUUUUUUAUUUUUUUUUUUUUUUUUUUUUUUUUUUUUUUUUUUUUUUUUUUUUUUUUUUUUUUUUUUUUUUUUUUUUUUUUUUUUUUUUUUUUUUUUUUUUUUUUUUUUUUUUUUUUUUUUUUUUUUUUUUUUUUUUUUUUUUUUUUUUUUUUUUUUUUUUUUUUUUUUUUUUUUUUUUUUUUUUUUUUUUUUUUUUUUUUUUUUU uuuuu uu uu uu uu uu uu uu uu uu uu uu uu uu uu uu uu uu uu uu uu uu uu uu uu uu uu uu uu uu uu uu uu uu uu uu uu uu uu uu uu uu uu uu uu uu uu uu uu uu uu uu uu uu uu uu uu uu uu uu uu uu uu uu uu uu uu uu uu uu uu uu uu uu uu uu uu uu uu uu uu uu uu uu uu uu uu uu uu uu uu uu uu uu uu uu uu uu uu uu uu ku uu uu uu uu uu uu uu uu uu uu uu uu uu uu uu uu uu uu uu uu uu uu uu uu uu uu uu uu uu uu uu uu uu uu uu uu uu uu uu uu uu uu uu uu uu uu uu uu uu uu uu uu uu uu uu uu uu uu uu uu uu uu uu uu uu uu uu uu uu uu uu uu uu uu uu uu uu uu uu uu uu uu uu uu uu uu uu uu uu uu uu uu uu uu uu uu uu uu uu xu uu uu uu uu uu uu uu uu uu uu uu uu uu uu uu uu uu uu uu uu uu uu uu uu uu uu uu uu uu uu uu uu uu uu uu uu uu uu uu uu uu uu uu uu uu uu uu uu uu uu uu uu uu uu uu uu uu uu uu uu uu uu uu uu uu uu uu uu uu uu uu uu uu uu uu uu uu uu uu uu uu uu uu uu uu uu uu uu uu uu uu uu uu uu uu uu uu uu uu'u uu uu uu uu uu uu uu uu uu uu uu uu uu uu uu uu uu uu uu uu uu uu uu uu uu uu uu uu uu uu uu uu uu uu uu uu uu uu uu uu uu uu uu uu uu uu uu uu uu uu uu uu uu uu uu uu uu uu uu uu uu uu uu uu uu uu uu uu uu uu uu uu uu uu uu uu uu uu uu uu uu uu uu uu uu uu uu uu uu uu uu uu uu uu uu uu uu uu uu BB |
42 ≤ x < 55
jie 11 / dc Jia ci/5016>1 jie 24 / 14011
"OFF"g0g/1,dc goljli/2glao 29
y/11
aallolall aagaaaiolll aai
.qlio alisig
aiall Jg>
0oJg jgljgljz
a
yolal/ jglj/ ypa: y. jiall jla
.0jio cakbui 1go a/ piai
aaiololai aai
olololololololol
9 aogaoag allo 9 aobg oai
jgljll jcbui jiaoz Juic Jgdo
.0gjdl sic aabii g9 g jil6
wollg>gbawillg>ab
a 100
.0g
.(aiJlJIaI;jBil) jyIy jyIy
0j>0g>gall pS>yl polic aab
2g9 g 100 sStig aillb8g axuall olall
j01 j13 |g2awlg w
olalallabii9
Lg
C. x_0 all 0.25
aJalali
olalalb
1
以 2k < t ≤ 2k + 1
.
Lgabw oos>gallolal
olalw
aclll jocol
cllaal glc
←
aill a b y 1g yjy jzll
aalll
#
4g
ololololololololololololololololololololololololololololololololololololololololololololololololololololololololololol
ii
jSloy jSGW jgeI I 10 jz jz y
aolal
J 1
gljyIaJus
< 1
<Joo
J 1 J 1 J 1
#
4
jz11 jauu y. uoyy
10.11
Jai
10 : 7
y^2x^2 + 52x + 1 = 0 y^2 - 16x + 1 = 0
1.4 = 91( a_4 + 2) 0.2g
<.2laill
aal
←a.bu|
E.
11EJJJ0a5
.
1.000元
:abg>lo
-81j
aBull y 2000
gaaill aaiiagjll
-jlalg
-ρgai,0j
("baaillgjbsaw"jai).baaillgjbs
aij jaoi jaoi aai i 0
a 1
oallll jg g 1g
.0jai
Jd
←.
"OFF"
Jusgill ssaoaasll
aaiolol
m - 1 0 ;
( 2)
:algdo
.ogcJl oysu uul y 100
jbs 1a loy jbs
jbs//uoc a52//e/lo/21000000000000000000000000000000000000000000000000
aalbi olu
.aaall olall oJs elacg 60 aalj) aaull olally oJsI Jol 0> odawlaaill aJl> (agio a> jL
.eJall
.aabll olall oJs elac gJl
ailljw
abll 1g0 y pssu w y jaiil aai l bia
biall alguino Jauaill Jax uagall
e99 ojz5g Jauwll aoxlw auill oujuaal
s/ cai b0 g0 pOxlw all> 9 sgl>
yiaI I0 aI/I Cai bll /g0 y pssu w
dolgog//2a>9 dolgog//2a>9
gay aoxlw// slw/ pljUy
jgljlljc02jgljg0
1 AR aallll allda
1 AR aabgll
11 ar aalla
1 AR aal
2 AR aagaaagaaagaaagaaag
3 AR JJ
3 AR JJ
4 AR J
4 AR J
4 AR J
4 AR J
4 AR J
5 AR J
5 AR J
6 AR J
6 AR J
aLlJd
J 1 J
J 1 J
J 1 J
J 1 J
J 1 J
J 1 J
J 1 J
J 1 J
J 1 J
J 1 J
J 1 J
J 1 J
J 1 J
J 1 J
J 1 J
J 1 J
J 1 J
J 1 J
J 1 J
J 1 J
J 1 J
a
http://www.kaercher.com/dealersearch