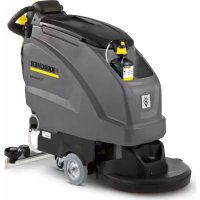
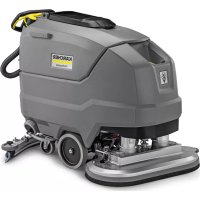
B 40 W Bp Dose - Sweeper Kärcher - Free user manual and instructions
Find the device manual for free B 40 W Bp Dose Kärcher in PDF.



| Product type | Sweeper / Floor scrubber |
| Brand | Kärcher |
| Model | B 40 W Bp Dose |
| Nominal voltage | 24 V |
| Recommended battery capacity | 70 Ah, 80 Ah or 105 Ah (5h) |
| Clean water tank | 40 L |
| Dirty water tank | 40 L |
| Max water temperature | 50 °C |
| Max water pressure | 5 bar (0.5 MPa) |
| Empty weight (with 105 Ah batteries) | 164 kg |
| Total weight in operation | 204 kg |
| Theoretical cleaning area | up to 2200 m²/h |
| Maximum slope of working area | 2 % |
| Drive motor (B 40 W) | 130 W |
| Suction motor | 500 W |
| Brush motor | 600 W |
| Brush speed (BR variant) | 600 - 1200 rpm |
| Brush speed (BD variant) | 180 rpm |
| Working width | 430 to 550 mm (depending on head) |
| Sound pressure level LpA | 68 dB(A) |
| Sound power level LWA + uncertainty | 85 dB(A) |
| Power supply | 24 V batteries (2 x 12 V) |
| Assisted drive | Yes (B 40 W model) |
| Dosing system | Integrated Dose |
Frequently Asked Questions - B 40 W Bp Dose Kärcher
User questions about B 40 W Bp Dose Kärcher
0 question about this device. Answer the ones you know or ask your own.
Ask a new question about this device
Download the instructions for your Sweeper in PDF format for free! Find your manual B 40 W Bp Dose - Kärcher and take your electronic device back in hand. On this page are published all the documents necessary for the use of your device. B 40 W Bp Dose by Kärcher.
USER MANUAL B 40 W Bp Dose Kärcher
Deutsch 3
English 14
Français 25
Italiano 36
Nederlands 47
Español 58
Português 69
Dansk 80
Norsk 90
Svenska 100
Suomi 110
Ελληνικά 120
Türkçe 131
Русский 141
Magyar 152
Čeština 163
Slovenščina 174
Polski 184
Românește 195
Slovenčina 206
Hrvatski 217
Srpski 228
Български 239
Eesti 250
Latviešu 260
Lietuviškai 270
Українська 281
Register and win! www.kaercher.com/register-and-win




59641620 03/19
1 Federelement
2 Schubbügel
Chairman of the Board of Management
Director Regulatory Affairs & Certification
71364 Winnenden (Germany)
Tel.: +49 7195 14-0
Fax: +49 7195 14-2212
Winnenden, 2019/02/01
Please read and comply with these original instructions prior
to the initial operation of your appliance and store them for later use or subsequent owners.
Contents
| Safety instructions | EN 1 |
| Function | EN 1 |
| Proper use | EN 1 |
| Environmental protection | EN 1 |
| Warranty | EN 1 |
| Operating and Functional Elements | EN 2 |
| Before Startup | EN 3 |
| Operation | EN 4 |
| Shutting Down the Appliance | EN 5 |
| Grey Intelligent Key | EN 5 |
| Transport | EN 5 |
| Storage | EN 6 |
| Care and maintenance | EN 6 |
| Frost protection | EN 8 |
| Faults | EN 9 |
| Accessory B 40 | EN 10 |
| Technical specifications | EN 11 |
| EU Declaration of Conformity | EN 11 |
| Accessories and Spare Parts | EN 11 |
Safety instructions
Before using the appliance for the first time, read and observe these operating instructions and the accompanying brochure: Safety information for brush cleaning units and spray-extraction units, No. 5.956-251.0.
The device may only be operated when the cover and all lids are closed. Remove the Intelligent Key (emergency stop) to take all functions out of operation immediately.
The appliance must only be operated on surfaces that do not exceed the max. permitted incline (see "Technical Specifications").
△WARNING
Do not use the appliance on inclines.
Safety Devices
Safety devices serve to protect the user and must not be rendered in operational or their functions bypassed.
Safety switch (B 40 C Bp)
If the safety switch is released, the brush drive shuts off.
Drive lever (B 40 W Bp)
If the drive lever is released, the travel drive and the brush drive shuts off.
Hazard levels
△DANGER
Pointer to immediate danger, which leads to severe injuries or death.
⚠ WARNING
Pointer to a possibly dangerous situation, which can lead to severe injuries or death. △CAUTION
Pointer to a possibly dangerous situation, which can lead to minor injuries.
ATTENTION
Pointer to a possibly dangerous situation, which can lead to property damage.
Function
The scrubber vacuum is used for wet cleaning or polishing of level floors.
- The device can be easily adjusted to the respective cleaning task by adjusting the water volume and the detergent volume.
- The appliance is equipped with a fresh water and a wastewater reservoir (40 litres each). These allow an effective cleaning with a long usage life.
- Depending on the selected cleaning head, the working width of the B 40 is between 430mm and 550mm .
- B 40 C Bp
This appliance model is not equipped with a travel drive. The advance drive is operated by and is supported by the rotation of the brushes. The brush drive is powered by two batteries.
- B 40 W Bp
This appliance model is equipped with a travel drive. The travel speed can be adjusted with a rotary knob.
- A charger is already integrated in all models. Batteries can be selected according to the configuration (see Chapter "Recommended batteries")
Note:
The appliance can be equipped with various accessories depending on the cleaning task.
Please request our catalogue or visit us on the Internet at www.kaercher.com.
Proper use
Use this appliance only as directed in these operating instructions.
– The appliance may only be used for the cleaning of hard surfaces that are not sensitive to moisture and polishing operations.
- The appliance is not suited for the cleaning of frozen grounds (e.g. in cold stores).
- The appliance may only be equipped with original accessories and spare parts.
– The appliance is not suited for the use in potentially explosive environments.
- The machine should not be used to suck in inflammable gases, undiluted acids or solvents.
This includes petrol, thinning agents or hot oil that can form an explosive mixture when it comes in contact with sucked air. Do not use acetone, undiluted acids and solvents as they are aggressive towards the materials from which the appliance is made.
- The machine has been approved for use on surfaces with max. gradients as listed under "Technical Specifications".
Environmental protection

The packaging materials are recyclable. Please do not throw packaging in the domestic waste but pass it on for recycling.
Old units contain valuable recyclable materials. Batteries, oil and similar substances may not be released into the environment. Therefore please dispose of old units through suitable collection systems.
Notes about the ingredients (REACH)
You will find current information about the ingredients at:
www.kaercher.com/REACH
Warranty
The warranty terms published by our competent sales company are applicable in each country. We will repair potential failures of your accessory within the warranty period free of charge, provided that such failure is caused by faulty material or defects in fabrication. In the event of a warranty claim please contact your dealer or the nearest authorized Customer Service center. Please submit the proof of purchase.
Operating and Functional Elements
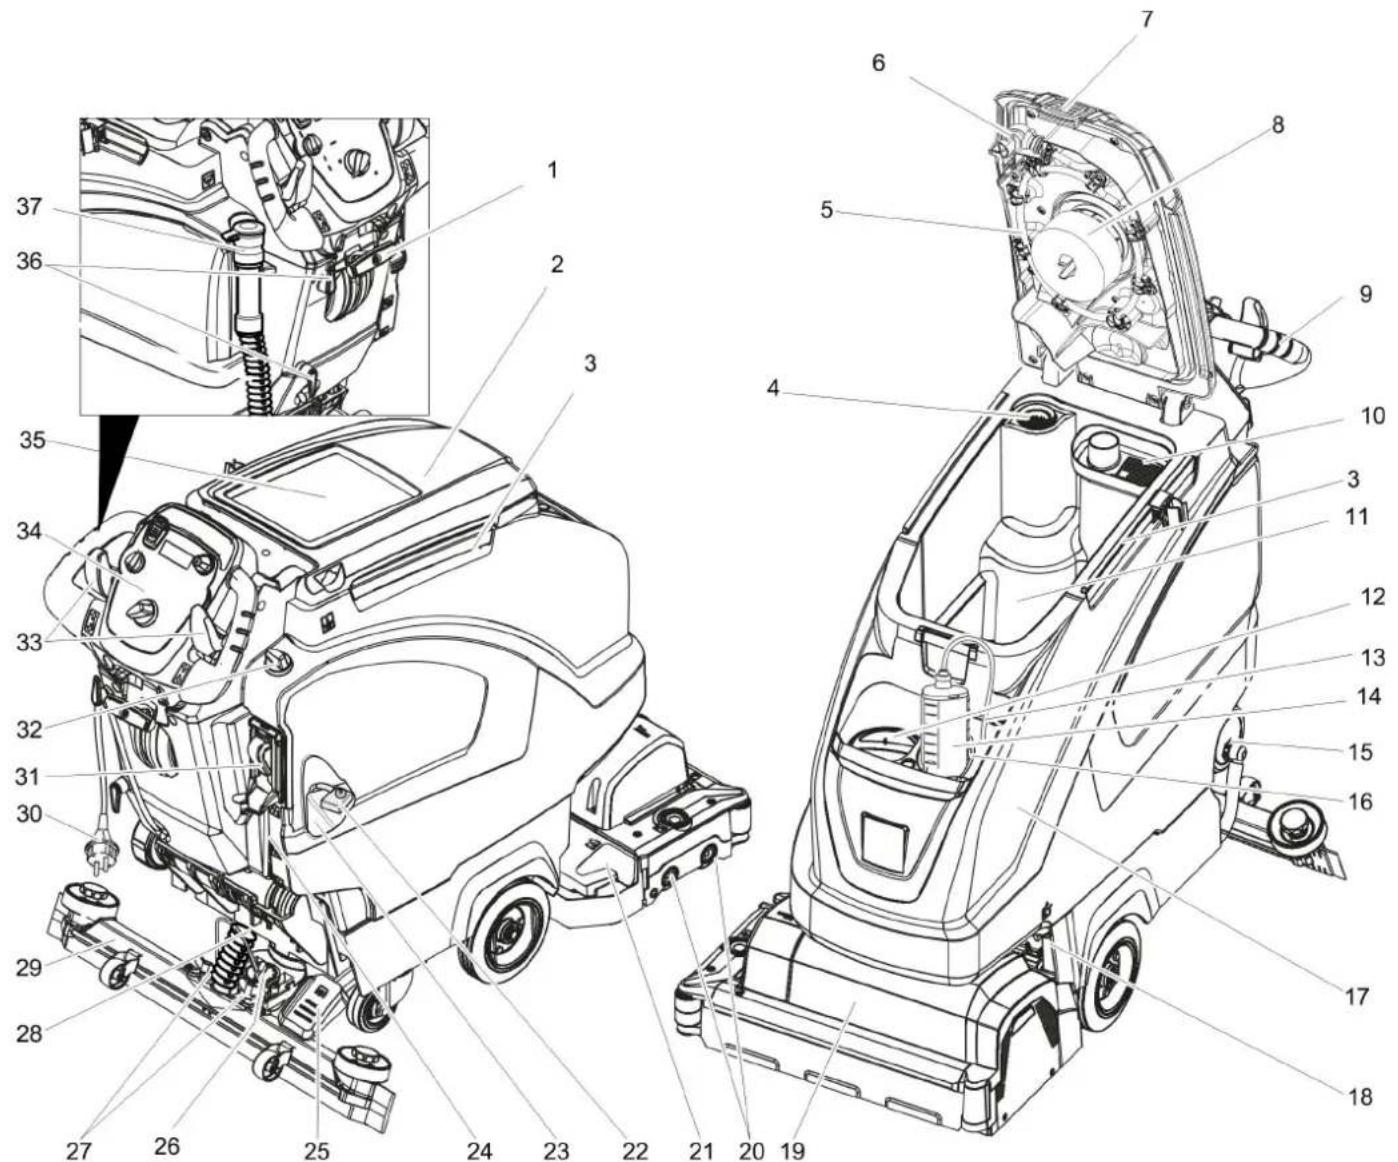
1 Vacuum bar lowering lever
2 Cover waste water tank
3 Holding rail for home base
4 Fluff filter
5 Wastewater reservoir rinsing system (option)
6 Flexible lock of rinsing system (option)
7 Lock of waste water tank
8 Float
9 Push handle
10 Coarse dirt sieve
11 Waste water tank
12 Fresh water reservoir filler neck
13 Suction hose for detergent (only DOSE model)
14 Detergent bottle (only DOSE model)
15 Lock of the fresh water reservoir with filter
16 Detergent bottle holder
17 Fresh water tank
18 Locking the tank
Secured with an additional plate and a screw
19 Cleaning head (illustration is symbolic)
20 Brush rollers (BR model) Disk brushes (BD model) *
21 Waste container (only BR)
22 Battery pole fuse
23 Battery *
24 Fresh water level display
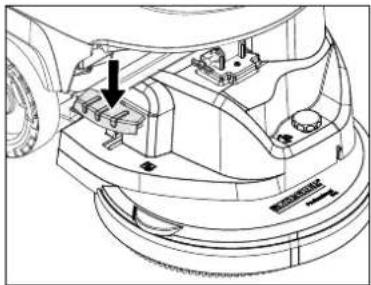
25 Pedal for raising/ lowering the cleaning head
26 Rotary handle to incline the vacuum bar
27 Wing nuts for fastening the vacuum bar
28 Suction hose
29 Vacuum bar *
30 Connecting cable for charger
31 Automatic fill of fresh water reservoir (option)
32 Water quantity regulator
33 Drive lever (B 40 W Bp)
Safety switch (B 40 C Bp)
34 Operator console
35 Storage surface for cleaning set "Home base box"
36 Cable hook
37 Drain hose for wastewater with dosing unit
* not included in the delivery
Colour coding
- The operating elements for the cleaning process are yellow.
- The controls for the maintenance and service are light gray.
Operator console
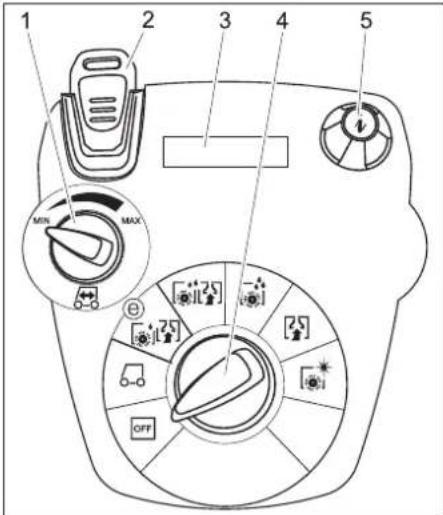
1 Rotating button for drive speed (B 40 W only)
2 Intelligent Key
yellow - operator
grey - supervisor
3 Display
4 Program selection switch
5 Info button
Program selection switch
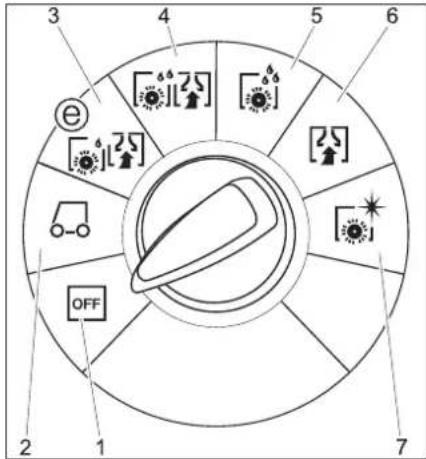
1 OFF
Device is switched off
2 Transport mode
(B 40 W only)
Driving to the Place of Use.
3 Eco mode
Wet clean the floor (with reduced brush speed) and vacuum up wastewater (with reduced suction).
4 Normal mode
Wet clean the floor and vacuum up dirt water.
5 Intense mode
Wet clean the floor and allow the detergent to react.
6 Vacuum mode
Suck in the dirt fleet.
7 Polishing mode
Polishing the floor without the application of liquid.
Before Startup
Installing the Brushes
BD model
The disc brush must be installed before the initial operation (see "Maintenance work").
BR model
The brushes are mounted.
Install batteries
Install the batteries (see "Care and Maintenance/Install and connect batteries").
Setting the charging marker line
Prior to the initial startup, following a service reset or when switching to another battery type, you must adjust the charging marker line.
→ Use the Grey Intelligent Key.
Setting the charging marker line (see Chapter "Grey Intelligent Key/Setting the charging marker line".
Using batteries made by other manufacturers
We recommend using our batteries as described in chapter "Care and Maintenance/Recommended batteries".
Note:
When using other batteries (e.g. of other manufacturers) the total discharge protection for the respective battery must be readjusted.
Charging battery
Note:
The device is equipped with a safety mechanism to prevent total discharge, i.e. when the permissible minimum capacity is reached, the brush motor and the turbine are switched off.
→ Drive the machine directly to the charging station; avoid any steep gradients in the process.
△DANGER
Danger of injury due to electric shock. Observe the mains voltage and fuse protection on the type plate of the device.
Only use the charger in dry rooms with sufficient ventilation!
Charging process
– Average charging time is approx. 10 -15 hours.
- The built-in charger has electronic controls and is suitable for all recommended batteries; it automatically switches off the charging process.
- The built-in battery is shown on the display during the charging process. If this is not the case, the charging marker line must be selected (see "Setting the charging marker line").
- The appliance must not be used during the charging process.
Initial charge tips
With the initial charge, the control will not yet be able to detect which battery type has been installed. Keep charging the batteries until the display shows a full charge
△DANGER
Risk of explosion!
Prior to Charging low-maintenance batteries, the tank must be swivelled upwards (see chapter "Installing and connecting batteries"). This will prevent the generation of dangerous gases during the charging process under the tank.
While the water tank is folded up, you must not clean with any water.
When charging maintenance-free batteries, the water tank does not need to be folded up.
→ Insert the plug of the connecting cable into the socket. The charging process will start.
Note: The selected battery will be displayed during charging.
→ Charge until the display shows a full charge.
Low maintenance batteries (wet batteries)
⚠ WARNING
Danger of causticization!
- Adding water to the battery in its discharged state can cause the acid to leak.
- Use safety glasses while handling battery acid and follow the safety instructions to avoid personal injury or damage to clothes.
- Should the acid spray on to the skin or clothes, rinse immediately with lots of water.
ATTENTION
Risk of damage!
- Use only distilled or desalinated water (EN 50272-T3) for filling the battery.
- Do not add any substances (so-called performance improving agents), else warranty claims will not be entertained.
- Replace batteries with the same battery type only. Otherwise the charging characterisitc must be readjusted by the aftersales service.
Installing the Vacuum Bar
→ Insert the vacuum bar into the vacuum bar suspension in such a manner that the profiled sheet is positioned above the suspension.
→ Tighten the wing nuts.
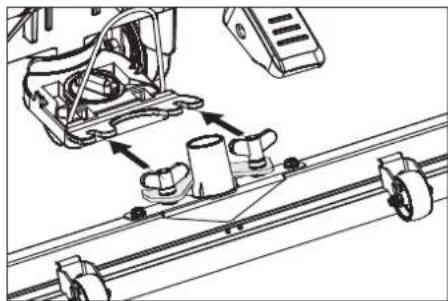
→ Insert the suction hose.
Unloading
△DANGER
Risk of injury. Pull the Intelligent Key to take all functions out of operation immediately.
→ Insert batteries and connect (see "Before Start-up").
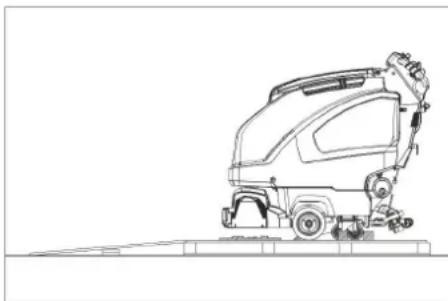
→ Place long lateral boards of the packaging as a ramp next to the pallet.
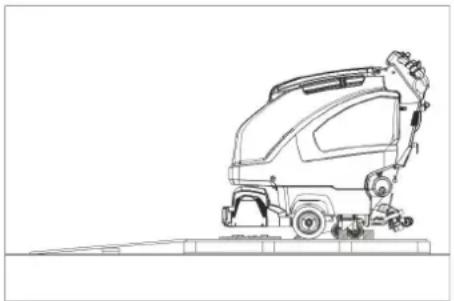
→ Fix the ramp on the pallet with nails.
→ Place short boards as a support underneath the ramp.
→ Remove the wooden bars in front of the wheels.
→ Lift the cleaning head by pressing the pedal all the way down.
Remove the cardboard with the R cleaning head.
B 40 C Bp
→ Push down the appliance through the ramp from the pallet.
B 40 W Bp
→ Plug in the Intelligent Key.
→ Turn the program selection switch to transport mode.
→ Press the driving lever and slowly move the machine down from the ramp.
→ Remove the Intelligent Key.
Operation
△DANGER
Risk of injury. Push the pedal for raising/ lowering the cleaning head with one foot only. The other foot must firmly be placed on the floor.
In dangerous situations, release the safety switch/drive lever.
Driving with motor support (B 40 W Bp only)
ATTENTION
Risk of damage. The suction bar must be lifted for reversing.
Note:
The device is designed and built in such a way that the cleaning head protrudes towards the right. This enables working in a comfortable way close to the edges.
→ Plug in the Intelligent Key.
→ Preselect the speed on the drive speed rotary knob.
→ Turn the programme selection switch to transport mode.
→ Drive the machine.
Forwards:
Press the driving lever to the front.
Backward:
Press the driving lever to the rear.
Note:
The device moves only when the driving lever is moved by 15° .
→ Stop the machine: Release driving lever.
Filling in detergents
Fresh water
→ Open the lock of the fresh water reservoir.
→ Fill up fresh water (maximum 50 °C) until the lower edge of filling nozzle.
→ Close the lock of the fresh water reservoir.
With automatic fill of fresh water reservoir (option)
→ Connect the hose to the automatic filling system and open the water supply (max. 50 °C, max. 5 bars).
→ Monitor the appliance - the automatic filling system will interrupt the water supply when the tank is full.
→ Shut off the water supply and disconnect the hose from the appliance.
Detergent
⚠ WARNING
Risk of damage. Only use the recommended detergents. With other detergents, the operator bears the increased risk regarding the operational safety and danger of accident.
Only use detergents that are free from solvents, hydrochloric acid and hydrofluoric acid.
Follow the safety instructions for using detergents.
Note:
Do not use highly foaming detergents.
| Application Detergent | |
| Routine cleaning of all water resistant floors | RM 746RM 780 |
| Routine cleaning of glossy surfaces (e.g. granite) | RM 755 es |
| Routine cleaning and basic cleaning of industrial floors | RM 69 ASF |
| Routine cleaning and basic cleaning of fine stoneware tiles | RM 753 |
| Routine cleaning of tiles in sanitary areas | RM 751 |
| Cleaning and disinfection in sanitary areas | RM 732 |
| Removal of coating from all alkali-resistant floors (e.g. PVC) | RM 752 |
| Removal of coating from li-noleum floors | RM 754 |
Appliance with dosing equipment DOSE (option)
Detergent is added to the fresh water on the way to the cleaning head with the help of a dosaging device.
Note:
The dosing unit can be used to add 3% detergent at maximum. With higher dosage the detergent must be put into the fresh water tank.
→ Place the detergent bottle into the holder.
→ Close the bottle lid.
→ Insert the suction hose of the dosaging equipment into the bottle.
Note:
If the fresh water tank is empty, then the function of adding detergent gets deactivated. The cleaning head continues to work without the addition of any liquid.
Models without dosing equipment
→ Add the detergent to the fresh water reservoir.
Setting the water quantity
→ Adjust the water quantity using the regulating button according to the dirt on the floor covering.
Note:
Carry out initial cleaning attempts with low water volume. Increase water volume step-by-step until the desired cleaning result is achieved.
The detergent pump of the dosing equipment does not start working until a minimum water volume is present.
Setting the Vacuum Bar
Oblique position
To improve the vacuuming result on tiled floors the vacuum bar can be turned to an oblique position of up to 5° .
→ Loosen the wing nuts.
→ Turn the vacuum bar.
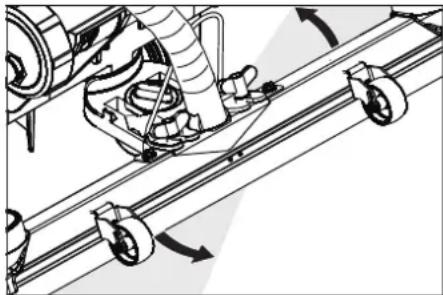
→ Tighten the wing screws.
Inclination
If the vacuum result is unsatisfactory the inclination of the straight vacuum bar can be modified.
→ Adjust the rotary handle to incline the suction bar.
Setting the parameters
With yellow Intelligent Key
Parameters for the different cleaning programmes are preset in the appliance.
Depending on the authorisation of the yellow Intelligent Key, individual parameters can be changed.
If you wish to permanently change the parameters, you must use a grey Intelligent Key. This adjustment procedure is described in the section "Grey Intelligent Key".
Note:
Almost all displayed text regarding parameter adjustment is self-explanatory. The only exception is the parameter FACT:
– Fine Clean: Lower brush speed for removing the grey film on fine stone floors.
- Whisper Clean: Medium brush speed for regular cleaning with reduced noise level.
– Power Clean: High brush speed for polishing, crystallising and sweeping.
→ Turn the program selection switch to the desired cleaning program.
→ Turn the info button until the desired parameter is displayed.
→ Press Info button - the set value blinks.
→ Set the desired value by turning the info button.
→ Confirm the changed setting by pressing the Info button or wait till the set value is automatically accepted after 10 seconds.
Cleaning
ATTENTION
Risk of damage to the floor covering. Do not operate the appliance on the spot.
→ Turn the program selection switch to the desired cleaning program.
Lower the cleaning head
→ Press the pedal for lowering the cleaning head downwards slightly and then move it to the left. This unlocks the pedal. Release the pedal slowly upwards. The cleaning head is lowered.
Note:
The brush motor comes to a halt when the machine stops and when there is overload.
Lower the vacuum bar
→ Pull the lever out and press it down; the vacuum bar is lowered.
Note:
For cleaning tiled floors, adjust the straight suction bar in such a way that cleaning is not done at an angle of 90 degrees to the joints.
The inclined position and the inclination of the suction bar can be adjusted to achieve better suction results (see "Adjusting the suction bar").
If the wastewater reservoir is full, the floater will close the suction opening and the suction turbine will run at a higher speed. If this is the case, shut the vacuum off and drive to empty the wastewater reservoir.
Setting the Advance Speed (BD cleaning head only)
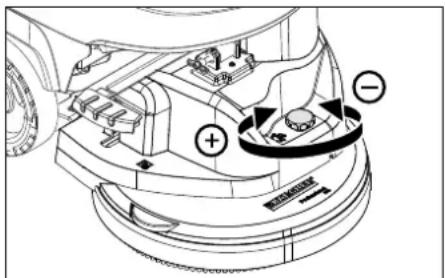
→ Reducing the speed: Turn the button in "-" direction.
→ Increasing the speed: Turn the button in "+" direction.
Shutting Down the Appliance
→ Close the regulatory button for setting the water quantity.
→ Release drive lever/safety switch.
→ Set the program selection switch to suction or vacuuming.
→ Lift the cleaning head.
→ Briefly drive forward and suck of the remaining water.
→ Raise the vacuum bar.
The suction turbine will continue to run for 10 more seconds to suck off residual water from the vacuum bar and the vacuum hose.
→ Remove the Intelligent Key.
→ Charge battery, if required.
Drain off dirt water
⚠ WARNING
Please observe the local provisions regarding the wastewater treatment.
→ Take the water discharge hose from the support and lower above a suited collection device.
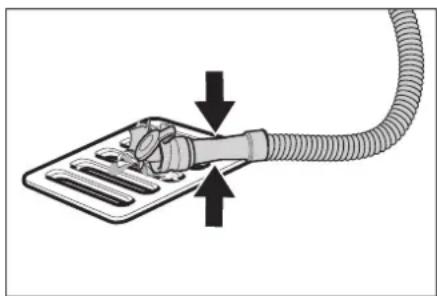
→ Crush or bend the dosing equipment.
→ Open the lid of the dosing equipment.
→ Drain off the dirt water - regulate the water quantity by pressing or bending.
→ Rinse the waste water tank with clean water or with the rinsing system for the waste water tank (option).
Drain off clean water
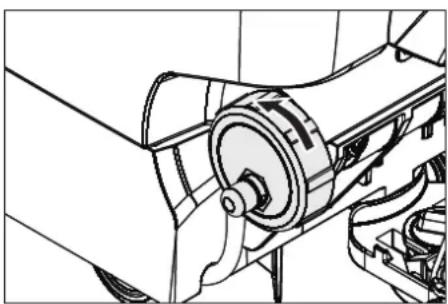
→ For a quicker emptying process, remove the entire lid.
→ To rinse the fresh water reservoir, remove the cover completely and remove the fresh water filter.
Grey Intelligent Key
→ Plug in the Intelligent Key.
→ Select the desired function by turning the Info button.
The different functions are described in the following.
Key menu >>
In this menu item, the authorisations for the yellow Intelligent Keys are released.
→ Press the info button while "Key menu >>" is displayed.
→ Remove the grey Intelligent Key and insert the yellow Intelligent Key to be programmed.
→ Select the desired menu item to be modified by turning the Info button.
→ Press Info button.
→ Adjust the menu item by turning the Info button.
→ Confirm the setting by pressing the menu item.
→ Select the next menu item to be modified by turning the Info button.
To save the authorisations, retrieve the menu "Save settings" by turning the info button and pressing it.
→ To exit, retrieve the menu "Exit menu" by turning the info button and pressing it.
Cleaning App >>
Parameters that are adjusted with the grey Intelligent Key, are kept until another setting is selected.
→ Turn the program selection switch to the desired cleaning program.
→ Turn the info button until "Cleaning App >>" is displayed.
→ Press the info button - the first adjustable parameter is displayed.
→ Press Info button - the set value blinks.
→ Set the desired value by turning the info button.
→ Confirm the changed setting by pressing the Info button or wait till the set value is automatically accepted after 10 seconds.
→ Select the next parameter by turning the Info button.
→ After all desired parameters have been modified, turn the info button until "Exit menu" is displayed.
→ Press the info button - you will exit the menu.
Setting the language
→ Press Info button - the set value blinks.
→ Set the desired language by turning the info button.
→ Confirm the changed setting by pressing the Info button or wait till the set value is automatically accepted after 10 seconds.
Brush trailing
Adjust the trailing time of the brushes.
→ Same adjustment as "Set language".
Setting the charging marker line
→ Turn the info button until the function "Battery menu" is displayed.
→ Press the info button - select the charging marker line according to the built-in batteries.
Note: Setting the charging marker line should be discussed with Kärcher customer service. This applies especially if the battery is not listed in the menu.
→ Confirm the changed setting by pressing the Info button or wait till the set value is automatically accepted after 10 seconds.
LOAD DEFAULT
Recreate the basic settings.
Transport
△DANGER
Risk of injury! When loading or unloading the machine, it may only be operated on gradients up to the maximum value (see "Technical Specifications"). Drive slowly.
△CAUTION
Risk of personal injury or damage! Mind the weight of the appliance during transport.
→ Raise the cleaning head to avoid damage to the brushes.
→ Remove the brush to avoid damage to the brushes.
→ When transporting in vehicles, secure the appliance according to the guidelines from slipping and tipping over.
Storage
△CAUTION
Risk of personal injury or damage! Consider the weight of the appliance when storing it.
This appliance must only be stored in interior rooms.
Care and maintenance
△DANGER
Risk of injury! Before working on the appliance, remove the Intelligent Key and the mains plug of the charger.
→ Drain and dispose of the dirt water and the residual fresh water.
Maintenance schedule
Maintenance intervals
Recommended cleaning processes are shown on the display at certain cleaning intervals.
→ Perform the maintenance task shown on the display.
→ Press the Info Button, the display will be reset. The display will be shown again at certain predefined time intervals.
| Display Display all | |
| Clean the vacuum bar | 20 hours |
| Clean the fluff filter | 20 hours |
| Clean water filter. | 50 hours |
| Check the suction lips | 100 hours |
| Check the brushes | 100 hours |
| Service reset | 200 hours |
Note: A service reset resets all maintenance intervals.
After each operation
ATTENTION
Risk of damage. Do not sluice the appliance with water and do not use aggressive detergents.
→ Drain off dirt water.
→ Rinse the waste water tank with clean water or with the rinsing system for the waste water tank (option).
→ Remove the coarse dirt sieve from the waste water tank and clean it.
→ Clean the outside of the appliance with a damp cloth which has been soaked in mild detergent.
→ Check the fluff filter, clean if required.
→ Only BR model: Remove bulk waste container and empty it.
→ Only BR model: Clean water distributor channel (see section „Maintenance work“).
→ Clean the vacuum lips and the wiping lips, check for wear and replace if required.
→ Check the brushes for wear, replace if required.
→ Press the lock of the waste water tank in and close the cover of the waste water tank so that a gap remains open to facilitate drying.
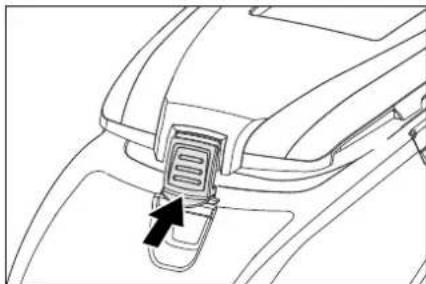
→ Charge the battery:
If the charging state of the battery is under 50%, charge the battery fully and without interruption.
If the charging state of the battery is over 50%, only recharge the battery if the entire operation duration will be required when next used.
Weekly
→ When used regularly, charge the battery fully and without interruption at least once a week.
Monthly
→ Check battery poles for oxidation, brush off if necessary. Ensure that the connection cable sits firmly.
→ Clean the seals between waste water tank and cover and check for tightness, replace if required.
→ Check the acid density of the cells if the batteries are not maintenance-free batteries.
→ Clean the brush tunnel (only BR model).
→ For long periods of disuse, only turn the device off when the battery is fully charged. Fully recharge the battery at least every month.
Yearly
→ Have the prescribed inspection carried out by the customer service.
Maintenance Works
Waste water tank rinsing system (option)
→ Drain the wastewater, see section "Drain wastewater".
→ Open the cover of the waste water tank.
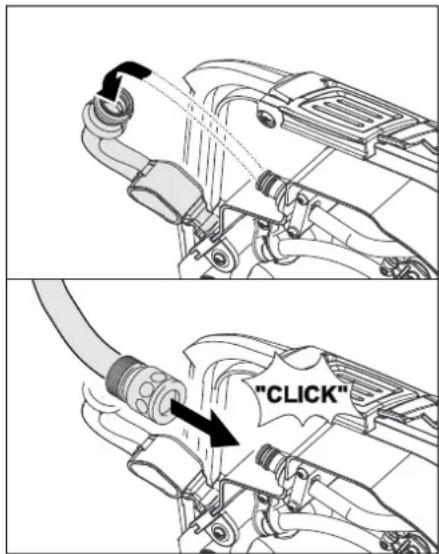
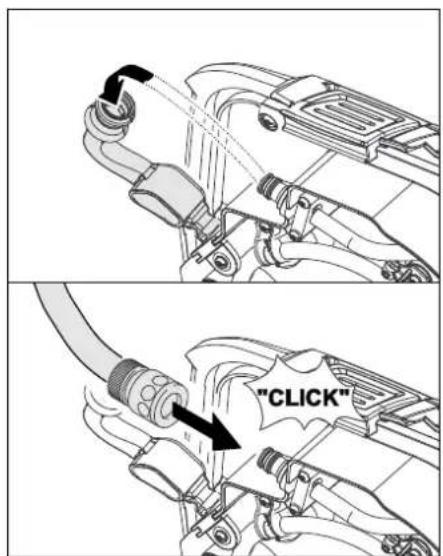
→ Pull the flexible lock off of the rinsing system.
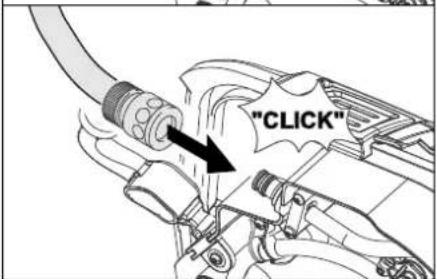
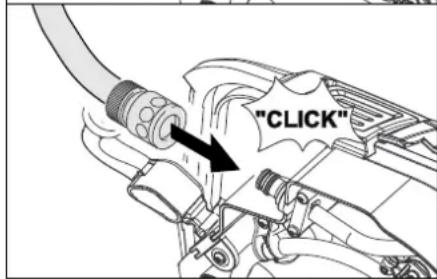
→ Connect the water hose to the rinsing system.
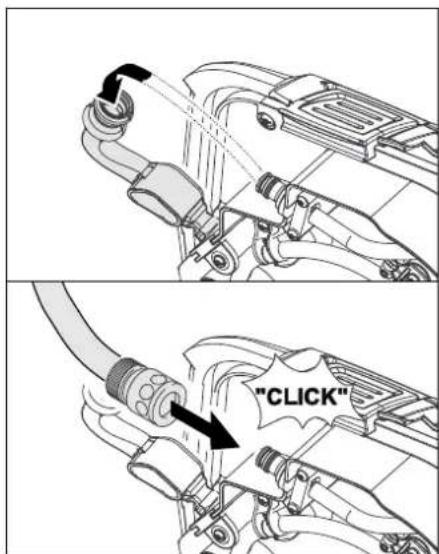
→ Close the cover of the wastewater reservoir until it rests on the flexible lock.
→ Open the water supply and rinse the wastewater reservoir for about 30 seconds.
Repeat the rinsing process 2 to 3 times.
→ Shut off the water supply and disconnect the hose from the appliance.
→ Reattach the flexible lock to the connection. Leave the wastewater reservoir cover open a crack to let it dry.
Replace or turn vacuum lips
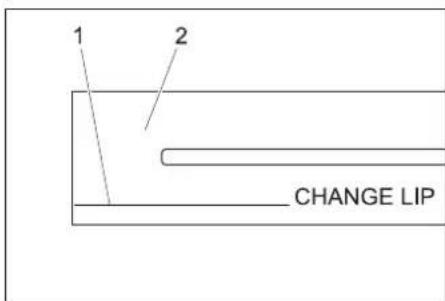
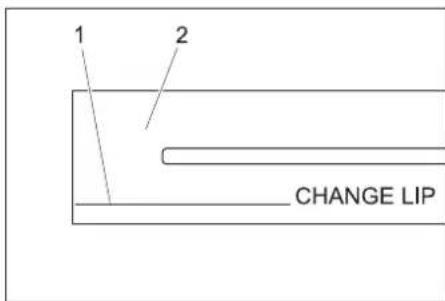
1 Wear indicator
2 Vacuum lip
The vacuum lips must be replaced or reversed if they are worn down to the wear indicator.
→ Remove the vacuum bar.
→ Unscrew the star grips.
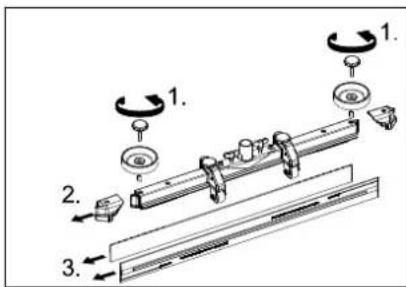
→ Remove the plastic parts.
→ Remove the vacuum lips.
→ Insert new or reversed vacuum lips.
→ Insert the plastic parts.
→ Screw in and tighten the star grips.
Clean water distribution channel
→ Remove the rubber strip and clean the channel with a cloth. After cleaning, replace the rubber strip evenly.
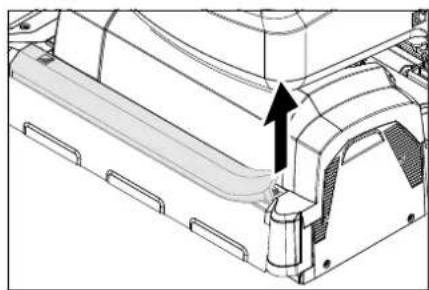
Replacing the brush rollers
→ Lift the cleaning head.
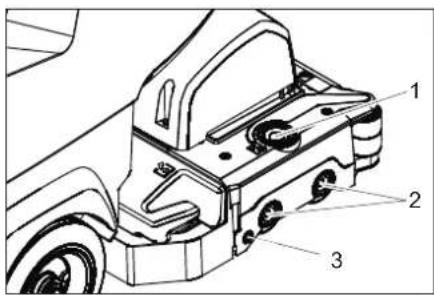
1 Unlocking key, storage cover
2 Brush
3 Push button
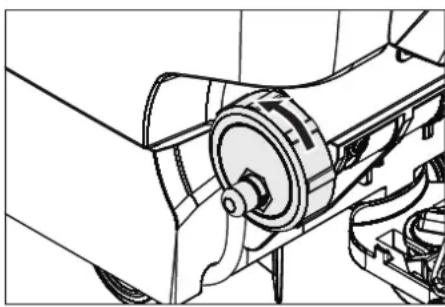
→ Press the release button of the storage cover.
→ Swivel the storage cover to the side.
→ Pull out the brush rollers.
Note: The brush rollers must be replaced when the bristle length has reached 10 mm.
→ Insert new brush rollers.
→ Swivel the storage cover back and press it closed on the push button.
Replacing the disk brushes
→ Lift the cleaning head.
→ Press the pedal for changing the brushes downward beyond its resistance.
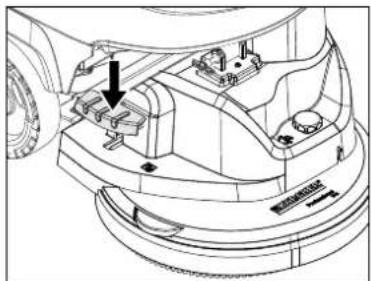
→ Pull the disc brush out of the side below the cleaning head.
→ Hold the new disc brush under the cleaning head, push upward and lock.
Install cleaning head
→ Push the appliance forward about 2 m so that the steering rollers point toward the rear.
→ Press the pedal for lowering the cleaning head downwards slightly and then move it to the left. This unlocks the pedal. Release the pedal slowly upwards. The lift arm of the cleaning head will be lowered.
→ Empty the fresh and waste water tank.
→ Loosen the tank lock and tilt the tank upwards.
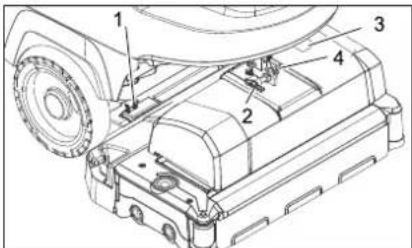
1 Spring element
2 Locking pin
3 Terminal strip cover
4 Lock of safety pin
→ Place the cleaning head halfway in front of the appliance.
→ Remove the terminal strip cover.
→ Connect the mains supply cable of the cleaning head to the appliance.
→ Attach the terminal strip cover.
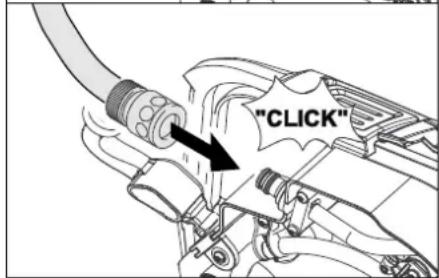
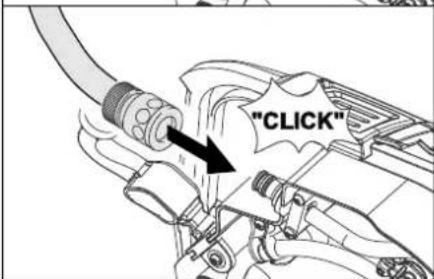
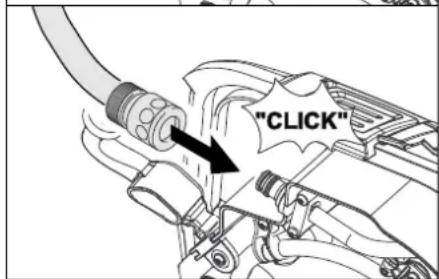
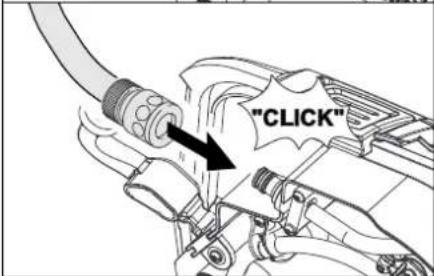
→ Connect the hose couplers on the cleaning head to the hose on the appliance.
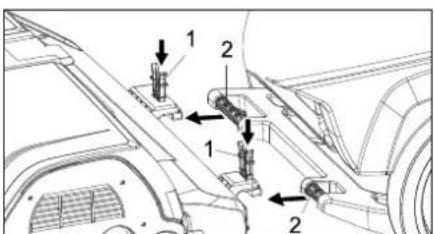
1 Spring element
2 Push handle
→ Insert the push bow into the cleaning head intake.
→ Push the spring elements down and lock them into place.
→ Align the lift arm of the cleaning head with the intake on the top side of the cleaning head.
→ Insert the safety pin and lock it into place.
→ Adjust the cleaning head: to the desired position via the adjustment screw.
→ Swivel the water reservoir all the way down, check the lock.
Dismantling the cleaning head
The removal will take place in the opposite order of the installation.
△CAUTION
When the cleaning head is removed, the stability of the appliance can be compromised; ensure a safe stance.
Support the rear of the device to prevent it from tipping.
Batteries
Please observe the following warning notes when handling batteries:
| Observe the directions on the battery, in the instructions for use and in the vehicle operating instructions | |
| Wear eye protection | |
| Keep children away from acid and batteries | |
| Danger of explosion | |
| Fire, sparks, naked flames and smoking must be strictly avoided | |
| Danger of chemical burns | |
| First aid | |
| Warning note | |
| Disposal | |
| Do not throw the battery into the regular waste |
| Observe the directions on the battery, in the instructions for use and in the vehicle operating instructions | |
| Wear eye protection | |
| Keep children away from acid and batteries | |
| Danger of explosion | |
| Fire, sparks, naked flames and smoking must be strictly avoided | |
| Danger of chemical burns | |
| First aid | |
| Warning note | |
| Disposal | |
| Do not throw the battery into the regular waste |
| Observe the directions on the battery, in the instructions for use and in the vehicle operating instructions | |
| Wear eye protection | |
| Keep children away from acid and batteries | |
| Danger of explosion | |
| Fire, sparks, naked flames and smoking must be strictly avoided | |
| Danger of chemical burns | |
| First aid | |
| Warning note | |
| Disposal | |
| Do not throw the battery into the regular waste |
△DANGER
Risk of explosion. Do not place tools or the like on the battery, i.e. on the terminal poles and cell connectors.
Risk of injury. Ensure that wounds never come into contact with lead. Always clean your hands after having worked with batteries.
Recommended batteries, B 40
| Order No. Description | ||
| 6.654-141.0 1) | 105 Ah - maintenance-free | 12 V* |
| 6.654-093.0 2) | 70 Ah - maintenance-free | 12 V* |
| 6.654-097.0 3) | 80 Ah, - low maintenance | 12 V* |
* Appliance requires 2 batteries
1) Complete set (24 V/105 Ah) incl. connecting cable, order no. 4.035-449.0
2) Complete set (24 V/70 Ah) incl. connecting cable, order no. 4.035-447.0
3) Complete set (24 V/80 Ah) incl. connecting cable, order no. 4.035-450.0
Insert batteries and connect
→ Push the appliance forward about 2 m so that the steering rollers point toward the rear.
→ Lower the cleaning head.
→ Empty the fresh and waste water tank.
→ Loosen the tank lock and tilt the tank upwards.
→ Place the batteries in the tray close to each other towards the cleaning head and fasten them to the floor using the included holding blocks.
△CAUTION
When the batteries are installed and removed, the stability of the appliance can be compromised; ensure a safe stance.
→ Connect the connection cable to the free battery poles (+) and (-).
→ Connect pole using the enclosed connecting cable.
ATTENTION
Pay attention to correct poles.
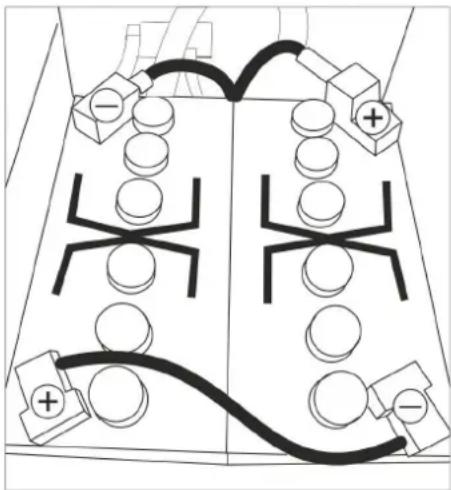
Installation sketch for 2 batteries
→ Swivel the water reservoir all the way down, check the lock.
Note:
Charge the batteries before commissioning the appliance.
See also "Charging the batteries".
Removing the batteries
△CAUTION
Risk of damage due to tipping appliance; remove batteries only if the appliance is equipped with a cleaning head.
→ Remove the Intelligent Key.
→ Push the appliance forward about 2 m so that the steering rollers point toward the rear.
→ Lower the cleaning head.
→ Loosen the tank lock and tilt the tank upwards.
→ Clamp off the minus pole of the battery.
→ Clamp off the remaining cables from the battery.
→ Remove the support blocks or the foam pieces.
→ Remove the batteries.
△CAUTION
When the batteries are installed and removed, the stability of the appliance can be compromised; ensure a safe stance.
→ Dispose of the used batteries according to the local provisions.
Maintenance contract
To ensure a reliable operation of the appliance maintenance contracts can be concluded with the competent Kärcher sales office.
Frost protection
In case of danger of frost:
→ Empty the fresh and waste water tank.
→ Store the appliance in a frost-protected room.
Faults
△DANGER
Risk of injury! Before working on the appliance, remove the Intelligent Key and the mains plug of the charger.
→ Drain and dispose of the dirt water and the residual fresh water.
Faults with display
| Display Remedy | |
| ERR_I_BÜRSTE_049 Check if foreign matters block the brushes; remove foreign matter if required. | |
| ERR_I_TURB_050 Check suction turbine for contamination and clean it if necessary. | |
| ERR_U_BATT_001 Check battery; charge it if required. | |
If the display shows different error messages or if the error cannot be remediated:
→ Remove the Intelligent Key.
→ Wait for 10 seconds.
→ Plug in the Intelligent Key.
→ If the fault recurs, call customer service.
Faults without display on the console
| Fault Remedy | |
| Appliance cannot be started | Stand-by. Turn the appliance off and reinsert the Intelligent Key.Turn the program selection switch to the desired programme. |
| Check battery; charge it if required. | |
| Make sure that all battery terminals are connected. | |
| Insufficient water quantity | Check fresh water level, refill tank if necessary. |
| Increase the water volume on the regulating knob for water volume. | |
| Unscrew the lock of the fresh water reservoir. Remove and clean the fresh water filter. Insert the filter and screw in the lock. | |
| Remove the water distribution strip from the cleaning head and clean water canal (only R cleaning head). | |
| Check hoses for blockages; clean if required. | |
| Do not add detergents In | crease the water volume to activate the dosing pump. |
| Check the detergent level | |
| Insufficient vacuum performance | Clean the seals between waste water tank and cover and check for tightness, replace if required. |
| Wastewater reservoir is full; shut off the appliance and empty the wastewater reservoir | |
| Clean the fluff filter. | |
| Clean the vacuum lips on the vacuum bar, replace if required | |
| Check suction hose for blockages; clean if required. | |
| Check the suction hose for tightness; replace if required. | |
| Check if the cover on the dirt water discharge hose is closed | |
| Check the setting of the vacuum bar. | |
| Insufficient cleaning result | Check the brushes for wear, replace if required. |
| Brushes do not turn Check | ck if foreign matters block the brushes; remove foreign matter if required. |
| If over-current switch in the electronics system has been triggered, turn programme selection switch to "OFF". Afterwards, set it back to the desired programme. | |
| Vibrations during cleaning | You might need to use softer brushes. |
| In case of faults that cannot be remedied using the table below please contact the customer service. | |
Accessory B 40
BR appliance B 40 (brush roller accessories)
| Description Part no.: | Working width 450 mm | Part no.: Working width 550 mm | Description | Packaging unit | Appliance requires |
| Brush roller, red (medium, standard) | 4.762-392.0 | 4.762-393.0 | so for regular cleaning of heavily dirtied floors. 1 2 | ||
| Brush roller, white (soft) 4.762-405 | 0 4.762-409.0 | For polishing | and cleaning sensitive floors. 1 2 | ||
| Brush roller, orange (high/ low) 4.7 | 62-406.0 4.76 | 2-410.0 For scrubbing structured floors (safety tiles, etc.). 1 2 | |||
| Brush roller, green (grit) 4.762-407 | 0 4.762-411.0 | For thoroughly cleaning heavily dirtied floors and for removing the coating (for e.g. of wax, acrylate). | 1 | 2 | |
| Brush roller, grey (1 mm grit) 4.762 | -408.0 4.762 | -412.0 1 2 | |||
| Pad roller shaft 4.762-413.0 4.762 | -415.0 For intake of roller pads. 1 2 | ||||
| Roller pad, white (very soft) 6.367 | -108.0 6.369-7 | 35.0 For cleaning and polishing sensitive floorings. 1 2 | |||
| Roller pad, yellow (soft) 6.367-105 | 0 6.369-732.0 | For polishing floors. 1 2 | |||
| Roller pad, red (medium) | 6.367-107.0 | 6.369-734.0 | For cleaning slightly dirtied floors. | 1 | 2 |
| Roller pad, green (hard) | 6.367-106.0 | 6.369-733.0 | For cleaning normal to heavily dirtied floors. | 1 | 2 |
BD appliances B 40 (disc roller accessories)
| Description | Part no.: Working width 430 mm | Part no.: Working width 510 mm | Description | Packaging unit | Appliance requires |
| Disk brush, natural (white) | 4.905-023.0 | 4.905-027.0 | For polishing floors. | 1 | 1 |
| Disk brush, white | 4.905-024.0 | 4.905-028.0 | For polishing and cleaning sensitive floors. | 1 | 1 |
| Disk brush, red (medium, standard) | 4.905-022.0 | 4.905-026.6 | For cleaning slightly dirtied or sensitive floors. | 1 | 1 |
| Disk brush, black (hard) | 4.905-025.0 | 4.905-029.0 | For cleaning heavily dirtied floors. | 1 | 1 |
| Driver plate pad | 4.762-533.0 | 4.762-534.0 | For intake of pads. | 1 | 1 |
BR/BD appliances B 40 (vacuum bar accessories)
| Description | Part no.: Working width 850 mm | Description | Pack-aging unit | Appli-ance re-quires |
| Rubber lip, blue | 6.273-213.0 | Standard | pair | 1 pair |
| Rubber lip, transparent, grooved | 6.273-207.0 | oil-resistant | pair | 1 pair |
| Rubber lip, transparent | 6.273-229.0 | Non-scarring | pair | 1 pair |
| Rubber lip, transparent | 6.273-290.0 | For difficult floors | pair | 1 pair |
| Vacuum bar, straight | 4.777-401.0 | Standard | 1 | 1 |
| Vacuum bar, bent | 4.777-411.0 | Standard | 1 | 1 |
Technical specifications
| BR appliance B 40 | BD appliance B 40 | ||||
| R 45 R | 55 D 43 | D 51 | |||
| Power | |||||
| Nominal voltage V 24 | |||||
| Battery capacity Ah (5h) 70, 80; 105 | |||||
| Medium power pickup B 40 W (B 40 C) W 1400 (1300) | |||||
| Nominal power of drive motor B 40 W (B 40 C) W 130 (---) | |||||
| Suction engine output W 500 | |||||
| Brush engine output W 600 | |||||
| Vacuuming | |||||
| Vacuum power, air volume (max.) l/s 22 | |||||
| Vacuuming power, negative pressure (max.) | kPa (mbar) | 12,0 (120) | 11,5 (115) | ||
| Cleaning brushes | |||||
| Brush speed | 1/min | 600 - 1200 | 180 | ||
| Dimensions and weights | |||||
| Theoretical surface cleaning performance | m2/h | 1800 | 2200 | 1800 | 2200 |
| Max. working range inclineB 40 C; B 40 W | % | 2 | |||
| Fresh/waste water tank volume | l | 40/40 | |||
| Max. water temperature | °C | 50 | |||
| max. water pressure | MPa (bar) | 0,5 (5) | |||
| Net weight (transport weight) | kg | 164 (with batteries 105 Ah) | |||
| Total weight (ready to operate) | kg | 204 (with batteries 105 Ah) | |||
| Values determined as per EN 60335-2-72 | |||||
| Total oscillation value | m/s2 | 0,3 | |||
| Uncertainty K | m/s2 | 0,1 | |||
| Sound pressure level LpA | dB(A) | 68 | |||
| Uncertainty KpA | dB(A) | 2 | |||
| Sound power level LWA + Uncertainty KWA | dB(A) | 85 | |||
| Subject to technical modifications! | |||||
EU Declaration of Conformity
We hereby declare that the machine described below complies with the relevant basic safety and health requirements of the EU Directives, both in its basic design and construction as well as in the version put into circulation by us. This declaration shall cease to be valid if the machine is modified without our prior approval.
Product: Floor cleaner
Type: B 40 C Bp
B 40 W Bp
Relevant EU Directives
2006/42/EC (+2009/127/EC)
2014/30/EU
Applied harmonized standards
EN 55014-1: 2006+A1: 2009+A2: 2011
EN 55014-2: 2015
EN 60335-1
EN 60335-2-29: 2004+A2: 2010
EN 60335-2-72
EN 61000-3-2: 2014
EN 61000-3-3: 2013
EN 62233: 2008
Applied national standards
The signatories act on behalf of and with the authority of the company management.
Chairman of the Board of Management
Director Regulatory Affairs & Certification
Documentation supervisor:
S. Reiser
Alfred Kärcher SE & Co. KG
71364 Winnenden (Germany)
Tel.: +49 7195 14-0
Fax: +49 7195 14-2212
Winnenden, 2019/01/01
Accessories and Spare Parts
Only use original accessories and spare parts, they ensure the safe and trouble-free operation of the device.
For information about accessories and spare parts, please visit www.kaercher.com.

www.kaercher.com/REACH
Garantie
1 Élément à ressort
2 Guidon de poussée
2006/42/CE (+2009/127/CE)
2014/30/UE
Chairman of the Board of Management
Director Regulatory Affairs & Certification
71364 Winnenden (Germany)
Tel.: +49 7195 14-0
Fax: +49 7195 14-2212
Winnenden, 2019/01/01
www.kaercher.com/REACH
Garanzia
2006/42/CE (+2009/127/CE)
2014/30/UE

Chairman of the Board of Management
S. Reiser
Director Regulatory Affairs & Certification
71364 Winnenden (Germany)
Tel.: +49 7195 14-0
Fax: +49 7195 14-2212
Winnenden, 2019/01/01
Accessori e ricambi
Rijhendel (B 40 W Bp)
www.kaercher.com/REACH
Garantie
Programmakeuzeschakelaar

1 OFF
→ Batterij laden:
1 Ontgrendelingsknop lagerdeksel
2 Borstel
3 Drukknop
1 Veerelement
2 Borgpen
3 Afdekking klemmenkast
4 Pal sluitpen
1 Veerelement
2 Duwbeugel
Chairman of the Board of Management
S. Reiser
Director Regulatory Affairs & Certification
71364 Winnenden (Germany)
Tel.: +49 7195 14-0
Fax: +49 7195 14-2212
Winnenden, 2019/01/01
www.kaercher.com/REACH
Garantía
2006/42/CE (+2009/127/CE)
2014/30/UE
Chairman of the Board of Management
S. Reiser
Director Regulatory Affairs & Certification
71364 Winnenden (Germany)
Tel.: +49 7195 14-0
Fax: +49 7195 14-2212
Winnenden, 2019/01/01
www.kaercher.com/REACH
Garantia
Instalar as baterias
1 Elemento de mola
2 Pino de segurança
1 Elemento de mola
2 Alavanca de avanço
Desmontar as baterias
△CUIDADO
2006/42/CE (+2009/127/CE)
2014/30/UE
Chairman of the Board of Management
S. Reiser
Director Regulatory Affairs & Certification
71364 Winnenden (Germany)
Tel.: +49 7195 14-0
Fax: +49 7195 14-2212
Winnenden, 2019/01/01
www.kaercher.com/REACH
Garanti
→ Stram vingeskruerne.
Hældning
→ Tryk doseringsanordningen sammen eller knæk den.
1 Fjederelement
2 Låsestift
1 Fjederelement
2 Bøjle
Monteringstegning for 2 batterier
→ Drej vandtanken helt ned og kontroller låsemekanismen.
Bemærk:
2006/42/EF (+2009/127/EF)
2014/30/EU
Chairman of the Board of Management
S. Reiser
Director Regulatory Affairs & Certification
71364 Winnenden (Germany)
Tel.: +49 7195 14-0
Fax: +49 7195 14-2212
Winnenden, 2019/01/01
www.kaercher.com/REACH
Garanti
→ Monter slangen.
Lossing
⚠️FARE
→ Sett inn Intelligent Key.
→ For rask tømming, ta lokket helt av.
→ Sett inn Intelligent Key.
→ Lade batteriet: Er ladetilstanden under 50 %, skal batteriet lades helt opp uten avbrudd. Er ladetilstanden over 50 %, skal batteriet lades opp kun dersom full driftsvarighet trengs ved neste bruk.
Ukentlig
1 Låsetast lagerlokk
2 Børste
3 Trykknapp
1 Fjærelement
2 Låsepinne
3 Lokk koblingsboks
4 Låsehakk sikringsstift
1 Fjærelement
2 Skyvebøyle
Monteringsskisse for 2 batterier
→ Sving vanntanken helt ned og kontroller låsen.
Merknad:
2006/42/EF (+2009/127/EF)
2014/30/EU
Chairman of the Board of Management
S. Reiser
Director Regulatory Affairs & Certification
71364 Winnenden (Germany)
Tel.: +49 7195 14-0
Fax: +49 7195 14-2212
Winnenden, 2019/01/01
www.kaercher.com/REACH
Garanti
→ Dra fast vingskruvar.
Lutning
→ Sätt in Intelligent Key.
Byta borstvalsar
Chairman of the Board of Management
S. Reiser
Director Regulatory Affairs & Certification
71364 Winnenden (Germany)
Tel.: +49 7195 14-0
Fax: +49 7195 14-2212
Winnenden, 2019/01/01
www.kaercher.com/REACH
Takuu
→ Liitä imuletku.
Purkaminen lavalta
⚠VAARA
→ Akun lataaminen:
Harjatelojen vaihto
1 Jousielementti
2 Työntökahva
Asetuskaavio 2 akulle
Chairman of the Board of Management
S. Reiser
Director Regulatory Affairs & Certification
71364 Winnenden (Germany)
Tel.: +49 7195 14-0
Fax: +49 7195 14-2212
Winnenden, 2019/02/01
1 Ελατήριο
Chairman of the Board of Management
Director Regulatory Affairs & Certification
71364 Winnenden (Germany)
Tel.: +49 7195 14-0
Fax: +49 7195 14-2212
Winnenden, 2019/01/01
www.kaercher.com/REACH
Garanti
→ Akü şarji:
Chairman of the Board of Management
Director Regulatory Affairs & Certification
71364 Winnenden (Germany)
Tel.: +49 7195 14-0
Fax: +49 7195 14-2212
Winnenden, 2019/01/01
www.kaercher.com/REACH
Гарантия
Chairman of the Board of Management
S. Reiser
Director Regulatory Affairs & Certification
71364 Winnenden (Germany)
Tel.: +49 7195 14-0
Fax: +49 7195 14-2212
Winnenden, 2019/01/01
www.kaercher.com/REACH
Garancia
Chairman of the Board of Management
S. Reiser
Director Regulatory Affairs & Certification
71364 Winnenden (Germany)
Tel.: +49 7195 14-0
Fax: +49 7195 14-2212
Winnenden, 2019/01/01
www.kaercher.com/REACH
Záruka
→ Nasad'te sací hadici.
Vykládka
⚠NEBEZPEČÍ
→ Dobijte baterii:
2006/42/ES (+2009/127/ES)
2014/30/EU
Chairman of the Board of Management
S. Reiser
Director Regulatory Affairs & Certification
71364 Winnenden (Germany)
Tel.: +49 7195 14-0
Fax: +49 7195 14-2212
Winnenden, 2019/01/01
www.kaercher.com/REACH
Garancija
→ Nataknite gibko sesalno cev.
Razkladanje
ΔNEVARNOST
→ Z žeblji pritrdite rampo na paleto.
→ Kratke deske položite kot podporo pod rampo.
→ Odstranite lesene letvice pred kolesi.
→ Dvignite čistilno glavo, v ta namen pritisnite pedal navzdol.
→ Pritegnite krilate vijake.
Nagib
→ Dozirno pripravo stisnite skupaj ali jo prepognite.
→ Odprite pokrov dozirne priprave.
→ Izpustite umazano vodo - s stisnjenjem ali prepognjenjem regulirajte količino vode.
→ Rezervoar za umazano vodo splaknite s čisto vodo ali ga očistite s splakovalnim sistemom rezervoarja za umazano vodo (opcija).
→ Polnjenje baterije:
→ Pokrov rezervoarja za umazano vodo zaprite, dokler ne nalega na fleksibilno zapiralo.
→ Odprite dotok vode in rezervoar za umazano vodo spirajte približno 30 sekund.
Splakovanje po potrebi 2 do 3 krat po- novite.
→ Zaprite dotok vode in gibko cev ločite od naprave.
→ Fleksibilno zapiralo ponovno nataknite na priključek. Pokrov rezervoarja za umazano vodo pustite odprt na režo, da se posuši.
→ Snemite plastične dele.
→ Izvlecite sesalne brisalce.
→ Vstavite nove ali obrnjene sesalne nastavke.
→ Nataknite plastične dele.
→ Privijte zvezdaste ročaje in jih zategnite.
1 Tipka za deblokado ležajnega pokrova
2 Krtača
3 Pritisni gumb
→ Pritisnite tipko za deblokado ležajnega pokrova.
→ Ležajni pokrov zasukajte v stran.
→ Izvlecite krtačne valje.
Opozorilo: Zamenjajte krtačne valje,
ko dolžina dlačic doseže 10 mm.
→ Vstavite nove krtačne valje.
→ Ležajni pokrov zasukajte nazaj in ga zaprite s pritisnim gumbom.
Zamenjava kolutne krtače
→ Dvignite čistilno glavo.
→ Pedal za zamenjavo krtač potisnite navzdol preko upora.
1 Vzmetni element
2 Potisno streme
→ Potisno streme potisnite v nastavek či-stilne glave.
→ Vzmetne elemente potisnite navzdol in zaskočite.
Dvižno roko čistilne glave usmerite na nastavek na zgornji strani čistilne glave.
→ Varnostni zatič vtaknite in zaskočite.
→ Nastavljanje čistilne glave: z nastavitvenim vijakom nastavite na želeni položaj.
→ Rezervoar za vodo zasukajte navzdol, preverite zapah.
Skica vgradnje za 2 bateriji
→ Rezervoar za vodo zasukajte navzdol, preverite zapah.
Napotek:
Pred zagonom stroja napolnite baterije. Glejte poglavje „Polnjenje baterij“.
Odstranitev baterij
PREVIDNOST
Nevarnost poškodbe zaradi prevrnljive naprave, baterije demontirajte le, će je na napravi nameščena čistilna glava.
→ Izvlecite Inteligentni ključ.
→ Napravo potisnite pribl. 2 m naprej, da vodilna kolesa gledajo nazaj.
→ Izpustite čistilno glavo.
→ Sprostite zapah rezervoarja in rezervoar obrnite navzgor.
→ Odklopite kabel z minus pola baterije.
→ Preostali kabel odklopite z baterij.
→ Snemite zadrževalne kocke ali penaste dele.
→ Izvlecite baterije.
▲PREVIDNOST
Pri demontaži in vgradnji baterij lahko položaj naprave postane nestabilen, pazite na varen položaj.
2006/42/ES (+2009/127/ES)
2014/30/EU
Chairman of the Board of Management
Director Regulatory Affairs & Certification
71364 Winnenden (Germany)
Tel.: +49 7195 14-0
Fax: +49 7195 14-2212
Winnenden, 2019/01/01
Pribor in nadomestni deli
Uporabljajte samo originalen pribor in originalne nadomestne dele, ki zagotavljajo varno in nemoteno delovanje naprave. Informacije o priboru in nadomestnih delih najdete na www.kaercher.com.
www.kaercher.com/REACH
Gwarancja
Wymiana szczotek
2006/42/WE (+2009/127/WE)
2014/30/UE
Chairman of the Board of Management
Director Regulatory Affairs & Certification
71364 Winnenden (Germany)
Tel.: +49 7195 14-0
Fax: +49 7195 14-2212
Winnenden, 2019/01/01
www.kaercher.com/REACH
Garantie
→ Strângeti şuruburile-fluture.
Înclinatie
1 Element de arc
2 Bolt de siguranță
3 Capac cutie de clemé
4 Element de prindere stift de siguranță
Directive UE respectate:
2006/42/CE (+2009/127/CE)
2014/30/UE
Norme armonizate utilize:
EN 55014-1: 2006+A1: 2009+A2: 2011
EN 55014-2: 2015
EN 60335-1
EN 60335-2-29: 2004+A2: 2010
EN 60335-2-72
EN 61000-3-2: 2014
EN 61000-3-3: 2013
EN 62233: 2008
Chairman of the Board of Management
S. Reiser
Director Regulatory Affairs & Certification
71364 Winnenden (Germany)
Tel.: +49 7195 14-0
Fax: +49 7195 14-2212
Winnenden, 2019/01/01
1 Páka spustenia sacej nadstavby
2 Kryt nádrže znečistenej vody
3 Upevňovacia lišta pre Homebase
4 Filtračné sito
5 Nádrž na znečistenú vodu vyplachovací systém (vol'ba)
6 Pružný uzáver vyplachovacieho systému (vol'ba)
7 Zablokovanie nádrže na znečistenú vodu
8 Plavák
9 Posuvná rukovät'
10 Sitko na hrubú načistotu
11 Nádrž znečistenej vody
12 Plniaci otvor nádrže na čistú vodu
13 Vysávacia hadica na čistiaci prostriedok (len variant DOSE)
14 Flaša na čistiaci prostriedok (len variant DOSE)
15 Uzáver nádrže na čistú vodu s filtrom
16 Držiak na f'lašu na čistiaci prostriedok
17 Nádrž na čistú vodu
18 Uzavretie nádrže
dodatočne zabezpečený plechom a
skrutkou
19 Čistiaca hlava (symbolický obrázok) *
20 Valcové kefy (variant BR), kotúčové kefy (variant BD) *
→ Nasadte saciu hadicu.
Vyloženie
⚠NEBEZPEČENSTVO
→ Rampu upevnite s klincami na paletu.
→ Krátke dosky položte k podopretiu pod rampu.
→ Odstráňte drevené lišty pred kolesami.
→ Nadvihnite čistiacu hlavu, stlačte k tomu dolu pedál.
→ Dobite batériu: Ak je stav nabitia pod 50 %, batériu na- bite kompletne a bez prerušenia. Ak je stav nabitia nad 50 %, batériu na- bite až vtedy, ak je pri nasledujúcom použití potrebná plná doba prevádzky.
Týždenne
2006/42/ES (+2009/127/ES)
2014/30/EÚ
Uplatňované harmonizované normy:
EN 55014-1: 2006+A1: 2009+A2: 2011
EN 55014-2: 2015
EN 60335-1
EN 60335-2-29: 2004+A2: 2010
EN 60335-2-72
EN 61000-3-2: 2014
EN 61000-3-3: 2013
EN 62233: 2008
Chairman of the Board of Management
Director Regulatory Affairs & Certification
71364 Winnenden (Germany)
Tel.: +49 7195 14-0
Fax: +49 7195 14-2212
Winnenden, 2019/01/01
www.kaercher.com/REACH
Jamstvo
U svakoj zemlji važe jamstveni uvjeti koje je izdala naša nadležna organizacija za distribuciju. Eventualne smetnje na priboru za vrijeme trajanja jamstva uklanjamo besplatno ukoliko je uzrok greška u materijalu ili proizvodnji. U slučaju koji podliježe garanciji obratite se, uz prilaganje potvrđe o kupnji, Vašem prodavaču ili najbližoj ovlaštenoj servisnoj službi.
1 Poluga za spuštanje usisne konzole
2 Poklopac spremnika prljave vode
3 Potporna tračnica za Homebase
4 Mrežica za skupljanje vlakana
5 Sustav za ispiranje spremnika prljave vode (opcija)
6 Savitljivi zatvarač sustava za ispiranje (opcija)
7 Bravica spremnika prljave vode
8 Plovak
9 Potisna ručica
10 Mrežica za grubu prljavštinu
11 Spremnik prljave vode
12 Otvor za punjenje spremnika svježe vode
13 Usisno crijevo sredstva za pranje (sa-
mo izvedba DOSE)
14 Boca sa sredstvom za pranje (samo izvedba DOSE)
15 Zatvarač spremnika svježe vode s filtrom
16 Držač boce sa sredstvom za pranje
17 Spremnik svježe vode
18 Zapor spremnika
dodatno osiguran limenom podloškom i
vijkom
19 Blok čistača (simbolički prikaz) *
20 Valjkasta četka (izvedba BR), pločaste četke (izvedba BD) *
21 Spremnik za grubu prljavštinu (samo BR)
22 Osigurač akumulatora
23 Akumulator *
24 Pokazivač napunjenosti spremnika svježe vode
25 Papučica za podizanje/spuštanje bloka čistača
26 Okretna ručka za naginjanje usisne konzole
27 Leptir matice za pričvršćenje usisne konzole
28 Usisno crijevo
29 Usisna konzola *
30 Priključni kabel punjača
31 Automatika za punjenje spremnika svježe vode (opcija)
32 Gumb za regulaciju količine vode
33 Vozna poluga (B 40 W Bp)
Sigurnosna sklopka (B 40 C Bp)
34 Komandni pult
35 Mjesto za odlaganje kompleta za čišćenje "Homebase Box"
36 Kukica za kvačenje kabela
37 Crijevo za ispuštanje prljave vode s do-
zatorom
* nije u opsegu isporuke
Oznaka u boji
→ Nataknite usisno crijevo.
Istovar
△OPASNOST
→ Rampu pričvrstite na paletu čavlima.
→ Kratke daske postavite ispod rampe kao potporu.
→ Uklonite drvene letvice ispred kotača.
→ Pritisnite papučicu prema dolje kako bi-
ste podigli blok čistača.
Uklonite kartone kod R bloka čistača.
B 40 C Bp
→ Uređaj spustite s palete preko nagibne rampe.
B 40 W Bp
→ Utaknite ključ "Intelligent Key".
→ Okrenite sklopku za odabir programa na transportni način rada.
→ Pritisnite voznu polugu pa uređaj laga-
no svezite niz rampu.
→ Izvucite ključ "Intelligent Key".
U radu
△OPASNOST
→ Zategnite krilne vijke.
Nagib
→ Sabijte ili preklopite dozator.
→ Otvorite poklopac dozatora.
→ Ispustite prljavu vodu - pritiskanjem ili presavijanjem prilagođavajte količinu vode.
→ Spremnik prljave vode isperite čistom vodom ili očistite primjenom sustava za ispiranje (opcija).
→ Punjenje baterije: Ako je stanje napunjenosti niže od 50 % bateriju bez prekida napunite do kraja. Ako je stanje napunjenosti više od 50 %, bateriju samo dopunite pri sljedećem korištenju kada vam bude potrebno puno trajanje rada.
Tjedno
→ Pri redovitom korištenju bateriju najmanje jednom tjedno bez prekida napunite do kraja.
Mjesečno
→ Provjerite oksidaciju polova akumulatora, po potrebi ih iščetkajte. Pazite na pričvršćenost spojnih kabela.
→ Očistite brtvila između spremnika prlja-ve vode i poklopca, provjerite zabrtvlje-nost i po potrebi zamijenite.
→ Kod akumulatora koji se moraju održavati provjerite koncentraciju kiseline u ćelijama.
→ Očistite tunel sa četkama (samo BR izvedba).
→ U slučaju duljeg razdoblja mirovanja uređaj spremite samo s do kraja napunjenim baterijama. Bateriju najmanje jednom mjesečno ponovno napunite do kraja.
Godišnje
→ Uređaj predajte servisnoj službi radi provođenja propisanog tehničkog pregleda.
Radovi na održavanju
Sustav za ispiranje spremnika prljave vode (opcija)
→ Ispustite prljavu vodu, vidi o tome odlo-mak "Ispustanje prljave vode".
→ Otvorite poklopac spremnika prljave vo-
de.
→ Skinite savitljivi zatvarač sa sustava za ispiranje.
→ Spojite crijevo za vodu sa sustavom za ispiranje.
1 Tipka za deblokiranje poklopca ležaja
2 Četka
3 Pritisni gumb
→ Pritisnite tipku za deblokiranje poklopca ležaja.
→ Pomaknite poklopac ležaja u stranu.
→ Izvucite valjkastu četku.
Napomena: Zamijenite valjkaste četke kada se čekinje skrate na 10 mm.
→ Umetnite nove valjkaste četke.
→ Vratite poklopac ležaja i zatvorite pritiskom na gumb.
→ Izvucite pločastu četku bočno ispod bloka čistača.
→ Stavite novu pločastu četku ispod bloka čistača te ju pritisnite prema gore da dosjedne.
1 Opružni element
2 Potisna ručica
→ Ugurajte potisnu ručicu u prihvatnik bloka čistača.
→ Opružne elemente gurnite prema dolje i uglavite.
→ Usmjerite podizni krak bloka čistača prema prihvatniku na gornjoj strani bloka čistača.
→ Utaknite i uglavite sigurnosni zatik.
→ Namještanje bloka čistača: namjestite u željeni položaj uz pomoć vijka za namještanje.
→ Spremnik vode zakrenite sasvim prema dolje pa provjerite zapore.
2006/42/EZ (+2009/127/EZ)
2014/30/EU
Primijenjene uskladene norme:
EN 55014-1: 2006+A1: 2009+A2: 2011
EN 55014-2: 2015
EN 60335-1
EN 60335-2-29: 2004+A2: 2010
EN 60335-2-72
EN 61000-3-2: 2014
EN 61000-3-3: 2013
EN 62233: 2008
Primijenjeni nacionalni standardi:
Chairman of the Board of Management
S. Reiser
Director Regulatory Affairs & Certification
71364 Winnenden (Germany)
Tel.: +49 7195 14-0
Fax: +49 7195 14-2212
Winnenden, 2019/01/01
www.kaercher.com/REACH
Garancija
U svakoj zemlji važe garantni uslovi koje je izdala naša nadležna distributivna organizacija. Eventualne smetnje na priboru za vreme trajanja garancije otklanjamo besplatno, ukoliko je uzrok greška u materijalu ili proizvodnji. U slučaju koji podleže garanciji obratite se sa potvrdom o kupovini Vašem prodavcu ili najbližoj ovlašćenoj servisnoj službi.
1 Poluga za spuštanje usisne konzole
2 Poklopac rezervoara za prljavu vodu
3 Potporna šina za Homebase
4 Mrežica za skupljanje vlakana
5 Sistem ispiranja rezervoara za prljavu vodu (opcija)
6 Savitljivi zatvarač sistema za ispiranje (opcija)
7 Bravica rezervoara za prljavu vodu
8 Plovak
9 Potisna ručica
10 Mrežica za grubu prljavštinu
11 Rezervoar za prljavu vodu
12 Otvor za punjenje rezervoara za svežu vodu
13 Crevo za usisavanje deterdženta (samo kod verzije Dose)
14 Boca sa deterdžentom (samo kod verzije Dose)
15 Zatvarač rezervoara sveže vode sa filterom
16 Držač boce sa deterdžentom
17 Rezervoar za svežu vodu
18 Bravica rezervoara dodatno pričvršćeno limenom podloškom i zavrtnjem
19 Blok čistača (simbolički prikaz) *
20 Valjkasta četka (verzija BR), pločaste četke (verzija BD) *
21 Rezervoar za grubu prljavštinu (samo BR)
22 Osigurač akumulatora
23 Akumulator*
24 Indikator napunjenosti rezervoara sveže vode
25 Pedala za podizanje/spuštanje bloka čistača
26 Obrtna ručka za naginjanje usisne konzole
27 Leptir navrtke za pričvršćenje usisne konzole
28 Usisno crevo
29 Usisna konzola *
30 Priključni kabl punjača
31 Automatika za punjenje rezervoara sveže vode (opcija)
32 Dugme za regulisanje količine vode
33 Vozna poluga (B 40 W Bp)
Sigurnosni prekidač (B 40 C Bp)
34 Komandni pult
35 Mesto za odlaganje kompleta za čišćenje "Homebase Box"
36 Kuka za kačenje kabla
37 Crevo za ispuštanje prljave vode sa dozatorom
* nije u obimu isporuke
Oznaka u boji
- Komandni elementi za proces čišćenja su žuti.
- Komandni elementi za održavanje i servis su svetlo sivi.
Komandni pult
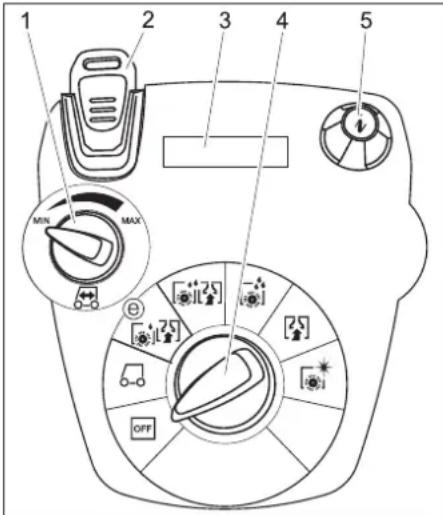
1 Podešivač brzine vožnje (samo B 40 W)
2 Ključ "Intelligent Key"
žuto - korisnik
sivo - predradnik
3 Ekran
4 Prekidač za izbor programa
5 Dugme za poziv informacija
Prekidač za izbor programa
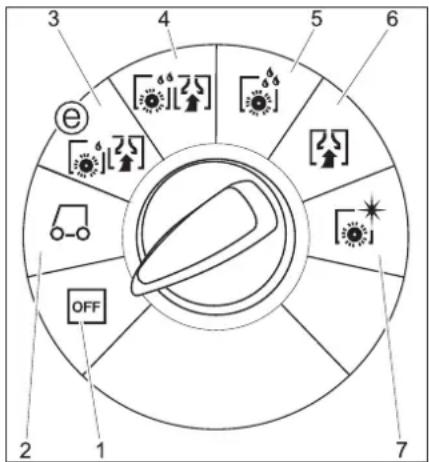
1 OFF
→ Nataknite usisno crevo.
Istovar
⚠ OPASNOST
Opasnost od povreda. Za momentalno isključivanje svih funkcija izvucite ključ "Intelligent Key".
→ Ugradite i priključite akumulatore (vidi "Pre upotrebe").
→ Dugačke bočne daske paketa postavite na paletu kao podlogu za kretanje (nagibnu rampu).
→ Rampu pričvrstite na paletu ekserima.
→ Kratke daske postavite ispod rampe kao potporu.
→ Uklonite drvene letvice ispred točkova.
→ Pritisnite pedalu na dole kako biste podigli blok čistača.
Uklonite kartone kod R bloka čistača.
B 40 C Bp
→ Uređaj spustite sa palete preko nagibne rampe.
B 40 W Bp
→ Utaknite ključ "Intelligent Key".
→ Okrenite prekidač za izbor programa na transport.
→ Pritisnite voznu polugu pa uređaj polako svezite niz rampu.
→ Izvucite ključ "Intelligent Key".
Rad
⚠ OPASNOST
Opasnost od povreda. Pedalu za podizanje odnosno spuštanje bloka čistača uvek pritiskajte samo jednom nogom. Druga noga mora stajati stabilno i sigurno na podlozi.
U slučaju opasnosti pustite sigurnosni prekidač odnosno voznu polugu.
Vožnja uz uključeni motor (samo B 40 W Bp)
PAŽNJA
Opasnost od oštećenja. Za vožnju unazad mora da se podigne usisna konzola.
Napomena:
Uređaj je tako konstruisan da blok čistača izviruje sa desne strane. To omogućava pregledan rad i čišćenje uz ivice.
→ Utaknite ključ "Intelligent Key".
→ Odaberite brzinu na podešivaču brzine vožnje.
→ Prekidač za izbor programa postavite u položaj za transport.
→ Vozite uređaj.
Prema napred:
Pritisnite voznu polugu prema napred.
Unazad:
Pritisnite voznu polugu unazad.
Napomena:
→ Zategnite leptir zavrtnje.
Nagib
→ Usporavanje: okrenite dugme u smeru "-"
→ Ubrzavanje: okrenite dugme u smeru "+".
→ Sabijte ili preklopite dozator.
→ Otvorite poklopac dozatora.
→ Ispustite prljavu vodu - pritiskanjem ili presavijanjem prilagođavajte količinu vode.
→ Rezervoar prljave vode isperite čistom vodom ili očistite primenom sistema za ispiranje (opcija).
Ispuštanje sveže vode
→ Punjenje akumulatora: Ako je stanje napunjenosti ispod 50%, akumulator napuniti u potpunosti i bez prekida. Ako je stanje napunjenosti iznad 50%, akumulator dopuniti samo ako je prilikom sledećeg korišćenja neophodno puno trajanje rada.
Sedmično
→ Kod redovnog korišćenja, akumulator najmanje jednom sedmično napuniti u potpunosti i bez prekida.
Mesečno
→ Proverite oksidaciju polova akumulatora, po potrebi ih iščetkajte. Pazite na pričvršćenost spojnih kablova.
→ Očistite zaptivke između rezervoara prljave vode i poklopca, proverite zaptivenost i po potrebi zamenite.
→ Kod akumulatora koji se moraju održavati proverite koncentraciju kiseline u ćelijama.
→ Očistite tunel sa četkama (samo BR varijanta).
→ Kod dužeg perioda mirovanja, uređaj odložiti samo sa potpuno napunjenim akumulatorom. Najmanje jednom mesečno akumulator ponovo u potpunosti napuniti.
Godišnje
→ Uređaj predajte servisnoj službi radi sprovođenja propisanog tehničkog pregleda.
Radovi na održavanju
Sistem ispiranja rezervoara za prljavu vodu (opcija)
→ Ispustite prljavu vodu, vidi o tome odlomak "Ispuštanje prljave vode".
→ Otvorite poklopac rezervoara za prljavu vodu.
→ Skinite savitljivi zatvarač sa sistema za ispiranje.
→ Spojite crevo za vodu sa sistemom za ispiranje.
→ Zatvorite poklopac rezervoara za prljavu vodu tako da naleže na savitljivi zatvarač.
→ Otvorite dovod vode i isperite rezervoar za prljavu vodu u trajanju od 30 sekundi.
Prema potrebi, isperite još 2 do 3 puta.
→ Zatvorite dovod vode i crevo ponovo odvojite od uređaja.
→ Ponovo nataknite savitljivi zatvarač na priključak. Poklopac rezervoara za prljavu vodu zatvorite tako da ostane zazor za sušenje.
Zamena ili prevrtanje gumica za usisavanje prljavštine
1 Oznaka pohabanosti
2 Gumica za usisavanje
Gumice za usisavanje se moraju zameniti ili prevrnuti naopako onda kada su istrošene do oznake pohabanosti.
→ Skinite usisnu konzolu.
→ Odvrnite zvezdaste pričvrsnike.
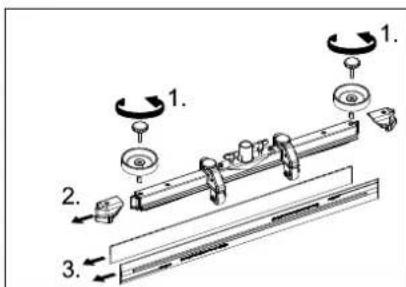
→ Skinite plastične delove.
→ Skinite gumice za usisavanje.
→ Umetnite nove ili prevrnute gumice za usisavanje.
→ Nataknite plastične delove.
→ Zavijte i zategnite zvezdaste pričvrsnike.
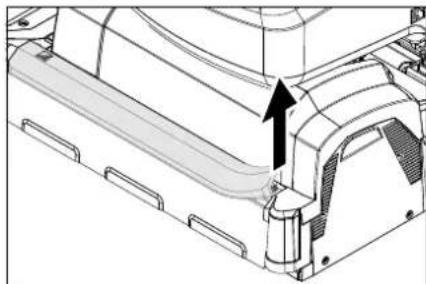
Čišćenje kanala razdelnika vode
→ Skinite gumenu letvu pa kanal prebrišite krpom. Nakon čišćenja ponovo ravnomerno utisnite gumenu letvu.
Zamena valjkaste četke
→ Podignite blok čistača.
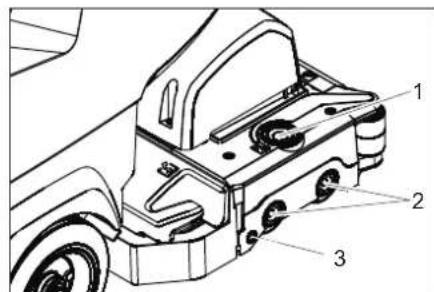
1 Taster za deblokadu poklopca ležaja
2 Četka
3 Pritisno dugme
→ Pritisnite taster za deblokadu poklopca ležaja.
→ Pomerite poklopac ležaja u stranu.
→ Izvucite pločastu četku bočno ispod bloka čistača.
→ Stavite novu pločastu četku ispod bloka čistača pa je pritisnite na gore da se uglavi.
1 Opružni element
2 Sigurnosni klin
3 Poklopac priključne kutije
4 Reza sigurnosnog klina
→ Položite blok čistača po sredini ispred uređaja.
2006/42/EZ (+2009/127/EZ)
2014/30/EU
Primenjene uskladene norme:
EN 55014-1: 2006+A1: 2009+A2: 2011
EN 55014-2: 2015
EN 60335-1
EN 60335-2-29: 2004+A2: 2010
EN 60335-2-72
EN 61000-3-2: 2014
EN 61000-3-3: 2013
EN 62233: 2008
Chairman of the Board of Management
S. Reiser
Director Regulatory Affairs & Certification
71364 Winnenden (Germany)
Tel.: +49 7195 14-0
Fax: +49 7195 14-2212
Winnenden, 2019/01/01
Pribor i rezervni delovi
www.kaercher.com/REACH
Гаранция
→ Затегнете крилчатите винтове.
Наклон
1 Деблокиращ бутон на капака на лагера
2 Четка
3 Копче
Chairman of the Board of Management
Director Regulatory Affairs & Certification
71364 Winnenden (Germany)
Tel.: +49 7195 14-0
Fax: +49 7195 14-2212
Winnenden, 2019/01/01
Hall Intelligent Key.....ET 5
Transport....ET 5
www.kaercher.com/REACH
Garantii
→ Pange imivoolik kohale.
Mahalaadimine
△OHT
→ Pingutage tiibmutreid.
Kalle
Hall Intelligent Key
1 Vedruelement
2 Kinnitustihvt
3 Klemmikasti kate
4 Kinnitustihvti riiv
1 Vedruelement
2 Tõukesang
Akude mahamonteerimine
⚠ETTEVAATUS
Chairman of the Board of Management
Director Regulatory Affairs & Certification
71364 Winnenden (Germany)
Tel.: +49 7195 14-0
Fax: +49 7195 14-2212
Winnenden, 2019/01/01
www.kaercher.com/REACH
Garantija
→ Pievelciet spärnskrüves.
Slīpums
1 Atsperes elements
2 Vadāmais rokturis
Chairman of the Board of Management
S. Reiser
Director Regulatory Affairs & Certification
71364 Winnenden (Germany)
Tel.: +49 7195 14-0
Fax: +49 7195 14-2212
Winnenden, 2019/01/01
Piederumi un rezerves da las
www.kaercher.com/REACH
Garantija
→ Atsukite sparnuotasias veržles.
Pakreipimas
Jei siurbimo efektas néra pakankamas, si-urbimo rémelj galima pakreipti.
1 Spyruoklinis elementas
2 Stūmimo rankena
Chairman of the Board of Management
Director Regulatory Affairs & Certification
71364 Winnenden (Germany)
Tel.: +49 7195 14-0
Fax: +49 7195 14-2212
Winnenden, 2019/01/01
www.kaercher.com/REACH
Гарантія
Chairman of the Board of Management
S. Reiser
Director Regulatory Affairs & Certification
71364 Winnenden (Germany)
Tel.: +49 7195 14-0
Fax: +49 7195 14-2212
Winnenden, 2019/01/01
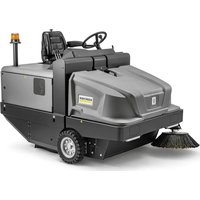
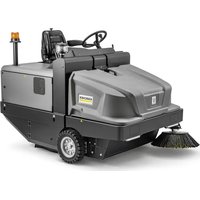
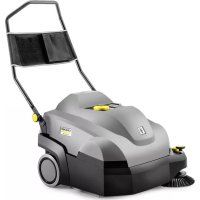
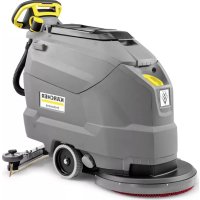
- SAFETY INSTRUCTIONS
- △WARNING
- SAFETY DEVICES
- SAFETY SWITCH (B 40 C BP)
- DRIVE LEVER (B 40 W BP)
- HAZARD LEVELS
- △DANGER
- ⚠ WARNING
- ATTENTION
- FUNCTION
- B 40 C BP
- B 40 W BP
- NOTE
- PROPER USE
- ENVIRONMENTAL PROTECTION
- NOTES ABOUT THE INGREDIENTS (REACH)
- WARRANTY
- OPERATING AND FUNCTIONAL ELEMENTS
- COLOUR CODING
- OPERATOR CONSOLE
- PROGRAM SELECTION SWITCH
- BEFORE STARTUP
- INSTALLING THE BRUSHES
- BD MODEL
- BR MODEL
- INSTALL BATTERIES
- SETTING THE CHARGING MARKER LINE
- USING BATTERIES MADE BY OTHER MANUFACTURERS
- CHARGING BATTERY
- CHARGING PROCESS
- LOW MAINTENANCE BATTERIES (WET BATTERIES)
- INSTALLING THE VACUUM BAR
- UNLOADING
- OPERATION
- DRIVING WITH MOTOR SUPPORT (B 40 W BP ONLY)
- FILLING IN DETERGENTS
- FRESH WATER
- WITH AUTOMATIC FILL OF FRESH WATER RESERVOIR (OPTION)
- DETERGENT
- APPLIANCE WITH DOSING EQUIPMENT DOSE (OPTION)
- MODELS WITHOUT DOSING EQUIPMENT
- SETTING THE WATER QUANTITY
- SETTING THE VACUUM BAR
- OBLIQUE POSITION
- INCLINATION
- SETTING THE PARAMETERS
- WITH YELLOW INTELLIGENT KEY
- CLEANING
- LOWER THE CLEANING HEAD
- LOWER THE VACUUM BAR
- SHUTTING DOWN THE APPLIANCE
- DRAIN OFF DIRT WATER
- GREY INTELLIGENT KEY
- KEY MENU
- CLEANING APP
- SETTING THE LANGUAGE
- BRUSH TRAILING
- LOAD DEFAULT
- TRANSPORT
- △CAUTION
- STORAGE
- CARE AND MAINTENANCE
- MAINTENANCE SCHEDULE
- MAINTENANCE INTERVALS
- AFTER EACH OPERATION
- WEEKLY
- MONTHLY
- YEARLY
- MAINTENANCE WORKS
- WASTE WATER TANK RINSING SYSTEM (OPTION)
- CLEAN WATER DISTRIBUTION CHANNEL
- REPLACING THE BRUSH ROLLERS
- REPLACING THE DISK BRUSHES
- INSTALL CLEANING HEAD
- DISMANTLING THE CLEANING HEAD
- BATTERIES
- INSERT BATTERIES AND CONNECT
- REMOVING THE BATTERIES
- MAINTENANCE CONTRACT
- FROST PROTECTION
- FAULTS
- EU DECLARATION OF CONFORMITY
- ACCESSORIES AND SPARE PARTS
- WWW.KAERCHER.COM/REACH
- GARANTIE
- GARANZIA
- ACCESSORI E RICAMBI
- GARANTÍA
- GARANTIA
- INSTALAR AS BATERIAS
- DESMONTAR AS BATERIAS
- △CUIDADO
- GARANTI
- HÆLDNING
- BEMÆRK
- LOSSING
- ⚠️FARE
- UKENTLIG
- MERKNAD
- LUTNING
- BYTA BORSTVALSAR
- TAKUU
- PURKAMINEN LAVALTA
- ⚠VAARA
- HARJATELOJEN VAIHTO
- ГАРАНТИЯ
- GARANCIA
- ZÁRUKA
- VYKLÁDKA
- ⚠NEBEZPEČÍ
- → DOBIJTE BATERII
- GARANCIJA
- RAZKLADANJE
- ΔNEVARNOST
- NAGIB
- ZAMENJAVA KOLUTNE KRTAČE
- NAPOTEK
- ODSTRANITEV BATERIJ
- PREVIDNOST
- ▲PREVIDNOST
- PRIBOR IN NADOMESTNI DELI
- GWARANCJA
- ÎNCLINATIE
- VYLOŽENIE
- ⚠NEBEZPEČENSTVO
- TÝŽDENNE
- JAMSTVO
- OZNAKA U BOJI
- ISTOVAR
- △OPASNOST
- U RADU
- TJEDNO
- MJESEČNO
- GODIŠNJE
- RADOVI NA ODRŽAVANJU
- SUSTAV ZA ISPIRANJE SPREMNIKA PRLJAVE VODE (OPCIJA)
- KOMANDNI PULT
- ⚠ OPASNOST
- RAD
- VOŽNJA UZ UKLJUČENI MOTOR (SAMO B 40 W BP)
- PAŽNJA
- NAPOMENA
- ISPUŠTANJE SVEŽE VODE
- SEDMIČNO
- MESEČNO
- SISTEM ISPIRANJA REZERVOARA ZA PRLJAVU VODU (OPCIJA)
- PRIBOR I REZERVNI DELOVI
- ГАРАНЦИЯ
- НАКЛОН
- GARANTII
- MAHALAADIMINE
- △OHT
- KALLE
- HALL INTELLIGENT KEY
- AKUDE MAHAMONTEERIMINE
- ⚠ETTEVAATUS
- GARANTIJA
- SLĪPUMS
- PIEDERUMI UN REZERVES DA LAS
- PAKREIPIMAS
- ГАРАНТІЯ
Brand : Kärcher
Model : B 40 W Bp Dose
Category : Sweeper