Actioncam 420 - Camcorder ROLLEI - Free user manual and instructions
Find the device manual for free Actioncam 420 ROLLEI in PDF.

User questions about Actioncam 420 ROLLEI
0 question about this device. Answer the ones you know or ask your own.
Ask a new question about this device
Download the instructions for your Camcorder in PDF format for free! Find your manual Actioncam 420 - ROLLEI and take your electronic device back in hand. On this page are published all the documents necessary for the use of your device. Actioncam 420 by ROLLEI.
USER MANUAL Actioncam 420 ROLLEI
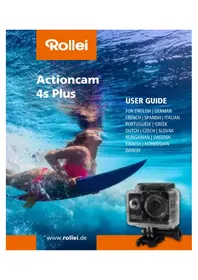
2. Safety Pad Curved & Flat
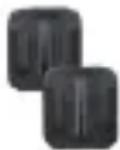
3. Lithium-Ion Akku
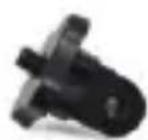
4.Halterung Basic

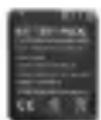
5. Stativ-Adapter
Selbstauslser: Aus / 2s / 10s / 30s / 60s / Doppel
Power on/off. 05
Insert/Remove Battery. 05
Battery Charging. 05
Video Mode. 06
Picture Mode. 06
Playback Mode. 07
Menu Setting. 08
Remote Control Description. 10
Install and use WiFi-Function. 11
Notes. 12
Playback on PC. 12
7. Technical specification 13
8. Conformity 15
1. Precaution
Please be well look through the following guidelines before you use this DVR.
- Please refer to the instruction manual to operate the camera correctly. Illegal operation may cause damage to internal components.
- Do not fall or hit the DVR, it may damage the internal components.
- Do not alter or dismantle the DVR to avoid the damage to the DVR.
The temperature rise is normal when DVR is in use for a long time. - Do not touch the lens when recording which will affect the video quality.
- Please use "Class10" and above TF card to ensure machine works properly
2. Rollei AC 420 Special Features:
Inversion Mode
If need to invert camera while using, you can set "inversion mode" in the menu "On", then the picture on the screen of the camera can be rotated 180^ , but characters and images on the screen will be shown in the correct alignment.
WiFi Function
It will be more convenient to operate the camera at a distance of 15 meters using a mobile phone via the WiFi connection
High Speed Recording
The Camera has 720P 120fps, VGA 240fps and 4K 10fps high definition resolution.
Slow Motion
The video will be displayed in twice as slow as the video frame (60fps video) or 4 times (120fps video).
Time Lapse
The DVR will take pictures at a certain rate then make a video consisted by the pictures.
Capture Mode
Under recording press Mode button to take a still picture. It not only can be used by manually capture, but also can be set automatically, which makes it becomes more convenient.
2.4G wireless remote control
Waterproof wrist remote controller
Diving mode
Video's color underwater will be the same as normal environment when set "Diving mode" on.
3. Product Accessories:
- Adaptor
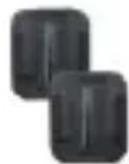
- Flat & Curved Mount
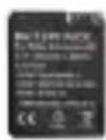
- Li-Ion Battery

- Mount Basic
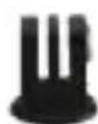
- Tripod Mount

- Two Component Screw
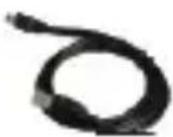
- USB cable
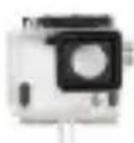
- Waterproof case
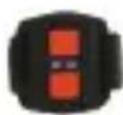
- Wrist remote controller
4. Rollei AC 420 Interface
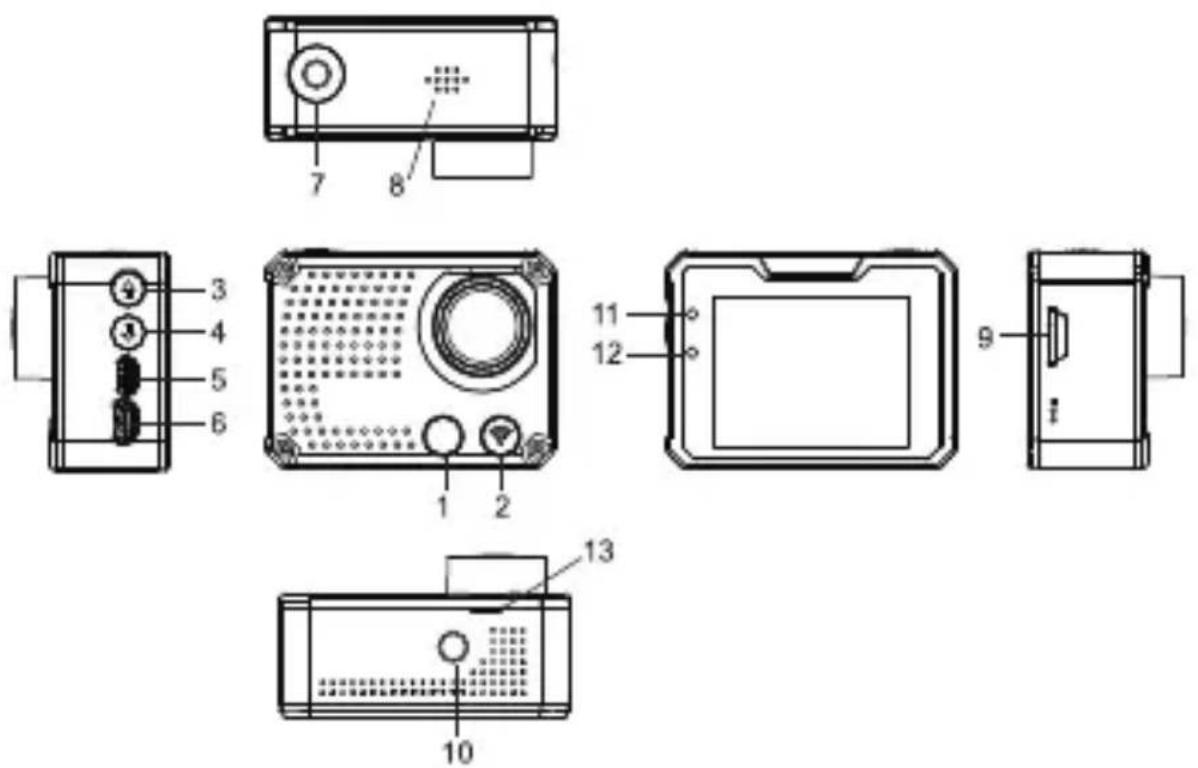
Product Accessories:
- WiFi indicator
2.Mode button
3.Up button - Down button
- HDMI port
- USB port
-
Power button
-
Speaker
- TF card slot
- 1/4" Tripod Mount
- Working indicator
- Charging Indicator
- Opening for front Cover
5. Button function
Power button :
Short press to turn on/off the Camera;
Under standby mode short press to start/stop the recording;
Under Picture mode short press to take a picture;
Under playback mode short press to start/pause playback;
Confirm menu setting and time setting.
Up button :
Under standby mode use this button to zoom in;
Long press to enter/exit the menu;
In the Menu setting or Playback mode choose the last option or file;
Increase the digit in the time setting.
Down button:
Under standby mode press this button to zoom out
Choose the next option or file in the Menu setting or Playback mode;
Decrease the digit in the time setting.
Mode button:
Short press this button to switch to Video/Picture/Playback Mode.
Long press to enter WiFi setting;
During recording short press to capture;
In time setting to switch Year/Month/Date/Time;
Start/stop capture when setting capture automatically.
6. Operation
Power on/off
Power on:Short press Power button, screen shows start up picture the blue working indicators will light up, Camera enters standby mode. Power off: When camera is on, long press Power button to switch the camera off.
Insert/Remove Battery
The Camera has an exchangeable Li- ion battery. To insert or exchange the battery please remove the front cover of the camera.
Battery Charging
Connect the Camera with the USB cable to a USB Port on your computer or a USB Charger. The red light will light up during the charging. Once the battery is full, the red light will switch off. Turn off the Camera when charging to charge the battery faster.
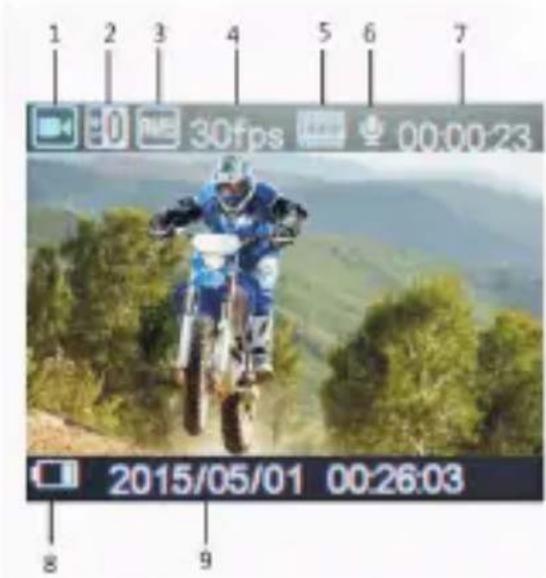
Video Mode
Icons on Video Screen:
- Record icon
- Exposure Compensation
- White Balance
- Frame rate
- Video resolution
- Microphone
- Remaining recording time
- Battery indicator
- Date and Time
Normal recording
Disable the "seamless" function in the video mode menu to record videos Until the memory card is full. Press Power button to start the recording and press the button again to stop the recording.
Seamless recording (refer to menu setting)
Press Power button to start recording. When the footage of the video reach the selected recording time (1 minute/3 minutes/5minutes) the camera will save the footage automatically and continue recording with a new clip.
When TF card is full the camera will overwrite the first footage by time sequence and continue recording. Press Power button again to stop recording, the remaining recording time is shown on the LCD screen. Notes:
- Seamless cannot be used in the resolution 4K.
- 4k resolution doesn't support Wifi, zoom function and time lapse.
- Please set "capture timing" off when you use "seamless" or "time lapse".
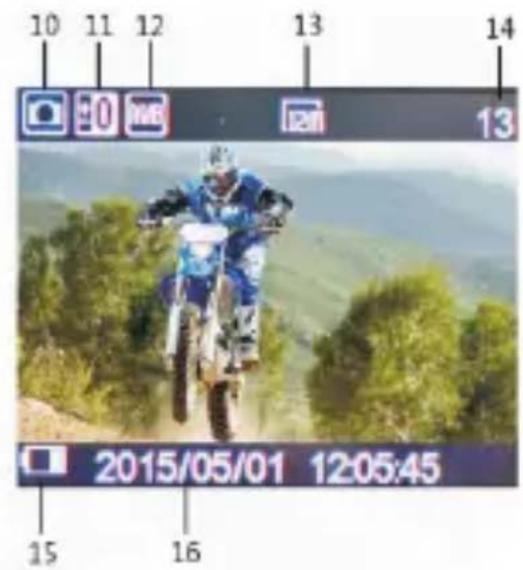
Picture Mode
- Picture icon
- Exposure Compensation
- White balance
- Picture size
- Remaining photos
- Battery indicator
- Date and Time
Camera default setting is Video mode. In standby mode press Mode button to enter picture mode, aim at the object you want to take a still picture and press Power button.
Capture function
- Capture manually: Press mode button to take a picture under recording when “Capture” in system menu is off.
- Capture automatically: When “Capture timing” is activated (5s/10s/15s/30s/60s) the Camera will capture still pictures in the selected time interval automatically.
Note:
- 4k resolution does not support capture function.
- Camera does not support capture function when "time lapse" and "slow motion" is on.
- Please set "capture timing" off when "seamless/time lapse/slow motion" will be used.
Playback Mode
- Playback icon
- File number / total number of files
- Select the file you want to play
- File Preview
- File length
- Date stamp
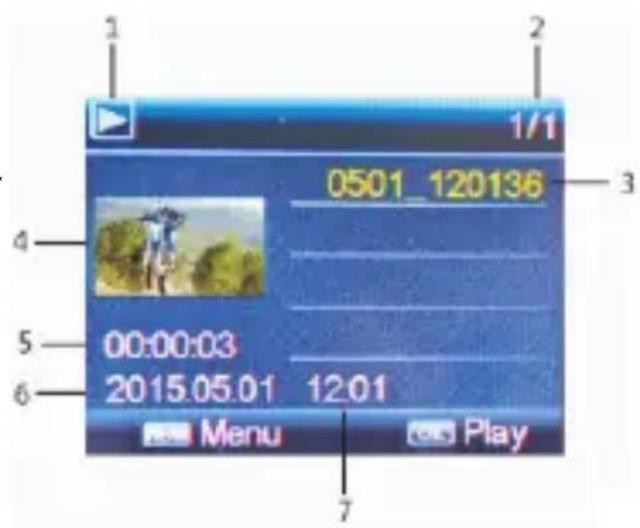
In standby mode press the Mode button to switch to Playback mode. Press the UP or DOWN button to select the desired video/picture and press the power button to Preview or playback the selected file. Press the Power button to stop the playback!
Menu Setting
With a long pressing of the Up button you can enter the Menu mode. Press the Mode button to switch from the Menu mode to the System settings. Press the Down button for page down, press the Up button for page up. Press the Power button to confirm your selection. Press the Up button for a long time to exit the menu.
Please refer to the following Information to find the desired function in the menu:
Video Menu:
Movie Size: 4k 10fps/1440p 30fps/1080p 60fps/1080p 50fps/1080p
30fps/1080p 25fps/720p 120fps/720P 60fps/720p 50fps/720p 30fps/
720p 25fps/VGA 240fps
Video quality: super fine / fine / normal
Seamless: Off / 1 minute / 3 minutes / 5 minutes
Slow Motion: Off / Auto
Time Lapse: Off / 0.5sec / 1sec / 3sec / 5sec / 10sec / 30sec / 1min
White Balance: Auto / Daylight / Cloudy / Tungsten / Fluor
Diving mode: Off / On
Exposure: -2.0, -1.0, +0.0, +1.0, +2.0
Motion detect: Off / On
Date stamp: Off / Date / Date & Time
Picture menu:
Resolution: 12M / 8M / 5M / 3M
White Balance: Auto / Daylight / Cloudy / Tungsten / Fluor H
Exposure: -2.0, -1.0, +0.0, +1.0, +2.0
Timer shot: Off / 2s / 10s / 30s / 60s / Double
Periodical Snap: Off / 0.5s / 1s 2s/ 3s
Photo Burst: Off / 3 photos / 5 photos / 10 photos
Playback mode menu:
Please select File type!
Video
JPG
Protect: Single / Protect All / Unprotect All
Delete: Single / All
System menu:
Sounds: Beep (On / Off) / Volume (0/1/2/3) Voice Rec (H/M/L /off)
Power frequency: 50Hz / 60Hz / Auto
Power Save: Off / 1 min / 3 min / 5 min
Date & Time: 02/06/2012 19:17 Year / Month / Day
Language: German, English, French, Italian, Spanish, Portuguese
Dutch, Greek, Polish, Czech, Slovak, Danish, Swedish, Norway
Finnish, Hungarian.
Invert Mode: Off / On
WiFi password: 1234567890
Time Zones: -12 to +12
Time Zone 0 is the Greenwich time, please check your time zone to set the correct time in your camera.
TV out: Yes / No
Remote Pair: Off / On
Format: Yes / No
Capture timing: Off /5s/10s/15s/30s/60s
System: Factory Reset / System Info / Card Info
Remote Control Description
There are two buttons on the remote controller, press the video button to start/stop the recording. Press the picture button to take pictures under picture mode or capture under video mode.

Please note the remote control contains a CR 2032 Cell Battery. To exchange the battery release the 4 screws on the backside of the remote.
Matching the remote control:
Set "Remote Pair" in the menu to "On", keep pressing the two buttons on the remote control. You can see the blue LED on the Remote control flashing. Release the two buttons after 3 seconds. Remote should be paired now. Press the power button on the Camera to exit the Remote Pair and return to the preview mode. Try to record a video or a picture with the remote control. Please repeat the pairing if remote cannot start recording!
Install and use WiFi
- Download the App "Rollei AC420" from the App store or from GooglePlay;
- Set the WiFi password in the Menu of the camera. (The default password it 1234567890).
- Long press Mode Button to Open WiFi function.
- Find "Rollei AC420" in the WiFi list of smart phone and enter the password to connect it.
- When smart phone is connected to the camera, the camera screen will display "Rollei AC420" and the WiFi indicator on the camera will light. If the connection was not successful the WiFi indicator on the camera will keep flashing.
- Find the APP "Rollei AC420" on your smartphone. You can control the camera via your smart phone.
- Press Mode Button again to exit the WiFi setting.
Notes:
- Before you open the WiFi function, make sure a Memory card is inserted in the camera. Otherwise the WiFi function will not work!
- The effective distance is influenced by environment. The decrease of the WiFi signal and an operation delay are normal circumstance during use.
- The "Power Saving Mode" in mobile should be set to "Off".
- The "Keep Wi-Fi on during sleep" in the mobile phone should be set to "Always".
Playback on PC
Connect camera with the included USB cable to your PC and switch the camera on. The screen will display: "MSDC", "PCCAM" or "Working". Press Up or Down button to choose the desired function. Press the Power button to confirm.
MSDC: Enter the MSDC to check the files.
PCCAM: Camera will be worked as PCCAM.
Working: Camera can be used normally and be powered by the PC.
- Technical specification
| Camera Size | 61*45*25mm (Not include the lens) |
| Weight | 65g (Not include battery) |
| Sensor | Sony IMX078 12.4Mega CMOS |
| Lens | 7G+IR F=2.5 f=3.0mm |
| View angle | 170 degree |
| Resolution | 4K 10fps, 1920*1440p30fps1920*1080p60/50/30/25fps,1280*720p120/60/50/30/25fps640*480p240fps |
| Image Size | 12M 8M 5M 3M |
| File formats | JPG/MOV H.264 |
| Memory card | 4GB to 32GB (For 4K 10fps, please use Micro SD Card Class 10) |
| Audio | Built-in microphone / speaker |
| USB Port | USB 2.0 high-speed interface for charging and data transfer |
| TFT-Screen | HD 2"TFT 960x480 |
| Seamless loop recording | Optional 1/3/5 minutes |
| HDMI output | Real-time transmission |
| White balance | supported |
| Exposure compensation | supported |
| Capture | supported by DVR and remote control |
| Continuous | supported |
| Time Lapse | supported |
| Image Invert | supported |
| Slow Motion | supported |
| WiFi frequency | 2.4GHz-2.4835GHz |
| WiFi support phone system | IOS6.1 and above, Android 4.0 and above |
| WiFi function | Image transmission, remote control, settings sync and sharing albums |
| WiFi distance | 15m |
| Wireless transmission | IEEE 802.11b/g/n |
| Battery capacity | Exchangeable Lithium-ion (1050 mAh) |
| Waterproof | 40 meters |
| Remote control frequency | 2.4GHz |
| Remote control waterproof | IP65 |
| Remote control distance | 10m in open space |
| Language | German, English, French, Italian, Spanish, Portuguese, Dutch, Greek, Polish, Czech, Slovak, Danish, Swedish, Norway, Finnish, Hungarian. |
8. Conformity
The Manufacturer hereby declares that the CE marking was applied to the Rollei AC 420 in accordance with the basic requirements and other relevant provisions of the following CE Directives:
2011/65/EC RoHs Directive
2004/108/EC Low Voltage Directive
1999/5/EG R&TTE Directive
2006/95/EEC LVD Directive
2009/125/EG EuP Directive
2002/96/EG WEEE Directive

The EC Declaration of Conformity can be requested from the address specified on the Warranty card.
Format Video: 4k 10fps/1440p 30fps/1080p 60fps/1080p 50fps/1080p
30fps/1080p 25fps/720p 120fps/720P 60fps/720p 50fps/720p 30fps/720p
25fps/VGA 240fps
Minuterie de capture: Désactivée/5s/10s/15s/30s/60s
Directive Basse Tension 2004/108/EC
Directive 1999/5/EG R&TTE
Directive 2006/95/EEC LVD
Directive 2009/125/EG EuP
Directive 2002/96/EG WEEE

Dimensioni Film: 4k 10fps/1440p 30fps/1080p 60fps/1080p 50fps/1080p 30fps/1080p 25fps/720p 120fps/720P 60fps/720p 50fps/720p 30fps/720p 25fps/VGA 240fps
Tempo di Istantanea: Off /5s/10s/15s/30s/60s
Suoni: Beep (On / Off) / Volume (0/1/2/3) Voice Rec (H/M/L /off)
Frequenza : 50Hz / 60Hz / Auto
Risparmio di energia: Off / 1 min / 3 min / 5 min
Directive 2006/95/EEC
Tamañodepellicula:4k10fps/1440p30fps/1080p60fps/1080p50fps/
1080p 30fps/1080p 25fps/720p 120fps/720P 60fps/720p 50fps/
720p 30fps/720p 25fps/VGA 240fps
Periodo de captura: apagado /5s/10s/15s/30s/60s
Resolution: 12M / 8M / 5M / 3M
Balance de blanco: Auto / dia/ noblado/ Tungsten / Fluor H
2002/96/EG WEEE Directiva

Resolucao: 12M / 8M / 5M / 3M
Equilibrio de Brancos: Auto / Luz do Dia / Nublado / Tungsténio / Fluor
Exposicao: -2.0, -1.0, +0.0, +1.0, +2.0
Captura por Temporuzador: Off / 2s / 10s / 30s / 60s / Duplo
Captura Periódica: Off / 0.5s / 1s / 2s / 3s
Sons: Bip (On/Off) / Volume (0/1/2/3) Gravacao de Voz (H/M/L/Off)
Directiva WEEE 2002/96/EG

Opnametiming: Uit /5s/10s/15s/30s/60s
Timeroto:Uit/2s/10s/30s/60s/dubbele
Periodieke Foto: Uit / 0.5s / 1s /2s/3s
Foto barsten: Uit / 3 Foto's / 5 Foto's / 10 Foto's
Afspeelmenu modus:
Selecteer bestandstype!
Video
JPG

5. Tripod-monitoring
8. Vandtaet etui
3. Li-ion batteri


6. To-komponent skrue 4. Monteringsb
9. Handleds-fjernbetjening
Optage-timing: Fra /5 s/10 s/15 s/30 s/60 s
Motion detect: Fra / Til
Resolutio: 12M / 8 M / 5M / 3M
Filmstørre: 4k 10fps/1440p 30fps/1080p 60fps/1080p 50fps/1080p
30fps/1080p 25fps/720p 120fps/720P 60fps/720p 50fps/720p30fps/720p
25fps/VGA 240fps
Videokvalitet: Superfin / fin / normal
Sømløs: Av / 1 minutt / 3 minutter / 5 minutter Sakte film: Av / Auto
Intervallfotografiaering: Av / 0,5 sek / 1 sek / 3 sek / 5 sek / 10 sek / 30 sek / 1 min Hvitbalanse: Auto / Dagslys / Overskyet / Wolfram / Fluorescerende
-08-
Dykkemodus: Av / På
Eksponering: -2,0, -1,0, +0,0, +1,0, +2,0
Tidsforsinkelse for stillbilder: Av / 5 sek / 10 sek / 15 sek / 30 sek / 60 sek
Tagningstid: Av/5s/10s/15s/30s/60s
Timertagning: av/2s/10s/30s/60s/dubble
Periodisk snapp: av/0.5s/1s/2s/3s
1080p 30fps/1080p 25fps/720p 120fps/720P 60fps/720p 50fps/
720p 50fps/720p 30fps/720p 25fps/VGA 240fps
Vel'kost' filmu: 4k 10fps/1440p 30fps/1080p 60fps/1080p 50fps/1080p
30fps/1080p 25fps/720p 120fps/720P 60fps/720p 50fps/720p 30fps/720p
25fps/VGA 240fps
Časovač fotenia: Vyp /5s/10s/15s/30s/60s
Filmméret: 4k 10fps/1440p 30fps/1080p 60fps/1080p 50fps/1080p
30fps/1080p 25fps/720p 120fps/720P 60fps/720p 50fps/720p 30fps/
720p 25fps/VGA 240fps
Aεσouαρ Tou TpoiovToC:
- ikt Wi-Fi
8.Hxεio
- Bao ng yia tpinodo 1/4"
4.Πλήκτρο «Κατω»