
SBEV 11002 S - Drill METABO - Free user manual and instructions
Find the device manual for free SBEV 11002 S METABO in PDF.
| Product type | Percussion drill |
| Brand | Metabo |
| Model | SBEV 11002 S |
| Power supply | Mains, alternating current |
| Protection class | II |
| Chuck type | Keyed chuck, self-tightening chuck Futuro Plus or Futuro Top (depending on equipment) |
| Main functions | Drilling without impact, drilling with impact, screwdriving, tapping, impulse function |
| Variable speed | Yes, by presetting wheel and trigger |
| Speed selection | 2 mechanical speeds (selector) |
| Rotation direction | Reversible (switch) |
| Depth stop | Yes, adjustable |
| Additional handle | Yes, included, with vibration damping |
| Safety clutch | Metabo S-automatic |
| Restart protection | Yes (fast flashing electronic indicator) |
| Continuous operation | Yes (continuous operation button) |
| Sound level | Wear ear protection (values according to EN 60745) |
| Accessories | Use only Metabo accessories |
| Routine maintenance | Cleaning of self-tightening chuck, replacement of carbon brushes by customer service |
| Repairs | By specialist, contact Metabo representative |
| Country of origin | Germany (Metabo brand) |
Frequently Asked Questions - SBEV 11002 S METABO
User questions about SBEV 11002 S METABO
0 question about this device. Answer the ones you know or ask your own.
Ask a new question about this device
Download the instructions for your Drill in PDF format for free! Find your manual SBEV 11002 S - METABO and take your electronic device back in hand. On this page are published all the documents necessary for the use of your device. SBEV 11002 S by METABO.
USER MANUAL SBEV 11002 S METABO
SB 850-2
SBE 780-2
SBE 850-2
SBE 850-2 S
SBEV 1000-2
SBEV 1100-2 S
SBEV 1300-2
SBEV 1300-2 S

de Originalbetriebsanleitung 9
en Original instructions 13
fr Notice originale 17
nl Originele gebruiksaanwijzing 21
it Istruzioni per l'uso originali 25
es Manual original 29
pt Manual original 33
sv Originalbruksanvisning 37
fi Alkuperainen kayttoopas 40
no Original bruksanvising 44
da Original brugsanvising 47
pl Instrukcja oryginalna 51
el PpwtotuO o8nywv xPnoc 55
hu Eredeti hasznalati utasitas 59
ru OpunHahbHoe pyKOBODCTBO no
3Kcnnyatau 63
A
B
(2) 5 ~mm (3 / 16^ ) 0 ~mm
A
C
8.1
D
SBE 780-2, SBE 850-2, SBE 850-2 S
| mm | |||||
| 4 | F F F E F F F F F F F F F F F F F F F F F F F F F F F F F F F F F F F F F F F F F F F F F F F F F F F F F F F F F F F F F F F F F F F F F F F F F F F F F F F F F F F F F F F F F F F F F F F F F F F F F F F F | F F F F F F F F F F F F F F F F F F F F F F F F F F F F F F F F F F F F F F F F F F F F F F F F F F F F F F F F F F F F F F F F F F F F F F F F F F F F F F F F F F F F F F F F F F F F F F F F F F F F f F f f f f f f f f f f f f f f f f f f f f f f f f f f f f f f f f f f f f f f f f f f f f f f f f f f f f f f f f f f f f f f f f f f f f f f f f f f f f f f f f f f f f f f f f f f f f f f f f f f f f d d d d d d d d d d d d d d d d d d d d d d d d d d d d d d d d d d d d d d d d d d d d d d d d d d d d d d d d d d d d d d d d d d d d d d d d d d d d d d d d d d d d d d d d d d d d d d d d d d d d f f f f f f f f f f f f f f f f f f f f f f f f f f f f f f f f f f f f f f f f f f f f f f f f f f f f f f f f f f f f f f f f f f f f f f f f f f f f f f f f f f f f f f f f f f f f f f f f f f f l f f f f f f f f f f f f f f f f f f f f f f f f f f f f f f f f f f f f f f f f f f f f f f f f f f f f f f f f f f f f f f f f f f f f f f f f f f f f f f f f f f f f f f f f f f f f f f f f f f f r r r r r r r r r r r r r r r r r r r r r r r r r r r r r r r r r r r r r r r r r r r r r r r r r r r r r r r r r r r r r r r r r r r r r r r r r r r r r r r r r r r r r r r r r r r r r r r r r r r r |
| SBE 780-2, SBE 850-2, SBE 850-2 S | ||||||
| A | B | C | D | E | F | |
| 570 | 1050 | 1560 | 2080 | 2480 | 3100 | 2 |
| 200 | 370 | 550 | 730 | 870 | 1100 | 1 |
| ±50 | ±40 | ±30 | ±20 | ±15 | ±10 | % |
SBEV 1000-2
| ∅mm | |||||
| 46 | 76 | 76 | 77 | 77 | 2 |
| 8101316203040 | 754367377 | 77777777 | 1 |
| SBEV 1000-2 | |||||||
| 1 | 2 | 3 | 4 | 5 | 6 | 7 | |
| 540 | 830 | 1250 | 1620 | 1990 | 2420 | 2800 | 2 |
| 190 | 290 | 440 | 570 | 700 | 850 | 1000 | 1 |
| ±50 | ±40 | ±30 | ±20 | ±15 | ±10 | ±10 | % |
SBEV 1100-2 S, SBEV 1300-2, SBEV 1300-2 S
| ∅mm | |||||
| 46 | 64 | 65 | 66 | 2 | |
| 8101316203040 | 64366 | 66 | 66 | 1 | |
| 366 | 66 | ||||
| 56 | 6 | ||||
| 6 | 6 | ||||
| 6 | |||||
| 6 |
| SBEV 1100-2 S, SBEV 1300-2, SBEV 1300-2 S | ||||||
| 1 | 2 | 3 | 4 | 5 | 6 | |
| 510 | 1110 | 1540 | 2050 | 2590 | 3100 | 2 |
| 180 | 390 | 540 | 720 | 910 | 1100 | 1 |
| ±50 | ±40 | ±30 | ±20 | ±15 | ±10 | % |

| 14. | SB 850-2 1) Serial Number: 00780... | SBE 780-2 1) Serial Number: 00781... | SBE 850-2 1) Serial Number: 00782... | SBE 850-2 S 1) Serial Number: 00787... | SBEV 1000-2 1) Serial Number: 00783... | SBEV 1100-2 S 1) Serial Number: 00784... | SBEV 1300-2 S 1) Serial Number: 00785... | ||
| P1 | W | 850 780 | 850 10 | 10 1100 1300 | |||||
| P2 | W | 490 470 | 490 54 | 580 730 | |||||
| n1 | /min | 1 | 1100 0 | -1000 0-1000 0-1100 | |||||
| 2 | 3100 0 | -3100 0-2800 0-3100 | |||||||
| n2 | /min | 1 | 640 680 | 640 10 | 00 1100 | ||||
| 2 | 1800 1 | 900 1800 | 2800 3100 | ||||||
| ø max. | mm (in) | 2 | 20 (3/4") | 22 (7/8") | |||||
| s max. | /min. bpm | 2 | 58900 | 53200 | 58900 | ||||
| ø max. | mm (in) | 1 | 40 (1 9/16") | ||||||
| 2 | 25 (1") | ||||||||
| ø max. | mm (in) | 1 | 13 (1/2") | 16 (5/8") | |||||
| 2 | 8 (5/16") | 10 (3/8") | |||||||
| b | mm (in) | 1,5 - 13 (1/16" - 1/2") | |||||||
| G | UNF (in) | 1/2" - 20 | |||||||
| H | mm (in) | 6,35 (1/4") | |||||||
| kg | m | kg lbs | 2,6 (5.7) | 2,7 (5.9) | 2,8 | (6.2) | |||
| D | mm (in) | 43 (1 11/16") | |||||||
| ah,ID/kh,ID | m/s2 | 17,0 / 1,5 | |||||||
| ah,D/kh,D | m/s2 | 4,2 / 1,5 | |||||||
| LpA/KpA | dB(A) | 103 / 3 | |||||||
| LWA/KWA | dB(A) | 114 / 3 | |||||||
Original instructions
1. Declaration of Conformity
We declare under our sole responsibility: These impact drills, identified by type and serial number 1 , comply with all relevant requirements of the directives 2 and standards 3 . Technical file at 4 - Fig. P
2. Specified Use
The machine is suitable for drilling, without impact, in metal, wood, plastic and similar materials and for impact drilling in concrete, stone and similar materials. It is also suitable for thread tapping and for screwdriving (not SB 850-2).
The user bears sole responsibility for any damage caused by improper use.
Generally accepted accident prevention regulations and the enclosed safety information must be observed.
3. General Safety Instructions

For your own protection and for the protection of your power tool, pay attention to all parts of the text that are marked with this symbol!

WARNING - Reading the operating instructions will reduce the risk of injury.

WARNING Read all safety warnings and instructions. Failure to follow all safety warn
ings and instructions may result in electric shock, fire and/or serious injury.
Keep all safety instructions and information for future reference.
Pass on your power tool only together with these documents.
4. Special Safety Instructions
Wear ear protectors when impact drilling.
Exposure to noise can cause hearing loss.
Use the additional handle supplied with the tool. Loss of control can cause personal injury.
Hold the power tool by insulated gripping surfaces, when performing an operation where the cutting accessory may contact hidden wiring or its own cord. Cutting accessory contacting a "live" wire may make exposed metal parts of the electrical tool "live" and could give the operator an electric shock.
Pull the plug out of the plug socket before any adjustments or servicing are performed.
Avoid inadvertent starts by always unlocking the switch when the plug is removed from the mains socket or in case of a power cut.
Ensure that the spot where you wish to work is free of power cables, gas lines or water pipes (e.g. using a metal detector).
Smaller workpieces must be secured such that they are not carried along with the drill bit when drilling (e.g. by clamping in a vice or on a work bench with screw clamps).
Keep hands away from the rotating tool! Remove chips and similar material only with the machine at standstill.
Metabo S-automatic safety clutch. When the safety clutch responds, switch off the machine immediately! If the tool jams or catches, the power supply to the motor is restricted. Due to the strong force which can arise, always hold the machine with both hands using the handles provided, stand securely and concentrate.
The Metabo S-automatic safety clutch must not be used for torque control.
Caution with hard screwdriving (driving of screws with either a metric or an imperial thread into steel)! The head of the screw may rip off or high restoring torques may be incurred at the handle.
Reducing dust exposure:
Some of the dust created using this power tool may contain substances known to cause cancer, allergic reaction, respiratory disease, birth defects or other reproductive harm. Some examples of these substances are: lead (from lead-based paints), crystalline silica (from bricks cement, etc.), additives for wood treatment (chromate, wood preservative), some types of wood (like oak and beech dust), metals, asbestos.
The risk from exposure to such substances will depend on how long the user or nearby persons are being exposed.
Do not let particles enter the body.
To reduce exposure to these substances: work in a well ventilated area and wear protective equipment, such as dust masks that are specially designed to filter out microscopic particles.
Observe the relevant guidelines for your material, staff, application and place of application (e.g. occupational health and safety regulations, disposal).
Collect the generated particles at the source, avoid deposits in the surrounding area.
Use only suitable accessories. In this way, fewer particles enter the environment in an uncontrolled manner.
Use a suitable extraction unit.
Reduce dust exposure with the following measures:
- Do not direct the escaping particles and the exhaust air stream at yourself or nearby persons or on dust deposits.
- Use an extraction unit and/or air purifiers.
- Ensure good ventilation of the workplace and keep it clean using a vacuum cleaner. Sweeping or blowing stirs up dust.
ENGLISHen
Vacuum or wash protective clothing. Do not blow, beat or brush.
5. Figures
Illustrations are provided at the beginning of the operating instructions.
Symbol explanation:

Normal drilling/Drill bit
Impact drilling
Movement direction
Driving screws/Screw
Slow
Fast
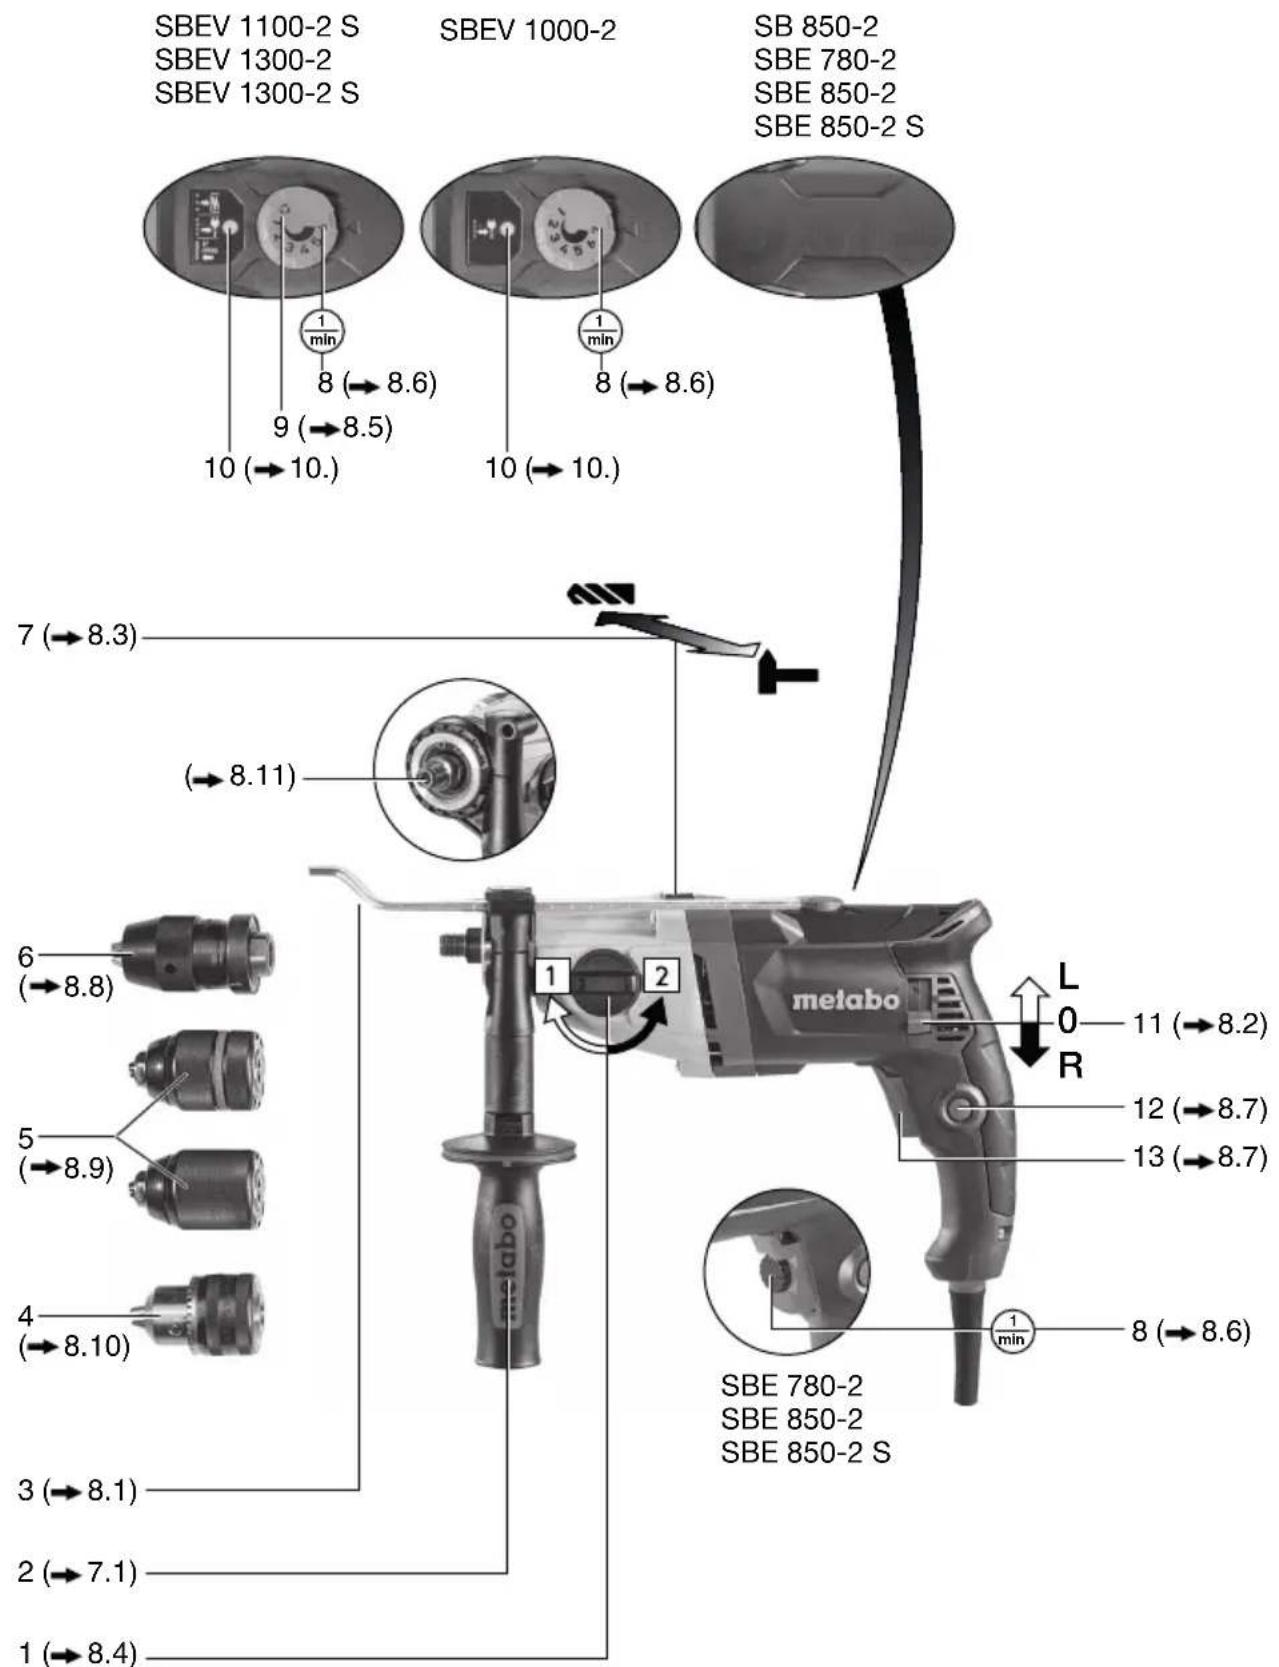
6. Overview

Fig. A
1 Thumb-wheel for gear selection
2 Additional handle/Additional handle with vibration damping
3 D e p t h s t o p
4 Geared chuck *
5 Futuro Plus keyless chuck *
6 Futuro Top keyless chuck *
7 Sliding switch (normal drilling/impact drilling)
8 Speed preselection wheel *
9 Setting wheel for impulse function *
10 Electronic signal indicator
11 Rotation selector switch *
12 Lock button for continuous activation
13 Trigger
* depending on model
7. Initial Operation

Before plugging in the device, check to see that the rated mains voltage and mains
frequency, as specified on the rating label, match your power supply.

Always install an RCD with a maximum trip current of 30mA upstream.

To guarantee secure purchase of the chuck: After initial drilling (clockwise), use a screw
driver to firmly tighten the safety screw inside the drill chuck (if available/depending on the model).
THE SAFETY SCREW HAS A LEFT-HANDED THREAD!
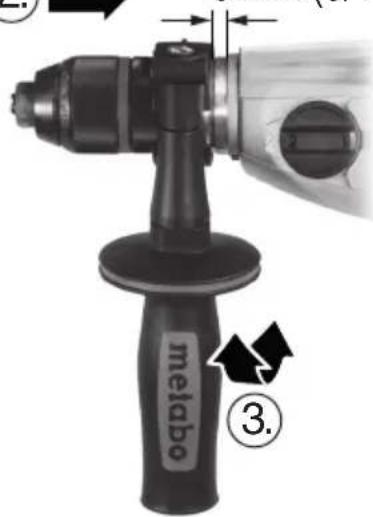
7.1 Fitting the additional handle (2)

For safety reasons, always use the additional handle supplied.
Tighten the additional handle firmly by turning it.
8. Use
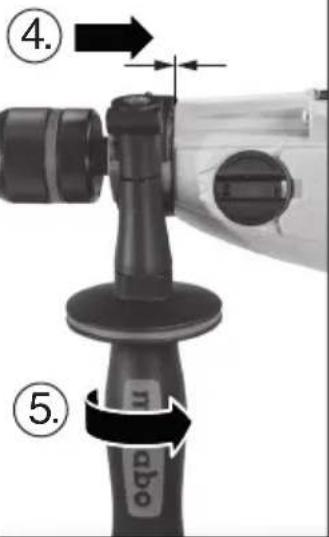
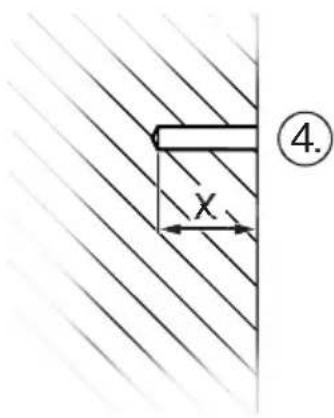
8.1 Setting depth stop

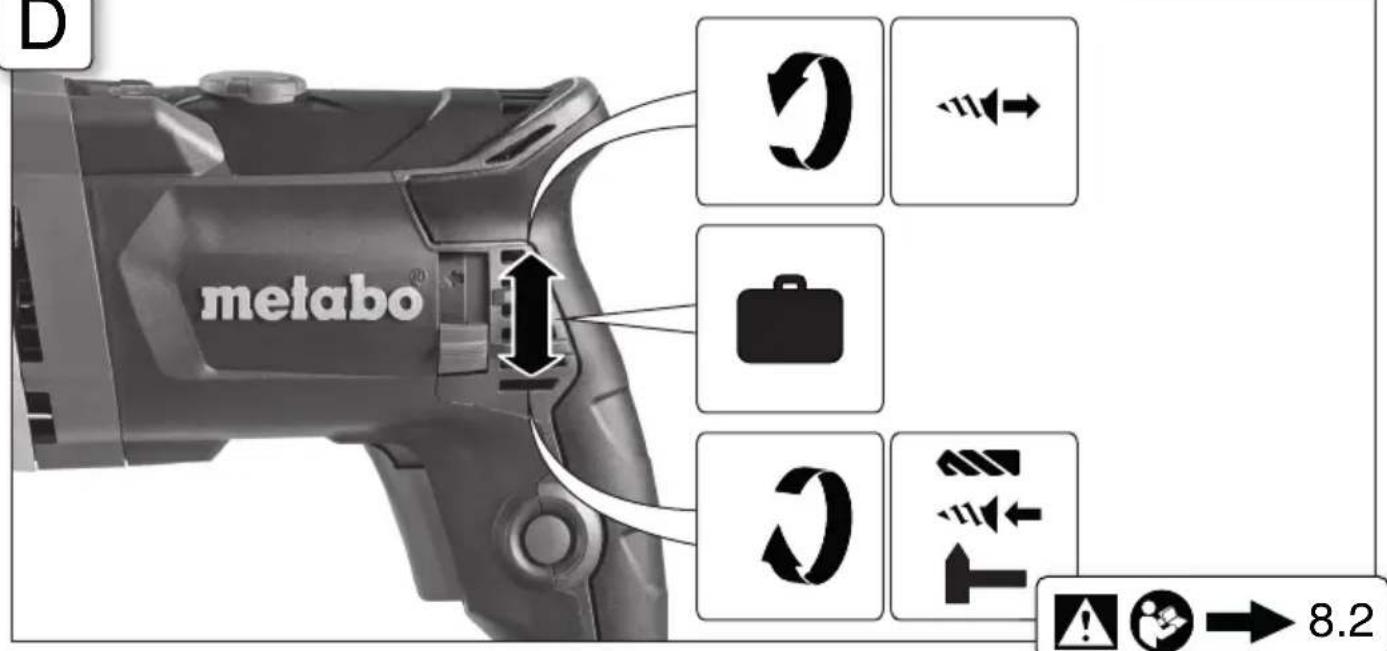
8.2 Setting direction of rotation, transporting safety device (switch-on lock) Fig. D

Do not activate the rotation selector switch (11) unless the motor has completely stopped.
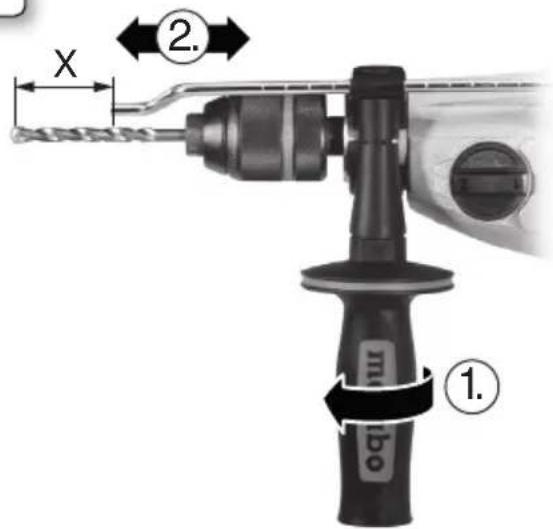
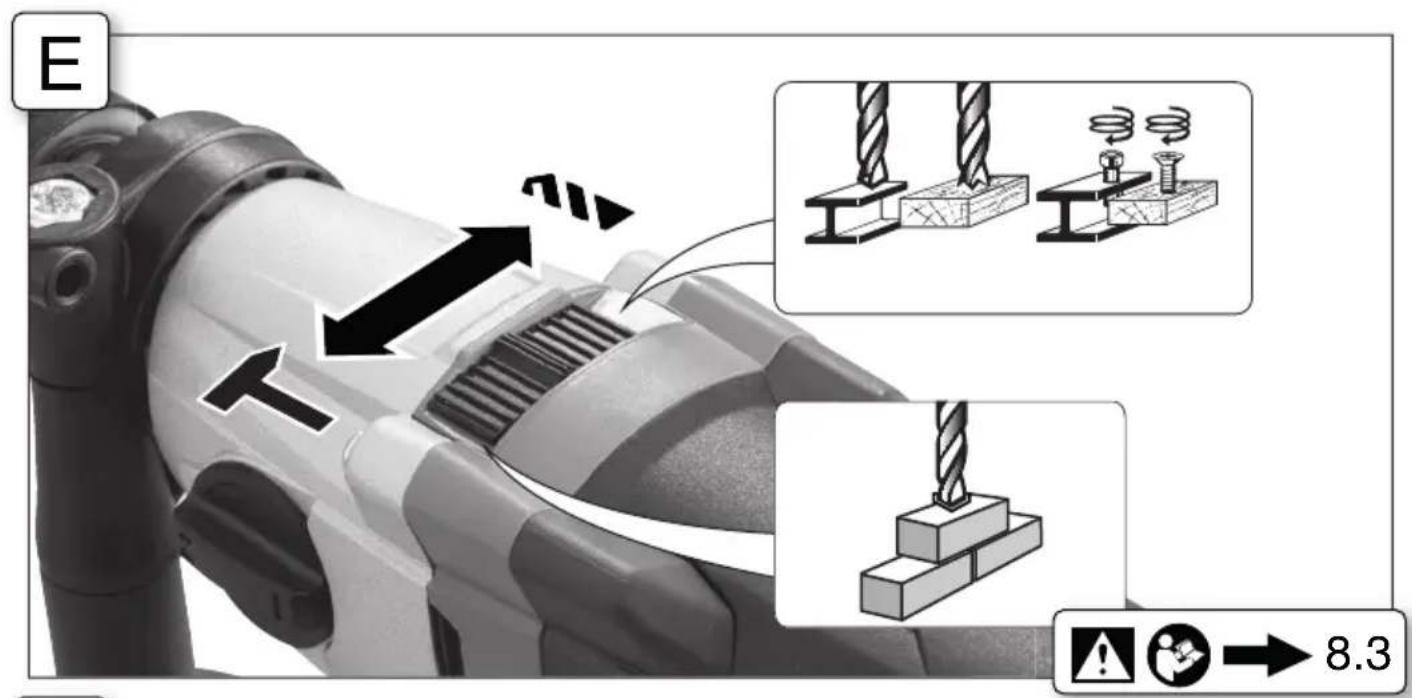
8.3 Setting for normal drilling, impact drilling Fig. E

Impact drilling and normal drilling only in a clockwise direction.
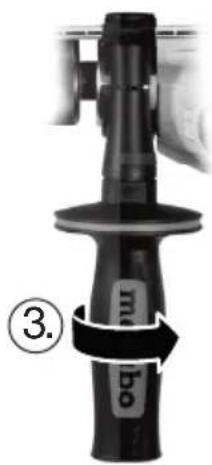
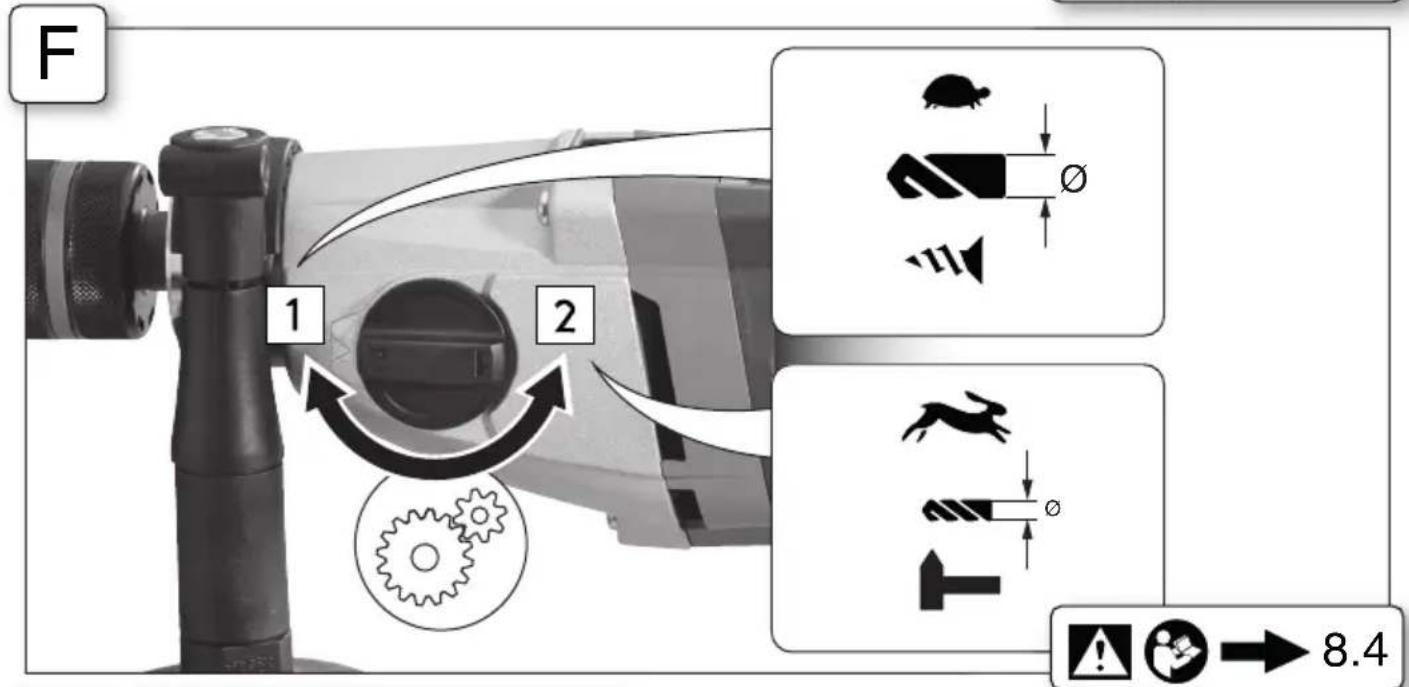
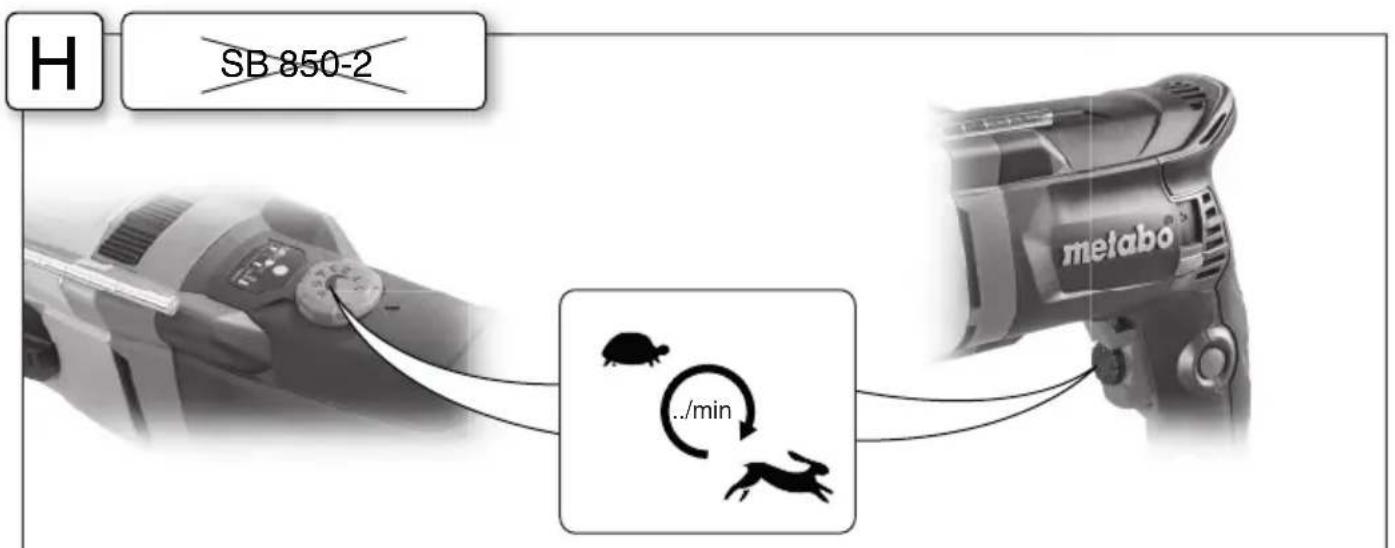
8.4 Selecting gear

Change thumbwheel (1) only when the machine is in the process of running down, by switch it on and off).
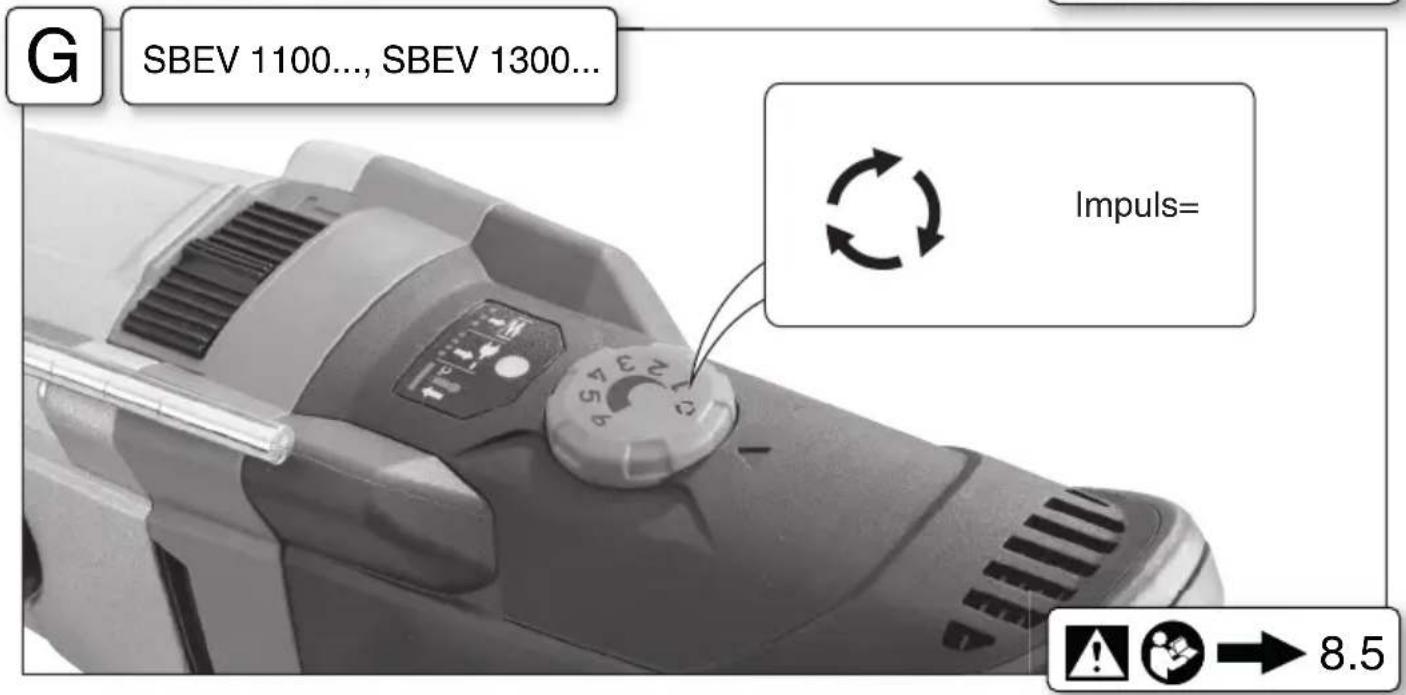
8.5 Setting impulse function

= impulse function switched on constantly (to facilitate tightening and releasing of screws that are tight even when the screw heads are damaged. To enable clean drilling without centre punching in tiles, aluminium or other materials).
8.6 Preselecting rotational speed
See the table for recommended rotational speeds for drilling.
8.7 Switching On and Off
Switching on, rotational speed Fig. A: Press the trigger (13).
Release the trigger to switch off.
Continuous operation Fig. A: With the trigger (13) pressed, push in the locking button (12) and release the trigger. Press and release the trigger (13) again to switch off.
In continuous operation, the machine continues running if it is forced out of your hands. Therefore, always hold the machine with both hands using the handles provided, stand in a safe position and concentrate.
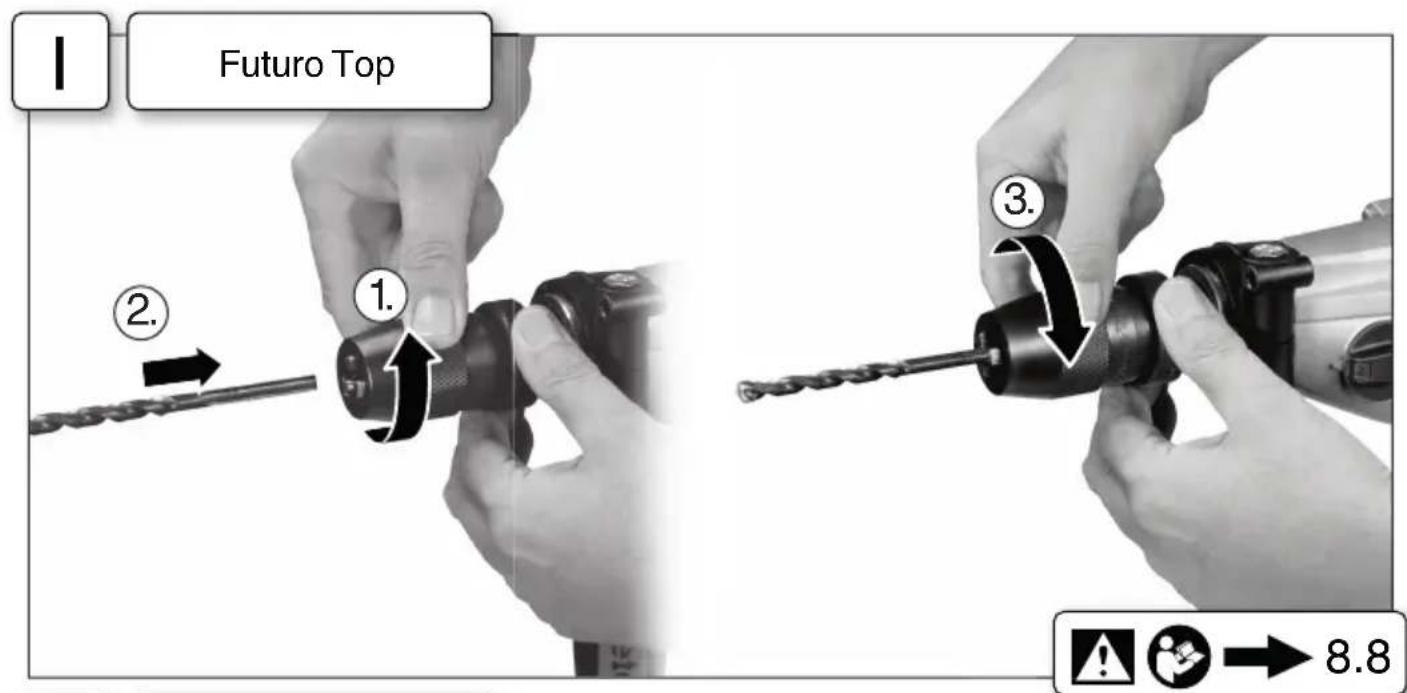
8.8 Tool change, Futuro Top keyless chuck (6) Fig.1
Clamp the tool by turning the sleeve firmly to its stop.
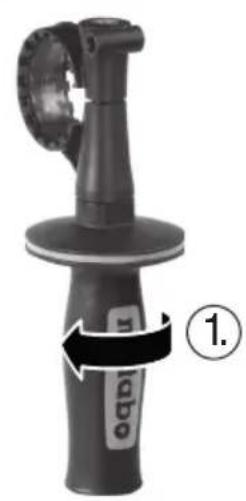
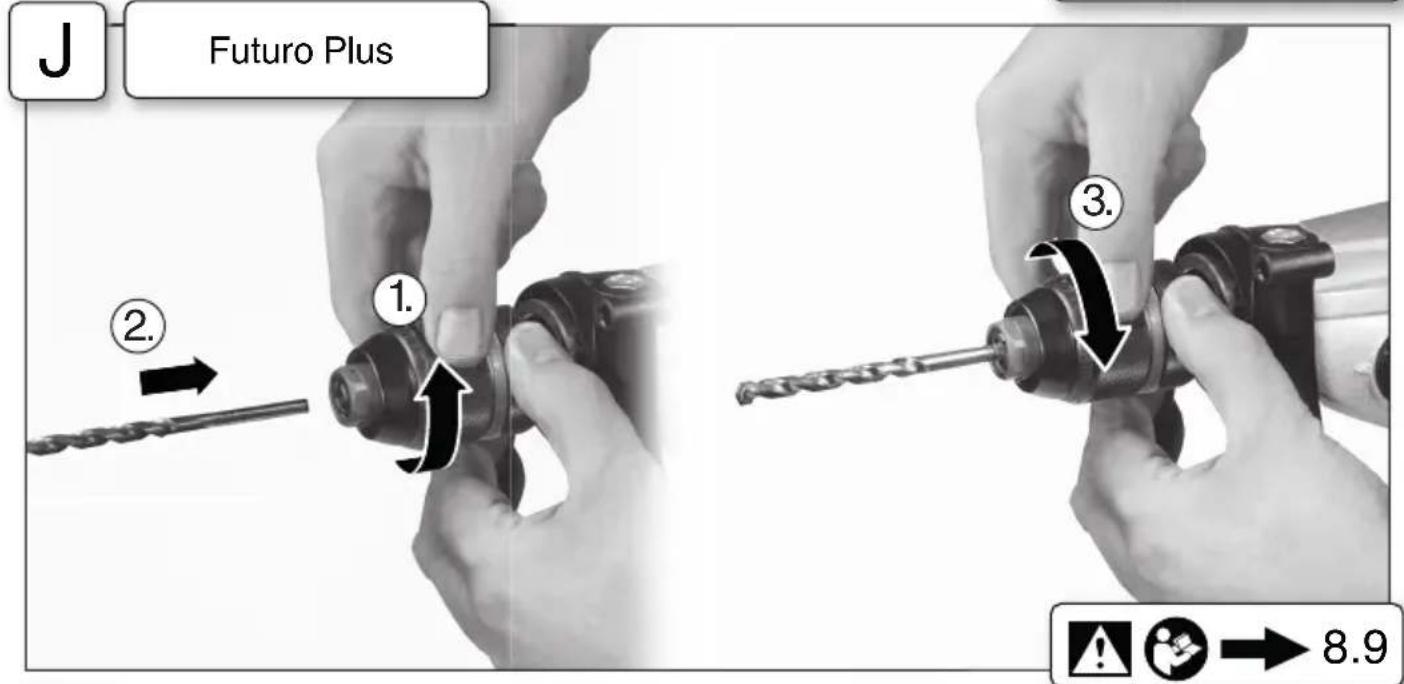
8.9 Tool change, Futuro chuck Fig.J

The ratchet sound which can possibly be heard after opening the drill chuck is functional and is switched off by a reverse rotation of the sleeve.
If the chuck is very tightly closed: Firmly grip the chuck with an open-end spanner at the chuck head and firmly turn the sleeve in the direction of the arrow -1.
Clamping the tool
- Insert the tool -2- as far as possible.
- Using one hand, hold the retainer ring securely (depending on fittings).
-
Turn sleeve in direction -3- until the noticeable mechanical resistance has been overcome.
-
Caution! The tool is not yet fully tightened! Keep turning the sleeve (it must "click" when turning) until it cannot be turned any further - only now is the tool safely clamped.
With a soft tool shank, retightening may be required after a short period of operation.
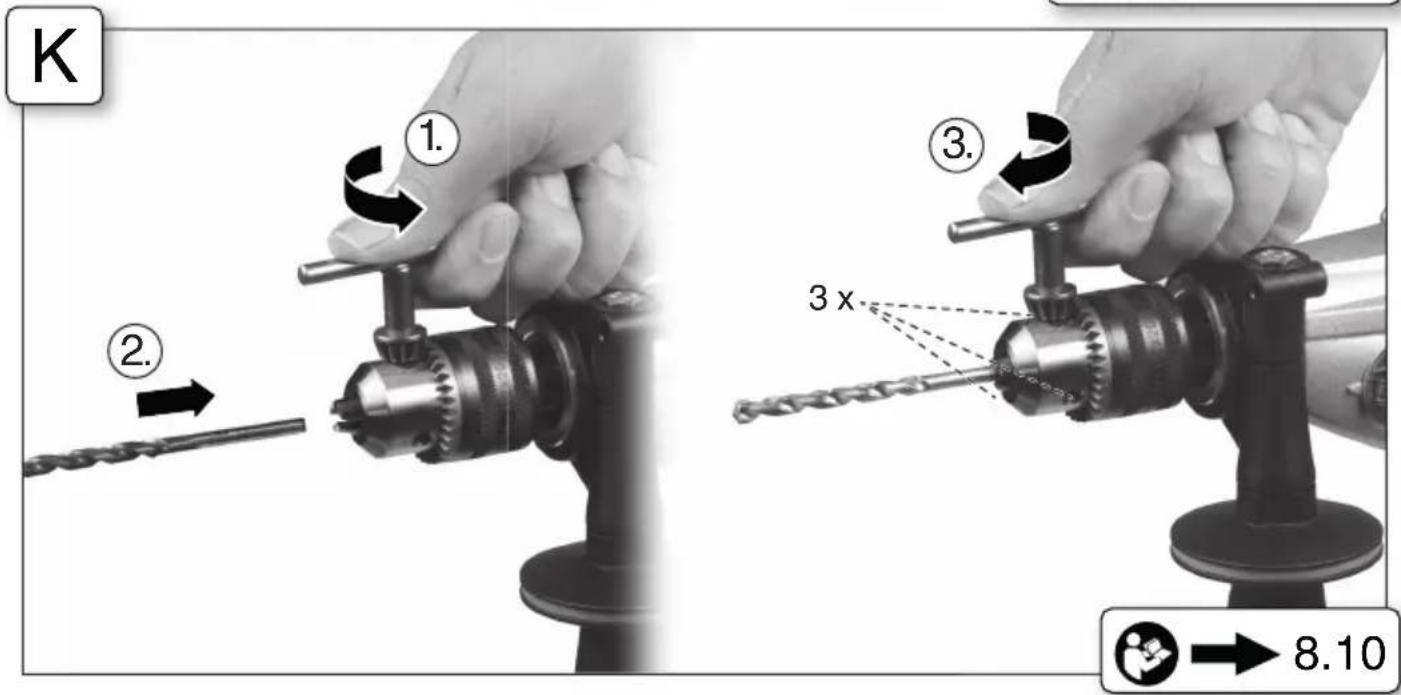
8.10 Tool change, geared chuck (4) Fig. K
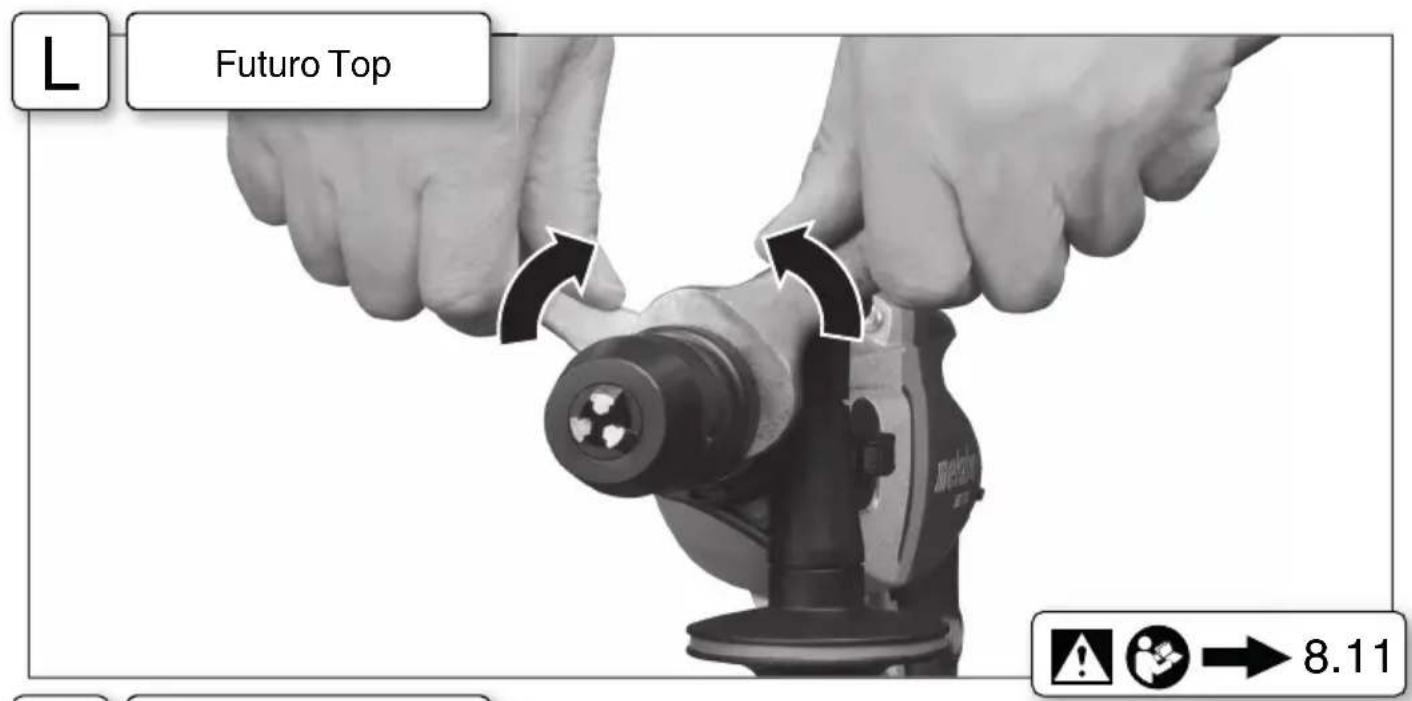
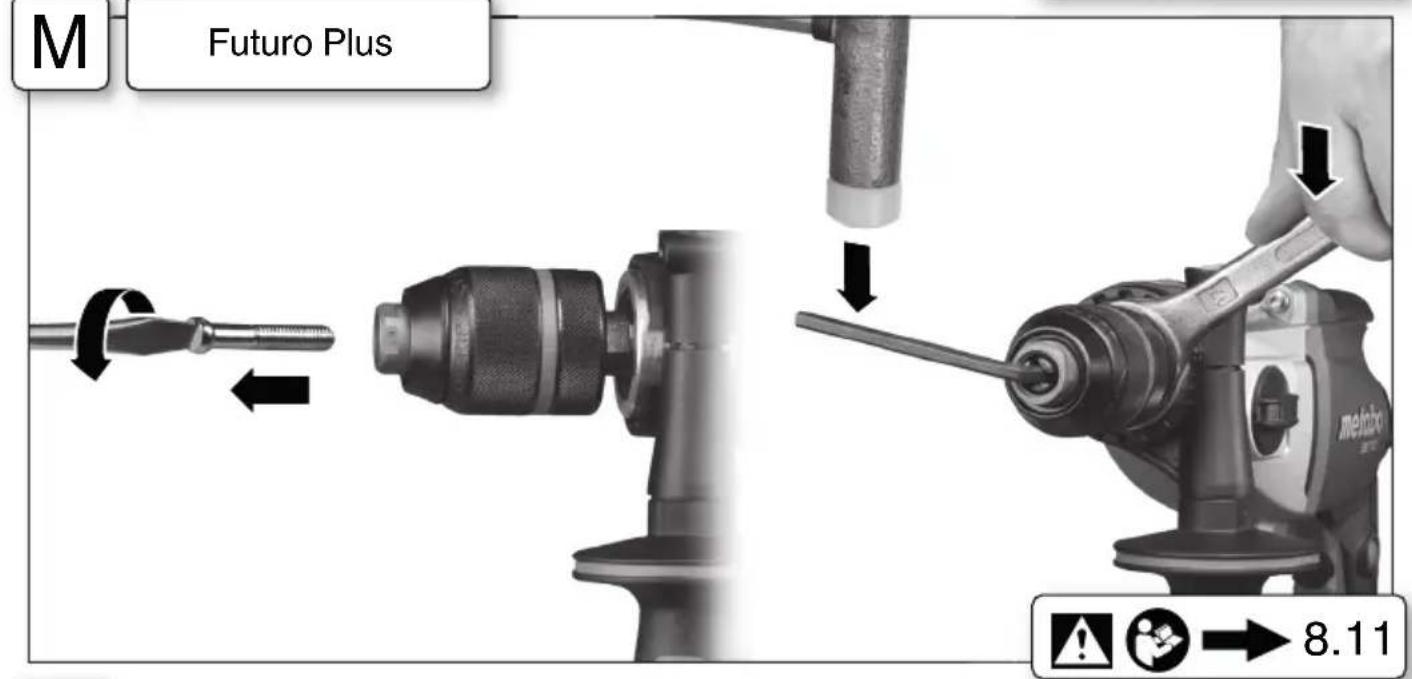
8.11 Unscrew the chuck (when driving screws without the chuck or for use with attachments) Fig. L, M, or N
Note for Fig. M. N: Release by tapping lightly with a rubber hammer, as shown, and unscrew.
Note: If a bit clamping bush (order no. 6.31281) is attached, the screwdriver bit inserted in the hexagon socket of the spindle is held in place.
9. Cleaning, Maintenance
Keyless chuck cleaning:
After prolonged use hold the chuck vertically, with the opening facing down, and fully open and close it several times. The dust collected falls from the opening. The application of cleaning spray to the jaws and jaw openings at regular intervals is recommended.
10. Troubleshooting
Electronic signal display (10):
Rapid flashing - restart protection
(SBEV 1300-2, SBEV 1300-2 S, SBEV 1100-2 S, SBE 1000-2)
When power is restored after a power failure, the machine - which is still switched on - will not start for safety reasons. Switch machine on and off again.
Slow flashing - carbon brushes worn
(SBEV 1300-2, SBEV 1300-2 S, SBEV 1100-2 S)
The carbon brushes are almost completely worn. If the brushes are completely worn, the machine switches off automatically. Have the brushes replaced by an authorized service centre.
Permanently lit - overload
(SBEV 1300-2, SBEV 1300-2 S, SBEV 1100-2 S) If the machine is subject to long periods of continuous overloading, the power input of the machine is limited. This prevents the further unauthorized heating of the motor.
Run the machine in idling until it cools down and the electronic signal display switches off.
11. Accessories
Use only genuine Metabo accessories.
Use only accessories which fulfil the requirements and specifications listed in these operating instructions.
Fit accessories securely. Secure the machine if it is operated in a bracket. Loss of control can cause personal injury.
For a complete range of accessories, see www.metabo.com or the main catalogue.
12. Repairs
Repairs to electrical tools must be carried out by qualified electricians ONLY!
If you have Metabo electrical tools that require repairs, please contact your Metabo service centre. For addresses see www.metabo.com.
You can download spare parts lists from www.metabo.com.
13. Environmental Protection
Observe national regulations on environmentally compatible disposal and on the recycling of disused machines, packaging and accessories.
Only for EU countries: Never dispose of power tools in your household waste! In accordance with European Guideline 2002/96/EC on used electronic and electric equipment and its implementation in national legal systems, used power tools must be collected separately and handed in for environmentally compatible recycling.
14. Technical Specifications
Fig. O. We reserve the right to make technical improvements.
P1 = Rated input
P2 =Power output
n1* =No-load speed
n2* L o a d s p e e max.dia. = Max.solid drill diameter s max = Max.impact rate b =Chuck capacity
G = S p i n d I e H =Spindle with hexagon socket m =Weight D =D=Collar diameter
Measured values determined in conformity with EN 60745.
Machine in protection class II
Alternating current
The technical specifications quoted are subject to tolerances (in compliance with the relevant valid standards).
- Energy-rich, high-frequency interference can cause fluctuations in speed. The fluctuations disappear, however, as soon as the interference fades away.
A Emission values
Using these values, you can estimate the emissions from this power tool and compare these with the values emitted by other power tools. The actual values may be higher or lower, depending on the particular application and the condition of the tool or power tool. In estimating the values, you should also include work breaks and periods of low use. Based on the estimated emission values, specify protective measures for the user - for example, any organisational steps that must be put in place.
Vibration total value (vector sum of three directions) determined in accordance with EN 60745:
ENGLISHen
a_h, ID = Vibration emission value (impact drilling into concrete)
a_h,D =Vibration emission value (drilling into metal)
Typical A-effective perceived sound levels:
L_pA =Sound pressure level
LWA = Acoustic power level
K_pA , K_WA = Uncertainty

Wear ear protectors!
Notice originale
(SBEV 1300-2, SBEV 1300-2 S, SBEV 1100-2 S, SBE 1000-2)
Allumage permanent - surcharge
(SBEV 1300-2, SBEV 1300-2 S, SBEV 1100-2 S)
K_h,|D, K_h,D = Incertitude (vibration)
(SBEV 1300-2, SBEV 1300-2 S, SBEV 1100-2 S, SBE 1000-2)
a_h, D = trillingsemissiewaarde (boren in metaal)
K_h,ID, K_h,D = onzekerheid (trilling)
(SBEV 1300-2, SBEV 1300-2 S, SBEV 1100-2 S, SBE 1000-2)
(SBEV 1300-2, SBEV 1300-2 S, SBEV 1100-2 S, SBE 1000-2)
8.5 Stalla in impulsfungtion


(SBEV 1300-2, SBEV 1300-2 S, SBEV 1100-2 S, SBE 1000-2)
a_h, ID = vibrationsemissionsvärde (slagbörning i betong)
a_h,D = Vibrationsemissionsvärde (börning i metall)
K_h, ID, K_h, D = onoggrannhet (vibrationer)
Normal, A-viktad ljdniva:
LDA =Ljudtrycksnivá
L'WA =ljudeffektniva
K_pA K_WA = Os akerhet

Använd hörskyydd!
SUOMlfi
8.3 Stille inn boring, slagboring fig
Reservedslsister kan downloads pa www.metabo.com.
a_h, ID = Vibrationsemission (slagboring i beton)
DANSKda
a_h,D = Vibrationsemission (boringimetal)
K_h,ID, K_h,D = Usikkerhed (vibration)
n1* =ApiOoC oTpooWv Xomega
n2* =ApiOoC OToPoOoV e optio
max = Meyiotn diaetpos tpuunmuotc
s max =MéyioTOS aipθμoC kpoouεwv
b Avoiγμa TσoK
(SBEV 1300-2, SBEV 1300-2 S, SBEV 1100-2 S, SBE 1000-2)
G = furotengelymenet
H =furotengely belso hatszogletu veggel
m = s y
O6pa6aTbIbAembIe Detaln He60JbIoro pa3Mepa DOLHHb 6bITb 3aΦHKcnpOBaHb (HaNPIMep, 3aKaTbIB TnCKax INN 3aKpeNJIeHb Ha pa6ooyem CTOIe C NOMOuBIO CTpy6uH) TaHIM O6pa3OM, YTO6blPn CBepLeHn OHn He 6blIN 3aXBaueHb CBepIOM.
He npHKacaiTeCb K BpaaioUeMcy INHCTpyMeHTy!YdaJIaIte OINIKN I TOMy NOIO6HOe TOJbKO NocJe NOJHO OCTaHOBHNHCTpyMeHTa.
PpeOxpaHnTeIbHaMyfTa Metabo S-automatic. Pn CpabTaBbAHnn PpeOxpaHnTeIbHOm MyfTbI cpa3y JHe OTKIOUHTe IHCTpymENT! B Cnyae 3aKINHBaHH Nn 3aeDAHH INCTpymENTa DBnraTeJb OCTaHaBJIbBaETcR. Tem He Mehee, B CBa3N C BO3MOXHbIM BO3HNKHOBeHHem OTdaHn Pn pa60Te BcerDa DepHXnTe IHCTpymENT DByM pyKaAMN 3a pyKoRTKn, PnIHMaTte BoJee yCTOnYuBOE NOLOKeHne I 6yDbTe BHImaTeJIbHbI Pn BBInONHeHH pa60Tbl.
He nCnoIb3yIe npEdoxpaHntelbHyIO MyfTy Metabo S-automatic dIra orpaHnueHnKpyTaeo MOMeHTa.
Co6IIOJaIe 0CTOpOxHOCtB npn JkctKOM 3aBOpaunBaHHu WpypNOB (3aBOPaUNBaHne WypyNOB C MeTpInueCKo HIN DIOHMOB Pe3b6oB B CTaJIb)! TIOBka Wypyna MoKeT 6bITb CopBaHa HIN Ha pyKOJrke MOrY Bo3HKnHyTb BBICOKHe peAKTINBHbIe KpyTAAUne MOMHTbl.
CHINHEHNE nbileBOH Harpy3KN:
Auctu,6pa3yiouneepn pa6oTe c DaHHbIM HHCTpyMeHToM,MOYr COepeKaTb BeuecTBa,KOTOpBie CNOOC6TByOT pa3BHTHO paKa,POBLeHIO aIJIeprruecknx peakni, 3a6OleBaHn DbIXaTeNbHbIX NyTei,BPOKDeHHbIX DeΦeKTOB INPouHx 3a6OJeBaHn peNpOdyKTNBHO CnCTeMb.I.HeCKoJbKO npImepOB IIO6hXBeueCTB:CBHeC(B CODepHaUem CBHeuc JIKI),MNHepaJIbHaN PbIb (13 CTponTeIbHoro KnpNua,6eToHa NT. n.)D06aBKn dIra O6pa6OTN DpeBecHbI (coIb xpomOBoi
PYCCKHru
KNCLOTbI, CpeDCTBa 3aUHTbI DpeBecnHbl), HEKOToPbIe BNDbl DpeBecnHbl (HaNPmep, Nblb OT dy6a nn 6yka), MeTJIbI, ac6ect.
CTeNeHb pNcKa 3aBNCHT OT npoDoJIHKeIbHOCTN BO3DeIcTBnA 3Tnx BeIeCTB Ha nOJIb3OBaTeJIra IIN HaxOJaUHXCBA6JIu3N IIOJe.
He donyckaIte nonadaHna YactnO6pa6aTbIbAemOro MaTePnJaB OprHaHn3M.
IymeHbWeHHBpeHOroBO3dEChBn3TNX BeueCTB:OeCneYteXopoWyIOBEHTNIAuIO pa6oeryo MeCTa HocHTe NOxOJaUne CpeDCTBa 3aunTbI,HaNPmep,peCnnpaTOpbI,KOTOpbie CNOC6HbI OTnbltpOBbIBaTB MKNPOCKONHueckHe Yaactnbl.
Co6IIOdaIte DnpeKTHBbl, pacnpoctpaHIOUncEca Ha o6pa6aTbIbAembM MaTePnaI, nepcoHaJI, BapnAHr npIMeHEnn I MeCTO npOBeDeHn pa6OT (HaNPmep, nIoJXeHne O6 oxpae Tpyda, yTNIN3aun).
Obecneyte ydaJIeHne o6pa3yUOxxCraactn,He DonynckaIte 6pa3oBaHnO TIOJKeHnB OKpyKaIOUeM npocTpaHCTBe.
NcnoJb3yIte TOLbHO NOxOJaIyIO OChACTHy. 3TO N03BOJNT COKpaTHTb KOJIInueCTBO YaCTNu, HEKOHrPoJIpyEmo Bbl6paCbIBaEmbIX B OKpyKaIOU cyEdu.
IcnoJb3yInTe nOxDxOJaUe BbITJHHOe yCTPOINCTBO.
YMeHbIHTb NblIeByIO HaPy3Hy Bam NOMOryT CneDyUoNe MepbI:
- He HappaBraIte BbIXOJaIe I3 IHCTpyMeHTa YactnIbI N Otpa6oTaHHbI BO3dYx Ha Ce6r, HaxOJaIcxCpRdOM IIODeI INN CKOpJIeHnI PbIIN;
- INCNoJIb3yIte BBITaHHOe yCTpoIcTBO H/INBIO3DyXOOuNCTHTeJIb;
- xopoio npoBeptnBaHte pa6ooye MeTo n COpeHHTe eRO B YNCTOTE C NOMOu bIO nbIeCocA. POnMeTaHne nn BbIDyBaHne ToIbKO pOnHnMaet nbIb B BO3dyX.
O6pa6aTbIbAIte nbJIeCOCOM nIN CTnpaIte 3aUHTHyO OJeKdy. He npOduBaIte ODeJy BO3dYxOM, He BbIbIbAIte n He CMeTaIte C Hee PbIb.
5.PncyHnn
PncyHn pacnoJKeHb IB hauaJe pyKOBoDCTBa no 3KcnpyaTaun.
IORCHEHNAHCNOb3yEmbIM CHMBOJAM:

CbepeHne/cBepno
YdapHoe CBePJIeHne
HanpaBLeHne DvHexnna
JaTe npa6oTaTb 3JIeKtponHCTpyMeHTy Ha
PYCCHNru
XOLOCTOM XOy, NOKa OH He OCTbIHET HHe NORaCHET 3LeKTPoHHb CnHaJIbHb INHdNKaTOP.
11. Пинадлжноctи
IcnoJIb3yIe ToJIbKO opnHnHaJIbHbIe npHaJdJIeK-HocTn Metabo.
IcnoJb3yIe ToJIbKO Te npHaJaIeKHOCTN, KOTOpBle OTBeuAOT Tpe6ObaHnM nnapaMeTpam, nepeuCJIeHHbIM B DaHHOM pyKOBOdCTBE NO 3KcnIyataun.
HaJeKHo fHKcpyTe npHaJdeKHOCTn. Ppi 3KcNlyaTaunn 3JeKTPoHnHCTpyMeHTa B depKaTeJe: HaJeKHO 3aKePnITE 3JeKTPoHnHCTpyMeHT. Iotepa KOHTpOJa HAd 3JeKTPoHnHCTpyMeHTOM n HaCaKnO MoKeT CTaTB npuHHo NOLyehn TpaBM.
Полны accopTUMENT npHnAJIeKHOCTe CMOTPnTe Ha caIte www.metabo.com ИИВ ГлавHOM KaTaNore.
12. PemoHT
K peMOHTy 3JIeKTPoHHCTpyMeHt aOnyCKaIOTcT TOJbKO KBaINΦuNpOBaHHbI CneuaJIHCTbI-3JIeK- TpIKn!
Cnncn 3anpaTeM MoXHo cKaaTaB Ha www.metabo.com.
13. 3auntata OKpyhaioe cpebl
BbInHnIe HaunOHaJIbHbIe npaBnla yTnIN3aunn n nepepa6OTKn OTCnyKHBwero HhCTpyMeHTa, yNaKOBn n npHaJdLeXHOCTei.

ToIbKOДЯСТРАн EC: He BbIbpaCbIbAaTe 3JIeKTKPOnHCTpyMeHT BmEcTe C 6bITOBbIMN OTXODAM! CorJaCHO DnpeKTHBe 2002/96/
EG 06 yTnIIN3aunn CTapbIX 3JIeKTPoPnP6OpOB n 3JIeKTPoHNO 06OpyIOBAnHH N COOTBeTCTByIOUIM HauNHOJbHbIM HOPMaM 6bIBWne B yNtpe6JIeHN 3JIeKTPoPnP6OpB i N 3JIeKTPoINHCTpyMeHTbl NOJIeXaT pa3dEINbHOY TnIIN3aUN C ueJIbIO IN NOcLJeDyIOUeN 3KOJIoRNUeCKN 6e3ONaCHO nepepa6OTKn.
14. Texnuechne xapaHTepncTnKn
Puc.O.Bo3MOXHHbI N3MeHeHnB BCBA3N CycOBepueHcTBOBaHHem N3DeJIIn.
P1 = HOMHaJIbHaJ MOUHOCTb
P2 =BbIXOHaRA MOUHOCtB
n1* =acToTa BpaueHna 6e3 Harpy3KN
n² =caCToTaBpaueHnI NOHaRpy3KoI
MaHC. = MaKcHMaJIbHbIДnAmEtP CBePnA S MaHC. = MaKcHMaJIbHaJ YaCTToA yDapOB
b =Диаэзн 3аЖИма CBepиьнбHoro naTpoHa
G =pe3b6a cBepnIbHOro IINHeJIa
H =CBePnIbHbI NIIHdJIb C BHyTpEHNM ⅢeCTnIgpaHHNKOM
m = macca
D =ДиametpшeнкзаЖИMa
Pe3yIbTaTbI H3MepeHn NIOJyueHbIB COOTBETCTBn CO CTAHpTOM EN 60745.
3JIeKTPoHnHCTpyMeHT Klaacca 3aunTbI II
NepemehhbiTOK
Ha yka3aHHbIe TexHnueckne XapaKTepcntHKn pacnpocTpaHraOTc DOnyCKN, npEpyCMOTpeHHbIE DeiCTByUOIMN CTaHdApTaMn.
- Moцьie BBICOKOcaCTOTHbIe NOMEXN MOryT Bbl3BaTb KOLe6aHn YaCAcTOTbI BpaueHn. Ipn 3aTyXaHn NOMex KOLe6aHn PpeKpaaJauTcJ.

3haeHnIyMaN Bn6paun
3TN 3NaueHnI NO3BOJIaOT OceHNbTaB N CpABHnBaTb Wym IN Bn6paCNUO, CO3DaBAeMbIe npi pa6OTE pa3NHybIX 3JeKTPoHnCTpymeHTOB. B 3aBNCmOCTN OT yCIOBNI 3KcNlyaTaCNI, COCTOJHnA 3JeKTPoHnCTpymeHTA NII pa6OuNX (CMeHHbIX) INCTpyMeHTOB 4aKTnueCha Harpy3Ka MOKeT 6bITb BblSe NII HNKe. Pn ONpeDeJIeHN NpIMepHO rpoBH Wymu IN Bn6paCNUyHTbI-BaNTe NepepbIBbl PA6OTE N 4a3bl pa6Otbl C NOHNJKeHHoN (WymoBOH) Harpy3KO. ONpeDeJInte NpeyeHbOPraHn3aCNOHHbIX MEP NO 3aUHTe N0lb3OBAteJIc C yYeTOM TEX NII INHbIX 3HaueHni Wyma IN Bn6paCNU.
CymMapHoe 3NaHeHne Bn6paun (BeKTopHa CymMa Tpex HapPaBleHn) paccHTbIbAeTcB COOTBeTCTBn co CTaHdApTOM EN 60745:
ah,ID =3NaueHne Bn6paun (yDapHoe Cbep- JENHe B 6eTOHe)
ah,D =3HaueHne Bn6paunn (CBepeHne B MeTaJIne)
KhID,Kh,D=Ko3ΦΦnueHT norgpeuHocTn (Bn6paun)
YpOBeHb Wyma no MeToy A:
LpA =ypoBeHb 3ByKOBOrO DaBLeHnRA LWA =ypoBeHb 3ByKOBOMouHOCTH
KpA, KWA= KOaΦΦnUeHT nOprpeHocTn

HaedebaaTe 3aunTHbIe HaywnnK!
EAC
HΦopMaζηДЯ NOkynatela:
Ceptnuikat COOTBETCTBnA:
CepTnФнкaT COOTBcTeTBnA: No TC RU C-DE.AH30.B.01484, cpoK DeiCTBnA c 24.03.2015 no 23.03.2020 r., BbIaH opraHOM nO ceTpNfKaun npoDyKnu «INBAHOBO-CEPTNΦHKAT» OOO «INBaHOBcKn ΦOnD CepTnФнkaun»; Adpec(lop. nФaKT.): 153032, PocsnckaЯ Фepeaun, INBaHOBcKa o6JI, r. INBaHOBO, yI. CTaHkoCTponTeJe, d. 1; TeI. (4932)23-97-48; paKc (4932)23-97-48; E-mail: ivfs@mail.ru; ATTecTaT aKKpeiHTaun Np POCC RU.0001.11AN30 ot 20.06.14 r., BbIaH ΦeepaJIbHoN clyJb6oN no aKKpeiHTaun
CtpaHa n3roTOBLeHn: TepMaHHa
Pon3BOIDTeJIb (3aBOJ-n3rOToBHTeJIb):
"Metabowerke GmbH",
Metaboallee 1.
D-72622 Nuertingen, RepmaHnIa
HmnpTeB Pocn:
OOO "MeTa6o EBa3n"
Poccn,127273,MockBa
yI. Bepe3oBaA aIIe, 5 a, cTp 7, oΦnc 106
Tei:+74959807841
IaTApOIN3BOIDCTBa 3aunHΦpOBaHa B 10-3NaHOM CepnHOM HOMepe INHCTpyMeHTa, yKa3aHHOM Ha ero IuNbDnke. 1 RaNΦpa O6O3NaHae TOrd,
Hanpimep «4» 06o3Haayet, YTO n3dJIne npOn3-BeDeHO B 2014 roy. 2 a n 3 aunphi bI o6o3Haayot
HOMep MecaB FOy npOn3BOcTBA, HApnpMeP 05》-Ma
TapaHTnHbI cpoK: 1 roD c DaTbI npOdaHn
CpoK cIyJ6bI INHCTpyMeHTa: 5 JeT C daTbI N3rTOBLeHn