
Predator XB253QGW - Monitor ACER - Free user manual and instructions
Find the device manual for free Predator XB253QGW ACER in PDF.
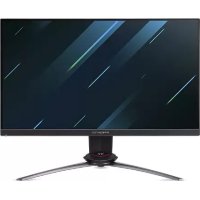
 FR
FR
 BG
BG
 CS
CS
 DA
DA
 DE
DE
 EL
EL
 EN
EN
 ES
ES
 ET
ET
 FI
FI
 HU
HU
 IT
IT
 JA
JA
 LT
LT
 LV
LV
 NL
NL
 NO
NO
 PL
PL
 PT
PT
 RO
RO
 RU
RU
 SK
SK
 SL
SL
 SV
SV
 TH
TH
 TR
TR
 UK
UK
 ZH
ZH
| Product Type | LCD Monitor |
| Brand | Acer |
| Model | Predator XB253QGW |
| Screen Size | 24.5 inches (62 cm) |
| Panel Type | IPS (In-Plane Switching) |
| Maximum Resolution | 1920 x 1080 @ 240 Hz (HDMI/DP), 280 Hz (DP with Over Clock) |
| Brightness | 400 cd/m² (native and HDR400 mode) |
| Contrast | 100,000,000:1 (ACM) |
| Response Time | 1 ms (gray to gray), 0.5 ms (min) |
| Viewing Angle | 178° horizontal / 178° vertical (CR=10) |
| Built-in Speakers | 2 W x 2 (optional) |
| Connectors | HDMI, DisplayPort, USB 3.0 x 2 (optional) |
| Power Supply | 100-240 V, 50/60 Hz |
| Consumption (on) | 22.0 W (typical) |
| Consumption (standby) | 0.45 W (typical) |
| Dimensions (W x H x D) | 557.79 x 397.84 ~ 512.84 x 236.27 mm |
| Net Weight | 5.30 kg |
| Ergonomic Adjustments | Tilt (-5° to +25°), swivel (-20° to +20°), height (0-115 mm), pivot (-90° to +90°), removable stand |
| Main Functions | Brightness, contrast, blue light, HDR, Adaptive-Sync, Over Drive, VRB, gaming modes, etc. |
| Care and Cleaning | Clean with a soft cloth and solvent-free solution. Do not spray liquid directly. Do not use ammonia or alcohol. |
| Safety | Do not expose to rain or moisture. Do not open the enclosure. Unplug if damaged. |
| Repairability | Repair by authorized technician only. |
| Energy Class | B (annual consumption 39 kWh) |
| Standards | Compliant with FCC, CE, RoHS, ErP directive |
Frequently Asked Questions - Predator XB253QGW ACER
User questions about Predator XB253QGW ACER
0 question about this device. Answer the ones you know or ask your own.
Ask a new question about this device
Download the instructions for your Monitor in PDF format for free! Find your manual Predator XB253QGW - ACER and take your electronic device back in hand. On this page are published all the documents necessary for the use of your device. Predator XB253QGW by ACER.
USER MANUAL Predator XB253QGW ACER
Acer LCD Monitor Quick Start Guide (QSG)
Important safety instructions
Please read the following instructions carefully.
- To clean the LCD monitor screen: Be sure that your monitor is electrically rated to operate with the AC power available in your location.
- Turn off the LCD monitor and unplug the power cord. Spray a non-solvent cleaning solution onto a rag and clean the screen gently.
- NEVER SPRAY OR POUR ANY LIQUID DIRECTLY ONTO THE SCREEN OR CASE.
- PLEASE DO NOT USE ANY AMMONIA OR ALCOHOL-BASED CLEANERS ON THE LCD DISPLAY SCREEN OR CASE.
- Acer will not be liable for damage resulting from use of any ammonia or alcohol-based cleaners.
- Do not place the LCD monitor near a window. Exposing the monitor to rain, moisture or sunlight can severely damage it.
- Do not apply pressure to the LCD screen. Excessive pressure may cause permanent damage to the display.
- Do not remove the cover or attempt to service this unit yourself. An authorized technician should perform servicing of any nature.
- Store the LCD monitor in a room with a temperature of -20° to 60° C (-4° to 140° F). Storing the LCD monitor outside this range may result in permanent damage.
- Immediately unplug your monitor and call an authorized technician if any of the following circumstances occur:
- Monitor-to-PC signal cable is frayed or damaged.
- Liquid spills onto the LCD monitor or the monitor is exposed to rain. The LCD monitor or case is damaged.
Attaching the monitor to the base
- Remove the monitor from the packaging.
- Attach the foot stand to the base. (for selected models)
- Turn clockwise to lock. Ensure that the base is locked onto the stand. (for selected models)
- Secure the base to the stand by turning the screw using the integrated tab or a suitable coin. (for selected models)
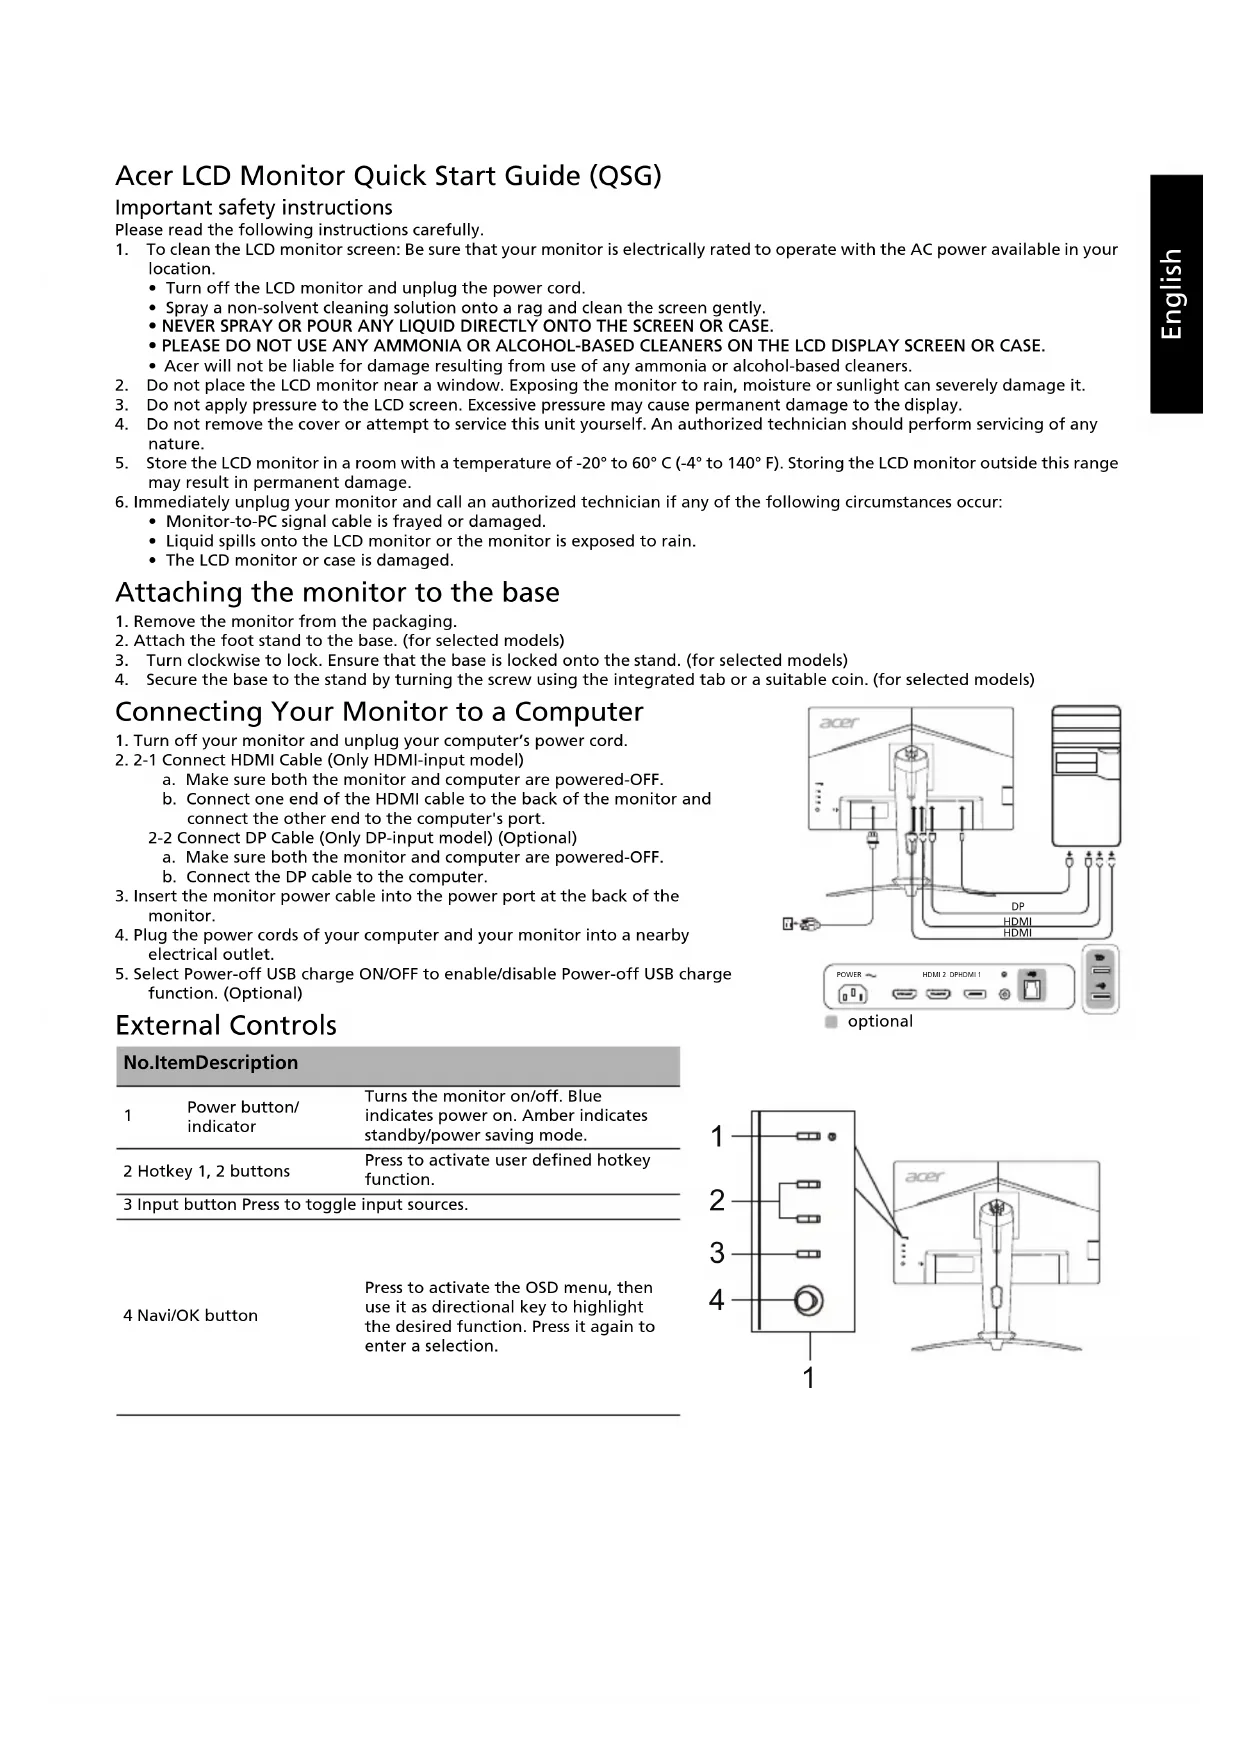
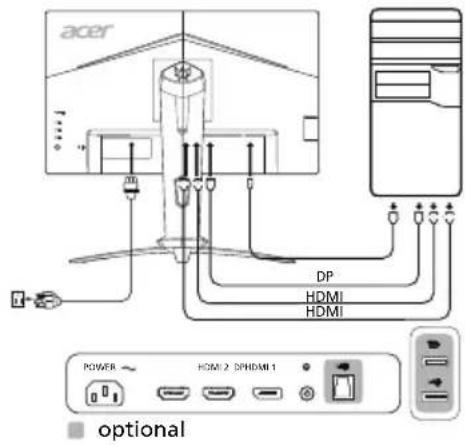
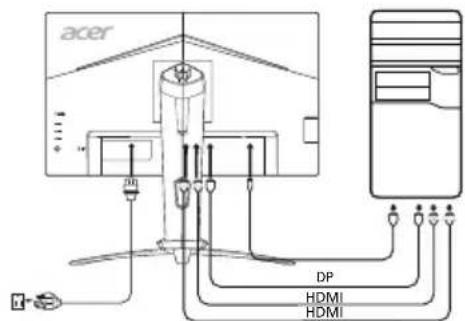
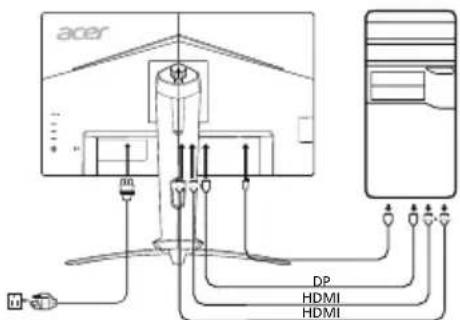
Connecting Your Monitor to a Computer
- Turn off your monitor and unplug your computer's power cord.
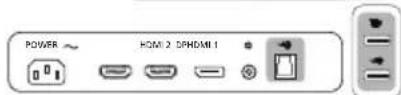
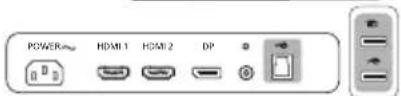
- 2-1 Connect HDMI Cable (Only HDMI-input model)
a. Make sure both the monitor and computer are powered-OFF. b. Connect one end of the HDMI cable to the back of the monitor and connect the other end to the computer's port.
2-2 Connect DP Cable (Only DP-input model) (Optional)
a. Make sure both the monitor and computer are powered-OFF. b. Connect the DP cable to the computer.
- Insert the monitor power cable into the power port at the back of the monitor.
- Plug the power cords of your computer and your monitor into a nearby electrical outlet.
- Select Power-off USB charge ON/OFF to enable/disable Power-off USB charge function. (Optional)
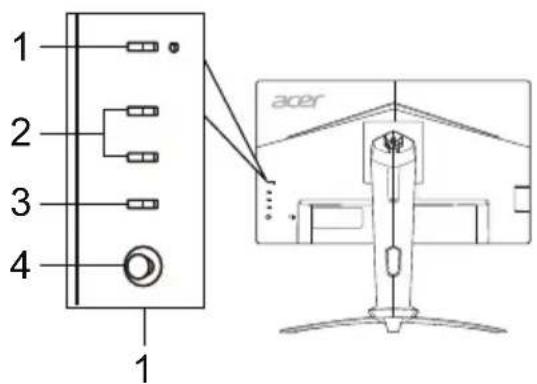
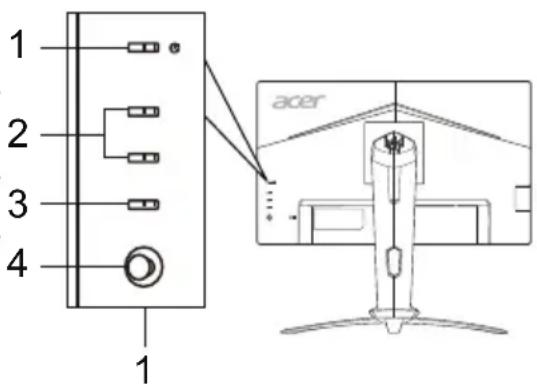
External Controls
| No.ItemDescription | ||
| 1 | Power button/indicator | Turns the monitor on/off. Blue indicates power on. Amber indicates standby/power saving mode. |
| 2 | Hotkey 1, 2 buttons | Press to activate user defined hotkey function. |
| 3 | Input button Press to toggle input sources. | |
| 4 | Navi/OK button | Press to activate the OSD menu, then use it as directional key to highlight the desired function. Press it again to enter a selection. |
Regulations and safety notices
FCC notice
This device has been tested and found to comply with the limits for a Class B digital device pursuant to Part 15 of the FCC rules. These limits are designed to provide reasonable protection against harmful interference in a residential installation. This device generates, uses, and can radiate radio frequency energy and, if not installed and used in accordance with the instructions, may cause harmful interference to radio communications.
However, there is no guarantee that interference will not occur in a particular installation. If this device does cause harmful interference to radio or television reception, which can be determined by turning the device off and on, the user is encouraged to try to correct the interference by one or more of the following measures:
Reorient or relocate the receiving antenna. - Increase the separation between the device and receiver. - Connect the device into an outlet on a circuit different from that to which the receiver is connected. - Consult the dealer or an experienced radio/television technician for help.
CE declaration of Conformity
Hereby, Acer Inc., declares that this LCD monitor is in compliance with the essential requirements and other relevant provisions of EMC Directive 2014/30/EU, Low Voltage Directive 2014/35/EU, and RoHS Directive 2011/65/EU and Directive 2009/125/EC with regard to establishing a framework for the setting of ecodesign requirements for energy-related product.
Notice:
In order to prevent damage to the monitor, do not lift the monitor by its base.
Notice: Shielded cables
All connections to other computing devices must be made using shielded cables to maintain compliance with EMC regulations.
Notice:
Acer monitor is purported for video and visual display of information obtained from electronic devices.
Notice: Peripheral devices
Only peripherals (input/output devices, terminals, printers, etc.) certified to comply with the Class B limits may be attached to this equipment. Operation with non-certified peripherals is likely to result in interference to radio and TV reception.
Caution
Changes or modifications not expressly approved by the manufacturer could void the user authority, which is granted by the Federal Communications Commission, to operate this product.
Operation conditions
This device complies with Part 15 of the FCC Rules. Operation is subject to the following two conditions: (1) this device may not cause harmful interference, and (2) this device must accept any interference received, including interference that may cause undesired operation.
Notice: Canadian users
This Class B digital apparatus complies with Canadian ICES-003.
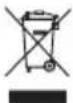
Disposal of Waste Equipment by Users in Private Household in the European Union
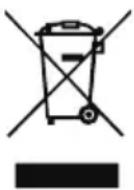
This symbol on the product or on its packaging indicates that this product must not be disposed of with your other household waste. Instead, it is your responsibility to dispose of your waste equipment by handing it over to a designated collection point for the recycling of waste electrical and electronic equipment. The separate collection and recycling of your waste equipment at the time of disposal will help to conserve natural resources and ensure that it is recycled in a manner that protects human health and the environment. For more information about where you can drop off your waste equipment for recycling, please contact your local city office, your household waste disposal service or the shop where you purchased the product.
SPECIFICATION
| LCD Panel | Driving System TFT Color LCD | |
| Size 24.5"W (62 cm) | ||
| Pixel Pitch 0.283 mm (H) x 0.280 mm (V) | ||
| Brightness | Native: 400 cd/m²; HDR400 mode: 400 cd/m² | |
| Contrast 100000000:1 Max (ACM) | ||
| Viewable Angle 178° (H) 178° (V) (CR=10) | ||
| Response Time 1 ms (G to G) / 0.5 ms (G to G, min) | ||
| Panel Type In-Plane Switching | ||
| H-Frequency 31 - 308 kHz | ||
| V-Frequency 56 - 280 Hz | ||
| Display Colors 16.7 Million | ||
| Dot Clock 650 MHz | ||
| Maximum Resolution | HDMI/DP: 1920 x 1080 @ 240 HzDP: 1920 x 1080 @ 280 Hz (with Over Clock On) | |
| Plug & Play VESA DDCCI/DDC2B | ||
| Energy Efficiency Class B | ||
| *Annual Energy Consumption 39 (kWh) (for HDMI-Input Model) | ||
| Power Consumption (at 200 nits) | On Mode 22.0 W (Typical) | |
| Sleep Mode 0.45 W (Typical) | ||
| Off Mode | 0.25 W (Typical) | |
| Input Connector | HDMI (Only HDMI-Input Model)DP (Only DP-Input Model) | |
| Input Video Signal | HDMI (Only HDMI-Input Model) (Optional)DP (Only DP-Input Model) (Optional) | |
| Speakers | 2 W x 2 (Only Audio-Input Model) (Optional) | |
| USB | USB 3.0 x 2 (Optional) | |
| Maximum Screen Size | Horizontal: 543.744 mmVertical: 302.616 mm | |
| Power Source | 100-240 V, 50/60 Hz | |
| Environmental Considerations | Operating Temp: 0° to 40°CStorage Temp: -20° to 60°COperating Humidity: 20% to 80% | |
| Dimensions | 557.79 (W) x 397.84 - 512.84 (H) x 236.27 (D) mm | |
| Weight (N. W.) | 5.30 kg (net) | |
| Mechanism Specifications | Tilt: -5° to +25° (Only at the highest point can 25 degrees of recline be offered for the angle of elevation)Swivel: -20° to 20°Height adjustment: 0 mm to 115 mmPivot: -90° to 90°Detachable foot stand: Yes | |
| External Controls | Switch/Buttons | Power ButtonHotkey 1Hotkey 2InputHotkey 1 Menu/Navi/OKHotkey 2 |
| Functions | BrightnessContrastBlue LightBlack BoostACMHDRSuper SharpnessGammaColor TemperatureModesColor SpaceGrayscale Mode6-axis Hue6-axis SaturateVolumeMuteOver DriveAdaptive-SyncRefresh Rate NumVRBInput Output DriveDisplay InformationReset All SettingsExitSpecifications vary depending on model and/or region. | |
Find manuals and other documents for your Acer product on the official Acer support website.
*Annual energy consumption is calculated using the typical power consumption 4 hours per day, 365 days per year.
Overclocking may result in flicker or other adverse effects that may derive from the total configuration of the system connected to the display, and possibly, in addition, the display's panel specifications. It may be possible to resolve or reduce such effects by setting a lower refresh rate.
Acer LCD Monitor Quick Start Guide (QSG)
4 Navigation/OK button
Acer LCD Monitor Quick Start Guide
Installing the monitor on the base.
- Remove the monitor from the packaging.
- Attach the stand to the base (not for all models).
- Turn clockwise to secure. Make sure the base is secured to the stand (not for all models).
- Secure the base to the stand by turning the screw with a suitable screwdriver or a coin (not for all models).
Connecting the monitor to the computer
- Turn off the monitor and disconnect the power plug from the computer's power outlet.
- 2-1 Connect the HDMI cable (only for models with HDMI input)
a. Make sure the power to the monitor and computer is turned off. b. Connect one end of the HDMI cable to the HDMI port on the back of the monitor, and the other end to the HDMI port on the computer.
2-2 Connect the DP cable (only for models with DP input) (purchased separately)
a. Make sure the power to the monitor and computer is turned off. b. Connect the DP cable to the computer.
3. Connect the monitor power cable to the power port on the back of the device. 4. Connect the power plugs of the computer and monitor to an electrical outlet. 5. Select "Charge via USB when power is off" to enable/disable the charging function via USB when the power is off. (purchased separately)
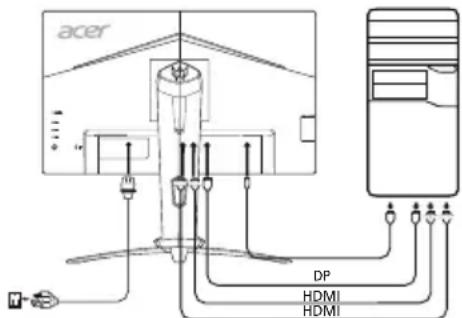
Purchased separately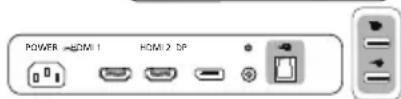
External controls
No. Element Description
Quick Setup Guide for Acer LCD Monitor
Important Safety Instructions
Please read these instructions carefully.
- To protect the screen of the LCD monitor: Do not touch the screen. Your monitor is not intended for use with a touchscreen interface.
- Connect the LCD monitor and connect the power cable to the outlet.
- Press the cleaning solution without diluting it on the top of the screen and wipe the screen gently. Do not press or apply pressure to the screen or the cabinet.
- Do not use cleaning agents based on ammonia or alcohol to clean the LCD screen or the cabinet.
- Acer is not responsible for damage resulting from the use of cleaning agents based on ammonia or alcohol.
- Do not place the monitor near a window. Exposure of the monitor to direct sunlight, wind, or rain can seriously damage it.
- Do not press on the LCD screen. Excessive pressure may cause permanent damage to the display.
- Do not remove the cover and attempt to repair this device yourself. Authorized technicians must perform any servicing.
- Store the LCD monitor in a place with a temperature between -20°C and 60°C (-4°F to 140°F). Storing the LCD monitor outside this range may cause permanent damage.
- Remember to disconnect the power cable from your monitor and contact an authorized technician for any service issues.
The signal cable from the monitor to the computer is damaged or broken. The LCD monitor or the monitor's cabinet is damaged. The LCD monitor or the cabinet is damaged.
Attaching the monitor to the base
- Remove the monitor from the packaging.
- Attach the stand to the base. (For selected models)
- Turn the screw clockwise to lock the stand. Make sure the base is locked onto the stand. (For selected models)
- Secure the base to the stand by turning the screw with the provided screwdriver or a coin. (For selected models)
Connecting the monitor to the computer
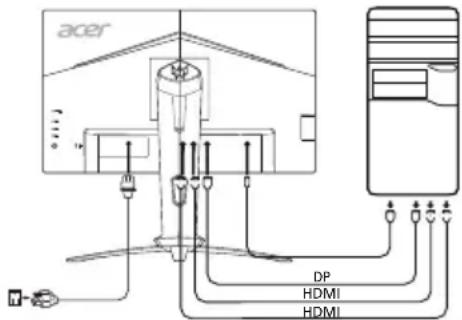
1. Turn off the monitor and unplug the power cable from the computer's power outlet. 2. 2-1 Connect the HDMI cable (see models with HDMI input)
a. Make sure both the monitor and the computer are turned off. b. Connect one end of the HDMI cable to the HDMI port on the monitor, and the other end to the HDMI port on the computer.
2-2 Connect the DP cable (see models with DP input) (optional)
a. Make sure both the monitor and the computer are turned off. b. Connect the DP cable to the computer.
- Connect the power cable of the monitor to the power port on the back of the monitor.
- Plug the power cables of the computer and the monitor into a nearby electrical outlet.
- Press the power button to turn on the monitor. To use the USB charging function, press the power button to activate/deactivate this function. (Optional)
ON/OFF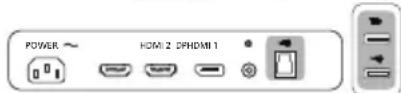
Control buttons
| Homép | Еlement | Описаиме |
| 1 | Бутон за Зхранвае/ ИнданkaTop | Изк nullыВК nullы моинтора. Синьото пoka3BA,谁能 MOHITOPbT e BK nullуен. ОранжевOTо OЗнача BA рекIM Ha гOTOBHOCТ/пес themselves Ha eнергия. |
| 2 | Бурз Клавиш 1, 2 Бутона | Нат SCHETe 3a Ак TИВИране Ha Функцията с НастpoЕн OT поразбИтейя Бурз Клавиш. |
| 3БуTOH 3a BxOD | Нат SCHETe 3a И畴 ВК nullуВе He Na ИЗTOUHINZITe Ha BxOD. | |
| 4 | Бутон Navi (Hавигаця)/OK | Нат SCHETe 3a Ак TИВИранe Ha OSD MeHIOTo, След TOBa ГИПОЛЗВай Te KaTo БуTOH 3a НавигацЯ, за за МаркураTe Леганatura Функция.Нат SCHETe ro OTHOBO 3a Быveжданe Ha ИЗбор. |
Safety instructions and warnings
FCC compliance statement
This device has been tested and found to comply with the limits for a Class B digital device, pursuant to part 15 of the FCC Rules. These limits are designed to provide reasonable protection against harmful interference in a residential installation. This device generates, uses, and can radiate radio frequency energy and, if not installed and used in accordance with the instructions, may cause harmful interference to radio communications.
However, there is no guarantee that interference will not occur in a particular installation. If this device does cause harmful interference to radio or television reception, which can be determined by turning the device off and on, the user is encouraged to try to correct the interference by one or more of the following measures:
- Reorient or relocate the receiving antenna.
- Increase the separation between the device and receiver. Connect the device into an outlet on a circuit different from that to which the receiver is connected. Consult the dealer or an experienced radio/TV technician for help.
CE Declaration of Conformity
Hereby, Acer Inc., declares that this LCD monitor is in compliance with the essential requirements and other relevant provisions of the following EU directives: EMC Directive 2014/30/EU, Low Voltage Directive 2014/35/EU, RoHS Directive 2011/65/EU, and Directive 2009/125/EC regarding the establishment of a framework for the setting of ecodesign requirements for energy-related products.
Note:
To prevent damage to the monitor, do not lift it by its base.
Note: Shielded cables.
All connections to other computing devices must be made using shielded cables to maintain compliance with EMC regulations.
Note: Peripheral devices
Only peripherals (input/output devices, terminals, printers, etc.) that are certified to comply with Class B limits may be attached to this equipment. Operation with non-certified peripherals may cause interference to radio and television reception.
Caution
Changes or modifications not expressly approved by the manufacturer could void the user's authority to operate this product.
Operating conditions
This device complies with Part 15 of the FCC Rules. Operation is subject to the following two conditions: (1) This device may not cause harmful interference, and (2) this device must accept any interference received, including interference that may cause undesired operation.
Canadian notice: CAN ICES-003 (B)
This digital device does not exceed the Class B limits for radio noise emissions from digital apparatus set out in the Radio Interference Regulations of the Canadian Department of Communications.
Important safety instructions
2-2 1aD P (awwauuDP)
a. a b. 1aD P
- 1
Acer Inc., 2014/30/EU, Low Voltage Directive 2014/35/EU and RoHS Directive 2011/65/EU and Directive 2009/125/EC (to be amended) for the use of electronic devices in conjunction with the use of electronic devices.
Class B digital apparatus complies with Canadian ICES-003.
| LED | 24.5"W (62 mm) | |
| 24.5"W (62 mm) | ||
| 24.5"W (62 mm) | ||
| 24.5"W (62 mm) | ||
| 24.5"W (62 mm) | ||
| 24.5"W (62 mm) | ||
| 24.5"W (62 mm) | ||
| 24.5"W (62mm) | ||
| 24.5"W (62mm) | ||
| 24.5"W (62mm) | ||
| 24.5"W (62mm) | ||
| 24.5"W (62mm) | ||
| 24.5"W (62mm) | ||
| 24.5"W (62mm) | ||
| 24.0"W (100000000:1 (ACM)) | ||
| 178° (mm H) 178° (mm H) (CR=10) | ||
| 1 ms (G # G) / 0.5 ms (G # G, # # #) | ||
| In-Plane Switching | ||
| H-Frequency | 31 - 308 kHz | |
| V-Frequency 56 - 280 Hz | ||
| Dot Clock 650 MHz | ||
| HDMI/DP: 1920 x 1080 @ 240 HzDP: 1920 x 1080 @ 280 Hz (### n###) | ||
| Plug & Play VESA DDCCI/DDC2B | ||
| * | ||
| * | ||
| * | ||
| * | ||
| * | ||
| * | ||
| * | ||
| * | ||
| * | ||
| * | ||
| * | ||
| * | ||
| * | ||
| * | ||
| * | ||
| * | ||
| * | ||
4
140 60 20 LCD
LCC
6.4.1.1.2
1
LCD
aJy
1
(j)all jin 1222 (g yal). 6x kdy dall ay 2
(jjbnssaaegg)Jolalglcclll Jaa Jaae aull jae aall 3
(jalll jssaae aeg) 4aiaeaiaaie aacj aabannall gajr jg jaoaaii
jgssll jgsaal
jssll jiee 1
(HDMI)HDMI 2-1.2
HDMI 1
1
y
Declaration of Conformity
We,
Acer Incorporated
8F, 88, Sec. 1, Xintai 5th Rd., Xizhi, New Taipei City 221, Taiwan
And,
Acer Italy s.r.l.
We, Acer Incorporated, hereby declare under our sole responsibility that the product described above is in conformity with the relevant Union harmonization legislations as below Directive and following harmonized standards and/or other relevant standards have been applied:
EMC Directive: 2014/30/EU
EN55032:2012/AC:2013 Class B
EN55035:2017
EN55032:2015/AC:2016 Class B
EN61000-3-3:2013
ENIEC61000-3-2:2019 Class D
LVD Directive: 2014/35/EU
EN60950-1:2006/A11:2009/A1:2010/A12:2011/A2:2013
RoHS Directive: 2011/65/EU
EN50581:2012
ErP Directive: 2009/125/EC
Regulation (EC) No. 1275/2008; EN 50564:2011
Year to begin affixing CE marking: 2020.
Oct. 17, 2020
RU Jan / Sr. Manager
Date
Acer Incorporated (Taipei, Taiwan)
8F, 88, Sec. 1, Xintai 5th Rd., Xizhi, New Taipei City 221, Taiwan
Acer Italy s.r.l.
RU Jan / Senior Manager Acer Incorporated (Taipei, Taiwan)
Oct. 17, 2020
Date
8F, 88, Sec. 1, Xintai 5th Rd., Xizhi, New Taipei City 221, Taiwan
Acer Italy s.r.l.
Acer Incorporated (Taipei, Taiwan)
Oct. 17, 2020
Date
8F, 88, Sec. 1, Xintai 5th Rd., Xizhi, New Taipei City 221, Taiwan
Et,
Acer Italy s.r.l.
RU Jan / Sr. Manager Acer Incorporated (Taipei, Taiwan)
Oct. 17, 2020
Date
8F, 88, Sec. 1, Xintai 5th Rd., Xizhi, New Taipei City 221, Taiwan
E,
Acer Italy s.r.l.
RU Jan / Senior Manager
Acer Incorporated (Taipei, Taiwan)
Oct. 17, 2020
Data
8F, 88, Sec. 1, Xintai 5th Rd., Xizhi, New Taipei City 221, Taiwan
En,
Acer Italy s.r.l.
RU Jan / Sr. Manager Acer Incorporated (Taipei, Taiwan)
Oct. 17, 2020
Date
8F, 88, Sec. 1, Xintai 5th Rd., Xizhi, New Taipei City 221, Taiwan
E,
Acer Italy s.r.l.
Regulatory Compliance











- ACER LCD MONITOR QUICK START GUIDE (QSG)
- IMPORTANT SAFETY INSTRUCTIONS
- ATTACHING THE MONITOR TO THE BASE
- CONNECTING YOUR MONITOR TO A COMPUTER
- EXTERNAL CONTROLS
- REGULATIONS AND SAFETY NOTICES
- FCC NOTICE
- CE DECLARATION OF CONFORMITY
- NOTICE
- NOTICE: SHIELDED CABLES
- NOTICE: PERIPHERAL DEVICES
- CAUTION
- OPERATION CONDITIONS
- NOTICE: CANADIAN USERS
- DISPOSAL OF WASTE EQUIPMENT BY USERS IN PRIVATE HOUSEHOLD IN THE EUROPEAN UNION
- ACER LCD MONITOR QUICK START GUIDE
- INSTALLING THE MONITOR ON THE BASE
- CONNECTING THE MONITOR TO THE COMPUTER
- QUICK SETUP GUIDE FOR ACER LCD MONITOR
- CONTROL BUTTONS
- SAFETY INSTRUCTIONS AND WARNINGS
- FCC COMPLIANCE STATEMENT
- NOTE
- NOTE: SHIELDED CABLES
- NOTE: PERIPHERAL DEVICES
- OPERATING CONDITIONS
- CANADIAN NOTICE: CAN ICES-003 (B)
- AJY
- JGSSLL JGSAAL
- DECLARATION OF CONFORMITY
Brand : ACER
Model : Predator XB253QGW
Category : Monitor