
iSENSYS MF4570DN - Printer CANON - Free user manual and instructions
Find the device manual for free iSENSYS MF4570DN CANON in PDF.
| Product type | Monochrome laser multifunction printer |
| Brand | Canon |
| Model | iSENSYS MF4570DN |
| Functions | Print, copy, scan, fax |
| Connections | USB, Ethernet (LAN), Telephone line (fax) |
| Power supply | 220-240 V, 50/60 Hz |
| Maximum power consumption | 1220 W |
| Operating temperature | 10 to 30 °C |
| Operating humidity | 20 to 80 % RH (non-condensing) |
| Laser class | Class 1 (IEC 60825-1:2007) |
| Laser wavelength | 780-800 nm |
| Maximum laser power | 6 mW |
| Maintenance and cleaning | Clean with a soft cloth lightly moistened with water or mild detergent; do not use alcohol, benzine, or thinner. |
| Spare parts (toner cartridges) | Available for at least 7 years after the end of production |
| Safety | Do not disassemble the machine, avoid flammable liquids, unplug before cleaning |
| Number of pages in the manual | 268 pages |
Frequently Asked Questions - iSENSYS MF4570DN CANON
User questions about iSENSYS MF4570DN CANON
0 question about this device. Answer the ones you know or ask your own.
Ask a new question about this device
Download the instructions for your Printer in PDF format for free! Find your manual iSENSYS MF4570DN - CANON and take your electronic device back in hand. On this page are published all the documents necessary for the use of your device. iSENSYS MF4570DN by CANON.
USER MANUAL iSENSYS MF4570DN CANON
Read this guide first.
Please read this guide before operating this product. After you finish reading this guide, store it in a safe place for future reference.
English
Základní příručka
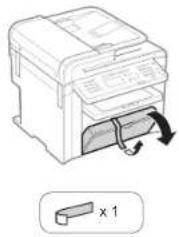
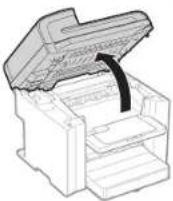
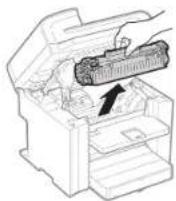
natural_image
Diagram of a printer or printer with an open lid and arrow indicator (no text or symbols present)2
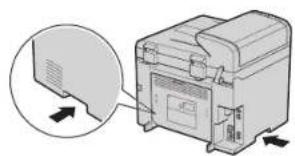
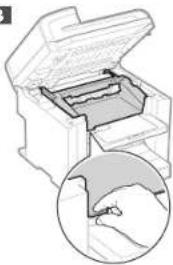
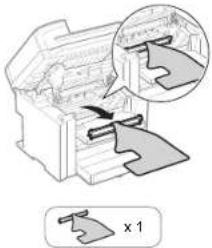
natural_image
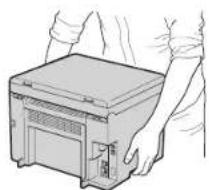
Line drawing of a hand holding a portable electronic device (no text or symbols visible)3
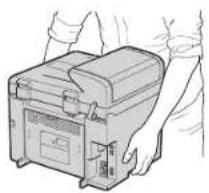
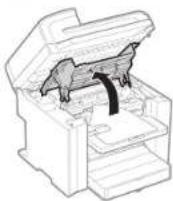
4
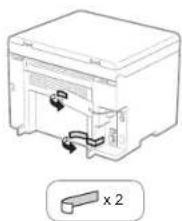
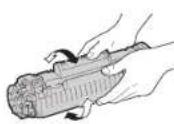
natural_image
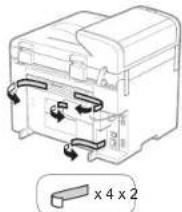
Diagram of a mechanical or electrical component with directional arrows and a labeled section 'x 4' (no text or symbols on the diagram itself)5
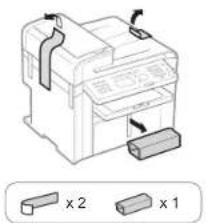
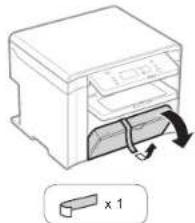
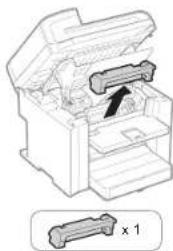
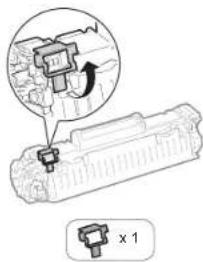
natural_image
Illustration of a printer with a scroll wheel and a 1x1 multiplier label (no text or symbols on the diagram itself)• MF4570dn/MF4550d/MF4450/MF4430
1
natural_image
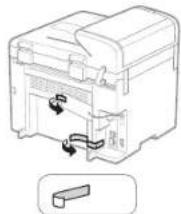
Diagram of a printer with an open lid and arrow indicator (no text or symbols)2
natural_image
Line drawing of a hand holding a portable electronic device (no text or symbols visible)3
natural_image
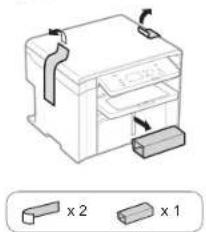
Diagram of a printer with two labeled parts (x1 and x2) showing internal structure and arrows indicating orientation (no text or symbols beyond labels)4
MF4570dn/MF4550d
natural_image
Diagram of a mechanical device with internal components and directional arrows, no readable text or symbolsMF4450/MF4430
natural_image
Diagram of a mechanical device with internal components and directional arrows indicating movement (no text or symbols)MF4410
1

natural_image
Diagram showing a computer monitor with an open lid and a close-up view of its front panel (no text or symbols present)2
natural_image
Line drawing of hands operating a portable electronic device (no text or symbols visible)3
natural_image
Diagram of a mechanical device with two labeled components (x1 and x2) and directional arrows indicating movement or force, no readable text or symbols present.4
natural_image
Line drawing of a mechanical device with a 2x2 x2 label, showing internal components and arrows (no text or symbols beyond the label)5
natural_image
Diagram of a printer with a slide and scroll, showing internal components and a magnified view (no text or symbols)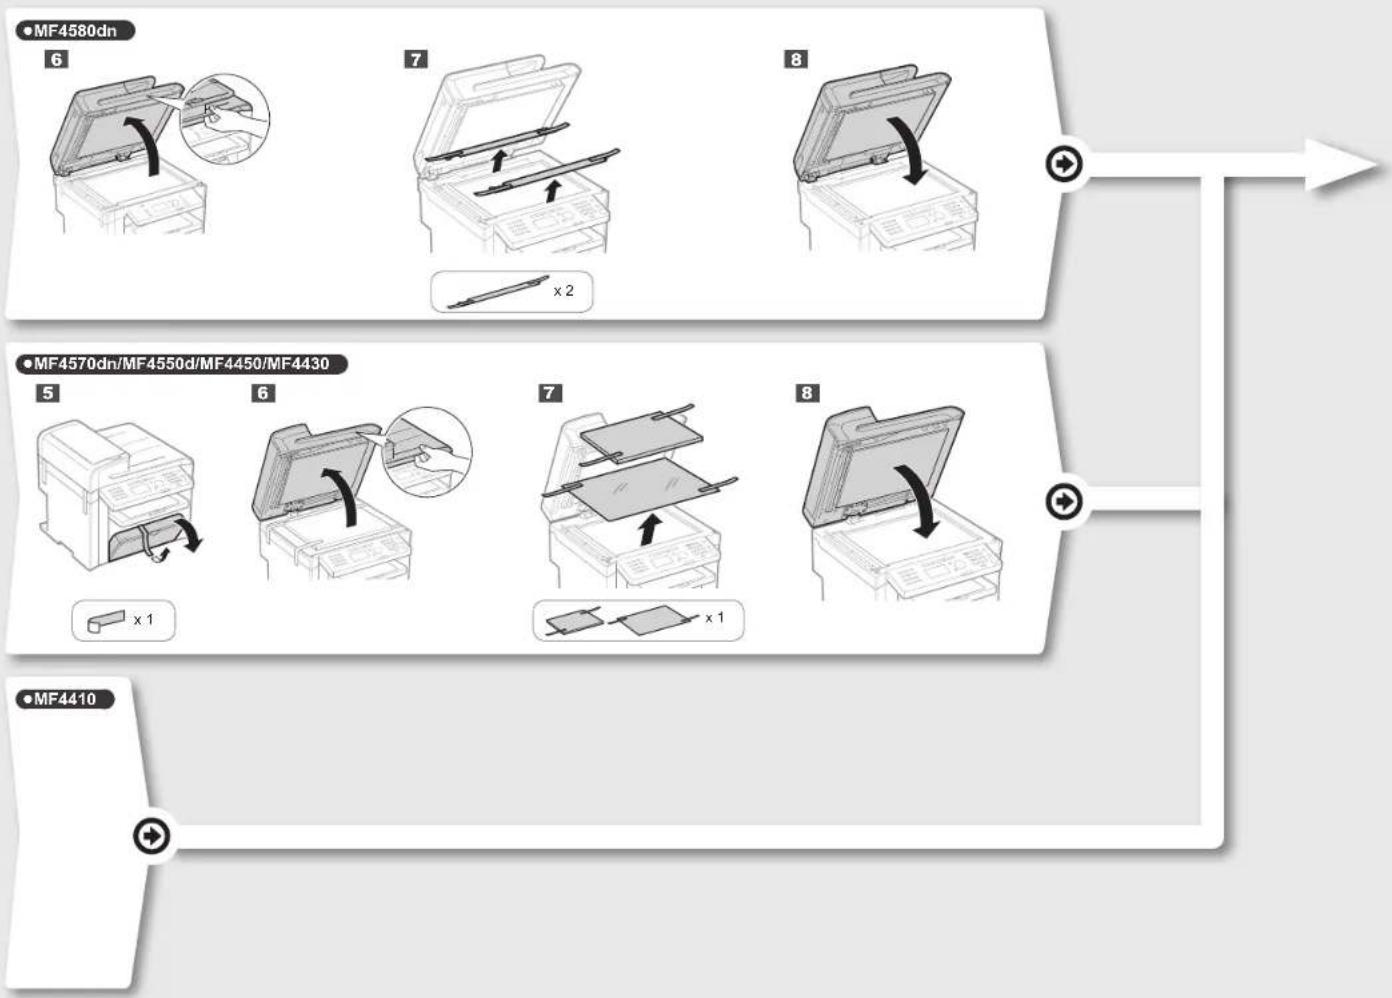
- MF4580dn/MF4570dn/MF4550d/MF4450/MF4430/MF4410
1
2
3
natural_image
Diagram of a printer with an open lid and internal structure, showing a magnified view of the printer's handle (no text or symbols present)4
5

6
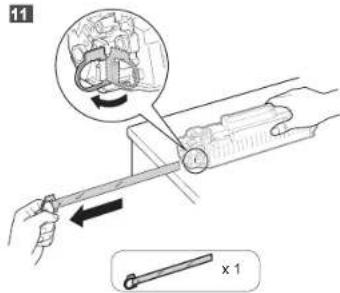
natural_image
Diagram of a mechanical device with an open lid and internal components, showing a cross-section view labeled 'x 1' (no text or symbols on the diagram itself)7
8
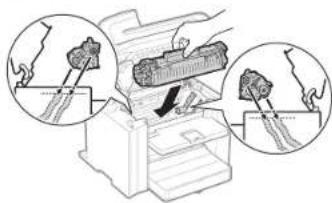
natural_image
Diagram of a mechanical assembly with a magnified inset showing internal components (no text or symbols)9
10
11
12
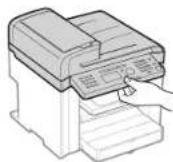
natural_image
Illustration of a printer with three circular insets showing hands operating the circuit (no text or symbols present)13
14

natural_image
Illustration of a printer being inserted into a paper airplane, with a hand inserting a cable (no text or symbols visible)16
natural_image
Illustration of a printer with arrows indicating process flow (no text or symbols)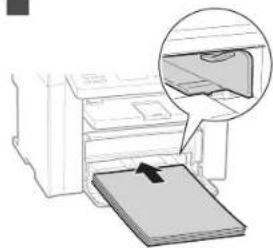
natural_image
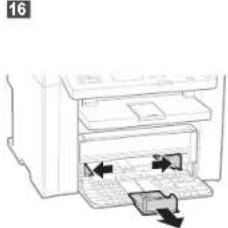
Diagram of a printer printing a physical object, showing paper being placed on a surface with an arrow indicating motion (no text or symbols present)18
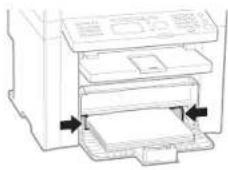
19
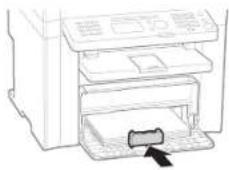
21
MF4570dn/MF4550d/MF4450/MF4430

natural_image
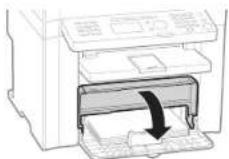
Illustration of a printer with an arrow pointing to its cover, showing a magnified view of the cover (no text or symbols present)Option
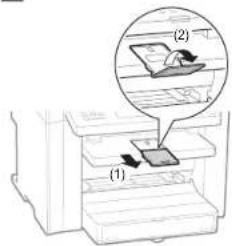
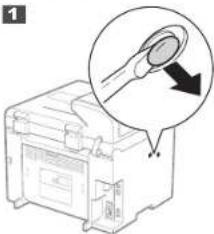
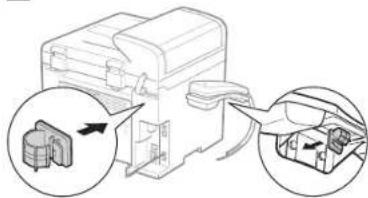
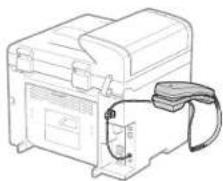
Installing the Handset
1
natural_image
Illustration of a printer with a magnified view showing a tip and arrow (no text or symbols)2
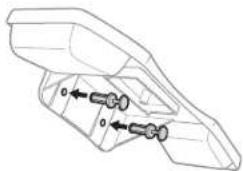
natural_image
Technical line drawing of a mechanical component with two cylindrical features and directional arrows indicating movement (no text or symbols)3
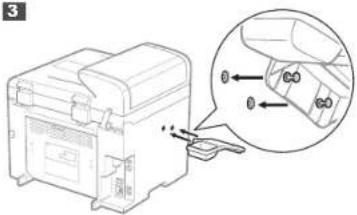
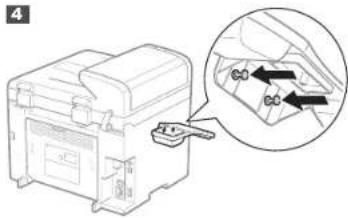
5
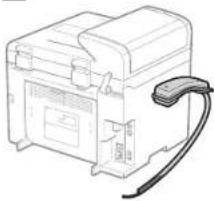
natural_image
Line drawing of a portable electronic device with a cable attached (no text or symbols)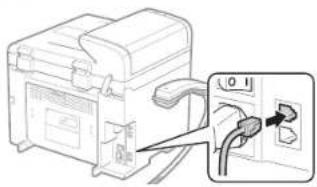
natural_image
Diagram of a device with cable and plug, showing connection to a terminal block (no text or symbols present)The image is too blurry to recognize any text content.
natural_image
Line drawing of a mechanical device with attached cable and housing (no text or symbols)| English | Settings for the Machine and Software Installation | Next, specify the settings for the machine and install software. See the language tab page on the right. | Français |
| Français | Paramètres pour l'installation de la machine et du logiciel | Spécifiez ensuite les paramètres de la machine et installez le logiciel. Raportez-vous à l'onglet de langue, à droite. | Italiano Deutsch |
| Italiano | Impostazioni della macchina e installazione del software | Selezionare le impostazioni della macchina e installare il software. Vedere la pagina a destra corrispondente alla scheda della lingua. | Deutsch |
| Deutsch | Einstellungen für das Gerät und Softwareinstallation | Geben Sie als nächstes die Einsellungen für das Gerät an, und installieren Sie die Software. Sie finden cas Spracherregister auf der rechten Seite. | Česky Magyar Polski Slovensky |
| Česky | Nastavení zařízení a instalace softwaru | Potó zvoite nastavení zařízení a nainstalujte software. Stránka karty s jazykem jo umístěna vpravo. | Dihvratá Latvikamára Slovenským Béveckov |
| Magyar | A készülék beállitásainak megadása és szoftvertelopités | A követkoző lépésben adja meg a készülék beállitásal és telepitse a szoftvert. Tekintse meg a jobe oldalon tatálható nyelvi clinke oidalát. | |
| Polski | Ustawienia urządzenia oraz instalacja oprogramowania | Następnie określ ustawienia urządzenia i zainstaluj oprogramowanie. Patrz odpowiednia karta języka po prawej stronie. | |
| Slovensky | Nastavenie zarladenia a instálácia softvéru | Potom zvohe nastavenie zariadenia a nainstalujte softvér. Stránka karty s jazykom je umiestnená vpravo. | |
| Hrvatski | Postavke za uredaj i instaliranje softvera | Zatim odredite postavke za uređaj, a potom instalirajte softver. Pogliedajte stranicu kartice jazika na desnoj strani. | |
| Română | Setári pentru aparat și instalarea software-ului | În continuare, specificají setárlie pentru aparat și instalají software-ul. Vezi pagina cu etichate de limbi din partea dreaplá. | |
| Slovensčina | Nastavitve za namestitov naprave in programske opreme | Nato določite nastavitve za napravo in nameslite programsko opremo. Oglejle si stran zavihka z jaziki na desni. | |
| Български | Настройки на устройството и инсталиране на софтуера | След това задайте настройките за устройството и инсталирайте софтуера. Вх. странишата с раздела за язик дясно. | |
| Русский | Настройки для аппарата и установка программного обеспечения | Далее задайте настройки для аппарата и установите программное обеспечение. См. вкладу для вашего языка справа. | Русский Українська түрін |
| Українська | Параметри для встановлення программного забезпечення та аппарата | Потім вкажить параметри для аппарата та встановить программне забезпечення. Див. вкладу зі сторонкою мови з правого боку. | |
| العربية | agreeодатات للههاز. وشَّيْتَ ال Brojasج | تح ALLI, حنت اعتنادات الجهاز و Verm stethits LR Arabic. Anظر صححة علامة ت Wirib the lthe Murojredة على النيم. | |
| فرسي | تظيمات دستگاه و نسب نرم فقرار | سایم، کطیفات مستکاً را ل Tourismانه و نزم الورا زان نسب کبید. به صححة ریله بزیان نز مост راست مراجعه کبید. | |
| Türkçe | Makine Ayarlan ve Yazılım Kurulumu | Ardindan, makine ayarlarını belirleyin ve yazılımi kurun. Sag taraftaki dil sekmesine bakın. | Lietuvískal Eestl |
| Latviešu | Iekārtas iestatījumi un programmatūras instalēśana | Tālāk norādiet iekārtas iestaṭījumus un instalējjiet programmatūru. Skatiet velodu cilnes lapu, kas atrodas labajā pusē. | |
| Lietuviškai | Aparato ir programinês jrangos diegimo parametrai | Nurodykite aparato parametrus ir jdiskite programinę jranga. Žr. kalbų skirtuko puslapį cesīrinėje. | |
| Eestl | Seadme ja tarkvara Installisätted | Järgmisena määrake seadme ja tarkvara installisätted Vaadake paremal asuvat keelte loendit. | |
| Dansk | Maskinindstillinger og softwareinstallation | Angiv derefter maskinindstillingerne, og installer software. Se fanesiden för sprog i højre side. | Dansk Norek Suomi Svenska |
| Norsk | Innstillinger for maskin- og programvareinstallasjon | Angi deretter innstillinger for maskinen, og installer programvaren. Se kategorisiden for språk til høyre. | |
| Suomi | Laitteen asetukset ja ohjelmiston asentaminen | Mälārtā seuraavaksi laiteen asetukset ja asenna ohjelmisto. Katso kiellvällilehtsivu oikealla. | |
| Svenska | Inställningar för enheten och installation av programvaran | Ange sedan inställningarna för enheten och installera programvaran. Se sidan med språkflikar till höger. | |
| Español | Configuración para la máquina e instalación del software | A continuación, especifique la configuración para la máquina e instale si software. Vea la página de la ficha de idioma en el lado derecho. | Español Nederlands Português EALnyvko |
| Nederlands | Instellingen voor het apparaat en software-installatie | Geef vervolgens de instellingen voor het apparaat op en instelleer de software. Zie het tabblad van uw taal aan de rechterkant. | |
| Português | Defi nições da máquina e instalação do software | A seguir, especifici que as defi nições da máquina e instale o software. Consulte a página do separador do idioma, do lado direito. | |
| ЕАЛЯНКА | Рубівсієє ощаєюșк кай екгота́остаєюл лоутирікою | Стін сивістья, каліорісте тіс рудіжатеє своєкеун’є кай екготаастінте та лоутирікою. Анатрёсте атн аелійна картелас якώσασας ата бекуа. |
Contents
Table des matières
Sommario
Inhalt
| English | 1 About the Supplied Manuals....P.22 Navigating the Menu and Text Input Method....P.33 Connecting the Power Cord and Turning ON the Power....P.44 Specifying the Initial Settings....P.55 Setting a Paper Size and Type....P.5 | 6 Specifying Initial Fax Settings and Connecting a Telephone Cable....P.67 Network Connection and Configuration....P.88 Installing the Driver/Software....P.99 Perform Useful Tasks....P.10 |
| Français | 1 A propos des manuels fournis....P.22 Navigation dans le menu et méthode de saisle de texte....P.33 Branchement du cordon d'alimentation et allumage de la machine....P.44 Spécification des paramètres initiaux....P.55 Réglage du format et du type de papier....P.5 | 6 Spécification des paramètres de fax initiaux et connexion du câble téléphonique....P.67 Connexion et configuration réseau....P.88 Installation du pilote/logiciel....P.99 Exécution de tâches utiles....P.11 |
| Italiano | 1 Informazioni sui manuali forniti a corredo con il prodotto....Pag.22 Navigazione del menu e metodo di input del testo....Pag.33 Collegamento del cavo di alimentazione e accensione della macchina....Pag.44 Selezione delle impostazioni iniziali....Pag.55 Impostazione di un formato e di un tipo di carta....Pag.5 | 6 Impostazioni iniziali del fax e collegamento di un cavo telefonico....Pag.67 Collegamento di rete e configurazione....Pag.88 Installazione di driver/software....Pag.99 Attività utili....Pag.12 |
| Deutsch | 1 Informationen zu den mitgelieferten Handbüchern....S.22 Navigieren durch das Menü und Texteingabemethode....S.33 Anschließen des Netzkabels und Einschalten des Geräts....S.44 Angeben der Anfangseinstellungen....S.55 Einstellen eines Papierformats und Papiertyps....S.5 | 6 Angeben der Anfangsfaxeinstellungen und Anschließen eines Telefonkabels....S.67 Netzwerkverbindung und -konfiguration....S.88 Installieren des Treibers bzw. der Software....S.99 Hilfreiche Funktionen....S.13 |
1
About the Supplied Manuals

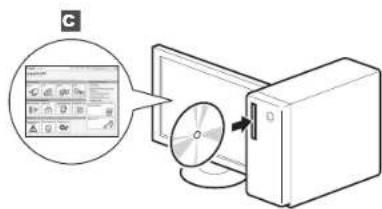
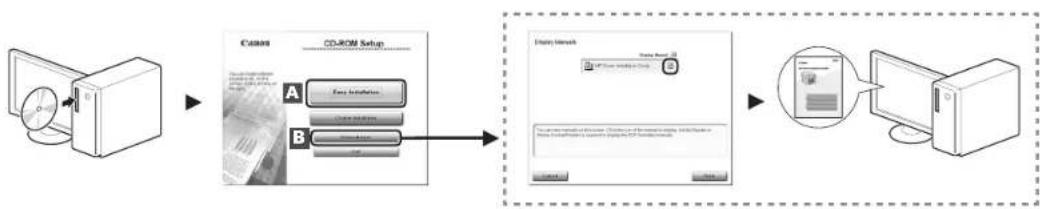
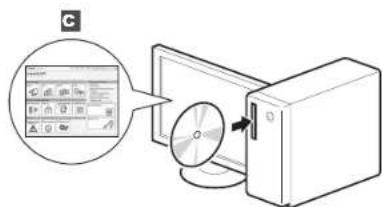
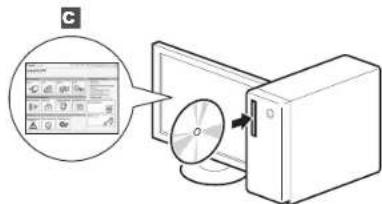
| English | A Starter Guide (This manual):Read this manual first.This manual describes the installation of the machine, the settings, and a caution. Be sure to read this manual before using the machine. | B MF Driver Installation Guide(User Software CD-ROM):Read this manual next.This manual describes software installation. | C e-Manual (User Manual CD-ROM): Read the desired chapter to suit your needs.The e-Manual is categorized by subject to find desired information easily.Viewing the e-Manual from the CD-ROM1. Insert the User Software CD-ROM in your computer.2. Click [Display Manuals].3. Click the [button in [e-Manual].* Depending on the operating system you are using, a security protection message appears. Allow the contents to be displayed. |
| Français | A Guide de démarrage (ce manuel) :Lisez ce manuel en premier.Ce manuel décrit l'installation de la machine, les paramètres et les précautions à prendre. Veillez à lire attentivement ce manuel avant d'utiliser la machine. | B Guide d'installation des pilotes MF(CD-ROM "User Software CD-ROM") :Lisez ensuite ce manuel.Ce manuel décrit l'installation du logiciel. | C Manuel électronique (CD-ROM "User Manual CD-ROM"): Lisez le chapitre qui répond à vos besoins.Le manuel électronique est divisé en catégories par sujet, ce qui permet de trouver facilement les informations voulues.Affichage du manuel électronique directement depuis le CD-ROM1. Inselez le CD-ROM "User Software CD-ROM" dans votre ordinateur.2. Cliquez sur [Afficher manuel].3. Cliquez sur le bouton [sous [Manuel électronique].* Salon voire système d'exploitation, un message de protection de la sécurité peut s'afficher. Autorisez l'affichage du contentu. |
| Italiano | A Guida all'avvio (questo manuale):Leggere prima questo manuale.In questo manuale vengono descritti l'installazione della macchina, le impostazioni e le avvertenze da osservare. Leggere attentamente il manuale prima di utilizzare la macchina. | B Guida di Installazione del Driver MF(User Software CD-ROM):Leggere dopo questo manuale.Questo manuale descrive l'installazione del software. | C e-Manual (User Manual CD-ROM): Leggere il capitolo desiderato in base alle proprie esigenze.L'e-Manual è suddiviso in una serie di categorie per argomento che consentono di trovare le informazioni desiderate più facimente. Visualizzazione dell'e-Manual dal CD-ROM1. Inselez l'User Software CD-ROM nel computer.2. Fare clic su [Visual. manuale].3. Fare clic sul pulsante [in [e-Manual].* A seconda dei sistemi operativo in uso, e possibile che venga visualizzato un messaggio di protezione. Consentire la visualizzazione del contenti. |
| Deutsch | A Handbuch für Starter (dieses Handbuch):Lesen Sie zuerst dieses Handbuch.In diesem Handbuch werden die Geräteinstallation, die Einstellungen und Vorsichtshirweise beschrieben. Lesen Sie dieses Handbuch vor Inbetriebnahme des Geräts unbedingt durch. | B Installationshandbuch zum MF-Treiber(User Software CD-ROM):Lesen Sie dieses Handbuch als nächstes.In diesem Handbuch wird die Softwareinstallation beschrieben. | C e-Anleitung (User Manual CD-ROM): Lesen Sie das gewünschte Kapitel entsprechend Ihren Anforderungen.Die e-Anleitung ist thematisch gegliedert, sodass Sie die gewünschten Informationen problemlos finden.Anzigen der e-Anleitung von der CD-ROM1. Legen Sie die User Software CD-ROM in Ihren Computer sir.2. Klicken Sie auf [Zeige Handbuch].3. Klicken Sie in [e-Handbuch] auf die Schafffläche [1.* Abhängig von dem von Ihnen verwendeten Betriebsystem wird eine Sicherheitswannung angesetzt. Lassen Sie die Anerige des Inhalts zu. |
2
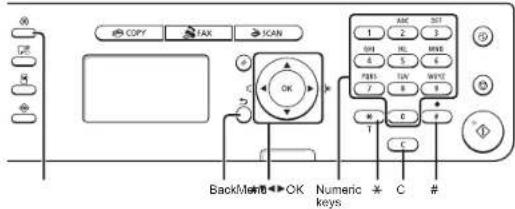
Navigating the Menu and Text Input Method
English
Entering text, symbols, and numbers
| Key Entry mode: <aA> Entry mode: <12> | ||
| 1 | @ : _ / 1 | |
| 2 | ABCatic 2 | |
| 3 | DEFdef 3 | |
| 4 | CHighi 4 | |
| 5 | JKLje 5 | |
| 6 | MNOmmo 6 | |
| 7 | PORSgps 7 | |
| 8 | TUWtw 8 | |
| 9 | WXYZwysz 9 | |
| 0 | (Not available) 0 | |
| 1 | @ : / - / 1 & % # : { } | (Not available) |
| { }<=4<=- * : : :^ : 1 | ||
Changing entry mode
| Entry mode Available text | |
| Alphabet [capital and small letters] and symbol | |
| <12> Numbers | |
flowchart
graph TD
    A["Device with OFF"] --> B["Switch"]
    B --> C["Power Outlet"]
    C --> D["Output Switch"]
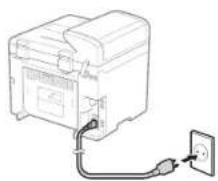
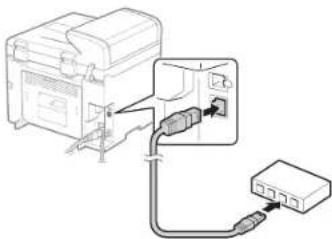
Do not connect the USB cable at this time. Connect it when installing software.
English
English
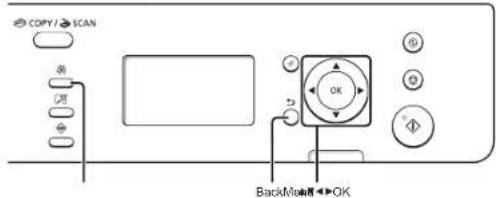
Follow the instructions on the screen, set the language and time.
For details on navigating the menu and how to input the numbers, see 2 "Navigating the Menu and Text Input Method" (P.3).
Français
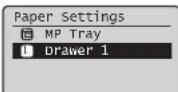
Setting a Paper Size and Type
Réglage du format et du type de papier Impostazione di un formato e di un tipo di carta Einstellen eines Papierformats und Papiertyps
•N
●MF4580dn/MF4570dn/MF4550d/MF4450
•

English
Follow the instructions on the screen, set the paper size and type.
After completing the setting, specify the following settings.
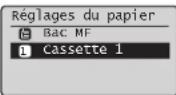
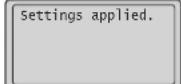

Réglages appliqués.
Français
6 "Specifying Initial Fax Settings and Connecting a Telephone Cable" (P.6)
MF4430/MF4410
8 "Installing the Driver/Software" (P.9)
MF4580dn/MF4570dn/MF4550d/MF4450
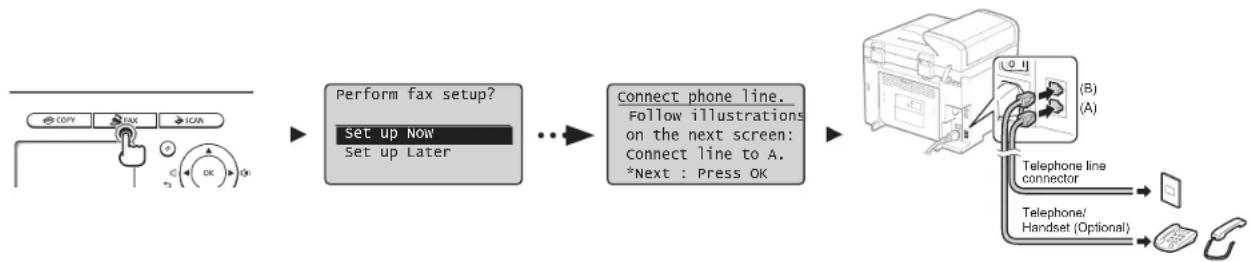
Follow the "Fax Setup Guide" to specify a fax number, a unit name, and a receive mode. For more details on the receive mode, see the e-Manual.
e-Manual -> "Fax" -> "Using Fax" -> "Receiving Faxes" -> "RX Mode."
How to use a username
When you send a document, the sender information that you registered is printed on the recipient's paper.
6-2 Connect a telephone cable.
When
When installing the optional handset
For more details, see the supplied manual with the handset.
Français
6-3 Exit the Fax Setup Guide, and then restart the machine.
English
Turn OFF the machine and wait for at least 10 seconds before turning it ON again.
The telephone line types are not detected automatically. See the e-Manual and set a telephone line manually.
e-Manual -> "Fax" -> "Using Fax" -> "Changing Settings for Fax Sending (Items Specified Using the [Menu] Button)" -> "Specifying Fax Sending Settings" -> "Select Line Type."
For Network Connection (MF4580dn/MF4570d Only)
7 "Network Connection and Configuration" (P.8)
For USB Connection
8 "Installing the Driver/Software" (P.9)
Français
Network Connection and Configuration
natural_image
Diagram showing connection between a device and a network switch (no text or symbols present)English
Connect the LAN cable.
About the LAN cable
Use a Category 5 or higher twisted pair cable for the LAN.
The machine sets the IP address automatically. Wait approximately two minutes.
About obtaining the IP address automatically (Auto IP)
DHCP or Auto IP is enabled in the default setting. Even if you do not set the IP address manually, this machine can obtain it automatically. • The IP address can be automatically assigned with or without a DHCP server.
- The
If a fixed IP address is set as the IP address of the computer, set the fixed IP address also for this machine manually.
If you want to set the IP address manually, see the following items. + e-Manual -> "Network Settings" -> "Basic Network Settings" -> "Selling IPv4 Address" or "Setting IPv6 Address."
Français
| Česky | Postupujte podle pokynů na obrazovce a nastavte jazyk a čas.Podrobné informace o navigaci v nabídce a zadávání čisel najdete v části 2 „Navigace v nabídce a metoda zadávání textu” (Str.3). |
| Magyar | A képernyőn megjelenő útmutatást követve állítsa be a nyelvet és az időt.A menüben végzett navigálással és a számok beviteli módjával kapcsolatos részletekről a 2. „Navigálás a menüben és a szövegbeviteli mód megadása” (3.o.) těmakórban olvashat. |
| Polski | Postępując zgodnie z instrukcjarni wyświetlanymi na ekranie, ustaw język i czas.Szczegółowe informacje na temat poruszania się po menu oraz sposobu wprowadzania cyfr znajdują się w części 2 „Poruszanie się po menu i sposób wpisywania tekstu” (Str.3). |
| Slovensky | Postupujte podľa pokynov na obrazovke a nastavte jazyk a čas.Podrobné informácie o navigácií v ponuke a zadávaní čisel nájdete v časti 2 „Navigácia v ponuke a metóda zadávania textu” (Str.3). |
flowchart
graph LR
    A["Start"] --> B["Perform fax setup?\nSet up Now\nSet up Later"]
    B --> C["Connect phone line.\nFollow illustrations\non the next screen:\nconnect line to A.\n*Next : Press OK"]
    C --> D["Telephone line\nconnector\nTelephone/Handset (Optional)"]
    D --> E["End"]
natural_image
Diagram showing connection between a device and a network switch (no text or symbols present)Pripojte kabel LAN.
O kabelu LAN

| Hrvatski | A Upute za početak korištenja (ovaj priručnik):Najprije pročitajte ovaj priručnik.Ovaj priručnik opisuje instalaciju uređaja, postavke i oprez. Prije konštenja uređaja svakako pročitajte ovaj priručnik. | B MF Driver Installation Guide (Upute za instaliranje upravljačkog programa MF Driver) (User Software CD-ROM) (CD-ROM s korisičkim softverom):Zatim pročitajte ovaj priručnik.U ovom je priručniku opisana instalacija softvera. | C e-priručnik (User Manual CD-ROM) (CD-ROM s korisičkim uputama): Pročitajte poglavlja koje odgovara vašim potrebama.Da biste jednostavno pronašli tražene informacije, e-priručnik podijeljen je u kategorije po temama.Pregledavanje o-priručnika s CD-ROM-a1. Umetilite User Software CD-ROM (CD-ROM s korisičkim softverom) u računato.2. Kiknite [Display Manuals] (Pikači priručnike).3. U opoji [e-manual] (o-priručnik) kiknite gumb [ [ ]]* Ovleno o toine koji operacijski sustav korisite, možda će se pojavili pruruka o sigurnosni zašiti. Dopusilite prikaz sedizaja. |
| Româna | A Ghid de punere rapidă în funcțiune (acest manual):Citiți mai întăi acest manual.Acest manual descrie instalarea aparatului, setănile și o secțiune de atenționare. Vă rugăm să citiți acest manual înainte de a utiliza aparatul. | B MF Driver Installation Guide (User Software CD-ROM (CD-ROM cu software pentru utilizator)):Citiți apoi acest manual.Acest manual descrie instalarea software-ului. | C Manual electronic (User Manual CD-ROM (CD cu manualul de utilizare)): Citiți capitolul corespunzător necesitațiilor dvs.Manualul electronic este strucurat pe categorii, după subiect, pentru simplificarea găsiri informațiilor.Vizualizanea Manualulul electronic da pe CD-ROM1. introdocejí decul User Software CD-ROM (CD-ROM cu software pentru utilizator) in computer.2. Facej’ dle pe [Display Manuals] (Afișare manuale).3. Facej’ dle pe butonu [ [ ] din [e-Manual] (Manual electronic).* În funcije de sistemul de sperare utilizat, este posibil să se afișeze un mesaj de protecije de securiște. Permitelj afișraa conđirului. |
| Sloveniščina | A Začetna navodila (ta priročnik):Najprej preberite ta priročnik.V tem priročniku so opisani nastavitev naprave, nastavitev in opozorilo. Preden začnete uporabljati napravo, preberite ta navodila. | B Priročnik »MF Driver Installation Guide«(User Software CD-ROM (CD z uporabniško programsko opremo)):Nato preberite ta priročnik.V tem priročniku je opisana nastavitev programske opreme. | C E-priročnik (User Manual CD-ROM (CD z uporabniškim priročnikom)): Preberite želeno poglavje, ki ustreza vašim potrebam.E-priročnik je razvršćen v poglavja, tako da preprosto najdele želene informacije.Ogled E-priročnika s CD-ja1. V rađunatnik vstavite CD z uporabniško programsko opremo.2. Kiknite [Display Manuals] (Pikači priručnike).3. V [e-Manual] (E priročnik) kiknite gumb [ [ ]]* Odverso od operaciškega sistema, ki ga uporabate, se prikaže varnostno sporodito. Dovolite prikaz vsebine. |
| Български | A Кратко ръководство (този документ):Прочетете първо това ръководство.В това ръководство се описат инсталирането на устройство, настройжите и предупрежденията.Непременно прочетете това ръководство, проди да испозвате устройство. | B MF Driver Installation Guide(User Software CD-ROM) (Компакт диск с потребителски softyPER):След това прочетете топа ръководство.В това ръководство се описа инсталирането на softуера. | C Електронно ръководство (User Manual CD-ROM) (Компакт диск с ръководство за потребителя): Прочетете главата, която ви е необходима.Съдържанието на электронното ръководство в категоризирано по теми, за да се упесни намирането на желаната информации.Преплекдане на электронното ръководство от компакт диска1. Поставите User Software CD-ROM (Компакт диск с потребилаком softyPER) в компантера.2. Шраните парку [Display manuals] (Посажи ръководствота).3. Шраните паркуbutona [ [ ] in [e-Manual] (Electронно ръководство).* В замасимост от испозвана аперацияна системе се поклига сообщение за защита на ситуността. Разрешете показавите на съдържанието. |
2
Kretanje po izborniku i način unosa teksta
MF4430/MF4410
| Hrvatski | Kretanje po izborniku• Odabr stanke il pomnoarje pokaživača po stavlakme izbornikaPomotu gunba [ ▲ ili ]Podaboriz noku stavku.Nastavite do ajusteča razirno u hijerenhiji pomotu gunba [OK]ii ▲Vraste se na prehodnu ražinu u hijerenhiji pomotu gunba [ ] (Biecki (Natrag) iii ] ◀Podavljanje potravePritislite [OK].Ava se na prikazu pojani <Apply> (Primjeni), odaberite <Apply> (Primijeni), a zalin prisnite [OK). | Način unosa teksta• MF458dnf/MF4570dnf/MF4550dnf/MF4450• Promjena našina unosaPritilante [ ] Vako biste odorati <način unosat, a zalin prisnate [OK]. De biste prornjeniti način unosa, možete prisnalti i [ * ] (Tan).• Unos slove, simbale i orjevaUrestite pomotu numeriček tipki ili [ * ] (Simboli).Poiedzinesti i načinu koji se može prebasivati ili o doslupnom teketu potražite na apstacići strenici. | • Pomicanje pokozivača (Unos razmaka)Pornitite pomotu [ ▲ ili ] ▶Pokazivac pomeknite na kraj teksla, a zalin za dodavanje razmaka pritisante [ ]• Brisanje znakovsDrižate pomotu tipke [ C ] (Izbrăti).Prisitak i držanje tipke [ ] (Izbrăti) brite sve znakovs. | • MF4430MF4410- Unos teksla i brojavaPomocu [ ▲ ili ] pesasite tekoi i brojava,a zalin prisnite [ OK].• Brisanje teksla i brojavaDa odaberete <BS>, prisnite [ ▼], a zalin prisnate [OK]. |
| Română | Navigarea prin meniu• Selectares elementelor sau deplasarea cursorului prin elementele do meniuSelectaj un element cu [ A ] sau cu [ ▼]Treceji la izerihia umaloizore cu [ OK] sau cu [ ▲].Reventiti le oramia antarostră cu [ ] (Inapol) sau cu [ ] ◀Confirmarea seltrătorApisbaij [OK]. Toluți, când pe estran se afipazua <Apply> (Aplicare), selectați <Apply> (Aplicaro), apoi apăracți [OK]. | Metoda de introducere a textului• MF458dnf/MF4570dnf/MF4550dnf/MF4450• Schimbarea modului ce intreareApaseli [ ] Vențru a selecta <Entry Mode> (Mod Intreare), apoi apăracți [OK]. De aasemene, puteți apșea pe [ * ] (Tan) pentru e schimba modu de intrare.• Introducerea textului, simbolurlor și numenelorIntroduceri utilizând tatele numenice sau [ * ] (Simboluri). Pentru detaliți zrespre modul consultatii sau textul disponitii, consultatii pagina umetendire. | • Deplasarea cursorului (introducerea unui spaju)Va deplasaji utilizând [ ▲ ili ] ▶Depiasazi cursoral la stărlpăl textului și apăscaji [ ] pentru a introduce un spalje.• Slengerarea caracterelor.Stergeți cu [ C ] (Goline). [Thând apăscătă taste I [ Goliire], se starg toste caracterele. | • MF4430MF4410- Introducerea textului și a numenelorSelectaj textului și numenere cu [ ▲ sau cu [ ▶ apoi apăscoj [OK]).• Slengerarea textului și a numenelorApăscaji [ ▼] pentru a selecta <BS>, spoi apăscaji [OK]. |
| Slovenăcina | Krimarjenje po meniju• Lubiranje elementa ali premikanja kazalke po menijskih elementhS tipko [ ▲ ili ] Izberite element.S tipko [OK] (V radu) ali [ ] Ize premaknite na nasiednja haveriju.S tipko [ ] (Jhaszile) ali [ ] se veinele na prejănjo hierarhijo.Nestantilev spreditePritislite [OK] (V redu). Ce se na zastenu prikaže <Apply>(Uporzi), izborite <Apply> (Uporizi) in plaitineta [OK] (V redu). | Način vnosa besedila• MF460dnf/MF4570dnf/MF4550dnf/MF4450• Spreminiarje načina vnosasTipko [ ] Vbenite <Entry Mode> (Način vnosa) in plaitinite [OK] (V redu). Pritlisneta tenko tari tipko [ * ] (Tonso) în sprementa način vnosas.Vnosa besedila, simbolov în šlevilkVesate jin o šlevisknimi tipkami ali [ * ] (Simbolii).Ça žeste podrinostă o načinu, ki ga je mogoće prekopiti, ali razpolo:Zliben v respolno, el odejle nasediu očen. | • Premkarje kazalke (vmos presledka)Premelneta se a tipko [ ▲ ili ] ▶Kazalke premaknite na korec besedila in s tipko [ ]imeske presledek.• Brisanje znakovsZnača brideic s tipko [ C ] (Izbrăti).Ce tipko [ ] (Izbrăti) pridizite, izbiridec vsa znake. | • MF4430MF4410- Vnos besedila in šlevilkS tipko [ ▲ ili ] berente besadio in stevelka tor nato prisnite [OK] (V redu).• Brisanja basodila in stevalkS tipko [ ▼] izborite <BS> in prisninte [OK] (V redu). |
| Білгарски | Прияджване в менито• Избирене на звгемент или промєстване на курора между вирементате на мезотаИзбосте сламот [ ▲ ili ]YПримените на спедавшого резвохривно ниво с [OK] клінгі].Върнете се на предишитної резвохривно ниво с [ ] (Назал) или [ * ]• Поткирідзапне на настрокними Понитене [OK]. Katro obate на дисплен се полев съдбідшенного <Apply>, избирете <Apply>, след кошто натисната [OK]. | Метод на въвеждане на текст• MF468dnf/MF4570dnf/MF4550dnf/MF4450• Промена на режима на въвежданеНатикната [ ] We da избирете «Рними за въвеждане», след кошто натисните [OK]. Мокете щою да налионите [ * ] (Tan) за промена на рескина до налиокріле.• Въвеждане на текст, сивели и цифр.• Въвеждане с бутоните о цифров или [ C ] (Симоли).За пoredробки: за резкините, на като може да се превкина, или таксто, като може да се въвеноша, як спорудиата страница. | • Промєстване на курора (въвеждане на интервал)Примоставното става с [ ▲ или ] ▶Приместите курора в края на текста и натисните [ >за да поколите нитрасп.• Изативне на акциИзграйте с бутонта [ C ] (Имновтена).Ако натисните и задържите бутона [ ] (Ойкистанна), ща изтрікта посяки знаца. | • MF4430MF4410- Нывадає на ек тект и циркиИаберела такт и цирори с [ ▲ или ] ▶спед его натисните [OK].Изгрване на ек тект и циркиНаписните [ ▼], за да избирете <BS>, одж кошто натисната [OK]. |
3
Hrvatski
Pratite upute na zaslonu; postavite jezik i vrijeme.
Pojedinosti o kretanju po izborniku i načinu unosa brojeva potražite u poglavlju 2 "Kretanje po izborniku i način unosa teksta" (● str.3).
Română
flowchart
graph LR
    A["Start"] --> B["Perform fax setup?"]
    B --> C["Set up Now\nSet up Later"]
    C --> D["Connect phone line.\nFollow illustrations\non the next screen:\nconnect line to A.\n*Next : Press OK"]
    D --> E["Telephone line\nconnector"]
    E --> F["Telephone/Handset (Optional)"]
Hrvatski
6-1 Odredite početne postavke faksa.
| Hrvatski | 6-3 Izadite iz Fax Setup Guide (Upute za postavljanje faksa), a zatim ponovno pokrenite uređaj. | |
| Isključite uređaj pa pričekajte barem 10 sekundi prije no što ga ponovo uključite.Vrste telefonskih linija ne otkrivaju se automatski. Pogledajteh e-priručnik i ručno postavite telefonsku liniju.∅ e-priručnik -> "Faks" -> "Korištenje faksa" -> "Promjene postavki za slanje faksa (stavke koje treba navesti pomoću tipke [Menu] (Izbomik)) -> "Odredivanje postavki slanja faksa" -> "Odaberi vrstu linije". | Za mrežnu vezu (samo MF4580dn/MF4570d)∅7 "Povezivanje i konfiguracija mreže" (str.8) | |
| Za USB vezu∅8 "Instalacija upravljačkog programa ili softvera" (str.9) | ||
| Română | 6-3 Ieşiti din Fax Setup Guide (Ghid de configurare a faxului), apoi reporniti aparatul.Opriti aparatul și așteptati cel puțin 10 secunde, apoi PORNITI-L din nou.Tipurile de linii telefonice nu sunt detectate automat. Consultați Manualul electronic și setați manual o linie telefonica.∅ e-Manual (Manual electronic) -> „Fax" -> „Using Fax" (Utilizarea faxului) -> „Changing Settings for Fax Sending (Items Specified Using the [Menu] Button)" (Modificarea setârilor pentru trimiterea faxurilor (Elementale specificale prin utilizarea butonului [Menu] (Meniu)) -> „Specifying Fax Sending Settings" (Specificarea setârilor de trimitere a faxurilor) -> „Select Line Type" (Selectarea tputului de linie). | Pentru conectarea prin rețea (numai la MF4580dn/MF4570d)∅7 „Conectarea și configurarea rețelei" (P.8) |
| Pentru conectarea prin USB∅8 „Instalarea driverului/software-ului" (P.9) | ||
| Slovensăžina | 6-3 Zaprite vodnik za nastavitev faksa in znova zaženite napravo.Izklopite napravo in počakajte vsaj deset sekund, preden jo znova vklopite.Vrste telefonske linije niso samodejno zaznane. Oglejte si E-priročnik in ročno nastavite telefonsko linijo.∅ E-priročnik -> "Faks" -> "Uporaba faksax" -> "Sprominjanje nastavitev za pošiljanje fakov (elementi, določeni z gumborn [Menu] (Menii)) -> "Določanje nastavitev za pošiljanje fakov" -> "Izberite vrsto linije". | Za omrežno povezavo (samo MF4580dn/MF4570d)∅7 »Omrežna povezava in konfiguracija« (Str.8) |
| Za povezavo USB∅8 »Namestitev gonilnika/programske opreme« (Pag.9) | ||
| Български | 6-3 Излезте от Fax Setup Guide (Ръководство за конфигуриране на факса) и след това рестартирайте устройството.ИЗКЛОЧЕТЕ устройството и изнакайте поне 10 секунди, преди да го ВКЛЮЧИТЕ отново.Типът на телефонната линия не се открива автоматично. Вж. електронното ръководство и задайте ручно телефонната линия.∅ e-Manual (Електронно ръководство) -> "Fax" (факс) -> "Using Fax" (Използване на факса) -> "Changing Settings for Fax Sending (Items Specified Using the [Menu] Button)" (Промяна на настройите за изпращане на факс (влементите, зададени чрез бутона [Menu] (Menio)) -> "Specifying Fax Sending Settings" (Задаване на настройки за изпращане на факс) -> "Select Line Type" (Избор на тип линия). | За мрежова връзка (само за MF4580dn/MF4570d)∅7 "Свързване и конфигуриране на мрежа" (стр.8) |
| За USB връзка∅8 "Инсталиране на драйвера/софтуера" (стр.9) | ||
7
Mrežna veza i konfiguracija
natural_image
Diagram of a device with connectors and a power outlet, no text or symbols presentHrvatski
Služi za priključivanje kabela za LAN.
O LAN kabelu
Za LAN vezu koristite mrežni kabel kategorije 5 ili više.
Urođaj automatski postavlja IP adresu. Pričakaja približno dvje minute.
O automalskom dohvaćanju IP adrese (Auto IP)

Русский
natural_image
Line drawing of an electrical outlet connected to a power plug (no text or symbols)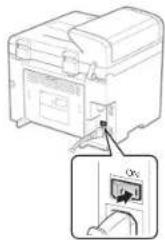
Русский
flowchart
graph LR
    A["Copy"] --> B["DAX"]
    B --> C["SCAN"]
    C --> D["OK"]
    D --> E["Perform fax setup?"]
    E --> F["Set up Now"]
    E --> G["Set up Later"]
    F --> H["connect phone line. Follow illustrations on the next screen: Connect line to A. *Next : Press OK"]
    H --> I["Telephone line connector"]
    I --> J["Telephone/ Handset (Optional)"]
    J --> K["End"]
Русский
| Русский | 6-3 Выйдите из Руководства по настройке факса и перезапустите аппарат.Выключите аппарат и подождите как минимум 10 секунд, прежде чем включить его снова.Типы телефонных линий не определяются автоматически. См, электронное руководство пользователя, чтобы настроить телефонную линию вручную.Электронное руководство пользователя -> «Факс» -> «Использование факса» -> «Изменение настроек отправки факсов (значения указываются кнопкой [Menu] (Меню)» -> «Указание настроек отправки факсов» -> «Выбор типа линии». | Для сетевого соединения (только модели MF4380dn/MF4370dn)7 «Подключение к сети и настройка сетевых параметров» (Стр. 8) |
| Для USB-соединения8 «Установка драйвера или программного обеспечения» (Стр. 9) | ||
| Українська | 6-3 Вихід з режиму перегляду Посібника з настрокования факсу та перезапуск апарата.ВИМКНІТЬ апарат і почекайте приміймні 10 секунд перш нік УВІМКНУТИ його знову.Типи телефонних ліній не визначаются автоматично. Ознайкоитсяся з инструкціями в електронному пообнику та важять телефонну ліню вручну.» e-manui (Електронний посібник) -> «Fax» (Факс) -> «Using Fax» (Використання факсу) -> «Changing Settings for Fax Sending (Items Specified Using the [Menu] Button] (Зазначення параметрів надсилання факсів (параметри, зазначення яких встановлюється за допомогою кнопки [Menu] (Меню)) -> «Specifying Fax Sending Settings» (Встановлення параметрів надсилання факсів) -> «Select Line Type» (Вибір типу лінії). | Підключення до мережі (тільки для моделей MF4580dn/MF4570d)7 «Підключення до мережі та її налаштування» (стор. 8) |
| Для підключення через USB8 «Установлення драйвера та программного забезпечення» (стор. 9) | ||
| العربية | 6-3-ac included من دليل إعداد الفاكس، ثم اعاد تشغيل الجهازأربق شتملي الجيهز وتائ Gray لودة 10 توان علي الأقل خاشطه مرة أفریدلا تاب اكت соответств رارع خطرط المبيف ثالنّة (e-Manual) (القيلاي اللكروم) واسیطیت اح خطرط البیف خرط بورایChenging Settings for Fax Sending (Items Specified Using the [Menu] Button)* "Using Fax" -> "Using (الست Cloud قاقس)" (الست Cloud قاقس) (Fax) -> "Theat (الست Cloud قاقس) (Fax)"; "Theat (الست Cloud قاقس) (Fax)"; "Theat (الست Cloud قاقس) (Fax)"; "Theat (الست Cloud قاقس) (Fax)"; "Theat (الست Cloud قاقس) (Fax)"; "Theat (الست Cloud قاقس) (Fax)"; "Theat (الست Cloud قاقس) (Fax)"; "Theat (الست Cloud قاقс) (Fax)"; "Theat (الست Cloud قاقс) (Fax)"; "Theat (الست Cloud قاقс) (Fax)"; "Theat (الست Cloud قاقс) (Fax)"; "Theat (الست Cloud قاقс) (Fax)"; "Theat (الست Cloud قاقс) (Fax)"; "Theat (الست Cloud قاقс) (Fax)"; "Theat (all (all (all (all (all (all (all (all (all (all (all (all (all (all (all (all (all (all (all (all (all (all (all (all (all (all (all (all (all (all (all (all (all (all (all (all (all (all (all (all (all (all (all (all (all (all (all (all (all (all ( all (all (all (all (all (all (all (all (all (all (all (all (all (all (all (all (all (all (all (all (all (all (all (all (all (all (all (all (all (all (all (all (all (all (all (all (all (all (all (all (all (all (all (all (all (all (all (all (all (all (All (all (all (all (all (all (all (all (all (all (all (all (all (all (all (all (all (all (all (all (all (all (all (all (all (all (all (all (all (all (all (all (all (all (all (all (all (all (all (all (all (all (all (all (all (all (all (all (all (all ( All (all (all (all (all (all (all (all (all (all (all (all (all (all (all (all (all (all (all (all (all (all (all (all (all (all (all (all (all (all (all (all (all (all (all (all (all (all (all (all (all (all (all (all (all (all (all (all (all (all (al (all (all (all (all (all (all (all (all (all (all (all (all (all (all (all (all (all (all (all (all (all (all (all (all (all (all (all (all (all (all (all (all (all (all (all (all (all (all (all (all (all (all (all (all (all (all (all (all (all (a) (a) (a) (a) (a) (a) (a) (a) (a) (a) (a) (a) (a) (a) (a) (a) (a) (a) (a) (a) (a) (a) (a) (a) (a) (a) (a) (a) (a) (a) (a) (a) (a) (a) | (подMF4580dn/MF4570d)الناك translation بالملكة (8"النتوصيل بالملكة والثئي Medicine)USBالتوسط عير (9"الwidت برطاح الت SHEГИ)البراهيم ("الwidت بوراهيم") |
| العربية | 6-3از راهماي نظ Perm فاكس خارج شويد و سيس دستغادرا مجددا راكيا كنابمنستكه، وخامش کردنو و براي روزین کردن مجدان حناق 10 تباي صیر کنابالنوع خطر طق به ب طور و طور و طور و طور و طور و طور و طور و طور و طور و طور و طور و طور و طور و طور و طور و طور و طور و طور و طور و طور و طور و طور و طور و طور و طور و طور و طور و طور و طور و طور و طور و طور و طور و طور و PHC;النوع خطر طق به ب طور و طور و طور و طور و طور و PHC;النوع خطر طق به ب طور و طور و طور و PHC;النوع خطر طق به ب طور و طور و PHC;النوع خطر طق به ب طور و طور و PHC;النوع خطر طق به ب طور و طور و PHC;النوع خطر طق به ب طور و PHC;النوع خطر طق به ب طور و PHC;النوع خطر طق به ب طور و PHC;النوع خطر طق به ب طور و PHC;النوع خطر طق به ب طور و PHC;النوع خطر طق به ب طور و PHC;النوع خطر طق به ب طور وPHC;النوع خطر طق به ب طور و PHC;النوع خطر طق به ب طور و PHC;النوع خطر طق به ب طور و PHC;النوع خطر طق به ب طور و PHC;النوع خطر طق به ب طور و PHC;النوع خطر طق به ب طور و PHC;الनع خطر طق به ب طور و PHC;النوع خطر طق به ب طور و PHC;النوع خطر طق به ب طور و PHC;النوع خطر طق به ب طور و PHC;النوع خطر طق به ب طور و PHC;النوع خطر طق به ب طور و PHC;النوع خطر طか b) | (MF4580dn/MF4570d)پرای اتصال شیکه (النقط (8"“پیکول牌ندی و لتصال شیکه”(8"“پیکول牌ندی) |
| (MF4580dn/MF4570d)پرای اتصال شیکه (النقط (8"“پیکول牌ندی و لتصال شیکه”(8"“پیکول牌ندی) | ||
| (MF4580dn/MF4570d)پرای اتصال شیکه (النقط (8"“(8"“پیکول牌ندی) | ||
| (MF4580dn/MF4570d)پرای اتصال شیکه (النقط (8"“(8"“پیکول牌ندی) | ||
| (MF4580dn/MF4570d)پرای اتصال شیکه (النقط (8"“(8”“پیکول牌ندی) |
7
natural_image
Diagram of a device with connectors and ports, no text or symbols presentРусский
(MF Driver Installation Guide) MF Driver Installation Guide (MF)
[Unreadable]
• (WIA Driver) WIA Driver
(Windows XP/Vista/7)
(MF4580dn/MF4570dn/MF4550d/MF4450) (فقط اسكنفاكس)
درباق
هربق در حفظه
| Türkçe | A Başlangıç Kılavuzu (Bu kılavuz):Öncelikle bu kılavuzu okuyun.Bu kılavuzda makininin kurulumu,ayarlar ve bir dikkat notu açıklanmaktadır.Makineyi kullanmadan önce bu kılavuzuokuduğunuzdan ermin olun. | B MF Driver Installation Guide(User Software CD-ROM (Kullanıcı YazılımıCD-ROM'u)):Ardından bu kılavuzu okuyun.Bu kılavuzda, yazılım kurulumu açıklanmaktadır. | C Elektronik Kılavuz (User Manual CD-ROM): Gereksinimlerinize uyan bölümü okuyun.Elektronik Kılavuz, istenen bilgilerin kolayıklka bulunabileceği şekilde konulara göre kategorilere ayrılmıştır.Elektronik Kılavuz Belgesini CD-ROM'dan Görüntülme1. Kullanıcı Yazılımı CD-ROM'uru bisgesayennizte tekin.2. [Display Manuals] (Kullanıdan Görüntüle) İşgesiri uklatın.3. [e-Manual] (Elektronik Kılavuz) İşesindeki [ ] düğmesni ikksun.* Kullandığın 2 işyeliin sistemine bağlı olarak, bir gövenlik korunna messiği görününlerir. İşerğin görünülenmesine lärin verin. |
| Latvriesu | A Darba sâkšanas rokasgrâmata(şi rokasgrâmata):vispirms izlasiet Sao rokasgrâmatu.Šajá rokasgrâmata aprakstıta iekartasuzstadifiâna, ilestatjumi un piesarcızıbaspasakumi. Pirims iekartas lietošanas noteiktiizlasiet Sao rokasgrâmatu. | B MF Driver Installation Guide(MF dralvera instalëšanas rokasgrâmata)(User Software CD-ROM (Lietotâja programmatüras kompaktdisks)):pêc tam izlasiet Sao rokasgrâmatu.Šajá rokasgrâmata aprakstıta programmatüras instalëšana. | C e-Rokasgrâmata (User Manual CD-ROM (Lietotâja rokasgrâmatas kompaktdisks)): lasiet savâm vajadzibâm atbilstošo nodaju.e-Rokasgrâmata ir sadalita pa têmâm, lai varetu erti atrast nepiecilešamo informaciju.e-Rokasgrâmatas skatišana kompaktdiskâ1. İsvietolojat destorâ Lietotîje programmetüras kompecişleku.2. Notikâkiniel uz [Display Manuals] (Parazit rokasgramatas).3. Sadaiti [e-Manual] [e-Rokasgrâmenta] noklişşmet uz pogas [ ]* Alkaritâ no izmantolás speriâlşisâmas tek parâtils druâbas azsandrâbas dipojuma. Laujiel râdil sabırı. |
| Lieutivlâkai | A Pradinê instrukcija (si instrukcija):pirmlausia perskaitykite šią instrukciją.Sloje instrukcijoje aprašylas aparatorijangimas, parametrai ir atsargumo priernones. Prieš pradıdarni naudoiti aparatıa,bötinai perskaitykite šią instrukciją. | B „MF Driver Installation Guide“(MF tvarkyklés diegimo vadovas)yra „User Software CD-ROM”(Vartotojo programines jrangos kompaktlımlame diske):perskaitykite šią instrukciją.Sloje instrukcijoje aprašylas programinós jrangos diegimas. | C El. instrukcija („User Manual CD-ROM“ (Vartotojo instrukcijos kompaktinis diskas)): skaitykite jûsų poreikius attinkantį) skyrių.El. instrukcija yra suskirstytla kategorjonimis pagal temas. kad galėtumėle lengvai rasti reikiarmos informacijos.El. instrukcijes perziðra tiesiogiați it kompaktinio disko.1. [deško: User Software CD-ROM" (Varistojo programinês įrangas kompaklinį diska) ] kompiutoj.2. Spusielekile [Display Manuals] (Rodyli instrukcijes).3. Spusielekile [e-Manual] (El. instrukcijos) nyigluka [ ]* Atsizvegiarı i naudojanę operacığın sisteme, rodomas saugas pranočimas. Leškote rodyli turnj. |
| Eesti | A Alustusjuhend (see juhend):köigepealt lugege lábi see juhend.Juhend kirjeldab seadme paigaldamist.sâtteid ja hoiatusi. Lugege juhend enne seadme kasutuselevõttu kindlasti lábi. | B MF Driver Installation Guide(MF dralveri installijuhend)(User Software CD-ROM(kasutustarkvara CD)):lugege järgmiseks seda juhendit.See juhend kirjeldab tarkvara installimist. | C E-juhend (User Manual CD-ROM (kasutusjuhend CD-I)): lugege vastavat peatükki juhendist.E-juhend on teemade järgi kategoriateks joatatud, et soovitud teavet oleks lihthe üles leida.E-juhendi vaatamine CD-lt1. Sleestlage kasutustarkvara CD envülisee.2. Klöpsake [Kova juhendit].3. Klöpsako [e-Manual] (e-juhendis) ruppu [ ].* Sötuvet kasutastavet opalistərmist kuvaletkea okrasni turbeteade. Lubago sišu kuventine. |
2 Menüde Gezinme ve Metin Giriş Yöntemi Navigëšana izvëlnë un teksta ievades metode Meniu naršymas ir teksto įvesties būdas Menüüs liikumine ja tekstisisestusviis
MF4580dn/MF4570dn/MF4550d/MF4450
MF4430/MF4410

| Türkçe | Monüde Gezinme• Oğa seçimi veya imedi merü öğeleri ensanında hareket altirrme [ ] ligva [ ] lityla bir oğa segn. [OK] (Tamam) veya [ ] supuyla bir sonraki aşanınaya İerleyin. [(Şeri) veya [ ] tariya öncoki aşanızya ger denotes. • Ayar crayı [OK] (Tamam) tuguna basin. Ansik. ekranda <lygula> gorintalendığinde, <lygula> seçonogni belirlsip ardindan [OK] (Tamam) tuguna basin. | Metin Giriş Yöntemi• MF4580dn/MF4570dn/MF4550dn/MF4450- Giriş modunu Angelisme. •Giriş modunu seriniin yapnak için [ ] supura, arındindan da [OK] (Tamam) suguna basin. Giriş modunu [ ] (Tən) suguna basarak da Angelisbilinsiz. • Metin, sinige ve numaralen gimse Sayı tulşininaya veya [ ] (Singcler) tugunu kullanırak girim. Değişirilebilir modaki veya kullanıslatil melexdi ayirinlalar için, sonraki seçays secun. | - Imisi harnikat altirmo (Roguk gimse) [ ] veya [ ] supuyla hareket edin. Imisi motrin sonuna getinin ve bepluk gimek için [ ] supuna basin. Karakiter silne [ ] (SII) supuyla silin. [ ] (SII) supuyla basai tutulatığunda tam karakitarler silinir. | • MF4430/MF4410- Metin ve sayi gimse Metin ve sayilan [ ] veya [ ] supuyla seçin ve arındindan [OK] (Tamam) tuguna basin. Metin ve sayilan silme <BS> ogasini seçnek için [ ] supuna basin, arındindan da [OK] (Tamam) tuguna basin. |
| Latvivesu | Navigészana izveline• Vlanunu izvila val kursere pârıvetolana pe izvlârnes vlarunlam Izvelielen vierunnu, iznaniloja [ ] ali [ ].Pârjete uz nikiamo herapihla limeni, naspizet [OK] (Lalvi) val Agreizistos ortipskoja herantijas limeni, nospizet [ ] [ ] (Apakag) val [ ]• Iostertjumu aporinăsena Nospietel [OK] (Labi). Taču, ja displeja i redzama ispejsa <Apply> (Lator), inveliotes <Apply> (Listet) un pirc tam nospiedist [OK] (Labi). | Teksta levades metode• MF4580dn/MF4570dn/MF4550dn/MF4450- levades režima maliga Naspidet [ ] ve izvlătins <Entry Moda> (levades režims), un pot tam nospiedist [OK] (Lab). Lai maintu levades režimu, varat an nospiect [ ] (C.) (tonăs numru sastăfăsina).• Teksta, simcui un copan lovade levresid, iznanolool opara lausigus val [ ] (Simboli). Datalizutu informaciju par pârsăluzama režimu va pisoqama tekstu sx nakamaja lapuse. | - Kursora parvieizcăna (alstarpes levade) Parvieizjet kursaru, zhenatey [ ] [ ] ve [ ] Lai levaditu aslarpi, parvieizjet kursaru lize teksta togam un nospiedist [ ], - Harkstirju diRăfăne Duzesti, iznanolojat [ ] (Dzesti). Lai dizestu visas rakistzmes, nospiedet un turist leustingu [ ] (Dzesti). | • MF4430/MF4410- Teksta un coparu levade izvlătines teksu un opanus, izmențojat [ ] vai [ ] pum pot tam nospiedet [OK] (Lab). • Teksta un opatu dežăme Nospiedet [ ] ve mătăsăsăsăsăsăsăsăsăsăsăsăsăsăsăsăsăsăsăsăsăsăsăsăsăsăsăsăsăsăsăsăsăsăsăsăsăsăsăsăsăsăsăsăsăsăsăsăsăsăsă 2016/2017, un pico tam nospiedet [OK] (Lab). |
| Lie UVUVskii | Meniu narişymas• Elementa pasiriniimaz arba zynaliio pekâtimas pris menu skerentji Pasiriniota elementa naudodami [ ] Arba [ ].Parekite pra paksasinis hierarchijas spustalaje [OK] (Gerai) arba [ ]Grirkte pra ankals NCIs hierarchijas spustalaje [ ] (Algal) arba [ ]• Patvirinimo rustatymasPaspaskitc [OK] (Gerai). Tačiai kizi okrana bus ratama <Apply> (Tsaky). pasirinkla <Apply> (Takyli) li paspaskite [OK] (Gerai). | Teksto ivesties biodas• MF4580dn / MF4570dn / MF4550d / MF4450- ivestes režimo kellimas Pasuspaskite [ ] vad pasirivutmate <Entry Moda> (Ivastes režina) ir paspaskilele [OK] (Gerai). Noriștari pi pasteli ivesites režinirap tap galirin paespasib [ ] (Toras).• Teksto, simbolii ir skaloğ iveses ivsakite naudodani skaloğ mygtukus arba [ ] (Smbolius) Iaasmanes informacijas apo porungimo rezhirag arba galirinag teksta lekokite paskesiame suaslayle. | - Zyneklio perkeiiras (tarpo yedines) Perkeikta naudodani [ ] arba [ ] Perkeikte zynekli i lekslo pabaiga ir paspaskilele | kad iverstunile tarpa. - Sirbiliq naikinimas Naiknitke neudolam [ ] (Vaie): Paspaskitus ir pasikus mygtuk; [Valyi] panaikinami visi sirbolili. | • MF4430 / MF4410- Teksto ir numerlu ivesite Pasirinkte teksita ir numerus naudolami [ ] arba [ ] Pada paspaskulite [OK] (Gerai).• Teksto ir numery naikinimas Paspaskite [ ] kad pasirinkumite <BS>, tada paspaskilete [OK] (Gerai). |
| Eesti | Monüüs likumine• Kaskude valinine või kursorigis menütkâskudes likumine Valige idak, vajutades [ ] vii [ ]Lilugu järginele tasemele, kasultades nupu [OK] või [ ]Lilugu cozinisale tasemole, kasultades nupu [ ] ( ] agasei väl • Salbi küninamine Vajutage nupu [OK] Ku nildiculi kuwatske <Apply> , valige <Apply> ja seejârel vajutage [OK]. | Tekstisisostusvilis• MF4580dn/MF4570dn/MF4550dm/FM4450- Sissastasztiniin muutamine Vajutage [ ] ve valida <Entry Mode> (Sissasturezimi) ja seejârel vajutage [OK] Sissastusvehini muutniaks vato vajutasa ka [ ] (Ton).• Tekst, sunbollte ja numbite sieastamine Sissestga numbratkahde vio nupu [ ] (Sikkoliide) ahi. Taliendavat, leavel, ünberiğülusrežini või saedzeleva leksi kolihaa vastaks järgnisat kehokulij. | - Kursori likutamine (Tönlku siaestamine) Lilitutage [ ] ve bil. Uhlulu siasstamasce no hige kursor teksti lippu ja vajutoge [ ] Tähomânisde kusturamine. Kustutamiseka kesutage [ ] (Kustuts). Klenvi [ ] (Kubuhate) vajutamise ja alihotmisaga saeto kustutaca këlk läheriârgid. | • MF4430/MF4410- Teksto ja numerta siaestamine Teksi ja numbrile siestaniseke kasutage [ ] vasi [ ] soçajeli vajutage [OK]• Teksto ja numerta kusturamine Vajutage [ ] ve valida <BS> je seejârel vajutage [OK] |
3 Güç Kablosunu Bağlama ve Makineyi AÇIK Konuma Getirme Strâvas vada pievienošana un iekârtas ieslêgšana Maitinimo laido prijungimas ir aparato ijungimas Toitejuhtme ühendamine ja toite sisselülitamine
| Türkçe | Ekrandaki talimatlan izleyin, dili ve saati ayarlayın.Menüde gezinmeyle ve sayıların nasıl girileceğiyle ilgili ayrıntılar için, bkz. 2 "Menüde Gezinme ve Metin Giriş Yöntemi" (S.3). |
| Latviseu | Izpildiet ekränä redzamos norädijumus un iestatiet valodu un laiku.Detailizetu informaciju par navigiğešanu izvělně un ciparu levadi sk. 2. nodajā "Navigiğešana izvělně un teksta ievadas metode" (Ipp.3). |
| Lietuvitskai | Vykdydami ekrane rodomas instrukcijas nustatykite kalbą ir laiką.Informacijos apie meniu naršymą ir skaičių jvestį rasite 2 skyriuje „Meniu naršymas ir teksto įvesties būdas" (P.3). |
| Eesti | Järgige ekraanil kuvatavaid juhiseid, määrake keel ja kellaaeg.Menüüs liikumise ja numbrite sisestamise kohta tâlendava teabe saamiseks vaadake ptk 2 "Menüüs liikumine ja tekstisisestusviis" (P.3). |
5 Papira formāta un tipa iestatīšana Popieriaus formato ir tipo nustatymas Paberiformaadi ja -tūübi määramine
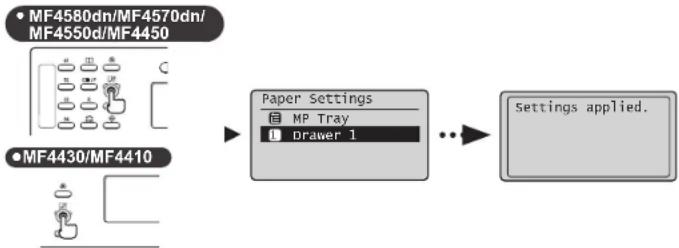
flowchart
graph LR
    A["MF4430/MF4410"] --> B["Paper Settings"]
    B --> C["Settings applied."]
| Türkçe | Ekrandaki taliimatları izleyin, kağıt boyutunu ve türünü ayarlayın.Ayarlamayı tamamladıktan sonra, aşağıdaki ayarılan belirleyin. | MF4580dn/MF4570dn/MF4550d/MF44506 "Başlangıç Faks Ayarlarını Belirleme ve Telefon Kablosunu Bağlama" (S.6) |
| MF4430/MF44108 "SürücüYazılım Kurulumu" (S.9) | ||
| Latvieşu | Izpildiet ekrânâ redzamos norâdijumus, iestatilet papîra formâtu un tipu.Kad iestatišana ir pabeigta, norâdiet tâlâk minîslos iestatițijumus. | MF4580dn/MF4570dn/MF4550d/MF44506. nodaļa "Säkotnëjo faksa iestatijumu norâdišana na tâlrupa kabela plevienošana" (Ipp.6) |
| MF4430/MF44108. nodaļa "Dralveru/programmatüras instališana" (Ipp.9) |
| Lieutuškai | Vykdydami ekrane rodomas instrukcijas nustatykite popieriaus dydj ir tipą.Nustatę parametra, nurodykite toliau aprašytus parametrus. | MF4580dn / MF4570dn / MF4550d / MF44506 Pradinių fakso parametru nustatymas ir telefono kabelio prijungimas (P.6) |
| MF4430 / MF44108 Tvarkyklės / programinės įrangos diogimas (P.9) | ||
| Eesti | Järgige juhiseid ekraanil, määrake paberi suurus ja tüüp.Pärast sätte määramist määrake järgmised sätted. | MF4580dn/MF4570dn/MF4550d/MF44506 "Faksi algsätele määramine ja telefonikaabli ühendamine" (P.6) |
| MF4430/MF44108 "Draiveri/tarkvara installimine" (P.9) |
6 Başlangıç Faks Ayarlarını Belirleme ve Telefon Kablosunu Bağlama Sâkotnëjo faksa iestatijumu norâdîsana un tâlruṇa kabela pievienošana Pradinių fakso parametrų nustatymas ir telefono kabelio prijungimas Faksi algsätete määramine ja telefonikaabli ühendamine
flowchart
graph LR
    A["Copy"] --> B["TAX"]
    B --> C["SCAN"]
    C --> D["Perform fax setup?"]
    D --> E["Set up Now"]
    E --> F["Set up Later"]
    F --> G["Connect phone line. Follow illustrations on the next screen: Connect line to A. *Next : Press OK"]
    G --> H["Telephone line connector"]
    H --> I["Telephone/Handset (Optional)"]
    I --> J["Mobile Phone Icon"]
| Türkçe | 6-3 Faks Kurulum Kılavuzu'ndan çıkın ve makineyi yeniden başlatın.Makineyi kapatın ve yeniden açmadan önce en az 10 sanıye bekleyin.Telefon hattı türleri otomatik olarak algılanmaz. Elektronik Kılavuza başvurun ve telefon hattını manuel olarak ayarlayın.Εlektronik Kilavuz -> "Faks" -> "Faksi Kullanma" -> "Faks Gönderme Ayarlarını Değiştirme ([Menu] (Menü) Düşmesi Kullamılarak Belirtilen Öğeleri)" -> "Faks Gönderme Ayarlarını Belirleme" -> "Hat Türünü Seç." | Ağ Bağlantısı için (Yalnızca MF4580dn/MF4570d)7 "Ağ Bağlantısı ve Yapılandırma" (S.8)USB Bağlantısı için8 "Sürücü/Yazılım Kurulumu" (S.9) |
| Latvisešu | 6.3. Aizveriet Faksa uzstâdišanas vedni un pêc tam restartëjiet iekârtu.Izslëdziet iekârtu un uzgaidilet vismaz 10 sekundes, pirms to atkal ieslëdzat.Târlruga linijas tips netiek noteikts automatiski. Sk. e-Rokasgrâmata u istatiet târlrupa liniju manuali.Εe-Rokasgrâmata -> Fakss -> Faksa lietošana -> Faksa sütišanas iestatitjumu mainišana (vienumi, kas ir jānorāda, izmantojot pogu [Menu] (Izvelne)) -> Faksa sütišanas iestatitjumu norâdišana -> Izvelëties linijas veidu. | Tikla savienojums (tikal MF4580dn/MF4570d)7. nodaja "Tikla savienojums un konfigurëšana" (Ipp.8)USB savienojumam8. nodaja "Draiveru/programmatüras instalëšana" (Ipp.9) |
| Lietuvriski | 6-3 Uždaryklite „Fax Setup Guide“ (Fakso sârankos vadovą) ir palejsklte aparatą iš naujo.IŠJUNKITE aparatą, palaukite bent 10 sekundzių ir vėl ji JUNKITE.Telefono linijų tipai neaptinkami automatiskai. Peržiūrekite vadovą „EI instrukcija“ ir nustatykite telefono liniją rankomis.ΕI. instrukcija -> Faksas -> Fakso naudojimas -> Faksogramų siuntimo parametrų keitimas (parametrai, nurodami naudojant mygtuką [Menu] (Meniu) -> Faksogramų siuntimo parametrų nurodymas -> Pasrinkti linijos lipq. | Tinklo ryšys (tik MF4580dn / MF4570d)7 Tinklo ryšys ir konfigüracija (P.8)USB ryšys8 Tvarkyklês / programinês įrangos diegimas (P.9) |
| Eesti | 6-3 Sulgege faksi häälestusjuhend ja taaskäivitage seade.Lülitage seade VÄLJA ja oodake enne uuesti sisselülitamist vähemalt 10 sekundit.Telefonilini tûüp ei tuvastata automaatselt. Vaadake e-juhendit ja määrake telefonilin käsitsi.ΕE-juhend -> "Faks" -> "Faksi kasutamine" -> "Faksisaatmissätete muutmino (käsud, mida kuvatakse nupu [Menüü] vajutamisel)" -> "Faksisaatmissätete määramine" -> "Linitülibi määramine." | Vörguühenduse jaoks (MF4580dn/MF4570d ainult)7 "Vörguühendus ja konfiguratsioon" (P.8)USB-ühenduse korral8 "Draiveri/tarkvara installimine" (P.9) |
natural_image
Diagram showing connection between a device and a network switch (no text or symbols present)| Türkçe | LAN kablosuru bağlayın.LAN kablosu hakkındaLAN için bir Kategorı 5 veya daha üstü, dolarınış çifti kablo kullanır. | Makine IP adresni otomatik olarak ayarlar. Yakライブ ki daikla zelkeyin.Otomatik IP adresi alma hakkında (Otomatik IP)veyo <Otomatik IP>, varsayıları ayarda eingödir. IP adresini manuel olarak ayarlamasanız da, bu makine onu otomatik olarak elabitir.IP adresi DHCP sunurususyla veya DHCP sunurusu olmadan otomatik olarak olanabilir.ayen <Otomatik IP> ayenne göre oncalkıldır.Saat bir IP adresi bilgseyanın. IP adresi olarak ayarlanise, saatit IP adresini bu makine için de manuzl olarak ayarlayın. | IP adresini manuel olarak ayarlamak isterseniz, asegüdakiere bakın.Elektronik Kiloaz -> "Ağ Ayarları" -> "Tennal AĞ Ayarten" -> "IPv4 Adresini Ayarlanra" veya "IPv6 Adresini Ayarlanra". |
| Latviredu | Plevlençlet LAN kabel.Par LAN kabellTikam LAN izmantojat viamaz 5 kategorijas viliš pura kabelli. | Iekârla IP adresi leszata automâlski. O cardet aptuveni 2 mindles.Par automâltisku IP adresses logișanu (Automâltiska IP)Kë nokudujume ostafitjumas ir aktivizrta lespjeta <DHCP> ve <Auto IP> (Automâltiska IP). Pat tad, ja IP adresi noestaltt manuali, fi iekârla to var ilegül automâlski.IP adresi var automâlski pleişyirt mesikarigli no la, vai lanzantojasi DHCP serveri.Iesistajuma -DHCIP> priorităte ir ielaka par iesiatljuma <Auto IP> (Automâltiska IP) prioritali.Ja kà datora IP adreso ir isastifta fisakta IP adrese, manuali iestahet fisakta IP adresi eif tai iekârtai. | Ja IP adresi vetalics existeti manuali, sk. šodus jautajumus.e Rokasgranala -> Tikla estalitjami -> Tikla paramilestalitjami -> IPv4 adresses estalitjana val IPv6 adresses istalitjana. |
| Lievičlava | Prjunkite LAN kabel.Apie LAN kabollNeudakite LAN skirta 5 (orba aukâtosnes) kategorija vytj porj kaboli. | Aparatas gauna IP adreso automatiskai. Palaukota apie dvi minutos.Apie automatinj IP adreso nustatymą (automatinj IP)Pagal numatytusius parametrus jungta <DHCP> arba <Auto IP> (Automatinis IP). Nat jei nemustatysta IP rankinu bácu, aparatas gali nustatyti IP automatiskai1Automatinis IP adreass geli bött piskiramas automatiskai tek su DHCP servaru, tek be jo.Paranimetru <DHCP> leikiama didesne pirminybe nei <Auto IP> (Automatiniam IP).Jei nustalytas komplustrio ifksustas IP adreas, rankinu budu rustatsykve ir aparata ifksuchtą IP adresq. | Jei norite nustatyti IP adreza rankinu bácu, źr. Siuces elementius.EL instrukcija -> Tikko parametriai -> Pogridiniai inklo parametriai -> IPv4 adreso nustatymas alms IPv6 adress nustatymas. |
| Eesti | Ühondoge LAN-kaabel.KohivõrgukaabelKohivõrgühihenduse loomiseks kasutage vähemali 5. kategoris keerdsparkasbili. | Seado miârab IP-adressi automaatsolt. Ocdako umises kaks minutil.IP-adressi hankimine automaatselt (Auto IP)Vaskesältera on lubatut <DHCP> vēl <Auto IP>, isegi kui te ei miâra IP-adressi kâsilsi, vôü seade sele hankida automaatselt.IP-adressi vôb mârāsa automaatselt DI ICP serveri abl vii lima DI ICP serverita.<DHCP> sètle on <Auto IP> aftas prioritatne.Kul anulli IP-adressiko on miâretud fiksecertud IP-adress, mâriske fiksecertud IP-adress kâsatai ke osedmala. | IP-adressi mâramise kohla kâsilsi varadake leemazid.E-juhend -> "Võrgusätted" -> "Põhlised võrgusätted" -> "IPv4 adressi mâramine" vēl "IPv6-adressi mâramine". |
8 Sürücü/Yazılım Yükleme Draiveru/programmatüras instalëšana Tvarkyklès / programinês jrangos diegimas Draiveri/tarkvara installimine
flowchart
graph LR
    A["Computer"] --> B["File Import"]
    B --> C["CD-ROM Setup"]
    C --> D["Server Interface"]
    D --> E["User Interface"]
    E --> F["Server System"]
    F --> G["Computer"]
A Kullanıcı Yazılımı CD-ROM'unu kullanarak sürücü ve yazılımı kurun.
B Kurulum prosedürleryle ilgili ayrıntılar için, bkz. MF Driver Installation Guide.
A Instalējiet draiveri un programmatūru, izmantojot Lietotāja programmatūras kompaktdisku.
B Detalizētu informāciju par instalēšanas procedūrū sk. MF Driver Installation Guide (MF draivera instalēšanas rokasgrāmata).
A Idiekite tvarkyklę ir programinę jranga naudodami „User Software CD-ROM* (Vartolojo programinės jrangos kompaklinį diską).
B Informacijos apie diegimo proceduras rasite „MF Driver Installation Guide“ (MF tvarkyklés diegimo vadove).
A Installige draiver ja tarkvara kasutustarkvara CD abil.
B Draiverite ja tarkvara installimise kohta leiate lisateavet juhendist MF Driver Installation Guide.
MF4430/MF4410

flowchart
graph LR
    A["Start"] --> B["Perform fax setup?"]
    B --> C["Connect phone line. Follow illustrations on the next screen: connect line to A. *Next : Press OK"]
    C --> D["Telephone line connector"]
    D --> E["Telephone/Handset (Optional)"]
6-1 Angiv startindstillingerne for fax.
natural_image
Diagram of a device with connectors and wiring, showing connections between an electrical outlet (no text or symbols present)Tilslut LAN-kablet.
Om LAN-kablet
| Español | A Guía de inicio (este manual):Lea en primer lugar este manual.En este manual se describe la instalación de la máquina, la configuración y una precaución. Asegúrese de leer este manual antes de utilizar la máquina. | B Guía de instalación de controladores MF (User Software CD-ROM):A continuación, lea este manual.En este manual se describe la instalación del software. | C e-Manual (User Manual CD-ROM): Lea el capítulo deseado de acuerdo con sus necesidades.El e-Manual está organizado por temas para que pueda encontrar fácilmente la información deseada.Visualización del e-Manual desde el CD-ROM1. Introduzca el disco User Software CD-ROM en su ordenador.2. Haça cito en [Muezar manus].3. Haça cito en al botón [ ] en [o-Manual]* Aparecerá un mensaje de protección de seguridad en función del sistema operativo que este utilizando. Permitta que se inmuestron los contenidos. |
| Nederlards | A Beknopte handleiding (deze handleiding):Lees deze handleiding eerst.In deze handleiding worden de installatie van het apparaat, de instellingen en waarschuwingen beschreven. Lees deze handleiding voordat u het apparaat gaat gebruiken. | B Installatiehandleiding MF-stuurprogramma (cd met gebruikerssoftware):Lees vervolgens deze handleiding.In deze handleiding wordt de installatie van de software beschreven. | C e-Handleiding (cd met gebruikershandleiding) Lees de hoofdstukken die voor u van toepassing zijn.De e-Handleiding is ingedeeld op onderwerp zodat u de gewenste informatie eenvoudig kunt vinden.De e-Handleiding openen vanaf de cd-rom1. Plasta de cd met gebruikerssoftware in uw computer.2. Kilk op [Display Manuals] (Handelingen weergeven).3. Kilk op de kno [ ] in [o-Manul] (o-Handleiding)* Albankeijk van het besturingsystem dat u gebruikt, wordt er een beverwijzigewawschuwing weergegeven. Geef aan dat de inhoud van de od mag worden weergegeven. |
| Portugues | A Manual Inicial (Este manual):Leia primeiro este manual.Este manual descreve a instalação da máquina, as definições e inclui uma chamada de atenção. Leia este manual antes de utilizar a máquina. | B MF Driver Installation Guide (Manual de Instalação do Controlador MF)(User Software CD-ROM (CD de software do utilizador)):A seguir leia este manual.Este manual descreve a instalação do software. | C Manual Electrónico (User Manual CD-ROM (CD do Manual de Utilizador)): Leia o capítulo correspondente às suas necessidades.O Manual Electrónico está organizado por tópicos, para que possa encontrar facilmente a informação pretendVisualizar o Manual Electrónico a partir do CD1. Introduzca o User Software CD-ROM (CD de software do utilizador) no computador.2. Olique em [Display manuals] (Visualizer manuals).3. Citqus no botão [ ] do [Manual Electrónico].* Despendenda do sistema operativa que esiver a utilizar, poderá aparecer uma mensagem de proteção de segurança. Autorize a visualização dos conteudos. |
| Eλληρικές | A Οδηγός πρώτων βημάτων (To παρόν εγχειρίδιο):Διαβάστε αυτό το εγχειρίδιο πρώτα.Aυτό το εγχειρίδιο περιγράφει την εγκατάσταση της συσκευής, τις ρυβμίσεις και μιο προφύλαξη. Διαβάστε αυτό το εγχειρίδιο πριν χρησηματοπαξησε τη συσκευή. | B MF Driver Installation Guide (User Software CD-ROM (CD-ROM Λογισμικού Χρήστη)):Διαβάστε αυτό το εγχειρίδιο στη συνέχεια.Aυτό το εγχειρίδιο περιγράφει την εγκατάσταση του λογισμικού. | C Hλεκτρονικό εγχειρίδιο (User Manual CD-ROM (CD-ROM Εγχειρίδιου χρήστη)) Διαβάστε το κεφάλαιο που εξυπτρετεί τις ανάγκες σας.Το Hλεκτρονικό εγχειρίδιο χωριζετα σε ενότητες ανά θέμα έτσι ώστε να βρίσκετε εύκολα τις πληροφορίες που Προβολή του Hλεκτρονικού εγχειρίδιου από το CD-ROM1. Τοπολείστε το CD-ROM Λογισμικού χρήστη στον υπαλογστη σας2. Κίστε κλικ στο [Display Manuals] (Προβολή εγχειρίδιου);3. Κίστε κλικ στο κουρτι) [ ] στο [o-Manual] (Ηλεκτρονικό εγχειρίδιο)* Ανάλους με το Λαποσρικού εκοστηρο του χρησαρακούτε, εφωρίζεια ένα πάνωσα προστασίας. Λινοδχθεία την ευφάνση του περεχσυδευς. |
2 Navegación por el menú y Método de introducción de texto Navigeren in het menu en tekstinvoermethode Navegar no menu e método de introdução de texto Перінігнот ото мєвою кай тн мєдобо еісагыжүнєк кеімєвов
MF4580dn/MF4570dn/MF4550d/MF4450

MF4430/MF4410

| Españal | Navegación por el menú• Selección de elemento o despiazamiento del cursor entre los elementos del menuSelectione un elemento con [▲][.] ▼Procesa con la yorarquía siguiellos con [OK] o [▶]Vuelvo a la yorarquía anterior con [I](Anterior) o []. ◀• Confirmación del ajustePulsos [OK]. No ostante, cuando aparezca «Aplicar» en la partilla, selecione«Aplicar» y, o continuación, pulse [OK]. | Método de introducción de texto• MF4580dn/MF4570dn/MF4550dn/MF4450• Cambio del modo de contraciaPulsos [.] para seleccioner«Mode de entrada» y, a continuación,pulsor [OK]. También podrá pulsar [ (● ) ] (Tonos) para cambiar el modo de entrada.- Introducción de texto, simbolos y números introducción con las botas numáticas o [ (1)(1)(2)(3)(4).Para obtener una información deslástia sobre el modo que se puede cambiar o el texto disponible, consulte la página siguiente. | - Desplazamiento del cursor (introducción de un espacio)Desplace con [ (●)[.] ▶Desplace el cursor al final del texto y pulse[ ] para introducir un espacio.- Eliminación de caracteresElimina con [ (C ) ] (Borrar).Si se pulse y se mantiene personada la toda [ (1)(1)(2), se elimineren todos los caracteres. | • MF4430/MF4410- Introducción de texto y númerosSelección texto y números con [ (●) o [▶] a continuación, pulse [OK].- Climinación de texto y númerosPulsos: ▼para seleccioner«BS» y, a continuación, pulse [OK]. |
| Nederlands | Navigeren in het menu• Items selecteren of de cursor verplaatsen door de menu-leansSelectear en tam met [▲][.] ▼Ga naar de volgende structuur met [OK] o [▶]Ga naar de vorga structuur met [I](Vorge) o [▶]• Instellings bevaatigarDruk op [OK]. Als«Tcepassen» echter wordt wteergegeven op het display, selectiert u «Tcepassen» en druk u op [OK]. | Tekstinvoormethode• MF4580dn/MF4570dn/MF4550dn/MF4450• Invocendodus svijzenDruk op [■m]«Invocendodus» le selectieren en druk op [OK]. U kunt ook no [ (● ) ] (1 son) drukken om de invocendodus te svijgen.• Tektot, optimieren en dijkles invoenenGebruik de numerale boresen of [ (1)(1)(2)(3)(4). En in le voeren.Zie de volgende pagina voor meer informatie over de beschiktare modus de text. | - De cursor verplaatsen (een spatie invoeren)Verplasia de cursor met [ (●)[.] ▶Verplaats de cursor naar het einde van de text on druk op [ ] een aan spatie in te voerenTekens verwijderenVenvijder takena met [ (C ) ] (Wissen).Houd [ (1)(1)(2)(3) inspebruik om alle levens le wissen. | • MF4430/MF4410- Textet en cijfers invoerenSelecter tekst en nummers met [ (●) of [▶] on druk op [OK].- Textet en cijfers verwijderenDruk op [▼] om «BS» ta seleccioner an druk op [OK]. |
| Portugues | Navegar no menu• Seleção de items ou movimentação do cursor entre os veicos tars de metroSalaciones un tom com [▲] ou [▼]Avance para o item segunte na hiorarquía com [OK] ou [▶]Rogressa ao tom anterior na hiorarquía com [ (□)(Retroceder) ou [▼]• Confirmação de definiçãoPrima [OK]. No entanto, quando spencer no cerrá a mensagem«Aplicar», selecione«Aplicar» e depois prima [OK]. | Método de introdução de texto• MF4580dn/MF4570dn/MF4550dn/MF4450• Mucar o modo de introduçãoPrima [■m] para seleccioner«Mode de Introdução» e, depois, prima [OK]. También pode prema [ (● ) ] (Silina) para mudar o modo de introdução.- Introduzir texto, simbolos e númerosIntroduce com as todas numéricos ou com [ (● ) ] (Simbolos).Para poder mas detalhes sobre o modo da mudança ou a texto disponível, consulte a página seguinte. | - Mover o cursor (introduzir um espaço)Move a cursor com [ (●) ou [▶]Moves o cursor para o final do texto e prima [ ] para introduzir un espaço.- Apapar caracteresApague com [ (C ) ] (Limpar).Se mantiver a toda [ (1)(1)(2)(3) promda, são apagarios todos os caracteres. | • MF4430/MF4410- Introduzir texto e númerosSelección texto e números com [ (●) ou [▶] e, em seguida, prima [OK].- Asegar texto e númerosPrima [▼] para seleccioner «BS» e, em seguida, prima [OK]. |
| En Moldev | Περήγηση στο μενού• Enkaryi στο ισχόσεις μ πακράνωη κου δρομές στο στοχεία μενούEnkýt ε ένα στοχεία με [▲] ή [▼Συσχόσεις και ευάρχην ειρορχές με [OK] ή [▶].Enkaryi στο τα προρομένων ειρορχές με [ (○)(προρογμένων) η [●] ◆Enkβαρασειο προλρυση.Panorte [OK]. Ondices, διαν ευάρχηνε το στοχείο «Ευαργιση» στοχεία, επελπα ποτηστε [OK]. | Médiócos ευαγωγής κεμένου• MF4580dn/MF4570dn/MF4550dn/MF4450• Αλλαγή καπρουγίας πακραγωήςΓοιγέτες με να επακέξετε σκόν ακτα και εκτα επτα πακραγωή Σπο Σπονειο τε πακραγωή σευαγωγής• Ευαγωγή κεραένου, συμβέλων και οριθείωνΕυαγωγή με αριθυγταν πακραγωή [ (● ) (Δυβδοια).Για Απταπορείες σχετικε με τα Απταργωία με δυναπότητα εκλαγητες ή τα δυδέσιομα κεμενα, δειε την επιδυση σευλία. | - Μεπεύνηρη του δρομέα (Ευαγωγή κενού)Μετικυνηρη με [ (●) ή]Μετικυνητο το δρομέα στο έκο του κευμένου και ποιήστε [ ] συ την ευαγωγή κενού.• Δινηροφή χορεκτήρωνΔικευαση με [ (●) (Δυχευαση).Παλτυντας και κρολικήνες πακραγωή το ταχήσρα [ (■) (Δυχευαση)διαγράστατα θόκα ο χαραστήρος. | • MF4430/MF4410- Εισαγωγή καπρύνου και παλρύσηνΕικείτες κευλενα και πακρεμούς με [ (●) ή] και εκτα πατηστε [OK].- Δυγραση καπρύνου και παλρύσηνΠαποτε [▼] νο να επακέξετε «BS», κε επτα πατηστε [OK]. |
3 Conexión del cable de alimentación y encendido Het netsnoer aansluiten en het apparaat inschakelen Ligar o cabo de alimentação e a alimentação Σύνδεση του καλωδίου ρεύματος και ενεργοποίηση της ισ
flowchart
graph TD
    A["Device with CFF"] --> B["Switch"]
    B --> C["Outlet with Ov"]
Español
flowchart
graph LR
    A["Copy"] --> B["TAX"]
    B --> C["SCAN"]
    C --> D["OK"]
    D --> E["OK"]
    E --> F["Perform fax setup?"]
    F --> G["Set up NOW"]
    G --> H["Set up Later"]
    H --> I["Connect phone line. Follow illustrations on the next screen: Connect line to A. *Next : Press OK"]
    I --> J["Telephone line connector"]
    J --> K["Telephone/Handset (Optional)"]
    K --> L["End"]
Espanol
| Español | 6-3 Salga de la Guía de configuración de fax y, a continuación, reinicie la máquina.Apague la máquina y espere 10 segundos como mínimo antes de volver a encenderla.Los tipos de línea telefónica no se detectan automáticamente. Consulte el e-Manual y establezca una línea telefónica manualmente.◎ e-Manual -> "Fax" -> "Uso del fax" -> "Cambio de las opciones para envío de fax (elementos especificados utilizando el botón [Menú]) -> "Especificación de las opciones de envío de faxes' -> "Seleccionar tipo línea. | Para conexión de red (sólo MF4580dn/MF4570d)◎7 "Conexión y configuración de red" (Pág.8) |
| Para conexión USB◎8 "Instalación del controlador/software" (Pág.9) | ||
| Netherlands | 6-3 Sluit de Fax installatiegids en start het apparaat opnieuw.Schakel het apparaat uit en wacht minimaal 10 seconden voordat u het weer inschakelt.Het type van de telefoonlijn wordt niet automatisch vastgesteld. Raadpleeg de e-Handleiding en stel handmatig een telefoonlijn in.◎ e-Handleiding -> Fax -> Faxen -> De instellingen voor faxverzending wijzigen (items opgegeven met de knop [Menu]) -> Instellingen voor faxverzending opgeven -> Lijntype selecteren. | Voor netwerkverbinding (alleen MF4580dn/MF4570d)◎7 Netwerkverbinding en -configuratie (P. 8) |
| Voor de USB-verbinding◎8 Het stuurprogramma/de software installoren (P. 9) | ||
| Portuglós | 6-3 Sala do "Fax Setup Guide" (Manual de configuração do fax) e depols reinicie a máquina.Desligue a máquina e aguarde pelo menos 10 segundos até voltar a ligá-la.Os tipos de linha telefónica não são detectados automaticamente. Consulte o Manual Electrónico e derina uma linha telefónica manualmente.◎ Manual Electrónico -> "Fax" -> "Utilizar o fax" -> "Alterar definições de envío de fax (Itens especificados utilizando o botão [Menu]) -> "Especificar definições de envío de fax" -> "Selec. Tipo de Linha." | Para ligação de rede (apenas MF4580dn/MF4570d)◎7 "Ligação e configuração da rede" (Pág.8) |
| Para ligação USB◎8 "Instalar o controlador/software" (Pág.9) | ||
| Elektivál | 6-3 Έξοδος από το "Fax Setup Guide" (Οδηγός διαμόρφωσης φαξ) και έπειτα επανεκκίνηση της συσκευής.Απενεργοπούηστε τη συσκευή και περιμένετε τουλάχιστον 10 δευτερόλεπτα πριν την ενεργοπούηστε δανά.Οι τύποι γραμμών τηλεφίνων δεν εντοπίζονται αυτόματα. Ανατρέξτε στο Ηλεκτρονικό εγχειρίδιο και ορίστε μια γραμμή τηλεφίνων χειροκίνητα.◎ Ηλεκτρονικό εγχειρίδιο -> "Φαξ" -> "Χρήση του φαξ" -> "Αλλαγή των ρυθμίσεων για αποστολή φαξ (Στοιχεία που καθορίζονται με το πλήκτρα [Menu] (Μένού)) -> "Καθορισμός ρυθμίσεων αποστολής φαξ" -> "Επιλογή τύπου γραμμής". | Για σύνδεση δικτύου (Μόνο MF4580dn/MF4570d)◎7 "Σύνδεση και διαμόρφωση δικτύου" (Σελ. 8) |
| Για σύνδεση USB◎8 "Εγκατάσταση προγράμματος οδήγησης/λογισμικού" (Σελ. 9) |
7 Conexión y configuración de red Netwerkverbinding en -configuratie Ligação e configuração da rede Σύνδεση και διαμόρφωση δικτύου
natural_image
Diagram showing connection between a device and a network switch (no text or symbols present)| Español | Correcte al cable de LAN.Acerca del cable de LANUtilize un cable de par tenuzado de Categoría 5 o superior para la LAN. | Esta máquina establece la dirección IP automáticamente. Espere aproximadamente dos minutos.Acerca de la obtención de la dirección IP automáticamente (IP automática).Le opción <DHCP> o <IP automática> está activada en la configuración predeterminada. Aunque no establezza la dirección IP manualmente, esta máquina podrá obtenerla automáticamente.• La dirección IP puede asignarca automáticamente con o sin un servidor de DHCP.• La opción <DHCP> tiene prioridad sobre <IP automático>Si se establece una dirección IP fja como dirección IP del ordenador, osteatazoa la dirección IP fja estimando para esta máquina manuamente. | Si desea establecer la dirección IP manualmente, consulte los puntos siguientes.◦ e-Adenual -> "Configuración de red" -> "Configuración de red basics" -> "Ajuste de la dirección IPv4" o "Ajuste de la dirección IPv6". |
| Nordafandis | Sluit de LAN-kabel san.Informatie over de LAN-kabelGabank con categorie 5 of hoger van de twisted-par kabel voor de LAN. | Het IP-adres wordt automatisch door het apoarat ingesteld. Wascht ongeveer twee minuten.Informatie over het automatisch verkrijgen van het IP-adres (Auto-IP)is ingachalkald in de standaardinstelling. Zoefs als u het IP-adres niet handmatig instell, kan dit apparaat het automatisch optieren.• Het IP-adres kan automatisch worden loesgevezen mes of zonder een DHCP-server.• De <ID ICP>-instelling heeft hogere prioriteli dan de <Auto-IP>instelling.Ala een vast IP-adres is ingaateid als het IP-adres van de computar, moet u het vaste IP-adres ook handmatig voor dit apparaat instellen. | Zia do volgende items als u het IP-adres handmatig welt instellen.◦ e-Handeling -> Nesterkinstellungen -> Slandaardnetverkinstellungen -> IPv4-adres instellen of IPv6-adres instellen. |
| Portugues | Ligue o cabo de rede local.Acerca do cabo de rede localUtilizs um cabo de rede local entrençado de categorie 5 ou superior. | A máquina defina o endereço IP automaticamente. Aguieda aproximadamente dos minutos.Acerca da obtenção automática do endereço IP (IP Auto)isá activada na predefinição. Misão que não tenha definico o endereço IP manuimento, esta máquina pada oetólo automaticamente.◦ O endereço IP pode ser atribuído automaticamente com ou sem um servidor DHCP.• A definição <DI ICP> tem prioridade sobre a definição<IP Auto>.Se um endereço IP fixo liver sido definida como endereço IP do conversador, defina o endereço IP fixo manualmente para esta máquina. | Se pretender definir o endereço IP manualmente, consulte os seguintes itens◦ Manual Electronico -> "Definições de Rede" -> "Definições de rede basicas" -> "Definitr o endereço IPv4" ou "Definitr o endereço IPv6". |
| Elkjavat | Σανδέστε το καλώδιο LAN.Σχετικά με το καλώδιο τοπικού δικτύου (LAN)Γιο το ποτικό δικυα (LAN) χρημμοσεταιρεία εντα καλώδιο συντορομμένου (ζύνως κατηγορίας 5 ή ανταπρο. | Η προφορίες για την αυτόματη λήψη της δικτύνυσης IP (Aut. δικθ. IP)<DI ICP> η <Aut. δικθ. IP> εναγανατατα την προσελκενεμη προθμοη. Ανάρα και εν δεν αρίσειε τη δικτύνυση IP χαροκίνερια, αυή η αυσκευή μπερε να τη λήδε αυτόματα.• Η εκδυνυση IP μπορεί να ευχαγριβεί αυναματε με η χωρις διανοματη DHCP.• Η ρερμειη <DHCP> ξην μεγαλεκτηρ προστρεσετετο απο τη ρυρματα <Aut. δεύθ. IP>Αν μο αρομένη δεύθυνοση IP εχεν ρυρματεί ως η δεύθυνοση IP του αυτολοχιση, ρυβικτε την ορομένη δεύθυνοση IP χαροκίνερια και γο αυτόν τον αυτολοχιση». | Εὐν δέλετε να αρομένε τη δεύθυνοση IP μη αυτόματα, δελε τα ακάλυδα αυτόχεια.• Ηεκτρονικό εγγεριβειο -> "Ρυθμοτικό δικτύου" -> "Βαστικός ρυθμικτικός δικτύου" -> "Ρυθμοτική της δικτύνυσης IPv4" η "Ρυθμοτη της δικτύνυσης IPv6". |
8 Instalación del controlador/software Het stuurprogramma/de software installeren Instalar o controlador/software Εγκατάσταση προγράμματος οδήγησης/λογισμικού
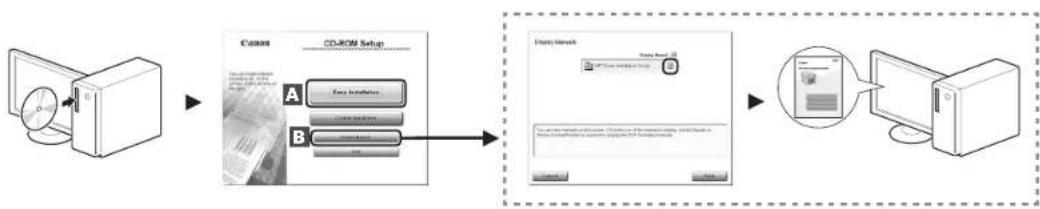
flowchart
graph LR
    A["Computer"] --> B["File Transfer"]
    B --> C["USB Drive / USB Drive / USB Drive / USB Drive / USB Drive / USB Drive / USB Drive / USB Drive / USB Drive / USB Drive / USB Drive / USB Drive / USB Drive / USB Drive / USB Drive / USB Drive / USB Drive / USB Drive / USB Drive / USB Drive / USB Drive / USB Drive / USB Drive / USB Drive / USB Drive / USB Drive / USB Drive / USB Drive / USB Drive / USB Drive / USB Drive / USB Drive / USB Drive / USB Drive / USB drive"]
Symbols Used in This Manual
WARNING
Indicates a warning concerning operations that may lead to death or injury to persons if not performed correctly. To use the machine safely, always pay attention to these warnings.
CAUTION
Indicates a caution concerning operations that may lead to injury to persons if not performed correctly. To use the machine safely, always pay attention to these cautions.
IMPORTANT
Indicates operational requirements and restrictions. Be sure to read these items carefully to operate the machine correctly, and avoid damage to the machine or property.

Indicates an operation that must not be performed. Read these items carefully, and make sure not to perform the described operations.
●Keys and Buttons Used in This Manual
The following symbols and key names are a few examples of how keys to be pressed are expressed in this manual.
• Operation panel keys: [Key icon] + (Key name)
Example: [◎] (Stop)
- Display:
- Buttons and items on the computer display: [Preferences]
Illustrations and Displays Used in This Manual
Illustrations and displays used in this manual are which of MF4570dn unless specified.
Important Safety Instructions
Please read these "Important Safety Instructions" thoroughly before operating the machine. As these instructions are intended to prevent injury to the user and other persons or to prevent destruction of property, always pay attention to these instructions and operational requirements. Also, as it may result in unexpected accidents or injuries, do not perform any operation unless otherwise specified in the manual.
Installation
WARNING
- Do not install the machine in a location near alcohol, paint thinner, or other flammable substances. If flammable substances come into contact with electrical parts inside the machine, this may result in a fire or electrical shock.
Do not place the following items on the machine. - Necklaces and other metal objects
- Cups, vases, flowerpots, and other containers filled with water or liquids
If these items come into contact with a high-voltage area inside the machine, this may result in a fire or electrical shock. If these items are dropped or spilled inside the machine, immediately turn off the power switches of the machine and computer (1) and disconnect the interface cable if it is connected (2). Then, unplug the power plug from the AC power outlet (3) and contact your local authorized Canon dealer.
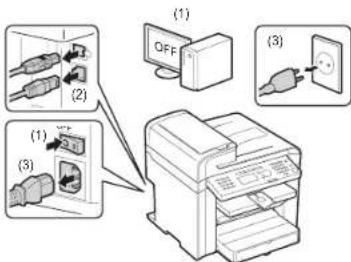
CAUTION
- Do not install the machine in unstable locations, such as on unsteady platforms or inclined floors, or in locations subject to excessive vibrations, as this may cause the machine to fall or tip over, resulting in personal injury.
- The ventilation slots are provided for proper ventilation of working parts inside the machine. Never place the machine on a soft surface, such as a bed, sofa, or rug. Blocking the slots can cause the machine to overheat, resulting in a fire.
-
Do not install the machine in the following locations, as this may result in a fire or electrical shock.
-
A damp or dusty location
- A location exposed to smoke and steam, such as near a cookery or humidifier
- A location exposed to rain or snow
- A location near a water faucet or water
- A location exposed to direct sunlight
- A location subject to high temperatures
-
A location near open flames
-
When installing the machine, gently lower the machine to the installation site so as not to catch your hands between the machine and the floor or between the machine and other equipment, as this may result in personal injury.
- When connecting the interface cable, connect it properly by following the instructions in this manual. If not connected properly, this may result in malfunction or electrical shock.
- When moving the machine, follow the instructions in this manual to hold it correctly. Failure to do so may cause you to drop the machine, resulting in personal injury.
e-Manual -> "Maintenance" -> "Transporting the Machine."
Power Supply
WARNING
- Do not damage or modify the power cord. Also, do not place heavy objects on the power cord or pull on or excessively bend it. This can cause electrical damage, resulting in fire or electrical shock.
- Keep the power cord away from all heat sources. Failure to do so can cause the power cord insulation to melt, resulting in a fire or electrical shock.
• The power cord should not be taut, as this may lead to a loose connection and cause overheating, which could result in a fire.
• The power cord may become damaged if it is stepped on, fixed with staples, or if heavy objects are placed on it.
- Continued use of a damaged power cord can lead to an accident, such as a fire or electrical shock.
- Do not plug or unplug the power plug with wet hands, as this can result in electrical shock.
- Do not plug the power cord into a multiplug power strip, as this can result in a fire or electrical shock.
- Do not bundle up or tie up the power cord in a knot, as this can result in a fire or electrical shock.
- Insert the power plug completely into the AC power outlet. Failure to do so can result in a fire or electrical shock.
- If excessive stress is applied to the connection part of the power cord, it may damage the power cord or the wires inside the machine may disconnect. This could result in a fire. Avoid the following situations:
- Connecting and disconnecting the power cord frequently.
- Tripping over the power cord.
- The power cord is bent near the connection part, and continuous stress is being applied to the power outlet or the connection part.
- Applying a shock to the power connector.
- Do not use power cords other than the one provided, as this can result in a fire or electrical shock.
- As a general rule, do not use extension cords. Using an extension cord may result in a fire or electrical shock.
- Remove the power plug from the AC power outlet and refrain from using the machine during a thunderstorm. Lightning can result in a fire, electrical shock or malfunction.
CAUTION
- Do not use a power supply voltage other than that listed herein, as this may result in a fire or electrical shock.
- Always grasp the power plug when unplugging the power plug. Do not pull on the power cord, as this may expose the core wire of the power cord or damage the cord insulation, causing electricity to leak, resulting in a fire or electrical shock.
- Leave sufficient space around the power plug so that it can be unplugged easily. If objects are placed around the power plug, you may be unable to unplug it in an emergency.
Handling
WARNING
- Do not disassemble or modify the machine. There are high-temperature and high-voltage components inside the machine which may result in a fire or electrical shock.
- Electrical equipment can be hazardous if not used properly. Do not allow children to touch the power cord, cables, internal gears, or electrical parts.
- If the machine makes an unusual noise or emits smoke, heat, or an unusual smell, immediately turn off the power switches of the machine and computer and disconnect the interface cable if it is connected. Then, unplug the power plug from the AC power outlet and contact your local authorized Canon dealer. Continued use can result in a fire or electrical shock.
- Do not use flammable sprays near the machine. If flammable substances come into contact with electrical parts inside the machine, this may result in a fire or electrical shock.
- Always turn off the power switches of the machine and computer, and then unplug the power plug and interface cables before moving the machine. Failure to do so can damage the cables or cords, resulting in a fire or electrical shock.
- Confirm that the power plug or power connector is inserted completely after moving the machine. Failure to do so can result in an overheating and fire.
- Do not drop paper clips, staples, or other metal objects inside the machine. Also, do not spill water, liquids, or other flammable substances (alcohol, benzene, paint thinner, etc.) inside the machine. If these items come into contact with a high-voltage area inside the machine, this may result in a fire or electrical shock. If these items are dropped or spilled inside the machine, immediately turn off the power switches of the machine and computer and disconnect the interface cable if it is connected. Then, unplug the power plug from the AC power outlet and contact your local authorized Canon dealer.
- When plugging or unplugging a USB cable when the power plug is plugged into an AC power outlet, do not touch the metal part of the connector, as this can result in electrical shock.
CAUTION
- Do not place heavy objects on the machine. The object or the machine may fall, resulting in personal injury.
- Turn off the power switch when the machine will not be used for a long period of time, such as overnight. Turn off the machine and unplug the power plug if the machine will not be used for an extended period of time, such as for several days.
- Open or close covers and install or remove cassettes gently and carefully. Be careful not to hurt your fingers.
- Keep your hands and clothing away from the roller in the output area. Even if the machine is not printing, the roller may suddenly rotate and catch your hands or clothing, resulting in personal injury.
- The output slot is hot during and immediately after printing. Do not touch the area surrounding the output slot, as this may result in burns.
- Printed paper may be hot immediately after being output. Be careful when removing the paper and aligning the removed paper, especially after continuous printing. Failure to do so may result in burns.
- When performing copy with a thick book placed on the platen glass, do not press the feeder or the platen glass cover forcefully. This may damage the platen glass and cause personal injury.
- Be careful not to drop a heavy object, such as a dictionary, on the platen glass. This may damage the platen glass and cause personal injury.
- Close the feeder or the platen glass cover gently so as not to catch your hand. This may result in personal injury.
- The laser beam can be harmful to the human body. The laser beam is confined in the laser scanner unit by a cover, so there is no danger of the laser beam escaping during normal machine operation. Read the following remarks and instructions for safety.
- Never open covers other than those indicated in this manual.
- Do not remove the caution label attached to the cover of the laser scanner unit.
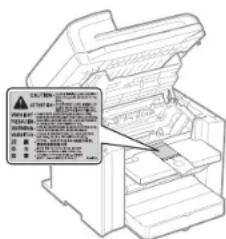
- If the laser beam should escape and enter your eyes, exposure may cause damage to your eyes.
- This machine is confirmed as the class 1 laser product in IEC60825-1:2007. Laser Diode Information
- wavelength: 780-800 nm
- maximum power: 6 mW
Maintenance and Inspections
WARNING
- When cleaning the machine, turn off the machine and computer, and unplug the interface cables and power plug. Failure to do so can result in a fire or electrical shock.
- Unplug the power plug from the AC power outlet periodically and clean the area around the base of the power plug's metal pins and the AC power outlet with a dry cloth to remove all dust and grime. In damp, dusty, or smoky locations, dust can build up around the power plug and become damp, which can cause a short circuit, resulting in a fire.
- Clean the machine with a well wrung out cloth dampened with water or mild detergent diluted with water. Do not use alcohol, benzene, paint thinner, or other flammable substances. If flammable substances come into contact with electrical parts inside the machine, this may result in a fire or electrical shock.
- Some areas inside the machine are subject to high voltage. When removing jammed paper or when inspecting inside of the machine, be careful not to allow necklaces, bracelets, or other metal objects to touch the inside of the machine, as this can result in burns or electrical shock.
- Do not dispose of used toner cartridges in open flames. This may cause the toner remaining inside the cartridges to ignite, resulting in burns or fire.
- Confirm that the power plug or power connector is inserted completely after cleaning the machine. Failure to do so can result in an overheating and fire.
- Check the power cord and plug regularly. The following conditions may result in fire, so please contact your local authorized Canon dealer or the Canon help line.
- There are burn marks on the power plug.
- The blade on the power plug is deformed or broken.
- The power is turned OFF or ON when bending the power cord.
- The coating of the power cord is damaged, cracked, or dented.
- A part of the power cord becomes hot.
-
Check regularly that the power cord and plug are not handled in the following manner. Failure to do so can result in a fire or electrical shock.
-
The power connector is loosened.
- Stress is being applied to the power cord by a heavy object or by fixing it with staples.
- The power plug is loosened.
- The power cord is tied in a bundle.
- A part of the power cord is put in an aisle.
- The power cord is put in front of the heating appliance.
CAUTION
- The fixing unit and its surroundings inside the machine become hot during use. When removing jammed paper or when inspecting the inside of the machine, do not touch the fixing unit and its surroundings, as this may result in burns.
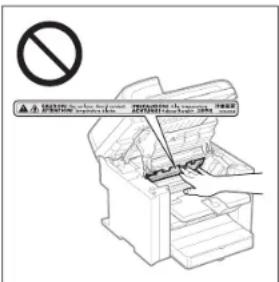
- When removing jammed paper or when inspecting the inside of the machine, do not expose yourself to the heat emitted from the fixing unit and its surroundings for a prolonged period of time. Doing so may result in low temperature bums, even though you did not touch the fixing unit and its surroundings directly, as this may result in bums.
-
If paper is jammed, remove the jammed paper so that any pieces of paper do not remain inside the machine according to the displayed message. Also, do not put your hand in an area other than indicated areas, as this may result in personal injuries or burns.
-
When removing jammed paper or replacing a toner cartridge, be careful not to get any toner on your hands or clothing, as this will dirty your hands or clothing. If toner gets on your hands or clothing, wash them immediately with cold water. Washing with warm water sets the toner, making it impossible to remove the toner stains.
- When removing jammed paper, be careful not to allow the toner on the paper to scatter. The toner may get into your eyes or mouth. If toner gets into your eyes or mouth, wash them immediately with cold water and consult a physician.
- When loading paper or removing jammed documents or paper, be careful not to cut your hands with the edges of the paper.
- When removing a toner cartridge, remove the toner cartridge carefully so as to prevent the toner from scattering and getting into your eyes or mouth. If toner gets into your eyes or mouth, wash them immediately with cold water and consult a physician.
- Do not attempt to disassemble the toner cartridge. The toner may scatter and get into your eyes or mouth. If toner gets into your eyes or mouth, wash them immediately with cold water and consult a physician.
- If toner leaks from the toner cartridge, be careful not to inhale the toner or allow it to come into direct contact with your skin. If the toner comes into contact with your skin, wash with soap. If the skin becomes irritated or you inhale the toner, consult a physician immediately.
Consumables
WARNING
- Do not dispose of used toner cartridges in open flames. This may cause the toner to ignite, resulting in burns or fire.
- Do not store toner cartridges or paper in a location exposed to open flames. This may cause the toner or paper to ignite, resulting in burns or fire.
- When disposing of a toner cartridge, place the toner cartridge into a bag to prevent the toner from scattering, and then dispose of the toner cartridge according to local regulations.
CAUTION
- Keep the toner cartridges and other consumables out of the reach of small children. If the toner or other parts are ingested, consult a physician immediately.
- Do not attempt to disassemble the toner cartridge. The toner may scatter and get into your eyes or mouth. If toner gets into your eyes or mouth, wash them immediately with cold water and consult a physician.
- If toner leaks from the toner cartridge, be careful not to inhale the toner or allow it to come into direct contact with your skin. If the toner comes into contact with your skin, wash with soap. If the skin becomes irritated or you inhale the toner, consult a physician immediately.
- Do not pull out the sealing tape forcefully or stop at midpoint, as this may cause toner to spill out. If toner gets into your eyes or mouth, wash them immediately with cold water and consult a physician.
Others
WARNING
- If you are using a cardiac pacemaker
This machine generates a low level magnetic field. If you use a cardiac pacemaker and feel abnormalities, please move away from this machine and consult your physician immediately.
Installation Requirements and Handling
In order to use this machine in a safe and trouble-free manner, install the machine in a place that fulfills the following conditions. Also, read the remarks carefully.
Temperature and Humidity Conditions
• Temperature range: 10 to 30°C
• Humidity range: 20 to 80 % RH (no condensation)
IMPORTANT
Protecting the machine from condensation
• To prevent condensation from forming inside the machine in the following cases, let the machine adjust to the ambient temperature and humidity for at least two hours before use.
- When the room where the machine is installed is heated rapidly
- When the machine is moved from a cool or dry location to a hot or humid location
- If water droplets (condensation) form inside the machine, this can result in paper jams or poor print quality
When using an ultrasonic humidifier
When you are using an ultrasonic humidifier, it is therefore recommended that you use purified water or other water that is free of impurities.
If you use tap water or well water, impurities in the water will be dispersed through the air. This can be trapped inside the machine, causing degradation in print quality.
Power Supply Requirements
220 to 240 V, 50/60 Hz
IMPORTANT
Precautions when connecting the power cord
- Do not connect this machine to an uninterruptible power source.
- Use an AC power outlet exclusively for the machine. Do not use the other sockets of the AC power outlet.
- Do not plug the power plug into the auxiliary outlet on a computer.
Do not use the same AC power outlet for both the machine and any of the following equipment.
- Copy machine
- Air conditioner
- Shredder
- Equipment that consumes a large amount of electricity
- Equipment that generates electrical noise
- When unplugging the power cord, keep interval of 5 seconds or more before plugging it again.
Miscellaneous precautions
- The maximum power consumption of the machine is 1,220 W or less.
- Electrical noise or a dramatic drop in supplied voltage may cause the machine or computer to operate incorrectly or lose data.
Installation Requirements
- A location with sufficient space
• A location with good ventilation - A location with a flat, even surface
- A location able to fully support the weight of the machine
IMPORTANT
Do not install the machine in the following locations, as this may result in damage to the machine.
• A location subject to dramatic changes in temperature or humidity
• A location subject to condensation
- A poorly ventilated location
(If you use the machine for a long time or to perform a large amount of printing in a poorly ventilated room, the ozone or other odors generated by the machine may create an uncomfortable working environment. In addition, chemical particles are dispersed during printing; therefore, it is important to provide adequate ventilation.)
- A location near equipment that generates magnetic or electromagnetic waves
• A laboratory or location where chemical reactions occur
• A location exposed to salt air, corrosive gases, or toxic gases
- A location, such as on a carpet or mat, that may warp from the weight of the machine or where the machine is liable to sink.
Maintenance and Inspections
IMPORTANT
- Follow the instructions in the caution label attached to this machine.
- Avoid shaking or applying a shock to this machine.
- To prevent a paper jam, do not turn the power ON/OFF, open/close the operation panel or rear cover, and load/unload paper in the middle of printing operation.
- Be sure to remove the toner cartridge from the machine when transporting the machine to a distance.
- To avoid exposing the toner cartridge to light, place it in the protective bag included with this machine or wrap it in a thick cloth.
- Clean this machine regularly. If this machine becomes dusty, it may operate improperly.
- Use a modular cable of 3 m or shorter in length.
- Depending on your locale or your telephone connection, you may be unable to perform data communication. In this case, contact your local authorized Canon dealer or the Canon help line.
- The repairing parts and toner cartridges for the machine will be available for at least seven (7) years after production of this machine model has been discontinued.
Legal Notices
Model Names
MF4580dn (F159302)
MF4570dn (F159302)
MF4550d (F159302)
MF4450 (F159502)
MF4430 (F159500) MF4410 (E159500)
MI-4416 (F 159503)
WEEE Directive

Only for European Union and EEA (Norway, Iceland and Liechtenstein)
These symbols indicate that this product is not to be disposed of with your household waste, according to the WEEE Directive (2012/19/EU), the Battery Directive (2006/66/EC) and/or national legislation implementing those Directives.
If a chemical symbol is printed beneath the symbol shown above, in accordance with the Battery Directive, this indicates that a heavy metal (Hg = Mercury, Cd = Cadmium, Pb = Lead) is present in this battery or accumulator at a concentration above an applicable threshold specified in the Battery Directive.
This product should be handed over to a designated collection point, e.g., on an authorized one-for-one basis when you buy a new similar product or to an authorized collection site for recycling waste electrical and electronic equipment (EEE) and batteries and accumulators. Improper handling of this type of waste could have a possible impact on the environment and human health due to potentially hazardous substances that are generally associated with EEE. Your cooperation in the correct disposal of this product will contribute to the effective usage of natural resources.
For more information about the recycling of this product, please contact your local city office, waste authority, approved scheme or your household waste disposal service or visit www.canon-europe.com/weee, or www.canon-europe.com/battery.
R & TTE Directive
CE
This equipment (F159302/F159502) conforms with the essential requirements of EC Directive 1999/5/EC and is usable in EU. (Only for models with facsimile functionality.)
(For Europe only) Canon Inc. / Canon Europa N.V.
EMC requirements of EC Directive
This equipment conforms with the essential EMC requirements of EC Directive. We declare that this product conforms with the EMC requirements of EC Directive at nominal mains input 230 V, 50 Hz although the rated input of the product is 220 to 240 V, 50/60 Hz. Use of shielded cable is necessary to comply with the technical EMC requirements of EC Directive.
International ENERGY STAR Program

As an ENERGY STAR® Partner, Canon Inc. has determined that this product meets the ENERGY STAR Program for energy efficiency.
The International ENERGY STAR Office Equipment Program is an international program that promotes energy saving through the use of computers and other office equipment.
The program backs the development and dissemination of products with functions that effectively reduce energy consumption. It is an open system in which business proprietors can participate voluntarily.
The targeted products are office equipment, such as computers, displays, printers, facsimiles, and copiers. The standards and logos are uniform among participating nations.
IPv6 Ready Logo

The protocol stack included in this machine has obtained the IPv6 Ready Logo Phase-1 established by the IPv6 Forum.
Laser Safety Information
Laser radiation could be hazardous to the human body. For this reason, laser radiation emitted inside this equipment is hermetically sealed within the protective housing and external cover. No radiation can leak from the machine in the normal operation of the product by the user. This machine is classified as a Class 1 Laser Product under IEC 60825-1: 2007, EN60825-1: 2007.
220 to 240 V Model
The label shown below is attached to the laser scan unit on the machine.
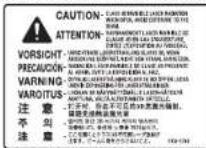
This machine has been classified under IEC 60825-1: 2007, EN60825-1: 2007 and conforms to the following classes:
CLASS 1 LASER PRODUCT
LASER KLASSE 1
APPAREIL À LASER DE CLASSE 1
APPARECCHIO LASER DI CLASSE 1
PRODUCTO LÁSER DE CLASE
APARELHO A LASER DE CLASSE 1
LUOKAN 1 LASER-TOOTE
LASERPRODUKT KLASS 1
CAUTION
Use of controls, adjustments, or performance of procedures other than those specified in the manuals for the machine may result in hazardous radiation exposure.
Trademarks
Canon and the Canon logo are trademarks of Canon Inc.
Microsoft, Windows and Windows Vista are either trademarks or registered trademarks of Microsoft Corporation in the United States and/or other countries.
All other product and brand names are registered trademarks, trademarks or service marks of their respective owners.
Copyright
Copyright CANON INC. 2014
No part of this publication may be reproduced, transmitted, transcribed, stored in a retrieval system, or translated into any language or computer language in any form or by any means, electronic, mechanical, magnetic, optical, chemical, manual, or otherwise, without the prior written permission of Canon Inc.
Third Party Software
A. This product includes third-party software modules. Use and distribution of this software modules, including any updates of such software modules (collectively, the "SOFTWARE") are subject to conditions (1) through (9) below.
(1) You agree that you will comply with any applicable export control laws, restrictions or regulations of the countries involved in the event that this product including the SOFTWARE is shipped, transferred or exported into any country.
(2) Rights holders of the SOFTWARE retain in all respects the title, ownership and intellectual property rights in and to the SOFTWARE. Except as expressly provided herein, no license or right, expressed or implied, is hereby conveyed or granted by rights holders of the SOFTWARE to you for any intellectual property of rights holders of the SOFTWARE.
(3) You may use the SOFTWARE solely for use with the Canon product you purchased (the "PRODUCT").
(4) You may not assign, sublicense, market, distribute, or transfer the SOFTWARE to any third party without prior written consent of rights holders of the SOFTWARE.
(5) Notwithstanding the foregoing, you may transfer the SOFTWARE only when (a) you assign all of your rights to the PRODUCT and all rights and obligations under the conditions to transferee and (b) such transferee agrees to be bound by all these conditions.
(6) You may not decompile, reverse engineer, disassemble or otherwise reduce the code of the SOFTWARE to human readable form.
(7) You may not modify, adapt, translate, rent, lease or loan the SOFTWARE or create derivative works based on the SOFTWARE.
(8) You are not entitled to remove or make separate copies of the SOFTWARE from the PRODUCT.
(9) The human-readable portion (the source code) of the SOFTWARE is not licensed to you.
B. Notwithstanding A above, in case the other conditions accompany third-party software modules, these software modules are subject to the other conditions.
The Software Subjected to the Other Conditions
Please refer to eManual on a CD-ROM bundled with this product, for more detail and corresponding license conditions.
Disclaimers
The information in this document is subject to change without notice. CANON INC. MAKES NO WARRANTY OF ANY KIND WITH REGARD TO THIS MATERIAL, EITHER EXPRESS OR IMPLIED, EXCEPT AS PROVIDED HEREIN, INCLUDING WITHOUT LIMITATION, THEREOF, WARRANTIES AS TO MARKETABILITY, MERCHANTABILITY, FITNESS FOR A PARTICULAR PURPOSE OF USE OR NON-INFRINGEMENT. CANON INC. SHALL NOT BE LIABLE FOR ANY DIRECT, INCIDENTAL, OR CONSEQUENTIAL DAMAGES OF ANY NATURE, OR LOSSES OR EXPENSES RESULTING FROM THE USE OF THIS MATERIAL.
Legal Limitations on Usage of Your Product and the Use of Images
Using your product to scan, print or otherwise reproduce certain documents, and the use of such images as scanned, printed or otherwise reproduced by your product, may be prohibited by law and may result in criminal and/or civil liability. A non-exhaustive list of these documents is set forth below. This list is intended to be a guide only. If you are uncertain about the legality of using your product to scan, print or otherwise reproduce any particular document, and/or of the use of the images scanned, printed or otherwise reproduced, you should consult in advance with your legal advisor for guidance.
- Paper Money
- Travelels Checks
- Money Orders
- Food Stamps
- Certificates of Deposit
-
Passports
-
Postage Stamps (canceled or uncanceled)
- Immigration Papers
- Identifying Badges or Insignias
- Internal Revenue Stamps (canceled or uncanceled)
- Selective Service or Draft Papers
- Bonds or Other Certificates of Indebtedness
- Checks or Drafts Issued by Governmental Agencies
- Stock Certificates
- Motor Vehicle Licenses and Certificates of Title
- Copyrighted Works/Works of Art without Permission of Copyright Owner
Considerable effort has been made to make sure that the manuals for the machine are free of inaccuracies and omissions. However, as we are constantly improving our products if you need an exact specification, please contact Canon.
ATTENTION
CLASS 1 LASER PRODUCT LASER KLASSE 1
APPAREIL À LASER DE CLASSE 1 APPARECCHIO LASER DI CLASSE 1
PRODUCTO LASER DE CLASE 1 APARELHO A LASER DE CLASSE 1
LUOKAN 1 LASER-TUOTE LASERPRODUKT KLASS 1
ATTENTION
ATTENZIONE
CLASS 1 LASER PRODUCT
LASER KLASSE 1
APPAREIL À LASER DE CLASSE 1
APPARECCHIO LASER DI CLASSE 1
PRODUCTO LASER DE CLASE 1
APARELHO A LASER DE CLASSE 1
LUOKAN 1 LASER-TUOTE
LASERPRODUKT KLASS 1
ATTENZIONE
VORSICHT
CLASS 1 LASER PRODUCT
LASER KLASSE
APPAREIL À LASER DE CLASSE 1
APPARECCHIO LASER DI CLASSE 1
PRODUCTO LASER DE CLASE 1
APARELHO A LASER DE CLASSE 1
LUOKAN 1 LASER-TUOTE
LASERPRODUKT KLASS 1
VORSICHT
UPOZORNĚNÍ
www.canon-europe.com/weee nebo www.canon-europe.com/battery.
Směrnice R & TTE

LASERPRODUKT KLASS 1
UPOZORNĚNÍ
VIGYÁZAT
LASERPRODUKT KLASS 1
VIGYÁZAT
PRZESTROGA
www.canon-europe.com/weee. lub www.canon-europe.com/battery.
Dyrektywa RTTE

LASERPRODUKT KLASS 1
PRZESTROGA
III. 110 (1 October)
www.canon-europe.com/weee, alebo www.canon-europe.com/battery.
LASERPRODUKT KLASS 1
UPOZORNENIE
OPREZ
- Izlaganje laserskoj zraci koja pobjegne može dovesti do ozbiljnog oštećenja očiju.
- Prema pravilniku IEC60825-1:2007 ovaj je uređaj potvrđen kao laserski proizvod prve klase. Informacije o laserskoj diodi
- duljina talasa: 780-800 nm
- maks. snaga: 6 mW
- Kada uklanjate zaglavljeni papir ili provjeravate unutrašnjost uređaja, nemojte se na dulje vrijeme izlagati vručini koja dolazi iz jedinice za fiksiranje i njene okoline. U suprotnom može doći do opeklina niske temperature, a do opeklina može doći čak i ako izravno na dotaknele jedinicu za fiksiranje i njenu okolinu.
- Ako se papir zaglavi, uklonite ga u skladu s prikazanom porukom tako da unutar uređaja ne ostanu nikakvi komadići papira. Također nemojte gurati ruku u područja koja nisu naznačena jer to može dovesti do ozljeda ili opeklina.
- Prilikom uklanjanja zaglavljenog papira ili zamjene spremnika za toner, pripazite da toner ne dođe u dodir s vašim rukama ili odjećom jer ćete ih uprijati. Ako toner dospije na ruke ili odjeću, odmah ih operite hladnom vodom. Pranje toplom vodom rastapa tonera, pa je mrlje nemoguće ukloniti.
- Prilikom uklanjanja zaglavljenog papira budite pažljivi kako se toner s papira ne bi rasuo. Toner može dospjeti u vaše oči i usta. Ako vam toner dospije u oči ili usta, odmah ih isperite hladnom vodom i obralite se liječniku.
- Pri urnetanju ili uklanjanju zaglavljenih dokumenata ili papira pripazite da se ne porežete na rubove papira.
-
Prilikom uklanjanja iskorištenenog spremnika za tonerom, pažljivo uklonite spremnik da biste spriječili rasipanje tonera i upađanje u oči i usta. Ako vam toner dospije u oči ili usta, odmah ih isperite hladnom vodom i obratite se liječniku.
-
Ne pokušavajte rastaviti spremnik za toner. Toner se može raspršiti i dospjeti vam u oči i usta. Ako vam toner dospije u oči ili usta, odmah ih isperite hladnom vodom i obratite se liječniku.
- Ako toner curi iz spremnika za toner, pazile da ga ne udahnete ili da on ne dođe u izravan dodir s vašom kožom. Ako toner dođe u dodir s vašom kožom, isperite je sapunom. Bude li koža iritirana ili ako toner udahnete, odmah se obratite liječniku.
Potrošni materijal
UPOZORENJE
LASERPRODUKT KLASS 1
OPREZ
ATENTIE
CLASS 1 LASER PRODUCT
LASER KLASSE
APPAREIL À LASER DE CLASSE 1
APPARECCHIO LASER DI CLASSE 1
PRODUCTO LASER DE CLASE 1
APARELHO A LASER DE CLASSE T
LUOKAN 1 LASER-TUOTE
LASERPRODUKT KLASS 1
ATENTIE
www.canon-europe.com/weee. all www.canon-europe.com/battery.
Direktiva o radijski opremi in telekomunikacijski terminalski opremi (R & TTE)

LASERPRODUKT KLASS 1
PREVIDNO
www.canon-europe.com/weee, или www.canon-europe.com/battery.
R & TTE Директива

LASERPRODUKT KLASS 1
ВНИМАНИЕ!
LASERPRODUKT KLASS 1
ВНИМАНИЕ
УВАГА
LASERPRODUKT KLASS 1
УВАГА
LASERPRODUKT KLASS 1

m = 311
- أَرْزَكَ الْمِسْمِ
ب Industries, Industry sector, Market, and Investment in the United States
CLASS 1 LASER PRODUCT
LASER KLASSE 1
APPAREIL À LASER DE CLASSE
APPARECCHIO LASER DI CLASSE 1
PRODUCTO LASER DE CLASE 1
APARELHO A LASER DE CLASSE 1
LOOKAN 1 LASER-TOOTE
LASERPRODUKT KCLASS 1
احناط
DİKKAT
CLASS 1 LASER PRODUCT
LASER KLASSE 1
APPAREIL À LASER DE CLASSE 1
APPARECCHIO LASER DI CLASSE 1
PRODUCTO LASER DE CLASE 1
APARELHO A LASER DE CLASSE 1
LUOKAN 1 LASER-TOOTE
LASERPRODUKT KCLASS 1
DIKKAT
flowchart
graph TD
    A["1: OFF"] --> B["2: Switching to printer"]
    B --> C["3: Plug-in to outlet"]
UZMANİBU!
www.canon-europe.com/weee, vai www.canon-europe.com/battery.
R&TTE direktiva

LASERPRODUKT KLASS 1
UZMANIBU!
- Jei lazerio spindulys pateks jurns i akis, gali jas pažeisti.
CLASS 1 LASER PRODUCT
LASER KLASSE 1
APPAREIL À LASER DE CLASSE 1
APPARECCHIO LASER DI CLASSE 1
PRODUCTO LÁSER DE CLASE 1
APARELHO A LASER DE CLASSE 1
LUOKAN 1 LASER-TUOTE
LASERPRODUKT KLASS 1
DÉMESIO
ETTEVAATUST
LASERPRODUKT KLASS 1
ETTEVAATUST
www.canon-europe.com/weee. eller www.canon-europe.com/battery
LASERPRODUKT KLASS 1
FORSIGTIG
- Kvitteringer for deponering
- Pas
- Immigrationspapirer
www.canon-europe.com/weee, eller www.canon-europe.com/battery.
R & TTE-direktivet

CLASS 1 LASER PRODUCT
LASER KLASSE
APPAREIL À LASER DE CLASSE 1
APPARECCHIO LASER DI CLASSE 1
PRODUCTO LASER DE CLASE 1
APARELHO A LASER DE CLASSE LUOKAN 1 LASER TUOTE
LASEBPRODUKT KCLASS 1
FORSIKTIG
HUOMIO
www.canon-europe.com/weee. lai www.canon-europe.com/battery.
R & TTE -direktiivi
CE
LASERPRODUKT KLASS 1
HUOMIO
VAR FÖRSIKTIG!
www.canon-europe.com/weee, eller www.canon-europe.com/battery.
R & TTE-direktivet

LASERPRODUKT KLASS 1
⚠️ VAR FÖRSIKTIG!
- Immigrationshandlingar
ATENCIÓN
CLASS 1 LASER PRODUCT
LASER KLASSE 1
APPAREIL À LASER DE CLASSE 1
APPARECCHIO LASER DI CLASSE 1
PRODUCTO LÁSER DE CLASE 1
APARELHO A LASER DE CLASSE 1
LUOKAN 1 LASER-TUOTE
LASERPRODUKT KLASS 1
ATENCIÓN
www.canon-europe.com/webe, of www.canon-europe.com/battery.
R&TTE-richtlijn

CLASS 1 LASER PRODUCT
LASER KLASSE 1
APPAREIL À LASER DE CLASSE 1
APPARECCHIO LASER DI CLASSE 1
PRODUCTO I ÁSFR DE CLASE 1
APARELHO A LASER DE CLASSE 1
LUOKAN 1 LASER-TUOTE
LASERPRODUKT KLASS 1
VOORZICHTIG
CUIDADO
www.canon-europe.com/weee, ou www.canon-europe.com/battery.
Directiva R & TTE

CLASS 1 LASER PRODUCT
LASER KLASSE 1
APPAREIL A LASER DE CLASSE 1
APPARECCHIO LASER DI CLASSE 1
PRODUCTO LASER DE CLASE
APARELHO A LASER DE CLASSE 1
LUOKAN 1 LASER-TUOTE
LASERPRODUKT KLASS 1
CUIDADO
ΠΡΟΣΟΧΗ
www.canon-europe.com/weee ή www.canon-europe.com/battery.
LASERPRODUKT KLASS 1
⚠️ ΠΡΟΣΟΧΗ
30-2, Shimomaruko 3-chome, Ohta-ku, Tokyo 146-8501, Japan
One Canon Park, Melville, NY 11747, U.S.A.
CANON EUROPA N.V.
Bovenkerkerweg 59, 1185 XB Amstelveen, The Netherlands
15F Jinbao Building No.89, Jinbao Street, Dongcheng District, Beijing 100005, PRC
CANON SINGAPORE PTE LTD
1 HarbourFront Avenue, #04-01 Keppel Bay Tower, Singapore 098632
CANON AUSTRALIA PTY LTD
1 Thomas Holt Drive, North Ryde, Sydney NSW 2113, Australia
CANON GLOBAL WORLDWIDE SITES
http://www.canon.com/