BKCM03 - Electric bike SHARP - Free user manual and instructions
Find the device manual for free BKCM03 SHARP in PDF.
| Product type | Electric pedal-assist bicycle |
| Brand | Sharp |
| Model | BKCM03 |
| Total weight | 25.5 kg |
| Maximum load | 100 kg |
| Recommended rider height | 150-190 cm |
| Maximum speed (electric assist) | 25 km/h |
| Approximate range | 45 km |
| Motor | Rear hub motor 36V, 250W |
| Battery | Lithium-ion, 36V, 8Ah (288 Wh) |
| Battery charge cycles | 600 to 700 cycles |
| Charging time | 5 to 7 hours |
| Charger | AC 100-240V, DC 42V 2A |
| Transmission | Shimano Tourney TZ derailleur, 6-speed (Revoshift) |
| Brakes | V-Brake brakes with motor cut-off on levers |
| Tires | 26 inches, 2.125 |
| Frame | Steel frame, rigid front fork |
| Lighting | Front headlight and rear light, powered by AAA batteries |
| Display | LED with battery indicator and 5 levels of assistance |
| Additional features | Walk assist mode, pedal assist system |
| Box contents | Electric bike, charger, 2 pedals, 2 battery keys, quick start guide, warranty guide |
| Maintenance | Clean with damp cloth and non-abrasive detergent; regular chain lubrication; periodic check of brakes, tires, and screws |
| Safety | Helmet mandatory; obey traffic rules; do not use in bad weather; motor cut-off on brakes |
Frequently Asked Questions - BKCM03 SHARP
User questions about BKCM03 SHARP
0 question about this device. Answer the ones you know or ask your own.
Ask a new question about this device
Download the instructions for your Electric bike in PDF format for free! Find your manual BKCM03 - SHARP and take your electronic device back in hand. On this page are published all the documents necessary for the use of your device. BKCM03 by SHARP.
USER MANUAL BKCM03 SHARP
natural_image
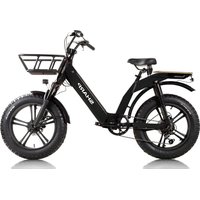
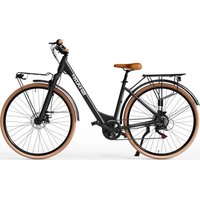
Black and white photo of a modern electric bicycle with a Sharp branding, featuring a front livery and side panels (no visible text or symbols on the bike body beyond branding)User Manual
BK-CM03
Electric Bike

*Product images are for illustration purpose only. Actual product may vary.
Use this Quick Guide to set up and start using your e-bike. For more detailed information on your model of e-bike, please refer to the on-line manual which can be found by following the link below or scanning the QR Code and searching by model name BK-CM03.

https://www.sharpconsumer.com/support/


Quick start guide

Warranty guide Battery locking keys

natural_image
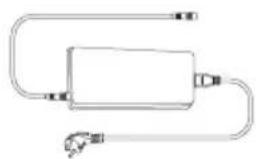
Simple line drawing of a rectangular device with curved and straight lines, no text or symbols present.Charger

Pedals

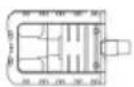
Useful tools (Not included)

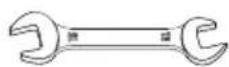
Open end wrench 15-13mm

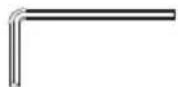
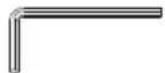
Allen key- 6mm Allen key- 5mm

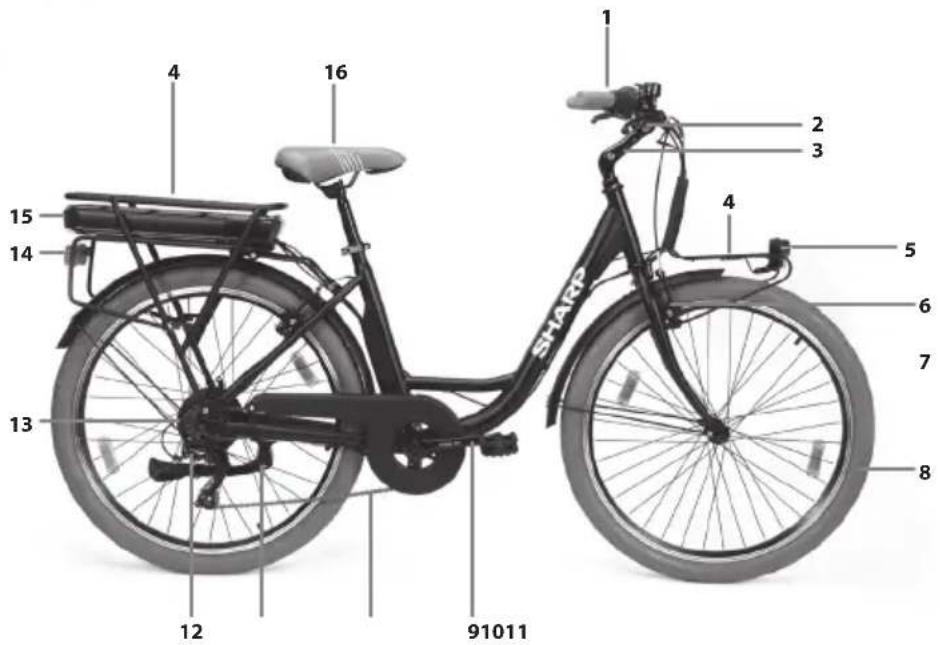
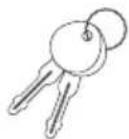
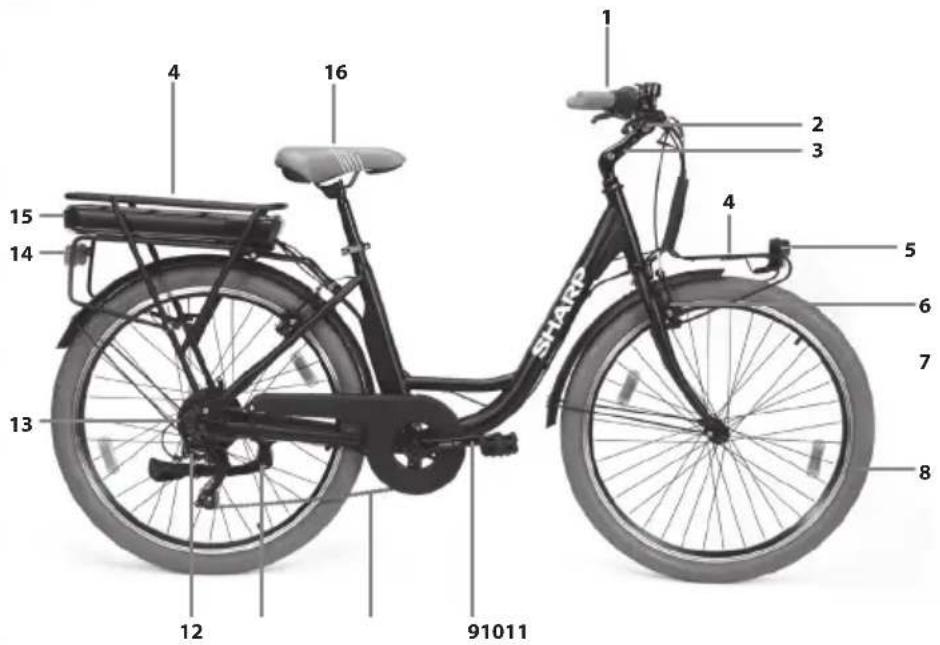
- Display
- Handlebar
- Stem
- Carrier
- Headlight
- Brake
- Front fork
- Tire
- Crank
- Chain
- Side stand
- Derailleurs
- Hub motor
- Taillight
- Battery
- Saddle
Important safety instructions
Please, read these safety instructions and respect the following warnings before the appliance is operated:

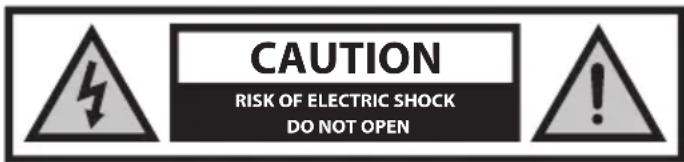
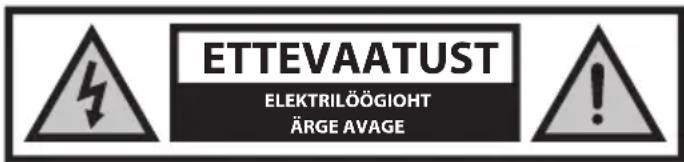
The lightning flash with an arrowhead symbol, within an equilateral triangle, is intended to alert the user to the presence of uninsulated “dangerous voltage” within the product’s enclosure that may be of sufficient magnitude as to constitute a risk of electric shock to persons.

The exclamation point within an equilateral triangle is intended to alert the user to the presence of important operating and maintenance (servicing) instructions in the literature accompanying the appliance.

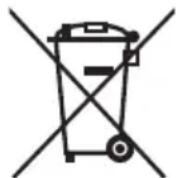
This symbol means that the product should be disposed of in an environmentally friendly manner and not with general household waste.

AC voltage

Class II equipment
In order to prevent fire always keep candles and other open flames away from this product.

IMPORTANT: Read the following carefully and keep it for future reference.
CAUTION: Wear a protective helmet!
To reduce the risk of injury, wear a suitable helmet when riding!
Risk of accident and injury
- Incorrect operation of the e-bike due to insufficient knowledge may cause an accident. Please familiarize yourself with the features of the e-bike before riding.
- Familiarize yourself with the brake lever in advance if you are not sufficiently aware of the front and rear brakes' placement. Please also adjust accordingly before riding.
- Please make sure the brakes are properly adjusted and function well.
CAUTION: Hardware may not be fully tightened, including but not limited to bolts, nuts, the front hub shaft, the rear wheel, steering mechanisms (handlebar, stem), the brake system, the driving system, pedals, etc.
To reduce the risk of injury, ensure that all bike hardware is locked tightly and correctly into position and that there is no loss of equipment, breakage, or other types of damage.
CAUTION: This bike is designed for adults. Children may only ride under the supervision of adults.
To reduce the risk of accident and injury, make sure that the bike and any of its structures are not within the reach of children under the age of 3.
CAUTION: Component breakage due to improper use of the bicycle may occur.

Risk of accident and injury!
- Do not ride over ramps or mounds with the bicycle.
- Do not ride this bicycle in cross-country cycling.
- Do not ride the bicycle over stairs, rocks, or other steps with a height greater than 15 cm.
Improper additions or alterations to the bicycle and incorrect accessories can cause the bicycle to malfunction.
To reduce the risk of accident and injury, do not add any extra accessories that are not purchased from the seller or without getting permission from the seller, including but not limited to child safety seats, trailers, etc.
CAUTION: Do not ride the bicycle in a risky way.
To reduce the risk of accident and injury, ride the bicycle only in the correct way. Make sure you are able to control the bike and do not try dangerous actions, including but not limited to riding with no hands, jumps, and wheelies.
DANGER: Lack of bicycle maintenance presents the risk of accident and injury.
Check the bike before every ride, including but not limited to brake function, tire wearing and PSI, bolt and nut condition, steering, and spokes tension.
If you hear any abnormal noise while riding, stop immediately and check the entire bike.
CAUTION: Ensure full compliance with local law.
Risk of fines and confiscation!
Before riding the bike, make sure the bike aligns with the standards of your local law.
Reflectors are not a substitute for required lights. Riding at dawn, at dusk, at night or at other times of poor visibility without an adequate bicycle lighting system and without reflectors is dangerous and may result in serious injury or death.
If your bicycle does not fit properly, you may lose control and fall.
Bolts that are too tight can stretch and deform.
Do not expose your battery to high temperatures.
Riding with improperly adjusted brakes or worn brake pads is dangerous and can result in serious injury or death.
Never inflate a tire beyond the maximum pressure marked on the tire's sidewall or the wheel rim. If the maximum pressure rating for the wheel rim is lower than the maximum pressure shown on the tire, always use the lower rating. Exceeding the recommended maximum pressure may blow the tire off the rim or damage the wheel rim, which could cause damage to the bike and injury to the rider and bystanders. The best and safest way to inflate a bicycle tire to the correct pressure is with a bicycle pump which has a built-in pressure gauge.
Applying brakes too hard or too suddenly can lock up a wheel, which could cause you to lose control and fall. Sudden or excessive application of the front brake may pitch the rider over the handlebars, which may result in serious injury or death.
Stop the charging procedure immediately if you notice a strange smell or smoke.
- SHARP is not responsible for injury/death caused by improper use.
- Sharp is not responsible if you do not comply with local regulations and restrictions.
- The warranty does not cover damages caused by improper use of the device, especially in case use for non-domestic purposes and alterations and / or adaptations necessary for countries or regions, for which it was not originally designed.
- Always abide by local traffic rules and national laws and regulations while using your e-bike.
- Always adhere to the local speed limit. DO NOT exceed the speed limit for your e-bike.
• Always wear safety protection equipment when in use.
• Always wear a safety helmet when riding your e-bike.
- Always ride with both hands holding the handles, never ride with one hand.
- Do not ride in bad weather.
- Do not use this e-bike to perform stunts or dangerous maneuvers. It is a bike designed for domestic use.
- Do not carry people or items such as bags.
- Ride slowly in crowded places.
- Ensure that all screws and fasteners are tight and normal before use.
- Make sure that the folding shaft enters the slot when unfolding the e-bike.
- Do not ride on uneven roads, water, oil or ice.
- Do not weave through traffic or make moves which are unpredictable to other people.
- Do not ride the e-bike if outside of the country's age limits.
- Do not ride the e-bike over the country's legal speed limit for e-bikes.
- Do not use the e-bike if it is damaged.
- Do not use the e-bike if the battery emits a peculiar smell and/or heats up.
- Do not use the e-bike if liquid leaks out of it, avoid contact and place out of the reach of children.
- Before use, ensure that the e-bike is not damaged. Do not ride if there is any damage.
- Ensure that you read all of this User Manual before using the e-bike.
- Learn how to ride your e-bike before using it in a public space.
- This e-bike can be identified by the model and serial number located on the rating plate.
- Propulsion is via an electric motor located in the driving wheel.
- Only one person may ride on the e-bike.
- Do not modify this e-bike in any way.
- Do not use any parts or accessories unless recommended or approved by SHARP.
- Ride the e-bike on level surfaces. Do not exceed the specified incline.
- Excessive use will reduce the lifetime of this e-bike.
- Caution, brakes and associated parts may become hot during use. Do not touch after use.
Battery and Charger Warnings
- Do not power on the e-bike while charging.
• After the battery is fully charged, disconnect the charging cable. - The battery indicator in the display will show the battery lifetime.
- When the battery is low, it may result in weakened electric power assistance. It is recommended that you start charging at 20 - 40% charge.
- Charge the battery after every use.
- If the e-bike is not used for a long time, charge it at least once a month. Note that if the battery is not charged for a long time, the battery will enter a self-protection state and will fail to charge. In this case, please contact your dealer.
- When charging, plug the charger into the charging port before plugging it into the wall socket.
- While charging the indicator light of the charger is red; this means the charging is normal. When the indicator light turns green, charging is complete.
- Only use the original charger to charge the battery.
- The charger has an overcharge protection function, if the e-bike is 100% fully charged, the charger will automatically stop charging.
- Dispose of batteries and e-bikes in compliance with the applicable regulations in your country.
Batteries
- Do not expose batteries to high temperatures and do not place them in locations where the temperature might increase quickly, e.g. near fire or in direct sunshine.
- Do not expose batteries to excessive radiant heat, do not throw them into the fire, do not disassemble them and do not try to recharge non-rechargeable batteries; they could leak or explode.
- Disposal of a battery into fire or mechanically crushing or cutting a battery can result in an explosion.
- Leaving a battery in an extremely high temperature surrounding environment can result in an explosion or the leakage of flammable liquid or gas.
- A battery subjected to extremely low air pressure may result in an explosion or the leakage of flammable liquid or gas.
- CAUTION: Risk of explosion or damage to equipment, if incorrect type batteries are used.
- Never use different batteries together or mix new and old batteries.
- Do not use any batteries other than those specified.
Disposal of this equipment and batteries
- Do not dispose of this product or its batteries as unsorted municipal waste. Return it to a designated collection point for the recycling of WEEE in accordance with local law. By doing so, you will help to conserve resources and protect the environment.
- Most of the EU countries regulate the disposal of batteries by law. A recycling symbol appears on electrical equipment, packaging and batteries to remind users to dispose these items correctly. Users are requested to use existing return facilities for used equipment and batteries. Contact your retailer or local authorities for more information.
- The battery and battery charger contain hazardous materials. Always keep the battery and battery charger away from children, animals, or persons incapable of understanding the potential hazards.


CE statement:
- Hereby, Sharp Consumer Electronics Poland sp. z o.o. declares that this equipment is in compliance with the essential requirements and other relevant provisions of RED Directive 2014/53/EU.
- The full text of the the EU Declaration of Conformity is available by following the link www.sharpconsumer.com and then entering download section of your model and choosing "CE Statements".

www.sharpconsumer.com/contact/

www.sharpconsumer.com/support/

www.sharpconsumer.com/documents-of-conformity/
What's in the Box:
E-Bike Parts
- 1 × E-bike
Accessories Box
• 1 × Quick Start Guide (this document)
- 1 × Warranty guide
- 1 × Charger
- 2 × Pedal
- 2 × Battery keys
Accessories Box
(Refer to 1. on page 1)
Bike Parts
(Refer to 2 on page 1)
Bike Frame Number
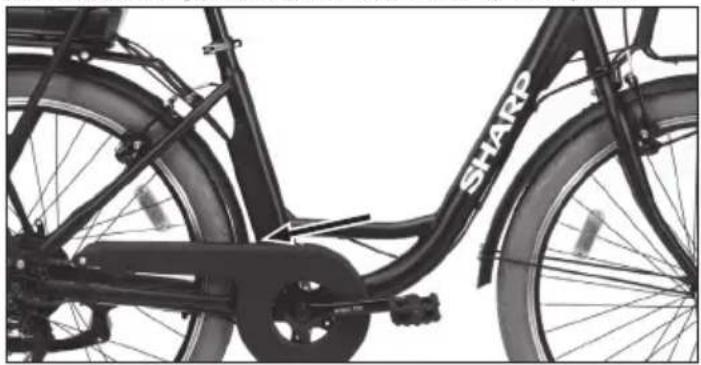
The bike frame number can be found stamped on the tube, as shown in the figure. It is the unique identifier for your e-bike. When your bike is stolen, it's the serial number that gives you the biggest chance of getting it back. It would be a good idea to write it somewhere or take a picture.
natural_image
Close-up of a shared bicycles with visible branding and wheel (no text or symbols beyond the brand name)Assembling the E-bike
The bicycle comes assembled with turned handlebar. Turn the handlebar referring to the dedicated paragraph. The pedals are to be assembled. Refer to the dedicated paragraph. Remove the protections and position it correctly to be able to use the bicycle. To remove and reposition it, refer to the dedicated paragraph.
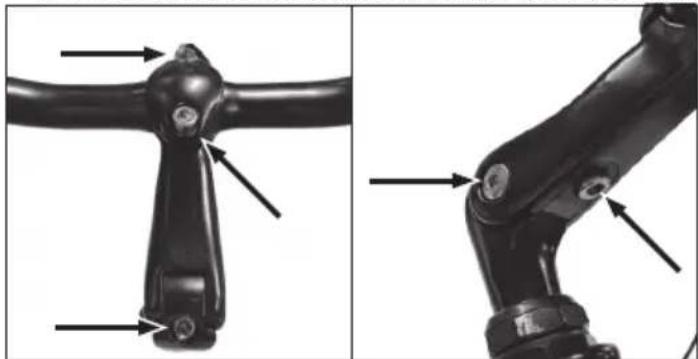
STEP 1: Install and adjust the handlebar
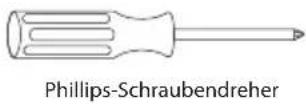
a. Turn the handlebars perpendicular to the bike, If necessary, you can adjust the angle of the handlebars. Use a allen key to loosen screws and adjust handlebar, after that retighten the screws.
b. Use a allen key to loosen the angle adjustment screw at the bottom of the stem. Adjust the stem to a suitable angle and retighten the screw.
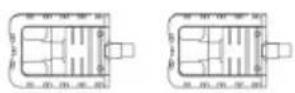
natural_image
Mechanical assembly diagram showing two views of a mechanical component with arrows indicating features (no text or symbols present)c. Adjust the position of the brake levers, display, ringbell to fit your requirements.
CAUTION: Be sure to carefully fasten all locks before riding the bicycle.
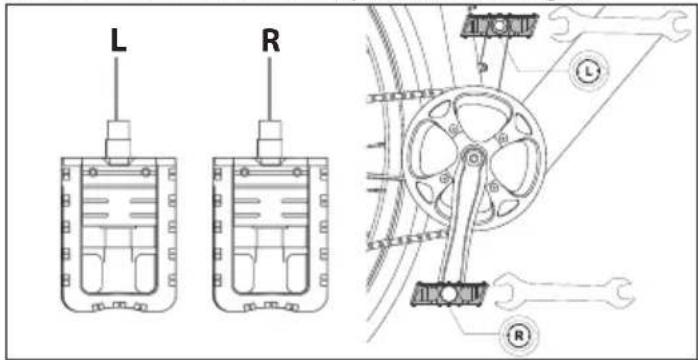
STEP 2: Install the pedals
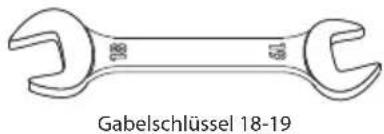
Use the 15 mm wrench to mount the pedals, as shown in figure.
NOTES:
Pedal thread must be lubricated before being assembled.
Check the end cap on both pedals to identify the left pedal and right pedal. Please note that the right pedal will tighten clockwise, while the left pedal will tighten anticlockwise. Make sure the torque is about 35 N·m.
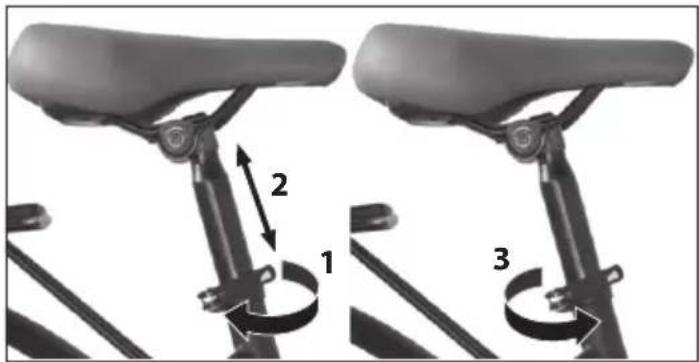
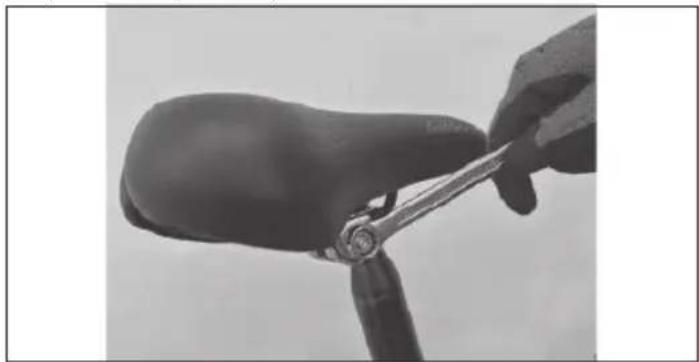
STEP 3: Saddle height adjustment and tightening
Adjust the saddle
The correct adjustment of the saddle is important for the position of the body while pedalling and allows you to obtain the best performance with less stress on the joints.
Before use, ride the bicycle and adjust the height and angle of the saddle.
Height
The height of the saddle must be adjusted according to the length of the legs. The height is correct if, while sitting, you reach the pedal placed in the lowest position with the heel. The leg must be completely straight. Adjust the height according to these indications.
Open the closing lever and adjust the height of the saddle, after the adjustment is done, tighten the screw or clip locking the support.
NOTES:
In the height adjustment, in any case respect the STOP MARK on the seat post. The notch must always be inserted in the frame tube.
Angle
In case you want to keep the saddle not completely horizontal but with the "nose" slightly raised, you must loosen the locking placed under the saddle and adjust the angle. Re-tighten the lock so as not to move the saddle. Changes in the position of the saddle, even if small, can affect comfort while pedalling. It is recommended, each time you want to make an adjustment, to make only one change at a time and gradually until you find the most comfortable and correct position.
On the seat post there is the notch with stop limit. Make sure that the clamp nuts that regulate the position of the saddle are well locked.
natural_image
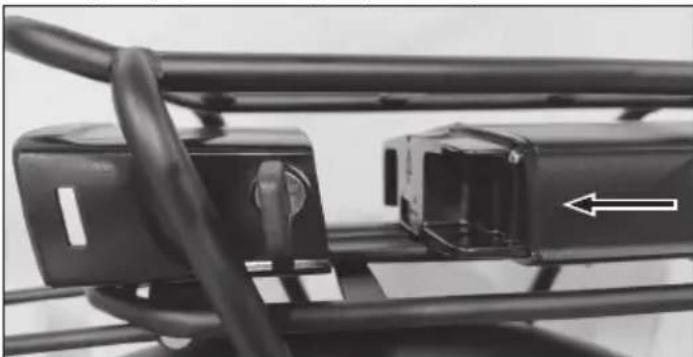
Close-up of a hand using a tool to lift a dark, smooth, cylindrical object (no text or symbols visible)STEP 4: Battery
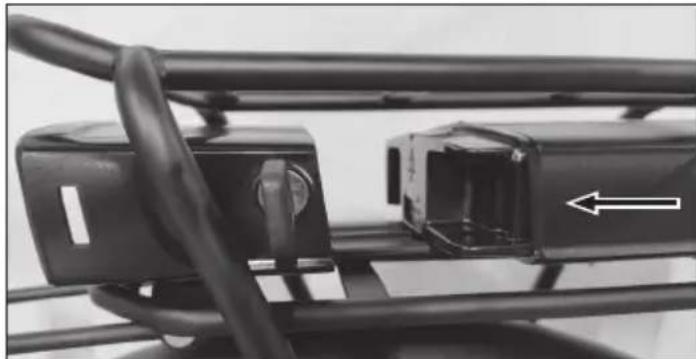
a. Insert the battery into the slot located at the rear of the bicycle frame.

natural_image
Close-up of a black metal bracket with a white arrow pointing to a damaged component (no text or symbols visible)b. Use the supplied keys (attached to the handlebar) to lock the battery – turn the key clockwise to secure it.

natural_image
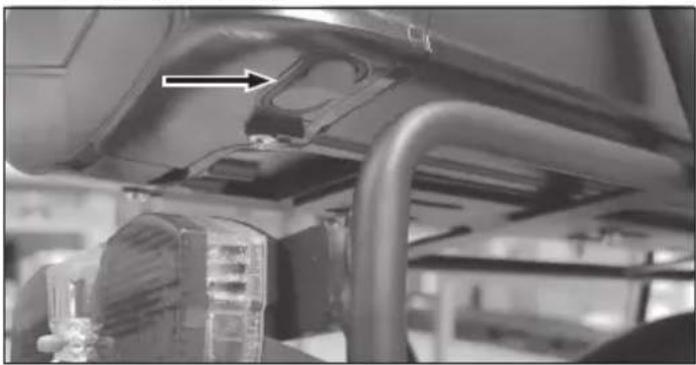
Close-up of a mechanical component with a white arrow indicating rotation or movement (no visible text or symbols)c. Locate the red power switch under the battery and set it to the ON position to activate battery.

natural_image
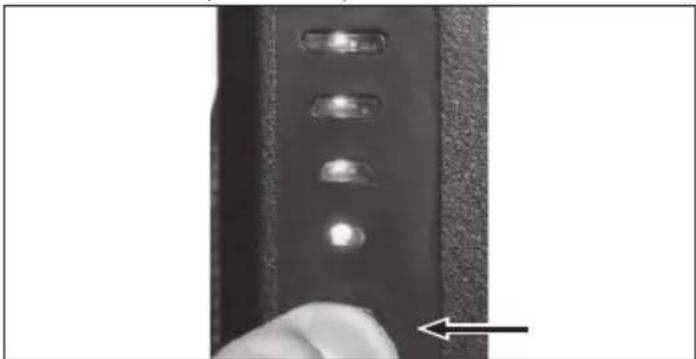
Close-up of a car's undercarriage showing mechanical components and a directional arrow (no text or symbols)d. Check charging level by pressing status button.

natural_image
Close-up of a finger pressing down on a black metal panel with four circular buttons, no text or symbols visible4 leds on: 100%
3 leds on: 70 % residual charge
2 leds on: 40% residual charge
1 led (red) lit: up to 15% remaining charge (you need to recharge the battery as soon as possible).
How to use the E-bike
Fully charge the battery before first use.
Check tire pressure regularly for best performance.
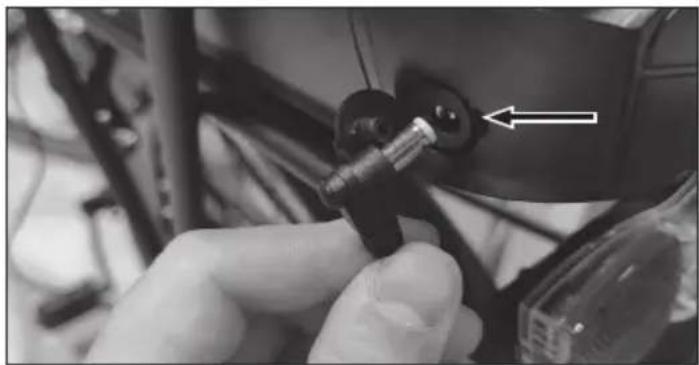
How to charge
a. Open the rubber cap and plug the charger into the e-bike charge port. Make sure that the charger port is in the given direction.
b. Plug the charger into the mains wall socket.
c. When connected to the battery charger, the battery will start to charge and the charge indicator on the charger will turn red.
d. After the charging is complete, the charge indicator will turn green. Remove the battery charger when fully charged.
e. Close the rubber cap after charging.
natural_image
Close-up of a hand inserting a small component into a device (no visible text or symbols)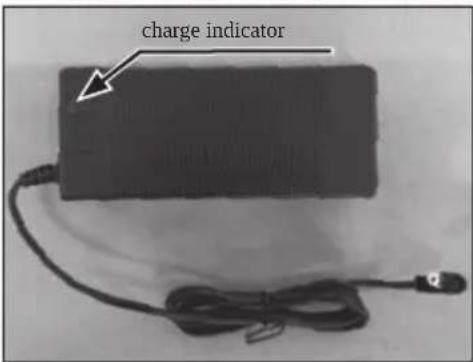
The Assisted Pedalling
This electric bicycle is equipped with an "assisted pedalling system", consisting of a motor, a battery and a speed sensor.
It is important to know that when the system is on, the engine undertakes to supply energy only while you are pedalling. When you stop pedalling, the motor switches o and the electrical assistance for pedalling is missing. In all pedal-assisted bicycles the engine switches o and the electrical assistance stops when the maximum speed allowed for electric bicycles of 25 km/h is reached.
When the speed drops below this value, the electrical assistance starts again until you stop pedalling.
Switch on e-bike by long press ⏻ button on the display to activate.
Display functions:
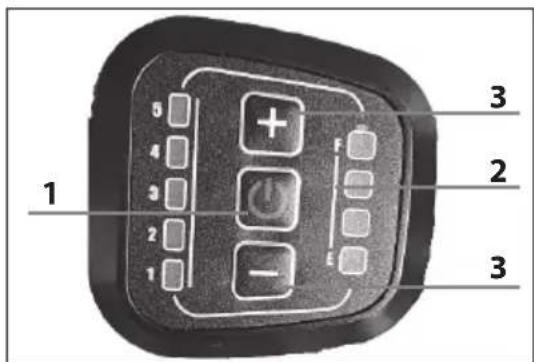
- "ON/OFF" power button – Turns the bicycle on and o
- "F-E" LEDs – Indicate the immediate battery capacity.
- “+/-” button – Selects pedal assistance
Level 1
Level 2
Level 3
Level 4
Level 5
The pedal assistance system is on by pressing the "ON/OFF" button. The assistance level is reset to "1", the lowest.
To change it: start pedalling and stabilize your speed; press the "+ / - " buttons to choose the required assistance.
Walk Assist mode:
Pressing and holding the "-"button for 3 seconds activates Walk-Assist Mode.
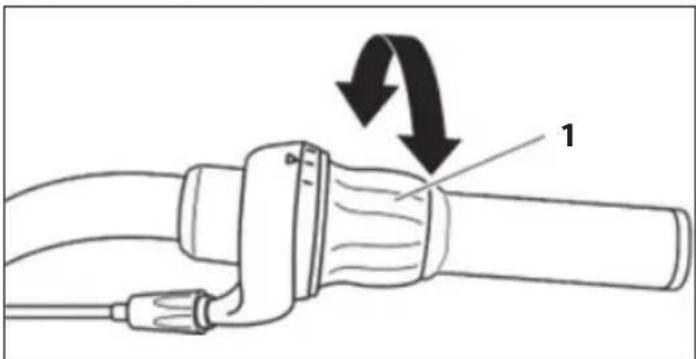
Change gears
Use the twist grip on the right side of the handlebars to operate the rear derailleur. A gear engaged indicator, gear selected, is visible next to the rotating handle.
To operate the derailleur with a twist grip, follow these steps:
a. Press the pedals forward.
b. Turn the ring (1) by hand clockwise to shift to a smaller sprocket, where the pedaling effort will be greater.
c. Turn the gear shift ring by hand counterclockwise to move to a larger gear, where the pedaling e ort will be less.
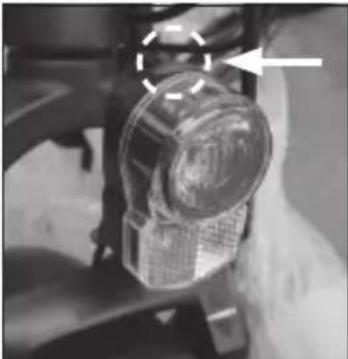
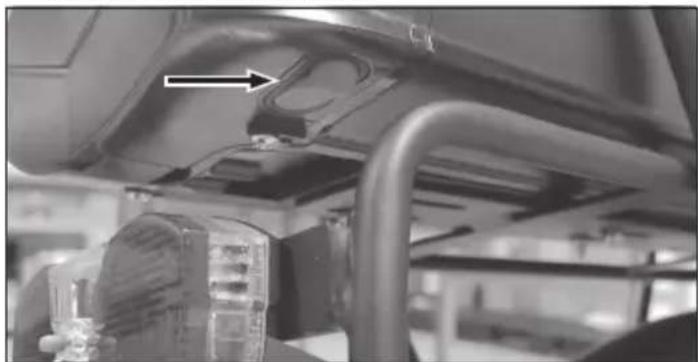
Light operation
Lighting is one of the basic elements of bicycle user safety and it must be installed. If you intend on riding in low visibility conditions, make sure that the lighting works properly.
The bike is equipped with front and rear lights powered by AAA batteries. To turn them on, press the button on the light.
natural_image
Close-up of a mechanical component with a highlighted circular feature and an arrow pointing to it (no visible text or symbols)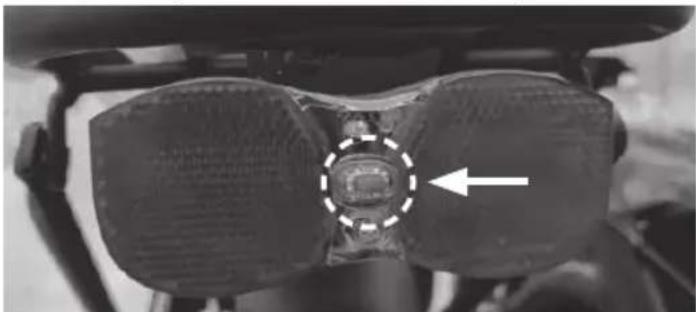
natural_image
Close-up of a mechanical device with two dark components and a central circular component, no visible text or symbols.Batteries are a product deemed to be dangerous, after use should be discarded in a container assigned to it.
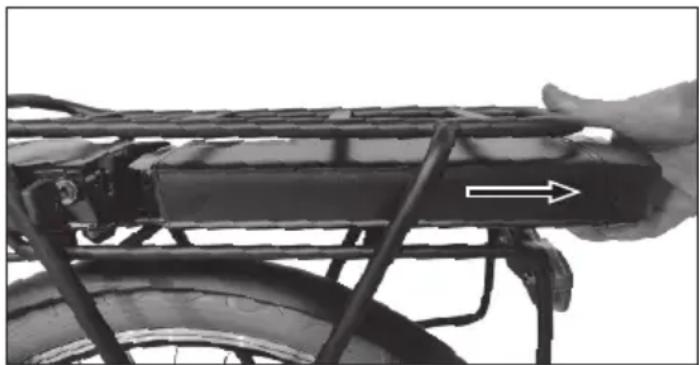
Battery removal
a. Make sure the bike is securely positioned on the rack. Turn the red switch to the OFF - 0 position.
b. Turn the key counterclockwise to the "OPEN" position.
c. Hold the battery pack rmly and pull it back using the handle on the bottom. It is recommended to hold the battery with both hands.

natural_image
Close-up of a hand adjusting a black bicycle rear panel with a white arrow indicating motion (no text or symbols)d. You can also charge the battery unmounted in the bike.
Battery & Charger maintenance
LITHIUM BATTERY
At the end of each use of the bicycle or if the battery is flat, recharge the battery.
After prolonged use the battery capacity will slowly decrease.
The average life of the battery depends on personal use and storage conditions. Even with proper maintenance, rechargeable batteries are not eternal. On average, a lithium battery remains active for about 500 charging cycles. It should be considered, however, that with each recharge the "capacity" of the battery drops proportionally. Even partial recharges (for example 1H recharge) are to be considered, for the purpose of the number of possible cycles, as a complete recharge. Periodically fully discharge the battery and recharge it.
If the bicycle is not used for a long period, do not leave the battery connected to the charger, for more than 8 hours. Leaving it to charge for about 4 hours. In this case, do not pay attention to the battery charger lights.
When the battery is completely discharged it must be immediately recharged. Do not leave the battery discharged unused but immediately proceed with a recharge cycle. In this case, provide for a longer charging cycle, of about 6 hours to allow complete activation of the battery.
It is recommended to use the bicycle once or twice a year until the battery is completely discharged. Then fully charge it. This process has a beneficial effect on battery life.
Battery capacity on the display
When you turn on the bicycle engine and start pedalling, the battery icon on the display indicates the instantaneous charge measured and not the actual charge availability.
In case of uphill routes, when the engine is more stressed, the indicator may show a reduced residual charge (the number of LEDs lit on the display decreases). When the motor is stopped, in case of stop or advance by inertia (for example downhill) the indicator may show a higher available charge (in the absence of load on the engine the battery voltage increases).
The best time, therefore, to achieve the amount of residual charge is when reaching a constant speed and on a flat and straight path after stabilizing the work of the battery.
Battery charging
Recharge the battery without removing it from the frame.
At the end of each use of the bicycle, we do consider it worthwhile to always recharge the battery. Keeping the battery charged at all times extends its life.
It is compulsory to use the battery charger supplied and follow the instructions on it. Do not use battery chargers not approved by SHARP. They may damage the battery and limit its life. By using personal accessories, not supplied with the bicycle, the legal guarantee will automatically expire.
Before charging the battery, carefully read the following instructions and follow them during the process.
- Use only the supplied battery charger.
- Keep both the battery charger and the battery away from children and pets.
- The charging operation must be carried out in a spacious, cool and dry place; away from direct heat sources and humidity.
- If the charging operation takes place with the battery housed in the bicycle, make sure that it is stable on the stand and turned off.
- It is normal for the battery charger to heat up during charging.
- Do not cover the battery charger.
- Keep the plugs always clean and dry.
- Do not get the battery charger wet.
- Do not use the battery charger and/or the battery if they are damaged.
- Always connect the battery charger to the battery first and then to the power socket.
- Do not carry out the charging process in direct sunlight.
- Do not use the battery charger for other purposes or for other devices.
• Voltage drops during charging cycles could damage the battery.
Do not leave the battery connected to the charger, for more than 8 hours. If the temperature of the battery rises too high, an unpleasant smell will be felt: stop charging immediately and contact the Service Centre.
Battery FAQs
Is it normal for the battery to get warm during charging?
Yes, it is normal for the battery to be warm during the charging process.
Battery charger maintenance
Follow the following maintenance instructions for the battery charger:
- When the battery is fully charge, first disconnect the cable from the socket and then the battery power cable.
- Store the battery charger in a dry and clean place.
- The battery charger requires no maintenance. Any opening or tampering is prohibited.
- If you suspect that the battery charger is damaged, contact the service centre.
- If the cable is damaged, contact the service centre to replace it.
- If the temperature of the battery charger rises too high (over 65°C), an unpleasant smell will be felt: stop charging immediately and contact the Service Centre.
Maintenance and cleaning
Technological advances have made the E-Bike and its components more complex than in the past and the pace of innovation is increasing. With this continuous evolution, it is essential, for any mechanical and / or electrical repair and / or maintenance, to contact an authorized service centre. For routine maintenance and cleaning, follow the instructions below.
Inspection and Maintenance
For your safety and to ensure long life of your bicycle, it is recommended to inspect it regularly to understand the state of the mechanical part and, if necessary, request the assistance of a technician.
Maintaining good mechanical and electrical parts is fundamental for your safety during use. Periodically check the wiring and electrical connectors to make sure they are not damaged.
| Bicycle part | Always check before use | Peri-odically check | Clean and lubruicate | Adjust and Tighten | Repair if necessary |
| Tire pressure √√ | |||||
| Tire conditions √√ | |||||
| Brake calibration √ | √ | ||||
| Handlebar lock √√ | |||||
| Display √ | |||||
| Saddle lock √√ | |||||
| Brake pads √√ | |||||
| Brake cable tension | √√√ | ||||
| Spokes tension √√ | |||||
| Wheel centering √ | √ | ||||
| Hubs √√√ | |||||
| Chain lubrication | √√ | ||||
| Rear deraillerur calibration | √√√ | ||||
| Reflectors | √√√√ | ||||
| Battery and bat-tery charger | √ | √ | |||
| Steering | √√√ | ||||
| B,B. | √√√ | ||||
| Screws, nuts, bolts, locks | √√√ |
Components subject to normal wear and tear (e.g., tires, chain, brakes) are not covered by the warranty.
The basic maintenance of the bicycle can and must be carried out directly by the owner; does not require special tools or specific technical knowledge beyond what is explained in this manual.
Here are some examples of interventions that you can perform yourself. All other inspection, maintenance and repair services must be carried out in a specialized centre by a qualified technician. Always contact the service centre for any doubts or uncertainties.
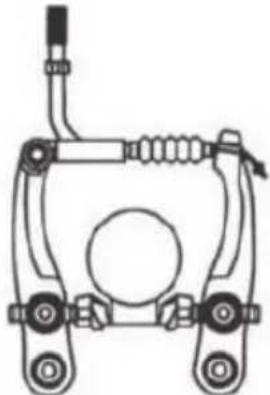
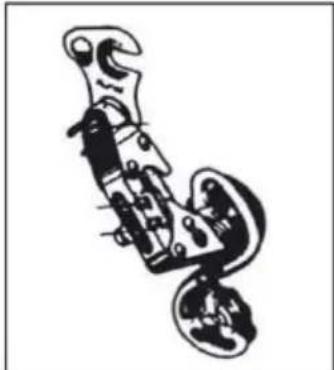
Adjust the brakes
The bike is equipped with V-BRAKE brakes.
natural_image
Technical line drawing of a mechanical clamp or bracket assembly (no text or symbols)The right lever controls the rear brake. The left lever controls the front brake.
When adjusting V-Brake brakes, maintain a distance of about 2 mm between the brake pads and the rim. Both brake pads must touch the rim at the same time during braking and without touching the cover.
Adjustments should be made by turning the adjustment screws on the brakes. If you have any doubts or notice any irregularities during use, have your bicycle checked by a competent mechanic.
Adjust the gearbox
If the chain has difficulty climbing on the large rear chainring (shifter on the handlebar turned to maximum), unscrew screw B slightly, avoiding that the chain goes beyond the last chainring.
natural_image
Mechanical linkage diagram with no visible text or symbols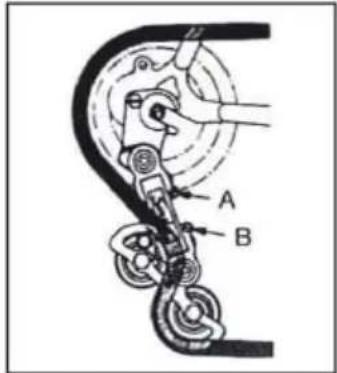
If the chain descends with difficulty on the small rear chainring, slightly unscrew screw A to align the derailleur unit on the small chainring.
Bolts and nuts tightening
During use, due to vibrations, some screws may become loose. We advise you to periodically check the tightness of the screws. Replace any damaged or lost parts immediately. The following is a table of tightening torques to be applied for the assembly of different types of components. For each component, the "minimum-maximum" interval at which those components are generally kept is reported. The table is purely indicative, because we repeat that numerous variables contribute to affecting the precise degree of torque to be applied to the various screws, such as the material used for the screw and / or the type of thread, the sections and the thicknesses of the material on which you act and of course the material of the parts to be interfaced.
The tightening torques are expressed in Newton-meters; remember that to correctly carry out this operation, a torque wrench is required, which detaches when the desired torque is reached.
| Front hub nut | 20 - 27 Nm |
| Rear hub nut | 27 - 33 Nm |
| Saddle clamp | 7 - 22 Nm |
| Brake | 10 Nm |
| Brake pad | 8 Nm |
| Brake cable | 5 Nm |
| Rear derailleur cables | 5 - 6 Nm |
| Seat post clamp | 10 - 14 Nm |
| Stem nut and screw 18 - 20 Nm | |
| Derailleur on the dropout | 12 - 15 Nm |
| Front derailleur nut | 5 - 7 Nm |
| Disc brake caliper nut | 6 - 8 Nm |
| Stem on the fork | 5 - 8 Nm |
| Stem on the handlebar | 5 - 8 Nm |
| Shifters on the handlebar | 10 Nm |
| B.B. chainwheel and crank | 32 - 50 Nm |
| BSA B.B. parts | 70 Nm |
| Pedals | 34 - 40 Nm |
Running-in period
Your bicycle will be more efficient and will remain in optimal conditions for a long time with a break-in period before continuous and intensive use.
Brake or gear cables, spokes and other mechanical parts may become loose in the very first period of use and a change to the service centre may be required for final adjustment.
We suggest after 30/35 hours of use and in any case after the first 30 days, to have the electric bicycle checked in a service centre.
In any case, for any problem or doubt that you cannot solve on your own, always contact the specialized technical assistance centre and do not use the bicycle in the event of real or presumed anomalies.
We recommend to check the mechanics before each use.
After each long or difficult ride on unpaved terrain, in case of exposure to water or sand and in any case every 150 km.
- Clean the bicycle.
- Lubricate the chain, the freewheel, the gearbox and then remove the excess oil. You can ask your trusted technician for advice on the best lubricants on the market and the frequency of maintenance.
- Apply the front brake and move the bicycle back and forth and make sure everything is in order. If you hear a dull noise with every movement, there are likely to be problems with the steering: contact the service centre.
- Lift the front wheel off the ground and turn it to the right and left and make sure that the steering is soft. If the steering turns stiff, there are likely to be problems with the steering: contact the service centre.
- Make sure that nuts, bolts, locks and all mechanical and fixing components are closed and not worn and / or damaged.
The bicycle and its mechanical components are subject to wear. The materials of which they are composed have different life cycles. IT IS RECOMMENDED TO CHECK THE BIKE PERIODICALLY OR AT LEAST ONCE A YEAR TO EVALUATE THE CORRECT FUNCTIONALITY AND THE STATE OF WEAR OF THE COMPONENTS AND REPLACE IT IF NECESSARY.
Flat tire
Do not use the bicycle in the event of a flat or partially flat tire. Carry it by hand.
If a tire punctures, release the wheel from the hub to remove it and deflate the tire. Remove the tire with the aid of a tire lever to remove it from the rim. Remove the perforated inner tube and replace it. Inflate the chamber slightly and reposition the tire on the rim above the chamber. Be careful not to pinch the new inner tube between the rim and the tire. Turn the wheel to make sure that the whole tire is correctly positioned on the rim and that the chamber is completely inside it. Inflate slowly to the recommended pressure, checking the position of the tire on the rim. Reposition the wheel. In case of difficulty, contact the service centre which will replace them.
We recommend that you use only a tire lever for this operation. Otherwise, using a screwdriver or any other tool, you risk puncturing the inner tube.
Clean the bicycle
Dust the frame with a soft cloth, remove the dirt with a damp cloth and non-abrasive detergent. Do not use high pressure cleaners. Dry all parts carefully and periodically apply car wax.
Clean the plastic parts and tires with soap and water, dry carefully.
If used on wet or rainy days, carefully dry the bicycle before parking it.
Do not leave the bicycle exposed to humidity, rain, direct sun. If it is not possible to take it to the shelter, cover it with a dark waterproof sheet.
The salt is highly corrosive. If you live or use the bicycle in coastal areas, it is recommended to wash the bicycle very often to remove salt, always dry carefully and apply an anti-rust to the unpainted parts.
Periodically grease the bottom bracket, the freewheel, the chain and other parts that need it. Periodically check screws, nuts, bolts, locks to make sure they are tight.
Bicycle storage
Keep the bicycle in a dry and covered place avoiding direct exposure to sun, bad weather and salt.
If you plan not to use the bicycle for a long period, before parking it, clean it thoroughly and thoroughly.
Deflate the tires in half and, if possible, hang the bicycle and cover it with a towel preferably made of cotton. Do not use plastic sheeting.
Recharge the battery and keep it recharged once every two months to prevent it from draining completely. Make sure that the battery charger is not connected to the power supply or to the bicycle.
The recommended storage temperature for the lithium battery is between 0^-25^ . Avoid storing the battery in too cold or too hot places.
Do not expose the battery to heat sources (+ 35/40 °) for long periods of time.
Do not leave the battery with condensation that could damage, cause a short circuit or corrode the battery.
Troubleshooting
| Description Causes Solution | ||
| Problem on the rear derailleur | Loose and/or damaged cablesIncorrect adjustment | Calibrate or replace the cablesCalibrate the rear derailleur |
| Problem on the chain | Chain link looseChain link bent or brokenUnregulated gearbox | Tighten the screwsReplace the chain linkCalibrate the rear derailleur |
| Noises while pedalling | Chain not lubricatedBroken pedal bearingsBroken B.B. bearingsFolded crank armLoose B.B. | Lubricate the chainReplace the pedalReplace the B.B.Replace the crankSecure the B.B. |
| The freewheel does not turn | Freewheel pins blocked | Lubricate the freewheel or replace it ifnecessary |
| The brakes do not properly work | Worn brake padsWet or dirty brake padsLoose and/or damaged cablesBrake lever blockedIncorrect brake adjustment | Replace brake padsClean brake pads and rimsCalibrate or replace the cablesCalibrate the brake leverCalibrate the brakes |
| There is a screech when using the brake | Worn brake padsIncorrect brake adjustmentWet or dirty brake padsBrakea arms loose | Replace brake padsCalibrate the brakesClean brake pads and rimsCheck the screws of the arms and fix them correctly |
| There is a dull noise when using the brakes | Projection on the rimWheel not alignedIncorrect brake adjustmentBrakea arms looseLoose steering | Repair or replace the rim (ask to service)Repair the wheel (ask to service)Calibrate the brakesCheck the screws of the arms and fix them correctlyTighten the steering |
| Wobbly wheel | Damaged hubWheel not alignedSteering lockedWheel not correctly fixed | Replace the hubRepair the wheel (ask to service)Calibrate the steeringCheck wheel |
| Driving not smooth | Wheel not alignedSteering lockedBent frame or fork | Repair the wheel (ask to service)Calibrate the steeringAsk the service for repeating |
| Frequent punture | Ols or damaged inner tubeDamaged tireTire not suitable for the rimTire not checked after a previous punctureTire pressure too lowSpokes out of the rim | Replace the inner tubeReplace the tireReplace the tireReplace the tireCheck pressure and adjustReplace the spoke |
| The bicycle has reduced autonomy and/o speed | Low batteryDefective battery or end-life batteryLow tire pressureBrakes rubbing on rimsWindward path, uphill... | Charge the batteryReplace the batteryInflate tiresCalibrate brakesIt is possible that the autonomy of travel is reduced in these cases of use |
| It is The bicycle works but the display does not show the battery charge capacity | Loose connectorsDamaged cable / casingDamaged display | Check all connectorsCheck all cable and casingReplace the display |
| The display indicates the battery charge but the bicycle does not work | Defective brake inhibitorLoose motor cable connector | Check the brakes, replace the inhibitorCheck connector |
| The motor works with no pedalling | Defective sensorDefective/damaged controller | Replace the sensorReplace the controller |
Technical specification
| Model BK-CM03 | |
| General | |
| Nominal speed 25 km/h | |
| Bicycle weight 25,5 kg | |
| Mileage* approx. 45 km | |
| Max load 100 kg | |
| Rider height 150-190 cm | |
| Tire/wheel size 26" 2.125 | |
| Frame | |
| Steel frame with rigrid front fork | |
| Electronics | |
| Motor Rear-hub motor 36V*250W | |
| Battery 36V*8Ah 288Wh Lithium cells | |
| Battery charging cycles 600 to 700 | |
| Display Led 5 level assist | |
| Battery charger AC 100V-240V /DC 42V | 2A |
| Charging time 5-7 hours | |
| Brakes | |
| V-brakes | |
| Brake Levers Aluminium brake levers w | ith cut-off system |
| Derailleur | |
| Revoshift 6 speed, Shimano Tourney TZ | |
NOTES:
The range of travel of the bicycle with the aid of pedal assistance may vary according to the different conditions of use and the weights to be transported. These values can be influenced by the weight of the user, the type of route (steep climbs), transport of heavy objects, tire pressure, adverse weather conditions, as well as repetitive stops and restarting of travel, thus significantly reducing the travel range.
https://www.sharpconsumer.com/support/


Hurtig start guide
Garantiguide Batterilåsnögler

natural_image
Simple line drawing of a rectangular device with curved and straight lines, no text or symbols present.Batterioplader


Pedaler
natural_image
Two circular icons showing a sneaker and a helmet, no text or symbols present.
www.sharpconsumer.com/contact/

www.sharpconsumer.com/support/

www.sharpconsumer.com/documents-of-conformity/
Hvad er i kassen:
E-Bike dele
- 1 × E-cykel
Tilbehørsboks
natural_image
Close-up of a black bicycle with visible 'SHARP' branding and side brackets (no additional text or symbols)Samling af E-cyklen
natural_image
Mechanical component with arrows pointing to features on a curved body (no text or symbols visible)
natural_image
Close-up of a mechanical linkage component with two arrows pointing to specific joints (no text or symbols visible)natural_image
Close-up of a hand using a tool to lift a saucer (no text or symbols visible)TRIN 4: Batteri
natural_image
Close-up of a black mechanical component with a white arrow pointing to its side (no text or symbols visible)natural_image
Close-up of a mechanical component with a curved arrow indicating rotation or movement (no visible text or symbols)natural_image
Close-up of a mechanical component under assembly, showing a curved bracket and a pipe with a directional arrow (no text or symbols visible)natural_image
Close-up of a finger pressing down on a black electronic device panel with five buttons (no text or symbols visible)4 IED tændt: 100 %
natural_image
Close-up of a hand inserting a small component into a device (no visible text or symbols)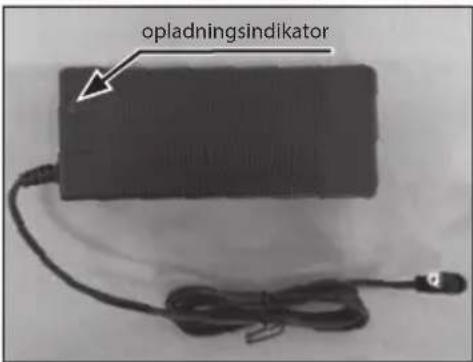
Assisteret Pedalering
Lysoperation
natural_image
Close-up of a mechanical component with a highlighted circular feature and an arrow pointing to it (no visible text or symbols)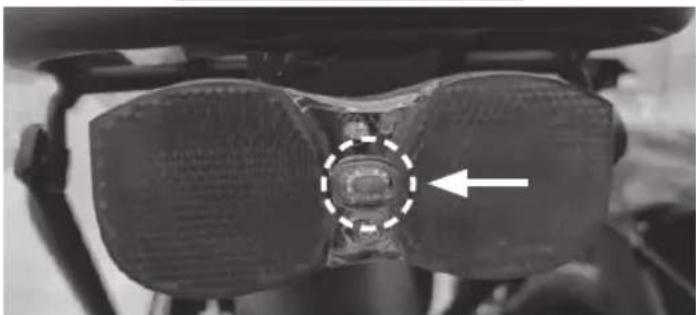
natural_image
Close-up of a mechanical device with two dark components and a central circular component, no visible text or symbols.natural_image
Close-up of a bicycle rear bumper with hand adjusting the seat frame (no text or symbols visible)natural_image
Technical line drawing of a mechanical clamp or bracket assembly (no text or symbols)natural_image
Abstract mechanical or robotic component illustration (no text or symbols)
https://www.sharpconsumer.com/support/
natural_image
Two circular icons showing a sneaker and a helmet, no text or symbols present.
www.sharpconsumer.com/contact/

www.sharpconsumer.com/support/

www.sharpconsumer.com/documents-of-conformity/
Was ist in der Box:
E-Bike Teile
- 1 × E-Bike
Zubehörkasten
natural_image
Close-up of a black bicycle with visible 'SHARP' branding and side brackets (no additional text or symbols)Montage des E-Bikes
natural_image
Mechanical component with arrows pointing to a central hub and two side ports (no text or symbols visible)
natural_image
Close-up of a mechanical linkage component with two arrows pointing to specific joints (no text or symbols visible)natural_image
Close-up of a hand using a tool to lift a dark, smooth, seated object (no text or symbols visible)SCHRITT 4: Batterie
natural_image
Close-up of a black mechanical component with a curved handle and a rectangular housing, mounted on a metal frame (no visible text or symbols)natural_image
Close-up of a mechanical component with a curved arrow indicating rotation or movement (no text or symbols visible)natural_image
Close-up of a car's undercarriage with visible mechanical components and a directional arrow (no text or symbols)natural_image
Close-up of a finger pressing down on a black rectangular device with five circular buttons, no visible text or symbols.4 LEDs an: 100%
natural_image
Close-up of a hand inserting a small connector into a device component, with no visible text or symbols.
natural_image
Diagram of a mechanical device with labeled component '1' and directional arrows indicating motion (no text or symbols beyond label)Lichtbedienung
natural_image
Close-up of a mechanical component with a highlighted circular feature and an arrow pointing to it (no visible text or symbols)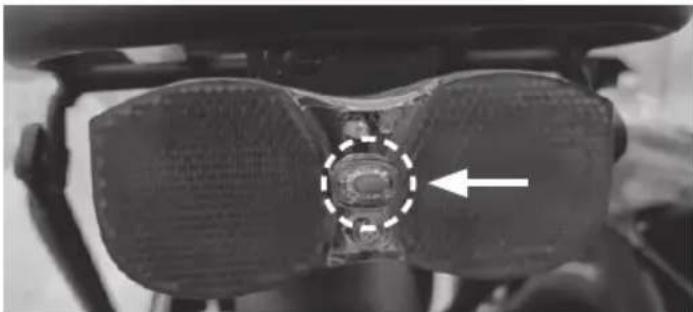
natural_image
Close-up of a mechanical device with dual lenses and a central circular component, no visible text or symbolsnatural_image
Close-up of a hand adjusting a black bicycle rear panel with a white arrow indicating direction (no text or symbols)natural_image
Technical line drawing of a mechanical clamp or bracket assembly (no text or symbols)natural_image
Illustration of a mechanical device with curved and linear components (no text or symbols)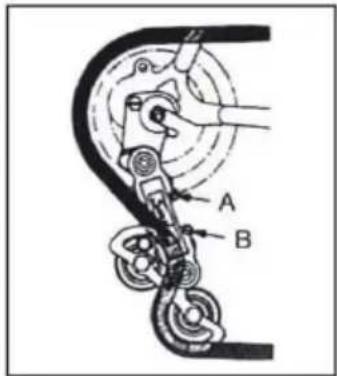
https://www.sharpconsumer.com/support/


natural_image
Simple line drawing of a rectangular device with curved and straight lines, no text or symbols present.Φορτιστής μπαταρίας


Πεντάλ

www.sharpconsumer.com/contact/

www.sharpconsumer.com/support/

www.sharpconsumer.com/documents-of-conformity/
natural_image
Close-up of a black bicycle with 'SHARP' branding, showing front wheel and side chain (no additional text or symbols)natural_image
Mechanical linkage components shown in two views: left with a mechanical component and right with a articulated joint (no text or symbols present)natural_image
Close-up of a hand holding a black sash with metal clips, no visible text or symbolsBHMA 4: Μπαταρία
natural_image
Close-up of a black plastic connector with a curved handle and arrow indicator (no text or symbols)natural_image
Close-up of a mechanical component with a curved arrow indicating rotation or movement (no text or symbols visible)natural_image
Close-up of a mechanical component with a directional arrow indicating a specific feature (no visible text or symbols)natural_image
Close-up of a finger pressing down on a black rectangular device with five circular buttons, no visible text or symbols.natural_image
Close-up of a hand inserting a small component into a device, with no visible text or symbols.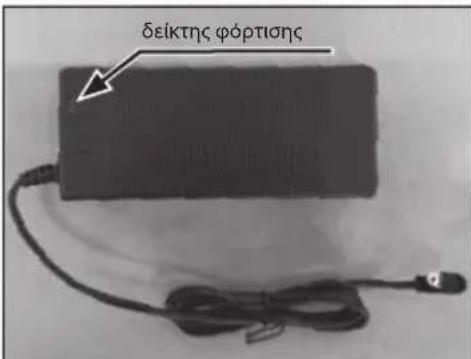
Λειτουργία φωτισμού
natural_image
Close-up of a mechanical component with a circular feature and an arrow pointing to it (no visible text or symbols)
natural_image
Close-up of a mechanical component with a circular feature and an arrow indicator (no text or symbols)natural_image
Close-up of a hand adjusting a bicycle rear panel with a white arrow indicating direction (no text or symbols)natural_image
Technical line drawing of a mechanical coupling or bracket assembly (no text or symbols)natural_image
Mechanical linkage diagram with no visible text or symbols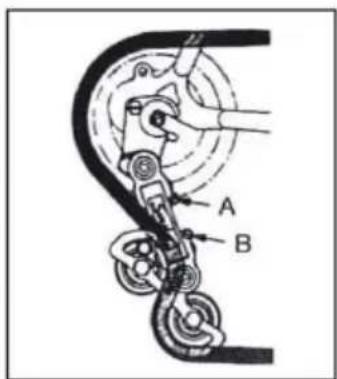
https://www.sharpconsumer.com/support/

natural_image
Simple line drawing of a rectangular device with curved and straight lines, no text or symbols present.Cargador de batería


Pedales

www.sharpconsumer.com/support/

www.sharpconsumer.com/documents-of-conformity/


Qué hay en la caja:
Partes de la E-Bike
natural_image
Close-up of a bicycle frame with visible 'SHARP' branding and no other text or symbolsMontando la E-bike
natural_image
Mechanical component diagrams showing two views of a mechanical linkage with arrows indicating features (no text or symbols present)natural_image
Close-up of a hand holding a black sash with a metal clip, against a plain background (no text or symbols visible)PASO 4: Batería
natural_image
Close-up of a black mechanical component with a white arrow pointing to a rectangular opening, mounted on a metal frame (no text or symbols visible)natural_image
Close-up of a mechanical component with a circular knob and directional arrow (no text or symbols visible)natural_image
Close-up of a car's undercarriage showing engine and wheel components (no visible text or symbols)natural_image
Close-up of a finger pressing down on a black electronic device panel with five buttons (no text or symbols visible)natural_image
Close-up of a hand inserting a small electronic component into a device (no visible text or symbols)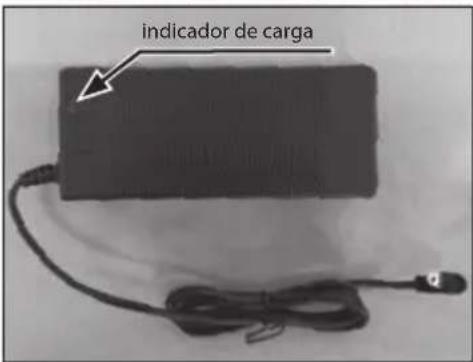
natural_image
Close-up of a mechanical component with a circular head and arrow indicator (no visible text or symbols)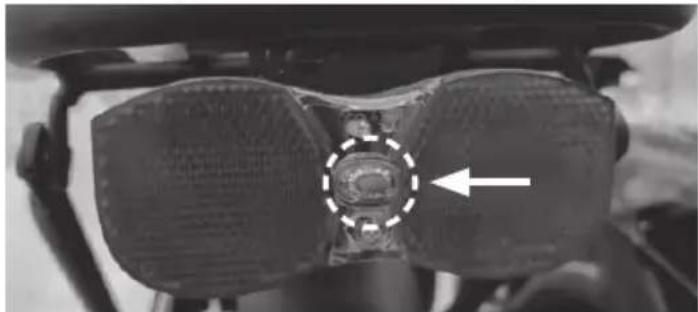
natural_image
Close-up of a mechanical component with a highlighted circular feature and an arrow indicator (no text or symbols)natural_image
Close-up of a hand adjusting a bicycle rear panel with a white arrow indicating direction (no text or symbols)natural_image
Technical line drawing of a mechanical clamp or bracket assembly (no text or symbols)natural_image
Abstract mechanical or robotic component diagram with no visible text or symbols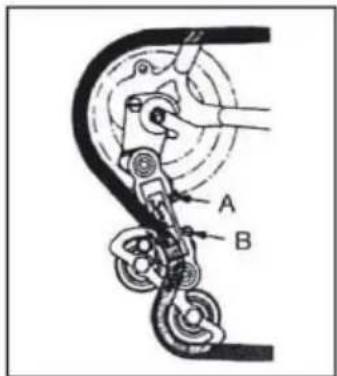
https://www.sharpconsumer.com/toetus/


Kiirjuhend
natural_image
Simple line drawing of a rectangular device with curved connectors and a small connector at the bottom (no text or symbols)akulaadija.


Pedaalid
Olulised ohutusjuhised

www.sharpconsumer.com/contact/

www.sharpconsumer.com/toetus/

www.sharpconsumer.com/documents-of-conformity/
Mis on karbis:
E-ratta osad
- 1 × E-ratas
Tarvikute kast
• 1 × Kiirjuhend (see dokument)
- 1 × Garantijuhend
- 1 × laadija
- 2 × Pedaalid
- 2 × Aku vôtmed
Tarvikute kast
(Viidake 1heheküljel 1)
Jalgratta osad
(Viidake 2leheküljel 1)
Jalgratta raaminumber
natural_image
Close-up of a bicycle frame with visible 'SHARP' branding and no other text or symbolsE-ratta kokkupanek
natural_image
Mechanical component diagrams showing two views of a mechanical linkage with arrows indicating features (no text or symbols present)natural_image
Close-up of a hand using a tool to lift a sash, no text or symbols visibleSAMM 4: Aku
a. Sisestage aku jalgratta raami tagaküljel olevasse pesasse.
natural_image
Close-up of a black plastic electrical connector with a wire and arrow indicator (no text or symbols)natural_image
Close-up of a mechanical component with a curved arrow indicating rotation or movement (no visible text or symbols)natural_image
Close-up of a car's lower body and engine components, showing no visible text or symbolsnatural_image
Close-up of a finger pressing down on a black textured surface, with five circular buttons and an arrow pointing to the right (no text or symbols visible)natural_image
Close-up of a hand inserting a small electronic component into a device (no visible text or symbols)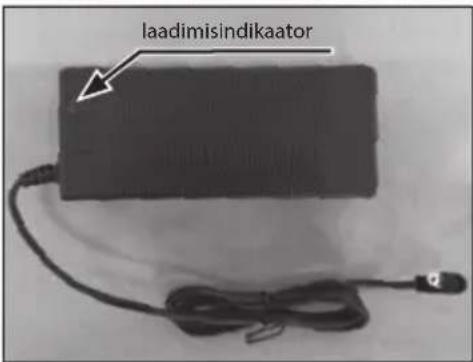
Avustusega sõitmine
natural_image
Diagram of a cable being inserted into a connector with a directional arrow indicating rotation (no text or symbols present)Valguse töö
natural_image
Close-up of a mechanical component with a highlighted circular feature and an arrow pointing to it (no visible text or symbols)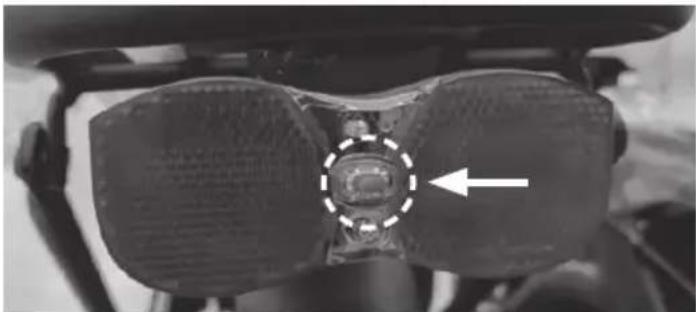
natural_image
Close-up of a mechanical component with a highlighted circular feature and an arrow indicator (no text or symbols)natural_image
Close-up of a hand adjusting a black bicycle rear panel with a white arrow indicating motion (no text or symbols)natural_image
Technical line drawing of a mechanical clamp or bracket assembly (no text or symbols)natural_image
Abstract mechanical or robotic component diagram with no visible text or symbols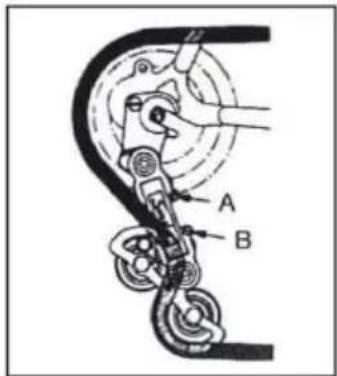
https://www.sharpconsumer.com/support/


Pikaopas
natural_image
Pure electrical circuit lines without any symbolsAkkulaturi

Polkimet

www.sharpconsumer.com/contact/

www.sharpconsumer.com/support/

www.sharpconsumer.com/documents-of-conformity/
Mitä paketissa on:
Sähköpyörän osat
• 1 × Sähköpyörä
Tarvikepakkaus
natural_image
Close-up of a bicycle frame with visible 'SHARP' branding and no other text or symbolsnatural_image
Mechanical linkage components shown in two views: left with a handle and valve, right with a bracket (no text or symbols)natural_image
Close-up of a hand using a tool to lift a dark, smooth object (no text or symbols visible)VAIHE 4: Akku
natural_image
Close-up of a black mechanical component with a curved handle and arrow indicator (no text or symbols)natural_image
Close-up of a mechanical component with a curved arrow indicating rotation or movement (no text or symbols visible)natural_image
Close-up of a car's lower body and roof structure with an arrow indicating a specific component (no text or symbols visible)d. Tarkista lataustaso painamalla tilapainiketta.
natural_image
Close-up of a finger pressing a button on a black surface, with no visible text or symbols4 Iediä: 100%
natural_image
Close-up of a hand inserting a small electronic component into a device (no visible text or symbols)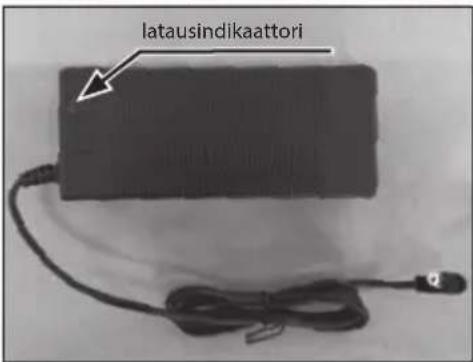
natural_image
Diagram of a cable being inserted into a plug, showing a curved arrow indicating direction (no text or symbols present)Valotoiminta
natural_image
Close-up of a mechanical component with a highlighted circular feature and an arrow indicator (no readable text or symbols)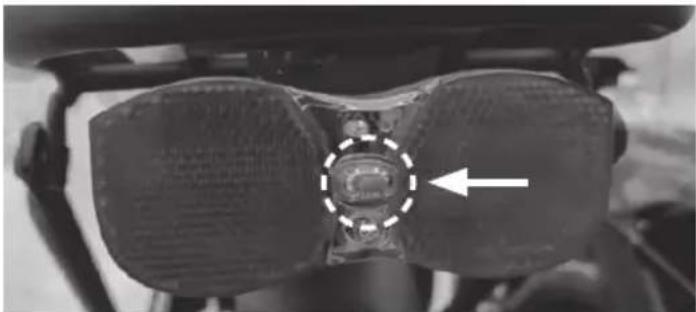
natural_image
Close-up of a mechanical component with a highlighted circular feature and an arrow indicator (no text or symbols)natural_image
Close-up of a hand adjusting a black bicycle rear panel with a white arrow indicating motion (no text or symbols)natural_image
Technical line drawing of a mechanical clamp or bracket assembly (no text or symbols)natural_image
Abstract mechanical or robotic component diagram with no visible text or symbols
https://www.sharpconsumer.com/support/

natural_image
Simple line drawing of a rectangular device with curved and straight lines, no text or symbols present.
www.sharpconsumer.com/contact/

www.sharpconsumer.com/support/

www.sharpconsumer.com/documents-of-conformity/

natural_image
Close-up of a black bicycle with visible 'SHARP' branding and side brackets (no additional text or symbols)natural_image
Mechanical component with arrows pointing to a central hub and two side ports (no text or symbols visible)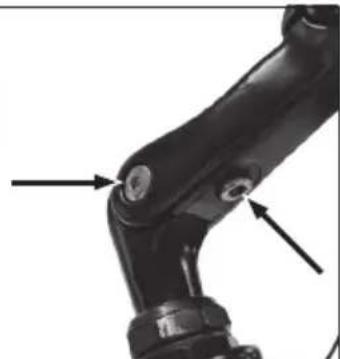
natural_image
Close-up of a mechanical linkage component with arrows pointing to specific joints (no text or symbols visible)natural_image
Close-up of a hand using a tool to lift a dark, smooth object (no text or symbols visible)ÉTAPE 4 : Batterie
natural_image
Close-up of a mechanical component with a curved handle and internal cutout, mounted on a metal frame (no visible text or symbols)natural_image
Close-up of a mechanical component with a curved arrow indicating rotation or movement (no visible text or symbols)natural_image
Close-up of a car's lower body and suspension system, showing mechanical components and a directional arrow (no text or symbols visible)natural_image
Close-up of a finger pressing a button on a black surface, with an arrow pointing to the right button (no text or symbols visible)natural_image
Close-up of a hand inserting a small electronic component into a device (no visible text or symbols)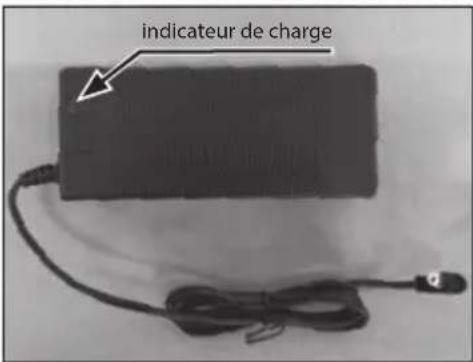
natural_image
Close-up of a mechanical component with a highlighted circular feature and an arrow pointing to it (no visible text or symbols)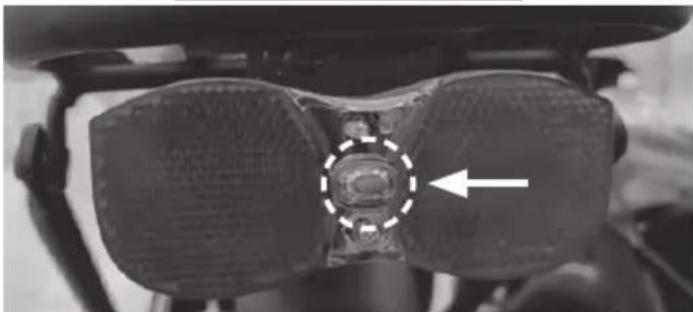
natural_image
Close-up of a mechanical component with a highlighted circular feature and an arrow indicator (no text or symbols)natural_image
Close-up of a hand adjusting a bicycle rear panel with a white arrow indicating direction (no text or symbols)natural_image
Technical line drawing of a mechanical clamp or bracket assembly (no text or symbols)natural_image
Abstract mechanical or robotic component illustration (no text or symbols)
https://www.sharpconsumer.com/support/
natural_image
Simple line drawing of a rectangular device with curved and straight lines, no text or symbols present.Punjač baterije

Pedale
Koristan alat (nije uključen)
Ključ otvorenog kraja 15-13mm
Disposal of this equipment and batteries

www.sharpconsumer.com/contact/

www.sharpconsumer.com/support/

www.sharpconsumer.com/documents-of-conformity/
natural_image
Close-up of a bicycle frame with 'SHARP' branding on the side (no additional text or symbols visible)natural_image
Mechanical linkage components shown in two views: front and side, with arrows pointing to specific parts (no text or symbols present)natural_image
Close-up of a hand holding a sash pen, showing the blade and handle (no text or symbols visible)KORAK 4: Baterija
a. Umetnite bateriju u utor na stražnjoj strani okvira bicikla.
natural_image
Close-up of a black mechanical component with a white arrow indicating direction, mounted on a metal frame (no text or symbols visible)natural_image
Close-up of a mechanical component with a white arrow indicating rotation or movement (no visible text or symbols)c. Pronađite crveni prekidač ispod baterije i postavite ga u ON položaj kako biste aktivirali bateriju.
natural_image
Close-up of a car's undercarriage showing mechanical components and a directional arrow (no text or symbols)natural_image
Close-up of a finger pressing down on a black metal panel with four circular buttons, no text or symbols visiblenatural_image
Close-up of a hand inserting a small component into a device (no visible text or symbols)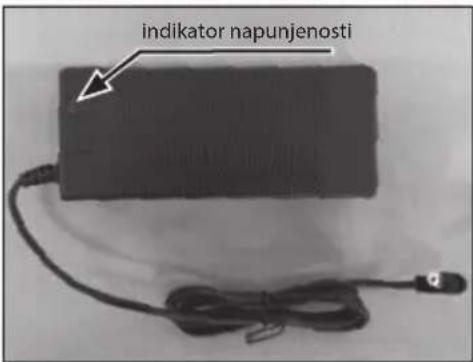
Asistirano pedaliranje
Funkcioniranje svjetla
natural_image
Close-up of a mechanical component with a highlighted circular feature and an arrow pointing to it (no visible text or symbols)
natural_image
Close-up of a mechanical device with dual lenses and a central hub, no visible text or symbolsBaterije su proizvod koji se smatra opasnim, nakon upotrebe treba ih odložiti u namijenjeni spremnik.
Uklanjanje baterije
a. Pobrinite se da je bicikl pravilno postavljen na nosač. Okrenite crveni prekidač na poziciju OFF - 0.
b. Okrenite ključ suprotno od smjera kazaljke na satu na "OPEN" poziciju.
c. Čvrsto držite paket baterija i povucite ga unatrag koristeći ručku na dnu. Preporučuje se držati bateriju objema rukama.
natural_image
Close-up of a hand adjusting a black bicycle rear panel with a white arrow indicating motion (no text or symbols)natural_image
Technical line drawing of a mechanical clamp or bracket assembly (no text or symbols)Desna ručka upravlja stražnjom kočnicom. Lijeva ručka upravlja prednjom kočnicom.
natural_image
Abstract mechanical or electronic component diagram with no visible text or symbols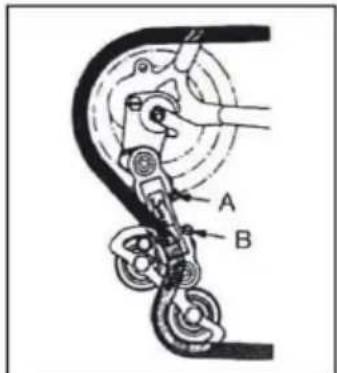
natural_image
Simple line drawing of a rectangular device with curved and straight lines, no text or symbols present.Akkumulátor töltő


Pedálok
natural_image
Two circular icons showing a sneaker and a helmet, no text or symbols present.
www.sharpconsumer.com/contact/

www.sharpconsumer.com/tamogatas/

www.sharpconsumer.com/documents-of-conformity/


Mi van a dobozban:
E-bike alkatrészek
- 1 × E-bicikli
Tartozékok doboza
natural_image
Close-up of a shared bicycles side by side, showing front wheel and rear suspension (no text or symbols visible)natural_image
Mechanical component with arrows pointing to features on a curved body (no text or symbols visible)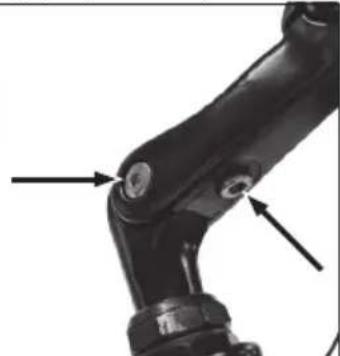
natural_image
Close-up of a mechanical linkage component with two arrows pointing to specific joints (no text or symbols visible)natural_image
Close-up of a hand using a sash tool to lift a yellow object (no text or symbols visible)natural_image
Close-up of a black plastic connector with a white arrow pointing to its side panel, mounted on a metal frame (no text or symbols visible)natural_image
Close-up of a mechanical component with a curved arrow indicating rotation or movement (no visible text or symbols)natural_image
Close-up of a car's undercarriage showing the wheel and dashboard (no visible text or symbols)natural_image
Close-up of a finger pressing down on a black electronic device with five illuminated buttons (no text or symbols visible)4 LED világít: 100%
natural_image
Close-up of a hand inserting a small connector into a device component, with no visible text or symbols.
Világítás működése
natural_image
Close-up of a mechanical component with a highlighted circular feature and an arrow pointing to it (no visible text or symbols)
natural_image
Close-up of a mechanical component with textured surfaces and a central circular feature, no visible text or symbolsnatural_image
Close-up of a hand adjusting a black bicycle rear panel with a white arrow indicating motion (no text or symbols)natural_image
Technical line drawing of a mechanical clamp or bracket with no visible text or symbolsnatural_image
Mechanical linkage diagram with articulated joints and base components (no text or labels)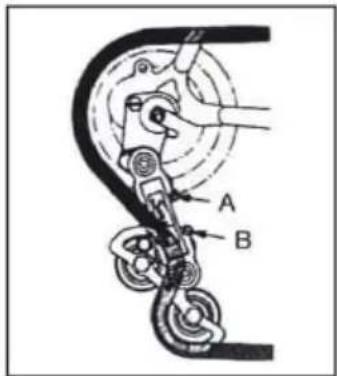
https://www.sharpconsumer.com/support/


Guida rapida
natural_image
Pure electrical circuit lines without any symbolsCaricabatteria

Pedali
natural_image
Two circular icons showing a shoe and helmet, no text or symbols present
www.sharpconsumer.com/contact/

www.sharpconsumer.com/support/

www.sharpconsumer.com/documents-of-conformity/

natural_image
Close-up of a bicycle frame with visible 'SHARP' branding and no other text or symbolsnatural_image
Mechanical linkage components shown in two views: front and side, with arrows indicating joint details (no text or symbols present)natural_image
Close-up of a hand using a tool to lift a dark, smooth object (no text or symbols visible)FASE 4: Batteria
natural_image
Close-up of a black mechanical component with a white arrow indicating direction, mounted on a metal frame (no text or symbols visible)natural_image
Close-up of a mechanical component with a curved arrow indicating rotation or movement (no text or symbols visible)natural_image
Close-up of a car's undercarriage showing mechanical components and a directional arrow (no text or symbols)natural_image
Close-up of a finger pressing down on a black rectangular object with four circular indentations, no visible text or symbols.4 led accesi: 100%
natural_image
Close-up of a hand inserting a small component into a device (no visible text or symbols)
natural_image
Close-up of a mechanical component with a highlighted circular feature and an arrow pointing to it (no visible text or symbols)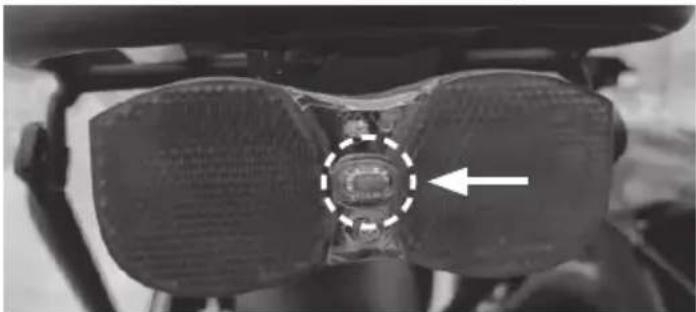
natural_image
Close-up of a mechanical component with two dark bands and a central circular feature, no visible text or symbolsnatural_image
Close-up of a hand adjusting a black bicycle rear panel with a white arrow indicating motion (no text or symbols)natural_image
Technical line drawing of a mechanical clamp or bracket assembly (no text or symbols)natural_image
Illustration of a mechanical device with curved and linear components (no text or symbols)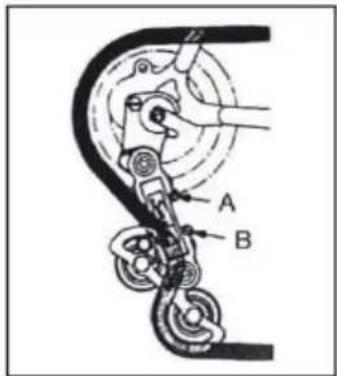
https://www.sharpconsumer.com/support/

natural_image
Simple line drawing of a rectangular device with curved and straight lines, no text or symbols present.Akumuliatoriaus jkroviklis

Pedalai
natural_image
Two circular icons showing a sneaker and a helmet, no text or symbols present.
www.sharpconsumer.com/contact/

www.sharpconsumer.com/support/

www.sharpconsumer.com/documents-of-conformity/


Kas yra děžěje:
natural_image
Close-up of a bicycle frame with 'SHARP' branding on the side (no additional text or symbols visible)natural_image
Mechanical component diagrams showing two views of a mechanical linkage with arrows indicating features (no text or symbols present)natural_image
Close-up of a hand using a sash tool to lift a dark, smooth object (no text or symbols visible)4 ŽINGSNIS: Akumuliatorius
natural_image
Close-up of a black mechanical component with a white arrow indicating direction, no visible text or symbolsnatural_image
Close-up of a mechanical component with a circular dial and arrow indicator (no visible text or symbols)natural_image
Close-up of a car's undercarriage showing mechanical components and a directional arrow (no text or symbols)natural_image
Close-up of a finger pressing down on a black metal object with four circular indentations, no visible text or symbols.4 šviesos jsijungusios: 100%
natural_image
Close-up of a hand inserting a small component into a device (no visible text or symbols)
Pagalbinis pedalas
Šviesų veikimas
natural_image
Close-up of a mechanical component with a highlighted circular feature and an arrow pointing to it (no visible text or symbols)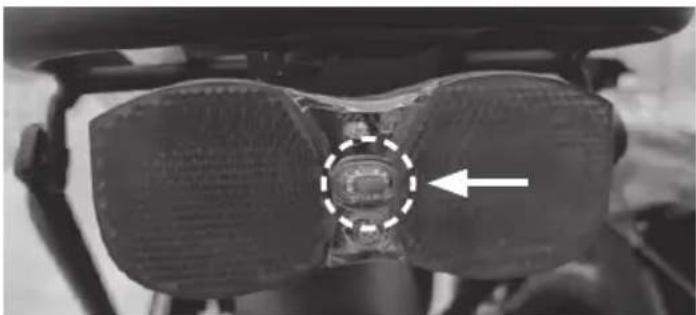
natural_image
Close-up of a mechanical device with a highlighted circular component and an arrow pointing to it (no visible text or symbols)natural_image
Close-up of a hand adjusting a black bicycle rear panel with a white arrow indicating motion (no text or symbols)natural_image
Technical line drawing of a mechanical clamp or bracket assembly (no text or symbols)natural_image
Abstract mechanical or robotic component diagram with no visible text or symbols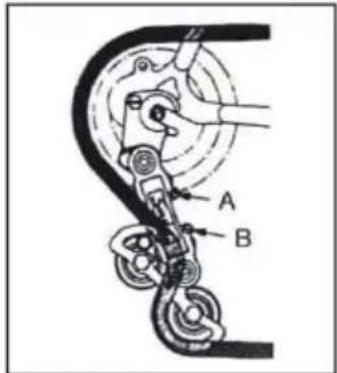
https://www.sharpconsumer.com/support/

natural_image
Simple line drawing of a rectangular device with curved and straight lines, no text or symbols present.
www.sharpconsumer.com/contact/

www.sharpconsumer.com/support/

www.sharpconsumer.com/documents-of-conformity/
Kas ir kastītē:
natural_image
Close-up of a bicycle frame with 'SHARP' branding on the side (no additional text or symbols visible)natural_image
Mechanical assembly diagram showing two views of a mechanical component with arrows indicating features (no text or symbols present)natural_image
Close-up of a hand holding a sash with a metal clip (no text or symbols visible)4. SOLIS: Akumulators
natural_image
Close-up of a black plastic connector with a white arrow indicating direction, mounted on a metal frame (no text or symbols visible)natural_image
Close-up of a mechanical component with a curved arrow indicating rotation or movement (no visible text or symbols)c. Atrast sarkano ieslėgšanas slėdzi zem akumulatora un iestatit to pozicijā IESLĖGTS, lai aktivizėtu akumulatoru.
natural_image
Close-up of a mechanical component with a curved pipe and internal structure, no visible text or symbolsd. Pârbaudiet uzlâdes limeni, nospiežot statusa pogu.

natural_image
Close-up of a finger pressing down on a black rectangular device with five circular buttons, no visible text or symbols.4 LED ieslēgti: 100%
natural_image
Close-up of a hand inserting a small component into a device (no visible text or symbols)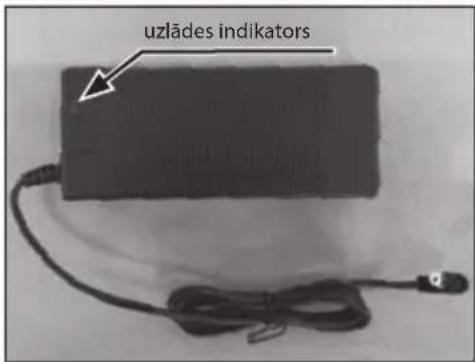
Palīdzības pedālis
Gaismas darbība
natural_image
Close-up of a mechanical component with a highlighted circular feature and an arrow pointing to it (no visible text or symbols)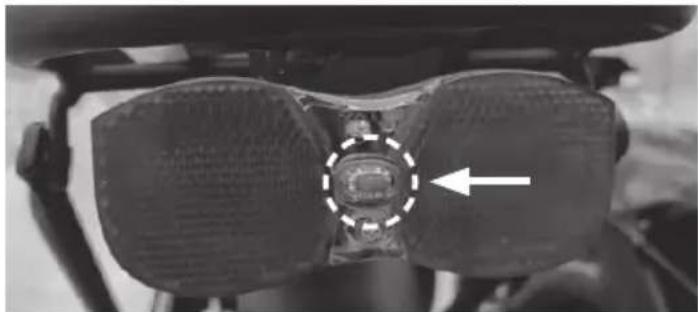
natural_image
Close-up of a mechanical component with textured surfaces and a central circular feature, no visible text or symbolsnatural_image
Close-up of a hand adjusting a black bicycle rear panel with a white arrow indicating motion (no text or symbols)natural_image
Technical line drawing of a mechanical clamp or bracket assembly (no text or symbols)natural_image
Abstract mechanical or electrical component diagram with no visible text or symbols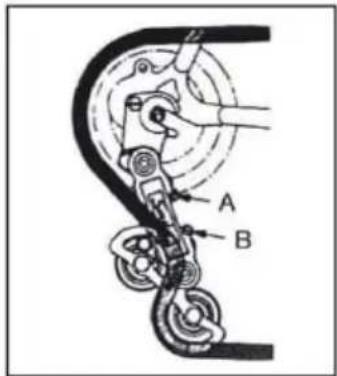
https://www.sharpconsumer.com/support/


Snelstartgids

natural_image
Simple line drawing of a rectangular device with curved and straight lines, no text or symbols present.Oplader


Pedalen
Nuttige gereedschappen (Niet inbegrepen)
Open Ringsleutel 15-13mm
Inbussleutel- 6mm Inbussleutel- 5mm


www.sharpconsumer.com/contact/

www.sharpconsumer.com/support/

www.sharpconsumer.com/documents-of-conformity/
natural_image
Close-up of a black bicycle with visible 'SHARP' branding and side brackets (no text beyond logo)natural_image
Mechanical component with arrows pointing to a central joint (no text or symbols visible)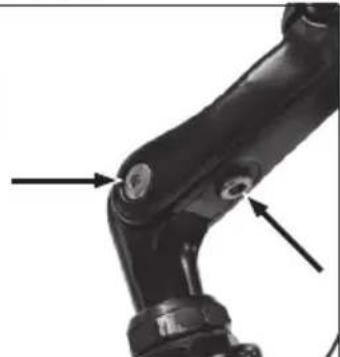
natural_image
Close-up of a mechanical linkage component with two arrows pointing to specific joints (no text or symbols visible)natural_image
Close-up of a hand using a sash tool to lift a lily pad (no text or symbols visible)STAP 4: Batterij
natural_image
Close-up of a black electrical connector with a white arrow pointing to its side panel (no text or symbols visible)natural_image
Close-up of a mechanical component with a circular dial and arrow indicator (no visible text or symbols)natural_image
Close-up of a car's undercarriage showing mechanical components and a directional arrow (no text or symbols)natural_image
Close-up of a finger pressing down on a black electronic device panel with five buttons (no text or symbols visible)4 leds aan: 100%
natural_image
Close-up of a hand inserting a small electronic component into a device (no visible text or symbols)
De trapondersteuning
Lichtbediening
natural_image
Close-up of a mechanical component with a highlighted circular feature and an arrow pointing to it (no visible text or symbols)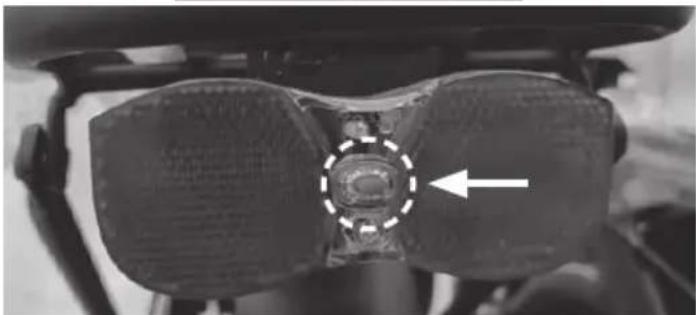
natural_image
Close-up of a mechanical component with a highlighted circular feature and an arrow indicator (no text or symbols)natural_image
Close-up of a hand adjusting a black bicycle rear panel with a white arrow indicating motion (no text or symbols visible)natural_image
Technical line drawing of a mechanical clamp or bracket assembly (no text or symbols)natural_image
Abstract mechanical or electronic component diagram with no visible text or symbols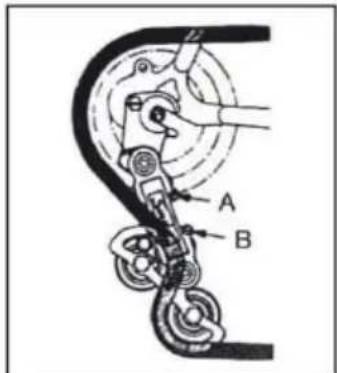
https://www.sharpconsumer.com/support/

natural_image
Simple line drawing of a rectangular device with curved and straight lines, no text or symbols present.Ładowarka baterii
Pedaly

www.sharpconsumer.com/contact/

www.sharpconsumer.com/support/

www.sharpconsumer.com/documents-of-conformity/


Co jest w pudełku:
natural_image
Close-up of a bicycle frame with 'SHARP' branding on the side (no additional text or symbols visible)natural_image
Mechanical component diagram showing a lever and fulcrum with directional arrows indicating parts (no text or symbols present)
natural_image
Close-up of a mechanical linkage component with two arrows pointing to specific joints (no text or symbols visible)natural_image
Close-up of a hand holding a sash with a metal clip (no text or symbols visible)KROK 4: Bateria
natural_image
Close-up of a black plastic connector with a white arrow indicating direction, mounted on a metal frame (no text or symbols visible)natural_image
Close-up of a mechanical component with a curved arrow indicating rotation or movement (no visible text or symbols)natural_image
Close-up of a mechanical component with a curved pipe and internal structure, no visible text or symbolsnatural_image
Close-up of a finger pressing down on a black electronic device with five illuminated buttons (no text or symbols visible)4 diody LED: 100%
natural_image
Close-up of a hand inserting a small electronic component into a device (no visible text or symbols)
Oświetlenie
natural_image
Close-up of a mechanical component with a circular feature and an arrow pointing to it (no visible text or symbols)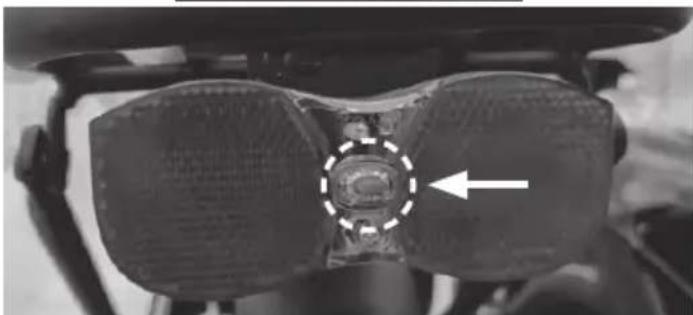
natural_image
Close-up of a mechanical component with a highlighted circular feature and an arrow pointing to it (no text or symbols visible)natural_image
Close-up of a hand adjusting a bicycle rear panel with a white arrow indicating direction (no text or symbols)natural_image
Technical line drawing of a mechanical clamp or bracket assembly (no text or symbols)natural_image
Abstract mechanical or electrical component diagram with no visible text or symbols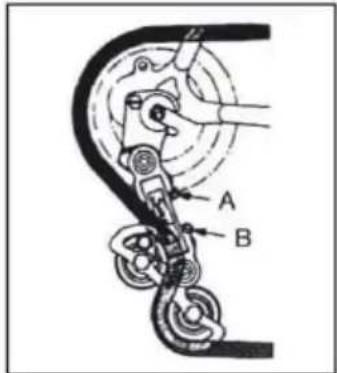
https://www.sharpconsumer.com/support/

natural_image
Simple line drawing of a rectangular device with curved and straight lines, no text or symbols present.
www.sharpconsumer.com/contact/

www.sharpconsumer.com/support/

www.sharpconsumer.com/documents-of-conformity/
natural_image
Close-up of a shared bicycles side by side, showing front wheel and rear suspension (no text or symbols visible)Montando a E-bike
natural_image
Mechanical assembly diagram showing two views of a mechanical component with arrows indicating features (no text or symbols present)natural_image
Close-up of a hand using a tool to lift a sash (no text or symbols visible)PASSO 4: Bateria
natural_image
Close-up of a black mechanical component with a curved handle and arrow indicator (no text or symbols)natural_image
Close-up of a mechanical component with a curved arrow indicating rotation or movement (no visible text or symbols)natural_image
Close-up of a car's lower body and upper roof structure with an arrow pointing to a component (no visible text or symbols)natural_image
Close-up of a finger pressing down on a black electronic device with five illuminated buttons (no text or symbols visible)4 LEDs acesos: 100%
natural_image
Close-up of a hand inserting a small component into a device, with an arrow pointing to the component (no visible text or symbols)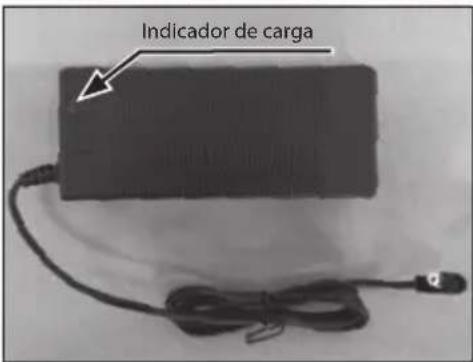
Operação de luz
natural_image
Close-up of a mechanical component with a highlighted circular feature and an arrow pointing to it (no visible text or symbols)
natural_image
Close-up of a mechanical component with a circular arrow pointing to a central feature (no visible text or symbols)natural_image
Close-up of a bicycle rear bumper with hand adjusting cable, showing no text or symbolsnatural_image
Technical line drawing of a mechanical clamp or bracket with no visible text or symbolsnatural_image
Illustration of a mechanical or robotic arm with no visible text or symbols
https://www.sharpconsumer.com/support/

Snabbstartsguide
natural_image
Pure electrical circuit lines without any symbolsBatteriladdare


Pedaler

www.sharpconsumer.com/contact/

www.sharpconsumer.com/support/

www.sharpconsumer.com/documents-of-conformity/
Vad finns i lådan:
E-cykel Delar
• 1 × Elcykel
Tillbehörslåda
- 1 × Snabbstartsguide (det här dokumentet)
- 1 × Garantiguide
- 1 × Laddare
- 2 × Pedaler
- 2 × Batterinycklar
Tillbehörslåda
natural_image
Close-up of a bicycle frame with 'SHARP' branding on the side (no additional text or symbols visible)natural_image
Mechanical linkage components shown in two views: front and side, with arrows pointing to specific parts (no text or symbols present)natural_image
Close-up of a hand using a tool to lift a dark, smooth, cylindrical object (no text or symbols visible)STEG 4: Batteri
natural_image
Close-up of a black plastic connector with a white arrow pointing to its side (no text or symbols visible)natural_image
Close-up of a mechanical component with a white arrow indicating rotation or movement (no visible text or symbols)natural_image
Close-up of a car's undercarriage showing mechanical components and a directional arrow (no text or symbols)natural_image
Close-up of a finger pressing down on a black metal panel with four circular buttons, no text or symbols visiblenatural_image
Close-up of a hand inserting a small component into a device, with no visible text or symbols.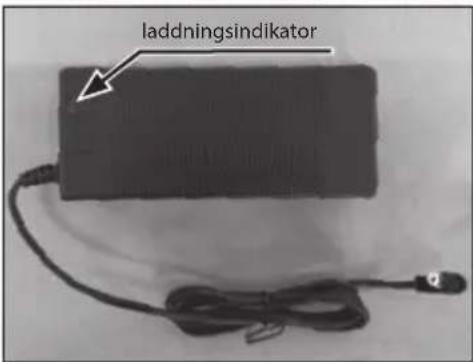
Det assisterade trampandet
natural_image
Diagram of a cable being inserted into a connector with a directional arrow indicating motion (no text or symbols present)Ljusfunktion
natural_image
Close-up of a mechanical component with a highlighted circular feature and an arrow pointing to it (no visible text or symbols)
natural_image
Close-up of a mechanical component with a central circular feature and an arrow pointing to it (no visible text or symbols)natural_image
Close-up of a hand adjusting a black bicycle rear panel with a white arrow indicating motion (no text or symbols)natural_image
Technical line drawing of a mechanical clamp or bracket assembly (no text or symbols)natural_image
Abstract mechanical or robotic component diagram with no visible text or symbols
Sharp Consumer Electronics Poland sp. z o.o.
Ostaszewo 57B, 87-148 Łysomice, Poland
EBK/MAN/0015
www.sharpconsumer.eu
SHARP