
P56201 - Thermostat Emos - Free user manual and instructions
Find the device manual for free P56201 Emos in PDF.
| Product type | Programmable WiFi thermostat |
| Brand | Emos |
| Model | P56201 |
| Dimensions | 138 × 88 × 33 mm |
| Power supply | 230 V AC / 50 Hz |
| Max switched load | 230 V AC, 6 A (resistive), 2 A (inductive) |
| Temperature measurement range | 0 °C to 40 °C, resolution 0.1 °C, accuracy ±1 °C at 20 °C |
| Temperature setting range | 5 °C to 35 °C in steps of 0.5 °C |
| Adjustable hysteresis | 0.2 °C to 2 °C in steps of 0.1 °C |
| WiFi frequency | 2.4 GHz, max power 25 mW e.i.r.p. |
| Mobile app | EMOS GoSmart for iOS and Android |
| Operating modes | Auto, Manual (HOLD), Temporary, Boost, Vacation, Anti-freeze |
| Schedule programming | Up to 6 periods per day, 7-day or 5+2 modes |
| Connection | WiFi 2.4 GHz, pairing via app |
| Installation | Wall mounting, wiring on terminals, requires power cut |
| Maintenance | Soft slightly damp cloth, no solvents or immersion |
| Safety | Cut power before installation, do not open or repair yourself |
| Repairability | Repair by qualified specialist, return to retailer |
| Warranty | Legal warranty, no duration specified in the manual |
Frequently Asked Questions - P56201 Emos
User questions about P56201 Emos
0 question about this device. Answer the ones you know or ask your own.
Ask a new question about this device
Download the instructions for your Thermostat in PDF format for free! Find your manual P56201 - Emos and take your electronic device back in hand. On this page are published all the documents necessary for the use of your device. P56201 by Emos.
USER MANUAL P56201 Emos
The P56201 thermostat is designed for controlling heating and air-conditioning systems.
Important
Before the first use, make sure to carefully read the instruction manual for the thermostat, as well as the manual for the boiler or air-conditioning equipment.
Turn off power supply before installing the thermostat!
Installation should be carried out by a qualified person!
Follow applicable standards during installation.
Technical specifications:
Switched load: max. 230 V AC; 6 A for resistive load; 2 A for inductive load Temperature measurement: 0^ to 40^ with 0.1^ resolution; accuracy ± 1^ at 20^
Temperature setting: 5^ to 35^ in 0.5^ increments
Temperature differential setting: 0.2^ to 2^ in 0.1^ increments
Operating temperature: 0^ to 40^
WiFi frequency: 2.4 GHz, max. 25 mW e.i.r.p.
Power supply: 230 V AC/50 Hz
Dimensions: 138 × 88 × 33 ~mm
Description of the Thermostat - Icons and Buttons (see fig. 1)
1-day number
2 - time
3-WiFi signal reception
4-cooling heating mode
5-set temperature
6 - menu lock
7 - holiday mode
8 - temporary change of temperature
9-HOLDmode
10 - current room temperature
11 - programme settings
12 - data and time settings
13 - function selection, confirmation
14 - temporary change of temperature; navigation in the settings
15 - return to main menu
Installing the Thermostat (see fig. 2)
Description of the Back of the Thermostat (see fig. 3)
1 - contact connection cover
2 - mounting holes
3 - mounting direction
Mobile Application
The thermostat can be controlled using a mobile application for iOS or Android.
Download the EMOS GoSmart app for your device.
QR code for downloading the Android app

QR code for downloading the iOS app

Description of Registering and Logging into the Application (see fig. 4)
To use the mobile application, you must first register by tapping the Sign Up button. Enter your country and e-mail address, check off your consent with the end user licence agreement and tap Get Verification Code.
Enter the verification code sent to your e-mail.
Then, set the password for your account and tap Done.
Choose whether you want to enable Data Analysis/Personalisation and tap Go to App.
Connecting the Thermostat to a Wi-Fi network for Control via the Mobile App (see fig. 5)
Long-press the button for about 5 seconds.
Then press and hold the button for 3 seconds.
E2 will appear on the screen and the icon will be flashing.
Tap Add Device in the app and enable location access.
Choose add manually and select Small Home Appliances - Thermostat (Wi-Fi) or Others - Others (Wi-Fi).
Select a 2.4 GHz Wi-Fi network, enter the password and tap Next.
Check off Confirm that the indicator is flashing rapidly and tap Next.
The chosen thermostat should appear in the app within 2 minutes.
Tap the green arrow on the right; the thermostat will be added into the app.
Then tap the thermostat icon in the app to open the main control menu.
Note:
If the thermostat fails to pair, repeat the process.
5 GHz Wi-Fi networks are not supported.
The thermostat can only be controlled via the app by 1 user at a time. If another user wants to control the thermostat, the previous user must log out.
Description of the Main Menu of the Mobile App.
Tap the thermostat icon in the app to open the main control menu (see fig. 6).
- Thermostat status (ON/OFF) - Anti-freeze mode, temperature fixed to 5^
- Work mode setting (detailed information in the WORK MODES chapter of this manual)
Automatic A
Manual - see HOLD mode

Temporary - see Temporary change mode
Boost - see Timed temporary change mode
Holiday - see Holiday mode

3. Schedule (see fig. 7)
1 - add a time period
2 - delete a time period
3-day display
7 days (Mon Sun)
5+2 days (Mon → Fri + Sat → Sun)
24-hour
Every day can be divided into a maximum of 6 periods.
When in 7 day mode, you can copy the temperature settings from one day into other days (see fig. 8).
Example:
Long-press the Thursday icon; a menu of other days will open. Mark them orange by tapping them and confirm.
Thursday's schedule will copy over to Monday, Tuesday and Wednesday.
4. Setting (see fig. 9)
1 - reset the thermostat to factory settings
2 - key lock
3 - correction of ambient temperature (-3 °C to +3 °C in 0.5 °C increments)
4-heating/cooling system mode
5 - calendar mode (7 days, 5+2, 24 h)
5. Thermostat mode icon
heating cooling off
- Work mode icon
- Adjust temperature
- Current room temperature
- Current set temperature
10. Adjust temperature
- Network information about the device, change the name in the app, location information, add an icon to the home screen and other similar settings
Deleting the Thermostat from the App (see fig. 10)
Long-press the thermostat icon, check off the thermostat and tap the dustbin icon to delete the thermostat.
User Overview/Password Change/App Update
Tap the on in the bottom right and then the icon in the top right. This will open a new menu with settings.
INSTALLATION
Attention:
Before changing the thermostat, disconnect the heating system from the mains power in your home. This will prevent potential injury by electric current.
Installing the Thermostat
- Remove the rear cover of the thermostat (see fig. 2).
- Mark the spots for holes.
- Drill two holes, carefully insert the plastic wall plugs into them and use two screws to fasten the rear thermostat cover.
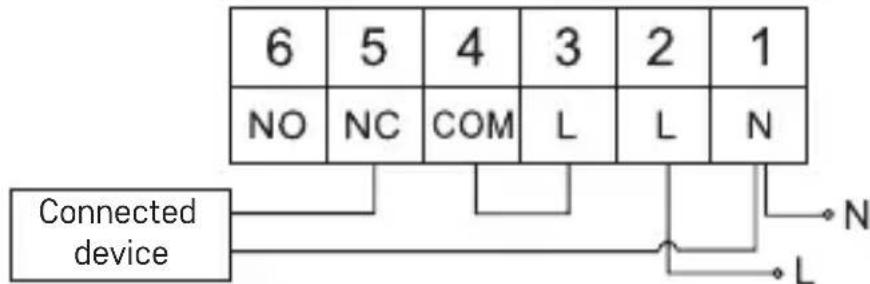
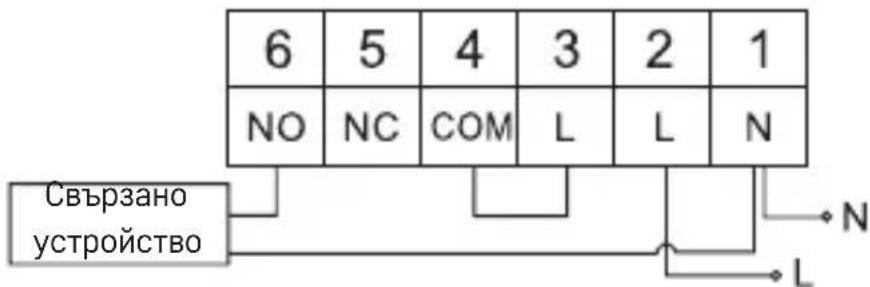
- Connect the wires to the labelled terminals according to the wiring diagram found under the cover.
- Complete the installation by fitting the thermostat onto the mounted rear cover.
Placement of the Thermostat
The placement of the thermostat (transmitter unit) significantly affects its functioning.
Choose a location where members of the family spend most of their time, preferably near an inside wall where air circulates freely, with no direct sunlight. Do not place the thermostat in the vicinity of heat sources (such as TV sets, radiators, fridges), or close to a door. Failure to comply with these recommendations will prevent proper control over room temperature.
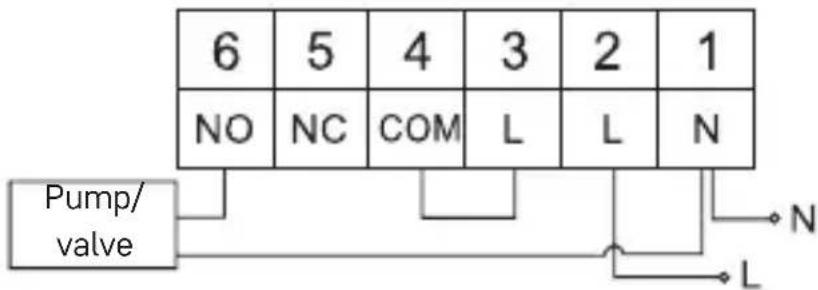
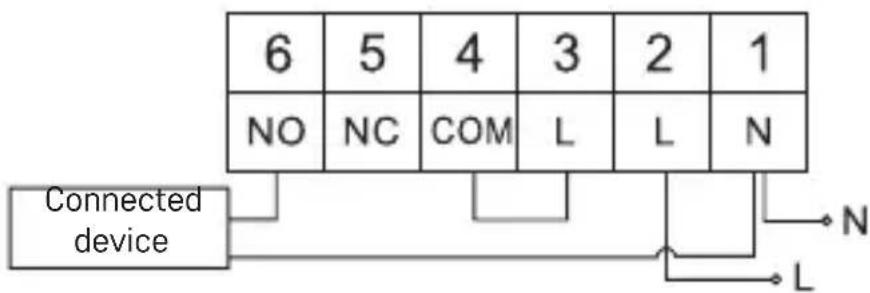
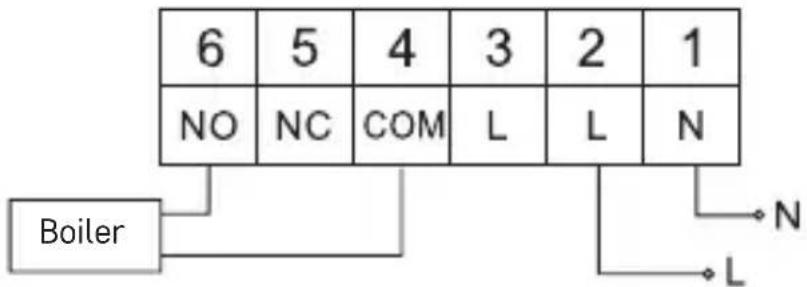
Wiring Diagram:
Pump/Motorised Valve Connection Diagram
Floor Heating Connection Diagram
Boiler Connection Diagram
- The pre-installed wire coupler will not be connected.
Expansion Valve/Electric Drive Connection Diagram
Setting the Clock, Calendar
Press the button; the values will start flashing.
Use the buttons to set the following values (holding the button down accelerates the value change):
Day - Month - Year - Hour - Minute.
Confirm the set value by pressing
To end setting, press the button or wait 30 seconds.
After setting is complete, the current day number will be displayed:
1 - Monday
2 - Tuesday
3-Wednesday
4- Thursday
5-Friday
6 - Saturday
7 - Sunday
WORK MODES
Holiday Mode
Sets a constant temperature for an extended period of time.
Long-press (5 seconds) the button; the time value will start flashing.
Release the button and press it again for 5 seconds.
The icon will appear and the number of days will start flashing.
Repeatedly press the button to set the number of days (from 1 to 99).
Confirm the set number of days by pressing the temperature value will begin flashing.
Repeatedly press the button to set the temperature.
Confirm by pressing the ic will appear.
If you want to go back and change the temperature for holiday mode, press the
button repeatedly.
You can cancel holiday mode by pressing or
Temporary Change Mode
Short-term manual change of temperature.
While in Auto mode, use the buttons to change the temperature setting; the value will be saved automatically.
The iron will appear.
This mode will be automatically cancelled by the first programmed temperature change (the time remaining until the change + clock will be alternating in the top
left corner) or it can be cancelled manually by pressing in
OFF Mode
Anti-freeze mode, temperature fixed to 5^
While in Auto mode, press the button 2 × ; a temperature of 5^ C will appear in the top right corner.
To cancel the mode, press
Timed Temporary Change Mode
Temporary manual change in temperature for 1 to 9 hours.
While in Auto mode, long-press the▶ button; the time setting will start flashing in the top left corner.
Use the buttons to set the duration of the temperature change, from 1 to 9 hours, with 1 h resolution.
Confirm by pressing Then set the temperature of choice using the buttons.
The remaining set time + the clock will be alternating in the top left corner; you can cancel the mode prematurely by pressing
HOLD Mode
Permanent manual temperature change.
While in Auto mode, press the button; the HOLD will appear in the bottom right.
Set the temperature of choice using the buttons; the value will be saved automatically.
The set temperature will be maintained until HOLD mode is cancelled.
Any programmed temperature change will not be carried out.
To cancel HOLD mode, press
Heating Programme Setting Mode
Sets temperature over the course of the whole day (6 temperature changes in the day).
Press the PRG button. The day number will start flashing (1-7 = Monday to Sunday).
Press repeatedly to select the days of choice.
Different each day programme – the number of the selected day flashes
Monday to Friday programme - 12345
Saturday to Sunday programme - 6f7shes
All week programme - 1234567 flashes
Select your programme of choice and confirm with
The time of the first temperature change will be flashing; you can set the time by repeatedly pressing (10 minute increments), then confirm with. The temperature value will begin flashing; set by repeatedly pressing P1 will appear below the set temperature, indicating the 1st temperature change in the day.
Confirm by pressing Continue by setting the start of the second temperature change (P2 will appear under the temperature).
Set the time and temperature by following the same steps as when setting the 1st temperature change.
Continue the process until all 6 temperature changes (P1 to P6) are set.
Factory pre-set times and temperatures are as follows:
Monday to Friday
| Temperature change Time Temperature | |
| P1 6:30 20 °C | |
| P2 8:30 16 °C | |
| P3 12:00 16 °C | |
| P4 14:00 16 °C | |
| P5 16:30 21 °C | |
| P6 22:30 7 °C |
Saturday to Sunday
| Temperature change Time Temperature | |
| P1 7:30 20 °C | |
| P2 9:30 20 °C | |
| P3 11:30 20 °C | |
| P4 13:30 20 °C | |
| P5 16:30 20 °C | |
| P6 22:30 15 °C |
Screen Illumination
Pressing any button will illuminate the screen for 15 seconds.
Other Technical Settings
Long-press the button for about 5 seconds.
Repeatedly pressing the button selects from the functions below, values are adjusted using the buttons.
Connecting the Thermostat to WiFi (COFI)
Long-press the button for about 5 seconds.
Then press and hold the button for 3 seconds.
E2 will appear on the screen and the icon will be flashing.
Complete the pairing of the thermostat in the mobile app.
See instructions for Connecting the Thermostat to a WiFi Network for Control via the Mobile App.
Switching Heating/Cooling Mode
Long-press the button for about 5 seconds.
Press the button once.
Use the buttons to switch to heating (HEAT) or cooling (COOL) mode.
Confirm with
Setting the Temperature Differential dI FF
The temperature differential (hysteresis) is the difference in temperature required for switching the system on and off. If, for example, you set the temperature in the heating system to 20^ and the differential to 0.2^ , the thermostat activates heating as soon as room temperature drops to 19.8^ and switches heating off when temperature reaches 20.2^ .
Long-press the button for about 5 seconds.
Press the button 2 × and use the buttons to set the temperature differential value (0.2 °C to 2 °C in 0.1 °C increments).
Confirm with
Ambient Temperature Calibration (CAL)
The temperature sensor in the thermostat is calibrated from production, but additional calibration can be done to optimise the thermostat further, for instance by comparing the measured room temperature with a reference thermometer.
Long-press the button for about 5 seconds.
Press the button 3 × and use the buttons to set the calibration value (-3^ C to +3^ C in 0.5^ C increments).
Confirm with
Time Synchronisation (SYNC)
Long-press the button for about 5 seconds.
Press the button 4× and use the buttons to set:
ON - time will be automatically synchronised with the Wi-Fi network;
OFF - time will not be synchronised with the Wi-Fi network and the time you set manually will be used.
Confirm with
Software Version
Long-press the button for about 5 seconds.
Press the button 5 × ; the software version of the thermostat will be displayed.
Return by pressing
Resetting the Thermostat (rESE)
Long-press the button for about 5 seconds.
Press the button 6× rESE will appear on the screen.
Press the PRG button; -- -- will be displayed.
Press the PRG button again; the thermostat's menu will be reset and all set values will be deleted.
Key Lock
Long-press the PRG button for about 3 seconds.
All buttons will be locked, the thermostat will flash LOC in the top left of the screen and the icon will be displayed.
To cancel the lock, hold the PRG button again for about 3 seconds; UNLO will flash on the screen.
Setting the lock in the mobile app:
- lock activation, - lock deactivation
Attention:
If you activate the lock in the app, the lock can also be cancelled using the PRG button on the thermostat.
Upkeep and Maintenance
The product is designed to serve reliably for many years if used properly. Here are some tips for proper operation:
- Read the manual carefully before using the product.
- Do not expose the product to direct sunlight, extreme cold and humidity and sudden changes in temperature. This would reduce measuring accuracy.
- Do not place the product in locations prone to vibration and shocks – may cause damage.
- Do not subject the product to excessive force, impacts, dust, high temperatures or humidity – doing so may cause malfunction, shorten battery life, damage batteries and deform plastic parts.
- Do not expose the product to rain or high humidity, dropping or splashing water.
- Do not place any open flame sources on the product, e.g. a lit candle, etc.
- Do not put the product in places with inadequate air flow.
- Do not insert any objects into the product's vents.
- Do not tamper with the internal electrical circuits of the product - doing so may damage the product and will automatically void the warranty. The product should only be repaired by a qualified professional.
- To clean the product, use a slightly moistened soft cloth. Do not use solvents or cleaning agents - they could erode the plastic parts and cause corrosion of the electric circuits.
- Do not immerse the product in water or other liquids.
- In the event of damage or defect of the product, do not perform any repairs by yourself. Have it repaired in the shop where you bought it.
- This device is not intended for use by persons (including children) whose physical, sensory or mental disability or whose lack of experience or knowledge prevents them from using it safely. Such persons should be instructed in how to use the device and should be supervised by a person responsible for their safety. Children must always be supervised to ensure they do not play with the device.
ATTENTION: The contents of this manual may be changed without prior notice - due to printing limitations, the symbols shown may differ slightly from those on the screen - the content of this manual may not be reproduced without the manufacturer's permission.

Do not dispose with domestic waste. Use special collection points for sorted waste. Contact local authorities for information about collection points. If the electronic devices would be disposed on landfill, dangerous substances may reach groundwater and subsequently food chain, where
it could affect human health.
Hereby, EMOS spel. s r. o. declares that the radio equipment type P56201 is in compliance with Directive 2014/53/EU. The full text of the EU declaration of conformity is available at the following internet address: http://www.emos.eu/download.
CZ | Termostat
(7 days) 7 dnü (Po → Ne)
(5+2 days) 5+2 (Po → Pa + So → Ne)
(24 hour) 24hodinovy
(7 days) 7 dni (Po → Ne)
(5+2 days) 5+2 (Po → Pia + So → Ne)
(24 hour) 24hodinovy
(5+2 days) 5+2 (Pon → Pt + Sob → Niedz)
(24 hour) 24 godzinny
(7 days) 7 Tage (Mo → So)
(5+2 days) 5+2 (Mo → Fr + Sa → So)
(24 hour) 24stunden
IiD yac BCTaHOBneHHn DOTpIMyTEcBCTaHOBneHnX CTaHapTIB.
Texhi ci neuikaii:
HabaHTaKeHH npBmKahHi: MaKcMym 230 B 3miHoro ctpMy; 6 A dnype3nCTNBHO HaBaHTaKeHHra; 2 A dnyiHdyKTUBHnx HabaHTaKeHb
BmipuBaHnra TemnepaTpyn: BiD 0 ^ C do 40 ^ C 3 po3dIbHOIO 3daTHicTIO 0,1 ^ C ; ToHnicb ± 1 ^ C npn 20 ^ C
HaataybaHHaemepaTpyn: Bi5 ^ C do 35 ^ C 3 kpoKoM 0,5 ^ C
BctaHOBJIeHa IucnepcIy Tempepatypi: BiD 0,2 ^ C do 2 ^ C 3 Kpokom 0,1 ^ C
Poboua temnepatypa: BiD 0°C Do 40°C
YacToTaWi-Fi:2,4ΓU,25MBTe.i.r.p.MaKc
XnBHeHHa:230B3miHoro ctpmy/50T
PozMipn: 138× 88× 33 MM
Onc Tepmoctaty - iKoHKn i KhoHKn (IINB. Man. 1)
1-HomepH
2-4ac
3- npniom cnHany Wi-Fi
4-pexnM oxoJooKeHHa 06irpiB
5-3aHaHa TeMnepaTypa
6-3aMOK MEHIO
7-peXnM KaHikyJ
8-TMmuaCOba 3MiHa TemnepaTpyn
9-pekHmHOLD
10-ntoTuHa TeMnepaTpaB KIMHAti
11-HaIaIaTyuBaHnH nporpaMn
12-ycTaHOBKa dATN Ta Yacy
13-Bn6ipФyHKuii,piTBePdKeHnBn6bOpy
14-TmMucoba 3MiHa TemnepaTpy; pyxB hanaWtYaHHJX
15-OBepHeHHB OCHOBHe MeHIO
BctaHOBJIeHHr TepMoCTaty (nVB. mJI. 2)
Onc 3aHboi YactHH TepMoCTata (nB. pnc. 3)
1-KpNkKa KOHTaKTHOro 3'eHaHHr
2-MOHTaXHHIOTBOPN
3-Hanpymok KpinHnH
Mobilha nporpama
Tepmoctatom moxHa kepyBaTu 3a donomoroIO mobiNbHOI nporpaMn Iy iOS a6o Android.
3aBaHTaXTe nporpaMy

QR-koI dIy 3aBaHTaXeHHn npoPam iOS

Onnc peecctpaui Ta BxOy B nporpamy (nB. Man. 4)
Tmucobn - nB. pekm Tmucoba 3MiHa
Boost-ДИВ.peЖIMТиМУССОВАЗMiHa rOДИHIN
KaHikyNil -INB. peKIM KaHikyNil

3.ΓpaΦik (nVB.MaI.7)
1-Додаванн.TIMчасOBOrO npomixKу
2-ckacyBaHHuacOBOrnpomixKy
3-306paXeHnI dHiB
(7 days) 7 dHiB (H→Hd)
(5+2 days) 5+2 (ΠH → ΠT + C6 → HД)
(24 hour) 24-roDInHOBn
KoKeH DeHb MoXHa po3diNtMakcImaJIbHO Ha 6 YaCTnH.
Y 7-ДeHHOMу peKIMi HanaStyBaHnЯ Tempepatyp OndHOrO dHЯ MoxHa cKoJIIOBAtn Ha DeKiNbKa dHIB (dNb. MaI. 8).
PnKnaI:
Tpnbane HaTnckaHna Ha iKoHky yeTbepra, 3'ABNTbCMAHIO IHuNX dHIB, N03HaayTe ix opahxkeBm KNIkHyTTam i NiTBePdItb.
Tmemepatypna nporpama yetbepra konioctbcn noheinok, BIBTOPOK, cepeda.
4.HanaWtYBaHHa (nB.MaI.9)
1-cnndaHHaBOccknxHaIaWtYBaHb TepMoCTata
2-3amnKaHHKnaBiaTpyN
3- kopekciay temnepaotypn havkoNo ( BiD - 3 °C do +3 °Cy kpoKax no 0,5 °C)
4-mód cnctemn onaeneHH/oxoJooKeHH
5-kaJIeHdapHnpeXm(7dHb,5+2,24roD)
5. Ikonka modu tepmoctata
Опалення
OXOIOJKeHH
BIMKHeHO

- IkoHk TeMnepaTyphoro peXnMy
- BctaHOBJIeHHr TempepaTpyn
- NotoUHa KIMHaTHa TempepaTypa
- BctaHOBiTb TemnepaTpy
- BctaHOBJIeHHaTeMnepaTpyn
KopoTkoUacHa 3MiHa TeMnepaTypn BpyuHy.
Y pexmi Auto NOBTOPO HaTNCiTB KHOPI 3MiHn HalaHTyBaHHaTEMnepatyp, Bi6yTebca ABtOMaTuHne 36peXeHHa.
Bynde 306paXeHa iKoHka
Ley pexn 6yde aBtOMaTHUHO nepepBaHO do nepo3anporpaMObHOi 3miHn TemepaTyPi (y BepxHbOMy NIBOMy KyTi 6yde MIRATN Yac, 0o 3aJIINUBCra Do 3MiHN +rOHH) abo Ioro MoXHa nepepBatn, HATNCHyBShn KHOJKy
Pexmm OFF
Pexnmpotn3aMep3aHHn, noctiHo halaTobHa TeMnepaTypa 5^
Y pexmi Auto HATnCHiTb 2 pa3n KhoNky I, y npabomy BepxHbomy Kyti bye 3o6paXeHa TemnepaTypa 5^
IЯ cKacyBaHHapeKIMyHaTNCiTb KHONKy
Pexm TmucoBa 3mHa roDnH
KopoTkoUacHa 3MiHa TeMnepaTyprn BpyHy B iAna3oHi BiD 1 do 9 roOnH.
Y peKIMi Auto hATnCHiTb DOBRO KHOHKnKy▶, y NiBOMy BepXhOBMy KyTi NOUHe MURaTn HanaSTyBaHHa Yacy.
IocTiHa 3MiHa TeMnepaTypn BpyuHy.
BpeKmI Auto haTncHt b KOnKy BHN3y npabOpyu BiO6pa3ntbcra iKoHa HOLD.
BctaHObitb 6aKaHI napameTpN TeMnepaTpyn KhoNkAmN BicbyeTbcra ABTomATnue 36epexeHHra.
BctaHOBJIeHa TempepaTpa 6yue iIaTI BeCb Yac, nOKn He ckacyeTe peKIM HOLD.
3aBocbki HanaTbyHnHa yacy Ta TemepaTypn Taki:
BIDNohejlkAdoPiTHNci
| Tempepatурни зminи час Tempepatура | |
| P1 6:30 20 °C | |
| P2 8:30 16 °C | |
| P3 12:00 16 °C | |
| P4 14:00 16 °C | |
| P5 16:30 21 °C | |
| P6 22:30 7 °C |
BID Cybotn Do Heini
| Tempepatуprhi зminи час Tempepatура | |
| P1 7:30 20 °C | |
| P2 9:30 20 °C | |
| P3 11:30 20 °C | |
| P4 13:30 20 °C | |
| P5 16:30 20 °C | |
| P6 22:30 15 °C |
PiccbiyBaHnIcnpeJ
HaTnCKaHHm 6yIb-koI KhoIKN 6yIe nicBiyBaTncB nCpIe npotraom 15 cekyHd.
IhwiTexhiHHaatayBaHHa
HaTnchItb Ta npntpmaTe KhoNky npotraGM 5 cekyHd.
IobtopHnHaTnCKOM KhoNkBn6paTe 3 nepeJIueHnx HxKue cyHKci, npaMeTpBCTaHOBIOIObCra IOBTOpHM HaTnCKaHHM KHOPOK
CnoJyueHHa Tepmoctata 3 wifi (COFI)
HaTnCHiB Ta npntpmaTe KhoNky pOToTgOM 5 cekyHd.
Notim HATnCHiB KHONKy pOToYROM 3 cekyHd.
Будze зображени E2 ta мигатиme iokнka. y mobiNbHi nporpami 3aBepwiTb cnolyuehnЯ Tepmoctata.
ДиВ.Вka3iBKN CnoIyuEHHa TepMoCTaTa 3 MepeXoIO wifi Дя KepyBaHnA 3a DonomoroIO MObilbHOI nporpaMn.
HanaatybaHHpeXMy onaJIeHH/oxoJodKeHH
HaTnCHiItb Ta npuTpmaTe KhoNky IpoTgrom 5 cekyHd.
HaTnChiTb 1 pa3 KhoNky
Повторим натуckом конок ---надаштуге рек imm onалени (HEAT) abo oxолджени (COOL).
PiTBePitb KHOIO
BcTaHOBJIeHHaBIXnJIeHHaTeMnepaTyprn dI FF
Диспеся (rictepe3nc) -е pi3nцЯ TemnepaTyp mixk TemnepaTpoIO BBIMKHeHH Ta BmKHeHH. HanpNKnaI, kIoo BCTaHOBHTu TemnepaTpy B CnCTeMI onaJIeHH Ha 20 ^ C i dincepciio Ha 0,2 ^ C , TepMoCTat noUHe npauOBATN, kIoo Temnpa-tya B npimiiueHHi onyctntbca do 19,8 ^ C , i BmKHeTbcra, kIoo TemnpaTpa DoocrHeHa 20,2 ^ C
HaTnchItb Ta npntpmaTe KhoNky POn6JIn3Ho 5 cekyHd.
HaTnCHiB 2 pa3n KhoNky IaIOBTOpHm HaTnCKOM KHONoK HauTyIte Heo6xidi napameTpni(Bid 0,2 C do 2 C y kpoKax no 0,1 C).
PiTBePdiTb KHOIOU
KopekciHaBkoHnHbOi TemnepaTypn (CAL)
Датунк Temператув В Термocтатi Вже 6уВ BiДКалIбрOBани пд чс Виpo6HnTBA, ane Дя ONТIMi3aцii моЖнБ BiДКалIbpyВATи Temператув B KMHaTI, HAnp. 3a etaJOHHm TepMometpom.
HaTnCHiTb Ta npntpMaTe KhoNky pOn6JIn3Ho 5 ceKyHd.
HaTnchItb 3 pa3n KhoNky HAI NOBTOpHIM HaTnCKOM KHOJOK HAnaTuYIte Heo6xidi napameTpni (Bi - 3 ^ C do +3 ^ C y kpkox no 0,5 ^ C ).
PiTBePdiTB KHOIO
CnHxponi3auiy (SYNC)
HaTnchItb Ta npntpmaTe KhoNky nOToTgrom 5 cekyHd.
HaTnCiHb 4 pa3n KHONky HAI NOBTOPHM HAToNCKOM KHONOK HanaYrIte:
ON- yac 6yde abTomauHo cHxpoHi3ObaHo 3 Mepxeo Wi-Fi;
OFF - уас He 6ynde cnHxpoHi3ObaHo 3 MepeJeo wifi aIe Heo6XiIHO HaIaStYBaTn napaMeTpN BpyHy.
IiTBepePiTB KHONKOIO
Bepcira softaru
HaTnchItb Ta npuTpmaTe KhoNky npotraRom 5 cekyHd.
HaTnCiHtB 5 pa3iB KhoNky,3b6pa3ntbc8 Bepci nporpaMHoro 3a6e3neueHHa TepMoCTata.
IJIa NOBepHeHHHaTNCiTb KHOJKy
Ск��данны Термocтata (rESE)
HaTnchItb Ta npntpmaTe KhoNky pOToTgrom 5 cekyHd.
HaTnchItb 6 pa3iB KhONky▶, 3o6pa3ntbcra RESE.
HaKmItb KhoNky PRG,6ynde 3o6paKeHo--
3Hoby HaTnCHiB KhONky PRG, MeHIO TepMoCTaTa CKNHeTbCra Ta aHyIIOUToBcra HanaWTOBaHi napaMeTpN.
3aMkaHnKnlaBiaTpyn
CTnCHiTb Ha TepMoCtati KhoNky PRG npu6Jn3Ho Ha 3 cekyHn.
Bid6ytdbc3a6nokybaHHya cix KHOOK,Ha dncnJIeI TepMoCTata 3JIbA Habepxy 3amrae LOC i 6yde 3o6paXeHa IKOHka
UO6 cKacyBaTn 3aMOK, HATNCHITb 3HOBy KHOJky PRG npotraom 3 ceKyHd, 3amirae UNLO.
HanauTyBaHHa 3aMka y nporpaMo6iNbHnKa:
-akTnBaui 3aMka, -deakTnBaui 3aMka
PonepeJxehn:
Якwo Bn akTbyeTe 6IokyBaHn3a DoNOMOIO MOBilbHOI nporpaMn, Ioro TaKoK MoJHa cKacyBaTu 3aHIM YncnOM 3a DoNOMOIO KhoNk PRG Ha TepMoCTaTi.
IorJra Ta TexHicHe 6cnyroByBaHHa
Bupi6 po3po6leHn TAK, 0o6 HadiHIO cIyKIN IbpoTAROM 6aRaTbOx PokIB 3a yMOBN npabNlboHO NOBOJKeHH. Tyr 3haxoINTbcra KeJIbka pad nIpaBnIbHoro KOpIMTyBaHH:
-
Ipeed TmM,Як понete Виробom КористуВаТИСЕ YВАЖно почпайт eHCTpyKciIO KOPINSTYBAчa.
He niDaaBai Te Bnip6 BnNBy npAix COHcHnx IpomeHb, CnIbHO XOJOny Ta BOIOrn, a TAKoK p3kX 3mH Tempeatypn. Lc 3HN3nlo 6 TouHicTb cKaHyBaHHa.
He po3taoobyte Bnp6 y Micx, cxnIbHnx do Bi6paui Ta yapib - BOHMOxyTB N0WKODHTN Ioro.
He niDabai Te Bpi6 HaidMipHomy Tncky, ydapaM, nny, BncoKi TeMnpaTpyi abo BOnorocti -e MoKe npN3BecTN Do HecnPabHocti Bnpo6y, ckOpouenHa TepmiHy cny6b, noWKoJxehnHa 6aTaapeKni i DeOpMaui II pIactNKOBnx YaCTnH.
He niDaaBte Bnip6 douy a6o BOIorocti, kpanlma 60p3kam BoN.
He nomiuae Ha Bnpi6 XoJne DxepeNo BiKpntoro BorHIO, HnP. 3anaJeHy CBiuKy Ta iHwe.
He po3miuye Bpi6 y micx, de e heocTaHi niotik nobitpr.
He BCobyTe y npocTip BeHTnlaicBnpo6y KoDnHex npedMetib.
He BtpuayTecb y BHyTp1iHi eJekTpNHi KOHTypn Bnpo6y - BN MOKeTe NOIkoDInTu Ioro Ta aBTOMaTnUHO BtpaTnT rapaHtio. Bnpi6 NobHHe npeMOHTyBaTu NIIe KBAJIΦIKOBAHm φaxIBEcb. -
Дя чиши СУКОРИСТОВЕ ВОЛORY, MЯг КУ RAнчIPК. He BИКОПИСТОВЕ розунніки, Hi миюci зхODи - можутб пошкразати пл actmacobi частни Та порушпіе щелктучни контypи.
He 3aHypioTe Bnpi6 y BOy nu iHsi piINH. - Ykso Bnpi6 noKoJKeHn a6o HeCnpaBn, He BnKOHyTe peMOHT cami. BiNecitb Ioro B Mara3n, De BN Ioro npnd6aHn.
- Léi npictpiH He npiahueHn dIy KopncTyBaHHa ocobam (BkIIOHO iTei), Iy KOTpix φi3nua, nouyTTeBA uH pO3ymoBa He3i6HicTb, uH He IOCTaTOK IOCBiDy Ta 3HaHb 3a6OpOHc Hm 6e3neuHO KopncTyBaTnCra, kUTo Taka ocoba He 6yde NiD DOrIaOM, uYkUo He 6yIa npOBedeHa dIy HeIHCTpyKTax BIDHOcoKopnc-TyBaHHa cNoXHBaueM BiINOBIDHO ocOboIO, KOtpa BiINOBIAe 3a ii 6e3neuHicTb.
Heo6xioDnBHTncs3aDITbMnTa3a6e3neuHTn,063npicTPOEm He rpaHsc. IONEPEIXEHH: 3MicTcIbOrO nocibNka MoKe 6yTu 3MiHeNo 6e3 nonepedhboTo NOBIDOMJIeHH-uepe3 06MeXeHi MOKJIINBOCTi DpyKy BIO6paXeHi CmBOnn MOKytb DeIo BIDPi3HrTncsB iD BIO6paXeHb Ha dncnle-i -BMt cIbO rnoocibNka He moXHa BiTbOPIOBAtn 6e3 3roOn BnPo6Nka.

He Bnkyte eektpnhi npncptoi k HecopTObHi KOMyHaJIbHI BiXoH, KopntyTeCB Miczma 360py KOMyHaJIbHNx BiXoID. 3a aKtyaJIbHOIO IH-ΦopMaIeIO npo Miczra 360py 3BepTaHTecb Do yCTAHOB 3a Miczem npoxnBaHHra. Kaio eektpnhi npncctopo' po3MiueHi Ha MiczX 3 BiXODAMN, TO
He6e3neuHi peOBOHn MoKytb npOHkATn Do Ni3eMHnx Boi i icTaTncb Do XapOBOrO obiry Ta nooKOJkyBAtn Bawe 3dopOB'
LIM iDnpnEMcTBo EMOS spol. s r.o. nporonoye, 0o Tn paoobnaadHnP56201 Biinobidae DnpeKtBam 2014/53/EU. Nobn TeKCT EC nporoloennIpo BiINOBIDHcTB MoJHa 3NaHTn Ha cboMy caTi http://www.emos.eu/download.
RO|MD | Termostat
Regim anti-ight, temperatura constanta 5^
MoHTaXbT Tp86Ba Da ce N3BbPshn OT npabocnoc6Ho JInce!
No BpeMe Ha MOHTaJa cIeBaiTe npINOxKIMTe CTaHApTn.
Texnueckn cneunpkauu:
Преевский Товар: Мас. 230 V AC; 6 A поpeзICTИBEн Товар; 2 A поИнДуКТИВЕн Товар
He MoHTnpaIe TepMoCTaTb 6n30cT Do n3ToUHnHa Ha ToJIInHa (HaNP. TeJeBn3Opn, paNaTOpn i XnaJInHnCi) nn 6n3o Do Bpata. HApuBaHaTe Ho Ta Te3n IpeDnscAHn BOIN Do He npabInHO peryJnPaHe Ha TempepaTypaTa B NOMEueHneTo.
EneKtpnuecka cxema Ha cBbp3BaHe:
Cxema Ha cBbp3BaHe Ha nomnata/MOTOpn3npaHn KJanaH
CxemaHa Cbbp3BaHe Ha nooBO OToPJIeHne
Cxema Ha CBbp3BaHe Ha KOTeJ

HacTpoBbAHe Ha YacOBHnKa N KaJIeHdapa
HaTnCHHeTe 6yToH CTOHOCHTne 3aNoUHaT da MmRaT.
I3noJ3BaIte 6byToHITe 3aHaCTpoiKa Ha cIeHNITe npaMeTpN (3aIbpxKaHeTo Ha 6byToHa yckopra Na pOMHaTa Ha cTOnHOCTTa):
IeH-Meceu-ToiHa-Yac-MnHyTa.
IOTBbpeTe 3aandaehata CToHocCT HATnCKaHe Ha
3a da npekpatnte HactpoKaTa, HATNCHe 6yToHa nn n3uKaaiTe 30 cekyn.
Cne KaTo HacTpoBaHeto e 3aBbPseHo, Ice Ce NOKaKe TekUanr Homep Ha DeH:
1-NoHeeJIHHK
2-BtopnK
3-Cpa
4-YeTBbpTbK
5-NetbK
6-Cb60Ta
7-HepeJ
PA60THN PEXKIMN
PexnM ,BaKaHcNJa
3aIaBa NocToHnHa TeMnepaTypa 3a npOdbJnxKeTJeH nepNoD OT BpeMe.
3aIpbkTe (5 cekyHn) 6byToHa ; cToHocTtHa BpeMeTo ige 3anOHe da npemrBa.
OcbboTe 6yToHa To HATnCHTe OTHOBo 3a 5 cekyn.
Lc ce noa Hkohata 6poT ha dHnte 3aNoyHe da Mira.
HeKoJIkoKpaTHo HaTnCHTe 6yToH 3aJa 3aJaTe 6poA dHn (OT 1do 99).
IOTBbpeTe 3aJaHeHaTa DHeBHa CToHocCT C HaTnCKaHe Ha TcOHTTa Ha Tempepatpata 3apOHe da Mira.
HeKoIkoKpaTHo HaTnchTe 6byToHa A3a Da 3aJaTe TeMnepaTypata.
IOTBbpeTe c HATnCKaHe Ha,IKoHaTa 1e NOyBN.
Ako nckate da ce BbpeTe n da npomeHnte TemnepaTypaTa 3a BaKaHcNoHeh peXIM, HATNCHEte HeKoJIKOKpaTHo 6yToHa A
MoKeTe Da OTMeHHTe BaKaHcNoHHnpeKIM, KaTo HaTNCHe

PeximHaBpeMeHHa npomraHa
KpaTkocpoHa pBuaHa npomHa Ha TempepaTypa.
ДokatoCTeВ abTomatuHepKIM,ИЗПОЛ3BaItebyToHITe,3a npOMeHITe HacTpoiKaTaHaTeMnepaTypaT;CTOINocTTa 6bIe 3ana3eHa abTomatuHNo.
IkoHata 1e Ce IoBn.
To3n pejHm 6bIe aBTOMaTHUHO OTMeHEn OT bPbAra TpoRpaMnpaHa npomHa Ha TeMneparypata (OCTaBauTO BpeMe DO npomHaTa + acOBHNkT Ue ce peDyBaT B rOpHnIAB bTbn) IIN MoKe Da 6bIe OTMeHEn PbUHO qpe3 HATNCKaHe Ha
Pexm OFF (N3KJI.)
PexnIM npOTIB 3aMpb3BaHe, TeMnepaTypa cNkCupaHa Ha 5^
Дokato cTe B abTomatuyeH peKIM, haTucheTe 6yToHa>12x;В rOpHnA Decen bIbI Ie ce nOBn TempepaTypa ot 5^
3a da OTMeHnTe peKIma,HaTnChHeTe

PexmHaMaKpnpaHaBpeMeHHa npomHa
BpemeHnha pUHa npomHa Ha TempepaTpaTa 3a 1do 9aca.
Дokato cTe B aBTOMaTnueH peKIM, 3aIpbXte 6yToHa; hAcTpOiKaTa 3a BpeMe Ⅲe 3anoyHe da Mira B rOpHna JAB bIbI.
I3noJ3BaIte 6byOnHTe 一 3a da 3aJaTe npOdbJIKHTeHOCCTTa Ha npomHaTa Ha Temepatypata, ot 1 do 9 yaca, cbc CTbNka Ha npomHa ot 1 yac.
IOTBbpeTe c HATnckaHe Ha CneT OBa 3aJaTe JKeJHaTa TeMnepaTypa C NOMOuTa Ha 6yToHInTe
OcTaBaUTo 3aIaIeHbpeMe + yacOBnKbT Iue ce peyBaT B rOpHnI JAB bRbJI; MoKeTe Da OTMeHInTe pexIma npexJdeBpeMeHHo, KaTO HaTnCHete
PexH M HOLD (3AaBpXaHE)
NocToHHa pUHa npOMHa Ha TeMnepaTypaTa.
Дokato cTe B aBTOMaTnueH peKIM, HATNCHeTe 6yToHa; 3AДbPXXAHE ue ce IOYBIOI Y BIACHO.
3aJaTe JKeJHaTa TempePaTpa C NOMOuTa Ha 6yToHIne A OToHocTTa 6bJe 3ana3eHa ABTomTuHNo.
3aIaeHaTa Tempeatpa ige ce noIbpxa, IOKaTo peKIMbT HOLD (3AIIbPXAHE) He 6bJe OTMeHeH.
Bcya npomHa Ha nporpaMnpaHaTa TeMnepaTypaT HMa da ce n3BbPn.
3a da otmeHnte peKIM 3AIDbPKAHE,HaTncHeTe
Pexm 3a hactpoika Ha nporpaMa 3a OToJIyBaHe
3aIaBa TeMnepaTpya npe3 cJIeN IeH (6 TeMnpaTyprn npomEn npe3 IeH).
HaTuschete 6yToHa PRG. HomepTa Ha deHЯ 3aNoUHe da MIna (1-7 = noHeeJIHHK do HeeJ).
HaTnucheTe HeKoNkoKpaTHO,3a Da n36peTe dHnte no n36op.
Pporpama „Pa3nUHa 3a BCEK n“-6poT n36paHn dHn Mra
Iporpama ,0T noheJENHK do neTbK" - 12345
Pporpama ,OT c6bota no HeeJra-67 Mnra
Pporpama ,Lya cemmua" - 1234567
I36epete JeknaHaTa nporpama n notBbpeTe c
BpeMeTo Ha IIpbBaTnPOMaHa HTeMnepaTppaTa 3aNoUHe Da Mna; MoKeTe Da HAcTpOte BpeMeBnTe CToHocT Upe3 HeKoJIkoKpaTHo HaTnCKaHe Ha (10-MnHyTHn CTbKn), n CneI TOBa Da NOTBbpDnTe c
CtoHocCTTa Ha TemnepaTypaTa 3anOuHe da Mira; HacTpoTe C HeKoNkoKpaTHo HA ByToHa
P1 Ⅲe ce noBn nOd 3aAedeHata Tempeatypa, KoETo noka3Ba nbpBaTa npomHa Ha TempeatypaTa 3a DeH.
IOTBbpeTe cHaTnckaHe Ha>poDbJxKeTe, KaTo 3aJaTe HauaIoTO Ha BToPaTa npomraHa Ha TemnepaTypata (P2 ue ce noRb NiD TemnepaTypata).
HactpoTe BpeMeTo n TemnepaTypaTa, KaTo CneBate CbUnte CTbnKu KaKTo npn HactpoNkata Ha NpBbata NpOmaHa Ha TemnepaTypa.
IpoBJIxHeI npOeCa, IOKaTO BCnUkInTe 6 TeMnepaTyprHn IpomEHn (P1 do P6) 6bDat 3aJaDeHN.
Φa6pnuHo 3aandaenHte BpeMeHa n TemnepaTpyn ca cneHNTE:
OT noheJHnK do netbK
| Промяна на Temпература Врeme Temпература | |
| P1 6:30 20 °C | |
| P2 8:30 16 °C | |
| P3 12:00 16 °C | |
| P4 14:00 16 °C | |
| P5 16:30 21 °C | |
| P6 22:30 7 °C |
Cb6ota do HeeJia
| ПROMЯHA на Temпература Врeme Temпература | |
| P1 7:30 20 °C | |
| P2 9:30 20 °C | |
| P3 11:30 20 °C | |
| P4 13:30 20 °C | |
| P5 16:30 20 °C | |
| P6 22:30 15 °C |
OcbetneHHe Ha ekpaHa
HaKoToIa e6yToH 0eocBeTn ekpaHa 3a 15 cekyHn.
HaTnchHeTe 6yToH BeHbJ.
I3noI3BaIte 6byOnHTe 3a IpeBkIIOUHTe Ha peKIM OToJIeHne (HEAT) IIN oxJaXdAHe (COOL).
TbpeTe c
HactpoKaHaTeMnepaTypHaTa pa3nka di FF
TempepatnraT nfepehua (xnctepe3nc) npedctabnaB pa3nkaT B Tempepatpata, HeobxOIMa 3a BKIOUbaHe u3KIOUbaHe Ha cncTeMaT. Hapnpemep, ako B peKIM Ha oToPHe He 3aJaHeTa Tempepatypa e 20^ , a dIepeHuaJIbT e 0, 2^ , TepMoCTaTbT Ce BKIOUba, KOrato cTaNHaT a Tempepatypa cnaHne do 19,8°C, I ce u3KIOUba, Korato Tempepatypa Ta DocTuRhe 20,2°C.
HaTnchete npoBJIKHTeJHo 6yToHa 3a OKONo 5 ceKyHdN.
HaTnCHHe 6byToHa 2IbTu N3NoJ3BaJTe 6byToHInTe ,3a Da 3aJaTeCToHocTTa Ha TempepatypHaTa pa3nka (0,2°C Do 2°C Ha CTbKn O T 0,1°C).
TbpeTe c
KannibpupaHa TeMnepaTypaHa OkonHaTa Cpea (CAL)
TemnepaTpyHnTcEH3OpB TepMoCTaTa e KaJIb6pnpaH 3aBOIDCKN, HO MOKe Da Ce N3BbPmI DOnbJIHnTeJIHO KaJIb6pnpaHe, 3a Da Ce ONTUMn3nPa TepMOCTaTbT, HApPIMepeUpe3 cpaBnBaHe Ha N3MepeHaTcAHa TemnepaTypa C TepMometbP 3a CnpabKa.
HaTnchete npoBxHTeJHo 6yToHa 3a OKoI0 5 ceKHyHd.
HaTncheTe 6byToHa BInbTu n N3noJ3BaIte 6byToHnte ,a Da 3aJaTe cToHocTTa Ha KaJIb6pnpaHe (-3 ^ C do +3 ^ C Ha CtbPkN oT 0,5 ^ C
TbpeTe C
CnHxpoHn3aunHa BpeMeTo (SYNC)
HaTnchHeTe npoDbIjKInTeJHo 6yToHa 3a OKONo 5 ceKyHn.
HaTnucHeTe 6yToHa TbTu N3NoJ3BaIte 6yToHnte , 2a Da 3aJaTe:
BKJI. - BpeMeTo aBtOMaTnUHO ige ce cnHxpoHn3npa c Wi-Fi mpeKaTa;
Bbphete ce c HatackaHe Ha
HyιnpaHe Na TepMocTaTa (rESE)
HaTnchete npoDbIxHntHo 6yToHa 3a OKOIO 5 ceKHydN.
HaTnchete 6 nbtn 6bytoHa;Ha ekpaHa ige ce nokaKe ,rESE".
HaTnchHe 6byToHa PRG; -- -- 1e ce nokae Ha nncnne.
HaTnchete OTHOBO 6yToH PRG; MeHIOTo Ha TepMoCTaTa 1e Ce Hynipa N BCnUKN 3aJaDeHN CToHOCtN 1e 6bDat n3TpNTN.
3aKlIOUbaHe Ha 6yToHnTe
HaTnchHeTe npoIbJIxHTeJIHo 6yToH PRG 3a oKOJIo 3 cekyn.
Bcun6bytoHn 6bDat 3aknoyeH, TepmoctaTbT 7e Mira LOC B rOpHna JAB bIHa ekpaHa n 7e ce nokae NkOHata
3a da OTMeHnTe 3akIIOUbaHeTo, 3aIpbXkTe OTHOBo 6yToHa PRG 3a OkOto 3ceKyni; UNLO 7e 3anOuHe Da Mna Ha ekpaHa.
HactpoKaHa 3aKJIouBaHeTo B MoBnIHoto npInIOxJHe:

- aKTNbUpaHo 3aKJIIOUBaHe, - DeaKTNbUpaHo 3aKJIIOUBaHe
BHIMAHNE:
Ako aKTHBnUpate 3aKnIOUbaHeTo B npNIOKeHneTo, 3aKnIOUbaHeTo MoKe da bDe OTMeHeNo n Upe3 ByToHa PRG Ha TepMoCTata.
06cnyxbahe n npdpbxxka
UpeT e npoeKtpaH da pa60Tu 6e3npo6mHo B npoBJxKeHne Ha MHoro roHN, ako ce n3noJ3Ba npabuInHO. Po-dony ca daJeHn HAKO npenOpbKn 3a npabuHa ekCnIooataun:
- PpOyETe BHNMaTeJHNO pBKOBOcTBOTo, npei Da n3nON3BaTe npOdyKTA.
He n3naarte npodykta Ha npka cIbHueBa CBeTnHa, npekaJeHO Hncka TemnepaTypa, TBbpE BnCOKa BnaXHoc T pe3Kn IpomEn Ha TemnepaTypa. ToBa 6n HamaNIO TOHOCCTTa Ha n3MepBaHe.
He MoHTnpaIte ypeHa Ha MeCTa, KbTeTo e Bb3MOxH0 Da NMa Bn6paCINu YdApN - Te MoXe Da rO NobpeJrT.
He nojnaarTe ypeHa Bb3dEiCTBnETo Ha 3NaHTeHN MexaHnHn CnH, yapn, npax, BnCoka TeMnepaTpya, IbJN INI BnAaXHOCT-Te MoRat da npuHnT Heu3npabHocTN, Da cbKpTaT JHBota Ha 6aTePnITE, Da nobpeJr 6aTePnITE, KaKTO n Da deOpMnpat NlactMacOBte qactn.
He n3naIte ypeHa Ha IbJd Nn BncoKa BnaXHocT, Kaeua Nn npckaua BOda.
He nocTaby Te Bbpxu ypea n3ToUHnHa oTKpTn PnaMbun, HapnPme 3anaJIeHN CBeUNn np.
He noctabraye ypea Ha Mecta c orpaHueHa znpKyaIaIra Na Bb3dyxa.
He BkapBaIte UyKIn TeJa BbB BeHTnlaCIOHHTe OTBOp Ha ypeJa.
He npabete Hnio NO BbTpewHnte eJeKtpueckn BepuHa ypea-Bb3MOxHo e da ro nobpeinte, npi Koeto rapaunra aBtOMaTHUHO ce npekpaTBA. YpeBb Tp8Ba Da ce peMOHTnpa cAmO OT TexHnC hXHHata KBaINΦnKaunr. -
Почистваши урета с мека, лесу habлажнения кьрп. He n3ползваши ра3творпітел ил поочистваши прени в - Te moratда ИЗдpackот пл actmacobinte чastи ил д р dedизвikат корозя по eilektpnuecknte Вериги.
He notanrte ypea BbB Boga nn npyra Teuhoct. -
Пи повраза илдесфekt Ha ураза He правete onntu da ro pemoHTnpate.празаTe ro 3a peMOHTВТьрROBCKnЯ obeKT,OTKbDETo e 3aKyneH.
ToBa yCTpoiCTBO He e npedHa3HaueHO 3a H3PON3BaHe OT IuCa (BKnIOUHTeJIHO deua), uHnTO cH3NueCKn, cETNBn HnIy UMCTBeHN CNOcO6HOctn, KaKTo n IuNCata Ha ONIT NII N03HaHnra, 6bxa Hm nonpeunIHa 6e3oNaCHOT My H3PON3BaHe. TaKINBa IuIa Tp8Ba Da 6bDat INHCTpyKTupAHn KaDa H3PON3BaT yCTpoiCTBOTO n da ca PoJ HAd3Opa Ha IInCe, OTROBapRyIO 3a TExHaTa 6e3oNaChOcT. DeCuTa Tp8Ba BnHaRn Da Ce Ha6JIouDaBat n Da He Ce DOnycka Da CN INrpaT C yCTpoiCTBOTO.
BHIMAHHE: CbIbpxaHHeTo Ha HAcTOraTO pBkoBOcTBo MoKe Da ce npomeha 6e3 npedn3BeCTne. Iopadn OgrpaHnueHnepn neuata noka3aHnTe Tk cImBOJIH MOrat MaIKO da ce pa3InuBaT OT Te3n Ha ekpaHa. CbIbpxaHHeTo Ha HAcTOraTO pBkoBOcTBo He MoKe Da ce KOnnpa 6e3 pa3peSeHne OT npOn3BoDntTeJI.

He n3xBbpynIte eIektpnueckn ypei n C hecoptnpaHnte DomaknHcN Otna-Dbu; npedabaIte rB nyHKTOBete 3a cb6npaHe Ha copTnpaHn OTnaDbu. AktyaHa IHcpOpMaunr OTHOCHO NyHKTOBete 3a cb6npaHe Ha copTnpaHn OTnaDbu MoKe Da noJyHIne OT KOMPeTeHTHIne MeCTHn oprAHn. PpN n3-
XbBpIaHe Ha eJekTpueckn ypeiHa CMeTnUaTa e Bb3MOxHO B NOIIOuBEHInTe BOi Da IOnaHaT OAnCHN BeIeCTBa, KOnTO CJIeT TOBa Da InpemHaT B XpaHInTeJIHaT BepiRa N Da YBpeJrT 3dPaBeTo Ha Xopata.
C hactoIto EMOS spel. s r. o. deKnappa, ye To3n TIN paNocbOpBXeHne P56201 e B cBoTBeTCTBne C DnpeKtNbA 2014/53/EC. LJIIOCTHnT TeKCT Ha EC deKnapaunra 3a cBoTBeTCTBne MOKe Ja ce HamepHa CJIeHNr INHTepHeT aDpec: http://www.emos.eu/download.
FR | Thermostat
Specifications techniques:
(5+2 days) 5+2 (Lun → Ven + Sam → Dim)
(24 hour) 24 heures
Scheme de raccordement:
(7 days) 7 giorni (Lun → Dom)
(5+2 days) 5+2 (Lun → Ven + Sab → Dom)
(24 hour) 24 ore

Programma Hele week - knippert 1234567


- Important
- Technical specifications:
- Description of the Thermostat - Icons and Buttons (see fig. 1)
- Installing the Thermostat (see fig. 2)
- Description of the Back of the Thermostat (see fig. 3)
- Mobile Application
- Description of Registering and Logging into the Application (see fig. 4)
- Connecting the Thermostat to a Wi-Fi network for Control via the Mobile App (see fig. 5)
- Description of the Main Menu of the Mobile App.
- Schedule (see fig. 7)
- Setting (see fig. 9)
- Thermostat mode icon
- Adjust temperature
- Deleting the Thermostat from the App (see fig. 10)
- User Overview/Password Change/App Update
- INSTALLATION
- Attention:
- Installing the Thermostat
- Placement of the Thermostat
- Wiring Diagram:
- Boiler Connection Diagram
- Expansion Valve/Electric Drive Connection Diagram
- Setting the Clock, Calendar
- WORK MODES
- Holiday Mode
- Temporary Change Mode
- OFF Mode
- Timed Temporary Change Mode
- HOLD Mode
- Heating Programme Setting Mode
- Monday to Friday
- Saturday to Sunday
- Screen Illumination
- Other Technical Settings
- Connecting the Thermostat to WiFi (COFI)
- Switching Heating/Cooling Mode
- Setting the Temperature Differential dI FF
- Ambient Temperature Calibration (CAL)
- Time Synchronisation (SYNC)
- Software Version
- Resetting the Thermostat (rESE)
- Key Lock
- Upkeep and Maintenance
- CZ | Termostat
- Texhi ci neuikaii:
- Onc Tepmoctaty - iKoHKn i KhoHKn (IINB. Man. 1)
- BctaHOBJIeHHr TepMoCTaty (nVB. mJI. 2)
- Onc 3aHboi YactHH TepMoCTata (nB. pnc. 3)
- Mobilha nporpama
- 3.ΓpaΦik (nVB.MaI.7)
- 4.HanaWtYBaHHa (nB.MaI.9)
- Ikonka modu tepmoctata
- Pexmm OFF
- Pexm TmucoBa 3mHa roDnH
- BIDNohejlkAdoPiTHNci
- BID Cybotn Do Heini
- PiccbiyBaHnIcnpeJ
- IhwiTexhiHHaatayBaHHa
- CnoJyueHHa Tepmoctata 3 wifi (COFI)
- HanaatybaHHpeXMy onaJIeHH/oxoJodKeHH
- BcTaHOBJIeHHaBIXnJIeHHaTeMnepaTyprn dI FF
- KopekciHaBkoHnHbOi TemnepaTypn (CAL)
- CnHxponi3auiy (SYNC)
- Bepcira softaru
- Ск��данны Термocтata (rESE)
- 3aMkaHnKnlaBiaTpyn
- PonepeJxehn:
- IorJra Ta TexHicHe 6cnyroByBaHHa
- RO|MD | Termostat
- Texnueckn cneunpkauu:
- EneKtpnuecka cxema Ha cBbp3BaHe:
- Cxema Ha CBbp3BaHe Ha KOTeJ
- HacTpoBbAHe Ha YacOBHnKa N KaJIeHdapa
- PA60THN PEXKIMN
- PexnM ,BaKaHcNJa
- PeximHaBpeMeHHa npomraHa
- Pexm OFF (N3KJI.)
- PexmHaMaKpnpaHaBpeMeHHa npomHa
- PexH M HOLD (3AaBpXaHE)
- Pexm 3a hactpoika Ha nporpaMa 3a OToJIyBaHe
- OcbetneHHe Ha ekpaHa
- HactpoKaHaTeMnepaTypHaTa pa3nka di FF
- KannibpupaHa TeMnepaTypaHa OkonHaTa Cpea (CAL)
- CnHxpoHn3aunHa BpeMeTo (SYNC)
- HyιnpaHe Na TepMocTaTa (rESE)
- 3aKlIOUbaHe Ha 6yToHnTe
- BHIMAHNE:
- 06cnyxbahe n npdpbxxka
- FR | Thermostat
- Specifications techniques:
- Scheme de raccordement:
Brand : Emos
Model : P56201
Category : Thermostat