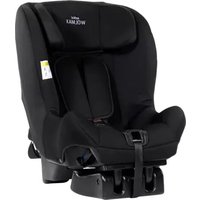
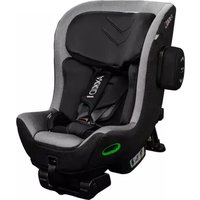
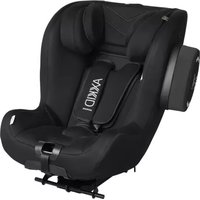
Move - Car seat Axkid - Free user manual and instructions
Find the device manual for free Move Axkid in PDF.
| Product type | Rear-facing car seat |
| Brand | Axkid |
| Model | Move |
| Safety standard | ECE R44/04 |
| Child weight | 9 to 25 kg |
| Recommended age | From about 6 months up to about 6 years |
| Installation orientation | Rear-facing only |
| Installation method | 3-point seat belt + tether anchor straps + support leg |
| Harness | 5-point integral harness with pads |
| Headrest | Height adjustable (3 positions) |
| Recline | 2 positions, reclining block |
| Support leg | Yes, with height adjustment |
| Side impact cushion | Optional, removable |
| Belt locking clips | 2 clips (one with diagonal and lap locking, one with lap locking) |
| Materials | Plastic, UV-resistant fabric |
| Cover maintenance | Machine washable at 30°C, short cycle, do not tumble dry |
| Plastic parts maintenance | Clean with water and mild soap |
| Spare parts | Only original Axkid parts |
| Warranty | 24 months from date of purchase |
| Use with airbag | Prohibited if airbag active; must deactivate |
| Recycling | Recyclable materials according to local legislation |
Frequently Asked Questions - Move Axkid
User questions about Move Axkid
0 question about this device. Answer the ones you know or ask your own.
Ask a new question about this device
Download the instructions for your Car seat in PDF format for free! Find your manual Move - Axkid and take your electronic device back in hand. On this page are published all the documents necessary for the use of your device. Move by Axkid.
USER MANUAL Move Axkid
Rear-facing 9-25 kg with vehicle seat belt and tethers
Instruction Manual
Important information
Read this instruction manual before installing the Move child restraint in your vehicle. For more information and installation videos visit www.axkid.com.
Thank you for choosing an Axkid child seat. Our team has over 30 years combined experience within child safety, and we have done our utmost to make the Move child seat as safe as possible. The Move child restraint is approved according to ECE R44/04, the latest European standards for child safety. To maximise your child's safety it is important that you keep the following in mind;

Read this instruction manual carefully before installing the Move child restraint. If in doubt, contact your retailer who can demonstrate a correct installation. An incorrect installation could endanger your child.

Do not use a child restraint in a seating position where an active airbag is fitted. If you still wish to install the Move in this location the airbag must be disconnected at an authorised service centre. Some vehicles may be equipped with a switch which allows you to manually switch the airbag off. It is important to always check if the vehicle's indicator light shows that the airbag is turned off.

Extensive research has shown that the risk of serious injury or worse is five times greater for a young child when in a forward facing restraint compared to a rearward-facing restraint. In Move your child can travel rearward-facing up to 25kg.

Always use the support leg when installing the Move seat. The support leg is a very important safety feature designed to maximise your child's safety in an accident.

Should you have an accident, no matter how small, your child restraint should be replaced. It may have damage that is undetectable and could seriously jeopardize your child's safety. For this reason Axlid do not recommend purchasing second hand child restraints.

Never leave your child unattended in the car.

Ensure any luggage or loose objects are secured in your vehicle as they may cause injuries to passengers in the event of a collision.

Store this instruction manual in the designated pocket (O) on the car seat.
Contents
The Move child restraint is suitable for use from approximately six months of age, or from when your child can sit up unsupported, up until the age of six. This child restraint can ONLY be installed rear-facing.
Parts 4
Allowed and disallowed positioning of the child car seat 4-5
Rear-facing 9-25kg with vehicle seat belt and tethers 5-9
This assembly can be used for children weighing between 9-25 kg (20-55 lb).
Removing and fitting the covers 9
Care and maintenance 10
Warranty 10
Parts
| A Headrest K Side impact pad connector | ||
| B Integral harness L Tether straps | ||
| C Harness buckle M Belt lock-off | ||
| D Seat belt slot N Grey button | ||
| E Harness adjuster button O Pocket for storage of instruction manual | ||
| F Harness adjustment strap P Zip | ||
| G Recline block Q Support leg | ||
| H Side impact pad R Leg extension button | ||
| I Heels S Yoke | ||
| J Indented vertical line |
Allowed and disallowed positioning of the child car seat

The child restraint can be used on any forward facing passenger seat which has a 3-point seat belt (i), so long as there is no active airbag in place. The child restraint cannot be used with a 2-point lap belt (ii).
IMPORTANT: If you wish to install your Move in a location where an airbag is fitted, then the airbag must be disconnected at an authorized service centre. Some vehicles may be equipped with a switch which allows you to manually switch the airbag off. It is important to always check if the vehicle's indicator light shows that the airbag is turned off.
WARNING: Never use on a seat with an active airbag
WARNING: Never use on rearward or side facing vehicle seats
WARNING: Air bags are designed for adults and can seriously harm your child in a crash
Allowed and disallowed positioning of the child car seat.
| Front passenger seat (no active airbag) Yes | |
| Front passenger seat (active airbag) NO | |
| Forward facing seat with 3-point seat belt Yes | |
| Seat with 2-point seat belt NO | |
| Side facing seats NO | |
| Rear facing seats NO |

Never use this child seat in a car that is not equipped with an ECE Reg 16 approved three-point belt.
Rear-facing 9-25 kg with seat belt & tethers
Adjusting the headrest and harness height
Before you install the child restraint make sure that the headrest is at the correct height for your child. The harness, when correctly installed, should be routed from the back of the seat to the front and pass just above your child's shoulders.
In order to adjust the height of the headrest and harness you will first need to detach the harness. Press the harness adjuster button (E) and pull forward on the shoulder straps (not the shoulder pads) to completely loosen the harness.
4 Open the zipper (P) on the back of the seat cover.
5 Unhook the shoulder straps from the yoke (S) at the back of the child restraint.
Unfasten the Velcro® and detach the shoulder pads (B) on the back of the seat.
7 Pull the shoulder pad straps and shoulder straps out from the seat.
8 Squeeze the plastic clip and gently pull the headrest free from the seat.
9 Reposition the headrest at one of the three heights that best suits your child. Push the bottom of the headrest until the plastic clip locks in place.
10 Feed the harness straps (i) through the shoulder pads (ii).
Thread the harness straps and shoulder pad straps through the holes in the headrest to the back of the seat ensuring all straps are at the same height. Connect the two shoulder pad straps using the Velcro®.
12 Reconnect the harness straps to the yoke.
13IMPORTANT! Make sure the harness straps pass through the same hole height positions on the headrest and the seat. IMPORTANT! Ensure the harness is routed between the seat and the support leg. The harness MUST NOT pass over the support leg's horizontal bar (i).
14 Make sure the height is correct by placing your child in the seat.
WARNING! Never use this child seat without the shoulder pads. The shoulder pads are an important safety feature.
Positioning the child restraint
The easiest way to lift the Move into the vehicle is with its back first. Place the child restraint in the vehicle with the back of the restraint facing the front of the vehicle.
The heels (I) should be sitting over the edge of the vehicle seat. The indented vertical line (J) on the heel should align vertically with the end of the vehicle's seat. If installing in a small vehicle, or if your child does not require extra leg room, you can instead place the heel upon the vehicle's seat this will also achieve a more reclined position.
Note: When installing Move in the front seat it is possible, but not crucial, for the back of the restraint to have contact with the dashboard.
To adjust the angle of the child restraint, rotate block (G) into one of the two tilt positions. Always choose the most upright position as possible, however your child must be able to hold their head up on its own, and there should be enough recline to ensure your child's head does not fall forward when sleeping. The rule of thumb is that the older the child grows, the more upright the seat can be installed. Please note that once the installation of the Move is complete, it will be somewhat more reclined as it sinks into the vehicle's seat from tightening seat belts and tether straps.
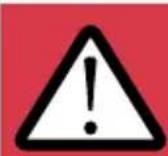
Never install a child restraint in a passenger seat where an active airbag is fitted.
Fastening the vehicle seat belt
Open the belt lock-off clips (M) on both sides of the Move child restraint. Fully lengthen the seat belt until the lap section of the belt is at least 70-80cm (27-32 inches) long. Feed the seat belt through the seat belt slot (D), between the seat cover and seat body until the belt comes out through the seat belt slot on the other side. If you prefer, you can instead feed the seat belt through the seat belt slot (D), then over the top of the seat cover and then through the seat belt slot on the other side.
19 Insert the seat belt tongue into the vehicle's seat belt buckle. Pull the seat belt until all slack is removed along the seat belt route. Secure both the lap and shoulder belt in the lock-off closest to the vehicle's seat belt buckle.
In the lock-off on the opposite side, only the lap belt should be secured.
Attaching the tether straps
21 Unclip the tether straps from the child restraint.
Press the grey button (N) and pull the loop end out to maximise the length of the strap.
To attach the tether straps to an anchor point, wrap the strap around the chosen anchor point and pass the metal clip through the loop.
When installing the Move on a back seat, wrap the tether straps through either the rear of the front seat rails (i), or the hinge of the front seat (ii).
When installing the Move in the front passenger seat, the tether straps should be wrapped around the nearest suitable anchor point (i) that will allow the straps to be tightened fully. Anchor points set further back (ii) can be used and if need be the straps can be crossed over (iii) and even looped together (iv).
26 Reattach the metal clips to each side of the child restraint and pull the free ends of both tether straps until you have tensioned them. Pull each strap once again as hard as possible to ensure the child restraint is secured tightly.
27 Unfold the support leg (Q) out to its maximum angle. Press the leg extension button (R) and extend the support leg until it reaches the floor. Note: The support leg belt may, but does not need, to be fully tensioned.
It is important that you check that the support leg is at an angle over 10^ from the back of the seat. You could check this by ensuring that the support leg is further away from the seat than the vertical line.

Now firmly pull the straps on both sides of the seat to make sure that your seat is fully secured.
If you have installed Move in the back seat you can now move the front seat to a comfortable position.
Note: The back of the child restraint may, but does not need to be in contact with the back of the front seat.
Using the side impact protection pad
Although optional we STRONGLY advise using the side impact pad where possible to add extra protection from side collisions.

Locate the side impact pad connector (K) on the child seat nearest to the side of the vehicle (i.e. closest to the door).
IMPORTANT: Ensure the two triangular arrows (i) on the side impact pad (H) point in the same direction as the triangular arrow on the side impact pad connector (K).
Place the upper of the two oval openings on the underside of the side impact pad over the side impact pad connector. Push the side impact pad against the side of the car seat and slide the side impact pad upwards onto the side impact pad connector. You will feel a slight click as the side impact pad locks in place.
To remove: Push the side impact pad downwards and remove.
Placing your child in the seat
Before placing your child in the seat, ensure you have adjusted the headrest and harness to the correct height for your child (see steps 2 to 14)

Press the harness adjuster button (E) and pull forward on the shoulder straps (not the shoulder pads) to completely loosen the harness.

Press the red harness release button on the buckle and unfasten the harness.

Place your child in the car seat. Put your child's arms in between the shoulder straps so that the straps are hanging over the chest and stomach.

Pull the shoulder straps together and insert the harness tongues into the crotch buckle.

Pull the harness adjustment strap (F). It's important that you always pull the harness straight and central when you tighten the adjustment strap. Failure to pull the harness correctly may cause the strap to jam in the mechanism.
Removing the child restraint from the vehicle
WARNING: Never attempt to remove the child restraint whilst your child is still seated in it.

Open the belt lock-off clips (M) on both sides of the child restraint.
Release the vehicle's seat belt buckle (i) and completely remove the seat belt from the child restraint. Collapse the support leg (Q). Unhook the tether straps' (L) from the child restraint and remove the child restraint from the vehicle. Finally unwrap the tether straps from the vehicle's anchor points and then re-hook the straps on to the child restraint.
Removing and fitting the covers
WARNING: Never use the child restraint without its covers. The covers are an integral safety feature.

Unclip the tether straps from the child restraint and remove the side impact pad (H) if attached.

Press the harness adjuster button (E) and pull forward on the shoulder straps (not the shoulder pads) to completely loosen the harness.

Press the red harness release button on the buckle to unfasten the harness and remove the crotch pad.

Open the zipper on the back of the seat cover. Unhook the shoulder straps from the yoke (S) at the back of the child restraint.

Unfasten the Velcro® and detach the shoulder pads (B) on the back of the seat.

Pull the shoulder pad straps and shoulder straps out from the seat. Squeeze the plastic clip and gently pull the headrest free from the seat.

Unhook the elastic loops (i) on both sides of the head rest and remove the headrest cover.

Release and remove the plastic strip along the front of the child restraint. IMPORTANT! Ensure you pull the plastic strip and DONOT pull the fabric. Store the plastic strip safely for when you need to fit the seat cover again. If you do lose the plastic strip you will need to contact your retailer for a replacement.

Unfasten all the press studs (i),(ii),(iii).

Carefully remove the seat cover from around the harness adjuster housing (i). Feed all straps through the slots in the seat cover and remove the cover.
To fit the cover, reverse the above steps ensuring the harness and shoulder pads are routed correctly (see steps 9-13 for details on attaching the headrest, harness and shoulder pads).
Care and maintenance

The seat cover can be removed and washed in a washing machine at 30^ C on the "Gentle Cycle" programme. Do not put the cover in a dryer as this can damage the cover and the padding may separate from the fabric.
Visit www. axkid.com to find videos explaining how to remove and attach the cover.
Any plastic parts of Move can be cleaned with mild detergent and water. Do not use aggressive chemicals containing solvents etc, as this can cause damage to the plastic and compromise the safety of the child restraint.
All materials used in the Move child restraint are recyclable and should be recycled as per your local legislation. Ask your local recycling centre for advice when recycling this product.
Do not make any modifications or alterations to the Move child restraint other than those described in this instruction manual. Follow the instructions in this manual carefully. Any repairs must be carried out by the manufacturer or agent.
If the seat cover needs replacing ensure only original products from Axkid are used. If other products are used the Move's safety system may be compromised and could lead to severe injury or death in case of an accident.
All materials used have a very high UV-resistance rating. However, UV-light is very aggressive and will ultimately lead to fading of the seat cover. This is not covered by our warranty as it is considered normal wear and tear.
Warranty
The Move child restraint is covered by a 24 month warranty from date of purchase. Ensure you save your receipt and bring it to your place of purchase should you have any warranty issues. The warranty does not cover:
- Normal wear and tear
- Damage due to incorrect use, neglect or accident
- If repairs have been carried out by a third party
Axkid Move
Remover e posicionar as capas 17
Cuido e Manutencao 18
Garantia 18
Partes
Remover e positional as capas
Independent Marketing
www.infobebe.es
info@infobebe.es
(+34)952561000
Polsce
Junior Andrzej Kwapinski
Horbaczewskiego 4-6
54-130 Wroclaw Dh Astra Sklep
Poland Tel: + (48) 713549723
Czech Republic
Domecek pro deti
www.domecekprodeti.cz
info@domecekprodeti.cz
(+42) 0727981815
Romania
SC Baby Car seats
www. axkid.ro
maria@axkid.ro
(+40)0747354747
New Zealand
Clicksafe
www.clicksafe.co.nz/axkid
axkid@clicksafe.co.nz
Tel: (+64) 212 504 215
Suomi
Lastentarvike
www.lastentarvike.fi
info@lastentarvike.fi
(+358)0985205100
Malaysia
SafenSound
www.safensound.com.my
may@safensound.com.my
(+60)358702284
Greece Eλαδα
Serbia Cp6nja
LETO shop
www.letoshop.gr
christos@letoship.gr
(+30)2111026730
Eesti
GreenHansa OÜ
www.beebjpood.ee
riho@beebipood.ee
(+372)53008000
Latvia
Muki
www.muki.lv
jurgis@muki.lv
+371 29282898
Lietuva
Koltryna Group
www.kotrynagroup.com
kotryna@kotryna.nl
(+370)52132254
South Africa
Quality Imports SA & #Carseatfullstop
www.qualityimportssa.co.za
qualityimportssa@gmail.com
+27 117897119
Island
Leiftur
www.leiftur.is
kristmann@leiftur.is
(+354)8212537