BD 304 C Bp - Scrubber Kärcher - Free user manual and instructions
Find the device manual for free BD 304 C Bp Kärcher in PDF.

| Product type | Scrubber |
| Brand | Kärcher |
| Model | BD 304 C Bp |
| Nominal voltage | 36.5 V DC |
| Battery capacity | 5.2 Ah |
| Average power consumption | 240 W |
| Protection type | IP23 |
| Suction air flow rate | 4.9 l/s |
| Suction vacuum | 2.25 kPa (ECO mode: 1.5 kPa) |
| Working width | 280 mm |
| Brush diameter | 280 mm |
| Brush speed | 150 rpm |
| Theoretical cleaning area | 560 m²/h |
| Fresh water tank capacity | 3.0 L |
| Dirty water tank capacity | 3.6 L |
| Dimensions (L × W × H) | 555 × 375 × 1050 mm |
| Transport weight | 20 kg |
| Total weight | 23 kg |
| Sound pressure level LpA | < 70 dB(A) |
| Sound power level LwA | 83.1 dB(A) |
| Charger | Nordelettronica mod. NE316, 100-240 V, 50-60 Hz, 2-1 A |
Frequently Asked Questions - BD 304 C Bp Kärcher
User questions about BD 304 C Bp Kärcher
0 question about this device. Answer the ones you know or ask your own.
Ask a new question about this device
Download the instructions for your Scrubber in PDF format for free! Find your manual BD 304 C Bp - Kärcher and take your electronic device back in hand. On this page are published all the documents necessary for the use of your device. BD 304 C Bp by Kärcher.
USER MANUAL BD 304 C Bp Kärcher

Chairman of the Board of Management

Director Regulatory Affairs & Certification
71364 Winnenden (Germany)
Tel.: +49 7195 14-0
Fax: +49 7195 14-2212
Winnenden, 2018/12/03
Technische Daten
Please read and comply with these original instructions prior
to the initial operation of your appliance and store them for later use or subsequent owners.
Contents
Safety instructions EN 1
Function. EN 1
Proper use. EN 1
Environmental protection. . . . EN 1
Control elements EN 1
Initial Start-Up EN 2
Charging the battery EN 2
Operation. EN 2
Transport EN 3
Storage EN3
Care and maintenance . EN 3
Faults. EN 3
Accessories EN4
Accessories and Spare Parts . EN 4
Warranty EN 4
EU Declaration of Conformity. EN 4
Technical specifications. . . . . EN 4
Safety instructions
Before using the appliance for the first time, read and observe these operating instructions and the accompanying brochure: Safety information for brush cleaning units, 5.956-251.0.
Hazard levels
DANGER
Pointer to immediate danger, which leads to severe injuries or death.
WARNING
Pointer to a possibly dangerous situation, which can lead to severe injuries or death.
CAUTION
Pointer to a possibly dangerous situation, which can lead to minor injuries.
ATTENTION
Pointer to a possibly dangerous situation, which can lead to property damage.
Battery/charger
△DANGER
- You may recharge the battery using only the original charger provided with the appliance or a charger approved by KÄRCHER.
- Check charger, mains cable and battery pack for damages before every use. Do not use damaged devices and get the damaged parts repaired only by experts.
- Do not use the charger if dirty or wet.
- The mains voltage must match the voltage mentioned on the type plate of the charger.
- Do not operate the charger in explosive environment.
- No metal parts may touch the contacts on the charger, risk of short circuit.
- Use the charger only to charge approved battery packs.
- Insert only clean and dry battery packs on the adapter of the charger.
-
Do not charge batteries (primary cells); risk of explosion.
-
Do not charge damaged battery packs. Replace damaged battery packs.
- Do not store battery packs along with metal objects; risk of short circuit.
- Do not open the accumulator.
- Do not dispose off battery packs by throwing them into fire or into household garbage.
- Avoid contact with liquids oozing out of defective battery packs. Rinse thoroughly if you accidentally come in contact with the fluid. Also consult a doctor if the fluid comes in contact with your eyes.
Information on storage and transport can be obtained from your Kärcher aftersales service.
Symbols on the machine

Risk of burns on account of hot surfaces!
Function
The scrubbing vacuum cleaner is used for the wet cleaning of level floors.
A working width of 280~mm and a capacity of 3 l for the fresh water tank enable effective cleaning of small areas.
The device is powered by an interchangeable battery.
Note:
The appliance can be equipped with various accessories depending on the cleaning task.
Please request our catalogue or visit us on the Internet at www.kaercher.com.
Proper use
Use this appliance only as directed in these operating instructions.
- This appliance is suited for the commercial use, e.g. in hotels, schools, hospitals, factories, shops, offices, and rental companies.
- Do not use the appliance on inclines.
- The appliance may only be used for the cleaning of hard surfaces that are not sensitive to moisture and polishing operations.
The application temperature ranges from +5^ to +40^ .
- The appliance is not suited for the cleaning of frozen grounds (e.g. in cold stores).
- The appliance may only be equipped with original accessories and spare parts.
- The appliance was designed for the cleaning of floors inside or of covered surfaces.
- The appliance is not intended for the cleaning of public traffic routes.
The appliance is not suited for the use in potentially explosive environments. - Use the charger in a dry environment only.
- Do not open the charger. Get repairs done only by authorised experts.
Environmental protection
The packaging material can be recycled. Please do not place the packaging into the ordinary refuse for disposal, but arrange for the proper recycling.
Old appliances contain valuable recyclable materials that should be recycled properly. Batteries, oil, and similar substances must not be released into the environment. Please dispose of your old appliances using appropriate collection systems.
Remove the integrated battery prior to disposing of the appliance and dispose of properly!
Electrical and electronic devices often contain components which could potentially pose a danger to human health and the environment if handled or disposed of incorrectly. However, these components are necessary for the proper operation of the device. Devices marked with this symbol must not be disposed of with regular household rubbish.
Notes about the ingredients (REACH)
You will find current information about the ingredients at:
www.kaercher.com/REACH
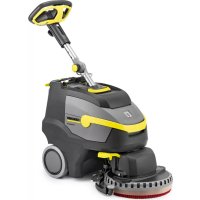
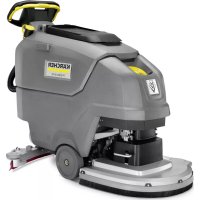
Control elements
Figure 1, see cover page
1 "ECO mode" button
2 "AUTO" button
3 Display
4 Suction off/on button
5 Key detergent solution
6 Steering device unlocking mechanism
7 Steering device
8 Safety button
9 Detergent solution filter
10 Cover waste water tank
11 waste water tank
12 Fresh water tank
13 Carrying handle
14 Disc brush
15 Vacuum bar
16 Power switch
17 Vacuum bar rotary knob
18 Battery
19 Release, battery
Display
Figure 2, see cover page
1 Hour glass, flashes when the operating hour counter is running
2 Operation duration, hours
3 Operation duration, minutes
4 Battery charging state, bar diagram
5 Battery charging state, in %
Symbols on the machine
| Open | Release, battery |
| Carrying handle | |
| Vacuum bar raised | |
| Vacuum bar lowered | |
| Drain opening, wastewater | |
| Do not swivel the device up- wards when the tanks are full. |
Initial Start-Up
Fully charge the battery prior to initial commissioning.
Charging the battery
Figure 3, see cover page
1 Switch charger
2 LED red, charging state glows red: Battery is being charged off: Battery is fully charged
3 LED green, power supply
Set the appliance switch to "0".
Squeeze the battery unlocking mechanisms and pull the battery out of the device.
Plug in the mains plug of the charger.
Position the charger switch to "1" - the green LED glows.
Insert the battery into the charger - the red LED glows.
The battery is fully charged if the red LED goes out.
Note:
The battery can remain in the charger after the charging process has finished.
Operation
Insert the battery
Remove the battery from the charger.
Push the battery into the device until unlocking mechanisms snap into place.
Install the brush
Figure 4, see cover page
Swivel the device up.
Push the brush onto the driver as far as it will go.
Adjusting the steering device
Set the appliance switch to "0".
Pull the steering device unlocking mechanism upwards and hold it.
Change the inclination of the steering device.
Release the unlocking mechanism for the steering device.
Removing the waste water tank
Set the appliance switch to "0".
Figure 5, see cover page
→ Swivel the two locks downwards.
Lift the waste water tank.
Fill fresh water reservoir
CAUTION
Risk of damage. Only use the recommended detergents. With other detergents, the operator bears the increased risk regarding the operational safety, risk of accident and reduced service life of the appliance. Only use detergents that are free of solvents, hydrochloric acid and hydrofluoric acid.
Follow the safety instructions for using detergents.
Note:
Do not use highly foaming detergents.
Observe the dosing notes.
Recommended detergents:
| Application Deter- | gent | Dosage |
| Everyday cleaner, alka- li-based | RM 743 | 0,5 - 2,0% |
| Everyday cleaner, acidic, for sanitary ap- plications, swimming pools, etc. Removes limestone deposits. | RM 738 | 0,5 - 3,0% |
| Wipe care EXTRA RM | 780 0,5 | - 2,0% |
Figure 6, see cover page
1 Fresh water tank
2 Drain outlet fresh water tank
3 Fresh water tank cover
4 Fresh water reservoir filler neck
Remove the waste water tank.
Remove the fresh water reservoir from the appliance.
Check whether the drain opening has been closed correctly.
Open the cover of the fresh water reservoir.
Pour in water/detergent mixture. Maximum temperature of the liquid 50^
Close the cover of the fresh water reservoir.
Insert the fresh water container into the appliance.
Attach and lock the waste water tank.
Cleaning
Figure 7, see cover page
1 Vacuum bar rotary knob
2 Power switch
3 Safety button
4 "ECO mode" button
Turn the rotary knob for lowering the vacuum bar in an anti-clockwise direction - the vacuum bar is lowered.
Set the appliance switch to "I".
Pull the safety switch towards the steering device - the brush drive and suction are switched on.
The device will move forwards.
Selecting the cleaning performance
At the start of cleaning, the device is in ECO mode. "ECO" is shown in the display. The "ECO mode" button switches back and forth between ECO mode and increased cleaning performance.
Release the safety switch.
Press the "ECO mode" button.
Pull the safety switch towards the steering device.
Dispensing the detergent solution
Press the Detergent solution button when the device is running.
The dosing is shown in the display. Dosing is continued by one stage each time the button is pressed.
Figure 8, see cover page
1 Detergent solution dosing OFF
2 Detergent solution dosing stage 3
Suction during reverse movement
Press the steering device downwards so that the brush is raised - the vacuum bar turns to the front side of the device.
Lower the device.
Pull the device backwards.
Cleaning without suction
Set the appliance switch to "0".
Swivel the vacuum bar centrally under the device.
Raise the vacuum bar, press the vacuum bar rotary knob in and turn it clockwise.
Set the appliance switch to "I".
Press the Suction button - suction is switched off after approx. 5 seconds.
Perform the cleaning operation.
Complete cleaning
Release the safety switch.
Set the appliance switch to "0".
Raise the vacuum bar, press the vacuum bar rotary knob in and turn it clockwise.
Pull the steering device unlocking mechanism upwards and hold it.
Put the steering column in a vertical position.
Release the unlocking mechanism for the steering device.
Emptying the waste Water tank
Note:
If the waste water tank is full, the float closes the suction channel. The suction operation is interrupted. Empty the waste water tank.
△WARNING
Please observe the local provisions regarding the wastewater treatment.
Switch the device off (see section "Completing cleaning").
Figure 9, see cover page
1 L o c k
2 Cover dirt water reservoir
3 waste water tank
4 Fresh water tank
5 Closure waste water tank
→ Swivel the two locks upwards.
Remove the lid.
Remove the waste water tank (see section "Removing the waste water tank").
Pour out dirt water.
Open the lock.
Completely empty the tank.
Rinse the waste water tank with clear water.
Close the lock.
Carefully attach the waste water tank onto the fresh water tank. Do not damage the components marked with arrows.
Swivel the locks upwards.
Attach and lock the cover.
Emptying the Fresh Water Reservoir
Remove the waste water tank (see section "Removing the waste water tank").
Figure 6, see cover page
1 Fresh water tank
2 Drain outlet fresh water tank
3 Fresh water tank cover
4 Fresh water reservoir filler neck
Remove the fresh water reservoir from the appliance.
Open the drain opening of the fresh water tank.
Pour out the cleaning liquid.
Close the cover of the fresh water reservoir.
Insert the fresh water container into the appliance.
Transport
CAUTION
Risk of personal injury or damage! Mind the weight of the appliance during transport.
Set the appliance switch to "0".
Pull the steering device unlocking mechanism upwards and hold it.
Swivel the steering device into the vertical position.
Release the unlocking mechanism for the steering device.
Push the appliance.
or
Set the appliance switch to "0".
Pull the steering device unlocking mechanism upwards and hold it.
Swivel the steering device into the horizontal position.
Lift appliance by the carrying handle and carry it.
When transporting in vehicles, secure the appliance according to the guidelines from slipping and tipping over.
Storage
CAUTION
Risk of personal injury or damage! Consider the weight of the appliance when storing it.
This appliance must only be stored in interior rooms.
Care and maintenance
△DANGER
Risk of injury if the machine is left running in an unattended state.
Turn the appliance off and remove the battery before carrying out any tasks on the machine.
ATTENTION
Risk of damage to the device on account of water leakage. Empty the waste water tank and the fresh water tank prior to performing maintenance tasks on the device.
Maintenance schedule
After the work
ATTENTION
Risk of damage. Do not sluice the appliance with water and do not use aggressive detergents.
Empty the waste water tank.
Rinse the waste water tank with clear water.
Clean the lid of the waste water container under running water. Clean the float valves with a wet cloth. Flush the opening marked "A" with water. Blow out the opening marked "C" with compressed air.
Empty the fresh water reservoir.
Rinse the appliance: Fill the fresh water reservoir with clear water (without detergent) and let the appliance run for one minute with the brush water supply turned on.
Empty the fresh water reservoir.
Clean the outside of the appliance with a damp cloth which has been soaked in mild detergent.
Clean the vacuum bar, check for wear and replace the suction lips if required (see "Maintenance tasks").
Clean the suction hose.
Clean the brush and check for wear and tear. Minimum bristle length: 10~mm
Charge the battery.
Weekly
Clean the detergent solution filter (see "Maintenance tasks").
Yearly
Have the prescribed safety inspection carried out by an electrician.
Maintenance Works
Clean the suction bar
Figure 10, see cover page
1 Suction bar support
2 Vacuum bar
3 Suction hose
4 Seal
5 Vacuum lip
Swivel the vacuum bar onto the front side of the device.
Pull out the suction hose from the vacuum bar.
Turn the locks by 90^ in an anti-clockwise direction.
Raise the holder and remove the vacuum bar (do not lose the seal).
Rinse off the vacuum bar and suction lips using water and then clean them with a wet cloth.
Check the suction lips.
Turn or replace the worn suction lips.
Reattach the vacuum bar to the device.
Exchanging the brush
Remove the fresh water reservoir.
Remove the waste water tank.
Pull the steering device unlocking mechanism upwards and hold it.
Swivel the steering device into the vertical position.
Release the unlocking mechanism for the steering device.
Tilt the appliance rearward.
Pull out the brush.
Push the new brush onto the driver as far as it will go.
Cleaning the detergent solution filter
Remove the fresh and waste water tanks.
Remove the detergent solution filter and rinse it off using water.
Insert the filter again.
Attach the fresh and waste water tanks.
Frost protection
In case of danger of frost:
Empty the fresh and dirt water reservoirs.
Store the appliance in a frost-protected room.
Faults
△DANGER
Risk of injury if the machine is left running in an unattended state.
Turn the appliance off and remove the battery before carrying out any tasks on the machine.
ATTENTION
Risk of damage to the device on account of water leakage. Empty the waste water tank and the fresh water tank prior to performing maintenance tasks on the device. In case of faults that cannot be remedied using the table below please contact the customer service.
Machine does not start
Set main switch to "1".
If an error message appears on the display, switch off the device immediately and call Customer Service.
Insert the battery into the device correctly.
Read off the charging state of the battery on the display, charge the battery if necessary.
Problems when charging the battery
Make sure the power cable is connected correctly between the charger and socket.
Check whether the charger is suitable for the available power supply.
Error display on the charger
Red LED flashes once
The battery is defective.
Red LED flashes twice or three times Fault in the charger.
Unplug the charger, wait briefly, then plug it back in.
If the fault recurs, call customer service.
Red LED flashes four times
Charger overheated.
Place the charger in a free-standing position so that there is enough ventilation for it to cool off.
Wait until the charger has cooled off.
Battery empty after a brief operating period
Fully charge the battery.
Too little detergent solution
Check the fill level of the fresh water tank.
Increase the detergent solution dosing.
Clean the detergent solution filter.
Poor cleaning performance
Increase the detergent solution dosing.
Set increased cleaning performance.
Check the brush type and the detergent for their suitability.
Replace worn brush.
Poor suction
Empty the waste water tank.
Clean suction bar and suction hose.
Check the lid on the waste water tank for a correct fit.
Check that the lock is correctly fitted in the waste water tank.
Check the lid on the waste water tank for an obstruction.
Clean the float on the lid of the waste water tank.
Accessories
| Accessories Order number | |
| Brush, red 6.670-127.0 | |
| Pad driving disk 6.670-129.0 | |
| Set of suction lips 6.670-234.0 | |
Accessories and Spare Parts
Only use original accessories and spare parts, they ensure the safe and trouble-free operation of the device.
For information about accessories and spare parts, please visit www.kaercher.com.
Warranty
The warranty terms published by our competent sales company are applicable in each country. We will repair potential failures of your accessory within the warranty period free of charge, provided that such failure is caused by faulty material or defects in fabrication. In the event of a warranty claim please contact your dealer or the nearest authorized Customer Service center. Please submit the proof of purchase.
EU Declaration of Conformity
We hereby declare that the machine described below complies with the relevant basic safety and health requirements of the EU Directives, both in its basic design and construction as well as in the version put into circulation by us. This declaration shall cease to be valid if the machine is modified without our prior approval.
Product: Floor cleaner
Type: 1.783-xxx
Relevant EU Directives
2006/42/EC (+2009/127/EC)
2014/30/EU
Applied harmonized standards
EN 60335-1
EN 60335-2-72
EN 60335-2-29
EN 62233: 2008
EN 55014-1: 2006+A1: 2009+A2: 2011
EN 55014-2: 2015
Applied national standards
-
The signatories act on behalf of and with the authority of the company management.
H.Jenner
Chairman of the Board of Management

S. Reiser
Director Regulatory Affairs & Certification
Documentation supervisor:
S. Reiser
Alfred Kärcher SE & Co. KG
71364 Winnenden (Germany)
Tel.: +49 7195 14-0
Fax: +49 7195 14-2212
Winnenden, 2018/12/03
Technical specifications
| Power | ||
| Nominal voltage VDC 36,5 | ||
| Battery capacity Ah | 5,2 | |
| Average power consumption | W | 240 |
| Type of protection | IP23 | |
| Vacuuming | ||
| Cleaning power, air quantity | l/s | 4,9 |
| Cleaning power, negative pressure | kPa | 2,25 |
| Suction performance, vacuum, Eco | kPa | 1,5 |
| Cleaning brush | ||
| Working width | mm | 280 |
| Brush diameter | mm | 280 |
| Brush speed | 1/min | 150 |
| Dimensions and weights | ||
| Theoretical surface cleaning performance | m²/h | 560 |
| Fresh/waste water tank volume | 1 3,0/3,6 | |
| Length x width x height | mm | 555 x 375 x 1050 |
| Transport weight | kg | 20 |
| Total weight | kg | 23 |
| Values determined as per EN 60335-2-72 | ||
| Hand-arm vibration value | m/s² | <2,5 |
| Sound pressure level LpA | dB(A) <70 | |
| Uncertainty KpA | dB(A) | 2.3 |
| Sound power level LwA | dB(A) | 83,1 |
| Uncertainty KwA | dB(A) | 2,3 |
| Charger | ||
| Nordelettronica mod. NE316 | ||
| Nominal voltage | V | 100...240 |
| Frequency | Hz | 50-60 |
| Power Input | A | 2...1 |

www.kaercher.com/REACH
Figure 3, cf. page de couverture
Figure 6, cf. page de couverture
Figure 7, cf. page de couverture
Figure 9, cf. page de couverture
Figure 6, cf. page de couverture
Figure 10, cf. page de couverture
H.Jenner Chairman of the Board of Management
S. Reiser
Director Regulatory Affairs & Certification
Responsible de la documentation : S. Reiser
Alfred Karcher SE & Co. KG
71364 Winnenden (Germany)
Tel.: +49 7195 14-0
Fax: +49 7195 14-2212
Winnenden, 2018/12/03
\section*{Caracteristiques techniques}
www.kaercher.com/REACH
2006/42/CE (+2009/127/CE)
2014/30/UE
Chairman of the Board of Management
S. Reiser
Director Regulatory Affairs & Certification
71364 Winnenden (Germany)
Tel.: +49 7195 14-0
Fax: +49 7195 14-2212
Winnenden, 2018/12/03
Dati tecnici
Potenza
www.kaercher.com/REACH
Bedieningselementen
Set zuiglippen 6.670-234,0

Chairman of the Board of Management
S. Reiser
Director Regulatory Affairs & Certification
71364 Winnenden (Germany)
Tel.: +49 7195 14-0
Fax: +49 7195 14-2212
Winnenden, 2018/12/03
Technische gegevens
Vermogen
www.kaercher.com/REACH
Elementos de mando
Figura 1, vexe contraportada
2006/42/CE (+2009/127/CE)
2014/30/UE
H.Jenner Chairman of the Board of Management

S. Reiser Director Regulatory Affairs & Certification
Responsible de documento:
S. Reiser
Alfred Kärcher SE & Co. KG
71364 Winnenden (Germany)
Tel.: +49 7195 14-0
Fax: +49 7195 14-2212
Winnenden, 2018/12/03
Datasétécnicos
Potencia
www.kaercher.com/REACH
Chairman of the Board of Management

S. Reiser
Director Regulatory Affairs & Certification
71364 Winnenden (Germany)
Tel.: +49 7195 14-0
Fax: +49 7195 14-2212
Winnenden, 2018/12/03
Dados技术和
Potência
www.kaercher.com/REACH
Betjeningesegmenter
Fig 1, se omsgsside
1 Tast "ECO mode"
2 Tast "AUTO"
3 Display
4 Tast Opsugning Til/Fra
5 Knap rensemiddeloplosning
6 Abningsmekanisme, styr
7 S t y r
8 Sikkerhedsafbryder
9 Filter, rensemiddeloplosning
10 Daeksel til snavsevandsbeholder
11 Snavsevandsbeholder
12 Ferskvandtank
13 Baeregreb
14 Skivebørste
15 Sugebjelke
16 Afbryder
17 Drejeknap, sugebjelke
18 Akku
19 Abningsmekanisme, batteri
Display
1 Holder, sugebjelke
2 Sugebjelke
3 Sugeslange
4 T aet n i n g
5 Sugelaebe
2006/42/EF (+2009/127/EF)
2014/30/EU

Chairman of the Board of Management
S. Reiser
Director Regulatory Affairs & Certification
71364 Winnenden (Germany)
Tel.: +49 7195 14-0
Fax: +49 7195 14-2212
Winnenden, 2018/12/03
Tekniske data
Effekt
| Mærkespaending VDC | 36,5 | |
| Akkumulator kapacitet | Ah 5,2 | |
| Mellemste optagne ef-fekt | W | 240 |
| Kapslingsklasse | IP23 |
Sugning
| Sugeeffekt, luftmäng- de | l/s | 4,9 |
| Sugeeffekt,ndertryk | kPa | 2,25 |
| Sugeeffekt,ndertryk,Eco | kPa | 1,5 |
Rengoringsbørste
| Arbejdsbredde | mm | 280 |
| Børsted diameter | mm | 280 |
| Børsteomdrejingnalstal | 1/min | 150 |
Mäl og vægt
www.kaercher.com/REACH
Betjeningesegmenter
2006/42/EF (+2009/127/EF)
2014/30/EU
Chairman of the Board of Management
Director Regulatory Affairs & Certification
71364 Winnenden (Germany)
Tel.: +49 7195 14-0
Fax: +49 7195 14-2212
Winnenden, 2018/12/03
Tekniske data
www.kaercher.com/REACH
Reglage

Chairman of the Board of Management
Director Regulatory Affairs & Certification
Dokumentationsbefullmaktigad:
S. Reiser
Alfred Karcher SE & Co. KG
71364 Winnenden (Germany)
Tel.: +49 7195 14-0
Fax: +49 7195 14-2212
Winnenden, 2018/12/03
Tekniska data
Effekt
| Märkspänning VDC 36 | 5 | |
| Batterikapacitet Ah 5,2 | ||
| Mellersta effektupp-tagning | W | 240 |
| Skydd | IP23 |
Suga
www.kaercher.com/REACH
Hallintalaitteet
Chairman of the Board of Management

S. Reiser
Director Regulatory Affairs & Certification
71364 Winnenden (Germany)
Tel.: +49 7195 14-0
Fax: +49 7195 14-2212
Winnenden, 2018/12/03
Tekniset tiedot
Teho
www.kaercher.com/REACH
Ttoixeia xepipou
Chairman of the Board of Management

S. Reiser
Director Regulatory Affairs & Certification
YITeUbovos Eyypaaw TEkunpiwns
S. Reiser
Alfred Kärcher SE & Co. KG
Alfred-Karcher-StraBe 28-40
71364 Winnenden (Germany)
Tel.: +49 7195 14-0
Fax: +49 7195 14-2212
Winnenden, 2018/12/03
Texvika xapaktnpiotiká
www.kaercher.com/REACH
Kumanda elemanlari

Chairman of the Board of Management

S. Reiser
Director Regulatory Affairs & Certification
71364 Winnenden (Germany)
Tel.: +49 7195 14-0
Fax: +49 7195 14-2212
Winnenden, 2018/12/03
Teknik Bilgiler
www.kaercher.com/REACH
3JemeHbI ynpaBJIeHnA
Pnc.1,cm.06opothyio ctopohy
1 KhoKa «ECO mode»
2 KhoNka «AUTO»
3Ди cп eи
4 KhoIka BkIIOueHnBbIKIOueHnBCaCbIBaHn
5 KhoKa ,PactBOp dIra OuHCTKn"
6 Pyhar pa36IOKINPOBKN HnpaBnaIOUe pyKoTkn
7 HanpaBnaIooa pykoTka
8IpeoXpaHnTeHbHbBbIKNoaTeHb
9 Φиьтpr oунстinteьного pactbopa
10 Kpbuika pe3epByapa rpa3HOBbI
11 PeερByap rρa3Hoi BɔdBi
12 BaK YIcToB BOybl
13 pykoTka IJIa HOSeHnI np6opa
14ДиСКOBаЯшЕТа
15 BcacbBaiouaa nlaactnka
16 BkIkuayateJIb annapata
17 NobopoTna pyka dIpyIynpoBKn BCaCbIbAIOSeI IJIaHKn
18 AkkyMnyTop
19 Pa3bIoknpoBk aKcMnyTopa
Ducnnei
ΦOTO 2, cM. cTpaHnuy cynepeo6noKKn
1 Necouhble yacbi, Miraot npn pa60te Chetuka yacOB 3Knnyataun
2 PpOJONKITEnbHocTb paOtbl, acbI
3ПюдолжнельноctpbaboTb,MHytbl
4 YpOBeHb 3apAaKkMyIaTopa, cToJI-6aTaA DaIarpaMa
5уразовь зараздкн akКуМлЯтopa,В%
CnmbolbHa np6ope
→ PnIMeHHTb npedoxpaHNTbHbI Bbl- KNoHaTeJIb.
Hakatb KhoNky ECOmode).
→ NToTHyTb npedoxpAHnTeHbHbBbl- KInOHTeJIb CTOPOHY HAnpaBIAHOSeI pyKoATrN.
Dznpobka uctraeero pactbopa
→ HauKaTb KhoNky NcCTaIe rO pactBopa BO BpeMa pa6ToI np6Opa.
O3npoBkA OTo6paKaetcHa dncnIee.
C KaXdbIM HaxaTneM KHOPIKn IOn3IpOBKa nepeKlnOyaeTcH Na CLeDyUoUsn ypoBeHb.
ΦOTo 8, cM. cTpaHnuy cynepeo6IoxKn
1O3npoBka YnCTraeero paCTbopa BblKJI.
2ДоэировkaчисяцeropacTBopa,ypoBHeHb3
BcacbBaHHe npn DmXKeHH Ha3a
→ PnkaTb HnpaBnIyUOy pyKoTky BHN3, YTO6bl UeTKN NOHnICb Hd NO-nOM - BCacbBaIOUaŋ NnAHa KnaOBopa- uBaETcK npeDHeC TOpOHe np60pa.
Onyctntb npn6op.
→ TOnrHyTb npn6op Ha3a.
OuNTKa 6e3 BCacbHaHn
YCTAHOBINTb BblKIOUaTeJIb yCTPOIcTBAB NOLOXKeHne "0".
→ IpepeMeCTnTb BcacBlaBIOUyIO nIaHky noI npnbopom B cepeDInHy.
→ PnnoHrT BcacbBAIOUyIOIHaHKy, HkaTb NOBOPOTHyO pyKy I nobepHyTbe ee no YacOBoi CTpeJIke.
YctahOBHTe BBkHouaTeIb np6opaB nOIOXHeH "I".
HaxaTb KHOJky BCacbIBAHnra - BCacblBaHne npekpaaaetcno nCTeueHHnpm.15cekyHd.
→ PpOu3BecTn OuNCTKy.
3aBepwnTb ouHcTk
→ PnIMeHNTb npedoxpaHHTeHbHbB BblKHOaTeJIb.
YCTaHOBNTb BblKIOHateJIb yCTPOIcTBA B NOIOXKeHne "0".
→ PnnoHrTb BCaBIAUyIO nHaHKy, HaxaTb NOBOPOTHyO pyKy u nobepHyTb ee no yacOBoi CTpeJIke.
→ TOnTMyTb pBiyar pa36nokpOBKN Ha-npaBnaIooJe pyKoTkn HabePx n ydepXnBaTb ERO B TAkOM NIOJKeHN.
YcTaHOBnTb pyJeByIO KOJOhKy BepTNKaJIbHO.
OTnyctntb pbuar pa36nokupobkn ha-npablaiooey pykoTKn.
YdaJIeHHe coDEpKIMoro n3 pe3epByapa dIra rpa3HOB BObl
Yka3aHHe:
PnnoHOM6ake DnI rpa3HO BObbl no- nlaBOK 3aKpbBaet BCacbBAoUm KaHaJ. Ppoeccc BCacbBAHn npepbBaetc. OnopoxHNt6akDnI rpa3HO Bobl.
△PENDYNPEKDEHNE
Cobnodaume MecmHbIe npeduncaHua no obaaueHIO CO cmoHyIMU oOaMu.
→ BbIKHouHTb np6op (cm. pa3dien «3a-BepueHne ouNTKn»).
ΦOTO 9, CM. CTpaHnU cypepo6NoKKn
1ФИкcaTopbI
2 Kpbiika pe3epebyapa rpa3Hoi BObl
3 PeερByap rρa3Hoi BOdbi
4 BaK uNCTO BODbl
5 KpbIka pe3epByapa dIra rpa3Hoi BObl
→ NObepHyt b o6a qKcaTopa BBepx.
→ CHrTb KpbIuKy.
→ ChTb pe3epByap nIra3HOBbI (cm. pa3dIe «ChTne pe3epByapa nIra 3HOBbI»).
→ BbInTb rpa3Hyo BOy.
OTKpbItb 3aMOK.
POnHocTbIO onOpOxKNHTb pe3epByap.
→Помытpe3epByapдягязнов BOычSTои BOДо.
3aKpbItb 3anop.
OcToPOxH0 yCTaHOBnTb pe3epByap dIra rpa3HO BODbHa pe3epByap dIra YnCToB ODbI. He NobpeDnTb KOHCTpyK-TNBhIE 3JeMeHTbl, 6o3NaueHHbie CTpeJIKoN.
→ ΠOBePhyTb ΦKcTOpbl BBepx.
YCTaHOBbTb KpbIbKyHaMeCTO N3aΦKcIpOBaTb.
YdaJeHHe coOpJxMOro n3 pe3epByapa dIy uNCTOBoBbI
→ ChTb pe3epByap dIra rpa3HOB BObl (cm. pa3dIe «ChrTne pe3epByapa dIra rpa3HOB BObl)
ΦOT6,CM. cTpaHnuy cynepeo6noKKn
1 BaK uNcToB vOdbI
2 CnBHOe OTBepCTne pe3epByapa nla CBExe BODbl
3 Kpbiuka pe3epByapa nctoBovbl
4 OTBepCTne ДЯЗАЛВАЧТОМ BODJI
BbHyTb pe3epByap IJIa YIcToI BObI n3 np6opa.
→ OtkpbItb cInBHOe OTBepCTne pe3epBy-apa dIra YNCTO BODbl.
→ BbIINMbMOUyIO KNUKOCtB.
3akpbItb KpbIuKy pe3epByapa nI-CTOIBoBbl.
BctabntbpeepByap nra uCToBdoB aannapat.
TpaHcnpOpTnPOBka
OCTOPOXHO
Onachocmb mpaMbI u nopekdeHua!
Obpaumb bHumaHue Ha bec ycmpoucm-
ea npu mpaHcnOpmUpoKe.
YCTaHOBnTb BBIKIOHATeJIb yCTPOIcTBa B NOIOXKeHne "0".
→ TOnTMyTb pByar pa36nOKIpOBKn Ha-npabJHOuei pyKoTkn HabePx n ydepXnBaTb eO B TaKOM NIOJKeHN.
YctahOBHTb HnpaBJIyUOyIpyKOaTky B BEPTKJaTbHOE NOIOXeHHe.
OTnyctntb pbyar pa36IOKINPOBKn Ha-npabnIOUe npykoTkn.
→ PtepeBnHyTb np6op.
NNN
YcTaHOBnTb BBkNIOuHaTeJIb yCTpoIcTBA B NOIOXKeHne "0".
→ TOnTMyTb pBvHar pa36nOKIpOBKn Ha-npabNIOUeI pyKoTkn HabePx n ydepXKNBaTb eO B TaKOM NNoJKeHN.
YctahOBnTB HanpaBJIIOUyIpyKoTky B TROP3OHTaNbHOE NOJXeHne.
BbIOKO pOAnHrTb npIbOp 3a pyKu npeHeCTn.
→Пи nepeBo3ke annapaTaВТраHcnpOpTHbIX CpeIcTBax CJIeIyET YUHTbIBaTbDeIcTBYIOUIme MeCTHBIE TOCyApCtBeHHbIe HOpMbI,HaNPaBJIeHHbIe Ha 3a-NTyOT CKOJIbXeHnI ONpOKnDbIbAHNIA.
XpaHeHne
△OCTOPOXHO
Onachocmbmpaemblu noepexkdehue!
Obpaummbehumahue ha eec ycmpooucmba npu xpahehuu.
3To yctpoCTBO pa3pewaetc xpaHnTb TOIbKO BO BHTpeHHNX NOMEueHHX.
YxOД n TeXHnueCkOe 06cnyxNBaHne
ONACHOCTb
Onachocmb nonyeHnma paaMbl om cnyaHIO 3anyueHHo2O ycmpoucmea.
Ipepepepeeem pabom cne- yem biknuyumycmpoucmo u 3- eueb aKKymyamop.
BHIMAHHE
Onachocmb nopejdehura ycmpoucmea bimekaoue bodu. Peped npoeedehuemexHuuecko0o obnykueanur cledy em onopokHum peepeyapbl dna ep3-Hou u yucmo bdo.
TnahTexHueckoro 06cnykBaHn
PocJe pa6oTbI
BHIMAHHE
Onachocmb noapekdeHua He onpbicku- bmycmpoucm8o eodou u He ucnnonb3o aapeccue hie yucmuaue cpedcmea.
OnopoxHnTb pe3epByap rpa3HOB Dbl.
→ PpOmbIbpe3epByap IJIg rpa3HOI BOdbI YHCTOIN BOIOI.
→ PpOmbTb KpbIuKy 6aka Dnra rpa3HOBBOdI NOI npOTouHO BDOJ.
NonnaKBObIe KJIanaHbI ONUCTNTb BNaXHOJ canfetKoI.
PpomblbOTBepctne,063NaueHHoe 6yKBOI A ,BOIOI.
IpoodytobTBepcTne,063NaueHHoe 6yKBOB C》,CKaTbIM BO3dyXOM.
→ YdaNTb coeepKIMoe n3 pe3epByapa dna YnCToB ODbI.
→ Ppombltpn6op:3aonHHTpe3epByapIJyNCTOBoBbYnCTOBoD0I (6e3MOUoero CpeDCTBa)IOCTABnTpnpnopnapoBtB TeueHne OHOIMHyTbICKTHOHbIMyBnAHHNTENM UTeOK.
→ YdaIITb coepKmOe n3 pe3epByapa DnA YNCTOIN BObl.
OuHCTnTb npn6op cHapyKn, nCNoJb3yI DnA 3TOBO BnaxHyIO TprkKy, npOnNTaHHyOM MmKIM UeIOUHbIM pACTBOPOM.
OuHCTNTb BCaCbIBaIOUne nIaNKn, npOBepuTb Ha H3HOC, npn Heo6xOJNMOCTn 3aMeHTb BCaCbIBaIOUne KpOMKn (CM. «Pa60tbl NO TEXHNueCKOMy O6cnyKbAHNO»).
OuHCTb BCaCbBAIOUIN UNaHr.
OuHCTHTb 1eTKN, INPPOBepNTb Hx Ha HAnmue N3Hoca.
MHHMaJIbHaJaIHa 10 MM.
3apraNTb aKKyMnyTApOp.
eKeHeIeJIbHo
OuHCTnTb pInIbTp qHCTraIeRo paCTBOpa (cm. pa3dEe «Pa60tB I NO TEXHueckomy o6cJyXNBaHHo»).
ExeroaNo
OBeceuHTb npoBeHeHne npedncaH Hoi npoBepKn 6e3onacHocTn 3JeKtpn- KOM.
Pa60tblnoTexHnueckomy 06cJyKuBaHHIO
OuHCTka BCaCbIbAHOse IINAHKIN
ΦOTO 10,cm. ctpaHcy cynepeo6JoxkN
1Держателвсасьlaошeп панкi
2 BcacbBaioua npactnHa
3 Bcacbbaiouni shaHr
4 YnnotheHne
5 BcabsbAoua KpOMka
Peremecntb BcacbBaioyIO nIaHkyB nepeHIOO qactb np6opa.
→ CHaTb BCaCbIbAIOuMn IJNaHr C BcAcblBaIOUeBaNKn.
→ ΠονερΗγήθυ φικκατόβα ἀς 90° προτήν έύασου Κτρελίη.
→ PππoŋdHЯTb āpeKαTeNb, Μ CHaTb Bca-CbIBaIouyO pIaHky (He nOtePraTb yNlnotHeHne).
→ NombTb BCacBIBaHOUO 6aNky IN BCAcBBAHOUIK POMKIN BOIOI 3aTeM OHnCTNTb cyXoJ caJIpeTKoI.
→ PpOBepNTb BCaCbIbAIOUne KpOMKn.
PpeBepHyTb IIN 3aMeHHTb BCaCbIBaIOUne KpOMKn.
YcTaHOBNTb BCaCbIBaIOUne PJIaHKn Ha npu6Op.
3aMeHa 电TKN
→ Chrtppe3epByap nna uHCTOu BObl.
→ ChЯт bpe3epByap dπr rpa3HoB OBObl.
→ TOnrHyTb pbUar pa36nOKupOBKn Ha-npaBIAJIOUeI pyKoTkn HabePx N ydepXKNBaTb ERO B TAKOM NIOLOKeHN.
YcTaHOBnTb HAnpaBnIyUpyKoAry BBePTkAnbHoe NoIOKeHne.
OTnycntb pbuar pa36noKpOBKn Ha-npaBnaHue pykOaTkn.
OnpOKnHyTb npn6Op Ha3a.
→ BbITaHyTb UeTKy.
HacaIHTb HOByIO UeTKy Do ynopa B 3a-XBaT.
OuHCTKaФnIbTpauNCTaIeO pactBopa
→ ChTb pe3epByapbl IJIa YnCToI n rpa3-HO BOnbl.
→ ChArybФnIbTp YnCTraUero pAcTBopa n npomblb erO BOdoJ.
BCTaBnTbΦnNbTpHaMeCTO.
YcTaHOBnTbpe3epByapblIINCTOINrpa3HOI BObl.
CnCTema 3aunTbI OT 3aMep3aHn
PnOnaChOCTn 3AmOpO3KOB:
→ CnITb BOyu n3 pe3epByapOB dny CTOnI rpr3HOB OdbI,
TOCTaBtB npu6op Ha xpaHeHne B He3amep3aIOUeM NOMEueHN.
Henoladkn
△ONACHOCTb
Onachocmb nolyuhenma mpaMb om cnlyaunho 3anyuenho ycmpoucmea.
Ipeo npoebeenuem nobx paobcmne dyem bknquumb ycmpoucmeu u u3- 8nueb akkymnyamop.
BHIMAHNE
Onachocmb noepexkdehura ycmpoucmea bmyeauue bdou. Peped npoeedeHu em mexHuuecko2o obcykueaHua cledyem onopokHumpepepyapbl dna ep3-Hou u yucmoeobbl.
PnHeNCpabHOCCTX, KOTOpbIe HeBO3-MoKHO yCTpaHHTb C NOMOuBIO daHHoT Ta6NtCbI, CneJeYet ObpaTbCB B cnyx6y cepBnCHOrO 06cJyKuBaHn.
Pn6op He BkIouaetcA
YCTaHOBntbIaBHbI BbIKHoyaTeIbB NOJoxKeHne1"
→ EcIn Ha nCnIe oTo6paKaetc coo6- ⅢeHne 06 OIN6Ke, cpa3y Xe BbIKIO- HtB np6op n 6paTntbCra B cepBn- CHyIO cnYk6y.
→ PpaBnIbHO BCTaBtB aKKMyTApB np6op.
→ POCMOTpeTB COCTOHNHe 3apJa aKKMyIaTopa Ha DnCnnee, npu Heo6xoNMOCTn 3apJNTb erO.
PpO6JIeMbI npn 3apJKe aKKymyIaTopa
→ PpaBnIbHo NOcOeDHHHTb CTeBOH Ka6eJIb K 3apAaHOMy yCTpoiCTBy n po-3eTKe.
→ PpOBepntb, npEpycMTopeHO nI dAH-Hoe 3apAHHOE yCTPOiCTBO IIN NOKJIIOUeHnK NIMeIOUeCRA NEKTPocETN.
HnDkaun HeucnpaBHOCT3apdHOrO yctpoiCTBa
-KpaChbI CBeToIOHO MmraET 1 pa3 HeucnpaBHoCTb aKKyMylTopa.
-KpachbIcBeToIOIO MraeT 2 nnn 3 pa3a
HeicnpabHoctb3apdHoro yctpoiCTBa.
OTcoeHINHTb 3apJHoe yCTPOICTBO OT CETN, HEMHOI NOOJOaTb, CHOBa NODKIOUHTb K CETN.
Pn coxpanen H enonanaKn obaTntbcra B cepBnchHy cnyk6y.
-KpaChbI CBTeOIOIO MmraT 4 pa3a AkymyTOp nepepert.
YcTaHOBtB 3apAHOe yCTpoIcTBO B JIObOM MecTe TAK, YTObI ObecneuHTB DOCTaTOHbI BO3dyXOO6MeH IJRAERO XJIaXJeHn.
IooJxTaB, noka 3apAaHoe yctpoiCTBO OCTbIHET.
AkkymyIaTOP nocJe KopoTkoBpeMeHn 3KcNlyaTaau pa3pJKeH
→ IOnHocTbIO 3apAaNTb aKKyMnyTOp.
CnHsKOM MaNo YnCTaIeO pactbopa
→Поверпь уровьз заолинецpe-3epByapa дячстог Вды.
→ YBeJIuNHTb D03nPoBky NcTraIeRo paTbOpa.
OuHCTNTb pINbTp qNCTraIeRo paCTBOpa.
HeoctaToUHAR MoUHOCTb BCacbIBAHN
→ YBeJIuNHTb I03nPoBky NcTraIeO paTbopa.
YCTAHOBNTb NOBbIeHHyIO MOUHOCTB BCaCbIBaHn.
PPOBepntb TIN UETKN N UCTRAeO CpeDCTBa Hn PnroHOCTb.
3aMeHnTb 3NHOWeHHyU UeTKy.
IInoxoeKauecTBo BcacbHaHn
OnopoxHNb pe3epByap rpa3HOB Dbl.
OuHCTnTB BCaCbIBaHOUIINaHKy IN BCAcBIAOUIIINHaHR.
→ PpoBepntb npaBnIbHocTb yCTaHOBKn KpbIuKn pe3epByapa dIra rpa3HOB BO- Dbl.
→ PpOBepnTb npaBnIbHOCt b yCTaHOBKn ΦKcaTopa B pe3epByape nna rpa3HOB BOdbl.
→ PpOBePntb, 3acOpnIac bI KpbIwKa pe3epByapa dIra rpa3HOBbI.
OuHCTnTb nonnaBOK Ha KpbIwKe pe3epByapa dIra rpa3HO B0dbI.
PnHaJneXHoCTn

Chairman of the Board of Management
S. Reiser
Director Regulatory Affairs & Certification
YIOJHOMOueHHbI COtpyDnIK NO BeDeHNIO DOKymeHToobopota:
S. Reiser
Alfred Kärcher SE & Co. KG
71364 Winnenden (Germany)
Tel.: +49 7195 14-0
Fax: +49 7195 14-2212
Winnenden, 2018/12/03
TexHmYeckne daHHbIe
NapaMetpbbl
| HomonahbHoe Hapra-Jxehne | VDC 36,5 |
| EmKoCTb aKKymyIaTo-pa | Ah 5,2 |
| CpeDnHry Notpe6JIe-MaJ MoUHocTb | Bt 240 |
| TIn 3aUnTb IP23 |
y60pka
www.kaercher.com/REACH
Kezelési elementek
Chairman of the Board of Management

S. Reiser
Director Regulatory Affairs & Certification
71364 Winnenden (Germany)
Tel.: +49 7195 14-0
Fax: +49 7195 14-2212
Winnenden, 2018/12/03
Muszaki adatok
Teljesitmény
Akumulátor/Nabiječka
△NEBEZPECI
www.kaercher.com/REACH
Ovladaci prvky
71364 Winnenden (Germany)
Tel.: +49 7195 14-0
Fax: +49 7195 14-2212
Winnenden, 2018/12/03
Technické udaje
www.kaercher.com/REACH
Upravljalni elementi
Zadevne directives EU
2006/42/ES (+2009/127/ES)
2014/30/EU

Chairman of the Board of Management

S. Reiser
Director Regulatory Affairs & Certification
71364 Winnenden (Germany)
Tel.: +49 7195 14-0
Fax: +49 7195 14-2212
Winnenden, 2018/12/03
Tehnični podatki
Zmogljivost
Akumulator/ladowarka
NIEBEZPIECZENSTWO
www.kaercher.com/REACH
Elementy obslugi
2006/42/WE (+2009/127/WE)
2014/30/UE
Chairman of the Board of Management

S. Reiser
Director Regulatory Affairs & Certification
Administrator dokumentaci:
S. Reiser
Alfred Kärcher SE & Co. KG
71364 Winnenden (Germany)
Tel.: +49 7195 14-0
Fax: +49 7195 14-2212
Winnenden, 2018/12/03
Dane techniczne
Accumulator/incarcator
PERICOL
www.kaercher.com/REACH
Elemente de operare
71364 Winnenden (Germany)
Tel.: +49 7195 14-0
Fax: +49 7195 14-2212
Winnenden, 2018/12/03
Date tehnice
2006/42/ES (+2009/127/ES)
2014/30/EU

Chairman of the Board of Management
Director Regulatory Affairs & Certification
71364 Winnenden (Germany)
Tel.: +49 7195 14-0
Fax: +49 7195 14-2212
Winnenden, 2018/12/03
Technické udaje
Vykon
www.kaercher.com/REACH
Komandni elementi
Slika 1, vidi ovoj
1 Tipka „Eco mode"
2 Tipka "AUTO"
3 Z a s l o n
4 Tipka za isključivanje/uključivanje usisavanja
5 Tipka za otopinu sredstva za pranje
6 Bravica upravlaja
7 Upravljač
8 Sigurnosna sklopka
9 Filtar otopine sredstva za pranje
10 Poklopac spremnika prljave vode
11 Spremnik prljave vode
12 Sprenik svjeze vode
13 Rukohvat
14 Pločasta Četka
15 Usisna konzola
16 Sklopka ureda
17 Okretni gumb za usisnu konzolu
18 Baterija
19 Bravica baterije
Zaslon
Slika 2, vidi ovoj
1 Pjescani sat, treperi dok je aktivan brojač sati rada
2 Trajanje rada, sati
3 Trajanje rada, minute
4 Stanje napunjeni baterije, trakasti di-jagram
5 Stanje napunjeni baterije, u %
Simboli na uredaju
| Open | Bravica baterije |
| Rukohvat | |
| Usisna konzola podignuta | |
| Usisna konzola spuštena | |
| Ispusni otvor, prljava voda | |
| Urežaj s punim spremonicima ne zakrecite prema gore. |
Prvo pušanje u rad
Prijeprvoqpustanjau pogonu potpunosti napunite bateriju.
Punjenje baterijee
Slika 3, vidi ovoj
1 Prekidač za punjač
2 Crveni indicator, stanje napunjenosti svijetli crveno: Baterija se puni isključen: Baterija je u potpunosti napunjena
3 Zeleni indicator, napajanje elektrichnom energijom
→ Sklopek uredaja prebacite na "0".
Stisnite bravice baterije i izvucite je iz ureda.
Utaknite strujni utikač punjača.
Prekidač punjáč postavite na „1" - svijetli zeleni indicator.
Utaknite bateriju u punjač - svijetli crve-ni indicator.
Baterija je u potpunosti napunjena kada se crveni indicator ugasi.
Napomena:
Baterija moze nakon zavrsetka punjenja ostati u punjacu.
U radu
Umetanje baterije
Izvadite bateriju iz punjaça.
Gurnite bateriju u uredaj dok se bravicne uglave.
Montaža Četke
Slika 4, vidi ovoj
Zakrenite uredaj uvis.
Četku gurnite na zahvatnik do grančni-ka.
Chairman of the Board of Management

S. Reiser
Director Regulatory Affairs & Certification
Opunomoceni za izradu dokumentacije: S. Reiser
Alfred Karcher SE & Co. KG
Alfred-Karcher-StraBe 28-40
71364 Winnenden (Germany)
Tel.: +49 7195 14-0
Fax: +49 7195 14-2212
Winnenden, 2018/12/03
Tehnicki podaci
| Snaga | ||
| Nazivni napon VDC 36,5 | ||
| Kapacitet baterije Ah | 5,2 | |
| Prosječna potrošnja energije | W | 240 |
| Zašita | IP23 | |
| Usisivanje | ||
| Snaga usisavanja, protok zraka | I/s 4,9 | |
| Snaga usisavanja, podtlak | kPa | 2,25 |
| Usisna snaga, podtlak, Eco | kPa | 1,5 |
| Četka za Čišćenje | ||
| Radna širina | mm | 280 |
| Promjer Četki | mm | 280 |
| Broj okretaja Četki | 1/min | 150 |
| Dimenzije i težine | ||
| Teoreski povrsinski učinak | m2/h | 560 |
| Zapremnina spremini-ka svježe/prljave vode | I | 3,0/3,6 |
| Duljina x širina x visina | mm | 555 x 375 x 1050 |
| Transportna težina | kg | 20 |
| Ukupna težina | kg | 23 |
| UtvrĐene vrijednosti prema EN 60335-2-72 | ||
| Vrijednost vibracije na ruci | m/s2 | <2,5 |
| Razina zvučnog tlaka LpA | dB(A) | <70 |
| Nepouzdanost KpA | dB(A) | 2.3 |
| Razina zvučne snage LwA | dB(A) | 83,1 |
| Nepouzdanost KwA | dB(A) | 2,3 |
| Punjac | ||
| Nordelettronica mod. NE316 | ||
| Nazivni napon V | 100...240 | |
| Frekvencija | Hz | 50-60 |
| Potrošnja energije | A | 2...1 |
2006/42/EZ (+2009/127/EZ)
2014/30/EU
Primenjene uskladene norme:
EN 60335-1
EN 60335-2-72
EN 60335-2-29
EN 62233: 2008
EN 55014-1:2006+A1:2009+A2:2011
EN 55014-2: 2015
Chairman of the Board of Management
S. Reiser
Director Regulatory Affairs & Certification
Alfred Karcher SE & Co. KG
71364 Winnenden (Germany)
Tel.: +49 7195 14-0
Fax: +49 7195 14-2212
Winnenden, 2018/12/03
Tehnicki podaci
Snaga
| Nominalni napon VDC | 36,5 | |
| Kapacitet baterije Ah 5 | 2 | |
| Prosečna potrošnja energije | W | 240 |
| Stepen zašite | IP23 | |
| Usisivanje | ||
| Snaga usisivanja, protok vazduha | I/s 4,9 | |
| Snaga usisivanja, podpritsak | kPa | 2,25 |
| Učinak usisivanja, podpritsak, Eco | kPa | 1,5 |
| Četka za Čišćenje | ||
| Radna širina | mm | 280 |
| Prečnik Četki | mm | 280 |
| Broj obrtaja Četki | 1/min | 150 |
| Dimenzije i težine | ||
| Teoreski povrsinski učinak | m2/h | 560 |
| Zapremina rezervaara sveže/prljave vode | I | 3,0/3,6 |
| Dužina x širina x visina | mm | 555 x 375 x 1050 |
| Transportna težina | kg | 20 |
| Ukupna težina | kg | 23 |
| Izračunate vrednosti prema EN 60335-2-72 | ||
| Vrednost vibracije na ruci | m/s2 | <2,5 |
| Nivo zvučnog pritiska LpA | dB(A) | <70 |
| Nepouzdanost KpA | dB(A) | 2.3 |
| Nivo zvučne snage LwA | dB(A) | 83,1 |
| Nepouzdanost KwA | dB(A) | 2,3 |
| Punjač | ||
| Nordelettronica mod. NE316 | ||
| Nominalni napon V | 100.. | 240 |
| Frekvencija | Hz 50-60 | |
| Potrošnja energije | A | 2...1 |

IpeNn PbBTO N3N013BaHe Ha Baunya ypei npoTeTe TOBA
opnHahno HNCTpykuyra 3a pa6oTa,
IeJCTBaIte CnpoeH Hero n Iro 3anaTe 3a
No-KbCHO n3noJI3BaHe nII n 3a CneDbaun
npTeKATen.
CbDbPkaHne
| Указаняза 6e3oanachoct... BG 1 |
| Функця... BG 1 |
| Улnotреба по пpeДиЗанчehе BG 1 |
| ОпаЗване на okолнота среда BG 1 |
| ОьслуЖвашиеlementи... BG 2 |
| ПьрBoHачално руСКане В eck- плоataця... BG 2 |
| Зарждэн Ha akymулирашата |
| Батэр... BG 2 |
| Експлогатця... BG 2 |
| Транс nostr... BG 3 |
| Съхсанен... BG 3 |
| Грижи и подрьжka... BG 3 |
| Повpeди... BG 4 |
| Принадлесхости... BG 4 |
| Принадлесхostи и peэервни чacr... BG 4 |
| Гаранця... BG 5 |
| EC Декларацяза сбOTВет- стve... BG 5 |
| Текнueckechn DaHHN... BG 5 |
Yka3aHna 3a6e3oNaCHOCT
Ppei Da ekcnnoaTnape Yepea 3a TbpBn
NbT, npoTeTe n cb6nOdaBaIte Hacto
yto ynbTbaHe 3a ynOtpe6a n npInIoKeHata 6pOwpa ,Yka3aHna 3a 6e3oNaCHOCT
3a yePei, NocntBaUnc C YeTKn
5.956-251.0
CTeneHH Ha onachoct
ONACHOCT
Yka3aHue 3a HnOpcedcmeHo ap03ra OnacHocm, KOmo eodu do mekku meeneHu HapaHreaHua unu do cMbpm.
△PENDYNPEXDEHNE
Yka3aHue 3a eb3MoXHa onacha cumya- uia, kOmo MoKe da doeede do meKku meNechu HapaHreaHua unu do cmbpm.
△PENEIA3NBOCT
Yka3aHue 3a 6b3MOxHa OAncha cumya- uia, KoAmo MoKe da doeede do neku Ha- paHraBaHua.
BHIMAHHE
Yka3aHue 3a 6b3MOxHa onacha cumya- uja, kOmo MoKe da doeede do Mamepu- aHnHu uemu.
Akymylnpa7a 6aTePn/3apdno yctpoiCTBO
ONACHOCT
-
3apekdaHemno ha bamepmae no3-0eNoHo cAmO c npUoKeHomo opuuaHAnHO 3apdHocympoucmbo uuC no3eJeHume om KARCHER 3apdHu ycmpoucmea.
-
Ppeu ecya ynompe6a 3apdHomo ycmpooucmo u akymyamopnma 6a mepu da ce npoeepm 3a yepkda-Hua. Poepehume ypeu da He ce u3no13bam noeue u noepedHume ycmu da ce nonpaBm om cneuaan3upaH nepcohan.
3apdHomo ycmpoucmeo da He ce u3- non3ea 3aMbpeHo unu Mokpo cbc-moHue.
- HanpexeHuemo omMpexama mpr6ea da cbenada cbc 3adadeHomo HanpeXeHue Ha munoeama maBekka Ha 3aprodHomo ycmpoUcmeo.
3apdHomo ycmpoucmeo da He ce u3- non3ea e6e 6puo0nacha cpea.
Ido konhmaxmune Ha 3aprHomo ycmpoucmeo He buea da nonadam Me-maHnU yacmu, onachocm om Kbco cbeDuHeHue.
3aprodHomoycmpoucm0daceu3- non3ea cmo 3a 3apejdohe Ha no36o- nenama akymyamopha bamepu.
Ha adanmepa ha 3apdHomo ycmpou-cmeo da ce nocmaaam caMo yucmu u cyxu akymyamophu bamepuu.
-Да He ce 3apekdam akymyamopu (nbpuehu Klemku), onachocm om ec-KNIOUSA.
-Да He ce 3apexdam nopedeHu akymy-namopHu bamepuu. NopepedHume akymyamopHu bamepuu da ce cmeHnM.
- Akymyamophume 6amepuu da He ce c bxpahraam 3aeho C Memaru nped Memu, onachocm om Kbc0cbeduHe-Hue.
-He oTbapnTe 6aTepeyra.
- Akymyamopnme bamepuu da he ce x6bpym 6 o2bna unu npu domaunme omnaobu.
- Da ce u362e KaHmK C u3n3auu me om depekmhme bamepu mue Hocmu. Ppu cnyaeh KOnhakm mey Hocma da ce u3nJaKHe C boda. Ppu KOHmakm C ouume donbJHumEnHo ce KOHCyImupaume C nekap.
-Yka3aHn3a cbxpaHHe n TpaHCnpTtpane ige noJyUte ot Baunr cepBn3Ha Karcher.
CnmboHnHa ypea

OnachoctOTn3raphe npapn IopeuIN NOBbpxHOctI
Функуня
Tbpkaaata Na3cmykbaa MaSHA ce n3-NOJ3Ba 3a MOKpo NOUHCTBAHe Ha paBHn NOOBe.
Pa6oTHaTa 申PnHa oT 280 mm n BmecTnMocTtHa pe3epBoapa 3a YnCTa BOda ot 3I no3BOJraBat eEeKTeNbHO nOuNCtBaHe HaMaJKN NOBbpXHOCTn.
YpeBt ce 3axpaHb C eHepnO T CmHema akymyIaTopHa 6atepna.
Yka3aHHe:
B cBoTBcETCBn CbC 3aJaTuHa Na NoHCTBaHe ypeBt MoKe da 6Be O6OpyDbaH C pa3NJuHN pInHaJNeKHOCTN.
PonntaTe 3a Haun KaTaNor Hn Hn NoCetete B INTEpHET Ha aDpec www.kaercher.com.
YnoTpe6a no npedHa3HaueHne
N3noJ3BaIteTO3nUpeDcMoBcBoTBeCTBHe CbC3aJaHTe BHaCToJIoTOYbTBAHe 3a EKJIIOATAuI.
-To3n ypeE roeH 3a npocepnoHaHa ynoTpe6a, Happ. B XOTeIN, YUINuIa, 60HNuIc, f6bpNkM, MArzHH, Ofncn I NOMeueHn Pd Haem.
- He n3noI3BaIte ypeIa no HaKIOHeHn NOBbpxHOCTn.
- YpeBt MoKe Da ce n3noJI3Ba cAmO 3a NOHcTBaHe Ha He yBCTBNTeJIHN KbM Bnara e He yBCTBNTeJIHN KbM NOJInpaHe TBbpN IOBbPxHOCTN. TemnepaTyprHnT o6xBaT ha npIIOKe-Hne e MeKdy +5^ n +40^
- YpeBt He e NOxOJa3a NoUcTBaHe Ha 3ampb3HaJIIN NoIOBE (HAnp. B Xla-DnIHH NOMEeHn).
- YpeBt MoKe Da ce obOpyDba cAmo C opnHaJIHn npHaIeKHOCTN pe3epBHN qACTN.
- YpeBt e pa3pa60TeH 3a noocTbaHe Ha noOBe BB BbTpewHn npocTpanCTBa pecn. Ha nokpTu NOBbpxHOctN.
- YpeBt He e npEHa3NaeHc 3a NoocTBaHe Ha o6uecTBeHn TpaHcnpTHn nTnua.
- YpeBt He e noDxOJa 3a npnloKeHne B 3acTpaWeHn OT ekCnNo3n o6-KpbXeHn.
-ИЗнOLБа�еЗарянOTOустюсвocamOB cyxa OKOLHa cpea.
-Да He ce OTbapr 3apnHOTO ycTPOI CTBO.Погрвкnte Da ce n3BbPbBaT cAmo OTeCneuaNImpaH nepcoHaI.
Ona3BaHe Ha OKoHaTa cpeDa

OnakobbHnTe MaepnauMoraT da ce peuKnnpaT. Monr He XbplnTeOBKInTe pRn DoMaunHIne OTnaDbuN, a eJaTe Ha BToPmHc CypOBHN C cen oPpHa ynoTpe6a.

CTapnte ypein cbdbpxkat ceHHMaTePnAni, noJnxKaun Ha peuKnnpaHe, KOITo MORAT da 6bDat
yIOTpe6eHN NOBtOHO. BatepHn, MaCna n IIOo6Hn Ha TRe Hc 6bNA da nonaDat B OKoHnata CpeHa. Iopadu TOBa MoJr OCTpaHraBaIte CTapnte ypeHn, n3no13BaIKN IOxOJaU 3a UeNTa CInCTeMn 3a cb6puane.
PpeHn PpeaBaHe Ha ypeHa 3a BToPunHn CypOBHH OCTpaHete MOHTnpaHata B Hero 6aTeepnI N oTcPaHete KaTO OTNa- DbK, ONa3BaKn OKoJHATA Cpda.
EneKtpueckte n eneKtpoHNHe ypeDiyeCTO CbIbpxkAT CbCTaBHn Yactn, KONTPOHn HnPaBnHO 6opabe He nn HnpaBnHO n3XbPnHe MoRat Da npEcdTaNBA TOTeHnAnHa ONachoc3 a YoBeuKOTo3dape N 3a OKoJnHa Tcpea. BnpeKnTOBa 3a npabnHata EcKnloaTaun Ha ypeNTe Te3n CbCTaBHn Yactn Ca Heo6xoDmN. O60hauehnte C To3n CmBON ypeNi He Tp8Ba da 6bDaT n3XBbPnHn C 6tTOBnTe OTnaBtu.
Yka3aHn3a cbCTaBKeTte (REACH)
AkyanHa HOpMaun 3a cbCTaBKnTe Ue HamepuTe Ha:
www.kaercher.com/REACH
06cnyxbaun eIemEnTn
Фигура 1, Вижт ectrpaHицаТа Ha KOpu-цata.
1 ByToH ,Pexm ECO
2 ByToH "AUTO" (aBToMaTnueH peKIM)
3Диспел奏
4 ByToH IV3cMyKBaHe IV3KJ./BKnJ.
5 ByToH noUcTbAa pa3TBOp
6 De6IokpAne Ha ynpabnBaunia nOCT
7 YnpabnBaau noct
8празаенпркьсвay
9ΦnITbP 3a nouchTbau pa3TBOP
10 Kanak pe3epBoap Mpbcha Boda
11 Pe3epBoap MpbchBa
12 PeερBoa qncTa Boda
13Дрьжka 3a HOceHe
14 YeTka c wai6n
15 JeHTa 3acMyKBaHe
16 KIIOH na ypeJa
17 Bbptrau 6yToH Ha JIeHTata 3a 3acMyKBaHe
18 Akymyntopna 6aTeperia
19 De6IokpaHe Ha 6aTepeYTa
Ducnnne
Фигура 2, Вижт ectrpaHuaTa Ha KOpuHaTa.
1IcBueH yacOBnK, Mra npaPaboteu 6pOaHa paBOTHTe YacObe
2 PpOdbJnxHtJIHOCT Ha eKcNIOaTaunraTa, YacObe
3ПрдьнгintelnoctHaekcnnoatauaTa,MnHyTN
4 CbctoHHe Ha 3apeKdane Ha aKyMynaTOpHaTa 6aTePn, JeHTOba Dnarpama
5 CbctoHHe Ha 3apeKdahe Ha akyMynaTOpHaTa 6aTepe, B %
CnmboHa ypea
| Open | Дeбл_OKиране на батугята |
| Дръжka 3a Носене | |
| ЛeNTa 3a засмУкBAнe подиг- нота | |
| ЛeNTa 3a засмУкBAнe спунсha- тɑ | |
| ИзпунSCКATEЛЕн OTВОР, МрьСнa ВODа | |
| Нe подигайт e уреда наharope с пьlen peЗервоap. |
HactpoKaHaynpaBnaBaau noct
NocTabete KIIOUa Ha ypeHa Ha noJIOXeHne " _ 0 "
→ N3ternete De6noknpaHTo Ha ynpaBnBaunna loct Harope n dpbXTe 3dpabo.
→ПомеhteHaKIOHaHa ynpaBnaBa-ия loct.
Ocbo6oJeTe De6IokpHaTeTo Ha ynpaBnBaunna loCT.
CbaIaHe Ha pe3epBoapa 3a MpbchA BOda
NocTabete KJIoua Ha ypeHa noloxhene "0"
ФИгура 5, Вижт ectrpaHuaTa Ha KOpuTa.
Ia He ce n3n03BaT CnJHo neHnBn no- uCTBaun cpeDCTBA.
Cna3BaIte yka3aHnraTa 3a Do3npaHe.
IpenopbHTeHcpeCTBO 3a NOHCBAHe:
| Унотреба По- | Чисьашиpenа-рат | Дозиюв-ka |
| Повдържаш поочst-ваши.apарат akален | RM 743 | 0,5 - 2,0% |
| Повдържаш поочst-ваши.apарат кисел, за санитарна тоблacr, басейни и.T.H. OT-stранива отлагань на КOTлен Камьк. | RM 738 | 0,5 - 3,0% |
| Грижаш рpreci мзtripивахEXTRA | RM 780 | 0,5 - 2,0% |
Фигура 6, Вжтс ectpaHuaTa Ha KOpuTa.
1 Pe3epBoap Yncta Boda
2 N3nyckaTeH eOTBop pe3epBoap 3a HnCTa BOda
3 Kanak pe3eepBoap 3a Yncta Boda
4 O TBOP 3a n bJIHe He pe3epBoap YIcTa BOda
→ CbaIeTe pe3epBoapa 3a MpbCHa BOJa.
→ Cbanepe3epBoapa 3a Yncta BOda OToypeda.
PpOBepTe DaIIN 3NpyKaTeHnT OTBOP e npaBnHO 3aTBOpEH.
OTBopeTe KaNakaHa pe3epBoapa 3a YnCTa BOJa.
→ HaneTe pa3TbOp Ha BODa n noocTBAu npenapat. MakmamHa temepaTypa Ha TeHocTTa 122.00 F.
3aTBopeTe KaNaka Ha pe3epBoapa 3a HnCTa BOda.
NocTaBeTe pe3epBoapa 3a YnCTa BoJa BypeJa.
→IocTaBeteN6nokpauTepe3epBoapa 3aMpcbHa BOda.
Nouctbahe
Фигура 7, Вижт ectpaHncaTа Ha KOpu-ata.
1 Bbptu6ytoH na neHTata 3a 3acMyKbaHe
2 K n y H a y pe da
PnKJIIOUBaHe Ha NOuCTBaHeTo
ΠycheTe npedna3Hnnpekcbvau.
NocTabeTe KIOUca Ha ypeHa noloxHne " _ 0 "
→ ΠΟβιπΗτΕ μηΤΑΤa 3a 3aÇMýKbaHe, HATINCHETE BbPTAUN HA μηΤaTa 3a 3aÇMýKbaHe N 3aBbPTe TNO NO-COKA Ha YacOBHnKOBaTa CTpeNka.
→ N3ternete De6boknpaHTo Ha ynpaBnBaun JocT Harope n DpbkTe 3dpabo.
NocTaBeTe ynpabJIbBaUaTa KOJIOHka OTBECHO.
Ocb6oTe De6IokpaHTo Ha ynpaBnBaunnoT.
N3npa3BaHe Ha pe3epBoapa 3a Mpbcha Boda
Yka3aHHe:
PnIbIeHpe3epBOap 3a Mpbcha BOda
NONJIaBbKbT 3aTBpaCMyKaTeHNHa KaHaJ.
N3cMcyKBaHeTo ce npeKbCBA. N3npa3Hete pe3epBOapa 3a Mpbcha BOda.
△NPEDYUNPEXDEHNE
Ja ce cna3eam MecmHume pa3nope6u 3a pa6oma c omnaDnu.
→ N3KIOUOHTe ypea(BX. pa3dI, Pnp- KIOUBAHe Ha nouCTBaHTo).
Фигура 9, Вжтс ectpaHuaTа Ha KOpuTa.
1Блнокиране
2 Kanak pe3epBoaap MpbchBaDa
3 Pe3epBoap MpbcHa B0da
4 Pe3epBoap Yncta Boda
5 3akonuankapeepboap 3a Mpbchao B0da
3aBbPTe Te DBeTe 6nOKnPobKn Harope.
Da ce cBaJIaKanaka.
→ Cbaenepe3epBoapa 3a Mpbcha B0da (BnKTe pa3dEe „CbaIaHe Ha pe3epBoapapa 3a Mpbcha B0da").
→ U3neTe Mpbchata B0da.
OTBopeTe 3aKnIOyBaHeTO.
→ ɪnɪpaɪsɪheɪsɪnɪbɪŋHo pɪeɪpɪboaɪpə.
Pe3epBoapbT 3aMpbcHbOda da ce n3nnaKHe C YnCTa BOda.
3aTbOpTe 3aKoNuaIkaTa.
→ BHMATeHNO NOCTaBeTe pe3epBOapa 3a MpbCHA BOJa Bbpxy pe3epBOapa 3a YnCTa BOJa. He NOBpeKdAte O6O3Ha-ueHInTe cbc CTpeJIka rpaINBHN eemeHTN.
3aBbptTe 6noknpOBKeHarope.
NocTabeTe u 6JIOKpaIte KaIaKa.
I3npa3BaHe Ha pe3epBoapa 3a Yncta BOda
→ Cbanepe3epBoapa 3a Mpbcha B0da (BnKTe pa3dEe, CbAneHa pe3epBoapa 3a Mpbcha B0da").
Фигура 6, Вижт ectpaHuaTa Ha KOpuata.
1 Pe3epBoap Yncta Boda
2 Nэ np c k a T e n H qncta BOda
3 Kanak pe3epBoap 3a Yncta Boda
4 OTBOP 3a nbJIHe He pe3epBoap YnCTa BOJa
→ Cbanepe3epBoapa 3a Yncta BOda otypeja.
OTBopTe n3nyckateHnna OTBOp Ha pe-3epBoapa 3a Yncta BOda.
→ ⅢneTe nouHCTBaAaTa TeuHOCT.
3aTBopeTe Kanaka Ha pe3epBoapa 3a YnCTa BOda.
NocTaBeTe pe3epBoapa 3a YnCTa BoJa BypeJa.
TpaHcnpT
△NPEDA3JNBOCT
Onachocm om hapaheane u yepkdaHnur! Ppumpancnpumane umaume nped bud meznomo ha ypeda.
NocTabete KJIoua Ha ypeHa ha noJoxHHe "0".
→ N3terJTe De6IokpAHeTo Ha ynpaBnBaun JocT Harope n DpbxTe 3dpBO.
3aBpTe ynpablaBaun JIOCT BOTBECHO NIOJXeHne.
Ocb6oTe De6nokpaHTo Ha ynpaBnBaunnoCT.
36ytaIte ypea.
NNN
NocTabete KJIoua Ha ypeHa ha noJoxHeNe _n0^
→ N3terJTe De6IokpHaTeTo Ha ynpaBnBaun JocT Harope n DpbXTe 3dpBO.
3aBbptTe ynpabnBaunna JIOCT B XOpN3OHTaHNOIOnKeHne.
→ПовдигнелуpeаЗаДрьжкатaи ro HOCETe.
→ Ptnp TaHcnpT B aBTOMObIMN OCSrypBaIte ypeDa cBflacHO BaINdHInTe DnpeKtBN npOTNB PJIb3raHe N ppeo-6pbuane.
CbXpaHeHne
△PENNA3JNBOCT
Onachocm om Hapanhahe u noepeda! Ppu cbxpanehue umaume nped bud mea nomo ha ypeda.
CbxpaenHnTo Ha To3n ypeI e N03BOJIeHO camo BbB BbTpEHHNOMeUeHn.
Tpuxxn noDpBxka
△ONACHOCT
Onachocm om HapaHaehe npadu He npedhamepeno nomeaun yped.
Ipedu ecuku deuHocmu no ypeda 20 u3- knioeuaume u u3aXkaUme akymylanopnama6amepu.
BHIMAHNE
Onachocm om yepexdahe 3a ype da nopadu u3muaua eoda. Ppedu deHocmu no nodopbkkama no ype da u3npa3heme pezepeoapume 3a Mpbcha u 3a Yucma oeda.
OT Paaepaeepaa 1
Cnepa6ota
BHIMAHNE
Onachocm om yepexkdahe. He npbckaume ypeda c 8oda u He u3non3eaume apecueHu noucmbau npenapamu.
→ ɪnɪpɑərəHeTe pe3epBoapɑa 3a MþbchA BOda.
Pe3epBoapbT 3a MpbcHa BOa Da ce n3PnakHe C YnCTa BOJa.
→ПоунстeteКанakaHa pe3epBoapa 3a Мьс ha BODЯ NOД TeuaJa BOda. Поунстete BeHTnJIte C nonJaBbK C BnaJha KbPna.
I3IIaKHeTe OTbopa c MapKnIpOBka ,A C BODa.
Пюдухайт eТВОа c МаркИровka „C" C Вьздух ПОД HANЯганe.
→ N3npa3HHepe3epBoapa 3a YnCTa BOda
→ NπλαBaHe Ha ypea: HanbHte pe-3epBoapa 3a uCTa BOa C uCTa BOa (6e3 nouCTBaU npenapat) npabotete c ypea eHa MNHyTa C BKNHO NO-dabaHe Ha BOa KbM YeTKnTe.
→ИЗпразнеле pe3epBoapa 3a Упста BOДа
YpeIbT Da CE NOUcTn OTBbH C BlnaXeH, HATOnEHN B MEKa NOuCtBaua Jyra napcaJ.
NOpHcTeTeJeHTaTa3a3acMyKBaHe, npoBepTe 3a n3HocBaHe n npn Heo6XoDMOCCTMeHETe CMyKaTeJIHnTe HaKpaHnU(BnKTe,Pa6OTn noNoDpBxKkata")
→ POnuNCTeTE BCMyKaTeHnHa Mapkyu.
→ПоистeteчETkaTЯ npOBepeTe 3a n3HOCBaHe. MHHMaJIHaДБЛЖИHAHaYeTHHaTa:10 mm.
3apeTe 6aTepeyra.
ExceDMNHO
→NouchBaHe Ha qnItbpa 3a nouchTBAu pa3TBOp (BnKTe DeHocTu NoNDpBxKaTa").
ExeroDno
→ PpoBeTe npeDncaHaTa npoBepka Ha 6e30nacHocTta OT eNeKtpOTexHnK.
DeyHocTn no NOdpbXkKaTa
IOncTbaHe Ha JeHtata 3a 3acMyKBaHe FHypTa 10,BXTe cTpaHncaTaHa Kopu- ta.
1 Hocau Ha JeHTaTa 3a 3acMyKbaHe
2 ΑeHTa 3acMyKBaHe
3 BCmykaTeJIeH Mapkyu
4 YIITbTHHeHnE
5 CmykaTeJIeH NaKpaHnIK
3aBbpteteJeHTata 3a 3acMyKBaHe KbM npedHaCTpaHa Ha ypeDa.
→ N3dbpnaIte cmykaTeHnHn Wnayx OT cmykaTeHnHaTa rpea.
3aBbptTe 6nOKpOBKNTe Ha 90^ o6paTHO HA yacOBHKnOBaTa CTpeJIka.
NOBINHETe Hocayu n3TerJTe JENrTa 3a 3acMyKBaHe (He ry6eTe ynIbTHeHneTo).
→ ΜπλαKHeTe μeHTaTa 3a 3acMyKBaHe n CMyKaTeHnTe HαKpaHnC BθOa N CneTobA NoCHTeTe C BλαKHa KbpNa.
→ PpOBepeTe CmyKaTeHnTe HApKaHnU. O6bPHeTe NmCmeHeTe N3HOceHc MyKaTeHnTe HApKaHnU.
NocTabete NeHTaTa 3a 3acMyKBaHe OTHOBO Ha ypeDa.
CmHa Ha YeTkata
→ CbaIeTe pe3epBoa pa 3a YnCTa BOJa.
→ CbaIeTe pe3epBoapa 3a MpbchBa BOJa.
→ N3terIeTe De6JoknpaHTo Ha ynpaBnBaun JIOCT HArope n DpBXTe 3dpaBO.
3aBbPTeTe ynpabraBaunrIOCT BOTBECHO NONOKeHne.
Ocbo6oJeTe De6IokpHaTeTo Ha ynpaBnBaunIOCT.
HaKIOHeTe ypeDa Ha3aI.
→ 3BaTe YeTkata.
→ ΠbXHETe HOBATA YeTka DoKpaB BbpxMyrCTOTO 3a 3axBaUaHe.
NoHCTBaHe HaΦHnTbP 3a NoHcTBaU pa3TBOp
→ Cbanepeepboapute 3a ucta mPbcha Bda.
→ CbaNeteФmntbpa3a noHCTBaU pa3-TBOP ro n3nJaKHeTe C B0da.
OTHOBO noctabete fHNTbpa.
→ NocTaBeTe pe3epBoapuTe 3a uHcTa mPbcha BOda.
PpeDn3BaHe ot 3aMpb3BaHe
Pn onachocT OT 3ampb3BaHe:
→ Μπηητe pe3ερBoapnte 3a ΚινιTaTα Μα Μρβchata BODa.
PocTaBeTe ypeDa B 3aUHTeHO OT 3am- p3BaHe NOMeueHne.
PobpeDn
ONACHOCT
Onachocm om hapaheane npadu Hnepehamepeho nomeaun yped. Ppedu ecuku deuHocmu no ypeda 20 u3Kluouaeum u u3eakdaume akymnamopnama bamepu.
BHIMAHHE
Onachocm om yepexdahe 3a ype da nopadu u3muuaa e oda. Ppedu deHocmu no nodopbkkama no ype da u3npa3heme pe-3epeoapume 3a MPcha u 3a yucma ooda. PnnoBpeNi, KOTo He Morat da 6bdat OCTpaHeHn C NOMOHTa Ha HactoMaTa Ta6nua, NOBkaiTe cepBn3a.
YpeBt He pa6oTn
→ NocTabete rnaBnna npeKbcBaH na-3nui,1.
AkoHaDnCnpeCeNoBn CbO6eHne 3a rpeka,He3a6abHO NkIIOUeTe ype Da n Ce o6bpheTe KbM cepBn3.
→ NocTabete npabunHO akymyIaTopHaTa 6aTepeBa ypeda.
Pa3yTeTe Ha dncnner CbctoHneTo Ha 3apeJdahe Ha akymyataOpHaTa 6aTePn, np He06xOIMOCT r 3apeTe.
Ipo6lem npn 3apexkaheTo Ha akymylaTophata 6aTepy
→ CbpxKeTe npabuHIO mpeKOBnKa6eIcB3aprHOTO yCTPOJCTBO N KOHTaT.
→ PpOBepTe DaIIN 3apAINDHOYcTPOINCTBOe CbBMECTIMO C HAJIuHHaTa eJekTpNueckaMpexka.
Hnkaa3a noBpeHa 3apAnHOyCTpoCTBO
- YepBHeHnT CBeToDnOd Mnra eDnHOkpaTHo AkyMynatopHaTa 6aTePnE nOBpeDeHa.
- CepBENrT CBToIIOI Mnra 2 nbTN nn3 nTn HEn3npaBHOCT B 3apJHOTO yCTPOI-CTBO.
N3KJIIOUeTe 3aprAnHOTO yCTpOoiCTBO, N3- YaKaaiTe MaIko, CNeD TOBa OTHOB BKIOUeTe.
Ako rpeuKaTa npOdbJkaBa da ce noBBA, n3BnKaIte cepBn3a.
-YepeBHeHrT CBeToDIOoM Mra 4 NbTN 3apAnHOTo yCTpoiCTBO e nperePraNo. IocTabeTe 3apAnHOTo yCTpoiCTBO Ha OTKpIto, Taka Ye da MoKe Da ce Ocb- lceCTBn CMHa Ha Bb3Dyxa 3a OxnaKDaHeTO My. IVzakaiTe, DOKato 3apAnHOTo yCTpoiCTBO Ce OxJaDiN.
AkymylaTOPHaTa 6aTePnBa CbbpwBa cIeK kpaTko pa6oTHOBpeMe
3apepeTe aKymyNaTopHaTa 6aTePnA Do KpaI.
Tbpe MaIIO NOHCTBaApa3TBOP
→ПовереTe HNBOTo Ha 3aIbJIbAHe Hape3epBoapa 3a YnCTa BOJa.
→ YBENIeTe Do3npaHTo Ha NouNCTBa-
→ NocTeTe qntbpa 3a noctBa pa3TbOp.
IowaMOUHOCHaNouchTbaHe
YBeNHTeD03nPaHToHaNoCTBa-
HactpoTe No-BnCOKa MOUHOCT Ha no-NCtBaHe.
→ PpOBepTe TnHa Ha YetKaTa n DaIIN NOYCTBaunr npenapate NOxOJa.
→ CmeHete n3HOceHaTa YeTka.
JIoTO n3cMyKBaHe
3npa3BaHe Ha pe3epBOap MpbCHA BO-da.
→ Πоунстete ЛeHTaTa 3a 3acMyKBaHe n BCMyKaTeHnHa Mapky.
→Поверетправиною поожене
на калaka на pe3epвогараза Мьсан
ВODa.
→Поверете npавиното пооженп ha 3akonчankataВ pe3epBOapa 3a Мьса BODa.
→ Προνερετe Kanaka Ha pe3ερBoapa 3a Мьса BOda 3a 3anyuBahe.
→Почирелу.nonлавькаHa kanakaHa pe3epBoapa 3a Мрса Вда.
PnHaJneXHoCTn
71364 Winnenden (Germany)
Tel.: +49 7195 14-0
Fax: +49 7195 14-2212
Winnenden, 2018/12/03
TexHnueckn daHHN
| Мошист | ||
| Номинално наразоже- нieves | VDC 36,5 | |
| КарацитET на akум- лirраците батери | Ah 5,2 | |
| Среда Консуmpана мошист | W | 240 |
| Вид зашипа IP23 | ||
| Измукванe | ||
| Смукателна мош- ност, колочевTO на Вьздуна | Л/сек 4,9 | |
| Смукателна мош- нost, Вakууm | kPa 2,25 | |
| Смукателна мош- нost, Вakууm, Eco | kPa 1,5 | |
| Почистваши четka | ||
| РавOTHA ШирINA мь 280 | ||
| Диаметър на четкиTe | MM 280 | |
| Овороти на четкиTe 1 | МMH 150 | |
| Мерки и тergla | ||
| Teоретчна поьрх- ностга мошноct | m²/h | 560 |
| Обем розервоар чес- тА/ Мьсны ВODа | Л | 3,0/3,6 |
| Дыжина xшиочиna х Висина | MM 555 | x 375 x 1050 |
| Тergл при Траимс nostr | 20 | |
| Овsiо тergл | Кr | 23 |
| Установен STоюностс съласно EN 60335-2-72 | ||
| Стойост на вибра- цinate в облacrTTа на длANTa - рькata | M/cesK² | <2,5 |
| Ниво на 3вука LpA | dB(A) | <70 |
| Heystоуновст KpA | dB(A) | 2.3 |
| Ниво на 3вукова мошист LWA | dB(A) | 83,1 |
| Heystоуновст KWA | dB(A) | 2,3 |
| Зapадно устroduстvo | ||
| Nordelettronica mod. NE316 | ||
| Номинално наразоже- нieves | V | 100...240 |
| Чecтоа | Hz 50-60 | |
| Консуmpана моши- ност | A | 2...1 |

Ohutusalased markused. ET 1
Funktsioon. ET 1
www.kaercher.com/REACH
Teeninduselemendid
Joonis 1, vt ümbris
1 Klahv,ECO mode
2 K I a h v , A U T O “
3 Ekraan
4 Klahv vãjaimemine vãjas/sees
5 Puhastuslahuse klahv
6 Juhthoova lahtilukusti
7 Juhthoob
8 T ur v a I ü l i t i
9 Puhastuslahuse filter
10 Musta veepaagi kaas
11 Musta vee paak
12 Puhta vee paak
13 Kandekäepide
14 Ketashari
15 Imiotsak
16 Seadme luliti
17 Imitata poordnupp
18 Aku
19 Aku vabastusnupp
Ekraan
Joonis 2, vt ümbris

Chairman of the Board of Management
S. Reiser
Director Regulatory Affairs & Certification
71364 Winnenden (Germany)
Tel.: +49 7195 14-0
Fax: +49 7195 14-2212
Winnenden, 2018/12/03
Tehnilised andmed
Vöimsus
www.kaercher.com/REACH
Vadibas elementi
1. attels, sk. apversto lappusi
1 Taustins "Eco Mode"
2 Taustins "AUTO"
3 Displejs
4 Taustinš "Nosūkšana iesl./izsl."
5 Tirisanas skiduma taustins
6 Stures atblokesana
7 Stūrē
8 Drošības sležís
9 Tirīsanas škīduma filtrs
10 Netirā udens tvertnes vaks
11 Netirā udens tvertne
12 Tira udens tverne
13 Rokturis aparata parnesāsanai
14 Diskveida suka
15 Suksanas stienis
16 Aparata sledzis
17 Sūkṣanas stiṇa grozāmā poga
18 Akumulators
19 Akumulatora atblokeesanas sledzis
Displejs
2. attels, skat. vaka lapu
71364 Winnenden (Germany)
Tel.: +49 7195 14-0
Fax: +49 7195 14-2212
Winnenden, 2018/12/03
Tehniskie dati
www.kaercher.com/REACH
Valdymo elementai
1 pav. Žr. viršelio puslapi.
1 Mygtukas ,ECO mode"
2 Mygtukas „AUTO"
3 Ekranas
4 Siurbimo Jj. / Išj. mygtukas
5 Valomojo tirpalo mygtukas
6 Vairo atblokavimo svirtis
7 V a i r a s
8 Apsauginis jungiklis
9 Valomojo tirpalo filtras
10 Užteršto vandens bako dangtis
11 Užterstó vandens bakas
12 Švárus vandens bakas
13 Rankena
14 Diskinis sepetys
15 Siurbimo rémelis
16 Prietaiso jungiklis
17 Siurbimo rémelio regulatorius
18 Akumulatorius
19 Baterijos atblokavimo mygtukas
Ekranas
H.Jenner

Chairman of the Board of Management
S. Reiser
Director Regulatory Affairs & Certification
71364 Winnenden (Germany)
Tel.: +49 7195 14-0
Fax: +49 7195 14-2212
Winnenden, 2018/12/03
Techniniali duomenys
www.kaercher.com/REACH
EneMeHTn KepyBaHHa
D03yBaHHMaMNoOToPO3uHy
→HaTnCHyTN KHONKY MmIOOro PO3uHy niД yac po6oTo npIcTpoI.
ΦaKT Do3yBaHHB BiO6paXaETbCra Ha dncnnei.
Iiuc KxHoro HaTnCKaHHK HONKN iINBUNyETbC TynHbO3yBaHH.
ΦOTo 8,ДИВ.сторнky cynepe6knadnHKn
1До3уВаHHЯ MИQUOуо рОЗУHу BIMKHe-HO
2D03yBaHHMNIOHOPO3HHy, CTyniHb 3
BCMOKryBaHHn iD yac pyxy Ha3aI
→ HATINCHyTN yHn3 KepMO, uo6 uitKa nID-HaIacr,-BCMOKtYBaJIbHa nlaHka NOBepTaetbCra do nepeHbOi CTOPOHn npNCTpOIO.
OnyctTu npucTpi.
→ DAtn npncptpo 3aHi xi.
OuichiHHH6e3BCMOKTyBaHH
BCTaHOBHTBIMNKaH npNCtpoU y noJIOXKeHH "0".
BcMOKTyBaIbHy nlaHky BCTaHOBTn iπ npnaad nocepeniHi.
→ΠiHЯТи BCMOKTyBaJIbHy nlaHky, BTNCHyTn peYIaTOp BCMOKTyBaJIbHOI nHaKn i NOBepHyTu NOrO 3a RoINHHKOBOIO CTpiIKoIO.
BCTaHObitb BmNka npncTpoHa "I".
→ HaTnchTyN KONky BCMOKTyBaHHa - np6m3HO uepe3 15 ckyHd BCMOKTyBaHHa npnnHHTbcra.
→ PpOBeCTM MmKy.
3aBepwnOuHn
3actocyBaTN 3ano6iKHN BUMNKaU.
BCTaHOBHTBIMNKaH npucTpoU y noNoXKeHH "0".
→ΠiHЯТи BCMOKTyBaJbHy nJaHky, BTNCHyTn peYJrTOp BCMOKTyBaJbHoI nJaHKi i NOBepHyTu NOrO 3a rOdHHN-KOBOIO CTpiIKHO.
ΦikcaTOp KepMa NOTaTTN Bropy i yTpnu MyBaTu.
BCTaHOBtN KePMoBy KOJOhky BepTNKaJIbHo.
BidnyctuTn pfikcatop kepMa.
BndaenHbMicty3pe3epByapa 46pydHOI BOIN
Bka3iBka:
Pn NOBHOy 6aui dnyHOI BOH nonJIabeue 3akpNBae BCMOKTyBaHbHN KaHaJI. Ppoec BCMOKTyBaHHnepePBAcTbcN. CnpoKHTn 6ak dna 3abpydHeOH BOH.
△NONEPEDXEHN
Cniodyume Micueeum HopMaM uOo cmiHux 00d.
BmKHyTn npntpi(INB.po3dIN «3a-BepueHHOuHHeHH>)
ΦOTO 9,ДИВ.сторнку сухиобларднки
1БnokyBaHHa
2 Kpnuka pe3epByapa 6pydnoi BOIN
3 Pe3epByap 6pydHoi BOIN
4 Pe3epByap chToBOn
5 3amok peeepbyapa nla 6pyndhoi BOIN
PiHnO6nBa 6NOKyBaHHa.
→ 3HRTKpUkY.
3Hrtn pe3epByap nna 6pydnoi BOIN (nVB. po3dn «3Himannpe3epByapy dna 6pydnoi BOIN)
→ Bnntn 6pydhy BoDy.
BikpnT3amok.
→ NOBHicTIO 3JNTN BOy 3 pe3epByapa.
→ПомИТи pe3epByap nIЯ 6pydHoi BOI YNCTOIO BOIOJ.
3akpuTn 3anop.
O6epEko nocTaBnT pe3epByap dny 6pydHO BOn Ha pe3epByap nry CTOI BOH. He nooKOHTn eJeMeHTN, No3Haehi cTpiKIOU.
PiHHTn 06nDb6NoKyBaHHa
BcTaHOBuTn Ta 3aΦikCyBaTn KpUkKy.
BudaeHHBaMICTy 3 pe3epByapa DnA YNCTOIO BODI
3Hrtnpe3epByapn86pydnoi BOIN (DNB. po3dIn «3HimaHHpe3epByapy dnn86pydnoi BOIN)
ΦOTo 6,ДиВ. cTOpiHky cynepeo6knadnHKn
1 Pe3epByap uHCTOI BODN
2 3nBnO TBippeepByapy dIa CbiKoi BOIN
3 Kpnuka pe3epByapa Ynctoi BODi
4 3aINBnO TBip 6aka YnCToI BODn
→ BnHrtn pe3epByap dna chcToi BOIN 3 npucTpo.
BikpnTn 3nVBn OTBip pe3epByapa DnryuNCTOIBODn.
BUNIHTMNUOHy pIDHy.
3akpnnt kpiuky peepByapa uictoi BOIN.
Bctabnt pe3epByap dna chctoi BOnn B anapaT.
TpaHcnpTyBaHHa
△OBEPEXHO
Hebe3neka mpaam ma nowokxeh!Pmu pmaHcnpmyaHHi cnid 3eephymu yeay haBaay npucmpoio.
BCTaHOBHTBUMKau npNCtpoU y noJIOXeHHA "0".
Φikcatop KePMA notTn Bropy i ytpnMyBaTu.
BcTaHOBtN KePMo y BepTnKaJIbHe noJIOXeHHr.
BidnyctHTn pfikcaTop KePma.
→ PpecyHytn npncptpi. a60
BCTAHOBHTBUMKau pncptpoU y noJIOXeHHa "0".
Φikcatop Kepma NotarNTBropy i ytpnMyBATN.
BCTaHOBHTn KepMo y rOpN3OHTaJIbHe nIOJKeHHr.
BncoKo niiHn npucpii 3a pyky Ta nepheecn.
→ Pn nepebe3eHHi anapaty B TpaHcnopTHHX 3acobax cnB bpaxobyBatN McUeBi dioHi depkaBHi HOpMn, HanpabNeHi Ha 3axnt BiKOB3aHHa Ta nepeKuJaHHa.
36epirahn
OSEPEXHO
He6e3neka mpaem ma nowkodxeHb! Ppu 36epiaaHHI 38epHymu yeaay Ha bazy npucmpoio.
Cen npnnae 36epiraTncra Nme y BHTpiHix npmuiueHHx.
DorjraTaTexhiuHe 06cnyroByBaHHa
HEBE3NEKA
Hebe3neca mpaemyeaHnaYepe3 bunaKo-ee yeimkHenH npunaoy.
Ipeod npoBeDeHHm 6yOb-kaux po6im 3 npucmpoeem cnid eumkhymu npucmpi i eumrahymu akmynnapop.
YBAGA
Hebe3neka nowkodxhen npucmpo 60 do, 0 eumikac. Pepe npoeedeHHm mexHnoo ocbnyooybaHn cidi cno-poxHum peepbyapu dna bpyho ma u-cmoi eodu.
TnahTexorJy
Piopo8o
YBATA
He6e3neKa yukodxehn. He 0npuckyme npucpiu eodmo ha he bukopcmoeyume aepecuHi zacobdnyuueHH
→ CnpopKHTn pe3epByap dIy6pydHoi BOIN.
→Помптпpe3epByapДЯбунHOI BOH NCTOIO BOJOIO.
→ Ppomntu Kpnuky 6aka dna 6pydnoi BOIN iD npoTOHIO BOHO.
InonnaKOBi Klanahn ONUCTHTN BOJIOHO raHJPKOHO.
PpOMHTBODHOOTBIP3no3HaUKOHO A
IpoDyTN CTNCHEHIM NOBITPm OTBip 3 nO3HaKoO «C».
→ BnlaNTn Bmict i3 pe3epByapa nIa CToI BOIN.
→ПомИТNпрUCПИ:3anOBHNTnpe3epByapДЯчICETOI BODIчICETOBODO(6e3MIOHO3ACO6y)Ta 3aJIIMHTnpUCPII NonpaQOBATn npOTAROM OHiCIXBUNIH i3 BKIOUeyHM 3BOJOKyBaYem IITOK.
→ BnIaIITN BmICT i3 pe3epByapa nIyCTO'BODN.
OuHCTnTn npnna3 30BHi, BIKOPNCToBbUOny dIraIcBoIBOIry raHcy, npocOeyH cIa6KIM IyKNHM po3HHOM.
OuHCTnI i nepeBipNT Ha 3HOC BCMOKTyBaJIbHy IIIAHky, y pa3i Heo6xIDHOCTI 3aMIHTN BCMOKtyBaJIbHi KpaIKN (INB. «Po60Tu 3 TexHiHoro OcCnyRObyBaHHA).
OuNTTN BCMOKTyBaJbHm pyKaB.
OuHCTUN Ta nepeBipNT Ha 3HOC uIT Ky.
MiHimaJIbHa IOBxInHa UeTINH: 10 MM.
3apdItbakmyTnTOp.
KoXHOrOToxHHa
OuHCTHTn fIbTp MmUHOrO po3HHy (INB. «Po6OTn 3 TexHiHOrO obcnyroByBaHHA»).
UoiuH
3a6e3neuTn npoBeHnHa npoHOBaHOI nepeBipKn 6e3neKn eektpnkOM.
PpOphiJnakTmHi pO6OtN
OuHHeHHBcMOKTyBaIbHoI nHaHKN
Bpa3i BnHnKHeHHN NOxKOJxKeH, kI He MoXHa yCyHyTN 3a DOnOMOrO UcIe TAbNIu, TepeohyTe Do cepBicHO cHTpy.
Pnncpti He npaioe
BCTaHOBNTI rONOBHn BUMNKaY B noJIOXeHHra "1".
→KaHnCnnei 3'ABnEeBcna NobiDOMHeHH npo HecnpaBHCtB, BiPa3y BmKHytn npucptpi Ta 3BepHyTncdo WgePCHr Cnyx6n.
→ PpaBnIbHO BCTaHOBHTn aKymyTOp y npncTpNi.
→ POnuBnTnca Ha nucnnei pibHeb 3aprKn akyMnyIaTopa, y pa3i Heo6xHocTi 3apraNTn akyMnyIaTop.
PpO6IeMn iD yac 3apJxKaHHa akymyIaTopa
3a donomoroMQepeKBeRo Ka6eJI npabNlbo NiDKIIOHTn 3apJdHn npu- cTpiJ do eJeKTpOmepeKi.
IpeBipuTn, uI npuaTHn 3apAHH npucpi dIe ekcnnyatauii Bid uei eNeKtpomepeki.
IIndkaia HecnpaBHOtei 3apdHoro npictpo
- YepBoHn cBITIOIOIDHn iHnKaTOp 6nMae 1 pa3 AkymyIaTOp noIkoDKeHn.
-epBOHn CBITIOIOHN iINkKatop 6nmae 2 a6o 3 pa3n 3apdHn npucptpi HecnpaBHN. Bi'EDHaTn 3apdHn npucptpi BiD eEKeKtpomepexi, TPOXn NOeKaTu, NoTIM 3HOB NIKIQUHTN Do MepeXi. Pn 3aJIuWeHHI 360O 3BepHyTncB cepBicHy cnYk6y.
-epBOHn cBITIOIOHN iHnKaTOp 6nMae 4 pa3n IpeperpiBaHHa3apdHOro npCTpo. IocTabHTn 3apdHn npCTpIy Mic3 BilbHM DOCTyNOM NOBITpy dIra NOrO OXONODKeHHa. POnekATn, nOKn 3apdHn npCTpi OXONOHe.
Ubndke po3pdkaHHaKymyIaTopa
→ NobHicTIO 3apAaTN aKymyIaTOP.
3amano MNIOORO po3uHy
→ IpepeBipuPiBeH 3aNoBHeHHpe3epByapa dIy uCToI BOn.
36ilbWHTN Do3yBaHHaMnHOHoro po3HHy.
OuHCTnTn pInbTp MmHOrO PO3Hy.
HeoctaTHnoTyXHictbOuHenn
36iIbWHTN Do3yBaHHaMnHOHoro po3HHy.
36inbwntnnoTyxhictbOuHnEHHa.
→ Ipepeipntu TnTtTK Ta YnCTyoro 3a-coby Ha npndaTHicTB.
3amihmtn 3HOWeHy 1tKy.
HeoctaTHNoTyXHicTb BCMOKTyBaHH
3BilbHHTn pe3epByap 6pydHOBoN.
OuHCTnTn BCMOKTyBaIbHy nIaHKy Ta BCMOKTyBaIbHNJHaHr.
→ IpebeipuTn npabunbHiCTb BcTaHOB-NeHHKpNsiKn pe3epByapa dna 6pydHOI BOi.
→ ΠepeBipu npabunbHictb noJoxKeHHa 3amka y pe3epByapi dny6pydHO BOHN.
→ IpebipuKpnuKpypeepByapa dIa 6pydHOI BOIN Ha BiCyTHiCtB 3acMueHn.
OuHCTnTn nonIaBOK Ha KpnIuCi pe3epByapa dna 6pydnoI BOIN.
Akcecyapn
Chairman of the Board of Management
S. Reiser
Director Regulatory Affairs & Certification
YnOBHOBaKeHH CnIBpo6iTHNK NO BeeHHIO DOKyMeHTo06iRy:
S. Reiser
Alfred Karcher SE & Co. KG
71364 Winnenden (Germany)
Tel.: +49 7195 14-0
Fax: +49 7195 14-2212
Winnenden, 2018/12/03
TexHiX xaapKTePncTnKn
"1"g0ll jc sssjllbla bla 1
l| c, jy jyjyj yjyj xic
.0aall a oJyJyJyJy JyJy
JyJyJyJyJyJy JyJy
JyJyJyJyJyJy JyJy
JyJyJyJyJyJy JyJy
aJlllall jw sic Jslio
jgego jswaswll JsJwosj< 1uagalg>swll asswll gge golg no slll
JLJLJLJLJLJLJLJLJLJLJLJLJLJLJLJLJLJLJLJLJLJLJLJLJLJLJLJLJLJLJLJLJLJLJLJLJLJLJLJLJLJLJLJLJLJLJLJLJLJLJ L J 1 J 1 J 1 J 1 J 1 J 1 J 1 J 1 J 1 J 1 J 1 J 1 J 1 J 1 J 1 J 1 J 1 J 1 J 1 J 1 J 1 J 1 J 1 J 1 J 1 J 1 J 1 J 1 J 1 J 1 J 1 J 1 J 1 J 1
aagg jyj 1jyj yj jyj
12>JdG 120
.aaabill oall jg sgsuwoo 5ll < aabill Jgl>0 oJy20 oJy j < .aabill Jgl>0 jil9 aabii
(3) a_1 + a_2 + ·s + a_n = a_1 + a_2 + ·s + a_n
. 1 JgJgO OoJz <
. 1 JgJgO OsJ J200
aosJn o gogoljgsjg
. aasall aal Oslo
. agall olwrll Jldw
aui jaiwll aLac
aaiall oaii jgsy p 1 aaii g baii g aai i 10aii jg caii jg 10aii jg 10aii jg 10aii jg 10aii jg 10aii jg 10aii jg 10aii jg 10aii jg 10aii jg 10aii jg 10aii jg 10aii jg 10aii jg 10aii jg 10ai
aaiololjg a
9 aagaaog allo 1a9 a2b9 oaiw
jglal caiuii juc Jglz
Jill aooa a>9g baooll gjj
(“aIalll Jlaic" jai) a>Jai sic aJauwlg
.1aaiIgBjxui
cJyI yg aJyI gJyI aJyI
10olwjlljwJgbld
aJbllj>awl
c
Jlac"jzil) caiiill Jgdo jia
gim
j 100000000000000000000000000000000000000000000
aJl
Iaillgjjc
alil,10
ai a ai 的最小值为 k .
2
aewllgbr 3
< 1, C 4
5
olwJlEeJz
a>olzjusc°90wllalwgjla!
()
pLswL bawll gBawll gJbaw < aBjRwlaaBaaLgBaw pOwl .bwll 0>
lllalgl allaalbaaalg> g jllal gaaalgjssd
aJfJ
aabillollljgde
aaiololj
LgWgI IgaaalrJyAaWgDw E .sgsall gogll gaaal
.2galljjaiwog
aJl jJgJdJlaI < aJwJzJzJ>
aLg aIg 0d2d2d00
aaiill Jgao jil Cai
aaiJg aaiJIolalj
.1aWg aWbJg>
jallls olacl
.aaill aalll
2a211 0 a1a211
:aill b5 a
olalg aabll olall ojg aai
Joo 10000000000000000000000000000000000000000000
aaiollolall
("aasssolalj
0.0006
aIJl^ _
1auiol
2a.bill c
3a:llol.
4. a11cl
jge1c
<aa.bai
←
←
←
lljIw wog jbi
aaiilolololc
Jai
aag
olco 1y jwal josill jbs ayj bs Jaiil uic jzll
0, gogll jgljglzao bao
Lgglcll gaaal alw g
.
gaoal jyjaiwog
jglj
←
91
- ggl jgcllae kaw w 1w,g, Jgaoaal y alw g
<.baill 8j w Jaaill pRgJbawll
al>1gJaaJiaaoa JgJai
J 100
aall 1jJll
#
aai
ololol 11111111111111111111
y j s g w jgll i 2 y jy y slo aol
a|la|g a|la|
ab > a
129 jg/1 Jaiu aui ay loy1 125 1/uu / uj g/1 LJLAC/a/0>1
a_i l( i = 1,2, ) > j ≤ j ≤ i
4
olallgclallljgljylyj 1 aIJlac/1c>1 j9 adillol allg
1
aIyIbIe 1c oJgbs J5.29 0 0 0 0 0 0 0 0 0 0 0 0 0 0 0 0 0 0 0 0 0 0 0 0 0 0 0 0 0 0 0 0 0 0
aJiaall aagai jao jorjll jogaaal ogey REACH) 1g> 1sJggo 1g> aIgale all
www.kaercher.com/REACH
Jasniyolic
| "ECO" | 1 |
| "AUTO" | 2 |
| "AWA" | 3 |
| "JAZZ" | 4 |
| "JAZZ" | 5 |
| "JAZZ" | 6 |
| "JAZZ" | 7 |
| "JAZZ" | 8 |
| "JAZZ" | 9 |
| "JAZZ" | 10 |
| "JAZZ" | 11 |
| "JAZZ" | 12 |
| "JAZZ" | 13 |
| "JAZZ" | 14 |
| "JAZZ" | 15 |
| "JAZZ" | 16 |
| "JAZZ" | 17 |
| "JAZZ" | 18 |
| "JAZZ" | 19 |
jllaw
http://www.kaercher.com/dealersearch