TravelMate 8571 - Laptop ACER - Free user manual and instructions
Find the device manual for free TravelMate 8571 ACER in PDF.
| Product type | Laptop |
| Brand | Acer |
| Model | TravelMate 8571 |
| Processor | Intel Core 2 Duo (up to 2.53 GHz) |
| RAM | 4 GB DDR2 (expandable) |
| Hard drive | 320 GB SATA (5400 rpm) |
| Screen | 15.6-inch HD (1366 x 768 pixels) |
| Weight | 2.8 kg |
| Dimensions (W x D x H) | 380 x 260 x 30 mm |
| Power supply | 65 W AC adapter |
| Battery | 6-cell lithium-ion (48 Wh) |
| Operating system | Windows 7 Professional |
| Connectivity | Gigabit Ethernet, WiFi 802.11 b/g/n, Bluetooth 2.1 |
| Ports | 3 x USB 2.0, 1 x VGA, 1 x HDMI, 1 x RJ-45, microphone/headphone jack |
| Webcam | Acer Crystal Eye (0.3 Megapixels) |
| Optical drive | DVD±RW |
| Main functions | Office work, Internet browsing, multimedia |
| Maintenance and cleaning | Clean with a soft, lint-free cloth. Avoid any liquid. |
| Security | Kensington lock slot, Acer Bio-Protection fingerprint reader (on some models) |
| Spare parts and repairability | Battery, adapter, hard drive, RAM, optical drive |
| General information | User guide in PDF format preloaded on the computer |
Frequently Asked Questions - TravelMate 8571 ACER
User questions about TravelMate 8571 ACER
0 question about this device. Answer the ones you know or ask your own.
Ask a new question about this device
Download the instructions for your Laptop in PDF format for free! Find your manual TravelMate 8571 - ACER and take your electronic device back in hand. On this page are published all the documents necessary for the use of your device. TravelMate 8571 by ACER.
USER MANUAL TravelMate 8571 ACER
TravelMate 8571/8531 Series
Quick Guide
© 2010 All Rights Reserved.
TravelMate 8571/8531 Series Quick Guide
Original Issue: 03/2010
TravelMate 8571/8531 Series Notebook PC
Model number: ____
Serial number: ____
Date of purchase: ____
Place of purchase: ____
First things first
We would like to thank you for making an Acer notebook your choice for meeting your mobile computing needs.
Your guides
To help you use your Acer notebook, we have designed a set of guides:
First off, the Just for Starters... poster helps you get started with setting up your computer.
The TravelMate Series Generic User Guide contains useful information applying to all models in the TravelMate product series. It covers basic topics such as using the keyboard and audio, etc. Please understand that due to its nature, the Generic User Guide as well as the AcerSystem User Guide mentioned below will occasionally refer to functions or features which are only contained in certain models of the series, but not necessarily in the model you purchased. Such instances are marked in the text with language such as "only for certain models".
The Quick Guide introduces you to the basic features and functions of your new computer. For more on how your computer can help you to be more productive, please refer to the AcerSystem User Guide. This guide contains detailed information on such subjects as system utilities, data recovery, expansion options and troubleshooting. In addition it contains warranty information and the general regulations and safety notices for your notebook. It is available in Portable Document Format (PDF) and comes preloaded on your notebook. Follow these steps to access it:
1 Click on

Start, All Programs, AcerSystem.
2 Click on AcerSystem User Guide.

Note: Viewing the file requires Adobe Reader. If Adobe Reader is not installed on your computer, clicking on AcerSystem User Guide will run the Adobe Reader setup program first. Follow the instructions on the screen to complete the installation. For instructions on how to use Adobe Reader, access the Help and Support menu.
Your Acer notebook tour
After setting up your computer as illustrated in the Just for Starters... poster, let us show you around your new Acer notebook.
Top view
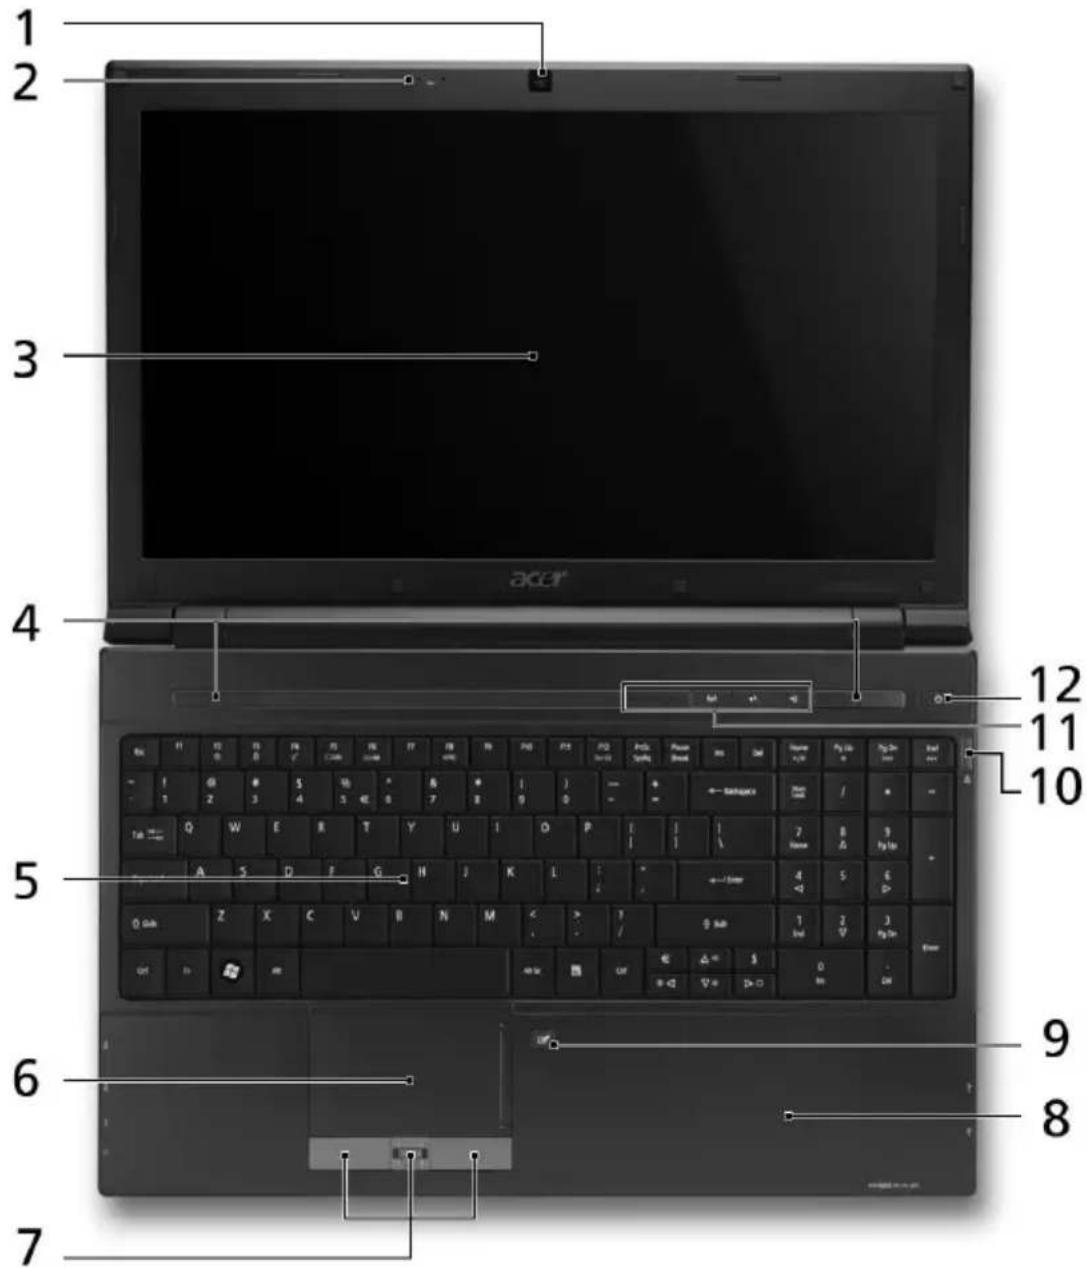
Icon Item Description
| 1 Acer Crystal Eye webcam | Web camera for video communication. (only for certain models) |
| # | Icon | Item | Description |
| 2 | Microphone Internal microphone for sound recording. | ||
 | |||
| 3 | Display screen Also called Liquid-Crystal Display (LCD), displays computer output (Configuration may vary by models). | ||
| 4 | Speakers Left and right speakers deliver stereo audio output. | ||
| 5 | Keyboard For entering data into your computer. | ||
| 6 | Touchpad Touch-sensitive pointing device which functions like a computer mouse. | ||
| 7 | Click buttons (left, center* and right) | The left and right buttons function like the left and right mouse buttons. *The center button serves as Acer Bio-Protection fingerprint reader supporting Acer FingerNav 4-way control function (only for certain models). | |
| 8 | Palmrest Comfortable support area for your hands when you use the computer. | ||
| 9 | Touch1  Toggle Turns the internal touchpad on and off. Toggle Turns the internal touchpad on and off. | ||
| 10 | Eject button Presses to eject the optical disk from the drive. | ||
| Optical disk access indicator | Lights up when the optical drive is active. | ||
| 11 | HDD Indicates when the hard disk drive is active. | ||
 | Num Lock Lights up when Num Lock is activated. | ||
 | Caps Lock Lights up when Caps Lock is activated. | ||
 | Communication key | Enables / disables the WLAN / 3G functions. | |
 | Backup key Launches Acer Backup Management for three-step data backup. | ||
 | Acer PowerSmart key | Puts your computer into power-saving mode. | |
| 12 | Power button / indicator | Turns the computer on and off. / Indicates the computer's power status. | |
Hotkeys
The computer employs hotkeys or key combinations to access most of the computer's controls like screen brightness and volume output.
To activate hotkeys, press and hold the
| Hotkey Icon Function Description | |||
+ <F2> Syst | property | Starts System Property for displaying system information. | |
+ <F3> Bluetooth  | Enables/disables the Bluetooth function. (only for certain models) | ||
+ <F4> Sleep Puts the computer in Sleep mode. | |||
+ <F5> Display | toggle | Switches display output between the display screen, external monitor (if connected) and both. | |
+ <F6> Screen | blank | Turns the display screen backlight off to save power.Press any key to return. | |
+ <F8> Speaker | toggle | Turns the speakers on and off. | |
+ <▶ | Brightness up | Increases the screen brightness. | |
+ <▶ | Brightness down | Decreases the screen brightness. | |
+ <▶ | Volume up | Increases the sound volume. | |
+ <▶ | Volume down | Decreases the sound volume. | |
Closed front view

natural_image
Laptop rear panel with labeled parts 1 and 2, showing ventilation grille and ventilation duct (no text or symbols beyond labels)# Icon Item Description
1 Battery Indicates the computer's battery status.

- Charging: The light shows amber when the battery is charging.
- Fully charged: The light shows blue when in AC mode.
2 Multi-in-1

card reader

Accepts Secure Digital (SD),
MultiMediaCard (MMC), Memory Stick (MS), Memory Stick PRO (MS PRO), xD-Picture Card (xD).
Note: Push to remove/install the card. Only one card can operate at any given time.
Rear view

natural_image
Black rectangular electronic device with a labeled component '1' (no text or symbols on the body)# Icon Item Description
1 Battery bay Houses the computer's battery

pack.
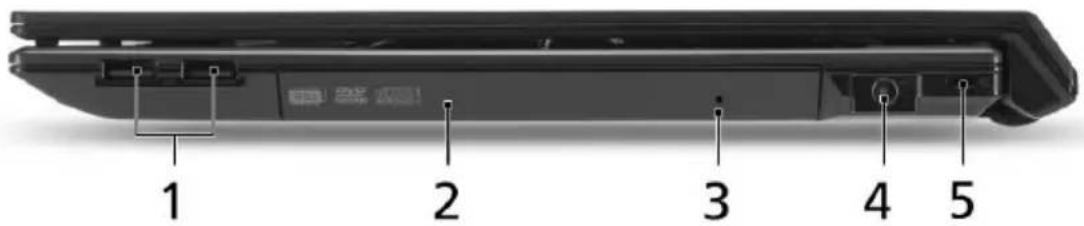
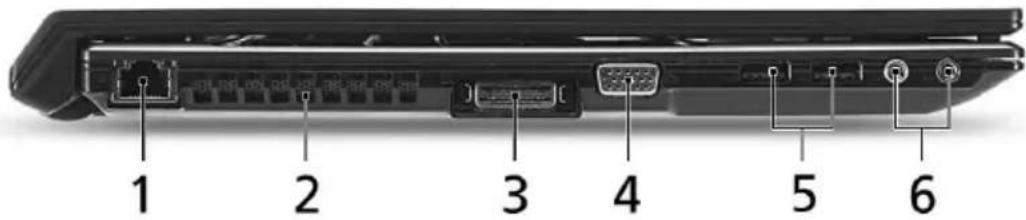
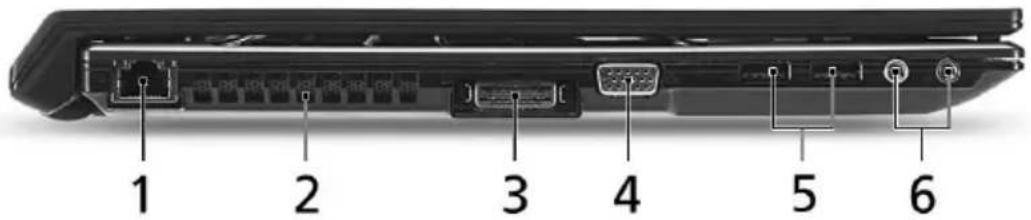
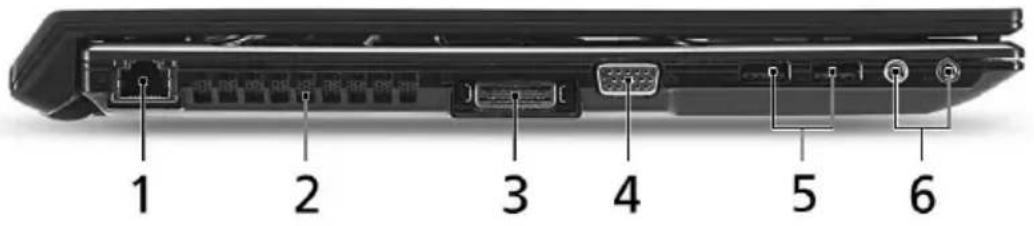
Left view

Icon Item Description
1 Ethernet (RJ-45) port Connects to an Ethernet 10/100/1000- based network. based network. | ||
| 2 Ventilation slots Enable the computer to stay cool, even after prolonged use. | ||
3 Acer Easy Port IV  connector connector | Connects to Acer EasyPort IV. | |
4 Ext display  (VGA) port (VGA) port | Connects to a display device (e.g., external monitor, LCD projector). | |
| 5 USB 2.0 port Connect to USB 2.0 devices (e.g., USB mouse, USB camera). | ||
6  | Microphone-in jack | Accepts inputs from external microphones. |
 | Headphones/speaker/ line-out jack | Connects to audio line-out devices (e.g., speakers, headphones). |
Right view
# Icon Item Description
1 USB 2.0 port Connects to USB 2.0 devices (e.g., USB mouse, USB camera).
2 Optical drive Internal optical drive; accepts CDs or DVDs.
3 Emergency eject hole Ejects the optical drive tray when the computer is turned off. Note: Insert a paper clip to the emergency eject hole to eject the optical drive tray when the computer is off.
4 DC-in jack Connects to an AC adapter.

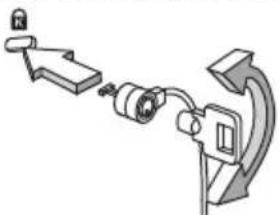
5 Kensington lock slot Connects to a Kensington-compatible

natural_image
Pure mechanical diagram showing a linkage mechanism with no text or symbolscomputer security lock.
Note: Wrap the computer security lock cable around an immovable object such as a table or handle of a locked drawer. Insert the lock into the notch and turn the key to secure the lock. Some keyless models are also available.
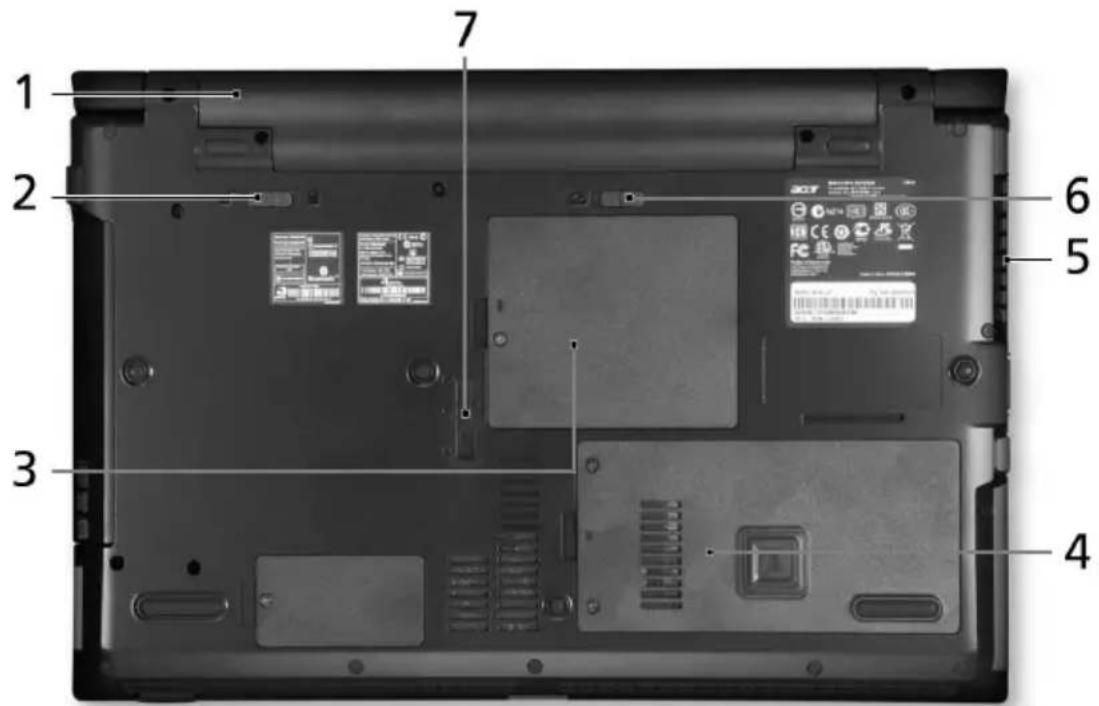
Base view

# Icon Item Description
1 Battery bay Houses the computer's battery pack.

2 Battery lock Locks the battery in position.

3 Memory compartment Houses the computer's main memory.
4 Hard disk bay Houses the computer's hard disk

(secured with screws).
5 Ventilation slots and cooling fan
Enable the computer to stay cool, even after prolonged use.
Note: Do not cover or obstruct the opening of the fan.
6 Battery release latch Releases the battery for removal.

7 Acer MediaBay release
Lock or unlock Acer MediaBay device (only for certain models).

Environment
- Temperature:
- Operating: 5^ C to 35^ C
• Non-operating: -20°C to 65°C
• Humidity (non-condensing): - Operating: 20% to 80%
• Non-operating: 20% to 80%
Gamme TravelMate 8571/8531
Guide rapide
natural_image
Laptop back panel with labeled parts 1 and 2, showing front and side views (no text or symbols beyond labels)natural_image
Black rectangular electronic device with a labeled component '1' (no text or symbols on the body)natural_image
Diagram of a mechanical or electrical component with directional arrows and a lock icon (no text or symbols)Vue de la base

natural_image
Laptop rear panel with labeled parts 1 and 2, showing ventilation grille and ventilation duct (no text or symbols beyond labels)natural_image
Black rectangular electronic device with a labeled component '1' (no other text or symbols visible)natural_image
Laptop rear panel with labeled parts 1 and 2, showing ventilation grille and ventilation slots (no text or symbols beyond labels)Supporta Secure Digital (SD),
MultiMediaCard (MMC), Memory Stick (MS), Memory Stick Pro (MS PRO), exD-Picture Card (xD).
natural_image
Black rectangular electronic device with a labeled component '1' on its side (no other text or symbols visible)natural_image
Laptop rear panel with labeled parts 1 and 2, showing ventilation grille and ventilation duct (no text or symbols beyond labels)natural_image
Black rectangular electronic device with a labeled component '1' (no other text or symbols visible)natural_image
Mechanical assembly diagram showing a linkage mechanism with no visible text or symbolsVista de la base

natural_image
Laptop rear panel with labeled parts 1 and 2, showing ventilation grille and ventilation duct (no text or symbols beyond labels)MultiMediaCard (MMC), Memory Stick (MS), Memory Stick PRO (MS PRO), exD-Picture Card (xD).
natural_image
Black rectangular electronic device with a labeled component '1' on its side (no other text or symbols visible)natural_image
Diagram of a mechanical device with a lock and rotating arm, showing motion direction (no text or symbols)Visão da base

natural_image
Laptop rear panel showing front and back views with labeled parts (no text or symbols beyond labels)natural_image
Black rectangular electronic device with a labeled component '1' on its side (no other text or symbols visible)natural_image
Diagram of a mechanical or electrical device with directional arrows and components (no text or symbols)Onderkant

natural_image
Laptop rear panel with labeled parts 1 and 2, showing ventilation grille and ventilation duct (no text or symbols beyond labels)# Ikon Element Beskrivelse
1 Batteriindikator Angir datamaskinens batteristatus.

- Lading: Lampen lyser gult när batteriet lades.
- Helt oppladet: Lampen lyser blått i nettstrømmodus.
2 Multi-i-1-kortleser Godtar Secure Digital (SD),


MultiMediaCard (MMC), Memory Stick (MS), Memory Stick Pro (MS PRO), og xD-Picture Card (xD).
natural_image
Black rectangular electronic device with a labeled component '1' (no other text or symbols visible)# Ikon Element Beskrivelse
1 Batterirom Huser datamaskinens batterier.

Venstre visning
Ikon Element Beskrivelse
natural_image
Mechanical assembly diagram showing a linkage mechanism with no visible text or symbolsKobler til en Kensington-kompatibel sikkerhetslås for datamaskinen.
Merk: Koble en sikkehetslåskabel rundt et ubevegelig objekt som et bord eller håndtaket på en låst skuff. Sett inn läsen i sporet og vri om nøkkelen for å låse. Noen nøkkelløse modeller er også tilgjengelige.
Bunnvisning

# Ikon Element Beskrivelse
1 Batterirom Huser datamaskinens batterier.

natural_image
Laptop rear panel with labeled parts 1 and 2, showing ventilation grille and ventilation duct (no text or symbols beyond labels)# Ikon Emne Beskrivelse
1 Batteri Angiver computerens batteristatus.

- Oplader: Lampen lyser gult, när batteriet oplader.
- Fuldt opladet: Lampen lyser blåt i AC-tilstand.
2 Multi-i-1-kortlæser Acceptorer Secure Digital (SD),


MultiMediaCard (MMC), Memory Stick (MS), Memory Stick PRO (MS PRO), og xD-Picture Card (xD).
natural_image
Black rectangular electronic device with a labeled dimension line marked '1' (no text or symbols on the device itself)# Ikon Emne Beskrivelse
1 Batteribås Indeholder computerens batteri.

Set fra venstre
Ikon Emne Beskrivelse
natural_image
Laptop rear panel with labeled parts 1 and 2, showing ventilation grille and ventilation duct (no text or symbols beyond labels)natural_image
Black rectangular electronic device with a labeled component '1' on its side (no other text or symbols visible)natural_image
Diagram of a mechanical device with a lock and rotating arm, showing motion direction (no text or symbols)natural_image
Laptop rear panel with labeled parts 1 and 2, showing ventilation grille and ventilation duct (no text or symbols beyond labels)natural_image
Black rectangular electronic device with a labeled component '1' on the side (no other text or symbols visible)natural_image
Diagram of a mechanical device with a lock and rotating arm, showing motion direction (no text or symbols)Pohjanäkymä
natural_image
Laptop rear panel showing front and back views with labeled parts (1 and 2), no text or symbols on the body itself.natural_image
Black rectangular electronic device with a labeled component '1' at the base (no other text or symbols visible)natural_image
Laptop rear panel with labeled parts 1 and 2, showing ventilation grille and ventilation duct (no text or symbols beyond labels)# Ikona Element Opis
1 Akumulator Wskazuje stan akumulatora komputera.

natural_image
Black rectangular electronic device with a labeled component '1' (no other text or symbols visible)# Ikona Element Opis
1

Wnęka na akumulator
natural_image
Laptop rear panel with labeled parts 1 and 2, showing ventilation grille and ventilation duct (no text or symbols beyond labels)# Ikon Elem Leírás
natural_image
Black rectangular electronic device with a labeled component '1' (no text or symbols on the body)# Ikon Elem Leírás
natural_image
Diagram of a mechanical device with directional arrows indicating motion or force (no text or symbols)Alulnézet

# Ikon Elem Leírás
natural_image
Laptop rear panel with labeled parts 1 and 2, showing ventilation grille and ventilation duct (no text or symbols beyond labels)Ikona Položka Popis
natural_image
Black rectangular electronic device with a labeled component '1' at the base (no other text or symbols visible)Ikona Položka Popis
natural_image
Laptop rear panel with labeled parts 1 and 2, showing ventilation grille and ventilation duct (no text or symbols beyond labels)Ikona Položka Popis
| 1 |  | Batéria | Signalizuje stav batérie počítača.1. Nabíjanie: Pri nabíjaní batérie svieti žltá kontrolka.2. Nabité doplna: V režime AC svieti modrá kontrolka. |
| 2 |  | Čítačka kariet Multi-in-1 | Podporuje karty Secure Digital (SD), MultiMediaCard (MMC), Memory Stick (MS), Memory Stick PRO (MS PRO) a xD-Picture Card (xD).Poznámka: Stlačením kartu vytiahnete/ vsuniete. Súčasne môže fungovat’ iba jedna karta. |
 | |||
 |
Pohl'ad zozadu

natural_image
Black rectangular electronic device with a labeled component '1' at the base (no other text or symbols visible)Ikona Položka Popis
natural_image
Laptop rear panel showing front and back views with labeled components (no text or symbols on the body)Ikona Predmet Opis
natural_image
Black rectangular electronic device with a labeled component '1' at the base (no other text or symbols visible)# Ikona Predmet Opis
1 Nosilec za baterijo Hrani baterijo računalnika.

Pogled iz leve strani
Ikona Predmet Opis
natural_image
Laptop rear panel with labeled parts 1 and 2, showing ventilation grille and ventilation duct (no text or symbols beyond labels)Prihvaća Secure Digital (SD), MultiMediaCard (MMC), Memory Stick (MS), Memory Stick PRO (MS PRO), xD-Picture Card (xD) kartice.

Napomena: Gurnite za uklanjanje/postavljanje kartice. Pogon može istodobno koristiti samo jednu karticu.

Pogled straga

natural_image
Black rectangular electronic device with a labeled component '1' on its side (no other text or symbols visible)#
Sličica
Stavka
Opis
natural_image
Laptop rear panel with labeled parts 1 and 2, showing ventilation grille and ventilation duct (no text or symbols beyond labels)natural_image
Black rectangular electronic device with a labeled component '1' (no other text or symbols visible)natural_image
Laptop front panel showing ventilation grille and ventilation slots (no text or symbols)natural_image
Side view of a black electronic device with a labeled component '1' (no text or symbols on the device itself)natural_image
Laptop rear panel showing front and back views with labeled components (no text or symbols on the body)natural_image
Black rectangular electronic device with a labeled component '1' at the base (no other text or symbols visible)natural_image
Diagram of a mechanical device with a lock and connecting rod, showing motion direction (no text or symbols)Põhjavaade

natural_image
Laptop rear panel with labeled components (1 and 2), showing ventilation grille and ventilation slots (no text or symbols beyond labels)natural_image
Black rectangular electronic device with a labeled component '1' (no other text or symbols visible)natural_image
Back view of a laptop with labeled parts (1 and 2), showing front panel and side panel (no text or symbols beyond labels)# İçin Öğe Açıklama
(MMC), Memory Stick (MS), Memory Stick PRO (MS PRO), ve xD-Picture Card (xD) kabul eder.
natural_image
Black rectangular electronic device with a labeled dimension line marked '1' (no text or symbols on the device itself)# İçin Öğe Açıklama
1
Pil bölmesi
© 2010 All Rights Reserved.
natural_image
Laptop back panel with labeled parts 1 and 2, showing front and side views (no text or symbols beyond labels)natural_image
Black rectangular electronic device with a labeled component '1' at the base (no other text or symbols visible)natural_image
Laptop front panel with labeled parts (1 and 2), showing internal ventilation grille and ventilation duct (no text or symbols beyond labels)natural_image
Black rectangular electronic device with a labeled component '1' on its side (no other text or symbols visible)natural_image
Laptop back panel with labeled parts 1 and 2 (no text or symbols on the body)natural_image
Black rectangular electronic device with a labeled component '1' on its side (no other text or symbols visible)natural_image
Laptop rear panel showing front and side views with labeled components (no text or symbols on body)# Ikon Item Penjelasan
1 Baterai Menunjukkan status baterai komputer.

- Mengisi daya: Lampu akan menyala kuning bila daya baterai sedang diisi.
- Daya terisi penuh: Lampu menyala biru bila dalam mode AC.
2 Pembaca kartu

Multi-in-1


Menerima Secure Digital (SD), MultiMediaCard (MMC), Memory Stick (MS), Memory Stick Pro (MS PRO), xD-Picture Card (xD).