EA8271 - Coffee machine KRUPS - Free user manual and instructions
Find the device manual for free EA8271 KRUPS in PDF.

User questions about EA8271 KRUPS
0 question about this device. Answer the ones you know or ask your own.
Ask a new question about this device
Download the instructions for your Coffee machine in PDF format for free! Find your manual EA8271 - KRUPS and take your electronic device back in hand. On this page are published all the documents necessary for the use of your device. EA8271 by KRUPS.
USER MANUAL EA8271 KRUPS
FR HOTLINE:BE:3270233159-FR:0974501061-CH:0800377737
EN HOTLINE: UK: 0845 330 6460 - ROI: (01) 677 4003
DE HOTLINE:DE:0800980000-AT:0800225225-CH:0800377737
NL HOTLINE:NL:0318582424
IT SERVIZIO CONSUMATORI: IT: 199 207701 - CH: 0800 37 77 37
ES HOTLINE:ES:902312300
PT Centro de Contacto do Consumidor: PT: 808 284 735
EL EAAADA:GR:2106371251
RU TOPRAJJIINHJ:RU:4952133228
UK YKPAIHA:UK:0443001304
PL INFOLINIA:PL:0801300420
CS HOTLINE:CZ:731010111
SK ZAKAZNICKA LINKA:SK:233595224
HU ÜGYFÉLSZOLGÁLAT: HU: (1) 8018434 567

8080014574-03
KRUPS
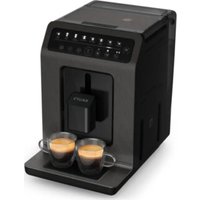
ESPRESSERIA AUTOMATIC
SERIE EA80 EA82

www.krups.com


25
29
33
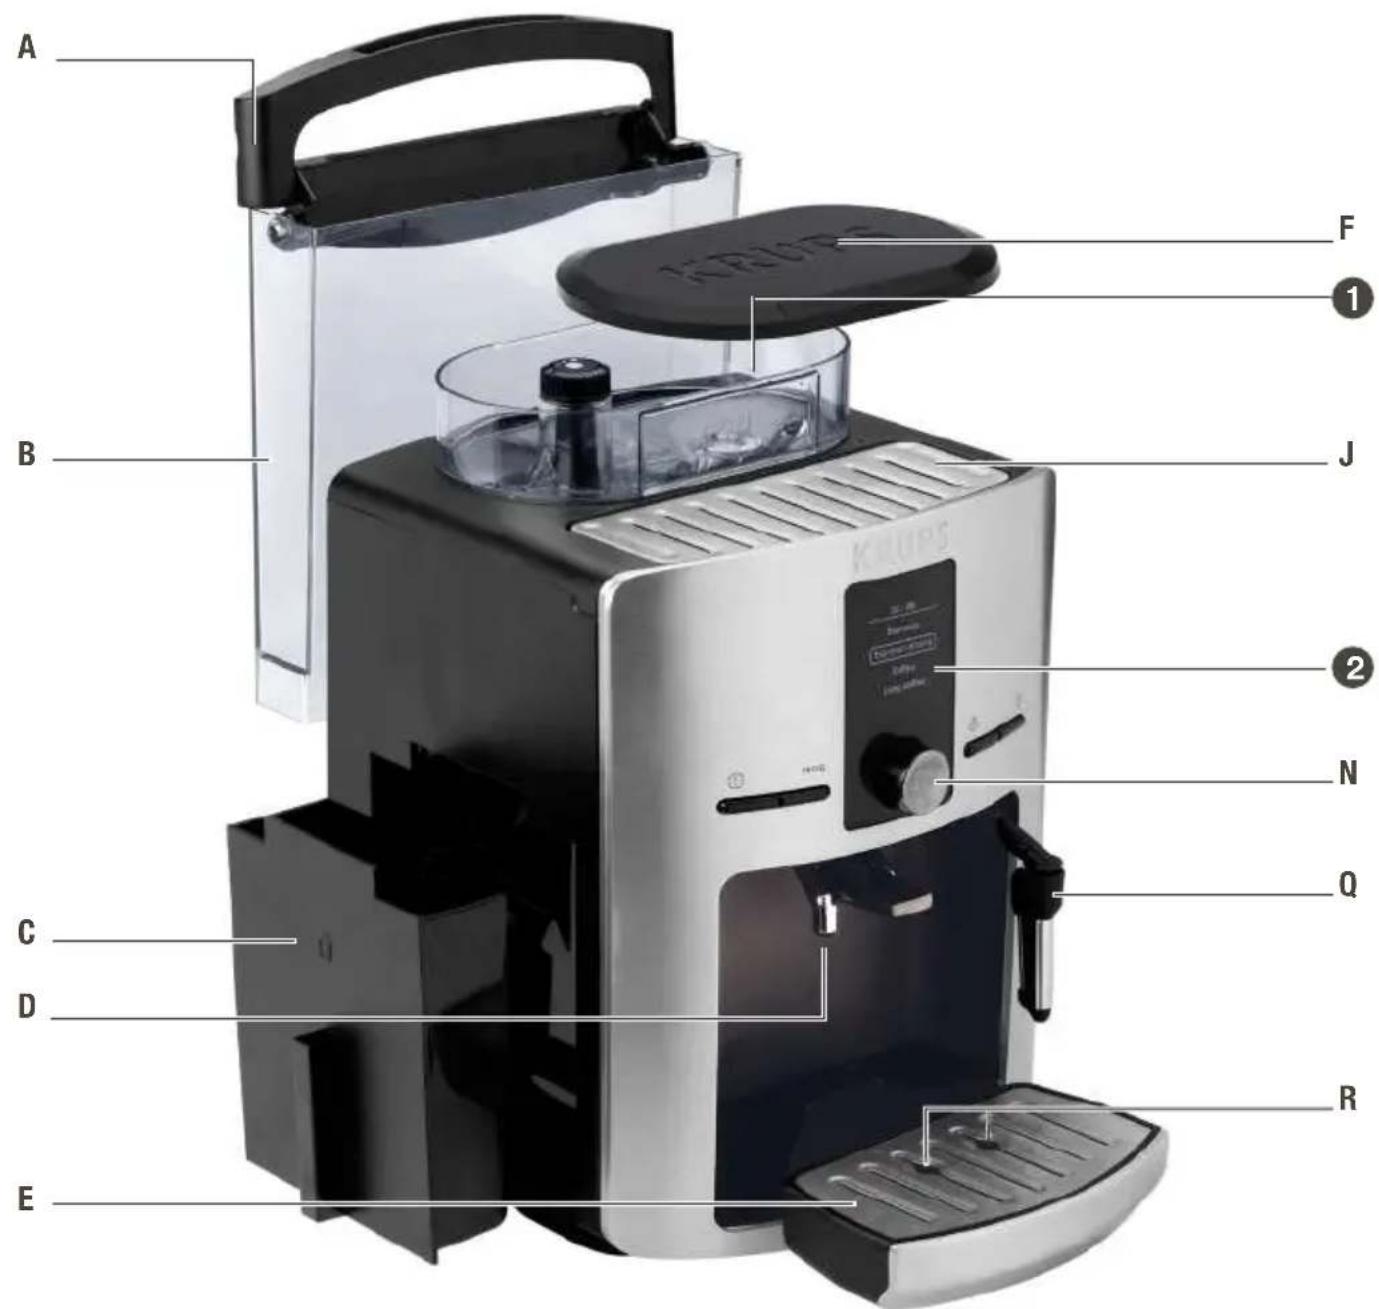
DESCRlPTIF
INFORMATIONS PRODUIT
A Water tank handle/lid
B Water tank
C Coffee grounds collector
D Coffee outlets and height-adjustable handle
E Grid and removable drip tray
F Coffee bean hopper lid
Coffee bean hopper
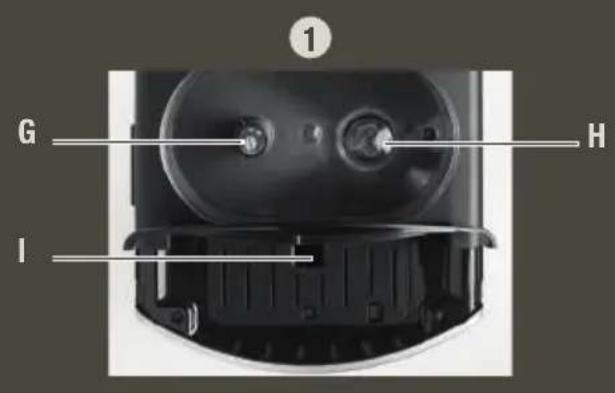
G Grinding fineness setting knob
H Metal grinding mill
Cleaning inlet
J Cup tray
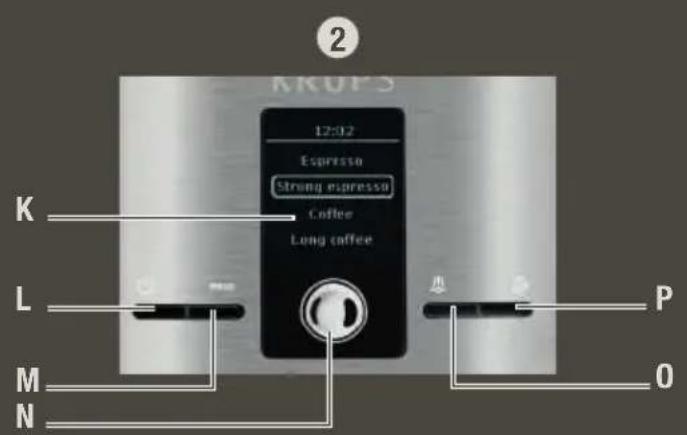
Control Panel
K Display screen
L "On/off" button
M Programmable button
N OK button
Steam button
P Hot water
Q Steam nozzle
R Water level floats
Dear Customer,
Thank you for having purchased this Krups Espresseria Automatic. We are sure you will enjoy both the quality of the coffee it makes and how easy it is to use.
Whether you want a short, strong shot of a ristretto, a good espresso, a larger and milder lungo, or a creamy cappuccino, your automatic coffee / espresso machine has been designed so you can enjoy the same quality at home as at the bistro, whatever the time of day and right through the week.
Thanks to its Thermoblock System, its 15 bar pump and because it uses real coffee beans that are ground just before the coffee is made, your Espresseria Automatic will give you a drink containing maximum aroma, with a fine creamy golden brown top produced by the natural oils contained in coffee beans.
Drink your espresso from small porcelain cups rather than the usual coffee cup or mug.
To obtain an espresso at just the right temperature and a nice compact creamy top, we advise you to pre-heat your cup.
After a few trial runs you will find the type of mix and roast of the coffee beans that suits your taste. The quality of the water used is obviously another essential factor in the coffee you get.
Make sure the water is fresh from the tap (contact with the air tends to make it stale), that it is free from chlorine odours and relatively cold.
Espresso coffee is richer in aroma than a conventional filter coffee. Despite its stronger, longer-lasting taste, espresso in fact contains less caffeine than filter coffee (about 60 to 80 mg a cup as compared with 80 to 100 mg a cup). This is due to the shorter percolation time. Due to the visibility of the containers and its automatic cleaning and scale removal programs, your Espresseria Automatic is extremely easy to use.
BEFORE FIRST USE
Measuring water hardness
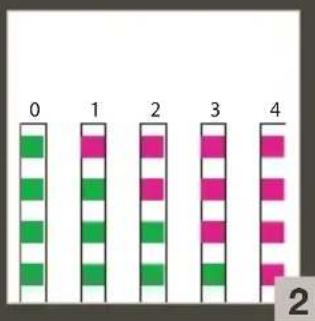
Before using the appliance for the first time or if you have noted a change in water hardness, it is advisable to adapt the appliance to the observed water hardness. To determine the water hardness, use the measuring stick included with the appliance or contact your water supplier. The appliance will ask you for the hardness of your water on first use.
| Degree of hardness | 0 very soft | 1 soft | 2 moderately hard | 3 hard | 4 extremely hard |
| ° dH < 3° | >4° >7° >14 | 4° >21° | |||
| ° e < 3.7 | 5° >5° >8.75 | >17.5° >26 | 25° | ||
| ° f < 5.4 | >7.2° >12.6 | >25.2° >37 | 8° | ||
| Setting machine | 0 1 | 2 | 3 4 |
water testing: Fill a glass with water and immerse a water testing stick into it.
After 1 minute the hardness measurement will appear (moderately hard water) - Fig. 1 and 2.
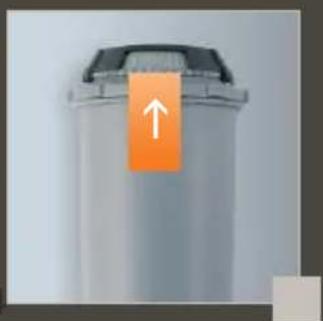
Claris - aqua filter system F 088 cartridge (sold separately)
To get the best taste from your coffee and extend your appliance's service life, we advise you to use only the Claris - Aqua Filter System cartridge sold as an accessory.
Fig. 3: Mechanism to memorise the month the cartridge was fitted and when to replace it (after 2 months at most).
Your appliance will give you a message telling you when to replace your Claris - Aqua Filter System cartridge.
Putting the filter in place
To prime the cartridge correctly, follow this procedure every time you fit a cartridge. Using for the first time : Choose the “YES” option in the “FILTER” function and follow the instructions on the screen.
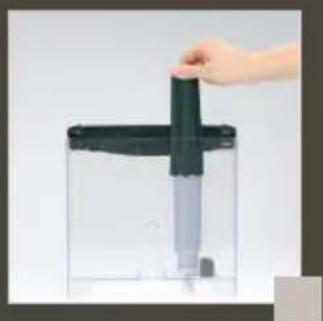
When using later or replacing the cartridge : Select the “FILTER” function using the PROG button : Maintenance -OK - Filter - OK - Place or change -OK - and follow the instructions on the screen. Screw the filtering cartridge into the bottom of the water tank using the spanner provided - Fig. 4.
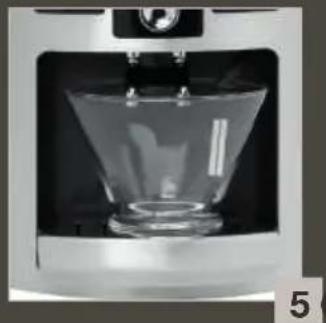
Place a 0.6 L container underneath the steam nozzle. - Fig. 5.
Preparing the appliance
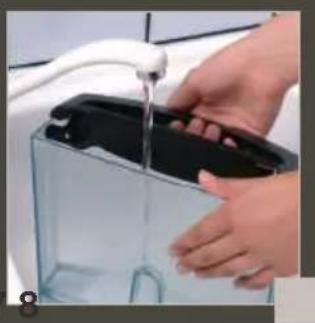
Pull out and fill the water tank - Fig. 6.
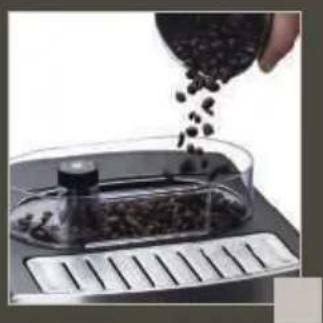
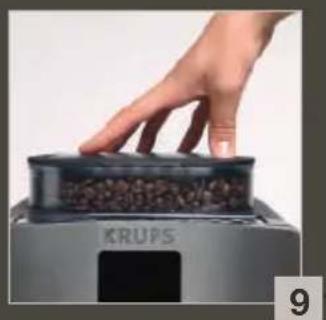
Put it back in place by pressing firmly and close the lid again - Fig. 7. Open the coffee bean container lid. Add the coffee beans - Fig. 8.
Close the coffee bean container lid again - Fig. 9.
Do not fill the water tank with hot water, milk or any other liquid. If you turn on the appliance when the water tank is not in place or not correctly filled (under the "min." level), the "fill water tank" light will come on and making an espresso or a cup of coffee will be made impossible.
First use / setting up the appliance
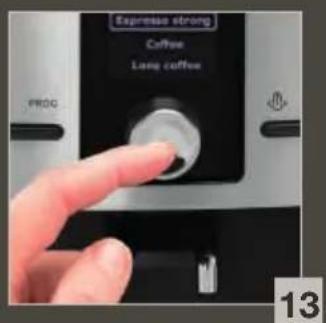
Use the rotating button to select a function, increase or reduce values. Confirm your choice using the OK key.
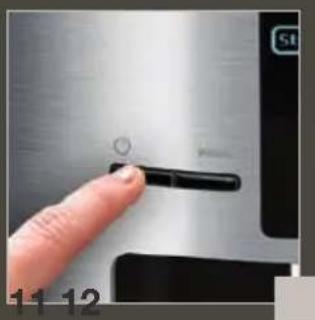
Press "On / Off" to turn your appliance on. Follow the instructions that appear on the "choice of language" screen - Fig. 10. Use the rotating button - Fig. 11, to choose a language (highlighted) - Fig. 12.
Press the OK key to validate - Fig. 13.
When you first use your appliance, it will ask you to set several parameters. If you unplug your appliance, you will again be asked for some of these parameters.
The appliance will ask you to set:
Language You can select your chosen language from those offered.
Measurement unit Choose either ml or oz as your measurement unit.
Date You must set the date.
Clock You can choose between 12 hour or 24 hour time display.
Auto-off You can choose the period after which your appliance will stop automatically.
Auto-on You can automatically start pre-heating of your appliance at your chosen time.
Water hardness You must set your water hardness between 0 and 4. See "Water hardness measurement" section.
Filter You must indicate whether a filter is fitted or not (Claris - Aqua Filter System cartridge)
When being used for the first time, it is possible that the machine will ask to be filled up. Just follow the instructions on the screen.
Rinsing of circuits
Rinsing out the coffee circuit :
Once you have turned the machine on and the preheating stage has completed, you can rinse out the coffee circuit. Place a container under the coffee outlets then select "YES" from the menu proposed.
Rinsing out the steam circuit :
Place a container under the steam nozzle. Press the key to rinse the steam circuit -
Fig. 14. The rinsing cycle will stop automatically after the volume of water displayed has flowed through.
Press PROG at any time to display menus to perform rinsing and then select MAINTENANCE => OK => RINSING.
It is best to perform rinsing after the appliance has remained unused for several days.
WHEN RINSING PROCESS IS IN PROGRESS, HOT WATER COMES OUT THROUGH THE NOZZLES. BE CAREFUL NOT TO BE SCALDED.
Preparing the grinder
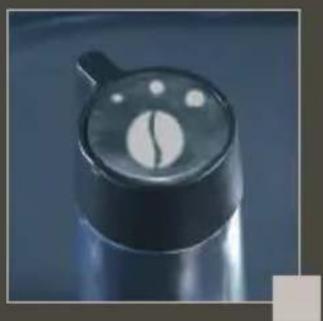
Adjust the fineness of your coffee grinding to set the strength of your coffee. The finer the grind setting, the stronger and creamier the coffee will be.
Turn the "Grinding fineness setting" button to set the degree of grinding fineness. Turn anticlockwise for a finer grind. Turn clockwise for a coarser grind. - Fig. 15.
CHANGE THE SETTING DURING GRINDING.
NEVER FORCE THE GRINDING FINENESS SETTING BUTTON.
PREPARING ESPRESSO AND ORDINARY COFFEE
YOUR APPLIANCE IS DESIGNED TO MAKE COFFEE FROM COFFEE BEANS ONLY.
When you first make coffee with the machine or after a long period of absence or a cleaning or scale removal procedure, a little steam and hot water will come out of the steam nozzle (priming).
Splashing or scalding may occur if the coffee outlets are set too high in relation to the size of the cups.
Preparing an espresso
The quantity of water for an espresso must be between 20 and 70ml
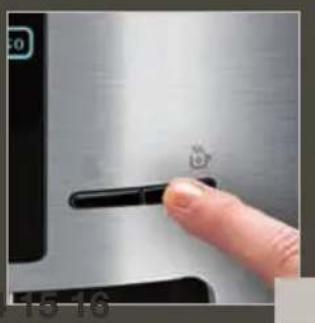
Press the button, wait for the end of pre-heating and perform a rinsing operation if you wish. Each time you plug your machine in, it will carry out an initialisation cycle.
The drink selection menu will be displayed - Fig. 16.
Put a cup under the coffee outlets. You can lower or raise the coffee outlets to suit the size of your cups - Fig. 17. Use the rotating button to select your drink - Fig. 12 and confirm by pressing the OK key - Fig. 13.
You can change the volume of water at any time using the rotating button - Fig. 12.
To stop coffee flowing into the cup, you can either again press a key or turn the rotating button to reduce volume.
Making a coffee
The amount of water required for a coffee is between 80 and 160ml
Making a long coffee
The amount of water required for a long coffee is between 120 and 240ml . The machine automatically carries out a double cycle, do not remove your cup before the process has ended.
The ground coffee is first moistened using a little hot water after the grinding stage. A few moments later, percolation as such begins.
There is a temperature setting function to control how hot your coffee is.
DO NOT REMOVE THE WATER COMPARTMENT BEFORE THE END OF THE CYCLE (that is around 15 seconds after the coffee has finished dripping through).
2-cup function
Your appliance enables you to prepare 2 cups of coffee or espresso for the following 3 kinds of drink : espresso / strong espresso / coffee. For “Large coffee” drinks, the 2-cup function is not available. Remember not to remove the cups after the first cycle. You have
now prepared your appliance. The drink select menu will be displayed.
Put two cups under the coffee outlets. You can lower or raise the coffee outlets to suit the size of your cups.- Fig. 17. Select your drink and confirm by clicking twice on the OK key. A message will appear to tell you that you have chosen two cups.
The appliance will automatically sequence 2 complete coffee-making cycles.
PREPARING HOT WATER
While the screen displays the drink selection menu, press the "hot water" key
A message will invite you to place a container under the steam nozzle. Again press the "hot water" key to produce hot water - Fig. 14.
To interrupt the steam function, just press any key.
If the nozzle is blocked, clean it out with a fine needle.
The maximum amount of hot water per cycle is limited to 300ml
PREPARING STEAM
Steam froths up the milk to make a cappuccino or a caffe latte, for example, and also heats up liquids. As you need a higher temperature to produce steam than to make an espresso, the appliance runs an additional pre-heating phase for steam.
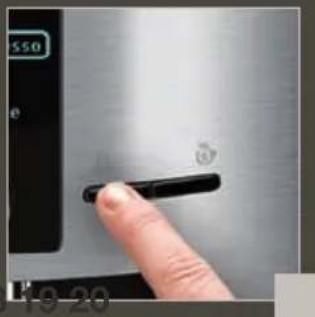
While the screen displays the drink selection menu, press the "steam" key - Fig. 18. A screen will inform you that the appliance is being pre-heated. Once the pre-heating phase has been completed, a message will ask you to place a container under the steam nozzle - Fig. 5. Press the "steam" key again to start generating steam. A little water will be produced first and then steam will start. Use the same key to stop steam generation.
BE CAREFUL, BECAUSE THE CYCLE DOES NOT STOP IMMEDIATELY.
Frothing milk
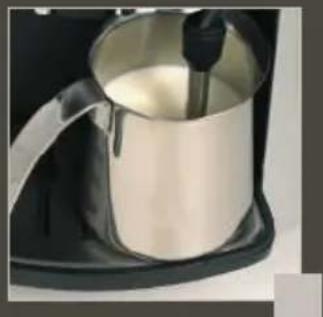
We recommend that you use pasteurised or UHT milk that has been recently opened. Do not use untreated milk. After the steam function has been used, the nozzle will be hot, and we recommend that you wait for a few moments before handling it.
Check that the steam nozzle is correctly fitted - Fig. 19.
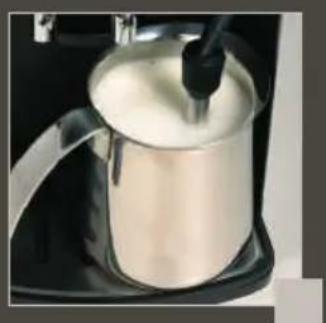
Pour the milk into your milk jug. Only half fill it. Immerse the nozzle in the milk - Fig. 20.
Press the "steam" key and follow the instructions on the screen.
Once your milk is frothy enough... - Fig. 21, again press the "steam" key to stop the cycle. Be careful, because the cycle does not stop immediately.
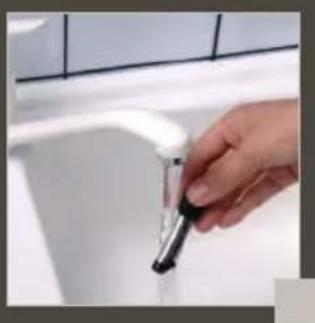
To remove any remaining milk from the steam nozzle, place a container under the nozzle and press the "steam" key. Let the hot water escape for at least 10 seconds and then again press the "steam" key to stop water.
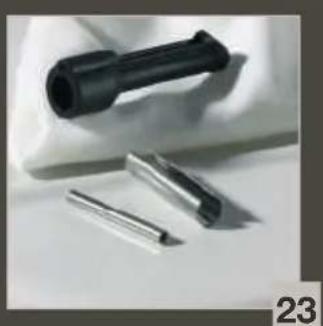
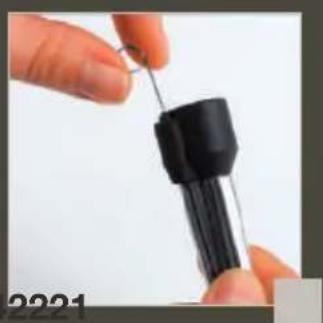
You can remove the steam nozzle for thorough cleaning. Wash it using a brush with water and a little non-abrasive washing up liquid. Rinse and dry it - Fig. 22-23. Before re-fitting, make certain that the air inlet holes are not clogged by milk residues. Clean out the holes with a needle if necessary - Fig. 24.
To interrupt the steam function, just press any key.
If the nozzle is blocked, clean it out with a fine needle.
The maximum duration for production of steam per cycle is limited to 2 minutes.
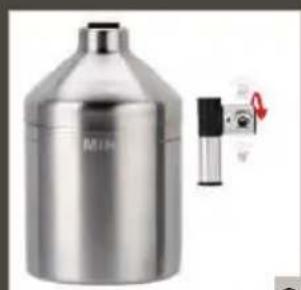
Setting up the Auto-cappuccino XS 6000 (sold separately)
This auto-cappuccino accessory makes it easier to make a cappuccino or a caffe latte. Attach the various parts together. - Fig. 25.
Select the cappuccino or caffe latte position on the special nozzle - Fig. 26.
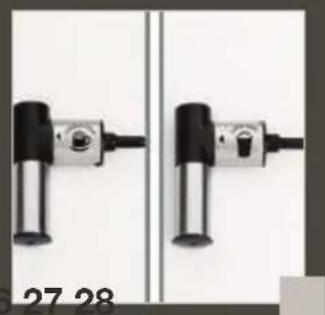
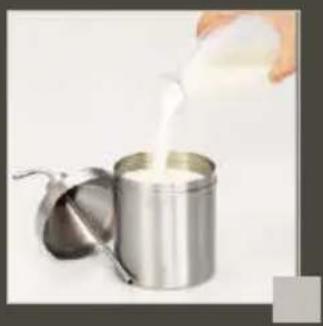
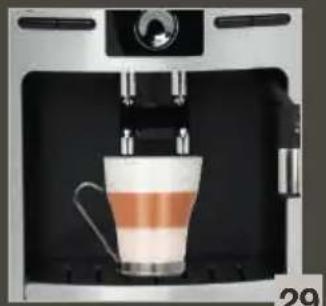
Fill up the milk pot - Fig. 27 and place a cup or a glass underneath the auto-cappuccino nozzle - Fig. 28. Press the button to start and then to stop the cycle.
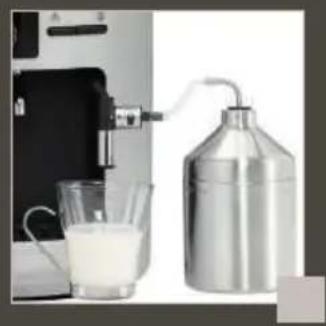
Place your cup under the coffee outlets and start a coffee / espresso cycle - Fig. 29.
The tube must not be twisted to ensure that the button is held in the correct position.
To prevent milk from drying on the auto-cappuccino accessory, it must be cleaned thoroughly after use.. It is recommend that you wash it immediately by carrying out a cycle with steam and the accessory pot filled with water in order to clean the inside of the nozzle.
To do so, you can use liquid cleaner XS4000, available as an accessory.
MAINTAINING YOUR APPLIANCE
Caution! To benefit from the guarantee conditions, it is essential to perform the appliance cleaning or a scale removal cycle when informed to do so. Be sure to follow the order of operations. You can continue to use the appliance, but you are advised to perform the program as soon as possible.
Emptying the used coffee collector and the drip collector tray
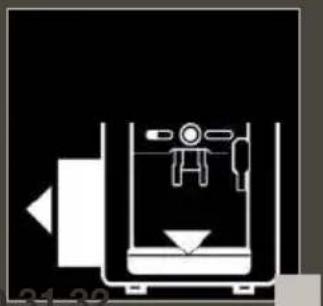
If the above message appears- Fig. 30, remove, empty and clean the drip tray (the drip tray may contain coffee grains).
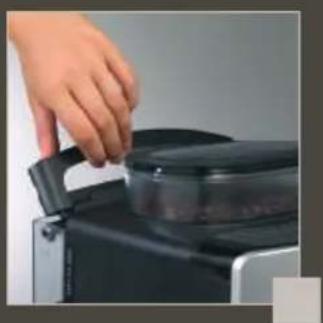
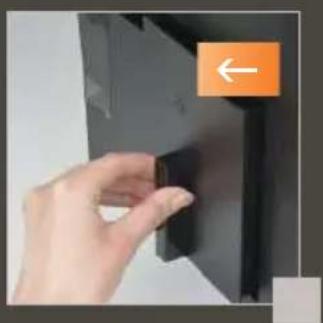
Remove, empty and clean the coffee grounds collector - Fig. 31.
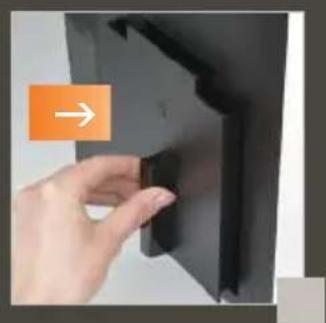
Replace the coffee grounds collector - Fig. 32.
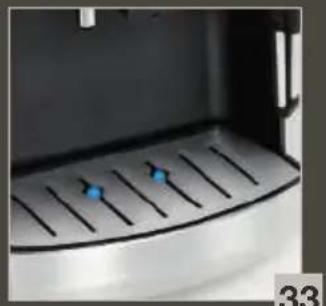
The drip tray is equipped with floats to tell you when to empty it.- Fig. 33.
As soon as you remove the coffee grounds collector, you will have to empty it completely to avoid any overflow.
The warning message will remain displayed if the coffee grounds collector is not slotted in fully or not fitted correctly. You cannot make espresso or coffee while the warning message is displayed.
The coffee grounds collector has a capacity of 9 coffees.
Rinsing out the circuits: see page 17
Machine cleaning program - total duration: about 13 minutes
You should perform the cleaning program about every 350 preparations of espresso or coffee.
The appliance will let you know when you need to proceed with cleaning through the 'clean' light coming on.
To perform the cleaning program, you will need a container with minimum capacity of 0.6 litres and a KRUPS (XS 3000) cleaning tablet.
If your machine is unplugged when cleaning or if there is a power cut, the cleaning programme will re-start at the step in progress when the incident occurred. You will not be able to postpone this operation. This is essential due to water system rinsing reasons. In this case, a new cleaning tablet may be required. Be sure to complete the entire cleaning cycle to avoid any risk of irritation (seek medical advice if cleaning solutions are accidentally swallowed). The cleaning cycle is a continuous cycle and the pump can be heard intermittently. Do not put your hands under the coffee outlets during the cycle.
Press the PROgo start the automatic cleaning program when the "Cleaning needed" message is displayed. Just follow the instructions shown on the screen.
The automatic cleaning program is in 2 parts - the cleaning cycle itself, then 1 rinsing cycle. This program lasts about 13 minutes. Press PROG perform cleaning at any time and then choose MAINTENANCE => OK => CLEANING from the menus displayed.
Only use KRUPS (XS3000) cleaning tablets. We cannot be held responsible for any damage that may result from the use of tablets from other brands.
You can obtain cleaning tablets from KRUPS Service Centres.
Automatic scale removal program – total duration: about 20 minutes If your product is equipped with our Claris - Aqua Filter System cartridge F088 - Please remove this cartridge during the descaling operation.
The quantity of scale deposited depends on the hardness of the water used. The appliance will automatically warn you with a message when you need to proceed with scale removal. To perform the cleaning program, you will need a container with minimum capacity of 0.6 litres and a KRUPS F 054 (40 g) cleaning sachet.
Press the PROG to start the automatic cleaning program when the "Scale removal needed" message is displayed. Just follow the instructions shown on the screen, making sure the sachet dissolves fully.
The scale removal program is in three parts - the scale removal cycle itself, then 2 rinsing cycles.
Only use KRUPS scale removal products. You can obtain scale removal products from KRUPS Service Centres. The manufacturer may not be held responsible for damage to the appliance through use of other products.
If a power cut occurs during the cycle or if you unplug your machine, the cycle will re-start at the step in progress when the incident occurred, without the option of postponing this operation.
Be sure to complete the entire scale removal cycle to avoid any risk of intoxication. The scale removal cycle is a continuous cycle and the pump can be heard intermittently. Do not put your hands under the coffee outlets during the cycle.
Make certain to protect your work surface during scale removal cycles, especially if they are made of marble, stone or wood.
General maintenance
Always remove the power supply cord from the socket and let your appliance cool down
before cleaning it. Do not use utensils or cleaning products likely to scratch or corrode the appliance.
Wipe the body of the appliance on the outside using a moist cloth. Rinse the water tank with fresh water.
These parts are not designed to go into the dishwasher.
OTHER FUNCTIONS: PROG KEY
Press the program on the drinks choice screen to access the appliance's other functions menu. Use the rotating button to browse through menus and options for all settings and validate your choice using the OK button. Press the PROGon to cancel a choice and go back to the drink selection menu.
| PROG | |
| Services To access maintenance. | |
| Settings To access settings. | |
| Machine info To access product information. | |
| Exit Return to the previous menu. |
Maintenance
You can use all the following options to start selected programs. Then follow the instructions on screen.
| SERVICES | |
| Rinsing To access rinsing | |
| Cleaning To access cleaning | |
| Water filter To access filter mode | |
| Exit Return to the previous menu | |
Settings
| SETTINGS | |
| Language You can select your chosen language from those offered. | |
| Display contrast You can set screen contrast for comfort. | |
| Date You need to set the date, especially if you use an anti-scale cartridge. | |
| Time You can choose between 12 hour or 24 hour time display. | |
| Auto-off You can choose the period after which your appliance will stop automatically, from 30 minutes to 4 hours by 30 minute increments. | |
| Auto-on You can automatically start pre-heating of your appliance at your chosen time. | |
| Volume unit | Choose either ml or oz as your measurement unit. |
| Water hardness You must set your water hardness between 0 and 4. See "Water hardness measurement" section. | |
| Coffee temperature You can set the temperature of your espresso or coffee to one of three levels. | |
| Exit Return to the previous menu. | |
Product information
| MACHINE INFO | ||
| Coffee cycles | Displays the total number of coffees the machine has made. | |
| Water cycles | Displays the total number of hot water cycles the machine has performed. | |
| Steam cycles | Displays the total number of steam cycles the machine has performed. | |
| Rinsing | Displays the total number of rinsing cycles the machine has performed. | |
| Descending | Last | Displays the total number of coffees made since last cleaning. |
| Next | Displays the number of coffees that can be made before next cleaning. | |
| Clean Starts the cleaning program. | ||
| Exit Return to the previous menu. | ||
| Descending | Last | Displays the total number of hot water or steam cycles made since last scale removal. |
| Next | Displays the number of hot water or steam cycles that can be made before next scale removal. | |
| Exit Return to the previous menu. | ||
| Filter | Last | Displays the date of the last filter change* and the quantity of water that has run through. |
| Next | Displays the date for the next filter change* and the quantity of water to run through. | |
| Install Starts the filter change procedure | ||
| Exit Return to the previous menu | ||
| Exit Return to the previous menu | ||
- You must first have correctly installed a filter through the program accessible via SERVICES => WATER FILTER => INSTALL before being able to access the first two options of the filter information sub-menu.
You can stop your appliance at all times: the appliance will emit two beeps and then it will stop soon afterwards.
PROBLEMS AND CORRECTIVE ACTIONS
PROBLEMS CORRECTIVE ACTIONS
| The appliance does not switch on when the “On/Off” is pressed. | Check that the plug of the power cord is pushed correctly into the mains socket. |
| Water or steam comes incorrectly out of the steam nozzle. | In case of repeated operation, several drops may drip from the steam nozzle. |
| The espresso or coffee is not hot enough. | Change the coffee temperature setting. Heat the cups by rinsing them with hot water. |
| The coffee is too light or not strong enough. | Check that the coffee bean tank has coffee in it and that it is flowing correctly. Avoid using oily, caramelised or flavoured coffee. Reduce the volume of coffee using the central knob. Turn the grinding fineness knob towards the left for a finer grind. Prepare in two cycles using the 2 cup function. |
| The coffee flows too slowly. | Turn the grinding fineness knob towards the right for a coarser grind (may depend on the type of coffee used). Carry out one or two rinsing cycles. |
| The coffee is not creamy enough. | Turn the grinding fineness knob towards the left for a finer grind (may depend on the type of coffee used). Change the Claris Aqua Filter System cartridge (follow the installation procedure on page 13). Carry out one or two rinsing cycles. |
| The appliance does not serve any coffee. | An incident has been detected during the preparation. The appliance resets itself automatically and is then ready for a new cycle. |
| Why can I not run descending/why does my machine not request a descending cycle? | The machine only requests a descending cycle once it has made a certain number of drinks using steam. |
| You have used ground coffee instead of bean coffee. | Use your vacuum cleaner to suck out the pre-ground coffee in the coffee bean tank. |
| The grinder makes a strange noise. | There are foreign particles in the grinder. Contact KRUPS' Customer Service. |
| The grinding fineness knob is hard to turn. | Only change the grinder setting when it is operating. |
PROBLEMS CORRECTIVE ACTIONS
| The steam does not come out of the nozzle. | After switching off your appliance and leaving it to cool: Make sure the tip of the steam nozzle is properly affixed. Make sure the steam nozzle is not clogged at the aerator (if necessary clean the steam nozzle aerator with the needle supplied). Empty the tank and remove the Claris filter. Fill the tank with mineral water high in calcium (>100 mg/litre or .015oz/gallon), it may take as many as 5 to 10 cycles of steam at 60 seconds each cycle to achieve a continuous jet of steam. |
| There is not enough milk froth. | Using the needle supplied unblock the small air inlet at the top of the nozzle if required.Use a cold container and milk that has been opened recently.Try changing the type of milk if this does not work (UHT or pasteurised). |
| The milk froth is too bubbly. | Check that the two ends of the small stainless steel tube are fitted correctly into the flexible part of the steam nozzle. |
| The Auto-Cappuccino accessory does not suck the milk (accessory sold separately). | Ensure that the tube immersed in the milk is not blocked.Check that the flexible tube is not twisted and that it is correctly fitted into the accessory to avoid any air being sucked in.After switching off your appliance and leaving it to cool, unblock the outlet of the Auto-Cappuccino accessory. |
| After emptying the coffee grounds collector, the warning message is still displayed on the screen. | Correctly replace the coffee grounds collector and follow the instructions on the screen. Wait at least 6 seconds before replacing them. |
| The power has been cut off during a cycle. | The appliance resets itself automatically when the power is switched back on and is ready for a new cycle. |
| There is water or coffee underneath the appliance. | The drip collector tray has overflowed: empty it and clean the coffee grounds collector. Check that the drip tray is fitted correctly.Do not remove the water tank before the end of the cycle. |
| A message appears. | Unplug the appliance for 20 seconds, remove the Claris cartridge and if required, put it back into service.If the fault persists, note the fault number and contact KRUPS’ Customer Service. |
| If coffee flows behind the coffee nozzles. | Pour cold or room-temperature water into the tank.Reduce the temperature level. |
PROBLEMS CORRECTIVE ACTIONS
| The appliance is working but no liquid is coming out. | Check that the water container is in the correct position and that the cord is not jammed between the appliance itself and the water container. |
| Coffee grains have found their way into the drip tray. | This happens if coffee grains fall outside the percolation tank; this keeps the machine clean. |
Here are some recipes you can make using your Espresseria Automatic:
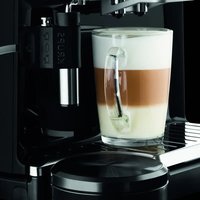
Cappuccino
For a cappuccino in the rules of the art, the ideal proportions are as follows: 1/3 hot milk, 1/3 coffee, 1/3 milk froth.
Caffe Latte
To make coffee with milk, also often called Latte Macchiato, the proportions are as follows:
3/5 hot milk, 1/5 coffee, 1/5 milk froth.
- For these milk-based preparations, it is best to use cold skimmed milk straight from the refrigerator (ideally between 6 and 8^ C).
- To finish off, you can sprinkle with cocoa.
Café Crème
Prepare a conventional espresso in a large cup.
Add a little cream to get a café crème.
Café corretto*
Prepare a cup of espresso as usual.
Then add 1/4 or 1/2 of a liqueur glass of Cognac to taste.
- You can also use anisette, brandy, Sambuca, Kirsch or Cointreau.
- There are many other ways to give some punch to your espresso.
- Just use your imagination.
Coffee liqueur*
Mix 3 cups of espresso, 250g of brown sugar candy and 1/2 litre of Cognac or Kirsch in an empty 0.75 litre bottle. Leave the mixture to macerate for at least 2 weeks.
- You will obtain a delicious liqueur. A real treat for coffee lovers.
Italian style iced coffee
4 scoops of vanilla ice-cream, 2 cups of espresso with sugar to taste, 1/8 I milk, fresh cream, grated chocolate.
- Mix the cold espresso with the milk.
- Serve the scoops of ice-cream into the glasses, pour the coffee onto them and decorate with fresh cream and grated chocolate.
Café à la frisonne*
Add a small glass of rum to a cup of sweetened espresso. Decorate with a good layer of fresh cream and serve.
Flambéed espresso*
2 cups of espresso, 2 small glasses of Cognac, 2 teaspoons of brown sugar, fresh cream.
- Pour the Cognac into heat-resistant glasses, heat and light.
- Add the sugar, mix, pour in the coffee and decorate with fresh cream.
Espresso Parfait*
2 cups of espresso, 6 egg yolks, 200g sugar, 1/8 litre of sweetened fresh cream, 1 small glass of orange liqueur.
- Beat the egg yolks with the sugar until it forms a thick, frothy mass.
- Add the cold espresso and the orange liqueur.
- Then mix in the whipped fresh cream.
- Pour the mix into saucer champagne glasses or ordinary.
- Put the champagne glasses in the freezer.
(*: Remember, over-indulgence in alcohol is bad for the health.)
BESCHREIBUNG
PROBLEMAS ACCOES CORRECTIVAS
Cologne as tacaas no congelador.
(^*:O abuso de alcool eperigoso para a saude.)
IPEPIPAAHTHESYKEYH
A Aβn/kaπáki doxεiou vερού
B x i o v p o u
C k n c unoAeiumuatwv kape
E\xo0ai kaepkai a u i o v o o
E Σχαρα και αφαιρούμενος δίσκος συλλούγής ὄνρων
F Kanaki doxxiou kape oKkouc
1 O x I o KaΦe Oε KOKouc
G Kouπi puθμionc tou naxouc aλεonc
H Metaaiikoc uao c aEonc
IPIN AIO THN PQTH XPHSH THE YKEYH
SYNTHPHESHTHE SYKEYH
IpoeioiOn! Ia Tnv npnon twv opwv eyyunong npeei va ekteleita otn ouokeu o kukloc kaogoiou onote unapxie npoeioloinon. Ipooexete yia tn owotn oepa twv diaikaaiv. Ipoooy! Ia va ouvexioei n eyyunon oac va iayuei, n diakkaia tnc apalatwnc eiva anapaiaTn otav autn oac zntnthetai ano tn ouokeu. Akooutheta tic obnyiec nou eupaviovtaI OTNV Oboyn. Mnopeite va ouvexioetve xpnoionoite tn ouokeu, ouc ocuvioute va ekteleite to npoypauma kaogoiou to ypyopotepo duvatov.
Adeltaaeta c h knc uonolmuatwv kaepkai tou oulambdaektn otayovwv.
Epoov eepavioi n avapepouevn poeiodoinon - Eik. 30, yalte, aediaote kai katheta todeltaoouloync uypwv (nootnta okovnc kaepuopei va bpioketai otov dioko oulloyng stayovidiowv).
Byalte, aediaote kai katheta to doxieio tou aeeoukape - Eik. 31.
EavatoonooetnoTe tn hKn unoalemuatov kape-Eik.32.
OdeltaocoulloyncuypwvdeltathetaiIawntnpes,oi oioioaacdeltayovuv note npeneiv aov adiaoe -Eik.33.
HanoHNHTe cTakAH BODOn I ONyCTnTE B Hero TcTOByo NOIOCKy.
IcnoJb3yIte poDnIKOBYIO BODy IINIΦJIbTpoBaHHyIO - Fig. 1-2.
Pn6op nonpocnt Bac yctaHOBNTb cneyuoune npaMeTpbl:
Язбik Bbl можete Bbl6paTbЯзбik n3ЧИСпаТEx, KOTOpbI e npeДlaRaIOTcB MeHIO.
EduHnua n3MepeHnBb MoKeTe Bb6paTbe eHNuCy u3MepeHn MeKdy Mm yHcnei.
Data Bby DOnKHbB BBeCTn DaTy.
Bpema Bbl moKeTe Bbl6paTb INHnKaunIO BpeMeHN B 12-ycaBOu nn 24-ycaBOU cnCTeme.
Abtooknouehne BbIMoKeTeBbI6paTbnpOdoJNKeIbHocTbpa6OtblKofoemaunHbI, noCne yeeroHaabTomatUyeCKnoCTaHOBUTcR.
ABTOBkiuoyehne Bbl moKeTe 3anporpaMMnpoBaTb BpeM aBTOMaTuueCKoro BKlioueHnra uKna npedBapntbHOro nporpeBaHn KoemauHbI.
XeCTKoCTb BObl Bbl DoJxHbI yCTaHOBnTb ypoBeHb XeCTKOCTN BObl OT 0do 4.Cm. naparpaΦ «I3MepeHne XeCTKOCTN BObl>.
Ha 3kpaHne NOBnEeTcMeHIO BbI6Opa HAnNTKOB - Fig.16.
IocTaBbTe yawky noJ ycTpoNCTBa noaun KoFe. YcTpoNCTBa noaun KoFe moKeTe yCTaHOBnTB Bbiue nn Hxke B 3aBNCIMOCTn OT pa3MepOB yaWK - Fig.17.
BbI6epnte HAnrTOK c NOMOuBIO BpaauoJceroa peryIaTopa - Fig. 12 n noTBePdTe BblOp KHOIIKOk OK - Fig. 13.
Bbl moxete B IIO6oM omeH TperynnpoBaTb obbem BoNbI C NOMOuB Opaauoeroa perynlTopa- Fig.12.
Pn Heo6xOaMocTn Bbl MoKeTe OCTaHOBNTb cNKI npuROToBJeHna Kofo, HaxkBa KaONK
, vRCK, a TaKke noBepHyb peryIaTOp B noLoXeHne «min».
ПриноТовленne кофe
KolnueCTBO BOIy IIN npiroTOBneHna ONDH NOpCn Koce coCTabReT o8 0do 160 mI.
PnroToBJIeHne KofoIyHro
KoJnueCTBO BODI Ia npuROToBLeHn OndHO nOpCn KoFe LyHro coCTabJIeT ot 120 do 240 mI. KoFemaunHa aBtOMaTuYeCKn ocUeCTBJIeT dBoHOn cIKn. He y6npaTe YauKy, noka npoueeC npuROToBHe He 3aKOHHTcR.
MolotbI KoFe yBnaXHeH He6OJIbUIM KOINueCTBOM rOpYeB ODi bI NOcNe OKOHuaHnA a3bI NOMOA. 3a KOpOTKoe Bpem npoDOnJxaeTc co6CTBeHHa nepKoJaunr.
Bbl mokeTe yctaHObntb TemnepaTpy Kofoe.
HE CHIMAITE PE3EPBYAP IJI BODBI IO OKOHUAHNIA (T.e. He pahee, Yem uepe3 15 cekynd noce okohuaHnnoaun Kofoe).
Функця «2чашки»
Bawa kofoemaunha no3boJareT npiroTOBntb 2 yaKn Kofoe nn 3-x cneDyUOx BnOB : 3cnpecco / Kpenkni 3cnpecco / Kofoe. FynKzra N 2 yauKn> He moKeT 6bTb nCnoIb3oBaHa dIy npiroToBHeHn 60nbux npucn Kofoe. He ybpaTe yauKn nocne nepBoro uKnla. Pnp6op rotob K pa6ote. Ha ekpaH eNoBnaetc MeHIO dIy Bb6opa HAnNTKOB.
IocTaBbTe 2 yawkn noj ycTpoiCTBa noaun Kofoe. YcTpoiCTBa noaun Kofoe moKeTe yctaHOBTb Bblwe nll Hnke B 3aBncmOCTn OT pa3MePoB yauek - Fig. 17.
BbIbepeTe HAnITOK n Dba pa3a 6bICTpo HaXMMTe KHOKNy OK dIra noDTBePxxdEHHa. IoRbUTbc8 coo6eHne, yTO Bbl 3aKa3aII nDe yauKn Kofoe.
Pp6op aBTomatueckn npoBeT 2 nonbIX uKna npuroTOBneHna Kofe.
ПРИГOTOBЛЕНЕСПOMOULTОГРЯЧЕВODы
Iocne TOrO KaK Ha 3KpaHe NOBIOcB MeHIO BbIOpa HApNTKOB,HaKMITE Ha KONKy IoRBAJETCA coo6ueHne, npednaraIOoee Bam yCTaHOBt bEmKocTb nOd napOBoe cOnNo. Bbl moKeTe haatb npiroTOBJIeHne rOpayeB ODbI, CHOBa HaxBa HA KONKy Fig.14.
Дятуоьnpeрваьцкл npiroTOBHeHЯ ropaye BODbl,doCTaTOUHO haxaTb Ha JIO6yI KhoNky. Ecnn coNLO 3akynopeHo, ouNCTte erO c nOMou bIO uROJKN, BXoJaueB KOMJIeK T KoΦemauHbl.
MaKcImaIbHoe KOInueCTBO nOaun rOpueN BoB1 3a OINn cIKn He dONJHo npBeBbIaTb 300 mI.
ПРИГOTOBЛЕHNEСИСПОЛБ3OBAHHEМ ПAPA
Iap npedHa3nueH dIy npiroTOBHeHn IeHbI N3 MOlOka, HApimep, IJyKpaSeHn KaNyHnIO nn IaTTE n OndOBpemEnHO dIy IODOrpeBa XnkOcTe. TaK kAc obpa3oBaHne npa Tpe6yeT 60lee BbICOKo TeMnepaTypbI NO cpaBHeHIO C npiroTOBHeHm Ecnpecco, npnbOpy Tpe6yeT DOCTaTOUHO BpemHdI npedBapntelhoro HarpeBa.
Iocne toro kaK Ha 3KpaHe noBnOcB MeHIO BbIbOpa HAnITKOB, HaxMITE Ha KHOkky -Fig.18. a 3KpaHe noBnEeTcra NfOpMaunr O uNKLe npEdBaPteNBHoro nporpeBaHn rnp6opara. I0 OKOHauHH npeBapntelbHoro nporpeBaHn NOBnAeTcra COo6uHHe, B KOtOpom npednaeraTcra yCTaHOBnTB eMKoCTb NO napOBoe conNo -Fig.5 Bbl MoXeTe Naatb npoecc o6pa3OBaHn npapa, CHOBA Hxab HA KHOkKy
BHIMAHNE, OCTAHOBKA LUKKIA HE IPOUCXODIT MHOBEHHO.
BcpeHbAHne MOlOKa BpyHyIO
PekomeHdyem Bam nCnoIb3OBAbHeJaBHO OTKpbItbI naKeTnK C nAcTepu3OBaHHbIM MOJOKOM. IcnoIb3ObaHne cbIporo MoJoka He no3BOJareT nOlyuHT bONtMaJIbHbIX pe3yIbTaTOB npi npiroTOBNeHn Kofoe. Nocle BCneHbAHn MaJoka, napo Boe cOnIO MoXeT 6blb OueHb TropaUM, NO3Tomy peKomeHdyetc nOdoXdaTb HeCKoJIbKO MInHyT, npexJe yem npNKOCHYb Ck Hemy.
PpOBepbTe, npabunbHo nn ycTaHOBneHo napoBoe conno - Fig. 19.
HaJIeTe MoIOKo B cOcyd Iy MoIoka. He 3aONHnIte ero 60nee yem Ha noIOBHy. OncyTe napOBoe conllo B MoIOKo - Fig.20.
HaKmTe KHONKy
Ecn npirotoBneHO doctatoHoe KOJnueCTBO MOnOuHoi neHbI,...-Fig.21 CHOBa HaxMnte KHOKNy n npepBNTe zukl. BnmaHne, octaHOBka zukla He npocxOINT MRHOBeHNO.
Iocne yctpaHHeNn BO3MOxHbIX CJeIOB MOJOKa Ha napOBom CONJIe NOCTaBBTe COcyd NOD CONIO n HaxMnte KhoNkY «Nap» B TeueHne 10 cekyHd ropayar Boda BblJeT NOHOCbU, NocJe Yero CHOBa HaxMnte KhoNkY «Nap» TOrO, UTO6bl OCTaHOBVt Ipouecc o6pa3OBAHnna npa.
AByokanyHaTOp xs 6000 (npoJaETc8 OTdelenbHo)
Hacaika «Auto-Cappuccino» önbéercaet πριroTOBHeHne kanyuHNo nIи KoΦe IaTte. CoeINHnte pa3nUHbI eJIemEHTbl dpyr c dpyrom - Fig. 25.
Bb6epnte noIoxKeHne «KanyuHo» nIe «Kofo NaTte» Ha cneuaNBom conIe - Fig. 26.
Hanse Moiko - Fig. 27 B KOHTeHep N NOCTaBbTe YauKy IIN CtaKaH NOd Hacdky «AutoCappuccino» - Fig. 28.
Haxmte Ha KHONky 3ayncka zukna, a 3aTe mI erO octaHOBKn.
IocTaBbTe yawky noj ycTpoiCTBa noaun Kofoe n BkIoUHTe uNKn npiroToBneHn Kofoe / 3cnpecco - Fig.29.
IpeD npOBeHnem OunchKn Bcerda BbIHMaIte shHyp NITaHnI n3 po3eTKn I daIte np60py OCTbITb.
He npimehnyTe npincnoc6nHnN nnu nucTae CpecCTBa, KOtOpbIe MoryT noaapanaTb nn NOBpeDntb np6op. Ouncntte Kopnyc npnbopa c Bheun He CTOpOHbI c NOMOuB BJaXHO TkaHn. CnonocHTe pe3epByap dna BObl uCToB BOoJ.
3TN DeTann 3anpeaetcMbItb B nocydomoeHou MaunHe,
YkpacbTe TOnCTbIM CNOe M B36ntbIX CINBOK N MOxHO NOJaBaTb.
I06aBBTe B36uTbIe CINBKN.
HaneTe BcB CtaKaH nn6okaJ.
IocTaBbTe CtaKaH B XOJIoNJIbHNK.
(^*) Ype3MepHoe ynoTpe6IeHne ankoRolbHbIX HauNTKOB BpeNT BaWemy 3IopOBbUo.)
ONNC
A Puyka/kpnuksa pe3epByapa nla BODn
B Pe3epByap nla BODn
C KOHTeHepIa KaBOBoI rUci
D OTBOPN BNXOy KaBn 3 pyuKoIO, IOp epyIIOeTbcra No BucOTi
E PewiTka Ta 3HIMn NiDOn JI Kpanenb
F Kpnuka KOHTeHepa IJIy KaBOBx 3epeH
1 KoHTeINHeP dIa KaBOBux 3epeH
G PerylaTOp cTyneHn nepemEnHHa KABN
H MeTaneBmMnHOKdIa nepemeneHHa KABN KOPHOBOROTUNy
BidbHnJ kono6 Ta6neTKn dny OunueneHH
J PewiTka Dnla BCTaHOBneHHraaWOK
2 Dnncnnne
K Dnncnnei
L KhoNka «Iyck/CTon»
M Khonka nporpaMyBaHHa
N Khonka niTBepeJxHeHHa (OK)
KhONkaФyHKuII napI
P Tapaa Boda
Q Napobe conno
IHHdNKaTOPpiBn
UaHOBHI nokynci!
Bitaemo Bac 3 npnd6aHHa m ABTomatHooi KaOBapKn "Esspresseria Automatic Krups". Bn 3moXeTe ouiHTn kictb po60tncb o60rno pnpnaI y i ODHocHo HeIMoBipHy IerKictb Ioro BVkOpNCTaHH npn npnroTybaHHi KabN. Ecnpcecco a6o LyHro, pictpeTo a6o KanyuHO - Ba7a abTomatTuHa KaOBapKa dO3BOJNTb Bam HacOLOxkyBaTnCBAOMa TakoIO X JIKCTU i pi3HomahITTM KabN, 0o N y Kab'apHi. He3anexHNo BiD uacy Ta dHra TnKnB N, Ba7a PoOnHa Ta Bawi roCTi MaTmMyTb MoKJIINBiCTb npnroTyBatn fipMOBy KabY nPoCTHM HaTnCKaHHM KHONK.
3aBdAnOpurHaHbHi CnCTeMI 3MiHHNX Do3aTopiB BN MaTumMeTe MoXJNtBc7b 3a 6aKaHHMaM HHTI JIA KOKHOI YauK, CMAK, COPT, MiunHb Ta CTynHb NepemEnHBAWoi KaBN. B KOMPJIeKT TAKOX BXOHTb NiDcTaBk dIy Do3aTopiB, Ya Ka 6yNa cneiaIbHO po3pO6JeHa, 0o6 3a6e3neHTN ONTImaJIbHe 36epeKeHHa apomatib npn BnKOpncTahHI IHsoro copTy Kabu. Bawa KabOBapka O6laHaHa CnCTeMoIO Compact Thermoblock Ta nomnoio, Ya Ka 3a6e3neue Tnck 15 6ap, 0o Do3BOInTB Bam OTPmAtn Hanii 3 HepepeBepseHm apomakcamITom Ta rycToIO nIHKOIO 30JOTABORO KOlbOpY.
Ecnpecco Tpaunio Ho nodaetbca B MaIeHbKnx nopueJHOBux yaweckax. LcE BnD KabN 6IbHn HacnueHn HIX KlaCnHa KaBa. Ondak, He3BaXaOUn Ha 6IbW BnPa3Hn, BiCyTHn Ta CTiKn CmAk, ecnpecco HacnpabDi Micntb MeHwe KofoHy, HIX fIbTpObaHa KaBa, (6Ira 60-80 Mr Ha YauKy B npIBHHi 31 80-100 Mr Ha yauKy). Yce ue E Hacniikom MeHwoiTpnbanocti fInbTpaii (Yac, BnpoDOK JKOTo BOda 3HaXODtbcB KOHTaKTi 3 KaBOIO).
O6 oTpMaTn ecPecco ontImaIbHOI TemnepaTyPi 3 rCyToIO nIHKOIO, Mn paIMo nonepeHbO do6pe HarpITN yAushK. KICTb BnKOpNCTOBvBaHOI BOIN, E npyHM Bu3HauchNM aKTOpOM, AKN BnInBaE Ha cMaK KaBN. IpekeohaiTeCg 10 Boa CBIXa i npoxoJOnHa 10 B Hei BiDcyTHi 3anax Xlopy.
3aBdIKN pOcToTI KepyBaHHn, npo3OpIM pe3epByapam, a TaKox ABTomaTnHm nporpaMAM OunueHHra BnAneHHn HaKnpy Ba7a abTomatuHa KabOBapka 3a6e3neuHTb Bam Hnd3BuayHn KOMOPT BnKOpNCtAHn.
Lia iHCTpykui MiCTnB BcO Heo6xIDHy iHOpMaIIO CTOCOBHO HanaHTyBaHb Ta ekCnlyataiabTOMaTHOHO KaBOBAPKn Esspresseria Automatic Krups. PekomeHaau II 0do 06cnyroByBaHHa TnpuroTyBaHHa KABN Do3BOJrB Bam 3a6e3neuHTn 6e3dOrAHHe yHKUohyBaHHa BaOoi KaBOBAPKnTa HaCaNojKyuBaTnca BeHnIM Pi3HomahITTM HanoIB 6e3 JODHx 3ucnlb.
AaTHHeo6xIDHO BucTaBnT DaTy.
Yacy Bn MoXeTe BCTaHOBHTu Yac 3a 12- a6o 3a 24-roHHHM LUKJOM.
ABTOBUMKHeHHa Bm moKeTe o6paTn npomixok yacy, nicra koro npnilad BUMKATUMetbca ABOTMaTHUHO.
AbTobBIMKHeHH Bn moKeTe 3anporpaMyBaTu Yac aBTOMaTuHOro 3anycky HarpiBaHH npuAdy.
Kopctkocti BoHn Heo6xio HO Bka3aTI pIbeHb JOpCTKOcTi BOi BID 0 do 4. NvBiTbc npOzIN «Bn3HaueHHJ KOpCTKOcTI BOiN
ΦiNbTpα Heo6xioHOBka3aTu HaaBHiCTb a6o BiCyTHiCtB φiNbTpα (KapTpIκ Claris - Aqua Filter System).
Iprn nepwomy BnKopncTahhi npnaad moxe 3anponohybaTu HAnOBHHTu KaBOBapKy. U cybomy Bnnapky Bam notpi6Ho 6yde Iiwe BnKOHaTu IHCTpykci, 0o 3'ABNIOTBcHa DnCnJIeI.
ПомИВангпрILAу
PpommbaHH npucTpoiv noaui Kabn.
Pn nikHeyHIO MepeXi, no 3aKInHcHHi HarpibaHHB, BN MoKeTe 3dIChHTN npOMBaHH KaBObAPKn. PndTabe EMHicTB niO TBOpN DnBuxOy KabN, Notim Bn6epitb «TAK» B 3anponoHObaHom My MeHIO.
PpommbaHnnapoBoro conna:
IiDCTaBTe EMHicTb nI napoBe conNo. Ira toro 06 npomTu NapoBe conNo, HATnCHiTb Ha KhoNky - Fig.14. UKl 3ynnHtbcr aBTOMaTHUHO nICJ npoxOxKeHHa3HaueHOro Ha dncnnei O6'EMy BODn.
Bn MoKeTe 3diIcHHTn IpOMuBaHHa B 6yDb-RAKNI MOMeHT, HATNCHyBUn Ha dJIa BUNBOy Ha PROG
DInCpNeMHeIO, Ta Bn6paBUn ProgMy OBCJYROBYAHHra OK IPOPUMBAHHra OK.
Li detani He npndaTHi Ira MTTy y nocydomnHi MaunHi.
IHWIΦYHKζ:KHONKA PROG
DocTyI Do MeHIO IHxN XyHKi npuAky 3diChHOETbCra 3a DOnOMOIO KONKn PROGIO Bn6OpY HanoIB. Byd-ki HanaSTyBaHHa 3diCHIOITbcra 3a DOnOMOIO NOBOPOTHO nepEMNKaHa, AKN DO3BOJNEpeMIyBaTcR B MeHIO Ta no ONUix, KONKa OK Do3BOJNE niTBePHTN Bu6ip, KHONKa ProGHNTN Ioro Ta NoBepHyTNCr DO MeHIO Bn6OpY HanoIB.
Iprnad moxHa BmKHyTu 6yDb-KoH. IiD yac BumKHeHHa LyHae noDbHn 3ByKOBn CunHan, i npnaed HeBdoB3i 3aBepwye po60ty.