BT LED Display - Controller THRUSTMASTER - Free user manual and instructions
Find the device manual for free BT LED Display THRUSTMASTER in PDF.
| Product type | Bluetooth LED display for PS4 gaming wheel |
| Brand | Thrustmaster |
| Model | BT LED Display |
| Compatibility | Sony PlayStation 4 (PS4) |
| Power supply | Internal rechargeable battery via micro-USB (cable not included) |
| Battery life | Rechargeable, duration not specified |
| Connectivity | Bluetooth 2.4 GHz (2402-2480 MHz, power <10 dBm) |
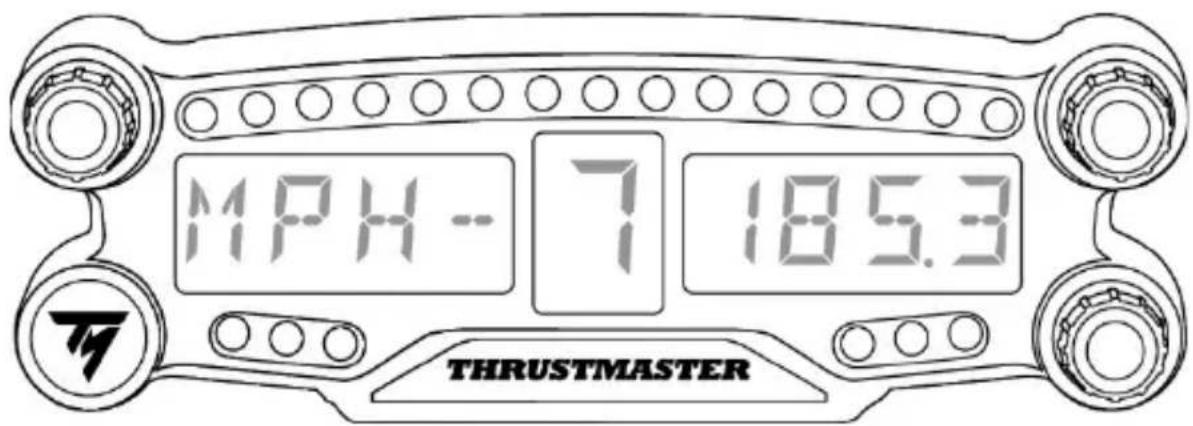
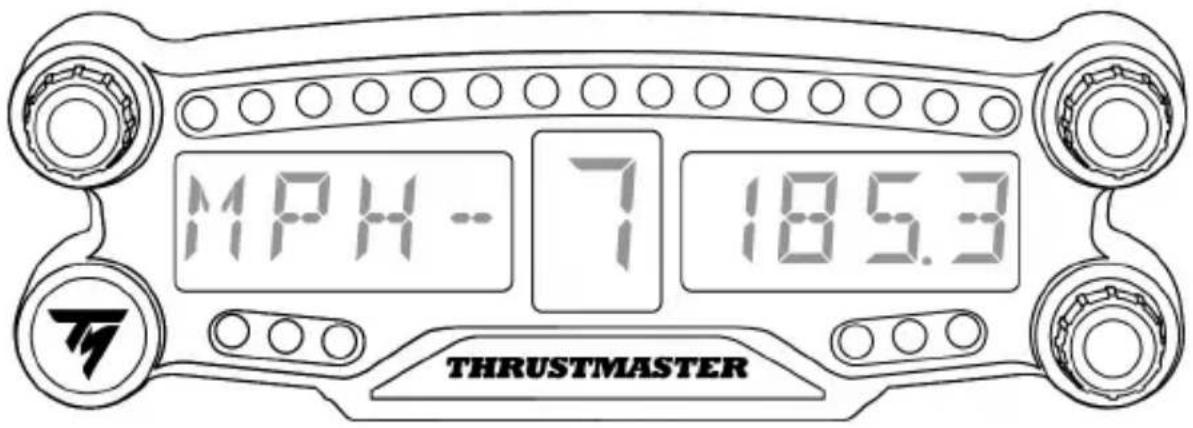
| Display | Scrolling main display + 21 LEDs |
| Controls | 3 rotary selectors with push function, 1 On/Off button |
| Settings | LED and display brightness via selector #3 |
| Bluetooth range | Approximately 10 meters (33 feet) |
| Mounting | Two M3 screw holes at the back for compatible brackets or wheels |
| Approximate dimensions | Approximately 12 x 6 x 3 cm (estimate) |
| Approximate weight | Approximately 150 g (estimate) |
| Firmware update | Via PC at support.thrustmaster.com (general and Bluetooth firmware) |
| Safety | Do not expose to moisture, shocks, high temperatures; battery not user-replaceable |
| Maintenance | Wipe with a dry cloth; do not use solvents |
| Warranty | 2 years in EU, 1 year elsewhere (according to local legislation) |
| Included accessories | None (micro-USB cable not included, use the one from the PS4 controller) |
| Manufacturer | Guillemot Corporation S.A., France |
| Country of manufacture | China |
Frequently Asked Questions - BT LED Display THRUSTMASTER
User questions about BT LED Display THRUSTMASTER
0 question about this device. Answer the ones you know or ask your own.
Ask a new question about this device
Download the instructions for your Controller in PDF format for free! Find your manual BT LED Display - THRUSTMASTER and take your electronic device back in hand. On this page are published all the documents necessary for the use of your device. BT LED Display by THRUSTMASTER.
USER MANUAL BT LED Display THRUSTMASTER
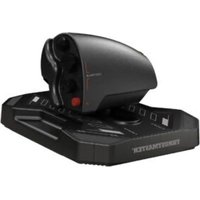
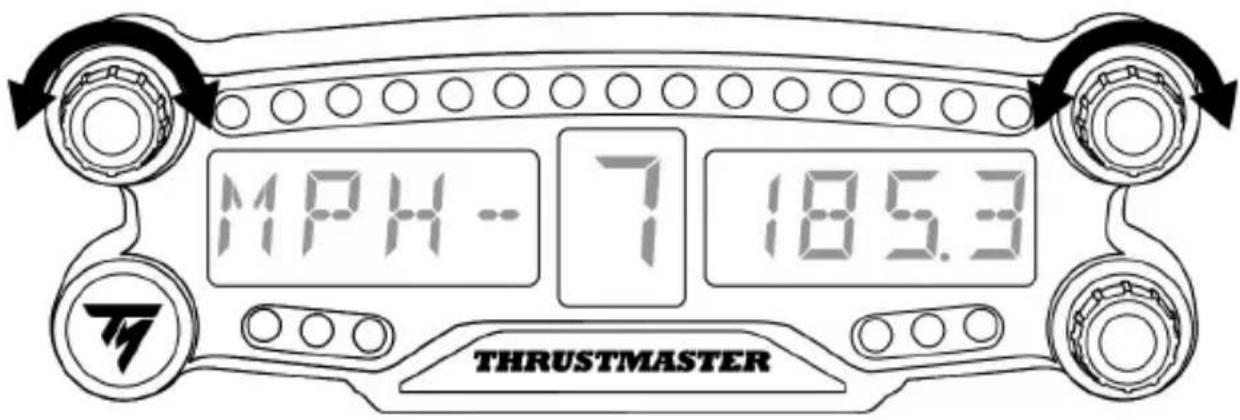
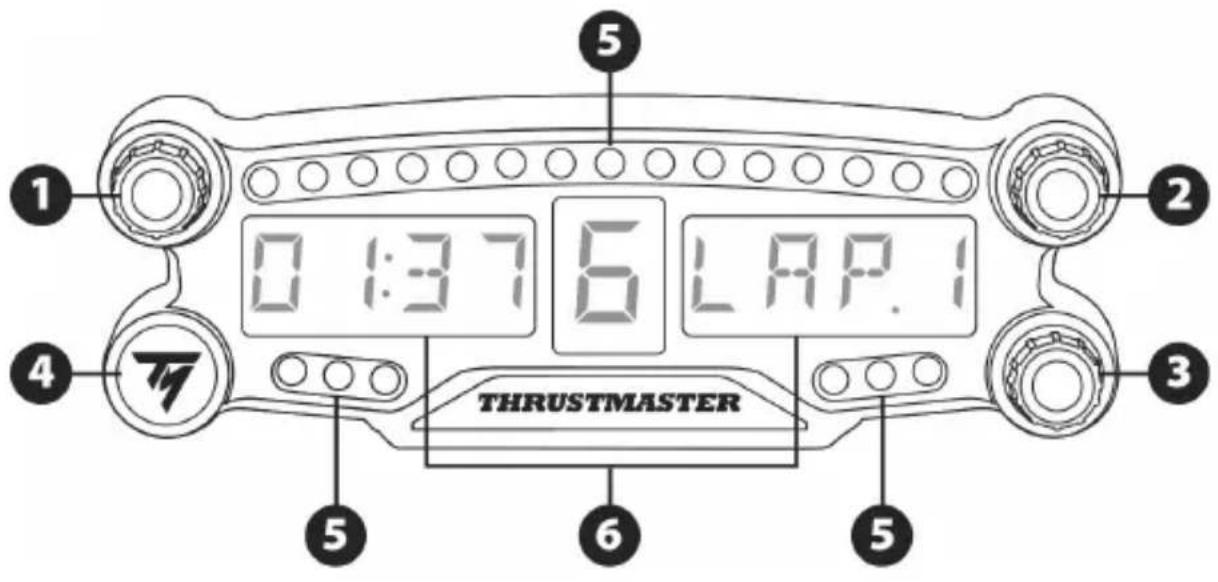
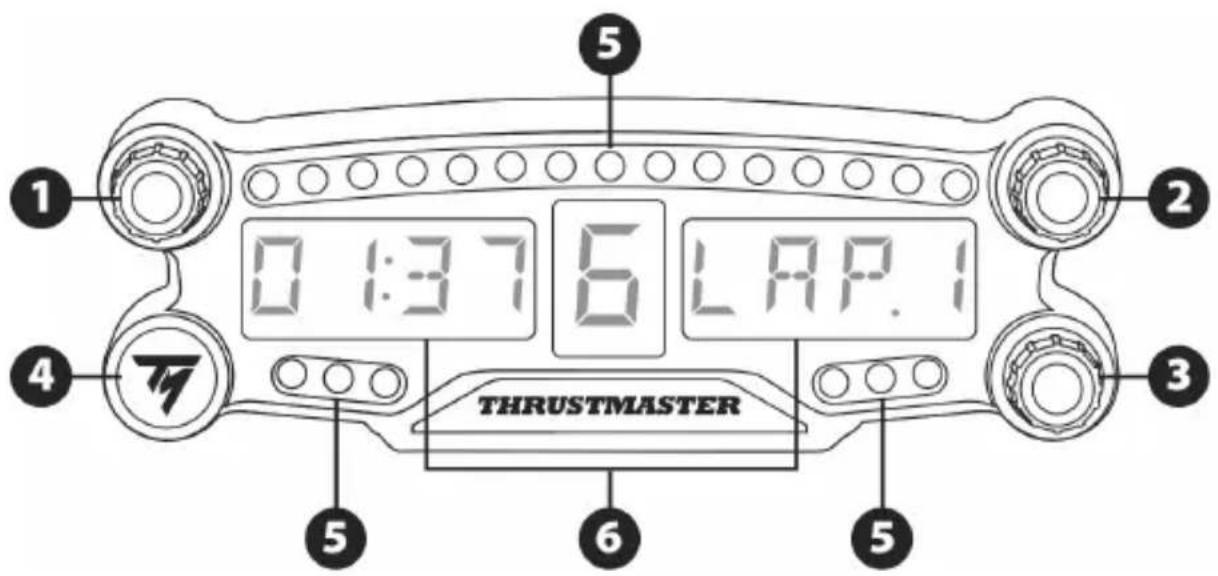
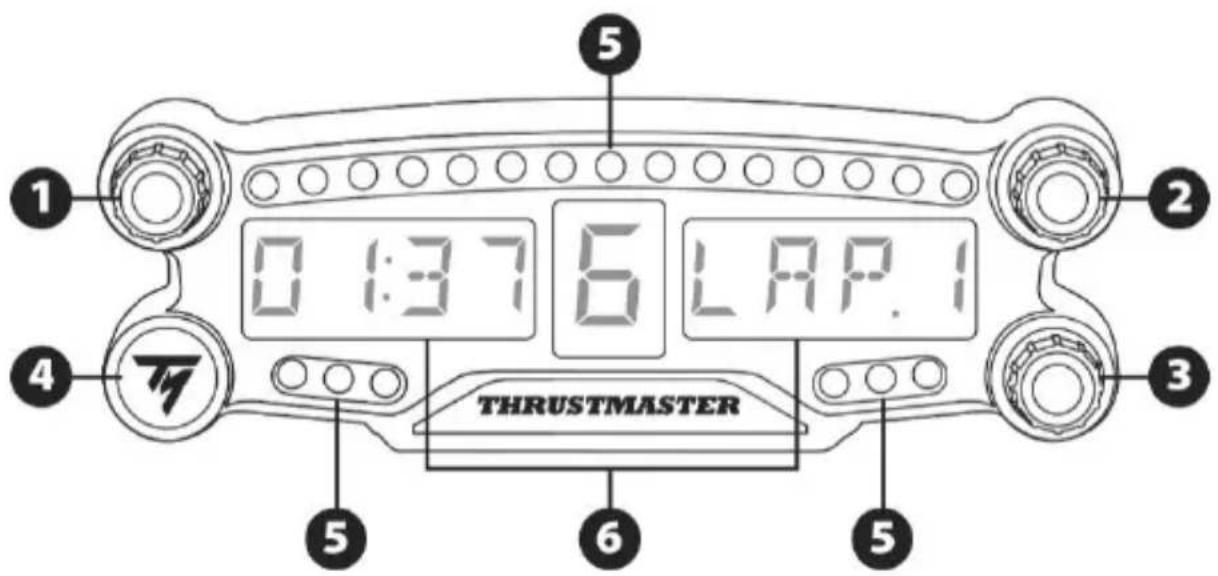
1 Rotary selector no. 1 with push-button feature
2 Rotary selector no. 2 with push-button feature
3 Rotary selector no. 3 with push-button feature (brightness adjustment control)
4 Power On/Off button
5 21 LEDs
6 Main display
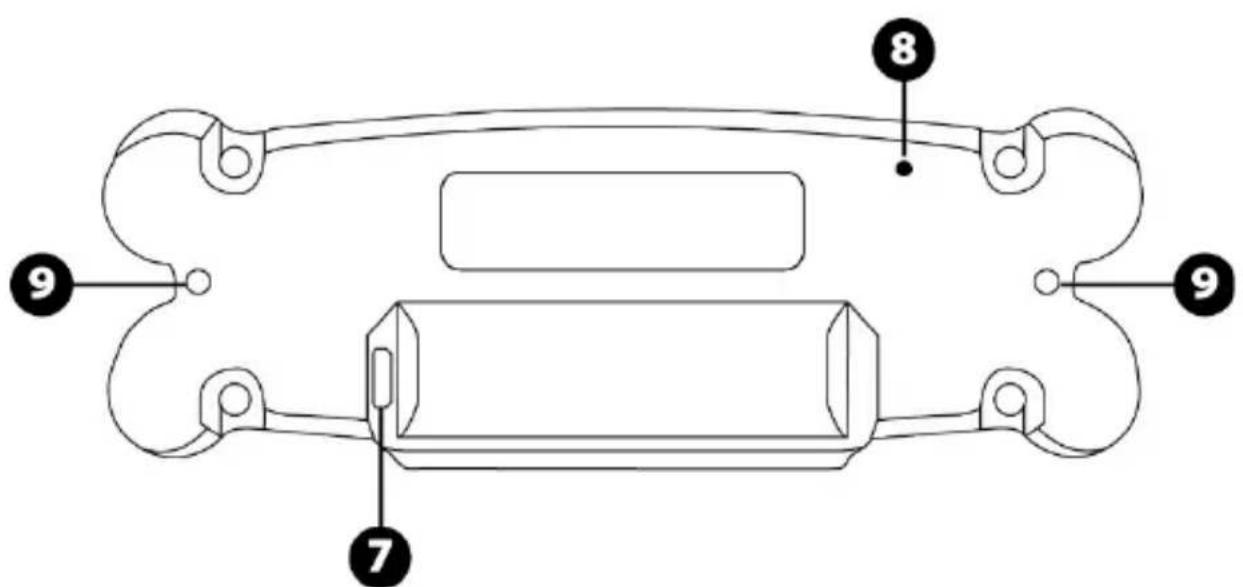
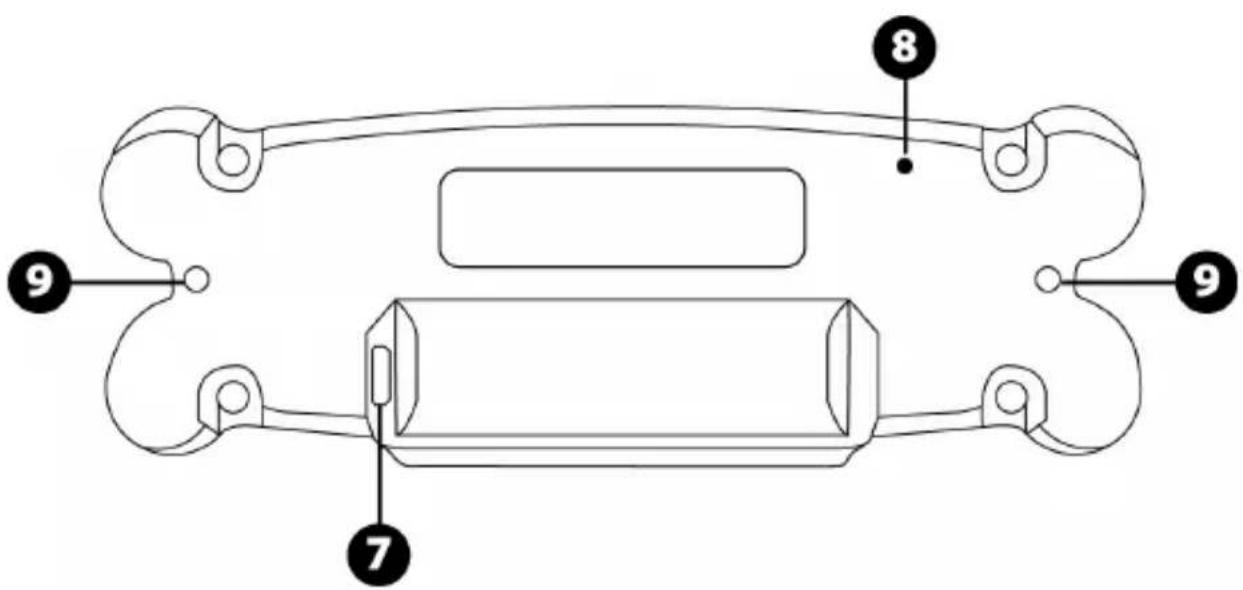
7 Micro USB charging connector
8 Charging indicator
9 Two M3 threaded holes for attaching the device
WARNING
Before using this product, please read this manual carefully and save it for later reference.

Warning - Electrical shock
- Keep the product in a dry location and do not expose it to dust or sunlight.
- Do not twist or pull on the connectors and cables.
- Do not spill any liquid on the product or its connectors.
- Do not short-circuit the product.
- Never dismantle the product; do not throw it onto a fire and do not expose it to high temperatures.
- Do not open up the device: there are no user-serviceable parts inside. Any repairs must be carried out by the manufacturer, its authorized representative or a qualified technician.

Warning - Internal battery
- Fully charge the BT LED DISPLAY before use.
- Do not disassemble the device; this would void its warranty.
- Protect your device from shocks and impacts.
- This device should not be used by children below the age of 14 without an adult's supervision.
THRUSTMASTER® DISCLAIMS ANY LIABILITY IN THE EVENT OF NON-COMPLIANCE WITH THESE INSTRUCTIONS.
WARNING: AN EXPLOSION MAY OCCUR IF THE BATTERY IS REPLACED WITH AN INCORRECT TYPE OF BATTERY.
FOLLOW INSTRUCTIONS REGARDING THE DISPOSAL OF BATTERIES.
CHARGING THE BT LED DISPLAY'S BATTERY
Using a micro USB cable (such as the USB cable supplied with the PS4™ system), connect the BT LED DISPLAY to one of the PS4™ system's free USB ports.
The charging connector (7) is located at the back of the BT LED DISPLAY.
The charging indicator (8) lights up in red when the device is charging, and turns off when it is fully charged.
COMPATIBILITY WITH PS4™ GAMES
A list of PS4™ games compatible with the BT LED DISPLAY is available at http://support.thrustmaster.com. Select Racing wheels / BT LED DISPLAY / Games settings.
This list will regularly be expanded with the release of new PS4™ games compatible with the BT LED DISPLAY.
Register the BT LED DISPLAY on the PS4™ system

This operation should only be performed once. It is not required every time the PS4™ system is restarted.
When using the BT LED DISPLAY for the first time, you must imperatively register it on your PS4™ system; this operation must only be performed once.
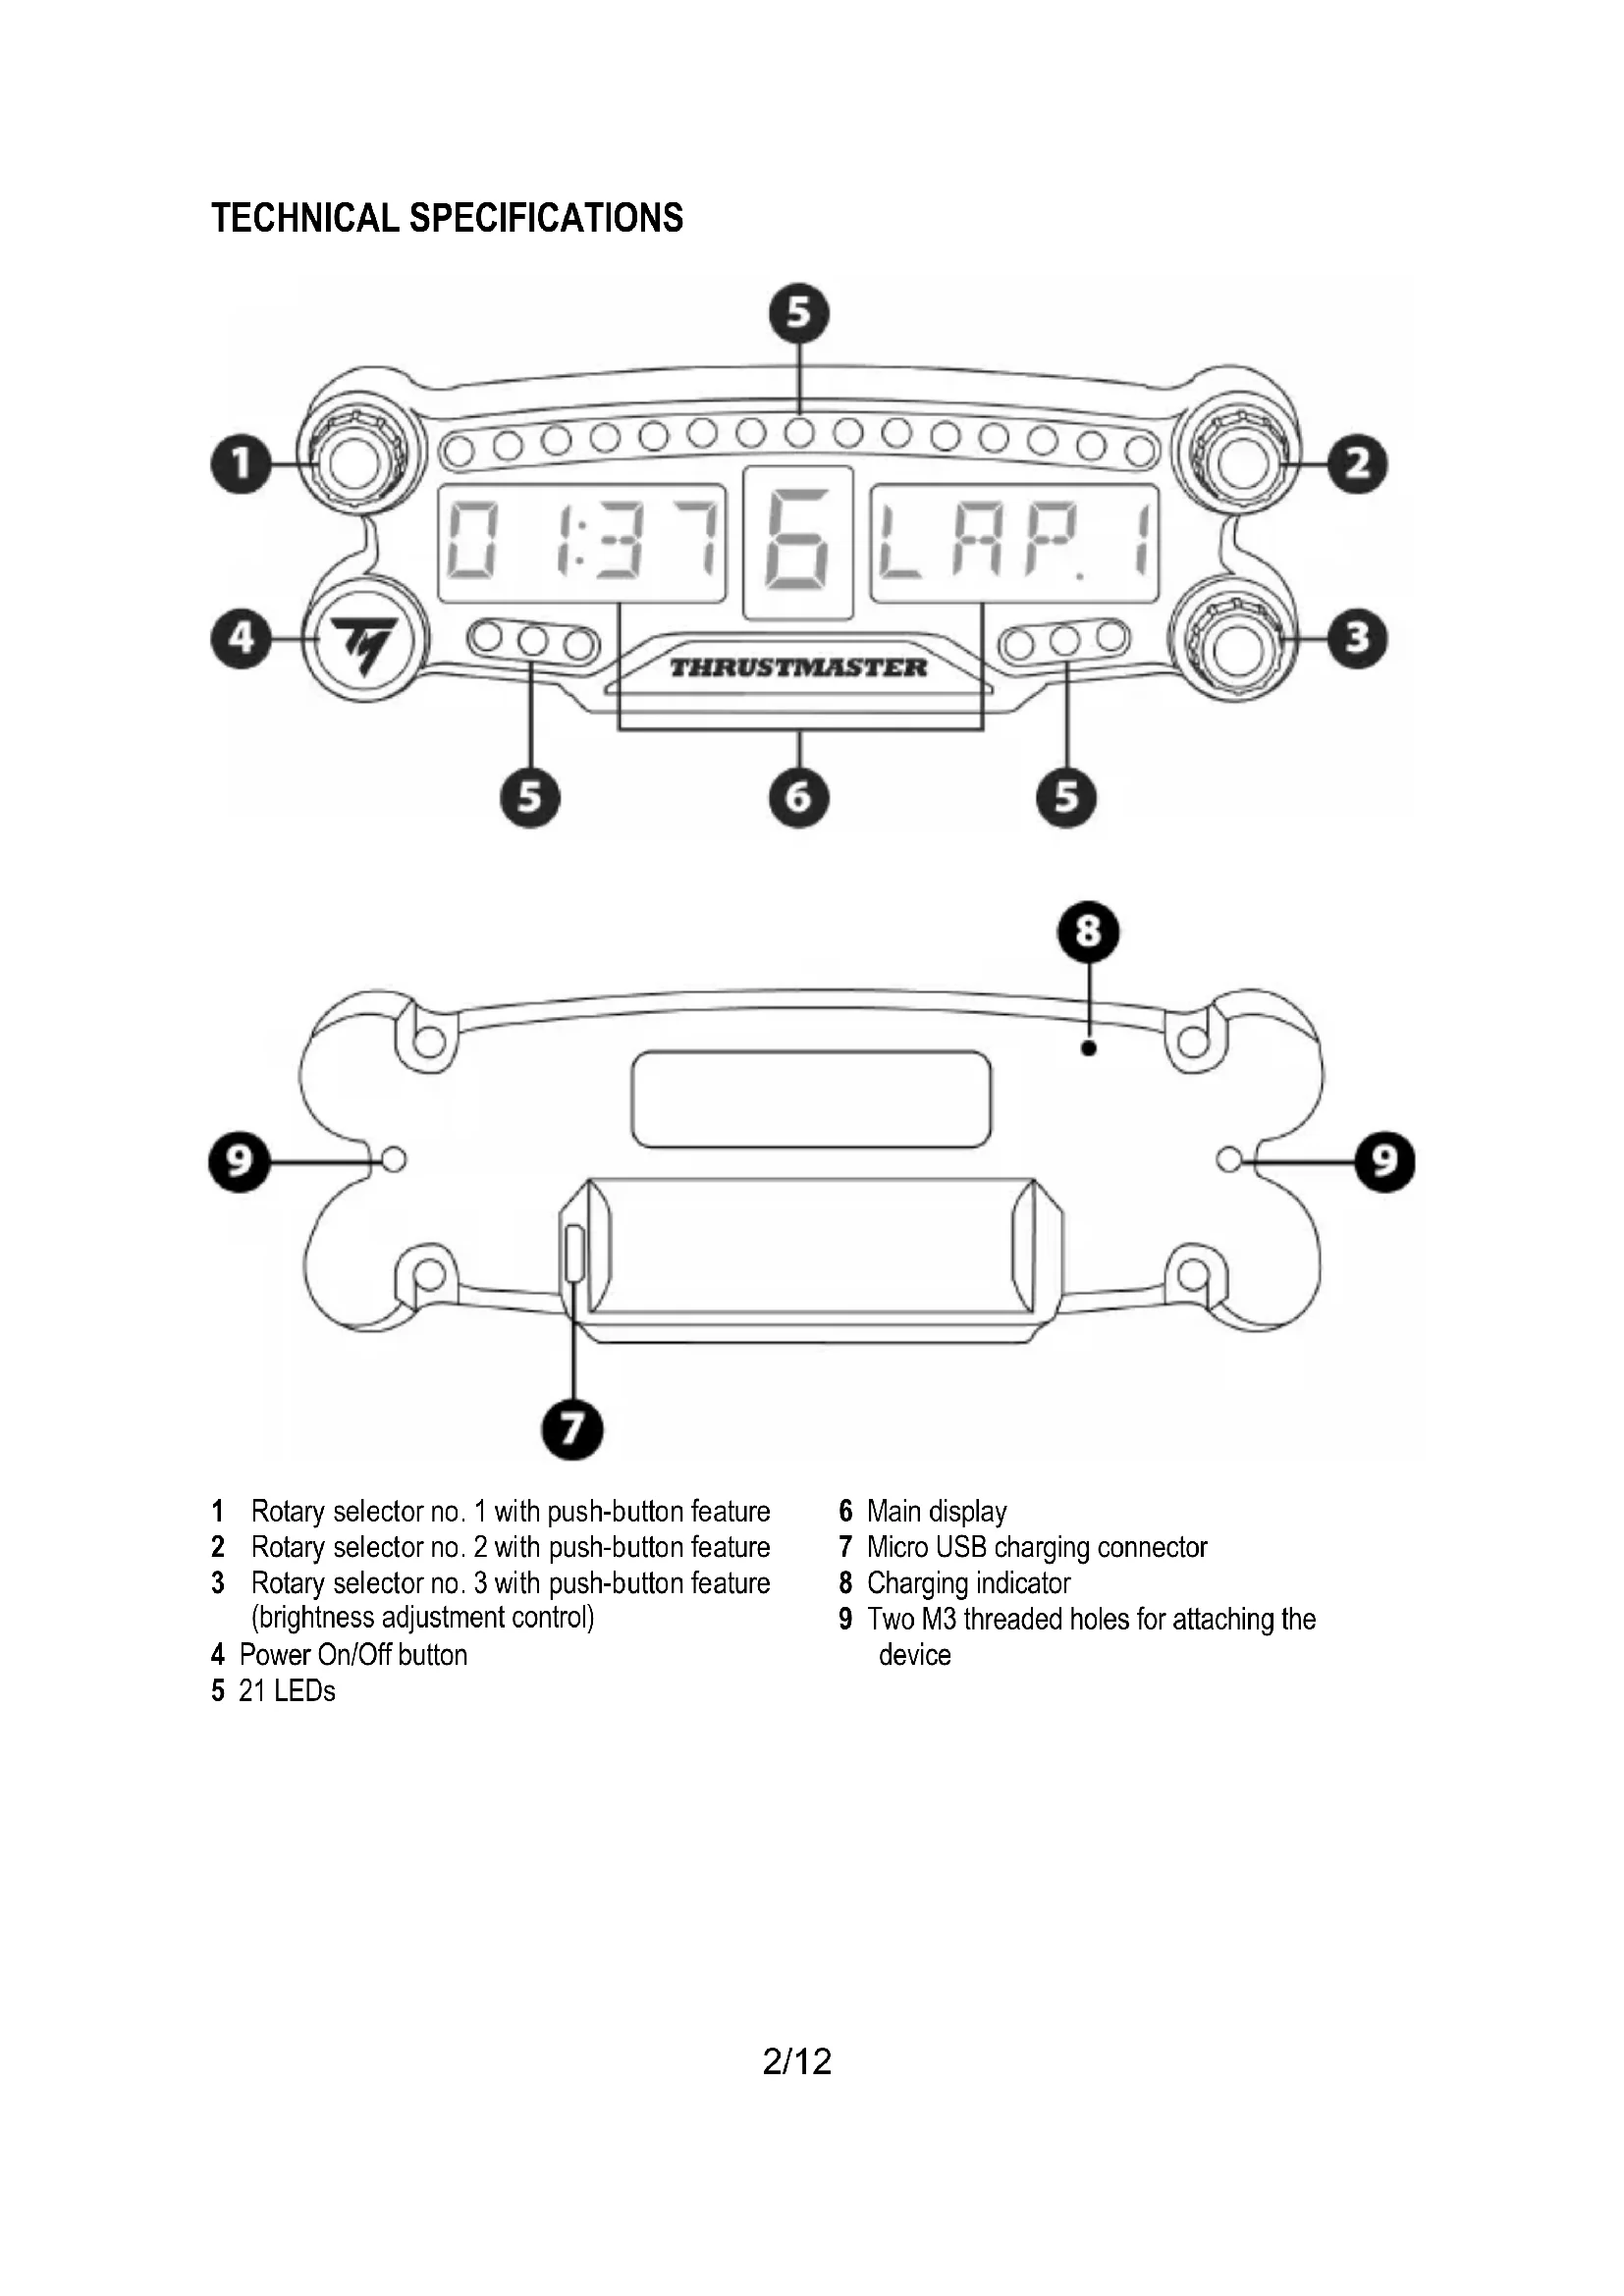
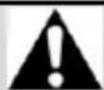
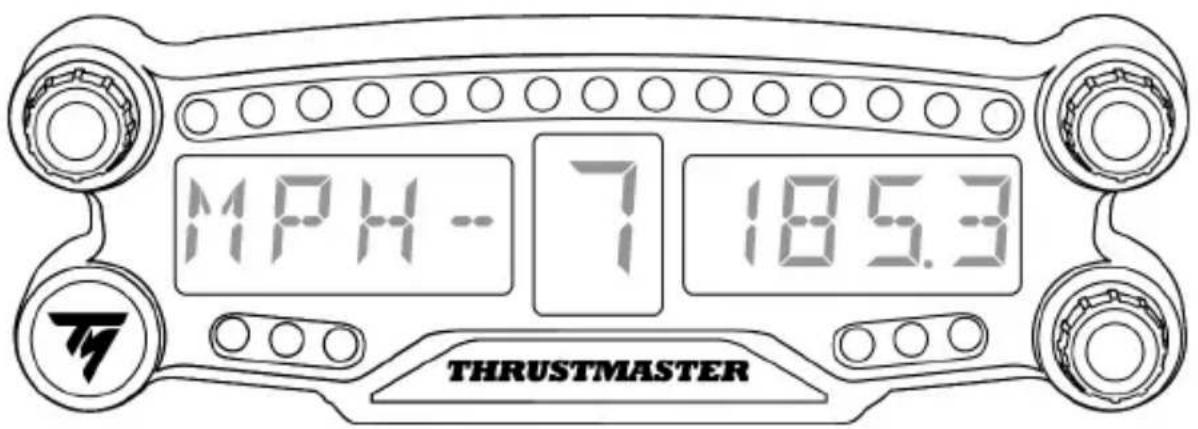
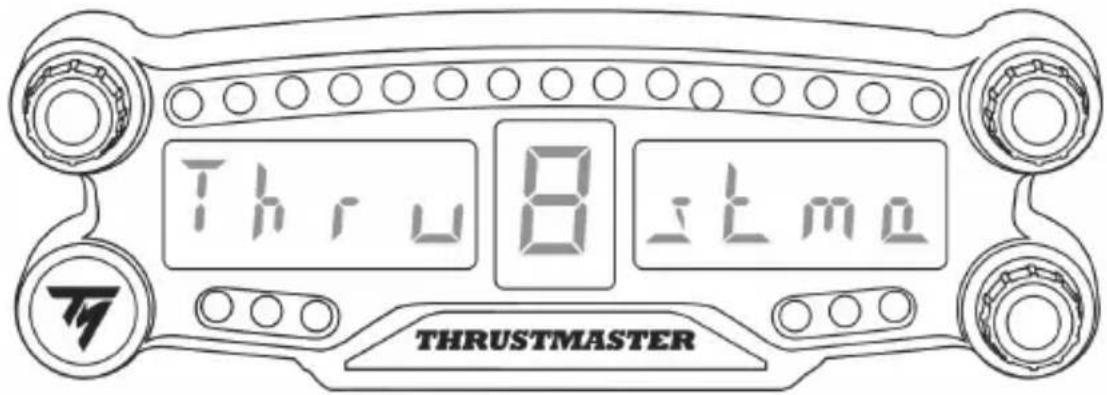
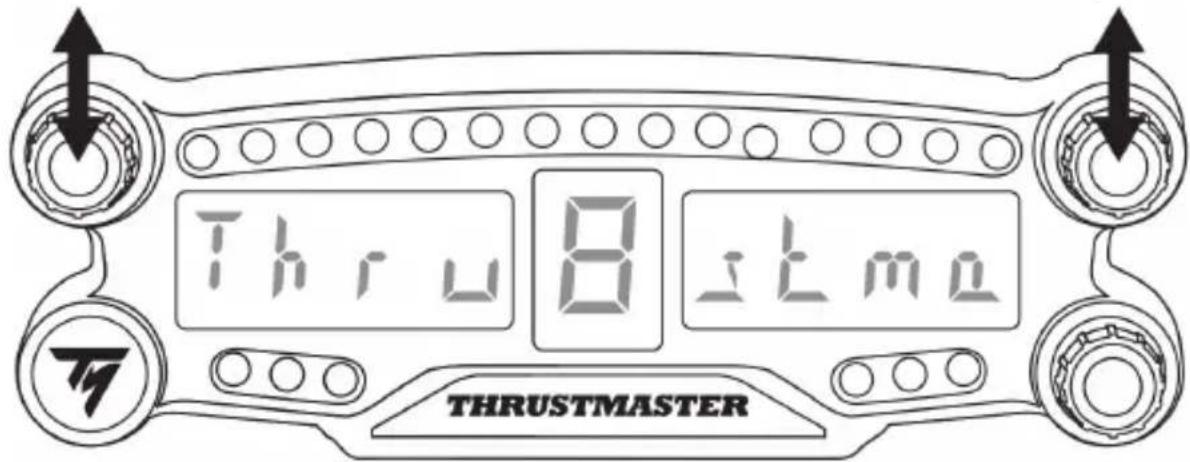
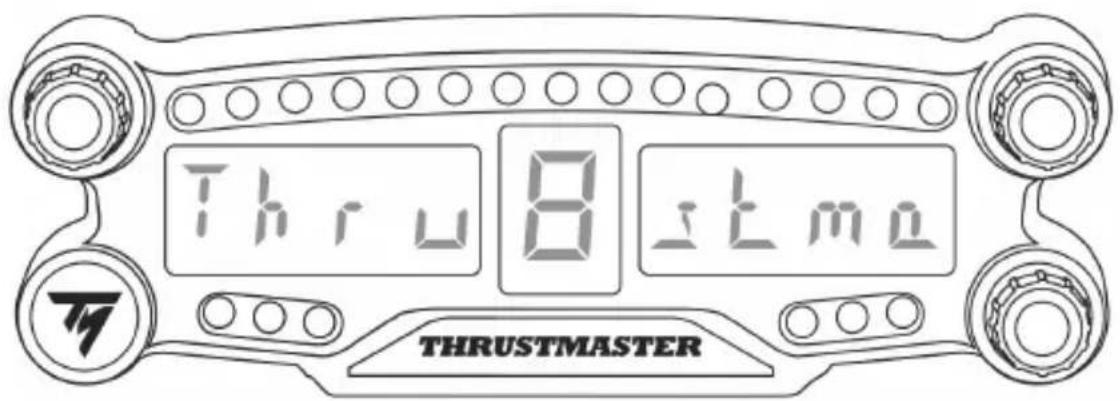
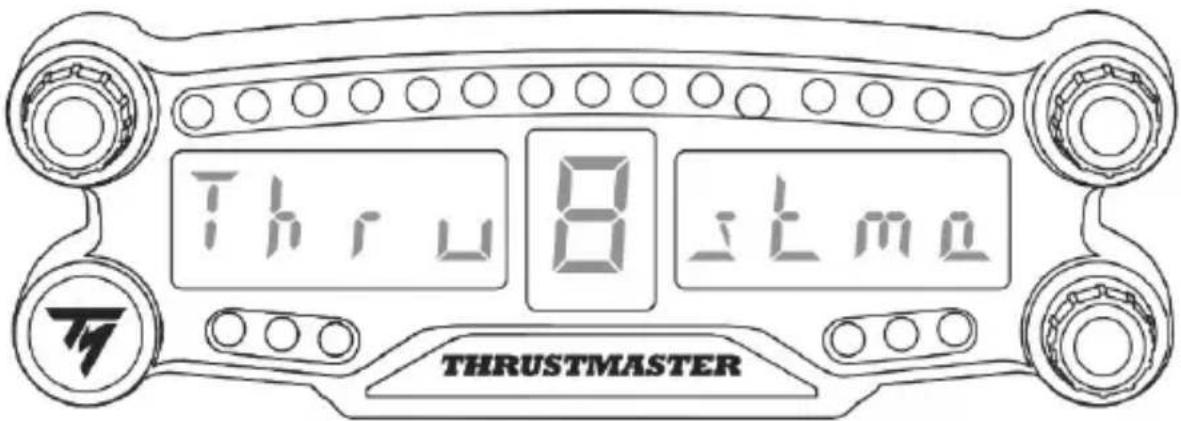
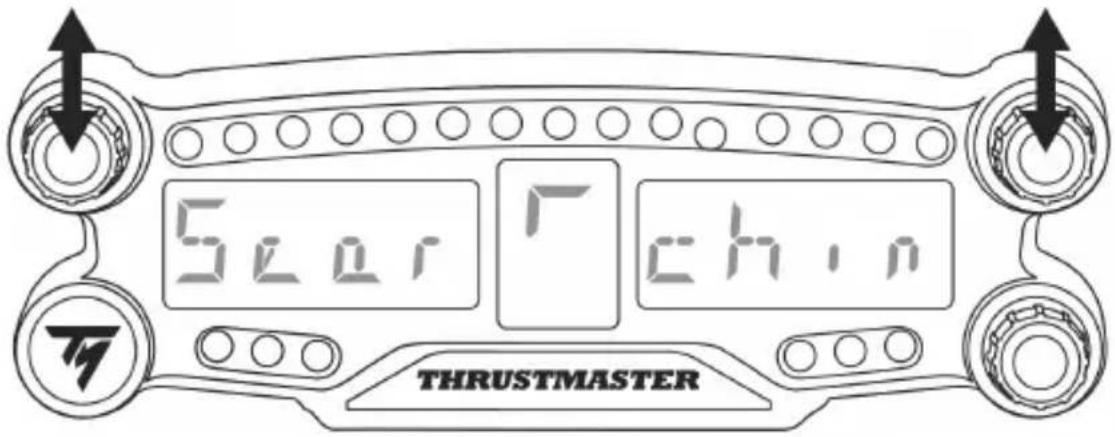
- Turn on the BT LED DISPLAY by pressing the On/Off button (4). The message Thrustmaster BT Wheel Display scrolls on the main display (6).
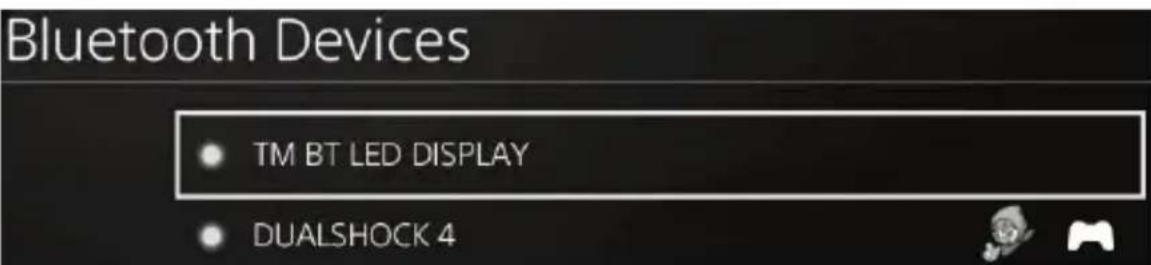
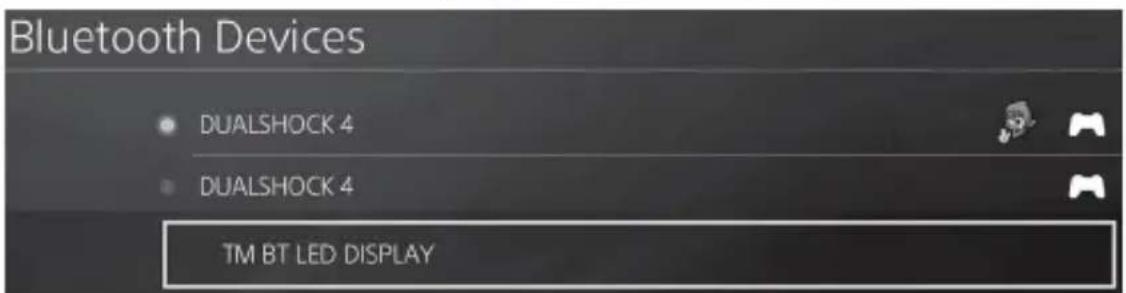
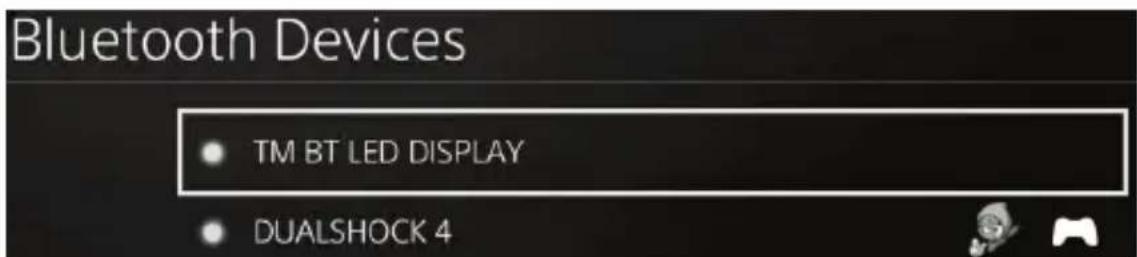
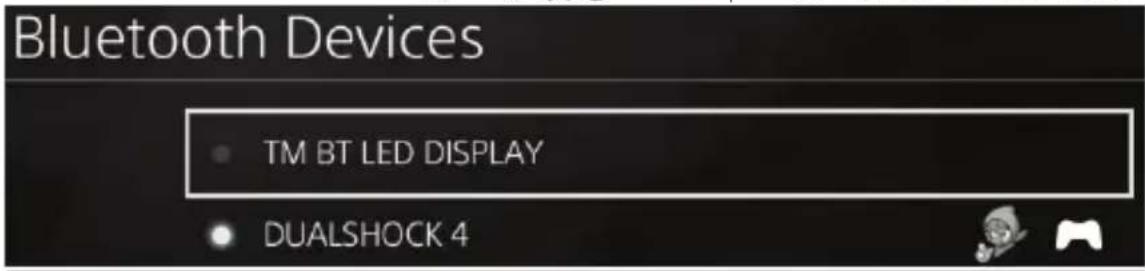
- In the PS4TM system's menu, select [Settings] > [Devices] > [Bluetooth Devices] to automatically search for nearby Bluetooth® devices. Paired devices and other Bluetooth devices will appear in the list.

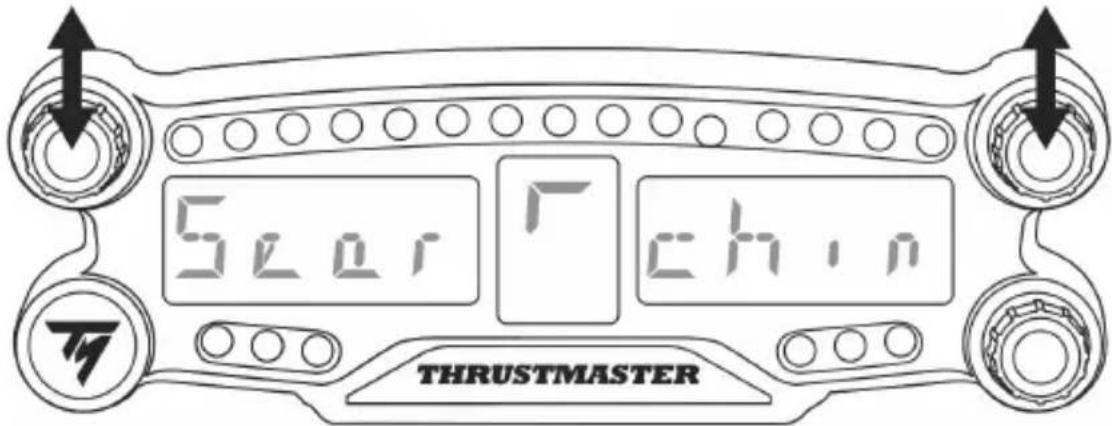
- Briefly press and release selectors no. 1 and 2 simultaneously on the BT LED DISPLAY. The message Searching known devices scrolls on the main display (6).

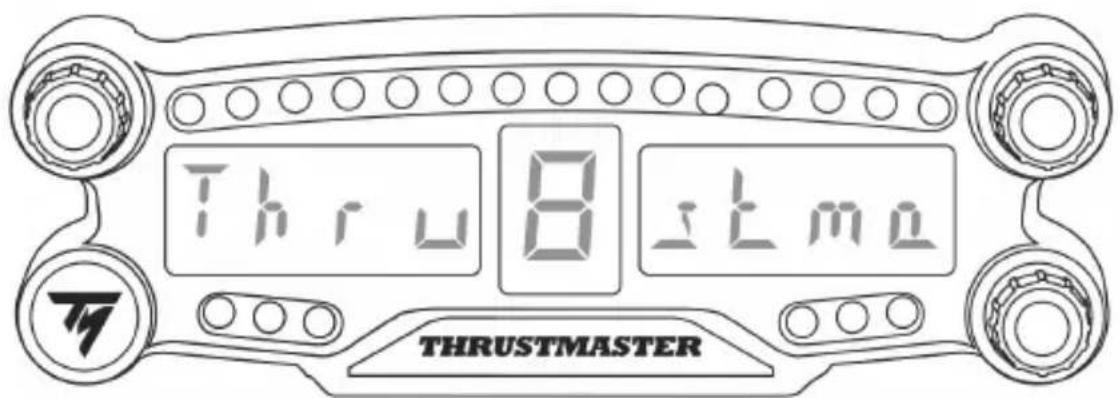
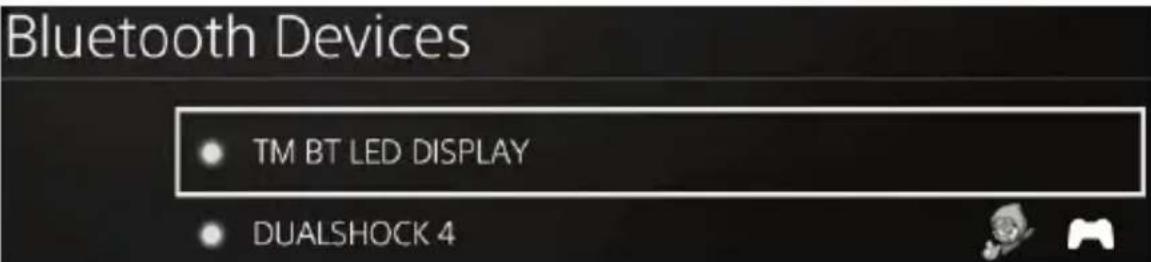
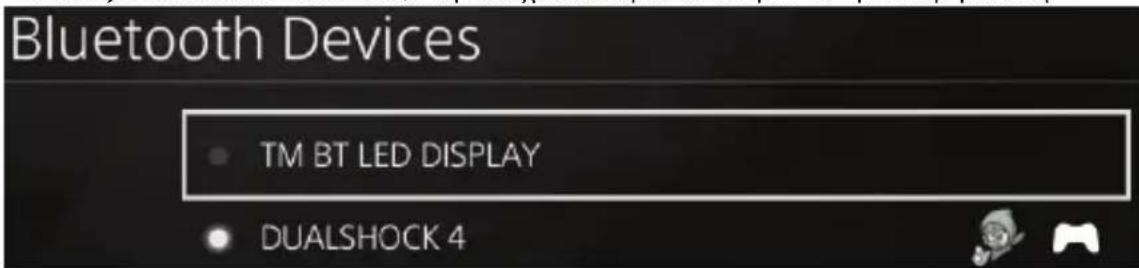
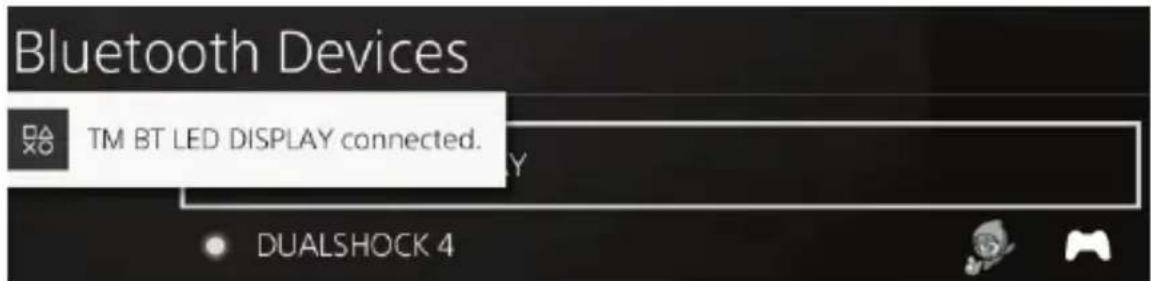
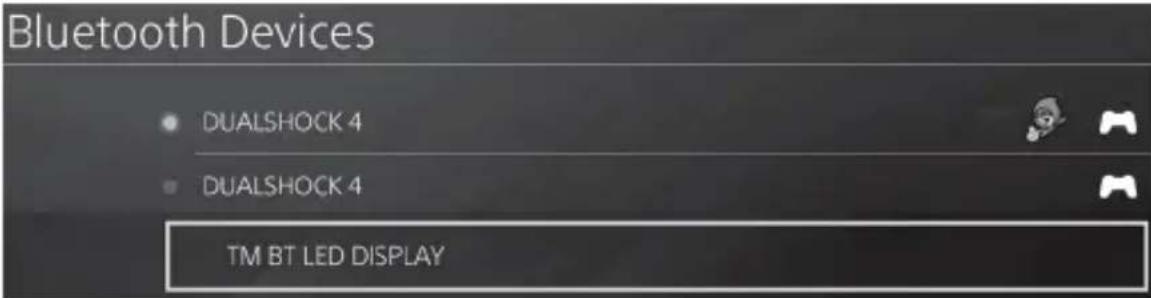
- After some time, the name TM BT LED DISPLAY should appear on the PS4™ system's screen. Using your controller, select it and press the button.

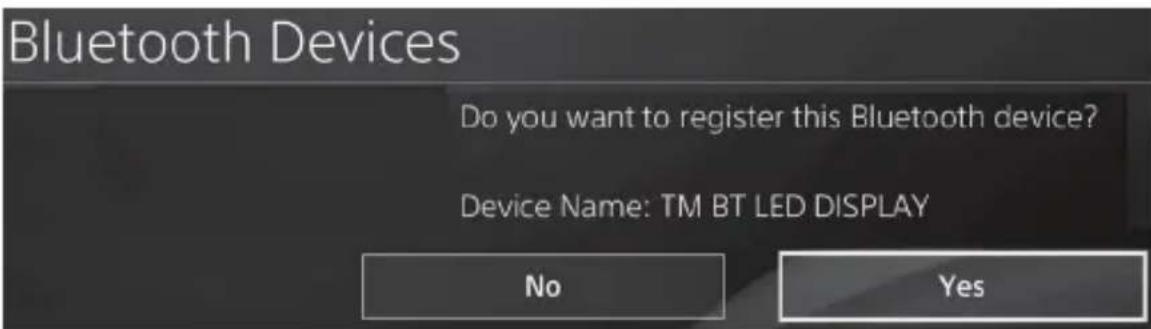
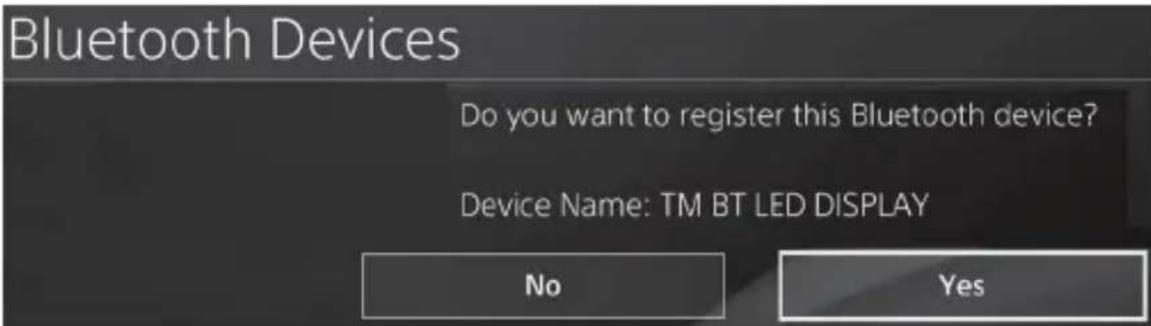
- The message Do you want to register this Bluetooth device TM BT LED DISPLAY? appears on the PS4™ system's screen. Select YES, then press the × button to confirm.
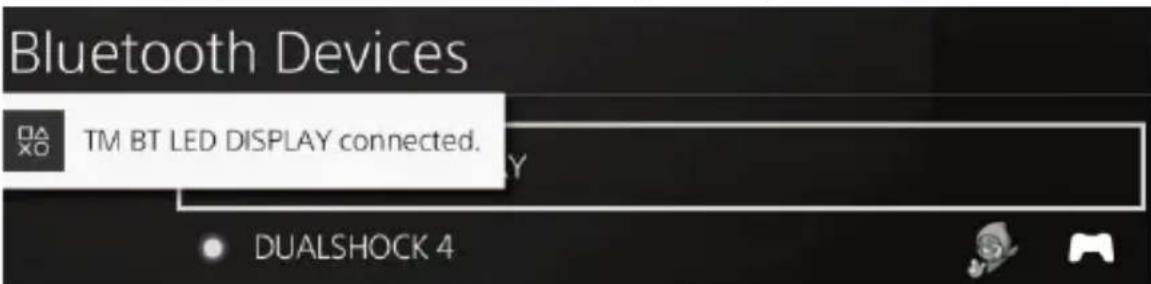
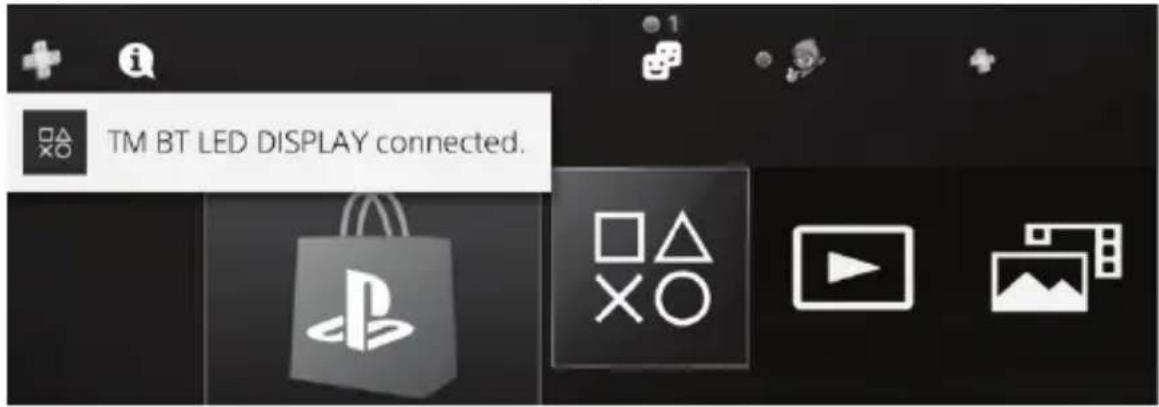
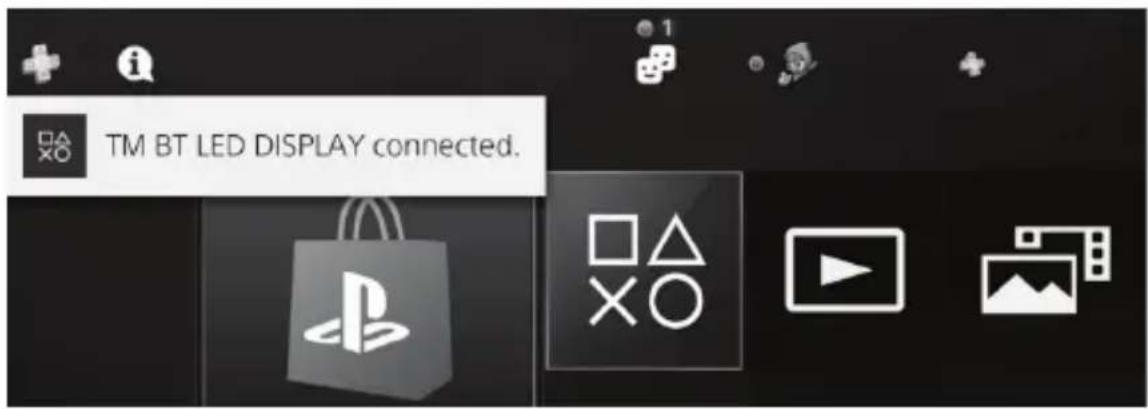
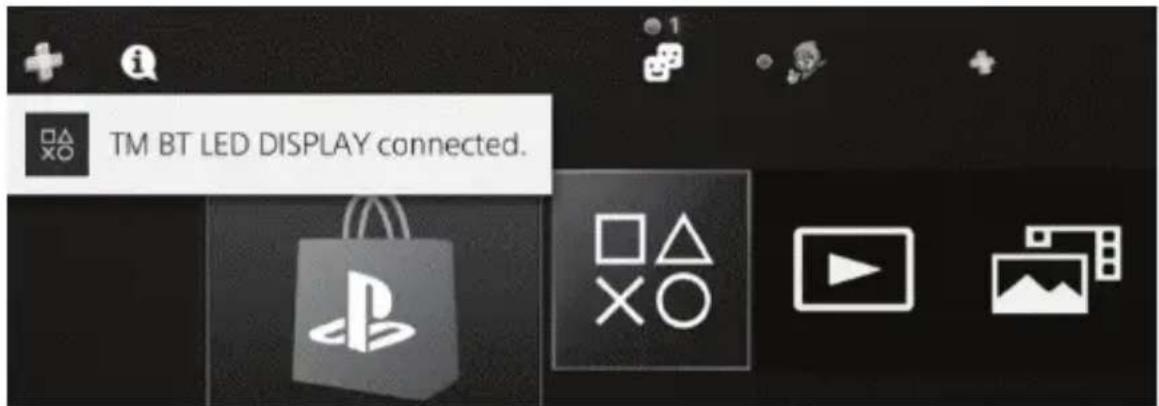
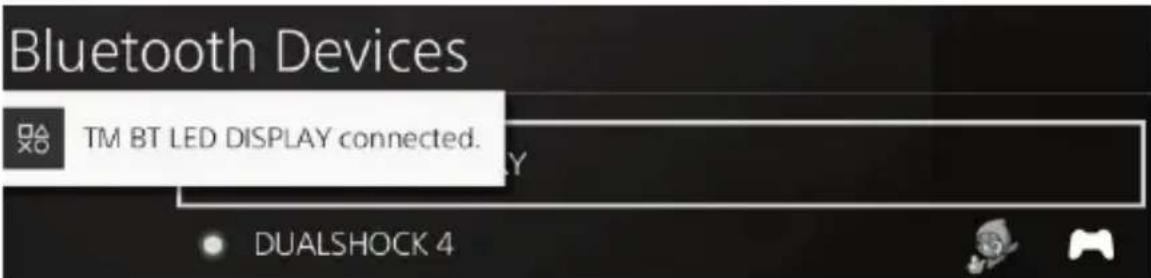
- The message TM BT LED DISPLAY connected briefly appears on the PS4™ system's screen.
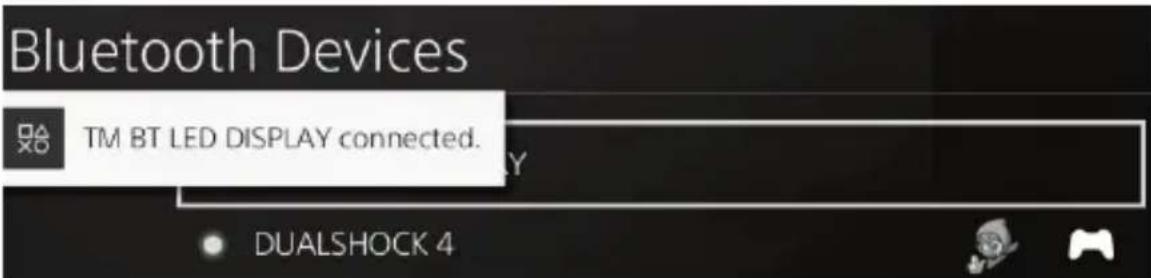
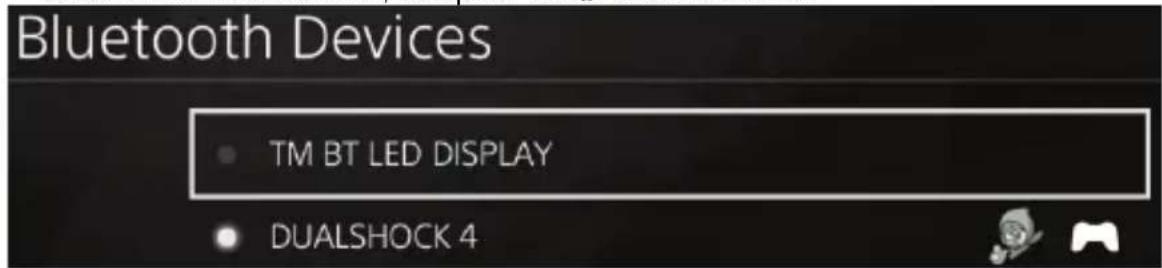
On the PS4™ system's screen, the indicator light located to the left of the TM BT LED DISPLAY now lights up in green, meaning that the device is correctly connected to the system.
- You are now ready to play!
If the operation fails, turn off your PS4™ system and disconnect, then reconnect the system's power cable. Restart your PS4™ system, then repeat registration steps 1 to 6.

VERY IMPORTANT

- It is imperative that you perform this operation every time the PS4™ system is restarted.
-
The connection of the BT LED DISPLAY to the PS4^TM system will only function if the previous step (i.e. Register the BT LED DISPLAY on the PS4^TM system) has been properly performed at least once.
-
Turn on the BT LED DISPLAY by pressing the On/Off button (4).
The message Thrustmaster BT Wheel Display scrolls on the main display (6). - Briefly press and release selectors no. 1 and 2 simultaneously on the BT LED DISPLAY.

The message Connected briefly appears on the main display (6).
The message TM BT LED DISPLAY connected briefly appears on the PS4™ system's screen.
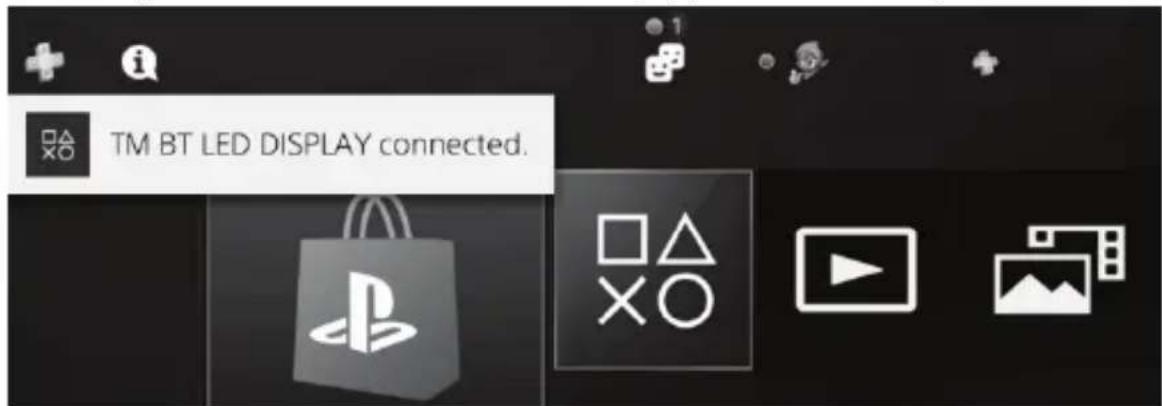
- You are now ready to play!
Unregister the BT LED DISPLAY from the PS4™ system
(This operation is only required when troubleshooting, or purchasing a new BT LED DISPLAY.)
- Turn off the BT LED DISPLAY by pressing the On/Off button (4).
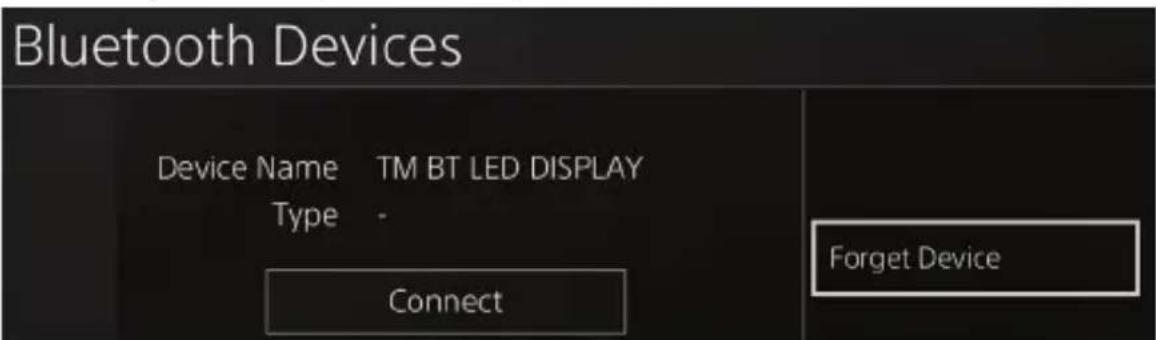
- In the PS4TM system's menu, select [Settings] > [Devices] > [Bluetooth Devices].
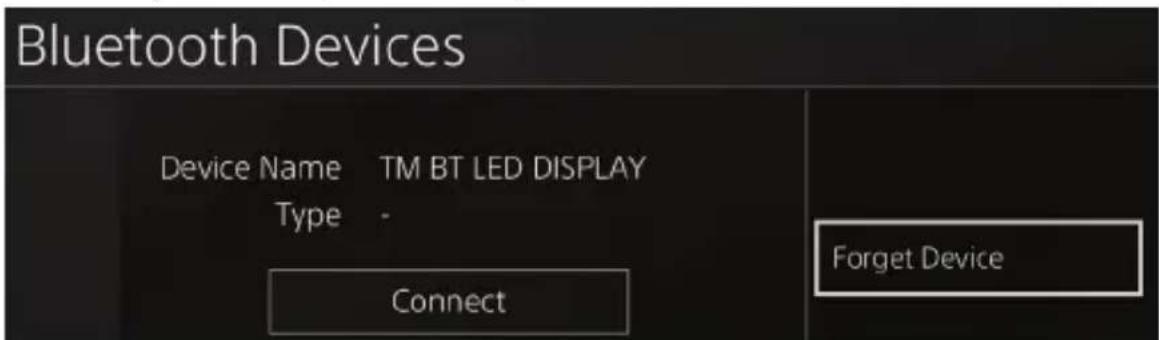
Select TM BT LED DISPLAY, then press the button to confirm.
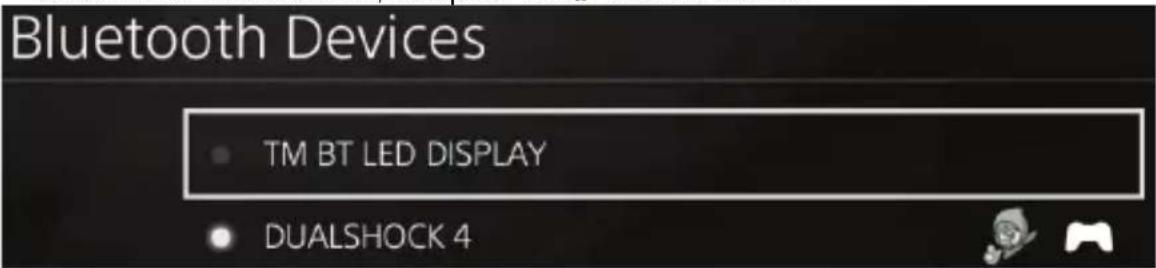
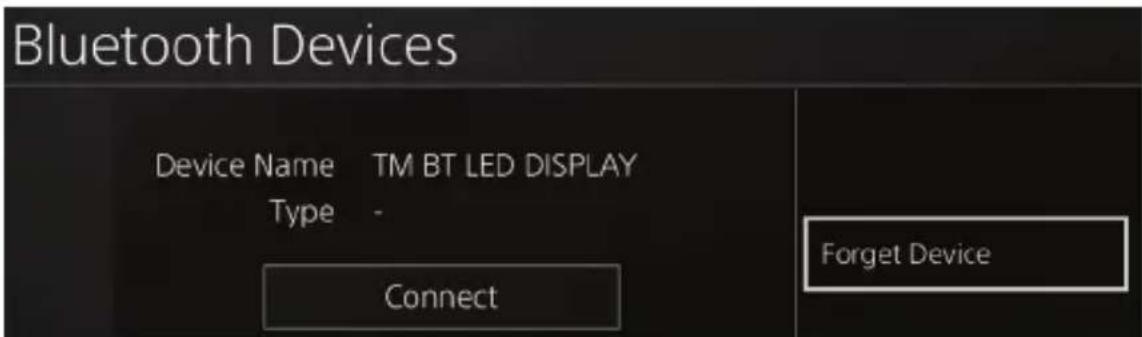
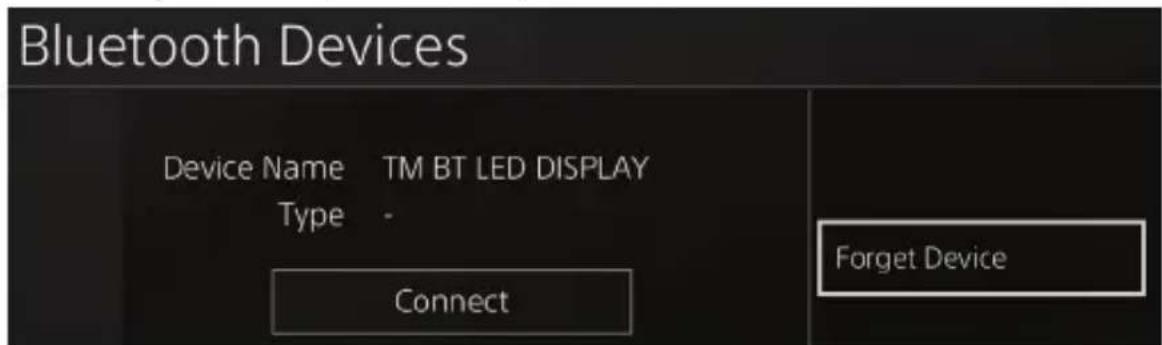
- The message Device Name TM BT LED DISPLAY appears on the screen. Press the OPTIONS button on your controller, then select Forget Device. Press the button to confirm.
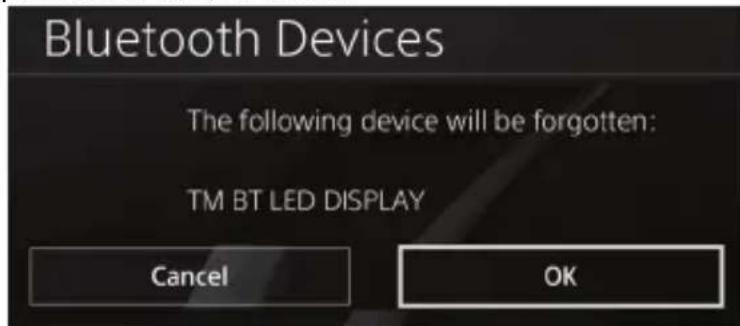
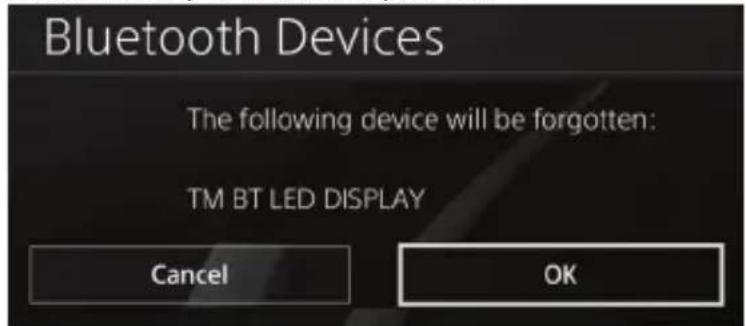
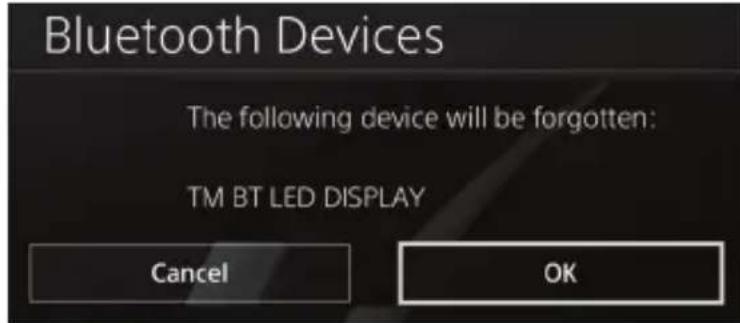
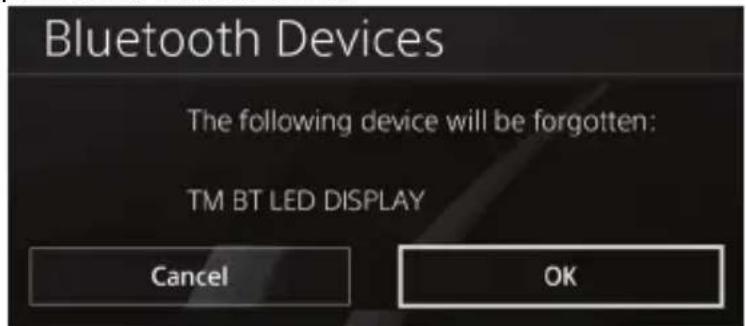
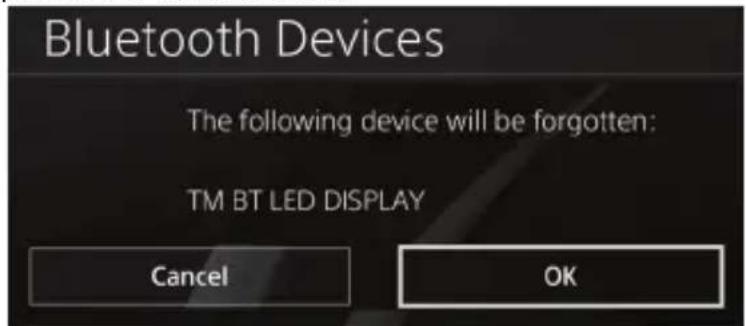
- The message The following device will be forgotten: TM BT LED DISPLAY appears on the screen.
Select OK, then press the × button to confirm.
- The TM BT LED DISPLAY is now unregistered from your PS4™ system.

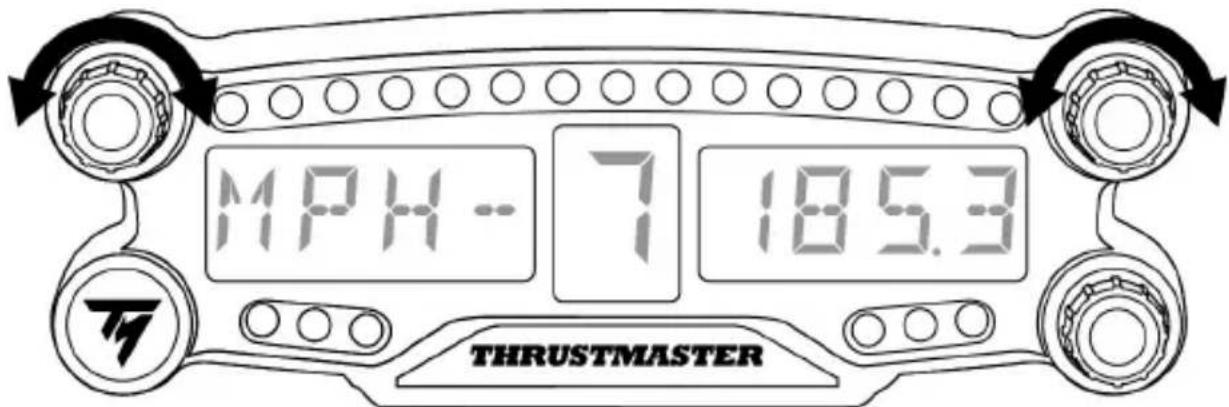
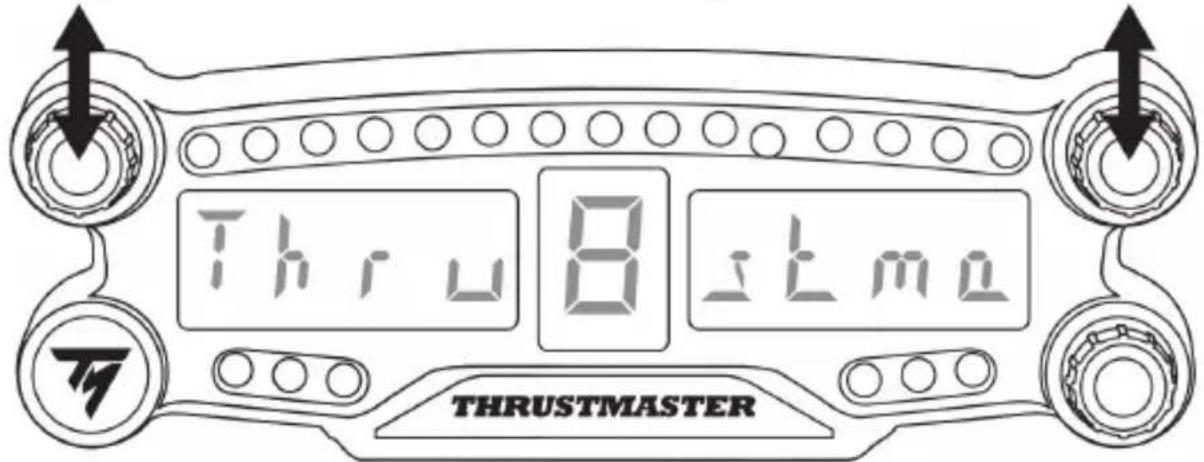
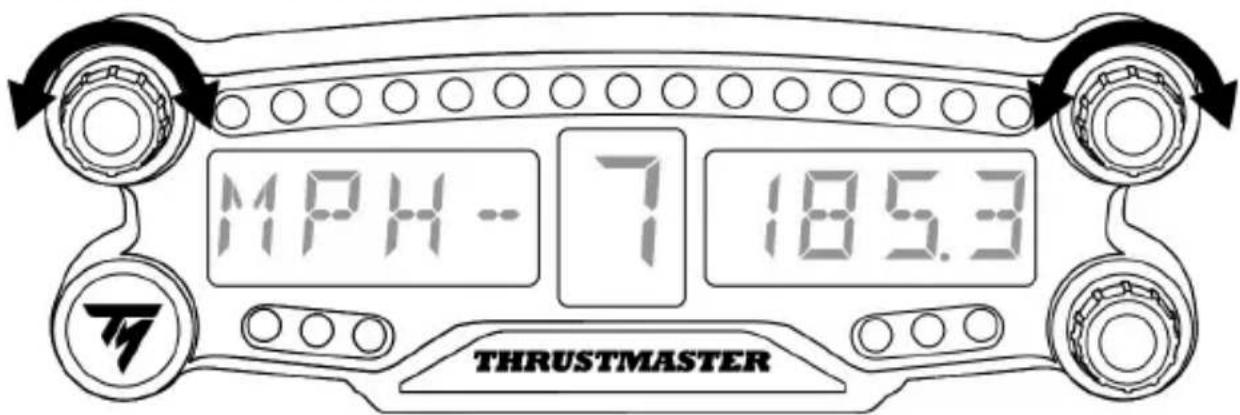
USING THE ROTARY SELECTORS NO.1 AND NO.2
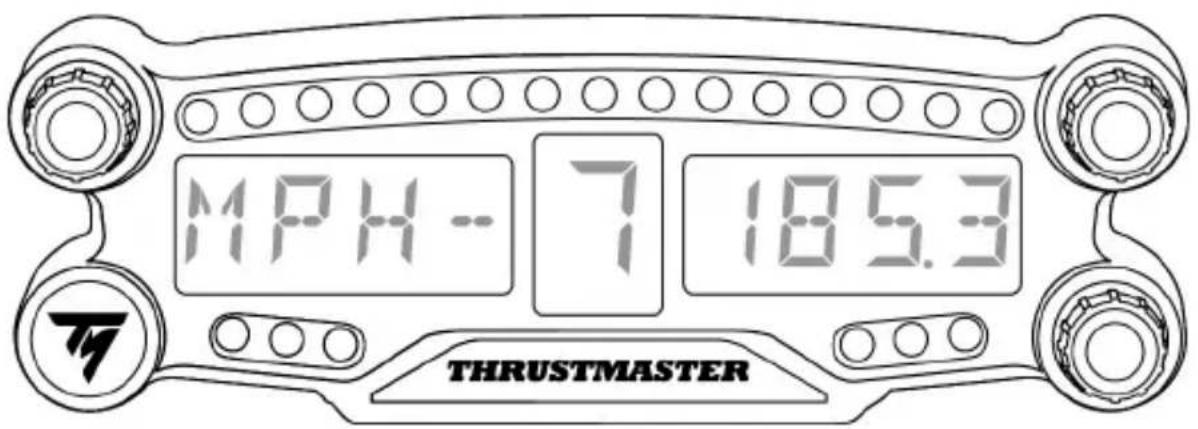
Depending on the PS4™ game, you can turn the selectors no.1 and no.2 to change the display settings, and to toggle from one setting to another.

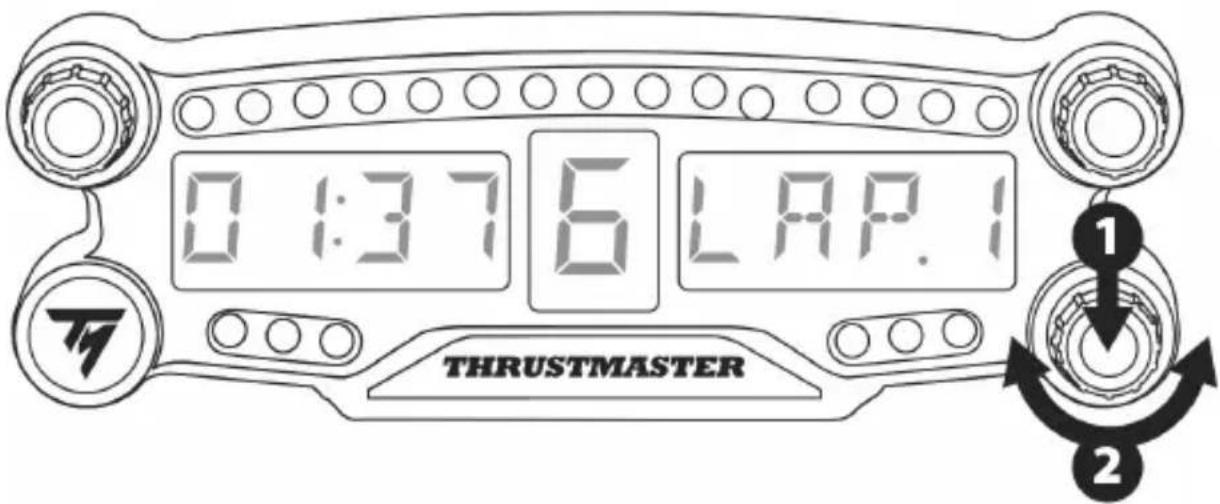
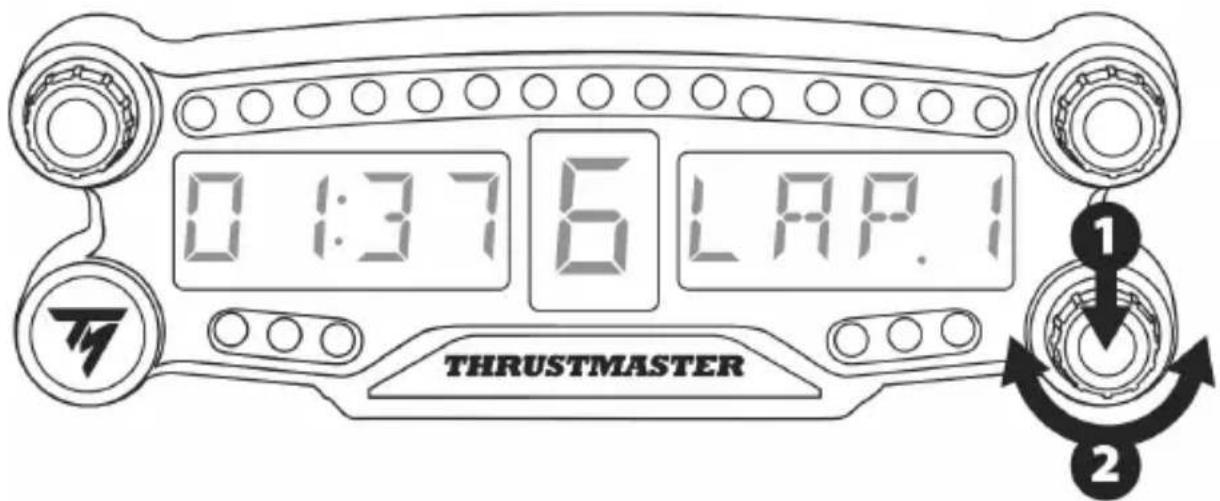
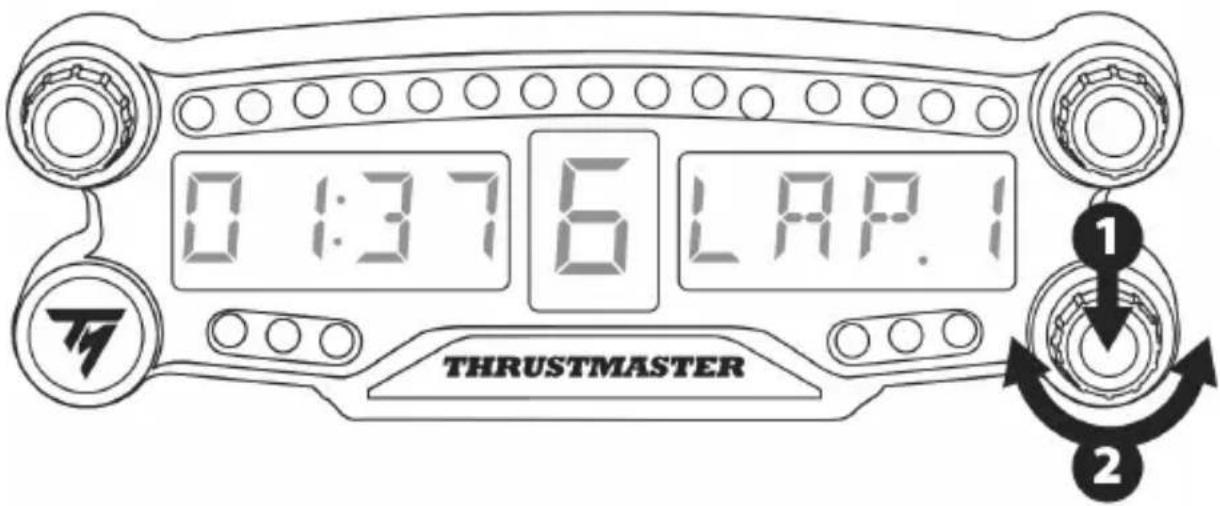
ADJUSTING THE BT LED DISPLAY'S BRIGHTNESS
1) Press and release the selector no. 3 to toggle from setting the brightness of the 21 LEDs (5) to adjusting the intensity of the main display (6), and conversely.
2) Turn the selector to the left to reduce the intensity or to the right to increase it.
ATTACHING THE BT LED DISPLAY
You can install the BT LED DISPLAY at your convenience within a 10 metre/33 foot radius around the PS4™ system.
You can also attach the device to various suitable items* or directly to some racing wheels using the two M3 threaded holes located at the back of the device (9).
- Sold separately
For more information about this, please go to http://support.thrustmaster.com. Select Racing wheels / BT LED DISPLAY, then User manual or FAQ.
UPDATING THE BT LED DISPLAY'S FIRMWARE
Both firmware (general firmware and Bluetooth firmware) included in the BT LED DISPLAY can be updated with more recent versions, featuring product improvements.
To display your BT LED DISPLAY's firmware versions and update them if required: on a PC, access http://support.thrustmaster.com, select Racing wheels / BT LED DISPLAY, then select Firmware and follow the instructions and the download and installation procedure.
HELP, FAQ AND HINTS
Access http://support.thrustmaster.com. Select Racing wheels / BT LED DISPLAY, then User manual or FAQ.
CONSUMER WARRANTY INFORMATION
Worldwide, Guillemot Corporation S.A., whose registered office is located at Place du Granier, B.P. 97143, 35571 Chantepie, France (hereinafter "Guillemot") warrants to the consumer that this Thrustmaster product shall be free from defects in materials and workmanship, for a warranty period which corresponds to the time limit to bring an action for conformity with respect to this product. In the countries of the European Union, this corresponds to a period of two (2) years from delivery of the Thrustmaster product. In other countries, the warranty period corresponds to the time limit to bring an action for conformity with respect to the Thrustmaster product according to applicable laws of the country in which the consumer was domiciled on the date of purchase of the Thrustmaster product (if no such action exists in the corresponding country, then the warranty period shall be one (1) year from the original date of purchase of the Thrustmaster product).
Notwithstanding the above, rechargeable batteries are covered by a warranty period of six (6) months from the date of original purchase.
Should the product appear to be defective during the warranty period, immediately contact Technical Support, who will indicate the procedure to follow. If the defect is confirmed, the product must be returned to its place of purchase (or any other location indicated by Technical Support).
Within the context of this warranty, the consumer's defective product shall, at Technical Support's option, be either replaced or returned to working order. If, during the warranty period, the Thrustmaster product is subject to such reconditioning, any period of at least seven (7) days during which the product is out of use shall be added to the remaining warranty period (this period runs from the date of the consumer's request for intervention or from the date on which the product in question is made available for reconditioning, if the date on which the product is made available for reconditioning is subsequent to the date of the request for intervention). If permitted under applicable law, the full liability of Guillemot and its subsidiaries (including for consequential damages) is limited to the return to working order or the replacement of the Thrustmaster product. If permitted under applicable law, Guillemot disclaims all warranties of merchantability or fitness for a particular purpose.
This warranty shall not apply: (1) if the product has been modified, opened, altered, or has suffered damage as a result of inappropriate or abusive use, negligence, an accident, normal wear, or any other cause unrelated to a material or manufacturing defect (including, but not limited to, combining the Thrustmaster product with any unsuitable element, including in particular power supplies, rechargeable batteries, chargers, or any other elements not supplied by Guillemot for this product); (2) if the product has been used for any use other than home use, including for professional or commercial purposes (game rooms, training, competitions, for example); (3) in the event of failure to comply with the instructions provided by Technical Support; (4) to software, said software being subject to a specific warranty; (5) to consumables (elements to be replaced over the product's lifespan: disposable batteries, audio headset or headphone ear pads, for example); (6) to accessories (cables, cases, pouches, bags, wrist-straps, for example); (7) if the product was sold at public auction.
This warranty is nontransferable.
The consumer's legal rights with respect to laws applicable to the sale of consumer goods in his or her country are not affected by this warranty.
Additional warranty provisions
During the warranty period, Guillemot shall not provide, in principle, any spare parts, as Technical Support is the only party authorized to open and/or recondition any Thrustmaster product (with the exception of any reconditioning procedures which Technical Support may request that the consumer carry out, by way of written instructions – for example, due to the simplicity and the lack of confidentiality of the reconditioning process – and by providing the consumer with the required spare part(s), where applicable).
Given its innovation cycles and in order to protect its know-how and trade secrets, Guillemot shall not provide, in principle, any reconditioning notification or spare parts for any Thrustmaster product whose warranty period has expired.
Liability
If permitted under applicable law, Guillemot Corporation S.A. (hereinafter "Guillemot") and its subsidiaries disclaim all liability for any damages caused by one or more of the following: (1) the product has been modified, opened or altered; (2) failure to comply with assembly instructions; (3) inappropriate or abusive use, negligence, an accident (an impact, for example); (4) normal wear; (5) the use of the product for any use other than home use, including for professional or commercial purposes (game rooms, training, competitions, for example). If permitted under applicable law, Guillemot and its subsidiaries disclaim all liability for any damages unrelated to a material or manufacturing defect with respect to the product (including, but not limited to, any damages caused directly or indirectly by any software, or by combining the Thrustmaster product with any unsuitable element, including in particular power supplies, rechargeable batteries, chargers, or any other elements not supplied by Guillemot for this product).

STATEMENT OF COMPLIANCE WITH EU REGULATIONS
Guillemot Corporation S.A. hereby declares that the device BT LED DISPLAY complies with the main requirements and other relevant clauses of Directive 2014/53/UE (RED). The compliance statement can be viewed at the following site:
http://www.thrustmaster.com/certificates/BT_Led_Display/Doc-BT_Led_Display.pdf
Frequency Band: 2402-2480MHz, RF MAX power: <10dBm
COPYRIGHT
© 2017 Guillemot Corporation S.A. All rights reserved. Thrustmaster® is a registered trademark of Guillemot Corporation S.A.
Licensed for sale in Europe, Africa, Middle East, Russia, India and Oceania. For use exclusively with PlayStation®4.
All other trademarks and brand names are hereby acknowledged and are property of their respective owners. Illustrations not binding. Contents, designs and specifications are subject to change without notice and may vary from one country to another. Made in China.
Manufactured and distributed by Guillemot Corporation S.A.
ENVIRONMENTAL PROTECTION RECOMMENDATION
In the European Union and Turkey: At the end of its working life, this product should not be disposed of with standard household waste, but rather dropped off at a collection point for the disposal of Waste Electrical and Electronic Equipment (WEEE) for recycling.
This is confirmed by the symbol found on the product, user manual or packaging. Depending on their characteristics, the materials may be recycled. Through recycling and other forms of processing Waste Electrical and Electronic Equipment,
you can make a significant contribution towards helping to protect the environment.
Please contact your local authorities for information on the collection point nearest you.
For all other countries: Please adhere to local recycling laws for electrical and electronic equipment.
Retain this information. Colours and decorations may vary.
Plastic fasteners and adhesives should be removed from the product before it is used.
www.thrustmaster.com
*Applicable to EU and Turkey only

BT LED DISPLAY
Pour PlayStation®4
FIXATION DU BT LED DISPLAY
INFORMATIONS RELATIVES A LA GARANTIE AUX CONSOMMATEURS
http://www.thrustmaster.com/certificates/BT_Led_Display/Doc-BT_Led(Display.pdf
www.thrustmaster.com
SO BRINGEN SIE DAS BT LED DISPLAY AN
http://www.thrustmaster.com/certificates/BT_Led_Display/Doc-BT_Led(Display.pdf
www.thrustmaster.com
ACCU OPLADEN VAN BT LED DISPLAY
INFORMATIE MET BETREKKING TOT KOPERSGARANTIE
http://www.thrustmaster.com/certificates/BT_Led_Display/Doc-BT_Led(Display.pdf
Frequentrieband: 2402-2480 MHz, RF MAX vermogen: <10 dBm
COPYRIGHT
www.thrustmaster.com
http://www.thrustmaster.com/certificates/BT_Led_Display/Doc-BT_Led(Display.pdf
Banda in frequenza: 2402-2480MHz, potenza MASSIMA RF: <10dBm
COPYRIGHT
www.thrustmaster.com
http://www.thrustmaster.com/certificates/BT_Led_Display/Doc-BT_Led_Display.pdf
www.thrustmaster.com
FIXAR O BT LED DISPLAY
www.thrustmaster.com
- Ha dincnee cncTeMbI PS4TM oTo6pa3ntc coo6ueHHe: Do you want to register this Bluetooth device TM BT LED DISPLAY? (3apernctpnpoBaTb Bluetooth-ycptpoCTBO TM BT LED DISPLAY). Bb6epuTe YES (DA) n HaxMITE KONky dIy IIOdTBePckdHnA.
- Ha dinçnlee cncTeMbI PS4TM kpaTko OTobpa3ntc coo6eHne: TM BT LED DISPLAY connected (YcTpoiCTBO TM BT LED DISPLAY noDKnIOyeHo).
Ha dinçnnee cnctembI PS4TM, cneBa ot imehn TM BT LED DISPLAY 3a ropntc 3e HndnkatOp, yTO O3Naayet npabNlbHoe NOdklouyehne ycTpoCTBa K cnCTeme.
- Tenepb BCE roTOBO dIa nIrpbl!
B clyuae c6oiaopauu BbiknouHTe n OTcoeHNHTe cnCTemy PS4TM, 3aTeM CHOba noKIOUHTe ka6eJIb NITAHNcCTEmbl. Ipeepzanyctnte cnCTemy PS4TM n NOBTOPHTe warn 1-6 npOeDpybl peRNCtpaun.
OUEHb BAXHO!

- 3Ty onepaunio o6raTeNbHO cIeNyET BbINOJHrTb NocJe KaXdoi nepe3arpy3kn cnCTembl PS4TM.
-
Покльецни усточь BT LED DISPLAY K систeme PS4™ 6удет paботаь, толък ecлп прдьдушee DeистBE (T. e., Perictraця усточь BA BT LED DISPLAY B систeme PS4™) 6blno KoppeKTHO BBINONHeHO XOTЯ 6bl OdnH pa3.
-
BkHouHTe yctpoCTBO BT LED DISPLAY HaxaTne KhoNKn NITaHn (4).
Ha ochOBHOM ducnlee (6) npokpyuBaetc coo6eHHe: Thrustmaster BT Wheel Display. - OndOBpeMeHNO 6bICTpo HaxMMte n OTnyCTnte nepeKIOuATEI 1 n 2 Ha yctpoiCTBe BT LED DISPLAY.
Ha oCHOBHOM dncnnee (6) 6bictpo oTo6paxaetc coo6eHHe: Connected.
Ha dinncnnee cinctembl PS4TM kpaTko oTo6pa3ntc coo6uHHe: TM BT LED DISPLAY connected (YcTpoiCtBO TM BT LED DISPLAY nooknoueHo).
- Tenepb BCE roTOBO nIry npbl!
OTmeha pernctpaunu yctpojctba BT LED DISPLAY B cncteme PS4TM
- Ha dincnee oTo6pa3ntc coo6eHne: The following device will be forgotten: TM BT LED DISPLAY (Clenyuooee yctpoiCTBO 3a6bIto: TM BT LED DISPLAY).
BbIbepeTe OK n HaxMnTe KHOJky IJI NOITBepKdEHHa.
- Tenepb yctpoCTBO TM BT LED DISPLAY 6oIbSe He 3apeHcTpnpObaHO B cncTeMe PS4TM.

NCSIOJIb3OBAHNE IOBOPOTHbIX NEPEKIIQUATEJEIe1 N2
B 3aBnCmOCTn OT nrgbl dny PS4TM c nmoUbI O nepeKIOuATEnei 1 n 2 MoXHO N3MeHrTb HacTpoKn DnCpIe, a TAKKe IpeKIOUcTaBC MExdy npaMeTpam.
PERYUNPOBKA JPKOCTN YCTPOINCTBA BT LED DISPLAY
1) Haxmte n otnyctnte nepeknoyateIb 3 dna nepexoda mexdy napametpamn npkoctn 21 INdkatopa (5) n perynipOBKn yobHn noDCBETKn OCHOBHO nucPnEe (6).
2)ДяуMeHbSeHnIHTeHCNBHOCTN NOcBETKIOBepHITe nepeKIOUaTeJIb BNeBO,ДBa yBeJIuHnIByBnPaBO.

KPEПLEHNEДИСПЛЕВТLEDDISPLAY
YcTpoIcTBo BT LED DISPLAY MOxHObITb B yO6Hom MeCTe Ha paCtOaHm He 6oJee 10 M ot CnCTeMb I PS4TM.
Kpome toro, ero moxho 3akpeHb Ha pa3nHbIX NOXODaixx npedMeTax* Hn HENOCpeCTBeHHo Ha HEKOTopbIX MOeJx pyIe C nOMOuBIO DByx pe3b6OBbIX OTBepCTN M3 Ha 3aHne CTopoHe ycTpoiCTBa (9). * Ppuobpemaemc omdelbo
Iopno6hee o6 etom cm. Ha caite http://support.thrustmaster.com. Bb6epnte «PynBbIe cncTeMbI / BT LED DISPLAY» n Bb6epnte INHCTpyKcNIO NO 3KcNJIyatauIN NIIu qAcTo 3aDaBaEmbIe BOnpocbl.
OBHOBJEHNIE PPOUINBKN YCTPOINCTBA BT LED DISPLAY
Obe npoBkn (obua n Bluetooth-npOuBka) yctpoCTBa BT LED DISPLAY MOxHO oHOBnTb do PocneDHe Bercn, BKIOUaOSeI NCpaBHeNn uIyUeHn.
Дя npocmoTpa Bercn npoWbok yctpoCTBa BT LED DISPLAY n, npn Heo6xodmoctn, oHOBHeHnIx:Ha PIK otKpOte caHT http://support.thrustmaster.com, BbIbepTe «PyneBbIe cnCTeMbI /BTLEDDISPLAY》,3aTeM BbIbepTe «ПpoWbKa» n BBInOnHnTe yka3aHnNo 3aRpy3Ke n yctahOBke.
NOMOJIb,OTBETbI HA YACTbIE BONPOcbl N COBETbl
OTKpoTe caT http://support.thrustmaster.com. BbI6epTe «PyJIeBbIe CnCTeMbI / BT LED DISPLAY》,3aTeM «ИHcTpkyKUmaNo 3KcPnYaTaUm» mIu «OTBeTbHa YacTbe BOpPoCbI」.
CbeHnO nOteBcko rapaHTn
Kopnpaun Guillemot Corporation S.A., 3apeHCTpnpoBAnHa no apecy Place du Granier, B.P. 97143, 35571 Chantepie, Phanua, (daee - «Guillemot») rapaHTpyet CBOIM KIneHTAM BO BCEM Mipe, yTO B daHHOM n3denn Thrustmaster He byet BbIbNeHO HnKaKnx DepeKTOB MaTePnAIOB IN pOu3BOvCTBa B TeueHne rapaHTnHoro nepnoDa, KOtbpI paBeH cPOky npEdbRbENHr npTeH3n I NO COOTBEcTBCNIO dJa DaHHoro n3denn. B cTaPax Ebponeckoro Co03a 3OT cPoK coOTBeTcByET DBym (2) roam c MOMeHTa noctabKn n3denn Thrustmaster. B dpynx cTpaHax rapaHTnHbI nepeNoD paBeH cPOky npEdbRbENHr npTeH3n I NO COOTBeTcBnIO dJa n3denn Thrustmaster, onpeDenreMOMy COOTBeTcByUOzIM 3aKOHOaTeNbCTBOM cTpaHbI, B KOToPOn npOKNBaI NOTpe6ntel Ha MOMeHT npio6peTHeNn n3denn Thrustmaster (ecn noo6hIE npTeH3n He DeiCTByIOT B COOTBeTcByIOUeI CTpaHe, rapaHTnHbI nepnoD paBHJeTc ODNomy (1) rody c nepBOHaalbHo DaBtI npio6peTHeNn n3denn Thrustmaster).
B cnyuae obhapykeHnIepeKToB n3dJIbno BO BpeMraPANTMHoro nepnoDa He3aMeIITteHbHO 6bpatntecb B cnYk6y TexHnecko NODepKKN, COtpyDnHKIO TOpOio OIpedeJrT DaJIbHeiSyu npoueDpy. EcJIN DepeKT 6ydt NODTBepKDeH, n3dJIne CNEdyET BepHyb IO MeCTy PnpOBeTeHnI (nIM B IIO6oe DpyroE MeCtO, yka3AHHOe cnYk60n TexHnecko NODepKKN).
B pamkax DeiCTBnra paoTHn DepeKTHoe H3dJIe 6ydt, No yCMOTpeHIO ClyjkbI TexHuecko IooepKKn, 3aMeHeHO nIN BO3BpaUeHO B paOohce COCTOHne. EcnB TeueHne rapaHTnHoro cPoka H3dJIne Thrustmaster 6ydt IOOBpKeHO TAKOMY BOCCTAHOBLeHNO, K OCTaBwEMycRApaHTN Homy cPOKy npbabTaeTcnpioD BPemHn, HO He MeHee cEMN (7) dHe, BO BpEmr KOtOpOro H3dJIne HaxOuNocB BHe YIpOTpeBleHn (HaJAmO 3TOr IepNoDa CHNTAETc DaTa 3AnPOCa NOKyIaTeJIr O BMeUaTeJBCTBe INI DATA PpeIOCTABLeHn DEpeKTHoRIO3dJIe INI BOCCTAHOBLeHn, cInn H3dJIne 6blno PpeIOCTaBHeO DnRA BOCCTAHOBLeHn PO3dHee, Yem 6bln CdeHAN 3Apoc O BMeUaTeJBCTBe). B Mepe, pa3peSeHHo IprIMeHMbIM 3aKOHOaTeNbCTBOM, nONHAR OTBcTBEHHOCb KOMNaHm Guillemot n ee DoUePHNX KOMNaHm (B TOM uCnE KOCBeHHbI yUep6) ORpaHNUBaETc BOCCTAHOBLeHnem paBOOero CoCTOHHra INI 3aMeHOn H3dJIe Thrustmaster. B Mepe, pa3peSeHHo IprIMeHMbIM 3aKOHOaTeNbCTBOM, KOMNaHn Guillemot otKa3bIbAetc Ot lIObIX rapaHTN KOMMepueCKo PpIRODHOCTN INI PpIRODHOCTN DnI RopedeHNHO CEHI.
Hactoa rapaHTn He paocpOCTpaHReTc: (1) Ha cTuayu, KOrda n3dEne 6bIto BNDOn3MeHeo, OTKpbITo, MoNfNpOBAHO IIN NOpUyHIO NOBpeKDeHn B pe3yIbTaTe HeDOnyCTUMORO IIN HnPaBnBHO rCNoJIb3OBAHn, He6peXHoCTn IIN HeCHAcTHoro Cnyua, ECTeCTBeHHoro I3HOCA IIN IIObIpyoI pnuHbI, He CBzAHHo C DepekTOM MaepnaIOB IIN IPOm3BOcTBA (BKIOUyA, NOMMO npOeyro, NcNoJIb3OBAHne I3dEInn Thrustmaster COBmecTHO C LIObIMn HnOdoXDoJzMMn 3IeMeHTAMn, B YactHOCTN - C 6bOKAMn PNTAHN, AKKMyJrTOpAMn, 3apRdHbIMN UcTPOcTBAMN IIObIMn DpyHMn 3IeMeHTAMn, He BXoDAUmm B KomIIeKtaUg Ullemot dnn DaHHoro I3dEInn); (2) Ha cTuayn IcNoJIb3OBAHn PNOyKTa B LIObIX cEnjx, KpOME 6bITOBbIX, B TOM YNCNE Ha cTuayn IpOceccnoHaLBHO IIN KOMMepueckoro PrimeHENHn (HaNPIMep, B INPOBbIX 3aJax, dJa IpoBeJeHne oObYeHn I COpeBHOAHN); (3) Ha cTuayu, KOrda yka3aHn cnyk6bl TexHueCKo NpDDepKKn He 6bl IN BvONPHeHbI; (4) Ha PO, TaK KaK Ha TakoE IIO paocpOCTpaHReTc OTeJIbHra rapaHTN; (5) Ha pacxoDHBie MaepnaJIbI (3eMeHTbl, PpeDaHa3NaHeHHle dnn 3aMeHbIB TeHeHne cPoka cnyk6bl I3dEInn: HnpIMep, BaTapeKn I yShhble NODuWKn dnn raphHTyp nll HayshNKOB); (6) Ha akceccyapbl (HaNPIMep, Ka6JIu, YexJIb, cyMKn, fytIpaBl, HapYHbe peMeWK); (7) Ha cTuayn PpOdaXn I3dEInn C OTKpbIToro ayKZIOHa. LaHHa rapaHTN He pNOpeKHT nepeLaue.
Hactoia rapaTna He yuemnre TnpaB nOpTeTne, npedocabnEmy npimeHMbIM3aKohm B OTHOWeHHn PpOaxn NOpTeJIbcknx TObApOB B COOTBETCTByIOue CTpaHe.
DOnonHnTeIbHbIe ycIOBra rapaHTm
B TeueHne rapaHTnHoro cpoka KOMpaHnGuillemot, B obuem n ceJom, He npedocTabIeT HnKaHX 3aNaChbIX Yactei, TAK KAC BcKpbITHe WnIM MoDnOPhKAciHIO NIObIX N3dEIN Thrustmaster Bnpabe OcyUeCTBJIaTb TOnbKO Cnyk6a TexHnueCKoN POnDEpKK (3a NCKNUOeHnEM KaHX-NIO BO PPOeDyp NO MoDnOPhKAciH, KOToPbIE Cnyk6a TexHnueCKoN POnDEpKK MoKeT PpeDIOXHTB BbINOHNHTb KInEHTy NpyTeM NcBMeHHbIX INCTpyKCIu N PpeDOCTaBnEHn, PnN HeOBxODmOCTN, TpeByEmbIX 3aNaChbIX Yactei: HApPImep, B CB83N C OTCyTCTBnEM CTAtyCa CNOXHOCTN NIN KOHΦnDEHuaJIbHOCTN y TaKoB BOCCTaHOBTelbHO NPOeDypbl).
C yyeTOM nepnoDa OCBOEHN HOBbIX N3DeIIN N B CEJIaX 3aIITbI CBOx HOy-Xay I KOMMepuecknx TaH KOMnHaHGuILlemot, B o5IeM N cIeLOM, He npedocTabIeT KaKHX-JIbO yBeDOMJIeH N O BOCCTaHOBJIeH NII 3aIacNbIX qactEn dJa IIO6bIX N3DeIIN Thrustmaster c nCTeKlIM rapaHTNIHbIM cPOKOM.
OTBetCTBeHHOCTb
B Mepe, pa3peuEHNOI npIMeHmblm 3aKoHOdaTeJIbCTBOM, KOMnHnIGuILlemot Corporation S.A. (danee - «Guillemot») n ee douehne IpeDnpTnIg OTka3bIBaHTcR O T IIO60I OTBeTCTBeHHOCTN 3a IIO60I yIep6, BbI3BaHbI oDNHM IIN HeCKOJIbKMn I3 CNeIyUoiXΦakTOPOB: (1) BUNOn3MeHHeN, BCKpbITHe IIN MoInOpKauZnI N3DeNIA; (2) HecobNoDEHne INCTpyKznn no c6opKe; (3) HeDOnyCTUMoe IIN HeNPaBnJIbHOE NCIOJIb3OBAHne, He6pexHOCTb, HeCuaCTbIg CnyAa (HaNPImep, Pn3NuCeKoe BO3deICTBVE); (4) ECTCTBeHNbI IN3HOC; (5) NCIOJIb3OBAHne IPOdyKTa B JIO6bIX CENJX, KPOME 6bITOBbIX, B TOM YNCNE IPOceCCNOHAJBHOe IIN KOMMepueckOE npIMeHHeN (HaNPImep, B INrPoBbIX 3aJax, IIN IPOBeHne OboeHnI COpeBHOBaHn). B Mepe, pa3peuEHNOI npIMeHmblm 3aKoHOdaTeJIbCTBOM, KOMnHnIGuILlemot Iee DoOpHne IpeDnpTnIg OTka3bIBaOTcR O T IO60I OTBeTCTBEHHOCTN 3a IIO60I yIep6, He CBraHHbI C DepeKtAMn MaTePnaIOB IIN I3rTOBLeHn, B OTHOSeHn DaHHORO I3DeNIA (BKlIOUay, NOMMO IpOuyero, IIO60 IyIep6, BbI3BaHbI II pRIMO IIN ONocpeBOAHHO JIO6blm IIporpaMMHbIM ObecTeueHem IIN NCIOJIb3OBAHmE I3DeNIA Thrustmaster C IIO6blm HeNoDxOJaUmm IJEMeHTAMn, B YactHOCTN - 6bnokam NiTaHnA, AkkymyTAToPAMn, 3apAnHbIM UcTPOiCTBAMn IIO6blm DpyIMN 3JeMeHTAMn, He BXODaUIMN B KOMPiKeTAtuHO GuILlemot dner daHHoro I3DeNIA).
THRUSTMASTER
TEXHnueCKa IODePjKKA
http://support.thrustmaster.com

3AABJIeHHe O COOTBETCTBn HOPMATiBAM EC
HacToaM KopnopaunGuillemot Corporation S.A. 3aBnAeT, yTo yCTpoiCTBO BT LED DISPLAY COOTBeTCTByeT OCHOBbIM Tpe6oBaHnM n DpyrHM COOTBeTCTByUOzHM NOIOXeHnM IInpeKTHBbl 2014/53/UE (RED). C 3aBnEHNEM O COOTBeTCTBm MOxHO O3HaKOMITbcr Ha caIte: http://www.thrustmaster.com/certificates/BT_LedDisplayed/Doc-BT_LedDisplayed.pdf POnoca qactot: 2402-2480 Mf, mAc. Pc-MouHocTb: <10 d5/MBt
ABTOPCKNE IIPABA
© Kopnpaun 2017 Guillemot Corporation S.A. Bce npaba 3aunuhenb. Thrustmaster®янгетс 3apernctpnpobahm TOBapnbim 3hakom kopnpauun Guillemot Corporation S.A. Пицендя пpoajkn B Ebpone, Appnke, ha BnHexem Boctoke, B Pocnn, Инду n Okean. Дя NCKIIOHTbHOrO nCNOJb3OBaHnC pLsTAton4. Bce octaHbIe TOBapHbIe 3HAKn YBnIOTc CO6CTBeHHOCbTO COOTBETCTByUOnx BnaDeJIbCeB. ИлIOCTpaun MOrT He COOTBEcTBoBaTb BHeUNHEy BVdy/ФyHKnIM KOHKpeTHOrO n3dEIny. CoepXaHne, KOHCTpyKUn n TexHnueckne XapaKTEpNCtKN n3dEIny MOrY 6bITb n3MeHeHb 6e3 прдВapNTbHOrO yBeDOMNeHn n 3aBnCrt OT cTpaHb Iprno6peTeHn. CdeNaHo B Kntae. ПрОЗБЕДeHn n pacPpocTpAnreTc kompaHne Guillemot Corporation S.A.
Pn noB3OBaHm n3deJHem yuHTbIBaIe CneDyUoJe: UBeTa n dN3aH MOrTy pa3NJuaTbcra.
PiactIKOBbIe CTJKKn KNeKkyU JeHTy CneDyET CHrTb Nepei NcNoJIb3OBaHHeM N3dEJIa.
www.thrustmaster.com

BT LED DISPLAY
Γα PlayStation®4
Evyερίδι χρήστη

TEXNIKE ΠΝΟΔΙΑΓΑΦΕΣ


1 Iepiotpoikoc ETIIAoyea cai. 1 e Aeioupyia TIOIkoU diaKOTTN
2 Περιστροφικός επιλογέας αριθ. 2 μελειουργία πεθικόύ διακόπη
3 Iepiotpoipikoc EIIAOyeac api.3 uE Aeioupyia TIEOTIKOU DIAKOTN (EAeYXOS puOmuNG φwTeivotnTac)
4 PAnktpo evepytooinanc/antveepytooinon
5 21 LED
6 Kupia oEoyn
7 Ytiooxyn option Micro USB
8 Evéiη φóption
9 Duo oneC me Otnepwma M3 yia tn toTOBETnON TNS OUOKEUNCS
IPOEIAOIOIHsH
Piv xpoiouoiote auTo TPOiov, diaaote TPOeKtikauTo EYXeiipidio kai aTIOeUoTe to yia uovTKn avopopa.

PpoeiDooiOn - Hktpoanxiia
* AiaTnpnoTe To Tpoiov oE eon xwpic uypaia kai mnu To EKeTeTe oE oKovn n aiako
Mny TEPIOTpeFE η TpaβATE TIG ouvδeεις KAI TA KAλωδια.
Mŋ píxveTE Upya OTO TPOIOv h OTIG OUVBéOEIC TOU.
Mn βpaxukukawvete T to Tpoiov.
* Ionte mnu attoouvapuooyeite to TPOIOv. mnu to pixveTe OTn qwiia kai mnu to EKETeTE oE uynAe GepukpaoieC.
Mny avoiyete tn oukeun: dev utapxouv oTo eotepiok eapntmuata Tou va mtopouv va etiokeuaotouv ano To xnoTn. Otoieobntote eiokeuec pTei va tpayatotoinoov an to Kov kataoekuaotn, tov eoioodtnevo avtippoosTou n Eoiikeuve Teyvikó.

ETMIÉTE TM BT LED DISPLAY, OTN OUVEXEA TATNOTE TO KOUPTI X YIA EMTIEPAIOW.
TONOETHEN TOY BT LED DISPLAY
Mtopeite va ykataotnoe to BT LED DISPLAY oTou oac eutnpetie oekiva 10 etpwv yupw aTo ouotma PS4TM.
Mtopeite enionc va toTOnoTe n OuaKeun oE diapopa kataaAanla avtkeiEv a * n aTeuOeiac oE opiaev aaywviotika tiovia xpoaiopoioiwvta c tic duo otec me otieipwma M3 Tnou pioakovai oTo Niow peoc ts ouakeun (9).
*IwAeiraiXwpioTAt
Ia Iepiaootepe c nnpopopiec oxetik a e auto, metaeite oTo http://support.thrustmaster.com. EtniaeTe AywioTikai Tiovia / BT LED DISPLAY, otN ouvexia Eyyepidio xphnTn h SuXveC epWntoeic.
ENHMEPQESH TOY YAIKOAOIEMIKOY TOY BT LED DISPLAY
Kai ta do ulikoloyoiuiká (yevko ulkooyoiukiokai ulkooyoiukio Bluetooth) nou Tepiaaavovtai oTo BT LED DISPLAY μTropov vα ενημερωθouv με πio póσφatec ekdoεic, μe βελιwoei s Tpoivw.
Guillemot Corporation S.A. hereby declares that the device BT LED DISPLAY complies with the main requirements and other relevant clauses of Directive 2014/53/UE (RED). The compliance statement can be viewed at the following site:
http://www.thrustmaster.com/certificates/BT_Led_Display/Doc-BT_Led_Display.pdf
Frequency Band: 2402-2480MHz, RF MAX power: <10dBm
INNEYMATIKA DIKAIOMATA
www.thrustmaster.com
*oXuEi MIOvo 0E EE KAI Toupkia

BT LED DISPLAY

PlayStation®4 écin
Kullanma Kilavuzu
TEKNIK ÖZELLLIKLER


1 Basma buton ozellikli doner seci diugme no. 1
2 Basma buton ozellikli doner seci diugme no. 2
3 Basma buton ozellikli doner seci ci dugme no. 3 (parlaklik ayar kontrlu)
4. Guc aça ma/kapama duğmesi
5 21 LED
6 Ana ekran
7 Micro USB sarj konektoru
8 Sarj gostergesi
9 Cihaz takmak icin iki M3 diqli delik
UYARI
http://www.thrustmaster.com/certificates/BT_Led_Display/Doc-BT_Led_Display.pdf
Frekans Bandi: 2402-2480MHz, RF Maks. Güç: <10dBm
TELIF HAKKI
www.thrustmaster.com
http://www.thrustmaster.com/certificates/BT_Led_Display/Doc-BT_Led(Display.pdf
www.thrustmaster.com
bcll 1 1 bcll jj 2 2 (aill) bcll jj 3 3
4 215
1
A
*
*
()jLgS JIJIJ 1
i111 1

JbIeBtLED DISPLAYyjR 1
. yJzJzJzJzJzJzJzJzJzJzJzJzJzJzJzJzJzJzJzJzJzJzJzJzJzJzJzJzJzJzJzJzJzJzJzJzJzJzJzJzJzJzJzJzJzJzJzJzJzJzJ
14 0e Jep jg jg jg
slll jlll m 10 1 1 1 1 1 1 1 1 1 1 1 1 1 1 1 1 1
J 1
BTLEDDISPLAY
PS4TM pIuIUSB UUSB IISUSS
.BT LED DISPLAY 7
PS4TM
BET LED DISPLAY PS4TM, jbjj BT LED / http://support.thrustmaster.com
aI 1
ps4TM 1
.BT LED DISPLAY
PS4TM 1Bt LED DISPLAY
.(4) /jBbBTLEDDISPLAY. (6) Thrustmaster BT Wheel Display
2

BT LED DISPLAY 2,1 3. (6) Searching known devices
aTMTBLED DISPLAY 4 .4 S jll bcil pdo sill iipjly.PSA4TM
Do you want to register this Bluetooth device TM BT 5 (TM BT LED DISPLAY LED DISPLAY?
S jg le bai (p) YES .PS4TM pui i

TM BT LED DISPLAY ) BT LED DISPLAY connected £6
.PS4TM 15
PS4TM pbl a1u 1c pblll m jgljll lal y bnnn n nn n n n n n n n n n n n n n n n n n n n n n n n n n n n n n n n n n n n n n
1.7
.6 10


A
.PS4TM pbi ydioc! gdxyds yd aal oiaaag m agg y 100000000000000000000000000000000000000000000000000000000000000000000
(4) /JbBbBTLEDDISPLAYJb
(6) Thrustmaster BT Wheel Display
BTLEDDISPLAY2,1
BAC = = 255
.(6) aiai jai iie aiai (aiai) Connected aiai jai (aiai TM BT LED DISPLAY)BT LED DISPLAY connected
.PS4TM 1
1.3
PS4TM nBT LED DISPLAY JSSJ (BTLLED DISPLAY
.(4) /jzBtLEDDISPLAY1.
[(] [J] PS4TM 2.
S j b tMT BT LED DISPLAY
TM BT LED Device Name TM BT LED DISPLAY
Forget 10000000000000000000000000000000000000000000000000000
S jie bai. (jie) Device
: (j) The following device will be forgotten 4.
(TM BT LED DISPLAY) TM BT LED DISPLAY
S jbcj(p)OK
PS4TM TM BT LED DISPLAY

291 1
12e! n 2g.1 pR y j k4 PS4 TM a
BT LED DISPLAY
buaJ (5) 21
3 3
(6)
1j 2
BT LED DISPLAY
aill (i yjy jil l jol jll g jll jll jll jll jll jll jll jll jll jll jll jll jll jll jll jll jll jll jll jll jll jll jll jll jll jll jll jll jll jll jll jll jll jll jll jll jll jll jll jll jll jll jll jll jll jll jll jll jll jll jell
L 1111111111111111111111111111111111111111111
iluagglglaiaiug
a / .http://support.thrustmaster.com g jyjBtLED DISPLAY
gaii jia clogao
("Guillemot" du B. P. 97143, 35571 Chantepie, France g Jd Thrustmaster j i j j j j j j j j j j j j j j j j j j j j j j j j j j j j j j j j j j j j j j j j j j j j j j j j j j j j j j j j j j j j j j j j j j j j j j j j j j j j

iill aibbaillll 1nlaal laiall s g jg .Thrustmaster 1 1 1 1 1 1 1 1 1 1 1 1 1 1 1 1 1 1 1 1 1 1 1 1 1 1 1 1 1 1 1 1 1 1 1 1 1 1 1 1 1 1 1
.(Thrustmaster
1 1
()
Jiiaai 11111111111111111111111111111111111111111111111111111111111
yI 10000000000000000000000000000000000000000000000000000
Thrustmaster
1
(2)(Guillemot
(3) : (Jidll Jssie ciaaiuall o jyirjill g jiejlyi jy
J 4
(5) 120
(6) (wJll aclaw aalil jdll cIeLg wJl lclaw gJdWv JdL
():(
jill
y
10
s
Gg iI 12 12 12 12 12 12 12 12 12 12 12 12 12 12 12 12 12 12 12 12 12 12 12 12 12 12 12 12 12 12 12 12 12 12
a
Gullemot (Guillemot) 1234567890123456789012345678901234567890123456789012345678901234567890123456789012345678901234567890123456789
BT LED DISPLAY 2014/53/UE (RED) guillemot Corporation S.A.
http://www.thrustmaster.com/certificates/BT_Led_Display/Doc-
BT_Led(Display.pdf
10>:2480-2404
y
^品 Thrustmaster®. 2017 Guillemot Corporation S.A.
.Guillemot Corporation S.A.
g g g g g g g g g g g g g g g g g g g
PlayStation®4
e 1
g 1
.
. Guillemot Corporation S.A.
auii iiaai
a 1000000000000000000000000000000000000000000000
.(WEEE)
dall g dssssll jldg jzssss s 0000000000000000000000000000000
JgSg 1 Jx jn. gaii aie 1e 1gall gao 1s
iiull aylos 6le xelull
gabai jgagale gaoaall aallll lss
- 11
a a a a a a a a a a a a a a a a a a a a a a a a a a
a.ii, j.
i j 1111111111111111111
aaii i j 1
www.thrustmaster.com
bui 15y/1 y

BT LED DISPLAY
PlayStation®4
User Manual

PRODUCT DESCRIPTION


1 Rotary selector no. 1 with push-button feature
2 Rotary selector no. 2 with push-button feature
3 Rotary selector no. 3 with push-button feature (brightness adjustment control)
4 Power On/Off button
5 21 LEDs
6 Main display
7 Micro USB charging connector
8 Charging indicator
9 Two M3 threaded holes for attaching the device
WARNING
Before using this product, please read this manual carefully and save it for later reference.

Warning - Electrical shock
- Keep the product in a dry location and do not expose it to dust or sunlight.
- Do not twist or pull on the connectors and cables.
- Do not spill any liquid on the product or its connectors.
- Do not short-circuit the product.
- Never dismantle the product; do not throw it onto a fire and do not expose it to high temperatures.
- Do not open up the device: there are no user-serviceable parts inside. Any repairs must be carried out by the manufacturer, its authorized representative or a qualified technician.

Warning - Internal battery
- Fully charge the BT LED DISPLAY before use.
- Do not disassemble the device; this would void its warranty.
- Protect your device from shocks and impacts.
- This device should not be used by children below the age of 14 without an adult's supervision.
THRUSTMASTER® DISCLAIMS ANY LIABILITY IN THE EVENT OF NON-COMPLIANCE WITH THESE INSTRUCTIONS.
WARNING: AN EXPLOSION MAY OCCUR IF THE BATTERY IS REPLACED WITH AN INCORRECT TYPE OF BATTERY.
FOLLOW INSTRUCTIONS REGARDING THE DISPOSAL OF BATTERIES.
CHARGING THE BT LED DISPLAY'S BATTERY
Using a micro USB cable (the PS4™ system controller's cable, for instance), connect the BT LED DISPLAY to one of the PS4™ system's powered USB ports.
The charging connector (7) is located at the back of the BT LED DISPLAY.
The charging indicator (8) lights up in red when the device is charging, and turns off when it is fully charged.
COMPATIBILITY WITH PS4™ GAMES
A list of PS4™ games compatible with the BT LED DISPLAY is available at http://support.thrustmaster.com: Select Racing wheels / BT LED DISPLAY / Games settings.
This list will regularly be expanded with the release of new PS4™ games compatible with the BT LED DISPLAY.
Register the BT LED DISPLAY on the PS4™ system
This operation should only be performed once. It is not required every time the PS4 ^TM system is restarted.
When using the BT LED DISPLAY for the first time, you must imperatively register it on your PS4™ system; this operation must only be performed once.
- Turn on the BT LED DISPLAY by pressing the On/Off button (4). The message Thrustmaster BT Wheel Display scrolls on the main display (6).
- In the PS4TM system's menu, select [Settings] > [Devices] > [Bluetooth Devices] to automatically search for nearby Bluetooth® devices. Paired devices and other Bluetooth devices will appear in the list.

- Briefly press and release selectors no. 1 and 2 simultaneously on the BT LED DISPLAY. The message Searching known devices scrolls on the main display (6).

- After some time, the name TM BT LED DISPLAY appears on the PS4™ system's screen. Using your gamepad, select it and press the button.
- The message Do you want to register this Bluetooth device TM BT LED DISPLAY? appears on the PS4™ system's screen. Select YES, then press the button to confirm.

- The message TM BT LED DISPLAY connected briefly appears on the PS4™ system's screen.

On the PS4™ system's screen, the indicator light located to the left of the TM BT LED DISPLAY now lights up in green, meaning that the device is correctly connected to the system.

- You are now ready to play!
If the operation fails, turn off your PS4™ system and disconnect, then reconnect the system's power cable. Restart your PS4™ system, then repeat registration steps 1 to 6.

VERY IMPORTANT

- It is imperative that you perform this operation every time the PS4™ system is restarted.
-
The connection of the BT LED DISPLAY to the PS4™ system will only function if the previous step (i.e. Register the BT LED DISPLAY on the PS4™ system) has been properly performed at least once.
-
Turn on the BT LED DISPLAY by pressing the On/Off button (4).
The message Thrustmaster BT Wheel Display scrolls on the main display (6). - Briefly press and release selectors no. 1 and 2 simultaneously on the BT LED DISPLAY.
The message Connected briefly appears on the main display (6).
The message TM BT LED DISPLAY connected briefly appears on the PS4™ system's screen.

- You are now ready to play!
Unregister the BT LED DISPLAY from the PS4™ system
(This operation is only required when troubleshooting, or purchasing a new BT LED DISPLAY.)
- Turn off the BT LED DISPLAY by pressing the On/Off button (4).
- In the PS4TM system's menu, select [Settings] > [Devices] > [Bluetooth Devices].
Select TM BT LED DISPLAY, then press the button to confirm.

- The message Device Name TM BT LED DISPLAY appears on the screen. Press the OPTIONS button on your controller, then select Forget Device. Press the button to confirm.
- The message The following device will be forgotten: TM BT LED DISPLAY appears on the screen.
Select OK, then press the button to confirm.
- The TM BT LED DISPLAY is now unregistered from your PS4™ system.

USING THE ROTARY SELECTORS NO.1 AND NO.2
Depending on the PS4™ game, you can turn the selectors no.1 and no.2 to change the display settings, and to toggle from one setting to another.
ADJUSTING THE BT LED DISPLAY'S BRIGHTNESS
1) Press and release the selector no. 3 to toggle from setting the brightness of the 21 LEDs (5) to adjusting the intensity of the main display (6), and conversely.
2) Turn the selector to the left to reduce the intensity or to the right to increase it.
ATTACHING THE BT LED DISPLAY
You can install the BT LED DISPLAY at your convenience within a 10 meter/33 foot radius around the PS4™ system.
You can also attach the device to various suitable items or directly to some racing wheels (for instance, the TM OPEN WHEEL) using the two M3 threaded holes located at the back of the device (9).
- Sold separately
For more information about this, please go to http://support.thrustmaster.com: click Racing wheels / BT LED DISPLAY, then User manual or FAQ.
UPDATING THE BT LED DISPLAY'S FIRMWARE
Both firmware (general firmware and Bluetooth firmware) included in the BT LED DISPLAY can be updated with more recent versions, featuring product improvements.
To display your BT LED DISPLAY's firmware versions and update them if required: on a PC, access http://support.thrustmaster.com, select Racing wheels / BT LED DISPLAY, then select Firmware and follow the instructions and the download and installation procedure.
HELP, FAQ AND HINTS
Access http://support.thrustmaster.com. Select Racing wheels / BT LED DISPLAY, then User manual or FAQ.
CONSUMER WARRANTY INFORMATION
Worldwide, Guillemot Corporation S.A., whose registered office is located at Place du Granier, B.P. 97143, 35571 Chantepie, France (hereinafter "Guillemot") warrants to the consumer that this Thrustmaster product shall be free from defects in materials and workmanship, for a warranty period which corresponds to the time limit to bring an action for conformity with respect to this product. In the countries of the European Union, this corresponds to a period of two (2) years from delivery of the Thrustmaster product. In other countries, the warranty period corresponds to the time limit to bring an action for conformity with respect to the Thrustmaster product according to applicable laws of the country in which the consumer was domiciled on the date of purchase of the Thrustmaster product (if no such action exists in the corresponding country, then the warranty period shall be one (1) year from the original date of purchase of the Thrustmaster product).
Notwithstanding the above, rechargeable batteries are covered by a warranty period of six (6) months from the date of original purchase.
Should the product appear to be defective during the warranty period, immediately contact Technical Support, who will indicate the procedure to follow. If the defect is confirmed, the product must be returned to its place of purchase (or any other location indicated by Technical Support).
Within the context of this warranty, the consumer's defective product shall, at Technical Support's option, be either replaced or returned to working order. If, during the warranty period, the Thrustmaster product is subject to such reconditioning, any period of at least seven (7) days during which the product is out of use shall be added to the remaining warranty period (this period runs from the date of the consumer's request for intervention or from the date on which the product in question is made available for reconditioning, if the date on which the product is made available for reconditioning is subsequent to the date of the request for intervention). If permitted under applicable law, the full liability of Guillemot and its subsidiaries (including for consequential damages) is limited to the return to working order or the replacement of the Thrustmaster product. If permitted under applicable law, Guillemot disclaims all warranties of merchantability or fitness for a particular purpose.
This warranty shall not apply: (1) if the product has been modified, opened, altered, or has suffered damage as a result of inappropriate or abusive use, negligence, an accident, normal wear, or any other cause unrelated to a material or manufacturing defect (including, but not limited to, combining the Thrustmaster product with any unsuitable element, including in particular power supplies, rechargeable batteries, chargers, or any other elements not supplied by Guillemot for this product); (2) if the product has been used for any use other than home use, including for professional or commercial purposes (game rooms, training, competitions, for example); (3) in the event of failure to comply with the instructions provided by Technical Support; (4) to software, said software being subject to a specific warranty; (5) to consumables (elements to be replaced over the product's lifespan: disposable batteries, audio headset or headphone ear pads, for example); (6) to accessories (cables, cases, pouches, bags, wrist-straps, for example); (7) if the product was sold at public auction.
This warranty is nontransferable.
The consumer's legal rights with respect to laws applicable to the sale of consumer goods in his or her country are not affected by this warranty.
Additional warranty provisions
During the warranty period, Guillemot shall not provide, in principle, any spare parts, as Technical Support is the only party authorized to open and/or recondition any Thrustmaster product (with the exception of any reconditioning procedures which Technical Support may request that the consumer carry out, by way of written instructions - for example, due to the simplicity and the lack of confidentiality of the reconditioning process - and by providing the consumer with the required spare part(s), where applicable).
Given its innovation cycles and in order to protect its know-how and trade secrets, Guillemot shall not provide, in principle, any reconditioning notification or spare parts for any Thrustmaster product whose warranty period has expired.
In the United States of America and in Canada, this warranty is limited to the product's internal mechanism and external housing. In no event shall Guillemot or its affiliates be held liable to any third party for any consequential or incidental damages resulting from the breach of any express or implied warranties. Some States/Provinces do not allow limitation on how long an implied warranty lasts or exclusion or limitation of liability for consequential or incidental damages, so the above limitations or exclusions may not apply to you. This warranty gives you specific legal rights, and you may also have other rights which vary from State to State or Province to Province.
Liability
If permitted under applicable law, Guillemot Corporation S.A. (hereinafter "Guillemot") and its subsidiaries disclaim all liability for any damages caused by one or more of the following: (1) the product has been modified, opened or altered; (2) failure to comply with assembly instructions; (3) inappropriate or abusive use, negligence, an accident (an impact, for example); (4) normal wear; (5) the use of the product for any use other than home use, including for professional or commercial purposes (game rooms, training, competitions, for example). If permitted under applicable law, Guillemot and its subsidiaries disclaim all liability for any damages unrelated to a material or manufacturing defect with respect to the product (including, but not limited to, any damages caused directly or indirectly by any software, or by combining the Thrustmaster product with any unsuitable element, including in particular power supplies, rechargeable batteries, chargers, or any other elements not supplied by Guillemot for this product).
DECLARATION OF CONFORMITY
CANADIAN COMPLIANCE NOTICE: this Class B digital apparatus meets all requirements of the Canadian Interference-Causing Equipment Regulations.
USA COMPLIANCE NOTICE: this equipment has been tested and found to comply with the limits for a Class B digital device, pursuant to Part 15 of the FCC rules. Operation is subject to the following two conditions:
(1) This device may not cause harmful interference, and
(2) This device must accept any interference received, including interference that may cause undesired operation.
These limits are designed to provide reasonable protection against harmful interference in a residential installation. This equipment generates, uses and can radiate radio frequency energy and, if not installed and used in accordance with the instructions, may cause harmful interference to radio communications. However, there is no guarantee that interference will not occur in a particular installation. If this equipment does cause harmful interference to radio or television reception, which can be determined by turning the equipment on and off, the user is encouraged to try to correct the interference by one or more of the following measures:
-
Reorient or relocate the receiving antenna.
-
Increase the separation between the equipment and receiver.
- Connect the equipment into an outlet on a circuit different from that to which the receiver is connected.
- Consult the dealer or an experienced radio/TV technician for help.
IC radiation exposure statement
This equipment complies with Canada radiation exposure limits set forth for uncontrolled environments. This transmitter must not be co-located or operating in conjunction with any other antenna or transmitter. This equipment should be installed and operated with a minimum distance of 5 millimeters between the radiator and your body.
FCCID: NAM4169091

COPYRIGHT
© 2018 Guillemot Corporation S.A. All rights reserved. Thrustmaster® is a registered trademark of Guillemot Corporation S.A.
Manufactured & distributed under license from Sony Interactive Entertainment LLC.
"PlayStation" and "△○×□" are registered trademarks of Sony Interactive Entertainment Inc.
"254" is a trademark of the same company. All rights reserved.
All other trademarks and brand names are hereby acknowledged and are property of their respective owners. Illustrations not binding. Contents, designs and specifications are subject to change without notice and may vary from one country to another. Made in China.
ENVIRONMENTAL PROTECTION RECOMMENDATION
Please adhere to local recycling laws for electrical and electronic equipment.
Retain this information. Colors and decorations may vary.
Plastic fasteners and adhesives should be removed from the product before it is used.


BT LED DISPLAY
PlayStation®4
FIXATION DU BT LED DISPLAY
INFORMATIONS RELATIVES A LA GARANTIE AUX CONSOMMATEURS
www.thrustmaster.com


BT LED DISPLAY
PlayStation®4
Manual del usuario
DESCRIPCION DEL PRODUCTO


www.thrustmaster.com


BT LED DISPLAY
PlayStation®4
Manual do usuario

ESPECIFICAÇÉS TÉCNICAS

Remover o BT LED DISPLAY doSYSTEMA PS4TM
www.thrustmaster.com


BT LED DISPLAY
PlayStation®4 用
一-沙一木二一
警告:
www.thrustmaster.com

:外箱

BT LED DISPLAY
适用于PlayStation®4
用户手册

技术规格

1 带按钮功能的 1 号旋钮式选择器
6 主显示屏
2 带按钮功能的 2 号旋钮式选择器
7 Micro USB 充电接头
www.thrustmaster.com
BT LED DISPLAY

適用於PlayStation®4
使用者手册
技術規格


www.thrustmaster.com
BT LED DISPLAY
PlayStation®4
사용명목서
吉
Thrustmaster BT Wheel Display [6]
- PS4TM 人S

[Settings(SELPG)]> [Devices(1)]>
[Bluetooth Devices(Bluetooth)]将伸到底 手部 Bluetooth®
癸合L。

TM BT LED DISPLAY connected(TM BT LED DISPLAY 为关联到会心。)
[MS4TM]
- 伊徒莱伊思卡尼已到会
BT LED DISPLAY PS4™ 社式通电同步
www.thrustmaster.com
BT LED DISPLAY

For PlayStation®4
User Manual
TECHNICAL SPECIFICATIONS

1 Rotary selector no. 1 with push-button feature
2 Rotary selector no. 2 with push-button feature
3 Rotary selector no. 3 with push-button feature (brightness adjustment control)
4 Power On/Off button
5 21 LEDs
6 Main display
7 Micro USB charging connector
8 Charging indicator
9 Two M3 threaded holes for attaching the device
WARNING
Before using this product, please read this manual carefully and save it for later reference.

Warning - Electrical shock
- Keep the product in a dry location and do not expose it to dust or sunlight.
- Do not twist or pull on the connectors and cables.
- Do not spill any liquid on the product or its connectors.
- Do not short-circuit the product.
- Never dismantle the product; do not throw it onto a fire and do not expose it to high temperatures.
- Do not open up the device: there are no user-serviceable parts inside. Any repairs must be carried out by the manufacturer, its authorized representative or a qualified technician.

Warning - Internal battery
- Fully charge the BT LED DISPLAY before use.
- Do not disassemble the device; this would void its warranty.
- Protect your device from shocks and impacts.
- This device should not be used by children below the age of 14 without an adult's supervision.
THRUSTMASTER® DISCLAIMS ANY LIABILITY IN THE EVENT OF NON-COMPLIANCE WITH THESE INSTRUCTIONS.
WARNING: AN EXPLOSION MAY OCCUR IF THE BATTERY IS REPLACED WITH AN INCORRECT TYPE OF BATTERY.
FOLLOW INSTRUCTIONS REGARDING THE DISPOSAL OF BATTERIES.
CHARGING THE BT LED DISPLAY'S BATTERY
Using a micro USB cable (such as the USB cable supplied with the PS4™ system), connect the BT LED DISPLAY to one of the PS4™ system's powered USB ports.
The charging connector (7) is located at the back of the BT LED DISPLAY.
The charging indicator (8) lights up in red when the device is charging, and turns off when it is fully charged.
COMPATIBILITY WITH PS4™ GAMES
A list of PS4™ games compatible with the BT LED DISPLAY is available at http://support.thrustmaster.com: Select Racing wheels / BT LED DISPLAY / Games settings.
This list will regularly be expanded with the release of new PS4™ games compatible with the BT LED DISPLAY.
Register the BT LED DISPLAY on the PS4™ system

This operation should only be performed once. It is not required every time the PS4 ^TM system is restarted.
When using the BT LED DISPLAY for the first time, you must imperatively register it on your PS4™ system; this operation must only be performed once.
- Turn on the BT LED DISPLAY by pressing the On/Off button (4). The message Thrustmaster BT Wheel Display scrolls on the main display (6).

- In the PS4TM system's menu, select [Settings] > [Devices] > [Bluetooth Devices] to automatically search for nearby Bluetooth® devices. Paired devices and other Bluetooth devices will appear in the list.

- Briefly press and release selectors no. 1 and 2 simultaneously on the BT LED DISPLAY. The message Searching known devices scrolls on the main display (6).
- After some time, the name TM BT LED DISPLAY appears on the PS4™ system's screen. Using your gamepad, select it and press the button.

- The message Do you want to register this Bluetooth device TM BT LED DISPLAY? appears on the PS4™ system's screen. Select YES, then press the × button to confirm.
- The message TM BT LED DISPLAY connected briefly appears on the PS4™ system's screen.
On the PS4™ system's screen, the indicator light located to the left of the TM BT LED DISPLAY now lights up in green, meaning that the device is correctly connected to the system.

- You are now ready to play!
If the operation fails, turn off your PS4™ system and disconnect, then reconnect the system's power cable. Restart your PS4™ system, then repeat registration steps 1 to 6.

VERY IMPORTANT

- It is imperative that you perform this operation every time the PS4™ system is restarted.
-
The connection of the BT LED DISPLAY to the PS4^TM system will only function if the previous step (i.e. Register the BT LED DISPLAY on the PS4^TM system) has been properly performed at least once.
-
Turn on the BT LED DISPLAY by pressing the On/Off button (4).
The message Thrustmaster BT Wheel Display scrolls on the main display (6). - Briefly press and release selectors no. 1 and 2 simultaneously on the BT LED DISPLAY.

The message Connected briefly appears on the main display (6).
The message TM BT LED DISPLAY connected briefly appears on the PS4™ system's screen.

- You are now ready to play!
Unregister the BT LED DISPLAY from the PS4™ system
(This operation is only required when troubleshooting, or purchasing a new BT LED DISPLAY.)
-
Turn off the BT LED DISPLAY by pressing the On/Off button (4).
-
In the PS4TM system's menu, select [Settings] > [Devices] > [Bluetooth Devices].
Select TM BT LED DISPLAY, then press the button to confirm.
- The message Device Name TM BT LED DISPLAY appears on the screen. Press the OPTIONS button on your controller, then select Forget Device. Press the button to confirm.
- The message The following device will be forgotten: TM BT LED DISPLAY appears on the screen.
Select OK, then press the × button to confirm.
- The TM BT LED DISPLAY is now unregistered from your PS4™ system.

USING THE ROTARY SELECTORS NO.1 AND NO.2
Depending on the PS4™ game, you can turn the selectors no.1 and no.2 to change the display settings, and to toggle from one setting to another.

ADJUSTING THE BT LED DISPLAY'S BRIGHTNESS
1) Press and release the selector no. 3 to toggle from setting the brightness of the 21 LEDs (5) to adjusting the intensity of the main display (6), and conversely.
2) Turn the selector to the left to reduce the intensity or to the right to increase it.

ATTACHING THE BT LED DISPLAY
You can install the BT LED DISPLAY at your convenience within a 10 meter/33 foot radius around the PS4™ system.
You can also attach the device to various suitable items or directly to some racing wheels (for instance, the TM OPEN WHEEL) using the two M3 threaded holes located at the back of the device (9).
- Sold separately
For more information about this, please go to http://support.thrustmaster.com: click Racing wheels / BT LED DISPLAY, then User manual or FAQ.
UPDATING THE BT LED DISPLAY'S FIRMWARE
Both firmware (general firmware and Bluetooth firmware) included in the BT LED DISPLAY can be updated with more recent versions, featuring product improvements.
To display your BT LED DISPLAY's firmware versions and update them if required: on a PC, access http://support.thrustmaster.com, select Racing wheels / BT LED DISPLAY, then select Firmware and follow the instructions and the download and installation procedure.
HELP, FAQ AND HINTS
Access http://support.thrustmaster.com. Select Racing wheels / BT LED DISPLAY, then User manual or FAQ.
COPYRIGHT
© 2018 Guillemot Corporation S.A. All rights reserved. Thrustmaster® is a registered trademark of Guillemot Corporation S.A.
"PlayStation", "PS4" and "OxO" are registered trademarks of Sony Interactive Entertainment Inc. All rights reserved.
All other trademarks and brand names are hereby acknowledged and are property of their respective owners. Illustrations not binding. Contents, designs and specifications are subject to change without notice and may vary from one country to another. Made in China.
ENVIRONMENTAL PROTECTION RECOMMENDATION
Please adhere to local recycling laws for electrical and electronic equipment.
Retain this information. Colors and decorations may vary.
Plastic fasteners and adhesives should be removed from the product before it is used.
FCCID: NAM4169091
www.thrustmaster.com