
Sol-R 6 Throttle - Game controller THRUSTMASTER - Free user manual and instructions
Find the device manual for free Sol-R 6 Throttle THRUSTMASTER in PDF.
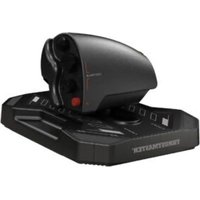


| Product Type | Throttle for Flight Simulation |
| Brand | Thrustmaster |
| Model | Sol-R 6 Throttle |
| Compatibility | PC Windows 10 and 11 |
| Connectivity | USB-C (USB-A to USB-C cable included) |
| Power | Via USB port |
| Number of Axes | 6 axes (throttle, rudder, analog mini-stick) |
| Number of Buttons | 12 programmable buttons (including 8- and 4-way hats, toggle switch, rotary button) |
| Adjustable Detent | 4 positions: no detent, 50%, 80% afterburner, dual detent |
| Integrated Rudder | Yes, manually operated with 15° angle and self-centering function |
| External Rudder Connector | RJ12 (compatible with TFRP) |
| Programming Software | T.A.R.G.E.T. (Thrustmaster Advanced pRogramming Graphical EdiTor) |
| Firmware Update | Mandatory, via Thrustmaster website (Drivers section) |
| Dimensions | Not specified (approx. 20 x 15 x 10 cm) |
| Weight | Not specified (approx. 1 kg) |
| Maintenance and Cleaning | Clean with a soft, dry cloth. Do not use chemical products. |
| Safety | Pinch hazard: do not place fingers between the base and the throttle axis |
| Spare Parts and Repairability | Not specified. Contact Thrustmaster support. |
| General Information | Throttle designed for flight simulations, compatible with TFRP and TPR rudders. |
Frequently Asked Questions - Sol-R 6 Throttle THRUSTMASTER
User questions about Sol-R 6 Throttle THRUSTMASTER
0 question about this device. Answer the ones you know or ask your own.
Ask a new question about this device
Download the instructions for your Game controller in PDF format for free! Find your manual Sol-R 6 Throttle - THRUSTMASTER and take your electronic device back in hand. On this page are published all the documents necessary for the use of your device. Sol-R 6 Throttle by THRUSTMASTER.
USER MANUAL Sol-R 6 Throttle THRUSTMASTER
Carefully read the instructions provided in this manual before installing the product, before any use of the product and before any maintenance. Be sure to follow the safety instructions. Failure to follow these instructions may result in accidents and/or damage. Keep this manual so that you can refer to the instructions in the future.
TABLE OF CONTENTS
- BOX CONTENTS......5
- TECHNICAL FEATURES ......6
- INFORMATION REGARDING USE......8
- INSTALLATION ON PC....10
Control panel 12
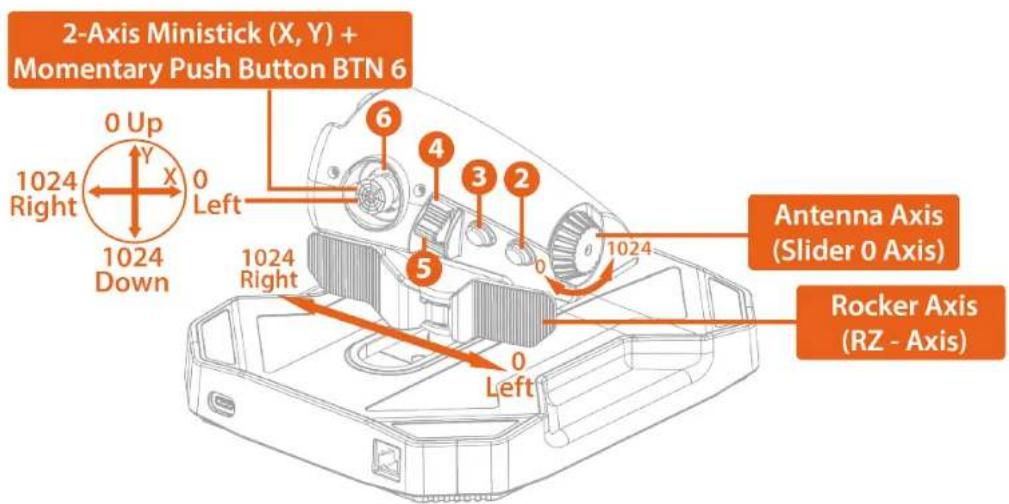
Mapping....14
- FEATURES ......15
Rudder function ......15
Detent....16
- COMPATIBILITY .....19
Rudders....20
- T.A.R.G.E.T. ADVANCED PROGRAMMING
SOFTWARE 22
Installation....22
Main features 23
- FAQ AND TECHNICAL SUPPORT ......24
SOL-P6
THROTTLE
With the Sol-R 6 Throttle, you can control the thrust of your aircraft's engines and enjoy easy-to-reach controls that complement your joystick.
This manual will help you install and use your Sol-R 6 Throttle in the best possible conditions. Before taking off, be sure to read the instructions and warnings carefully: they will help you get the maximum amount of enjoyment out of your product.

Updating the firmware
In order for the Sol-R 6 Throttle to work properly with video games, you need to update its firmware.
To carry out the update, visit
https://support.thrustmaster.com/product/sol-r-6-throttle/
Select Drivers and follow the instructions, including the downloading and installation procedure.
1. Box contents
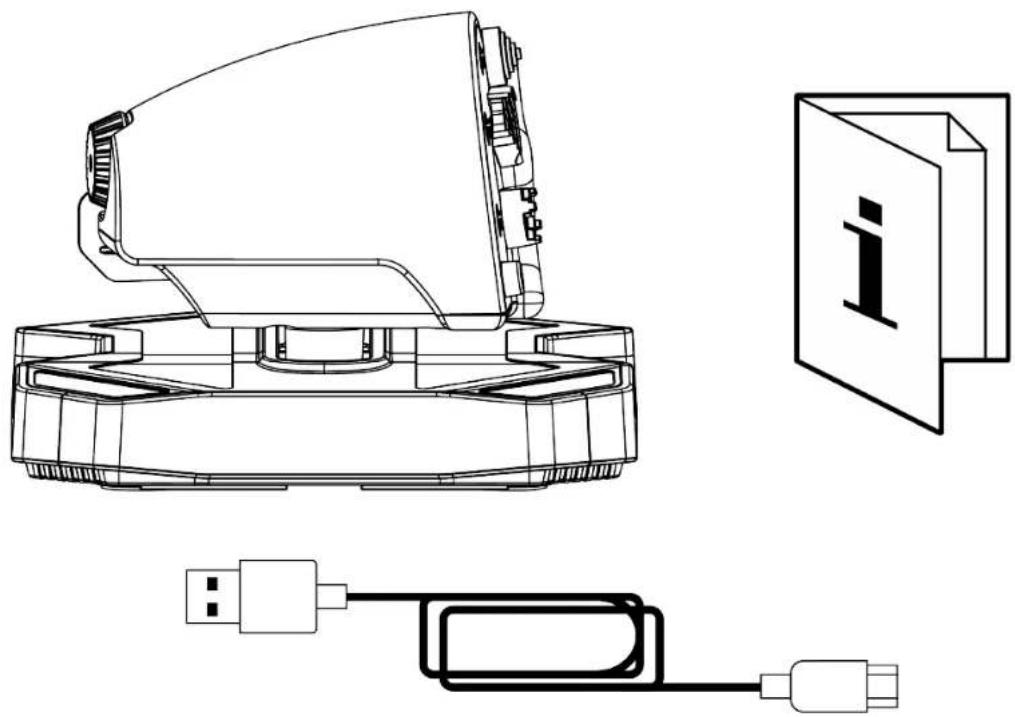
2. Technical features

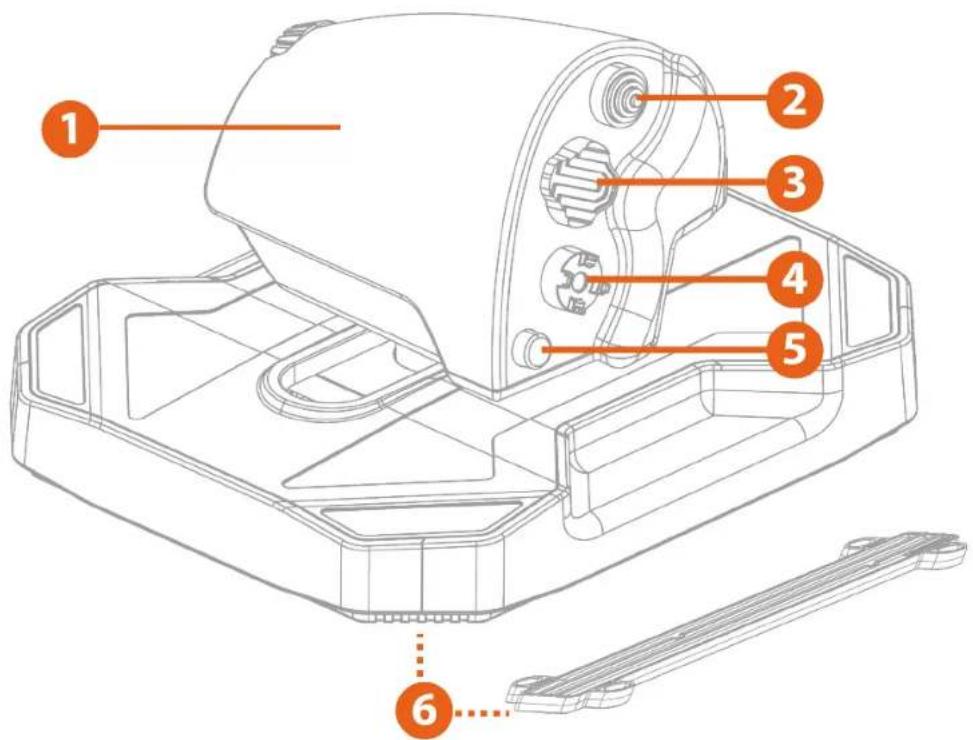
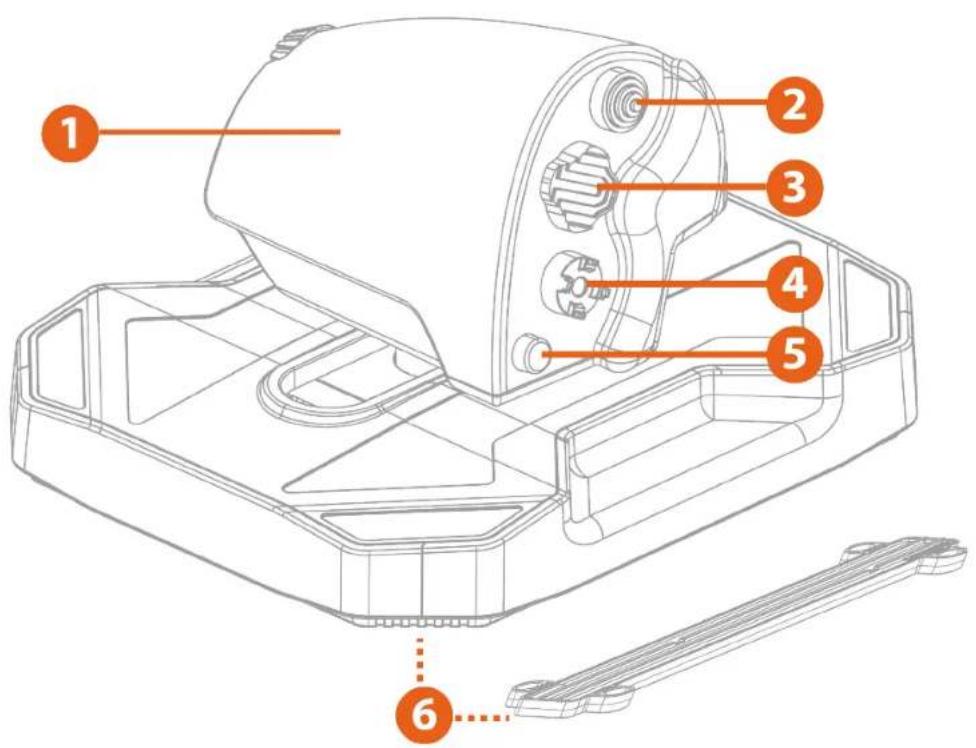
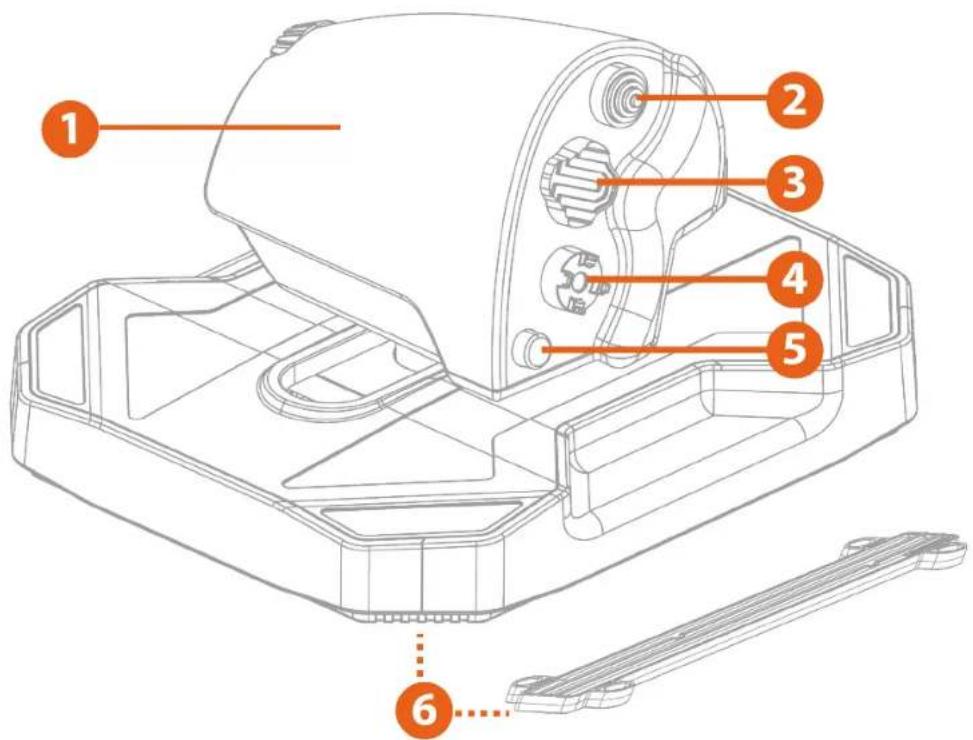
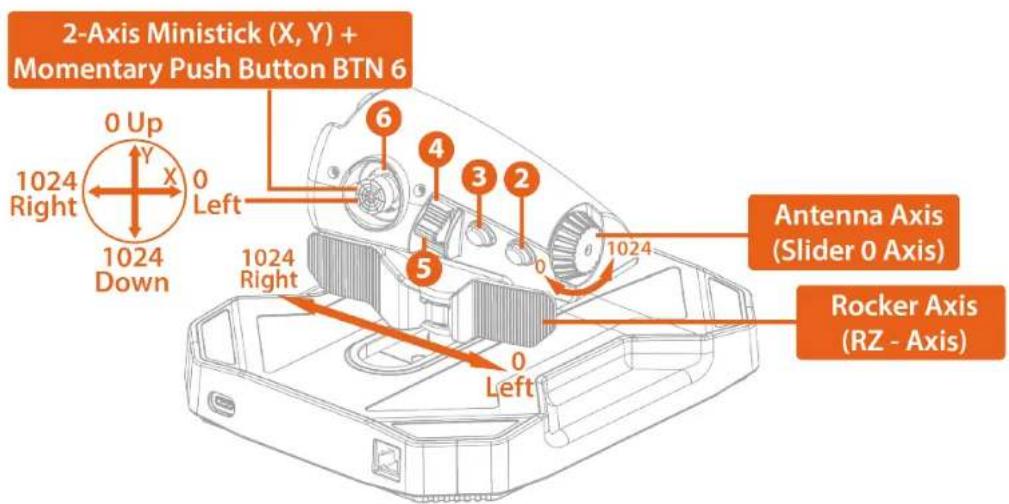
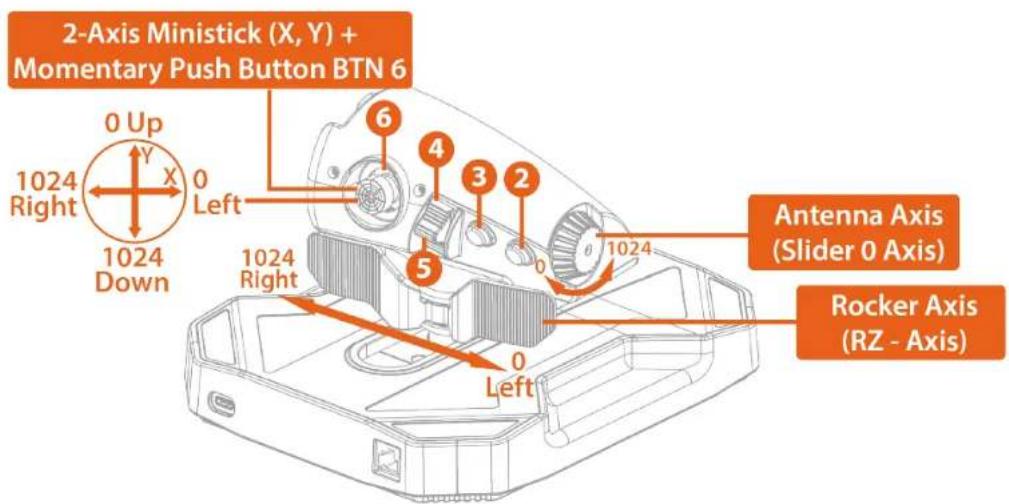
① Throttle handle ② 8-way hat switch ③ 4-way hat switch ④ 4-way hat switch ⑤ Action button ⑥ Removable detent (4 positions)
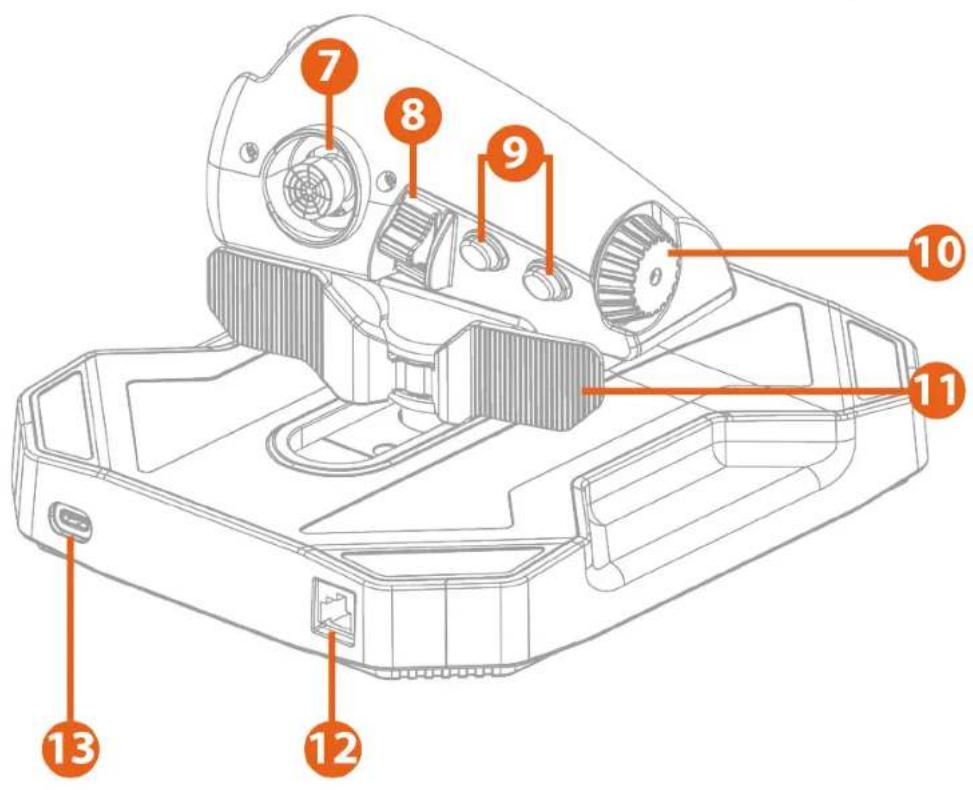
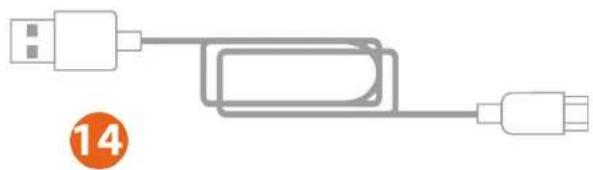
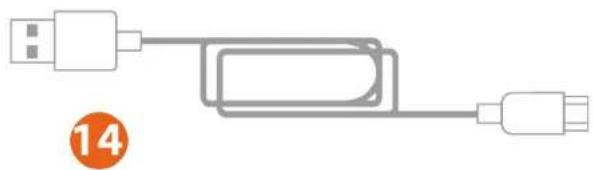
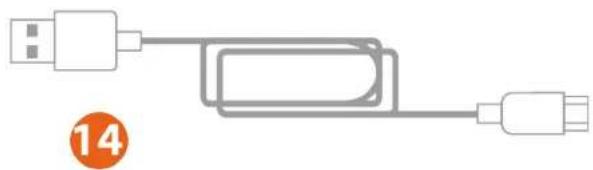
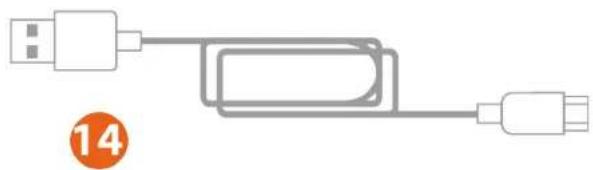
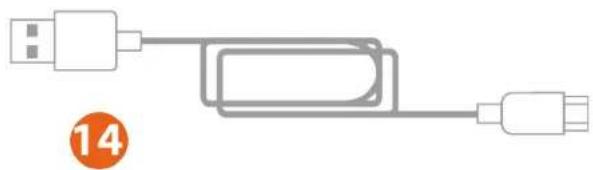
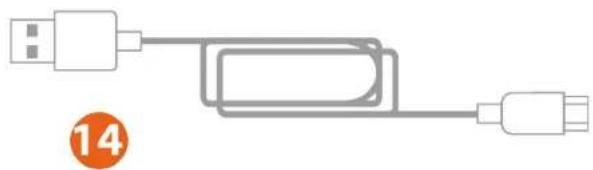
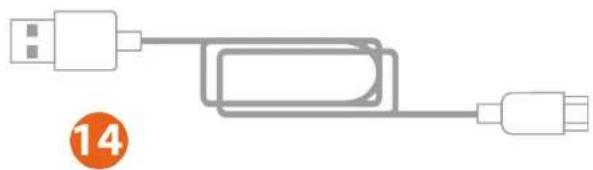
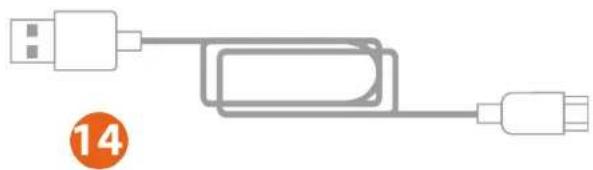
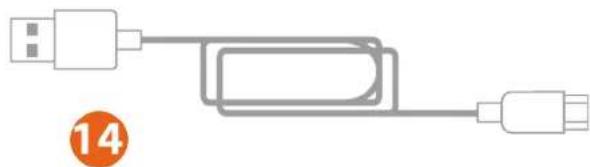
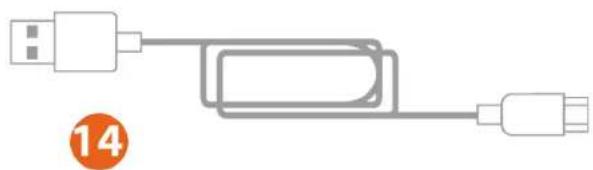
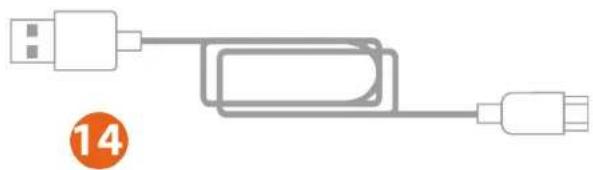
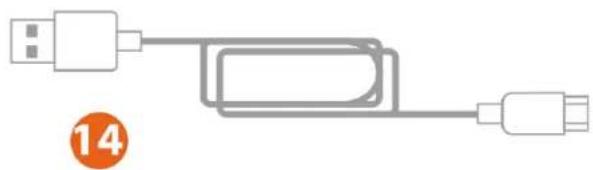
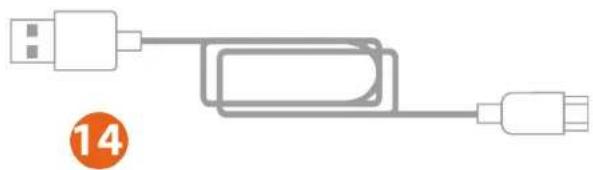
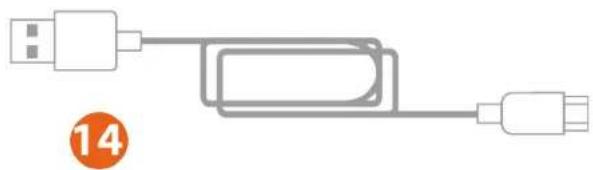
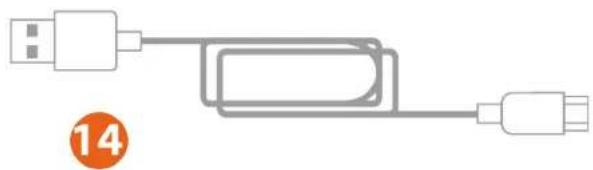
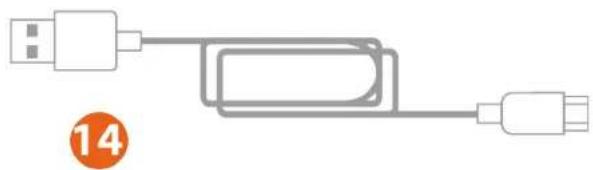
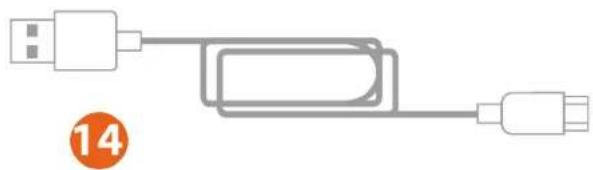
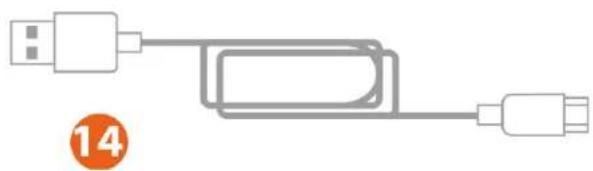
⑦ Analog mini-stick ⑧ Toggle switch (2 positions) ⑨ Action buttons ⑩ Radio rotary knob ⑪ Manually-operated rudder with 15° angle and re-centering function ⑫ RJ12 connector for external TFRP* rudder pedals system ⑬ USB-C connector ⑭ USB-A – USB-C cable
3. Information regarding use

Documentation
Before using this product, carefully read this documentation again and keep it for future reference.

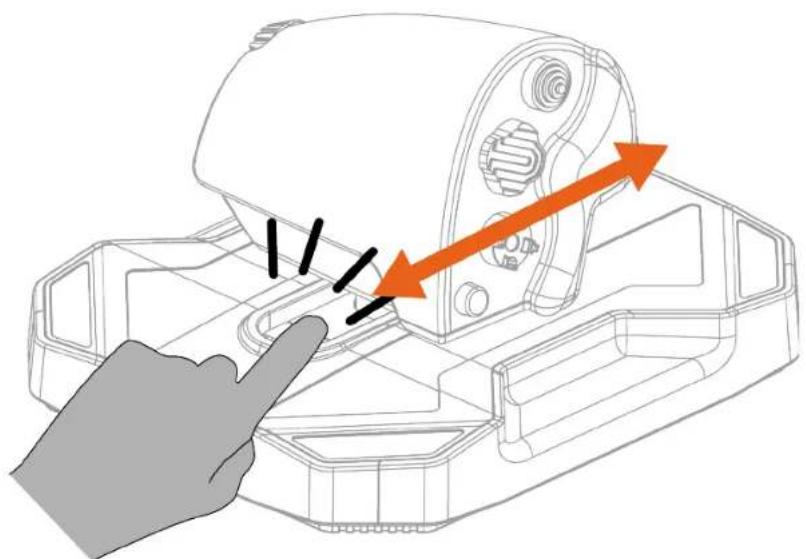
Pinch hazard
When using the Sol-R 6 Throttle throttle, never place your fingers in the space between the base and the throttle's axis.
4. Installation on PC
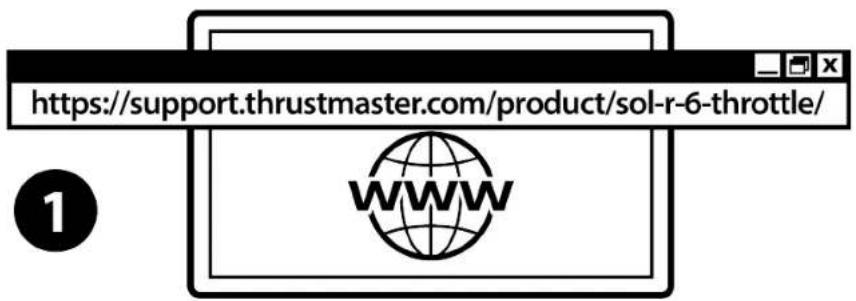
- Please visit:
https://support.thrustmaster.com/product/sol-r-6-throttle/
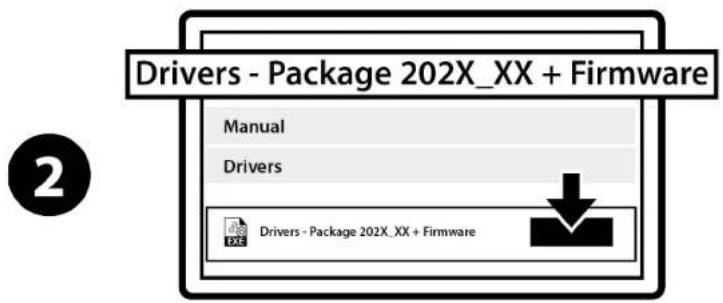
- Download and install the PC driver and its customized interface for the Windows control panel.
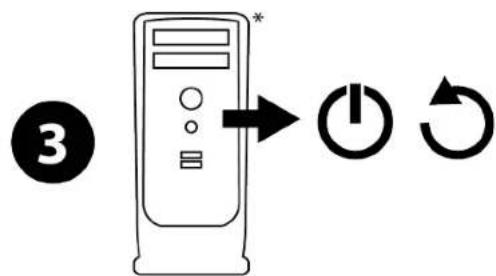
- Once the PC driver has been installed, restart the computer.
- Connect the Sol-R 6 Throttle throttle to one of your PC's USB ports, using the USB-A – USB-C cable.
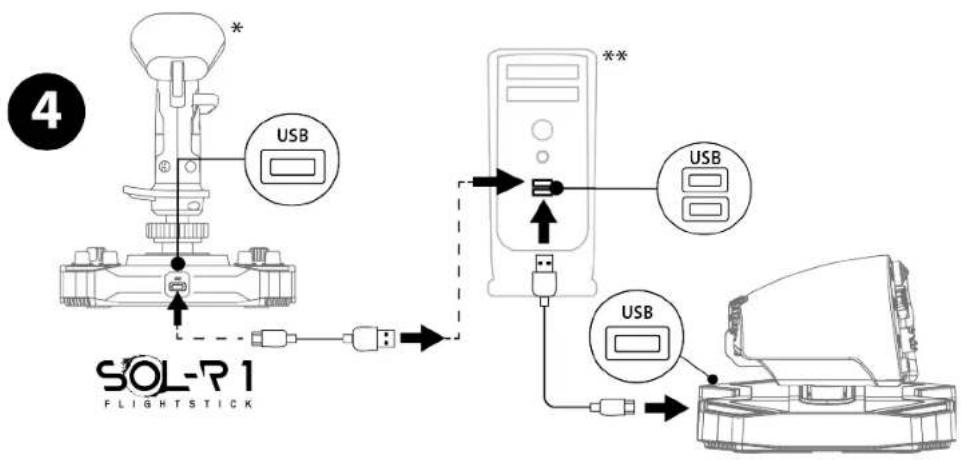
*Sold separately
**Not included
Control panel
To access the control panel, select Start, type Control Panel in the search bar, and then click Control Panel (in Windows® 10/11).
Control Panel
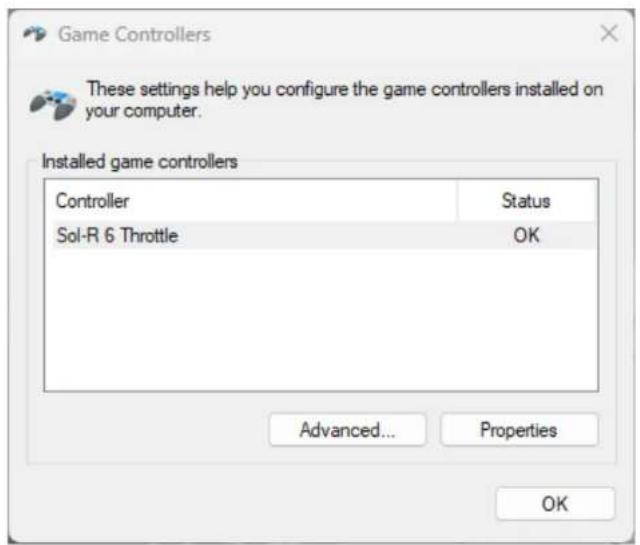
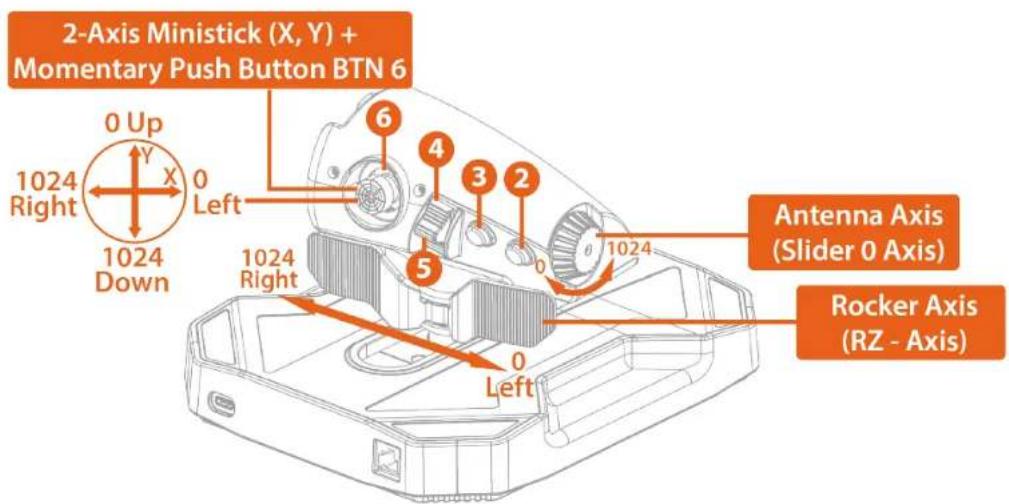
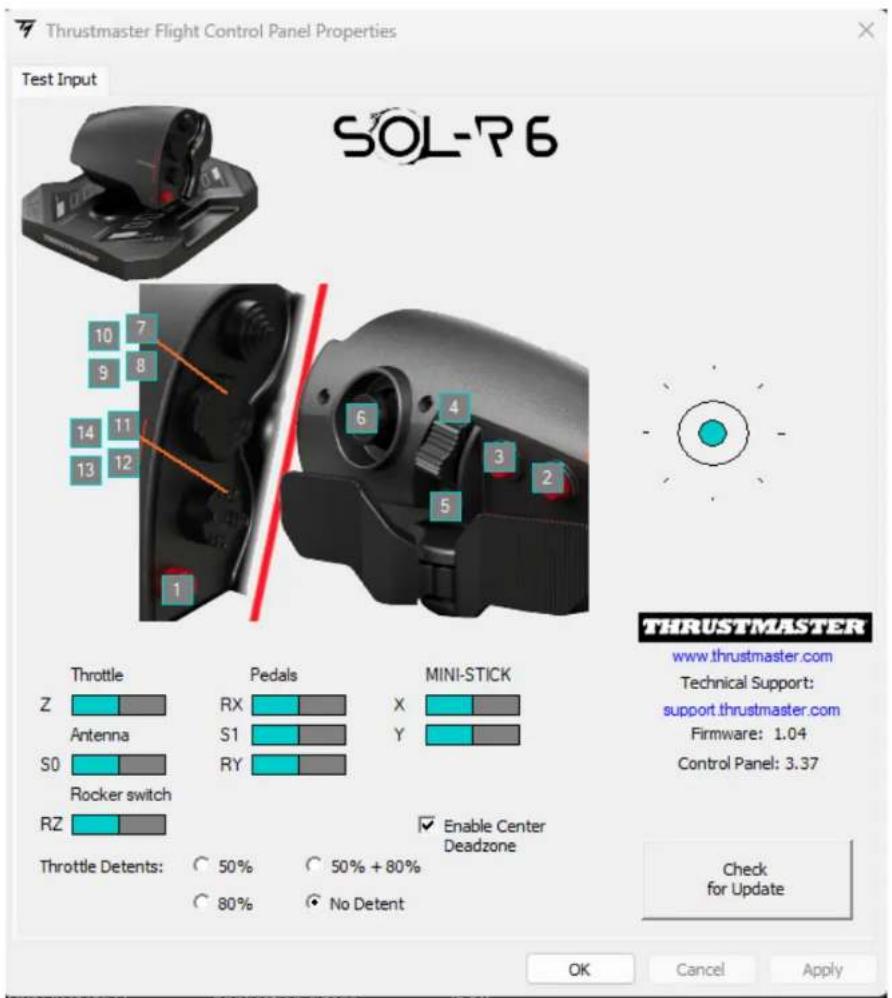
The Game Controllers dialog box is displayed. The accessory appears onscreen with the name Sol-R 6 Throttle and OK status.
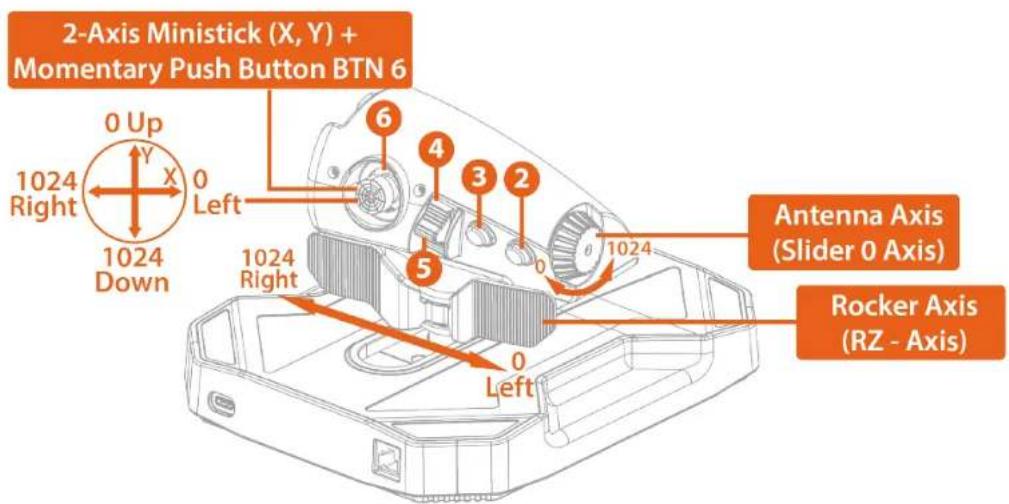
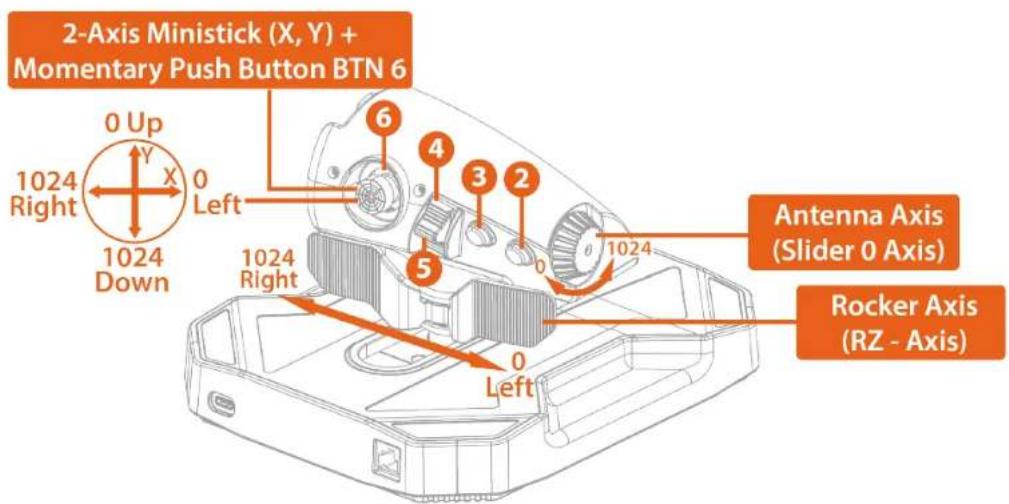
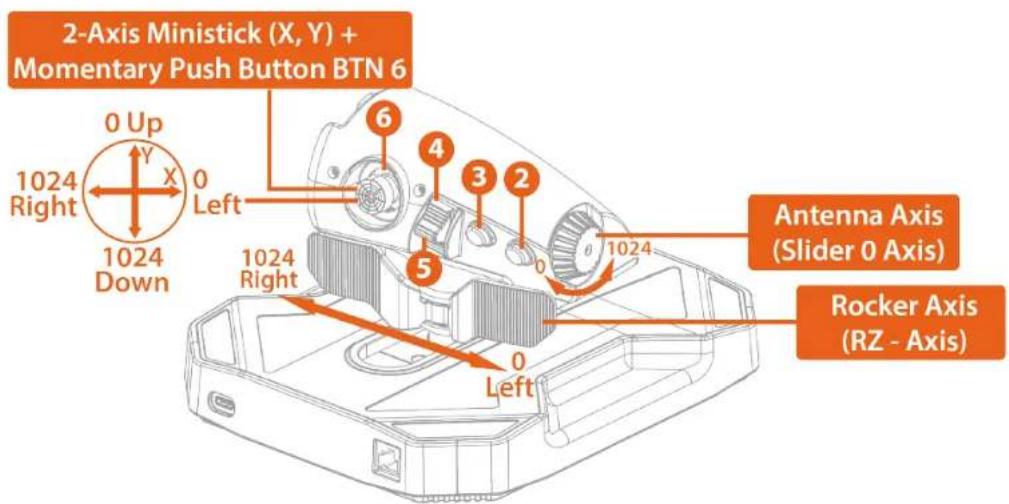
In the Game Controllers dialog box, click Properties to test and view all features.
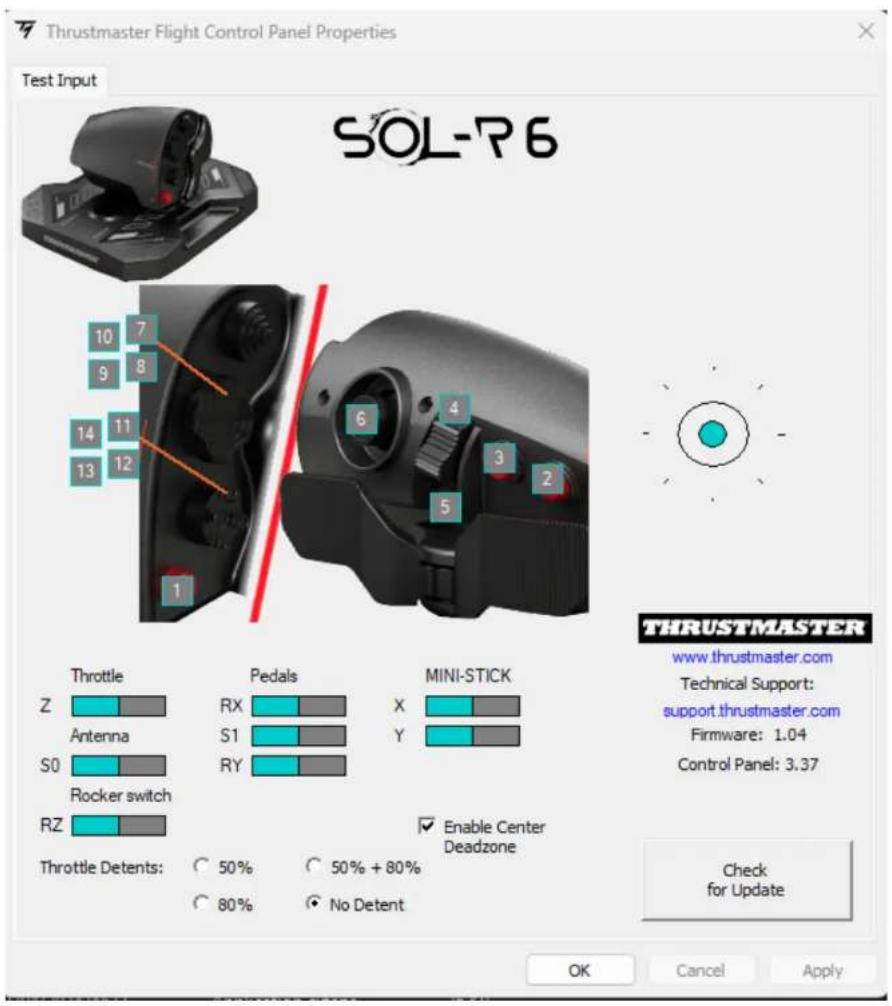
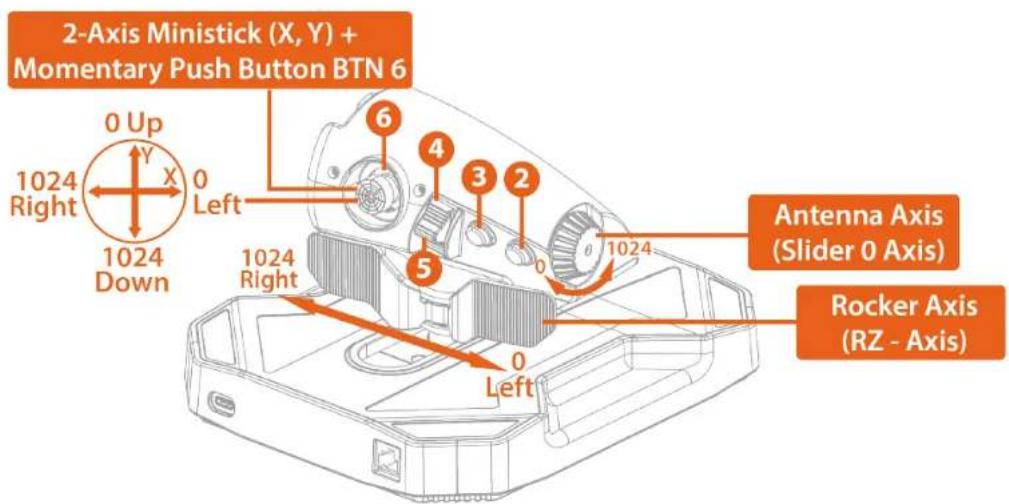
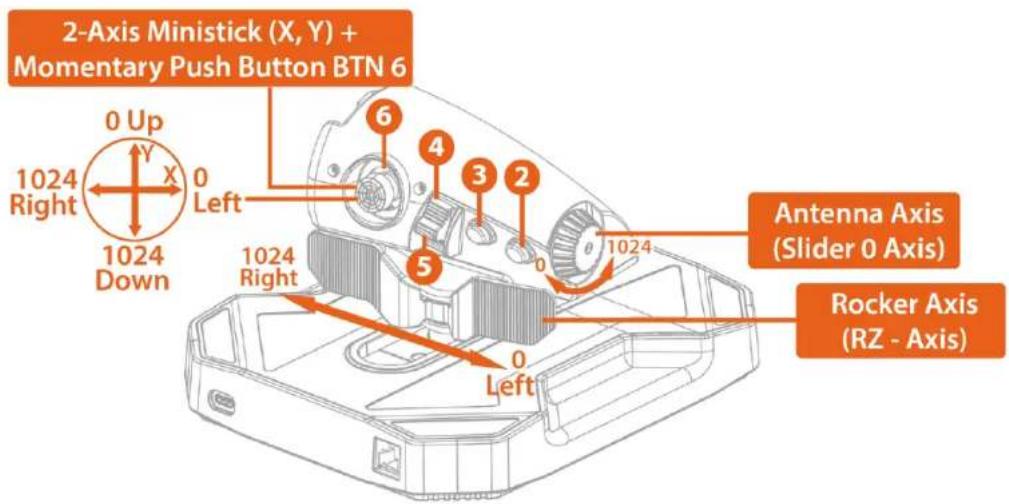
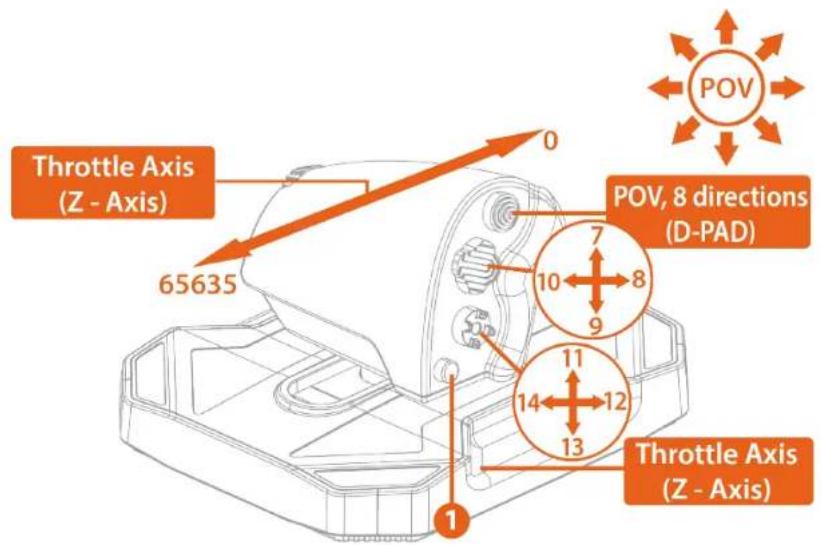
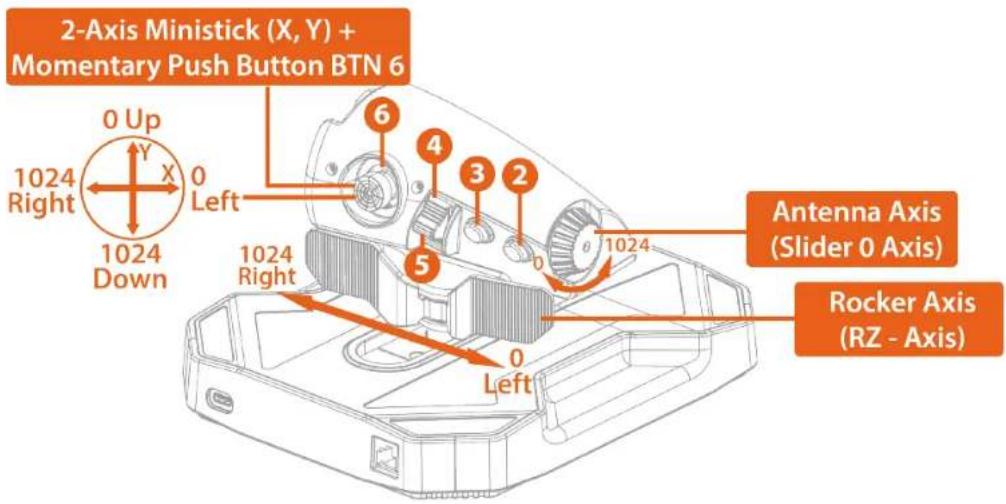
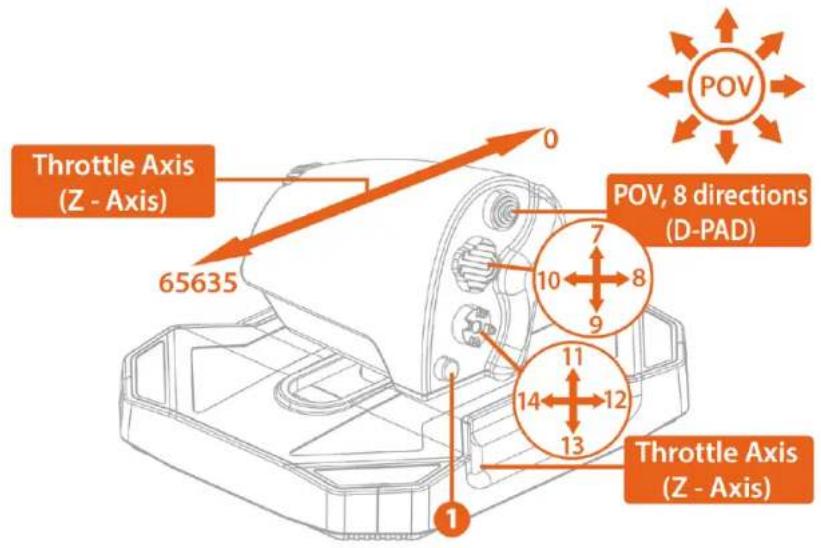
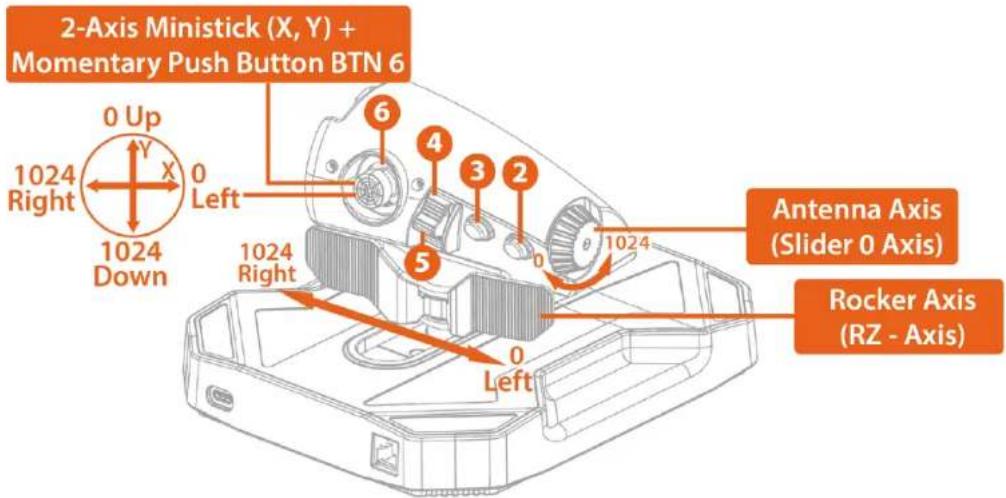
Mapping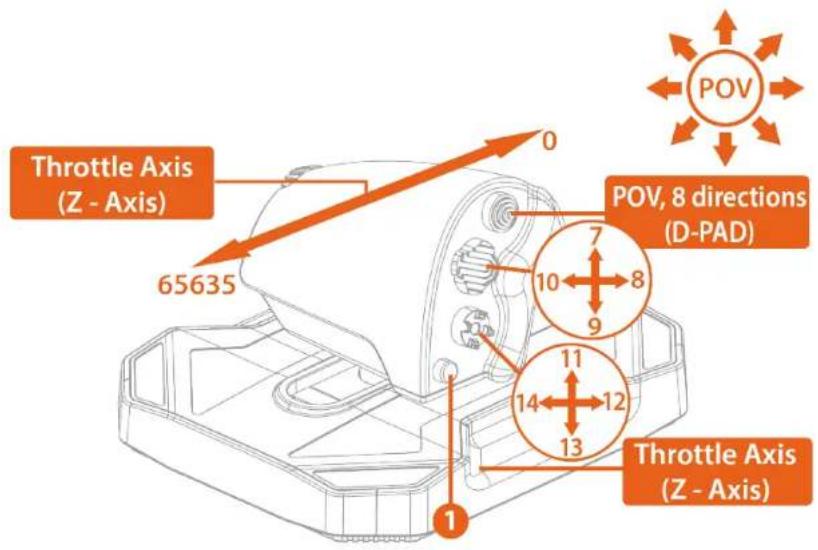
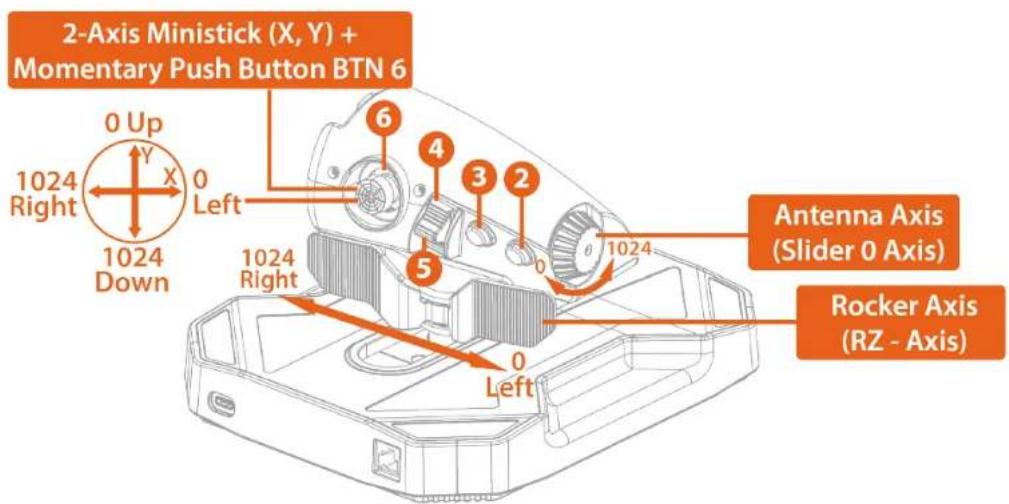
5. Features
Rudder function
In an airplane, the pilot manipulates the rudder to pivot the plane around its vertical axis (making the plane turn to the left or to the right).
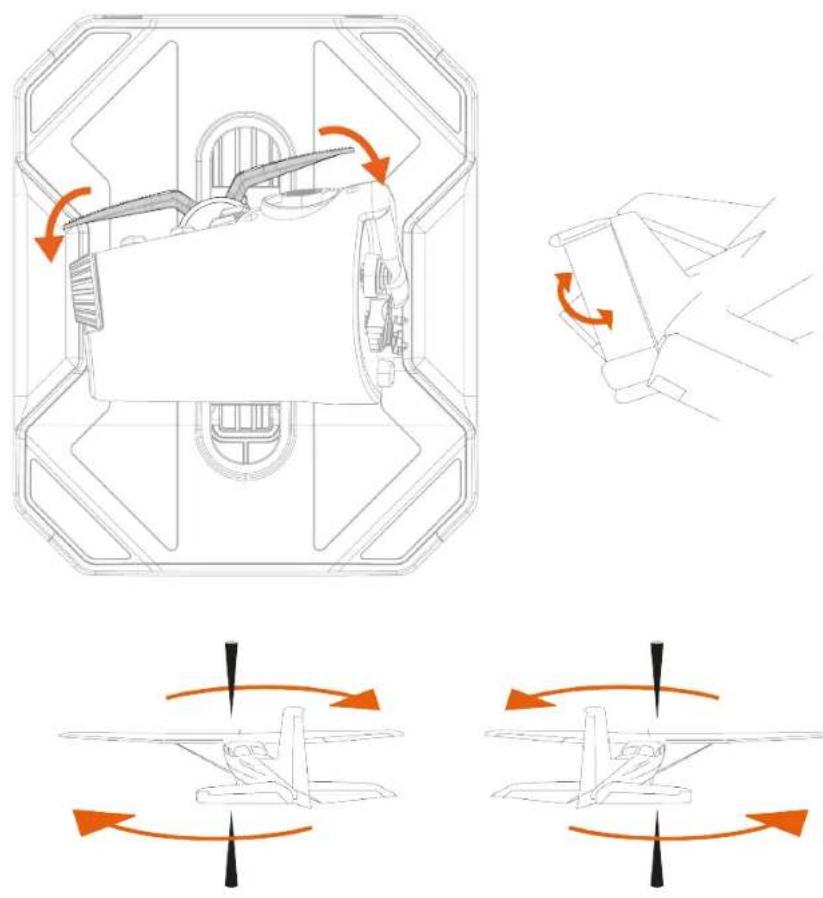

The Sol-R 6 Throttle has a manually-operated rudder function, with a 15° angle and a re-centering function.
Detent
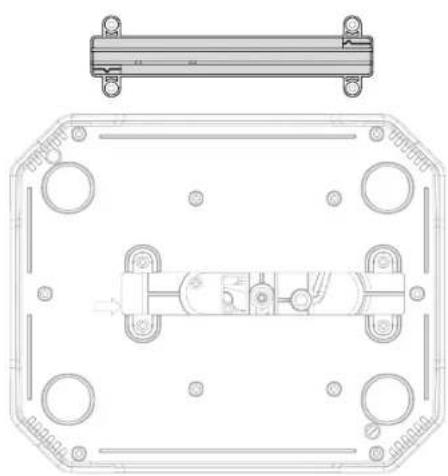
The detent can be configured in four different positions (no detent; 50%; 80% afterburner; dual-detent) to best suit the type of aircraft you are piloting.
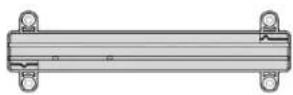
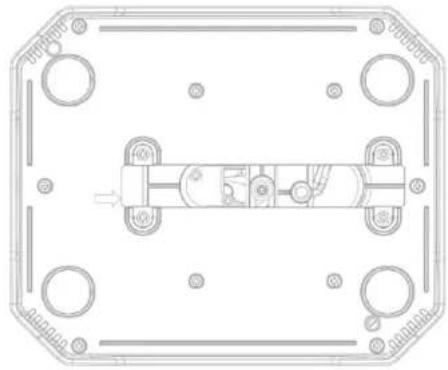
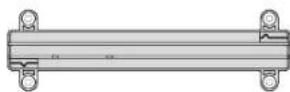
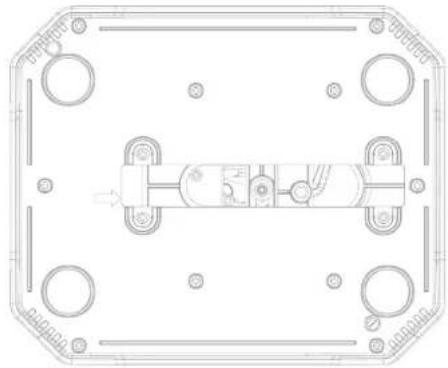
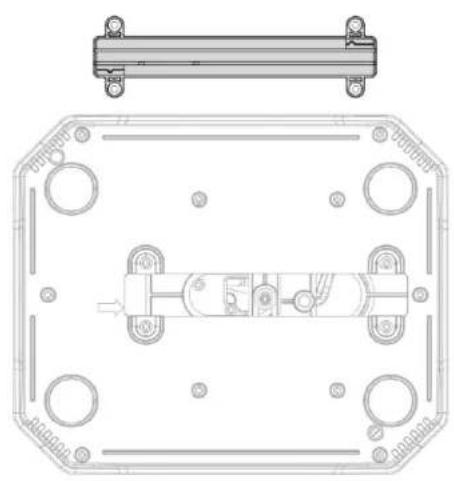
- Unscrew the four screws located on the underside of the base and remove the detent.
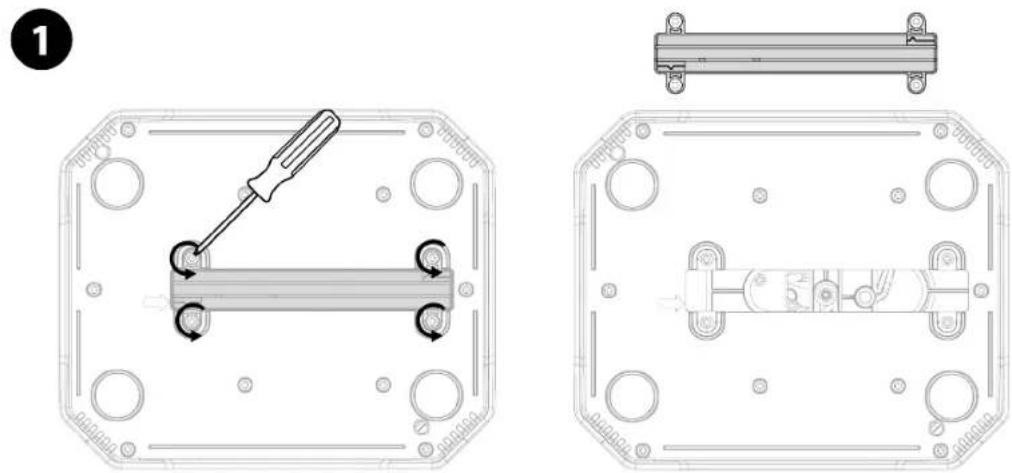
- Choose the detent position from the four options using the symbols placed in each corner and on each side of the part.
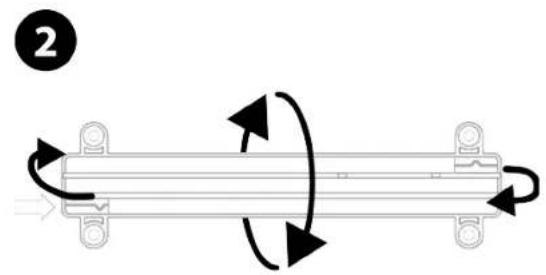
- Put the detent back in place and screw the four screws back in.
3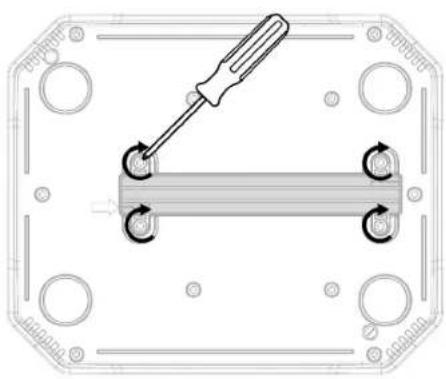

Align the symbol corresponding to your choice of configuration with the arrow on the underside of the base. Please refer to the table on the following page to see the possible configurations.

After each change of the detent's position, also be sure to select the corresponding configuration (no detent; 50% ; 80% afterburner; dual-detent) in the Control panel.
| Configurations | Aircraft type | |
| No detent | 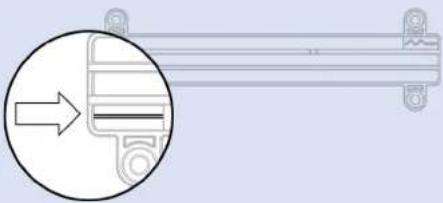 | General aviation |
| 50% | 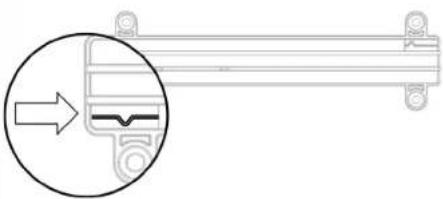 | Space simulation |
| 80% afterburner | 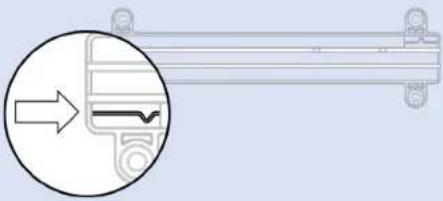 | Fighter aircraft with afterburner |
| Dual-detent | 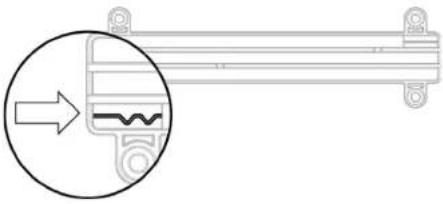 | Commercial aviation |
6. Compatibility

Be sure to only use authorized accessories. The use of unauthorized accessories may damage the product and void the warranty.
Rudders
The Sol-R 6 Throttle throttle is compatible with the following rudder pedals systems:
- TFRP T.Flight Rudder Pedals*;
- TPR: Thrustmaster Pendular Rudder*.
![graph TD A["Top Component"] --> B["T.Flight Rudder Pedals"] A --> C["TPR ThrustMASTER PENDULAR Rudder"]](/content/2026/04/740528/images/22193bd819a7629e54c2d59e1345fd00df88142fa3fb5eb57f39935efd26f01a.jpg)

- TFRP must be connected to the RJ12 port on your Sol-R 6 Throttle throttle. TFRP is compatible with all games that support rudders.
- TPR must be connected to your PC's USB port. TPR is compatible with all games that support multi-USB and rudders.
7. T.A.R.G.E.T. advanced programming software
T.A.R.G.E.T. (Thrustmaster Advanced pRogramming Graphical EdiTor) is an innovative, high-performance software suite allowing for improvements to most Thrustmaster flight controllers, and the sharing of profiles with the Thrustmaster community.
Installation
- Please visit:
https://support.thrustmaster.com/product/sol-r-6-throttle/
- In the Software section, download and install the T.A.R.G.E.T. advanced programming software.
Main features
- Various possible configurations of the axes.
- Multiple programming levels available: Basic, Advanced and Script.
- Use of the Drag and Drop principle.
- Ability to merge the Sol-R 6 Throttle with other Thrustmaster flight simulation accessories (Hotas Cougar*, T.16000M FCS*, TWCS*, TFRP*, MFD Cougar Pack*, TCA range*, VIPER range*, AVA range*, Sol-R range* — all of which are also compatible with T.A.R.G.E.T.), allowing for them to be recognized as a single USB device.
- Access to advanced profiles created by the Thrustmaster community.
8. FAQ and technical support
Do you have questions regarding the Sol-R 6 Throttle, or are you experiencing technical problems? If so, visit the Thrustmaster technical support website:
https://support.thrustmaster.com/product/sol-r-6-throttle/.

1. My throttle isn't working properly, or seems to be improperly calibrated
- Power off your PC, and disconnect your throttle from the USB port. Reconnect your throttle, restart your PC and then restart your game.
- When connecting your throttle, leave the rudder's axis centered and avoid moving it to prevent any calibration issues.
2. I can't configure my throttle
- Access your game's menu and select Options > Controller > Gamepad or Joystick. Then choose the most appropriate configuration, or completely reconfigure the throttle's options.
- For more information, please refer to your game's user manual or online help.
- Use the T.A.R.G.E.T. (Thrustmaster Advanced pRogramming Graphical EdiTor) advanced programming software.
3. My throttle is too sensitive, or not sensitive enough
- The Sol-R 6 Throttle throttle self-calibrates on its own after a few movements on the different axes and after having reached the stops.
- Access your game's menu and select Options > Controller > Gamepad or Joystick. Then adjust your throttle's sensitivity and dead zones if these options are available.
- Use the T.A.R.G.E.T. (Thrustmaster Advanced pRogramming Graphical EdiTor) advanced programming software.
4. My throttle isn't working
- In order for the Sol-R 6 Throttle throttle to work properly with video games, you need to update its firmware.
To carry out the update, visit
https://support.thrustmaster.com/product/sol-r-6-throttle/
Select Drivers and follow the instructions, including the downloading and installation procedure.
THRUSTMASTER®
SOL-P6
THROTTLE
For PC (Windows® 10/11)
Mapping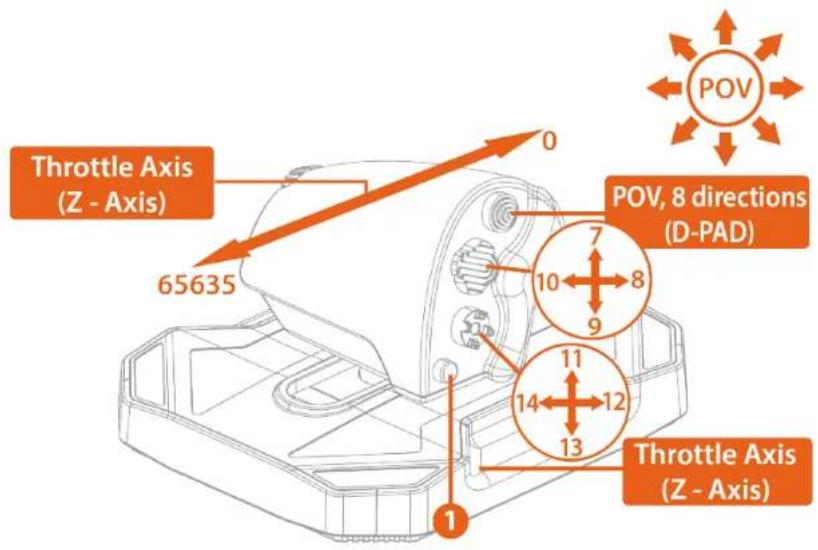
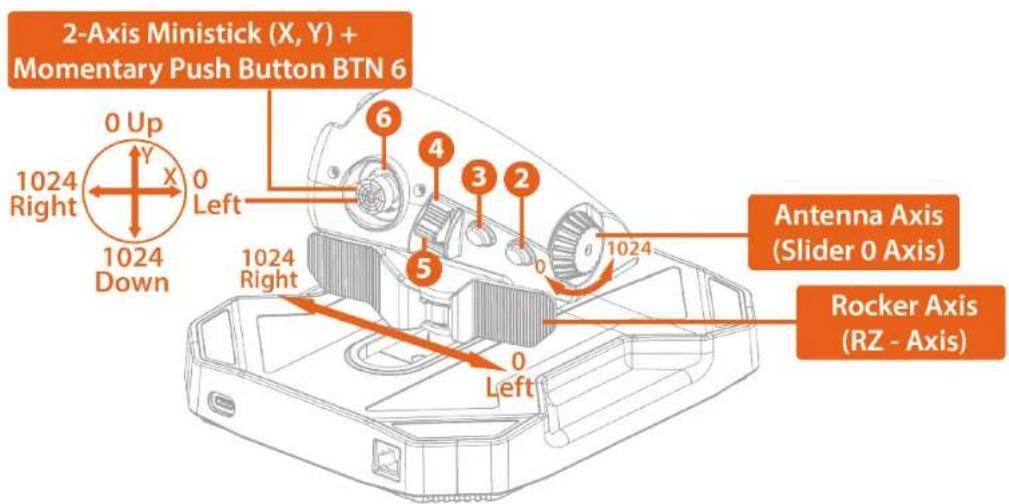
5. Features
Rudder function


Mapping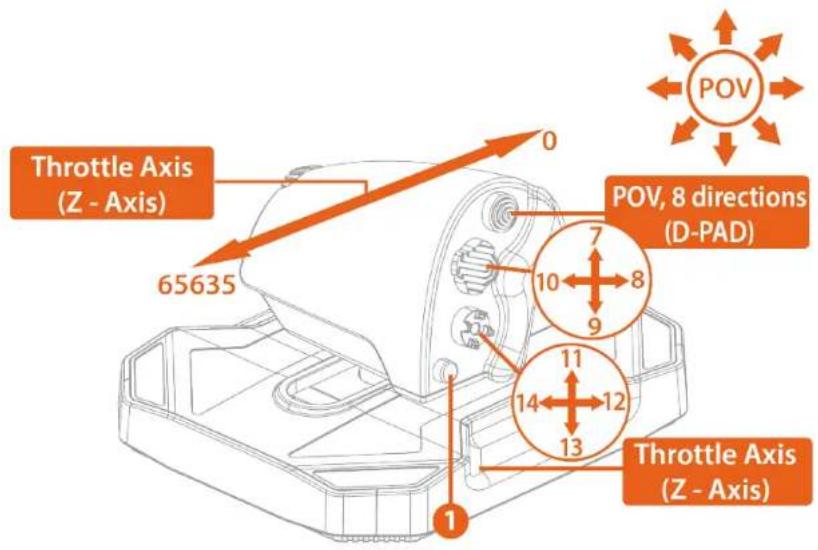
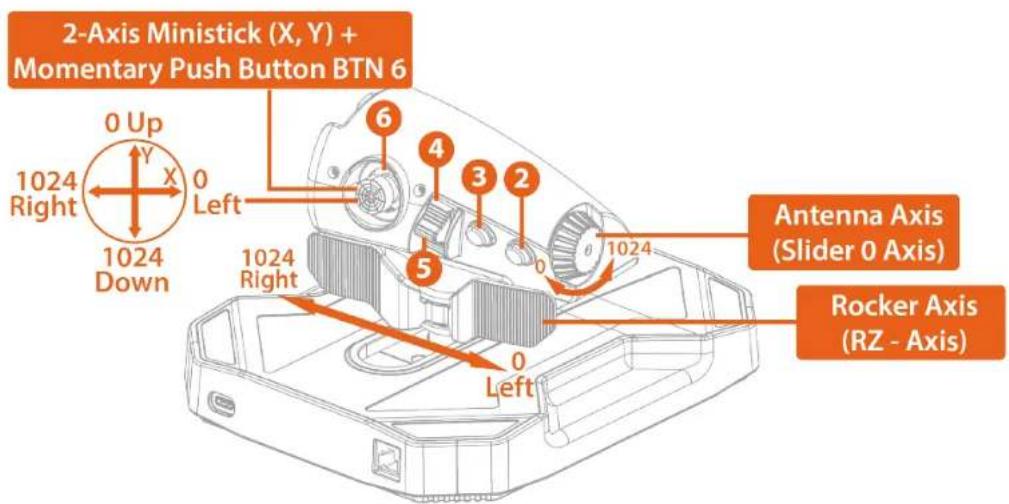
5. Features
Rudder function


PROGRAMMER SOFTWARE....22
Installation....22
https://support.thrustmaster.com/product/sol-r-6-throttle/
2. Technical specifications
https://support.thrustmaster.com/product/sol-r-6-throttle/
Mapping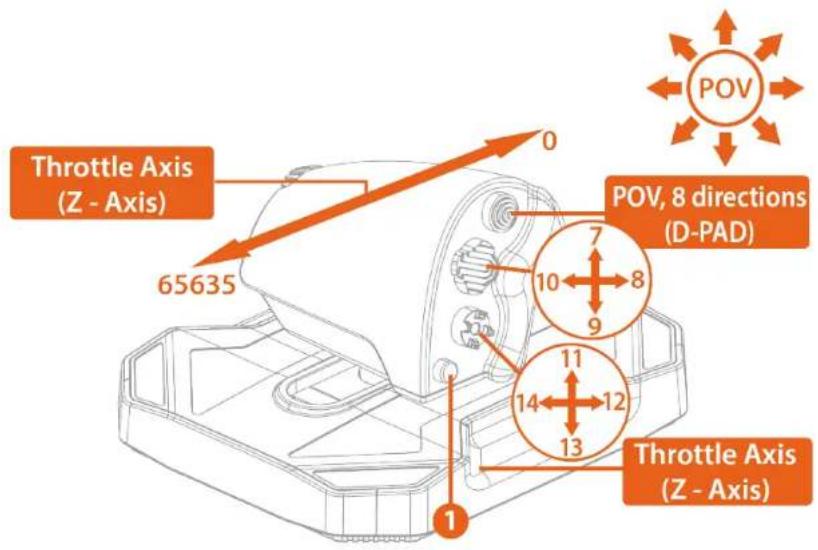
5. Functions
Rudder function

https://support.thrustmaster.com/product/sol-r-6-throttle/
https://support.thrustmaster.com/product/sol-r-6-throttle/.

https://support.thrustmaster.com/product/sol-r-6-throttle/
https://support.thrustmaster.com/product/sol-r-6-throttle/
Mapping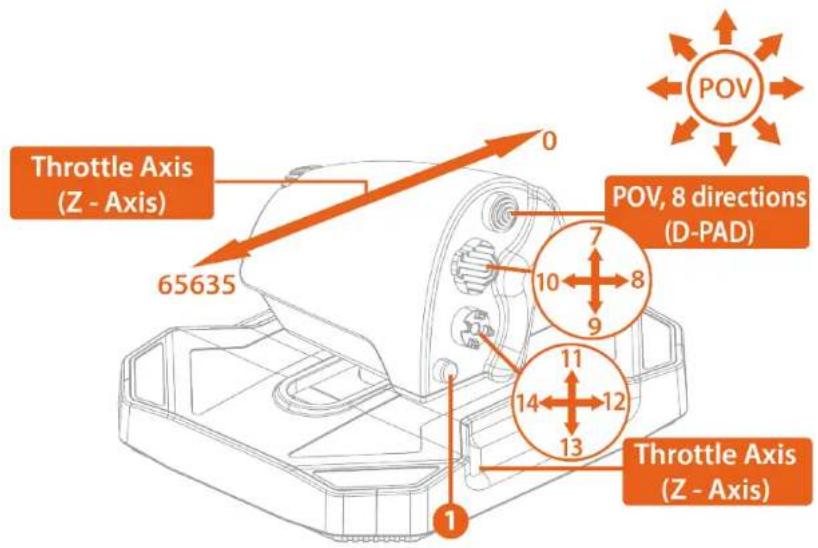
5. Features
Rudder function

https://support.thrustmaster.com/product/sol-r-6-throttle/
https://support.thrustmaster.com/product/sol-r-6-throttle/.

https://support.thrustmaster.com/product/sol-r-6-throttle/
https://support.thrustmaster.com/product/sol-r-6-throttle/
Mapping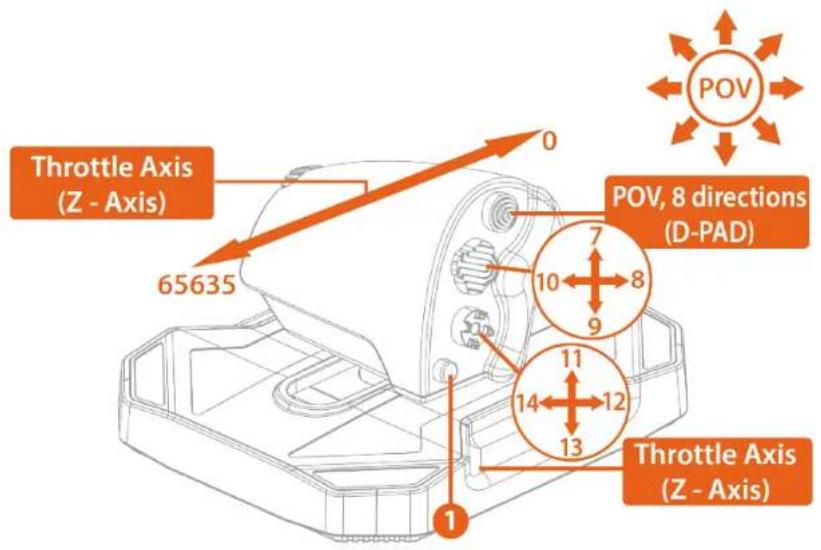
5. Features
Rudder function

https://support.thrustmaster.com/product/sol-r-6-throttle/
https://support.thrustmaster.com/product/sol-r-6-throttle/.

https://support.thrustmaster.com/product/sol-r-6-throttle/
https://support.thrustmaster.com/product/sol-r-6-throttle/.
4. Installation on PC
1. Visit:
https://support.thrustmaster.com/product/sol-r-6-throttle/.
Mapping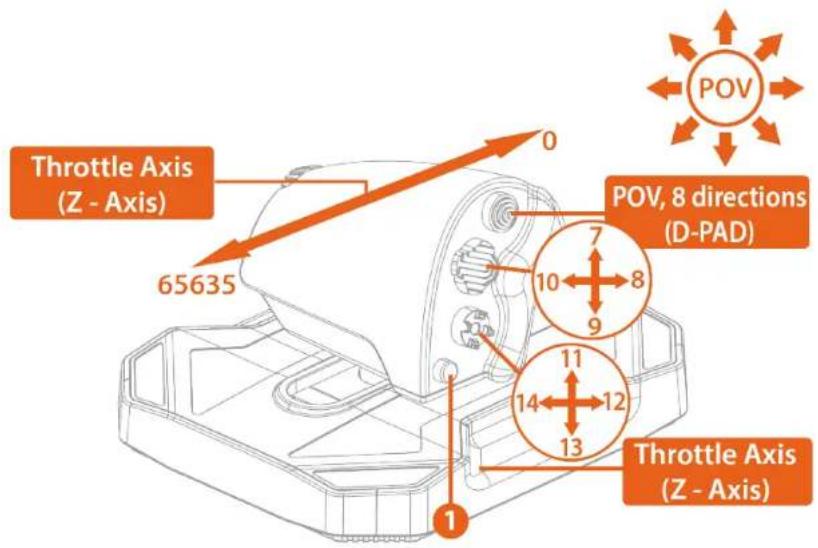

5. Features

https://support.thrustmaster.com/product/sol-r-6-throttle/.
https://support.thrustmaster.com/product/sol-r-6-throttle/.

https://support.thrustmaster.com/product/sol-r-6-throttle/.
4. PC Setup
https://support.thrustmaster.com/product/sol-r-6-throttle/
Button Mapping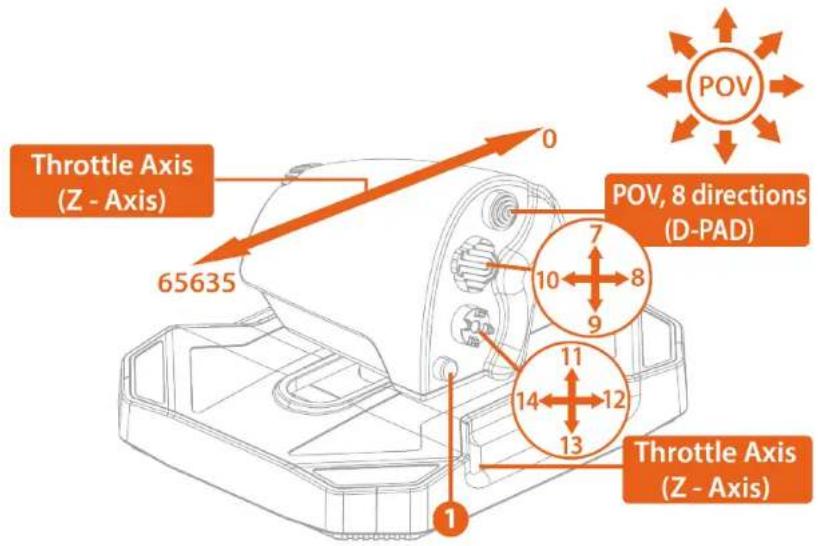
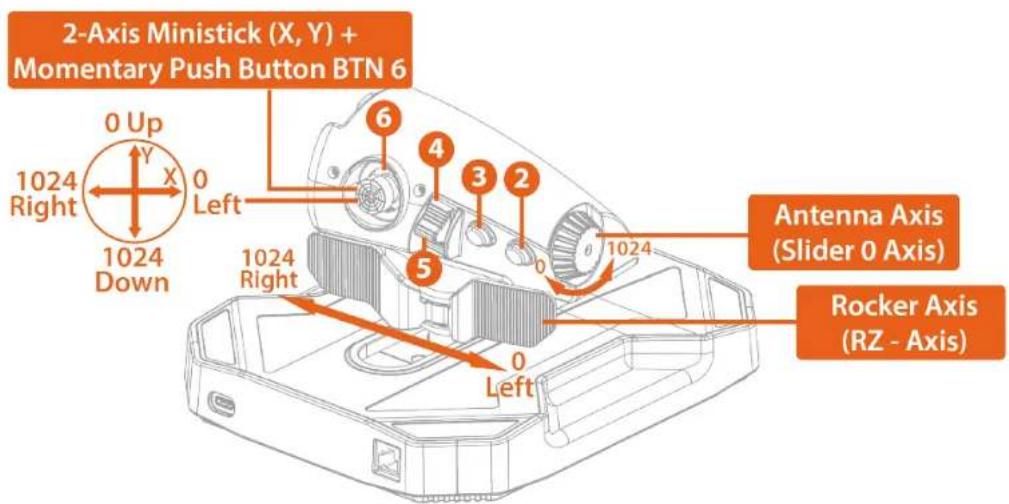

https://support.thrustmaster.com/product/sol-r-6-throttle/.

https://support.thrustmaster.com/product/sol-r-6-throttle/
4. PC Setup
- Please visit:
https://support.thrustmaster.com/product/sol-r-6-throttle/
Mapping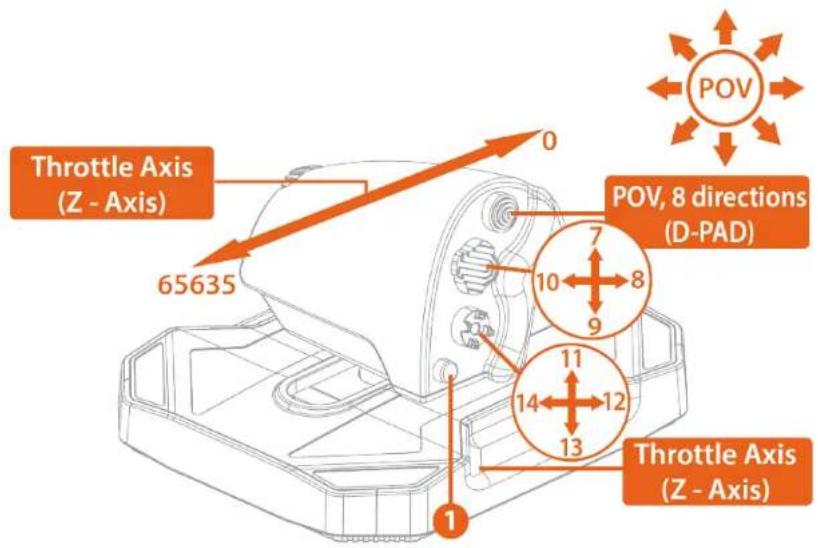
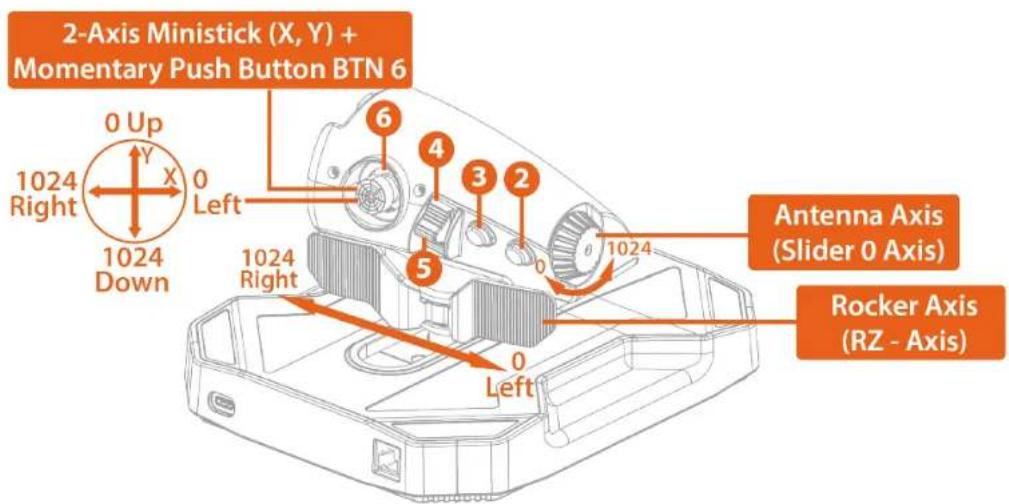
5. Features
Rudder Function

https://support.thrustmaster.com/product/sol-r-6-throttle/
https://support.thrustmaster.com/product/sol-r-6-throttle/.

https://support.thrustmaster.com/product/sol-r-6-throttle/
https://support.thrustmaster.com/product/sol-r-6-throttle/
4. Installation on PC
https://support.thrustmaster.com/product/sol-r-6-throttle/
Pairing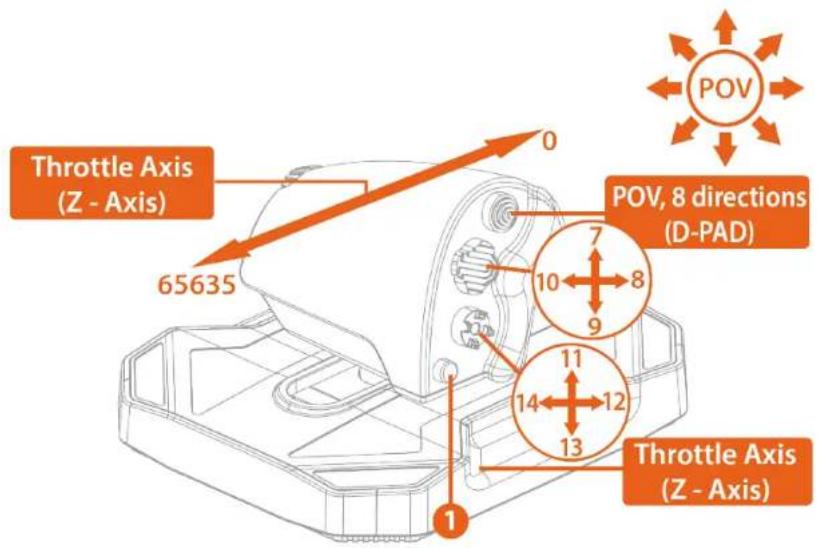
5. Features
Rudder function

https://support.thrustmaster.com/product/sol-r-6-throttle/
https://support.thrustmaster.com/product/sol-r-6-throttle/.

https://support.thrustmaster.com/product/sol-r-6-throttle/
- ADVANCED APPLICATION FOR
PROGRAMMING T.A.R.G.E.T. 22
Installation 22
Mapping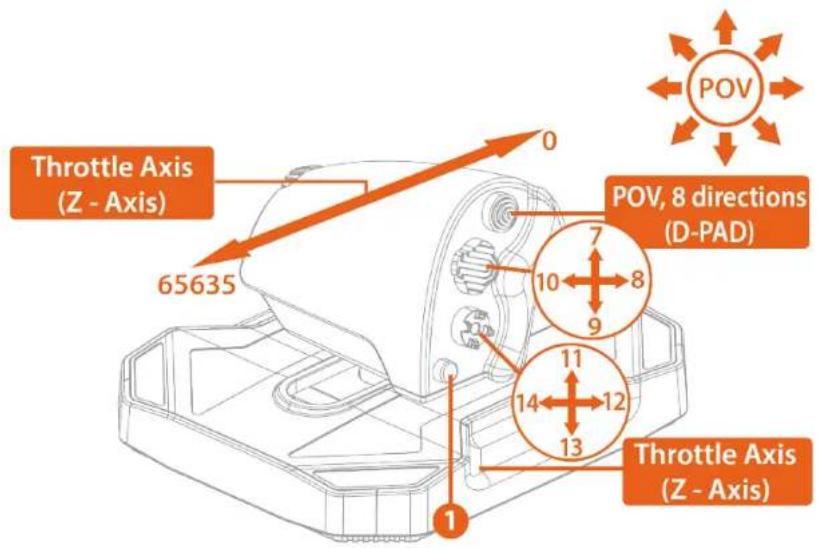
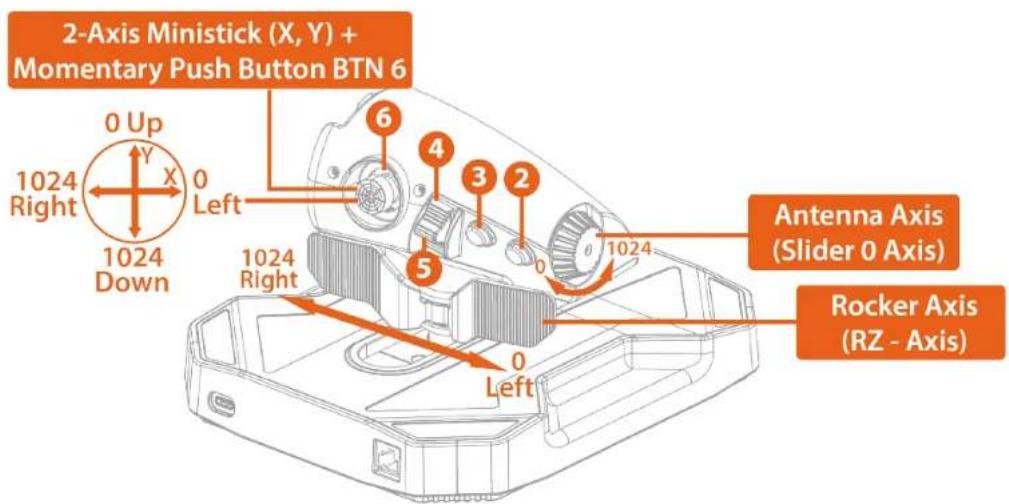
5. Elements


4. Using on PC
- Access the following:
Mapping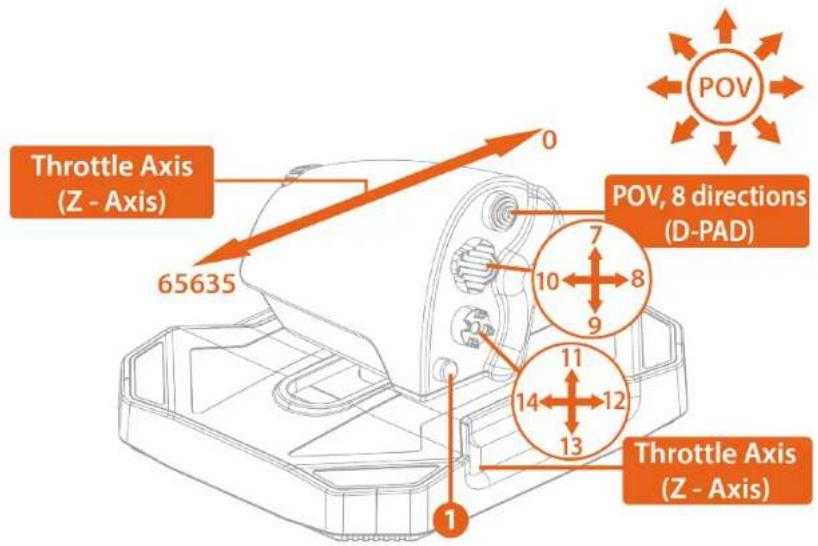
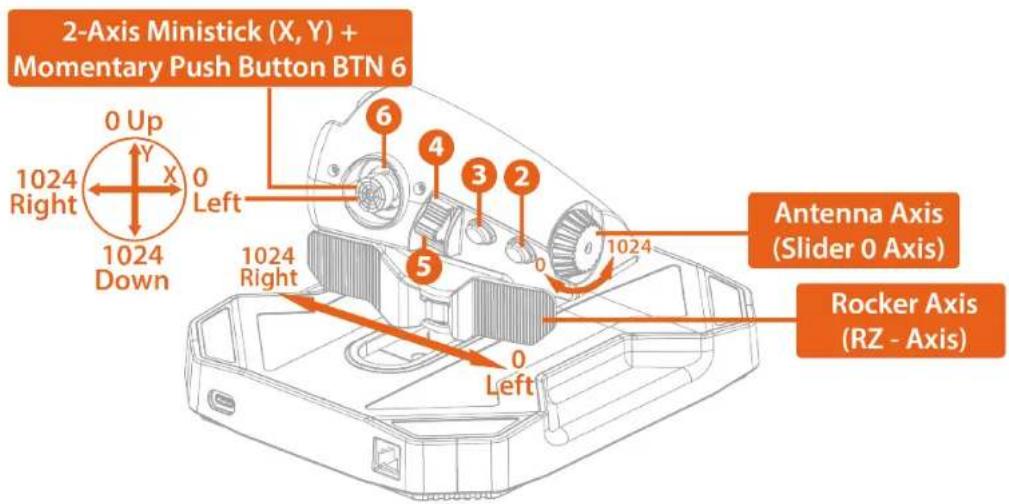
5. Features
Rudder function


4. Installing on a PC
1. Please visit:
http://support.thrustmaster.cn/product/sol-r-6-throttle/
Mapping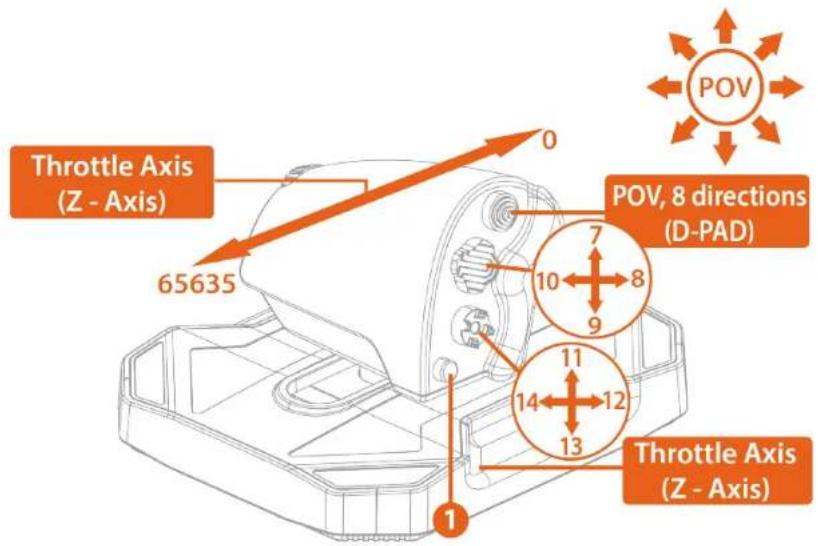
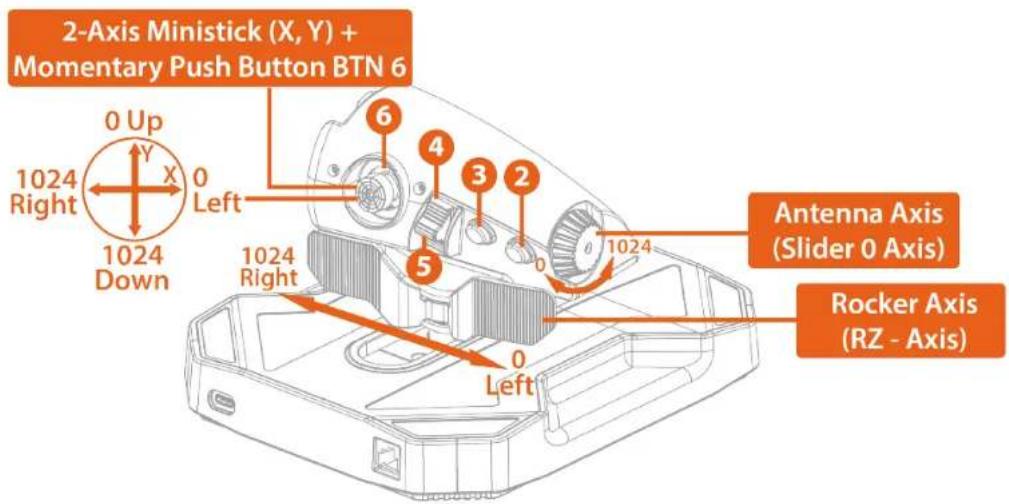
5. Features
Rudder function
- Push the detent back into place and retighten the four screws.
3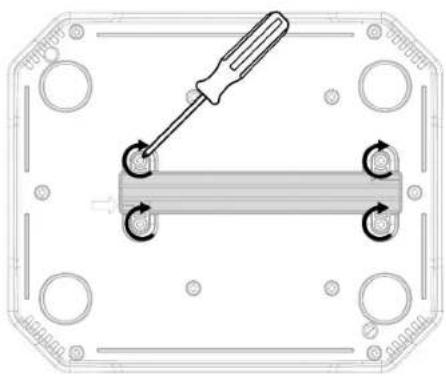

http://support.thrustmaster.cn/product/sol-r-6-throttle/
http://support.thrustmaster.cn/product/sol-r-6-throttle/
https://support.thrustmaster.com/product/sol-r-6-throttle/
4. Installing on a PC
1. Please visit:
https://support.thrustmaster.com/product/sol-r-6-throttle/
Corresponding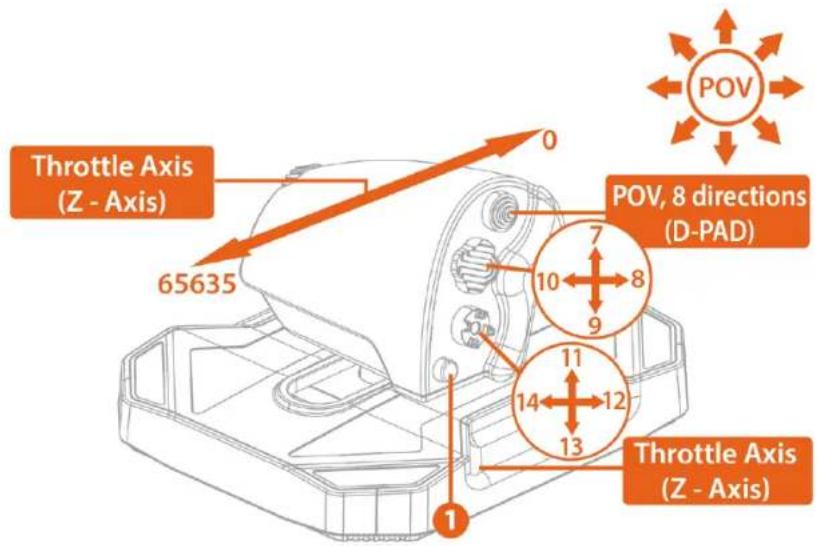
5. Features
Rudder function
- Push the detent back into place and retighten the four screws.
3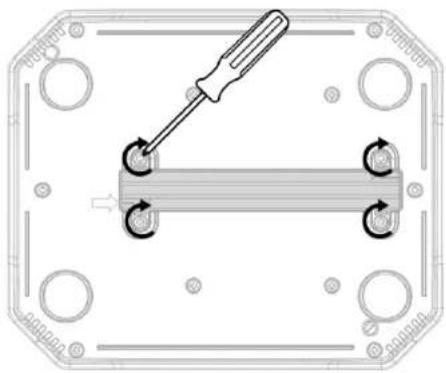

https://support.thrustmaster.com/product/sol-r-6-throttle/
https://support.thrustmaster.com/product/sol-r-6-throttle/.

https://support.thrustmaster.com/product/sol-r-6-throttle/
https://support.thrustmaster.com/product/sol-r-6-throttle/
2. Technical specifications
4. Installation on PC
- Please visit the following website.
https://support.thrustmaster.com/product/sol-r-6-throttle/
Mapping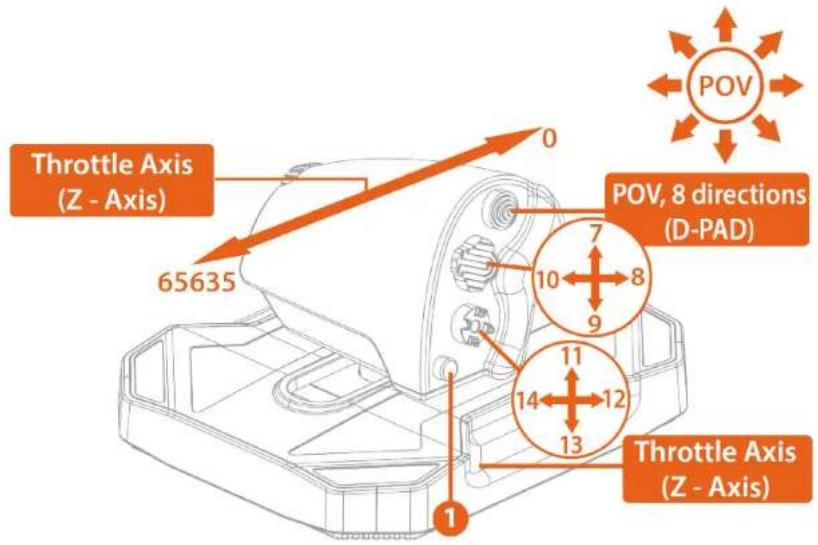

5. Functions
Rudder function


https://support.thrustmaster.com/product/sol-r-6-throttle/
https://support.thrustmaster.com/product/sol-r-6-throttle/.

1. The throttle does not work properly or
seems to be incorrectly calibrated
https://support.thrustmaster.com/product/sol-r-6-throttle/
TABLE OF CONTENTS
- PACKAGE CONTENTS ....5
- TECHNICAL PARTS......6
- USAGE INFORMATION ....8
- PC INSTALLATION....10
Control panel 12
Mapping....14
- FUNCTIONS......15
Rudder function....15
Lock 16
- COMPATIBILITY ......19
Rudder 20
- T.A.R.G.E.T. – AN ADVANCED
PROGRAMMING SOFTWARE....22
Installation....22
https://support.thrustmaster.com/product/sol-r-6-throttle/
2. Technical parts
4. Installation on PC
1. Go to:
https://support.thrustmaster.com/product/sol-r-6-throttle/
Mapping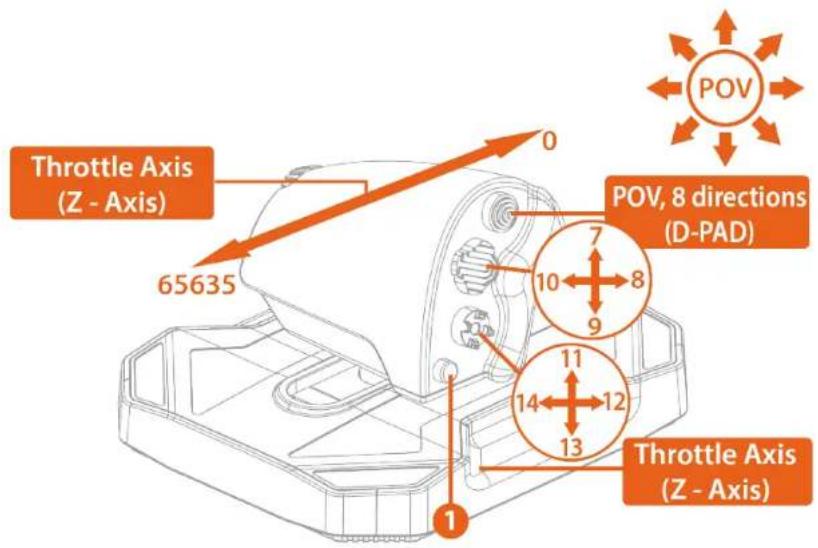
5. Functions
Throttle function

https://support.thrustmaster.com/product/sol-r-6-throttle/
https://support.thrustmaster.com/product/sol-r-6-throttle/.

https://support.thrustmaster.com/product/sol-r-6-throttle/
https://support.thrustmaster.com/product/sol-r-6-throttle/
https://support.thrustmaster.com/product/sol-r-6-throttle/
Specifications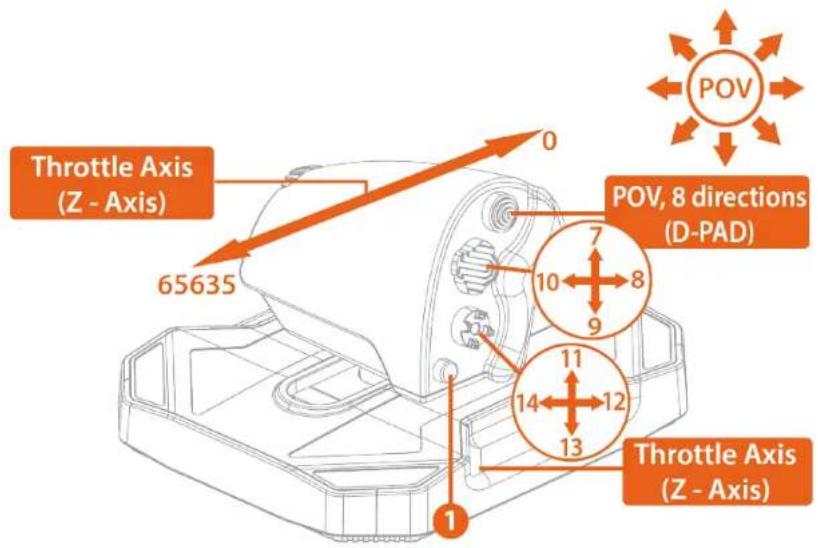
5. Features
Rudder function

https://support.thrustmaster.com/product/sol-r-6-throttle/
https://support.thrustmaster.com/product/sol-r-6-throttle/.

https://support.thrustmaster.com/product/sol-r-6-throttle/
https://support.thrustmaster.com/product/sol-r-6-throttle/
⑦ Analog mini-stick ⑧ Switch (2 positions) ⑨ Action buttons ⑩ Rotary radio knob ⑪ Manually operated rudder with 15° angle and centering function ⑫ RJ12 connector for external TFRP* rudder pedal system ⑬ USB-C connector ⑭ USB-A - USB-C cable
4. Installation on PC
1. Visit:
https://support.thrustmaster.com/product/sol-r-6-throttle/
In the Game Controllers dialog box, click on Properties and test and view all functions.
Mapping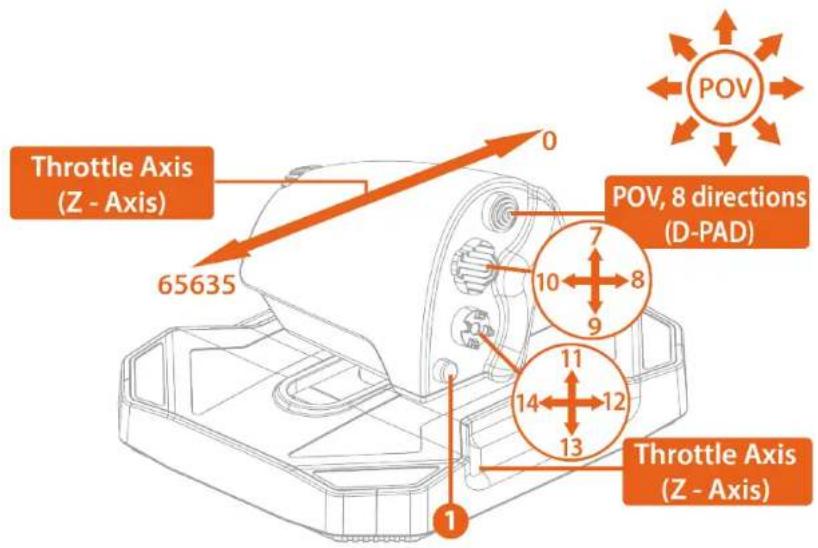
5. Features
Rudder function
- Return the stop to its place and screw the four screws back in.
3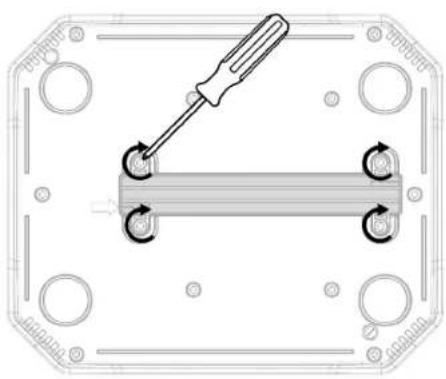

https://support.thrustmaster.com/product/sol-r-6-throttle/
https://support.thrustmaster.com/product/sol-r-6-throttle/.

https://support.thrustmaster.com/product/sol-r-6-throttle/
4. PC installation
Button assignment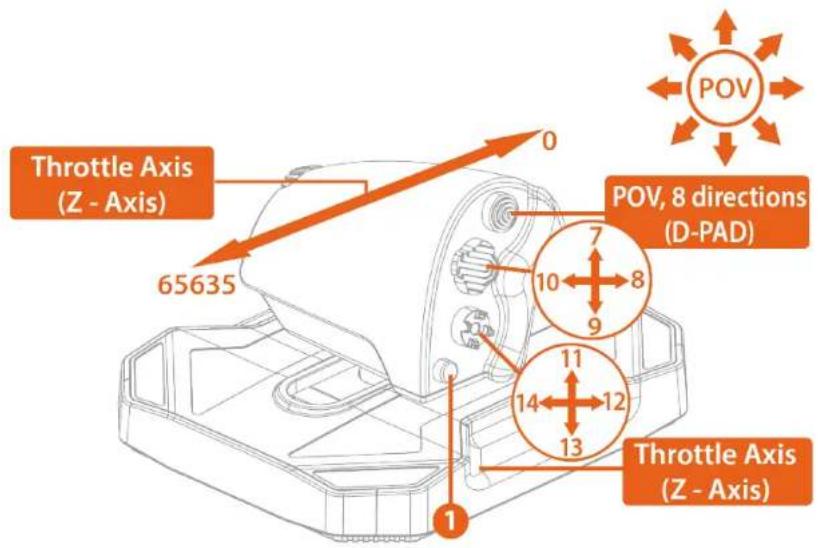
5. Features

https://support.thrustmaster.com/product/sol-r-6-throttle/.

https://support.thrustmaster.com/product/sol-r-6-throttle/
https://support.thrustmaster.com/product/sol-r-6-throttle/
1
8 cyonyosin 2
4 cyonyos 3
4 cyony 4
5 n L
4
1. In the box
https://support.thrustmaster.com/product/sol-r-
6-throttle/
m
5. Assembly
Assembly Assembly

.*Thrustmaster Pendular Rudder :TPR -
![graph TD A["Top Component"] --> B["T.Flight Rudder Pedals"] A --> C["TPR ThrustMASTER Pendular Rudder"]](/content/2026/04/740528/images/5229aad055e1c493de1ffe588a4931328f485d732c6ff8e8979c18c13c2cea16.jpg)

Thrustmaster Advanced pRogramming) T.A.R.G.E.T. .(Graphical EdiTor . Thrustmaster Advanced pRogramming)
https://support.thrustmaster.com/product/sol-r-6-throttle/
https://support.thrustmaster.com/product/sol-r-6-
.throttle/

https://support.thrustmaster.com/product/sol-r-6-throttle/
1 نق ② ات 3
7 8 (c) 9 هام 10 يو
11
12
13
14
* تُباع منفصلة
https://support.thrustmaster.com/product/sol-r-6-throttle/
Function of the throttle

Thrustmaster Advanced pRogramming ) T.A.R.G.E.T.
https://support.thrustmaster.com/product/sol-r-6-/throttle
- t Winning Businesses, Advanced Basic:
MFD Cougar, *TFRP, *TWCS, *T.16000M FCS
https://support.thrustmaster.com/product/sol-r-6-
./throttle

https://support.thrustmaster.com/product/sol-r-
/6-throttle


- TABLE OF CONTENTS
- SOL-P
- THROTTLE
- UPDATING THE FIRMWARE
- BOX CONTENTS
- TECHNICAL FEATURES
- INFORMATION REGARDING USE
- DOCUMENTATION
- PINCH HAZARD
- INSTALLATION ON PC
- CONTROL PANEL
- FEATURES
- RUDDER FUNCTION
- DETENT
- COMPATIBILITY
- RUDDERS
- T.A.R.G.E.T. ADVANCED PROGRAMMING SOFTWARE
- INSTALLATION
- MAIN FEATURES
- FAQ AND TECHNICAL SUPPORT
- MY THROTTLE ISN'T WORKING PROPERLY, OR SEEMS TO BE IMPROPERLY CALIBRATED
- I CAN'T CONFIGURE MY THROTTLE
- MY THROTTLE IS TOO SENSITIVE, OR NOT SENSITIVE ENOUGH
- MY THROTTLE ISN'T WORKING
- THRUSTMASTER®
- FOR PC (WINDOWS® 10/11)
- TECHNICAL SPECIFICATIONS
- FUNCTIONS
- VISIT
- PC SETUP
- ELEMENTS
- USING ON PC
- INSTALLING ON A PC
- PLEASE VISIT
- THE THROTTLE DOES NOT WORK PROPERLY OR
- SEEMS TO BE INCORRECTLY CALIBRATED
- TECHNICAL PARTS
- GO TO
- THROTTLE FUNCTION
- PC INSTALLATION
- HTTPS://SUPPORT.THRUSTMASTER.COM/PRODUCT/SOL-R-6-THROTTLE
- ASSEMBLY
- ASSEMBLY ASSEMBLY
Brand : THRUSTMASTER
Model : Sol-R 6 Throttle
Category : Game controller