Ultimate Autoclean FV9540 - Iron TEFAL - Free user manual and instructions
Find the device manual for free Ultimate Autoclean FV9540 TEFAL in PDF.
User questions about Ultimate Autoclean FV9540 TEFAL
0 question about this device. Answer the ones you know or ask your own.
Ask a new question about this device
Download the instructions for your Iron in PDF format for free! Find your manual Ultimate Autoclean FV9540 - TEFAL and take your electronic device back in hand. On this page are published all the documents necessary for the use of your device. Ultimate Autoclean FV9540 by TEFAL.
USER MANUAL Ultimate Autoclean FV9540 TEFAL
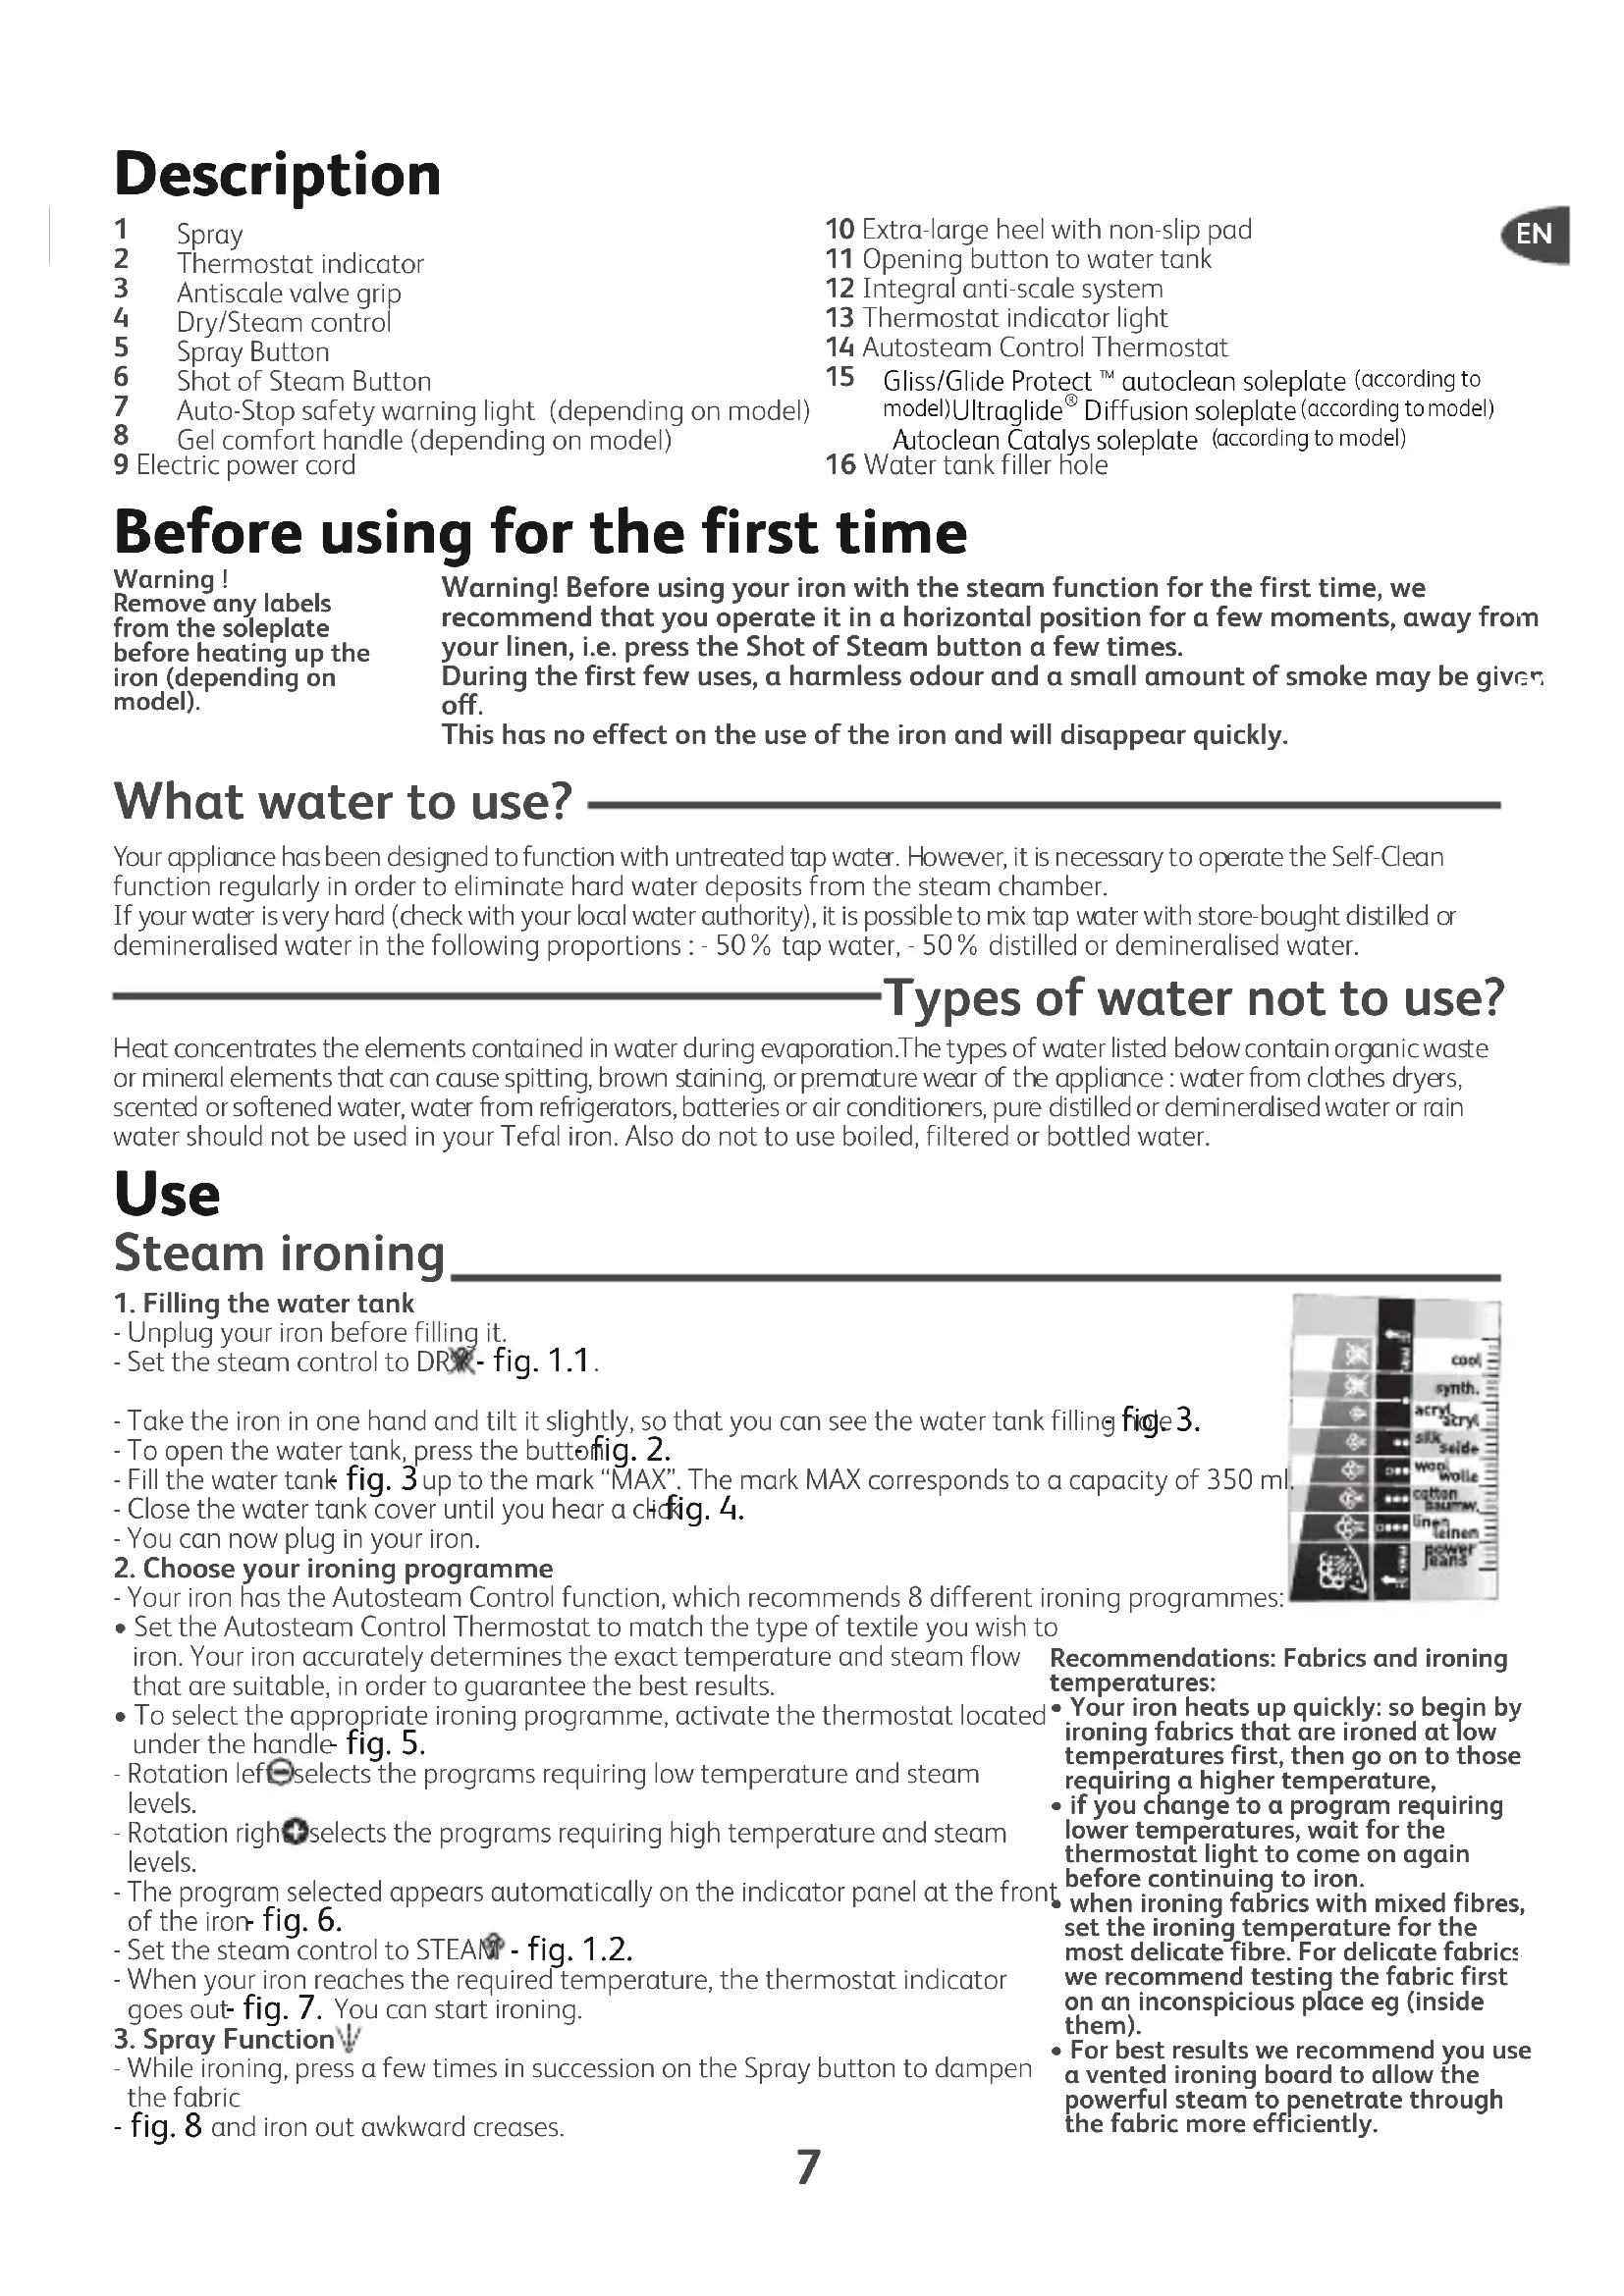
1 Spray
2 Thermostat indicator
3 Antiscale valve grip
4 Dry/Steam control
5 Spray Button
6 Shot of Steam Button
7 Auto-Stop safety warning light (depending on model)
8 Gel comfort handle (depending on model)
9 Electric power cord
10 Extra-large heel with non-slip pad
11 Opening button to water tank
12 Integral anti-scale system
13 Thermostat indicator light
14 Autosteam Control Thermostat
15 Gliss/Glide Protect™ autoclean soleplate (according to model)Ultraglide Diffusion soleplate(according to model) Autoclean Catalys soleplate (according to model)
16 Water tank filler hole
EN
Before using for the first time
Warning!
Remove any labels from the soleplate before heating up the iron (depending on model).
Warning! Before using your iron with the steam function for the first time, we recommend that you operate it in a horizontal position for a few moments, away from your linen, i.e. press the Shot of Steam button a few times.
During the first few uses, a harmless odour and a small amount of smoke may be given off.
This has no effect on the use of the iron and will disappear quickly.
What water to use?
Your appliance has been designed to function with untreated tap water. However, it is necessary to operate the Self-Clean function regularly in order to eliminate hard water deposits from the steam chamber.
If your water is very hard (check with your local water authority), it is possible to mix tap water with store-bought distilled or demineralised water in the following proportions : - 50% tap water, - 50% distilled or demineralised water.
Types of water not to use?
Heat concentrates the elements contained in water during evaporation. The types of water listed below contain organic waste or mineral elements that can cause spitting, brown staining, or premature wear of the appliance: water from clothes dryers, scented or softened water, water from refrigerators, batteries or air conditioners, pure distilled or demineralised water or rain water should not be used in your Tefal iron. Also do not to use boiled, filtered or bottled water.
Use
Steam ironing
-
Filling the water tank
-
Unplug your iron before filling it.
-
Set the steam control to DRX - fig. 1.1.
-
Take the iron in one hand and tilt it slightly, so that you can see the water tank filling fide 3.
- To open the water tank, press the button. 2.
- Fill the water tank fig. 3 up to the mark "MAX". The mark MAX corresponds to a capacity of 350ml
- Close the water tank cover until you hear a click. 4.
-
You can now plug in your iron.
-
Choose your ironing programme
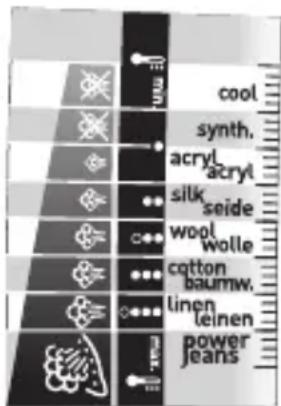
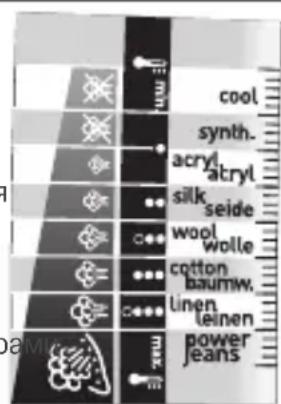
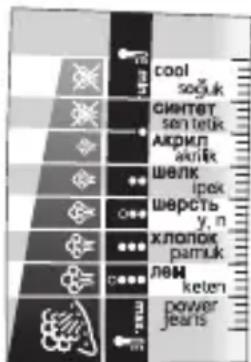
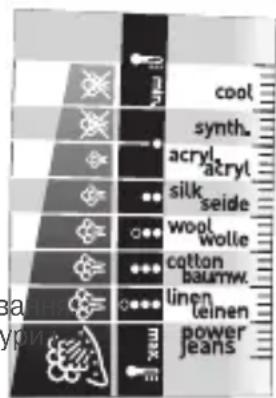
- Your iron has the Autosteam Control function, which recommends 8 different ironing programmes:
- Set the Autosteam Control Thermostat to match the type of textile you wish iron. Your iron accurately determines the exact temperature and steam flow that are suitable, in order to guarantee the best results.
- To select the appropriate ironing programme, activate the thermostat located under the handle fig. 5.
- Rotation left selects the programs requiring low temperature and steam levels.
- Rotation right selects the programs requiring high temperature and steam levels.
- The program selected appears automatically on the indicator panel at the front of the iron fig. 6.
- Set the steam control to STEAM - fig. 1.2.
- When your iron reaches the required temperature, the thermostat indicator goes out. Fig. 7. You can start ironing.
- Spray Function V
- While ironing, press a few times in succession on the Spray button to dampen the fabric
- fig. 8 and iron out awkward creases.
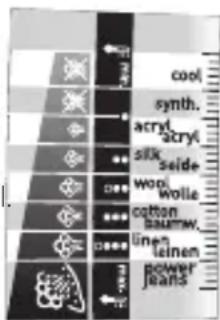
Recommendations: Fabrics and ironing temperatures:
- Your iron heats up quickly: so begin by ironing fabrics that are ironed at low temperatures first, then go on to those requiring a higher temperature,
- if you change to a program requiring lower temperatures, wait for the thermostat light to come on again before continuing to iron.
when ironing fabrics with mixed fibres, set the ironing temperature for the most delicate fibre. For delicate fabrics we recommend testing the fabric first on an inconspicious place eg (inside them). - For best results we recommend you use a vented ironing board to allow the powerful steam to penetrate through the fabric more efficiently.
4. For more steam (shot of steam button)
-
Ensure that the fabric you are ironing is flat to avoid steam venting sideways whilst ironing.
-
Press the Shot of Steam button from time to time. Fig. 9.
-
Wait a few seconds between each shot before pressing the button again.
5. Vertical steam ironing
-
Ideal for removing creases from suits, jackets, skirts, hanging curtains etc
-
Hang the garment on a hanger and hold the fabric slightly taut with one hand. The steam is very hot, so you should always do this with the garment on a hanger – never while someone is wearing it.
-
Set your thermostat to Maxfig. 10.
-
Press the Shot of Steam button ( ) repeatedly fig. 9 moving the iron from top to bottom fig. 11.
-
Hold the iron a few centimetres from the fabric to avoid burning delicate fabrics.
6. Anti-Calc Plus System
- You iron is equipped with an integral anti-scale syste. fig. 12.
- This system will help to provide :
- a better ironing quality with a constant flow of steam,
a longer life for your iron.
7. Anti-drip function
- Autosteam Control, i.e. the automatic selection of the ironing programme depending on the fabrics selected, makes it possible to reduce steam flow at low temperatures and prevents your iron from dripping water onto your linen.
8. Auto-Stop safety feature (depending on model)
-
For your safety, the electronic system cuts off the power and the autopost indicator light. When the Auto-Stop flashes-fig. 13 when: warning light is on, it
-
The iron remains motionless for more than 8 minutes on its heel.
- The iron remains flat or on its side for more than 30 seconds.
- To restart the iron, just move it gently until the warning light stops flashing.
warning light is on, it is normal for the thermostat light to remain off.
9. Gliss/Glide Protectautoclean - Autoclean Catalys soleplatedepending on model)
- Your iron is equipped with a catalytic self-cleaning soleplate.
- Its exclusive coating removes all impurities generated by normal use.
- It is recommended that you always rest your iron on its support base to preserve its self-cleaning coating.
Dry Ironing
- Choose your ironing program.
- Set the steam control to DRX - fig. 1.1.
- You may start ironing when the thermostat light goes out.
Caring for your iron
BE CAREFUL! Unplug your iron and let it cool down before cleaning it.
Cleaning the anti-calc valve (once per month)
- Unplug your iron and empty the water tank.
- To remove the antiscale valve, set your thermostat on the position M.10, warning: the steam control must be set to STEAM (fig.1.2) during the cleaning phase and the thermostat must be set to MAX (fig.10).
Never touch the end of the valve
- Soak the valve in a cup of white vinegar or plain lemon juice for 4 hofig. 16.
- Rinse the valve under running water.
- Replace the anti-calc valve.
The iron will not function without the anti-calc valve
1. Self-cleaning
In order to extend the life of your iron, use the Self-Cleaning function once a month.
-
Set the iron to DRY - fig. 1.1.
-
Fill the water tank to maximum.
-
Set the iron on his heel, with the water tank full, and set the thermostat to 10.
-
When the thermostat light goes out, unplug the iron and hold it in a horizontal position, over a sink.
-
Set the steam control to STEAM, - fig. 1.2
-
Remove the anti-calc valve.
-
Shake the iron gently, over the sink, until some of the water in the water tank (with the impurities) has flowed out through the soleplate.
-
At the end of the operation, push the anti-calc valve back into position.
-
Turn the iron back on for 2 minutes, setting it on its heel, to dry the soleplate.
-
Unplug the iron, and when the soleplate is just warm, wipe it with a soft cloth.
2. Cleaning the soleplate
Your iron has a self-clean soleplate (according to the model):
Recommendations: the self-cleaning function helps to slow down the scaling up of your iron.
-
Warning! Use of an abrasive cloth will damage the self-cleaning coating on the soleplate.
It's crucial to use a protective clothing, all iron qualities that can be removed or replace the iron's antiscale rod. -
Its exclusive active coating eliminates all impurities that can be generated under normal conditions of use.
-
Ironing with an incorrect program can however leave traces that may require manual cleaning. In this case, it is recommended that you use a soft damp cloth on the still warm soleplate so as not to damage the coating.
Attention! The use of a scouring pad will cause damage to your soleplate's self-cleaning coating (fig.17)
Your steam iron is fitted with an Ultraglide soleplate (depending on model):
- Never use aggressive or abrasive products.
- When the soleplate is still warm, wipe with a damp cloth
Storing your iron
- Unplug the iron and wait for the soleplate to cool down.
- Empty the water tank and set the steam control to DXY- fig. 1.1. A little water may remain in the tank.
-
Wind the cord not too tightly around the heel at the back of the iron.
-
Store the iron on its heel.
Environment

Environment protection first!
① Your appliance contains valuable materials which can be recovered or recycled.
Leave it at a local civic waste collection point.
If there is a problem?
| Problem Possible causes | Solutions | |
| ·Water drips from the holes in the soleplate. | ·You are using the Shot of Steam button too often. ·You have stored the iron horizontally, without emptying it and without setting it to DRY. | ·Wait a few seconds between each use of the button. ·See the section "Storing your iron". |
| ·Brown streaks come through the holes in the soleplate and stain the linen. | ·You are using chemical descaling agents. ·You are using pure distilled/demineralised or softened water. ·Your linen is not rinsed sufficiently or you have ironed a new garment before washing it. | ·Do not add any descaling agents to the water in the water tank. ·See section "Types of water not to use?". ·See section "Cleaning the soleplate". ·Ensure linen is rinsed thoroughly to remove any soap deposits or chemicals on new garments which may be sucked up by the iron. |
| ·The soleplate is dirty or brown and can stain the linen. | ·You have ironed with an unsuitable programme (temperature too high). ·You are using starch. | ·Select the appropriate program.Refer to the chapter "Clean the soleplate" ·Spray starch on the underside of the fabric to be ironed. |
| ·There is little or no steam. | ·The water tank is empty. ·The anti-calc valve is dirty. ·Your iron has a build-up of scale. ·Your iron has been used dry for too long. | ·Fill it. ·Clean the anti-calc valve. ·Clean the anti-calc valve and carry out a self-clean. ·Carry out a self-clean. ·Wait for the soleplate to reach the correct temperature. |
| ·The soleplate is scratched or damaged. | ·You have placed your iron flat on a metallic rest-plate or ironed over a zip. ·You have cleaned your soleplate with an abrasive or metal pad. | ·Always set your iron on its heel. ·Try to avoid ironing over zips. ·Refer to the chapter "Clean the soleplate". |
| ·Water is leaking out through the water tank cover. | ·You have not closed the water tank cover properly. | ·Make sure the water tank cover has clicked shut. |
| ·Steam or water come from the iron as you finish filling the tank. | ·The steam control is not set to the DRY position | ·Check that the steam control is set to the DRY position |
| ·The spray and/or shot of steam do not work. | ·The water is empty. ·Fill the water. | |
| ·Water leaks out of the front of the iron. | ·You have exceeded the level MAX when filling the water tank. | ·Empty the surplus water out of the water tank. |
Name of manufacturer : CALOR S.A.S 3.12 104
220-240V a.c. 2010-2400W
220-240 V a.c. 2185-2600W
50/60Hz
Made in France
If you have any problem or queries, please contact our Customer Relations
team first for expert help and advice.
845 602 1454 - UK / (01) 677 4003 - Ireland
or consult our website - www.tefal.co.uk
Description
1 Spray
2 Tableau de bord thermostat
3 Préhension tige anti-calcaire
4 Commande Sec / Vapeur
5 Touche Spray
6 Touche Superpressing
7 Voyant Auto-Stop (selon modele)
8 Poignée comfort gel (selon
modèle)
6. Anti-Kalk Plus system
6. Anti-Calc Plus system
5. Vertical toyglatting
- Ideelt til Å fjérne bredter på dresser, jakker, skjørt, gardiner,...
- Heng plagget på en kleshenger, og strekk stoffetlett. Da dampen er veldig varm, ma du alltid glatte toyet på en kleshenger og aldri en person.
Tkanine in temperature likanja:
- Likalnik se hitro segreje: začnite s tkaninami, ki se likajo pri nizki temperaturi, konçajte pa s tistimi, ki zahtevajo visjo temperaturo;
- Ce ze lite uporabiti program za likanje z nižjo temperaturo, preden pricnete z likanjem počakajte, da se kontrlna lučka termostata ponovno przyge.
- Ce likate tkanino Iz mesanih vlaken: temperaturo regulirajte za likanje najobcutljivejsih vlaken.
5. Gladite navpicno
B 3aBnCIMOCT OT Tnna Ha n36paHaTa 3a rlaJeHe MaTePnra, BaWtA ToTHo ONpeDJIeNoXODJUHTe TEMpePaTyPhO HnBO N KOJIuYeCTBO npa, 3a Da rapaHTnpa Ha- TaHbO TaHbO TaHbO TaHbO TaHbO TaHbO TaHbO TaHbO TaHbO TaHbO TaHbO TaHbO TaHbO TaHbO TaHbO TaHbO TaHbO TaHbO TaHbO TaHbO TaHbO TaHbO TaHbO TaHbO TaHbO TaHb0 TaHb0 TaHb0 TaHb0 TaHb0 TaHb0 TaHb0 TaHb0 TaHb0 TaHb0 TaHb0 TaHb0 TaHb0 TaHb0 TaHb0 TaHb0 TaHb0 TaHb0 TaHb0 TaHb0 TaHb0 TaHb0 TaHb0 TaHb0 TaHb0 TaHbO TaHbO TaHbO TaHbO TaHbO TaHbO TaHbO TaHbO TaHbO TaHbO TaHbO TaHbO TaHbO TaHbO TaHbO TaHbO TaHbO TaHbO TaHbO TaHbO TaHbO TaHbO TaHbO TaHbO TaHb
-
3a n36op Ha noJxOJaIa nporpama 3a rJaIeHe, 3aJeIcTbaIe TepMoCTaTaHaMnpaIc eNoI npbKkata fig.5.
-
BbptHe HalaBO, NOJyabaTe DOCTbI Do npoPamnte, KOITO N3NCKBaT HnCKn HnBa Ha TempepaI npoNoDaBaHe.
-
BbptHe HadaHcNoIyabate DoctbN Do nporpaMITE, KOITOn 3nCKBaT BnCOKn HnBa Ha TempepaTypa nnaponoDaBaHe.
-
N36paHaTa nporpaMa ce n3ncBa aBtOMaTnHOb bbpxU YeIHHra naHeI, pa3noJIOXeH B npedHaTa uact Ha IOTnTafig. 6.
-
NocTabete peryanaTopa 3a rnaDehe Ha Napbo - fig.1.2.
-KoratoIOTnraIOCTnHRe3aJaHeHaTATEmNepaTpya,CBETnHHnRTnHnKaTOPHa TepMoCTata yracBa - fig.7.MoKeTe da rnaNTe.
3.ObnaXHBAHe Ha TBkaHnte (cnpei
-Korato rlaIte HaTnckaIte HeKOJIOKKpaTHO n NocJeIOBaTeJIHO 6yToHa CnpE,3a Da HABJAXHnTE Pnata-fig.8 n da OTCTpaHnTe yNOPHTe FBHKn.
HaunrTcbBet:
TbKaHn TEmnepaTypa Ha rJaDeHe:
IOTnra 3aarpBa 6bp30: 3aONuHETe NpBPO C TbKaHN, KONTo CE rJaT Ha cJa6a IOTnN 3aBbPWeTe C TaKnBA, KONTo CE rJaT C NO-CUNHa IOTn;
- Ako npemnhabate KbM nporpaMa C NO-HNcKa TEMpepaTypa M3yakaIte CBETNIHHNRT HNDKAtOP Ha TepMOCTata Da CBETHE OTHOBO npedJa 3ANOHTE OTHOBO da rnaDNTe.
Ako rnaTe CmecEn TbKaHn, perynpaTe temnepaTpya cnPMAHO-NeIKAthata CbCTaKHa TbKaHnTe.
4. Iopdahe Ha noBee napa (Cynep PecnH)
He dokocbaite Bbpxa Ha naTpoHa
- OctaBeTe NaTPOHaJa KaKIsHe 4 Yaca B YaAa C 6 JaOeT NnC HAtypaEn JIMMOHOB COK - fig. 16.
-ИЗплakне NaTpOHa C Yeшma Hа BODa. - NocTaBete ro o6paTHo Ha MrcTOTO My.
IOTnraHe pa60n 6e3 npoTnBO-BapOBNKOBnaTPOH
1. CamonoynCTBaHe
EINn Nt MeceHNO n3BbPwBaIe CaMONoYnCTBaHe, 3a Da yDbJXnTe XNBOTA Ha IOTn.
- Nocstabete perylaTopa Ha napa B no3nca SE - fig.1.1.
-ПocтаветеюпаяВизпраьенонохеньe,спьлелpeзервогин hactpoi TepmoctataHaNo3uIGNMAX:fig.10. - Korato CBETINHHNRT INHIDKATop yrache, IN3KJIIOUcTe IOTnraIЯ NOCTaBeT HymBaJIHnka.
-ИЗвадепpoТиBO-BapOBиКOBиЯ NaTpoH.
-Пocтавete Perуларopa 3anapaВ поциЯ STEAM (Фиг.1.2) - JIeKo pa3knaaTe xOpn3OHTaJIHO IOTnRA NaI yMnBaJIHnKa, DOKaTO qAcT OT BOJATA (3aeJNO CbC 3ambpCtJEInTe) n3TeHe pE3 PIOUaTa.
- Cnei n3BbpuBaHe Ha Ta3n Opeaun, Bbphete o6paTHO npOTnBO
Haunr cBET: CamonOnuHCTBaHETO npedOTbpaTBA OTnaraHETo HA KOTNeH KAMbk B IOTnTa.
TBHMaHHe! N03nUraTa 3a npa 3aBjXnTeJHO Tp86Ba Da 6bJe Bbpxy IAPA (Pur.1.2.) 3a da MoKTe da H3BaJnteN da CNOxnte O6paTHO CTbJbEto IpOTNB KOTJIeH KaMbK Ha BaWataIOTNIA.
BHHMaHHe! n3nOJ3BaHeto Ha a6pa3nBHa r6a noBpeXda camOnoUncTbaUcTo ce nokpntne Ha Baawata rnaedeua nobbpxHOCT (fur.17)
BapOBIKOBINaTPOHHa MRCTO My.
- OTHOBO BKHIOUeTe IOTnra 3a 2 MNHyTN, KaTOI NOCTaBtE BbB BePTKaNHO NIOLOXeHne, 3a Da N3cbxHe NIOUaTa.
-ИЗкlioуete IOITЯи KOraTO ПLOYaТО NOn3CTUHe, ИЗТриTeяс MeKa KbPna.
2. NocntBaHe Ha nloyata
NapHaTa Bn IOTn e cHa6deHa CbC camOnOuNCtBaUa ce nloa (B 3aBncMocT OT MoJe):
BnmaHHe! NocTbaHeTo c a6pa3NBHa r6a nobpeKda camOnOuNCTBaIoTO nOKpUtne Ha nloaTa.
- -YHnkaHTo My NOKpTHe IpemaxBa BCnUKN HeuNCTOTn, NopOJeHN OT HopMaHa yIOTpe6a.
Bce naK, rnaeHTo Ha HeNoDxOJaA nporpaMa MoKe da ocTabn CneDi, KOInTO ue Tp6Ba da ce nouNCTaPbUHO. B TaKbB Cnyau CneDbA Da Ce NOn3Ba MeK BnaKeH napcaI Bbpxy BCE OSe XnaKaTa PNOa, 3a Da He ce nobpei NOKoNTNeTO.
Baata napha Iotna e cHa6deHa c nloa Ultragliss (cnopeM oMeJa):
- He noJI3BaIe arpeCnBn nIa6pa3NBn NOcHCTBaIu npenapatn.
-ДOKаTO ПLOЧАТe Oоше Xладka,Я NOчИСТeTe CBнajжЕн napцaJ.
CbxpaHHeHaIOTnraTa
-ИЗКЛЮЧЕТЯ ИИЗУАКAJТЕ ПЛОЧАТа ДА ИЗСТИНЕ
-ИзпраЗнete peэрьогаи постаытete peгулалopa на пара в пошю SEc -fig.1.1.Bpeepboapamoke da octaHe MaNKO BODa.
-HabnTe 乌Hypa OKoJIO 3aHaTa YaCT Ha IOTnTa.
- NocTabete IOTnraHa neta.
Okonha cpea 3aHTe Okonhata cpea!
① BaunrT eIekTpoUpei CbIbPxa MaTePnAIn, KOITo MOraT da 6bDaT peuKlnpaHn.
OTheCETe Ro Hn-6JIn3KnIeHtbp 3a OTnabu.
EbeHTyaJIHn npo6JIeMn cIOTna?
| ПюбLEM Вьзможнaja р�чина Рецениe | ||
| · Празе отворITE на пioоча наitsча вoda. | · Тьрдесcentо ИзлалзВATE БуТОнСупер-П��сиг. · Сыхаяльс STE IOTЯВ в Хориэонтailingпосожения,бeЗдая Излразимite ибeЗдая постовite Perugalatora в поэц�性 SEC. | · Из acquыгite по Няколко секундм м教职工уНатсканя. · Иниравete сравka с галава "Сыханение на пioоча". |
| · Кafeенikabn TeчOBе OT пioоча, кoITообразувAT петна Вьрху ТьkanITE за Гадende. | · ИзлалзВATE xIMmUeCKN prpeapatNi StpeuKOTLEH KAMbK. · ИзлалзВATE HepoDxOyAma BODa. | · He priobabayite НИКakbB prpeapat cpeuKOTLEH KAMbK в розервога за вODa. · Иниравete сравka с рубрика "Кakba вoda дce ИЗбягва". |
| · Пioоча e Мрьсан Или кafehenikaba и можеда замьрси пра themselves. | · АкSt TEлд们с C HepoDxOyAmaПрогам. (Тьрдe ВICOKA TempepaTур). · Прането He e Добre Изллakнato Или ИзлалзВATE prpeapat 3a КOLOCBaHe. | · Изberpeite noIxodma npograma. OTHecete StcKbM Гада „Почиствае на Гадша? · Пульberпзирaite skopблata ot образнatableстара на Гадша. · Ппсьтпетe КБМ симочисва. · Ппсьтпетe КБМ симочисва. |
| ·ЮтЯтабобразува малко Или Вьобшие Heобразува napa. | · Persepoarlt e npazeh. ·ПротиBO-BaporIKOBYR T NaTPOH eЗмьрсEH. ·ВЮтЯтб e OTLOXeH KOTLEH KAMbK. ·Тьрдe Дьлго STe ИзлалзВAnI IOTNЯТВ РexkIM cyxo Гадende. | · Habлнete ro. ·Почистete пotиBO-BaporIKOBYR NaTPOH. ·Почистete пotиBO-BaporIKOBYR NaTPOH ИЗьршete симочисва. ·Ппсьтпетe КБМ симочисва. |
| ·Пioоча e Надpackа на Или наразенha. | · ПocstавлSt STe IOTЯВ в Хориэонтailingпосожения. ПОLOжEither BByPbMeTALHaTaNOCSTABKЗaIOTY. · АкSt noOpCtualn ГадшаТа NOBbpxHCTc abpazinbHa Ilin Metalna Tьб. | · Виharн поставлte IOTЯТВ bBВervTKaIIHO ПОLOжEither. ·ОТhecete ce КБМ Гада „Почиствае на Гадша. ТгадшаТа NOBbpxHCT". |
| ·Акразе вратчкATERа на pezeрвога ИЗТчa вoda. | · Затворпil STe loшо ВратчкATERa на pezeрвога. PESEPBOAra. | · Пюberpeite дalm BrpatчкATERa на pezeрвога epdo surprise ЗатворпeHa. Добerte ЗатворпeHa (dkaToчуЕ тцрахва). · Пюberpeite дalm pergulatobT ha napata eпоставенВ пОLOжEither. (fig. 1.1) |
| ·ЮтЯтабобразува пара в пioоча на пьленье на pezeрвога. | · PeryalatorbT ha napata He e noctabenВ пОLOжEither SEC. (fig. 1.1) | · Пюberpeite дalm pergulatobT ha napata eпоставenВ пОLOжEither SEC. (fig. 1.1) |
| ·АкФункциитe „Спө" и „Сурр Naproн Гадende" He Функционрat. | · Persepoarlt e npazeh. · Habлнete рseрвога. | |
| ·Акразе вoda в п direната чast на пOTЯТa. | ·ПревшилStte НИВTo MAX рпппьлВанeto Ha pezeрвога. | · Изразнete ИЗПИБКа пres pezeрвога. |
3a BCnKn Dpyr Bb3HKnHaJI np6JIeMn Ce o6pbuaIte KbM OTOpu3npaH cepBn3, KOTo Da npOBepn CbCToHHeTo Ha IOTnTa.
Ogólny opis
Kakyu BODy NcnoJb30BaTb?
BaH np6bOp n3rOToBnE hI pyabOc BODOnpOBoHO BDOJ. TeM He MeHee, Iy anaHeHn HAcNn HeoXoDmO peYJApHO npOBDoTb cAmOoHNCKy KamepbI napoo6pa3OBAHN. B Cnyae ouhe JxecTKo BObl (CBeJeHn MOxHO NOnyHTB MyHnUaJIbHom ynpabLeHn INB YnpabLeHn BOIOChA6KeHn) MoKHO CMeUNBaT BODOnpOBoHOHyIO NOKyHIO demnepaIN3OBaHNyO BDOBy CneDuOuixn PONOpunx: - 50% BOOnpOBoHOBObl, - 50% demnepaIN3OBaHNo BDObl.
Kakyu Bovy HeIb3a IcNoIb30BaTb?
BoBpMaHcnapenHnTeNlO CnOco6CTByET KOHcEHTpaunu COepeKxuXxC B BoDe BeueCTB.
HekOTOpbIE BnDbI BOdbI COePkAT OprAhnueckne OTXoDbI MmHepaJIbHbIe CoIN, KOTOpbIE MOrY BbIBaTb NOBJIeHne 6pb3r, KopuHReBbIO TOTEKOB NII INPExJDeBpeMeHHbI IN3HOC INp6Opa. K TaKIM BnDAM BOdbI OTHCNTcR DeMnHepaJIIN3OBAHHa BOda, BOda IN3 CyUInIKN DlNEBIA apOMaTI3nPOBaHHa INI CMgHeHHa BOda, BOda IN3 paJaNaTOPOB ININ KOHdINIOHEPOB, INCTININIPOBaHHa IN DOXKeBAA BOda. OGTOMy He peKOMeHNyETcNcNOJIb3OBAbT BoY CJeDyIOUX BnIDOB.
Исpenь3OBaHne
Глaxesнец napom
1. 3anolnntpepeepbyap
-Передзалоннемpe3epByapaOTKJIIOHTeYTOI.
- YCTaHOBInTe KHOInKy noJaun npa B noJIoXeHne BE3 nA - fig. 1.1.
-Bo3bMTe yTIOI OHON pyKoN i CJIerKa HAcIHOHnTe erO, depXa IIOIoWBOB BHNafig. 3.
-ДяTOROчTOбblOTKpbblCTBOpkype3epByapa,HaxMnteHaKHONky -fig.2.
- 3aNoHInTe pe3epByap BOdoi - fig. 3doOTMeTKN «MAX». OTMeTKa MAX COOTBeTCTByET Obemy, paBHOMy 350 Ml.
- 3akpoTe CTBOpky pe3epByapa do ueJyka - fig.4.
- BbIMoKTe NOdKJIIOuHTb yTIOK CcTeN.
2. BbI6epnte huxhbl pexnM
-BaW yTIOg o6OpyOboH fynKcIeN Autosteam Control, KOTopRa Bb6npaet 8 npOrpamM rJaKeHHa
B 3aBnCmOCTn OT Tnna BbIpaHHo TKaHn, BaW yTIOr TOUHO ONpeJeINr HEoXoIMMbIe ypoB TEMnpaTpybl NMOHOCt b NOaH napa, rapaHTnpyUOuNe HauNyUn pe3yNbTaT rJaKeHn.
-Дя Вьбopa COOTBECTBByOUsE Прогмblглжehня NOBepHnTe TepMOcTaT,pacnoJoxeHHbI NOppykoj - fig.5.
- BpaueHne npOTnB YacOBON CTpeJIb : Bbl MOxTe yCTaHOBNTb pexIM C 60Jee Hn3KoTemnpaTyPON IN MehBuIM paCXODOM napa.
-BpaueHne no yacobO Bbl MOKeTe yCTaHOBnTb pexm C 60Jee BBICOKo TempeatypoN 60JIbShIM pacxOdom npa.
- Lüφpa BbIbpaHOro pexIma aBtOMaTnueCKn IOnBJIaTeCra Ha NaHeJN yIpaBJIeHnra, paCnoJIOXeHHoB npeJeHne Yactn yTjORA - fig. 6.
-CIOMOJIbIO COOTBeTCTBHyUeI KHOJIKYCTaHOBITepeXIM"Tap"-fig.1.2.
- KaT ToIbKO yIyIHor HArpeTeCra IIO HyXHOH TeMnepaTypbI, CBeTOBOH INDnKATOp - fig.7.noracHT. Bbl MOxETe HaHHaTb FJIaINTb.
3. YbnaXHeHne 6eIb8 (nyIbBepn3aTOp)
-Bnpouece rnaeHnBbMOKeTe c6pb3HyTb 6eJIbe BOOn, HeCKOJIbKO pa3 HaXaB HA KHOKnY npIbBepn3aTopa - fig.83TO NOMOKeT Bam n36abNTbCRAOT HeHyKbIX CKlaIOK.
4.ПolyчENEсиьногорapa(superpressing)
-BpemrO T BpeMeHn HaxkMaIte Ha KhoNky Npaun npoBoro yDapa - fig. 9.
- INHTepBaJI MEXJy DByM RAHaxTnA MIOJKeH 6bITb He MeHbWe HECKOJIbKINx CEkyH.
PpakTuueckn COBET:
Pa3JIuHbIe TkaHn I
TemnepatypraIaxKeHn:
- YIor HarpeBaetc6bIcTpo: NaHnHaTe rnaKeHne c TkaHei, KOToPbIe Tpe6yIOT 6oJee Hn3KoI TempeaTypbl, a 3aTem nepeiDte K 6eJIbIO, KOToPoE CneJyET rJaIHTb npN 6oJee BbcOKoI Tempeatype;
- EcIn Bbl yctaHOBNI IN pEXNM, Tpe6yUoun 60Jee Hn3KoI TemnepaTypbI, He rJaDbTe cpa3Y: NdoXdnte, noka CBETOBOINHdkaTOp 3aRopNTcBHOBb.
- Pn rnae Hn 6b, CNTORO n3 pa3nHbIX TkaHei, yCTaHaBnBaIte TEMepaTy B paCte Ha camyIO HexHyIO TkaHb.
5. BepTKkaJIbHoe OTnapBaHne
- INeaJIbHbI MeToD, P03BOLJIoUm N36ExKaTb 3aflaXnBaHnHa HeHyXhBix CKJaIOK Ha KOCIOMax, PnIDkaKax, IO6KaX, 3aHaBeCKaX n T.I.
IIOBecbTe OeJky HBeWanKy IeepKInTe ee OOnHou pyKo. Tempepatypa npa OueHb BbICOKa, NOOTOMy OeJky HEnb3r OTnpnBaTb Ha Ce6e.
-
YCTAHOBITE TepMOCTaT Ha OTMeTKy MAX - fig. 10.
-
BbINOJIHnTE NocJeIOBaTeIbHO HecCKoJIbKO NocJeIOBaTeIbHbIX KOpOTKHX HaKaTm Ha KHONKy NODaYn NapOBOrO yIapa ( ) - fig. 9 IN BeINTE yTIOrOM CBepxu BHN3. - fig. 11.
-Дерхinte yIor Ha paCCTOHN HeCKoJIbKIN CaHTIMetpoB OTeBJa, YTObI He CxYe HxHbIe TkaHN.
6. Cnctema Anti-Calc Plus
-BaW yTIO OcHaUeH BCTPOeHHoC NCTeMoI nPoTIN HAKIN - fig. 12.
-3TaCNCTEMAOBCNEHNAeT:
- 60lee KaueCTBeHHoe rJaxKeHne c NocToaHHo nOdae npa,
- 6oJee doJrnn cpoK cnJyKbI yTIOra.
Be3 npOTnBOU3BecTKOBORO CtepxHryTIOr He pa6oTae
1. BbInOJIHHTe cAmOoUncTy
IpaKTHueckn COBET: CamooHCTKa npenrTCTByET
YcTaHOBnTe KhoNky noDaun npa B noLoXeHne B63 PPA fig. 1.1.
- NocTaBbTeYyIor Ha oChOBaHHe, 3aOJIHInTe pe3eepByap BDOJn UcTaHOBInTe TepMOCTat B pIoJOKeHne MAX - fig. 10.
Korda cunha JAMnocha Norachet, BbIKIOUHTe TIOI IN DEpXHTe eHOpaOBHoi.
-CHIMMTEIPTOBON3BecTkoBbI CTePKeHb. - YcTaHOBnTe nepeKIOuHaTeIb Steam Control B noLoXeHne IAP (pnc. 1.2)
- CnIeRka BCTPAXINBAIte YIIOr Hau paKOBHOB B TROP3OHTaJIbHOM NIOLOXEHNI, NOKA BOJa (C 3a He BbITEeT Yepe3 IIOIOWBY.
- Tocne 3Toro yCTaHOBnTe npOTUBON3BcEeKOBbI CTepKeHb Ma MeTO.
-Notabte yTIOH naIpy-ONOpy IN BKLIOUHTe eOHa IBeMHNytb, YTO6bI BBICyWHTb NOIOOWBy. - BbikJIOUHTe yTIOI n pOToTne eIe TENnyo NOdoBBy MrgKoT prnko.
2. OuNTka nooWbbl
Baw yTIO rOchauen cAmoouHuaUoueiCn noDooBoB (B 3aBncmocTo n OT moJeJI):
BHHMaHHe!IcnoIb3OBAHHe a6pa3aIBHO r6Kn pnpBODIT K noBpeKdEHNIO camooUaIoUeOra NOKpbTnnaNooWBbl.
- YHnKaJIbHOe NOKpbITne, OCHOBaHHoe Ha npHcUne KaTaN3aTopa, No3BOLrE HEnpepbIBHO ydaJIrTb 3aIpy3HeHn, KOtOpbl NOBJIOTcR npHOPMaJIbHOM NCNOLb3OBaHHyTJOrA
OHaKo,ecnIgIraJrAaKn HcNIOb3yETcHecooTBeCTByIOuaI nporpaMa,HaNoIOUBE MOrYt OCTaBaTcBc CneDbI,KOTOpBIE NOTpe6yIOT HcNTKn BpyHyu. B Taknx clyuax peKomeHDoBaHO IpotnpaB eue TENyIO NOOuBY MAnKO IN BnaXHO TpRikO, KOTopA
BHHMaHHe!IJI TORO yTO6bI Bbl MORIN BbIHTb HIN NOCTaBnTb Ha MecTo cTePKeHb DnI c6Opa HaKUnn, peryIaTOp npa DoJXeH 6bITb O6raTeNbHOM NoPAKe YcTAHOBJe BNoIOXeHne PA (pnc.1.2)
BHMHnE!NcnoIb3OaHne R a6pa3nBHOI r6Kn MoKET NOpeDITb camoouHaIOUeecr NOKpbTHe nOdoBbl yTOrA(pnc.17)
- BbIKHIOHTe YIOT N DaITe NOOWBc OCTbITb.
- Onopoxhnte pe3epByap n yctahOBnTe pepyIaTOp B noJIOxHne BE3 IAPA - fig. 1.1. He cTpaUHO, ecn HEMHO BObO octaHeTcB pe3epByape.
- Hamotaite shyp nitaHnHa dpy, pacnoIoxeHHyO c3aDn yTiora.
- NocTabbTe yTOr Ha nTyr-onopy.

He 3aqrpa3nraTe OkpykaioyU opey!
① Baùnpnbop copeknt MaTepeNaIbI, KOToPbIE MOXHO nepepa60TaT b NcNoJb3ObaT b BTOpNHO.
OTdaiTe ero BVnykT c6opa BTOPCbIPbJ.
Oxpana okpykaioe cyedbl
Ry Body He MoxHa BnKOpncTOByBaTn?
IiD yac BnnapoBvBaHH TENIO CnpRAe KOHcHTpaui peOBN, 0o MICTbCBy BOi. DeaKi BNIN BOuN MiCTTb OpranHi BiXoOn Ta MiHepaBHi CoJI, kI MOxTy BnKInKaTu NOBy 6pN3OK, KOpUHeBnx NaTbOKIB aBO nepeAnachoro 3HOswBaHH npnAyn. Do TaNX BuDIB BOu BIDHOcRc JemHepaIIOBaHa BOa, BOa i3 cyuapKn dIy bIIIN3HN apOMATNoBAHa a6o NOM'KWeHa BOa, BOa i3 paiaTopiB a6o KOHduiohepiB, nCTnIbObaHa Ta DOouBa BOa.
BnKOpncTaHn
Пасуваня 3 napою
1. 3anOBHITb pe3epByap
-ПередзановнемpeзеруарВIMКИтbpackу.
- YctahOBiTb KhONky noJaY napu y noLoXeHHB E3 IAPN - fig. 1.1.
-Bi3bmiTb npacky B pyky i haxniliT ii roctpim KIncem niIOoBn BVn3 - fig. 3.
- Liob BiikpnTu KpnuKy pe3epByapa, HATnCHiTb KhoNky - fig. 2.
-HanobhitepeepByap-fig.3do no3ha kn «MAX».No3ha kna MAX Biinnoi da emnoctiy 350 mN
- 3akpiTe KpIshky pe3epByapa taK, IIO6 noOyTu KlaaHaHHaFig.4.
-Bn moKeTe niknOHTn npacky Do mepexi.
2. Bn6epitb Heo6xidHn peXHM
- Bawy npacky ochaeneo fynkciio Autosteam Control, kna nepedbaae 8 nporpam npacyBa
3aIexKHO BID Bn6paHOrO Tnny TkaHHn npacka TOUHO Bn3Haue BiNIOBidiPiBHi TEMpePaTy IHTeHCNBHOCTI napi dla 3a6e3neuHHe HaIKpauoro pe3yNbTaTy.
-Дя Вибору BiДиовийnporpaMu npacyBaHHЯ ckopnCTaITeCB TePMOCTaOM, po3MiueHIM nID pyuKoIO. - fig. 5.
-06eTpAHnI npabopy: Bn 3MOXeTe BCTaHOBtN pexm 3 6iNbHn3bKOIO TempePaTPOIO IMeHsIM BnKOpNCtaHHm nap. - 06eTpahnI libopy: Bn 3MOxTe BCTaHOBtN pexm 3 6iNbBnBCOKOIO TempepaTpoio i 6iNbWMnBnKOpNCtaHHm nap.
- Lünφpa pexmy, jkni Bn o6pajn, ABTomatuH0 3'ABNTbcra Ha naheJI KepybaHH, 3o 3NaXoDntbcR B npeDiHi YactNI Hi npack - fig. 6.
- 3aДОПOMOROIO BiIDNOBIDHOI KHONKIN BCTAHOBiTb pexim«「Fap» - fig.1.2.
-Як тлбниgarpiebсяdo Heo6xidHoi TeMnepaTyPi, CBITIOBni iHnKaTOp - fig.7 norache.Bm moKeTe noUnHaTu npacyBaTu.
3. 3B0JoxeHHa 6iIN3Hn (nyIbBepn3aTOp)
-Пи npacyванн (3napo10 a60 6e3 napu) DekiIbka pa3iB nocIIOBHO haTnCHITb Ha KhoIky npJIbIeRn3aTopa, uio6 3BOJoxNt6IIM3Hy-fig.8ipO3npacynte NaJxOpCTKIi CIKlaIckn.
PpaktnuHn npa:TKaHHN i TemnepaTyp npacyBaHH:
Bawa npacka harpibaecbca Wbndko. Pounhaite npacybatn TkaHHN, 0o notpe6yIOTb npacyBaHH npn Hn3bkn Temnepaotypi, a notim nepexoDbTe do 6iIN3Hn, kky Heo6xidHO npacybatn npn 6ilbW BUCOKI Temnepaotypi
KIO BV BCTaHOBN pEXHM, IO NOTpe6y 6INbH H3bky TEMnepaTyP, He npacyTe Oppa3y, 3aYeKaIte DOKc CBITNoBn iHNkATOp 3acBITNTbcra 3HOBy.
-Пи npacybaHhi 6iIN3HH,яka 3wnta 3 DeikbKox BnDIB TKAHH,BCTaHOBITb TemnepaTpy ДЯ HIXHOI TKAHHN.
4. OndepxaHnCnJIbHOI nap
-
Yac BiD yacy HATnCKaTe Ha KhoNkY nOaHi npoBOrO yIapy - fig. 9.
-
IHTepBaJ MIX DbOMa HaTnCKyBaHHrMa NOBuHEn 6yTu He MeHWe KjIbKoX CekyHd.
5. BepTKaJIbHe BiDnapIOBaHHa
-
NobicbTe OJg Ra Hb BiwAky I TpMaIte NOro OndHieO pyKOIO.
-
Tempepatya napu duyke Bucoka, TOMO Ondr He MoxHa BiDnapoBAtn Ha co6i.
Hikoli He doTopkaTecrdo KInuKa CTpnXn
-ПомICTITи npOTnBaHnHn CTpHXeHb Ha 4 FOiHn y CkIaHky i3 6IIM CnIPTOBm OcTOM a6O HATypaJIbHm JINMOHHM COKOM- fig.16.
-Помпт ectpижьпд КраHOM.
BctaHObiTb NOro Ha Micue.
Бe3 npOTnBaHЯHOrO cTpNXHЯ npacka He npaçоe
1.BnkoHaTe cAmOoUHHeHH
IIOOBXeHH TepMIny Cnyk6n npackn BIKOHyTe cAmOChuENHa Ha Micra.
- BctaHOBIb KhoNkY noaui napB noJoxeHHB E3 nAPn fig. 1.1.
-ПocTaBTe npackу 3 NOBHM pe3epByapOM Ha NiIcTaBky, NOBepHiTb TepMOCTaY NOJIOXeHHr MAX. fig.10.
- Koln Cngna hna na mnocha norache, BmKHiB npacky i Tpmae II ha paKOBHIO.
-BMIMtB npOTnBaHnHn CTpnKeHb.
- YctahOBiBt bnepeMnKa npu y noLoXeHHa STEAM (MaI.1.2)
- 3Ierka cTpyuynTe npacky Hnd paKOBHIOU y rOpN3OHTaIbHOMy nIoXeHHi, NOKI BOJa (i3 3a6pydHeHnMn) He BNTeue YpeE3 NiDoWBy.
-Псяцьо ВСТАНовп ПOTИВANHЯн CTрnxKeH NaMiCue.
- IocTaBte npacky Ha n'aty-onopy i BBIMKHiTb ii Ha dBi XBnIiHn, 0o6 BucuWHTn NiDooBy.
-BmKHiB npacky i npoTpiB ii Te nnIy nIOu By M'koH raHicpKOIO.
2.OuHnHnPiDOWBN
LapopBa npacka 6nlaHaHa aBTOOuHcHIO nIOoWBOIO (3aJeKHO BID MoDJI):
- Ybara! BnKOpncTaHnA abpa3nBHOiIg6Kn npu3BODInb do noNkoJKeHHra camooHCHOro nokpTTT niOoBn.
PpakTuHa nopada: CamoouHennn nonepdxkae yTbopeHHn HAKnny.
Ybara! 063nTn a6o NOCTABNTn Ha Micce CTPNXeHb nPTu HAKnIy, peryJrTOP napu NOBHeH 6TuO6OB'3KOBO V noLoXeHHI VAPEUR (MaI.1.2)
Ybara! BnKOpncTaanr r6kn 3abpa3NBHOro MaTepiany N0wKOJxye NOKpTTI niOswBn, kce camoochnyetybcma.17)
- YHikaihne noKpTTaT apom katani3atopa 03BONe 6e3nepepbHO BuaJIaTI a6pydHeHH, kI BnHkaIOb npHOPMaIbHOMy BnKOpNCaHHI npackn.
OHaK, kIIO npI npacyBaHn BkOpncToBc HBeiNobiHa nporpaMa, Ha NiIOoWi MoKyb 3aIIuWATCA CNI, Aki NOTpe6yHTb YIeHHBpyHy. B Taknx BnIaNkax peKOMeHDoBaHO npotnpaTn ige TENny nIOoBy M'koTO Ta BOIoro TO RaHcIPKOIO, IO Do3BOJIe yHInKHyTN NOIKoJKeHH NOKpTTT.
LnapoBnnpacko6laHaHa niouOuUltragliss (B3aIeXHocTi BId moJei):
- 3a6opohreBcBnKOpuctOByBatn arpecbNbi a6o a6pa3NBH 3ac06n.
3ДиСИОТe YIUSHЯ SE TeNIOI niOswBn 3a DonOMOrO BONORoi RaHupKn.
36epirahnny npackn
-BmKHTb npacky i daTne niOswBi oxoJohTyN.
- CnpoxhiB pe3epByap i BCTaHObitpepyIaTOp y noJIOKeHnBE3 IAM-fig. 1.1. HiYoro cTpaunHoro, kUso He3HaHa KJIbKicTb BOi 3aJIuWHTbcra y pe3epByapi.
- HamotaTe shyp xnblenna Ha duIy, po3TaOboaHy no3aI npackn
- Nocstabe npacky ha n'aty-onopy.
HabkoJnshc cepeobnse

He 3a6pydHIOIe OTOuyIOue cepeDobuIeI
①Baùnpiūnād mičtnb Maṭepiaɪn, yaki moxha nepepobu n i B冈kopncTaTn ige pa3.
BiDaaTe Ioro B nyKt 360py BTOpcuOBnH.
Autoclean Catalys tald (olenevalt mudelist)
16 Paagi taiteava.