
Express Steam FV2886 - Iron TEFAL - Free user manual and instructions
Find the device manual for free Express Steam FV2886 TEFAL in PDF.

| Product type | Steam iron |
| Brand | Tefal |
| Model | Express Steam FV2886 |
| Power | 1500 W (estimated) |
| Supply voltage | 120-127 V |
| Water tank capacity | 300 ml (estimated) |
| Weight | 1.5 kg (estimated) |
| Dimensions (L x W x H) | 30 x 15 x 15 cm (estimated) |
| Soleplate material | Stainless steel (estimated) |
| Main functions | Dry ironing, variable steam, spray, turbo steam, vertical steaming, auto-off |
| Auto-off | 8 min on the rest, 30 sec flat or on its side |
| Anti-calc cleaning | Removable anti-calc rod (monthly cleaning in lemon water) |
| Recommended water type | Untreated tap water; if very hard (>30°f), mix 50% with demineralized water |
| Maintenance | Monthly cleaning with full tank, soleplate with damp sponge |
| Safety | Do not immerse, do not direct steam at people, supervise children, damaged cord to be replaced by after-sales service |
Frequently Asked Questions - Express Steam FV2886 TEFAL
User questions about Express Steam FV2886 TEFAL
0 question about this device. Answer the ones you know or ask your own.
Ask a new question about this device
Download the instructions for your Iron in PDF format for free! Find your manual Express Steam FV2886 - TEFAL and take your electronic device back in hand. On this page are published all the documents necessary for the use of your device. Express Steam FV2886 by TEFAL.
USER MANUAL Express Steam FV2886 TEFAL
natural_image
Illustration of a steam iron with handle and spout (no text or symbols)IMPORTANT SAFETY INSTRUCTIONS
Important safety instructions.... p. 5
Before first use....p. 7
PREPARATION
Which water should I use? p. 8
Filling the water tank....p. 8
USE
Adjusting the temperature and steam....p. 9
Dry ironing....p. 10
Obtaining more steam....p. 10
Vertical steam ironing.... p. 11
Dampening clothing (Spray) p. 12
While ironing p. 12
Auto-Off Function (depending on model) p. 12
STORING AND MAINTAINING THE IRON
Storing your iron.... p. 13
Cleaning the anti-scale rod (once per month).... p. 14
Cleaning the iron (once a month) p. 15
Cleaning the soleplate p. 16
IS THERE A PROBLEM WITH YOUR IRON?
Problems, possible causes, solutions p. 17-18
IMPORTANT SAFETY INSTRUCTIONS
Read all instructions before using the iron.
When using your iron, basic safety precautions should always be followed, including the following:
- Use iron only for its intended use.
- To protect against a risk of electric shock, do not immerse the iron in water or other liquids.
- Always turn the iron OFF before plugging or unplugging the iron from the electrical outlet. Never pull on the cord to disconnect the iron from the electrical outlet; instead, grasp the plug and pull on the plug to disconnect the iron.
- Do not allow cord to touch hot surfaces. Let iron cool completely before putting away. Loop cord loosely around iron when storing.
- Always disconnect iron from electrical outlet when filling with water or emptying and when not in use.
- Do not operate iron with a damaged cord or if the iron has been dropped or damaged. To avoid the risk of electric shock, do not disassemble the iron. Contact our Consumer Service Department for examination, repair or adjustment. Incorrect reassembly can cause a risk of electric shock when the iron is used.
- Close supervision is necessary for any appliance being used by or near children. Do not leave iron unattended while connected or on an ironing board.
- Burns can occur from touching hot metal parts, hot water or steam. Use caution when you turn a steam iron upside down - there may be hot water in the reservoir.
- This appliance is only for domestic and personal use.
SPECIAL INSTRUCTIONS
- To avoid a circuit overload, do not operate another high-wattage appliance on the same circuit.
- If an extension cord is absolutely necessary, a 15 amp. cord should be used. Cords rated for less amper may overheat. Care should be taken to arrange the cord so that it cannot be pulled or tripped over.
SAVE THESE INSTRUCTIONS
For your safety
PLEASE READ THESE INSTRUCTIONS CAREFULLY AND KEEP THEM FOR FUTURE REFERENCE.
This appliance complies with the technical rules and standards for safety currently in force (Electromagnetic Compatibility, Low Voltage, Environnement).
- This appliance is not intended for use by persons (including children) with reduced physical, sensory or mental capa-bilities, or lack of experience and knowledge, unless they have been given supervision or instruction concerning use of the appliance by a person responsible for their safety. Children must be supervised to ensure that they do not play with the appliance.
- During the first few uses, a harmless odour and a small amount of smoke may be given off. This has no effect on the use of the iron and will disappear quickly.
- Warning! The voltage of your electrical installation must correspond to that of the iron (120V or 127 V). Connecting to the wrong voltage may cause irreversible damage to the iron and will terminate the guarantee.
- If it is absolutely essential to use an extension cable, choose a 15 amp cord.
- If the electrical cord becomes damaged, it must be immediately replaced by an Approved Service Centre to avoid any danger.
- The appliance should not be used if it has fallen, if it has obvious damage, if it leaks or functions incorrectly. Never dismantle your appliance: have it inspected by an Approved Service Centre, to avoid any danger.
- Never immerse your iron in water!
- Do not unplug your appliance by pulling on the cord. Always unplug your appliance: before filling or rinsing the water tank, before cleaning it, after each use.
- Never leave the appliance unattended when it is connected to a power source or if it has not cooled down for approximately 1 hour.
- Your appliance gives off steam, which may cause burns. Take extra care especially when you are ironing close to the edge or on a corner of your ironing board. Never direct the steam towards people or animals.
- Your iron should be used and placed on a flat, stable, heat-resistant surface. When you put your iron onto its iron rest, make sure that the surface on which you put it is stable.
- This product has been designed for domestic and indoor use only. The manufacturer will accept no responsibility and the guarantee will be terminated, if this product is used for commercial purposes, inappropriate use or failure to comply with the instructions.
What water to use?
Your appliance was designed to operate using untreated tap water. However, it is necessary to periodically clean the steam chamber to remove any mineral deposits.
If your water is very hard (above 30°f or 17°dH or 21°e)mix 50% untreated tap water with 50% distilled water(available in hardware stores).
Types of water not to use?
Do not use water with additive, pure demineralised or pure distilled water, water from clothes dryers, scented or softened water, rain water, filtered, bottled or boiled water, water from refrigerators, batteries, air conditioners or rain water as these may damage the iron. These types of water contain organic waste, mineral elements that become concentrated when heated and cause spitting, brown staining, leaking or premature wear on your iron
Environment

Environment protection first !
Leave it at a local civic waste collection point.
i Your appliance contains valuable materials which can be recovered or recycled.
BEFORE FIRST USE

Remove any possible labels from the sole-plate before heating the iron.
Before using the steam function in your iron for the first time, we recommend that you allow the iron to operate a few moments in a horizontal position without coming into contact with your laundry. Keeping the iron in this position, push the turbo steam button several times.
During the first few uses, the appliance may produce smoke, a harmless odour and a light emission of particles. These are simply the engineering residues from the manufacturing process burning off. These are harmless and will quickly disappear.

PREPARATION
Which water should I use?
- Your appliance was designed to operate using untreated tap water. However, it is necessary to periodically clean the steam chamber to remove any mineral deposits.
- Do not use water with additive, pure demineralised or pure distilled water, water from clothes dryers, scented or softened water, rain water, filtered, bottled or boiled water, water from refrigerators, batteries, air conditioners or rain water as these may damage the iron. These types of water contain organic waste, mineral elements that become concentrated when heated and cause spitting, brown staining, leaking or premature wear on your iron
If your water is very hard (above 30^ f or 17^ dH or 21^ e) mix 50% untreated tap water with 50% distilled water (available in hardware stores).
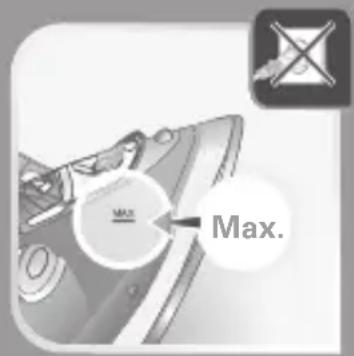
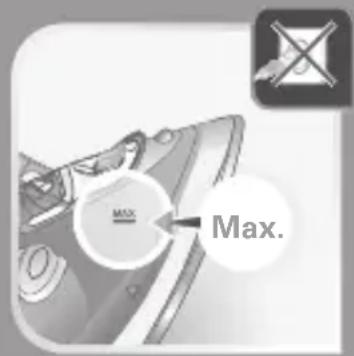
Filling the water tank
- Unplug the iron before filling it.
- Set the steam control to ✉.
- Lift the iron and, holding it at a slight incline, point the soleplate up.
- Open the water tank cover.
- Fill the water tank to the mark "Max".
- Close the water tank cover.
natural_image
Illustration of a hand inserting a plug into an electrical outlet (no text or symbols)
natural_image
Illustration of a car dashboard with directional arrows and icons (no text or symbols)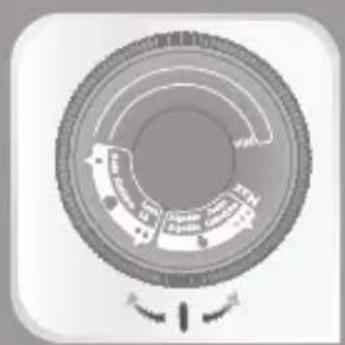
natural_image
Circular mechanical component diagram with concentric rings and directional arrows (no text or symbols)
natural_image
Abstract grayscale illustration of a curved surface with a central dark spot and an hourglass icon (no text or symbols)
natural_image
Close-up of a curved mechanical component with a small circular feature, labeled 'OK' in the corner (no other text or symbols)USE
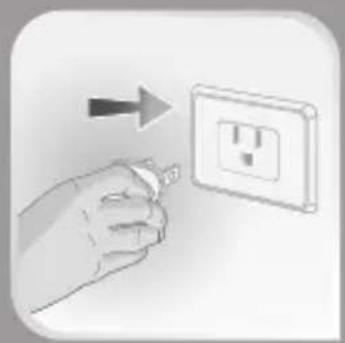
- Plug in the appliance.
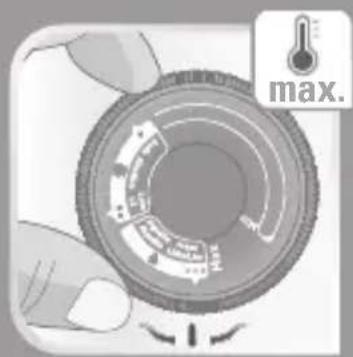
Adjusting the temperature and steam
- Set the steam control to

- Adjust the temperature control, referring to the table below.
| FABRIC | TEMPERATURECONTROL POSITION | STEAM |
| LINEN Max | ||
| COTTON ••• | ||
| WOOL •• | ||
| SILK/SYNTHETIC(Polyester,Acetate, Acrylic,Polyamide) | • |
• The temperature indicator light turns on.
- It will turn off automatically once the soleplate achieves the desired temperature.
Adjust the temperature to match the type of fabric that you wish to iron. Your iron automatically sets the steam flow rate based on the temperature.

natural_image
Diagram of a trash bin with waste sorting icons (no text or labels)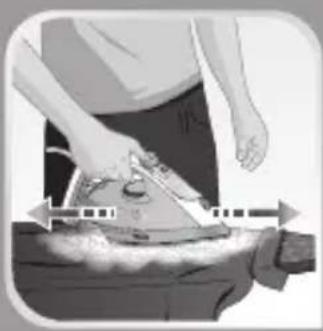
natural_image
Person using a power iron on a surface, no visible text or symbols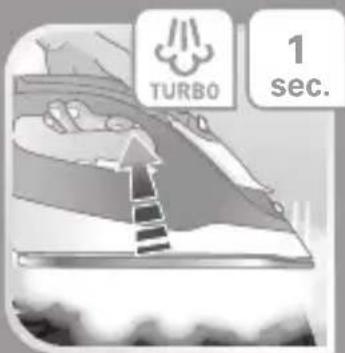
Dry ironing
- Set the temperature according to the fabric to be ironed
- Set the steam control to
- You may continue to iron when the indicator light turns off.
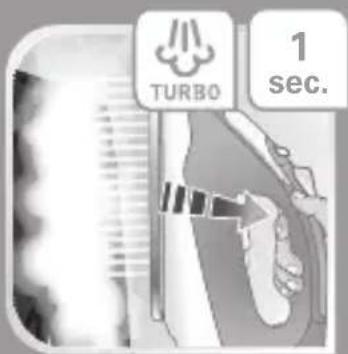
Obtaining more steam
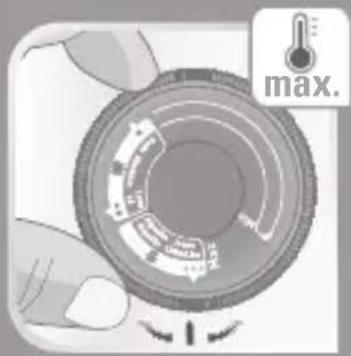
- Set the thermostat control to "Max" or "●●●".
- Set the steam control on
- Press and hold the steam control on while ironing to get an extra amount of steam
- For difficult tasks and thick fabrics, press the turbo steam button periodically (turbo steam).
- To avoid water dripping on the laundry, maintain an interval of a few seconds in between each press.
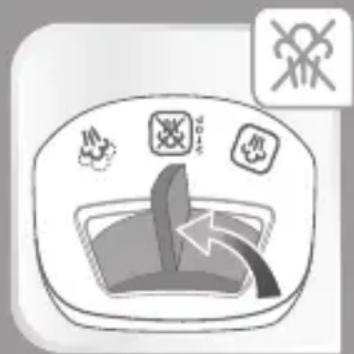
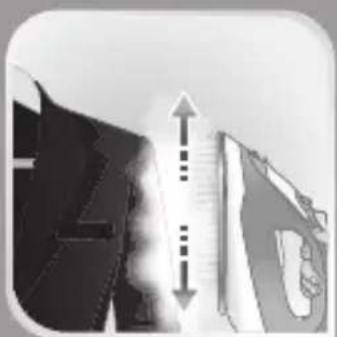
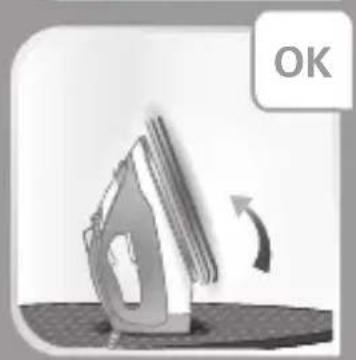
Vertical steam ironing

- Hang the item on a hanger and keep the fabric taut with one hand. The steam is very hot; never steam iron clothing while it is being worn—always use a hanger.
natural_image
Close-up of a hand holding a circular mechanical component with internal components, no visible text or symbols- Set the thermostat control to "Max"
- Press the turbo steam button (turbo steam) in pulses, moving the iron from top to bottom. - To avoid water dripping on the laundry, maintain an interval of a few seconds in between each press.
natural_image
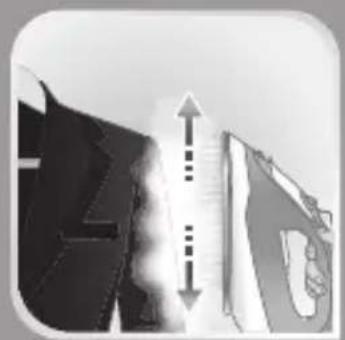
Diagram showing a vertical arrow pointing upward and a horizontal arrow pointing downward, with no visible text or symbols.- Hold the iron at a distance of a few centimetres from the clothing to avoid burning delicate fabrics.
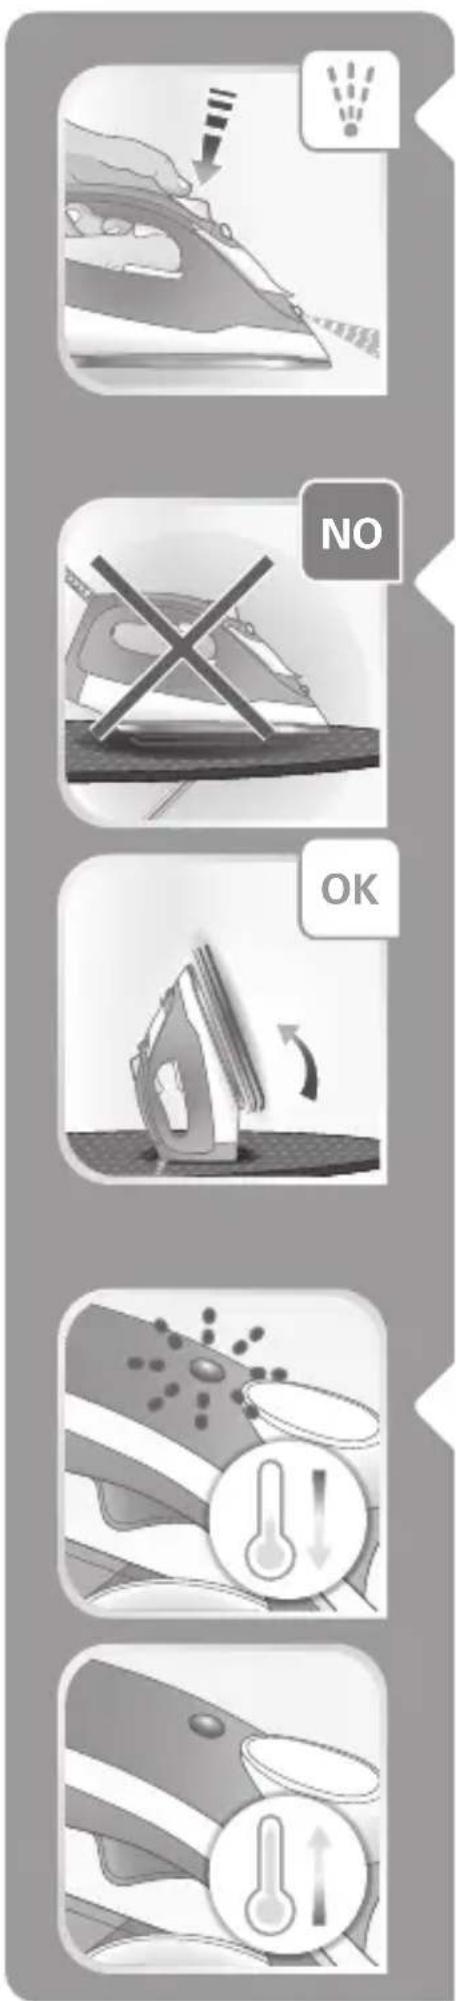
Dampening clothing (Spray)
- When dry or steam ironing, press repeatedly on the spray button to moisten clothing and remove stubborn creases.
- Ensure that there is water in the tank before using the spray button.
While ironing
- Do not lay the iron down on the soleplate; use the heel rest for this purpose.
Auto-Off Function (depending on model)
- If the iron remains unused for more than 8 minutes on the heel rest or more than 30 seconds laid flat or on its side, the electronic system will cut the power, the iron will stop heating and the temperature indicator light will begin to flash.
- The temperature indicator lights up. It automatically shuts off once the soleplate has reached the desired temperature.

STORING AND MAINTAINING THE IRON
Storing your iron
- Unplug the iron and wait for the soleplate to completely cool down (approx. 1 hour).
• Empty the water tank.
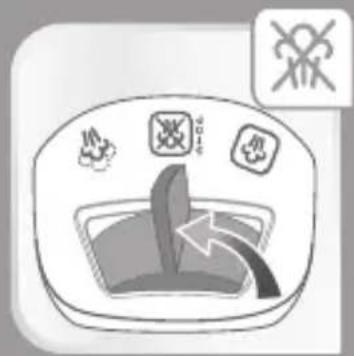
- Set the steam control to

- Store the iron on its heel rest.
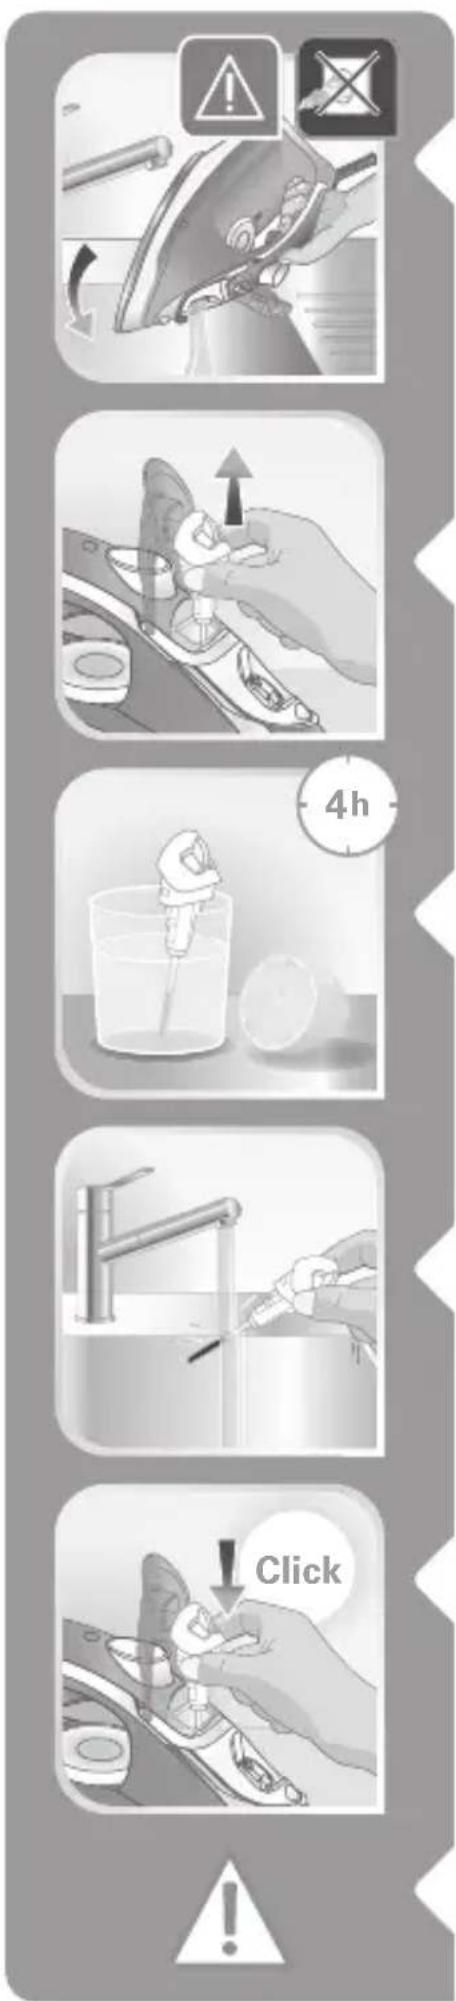
Cleaning the Anti-Scale Rod (once per month)
- Unplug your iron and empty the water tank.
- To remove the anti-scale rod, open the water reservoir cover and pull on the collector near the steam control.
- Soak the rod in a glass of water with some lemon juice for 4 hours.
- Rinse the rod under the tap.
- Re-insert the rod by pushing it in until you hear a click.
Beware!
Never touch the end of the rod.
The iron does not operate without the anti-scale rod.
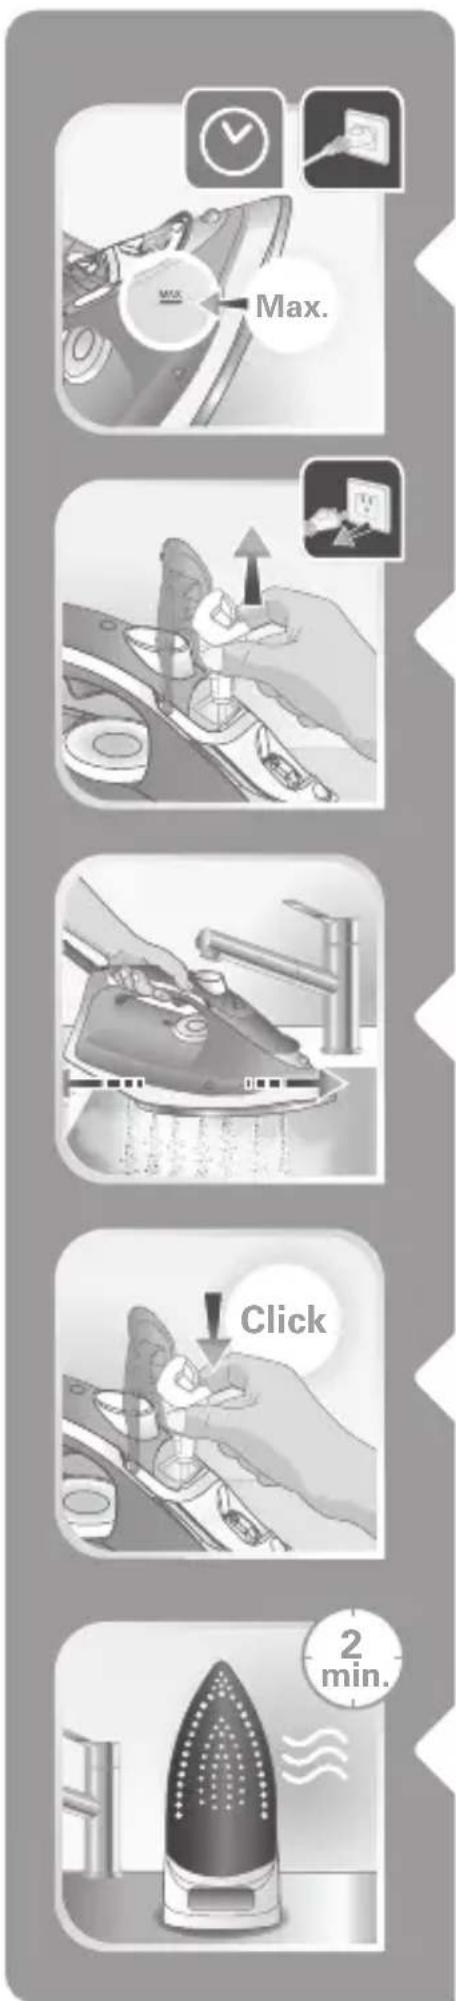
Cleaning the Iron (Once a Month)
- Allow your iron to heat up with a full water tank while on its heel rest and with the thermostat control set to Max.
- Once the indicator light turns off, unplug the iron and place it over a sink.
- After opening the reservoir cover, remove the anti-scale rod.
- Shake the iron gently in a horizontal position over the sink until some of the water (containing the impurities) leaks from the soleplate. You may push the turbo steam button to help flush out the minerals.
- To complete the process, re-insert the anti-scale rod by pushing on it until you hear a click.
- Plug in your iron for 2 minutes on the heel rest to dry the soleplate.
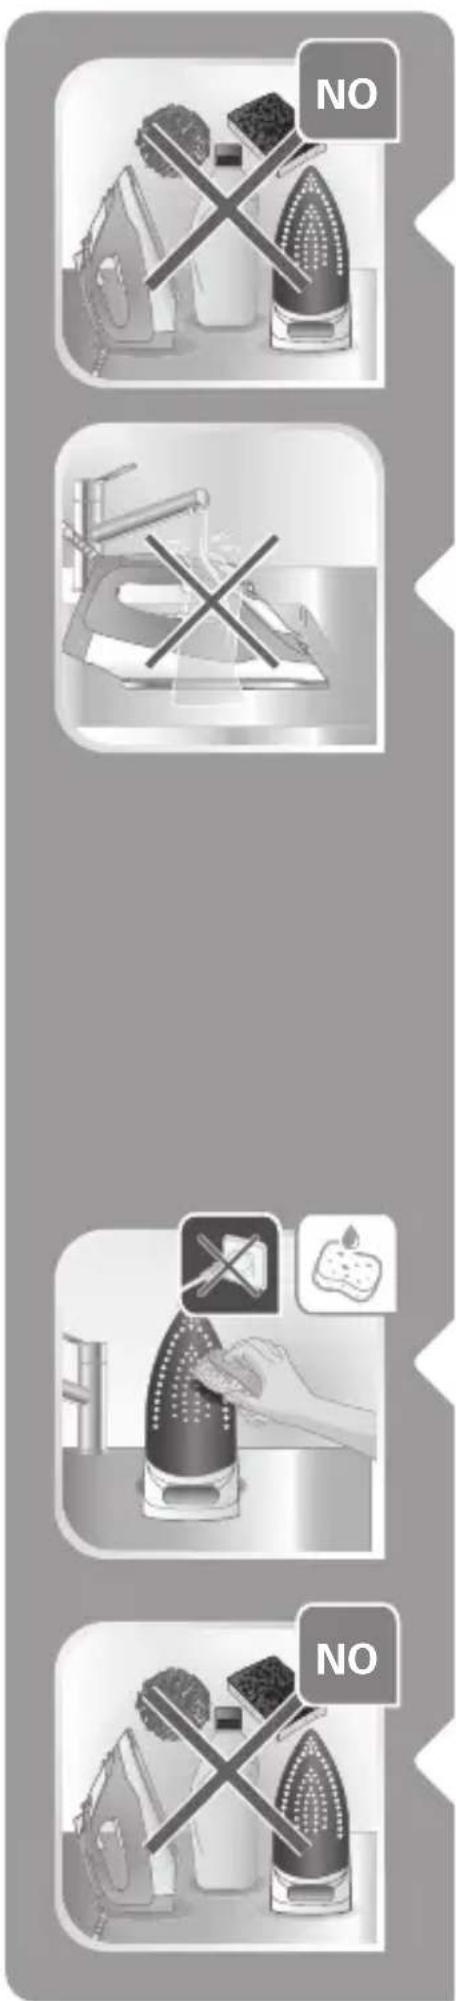
- Unplug your iron and, once cooled, wipe it with a soft sponge.
- Never use chemical or abrasive products.
- Never clean your iron under water tap.
Cleaning the soleplate
- Once the soleplate has cooled down, clean it with a damp non-metallic sponge.
- Never use chemical or abrasive products.
| PROBLEMS POSSIBLE CAUSES SOLUTIONS | ||
| Water is leaking from the holes in the soleplate. | You are using the steam when the iron is not hot enough. | Wait for the indicator light to turn off. |
| You are using the turbo steam button (turbo steam) too often. | Wait a few seconds between each use. | |
| You have stored the iron horizontally without emptying the water tank or setting the steam control to ☒. | See the chapter on “Storing your iron”. | |
| The iron leaks at the start of ironing. | You have removed the anti-scale rod to fill your iron. | Do not remove the anti-scale rod to fill the reservoir. |
| The steam control is not set on ☒when you fill the water reservoir. | Ensure that the steam control is set on ☒when you fill the water reservoir. | |
| Drips from the soleplate are staining clothing | You are using chemical descaling agents. | Do not introduce a descaling agent into the water tank. |
| You are not using the right type of water. | Clean the steam chamber and see the chapter on “Which water should I use?” | |
| Clothing fibres are building up in the holes of the soleplate and burning. | Clean the steam chamber and the soleplate with a damp sponge. Periodically vacuum the holes the holes in the soleplate. Please refer to the “Cleaning the Iron” paragraph. | |
| The soleplate is dirty or brown and may stain clothing. | You are using starch.. Clean the soleplate as indicated above. Spray the starch on the reverse side of the clothing to be ironed. | |
| Your laundry has not been rinsed sufficiently or you are ironing a new item of clothing before washing it. | Ensure that your laundry is sufficiently rinsed to eliminate potential soap deposits or chemical products on new items of clothing. | |
| You are not using the right type of water. | Refer to “Which water should I use?” | |
| Your iron produces little to no steam. | The water tank is empty. Fill | it up. |
| The anti-scale rod is dirty. Clean the anti-scale rod. Please refer to the “Cleaning the Anti-Scale Rod” paragraph. | ||
| Your iron is clogged up with limescale. | Clean the anti-scale rod and the iron. Please refer to the “Cleaning the Anti-Scale Rod” and “Cleaning the Iron” paragraphs. | |
| Your iron has been used for too long in the dry ironing function. | Cleaning the iron. Refer to “Descaling the steam chamber” section. | |
| The soleplate is scratched or damaged. | You have placed your iron on a metallic iron rest or ironed over metal zips or fastners. | Always place your iron on its heel rest when not in use.Do not iron over metal zips or fastners. |
| The iron steams once the water tank has been filled. | The steam control is not set to ☒. | Ensure that the steam control is set to ☒ |
| The water tank is too full. Do not exceed the max level for filling. | ||
| The spray function does not spray any water. | The water tank is not full enough. | Add water to the water tank until max level. |
If you have any problems or queries please call our Customer Relations team first for expert help and advice.
See Helpline number in the separate guarantee and country list leaflet.
SOMMAIRE
PRÉCAUTIONS IMPORTANTES
Précautions importantes ......p. 20
natural_image
Illustration of a hand inserting a plug into an electrical outlet with a power socket (no text or symbols)
natural_image
Illustration of a car interior with directional arrows and icons (no text or symbols)
natural_image
Circular mechanical component with concentric rings and directional arrows, no visible text or symbols
natural_image
Abstract grayscale illustration of a curved surface with a central droplet and an hourglass icon (no text or symbols)
natural_image
Close-up of a curved mechanical component with a small hole, labeled 'OK' in the corner (no other text or symbols)UTILISATION
Repassage à sec
natural_image
Close-up of a hand holding a camera lens with a thermometer icon and 'max.' label (no other text or symbols)natural_image
Diagram showing a vertical arrow with dotted lines pointing upward and downward, next to a stylized building (no text or symbols)natural_image
Illustration of a hand using a power iron to press down a piece of material, with a magnified inset showing the same components (no text or symbols present)
natural_image
Illustration of a stack of papers with an arrow indicating rotation (no text or symbols)
natural_image
Illustration of a blood vessel with granular particles and a thermometer icon (no text or symbols)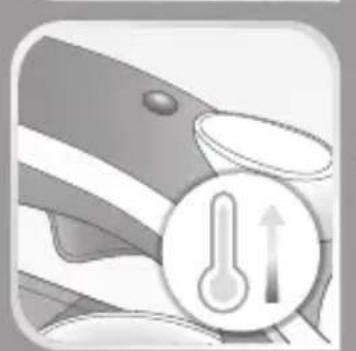
natural_image
Illustration of a car's dashboard with a thermometer icon and upward arrow (no text or symbols)NETTOYAGE ET ENTRETIEN DU FER
Nettoyer votre fer
PROBLÈMES CAUSES POSSIBLES SOLUTIONS
PROBLÈMES CAUSES POSSIBLES SOLUTIONS
PREPARACIÓN
natural_image
Illustration of a hand inserting a plug into an electrical outlet (no text or symbols)
natural_image
Illustration of a car interior with exhaust icons and a recycling symbol (no text or labels)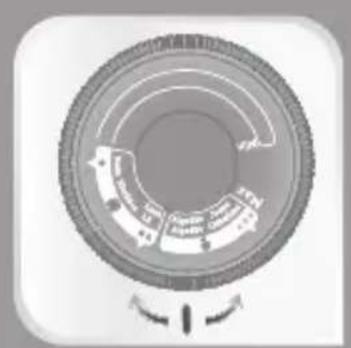
natural_image
Circular mechanical component with concentric rings and internal segments, no visible text or symbols
natural_image
Abstract grayscale illustration of a curved surface with a central droplet and an hourglass icon (no text or symbols)
natural_image
Close-up of a curved mechanical component with a small circular feature, labeled 'OK' in the corner (no other text or symbols)USO
natural_image
Close-up of a hand holding a circular mechanical component with internal components, no visible text or symbols
natural_image
Abstract 3D rendering of a vertical arrow pointing upward and a partial view of a building with a logo (no text or symbols)- IMPORTANT SAFETY INSTRUCTIONS
- PREPARATION
- USE
- STORING AND MAINTAINING THE IRON
- IS THERE A PROBLEM WITH YOUR IRON?
- Read all instructions before using the iron.
- SPECIAL INSTRUCTIONS
- SAVE THESE INSTRUCTIONS
- For your safety
- PLEASE READ THESE INSTRUCTIONS CAREFULLY AND KEEP THEM FOR FUTURE REFERENCE.
- What water to use?
- Types of water not to use?
- Environment
- Environment protection first !
- BEFORE FIRST USE
- Which water should I use?
- Filling the water tank
- Adjusting the temperature and steam
- Dry ironing
- Obtaining more steam
- Vertical steam ironing
- Dampening clothing (Spray)
- While ironing
- Auto-Off Function (depending on model)
- Storing your iron
- Cleaning the Anti-Scale Rod (once per month)
- Beware!
- Cleaning the Iron (Once a Month)
- Cleaning the soleplate
- SOMMAIRE
- PRÉCAUTIONS IMPORTANTES
- UTILISATION
- Repassage à sec
- NETTOYAGE ET ENTRETIEN DU FER
- Nettoyer votre fer
- PREPARACIÓN
- USO
Brand : TEFAL
Model : Express Steam FV2886
Category : Iron