
Manus 3 - Slicer Ritter - Free user manual and instructions
Find the device manual for free Manus 3 Ritter in PDF.
| Product type | Manual universal slicer |
| Brand | Ritter |
| Model | Manus 3 |
| Use | Domestic |
| Blade type | Circular stainless steel blade |
| Adjustable cutting thickness | 0 to 20 mm |
| Control | Manual crank |
| Cutting capacity | Various food products (frozen, bones and pits prohibited) |
| Cutting board | Removable (remove from right) |
| Carriage | Guided with integrated food pusher |
| Safety device | Adjustment knob to position « 0 » to cover the blade |
| Stability | Suction feet for fixing on worktop |
| Housing material | Resistant plastic |
| Blade material | Stainless steel |
| Dimensions (L × W × H) | Approximately 40 × 25 × 25 cm |
| Weight | Approximately 2.5 kg |
| Power | Manual (without electricity) |
| Cleaning | Damp cloth; removable parts washable in hot water (not dishwasher) |
| Periodic maintenance | Lubrication of carriage guide and gear wheel |
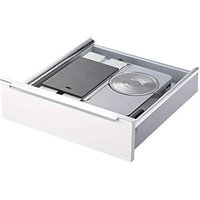
| Included accessories | Carriage, food pusher, cutting board, guide support |
| Spare parts available | Smooth blade, Ritter maintenance grease |
| Warranty | 2 years manufacturer |
| Country of origin | Germany |
| Standards | CE marking, food contact, WEEE recycling |
Frequently Asked Questions - Manus 3 Ritter
User questions about Manus 3 Ritter
0 question about this device. Answer the ones you know or ask your own.
Ask a new question about this device
Download the instructions for your Slicer in PDF format for free! Find your manual Manus 3 - Ritter and take your electronic device back in hand. On this page are published all the documents necessary for the use of your device. Manus 3 by Ritter.
USER MANUAL Manus 3 Ritter
SV Bruksanvising. 74
tr Kullanim kilavuzu 77
GENERAL SAFETY INSTRUCTIONS
To avoid personal injury or damage to the appliance, please observe the following safety instructions:
The food slicer is to be used for domestic purposes only and must not be used commercially.
- Never set the appliance down on hot surfaces or close to a naked flame.
-Use the accessories included in the delivery specification only.
-Only start to use the appliance after it has been securely set up.
- Persons with reduced physical, sensory or intellectual capabilities or lacking in relevant experience and/or knowledge may only use this appliance if they do so under supervision or have been instructed in the safe use of the appliance and understand the potential risks associated with its use.
-Do not allow children to play with the appliance.
-This appliance must not be used by children. Keep the appliance out of reach of children.
- Do not use it to cut frozen foods, hot foods, bones, food containing large stones, roast meats encased in netting or packaged foods!
-Stop using the appliance immediately if any parts are damaged and contact the ritter after-sales service.
Risk of injury
-
This appliance must not be used without a slice carriage or a left-over holder, unless the size and shape of the food to be sliced means that these parts cannot be used.
-
The rotary blade is extremely sharp.
-
Never touch the rotary blade when operating the appliance.
After each use and before cleaning, turn the slice thickness adjustment knob to the "0" position.
Unfold the illustrations at the front and back of this manual.
Please read these operating instructions thoroughly before you start to use the appliance. Keep these operating instructions in a safe place and ensure that they are included with the appliance if passing it on to a third party.
Alternatively, the current operating instructions are available at www.ritterwerk.de.
INTENDED USE
The manual food slicer is used for the slicing of household foods.

The food slicer is suitable for contact with foodstuffs.
If the appliance is used for a purpose other than this, or if it is operated incorrectly, severe injuries may occur or the appliance may be damaged. All warranty and liability claims will be rendered null and void in this case.
BEFORE USING THE APPLIANCE FOR THE FIRST TIME
Preparation
Remove the appliance carefully from the packaging. Remove all packaging components and keep them in a safe place along with the packaging itself. Clean the appliance before allowing it to come into contact with any food (see CLEANING).
Setting up the appliance
- Place the appliance on a flat, even surface.
- Press down on the appliance so that the suction feet (4) attach themselves to the surface.
Assembling the appliance
Assembling the hand crank (1):
A Loosen the fastening screw (10) and remove it.
- If the plastic bushing (9a) is not fully inside the crankcase (9), push the bushing backwards. When doing so, ensure that the lip on the plastic bushing fits exactly into the slot provided on the crankcase.
-
Place the hand crank on the shaft (9b).
B Replace the fastening screw and tighten it using a suitably sized coin.
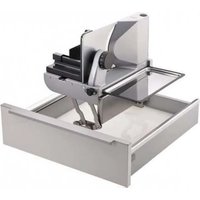
Insert the slicing board (12) from the right (on the amano 3/5/ piatto 3/5 model).
Mount the slice carriage (5): -
Insert the slice carriage into the front locking pin (6a) of the carriage guidance element (6).
- Then swivel the slice carriage downwards to insert it into the rear locking pin (6b) of the carriage guidance element.
E Slide the left-over holder (7) onto the handle of the slice carriage.
Moving the appliance
Do not use the slicing board (12) to lift the appliance. Before moving the appliance, you should slide the slicing board to the right out of the appliance (on the amano 3/5 /piatto 3/5 model). The board can only be pulled out to the right.
Take hold of the bottom of the appliance next to the right suction foot and lift it up carefully. The suction feet will detach themselves from the surface one by one.
SLICING
Use the slice thickness adjustment knob (14) to set the required thickness.
Info:
Slice thickness: 0mm to approx. 20~mm . The slice thickness adjustment scale is not a millimetre scale. For safety reasons, the "0" position is designed to cover the blade.
Pull the slicing board (12) out slightly to the right to collect the cut slices (on the amano ^3/5 / piatto ^3/5 model). The board can only be pulled out to the right.
- Place a plate or similar underneath to catch the cut slices if necessary (on the manus³/podio³ model).
H Place the food guide bracket (11) in a horizontal position until it locks into place.
Info:
The food guide bracket ensures that long, hard foods (e.g. a large loaf of bread) are passed on to the crank without hindering movement.
For short, thin, soft slices, we recommend that you turn the guide upwards (e.g. for sausages).
Place the food to be sliced onto the slice carriage (5). Use the left-over holder (7) to lightly press the food up against the stop plate (3).
Protect your hands by always using the slice carriage and, where applicable, the left-over holder.
Exception: Excessively large foods for slicing.
- Use your right hand to turn the hand crank (1) in a clockwise direction with even pressure.
- As soon as the rotary blade (8) starts moving, gently place the food to be sliced next to the rotary blade.
After each use, turn the slice thickness adjustment knob to the "0" position to cover up the sharp rotary blade and to avoid any injuries.
CLEANING
CAUTION
The rotary blade is extremely sharp. Before cleaning, turn the slice thickness adjustment (14) knob to the "0" position.
Clean the food slicer regularly to prevent the accumulation of food residue. The rotary blade must also be cleaned regularly as described below to prevent its surface from rusting.
Info:
Over time, an accumulation of food residue may damage the surface of the rotary blade, causing it to rust.
Preparation
C Slide the slicing board (12) to the right out of the appliance (on the amano 3 / 5 /piatto 3 / 5 model). The board can only be pulled out to the right.
- Remove the left-over holder (7).
Remove the slice carriage (5):
Pull the slice carriage fully towards you.
- Use the finger protection on the slice carriage to pull it upwards. The slice carriage detaches from each locking pin (6a and 6b) of the carriage guidance element (6) in turn. Ensure that the slice carriage does not tilt to the left.
M Remove the rotary blade (8):
- Keep a tight grip on the rotary blade from above during the entire removal process.
- Open the blade catch (2) by turning the locking screw (2b) in an anti-clockwise direction using a suitably sized coin.
- Remove the sealing washer (2a).
Press the blade out from the opposite side and take hold of it at its rotational centre.
Cleaning after each use
- Wipe down the housing and all removed parts, including the rotary blade, with a damp cloth.
Occasional cleaning
- Wash the slicing board in water and detergent (amano ^3/5 /piatto ^3/5 model). Do not use aggressive abrasive cleaners.
- Rub food-safe oil into the slicing board to keep it in the best condition (amano ^5 /piatto ^5 model).
- Give all removed parts, including the rotary blade, a thorough wash in warm soapy water (not in the dishwasher!).
- Clean the housing behind the blade using a dry cloth/brush. Info:
Do not use any abrasive cleaners, sponges with rough surfaces or hard brushes.
- The suction feet must be free of grease and crumbs to ensure a firm grip. We therefore recommend that you clean the suction feet regularly.
- Dry all parts that you have washed.
- Grease the rotary blade's gear wheel with a little ritter maintenance grease (or alternatively with a little Vaseline).
Repeat the steps above in reverse order to replace the rotary blade (8). When doing so, ensure that the sealing washer (2a) fits exactly into the slot provided.
MAINTENANCE
Your food slicer is maintenance-free. However, we recommend that you occasionally apply a little extra ritter maintenance grease or Vaseline to the rails of the slice carriage to keep them lubricated and ensure that the carriage continues to move easily.
STORAGE
Keep the appliance out of the reach of children.
DISPOSAL OF WASTE ELECTRICAL AND ELECTRONICEQUIPMENT

This symbol indicates that this product must not be disposed of with unsorted municipal
waste. There is a separate (free) system for the collection and return of waste electrical and electronic equipment. For more information, please contact your local authority or the shop where you purchased the product. By ensuring that this product is disposed of correctly, you will help prevent potential negative consequences for the environment and human health and contribute to the conservation of natural resources.
REACH DIRECTIVE
A special, non-toothed rotary blade is also available for use with sliced meat, sausage and ham.
The original ritter maintenance grease is available for delivery for maintaining (regreasing) the food slicer.
SERVICE, REPAIRS AND SPARE PARTS
Please contact your local after-sales service for service, repairs and spare parts.
This manual food slicer comes with a 2-year manufacturer's warranty, calculated from the date of purchase and in accordance with EU warranty directives. Your legal warranty claims according to § 437 ff. BGB (German Civil Code) remain unaffected by this regulation. The manufacturer warranty applies to all devices sold within the European Union. For details of the warranty conditions, see www.ritterwerk.de/warranty.
EXPLANATION OF SYMBOLS
Symbol Explanation

CE marking: The product complies with the applicable requirements of the European Union.
The product was put on the market after 13 August 2005. It must not be disposed of as normal domestic waste.
The crossed-out wheelie bin symbol indicates that separate collection is required.

Suitable for contact with foodstuffs
INSTRUCTIONS DE SECURITÉ GENÉRALES
Onachoct ot HapaHЯBaHe
-To3n ypei He Tp86Ba Da ce
noJ3Ba 6e3 HaprabIbIbIa
IOBbpxHOCT 3a Hap83BaHnI pOdyKT nIN DbpxKaU 3a
OCTaTBka, OCBEN B CInyauNTe,
KOrato rOJIemHaTa nIN oOpMaTa Ha Hap83BaHnI pOdyKT
He I03BOJRABat yNOTpe6aTa
IM.
-ДИСКOBИТ HOЖ e MHORO OCTbp.
-При работа на урета в Нкakьв слунай He дOKocbaiteДИСКOBЯ HOK.
-След BCяka ynoTpe6a nпрedi NOUcTBaHeto NOCTaBryTe 6yToHa 3a peYInpaHe Ha De6eJIHaTa Ha p3aHe BNo3nua „0".
OTbOpTe rpaΦnKeTe Ha npEdnHn 3aDnHa KNKKKaTa.
Molna, npocheTe BnHMaTeNHO pkoBODCTBOTo 3a ynoTpe6a npedn nuCKaHeTo Ha ypeDa B ekCnloatauia. 3anaTe pkoBODCTBOTo 3a ynoTpe6a n npn npedocTabaHe Ha ypeDa Ha dpyro Inue ro npdaIte c Hero.
AkyaHOTOpbKOBOCTBO3a ynoTpe6a e HAnuHo Cbso TaKa ha www.ritterwerk.de.
ПРЕДHA3HAUECHNE
YHnBepcaHnHrT pUyeH ypei 3a
pIaHe cIyKu 3a HapJ3BaHe Ha
ObHuHn 3a DOMaKNHCTBOTo
XpaHHTeHN IPOdyKTn.

YHnBepcaHnHrT ypeI 3a
pIa3ane e IIOxOJU3 3a
KOHTaKT C xpaHa.
N3noJ3BaHeTo He nO npEJa3Ha-ueHne IINI rpeHOTo 6cnykBaHe MoKe Da IOBeDe Do TeKKn HapaHbAHnI INI Do NOBpeDa Ha ypeDa. B TaKbB cIyuaI OTnadat BCNUKr rapaHcuOHn IpTeHcnn I pTeEHcN KbM KaYeCTBOTO.
NYCKAHE B EKCJIHOATALIJA
Poirotobka
BHHMaTeJIHO n3BaIeTe ypeJa OT onaKOBkATo.OTcTaPaHTe BCnKNo onaKOBbUHN MaTePn- aNn I n 3ana3eTe 3aeHNO c onaKOBkATo. POnuCTeTe ypeJa, npEi Da BNe3e B KOHTaKT C XpaHnTeHNI pOdyKTn (BnKTe IOChNTBAHE).
MOHTaK Ha ypeDa
- NocTabete ypea Bbpxy paBHa, rnaKa OCHOBA.
-Пи捜исенте урEDA,за да ce 3akpenT 3драВО BaKyyMHInTe kpaueTa (4) KBM OCHOBaTA.
Crno6BaHeHaypea
MoHTaK Ha pBkoXBaTKaTa 3a BbPTeHe (1):
A OTBnHTeTe cKpeNITeJIHHa BnHT (10) n ro n3BaJeTe.
- Ako nlaactmacobata Btynka (9a) He e n3zraNo B KOpnyca Ha pbKoXBaTKaTa 3a BbPteHe (9), n36ytaTne RaHa3a. BHImabaTe YeJHATA NOBpX-HocT Ha nlaactmacobata Btynka Da ce HAMipa TOHOB ppeBnDEHO To 3a He rHe3do Ha Kopnyca Ha pbKoXBaTKaTa.
- NocTaBeTe pBkoXbTaKaTa 3a BbPteHe Ha Bana (9b).
B NocTaBete OTHOBCKpeNTeHNHBAHTIro3aTeHETe C NOxOJaMa MOHeTa.
C N36yTaIe DbcKaTa 3a p3aHe (12) OTdACHO (np MoJe amano ^3 / 5 / piatto ^3 / 5
D NocTaBTe HnPaBnaBaUaTa nOBbPxHoc3a Hapra3BaHnra npOdyKT (5):
BkapaTe HappaBnaBaata NaBbpxHOCT 3a Hapra3BaHnna npOdyKT B npeDnHa KcnpaU uΦT (6a) Ha BODaHa HappaBJaBaata NaBbpxHOCT (6).
CneToba3aBbptete HaprablaBaauata NOBbpxHOCT 3aHapra3BaHnna npOdyKT HaDony, 3aJa Bkapate B 3aDnna FHKCu pauiu (6b)HaBoDaHa HaprablaBaauata NOBbpxHOCT.
E N36byTae DbpKka 3a ocTaTbKa (7) BbpxpypbkoXBaTKaTa HaHnpaBnBaAata NObPxHOCT3a HapraBaHnI npOdyKT.
PpemecTbaHe Ha ypea
He noBdnraIte ypea 3a DbcKaTa 3a p3aHe (12). 3aToBa npei npemecTbaHeto N3DbpaTe DbcKaTa 3a p3aHe HndrCHO OT ypea (pnp MoJe amano ^3 / 5 / piatto ^3 / 5 ). DbcKaTa MOKe Da ce N3DbpNbCaMo HaJrCHO.
FБpbkHeTe nOypea,do
JaCHOTo BaKyMHO KpaYe, IN
BHNMaTeJIHO rOBnHrHeTe.
BaKyMnTe KpaYeTa ce OTJeIaT
eJHo cNeI dpyro OTO OCHoBaTa.
PRA3AHE
C6yToHa 3a perynipaHe Ha De6eHnHaTa Ha p3aHe (14) HacTpoTe XeJHaHaTa De6eHnHa.
VHopmaa:
De6eHua Ha p3aHe: 0 mm do okono 20 mm. Ckana 3a pezynupahe Ha de6eHama Ha p3aHe He e MuIumempo8a ckana. Om cbobpaxenur 3a 6e3onacnocm no3uqma ,0" e u3nbHeHa maka, ye da nokpuBa Hoka.
3a c6bpahe Ha hapra3aHnTe napyeta 3ndbpnaite Maiko HADRCHO dBckata 3a p3aHe (12) (npmOden amano3/ piatto3/). DbCKATA MOKe da ce n3DbpBa cAmo HADRCHO.
3a cb6npaHnHa npra3aHnTe npueta nocTaBeTe npn Hxka OTOIy uHnI npDpy nOobEn CbI (npn moJeI manus / podio3).
H Prn Hxkd BdnHete Ha npabIyBaUaTa Cko6a 3a Hapra3BaHnnpOdyKT (11)do ynpB XOpN3OH-TaHa N03uN.
Hhopmaunr:
HapnaeBaaama ckoba 3a Hapra3BaHn npodykm cnyuKu 3a 6oedeHe Ha dbIb2, mebp npodykm nokpaP pbKOxemKama, 6e3 da ce eb3npenmCmea deuxkeHuemo (Haep. zonam camyn xna6).
Ppu Kbcu, mbHku, Meku waubu ce npenopbue bodehmo da ce 3aebmu Haeope (HaNP. npu konbacu).
I NocTaBete Hap3BaHnI npOdyKT Bbpxy HanpaBnaBaUaTa nOBbpxHOCT (5).HaTncHeTe IeKO Cdbpxa3a OcTaTBka (7) cpeu y OrpaHnHTeHNHaTa IIIOua (3).
Ia3eTe p6cTe Cn, KaTO BUNHn
N3No13BaTe HAnpaBnaTaTa
NOBbPxHOCT 3a HAp3BaHnA
IPOdyKT I eBeHTyaHnO DbpxKaHa
3a OCTaTbKa.
K N3KJIIOUeHHe: MHOrO rJlAm Hapr3BaH npOdyKT.
- 3abbpTeTe pbkoXBaTkata (1) cЯchata pbka NO yacOBHnKOBataCTpeIka.
- UOM DnCKOBnT HOX (8) ce 3aBbPTN, IpemecTe Hapra3BaHnI npOdyKT C JeKO NODaBaHe KbM HeRo.
CneI BcKa ynoTpe6a 3aBbpaTaIte 6yToHa 3a perynipaHe Ha De6eHHaHa p3aHe B No3nUra "0"3a Da NOKpNeTe OCTPnA DnCKOB HOK I Da N36ErHete HapaHbAHn.
ПОУNTBAHE
BHIMMAHNE
ДИСКOBИТ HOЖ E MHORO OCTьр. Ппеди почистваноюставете 6утона за рулларе на Deбенината на рязache (14) в поэц,在"0".
3a da He MoRaT Da ce Ha6nBaT pa3BaIaIe Ce OCTaTbU, NOuNCTBaIte peoBHO yHNBepCaHnYpeI 3a p3aHe. NsCKOBnT HOK CbIo Tp8Ba Da ce NoNCtBa peoBHO, KaKTo e OINcHoNo-DoNy, 3a Da ce 3aNa3n HepBXJaemata My NOBbpxHOCT.
HOpmaua:
Cneu3ecmno epeme ocmambuzme om xpaHumeHu npodykmu mosam da pa3a dam mamepuana ha duCKOBua HOK u da doeadam do noBaama Ha pbxka.
NoDrToBka
C IV3bpaIte Ibckata 3a py3aHe (12) HauRcHO ot ypeHa (npu moen amano ^3 / 5 / piatto ^3 / 5 ). Ibckata MoKe da ce n3dbpna caMo HaJrCHO.
- CbaneTe Ibpxkaa 3a octaTbka (7).
OTcTaHete HnPaBnaaata NOBbPxHOCT 3a Hapra3BaHHI npOdyKT (5):
- N3dbpnaTe HnnpabIbIaUaTa NOBbpxHocT 3a Hapra3BaHnI npOdyKT N3cJIIO KbM ce6e cn.
-ИздьрайтЕнарразьявацаТА ПОВьрхНOCТ3aHapяЗВанЯ пpoукT3a3aиТаHa napeц harope.HanpавлЯBaцаТ ПОВьрхНOCТ3aHapяЗВанЯ пpoукTи3nI3aNocleДова- TeJIHOOTДВaTaФИКсИрAzU ZuФТa(6aN6b)иВODaЧ HaHaprabлЯВaцаТаПОВьрх- HOCCT(6).ПиTOBAВHMмавЛe HanpавлЯВaцаТаПОВьрхНOCCT 3aHapяЗВаняпpoукТДaHece HakLOHnHaJBO.
M DEmoHTaX Ha NICKOBnHOx (8):
- ПО ВРЕм Ha ueJЯ npOuec HnДeMoHTaX DpBxTe 3dpaBO DNCKOBnH OK OTrope.
- OTbOpTe 6IoknpoBkata 3a HOka (2), KaTo C noDxOJaMa MOHeta 3aBbPntte BnHTa Ha 6IoknpoBkata (2b) o6paTHo Ha yacOBHKOBata cTpeNka.
- ɪЗbaɪdeteɪənɪbɑtəHa 6ɒkɪnpɔbkaɪta (2a).
Nn36yTaTe HOxA OT npOTUBO- NOIOXHaTcPapa NTo DpBxTe B ceHTbpa Ha BbPteHe.
CneB BceK npoec Ha pyaHe
-ИЗБьршeteКорпуcaиВСИЧКIN CBаLEнЧАТN,ВКЛЮЧИТЕЛHО ДИСКOBИНЖ,СВДАЖHAКьрna.
OT BpeMe Ha BpeMe
- I3nlaKHeTe DbckTa 3a
pra3aHc BODa n npenapat 3a
MneHe Ha cbdoBe (npu MoJeI amano3/5 / piatto3/5). He n3noJI3BaIte arpeCINBNI NOUcTBaIe CpeIcTBA. - HatpniTe Ibckata 3a p3aHe c ueI noIbprkaHe c 6e3BpeHNo 3a xpaHnTeHH npOyKTn MacJIo (npm oJen amano5 / piatto5).
-Поунсте OCHOВно BCNUKIN CBaJIeHn YactN, BKJIIOUHTeJHO DnCKOBn HOK, C TOnJa nPOMIBHa BOda (He B MmJInHa MaunHa).
-Почисте Корпуca 3ад Ножа CBС cyха Кьрna/Четka.
Hnfoopmaua:
He u3non3eaumte abpa3ueHu npenapamu, 66u c apy6u no8bpxHocmu unu m8bpdu yemku.
- 3a 3dpaba onopa Ha ypeda BakuymHnTe Kpaeta Tp6Ba da ca YnCTN OT Ma3HHn N TPOXn. 3aTOBA npenopbYBaMe peoBHO da NoCHTBaTe BakuymHnTe Kpaeta.
-Подсушete BCИЧКИ n3nJIaK-HaTN YaCTN.
CmaKeTe 3b6HOTo KOJIeNo Ha INCKOBnHOK C MaJIKO CMA3Ka 3a NOIpBxKa Ha ritter (NIN No N36Op C MaJIKO Ba3eInH).
MOHTIPAITE OTHOBO DINCKOBH NOX (8) B O6paTHa NOCNEIOBATEJIHOCT. BHIMABAITe SHAIBATA HA 6NoKINPOBkata (2a) DA CE HAMIPA TOUHO B IpeDbIe- HOTO 3a HeYrHe3do.
PbXKA
YHnBepcaHnT ype3a p3aHe HnMa HyKda OT nOdPbXka. Bce nak Bn npenOpbVbame nohKaora Da CMa3BaTe DOnbLnHrTeNHO BoDeHTo Ha HnPaBnBaUaTa NOBbPxHOCT 3a Hap83BaHn IPOdyKT C MaJko CMa3ka 3a NODpBxKa Ha ritter nIi Ba3eJInH, 3a Da 3ana3nte PnabHn XoD.
CbXPAHEHNE
CbxpaHnBaIte ypeHa HeIOCTb- nEH 3a Deua.
N3XBbPJIHE HA YNOTPEBBAHN EJEKTPUQUEKN EJEKTPOHH YPeDN
CmBOnbT yka3Ba,ye TO3n npOdyKT He Tp8Ba Da 6bNe n3XBbpHn C HecOpTnpaHn 6ntoBn
OTnabu. CbIeCTByBa OTdeJHa (6e3nPaTHa) cNCTema 3a cbbnpaHe n BpBuahe Ha ynoTpe6BaHn eEKeTpueckn neEeKtpoHHn ypei. 3a nobuee HnΦopMaunCe o6bPheTe KbM BaWata o6uHnCKa aDMHNCTpa- uN KbM TbproBCKn OBeKT, OT KOITcTe 3akynuN npOdyKa. BaWata rpnka 3a npabuHnTo N3XBpLnHe Ha npOdyKa IOnpHacr KaKTo 3a HaMaJIyBaHe Ha Bb3MOXHi HeaTINBHn NocJeDCTBnB YbpxypnpoDaTa N OBeewKOto 3dpaBe, Taka n 3a 3ana3BaHe Ha npupoHnTe pecypcn.
PERJAMEHT REACH
CNEUJIHIN PUNHADJEXKHOCTN
CneuHNo 3a p3aHe Ha Meco, KOJIbAcn N WUHa ce npedna ra DnCKOB HOK 6e3 3b6n.
3a noDpBxKkata Ha yHnBepcaHnYpeJ 3a pJ3aHe (OONbJIHNTeIHO Cma3BaHe) Ce npEJaRaOpINHaHnTa CMA3Ka 3aNoDpBxKkHa ritter.
CEPBUN3,PEMOHTN IN PE3EPBHN YACTN
3a cepBn3,peMOHTn n pe3epBHN
yactn,MOJn,CbbpKeTe ce c
MeCTHaTc cepBn3Ha cnjx6a!
BnxTe www.ritterwerk.de
TAPAHU
3aTo3n yHnBepcaJen ypeJ 3a
pIaHe Ha ritter Hne daBaMe
2-roMnHa rapaHnHa npOn3-
BOINTeJI, CMrTaHO OT DeHn Ha
NOKyPkata N B CbOTBeTCTBne C
DInpeKTHBnTe Ha EC 3a rapaH-
CUNOHATA NOHTika. CbrracHo
U.437 n cI. ot BGB (FeepaJIHnraPaxdAnckn KoDEKC) BaWeto
3aKoHHo npaBO Ha rapaHcNoHeH
NCK He e 3aceHato OT Ta3n
HopMaTbHbA ype6a. rapaHun-
rTa Ha npOn3BOInTeJI BAXn
3a BCnKn ypeDN, 3akynEn Ha
TePITOpnTa Ha EbponeeCKn
cbIO3.MoKe Da ce 3ano3Haete c
rapaHcNOHNte ycNoBn Ha aDpec www.ritterwerk.de/warranty.
OBRCHEHNE HA CUMBOJNTE
CMBOI
68aCHenne

CE MapKnpOBka: IpoDyKTBOTROBapHa DeiCTBaunTe n3NCKBaHnHa EbponeecknCbIO3.
IpoodyktbTe npchat Ha na3apa cnei 13 abryct 2005 r. 3a6paheHo e n3xBbpPnHeTo Ha npOdykTa c obNKHOBeHnTe 6ntOBn OTnaDbu.
CnmbonbT cbc 3auepkhataKoHTeHep 3a OTnaDbuYka3Ba Heo6xOdImocCTTa ot pa3deHNO cb6npahe.

IopxOJa3a KOHTaKTc XpaHITeHN npOdyKTN
VŠEOBECNÉ BEZPEČNOSTNI PřEDPISY
YcTaHOBka yCtpoiCTBa
- YcTaHOBnTe yCtPoNCTBO Ha poBHOe n rJaKnOe OCHOBaHne.
-ПрижмnteусториCTBO,HTO6bl npicaBaHouncsEra HOKKn(4) 3aKpeHHncbHaOCHOBAHIN.
C6opka yctpOuCTBa
MoHTaJx pyKoTkn (1):
A OTBnHTnte KpeNexHbI BnHT (10) n BbHbTe ero.
- Ecnn nnaactmaccoBaBtynka (9a) He noJnHocTbIO haxoDNTcB KOpnyce pyKoRTKn (9),BDbNHBte ee. PpocJeNTe 3aTEM, yTO6bl BbICTyn nnaCTmacCOBOB BtynkToUHO BoWeI BCOOTBeTCTByUOuN BbIpe3 HaKOpnyce pyKoRTKn.
- YctaHOBnTe pyKoRtKy Ha Ban (9b).
B BCTaBBTe KpeIeKHbI BnHT n 3aTaNHTe eO C NOMOuIIOPOXoDJIueM OHeTbl.
C BctaBbTe cnpaba Docky nna Hape3aHn (12) (nna moJe nn amano ^3 / 5 / piatto ^3 / 5
D UcTaHOBka cana3OK IJIa Hape-3aembIX npOdyKTOB (5):
- YctaHOBNTe caJa3Kn dna Hape3aEmbIX npOyKTOB Ha nepeHn yOpHbI wTnΦT (6a) 3JemeHTa cana3OK (6).
-ПослеЗTOROBePHTecaNa3KNBn3,YTO6bInxna3ycTaHOBUNcHa3aHnYnpHbIMtNΦT(6b)JemeHtca3OK.
OToBnHbTe IepKaTeIb InI OCTaTKOB (7) Ha 3axIM caIa3OK IIN Hape3aEmbIX npOdyKTOB.
IpepeeHne yctpOCTBa
He noDnMaIte yCTpoiCTBO 3a DOCKy IJRA Hape3aHNA (12).C 3ToI ueBIO nepeI nepeMeueHHeM yCTPOIcTBa BbIDBHNTE DOCKy BnpaBO n3 Hero (JnmaOeJI amano ^3 / 5 / piatto ^3 / 5 . DOCKy MOxHO BbIHytb TOJIbKO BnpaBO.
F POnxBaTnTe yCTpoNcTBO CHN3y pIaOM C npaBo Npncacbl BaUeCnHOXXKo N OCTOPOXHO NOHIMTE er. PnscablaBaIOuNecr HOKKn NoOuepeDnO OTCoeHNHOTc OT OCHOBAHn.
HAPE3KA
G UcTaHOBnTe JKeJaEmyTOJUHHy OTpe3aEmbIX KcKOB C NOMOsbIO KOleCnKa DnIpeRynPobAHnToJIuHbI Hape3Kn (14). HOpMaun.
TOnuHa Hape3aEmo2 npOdykma:0-20 MM. Uka nA hAcmpouku monuHbI He Jaemc MuIumempoeu uKaIou. IonoXHe «0» u3 coo6paXeHue 6eONacHocmu paccUmaHo Ka KepeKpbImue HOka.
CДяукадываньOTpe3aHbIX KyCKOB HEMHO BbITAHTEBnpaBO DOCKY (12)(ДЯМо徳amano ^3 / 5 /piatto ^3 / 5 ).DOCKy MoXHoBbHyTb TOnbKO BnpaBO.
- UTo6bI yKnaIbIbIbTb OTe3aH HbIe KycN, npn Heo6XoIMoCTn NocTaBtpeApkny nIn NoO6HyIO nocyU (Jnra MoDenn manus3 / podio3).
H Prn Heo6xOaMocTn CIOXKeTe HnpaBnaIooSyIO CkO6y DnA Hape3aHHOrO npOdyKta (11) Do ynpa B ropu3oHTaJIbHoe noIoXeHne.
HΦopMaua.
HapnaeNoaA cKoba dJa Hape3aHHo2 npOdykma npedHa3Ha-yeHa dJa mozo,ymo6bl dnuHHbui u mepbui Hape3aembu npOdykm npoxodun MmO pykoamku,He Mewaar ee dbuxekuio (Hanpumep,duHHbui xne6). B cnuyae Kopomkux, monkux, MraKux Kyccko peKomeHoyemcnoBepHymb 3my HapnaeNoouyIO 8eepx (Hanpumep, dJa konbacbi).
I IonoKnte Hape3aembI npOdyKT Ha caNa3Kn (5).C nomoobIO depKaTeJIy OCTaTKOB (7) Cnerka npXMMte npOdyKT K ynpHOJnactHe (3). ⅡI 3aunTbypykOT nope3OB mCNoB3yJTE caNa3KN DEpKaTeJIb DnI OCTaTKOB.
K NckHoueHne: ouHb 6oIbIe Hape3aEMblpOdykTbl.
- Haunhe paBHomepHo Bpa-aaTb pyKoTky (1) npaBoi pyKoI no Yacoboi CTpeJke.
Korda nuckobii HOX (8) NaHET BpaueHne, C He6oJbUIM HaxmOM nepemuaTe Hape3aEmble npOdyKtbl KHOxY. - Pocne KaKDoRo NcNoJb3OBAHn NaBepHnTe KOnecnKOdЯpeRyIInpOBaHn TOnuINbHaPe3Kn B NoJoxKeHne «0»,UTo6bl 3aKpbItb DnCKOBbI HOKN n36EkaTb TpaBM.
OuNCTKA
OCTOPOXHO
ДиCKOBBI HOX OueHb OCTpbI. Npeed ouNCTKOY yCTaHOBHTe KOncIO dIpapeylnpOBA-Hnra TOnuHbI Hape3Kn (14) B nOJoxKeHne «0».
YTo6bI npedOTbpaTb 3actpeBaHne pa3naRaUxxC8 ocTaKOB,peryJrphO BbINOHNYe OChCTky HNBepcaBHorO peKyuero ycpoiCTBa.TakKe cJeDyET peryJrphO YnCTNb DnCKOBBI HOK, YTO6bI NCKJIIOHTb BO3MOXHOCTb Koppo3nn.
Hopmaua.
Ocmamku nuue6bix npodykmoe
mozym uepe3 Hekomopoe 6pem
8o3deucmeobamb Ha Mamepuan
ducko02o Hoxa u npubeecmu
no8enneu Koppo3uu.
NoDrToBka
C BbIbUNHte DOCKy IJn Hape3aHn (12) BnpaBO n3 ycTpoiCTBa (JnMoJIe anno ^3 / 5 / piatto ^3 / 5 . Docky MoXHO BbIHytb TOnbKO BnpaBO.
- CHIMITE ČeρkaTeJIb ДЯ OCTaTKOB (7).
L ChyTne caIa3ok Inra Hape3a-EmbIX npOdyKToB (5):
-ПОJOCTью ВытЯнITE NO
Нанравленью К себ cana3kn
Ддя Hape3aemoro npodykta.
- Notaryte caana3kn Bbepx 3a 3aunTy dny 60nbwo rno naIbca. Cana3Kn OTcoeDnHraOTcra OT DByx ynpbIX wTnTOB (6a n 6b) npyr 3a npyrom 3nemeHTa cana3ok (6). PpocneiTe npn 3tOM 3a TeM, UTObl caana3Kn He ONpOKnHynncb BnEBO.
M DEmoHTax DNCKOBORO HOka (8):
Bxoede Bcero npocecca
dEmOnTaKa KpeNko ydePknBaIte
DnCKOBbl DnCK CBepxy.
- OtkpoTe 3anop Hoxa (2),ДЯ
ЗТОТС NOMOUsbIO NOxODЯшЕ
MOHETBI OTKpyTITe 3anOpHbI
BnHT (2b) npOTNB YacOBoi
CTpeKN.
- CHIMITE 3aOpHyo
wa6y (2a).
N BblaBnte HOX C npOTnBOONIOJoxHO CTOpOHbI N NOxBaTNTeeroNo ceHTpy BpaueHn.
PocJIe KaKDoRo pe3aHnA
- PpOtpnte BnaxHoJ caIpeTkoKopnyc, a TaKKe BCE ChrTbIe DeTaN, BKIOUaY dNCKOBbl HOK.
Bpemr ot BpeMeHn
- BbIMoTe DoCKy dIa Hape3aHnRA BOIOI MIOUcIM CpeCTBOM (dIra MoJeI amano ^3 / 5 / piatto ^3 / 5 He IcNoJIb3yIte arpeccuBhIe abpa3NBHbIe cpeCTBa.
-Дяуха cmaЖьTe docky 6e3BpeHbIM nЯпицeБыx npOdyKTOB macnOM (ДЯ модел amano5/ piatto5).
TuaTeIbHO npOMoTe TEnIOBBOO(He B NocyDoomoeHOMaUNHe)BCE CHrTbIE DeTaNN, BKIOUcA DnCKOBbl HOK.
OuHCTnTe KOpNc 3a HOXOM C NOMOUB cyxON TKAHEBOI caJPeTKn INN KNCTN.
Hopmaua.
He uonb3yume hukakux abpa3u8hbx cpecdme, 2y6ku c uepoXo8ambu NoeepxHocmmu unu Jecmkue uemku.
- UTo6bI yCTpoiCtBO 6blIO HAnExKHO 3aKpenJIeHo,Ha npicaCbIBaIOUxXcR HOKKax He DoJHKHO 6blT Xnpa N KPOseK. PoTOMy peKOMeHdyETcpeYnApHO OUnuAtb HOKKN.
- PocyuWnte BCE BbIMbITbIe Detan.
CmaxbTe 3y6uatoe KOleco Ha INCKOBOM HOKe He60nbWM KOnueCTBOM Cma3kn ritter (NIN NO Bb6opy He60nbWM KOInueCTBOM Ba3eNiHa).
YCTaHOBnTe DnCKOBbI HOK (8) B O6paTHOM NopAKe. IpocJeDNTe 3a TEM, YTO6bl 3anOpHnA Wa6a (2a) TOUHO BOuJa B COOTBeTCTByUOuN Bblpe3.
OBCJNYKINBAHNE
O6cnykBaHne yHnBepcaIbHoro pexkyero yctpOCTBa He Tpe6yETc. Ondako peKomeHdyETc Bpemr OT BpEmeHN Cma3bIBaTb HnpaBnIOUne caJa3OK He6oJIb-IM KOnuEcTBOM Cma3kn ritter INN Ba3eJIInHa, YTO6bl COxpaHITb JERKOCTb IX XOda.
XPAHEHNE
XpaHnTe yCTpoNCTBO B HeoCTynHOM IJIa DeTei MeCTe.
YTNIN3AUINCRAPbIX 3JEKTPNUECKNX N3JEKTPOHHbIX YCTPOINCTB
3TOT CUMBOJ yka3bIBaet Ha To, YTO DaHHoe 13eJIne 3anpeuaeTcra YTIN3NPOBaTb BmecTe O
HeOTcOpTnPOBaHHbIMN TBepDbIMN 6bITOBbIMN OTXODaMn.CyueCTByET OTdEINbHaj (6ecPNaTHa) CnCTema dIg c60paN BO3Bpata CTapbIX 3JIeKTPnueCKNX N3JIeKTPoHHbIX yCTPOJCTB.ДЯ NOLyuEnH JOnOINHTeJIbHO INHΦopMauIN NBpaTnTECb B MyHNzINaINbHyIO aDMNHCTpa-UNI INIIM MaRaN, B KOTOPOM 6blIO npNo6peTeHO 3TO n3DeJIne. IpePaabAra 3TO n3DeJIne Ha NaJIeXaUyO yTNlIN3aCInIO, Bbl NOMoRaTe N36ExaTB BO3MOxHBIX HeTaINBbIX NocJeDCTBNI DJIr OKpyXaIOUe CpeDbI N 3DOpOBbI NIODe, a TAKKe COxpaHaeTe InpoDnHbIe pecypcbI.
PPEINICAHNE REACH
IOCTABJIaEMbIE I03AKA3Y IPINHADJIeXHOCTN
CneuaJIbHO nI Haape3aHnma, KOJIbI N BeTcHbIppeIraeTcI NCKOBbI HOX 6e33y60B.
SERVICE, REPARATIONER OCH RESERVDELAR


- GENERAL SAFETY INSTRUCTIONS
- Risk of injury
- INTENDED USE
- BEFORE USING THE APPLIANCE FOR THE FIRST TIME
- Preparation
- Setting up the appliance
- Assembling the appliance
- Moving the appliance
- SLICING
- CLEANING
- CAUTION
- Cleaning after each use
- Occasional cleaning
- MAINTENANCE
- STORAGE
- DISPOSAL OF WASTE ELECTRICAL AND ELECTRONICEQUIPMENT
- REACH DIRECTIVE
- SERVICE, REPAIRS AND SPARE PARTS
- EXPLANATION OF SYMBOLS
- Symbol Explanation
- INSTRUCTIONS DE SECURITÉ GENÉRALES
- Onachoct ot HapaHЯBaHe
- ПРЕДHA3HAUECHNE
- NYCKAHE B EKCJIHOATALIJA
- Poirotobka
- MOHTaK Ha ypeDa
- Crno6BaHeHaypea
- PpemecTbaHe Ha ypea
- PRA3AHE
- ПОУNTBAHE
- BHIMMAHNE
- NoDrToBka
- CneB BceK npoec Ha pyaHe
- OT BpeMe Ha BpeMe
- Hnfoopmaua:
- PbXKA
- CbXPAHEHNE
- N3XBbPJIHE HA YNOTPEBBAHN EJEKTPUQUEKN EJEKTPOHH YPeDN
- PERJAMEHT REACH
- CNEUJIHIN PUNHADJEXKHOCTN
- CEPBUN3,PEMOHTN IN PE3EPBHN YACTN
- TAPAHU
- OBRCHEHNE HA CUMBOJNTE
- CMBOI
- 68aCHenne
- VŠEOBECNÉ BEZPEČNOSTNI PřEDPISY
- YcTaHOBka yCtpoiCTBa
- C6opka yctpOuCTBa
- IpepeeHne yctpOCTBa
- HAPE3KA
- HΦopMaua.
- OuNCTKA
- OCTOPOXHO
- PocJIe KaKDoRo pe3aHnA
- Bpemr ot BpeMeHn
- Hopmaua.
- OBCJNYKINBAHNE
- XPAHEHNE
- YTNIN3AUINCRAPbIX 3JEKTPNUECKNX N3JEKTPOHHbIX YCTPOINCTB
- PPEINICAHNE REACH
- IOCTABJIaEMbIE I03AKA3Y IPINHADJIeXHOCTN
- SERVICE, REPARATIONER OCH RESERVDELAR
Brand : Ritter
Model : Manus 3
Category : Slicer