
MFE 65 - Milling machine METABO - Free user manual and instructions
Find the device manual for free MFE 65 METABO in PDF.
| Brand | Metabo |
| Model | MFE 65 |
| Type | Concrete groove cutter (milling machine) |
| Wheel diameter | 230 mm |
| Maximum groove width | 30 mm (depending on spacers) |
| Maximum cutting depth | 65 mm |
| Input power | 2000 W |
| Output power | 1400 W |
| No-load speed | 6600 rpm |
| Voltage | 230 V |
| Frequency | 50 Hz |
| Weight | 6.5 kg |
| Protection class | II |
| Current type | AC |
| Electronic safety | Overload protection, restart protection, and S-automatic stop |
| Main handle | Rotatable 90° |
| Additional handle | Yes, adjustable |
| Dust extraction | Vacuum connection (bayonet) |
| Protective guard | Adjustable |
| Application | Grooving and cutting (with a single wheel) |
| Materials | Reinforced concrete, masonry, road surfaces |
| Included accessories | 7 spacers, pin spanner, chisel |
| Motor maintenance | Cleaning with compressed air through ventilation slots |
| Repairs | Only by a Metabo specialist |
Frequently Asked Questions - MFE 65 METABO
User questions about MFE 65 METABO
0 question about this device. Answer the ones you know or ask your own.
Ask a new question about this device
Download the instructions for your Milling machine in PDF format for free! Find your manual MFE 65 - METABO and take your electronic device back in hand. On this page are published all the documents necessary for the use of your device. MFE 65 by METABO.
USER MANUAL MFE 65 METABO
Original instructions
1. Declaration of Conformity
We declare under our sole responsibility: These wall chasers, identified by type and serial number 1), comply with all relevant requirements of the directives 2) and standards 3). Technical file at 4)- see page 3.
2. Specified Use
The machine is designed for cutting or slitting channels (chasing) in primarily mineral based materials such as reinforced concrete, masonry and paving, while firmly supported on the level surface, without water.
Do not use abrasive cut-off wheels. Use only diamond cut-off wheels.
Materials that generate dusts or vapours that may be harmful to health must not be processed.
The user bears sole responsibility for any damage caused by improper use.
Generally accepted accident prevention regulations and the enclosed safety information must be observed.
3. General Safety Instructions

For your own protection and for the protection of your electrical tool, pay attention to all parts of the text that are marked with this symbol!

WARNING - Reading the operating instructions will reduce the risk of injury.

WARNING Read all safety warnings and instructions. Failure to follow all safety warn-and instructions may result in electric shock, nd/or serious injury.
Keep all safety instructions and information for future reference.
Pass on your electrical tool only together with these documents.
4. Special Safety Instructions
4.1 Safety instructions for abrasive cut-off machines
a) The guard belonging to the power tool must be securely attached and positioned for maximum safety so that the minimum area of the wheel is exposed towards the operator. Ensure that neither you or bystanders are positioned within the plane of the rotating abrasive wheel. The guard helps to protect operator from broken wheel fragments and accidental contact with wheel.
b) Only use diamond cut-off wheels for your power tool. Just because the accessory can be
attached to your power tool, it does not assure safe operation.
c) The rated speed of the accessory must be at least equal to the maximum speed marked on the power tool. Accessories running faster than their rated speed can break and fly apart.
d) Abrasive wheels must only be used for the applications recommended. e.g.: Never use the side surface of a cut-off wheel for grinding. Abrasive cut-off wheels are intended for peripheral grinding, side forces applied to these wheels may cause them to shatter.
e) Always use undamaged wheel flanges that are of correct size and shape for your selected wheel. Proper wheel flanges support the wheel thus reducing the possibility of wheel breakage.
f) The outside diameter and the thickness of your accessory must be within the capacity rating of your power tool. Incorrectly sized accessories cannot be adequately guarded or controlled.
g) The abrasive wheels and flange must fit precisely onto your power tool's grinding spindle. Accessories with arbour holes that do not fit the power tool's grinding spindle will run out of balance, vibrate excessively and may cause loss of control.
h) Do not use damaged abrasive wheels. Before each use, check the abrasive wheels for chips and cracks. If the power tool or the abrasive wheel is dropped, inspect for damage. Never use a damaged abrasive wheel. Once you have checked and installed the wheel, position yourself and bystanders away from the plane of the rotating wheel and run the power tool at maximum no-load speed for one minute. Damaged abrasive wheels will normally break apart during this test period.
i) Wear personal protective equipment. Depending on application, use face shield, safety goggles or safety glasses. As appropriate, wear dust mask, hearing protectors, gloves and workshop apron capable of stopping small abrasive or workpiece fragments. The eye protection must be capable of stopping flying debris generated by various operations. The dust mask or respirator must be capable of filtering particles generated by your operation. Prolonged exposure to high intensity noise may cause hearing loss.
j) Keep bystanders a safe distance away from the work area. Anyone entering the work area must wear personal protective equipment. Fragments of workpiece or of a broken accessory may fly away and cause injury beyond immediate area of operation.
k) Hold the power tool by insulated gripping surfaces only, when performing an operation where the cutting accessory may contact hidden wiring or its own cord. Cutting accessory contacting a "live" wire may make exposed metal
ENGLISHen
parts of the power tool "live" and could give the operator an electric shock.
1) Position the cord clear of the spinning accessory. If you lose control of the tool, the cord may be cut or snagged and your hand or arm may be pulled into the spinning accessory.
m) Never lay the power tool down until the accessory has come to a complete stop. The spinning accessory may grab the surface and pull the power tool out of your control.
n) Do not carry the power tool while it is running. Your clothing could become caught accidentally in the rotating cutting accessory, and this accessory could then drill into your body.
o) Regularly clean the ventilation slots on your power tool. The motor's fan will draw the dust inside the housing and excessive accumulation of powdered metal may cause electrical hazards.
p) Do not operate the power tool near flammable materials. Sparks could ignite these materials.
q) Do not use accessories that require liquid coolants. Using water or other liquid coolants may result in electrocution or shock.
4.2 Kickback and RelatedWarnings

WARNING - Always wear protective goggles.
Kickback is the sudden response to an abrasive wheel that is jamming while rotating. Jamming causes the rotating accessory to stop abruptly, which in turn causes the uncontrolled power tool to be forced in the direction opposite to the accessory's rotation at the point of jamming.
For example, if an abrasive wheel jams in the workpiece, the edge of the wheel entering into the workpiece can snag, thus causing either kickback or the wheel to break off. Abrasive wheels may also break under these conditions.
Kickback is the result of power tool misuse and/or incorrect operating procedures or conditions and can be avoided by taking proper precautions as given below.
a) Maintain a firm grip on the power tool and position your body and arm to allow you to resist kickback forces. Always use additional handle, if provided, for maximum control over kickback or torque reaction during start-up. The operator can control torque reactions or kickback forces, if proper precautions are taken.
b) Never place your hand near the rotating accessory. Accessory may kickback over your hand.
c) Do not position your body either before or behind the rotating wheel. Kickback will propel the tool in the direction opposite to the wheel's movement at the point of snagging.
d) Use special care when working corners, sharp edges etc. Avoid bouncing and snagging the accessory. Corners, sharp edges or bouncing
have a tendency to snag the rotating accessory and cause loss of control or kickback.
e) Do not use a chainsaw blade, toothed saw blade or segmented diamond disc with slots wider than 10mm . Such blades create frequent kickback and loss of control.
f) Do not "jam" the cut-off wheel or apply excessive pressure. Do not attempt to make an excessive depth of cut. Overstressing the wheel increases the loading and susceptibility to twisting or jamming of the wheel in the cut and the possibility of kickback or wheel breakage.
g) If the wheel gets jammed or you interrupt operation for any reason, switch off the power tool and hold the power tool still until the wheel comes to a complete stop. Never attempt to remove the cut-off wheel from the cut while the wheel is in motion otherwise kickback may occur. Investigate and take corrective action to eliminate the cause of wheel jamming.
h) Do not restart the tool while in the workpiece. Let the wheel reach full speed and carefully reenter the cut. The wheel may bind, walk up or kickback if the power tool is restarted in the workpiece.
i) Support panels or any oversized workpiece to minimize the risk of wheel pinching and kickback. Large workpieces tend to sag under their own weight. Supports must be placed under the workpiece near the line of cut and near the edge of the workpiece on both sides of the wheel.
j) Use extra caution when making a "pocket cut" into existing walls or other blind areas. The protruding wheel may cut gas or water pipes, electrical wiring or objects that can cause kickback.
4.3 Additional Safety Instructions
Ensure that the spot where you wish to work is free of power cables, gas lines or water pipes (e.g. using a metal detector).
Always use the additional side handle provided when working with the wall chaser (9).
The workpiece must lay flat and be secured against slipping, e.g. using clamps. Large workpieces must be sufficiently supported.
The diamond cutting blades must fit without play in relation to the support flange. Do not use adapters or reducers.
Diamond cutting blades must be stored and handled with care in accordance with the manufacturer's instructions.
Ensure that the diamond cutting blades are installed in accordance with the manufacturer's instructions.
Never switch on the machine without the protective cover installed.
Ensure that sparks produced during work do not constitute a risk to the user or other personnel and are not able to ignite inflammable substances. Endangered areas must be protected with flame-resistant covers. Make sure that fire-risk areas are always provided with suitable fire extinguishers.
The diamond cutting blades continue running after the machine has been switched off.
Always wear protective goggles, dust mask, gloves, ear protectors and sturdy shoes when working with this tool.
Dust from material such as paint containing lead, some wood species, minerals and metal may be harmful. Contact with or inhalation of the dust may cause allergic
reactions and/or respiratory diseases to the operator or bystanders.
Use a suitable extraction unit!
Certain kinds of dust are classified as carcinogenic, especially in conjunction with additives for wood conditioning (chromate, wood preservative). Material containing asbestos must only be treated by specialists.
- To achieve a high level of dust collection, use a suitable Metabo vacuum cleaner together with this tool.
- The work place must be well ventilated.
- The use of a dust mask of filter class P2 is recommended.
Follow national requirements for the materials you want to work with.
Materials that generate dusts or vapours that may be harmful to health (e.g. asbestos) must not be processed.
When working in dusty conditions, ensure that ventilation openings are not blocked. If it becomes necessary to remove dust, first disconnect the power tool from the mains supply (use non-metallic objects) and avoid damaging internal components.
Damaged, eccentric or vibrating tools must not be used.
Avoid damage to gas or water pipes, electrical cables and load-bearing walls (static).
Connect a FI circuit-breaker with max. release current (30 mA) upstream when using the machine outdoors!
Pull the plug out of the socket before making any adjustments, converting or servicing the machine.
A damaged or cracked additional handle must be replaced. Never operate a machine with a defective additional handle.
A damaged or cracked safety guard must be replaced. Never operate a machine with a defective safety guard.
Do not switch on the machine if tool parts or guard devices are missing or defective.
An electronic error is present if the machine accelerates very quickly to maximum speed when switched on. Other safety-related electronic functions are no longer available. Have the machine repaired immediately (see 16.).
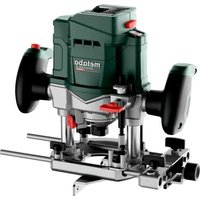
5. Overview
See page 2.
1 Lever for setting depth of cut
2 Scale for depth of cut
3 Aperture of extraction unit
4 Electronic signal indicator
5 Lock (to prevent the machine from being switched on unintentionally, or for continuous operation)
6 Trigger ( for switching on and off)
7 Button (to turn the main handle)
8 Main handle
9 Additional handle
10 Retaining screw
11 Locking button
12 Clamping screw (for securing the safety guard)
13 Adjusting nut
14 Spacers
15 Cut-off wheel *
16 Cut-off wheel *
17 Back flange
18 2-hole spanner
19 Safety cover
* depending on equipment/not in scope of delivery
6. Initial Operation

Before plugging in, check that the rated mains voltage and mains frequency, as stated on the listing label, match with your power supply.
To position the safety guard (if required):
- Release the clamping screw (12).
- Turn the safety guard until the closed section is facing the operator.
- Tighten the clamping screw (12) firmly. Make sure that the guard is seated securely - you should not be able to turn the safety guard (19).
6.1 Pivotable main handle

Only work with the main handle (8) engaged. See illustration B on page 2.
- Push in the button (7).
- The main handle (8) can now be turned 90^ to both sides and can be engaged.
- Make sure that it is securely positioned: the main handle (8) must be engaged and it should not be possible to move it.
7. Groove width
See page 2.

Switch off the machine. Disconnect the mains p
- Lie the tool on its side (the scale (2) for depth of cut must be visible).
- Release the lever (1) for setting the depth of cut and select the small depth.
- Press down the locking button (11) and turn the spindle until you can feel the locking button lock in place (only when tool is stopped!).
- Remove and clean the back flange (17), spacers (14) and adjusting nut (13).
- Fit the back flange (17) on the spindle. The flange should not turn on the spindle when properly attached.
- Fit the cut-off wheel (16) onto the back flange.
Make sure the direction of rotation is correct.
ENGLISHen
The direction of rotation is indicated by arrows on the cut-off wheel and guard.
- Fit the spacers (14). For groove width and spacers required, see table on page 2.
- Fit the cut-off wheel (15). Make sure the direction of rotation is correct. The direction of rotation is indicated by arrows on the cut-off wheel and guard.
Regardless of the groove width, all seven spacers must always be fitted. There must be at least one spacer between the two diamond cut-off wheels.
- Screw on the adjusting nut (13).
- Press and hold down the locking button (11).
- Using a 2-hole spanner, tighten the adjusting nut (13) (18).
Since the mounted cut-off wheels protrude from the safety guard, store the tool by placing it on its side, not on the rollers.
! Carry out a test run: Position yourself and bystanders away from the plane of the rotating wheel and run the power tool at maximum no-load speed for one minute. Damaged abrasive wheels will normally break apart during this test period. Stop immediately if significant vibrations occur or if other defects are noted. If such a situation occurs, check the machine to determine the cause.
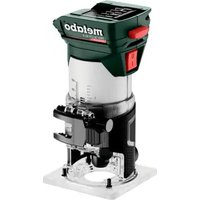
8. Using the machine with only one diamond cut-off wheel
If you remove the front diamond cut-off wheel and leave only the rear wheel on the machine, the wall chaser is then suited for cutting through materials (e.g. tiles).
9. Depth of cut
Release the lever (1) and set the depth of cut. Tighten the lever (1) again.
Tip: In the case of very hard concrete and cuts deeper than 35mm we recommend setting the cut in two steps to avoid overloading the machine.
10. Extracting the stone dust

Caution! Never work without a dust extraction device. Dusts can be harmful to health!

Never work without a dust extraction device. The motor can quickly choke on stone dust.
Use a suitable Metabo vacuum cleaner (see section15.).
To extract stone dust generated during work with the wall chaser, insert the suction hose 30 344 (4 m) in the aperture of the extraction unit (3). The bayonet catch prevents the suction hose from coming loose while the machine is in operation.
Using a second suction hose
30 344 allows you to set up the extraction unit at a distance of up to 8m from the work place.
(Suction hose not included in scope of delivery).
To connect a suction hose without a bayonet catch, use the connection adapter provided.
11. Switching on and off

Always guide the machine with both hands.
Switch on first, then guide the accessory towards the workpiece.
The machine must not be allowed to draw in additional dust and shavings. When switching the machine on and off, keep it away from dust deposits. After switching off the machine, only place it down when the motor has come to a standstill.
Avoid inadvertent starts: always switch the tool off when the plug is removed from the mains socket or if there has been a power cut.
In continuous operation, the machine continues running if it is forced out of your hands. Therefore, always hold the machine with both hands using the handles provided, stand in a safe position and concentrate.
See illustration A on page 2.
Torque activation
Switching on: Slide the lock (5) in the direction of the arrow and press the trigger (6).
Switching off: Release the trigger (6).
Continuous operation (depending on features)
Switching on: Slide the lock (5) in the direction of the arrow, press the trigger (6) and keep it pressed. The machine is now switched on. Now slide the lock (5) in the direction of the arrow once more to lock the trigger (6) (continuous operation).
Switching off: Press the trigger (6) and release.
12. Working With the Wall Chaser

Only use the wall chaser with the additional handle attached (9)!
Once the retaining screw is released (10), you can adjust the handle holder in 30^ steps to the relevant working position. When the retaining screw is tightened, the 4 fixing pins on the handle holder are introduced into the corresponding holes.

Always hold the tool by the main handle and additional handle, using both hands.
Position the wall chaser with the rear guide rollers on the work surface.
Slowly move the operating machine downward until all guide rollers are lying flat on the work surface.
Then pull the machine in the chase direction, e.g. from top to bottom as shown in Fig. A below (page 4) or - for horizontal chases - back towards itself as shown in Fig, B (page 4).
Once the channel is complete, switch off the tool and hold it steady until the wheel comes to a stop.
Never attempt to remove the cut-off wheel from the cut while the wheel is in motion otherwise kickback may occur. Lay the tool on its side.
You can remove the remaining strip between the two chases with the chase extraction chisel provided.
13. Cleaning
To clean the motor: To prevent stone dust from collecting inside the wall chaser, you must occasionally clean the motor by blowing compressed air through the air duct on the back of the motor housing, if the machine is used for extended periods. If possible, this process should NOT be carried out indoors/in a confined space.
Button (7) for adjusting the handle: Occasionally blow compressed air through the button (when pressed, in all 3 main handle positions).
14. Troubleshooting
- Overload protection: The electronic signal display (4) lights up and the load speed decreases slightly. The machine is overloaded. Work with a reduced load until the electronic signal display goes out.
- Overload protection: The electronic signal display (4) lights up and the load speed decreases dramatically. The motor temperature is too high! Run the machine in idling until it cools down and the electronic signal display switches off.
- Metabo S-automatic safety stop: The electronic signal display (4) lights up and the machine SWITCHES OFF automatically. If the slew rate of the current is too high (for example, if the machine suddenly seizes or kickback occurs), the machine switches off. Switch off the machine at the trigger (6). Switch it on again and continue to work as normal. Try to prevent the machine from seizing. See section 4.2.
- Restart protection: The electronic signal display (4) FLASHES and the machine does not start. The restart protection is active. If the mains plug is inserted with the machine switched on, or if the current supply is restored following an interruption, the machine does not start up. Switch the machine off and on again.
- When switched on, the machine accelerates to maximum speed very quickly, i.e. automatic restriction of the starting current does not work (soft start). An electronic error exists. Other safety-related electronic functions are no longer available. Have the machine repaired immediately (see 16.).
15. Accessories
Use only genuine Metabo accessories.
If you need any accessories, check with your dealer.
Metabo diamond cut-off wheels:
diameter 230~mm , laser-welded, suitable for dry cutting, wheel thickness in the clamping range = 1.8 mm , bore = 22.23 mm ,for wall chaser MFE 65 Application Order no.
for hard and medium-hard materials (e.g. concrete, including reinforced concrete) 6.28134
for abrasive materials (e.g. abrasive concrete, sandstone, lime sand brick, aerated concrete and similar materials) 6.28145
16. Repairs

Repairs to electrical tools must be carried out by qualified electricians ONLY!
If you have Metabo electrical tools that require repairs, please contact your Metabo service centre. For addresses see www.metabo.com.
You can download spare parts lists from www.metabo.com.
17. Environmental Protection
The sanding dust generated may contain hazardous materials: do not dispose of with the household waste, but at a special collection point for hazardous waste.
Observe national regulations on environmentally compatible disposal and on the recycling of disused machines, packaging and accessories.
Packaging materials must be disposed of according to their labelling in accordance with municipal guidelines. Further information can be found at www.metabo.com in the "Service" section.
Only for EU countries: Never dispose of power tools in your household waste! In accordance with European Guideline 2002/ 96/EC on used electronic and electric equipment and its implementation in national legal systems, used power tools must be collected separately and handed in for environmentally compatible recycling.
18. Technical Specifications
Explanation of details on page 3. Subject to changes serving technical progress.
D =Diameter of the diamond cut-off wheels
B =Groove width options
T =Adjustable depth of cut
P1 =Nominal power input
P2 =Power output
n =No-load speed
m =Weight without mains cable
Vibration total value (vector sum of three directions) determined in accordance with EN 60745:
a_h = Vibration emission level K_h = Uncertainty (vibration)
The vibration emission level given in this information sheet has been measured in accordance with a standardised test given in EN 60745 and may be used to compare one tool with another. It is also suitable for a provisional estimate of the vibratory load.
The specified vibration level applies to the main applications of the power tool. However, if the tool is
ENGLISHen
used for other applications, with different accessories or when poorly maintained, the vibration level may vary. An estimation of the level of exposure to vibration should also take into account the times when the tool is switched off or when it is running but not actually in use. This can considerably reduce the vibratory load over the entire working period.
Identify additional safety measures to protect the operator from the effects of vibration such as: maintain the tool and the accessories, keep the hands warm, organisation of work patterns.
A-effective perceived sound levels:
L_pA =Sound pressure level
L_WA =Acoustic power level
K_pA / WA = Uncertainty(noise~level)

Wear ear protectors!
Measured values determined in conformity with EN 60745.
Machine in protection class II
Alternating current
The technical specifications quoted are subject to tolerances (in compliance with the relevant valid standards).
Notice originale
6.1 Asidero principal giratorio
Reservedelsestiner kan downloads paa www.metabo.com.
ah =Vibrationsemission
K_h = Usikkerhed (vibration)
He donyckaetc06pa6oTKa MaTePnaIOB, BbIeJIIOx ONaCHbIe IJIa 3DOpOBbI PbIb NJI npbl.
OTBETCTBEHHOCTb 3a JIO6OuYUeep6,CB83aHHbIc
PnIMHeHEm HNCTpyMeHTa He NO Ha3HaueHIO,
BO3laEaTcB NOLHOM O6bEM Ha NOLb3OBaTeJI.
Heo6xOIMO co6IIOdaTb 06eepnHrTbIe npaBnA
TexHKn 6e3ONaCHOCTN, a TaKHe yKa3aHnR,
npiHaeraMble K daHHOMy pyKOBOdCTBy.
3.Оьи ue yha3aHnno TeXnKe 6e3oNaChocTH

Дя Baшew co6cTBeHHo 6e30nacHOCTn 3aunTbI 3JeKTPoHnCtpyMeHTa OT NOBpeJdeHn CO6JIoDaIte yKa3aHnA, OTMeueHHbI DaHHbIM CmBOJOM!

PNEyPENHEHNE!BueJAXCHNKeHn PNCKa TpaBMPOBaHnIpoHTe pyKOBoD-CTBO NO 3KcNlyatau.

PNEyPENKDEHNE! PnOuTte Bce HNCTpykunnyka3aHnnoTexHnke
6e30nacHocTn. HeBbIOnJIHeHne HNCTpyKuH N yKa3aHH NO TexHNKe 6e30NaChOCTn MOKeT npNBecTN K NopaHexHIO 3JIeKTPnuYeCHM TOKOM BO3rOpAHIO HIN N K NOLyueHIO TJKeJIbIX TpaBM.
CoxpaHnte Bce HnctpyKuN uYka3aHnna nToTexHnke 6e3oNaChocTn dIy6yUeRoBlaedeIbua HaCaKn.
IpeepaBaIte 3JIeKTPoINHCTpyMeHT CJIeDyIOUeMy BlaJeBcTy TOJbKO BmecTe C 3TIMN DOKyMeHTaMn.
4. CneuaJIbHbIe yHa3aHnnoTexHnke 6e3OpaCHOCTn
4.1 Yka3aHnno TexHnke 6e3onacHOCTn DnI WInΦOBaJIbHO-OTpe3HbIX MaWHN
a)HaedEHHO yCTaHOBNTe OTHOCaUNcRA 3JeHTpOHnHCTpyMeHTy 3aunTHbIKoHXN
OTperyIpye erTo TaH, TTO6bI HN OHa DaHe
camaMa MaJIeHbKa Yactb a6pa3NBHO
HHCTpymeHTa He 6bIa OTKpbIta C BaWei
CTOPoHbI - ToIbHO TaHIM o6pa3OM
OBeCneuHBaETc MaHCmMaJIbHa
6e3OnaChocTb pa60tI. PpocJeNTe, TTO6bl
HN Bbl, HN CTOraune pAdom JIOH He
HAXODINCb B NIOsCHOCTn BpaUaIOUeOcR
a6pa3NBHO Kpyra. 3aunTHbIKoHuyx O6ra3aH
3aunTaB ONepaTopa OT OCHONOB IOT
ClyauHoro KOHTaKTa C a6pa3NBbIM
MaTePnaJOM.
b) Испοльзуй Te Дя Baшero эльентроннструмени Тольноалиma3нBLE OTpe3нBLE Ктуг.ТолькOTфakT,чTO Bam yДалocb 3akpenTb ринадлжнoctи Ha эльентроннструмени, He rapaHTnpyET erO hydжнOH 3HcIIpyatauN.
c)ДоустимаячасотаВрашенирабочero
нстурмента Должна 6ыть He Нх;
maхсимально часоты Врашени,
уразанно на Злentоннстурмен.
Приhalделжно, Врашалшесс с ооборам,
празышалшим.Dоустимbie, могут
pa3pyштбя.
d) A6pa3NBbIe MaTePnaJIbI pa3peWaaTcR HCNoJIb3OBA TbToJIbKO dJIpeKOMeHIOBaHHbIX BnIOB pa6OT, HApPmEp: HNKoRJa He IpnON3BOAnTe WlnΦOBaHne 6OKOBOnOBepxHOCTbIO OTpe3HOrO Kpyr NpeJHa3HaueHbI dJI r CHHTN MaTePnaJa KpOMKo Kpyra. BokOBoe CINLOBE BO3deIeCTBHe Ha OTpe3HO Knpy MoKeT pa3pyuHTb erO.
e) Bcerda nCNoIb3yIte nCnpaBHyI 3aHmHOJ PhaHeU,ero pa3Mep HOpMa DOJIHHbI COOTBeTCTBOBaTb Bbl6paHOMy a6pa3NBHomY Kpyr. PhaHeU ppeCTaBnEe T CO60I ONOpY dIa a6pa3NBHO R Kpyra N TaHIM O6pa3OM CHNHaET ONaCHOCTb erO pa3lOMa.
f) HapyHHbI dHaMeTp n ToJIuHnHa pa6oeryo HHCTpyMeHTa DOJIHHa COOTBeTCTBOBaTb pa3MepHBIM DaHHbIM 3JeHTponHCTpyMeHTa. HeBO3MOJHO O6ecNeHTb 3KpaHnpOBaHne I KOHTpOJIb pa6OuHX INCTpyMeHTOB HEnpaBUNbHOrO pa3Mepa.
g) A6pa3nBhble Kpyr n ΦJaHcbl DoJHHbI TOUHO COOTBETCTBOBaTb 7nnHDeJIIO 3JIeKtpOHcTpymEHTa. Pa6OyHe NcHcTpymEHTbl, KOtOpbIe He NoJXoJAT ToUHO K WInHneJIIO, BpauaOTcR HepaBHomepHO, CINbHO Bn6pnpYOT IN MOrTy PnVBecTN K NTope KOHTPOJNAH HmN.
h) He ИспοльзуйTe NOВpeндeнны
a6pa3иBиБе Кpyг. ПЕрДнБIM
ИСПОЛБЗОВАнHem a6pa3иВнБiX KpyROB
пpoверяйTe nx Ha habичne ChOLOB n TpeшиN.
В сlyчae паденя ЗileктponHCTpymeHTa nIIN
a6pa3иВнО Кpyra пpoверьTe erO
ИСпраВHOCtь; ИспοЛьзуйTe TOLьНо
HENOBpeHdENHbI
a6pa3иВнБiн Кpyr. ПocLEпpoверни
уctанови a6pa3иВнО Кpyru пPoCleДNTe,
ЧTOБы HN Bbl, HN CTOnAuzne PЯДOM ЛЮДи He
HaxoDnIcB NIOCKOCTH BpauaIOUeOcR a6pa3NBHO Kpyra, DaIte npa6oTaTb HNCTpyMeHTy ONDy MNHyTc MaKcMmaJbHOuactOTOn BpaueHna. NobpeKeHHbIe a6pa3NBbIe KpyrN ObiuHO IOMaIoTCB BO BpeMa TaKo npOBepKn.
i) HcnoJb3yIte cpeCTBa HNdNBduaJIbHO 3aunTbI. HcnoJb3yIte, B 3aBNCIMOCTH OT Bnda pa60TbI, Macky noHON 3aunTbI Inuca, CpeCDtBA 3aunTbI rna3 IIN 3aunTHbIe OCHN. IIn 3aunTbI OT MeHNx YacTHu a6pa3NBHORO HHCTpyMeHTa MATEpHaIa HADeBaIte Pecnnpatop, 3aunTHbIe HayuHHN, 3aunTHbIe nepaTHn IIN CneuaJIbHbIh φapTyK. 3aunUaTe rna3aOT OTJeTaIOx NocToPOHHX NpeDMetOB. PecnnpatopbI INoCTOpOHNX NpeDMetOB. PecnnpatopbI INaUNTHbIe MaChN DOJHKHbI OTfNtBTOPBbIBaTB NblB, BO3HNaIOUBO BPEM Pa60TbI. DInTEJbHOE BO3deIcTBue rPOMHOrO Wyma MOHe TnpBeCTN K Notepe Cnyxa.
j) CneiTe 3a TeM, TTo6bI dpyrHe IIOH HaxoHIncB Ha 6e3OnacHom pacCTOHHN OT BaWero pa6oYero MecTa. KaKdbI YeNoBEn, BXoJnB B pa6oUyIO 30Hy, O6a3aH HaDeBaTb CpeDCTBa HNDNBdyaJIbHOJ 3aUNTbl.
OTetaOuHne OcKoHn OcbpaTaBbAemOM DeTaN HN NOBOMNBUNeCra paOChne NHCTpyMeHTb MOryT HaHeCTn TpaBMy DaKe BHe paOChen 30Hbl.
k)ПиВыINOLHeHn pa60T B6Iu3n ChpblToH npOBODH Hn CTeBOrO Ka6eHa Camoro IHCTpyMeHTa DePKeHTE INHCTpyMeHT TOJIbKO 3a H3OJInPOBaHHbIe NOBepXHOCTH. Pn KOHTaKTe C TOKONpOBoDAUm Ka6eJeM MetaJIuYeCKHe YAcTn IHCTpyMeHTa MOrY Oka3aTbCra NOD HaPRAJKeHEm, yTO MoJcET pNBeCTn K IopAKeHNo 3JIeKTpUeCKHM TOKOM.
I) DepeHnTe CeTeBOH Ka6eJIb NoJaJIbwe OT BpaauoUeOcra pa6oOero HNCTpyMeHTa. B Cnyae NOTepn KOHTpOJIra NaI INHCTpyMeHTOM OH MOKeT Nepepe3aTb IIN 3aTHHyTB CeTeBOH Ka6eJIb, N pRn 3Tom BaWu pyKu MOrY T nonAcTb B 3OHy BpaueHnra pa6oOero HNCTpyMeHTa.
m) HnKorDa He KlaaHnte 3JeHTponHcTpyment Do noJHoN octAHOBKn pa6Oyero HHCTpymeHTa. Bpaauounca pa6OuH INHCTpyMeHT MOKeT KOChYbCra NOBepXHOCTn, IN B pe3yIbTaTe 3TOr MOKeT npOn3OHTn NOTepa KOHTPOJIHa d3JeKTponHcTpymENTom.
n) He BkIouaTe 3JeHTponHCTpyMeHT BO BpeMa erOp nepeHoCHN. Bpaauoynnc pa6oynu INHCTpyMeHT MOKeT 3axBaNTb DeTaIN ODeHDb, B pe3yNbTaTe Yero Bbl MoKeTe NOnyUHTb TpaBMY.
o) PeryIrpHo OuHuaTe BeHTnlaCIOHHbIe ⅢeH3JIeKTPOHcTpymEHTa. BeHTnJIrTO pDIBraTeJIa 3aTARnBaET NbIb B KOpNyc, a 6OJIbwoe CKONJIeHHe MeTaJIINuecHOn NbIIN COnpJKeHO C ONaCHOCTbIO BO3dEInCTBnA 3JIeKTPUeCKORTo Ka.
p) He nCnoJb3yIte 3JIeKTHPOHcTpymeHT B6JIn3N JIERKOBCnJaMeHryIOUxxCa MaTePnaIob. IcKpbI MOrY T Bbl3BaTb BOCnJaMeHeHne 3TNX MaTePnaIob.
q) He nCnoJb3yIte pa6OuHe HnCTpyMeHtbl, KOTOpBle Tpe6yIOT npImeHEnn OXlaHdaIOUe HnIDHOCTN. IcNoJIb30BaHHe
BOBBI HIN HHOXJHDAIOUe JHKOCTH MOKET npBeCTN K ydapy 3JIeKTpuecKIM TOKOM.
4.2 OToJaHa n COOTBeTCTBHyIOUe yHa3aHnA NO TEXHNKe 6e3ONaCHOCTn
OTdau npedctabIeT c6oB HeOHNaHHyIOpeaKuIO B pe3yIbTaTe 3auePLeHnI IN3aKlnHBaHnB BpaUaIOUeROc a6pa3NBHOKpyra. 3auePLeHne IIN 6IoKpOBKa BeDyT K BHe3aHNO OctaHOBKe BpaUaIOUeROc pa6oeryo HNCTpyMeHTa. N3-3a 3aepKKn BpaUeHn pa6oeryo IHCTpyMeHTa pni 6IoKpOBKe IPONCxOJNT HeKOHTPoJIpyEmbl pbIBOK 3JIeKTPOINHCTpyMeHTa.
EcIn, HApnMep, abpa3nBHykpyr 3aKHMaeTcB 3aROTOBKe, KpOMka Kpyra 3acTpBeaET, IN B pe3yIbTaTe 3TOrO Kpyr MoJcET O6lOMITbcr HIN Bbl3BaTb OTdauy. BcJeDCTBne 3TOrO HcHcTpymeT DnKHeTcB HAnpaBLeHnn OepaTopa HIN B npOTNBONIOXHom HAnpaBLeHnn, B 3aBNCIMoCTN OT HAnpaBLeHnn BpaSeHn Kpyra B MeCTe 3aKHMa. Ppr 3Tom a6pa3nBHykpyr MoJcET pa3pyuNTbcr.
OTdauaBnIeTcCleEdCTBHeM HeIpaBnIbHOHn HeymenO 3KcNlyaTaunn 3NeKtpOnHCTpyMeHTa. Ee MoHHo N36EkaTb Pn CO6JIOpEnn OINcaHHbIX HnKe Mep npedocToPOKHOCTn.
a) Kpenho depHnTe 3JeHTpOHnCTpyMeHT B pyKax N BCTaHbTe TaK, YTO6bl Bbl MOrIn npOTNbOeJCTBOBaTb CnIe OTdauN. Pnp HAnuyn BCerda NcNoJIb3yIte DOONHnTeBHyO pyKoRTHy, DnA TORO YTO6bl MaHCmMaJIbHO KOHTPOJnPoBaTb CNly OTdauN INIpeAKTNBbIM MOMENT pR pa3roHe. Pn CO6JIIODeHN Mep IpeIOCTOpOJHOCHTN Bbl CMoXHeTe pOTNbOeJCTBOBaTb OTdauNe I peAKTNBbIM CINAm.
b) HnKOrda He depKHTe pyHy B6JH3n BpaaOuXcra pa6OuNX nHCTpyMeHTOB. Ipn OTdaue pa6OuH INHCTpyMeHT MOKeT KOCHyTbcr pyKn.
c) He cToIte B 3OHe nepei N 3a BpaauoUIMMCr OTpe3HbIM Kpyrom. HanpaBJIeHne DvIXeHnna 3JIeKTPOINHCTpMyEHTa Pn O'Taue IPOITIBONIOJXHO DvIXeHnIO UInΦKpyra B MeCTe 3aKIma.
d) Pa6oTaIe OcO6eHNO OCTOpOHNO B O6laCTn yrIOB, ocTpblx KpOMOH T. n. He donycaIte OTChaHbAHNn nn 3aUeMLeHnna pa6ouHX nHCTpyMeHTOB 6Opa6aTbIBaEMOn DeTaN. Bpa7auoHnCra pa6OuN INCTpyMeNT cHIOHeH K 3aUeMLeHnIO npn pa6Ote B O6laCTn yrIOB, OCtpbIX KpOMOK nn npn OTChaHbAHN. 3TO BBi3bIbAE TNotepHO KOHTPOJn nn OTdaCy.
e) He nCnoJb3yIte cenHoi nn 3y6aTbI INnIbHbI dNcH, a TaHKe cerMeHTnpoBaHHbI anMa3HbI dNcK co WnIcuom, WnPnHa KOTOPOr npEBiShaet 10 MM. NDo6HbIe pa6Ouy HnCTpyMeHTbI qAcTO Bbl3bIBaIOT OTdauY nn NotepIO KOHTpOJa HaJ 3JIeKTPOINHCTpyMeHTOM.
f) H36eraaTe 3axHMa OTpe3Horo Kpyra nIn cLHxHOM 60JbWOrO daBJeHHn npHXHm. He BbINOJIHnTe cLHxHOM rIy6oHne pe3bl.
PYCCHNIRu
Ipeperpy3ka OTpe3Horo Kpyra npHBoJNT K erO IpehenaprrKeHNIO N K nepeKocam NII 6LOHPOBKe N TeM CaMbIM K BO3MOHHOI OTdAue NN NOLOMKe abpa3NBHO MaTePnAna.
g) B clyuae 3aHnma OTpe3Horo Kpyra Hn npn nepepbIbe B pa6ote OTKIOUHTe INHCTpymENT n NOdepHnTE erO B pyKe Do NOnHOJ OCTaHOBHN BpaauoUeOcR Kpyra. HnHorda He nbTaIaTecb BbITaunTB DnHKyUnsCRA OTpe3HOJ Kpyr n3 pa3pe3a, TAK KaK 3TO MOxET Bbl3BaTb OTdauy. OnpedeJIte u yctpaHnTe npuHy 3aKnnHBaHn.
h) He BnIouaTe 3JeHTpOHcTpyMeH, ecnn OH HaxoNTcB O6pa6aTbIBaEMoJ DeTaJIH. Chauana daIte OTpe3Homy Kpyr Hy6paTb NOHyIO YactOTy BpaUeHHN, TOnbKO NocLe 3TOO OCTOpOHHo NPODJIHKeITpe3Hy.B IPOTNBHOM Cnyae Kpyr MOKeT 3aKINHHTb, OH MOKeT OTCHOHTb N3 O6pa6aTbIBaEMoJ DeTaJIH INN Bbl3BaTb OTdauY.
i)ДЯСнжehняпсka OTDAчВ pe3yЛьтATE 3aKlnHnBaHH OTepe3HOrO Kpyra npn 06pa6OTHe ПNTИЗarOTOBOK 6OJbWORO pa3Mepa NOBEdnte NOH INx ONOPY.
3arotobhno 60nbwofo pa3Mepa MoryT nporhytbcnao DeiCTBnEM CO6CTBeHHoro Beca. Noad 3arotobHy CneJeYeT NOBBeCTN ONOpbIC DByxCtoPOH B6n3n pe3a n KpOMKn.
j) Bydte oc6eHHO octopOHbI npn Bblpe3aHHN HwB cyuEcTByIOUx CTehax IIN dpynx He npocMaTpNBaEmbIX 30hax.
NorpykaembI OTpe3HOH Kpyr MoKet Bbl3BaTb OTdau npa pa3pe3AHn Ra30- N BOOIpOBODOB, 3JIeKTpUueCHX IpOBoOB HnN HbIX OBeHTOB.
4.3 DOnoJIHnTeJbHbIe yHa3aHnI NO TexHHKe 6e3onacHOCTN:

PNEyPENKDEHNE-Bcerda Hocnte 3aunTHbIe OUK.
Y6eHTecb, YTO B TOM MecTe, rIe 6ydyT npOn3BOInTBcra pa60TbI, He npoxoJr LiHHN 3JIeKTo-, BODo- n Ra3OCHa6KeHn (HaNPmep, C NOMOsbIO MeTALIOINCKaTeJI).
Bo Bpempa6oT co wItpo6ope30m Bcerda HcnoJIb3yIe BXOJaUyIO B KOMnJIeKT NocTaBKn 6OKOBYIO DOnONHITeJIbHyIO pyKoAry (9).
O6pa6aTbIbAeMyIO DeTaJIb HyKHO npOHyO 3aKpeNITb H 3aΦIKCnPOBaTb OT CdBnRa, HanpHMeP, C NOMOuBIO 3aXHMhBIX npncnoc6JIeHn. KpyHbIe 3arOTOBKn DOJHKHbI HmEt b DOCTaTOHyIO ONOpY.
AIma3HbIe OTpE3HbIe KpyrN DoJIHHbI 6e3 3a30pa
NoDxOuNTb K NoDpeKnBaIOUeMy flaHcy.
PpimHeHne aAnTepOB nIn nepExoHNKOB
3anpeuaetcra.
XpaHnTb n npimMeHrTa aIma3HbIe OTpe3HbIe KpyrN Heo6xOdmo aKkypaTHO N B COOTBETCTBHN C npednncAHmnpOn3BOJNTeJI.
Y6eHNTecb, YTO aIma3HbIe OTpe3HbIe KpyrN yCTaHOBJIeHbI B COOTBeTCTBn C IHCTpyKcIyMn npOn3BOJNTeJI.
HnKorda He 3KcnnyaTpynte INHcTpymeHT 6e3 yCTaHOBJIeHHOrO 3aUNTHOrO KOxyxa.
Bo3HnKaIOUeB npOceCe pa60Tb I NcKpbI He
DOLKHb6bITb HCTOCHNKOM ONaCHOCTN,HaPnMep,
nonaDaTb Ha BOCnJaMeHЯIOUeC8 BeUeCTBa,
NoIb3OBaTeJIy INpyrIX IInu. PoJapoonacHbIe
yAcTKn CLeDuET N3OJInpoBAtB
HeBOcNJaMeHReMbIM NOKpbITHe.M. Pn pa6Ote B
NoJXapoonacHbIX 3OHax CoDepKHTe B rOTOBHOCTN
CpeDCTBa NoJXapOTyuSeHnI.
Iocne OTKIOUeHnE 3JeKTPoINHCTpyMeHTa aMa3HbIe OTpe3HbIe KpyrN PpOdoJkaIoT DBnRaTbCn NO INHePcnn.
Pn pa6ote c 3JeKtpoHcTpymeHTOM Bcerda HaedeBaIte 3aunTHbIe OUK, peCnnpaTOp, pa6oUne nepaTkn, 3aunTHbIe HayuHNKn IN HeckOJIb3aUyO6yB!
Пьл,ВОЗнkaIOUЯ npиOBpa6OTKe MaTePnaIIOB,COДржаux CBnHeu, HeKOTOpbIX BINOДpeBecnHbl, MInHepaIOB N MeTaJIIOB,MOJET
npectabTb cobon onacHocb dIy 3doPObB.
Bdbxahne yactu taKo nbIn nIn KOHTc C Hei MOKeT cTaTb npUHHoN IOBHeHn
aIleprnuecknx peakun N/Inn 3a6OJIeBaHn
DbixaTeNbHbIX nyTei.
IcnoJb3ynte npiroDHyU yCTaHOBky dIy
ydaJeHn Ibln!
HeKOTOpbIE BnDbI NbIIN CUnTaHOTc KaHcEporeHHbIMN,OCO6eHHoB KOMbHaCmN C DonOJIHTeJIbHbIMM MaTePnaJAmN, IcNoJIb3yEMbIMN JIg O6pa6OTKn DpeBecHbI (CoJI XpOMOBONKNCLOTbI, CpeDCTBa 3aUHTbl DpeBecHbI).O6pa6OTKa MaTePnaJIOB C CoDepeKaHHeM ac6EcTa DOJIxHa BblNOJIHrTBcR ToJIbKO CneuaJIInCTAmN.
-Дя ONTUMaMbHOrO ydaJIeHnI NBIN NcNoJIb3yIte 3TOT 3JIeKTpONHCTpyMeHT B KOM6HaCnC NOxOJaIuM NBJIeECOCOM Metabo.
- 06ecneyTe xopouyu BeHTnlaunpaoboue3OHbl.
- PekomeHnyeTcnaHeBaTbpecnnpaTop c Φnltpom Klacca P2.
CobIouaIte DeIcTByIOUne HaunOHaIbHbIe npedncaHHaNo 6pa6OTke MaTePnaIOB.
He donyckaetc o6pa6oTKa MaTePnaIOB, BbIeJIIOUx ONaChbIe IJIa 3OpOBbI bIb IIN Napbl (B yacTHOCTN, ac6ecTa).
CJIeIte 3a TEM, YTO6bIB yCJIOBnIX
3aNbIeHHOCTn pa6oTaIN BCE BEHTnlaUHOHbIE OTBepCTn. Pn HEO6XODMOCTH OuNCTHN
NHCTpyMeHrAOT NbIIN OTKIIouHTe erO OT CETN IN CJIeIte 3a TEM, YTO6bIPn OUcTKe He
IpON30WJIO NOBpeKdEHN BHyTpEHNX DeTaJIeN (HCNoJIb3yIte HEmTaJIInueCKne ppeDMtbl).
He donyckaetc npimehene NOBpeKdEHHbIX, DeopmnpoBaHHbIX NIN Bn6pnpuyuux pa6ounx INHCTpyMeHTOB.
He donyckaIte noBpeKdEHH ra30- nII BODOpPOBOOB,JIHHN 3JIeKTPoNTaHnI Hecyuix CTeh.
PnHcNoB3OBaHHN HNCTpyMeHTa Ha OTKpbITOM BO3DyXe npedBapnteBHO BHKIOUHTe aBTOMaT 3aunTbI FI cMaKc. TOKOM OTKIOUChENr (30 MA)!
Ipepe npoBeHnem KaHX-Jn60 HacTpoE, nepeochaueHn IIN pa6OT NO TexHnueckomy 06cnyKnBaHnIO BbIHMaTe CeTeByIO BnIKy n3 po3eTKN.
NobpeKdEHHyU HIN NIOTpeckKaBHyOcR DONOJIHnTeJbHyU pyKOaTHy CJeDyeT 3aMeHNtB. He nCNoJIb3yIte HnCTpyMeHT C DeΦeKTHOJ DONOJIHnTeJbHOH pyKOaTKoH.
NobpeKdEHHbI ININOTpeCKaBUncR 3aUHTbI INOHyX CJIeDyET 3aMeHNTb. He nCNoJIb3yIte INHCTpyMeHT C DeΦeKTbIM 3aUHTbIM KOHXOM.
He BkIouaHte HNCTpyMeHT npn OTCyTCTBnH nnIOBpeJdeHn erO deTaJeH nn 3aunTHbIX npncnoc6JIeHn.
Ecn npn BkIoueHnn 3JeKtpOnHCTpyMeHT CInuKOM 6bICTpo DOCTnraeT MaKcImaJIbHOJ YactOTbI BpaueHn, IMeET MeCTO OUn6Ka B 3JeKtpOnHOM 6JIOKe. JpyHe yKa3aHn NO TexHnke 6e3oNaCHOCTN OTHOCHTeJIbHO FyHKnJ 3JeKtpOnHOrO 6JIOKa He IpnBOdA TcR.
HemeIeHHo cdaIte 3JeHTpOHcTpyMeHT B peMOHT (CM. IaBy 16.).
5.0630p
CM.C.2.
1 Pbyar dny pepynilipOBkn Iy6nHbI NJIeHnA
2UkaIraIy6HbI HnneHn
3 YctaHOBOUHoe OTBepCTne IyIbIeYdaJIauOJero annapata
4 3JIeKtpoHHbI CnHHaJIbHbI INHINKaTOp
5Блokиратор (Дязашитbi OTслучанHorO BкlioуенЯ/aHTNB3aцин HeNPepepbIBHORo peKIma pa60TbI)*
6 HaKIMHOI nepeKIOUaTeJIb (ДЯ BKNIOUeHIN/ BBIKIOUeHIN)
7 KhoHnKa (dЯperyIInpOBKn OCHOBHOn pyKoTkn)
8 OchOBHpa pyKoRTka
9Дононтельногукогга
10 CTonOpHbI BnHT
11 CtonopnHa KhoHa
6.1 NOBOPOTHAR OCHOBHAR pyKoTHa

Pa6oTaIeToJIbKOc3aΦNKcnpOBaHHoOCHOBHOpyKoTko(8).
CM.pncyHOKBHa c.2.
- HaKMMTe KHOINKy (7).
- Tenepb OCHOBHyO pyKoTky (8) MoKHO NOBepHyTb B o6e CToPOHbI Ha 90^ n 3aΦNKcnpoBaTb.
-Проверъпpoчнocь NOcaДи: OCHOВнагуКОТKa (8)doJIKHа 6bITb 3aФИКсИрOBаHa n HeДоЛЖна пpoBOPaЧиBaTбс.
7.Ширна заа
CM.c.2.

BbIKIOHTe MaunHy. BbIepHnTe cTeByIO BNJHy!
-ПОJOKHTe INHCTPymeHT Ha 60K (ДOLЖHa 6bITb BnDHa shkaJa (2) rIy6NHi nJIeHnI.
-Ocna6bTe pbyar (1)ДЯperулрOBKn rIy6HbI nIIeHnI yCTaHOBNTe MInHMaJIbHyO rIy6Hny nIIeHnI.
- Haxmnte cTOnOpHyIO KhoNky (11) n NOBepHnTe ⅢINHdJIb, NOKa cTOnOpHaJ KHOJa He 3aФNKcnpyETcR CO UeJIYKOM (ToIbKO npn Hepa6OtaIOUeM əJIeKTpOdBvIraTeNe!).
-СнHMITEи OuHCTte OOnOpHbI ΦlaHeU (17),pacnOpHbIe шaI6bl (14)иЗжIMHyIO raIKy (13).
- YctaHOBnTe OOnpHbI ΦlaHeu (17) Ha
UHHdeJIb. ΦlaHeu yCTaHOBJeH npaBnJIbHo,
ecn OH He npOBopaUNBaETcHa UHHDeJIe.
- HaJeTb OTpe3Hoi Kpyr (16) Ha onOpHbI ΦlaHeu. IpoBepntb npaBnIbHoCTb HAnpaBLeHn BpaUeHn. IpaBnIbHOe HApBaPBeHne BpaUeHn yKa3aHO CTpeJIkAmn Ha OTpe3HOM Kpyre n 3aUnTHOM KOKxye.
- Hacaɪntb paçnopNbIe Ⅶaɪ6bI (14). ΜιρnHy na3a n Tpe6yEmbIe paçnopNbIe Ⅶaɪ6bI cM. B Ta6JIncIe Ha c. 2.
- HacaHbToB OTepe3HoN Kpyr (15). NpOBePHTb npaBnIbHOCTb HAnpaBLeHnB BpaSeHn. IpaBnIbHoe HAnpaBJeHne BpaSeHn yKa3aHo CTpeJkAmn Ha OTpe3Hom Kpyre n 3aUHTHom KOxHyxe.
He3aBnCmO OT shnPnHb Na3a DoJIHHbI 6bITb yCTaHOBJIeHb BCE CEMb pAcNOpHBIX WaIb, BXODAUX B KOMNJIeK T NOCTABKN. MeJy OBOHMn aJIMa3HbIMN OTpe3HbIMN KpyrAmN DoJIHXHa HAXODITbcR KaK MInHMym OJHa pacNOPHa WaiBa.
- HabepHyTb 3aKIMHyo raKy (13).
-HaKMnTe cTOnOpHyIO KHOHcy (11) u ydepeHHBaIe eB HaKaTOM NIOLOKeHN.
PYCCHNIRu
-3aTAHHTe 3aHmHryo raHy (13) c NOMOu bIO DByXHTnΦTOBOro KJIoua (18).
YcTaHOBJIeHHbIe OTpE3HbIe KpyrN BblaOTcN 33aUHTHO HOxYxa, N03TOMy He CTaBBTe HnCTpyMeHT Ha XoOObIe POINK, a KlaJnte Ha6OK.
IpoBcHte npo6hbi nuc: npocJeNTe, YTObbln Bbl, HN CTOaUne pRdOM JIOH He HaxoHINscB PLOCKOCTn BpaaUoUeROc a6pa3NBHO Kpyra, DaTe Nopa6oTaTb IHCTpyMeHTy ONDHy MInHyC MaKcMmaJIbHO uactOTOB BpaueHN. IOBpeJKeHHbIE a6pa3NBbIe KpyrN O6bHuHO LOMaIOTc BO BpeM TaKo IPOBepKl. Ipn NOBLeHN OuyTMoB BV6paunu nn dpyr NeΦeKToB Cpa3y He BblIOUHTe 3JeKtpOnHCTpyMeHT. B 3tOM clyuae CJeDeyET npOBepTb 3JeKtpOnHCTpyMeHT uYCTaHOBHTb IpnuHy HeNCnPabHOCTn.
8. Исторьанne эльсторнострумени С одни мальзны OTpe3нын круrom
EcIn ChTb nepeHn aIma3HbI OTpe3HOKpyr n OCTaBHT Ha 3JIeKTPoINHCTpyMeHTe 3aHN Kpyr, Wtpo6ope3 6ydt npiroDeH dJpe3Kn (HaNPmep, KaΦeJbHOI pNTKN).
9. Г lyбина пленья
Ocna6bTe pbyar (1) n yctaHOBHTe rny6HnHy nIIeHn. ChoBa 3aTaNHTe pbyar (1).
PeKOMeHdaa: npn ouheb JecTKom 6eToHe n rIy6nHe pe3Kn, npeBbIwaOucei 35 MM, peKOMeHdyeTc npON3BOJntb pe3aHne B 2 XoJa dI pyTeBpAueHH nepepy3KN 3JIeKTPoHnCTpyMeHTa.
10. YdaJIeHne KameHHoN nbIIN
BHHMaHHe! HnKOrHa He pa6oTaIe 6e3 nblneOTcabBaOuOero annapata. Nblb MOKeT npedCTaBnTb OnaCHOct DnA 3doPoBb!
HnKorda He pa6oTaIte 6e3 nbileOTcabibaOuero annapata.B npOTNBOM Cnyae DbIrATeIb MoKeT 6bICTpo 3a6ntbCRA nbIbIO.
Icnoj3yTe noDxOaHn PbIeCoc Metabo, cm. rnaBy15..
Дя OTCaCbIbAHn Пыл, BO3HnKaIOUeN BO BpeM pa6OT CO WTPo6ope3OM, BCaCbIbAOUm WlaHr 30 344 (4 M) BCTaBJIeTcB YcTaHOBOuHOe OTBepCTne nbIeYdaJIauOJero annapaTa (3). BaNoHeTHbI 3anop IpeDToBpaUaET HenpeDHaMepeHHOe OTCoEINHeHHe BCaCbIbAOUeO WlaHra BO BpeM pa6Otbl C 3JIeKTPoINHCTpyMeHTom.
Pn nCnoJb3OBAHn BTOPO BCacbIbAOJero 7aHa
30 344 MoXHO yCTaHOBHTb NbIeYdaIIOUHn annapaT Ha pacCToHnN Do 8 M oT pa6oery MeCTa.
(BcacbIbaOuHmUHaHrB KOMnJIeHT NOCTaBn He BXoNT).
IJIy NOIDCOEINHeHNA BCACbIBaIOUeRO WJHaHra 6e3
6aHOHeTHoro 3anopa yCTaHOBnTe npInlaRaembI
NOIDCOEINHHTeNBHy NepexOHNK.
11. Bhijoyehne/BbIKJIOyeHne
HCTpyMeHT Heo6xOaMo Bcerda DepeKaTb 0eMn pykam.
I OIOBOIDTe INHCTpyMeHT K 6pa6aTbBaemOn DeTaJI TOLbKO BKNIOUeHHbIM.
CneIte 3a Tem,HTO6bIHNCTpyMeH THe BTAIBaII N3JIuHHe Nblb N OINIKn. Pp INBIOUeHN N BbIKIOUeHN DEpHXTE erO NOaJIbwe OT CKONNBWeJcNbIIN. He KlaIaNTe INHCTpyMeHr DO NOHOr OCTaHOBKn DBINrATeJr.
He donyckaTe HepeHaMepeHHoro nycKa: Bcerda BbIKIouaTe IHCTpyMeHT npn BbIHMaHm BNkN 3 p03eTKn Hn PpeKpaueHn IODaHu TOKa.
B HenpepbIBHOM peKHMe 3JIeKtpOnHCTpyMeHT npOdoJXaeT pa6oTaTb, daKe ecn OH BbIPBeTcra n3 pyKn. Po3Tomy BceIa HaJeHHO yDepHNBaTe NHCTpyMeHT DByMRA pyKaMn 3a pyKoTKn, 3aHmMaTIte YCTOuHBOe NOLOXHeNc KOHcEHTpnpYrTe BCe BHIMAHne Ha BBINOJIHReMoI pa6oTe.
CM. pncyHOK A Ha c. 2.
KpaTHOBpeMeHHoe BKLIOUeHHe:
BkIIOueHHe: nepeDbINHbTe 6IoKnpaTop (5) B HappaBLeHn CTpeJIKN HaKMITE nepeKlIOuYaTeJIb (6).
BbiknueHHe: OTnyctnte nepeKluoyatelb (6).
HenpepbBHybI peKHM pa60TbI (B 3aBnCHMOCTH OT KOMNJIeKTAUHN):
BkIIOueHHe:pepeBnHbTe 6JIOKnapaTop (5) B HappaBLeHn CTpeLKn HauKMnTe nepeKlOyateIb (6).3JeKtpOnHcTpymeHT BkIOUeH. TepeB pepeBnHbTe 6JIOKnapaTop (5) euepea3 B HappaBLeHn CTpeLKn, YTO6bl 3a6JIOKnpoBaTb HaJHMHOJ PepeKlOyatoJIb (6) (peJHM HepepepbIBHOJ pa60TbI).
BbiknueHHe:HaKMnTe nOTnyCTnTe nepeKluOaTeIb (6).
12. Pa60tbi co wTpo6ope30m
IcnoJIb3yIe 7Tpo6ope3 TJIbKO C yCTaHOBJEHHOJ DOIOJIHHTeJIbHOJ pyKoRTKOH
Iocne ocna6JIeHnA cTOnOpHOro BnHTa (10) MoKHO aHaANTnpOBaTb pyKoJepKaTeJIb WaarAMn 10 30^ K JIO6Omy pa6OcHMy nIoJKeHHIO. Pn3aTAAKHe cTOnOpHOro BnHTa 4 cTOnOpHbIe WTHΦTa Ha pyKoJepKaTeJIe BXODrB COOTBeTCTByIOUne OTBepCTnI.
Bcerda depKHTe HNCTpyMeH T DByM pyKaMn 3a OCHOBHyo N DOONHITeNbHyO pyKOATky.
YctaHOBHTe 7TpO6ope3 3aHIMn HAnpaBIAIOUcIMN poJIHKamn Ha pa6OuyIO NOBepxHOCTb.
MeIeHNo BeNTe pa6oTaOuN HnCTpyMeHT Bn3, noka BCE HaPpABLIOUne poJIHKn He 6yDt npIeRaT K pa6oey nobepxHOCTN.
3aTe m npoTnHHe 3JIeKTpOuHCTpyMeHT B HAnpaBLeHn pe3a,HaPpIMep,Cbepxv BHN3,KaK Noka3aHo Ha pnc.
A (c. 4) Или - пи гориэталь碍 розе - на ceбя, каспаasoHa рис. B (c. 4).
NocJe TOrO, KaK Na3 6yTe rOTOB, BbIKIOUHTe N NOdePHTe INCTpyMeH, NOKa DNCK He OCTaHOBNTc. HnKOrDa He NbTaIaTecb BbITaUHTb DBNHcyuNCr OTe3HOJ Kpyr n3 npONHa, TaK KaH 3TO MOKeT BbI3BaTb OTdauY. OTloJHtE INCTpyMeH BCTOpOHy.
OCTaBsyIOcMeKdyO60MnIPOpNlaMn- nepeMbIkyMOHNOydaJIHTbC NOMoIbO OTceKaTeJRAxOJaUeBO KOMnJIeKT NOCTaBKn.
13. OuHcTka
OuHCTHa DBnraTeJ: IJI npEDoTbpaueHnIOTLOKeHn KaMeHHo NblIN BHyTpN WtPo6ope3aPnp DInTeJbHO 3KcNpyatauH, Heo6XoHmOBBpMaOT BpMeHn PPOUHsTaB DBnraTeJIbNHCTpyMeHTa PPOyBaHnEM (Yepe3BEHTIIaONHHbIe 9eJI Ha 3aHem KOHc KOpNyCaDBnraTeJ).I0 BO3MOxHocTH, 3TO He CTONTDeJaTB B 3aKpbITbIX NOMEueHnx.
KhoNka (7) pyreynipOBn pykOaTHN: nepnoDnueckn npOdyBaIte KhoNky dny peynilpoBKn pyKOaTKn (B HaKaTOM COCToHNN, BO BCex TpEx nolKeHHx).
14. YcTpaHHe HeNCnPaBHOCTeI
3aunTa OT neperpy3HN: 3JeKtpoHHbI CNrHaJIbHbI INHdNkATOp (4) 3aropaeTcN Yactota BpaueHnnoh Harpy3KoCJELKA NOHnKaetc. 3JeKtpoHnCTpymEn TpepepyKeH. PpOdoJkaTe pa60TaTb C NOHKeHHoH Harpy3Ko, noka 3JeKtpoHHbI CNrHaJIbHbI INHdNkATOp He noracHeT.
-3aunTa OT neperpy3Kn: 3JeHTpoHHbI CNrHaJIbHbI INHdNHaTOp (4) 3aropaetcN uactota BpaueHnro Harpy3KoN 3AMETHO cHnaeTc. NObblweHHaTeMnepaTypaDbiratela! DaIte npa6oTaTB 3JeKTPOHNCTpymEnTy Ha XOIOCTOM XOdy, NOKa OH He OCTbIHET n He NorachET 3JeKTPOHHbI CNrHaJIbHbI INHdNkAToP.
-Be30anachoe OTHIOUeHne Metabo S-automatic: 3JIeKTPoHHbI CNrHaJIbHbI INHdINKaTOp (4)ROPHT N3JIeKTPoHHCTpymeHT ABToMaTnuecckN OTHIOUCHJLCr. PnCNIuHOM 6bICTPOM HapactaHmTOHa (3TO IPOINCXODHT HaNPIMep PnBHe3aHHO6BLOKInPOBKe Nn OTDaYe) 3JIeKTPoHHCTpymeHT OTHIOUOaETcR. BbIKIOUHTe 3JIeKTPoHHCTpymeHT HaKIMHBIM NepeKIOUaTeJem (6).IocNe 3TOERO CLeDyET CHOBa BKIOUHTb N IpOdoJHKITb pa6Ory B HopMaJIbHOM peKIme. N36eraIte 6LOKINPOBKn B DaJIbHeNWe.M.Cm. rIaby 4.2.
- 3aunTa OT NOBTOPHO rNcKa: 3JeKToHHbI CNrHaJIbHbI INdIKaTOp (4) MnFAET n 3JeKToHNCTpyMeHT He pa6oTaet.
Cpa6oTana 3aunTa OT nobTopHoro nycKa. Ecnn PnB KIIIOUeHHOM INHCTpyMeHT CeTeBa BnIka BCTaBnIeTcR B PO3eTKy IIN BOCCTaHOBUNAcb NODaHa 3JIeKTPoNITAHN IocNe C6OJ, INHCTpyMeHT He 3ayncKaeTcR. BbIKIOuHTe IN CHOBA BKIOUHTe INHCTpyMeHT.
-ПиВКИОЧENH3JIeHTPONHCTPymeHT OueHb 6bICTPO DOCTNRAET MAKCHMaJbHOH YAcTOTbl BpaUeHnA, T. e. aBtOMaTHueCKHn ORpaHnUHTeJIb NyCKOBORO TOKa (ФункцЯ ПлaBHorO Nycka) He cpa6aTbIbAe.T. Meet MeCTO OUsH6Ka B 3JIeKTPOHHom 6IloKe; dpyrHe yHa3aHnR NO TexHnke 6e3ONaChOCTN OTHOCHTeJIbHO Функцi NJIeHTPOHHO 6ILOKa H epNBODaTcR. HemeDJIeHNO CdaIte 3JIeHTPONHCTPymeHT B pemOHr (CM. rIaBy 16.).
15. Прпнадлжноctи
IcnoJb3yInTe TOLbKO opnHaJIbHbIe npHaJIeXHOCTN Metabo.
3a npnHaJeKHOCTMaN o6paaAtec b K dIJIepy fHpMbI Metabo.
AIma3HbIe OTepe3HbIe Hpyr Metabo:
1320 MM, CBapeHHbIe JIa3epHbIM CnOCo6OM, NOxOyT DJIa cyXoro pe3aHINr, TOnuHa Kpyra B Dnana3OHe 3aKHMa = 1,8 MM, OTBepCTne = 22,23 MM, DJIa Wtpo6ope3a MFE 65
O6laactb npimHeHn Homep dIa3Ka3a
ДТВердогоИсрднгьердогоMaTePnAla(HanpimEp,6eTOH,BТ.Y.apMnpoBaHHb)6.28134
Ia6pa3nBHO MaTePnaIa (HaNPmep, a6pa3nBhBn 6eToH, neChAHNK, CNIIKAthbI KNpNHy, ra3o6eTOH n.T.n.) 6.28145
16. PeMoHT
HpeMOHTy 3JIeKTPoHHCTpyMeHTa DOnyCKaIOTCra TOJbKO KBaIINΦnIUPOBaHHbie CneuaJIInCTbl-3JIeKTPnIK!
Для ремонта заEktrponHcTpymeHTa Metabo obpaцайтесьВ ретнональhoe прдставпгьстBO Metabo.АдPEC CM.На сaite www.metabo.com.
Cnncn 3anaChbix YacTei MoXHo cKaaTb C www.metabo.com.
17. 3auntata OKpyhaIoesei cpebl
YTNIN3aUIO UINFOBAHOBIN BbINBbINOHNrTe OTDeJIbHOOT6bITOBbIXOTXODOB HA COOTBECTBYIOe NLOUaJKe DnCneOxODOB, T. K. B COCTABe NbIIMoRyTHAXOINTbcR BpeHbIE BeUcctBa.
BbInHnIe HaunohhBHe IpaBnla yTnH-3aun n nepepa6OTKn OTCJyKHBWero 3JeKTPoHcTpymeHTa, yNaKOBnN npHaJNeXHOCTeN.
PYCCHNIRu
YnakoBouHbIe MaTePnaJIbI yTnJIIN3HpyUOTcB COOTBeTCTBnC hX MapKnpoBKOI corlaCHO KOMMyHaJIbHbIM npaBnIam. DOnoJIHnTeJIbHyIO INΦOpMaζIIO MOHNO HaHTN Ha caITe www.metabo.com B pa3dIe «CepBnC»

ToIbko DnIa CtpaH EC: He BbIbpaCbIbAaIte 3JIeKtPOnHCTpyMeHT BMeCTe C6bITOBbIMN OTXoJam! CoIJaCHO DnpeKtNBe 2002/96/
EG 06 yTnH3aunn CTapbIX 3eKTPoPn6OpOB IN 3JeKTPoHHOrO 06OpUyOBaHN I COOTBeTCTByIOuIM HaUNOHbHbIM HOpMaM 6bIBWne B yNtpe6IeHN 3eKTPoPn6OpB1 N 3eKTPoHHCTpyMeHTbI NOJIeKaT pa3deJbHOYTHnH3aUnn C cIeJbIO IX NocLeNyUoSeN 3KOLOrHuCeKN 6e3OnaChOH nepepa60TKn.
18. TexHnueckne xapaKTepeNCTnKN
Iorchenia KaHbIM Ha c. 3. OcTaBJIeM 3a co6o npaboHaTexHnueckne H3MeHeHHa.
P2=BbIXOHaRA MOUHOCTb
n=YacToTaBpaueHn86e3Harpy3KN
m=Macca6e3ceTeBOroKa6eJra
Cymmaphoe 3haeHne Bn6paun (BeKTopna Cymma Tpex HappaBleHn) pacCHNTbIbaeTcB COOTBETCTBN CO CTaHdApTOM EN 60745:
ah =3HaueHHe Bn6paun
Kn = KO3ΦΦnUeHT nOprpeuHOCTN (Bn6paun)
YkaaHHbI B DaHHOM pyKOoDCTBe ypoBEH bN6paun H3MepeH MeTODom, ONpeJeHHbIM cTaHdapTom EN 60745, n MoKeT hCNoJIb3OBAtbcr dIra CpaBHeHnE 3JIeKTPOnHCTpyMeHTOB dpyrC dpyrom. OH TaKHe NODxOAnT dIra npDeBaPnteJbHOrO ONpeJeHnE Bn6paUHOHOn HaRpy3Kn.
Yka3aHHbI yPOBeH bN6paunn DeIcTBNTeJIeH dIROCHOBhIX CΦep HcNoJIb3OBAHn
3JIeKTPoHnCTpyMeHTa.ODHaKO ecIn
3JIeKTPoHnCTpyMeHT nCNoIb3yeTcA DIA pyrIX
ZeIeN, C dpyHMn pa6OuHMn IHCTpyMeHTAMN IIN
B Clyuae erO HeyIOBNeTBOpNTeNbHO
TexO6CnyKHNBaHN, yPoBeHb BV6paCmN MOKeT
6bITb INbIM.ДЯ TOUHO rOpTeJeHn
BN6paOnHOHn HArpy3Kn CLeDyET TaKHe
yHTbIBaTb IpOMExKyTHKn BpeMeHn, B TeueHne
KOTOpbIX IHCTpyMeHT HaxOJNTcR B BbIKJIooYehHom
COCTOHHn IIN pa6Otae BXOJOcTyO. BCJeCDTBne
3TOBO TteHHe BCero NepnoDa pa6Otbl
IHCTpyMeHTa BO3MOJHo 3NaHTeJIbHOe
ymHeBWeHne BV6paOnHOHn HaPy3Kn.
PnMnTe DOnoJIHnTeIbHbIe Mepbl 6e3OnaCHOCTN Ia3aUHTbl OepaTopa OT Bo3DeiCTBnB BO3HnKaIOuEe BN6paun, HApnpMeP:
TexHnueckoe 06cnyKnBaHne
3JIeKTPoINHCTpyMeHTa n pa6OuNX IHCTpyMeHTOB,
coXpaHHeHne TeNla pyK, npaBnIbHaJ opraHn3aUna
pa6OuNX npoceccob.
LpA =ypOBeHb 3ByKOBOr DaBHeHHa
LWA =yPOBeHb 3ByKOBOI MOUHOCTN
CTpHa n3rOToBLeHn: TepMaHnI
Пожибовдель: "Metabowerke GmbH",
Metaboallee 1, D-72622 Nuertingen, Германь
UmmopTeB Poccn:
OOO"MeTa6o EBa3n"
Poccn,127273,MochBa
yI. Bepe3OBAa anIe, I 5 a, cTp 7, oΦnc 106 TeI.: +7 495 980 78 41
Даразпoin3водCTBa 3aшифрованВ 10-3нанOM cepинHom HOMepe INHCTpyMeHTa, уka3aHHOM Ha erошлбдIKE.1Яцфраобзнааet roД, HanpIMeP «4»обзнааeT,чTo ИЗдELne npoin3BedeNoВ 2014 roDy.2Яи3яцфрbl obO3нauOT HOMeP MecaBaВ roDy пoin3ВODCTBa, HanpIMeP «05» - МaI
Cpok clyk6bl n3dennn coctabnre7 let. HpeKOMeHdyeTcR K 3KcNpyaTuIN no nCTeueHN 5 let xpaHEnn C DaTb N3ROTOBLeHN 6e3 PpeBapntelbHOI npOBepKn (DaTy n3ROTOBLeHNr cm. Ha aTNIkeTke).
Opnirihbna iHctpyKci3 ekcnlyataii
PONEPENHEHHA O3haHOMTEc3 ycima npabnIamTa Bka3IBham 3
Texhikn 6e3neKn. HeoTpmaHn npaBn Ta Bka3iBOK 3 Texhikn 6e3neKn MOKe npu3BeCTN Do ypaHeHH eJeHTpnuHm CTpyMOM, POHeKi Ta/a60 TAHKHX TpaBM.
36epiraTe npaBnla Ta Bka3iBn 3 TexhiH N 6e3neKn JIA Ma6yTHbOro BHKOpNCtAHN. IpepaBaIte BaW eJNTpoIHCTpyMeHT TlbKn pa30M 3 ZIMN DOKMeHTAmN.
4. CneuiaJIbHi npaBnla texHikn 6e3neKn
4.1 IHCTpyKci3 Texhikn 6e3neHn dIa6pa3HBHO-BiDiPI3HNX BepcTaTIB
a) 3axnchno KOKyX, RaHn HaJeHNb Do
eIeHTPOiHCTpymEnTa NOBHeH 6yTu HAdiHNO
BcTahOBLeHn I HalaustOBaHn TaK,
3a6e3neuHTn MaHCmAbHn PiBeHb 3axNcty,
To6To B 6iK OpeaTopa BiHKpHTo CnpA MoBaHa
HaMeHsuaactHa a6pa3NBHO DnCHy.
TpmaTeCb n03a MeK PLOUHH N ObePtaHH
WlifyBaHBOrO DnCHy Ta He NiDnyChaTe Do
Hei InxNxc6. 3axnchno KOKyX pRn3NaueHn
dIra 3axNCTy OpeaTopa BiY lamMkiB i
BnPaADKOBOrO KOHTaHTy i3 a6pa3NBHM
IHCTpyMeHtOM.
b) BnKOpNCToBvIe dJI eJIeKtpoIHcTpymeHTa BnHIOUHO BiDiPI3Hi DNCKN 3 DIamaHTOBm NOKpTTAM. TIlbHI Te, 10 npHaJrPiIXoJNTb Do eJIeKtpoIHcTpymeHTa, He rapaHTyec 6e3neueHe BnKOpNCTaHH.
c)Доустma кькгбообртib
IHCTpymteHанн He NOBHHa 6yTH
MeHwe Bka3aHOi Ha eHHTpoHCTpymteTI
MaKChMaJIbHOi KILbKOcTi 06ptIb.Пиладя,
Яke OepeTaEcTbC WbUdWe ODoYCTMoi WbNdkOcTi,
MOKe 3JaMaTnca Ta po3JETtncr NO CTOpOHam.
d) A6pa3nBHI dncn cIiD BnHOpNCTOByBaTH BnKIOUHO 3a peKOMeHDoBAHm npn3HaueHHAM, HApp.: HIOJI He BnKOHyTe 3aunSeHHa 6oKBOIO nobepxHeO BiDi3Horo Kpyra. BIdpi3Hi Kpyrnpn3HaueHdiJ3HTT MaTePiaNy KpOMHO Kpyra.Cnn, zo BnJIbAIOTh Ha a6pa3HBn iHCTpymEHT 3 6iH0I CTOPHN, MOKyTb CnpuHHHT NOro pyHyBaHHa.
e)Дя установишлcfувальногура 3аБднВнорсюгупсравни 3aTNCKHnФlaHeCbNotpi6HOro po3mipy i φopMn. BiINOBiDiHi 3a ФорmoI O Ipo3mipOMФlaHci HaJIeHHM YHOMФIKCYIOb UIIfpyBaJbHnKpyr i 3HNKyIOb pN3NK HOrO po3lOMy.
f) 3OBHiWiHl DiAmTp Ta TOBUnHa IHCTpyMeHTaIbHOI HacaKn NOBHHI BiNobIdaTn napameTpam BaWoRO eENTPOIHCTpyMeHTa.IHCTpyMeHTaIbHNx HaCaIDOK, Ra6apITn IHKX He BiNobIdaIOTB eENTPOIHCTpyMeHTy, He 3a6e3neueHi dOCTaTHi3axNCT Ta KOHTpOJIb.
g) ⅢIiΦyBaJIbHI dNCHn Ta φJahci NOBHHI TOUHO iIXoHHTn Do ⅢIiΦyBaJIbHOrO ⅢINHdEJI eNEKTPoIHcTpymeHTa. IHCTpymeHTaJIbHI HacaIKN, JKI HE ToUHO iIXoHJrTb DO ⅢIiΦyBaJIbHOrO ⅢINHdEJI eNEKTPoIHcTpymeHTa, OBePTaIOTBcH HepIBHomipHO, CIIbHO BiOpYIObTa MOxHyTb npn3BecTI Do BTPaTH KOHTPOJIHO.
h) He BnKOpNCToBvIe NOnHODJHei 1JIiΦyBaIbHi DNCHN. IpePe KOKHM BnKOpNCtAHHm WlIΦyBaIbHnx KpyrIB cIa I npoBODHT IX nepeBipHy Ha npeDMeT cOJIb i
yKPAIHcBHAuk
TpiuH. y pa3i naIHHa eJeHTpoIHCTpyMeHt a6o wIyBaIbHO rDnCKy nepeKoHaITeCra, 10 HeMaE NOnKoJHeB, a6O Bi3bMitb HenoWHOHeHn WlIyBaIbHn Dnch. Nicra nepeBipKn Ta BCTaHOBLeHHr WlIyBaIbHOr Oncky YBMKnITb PnCtpi Ha MaKcMaaJIbHi OBeptn BnPDobK OndHcI XBNHn, B cEh Yac KOpNCyBaU Ta iHwi IIOdN NOBHHI TpImaTHcN No3a NLOuHIO OeptaHHr WlIyBaIbHO rDnch. NOnKoJHeHi WlIyBaIbHi Kpyr Jn npaBnlo NaMaIoTBcHa UcbOMy eTaTI TecTyBaHHr.
i) IpaioTe B 3ac06ax IHnBidyalbHoro 3axNCTy. 3aIeJHO BiD cfeepn BnKOpNCtAnHH o6npaTe 3axNCHn uTOK dJa O6nUpy, 3ac06 3axNCTy dJa Oey a6o 3axNCH i Okyapn. 3a Notpe6n BnHOpNCtobyte pecnipatop, 3ac06 3axNCTy opraHIB clyxy, 3axNCHi pykabuCi a6o cneiaIbHN hPapTyx, AHI 3axNCTaTB Bac BiD HeBeJIHHX qACTOK WlifyBaIbHoro MaTePiay Ta 3arOTOBOK. OHi NOBHHI ByTN 3axNueHi BiD qactOK, 1O POzITaIObCnPiJ ac npOBedeHn pI3Hnx po6it. Pecnipatop a6o fInbtpyBaIbHa 3axNcHa MacKa IOBHHI fInbtpyBatn nII, 1O yTBPOeTbcr Ni dac po6it. Jnso BVIOBnY cac 3a3HaTe BnINBy ShMy, MoKe CTATNC 3HNHeHH N cyxy.
j) CTeHrTe 3a THM, 0o6 iHwi JIOuN 3hAxOuINcB Ha 6e3neuHi BIDCTaHI BID Bauoi po6ooi 3oHN. Hoxen, XTO Ha6JnHaCTbCra Do po6ooyi 3oHN, NOBHeH BHKOpHCTOByBaTH 3acO6n 3axNcty. BiIamKn 3aOTobHn a6o IHCTpyMeHTaJIbHOi HacaIK MoHyTb BiJeTIu Ta 3aBdATn IwOOn HABiTb 3a MeKaMn po6ooyi 3OHn.
k) TpHMaIte npNCTpii TiIbKn 3a i3OJIbOBaHi NOBepxHi Ni d qac po6OTn, RaHIO e pN3H3 3ITKHeHHI INCTpyMeHTaJIbHOI HAcADHI 3 pInXOBAHm eJeHTPOnpoBOOM a60 Ha6eJem camoro IHCTpyMeHTaKT 3 eJeKTPOnpoBOKOIO Ni d HApPyRO MOKe Pn3BeCTn Do nepeDaui HApPyr TaKOH Ha MeTaJIeBi YactHIN nPncTPOIO Ta CnPnHyHHTu UpaKeHHa EJeKTPNHIM CTpyMOM.
I) Tpmaite Ka6eB HnBLeHn B CTOPOHi BiD eHeTpoIncTpymeHtib, 0o o6epTaIOb8c. RaU Bn BTPaTIte KOHTPOb HaI npuJaOM, MOKJIbE nepepi3aHHa 60 3axOpJIeHHa MepKeBOrO Ka6eJIO, 10 MoKe Ipn3BeCTn Do NOTpanJIaHHa BaWoI pyKn B 30Hy o6epTaHHa IHCTpyMeHTaJIbHOi HacaIKN.
m) Hikoln He BiHkaJaTe eHTpOHCTpyMeHT,doHN IHCTpyMeHTaIbHa HacaKa NOBHCIO He 3ynHHtbcra. MoJIuBn KOHTaHT IHCTpyMeHTaIbHOi HacaIKN, 06eptTaETbCRA,3 NOBepXHeIO, 0o MOKe npN3BecTN DO BTPaTH KOHTPOIIO HaI eNEKToHCTpyMeHTOM.
n) 3a6opohno nepenoctn npauoounyeIeHTpoHCTpymeHT. ICHyE pN3NK BnpanHOBOrO 3axONJIeHHBaWOrO OJry Ta TpaBM BHacJIiOK KOHTaKty 3 IHCTpyMeHTaJIbHOIO HacaIKOIO, 0o oBeptaetbcra.
o) PeryIaRHO OuHcyIte BeHTnJIaCiiHi OTBOpN Baworo eJeKtpoincTpymEnTa. BeHTnJIaTOp DnHyHa 3aTarye NII ycepeDInHy KopnyCy, BHacLiIOK YOrO BENIke ChyPueHHa MetaJIeBOrO
NIVy BNINKae pN3NK ypaKeHHeEneKTpHNM CTpyMOM.
p) He BnHOpNCToBMyTe eJeHtPoIHcTpymeHT no6Jn3y 3aMnCTnx MaTepiAIB. IcKpn MOHyTb BKNiNkATn 3aMHaHH cNX MaTepiAIB.
q) He BnHOpNCToBMyTe iHCTpyMeHTaIbHi HacaHN, rki IOTpe6yOt b piHNx OXoIOHyBaIbHNx 3ac06iB. BnKOpNCTaHH BODn a60 IHuNX pIKHX OXoIOJHyBaIbHNx 3ac06iB MOKe cIpruHHTu ypaKeHHr eJeKTpHuHM CTpyMOM.
4.2 BiDauTa BIDNOBIDHnpabnla 6e3neHn
BiDaua- ce panToba peakuiy BhacLiIOK 3aIdaHH
abo 6lokyBaHH iHCTpMeHTaJIbHOi HacaDN, Uo
OeepTaetbcra. 3aIdaHH a6o 6lokyBaHH
Pn3BOJrTb do pizKOi 3yUHHN IHCTpMeHTaJIbHOi
HacaDN, 0o o6epTaetbcra. 1e BHKlinkae
HeKOHtPOIbOBAHn pyx eJeHTpoIHCTpMeHTa B
Micti 6lokyBaHH y HapRMKy, npOTNIeHHOMy
HaPmKy o6epTaHH iHCTpMeHTaJIbHOi HacaDN.
KaHIO, HapRnKlnd, 7liIpyBaIbHN dNcK
3a6loKOBaHH a6o 3actprB 3arOTobci, KpOMKa
7liIpyBaIbHOrO dNcKa, 0o 3aHypeHa y 3arOTOBky,
BHKINKae NOWKODKeHH dNcKa Ta BIdaCy.
7liIpyBaIbHN dNcK pyxAeTbcra y HapRMKy
KopNCtBuAa 6oBid HbOrO, 3aJeKNHO bID
HaPmKy o6epTaHH dNcKa B MOMENT
6lokyBaHH. Pn ciBOMy 7liIpyBaIbHi dNcKn
TaHOK MOHyTB IaMaTnCra.
Bidae HacnIckom HenpaBbHoro a6o NOMIKOBORO BHKOPNCaHHa eKeTpoIHcTpymeHa.3anobirn noRbi BiDaayi DonOMOkytb HaBeDeHI HnXue BiNIOBIDhi 3axOni.
a)MiUHO TpMaIte eJekTpoHCTpyMeHT, Bawi
TIo Ta pyuN NOBHHI nepe6yBaTu B
NOLOHeHHI, IKe rapaHTyE MOJINBICTb
IpOTnCTOaTH BiDaui. 3aBKnD
BNKOpNCTOByTe DOaTHOBY pyKOaTHy, RaHIO
BOHa E, IJa MaKcHMalbHOrO KOHTPOIc Hn
BiDaayi Ta peaHTbHNx MOMeHTiB NiD Yac
po3roHy. 3a yMOBu BKNBaHHr BiIDNoBIDHNX
3axoDb 6e3neKn KOpNCtBuB aTaTHn
KOHTPOIbATn CInn BiDaayi Ta peaKcii.
b) He Trpmaite pykn no6n3y IHCTpymEnTaIbHOI HacaIK, 0o o6epTaetbcra. IHCTpyMeHTaJIbHa HacaIka MoKe B MOMeHT BiJaChi TpaBMByBaTH BaUy pyKy.
c) YHnKaIte 3HaXoJHeHH B 30Hi nepei BiDiPi3Hm Kpyrom, 0o o6eptaetbca, i no3aHy HboRo. Pn BiDaui eJeKtpoiHCTpymENT pyxaetbcB HAnpMky, IpOTnIeHOMy HAnpMky o6eptaHH WlifyBaJIbHO rNCKa B MOMHT 6IoKyBaHH.
d) IpaioTe OcO6IbBO yBaHNO 6iHaHyTIB, roCTpHX KpOMOK Too. He DonyckaIte pKHOwETy IHCTpymeHTaJIbHOi HacAdHN BiD 3aROTOBKn Ta II 3aHInHIOBaHH. IHCTpymeHTaJIbHy HacAdHy, 0O oBeptaEToBcR, MOKe 3aHInHn 6iHa HyTIB, RoCTpHX KpOMOK Ta npn pKoWeTi. HaCnIDKom E BtpaTa KOHTpOIO a6o BiDaaya.
e) He BnKOpNCTOByIte 3y6yacti nHIOBI dNCHN a6o DNCHN IJIaHcIOrBOI nHKN a
TAKOCH CERMEHTHI DNICN 3 DIAMHTOBIM NOKPHTTAM 3 WIPINHOU WLIICIB 6JIbwe 10 MM.
Taki ihctpymeHTaJIbHI HacaHn YacTo BnKlnKaIOTb BiDaay a6o BTPaTy KOHTpOJIHOHaI eNEKTPOIHCTpyMeHTOM.
f) YHnKaIte 6LoHyBaHH BIdpi3Horo Kpyra Ta 3aHaJTo BnCOHorO npHTncHoro 3ycnJIa. He BnHOHyTe 3aHaJTo rIn60i po3pi3n.
NpeBaHTaKeHHBip3HOroKpyra npnckopioe
Horo 3HOuYBaHHi 36IbWye CxNlbHicTb DO
nepeKocy a6o 6lokyBaHHiaJHK HacIIOK,
MOHNIBCTb BiDaui a6o pyHyBaHHa6pa3HBHO
IHCTpyMeHTa.
g) y pa3i 3aKlnHIOBaHHB BiDi p3Horo Kpyra a6o nepeepBaHHa PO6OTn BmMHITb IHCTpymeHT i DOueHaItec, NOKN Kpyr NOBHICTO 3yNNHtbcA. Y KOdHOMy pa3i He HamaraItec BNTARHyTN BiDi3HNI DnC, Oo O6epTaCTbC, 3 po3pi3y - MoJIINBa BiDdaua. BCTaHOBiTb i ycHybTe npuHny 3aKlnHIOBaHHa.
h) He BMnHaIte iHCTpymeHT 3HOBy, RkUO BIn BCE ue 3NaXoNDtbcra B O6po6JIbOBAHIN DeTAli. Npeed npoOobXeHHm po6OTn DOyekaTeCRA, NOHN BiDpi3Hn Kpyr DoC8rHe p6ooyoi HlkbKoCTi o6epTIB. IHaKUe MOKJIvBe 3aKNHIOBaHHN Kpyra, IHO RO BuCKaHyBaHHN 3 O6po6JIbOBAHOJ 3arOTOBHn a60 BiJa4u.
i)Пинраite ПNTa6O BeNkI 3arOTOBH, 06 3HN3HTn Pn3NK BiDauY BnnaHy 3aHaHnB iDpi3Horo Kpyra. BeNki 3arOTOBKn MOKyTb nporHnTaNC nD BnacHO BaroIO. O6po6nOBaHy DeTaN Heo6xIDHO NiPnpaTH 3 DBOXCTOpIH: Nopyu 3 Micem BnKoHaHHpO3pi3y Ta y3doBH II KpOMKn.
j)Будыо особиво obepeнhi рп вионанhi 3afln6hnx po3pi3iB B CTiHax Ta iHux 30Hax, lo He nporlaIbCЯ.Пр n3arln6JIeHHI duCKa NiД yac pi3aHHa MOKJIbNIO KOHTaHT 3 ra30- I BOJOpBOdAmu, eJeKTpUHOIO npOBODKOHO Ta iHWMn O6'kTaMn, lo BnKJIHKae BiJaay.
4.3 DoataKoBI Bha3iBKn 3 TexhiH 6e3neH:

NONEPEJXEHH!PpaOBAtnB 3axnCHnx OkyIpaX.
IpeekohaTec, 0B Micui npoBeHnHa pObit He npoxoJrbliHII eJeKTo-, BDO-i ra3OnocTaauHHa (HaPnKlaD, 3a DonOMoroIO MeTANOuKaHa).
IiD yac BnKoHaHH pObi 3i wTpo6opi3OM Heo6xIDHO BnKOpNCTOByBaTH 6OKOBy DOaTKOBy pyKoAHTky (9), 0B XbOdntb B KOMNJIeKT NOCTaHaHH
3arotobka nobHHa Haidinno npnilraTn do NOBepxHt Ta 6ytN 3akpinleHa BiD 3ickOB3yBaHHa HapnKla3a DONOMOIO 3atncHNx npNCtpoIB. IIN BELIKNX 3arotobok Tpe6a nepeIb6aHTN IOCTaTHIO ONOPY.
Bidi3hi DnCKN 3 diamaHTOBm NOKpTTTm NOBHHI npnlaRaTn Do onOpHOro fHaHcU 6e3 IIOfTy. 3actocyBaHHra aanTepiB a6o nepexiDHNKIB 3abopOHReTbcr.
36epiraTe BiDiPI3H IINCHN 3 iamaHTOBIM NOKpNTTAM Ta IOBObTEcR 3 HIMN BiIIOBIDHO DO BkAsiBOK BnPo6HnKa.
IpekeKaHTeCb, 0o BiDiPi3Hi DnCKN 3 DiaMaHTOBm NOKpTTTAM BCTaHOBJIeHI 3rIDHO BkA3IBOK BInpo6HnKa.
3a6bOpHeHO BMnKaTH iHCTpyMeHT 6e3 BCTaHOBJIeHOro 3axnCHOrO KOxyHa.
3a6e3neuTe, 0b icKpn, 0B bHnKaIOb B npoeci pOboTn, He cTaJI NKepeIOM He6e3neKn, HAp. He NotpanJn Ha KopNCtYBaHa a6o Ha iHux oc6 abo Ha 3aMnCTi MaTepiAn.
NoKHeKoHe6e3neHi DiHKn CnId i3OJIIOBaTN He3aMnCTHM NOKpTTTm. Pnppo60ti y NoKHeKoHe6e3neHnx 3OHax TpImaTe HAnorOTObi 3ac06n NoKeKhoracinHra.
IicnBmKHeHHiHCTpymeHTa BiDpi3Hi DnCKN 3 diamAHTOBIM NOKpTTTAMUe OBePtaIOTBcJeKnYac.
BnKOpncToBynte BiIIOBIiHi 3acO6n IJn BnJaJIeHnI nnIy!
IeHi BnIn Nnly BBaKaIOTbc KaHcepeRHeHMN, OcO6JIbBO B KOM6iHaui 3 DoaTHOBmM MaTePiAmn IJr Obpo6Kn DepeBHN (Cilb XpOMoBoI KNCIoTN, 3acO6n 3axnCTy DepeBHN). O6po6Ky MaTepiAIB 3 BMICTom a36ecTy NOBHHI BKNOHyBaTn TiNbKn PhaxiU.
-Ⅲo6doCgTn BnCOKOrO CTyneHnnIOBnIaJIeHHN, BnKOpNCToByIte npIaTHnnIInoc Metabo 3 cIIM eJIeKTpOIHCTpyMeHTOM.
- 3a6e3neUTe DoCTaTHIO BENTINJIuIIO pOboOoi 30Hn.
- PeKOMeHdyEeTbc8nHaJaRaTnpeCnPapTop 3
- ΦIbTpom KnaCy P2.
IotpmyTeCb iioxHaioHaJIbHnx npinnCIB 0do o6oKn MaTepiAIB.
He onyckaetbca o6p06ka MaTepiaiiB, 1o BnDInHIOb He6e3neuHi Ipn 3doPob'ny a6o npn (3okpeMa, a36ecT).
KuO BV npaioTe B yMOBax 3aHnIeHH, nepekoHaNTecra, yO yCI BeHTnlauiHi OTBOpn BiKpnti. 3a Heo6xIDHOCTi OOnuEHH IHCTpyMeHTa BiNluy BiKnIOUChTb NOrO BiEJeleKTpomepeKi i DbaJIINBO OUnCTiTb, He NoWKoDkyUOn BHyTpIuHi DeTani (BnKOpNCTOByTe HEmTaJIeBi npeDMtN).
He BnKOpNCToBnyTe NOwKOdJKeHi, EKcEHTpNHyTa Bi6pyuOi IHCTpyMeHTaJIbHi HacaKn.
YHnKaIte NOsKoDKeHHra3OBHX Ta BOOpOBoiDHNx Tpy6, eJeKTpNHOI npOBKn Ta HecyuX CTIN (CTaTnKa).
Pn BHKOpNCTaHHi IHcTpymeHt aIy po6it 3a MeKAMNI pIMiueHb: BHKOpNCTOByBaTH npNCtpi 3axnCHOro BiDJIIOUeHHr 3 MaKcImaJbHm CTpyMOM BHTOKy 30 MA!
yKPAIHcBHAuk
Ipeed npoBeeHHm pObi i3 peryIIOBaHHn, nepeoChaueHHa 60 TexHicHoro 6ocLyroByBaHHa BNTTHiB uTeKeP 3 po3eTKn.
NoHokHeHy a6o NoTpiKcAHy DoaTHOBy pyKoTky Heo6xIdHO 3amHHTn. 3a6OpOHeHO eKcNyaTyBaTN IHCTpyMeHT 3 NoHKOHeHOpyKoTkoI.
NoHKoJKeHn a6o nOtpicHaHn 3axncn Koxy Heo6xIDHO 3amInTu. He eKcnIpyaTyTe MaunHy 3 NoHKoJKeHm 3axncnM KOxyXOM.
He BMnKaIte iHCTpyMeHT, kUO noRo deTaJI a60 3axNCHI npncTpoi BiDCyTHi a60 yuKoDKeHi.
KIO nIyac yBIMKHeHHMaunHa dyKe WBNKO
PnCKOPHOETBCa DO MaKcMmaJIbHOi YAcTOTNI
OeptAHN, ce CBIDHTb npo HABHICTb
HecnpabHocTI eJekTPOHIk. He MoXHa
pO3paxOByBatn Ha iHsi fYHKUII eJekTPOHORO
6loKy, kI BiINObiADaIOTB 3a 6e3neKy. HeraHNO
3daIte eJekTPOIHCTpyMeHT B peMOHT (DNB. pO3d11
16.).
5.Orna
DUBCTOp.2.
1 BaxiJIb IaIHaIaUThyBaHHr IIN6HnPi3aHHr
2 Shkala rIi6Hn pi3aHH
3 OTbip TpMaaya npnCTpoIO dny BiDCMOKtYBaHHNJIy
4 EJIeKtpoHHn CnHbHn iHdNkAtOp
5ФiKcTOp(ДЯЗхИСТуВIDВипаДКОВOrOBMнKaHHa/NaAHTNBAuIb6e3npepeBBOrpoKIMypo60tN)*
6 HaTnckHn nepemkau (YBIMK/BIMK)
7 Khonka (dЯpeyIIOBaHHN OCHBOHoi pyKoTKn)
8 OchOBha pyKoTHa
9ДоаТКOBа pyKoRTa
10CTonopnHrBnHT
11 Khonka fiKcauii
12 3aTnCKHn TBNHT (dIyΦiKcaii 3axnCHoro KOxyxa)
13 3aTnckHa raiKa
14PomixHaIaI6a
15 BiDiPI3HNI DnCK
16 BiDiPI3Hn IINCK
17OnopnHnΦlaHeu
18 KIIOU niD IBA OTBOPN
19 3axnchnn kOxyx
*3aJIeXHO BiD KOMnJIeKTAuIi / He BXoIHTb y KOMnJIeKT NOCTaHaHHA
6. BBeDeHnB eKcnLyataciio

Ipeed BBeDeHnB EeknlyaTaucio nepekoHaTeC, 0o BkazHi Ha Tex
Tabnuii HcTpyMeHa Hanpya Ta YacToTa B MepeKi BiINOBIAIOb NapaMeTpam BaWoI eNeKtpomepeki.
BupiBHIOBaHHaXnCHOro HOHyxa (3a notpe6n):
BnpoOBX OndHiei XBnIHHN, npu cbyomy Heo6xIDHO 3haxoHTncr No3a nlouHIO o6epTaHHN WlifyBaIbHorO DNCKa Ta He DOnyckaTn Do IHCTpyMeNTa iHnx IIOJe, kki 3haxoJrTbcra
no6n3y. NookoJKeHi 7iYBaJIbHI KpyrN JK npabHNo IamaIObCHa 7bOMy eTani TcCTyBaHHa. Y pa3i BnHKHeHn BiDyTHoi Biopaui abo IHnx HeoJIkOB Opa3y BmKHITb IHCTpymENT. KaO BnHKae cen CTan, nepeBipTe IHCTpymENT 0o6 BN3HaHTn pnuHy.
8. Викорисанна Incстсрumsы Лше 3 OДнМ BiДрИЗнМ ДИСКOM 3 DiamaHTOBnM NOHpNTTЯ
K3HnepdiNHN 3
DiamaHTOBm NOKpTTAM i 3aNNHTn Ha
IHCTpyMeNTi NHe 3aHiN DnCK,TO wTpo6Op3
CTaHe npdaTHM NdJa PO3pi3aHHa (HaNPKnlaI,
PNTKN).
9. Глибина різань
Iocla6ntuBaJIb(1)iHaJauTyBaTu rIn6nHy pi3aHH.3HOby 3aTyrHuTaBaaKilb(1).
PekomeHdaucia: y pa3i o6p06JeHHN dyKe TBepeDoro 6eToHy Ta po3pi3iB rIn6we HiX 35 MM, 6aKaHo pO6HTn po3pi3 3a 2 npoxoDi Ira 3anobirAHn nepeBaHTaKeHHIO IHCTpyMeHTa.
10. BvdaleHnKaM'Anoro nnLy
Ybara! 3a60pOHeNo npauOBaTu 6e3 npncTpoDnBnDAJIeHnIy. Nm MoKe 6yTu WkIdINBnM DnI 3dOpOB'
3a6opoHeNo npauObaTn 6e3 npncTroIO nla BndaJIeHnIy.IHaKWe DbNpyH WbNdko 3a6BaETbcra Kam'rHIM NlOM.
BnKOpNCToBvBaTH BiIIOBiIHN IINLOCoc Metabo, nIB. po3di15.
ДяВидаLEHнКAM'ЯHOrOПИ,UO yTBOpIOeTbCЯ nIy qacpo6OTn3i wTp6o6pI3OM Heo6xIDHO BCTaBHTN BCMOKTyBaJIbHn UJahr 30 344 (4 M) y OTBip TpIMaHa npNCtPOu DЯ BiDCMOKTyBaHHra nIy (3). BaioHeTHe 3'eJHaHHa3ano6irae BInpaJIOBOMy BiE'EDHaHHIO BCMOKTyBaJIbHoro WJHaHra NiD qac po6OTn 3 IHCTpyMeHToM.
y pa3i BnKOpNCtAHHЯ DBOX BCMOHTyBaJbHnx shaHrib
30 344 npncptpii Ira BiDCMOKtYBaHHnIy MoXHa BCTaHOBHTn Ha BiDcTaHi Do 8 M BiD Micu R NIKOHAHHPO6iT.
(BCMOKTyBaJIbHn IJIaHr He BXOJITb y KOMNJIeKT NOCTaHaHH).
Ioo6 niD'EDHaTN BCMOKTyBaIbHn IJAAHr 6e3
6aNoHOETHO 3'EDHaHH, Heo6XiHO BCTaHOBHTN
3'EDHyBaIbHn aAnTep, IO BXoIDtB KOMPJIeKT.
11. YbIMKHeHHa i BmMKHeHHa
IhctpyMeHT 3aBKn Tpe6a TpHMaTn O6oma pyKaMn.
IiINBOJbTe IIO 3aROTOBKn TiNbKn yBIMKHeHIn HCtpyMeHT.
CTeKTe 3a Tm, Ioo6 IHcTpymeHT He BTrIyBaB 3aBn nn i TnpCy. Pny yBIMKHeHHi Ta
BIMKHeHHI TpMaIte NOro NODaJI BiD CkyuHb Nny. He KlaIITb BIMKHeHn IHCTpyMeHT Do NOBHOI 3yNNHKn DBNrHa.
He donyckaIte HeyMnchoro 3anycky: 3aBKnBmNkaIte iHCTpyMeHT, kUIO BnIKy 6yNo BVTRHyTO 3 pO3eTKn a60 CTaBCr 36i# eHeproNoctaHaHH.
Y peKmI 6e3nepepBHOi pO60Tu iHCTpyMeHT npoobKyE npaucOBaTu, HABiTb JaKIO BIN BnPBETbcr 3 pyK. Tomy 3aBKnM iuHO TpImaTe iHCTpyMeHT dBOMa pykAmN 3a pyKOaTKy, 3aIMtB CTiKe NIOJKeHHI i NOBHcTIO CkOHcHTpyNTecra Ha BVNOHYBaHIpo60TI.
INB.CTOp.2,MaI.A.
Hopotkouacn peKm po6oTu:
YbIMKHeHHa: nepecyHbTe fikCaTOp (5) y HanpMaKy cTpiKn i HaTnCHiTb HATnCKHn NepemnKauch (6). BIMKHeHHa: BiDnyctiTb HATnCKHn NepemnKauch (6).
Be3nepepeBHH pexHm po60n (3aJIeHHo BiKOMnIeHTaicii):
YbIMKHeHHa: nepeCyHbTe fikCaTOp (5) y HanpMycTpiKn,HaTnCHiB nepemKauch (6) i yTpmyTe Horo HaTNCHeHM. IHCTpymeHT YbIMKHeHH.
Ipecyhble thi KcTOp (5) 1e pa3 y Hapmky cTpiK, 06 3aikCyBaTu HaTnCKHn NepemHKay (6) (6e3nepepbHa po6Ota).
BIMKHeHHaTnCHiTB nepemkaq (6) i BiDnycTiB Ioro.
12. Po6ota 3 uTpo6opi3om
BnKOpNCTOByBaTu WITpo6opi3 MoXHa BnKIIuOHO 3i BCTaHOBJeHO IO DoaTHKOBOIO pyKoRTKHO (9)!
Iicna nocla6leHHcTOnOpHOro rBnHTa (10) TpIMauchykoTHMOxHapeRyIHOBaTu3KPOKOM 30^ dNBACTaHOBLeHHyBiIDNoBIDHepo6Oye IIOXeHH.Ⅱd Yac 3aTAYBaHHcTOnOpHOro TBnHTa BCTaBHTu4CToOpHNxWtNΦTuHa TpIMaichi pyKOaTHNuBIDHiOTBOpN.
IHCtpymeHT Heo6xIDHO TpMaTH BnKIOUHO DBOMa pyKaMn 3a OCHOBHy Ta DOnOMiKHy pyKOaTKH.
PonlaTn wTpo6opi3 i3 3aHIMn HAnpMaHmnpoNNKamn Ha po6Ouy nobepxHIO.
Nobibho HappaBnpyxomn iHcTpymeHT DOHN3y, DOKN BcI HAprrMHi POJIKn He 6ydyTb cnipatnc Ha po6ooy NoBepxHIO.
IOTIM NOTARHTN IHCTpyMeHT B HAnpRmKy p3aHHa, HAnpHKlaIAD, 3Bepxv BHN3, kHa MaJ. A (CTop. 4) a6o, y pa3i rOpN3OHTaJIbHnX p03pi3IB, Ha3ycTpiU ODNH ODNOMY, kH HaMaJ. B (CTop. 4).
KoJn pa3 npopi3aHn, BmKHyTn iHCTpymeHT Ta doyeKaTncb NOBHOi 3yNHHN BiDpi3HOrO dNcHy. y HoDHomy pa3i He HamaraIteCn BNTarHyTN BiDpi3Hn DNsC, 06opeTaecbC, 3 po3pi3y MOHJIbBa BiDaaya. POKlaCTn iHCTpymeHT Ha 6ik.
Ipeemny, 03aJnHnlaCmK Dboma po3piamn, MOKHbBnAJIHTN 3a DOJOMOIO DOJOTa IJI
yKPAIHcBHAuk
BndaJIeHHReKepHy,IO BxOAnTb y KOMnJIeKT NOCTaBKn.
13. OuHueHHa
OuHueHHa DBHyHa:Ja 3anobirAHnnyTbOpEHIO BIDKlaJeHb KAM'HNOro NnlyBcepeDHI WTPo6opi3a Heo6xIDHO nepioDnHOnOuyIaTN DBrHyN, npOduBaUOHy Ioro (Yepe3BeHTNJLJIiHi OTBOPn Ha 3aHni YactNI Hi KopNcyDBHyHa), RaIoo IHCTpymeHT BnKOpNCToByeTbcrIpOTAROM TpIBaIoro Yacy. 3a MoJInBOcTi HeBapTO pOBHTNu Ce B 3aKpNTnx PpIMiueHHX.
KhoHa (7) peryIOBaHH pyHOaTHn: 3a
NOTpe6n BuaJIaTI 3a6pyDHeHH 3a DOnOMoTOBnuBaHH (KhoHa B HaTNCHTOMy NIoJKeHHi, B 3
NIOJOeHHx OCHOBHOI pyKOaTHn).
14. YcyHeHHa HeCnpaBHOCTe
-3axnct BiD nepeBaHTaKeHHr: rOpntb eJektpoHnCnHaIbHn iHdNkAtop (4), Yactota 06epTaHHrPiD HabaHTaKeHHrM 3MeHwycbrcyIOBILbHO.MaunHa nepeBaHTaKeHa. IpoDobKnyTe npaQOBATn 3i 3HNKeHHM HaBaHTaKeHHrM, DOKN eJektpoHHn CnHaJIbHn iHdNkAtop He 3ragHe.
-3axnct BiD nepeBaHTaKeHHr: rOpntb eJektpoHHN CnHaJIbHn iHdNKatOp (4), Yactota 06epTaHH NiD HabaHTaKeHHrM IOMITHO 3MeHswyTbcra. TemnepaTypa DnIgTuHa 3aHaTo BnCOHa! 3aIuTe MaunHy npaUOBaTH Na XOIOCTOMy XoDi, DOKn TemnepaTypa He 3Hn3HTbcr i JelktpoHHN CnHaJIbHn iHdNKatOp He 3rache.
- CnCTema 3axnCHoro BmKHeHHa Metabo S automatic: 3acBiyEcBcA eJeKtpoHHn cnHaIbHn iHnHaTOp (4) nInCTpymeT camoctiHo BMNHAeTbCra. Pnp 3aHaTo WBnDkOMy HapocTaHHi CTpyM (ue BiD6yBaetbc, HanpNKlaD, npn paTobOMy 6loKyBaHHi a60 BiDaui) eJeKtpoiHCTpymeHT BMNKAeTbCra. BMKnITb eJeKtpoiHCTpymeHT HaTNCHNm nepemKaayem (6).PiCJzboro Noro Heo6xIdHO 3HOBy BBIMKHyTu IHCTpymeHT i npOdoBxHTn PO6OTy B HopMaJIbHOMy peKmI. YnHKaIte 6LOKYBaHHB NOdaJIbWOMy. INB. po3di 4.2.
-3axnCT BiN NOBTOPOHNOy: eJeHTPOHHN CnHaJIbHNI iINKaTOp (4) BJINMAE, eKeKTPoIHcTpymeHT He npaouc. CnpauOBab 3axnCT BiN NOBTOPOHO 3anycky. RaIIO npu yBIMKHeHOMY IHCTpymEtBIuHKy Ka6eIIO KINBHeHHB CTAuHTN Bpo3eTKy, a60 NiCJI 36OIO BIDHOBLHO NODaHy eJeKTPOXNBLeHHN, IHCTpymEt He 3anyCTTuTbcra. BImKHITb I 3HOBy yBIMKHiTB IHCTpymeHT.
-Пи уВIMКнEHи eЛeHTpoIHCTpyMeHT dУн eWbIaHIO DoCrae MaKcHMaJIbHnX O6epTIB,TO6TO aBTOMaTHuHn 06MExHyBaU nycKOBOrO cTpyMy (ФункцЯ плaBHorO ncy) He cnpaCbOBye.MaE Mice nOmIIHa B eJIeKTPOHHOMy 6Iooi,He MOxHa pO3paxOByBaTu Ha iHsiФункцi eJIeKTPOHHoro 6IloKy,Яi BiINOBiJaIOb 3a 6e3neKy.HeraHNo 3daIte eJIeKTpoIHCTpyMeHT b peMOHT (dNb. po3di16.).
15. Ппладя
BnKopncToBvBaTn TlIbKn opuRiHaJIbHe npUlaJa Metabo.
KaO Bam nTpi6He npilaA, npocmo 3BepTaTnca Do BaWOrO dInlepa.
BidiPi3Hi DnCKN 3 diamaHTOBm NOpHPTTMMetabo:
230 MM, 3BapeHi Ia3epom, npuaTHi JI cyxoro pi3aHHa, TOBUnHa DNcKa B o6laacti 3aTnChy = 1,8 MM, OTBip = 22,23 MM, JIra Wtpo6opisa MFE 65
Cfepa BnKOpncTaHHNo dna 3amOBJIeHHJ
TBePOro MaTepiAny Ta MaTepiAniB CepeHbOiT BePdoCTi (HaepnKlaI, 6eToH, 3OKpema apMOBaHn) 6.28134
Iy a6pa3nBHO MaTepiAly (HaPnKlaD, Iy a6pa3NBHO 6eToHy, NiuaHka, cnikatHOi cERnn, r3o6eToHy ToO)6.28145
16. PeMoHT
PemOHTeJeleKtpoiHCTpyMeHTa NOBHHI 3diChOBaTu TIlbKn KBaJIΦIKOBAhi φaxiBci- eJeKtpnKi!
IoRcHeHHaDaaHnx,HaBeDeHnxHaCTOp.3. 3aIIuMaE mo 3a co6oIO npaBO HaTexHiHi 3MiHN. D=iaMeTp BiDiPi3Hnx IiCKiB 3 DiamaHTOBm NOKpTTHM
B=MOHJIINBaIINPnHa nza3a
T =HanaToBvBaHa rIi6nHa pi3aHH
P1 =HomHaJIbHa cNoKuBaHa notyKHi
P2 =BiDaBaHa notyKHiCTb
n =KiIbKICt b 06epTIB XoIoCTOrO XoMy
m =Macac6e3Ka6eIIO
Cymaphe 3NaueHnB Bi6paqii (BeKTopHa Cyma Tpbox HanpzmkB) po3paxOByeTbcra BiIIOBiIDHO do cTaHdapTy EN 60745:
ah =3NaueHnBipauii
K=KoephiieHT noxnbn (biopaia)
PibeHbBipcaii, Bka3aHnB uX hCTpyKciX, BmipBOBaCz 3riHO 3 MeTODOM BmIPBOAHN, HopMOBaHm y EN 60745, i MoKe BIKOPNCOTByBaTncr dIra NopIBHHH eJIeKTpoHCTpyMeHTiB Mx Co6OIO. Bin npndaTHn TaKoJ I nonepedhbooi OciHNk Bi6pauiHoro HabaHTaKeHH.
Bka3aHn pBeHb Bi6paui CTOCyETbcra OCHOBHX cfepe 3actocyBaHHeJeKTPoIHCTpyMeHT. AJe RkUO eJeKTPoIHCTpyMeHT BHKOpNCTOByETbcra IInuXn BVIDIB PO6i, 3 iHUnm BCTaBkAmn a60 y pa3i HeOCTaTHbOro TexHcHOro 6cLyROBvBaHH, pBeHb Bi6paui MoKe 6bTu INuM. DnTouHOI OuzHKn Bi6paui Horo HabaHTaKeHHr Heo6XiHo BPaxOByBaTu TaKOH Yac, KOJI NcTpyMeHT BIMKHeHn, a60 yBIMKHeHn, aJe fAHTNuHO He BHKOpNCTOByETbcra. BHaCJIOK UbOro Bi6paui He HabaHTaKeHHra 3a nepioD pO6OTn MOKe 3HaUHO 3MeHsYBaTncra.
Дя 3axncty onepaTopa BiД iii Bi6paqui Heo6xidno BnpoBaAnTdoaTkOBI 3axOJb6e3neKn, HapnKlaI:TexHicHe 06cnyroByBaHHeIeKtpoiHCTpyMeHTa Ta IHCTpyMeHTaIbHnx HacaDOK, TpMaHHaPyK B TeNJI, opraHiaucjpo6oynx npocecib.
PIBEh 3ByKOBOrTO TnCKy 3a TnHOM A:
LpA =piBeHb 3ByKOBOrTO TnCKy
LWA =piBeHb 3ByKOBOi NOTYKHOCTi
KPxA/WA =KoeΦiüeHT NOXn6KN (piBEHb 3ByKOBOrTO TnCKy)

PpauObaTu B 3ac06ax 3axncty opraHIB cnIxy!
Pe3yIbTaTn BmMipHOBaHb OTPMaHI 3rIgHO 3i CTaHdapTom EN 60745.
IHCtpymeHT 3 KlaCOM 3axncty II \~ 3miHHn CTPym
Ha Bka3aHI TexHicHi xapaKTepeNCTnKn NOINPIOJTOBCa DOnyCKn, nepeIb6aueHi YHHIMN CTaHdApTaMn.

TOB "Metaabo YkpaHa"
Byl. 3opHa, 22
c.CBtOneTpIbCbKe
KniBcbka 06J.
08141,KnIB
www.metabo.com


Metabowerke GmbH
Metabo-Allee 1
72622 Nuertingen
Germany
www.metabo.com
metabo
PROFESSIONAL POWER TOOL SOLUTIONS

- Original instructions
- Declaration of Conformity
- Specified Use
- General Safety Instructions
- Special Safety Instructions
- Safety instructions for abrasive cut-off machines
- ENGLISHen
- Kickback and RelatedWarnings
- Additional Safety Instructions
- Overview
- Initial Operation
- To position the safety guard (if required):
- Pivotable main handle
- Groove width
- Using the machine with only one diamond cut-off wheel
- Depth of cut
- Extracting the stone dust
- Switching on and off
- Torque activation
- Continuous operation (depending on features)
- Working With the Wall Chaser
- Cleaning
- Troubleshooting
- Accessories
- Metabo diamond cut-off wheels:
- Repairs
- Environmental Protection
- Technical Specifications
- Wear ear protectors!
- Notice originale
- Asidero principal giratorio
- 3.Оьи ue yha3aHnno TeXnKe 6e3oNaChocTH
- CneuaJIbHbIe yHa3aHnnoTexHnke 6e3OpaCHOCTn
- OToJaHa n COOTBeTCTBHyIOUe yHa3aHnA NO TEXHNKe 6e3ONaCHOCTn
- PYCCHNIRu
- DOnoJIHnTeJbHbIe yHa3aHnI NO TexHHKe 6e3onacHOCTN:
- 5.0630p
- NOBOPOTHAR OCHOBHAR pyKoTHa
- 7.Ширна заа
- Исторьанne эльсторнострумени С одни мальзны OTpe3нын круrom
- Г lyбина пленья
- YdaJIeHne KameHHoN nbIIN
- Bhijoyehne/BbIKJIOyeHne
- KpaTHOBpeMeHHoe BKLIOUeHHe:
- HenpepbBHybI peKHM pa60TbI (B 3aBnCHMOCTH OT KOMNJIeKTAUHN):
- Pa60tbi co wTpo6ope30m
- OuHcTka
- YcTpaHHe HeNCnPaBHOCTeI
- Прпнадлжноctи
- AIma3HbIe OTepe3HbIe Hpyr Metabo:
- PeMoHT
- 3auntata OKpyhaIoesei cpebl
- TexHnueckne xapaKTepeNCTnKN
- Opnirihbna iHctpyKci3 ekcnlyataii
- CneuiaJIbHi npaBnla texHikn 6e3neKn
- yKPAIHcBHAuk
- 5.Orna
- BBeDeHnB eKcnLyataciio
- BupiBHIOBaHHaXnCHOro HOHyxa (3a notpe6n):
- Викорисанна Incстсрumsы Лше 3 OДнМ BiДрИЗнМ ДИСКOM 3 DiamaHTOBnM NOHpNTTЯ
- Глибина різань
- BvdaleHnKaM'Anoro nnLy
- YbIMKHeHHa i BmMKHeHHa
- Hopotkouacn peKm po6oTu:
- Be3nepepeBHH pexHm po60n (3aJIeHHo BiKOMnIeHTaicii):
- Po6ota 3 uTpo6opi3om
- OuHueHHa
- YcyHeHHa HeCnpaBHOCTe
- Ппладя
- BidiPi3Hi DnCKN 3 diamaHTOBm NOpHPTTMMetabo:
- PpauObaTu B 3ac06ax 3axncty opraHIB cnIxy!
Brand : METABO
Model : MFE 65
Category : Milling machine